- 投稿日:2019-08-16T21:45:40+09:00
OculusQuestをROSと通信させる
はじめに
以前、OculusGoをROSと通信させていた者です。
最近Oculus Questを購入したので、さっそく使ってみたいと思います。前回の執筆から1年以上経過してやり方もところどころ変わっているので、ソフトウェアのインストールからやり直します。今回使用するものは次の通りです。
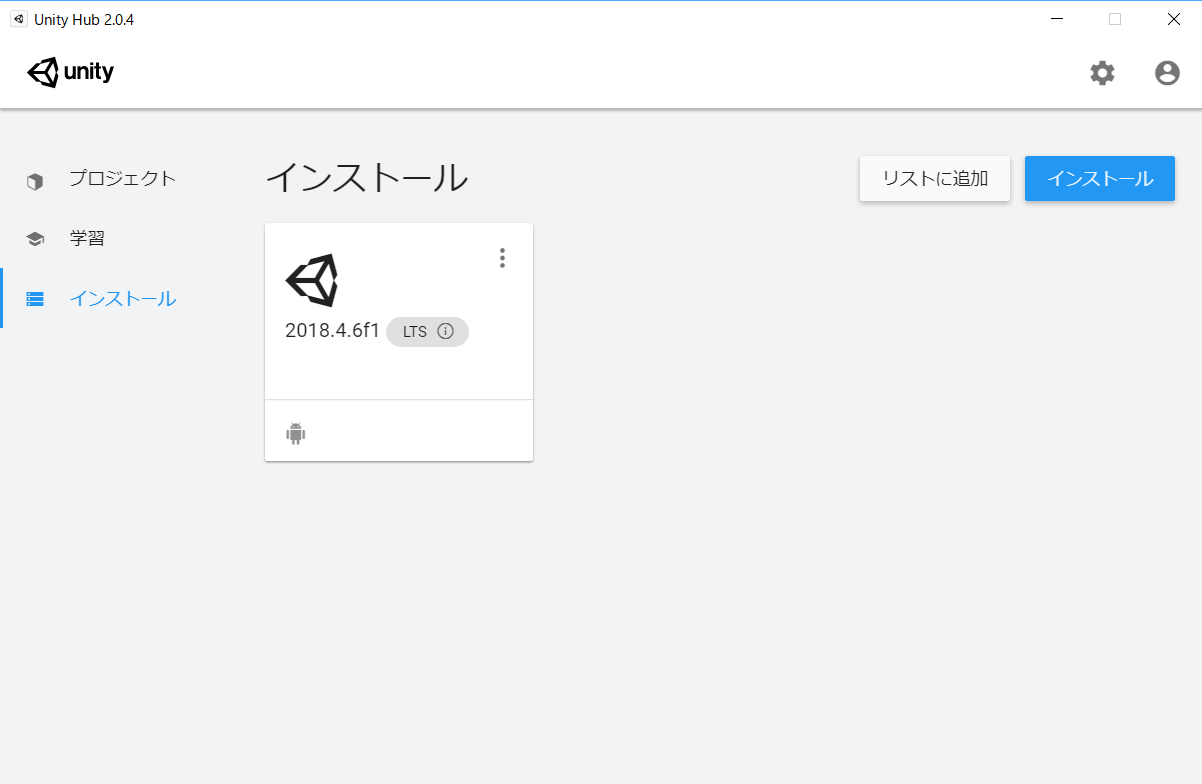
- Unity 2018.4.6f1
- Android SDK, API Level 25
- Android SDK Build Tools
- Oculus Integration for Unity 1.39
- ROS# 1.51) Oculus Questの開発ができるようにセットアップする
Oculus Quest自体のセットアップ
- Device Setup - Oculus Questによると、以下の3つが必要です。
- Oculus開発者に登録。
- こちらからOrganizationを作成します。過去に作成したことがあれば不要です。
- 開発者モードを有効化。
- スマホのOculusアプリから、設定 > その他設定 > 開発者モードをON。
- OculusGo ADB Driverのインストール
- OculusGo ADB Drivers のzipファイルをダウンロード。
- zipファイルを解凍した後、中のinfファイルを右クリックしてインストールを選択。
Android開発用のセットアップ
- Android SDK
- Oculus Goと同様に、Oculus QuestはAndroidベースなのでAndroid SDKが必要です。まず、こちら からAndroid StudioをダウンロードしてPCにインストールします。
- Android Studioを起動したら、画面右下のConfigureからSDK Managerを開いて、次のパッケージをインストールします。
- Android SDK Platform, API level 25
- Android SDK Build Tools
- JDK (Java Development Kit)
- Unity 2018.3.x以降にはOpenJDKベースのJDKが付属しているらしく、別途インストールする必要はないようです。
UnityをPCにインストール
- Oculusの Compatibility and version requirement によると、2019年8月現在、Unityのバージョンは2018.4 LTSなどが推奨のようです。
- Unity Hub を使ってUnityをインストールします。Unity Hubのインストール画面右上のインストールボタンから2018.4 LTSの最新版を選択します。このときAndroid Build Supportモジュールを追加しておきます。インストールが完了するまでしばらく待ちます。
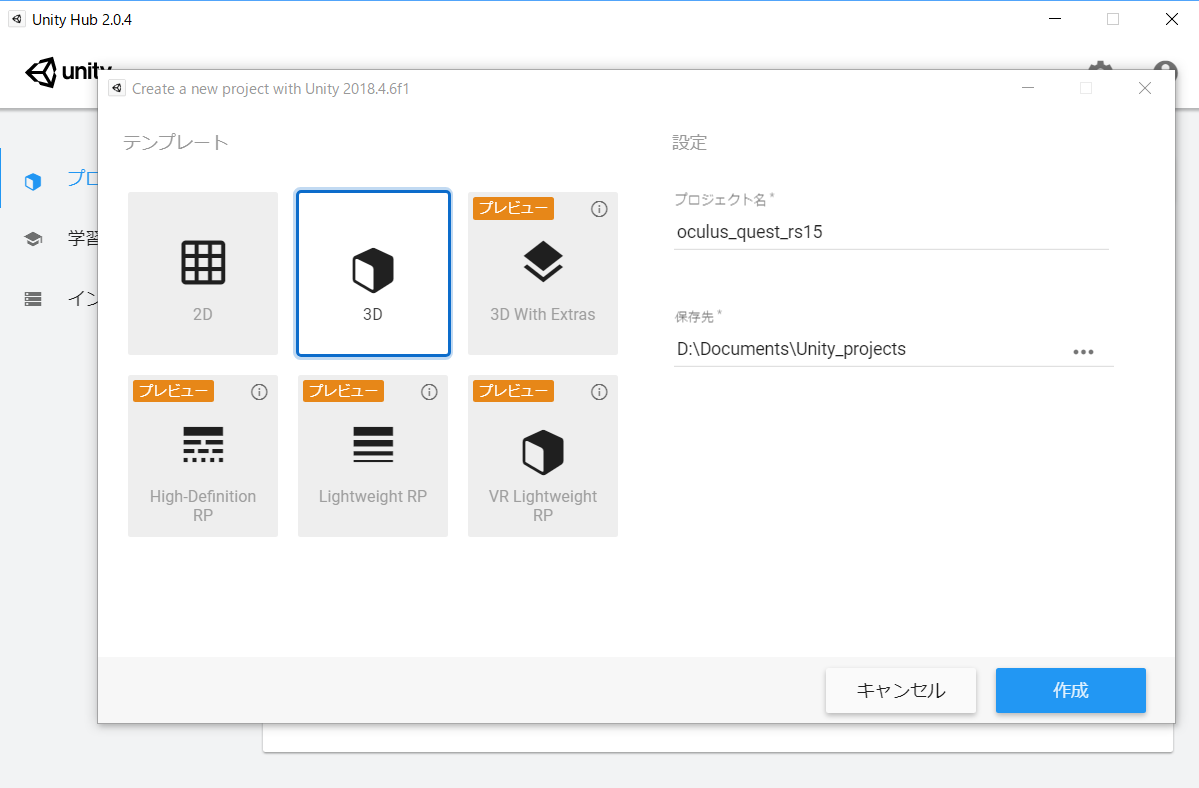
Unityプロジェクトの作成
- Unity Hubのプロジェクト画面から新規作成ボタンを押してプロジェクトを作成します。適当なプロジェクト名と保存先を指定します。
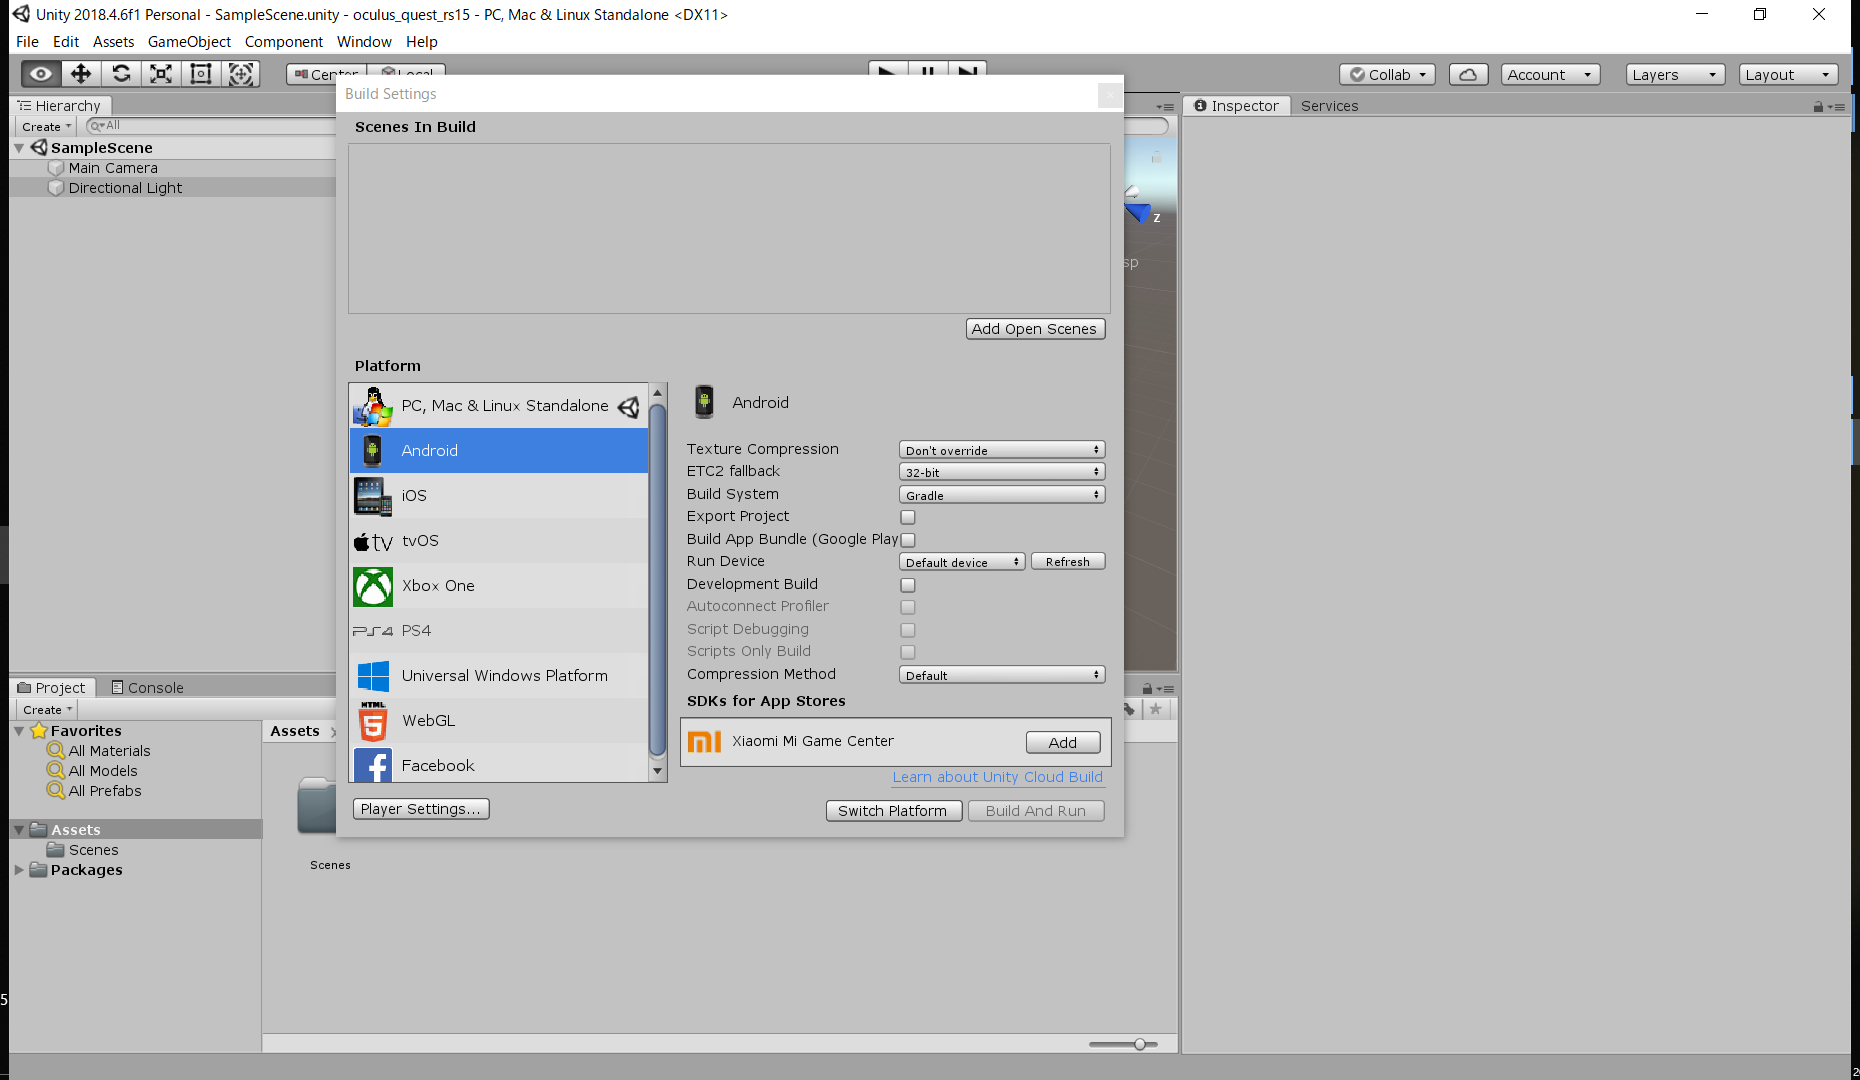
- Unity本体が立ち上がったら、PlatformをAndroidに変更します。
- File > Build Settings でBuild Settings画面を開く。
- Platformの一覧からAndroidを選択。
- 画面右下のSwitch PlatformボタンをクリックしてPlatformを変更。
Oculus Unity Integrationのインポート
- Asset Storeから Oculus Integration for Unity をインポートします。(かなり時間がかかるので気長に待ちます。)
Player Settingsの設定
- Edit > Project Settings > Playerを選択してPlayer Settingsを表示します。
- Other Settings
- Package Nameを適当なものに変更します。com.[CompanyName].[ProductName]の形式です。
- Minimum API LevelをAndroid 7.1 'Nougat' (API level 25)にします。
- Scripting Runtime Versionが.NET 4.x Equivalentであることを確認し、Api Compatibility Levelを.NET 4.xに変更します。
- XR Settings
- Virtual Reality Supportedにチェックを入れます。
- Virtual Reality SDKsの欄にOculusを追加します。
カメラの設定
- HierarchyウィンドウからMain Cameraを削除します。
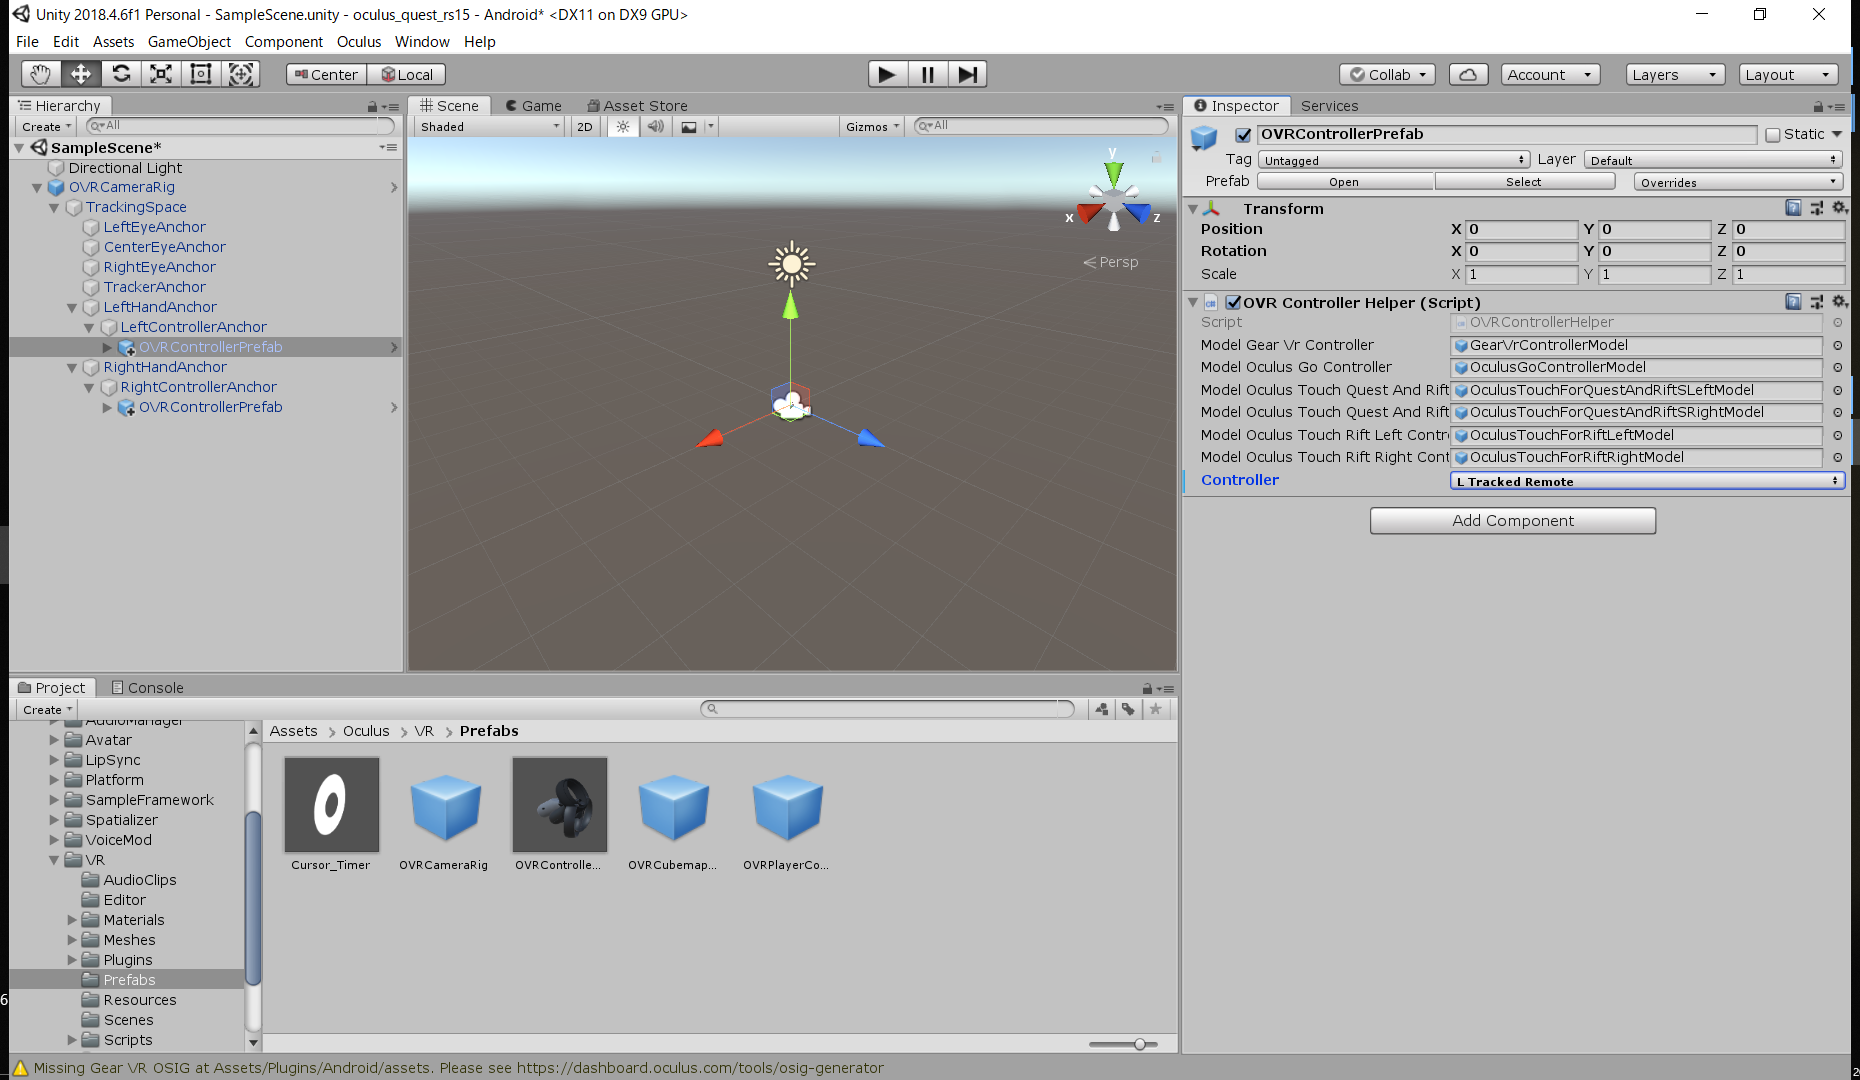
- ProjectウィンドウからAssets/Oculus/VR/Prefabsを開き、OVRCameraRigをHierarchyウィンドウにドラッグ&ドロップします。
- OVRCameraRigのOVR Managerスクリプトにある、Target Devicesを
Ger VR Or GoからQuestに変更します。コントローラの設定
- ProjectウィンドウからAssets/Oculus/VR/Prefabsを開き、OVRControllerPrefabをHierarchyウィンドウのRightControllerAnchorの下にドラッグ&ドロップします。
- LeftControllerAnchorの下にはOVRControllerPrefabをドラッグ&ドロップします。こちらはInspectorウィンドウでControllerのタイプをL Tracked Remoteに変更します。
- 両手のコントローラを認識させるためには、メニューバーからOculus > Tools > Remove AndroidManifest.xml を実行した後、 Oculus > Tools > Create store-compatible AndroidManifest.xml を実行してAndroidManifest.xmlを更新する必要があります。
- 更新したAndroidManifest.xmlは一部修正が必要です。ProjectウインドウのAssets/Plugins/AndroidからAndroidManifest.xmlをエディタで開き、
<category android:name="android.intent.category.INFO"/>
を<category android:name="android.intent.category.LAUNCHER"/>
に書き換えます。ビルドして実行
- ビルドするシーンを選択。
- File > Build Settingsを開き、Add Open Scenesをクリックして現在のシーンをビルドの対象とします。
- USBケーブルでOculus QuestをPCと接続すると、PCからのアクセスを許可するかどうかのダイアログがOculus Quest内に表示されるので許可します。
- Oculus QuestとPCを接続した状態で、Build And Runをクリックします。ビルド完了後にOculus Questを起動するとすぐに実行されます。
- 再度実行するときは、Oculus Questの ライブラリ > 提供元不明のアプリ を開くと設定したPackage Nameがあるのでそれを選択します。
2) ROS#を使ってROSと通信する
ROS#のインポート
- こちらのリンク から、RosSharp.unitypackageをダウンロードします。
- Assets > Import Package > Custom Packageから、先ほどダウンロードしたRosSharp.unitypackageを選択してインポートします。
- ちなみに、Asset StoreからROS#をインポート することもできるらしいのですが、今のところUnity 2019.3.0以降にしか対応していないようです。
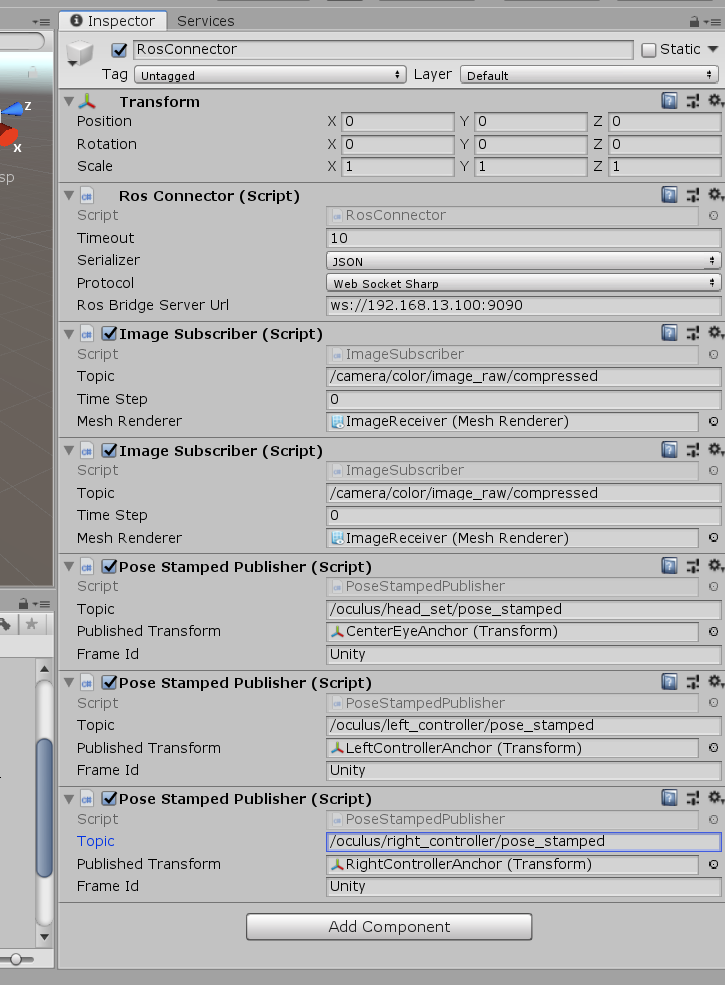
RosConnectorの設定
- Hierarchyウィンドウで右クリック > Create EmptyでGameObjectを作成し、名前をRosConnectorに変更します。
- ProjectウィンドウからAssets/RosSharp/Scripts/RosBridgeClient/RosCommunicationを開き、RosConnectorスクリプトを先ほど作ったRosConnectorオブジェクトにアタッチします。
- アタッチしたRosConnectorスクリプトのRos Bridge Server Urlを設定します。ROS側のPCのIPアドレス(例:192.168.13.100)とポート番号(デフォルト:9090)をあわせて、
ws://192.168.13.100:9090のように入力します。ROS側のPCの準備
- ROS#とROSの通信には RosBridge Server を使用します。
- 以下のコマンドでROS側のPCにRosBridge Serverをインストールします。
$ sudo apt-get install ros-<rosdistro>-rosbridge-server- 次のコマンドを入力し、RosBridge Serverを立ち上げます。
$ roslaunch rosbridge_server rosbridge_websocket.launchOculus Questで実行
- Oculus QuestがROS側のPCと同じネットワークのWiFiに繋がっていることを確認します。
- ROS側のPCでRosBridgeServerが立ち上がっていることを確認します。
- Oculus QuestをUnity側のPCとUSBで繋げた状態で、UnityのFile > Build&Runを実行します。
- ビルド完了後にOculus Questを起動して、ROS側のPCのターミナルにClient connectedと表示されたら成功です。
3) メッセージの送受信
カメラ画像の受信
ImageReceiverの作成
- Hierarchyウィンドウで右クリック > 3D Object > Planeで平面を作成し、名前をImageReceiverに変更します。
- InspectorウィンドウでPositionを(0, 0, 10)に、Rotationを(90, 0, 0)に、Scaleを(-1, -1, 0.75)に設定します。
RosConnectorの設定
- ProjectウィンドウからAssets/RosSharp/Scripts/RosBridgeClient/RosCommunicationを開き、ImageSubscriberスクリプトをRosConnectorオブジェクトにアタッチします。
- アタッチしたImageSubscriberスクリプトのTopicを
/camera/color/image_raw/compressedに設定します。- ImageSubscriberスクリプトのMessageReceiverに、カメラ画像を映すImageReceiverオブジェクトをHierarchyウィンドウからドラッグ&ドロップします。
ROS側のPCの設定
- 普通のWebカメラを使ってもいいのですが、今回はIntel RealSense D435iを使用しています。
(RealSenseのセットアップ方法はここでは割愛します。)- RosBridge Serverを立ち上げます。
$ roslaunch rosbridge_server rosbridge_websocket.launch- RealSenseノードを立ち上げます。
$ roslaunch realsense2_camera rs_camera.launch実行
- UnityのBuild&Runを実行し、ビルド完了後にOculus Questを起動します。
(起動後、ROS側のPCのターミナルにClient connectedと表示されるのにカメラ画像が受信できない場合、RosConnectorにImageSubscriberを2つアタッチしてビルドし直すと上手くいくことがあります。)座標と姿勢の送信
RosConnectorの設定
- ProjectウィンドウからAssets/RosSharp/Scripts/RosBridgeClient/RosCommunicationを開き、PoseStampedPublisherスクリプトをRosConnectorオブジェクトにアタッチします。
- アタッチしたPoseStampedPublisherスクリプトのTopicに適当なトピック名を設定します。
- PoseStampedPublisherスクリプトのPublished Transformに、座標と姿勢を取得するオブジェクトをHierarchyウィンドウからドラッグ&ドロップします。ヘッドセットはCenterEyeAnchor、右コントローラはRightControllerAnchor、左コントローラはLeftControllerAnchorです。
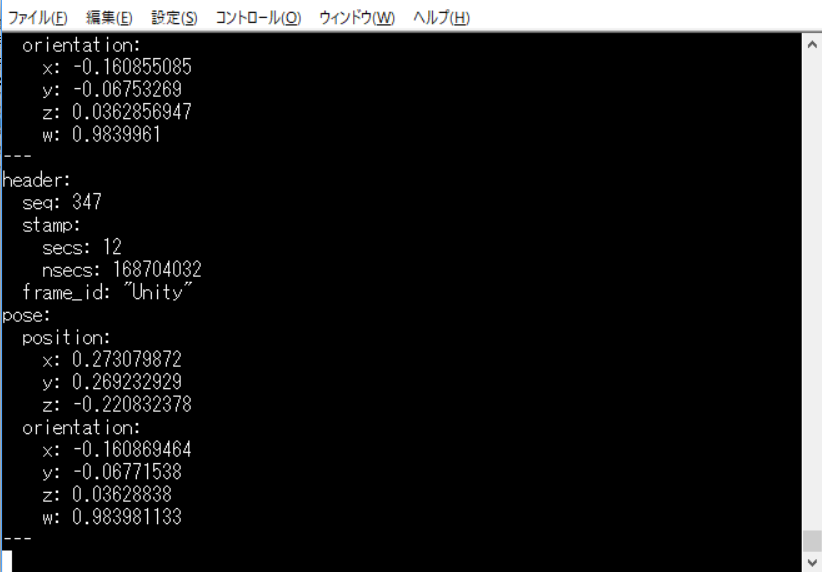
実行
- ビルドしたアプリをOculus Questで実行した後、ROS側のPCで
$ rostopic echo <設定したトピック名>を実行すると次のように表示されます。
(Oculus Questは72FPSで動作しているのでトピックも72Hzで更新されるようですが、通信速度などによってはメッセージの送受信が間に合わなくなることがあるようです。)コントローラ入力の送信
RosConnectorの設定
- ProjectウィンドウからAssets/RosSharp/Scripts/RosBridgeClient/RosCommunicationを開き、JoyPublisherスクリプトをRosConnectorオブジェクトにアタッチします。
- アタッチしたJoyPublisherスクリプトのTopicに適当なトピック名を設定します。
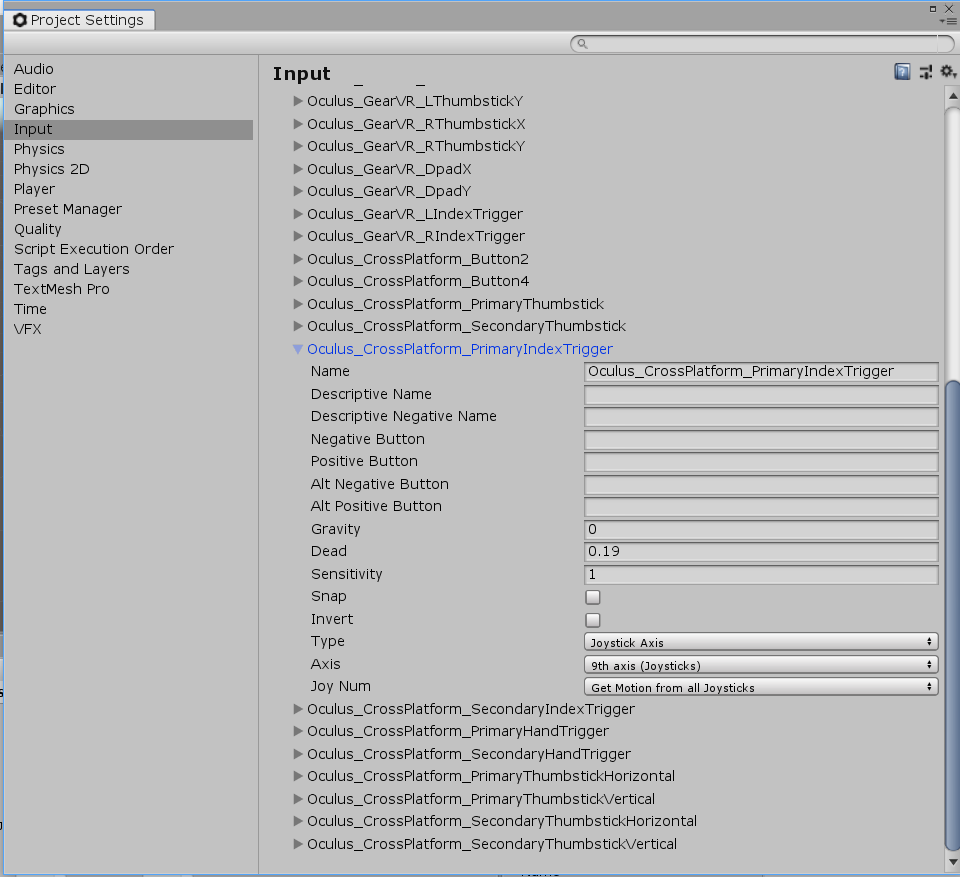
- ProjectウィンドウのAssets/RosSharp/Scripts/RosBridgeClient/MessageHandlingからJoyAxisReaderスクリプトとJoyButtonReaderスクリプトを必要な数だけRosConnectorオブジェクトにアタッチします。
- アタッチしたJoyAxisReaderスクリプトのNameに読み取りたいAxisの名前を、JoyButtonReaderのNameに読み取りたいButtonの名前を設定します。設定できる名前は Edit > Project Settings > Input > Axes から確認できます。Typeが
Joystick AxisであればAxis、Key or Mouse ButtonであればButtonです。各入力のレイアウトは OVRInput を参照してください。実行
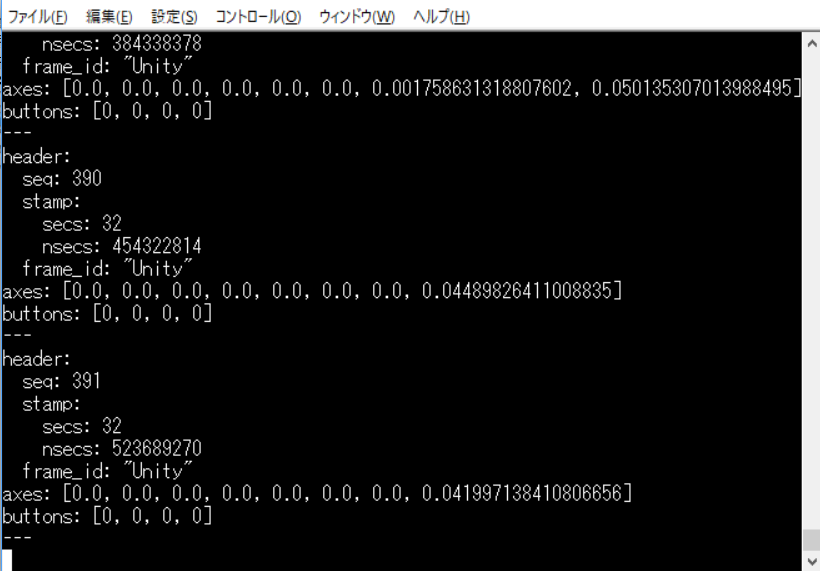
- ビルドしたアプリをOculusQuestで実行した後、ROS側のPCで
$ rostopic echo <設定したトピック名>を実行すると次のように表示されます。
- 投稿日:2019-08-16T20:57:22+09:00
Unity勉強メモ ~Collider~
はじめに
この記事は1日前にUnityを触り始めた人の勉強メモです。過度な期待はしないでください。
誤った内容が含まれる可能性が多々あります。誤りに気付いた方は、コメントにて脇腹をつついてください。Unityをはじめたきっかけ
Vtuber配信面白いなぁ → VR世界体験したいなぁ → Oculus買うか → Unity勉強しよ(←今ココ
驚くべき単細胞!良い子の皆はUnity勉強してからOculus買おうな!おじさんとの約束だ!チュートリアルとか見ながらやってみるじゃん?
Plane置いて、MMDモデル読み込ませて、Standard Assetsからアニメーションとか持ってきて・・・。
よし、できた!動く動く!(Kawaii!!!!!!!!!!!!!!
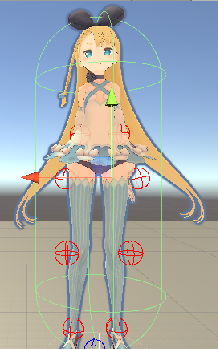
Colliderとの闘い
うわっ…私のCollider、ガバガバすぎ…?
上図の緑色の線がCollider(物理衝突判定の領域)なのですが、明らかにガバガバです。
抱き枕やん。
愛しのOculusちゃんが届いたとして、手に衝突判定ないのは致命的なので、ええ感じのもの探しました。SAColliderBuilder
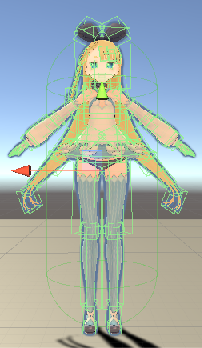
色々なところを見て、ええ感じのものを探していたところ、SAColliderBuilderを発見しました。
早速Asset Storeでダウンロード&インポート。
(互換性がないみたいな文言が出た気がするけど、見て見ぬふり)SAColliderBuilder-Scripts-SABoneColliderBuilderでMesh Colliderを生成してくれるらしい。
早速BuilderでMesh生成して、Capsule Collider消してっと・・・。
ええやん・・・。ちょっと動かしてみよ・・・。
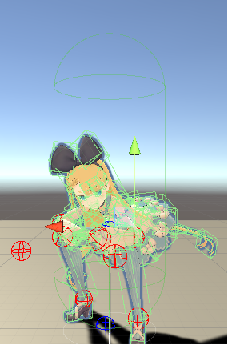
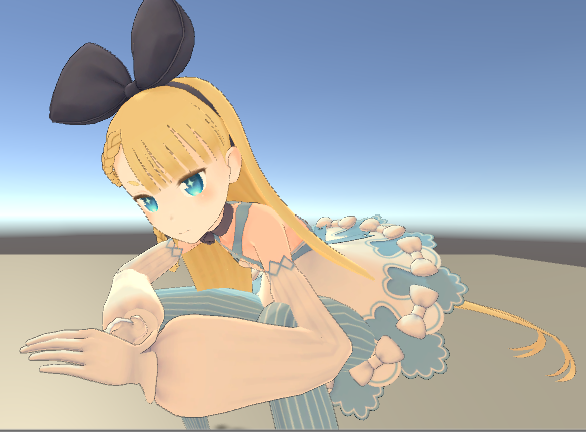
!?!?!?!?!?!?!?!?!?!?!?!?!?!?
MMDモデルがぐれました。完全にヤンキー座りのオラオラモードです。(Kowaii!!!!!!!!!!!!!!!!!!!!
あっ、でも可愛い・・・。
とはいえ、さすがにヤンキー座りの超低速オラオラ歩きをさせておくわけにもいきません。Standard Assetsから引っ張ってきたアニメーション、コントロール周り自体が
単一のCapsule Colliderを対象にした作りであるため、
そのあたりが何層にも分かれているMesh Colliderに対応できていないような感じがします。今回のメモはこの辺りにして、裏で調査、解決方法の模索をしていこうかな、と思います。
- 投稿日:2019-08-16T17:31:44+09:00
VRChatで弾が打てる銃を作る
ワールド作成の話になります。
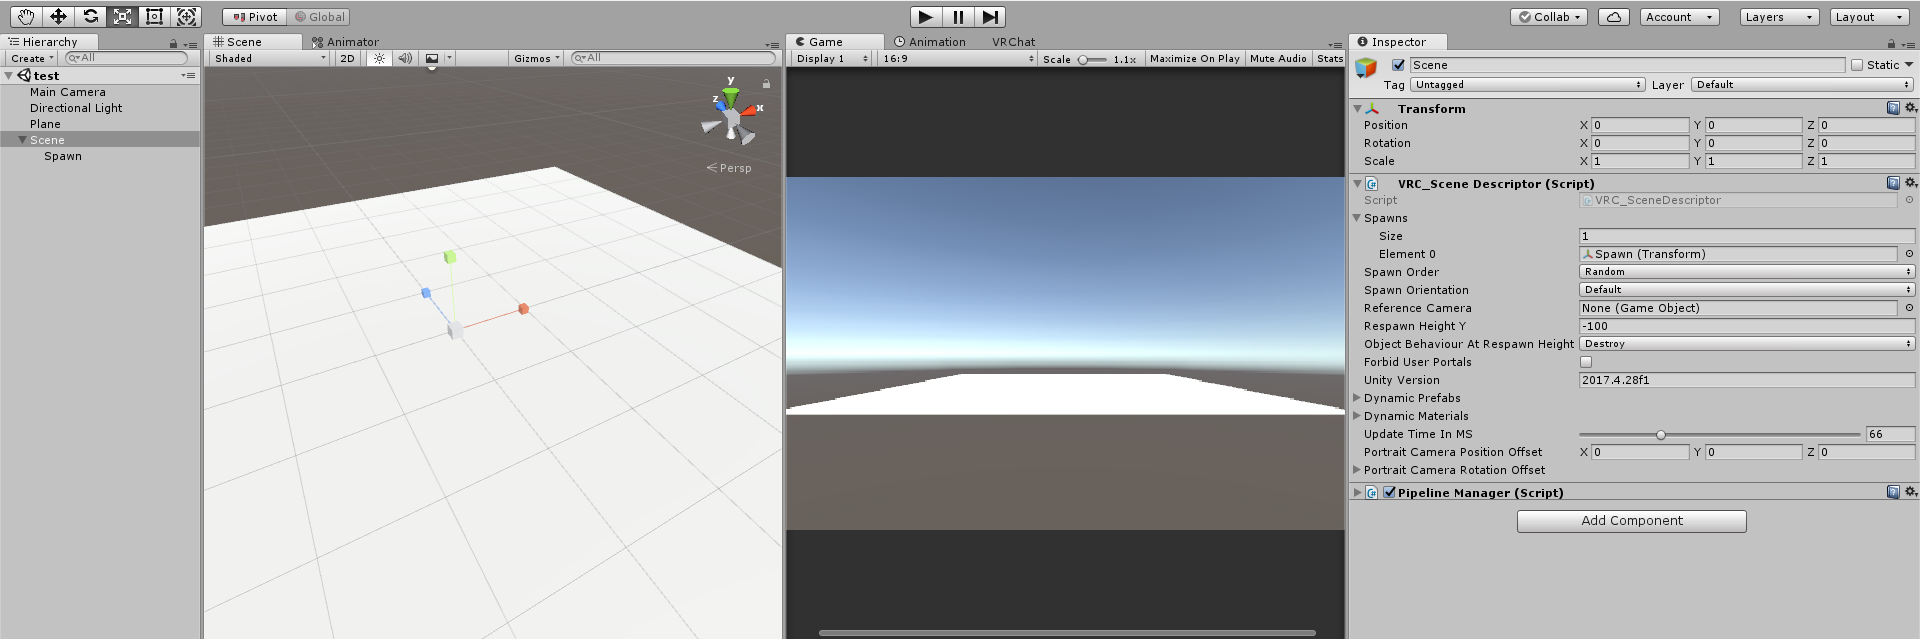
VRC SDKは準備しておいてください。まずは適当にVRC_SceneDescriptorを配置
銃作成
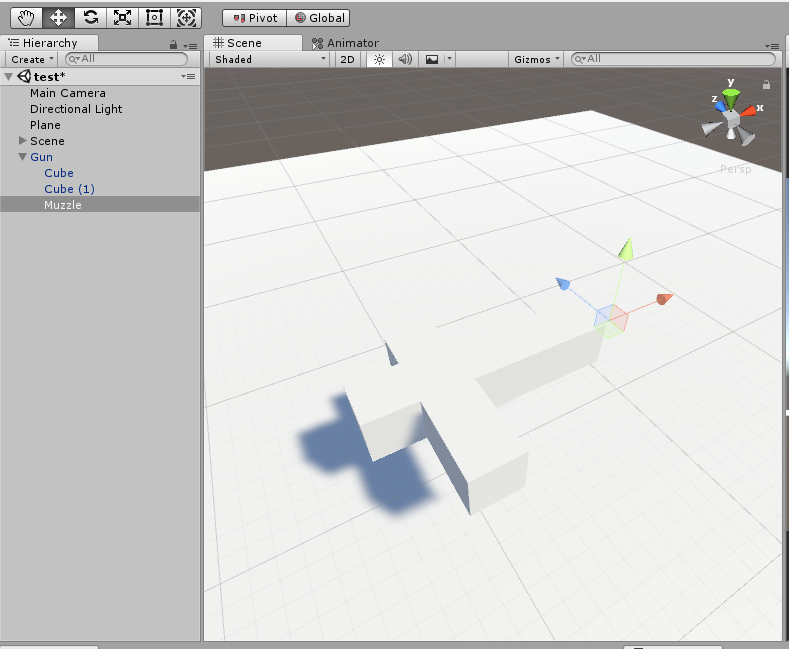
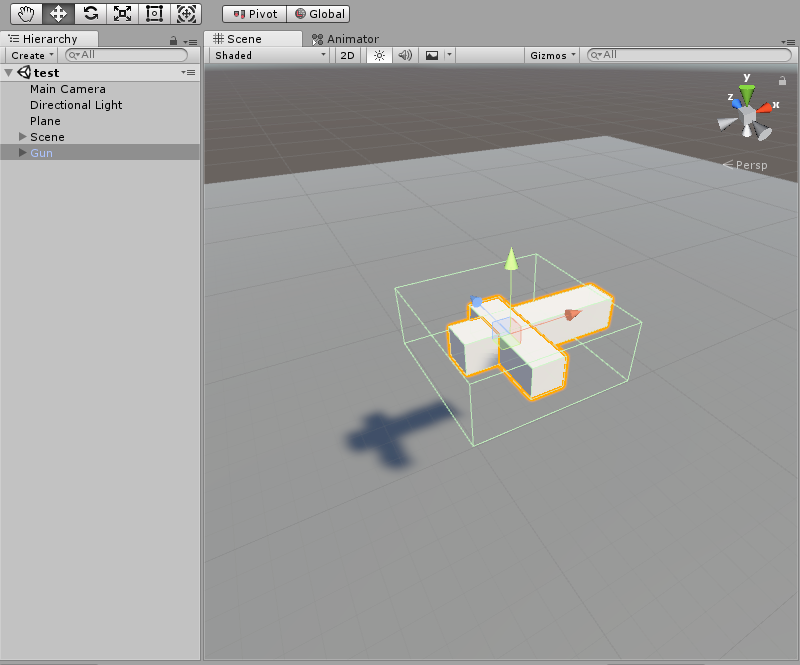
次にGunという名前の空のGameObjectの子に、Cubeを2つ置いて銃を作成します。
このときX方向が銃の先、Z方向が銃の上となるようにします。
空のGameObjecyで銃口の位置を設定
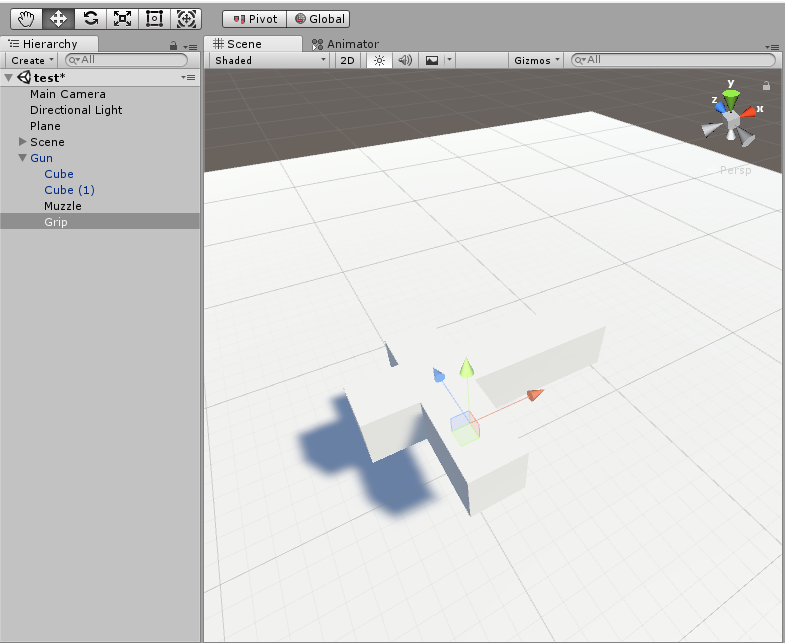
空のGameObjecyでGripの位置を設定
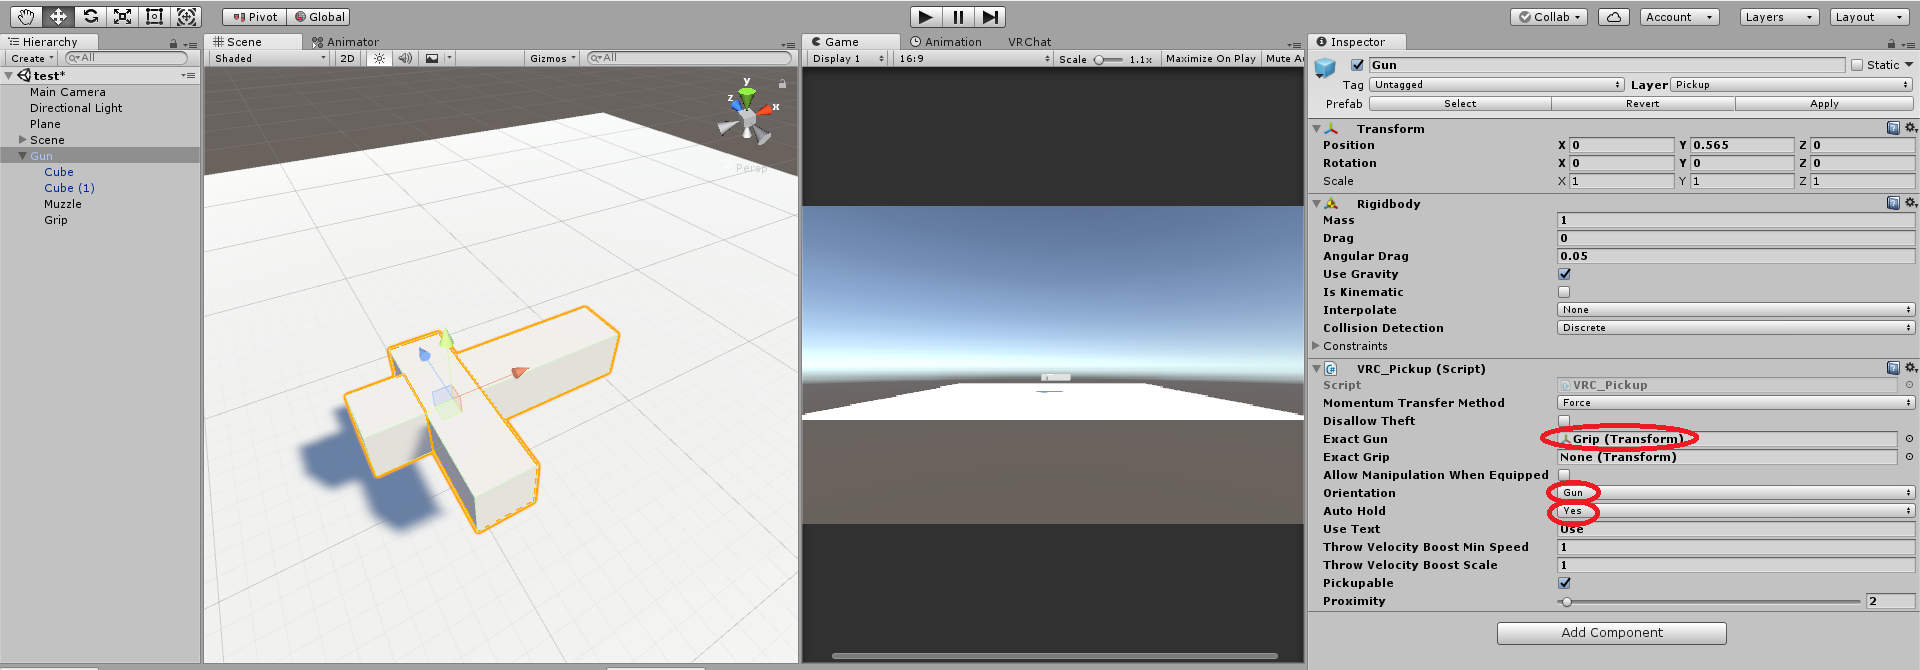
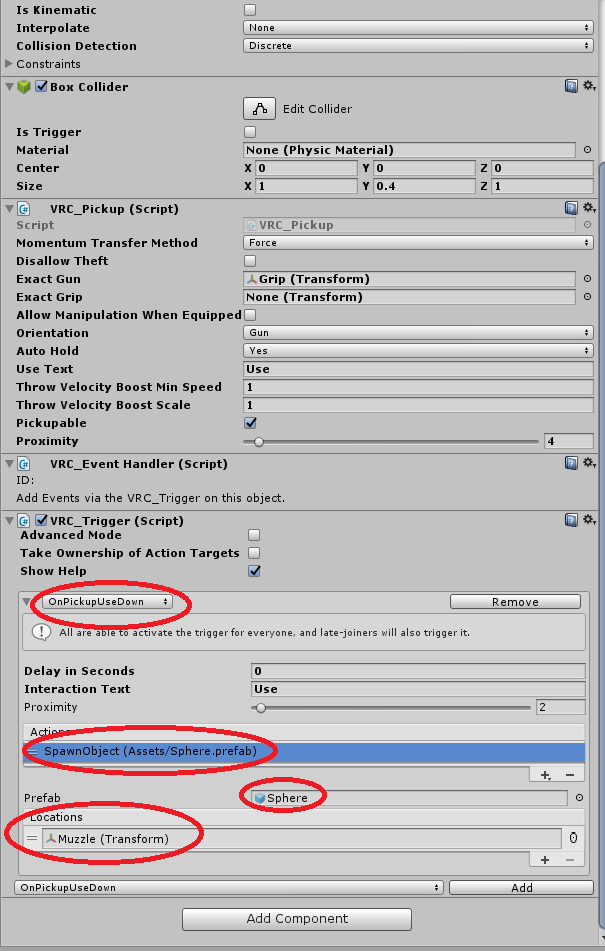
GunにVRC_PickupをAdd Componentします。
RigidBodyは勝手に付与されます。
設定は以下の通り。
VRC_Pickupについてはこちらのブログの方が詳しく書いてありました。
http://vrcprog.hatenablog.jp/entry/component-PickupGunにCollisionも追加します。
銃弾
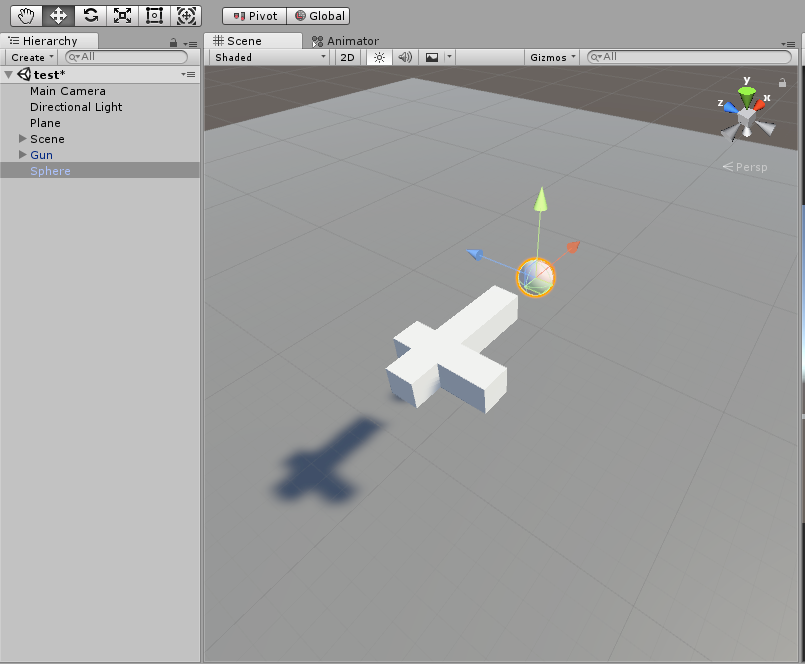
次に銃弾を作成します。
単なるSphereです。
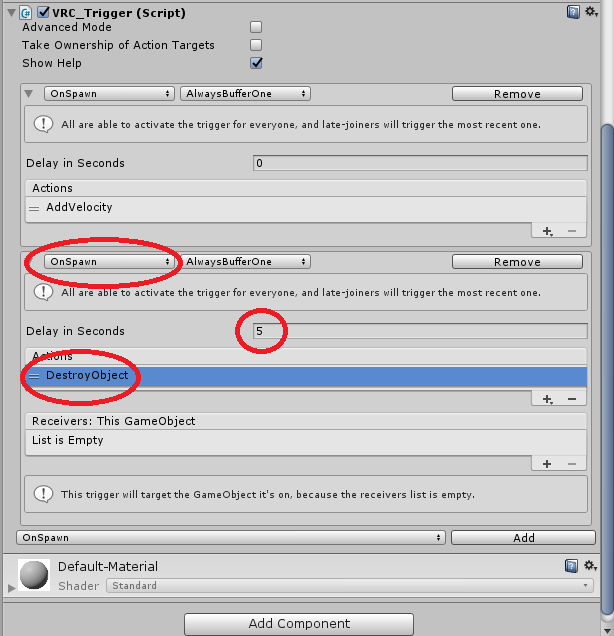
RigedBodyとVPC_Triggerを追加します。
設定は以下の通り。
もし弾を一定時間後に消したければ、
以下のように同じOnSpawnを追加し、5秒後とかでDestroyObjectを発生させるようにします。
終わったらこれをPrefab化します。
発射
発射できるようにするために、Gunの方に戻って、VPC_Triggerを追加します。
設定は以下の通り、Sphereは先程作ったPrefabです。Muzzleは銃口です。
これでいったん弾が撃てる銃は完成です。
この銃を使った、VRC_CombatSystemでプレイヤーにダメージを与えられるシステムについては、別で書こうと思っています。
次回はこちら告知
これらのシステムを使って
ゲームのワールドを作成し、VTuberでe-sports開催を目指しています。
詳細はこちらhttps://twitter.com/void_vtuber/status/1160160487176204288環境
Unity 2017 4.2.8f1
VRC SDK 2019.2.5 (31 July 2019)


- 投稿日:2019-08-16T17:14:17+09:00
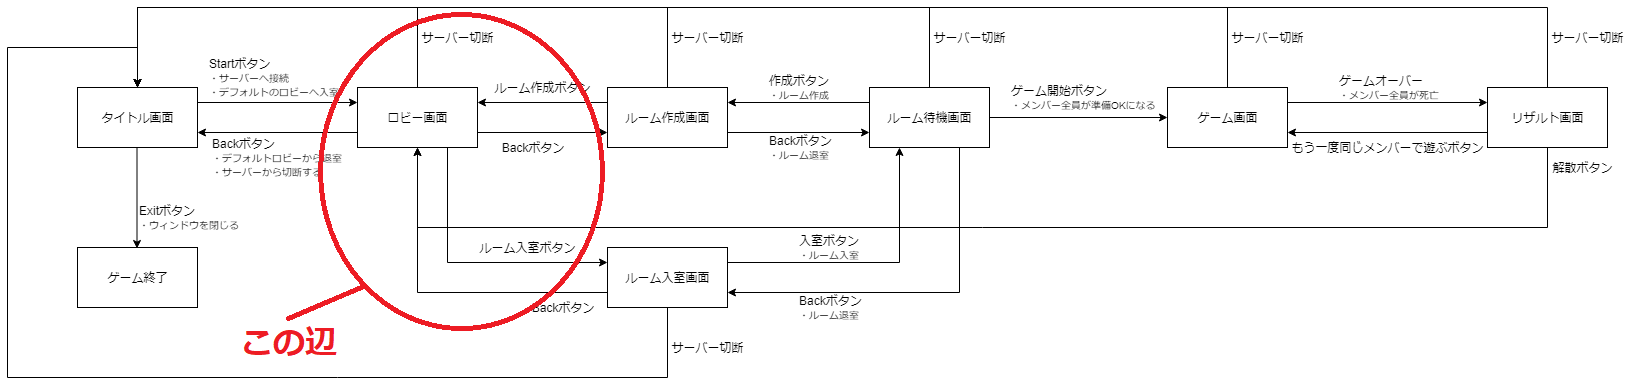
Unityでオンラインマルチプレイなゲームを作りたい その4 ロビー入室
前回の記事でサーバーへ接続できるようになったので、次の段階であるロビーへの入室を作成します。
今回の目標
前回の状態遷移図的には画像上の赤〇で囲っている辺りを作っていきます。
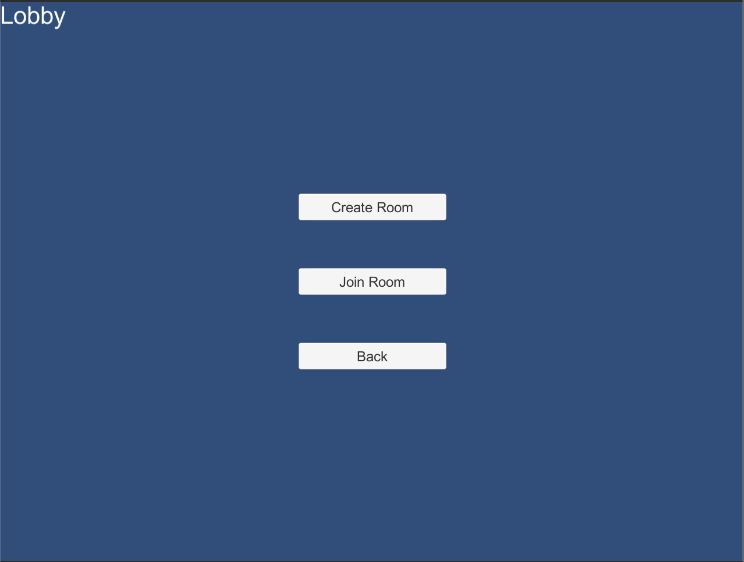
イメージ図
ロビー
http://www.monobitengine.com/doc/mun/contents/Reference/Glossary.htm#%E3%83%AD%E3%83%93%E3%83%BC
特定の条件でルーム群を分けるものとかそういうイメージでいいのでしょうか。
スプラのレギュラーマッチとガチマッチ的な感じで大きく分けるときに使うと良さそうかもです。
今回は特にロビーを複数作る理由が無いので、デフォルトのロビーを使っていこうと思います。ロビー入室処理
デフォルトのロビーへ入室する処理を追加します。
http://www.monobitengine.com/doc/mun/contents/FeatureClient/AutoJoinLobby.htmMonobitEngine.MonobitNetwork.autoJoinLobby = true;このコードをMonobitNetwork.ConnectServer()を呼ぶ前に追加するだけでデフォルトのロビーへ入室してくれます。
ということで追加してみます。
※変更点があったところ以外は割愛using System.Collections; using System.Collections.Generic; using UnityEngine; using UnityEngine.UI; using MonobitEngine; public class SceneTitle : MonobitEngine.MonoBehaviour { // スタートボタンが押された際に行いたい処理 private void OnClickStart() { // 自動でデフォルトのロビーへ入室する MonobitNetwork.autoJoinLobby = true; // スタートボタンが押されたときにサーバーへ接続させたい // 引数にはゲームのバージョンをいれてあげるといいです MonobitEngine.MonobitNetwork.ConnectServer("DungeonAction_v_1_0"); } }これでロビーへ入室できます。
ロビー入室成功直後で処理を行えるように更にソースを変更していきます。
http://www.monobitengine.com/doc/mun/contents/FeatureClient/CallbackFunction.htmpublic void OnJoinedLobby()この関数を追加するだけでロビー入室直後の処理を実装できそうです。
※MonobitNetwork.autoJoinLobbyをtrueにしているとOnConnectedToServer()が呼ばれなくなり、代わりにOnJoinedLobby()が呼ばれるようになっているため、OnConnectedToServer()で実装している内容はOnJoinedLobby()に移しましょう。using System.Collections; using System.Collections.Generic; using UnityEngine; using UnityEngine.UI; using MonobitEngine; public class SceneTitle : MonobitEngine.MonoBehaviour { // スタートボタンが押された際に行いたい処理 private void OnClickStart() { // 自動でデフォルトのロビーへ入室する MonobitNetwork.autoJoinLobby = true; // スタートボタンが押されたときにサーバーへ接続させたい // 引数にはゲームのバージョンをいれてあげるといいです MonobitEngine.MonobitNetwork.ConnectServer("DungeonAction_v_1_0"); } /// <summary>ロビーへ入室した際に呼ばれるコールバック</summary> private void OnJoinedLobby() { // ロビー入室に成功したのでロビー画面へ切り替える SceneManager.LoadScene("Lobby"); } }ロビーへ入室後にロビー画面へ切り替えることが出来るようになりました。
ロビー画面
ボタン毎にシーンを切り替える機能と、タイトル画面へ戻る際に、サーバー切断を行う機能を実装します。
ロビーへ入室できているかを確認
bool MonobitEngineBase.MonobitNetwork.inLobbyロビーへ入室している状態かをこれで確認できます。
ロビー入室がされていない状態では行ってほしくない処理などを制限するのに使えますね。サーバーから切断
http://www.monobitengine.com/doc/mun/contents/FeatureClient/DisconnectFromServer.htm
MonobitEngine.MonobitNetwork.DisconnectServer();サーバーから切断を行うにはこれを使います。
void OnDisconnectedFromServer()
DisconnectServer()が呼ばれた後に呼ばれる関数です。
サーバー切断後に行いたい処理はこの中に書きます。上記の機能たちを踏まえてロビー画面制御を作成していきます。
※uGUIの実装は省いてます。/// <summary>ロビー入室後の画面</summary> public class SceneLobby : MonobitEngine.MonoBehaviour { // Start is called before the first frame update private void Start() { // ロビーへの入室が成されているかを確認する if(!MonobitNetwork.inLobby) { Debug.Log("Not in lobby"); return; } /*-------------------------------ロビー画面変更後のuGUI配置などの処理-----------------------------*/ } /// <summary>MUNサーバーとの接続を切った際に呼ばれるコールバック</summary> private void OnDisconnectedFromServer() { // サーバーから切断された後にタイトル画面に戻るようにする SceneManager.LoadScene("Title"); } /// <summary>ルーム作成画面へ移動するボタンを押した際に呼ばれる</summary> private void OnClickCreateRoom() { SceneManager.LoadScene("CreateRoom"); } /// <summary>ルーム入室画面へ移動するボタンを押した際に呼ばれる</summary> private void OnClickJoinRoom() { SceneManager.LoadScene("JoinRoom"); } /// <summary>タイトル画面へ戻るボタンを押した際に呼ばれる</summary> private void OnClickBack() { // サーバーから切断する MonobitNetwork.DisconnectServer(); } }これでロビー画面で必要な機能は実装できました。
次回はルームを作成する画面を作っていこうと思います。
資料
http://www.monobitengine.com/doc/mun/contents/Reference/Glossary.htm#%E3%83%AD%E3%83%93%E3%83%BC
http://www.monobitengine.com/doc/mun/contents/FeatureClient/AutoJoinLobby.htm
http://www.monobitengine.com/doc/mun/contents/FeatureClient/CallbackFunction.htm
http://www.monobitengine.com/doc/doxygen/client/html/class_monobit_engine_base_1_1_monobit_network.html#ab4b92a64b1b2657f1eda9332186c721c

- 投稿日:2019-08-16T12:26:56+09:00
Unityでオンラインマルチプレイなゲームを作りたい その3 サーバー接続
前回でオンラインマルチを作成する準備ができていたので、実際に作っていこうと思います。前回の記事
内容は記事毎に小分けして書いていこうと思います。最終目標
ローグライク × アクションなゲームをの製作
今回の目標
タイトル画面を作成し、スタートボタンでサーバーへ接続する処理を作ります。
その前に
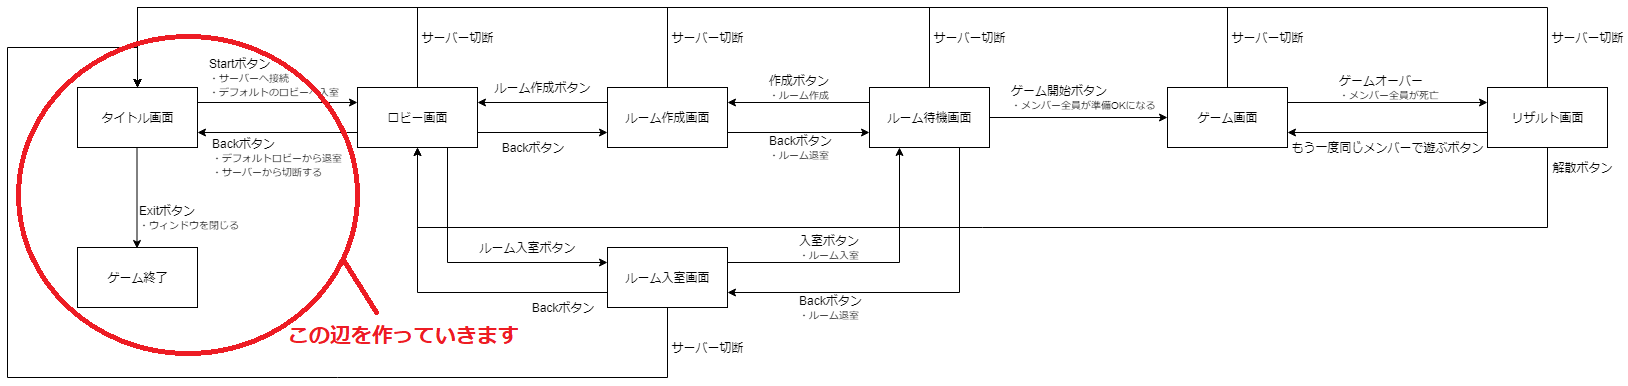
大まかに今回制作するゲームの画面遷移を状態遷移図にしてみました。
各画面でサーバーへの接続/切断、ルーム作成/入室/退室/といった遷移時に必要な処理も大まかに記入しています。
こういったものを作っておくと実装時にこんがらがることが少なくなります。
今回は画像上の赤い丸で囲ってる部分を実装していこうと思います。
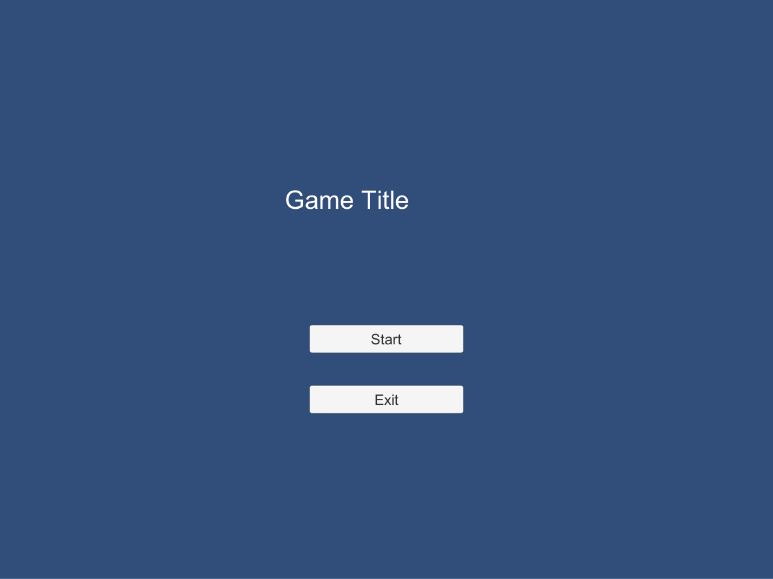
タイトル画面
※イメージ図(ゲームタイトルが左にずれてますけど気にしないでください)
このイメージを元にタイトル画面を作っていこうと思います。
※UI等の作成手順は簡略して書くか諸々端折ります。タイトル画面制御
タイトル画面を制御するコードを書いていきます。
※uGUI系はプレハブ化しています。using System.Collections; using System.Collections.Generic; using UnityEngine; using UnityEngine.UI; public class SceneTitle : MonoBehaviour { // UIを表示するキャンバス private GameObject m_CanvasObj; // タイトルテキスト private GameObject m_TitleTxtObj; // スタートボタン private GameObject m_StartBtnObj; // 終了ボタン private GameObject m_ExitBtnOnj; // Start is called before the first frame update void Start() { // UIを表示するためのキャンバス m_CanvasObj = Instantiate(Resources.Load("Canvas")) as GameObject; // タイトルテキスト表示 m_TitleTxtObj = Instantiate(Resources.Load("Text")) as GameObject; m_TitleTxtObj.transform.SetParent(m_CanvasObj.transform); m_TitleTxtObj.transform.localPosition = new Vector3(72.0f, 128.0f, 0.0f); m_TitleTxtObj.GetComponent<Text>().text = "Game Title"; // スタートボタンの作成 m_StartBtnObj = Instantiate(Resources.Load("Button")) as GameObject; m_StartBtnObj.transform.SetParent(m_CanvasObj.transform); m_StartBtnObj.transform.localPosition = new Vector3(0.0f, -80.0f, 0.0f); m_StartBtnObj.GetComponent<Button>().GetComponentInChildren<Text>().text = "Start"; m_StartBtnObj.GetComponent<Button>().onClick.AddListener(OnClickStart); // 終了ボタンの作成 m_ExitBtnOnj = Instantiate(Resources.Load("Button")) as GameObject; m_ExitBtnOnj.transform.SetParent(m_CanvasObj.transform); m_ExitBtnOnj.transform.localPosition = new Vector3(0.0f, -180.0f, 0.0f); m_ExitBtnOnj.GetComponent<Button>().GetComponentInChildren<Text>().text = "Exit"; m_ExitBtnOnj.GetComponent<Button>().onClick.AddListener(OnClickExit); } // Update is called once per frame void Update() { } // スタートボタンが押された際に行いたい処理 private void OnClickStart() { } // 終了ボタンが押された際に行いたい処理 private void OnClickExit() { #if UNITY_EDITOR UnityEditor.EditorApplication.isPlaying = false; #elif UNITY_STANDALONE UnityEngine.Application.Quit(); #endif } }uGUIを配置してボタンにクリック時に呼び出してほしい関数を定義しているだけですね。
サーバー接続
では、MUNを使ってサーバーへ接続する処理を実装していきます。
まずは公式のドキュメントでサーバーの接続方法を見てみます。
http://www.monobitengine.com/doc/mun/contents/FeatureClient/ConnectToServer.htmMonobitEngine.MonobitNetwork.ConnectServer();この関数を呼ぶだけでサーバーへ接続できそうです。
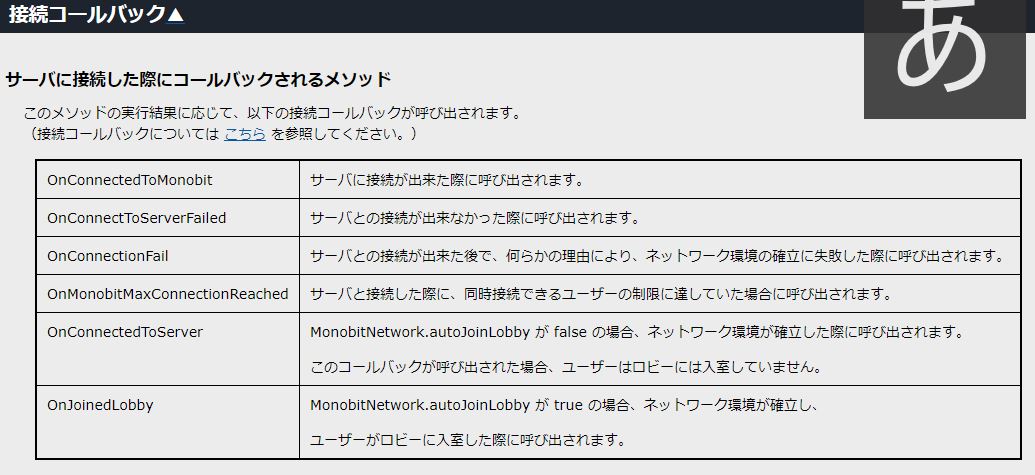
この接続コールバックというものを利用することで接続されたかどうか等の確認が行えるみたいです。ということで先ほどのコードにサーバー接続処理と接続コールバックを加えていきます。
※変更点以外の部分は省いて記載しています。using System.Collections; using System.Collections.Generic; using UnityEngine; using UnityEngine.UI; using MonobitEngine; // MUNの機能を使うために追加します public class SceneTitle : MonobitEngine.MonoBehaviour // 接続コールバックを利用するために、 { // UnityEngineではなくMonobitEngineのMonoBehaviourを利用する // スタートボタンが押された際に行いたい処理 private void OnClickStart() { // スタートボタンが押されたときにサーバーへ接続させたい // 引数にはゲームのバージョンをいれてあげるといいです MonobitEngine.MonobitNetwork.ConnectServer("DungeonAction_v_1_0"); } // MUNサーバーとの接続に成功した際に呼ばれる接続コールバック public void OnConnectedToMonobit() { Debug.Log("接続しました"); } // サーバから切断したときに呼ばれる接続コールバック public void OnDisconnectedFromServer() { Debug.Log("切断しました"); } // MUNサーバーとの接続に失敗した際に呼ばれる接続コールバック public void OnConnectToServerFailed(MonobitEngine.DisconnectCause cause) { Debug.Log("接続に失敗しました:" + cause.ToString()); } // MUNサーバーとの接続後に何らかの原因で切断されたときに呼ばれる接続コールバック public void OnConnectionFail(MonobitEngine.DisconnectCause cause) { Debug.Log("サーバーとの接続後に何らかの原因で切断されました:" + cause.ToString()); } // サーバーへの接続数が上限だった際に呼ばれる接続コールバック public void OnMonobitMaxConnectionReached() { Debug.Log("サーバーに接続しているクライアント数が上限に達しています"); } }上記コードに変更後、実行してStartボタンを押すと「接続しました」とConsoleに出力されます。
なお、接続が成功した状態で終了ボタンを押すと「切断しました」と表示されます。
アプリケーション終了時に自動で切断してくれているみたいです。サーバーへ接続できるようになりました。
次回はロビー画面とロビー入室の作成を行いたいと思います。資料
http://www.monobitengine.com/doc/mun/
http://www.monobitengine.com/doc/mun/contents/FeatureClient/ConnectToServer.htm

- 投稿日:2019-08-16T02:31:39+09:00
BLEでマイコン【ESP32】からAndroid上のUnityに数値を送る。$20のAsset【Bluetooth LE for iOS, tvOS and Android】買って何とかつながったよ
目次
・はじめに
・ハードの準備
・ESP32を使う
・Unityはじめに
マイコン【ESP32】からのBLEをAndroidのスマホで受信してみる。Unityを使って。
何とか数値を送れた結果は以下のと通り。
ESP32が0~100までの数値を順に500msごとに送信している。
何とかESP32からスマートフォンにBLEで数値飛ばすことができた。
— いっちー@builderscon見本市 (@get_itchy_feet) August 15, 2019
アプリ側もUnityでできた。$20出してAsset【Bluetooth LE for iOS, tvOS and Android】買ったかいがあるというものだ。 pic.twitter.com/zRyBBqtDIXAndroidStudioとかわからんが、Unityは使えるので、受信側のスマホソフトを作ってみる。ただし、UnityはBLEへの対応はしていない。Javaとか使って書かないといけないらしいが、そんなもの覚えていたら何年かかるかわからない。
幸いAssetstoreで【Bluetooth LE for iOS, tvOS and Android】なるものが売っている。$20なのでお試しに買ってみる。
https://assetstore.unity.com/packages/tools/network/bluetooth-le-for-ios-tvos-and-android-26661?aid=1101lGs4&utm_source=aff
BLEを出す側にはESP32の乗ったモジュールを使う。Arduinoの開発環境が使用できるし、下記のDevKitならばPCと接続するだけで使用できる。
http://akizukidenshi.com/catalog/g/gM-11819/参考にしたというかほぼコピペしたのは以下のサイト
・ESP32をArduinoの開発環境で開発する準備の仕方
https://deviceplus.jp/hobby/entry_069/
・ESP32側のUUIDの設定とか、Assetの使い方
http://takashiski.hatenablog.com/entry/2018/05/17/001301ハードの準備
⓵ESP32-DevKit : 秋月電子やマルツパーツで売っている
⓶USBケーブル : ⓵へのPCから書き込むのに使用する⓵側はマイクロUSB
⓷Android搭載スマートホン : NuAns NEO [Reloaded]
⓸USBケーブル : スマートホンへのソフトの転送用ESP32を使う
開発環境は以下に書いてある通り。もっと新しいやり方もあるらしいがそちらだとうまくいかなかった。
https://deviceplus.jp/hobby/entry_069/
なお、GitHubからダウンロードしたものを展開すると【libraries】内の【AzureIoT】フォルダの中身が空になってしまった。GitHubで見てみると後ろに@がついている、これはリンクということらしい。これだけは個別にダウンロードしてやる必要があるようだ。
あと、なんか【get.exe】を起動させると、【esptool】が入手できるはずが、なんか出てこない場合がある。
開発環境が整ったら、スケッチ例【ESP32 BLE Arduino】→【BLE_notify】を開く。以下のように少しいじってみた。
ESP32が0~100までの数値を順に500msごとに送信するように改造してみる。
また、UUIDも以下のサイトに書いてあるようにいじってみた。(ただしデバイス名は【ESP32】のまま)
http://takashiski.hatenablog.com/entry/2018/05/17/001301BLE_notifyTest.ino/* Video: https://www.youtube.com/watch?v=oCMOYS71NIU Based on Neil Kolban example for IDF: https://github.com/nkolban/esp32-snippets/blob/master/cpp_utils/tests/BLE%20Tests/SampleNotify.cpp Ported to Arduino ESP32 by Evandro Copercini updated by chegewara Create a BLE server that, once we receive a connection, will send periodic notifications. The service advertises itself as: 4fafc201-1fb5-459e-8fcc-c5c9c331914b And has a characteristic of: beb5483e-36e1-4688-b7f5-ea07361b26a8 The design of creating the BLE server is: 1. Create a BLE Server 2. Create a BLE Service 3. Create a BLE Characteristic on the Service 4. Create a BLE Descriptor on the characteristic 5. Start the service. 6. Start advertising. A connect hander associated with the server starts a background task that performs notification every couple of seconds. */ #include <BLEDevice.h> #include <BLEServer.h> #include <BLEUtils.h> #include <BLE2902.h> BLEServer* pServer = NULL; BLECharacteristic* pCharacteristic = NULL; bool deviceConnected = false; bool oldDeviceConnected = false; uint32_t value = 0; int a; // See the following for generating UUIDs: // https://www.uuidgenerator.net/ #define SERVICE_UUID "00002220-0000-1000-8000-00805F9B34FB" #define CHARACTERISTIC_UUID "00002221-0000-1000-8000-00805F9B34FB" class MyServerCallbacks: public BLEServerCallbacks { void onConnect(BLEServer* pServer) { deviceConnected = true; }; void onDisconnect(BLEServer* pServer) { deviceConnected = false; } }; void setup() { Serial.begin(115200); // Create the BLE Device BLEDevice::init("ESP32"); // Create the BLE Server pServer = BLEDevice::createServer(); pServer->setCallbacks(new MyServerCallbacks()); // Create the BLE Service BLEService *pService = pServer->createService(SERVICE_UUID); // Create a BLE Characteristic pCharacteristic = pService->createCharacteristic( CHARACTERISTIC_UUID, BLECharacteristic::PROPERTY_READ | BLECharacteristic::PROPERTY_WRITE | BLECharacteristic::PROPERTY_NOTIFY | BLECharacteristic::PROPERTY_INDICATE ); // https://www.bluetooth.com/specifications/gatt/viewer?attributeXmlFile=org.bluetooth.descriptor.gatt.client_characteristic_configuration.xml // Create a BLE Descriptor pCharacteristic->addDescriptor(new BLE2902()); // Start the service pService->start(); // Start advertising BLEAdvertising *pAdvertising = BLEDevice::getAdvertising(); pAdvertising->addServiceUUID(SERVICE_UUID); pAdvertising->setScanResponse(false); pAdvertising->setMinPreferred(0x0); // set value to 0x00 to not advertise this parameter BLEDevice::startAdvertising(); Serial.println("Waiting a client connection to notify..."); } void loop() { // notify changed value if (deviceConnected) { a++; if ( a>100 ) a=0; pCharacteristic->setValue((uint8_t*)&a, 1); pCharacteristic->notify(); value++; delay(500); // bluetooth stack will go into congestion, if too many packets are sent, in 6 hours test i was able to go as low as 3ms } // disconnecting if (!deviceConnected && oldDeviceConnected) { delay(500); // give the bluetooth stack the chance to get things ready pServer->startAdvertising(); // restart advertising Serial.println("start advertising"); oldDeviceConnected = deviceConnected; } // connecting if (deviceConnected && !oldDeviceConnected) { // do stuff here on connecting oldDeviceConnected = deviceConnected; } }うまくできたかどうかはスマートホンにテストツールを入れて確認できる。
BLE Scannerとか。Unity
スマートホンの側のアプリは以下のサイトの通りでうごいた。デバイス名は【ESP32】となるが。
http://takashiski.hatenablog.com/entry/2018/05/17/001301
ただし、Androidでしか動かないので確認がめんどくさい。adbとかいれてインストールの手間を省くかなぁ。
adbの入れ方の紹介サイト
https://sp7pc.com/google/android/34263なんとなく面白くないので、少し改造してみた。
送信した数値をテキストとスクロールバーで表示する。
【SimpleTest】のうち、GUI部分は不要なのでコメント文にするとともに、ほかのスクリプトでも数値を参照できるように【_dataBytes】をPublicな変数とする。SimpleTest.cs/* This is a simple example to show the steps and one possible way of * automatically scanning for and connecting to a device to receive * notification data from the device. */ using UnityEngine; public class SimpleTest : MonoBehaviour { public string DeviceName = "RFduino"; public string ServiceUUID = "2220"; public string SubscribeCharacteristic = "2221"; public string WriteCharacteristic = "2222"; enum States { None, Scan, ScanRSSI, Connect, Subscribe, Unsubscribe, Disconnect, } private bool _connected = false; private float _timeout = 0f; private States _state = States.None; private string _deviceAddress; private bool _foundSubscribeID = false; private bool _foundWriteID = false; public byte[] _dataBytes = null; private bool _rssiOnly = false; private int _rssi = 0; void Reset () { _connected = false; _timeout = 0f; _state = States.None; _deviceAddress = null; _foundSubscribeID = false; _foundWriteID = false; _dataBytes = null; _rssi = 0; } void SetState (States newState, float timeout) { _state = newState; _timeout = timeout; } void StartProcess () { Reset (); BluetoothLEHardwareInterface.Initialize (true, false, () => { SetState (States.Scan, 0.1f); }, (error) => { BluetoothLEHardwareInterface.Log ("Error during initialize: " + error); }); } // Use this for initialization void Start () { StartProcess (); } // Update is called once per frame void Update () { if (_timeout > 0f) { _timeout -= Time.deltaTime; if (_timeout <= 0f) { _timeout = 0f; switch (_state) { case States.None: break; case States.Scan: BluetoothLEHardwareInterface.ScanForPeripheralsWithServices (null, (address, name) => { // if your device does not advertise the rssi and manufacturer specific data // then you must use this callback because the next callback only gets called // if you have manufacturer specific data if (!_rssiOnly) { if (name.Contains (DeviceName)) { BluetoothLEHardwareInterface.StopScan (); // found a device with the name we want // this example does not deal with finding more than one _deviceAddress = address; SetState (States.Connect, 0.5f); } } }, (address, name, rssi, bytes) => { // use this one if the device responses with manufacturer specific data and the rssi if (name.Contains (DeviceName)) { if (_rssiOnly) { _rssi = rssi; } else { BluetoothLEHardwareInterface.StopScan (); // found a device with the name we want // this example does not deal with finding more than one _deviceAddress = address; SetState (States.Connect, 0.5f); } } }, _rssiOnly); // this last setting allows RFduino to send RSSI without having manufacturer data if (_rssiOnly) SetState (States.ScanRSSI, 0.5f); break; case States.ScanRSSI: break; case States.Connect: // set these flags _foundSubscribeID = false; _foundWriteID = false; // note that the first parameter is the address, not the name. I have not fixed this because // of backwards compatiblity. // also note that I am note using the first 2 callbacks. If you are not looking for specific characteristics you can use one of // the first 2, but keep in mind that the device will enumerate everything and so you will want to have a timeout // large enough that it will be finished enumerating before you try to subscribe or do any other operations. BluetoothLEHardwareInterface.ConnectToPeripheral (_deviceAddress, null, null, (address, serviceUUID, characteristicUUID) => { if (IsEqual (serviceUUID, ServiceUUID)) { _foundSubscribeID = _foundSubscribeID || IsEqual (characteristicUUID, SubscribeCharacteristic); _foundWriteID = _foundWriteID || IsEqual (characteristicUUID, WriteCharacteristic); // if we have found both characteristics that we are waiting for // set the state. make sure there is enough timeout that if the // device is still enumerating other characteristics it finishes // before we try to subscribe if (_foundSubscribeID) { _connected = true; SetState (States.Subscribe, 2f); } } }); break; case States.Subscribe: BluetoothLEHardwareInterface.SubscribeCharacteristicWithDeviceAddress (_deviceAddress, ServiceUUID, SubscribeCharacteristic, null, (address, characteristicUUID, bytes) => { // we don't have a great way to set the state other than waiting until we actually got // some data back. For this demo with the rfduino that means pressing the button // on the rfduino at least once before the GUI will update. _state = States.None; // we received some data from the device _dataBytes = bytes; }); break; case States.Unsubscribe: BluetoothLEHardwareInterface.UnSubscribeCharacteristic (_deviceAddress, ServiceUUID, SubscribeCharacteristic, null); SetState (States.Disconnect, 4f); break; case States.Disconnect: if (_connected) { BluetoothLEHardwareInterface.DisconnectPeripheral (_deviceAddress, (address) => { BluetoothLEHardwareInterface.DeInitialize (() => { _connected = false; _state = States.None; }); }); } else { BluetoothLEHardwareInterface.DeInitialize (() => { _state = States.None; }); } break; } } } } private bool ledON = false; public void OnLED () { ledON = !ledON; if (ledON) { SendByte ((byte)0x01); } else { SendByte ((byte)0x00); } } string FullUUID (string uuid) { return "0000" + uuid + "-0000-1000-8000-00805f9b34fb"; } bool IsEqual(string uuid1, string uuid2) { if (uuid1.Length == 4) uuid1 = FullUUID (uuid1); if (uuid2.Length == 4) uuid2 = FullUUID (uuid2); return (uuid1.ToUpper().CompareTo(uuid2.ToUpper()) == 0); } void SendByte (byte value) { byte[] data = new byte[] { value }; BluetoothLEHardwareInterface.WriteCharacteristic (_deviceAddress, ServiceUUID, WriteCharacteristic, data, data.Length, true, (characteristicUUID) => { BluetoothLEHardwareInterface.Log ("Write Succeeded"); }); } /* void OnGUI () { GUI.skin.textArea.fontSize = 32; GUI.skin.button.fontSize = 32; GUI.skin.toggle.fontSize = 32; GUI.skin.label.fontSize = 32; if (_connected) { if (_state == States.None) { if (GUI.Button (new Rect (10, 10, Screen.width - 10, 100), "Disconnect")) SetState (States.Unsubscribe, 1f); if (GUI.Button (new Rect (10, 210, Screen.width - 10, 100), "Write Value")) OnLED (); if (_dataBytes != null) { string data = ""; foreach (var b in _dataBytes) data += b.ToString ("X") + " "; GUI.TextArea (new Rect (10, 400, Screen.width - 10, 300), data); } } else if (_state == States.Subscribe && _timeout == 0f) { GUI.TextArea (new Rect (50, 100, Screen.width - 100, Screen.height - 200), "Press the button on the RFduino"); } } else if (_state == States.ScanRSSI) { if (GUI.Button (new Rect (10, 10, Screen.width - 10, 100), "Stop Scanning")) { BluetoothLEHardwareInterface.StopScan (); SetState (States.Disconnect, 0.5f); } if (_rssi != 0) GUI.Label (new Rect (10, 300, Screen.width - 10, 50), string.Format ("RSSI: {0}", _rssi)); } else if (_state == States.None) { if (GUI.Button (new Rect (10, 10, Screen.width - 10, 100), "Connect")) StartProcess (); _rssiOnly = GUI.Toggle (new Rect (10, 200, Screen.width - 10, 50), _rssiOnly, "Just Show RSSI"); } } */ }さらにスクリプトを追加する。
テキストとスクロールバーの表示に使用する。
出来たら【SimpleTest】と同じ場所【MainCamera】に追加する。UiDisplay.csusing System.Collections; using System.Collections.Generic; using UnityEngine; using UnityEngine.UI; public class UiDisplay : MonoBehaviour { public Text textDisplay; public int data; public float dataScroll; public Scrollbar scrollDisplay; void Start() { textDisplay.text = "Display"; } void Update() { SimpleTest simpleData = GetComponent<SimpleTest>(); data = simpleData._dataBytes[0]; textDisplay.text = data.ToString(); dataScroll = data; scrollDisplay.size = dataScroll * 0.01f; } }GameObjectとして、UIのimage(背景用),text,scrollbarを追加する。サイズは適当に。
textとscrollbarは【UiDisplay】の変数に突っ込んでやる。
これでなんとなくだが動くようになった。何がどうなっているかはとんとわからん。コネクトとかどうするんだろう...。
まあ、とにかく動いた。以上である。

