- 投稿日:2019-08-16T21:57:22+09:00
VirtualBoxでSSH接続して色々作業(npm installとか)した時、あっちに逝ったまま帰ってこなくなる問題の対策
環境概要
JamstackやWordPressの開発専用環境としてVirtualBoxにlinux(Ubuntu 18.0.4)をインストールして、ターミナルやVs CodeのRemote-SSH機能でSSH接続してコマンド操作しています。
問題
SSHで重たいコマンド操作(npm installなど)をする際に冗長だったり処理が重かったり時間掛かり過ぎると、そのままハングして反応が無くなる。
解決方法
"/etc/security/limits.conf"でリソース制限をした。
詳しくはulimitでユーザリソースの制限(Linux)(インフラ勉強wiki)で。
上述の"limits.conf"を以下の様に設定。coderがユーザ名です。再ログインするだけで設定が反映されます。
coder hard nofile 1024
coder hard nproc 1000000
coder hard stac 1024
これで快適にnpm installやgridsome build / developなどをぶんまわせる様になりました。時々怪しくなる時もありますが、少し待てば動き始める事が殆どです。
なお"ulimit -a"をターミナルで叩けば、現在の設定値が一覧表示されます。
この設定はうちの会社(の様なもの)のレンタルサーバにSSHで接続して、ターミナルから"ulimit -a"して出てきた設定を参考にしました。
雑記
Macの黒い画面でnpmやったりとか色々してウエブ開発やるにはhomebrewをインストールしておけば、快適に開発できるものの、最近アップルがMacOSのセキュリティに力を入れ始めて面倒臭くなってまいりました。こんどのMacOSのバージョンアップでさらに面倒になりそうですし。
こんどのMacOS 10.15 Catalinaでは、デフォのシェルがzshに変わるらしい。10.16以降はPythonやRuby、Perlを同梱しなくなるとも。OSのアップグレードの度に、色々と無駄な作業が増えそうです。
Dockerを試してみました。お手軽なdocker環境が欲しい場合は、laradockがよかったです。WordPressとかも動かせます。ただし、dockerは肥大なキャッシュ(64GBとかそんな感じ)が障壁に。最近のお高いマックのSSDには負担すぎる。外部接続ディスクにキャッシュを移動できる事はできますが、少し使っているうちに色々ダルくなってきた。
というわけで、linuxの開発環境をそのままポータブルに扱える様に、Ubuntuで開発環境を作ってVirtualBoxで動かす事にしました。本体のSSDになるべく依存したくないのと、本体のSSDの空き容量を常に確保しておきたいため、開発環境は全てUSB3.0接続の外部SSDに置いています。管理作業はVirtualBoxからWindow ManagerでGUIを使えるので色々とお気楽。
VirtualBoxのUbuntuに、nodeやらアパッチやらを好きなだけインストールして、MacOS側からはsshやsambaで接続して操作する感じです。
念の為。時折切りが良い時に、開発環境が入った仮想マシンをエキスポートしておくのは必須です。たまに具合おかしくなりますから。

- 投稿日:2019-08-16T21:51:22+09:00
FIDOサーバを立ててみた
Googleから最近になって、FIDO認証デバイスの「Titanセキュリティーキー」が発売されたので、購入しました。
[Google Titanセキュリティーキー]
https://store.google.com/jp/product/titan_security_key_kit今のところ、はやっていそうですし、せっかくなのでこれを使って遊んでいきたいと思います。
Titanセキュリティーキーがあれば、Webサーバから見てユーザID/パスワードで認証するのではなく、Titanセキュリティーキーのデバイスを認証してくれます。公開鍵をベースとしているそうです。
また、Titanセキュリティーキーには、USBに加えて、NFCとBLEの接続方法があるので、直接PCに挿さなくとも、デバイス認証してくれます。ということで、今回は、王道のFIDOサーバを立ち上げます。
FIDOの全体像を知る
以下のサイトの記事が非常に参考になりました。
https://techblog.yahoo.co.jp/advent-calendar-2018/webauthn/それから、以下のチュートリアルも非常に参考になりました。
https://github.com/fido-alliance/webauthn-demo頭が混乱してきたら、以下のページで再整理しましょう。
Web Authentication API の裏側と、なぜそうなっているのかを図解したサーバ側に必要なエンドポイントを知る
サーバ側に必要なエンドポイントは以下の4つです。
- POST /attestation/options
- POST /attestation/result
- POST /assertion/options
- POST /assertion/result
(参考)
https://fidoalliance.org/specs/fido-v2.0-rd-20180702/fido-server-v2.0-rd-20180702.html詳細はよくわからないのですが、以下のnpmモジュールを使わせてもらうことで、実装量をかなり省けました。(ありがとうございます!)
fido2-lib
https://github.com/apowers313/fido2-libエンドポイントに対応する関数が定義されていますので、それを呼び出せるように、エンドポイントへの入力パラメータを整理して呼び出します。
対応関係は以下の通りです。
- /attestation/options → f2l.attestationOptions()
- /attestation/result → f2l.attestationResult()
- /assertion/options → f2l.assertionOptions()
- /assertion/result → f2l.assertionResult()
ここで一つややこしいことがありまして、クライアントサーバ間のバイナリデータの受け渡しは、BASE64URLというエンコードするのが通例のようでして、エンドポイントからの入力と関数呼び出しの間、関数戻りからエンドポイントからの出力の間のそれぞれで、エンコード/デコードする必要があります。
さらにややこしいのが、一部fido2-libがエンコード/デコードを処理してなさそうに見えて、一部処理していたりで、ちょっと混乱しました。
後で示しますが、(頑張って理解しようとしたのですが)不具合と思われる個所を修正して、やっと動かすことができました。BASE64URLとは、Base64エンコードに対して、Webで扱いやすいように、「+」を「-」に、「/」を「_」に置き換えたもののようです。
以下のnpmモジュールを使わせていただきました。base64url
https://github.com/brianloveswords/base64urlユーザIDとデバイスの紐づけ
サーバ側から見てデバイスを認証できますが、そのデバイスの持ち主がどのユーザIDの人なのかはわからないので、紐づけが必要となります。
ですので、通常は、ユーザID/パスワードで認証したのち、デバイスで生成した公開鍵をユーザIDに紐づけます。こうすることで、デバイスを認証したこと=ユーザIDのユーザがログインした、ということになります。
一般に、/attestation/options のところで本人認証をしてから、デバイスの登録処理を進めるのですが、今回のデモサーバでは、ユーザID/パスワードの認証は省略しています。Client側の呼び出し関数
Client側は、ブラウザを使いました。
かなり実装が進んでいるようで、やはりChromeは対応していました。以下の2つの関数を呼び出します。
・navigator.credentials.create()
・navigator.credentials.get()まとめると、以下の順番になります。
[デバイスの登録]
・POST /attestation/options
・navigator.credentials.create()
・POST /attestation/result[デバイスでログイン]
・POST /assertion/options
・navigator.credentials.get()
・POST /assertion/resultちょっと補足します。
・POST /attestation/options
デバイスに紐づけたいユーザ名を知らせます。本来であれば、パスワードや認証後のセッションを渡して、ユーザ本人であることを示すのが正しいですが、省略しています。
レスポンスとして、チャレンジが返ってきます。・navigator.credentials.create()
デバイス内部で、公開鍵ペアを生成し、チャレンジに対して署名を付与します。
レスポンスとして、公開鍵値、署名値、公開鍵を識別するIDが返ってきます。・POST /attestation/result
デバイスから取得したレスポンスをサーバに登録します。
サーバでは、署名検証し、公開鍵・公開鍵を識別するID(credId)などを、ユーザ名に紐づけて保持することで登録完了です。・POST /assertion/options
ユーザ名を入力とし、サーバに保持しているユーザ名を検索します。
そして、ユーザ名に紐づけたcredIdを取り出し、またチャレンジを生成して、クライアントに返します。複数のデバイスが紐づけられている可能性もあるので、credIdは複数の場合があります。・navigator.credentials.get()
デバイスに署名生成を要求します。生成に使う公開鍵は、サーバから取得したcredIdで指定します。
レスポンスとして署名に使った公開鍵のIDと署名値が返ってきます。・POST /assertion/result
署名に使った公開鍵のIDでcredIdを特定し、署名を検証します。上記以外にも、細かいチェック処理が入っています。
ソースコード
ソースコード量が多いので、GitHubに上げておきました。
https://github.com/poruruba/fido_serverまずはサーバ部分です。
index.js'use strict'; const HELPER_BASE = process.env.HELPER_BASE || '../../helpers/'; const Response = require(HELPER_BASE + 'response'); const Redirect = require(HELPER_BASE + 'redirect'); const base64url = require('base64url'); const crypto = require('crypto'); const { Fido2Lib } = require("fido2-lib"); const FIDO_RP_NAME = process.env.FIDO_RP_NAME || "Sample FIDO Host"; const FIDO_ORIGIN = process.env.FIDO_ORIGIN || "https://localhost"; var f2l = new Fido2Lib({ rpName: FIDO_RP_NAME }); let database = {}; exports.handler = async (event, context, callback) => { if( event.path == '/assertion/options'){ var body = JSON.parse(event.body); console.log(body); let username = body.username; if(database[username] && !database[username].registered) { return new Response({ 'status': 'failed', 'message': `Username ${username} does not exist` }); } var authnOptions = await f2l.assertionOptions(); authnOptions.challenge = base64url.encode(authnOptions.challenge); let allowCredentials = []; for(let authr of database[username].attestation) { allowCredentials.push({ type: 'public-key', id: authr.credId, transports: ['usb', 'nfc', 'ble'] }) } authnOptions.allowCredentials = allowCredentials; console.log(authnOptions); context.req.session.challenge = authnOptions.challenge; context.req.session.username = username; authnOptions.status = 'ok'; return new Response(authnOptions); }else if( event.path == '/assertion/result'){ var body = JSON.parse(event.body); console.log(body); var attestation = null; for( var i = 0 ; i < database[context.req.session.username].attestation.length ; i++ ){ if( database[context.req.session.username].attestation[i].credId == body.id ){ attestation = database[context.req.session.username].attestation[i]; break; } } if( !attestation ){ return new Response({ 'status': 'failed', 'message': 'key is not found.' }); } var assertionExpectations = { challenge: context.req.session.challenge, origin: FIDO_ORIGIN, factor: "either", publicKey: attestation.publickey, prevCounter: attestation.counter, userHandle: null }; body.rawId = new Uint8Array(base64url.toBuffer(body.rawId)).buffer; var authnResult = await f2l.assertionResult(body, assertionExpectations); console.log(authnResult); if(authnResult.audit.complete) { attestation.counter = authnResult.authnrData.get('counter'); return new Response({ 'status': 'ok', credId: body.id, counter: attestation.counter }); } else { return new Response({ 'status': 'failed', 'message': 'Can not authenticate signature!' }); } }else if( event.path == '/attestation/options'){ var body = JSON.parse(event.body); console.log(body); let username = body.username; if(database[username] && database[username].registered) { return new Response({ 'status': 'failed', 'message': `Username ${username} already exists` }); } var id = randomBase64URLBuffer(); var registrationOptions = await f2l.attestationOptions(); registrationOptions.challenge = base64url.encode(registrationOptions.challenge); registrationOptions.user.id = id; registrationOptions.user.name = username; registrationOptions.user.displayName = username; console.log(registrationOptions); database[username] = { 'name': username, 'registered': false, 'id': id, 'attestation': [] }; context.req.session.challenge = registrationOptions.challenge; context.req.session.username = username; registrationOptions.status = 'ok'; return new Response(registrationOptions); }else if( event.path == '/attestation/result'){ var body = JSON.parse(event.body); console.log(body); var attestationExpectations = { challenge: context.req.session.challenge, origin: FIDO_ORIGIN, factor: "either" }; body.rawId = new Uint8Array(base64url.toBuffer(body.rawId)).buffer; var regResult = await f2l.attestationResult(body, attestationExpectations); console.log(regResult); var credId = base64url.encode(regResult.authnrData.get('credId')); var counter = regResult.authnrData.get('counter'); database[context.req.session.username].attestation.push({ publickey : regResult.authnrData.get('credentialPublicKeyPem'), counter : counter, fmt: regResult.authnrData.get('fmt'), credId : credId }); if(regResult.audit.complete) { database[context.req.session.username].registered = true return new Response({ 'status': 'ok', credId: credId, counter: counter }); } else { return new Response({ 'status': 'failed', 'message': 'Can not authenticate signature!' }); } } }; function randomBase64URLBuffer(len){ len = len || 32; let buff = crypto.randomBytes(len); return base64url(buff); }以下の部分は、環境に合わせて、変更してください。
・process.env.FIDO_RP_NAME
・process.env.FIDO_ORIGIN次は、クライアント側ソースです。
HTMLは以下の通りです。index.html<!DOCTYPE html> <html lang="ja"> <head> <meta http-equiv="Content-Type" content="text/html; charset=utf-8" /> <meta http-equiv="Content-Security-Policy" content="default-src * data: gap: https://ssl.gstatic.com 'unsafe-eval' 'unsafe-inline'; style-src * 'unsafe-inline'; media-src *; img-src * data: content: blob:;"> <meta name="format-detection" content="telephone=no"> <meta name="msapplication-tap-highlight" content="no"> <meta name="apple-mobile-web-app-capable" content="yes" /> <meta name="viewport" content="user-scalable=no, initial-scale=1, maximum-scale=1, minimum-scale=1, width=device-width"> <!-- jQuery (necessary for Bootstrap's JavaScript plugins) --> <script src="https://ajax.googleapis.com/ajax/libs/jquery/1.12.4/jquery.min.js"></script> <!-- Latest compiled and minified CSS --> <link rel="stylesheet" href="https://maxcdn.bootstrapcdn.com/bootstrap/3.3.7/css/bootstrap.min.css" integrity="sha384-BVYiiSIFeK1dGmJRAkycuHAHRg32OmUcww7on3RYdg4Va+PmSTsz/K68vbdEjh4u" crossorigin="anonymous"> <!-- Optional theme --> <link rel="stylesheet" href="https://maxcdn.bootstrapcdn.com/bootstrap/3.3.7/css/bootstrap-theme.min.css" integrity="sha384-rHyoN1iRsVXV4nD0JutlnGaslCJuC7uwjduW9SVrLvRYooPp2bWYgmgJQIXwl/Sp" crossorigin="anonymous"> <!-- Latest compiled and minified JavaScript --> <script src="https://maxcdn.bootstrapcdn.com/bootstrap/3.3.7/js/bootstrap.min.js" integrity="sha384-Tc5IQib027qvyjSMfHjOMaLkfuWVxZxUPnCJA7l2mCWNIpG9mGCD8wGNIcPD7Txa" crossorigin="anonymous"></script> <title>FIDO Demo Server</title> <script src="js/methods_utils.js"></script> <script src="js/vue_utils.js"></script> <script src="dist/js/vconsole.min.js"></script> <script src="https://cdn.jsdelivr.net/npm/js-cookie@2/src/js.cookie.min.js"></script> <script src="https://unpkg.com/vue"></script> </head> <body> <div id="top" class="container"> <h1>FIDO Demo Server</h1> <div class="alert alert-info" role="alert">{{message}}</div> <div class="form-inline"> <label>username</label> <input type="text" class="form-control" v-model="username"> </div> <button class="btn btn-default" v-on:click="start_register()">登録開始</button> <div v-if="attestation != null"> <label>rp.name</label> {{attestation.rp.name}}<br> <label>user.displayName</label> {{attestation.user.displayName}}<br> <label>user.id</label> {{attestation_encode.user.id}}<br> <label>challenge</label> {{attestation_encode.challenge}}<br> <label>attestation</label> {{attestation.attestation}}<br> <button class="btn btn-default" v-on:click="do_register()">登録実行</button> </div> <div> <div v-if="registered"> <label>credId</label> {{register_credId}}<br> <label>counter</label> {{register_counter}}<br> </div> <button class="btn btn-default" v-on:click="start_login()">ログイン開始</button> </div> <div v-if="assertion != null"> <div v-for="(cred, index) of assertion_encode.allowCredentials"> <label>cred.id[{{index}}]</label> {{cred.id}}<br> </div> <label>challenge</label> {{assertion_encode.challenge}}<br> <button class="btn btn-default" v-on:click="do_login()">ログイン実行</button> </div> <div v-if="logined"> <label>credId</label> {{login_credId}}<br> <label>counter</label> {{login_counter}}<br> </div> <div class="modal fade" id="progress"> <div class="modal-dialog"> <div class="modal-content"> <div class="modal-header"> <h4 class="modal-title">{{progress_title}}</h4> </div> <div class="modal-body"> <center><progress max="100" /></center> </div> </div> </div> </div> </div> <script src="dist/js/base64url-arraybuffer.js"></script> <script src="js/start.js"></script> </body>Javascript部分です。
start.js'use strict'; //var vConsole = new VConsole(); const base_url = "【サーバのURL】"; var vue_options = { el: "#top", data: { progress_title: '', message: "", username: 'test', attestation : null, attestation_encode: { user: {} }, register_credId: null, register_counter: -1, registered : false, assertion : null, assertion_encode: { allowCredentials: [] }, login_credId: null, login_counter: -1, logined : false }, computed: { }, methods: { start_register: function(){ this.registered = false; var param = { username: this.username, userVerification: true }; this.progress_open(); do_post( base_url + '/attestation/options', param ) .then(json =>{ this.progress_close(); console.log(json); if( json.status != 'ok'){ alert(json.message); return; } this.attestation_encode.challenge = json.challenge; this.attestation_encode.user.id = json.user.id; json.challenge = base64url.decode(json.challenge); json.user.id = base64url.decode(json.user.id); this.attestation = json; this.message = '登録の準備ができました。'; }) .catch(error =>{ this.progress_close(); alert(error); }); }, do_register: function(){ return navigator.credentials.create({ publicKey: this.attestation }) .then(response =>{ var result = publicKeyCredentialToJSON(response); this.progress_open(); return do_post(base_url + '/attestation/result', result ) }) .then((response) => { this.progress_close(); if(response.status !== 'ok'){ alert(json.message); return; } if( response.status == 'ok'){ this.register_credId = response.credId; this.register_counter = response.counter; this.registered = true; this.message = '登録が完了しました。'; }else{ throw 'registration error'; } }) .catch(error =>{ this.progress_close(); alert(error); }); }, start_login: function(){ this.logined = false; var param = { username: this.username, }; this.progress_open(); do_post( base_url + '/assertion/options', param ) .then(json =>{ this.progress_close(); console.log(json); if( json.status != 'ok'){ alert(json.message); return; } this.assertion_encode.challenge = json.challenge; json.challenge = base64url.decode(json.challenge); for(var i = 0 ; i < json.allowCredentials.length ; i++ ) { this.assertion_encode.allowCredentials[i] = { id: json.allowCredentials[i].id }; json.allowCredentials[i].id = base64url.decode(json.allowCredentials[i].id); } this.assertion = json; this.message = 'ログインの準備ができました。'; }) .catch(error =>{ this.progress_close(); alert(error); }); }, do_login: function(){ console.log(this.assertion); return navigator.credentials.get({ publicKey: this.assertion }) .then(response =>{ var result = publicKeyCredentialToJSON(response); this.progress_open(); return do_post(base_url + '/assertion/result', result ) }) .then((response) => { this.progress_close(); if(response.status !== 'ok') throw new Error(`Server responed with error. The message is: ${response.message}`); console.log('sendWebAuthnResponse received: ', response); if( response.status == 'ok'){ this.login_credId = response.credId; this.login_counter = response.counter; this.logined = true; this.message = 'ログインが成功しました。'; }else{ throw 'login error'; } }) .catch(error =>{ this.progress_close(); alert(error); }); } }, created: function(){ }, mounted: function(){ proc_load(); } }; vue_add_methods(vue_options, methods_utils); var vue = new Vue( vue_options ); function do_post(url, body){ // const headers = new Headers( { "Content-Type" : "application/json; charset=utf-8" } ); const headers = new Headers( { "Content-Type" : "application/json" } ); return fetch(url, { method : 'POST', credentials: 'include', body : JSON.stringify(body), headers: headers }) .then((response) => { if( !response.ok ) throw 'status is not 200.'; return response.json(); }); } function publicKeyCredentialToJSON(pubKeyCred){ if(pubKeyCred instanceof Array) { let arr = []; for(let i of pubKeyCred) arr.push(publicKeyCredentialToJSON(i)); return arr } if(pubKeyCred instanceof ArrayBuffer) { return base64url.encode(pubKeyCred) } if(pubKeyCred instanceof Object) { let obj = {}; for (let key in pubKeyCred) { obj[key] = publicKeyCredentialToJSON(pubKeyCred[key]); } return obj } return pubKeyCred }以下の部分は、環境に合わせて書き換えてください。
・【サーバのURL】fido2-lib の修正
下記に示すように、fido2-libの実装をいじらないとうまく動きませんでした。
lib/validator.js// 172行目あたり // 変更前 if (typeof req.response.userHandle !== "string" && !(req.response.userHandle instanceof ArrayBuffer) && req.response.userHandle != null && req.response.userHandle !== undefined) { throw new TypeError("expected 'response.userHandle' to be base64 String, ArrayBuffer, or undefined"); } // 変更後 if (typeof req.response.userHandle !== "string" && !(req.response.userHandle instanceof ArrayBuffer) && // modified by poruruba req.response.userHandle != null && req.response.userHandle !== undefined) { throw new TypeError("expected 'response.userHandle' to be base64 String, ArrayBuffer, or undefined"); }lib/utils.js// 183行目あたり // 変更前 function bufEqual(a, b) { var len = a.length; if (len !== b.length) { return false; } for (var i = 0; i < len; i++) { if (a.readUInt8(i) !== b.readUInt8(i)) { return false; } } return true; } // 変更後 function bufEqual(a, b) { // modified by poruruba if (!(a instanceof ArrayBuffer && b instanceof ArrayBuffer)) { throw new Error("expected bufEqual to be of type ArrayBuffer"); } var len = a.byteLength; if (len !== b.byteLength) { return false; } for (var i = 0; i < len; i++) { if (a[i] !== b[i]) { return false; } } return true; }lib/parser.js// 249行目あたり // 変更前 let userHandle; if (msg.response.userHandle !== undefined) { userHandle = coerceToArrayBuffer(msg.response.userHandle, "response.userHandle"); if (userHandle.byteLength === 0) { userHandle = undefined; } } let sigAb = coerceToArrayBuffer(msg.response.signature, "response.signature"); let ret = new Map([ ["sig", sigAb], ["userHandle", userHandle], ["rawAuthnrData", msg.response.authenticatorData], ...parseAuthenticatorData(msg.response.authenticatorData) ]); // 変更後 let userHandle; // modified by poruruba // if (msg.response.userHandle !== undefined) { if (msg.response.userHandle !== undefined && msg.response.userHandle !== null) { userHandle = coerceToArrayBuffer(msg.response.userHandle, "response.userHandle"); if (userHandle.byteLength === 0) { userHandle = undefined; } } let sigAb = coerceToArrayBuffer(msg.response.signature, "response.signature"); let ret = new Map([ ["sig", sigAb], ["userHandle", userHandle], // modified by poruruba // ["rawAuthnrData", msg.response.authenticatorData], ["rawAuthnrData", coerceToArrayBuffer(msg.response.authenticatorData, "authnrDataArrayBuffer")], ...parseAuthenticatorData(msg.response.authenticatorData) ]);動作確認
Windows10のChromeブラウザで実施してみました。
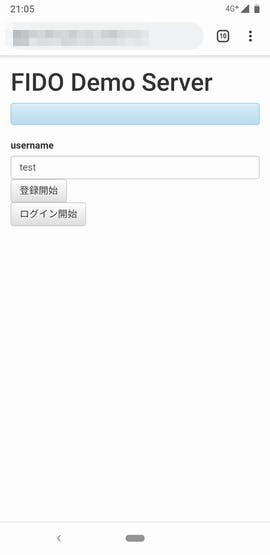
以下は、TitanセキュリティキーをUSB端子に挿した場合です。index.htmlを開きます。
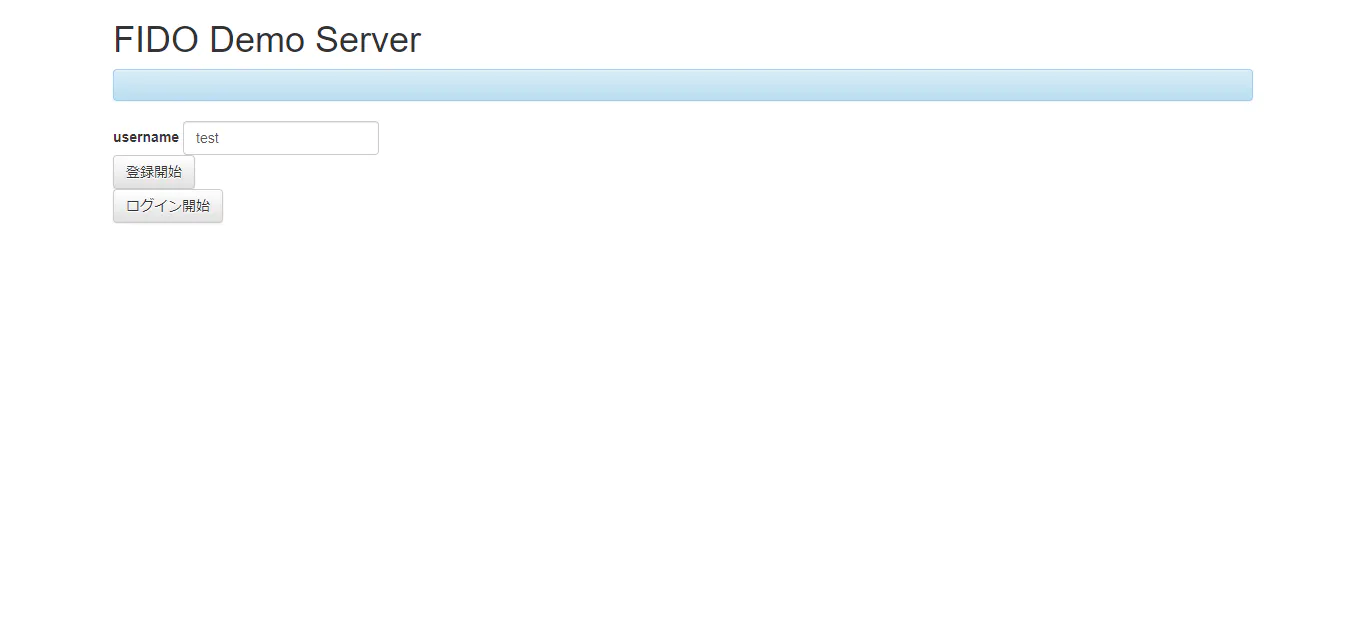
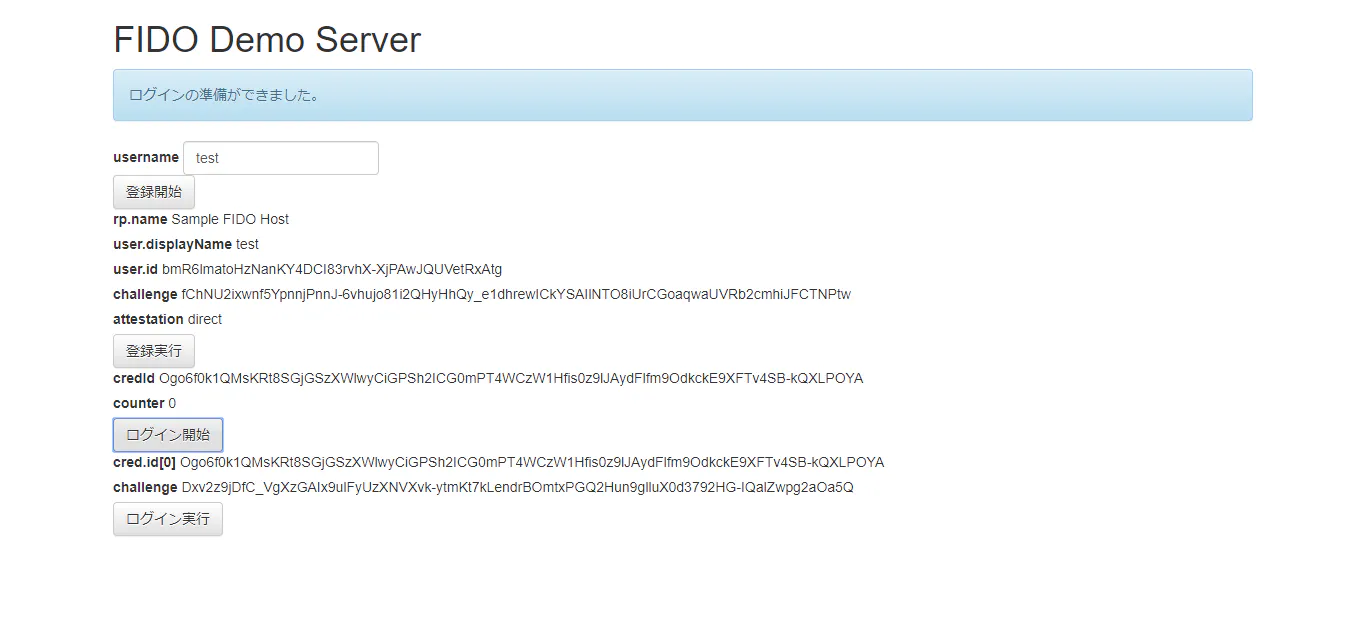
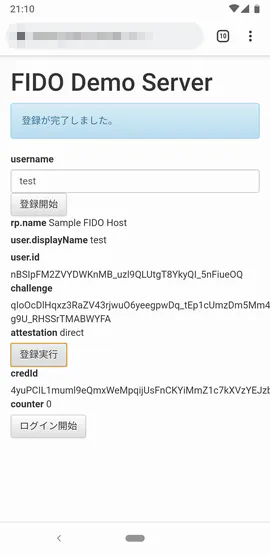
usernameに適当なユーザ名を入力して、「登録開始」ボタンを押下します。
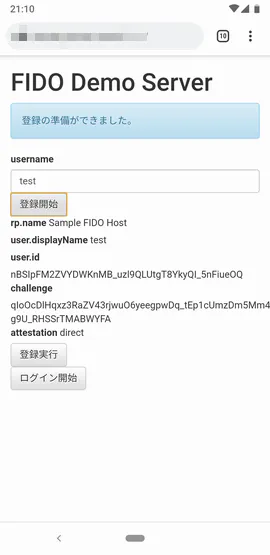
以下が表示されます。
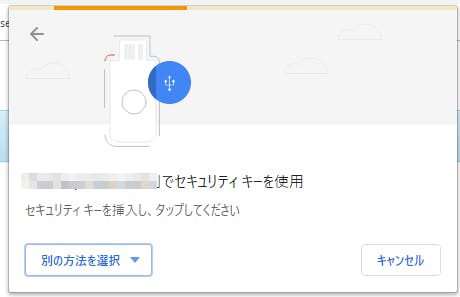
Titanセキュリティキーも表面の金属のところを指で触ります。
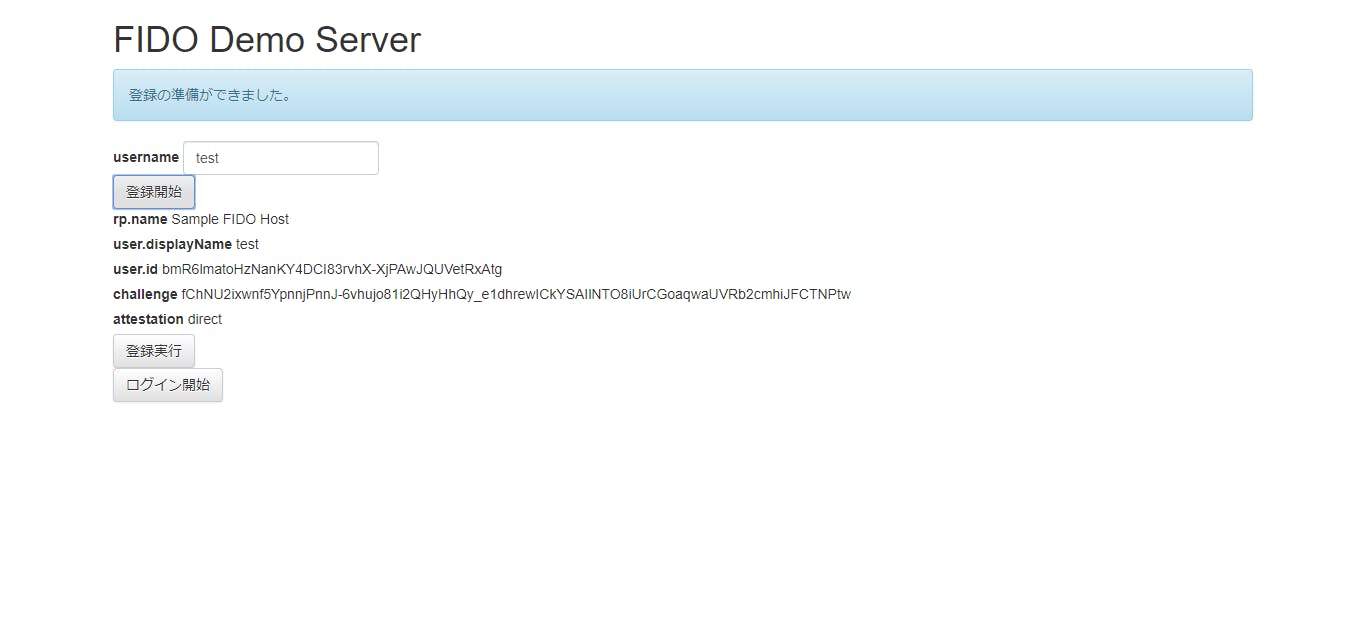
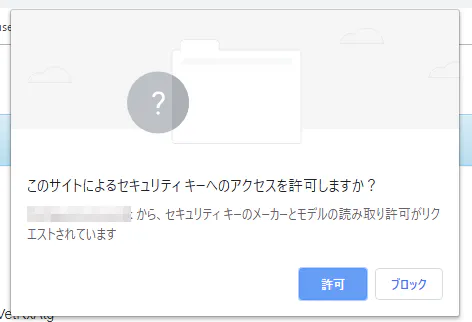
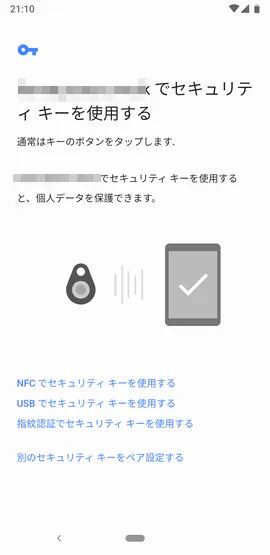
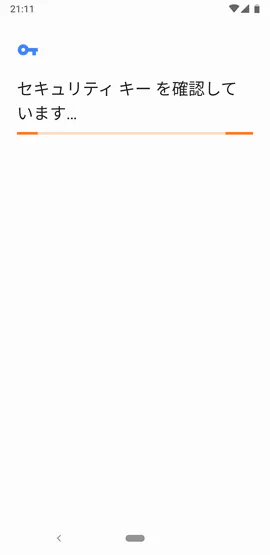
以下が表示されますので、「許可」ボタンを押下して進めます。
これで登録完了です。
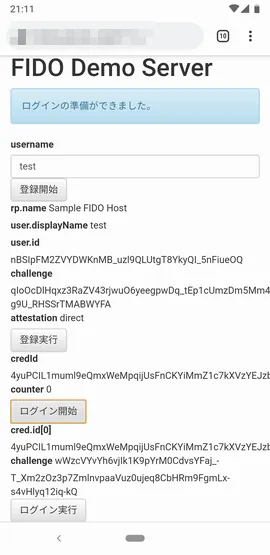
さあログインしましょう。
「ログイン開始」ボタンを押下すると、以下のようになります。
そして、「ログイン実行」ボタンを押下します。
登録時と同様に、Titanセキュリティキーも表面の金属のところを指で触ります。
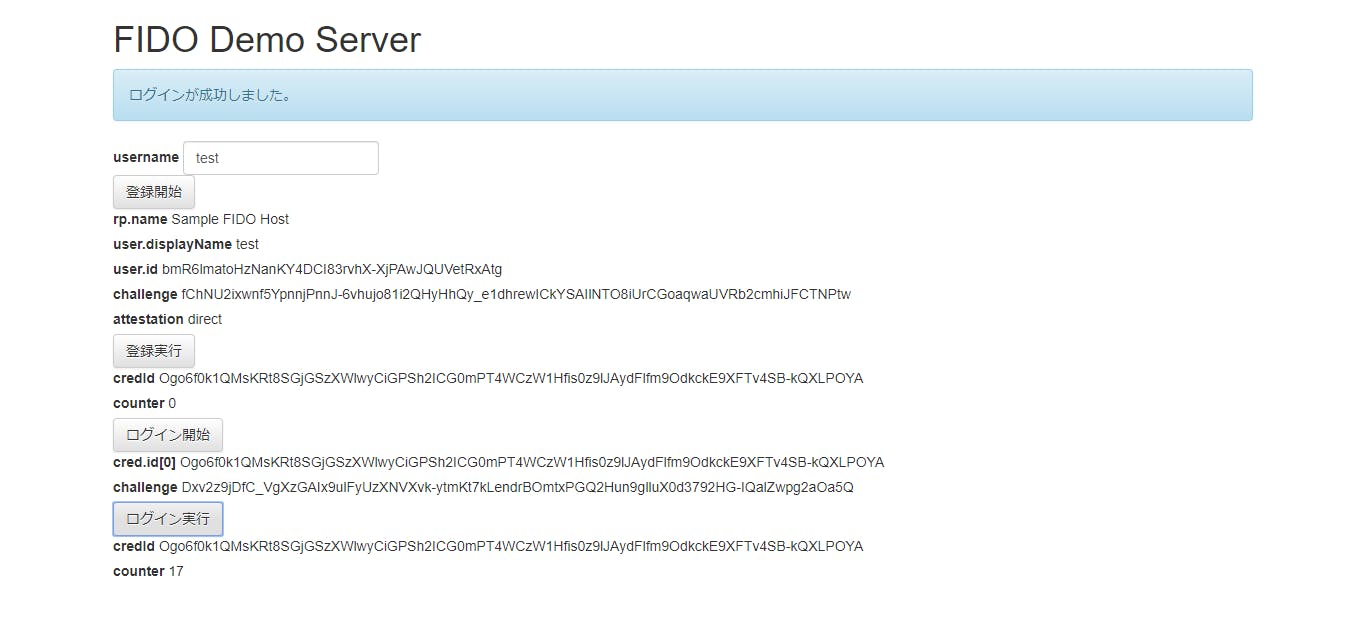
以下のように表示されて、ログイン完了です。
Androidでもやってみます。
こちらはBLEでやってみました。事前に、BLEデバイスとしてペアリングしておく必要があるようです。
ペアリングは、デバイスのボタンを5秒間長押しするとペアリングが開始されます。それでは、始めましょう。AndroidのChromeからindnex.htmlを開きます。
「登録開始」ボタンを押下します。
「登録実行」ボタンを押下します。
デバイスにあるボタンを押します。
登録完了です。
次はログインです。
「ログイン開始」ボタンを押下すると以下の画面になります。
「ログイン実行」ボタンを押下します。
デバイスにあるボタンを押します。
ログインできました!
制限事項
・WindowsでBLEを使って認証しようとしましたが、うまくいきませんでした。原因不明です。
以上


- 投稿日:2019-08-16T21:51:22+09:00
WebAuthnを使ったFIDOサーバを立ててみた
Googleから最近になって、FIDO認証デバイスの「Titanセキュリティーキー」が発売されたので、購入しました。
[Google Titanセキュリティーキー]
https://store.google.com/jp/product/titan_security_key_kit今のところ、はやっていそうですし、せっかくなのでこれを使って遊んでいきたいと思います。
Titanセキュリティーキーがあれば、Webサーバから見てユーザID/パスワードで認証するのではなく、Titanセキュリティーキーのデバイスを認証してくれます。公開鍵をベースとしているそうです。
また、Titanセキュリティーキーには、USBに加えて、NFCとBLEの接続方法があるので、直接PCに挿さなくとも、デバイス認証してくれます。ということで、今回は、王道のFIDOサーバを立ち上げます。
FIDOの全体像を知る
以下のサイトの記事が非常に参考になりました。
https://techblog.yahoo.co.jp/advent-calendar-2018/webauthn/それから、以下のチュートリアルも非常に参考になりました。
https://github.com/fido-alliance/webauthn-demoこれがWebAuthn
https://w3c.github.io/webauthn/頭が混乱してきたら、以下のページで再整理しましょう。
Web Authentication API の裏側と、なぜそうなっているのかを図解したサーバ側に必要なエンドポイントを知る
サーバ側に必要なエンドポイントは以下の4つです。
- POST /attestation/options
- POST /attestation/result
- POST /assertion/options
- POST /assertion/result
(参考) ただし、一部未対応。
https://fidoalliance.org/specs/fido-v2.0-rd-20180702/fido-server-v2.0-rd-20180702.html詳細はよくわからないのですが、以下のnpmモジュールを使わせてもらうことで、実装量をかなり省けました。(ありがとうございます!)
fido2-lib
https://github.com/apowers313/fido2-libエンドポイントに対応する関数が定義されていますので、それを呼び出せるように、エンドポイントへの入力パラメータを整理して呼び出します。
対応関係は以下の通りです。
- /attestation/options → f2l.attestationOptions()
- /attestation/result → f2l.attestationResult()
- /assertion/options → f2l.assertionOptions()
- /assertion/result → f2l.assertionResult()
ここで一つややこしいことがありまして、クライアントサーバ間のバイナリデータの受け渡しは、BASE64URLでエンコードするのが通例のようでして、エンドポイントからの入力と関数呼び出しの間、関数戻りからエンドポイントからの出力の間のそれぞれで、エンコード/デコードする必要があります。
さらにややこしいのが、一部fido2-libがエンコード/デコードを処理してなさそうに見えて、一部処理していたりで、ちょっと混乱しました。
後で示しますが、(頑張って理解しようとしたのですが)不具合と思われる個所を修正して、やっと動かすことができました。BASE64URLとは、Base64エンコードに対して、Webで扱いやすいように、「+」を「-」に、「/」を「_」に置き換えたもののようです。
以下のnpmモジュールを使わせていただきました。base64url
https://github.com/brianloveswords/base64urlユーザIDとデバイスの紐づけ
サーバ側から見てデバイスを認証できますが、そのデバイスの持ち主がどのユーザIDの人なのかはわからないので、紐づけが必要となります。
ですので、通常は、ユーザID/パスワードで認証したのち、デバイスで生成した公開鍵をユーザIDに紐づけます。こうすることで、デバイスを認証したこと=ユーザIDのユーザがログインした、ということになります。
一般に、/attestation/options のところで本人認証をしてから、デバイスの登録処理を進めるのですが、今回のデモサーバでは、ユーザID/パスワードの認証は省略しています。クライアント側の呼び出し関数
Client側は、ブラウザを使いました。
かなり実装が進んでいるようで、やはりChromeは対応していました。以下の2つの関数を呼び出します。
・navigator.credentials.create()
・navigator.credentials.get()まとめると、以下の順番になります。
[デバイスの登録]
・POST /attestation/options
・navigator.credentials.create()
・POST /attestation/result[デバイスでログイン]
・POST /assertion/options
・navigator.credentials.get()
・POST /assertion/resultちょっと補足します。
・POST /attestation/options
デバイスに紐づけたいユーザ名を知らせます。本来であれば、パスワードや認証後のセッションを渡して、ユーザ本人であることを示すのが正しいですが、省略しています。
レスポンスとして、チャレンジが返ってきます。・navigator.credentials.create()
デバイス内部で、公開鍵ペアを生成し、チャレンジに対して署名を付与します。
レスポンスとして、公開鍵値、署名値、公開鍵を識別するIDが返ってきます。・POST /attestation/result
デバイスから取得したレスポンスをサーバに登録します。
サーバでは、署名検証し、公開鍵・公開鍵を識別するID(credId)などを、ユーザ名に紐づけて保持することで登録完了です。・POST /assertion/options
ユーザ名を入力とし、サーバに保持しているユーザ名を検索します。
そして、ユーザ名に紐づけたcredIdを取り出し、またチャレンジを生成して、クライアントに返します。複数のデバイスが紐づけられている可能性もあるので、credIdは複数の場合があります。・navigator.credentials.get()
デバイスに署名生成を要求します。生成に使う公開鍵は、サーバから取得したcredIdで指定します。
レスポンスとして署名に使った公開鍵のIDと署名値が返ってきます。・POST /assertion/result
署名に使った公開鍵のIDでcredIdを特定し、署名を検証します。上記以外にも、細かいチェック処理が入っています。
ソースコード
ソースコード量が多いので、GitHubに上げておきました。
https://github.com/poruruba/fido_serverまずはサーバ部分です。
index.js'use strict'; const HELPER_BASE = process.env.HELPER_BASE || '../../helpers/'; const Response = require(HELPER_BASE + 'response'); const Redirect = require(HELPER_BASE + 'redirect'); const base64url = require('base64url'); const crypto = require('crypto'); const { Fido2Lib } = require("fido2-lib"); const FIDO_RP_NAME = process.env.FIDO_RP_NAME || "Sample FIDO Host"; const FIDO_ORIGIN = process.env.FIDO_ORIGIN || "https://localhost"; var f2l = new Fido2Lib({ rpName: FIDO_RP_NAME }); let database = {}; exports.handler = async (event, context, callback) => { if( event.path == '/assertion/options'){ var body = JSON.parse(event.body); console.log(body); let username = body.username; if(database[username] && !database[username].registered) { return new Response({ 'status': 'failed', 'message': `Username ${username} does not exist` }); } var authnOptions = await f2l.assertionOptions(); authnOptions.challenge = base64url.encode(authnOptions.challenge); let allowCredentials = []; for(let authr of database[username].attestation) { allowCredentials.push({ type: 'public-key', id: authr.credId, transports: ['usb', 'nfc', 'ble'] }) } authnOptions.allowCredentials = allowCredentials; console.log(authnOptions); context.req.session.challenge = authnOptions.challenge; context.req.session.username = username; authnOptions.status = 'ok'; return new Response(authnOptions); }else if( event.path == '/assertion/result'){ var body = JSON.parse(event.body); console.log(body); var attestation = null; for( var i = 0 ; i < database[context.req.session.username].attestation.length ; i++ ){ if( database[context.req.session.username].attestation[i].credId == body.id ){ attestation = database[context.req.session.username].attestation[i]; break; } } if( !attestation ){ return new Response({ 'status': 'failed', 'message': 'key is not found.' }); } var assertionExpectations = { challenge: context.req.session.challenge, origin: FIDO_ORIGIN, factor: "either", publicKey: attestation.publickey, prevCounter: attestation.counter, userHandle: null }; body.rawId = new Uint8Array(base64url.toBuffer(body.rawId)).buffer; var authnResult = await f2l.assertionResult(body, assertionExpectations); console.log(authnResult); if(authnResult.audit.complete) { attestation.counter = authnResult.authnrData.get('counter'); return new Response({ 'status': 'ok', credId: body.id, counter: attestation.counter }); } else { return new Response({ 'status': 'failed', 'message': 'Can not authenticate signature!' }); } }else if( event.path == '/attestation/options'){ var body = JSON.parse(event.body); console.log(body); let username = body.username; if(database[username] && database[username].registered) { return new Response({ 'status': 'failed', 'message': `Username ${username} already exists` }); } var id = randomBase64URLBuffer(); var registrationOptions = await f2l.attestationOptions(); registrationOptions.challenge = base64url.encode(registrationOptions.challenge); registrationOptions.user.id = id; registrationOptions.user.name = username; registrationOptions.user.displayName = username; console.log(registrationOptions); database[username] = { 'name': username, 'registered': false, 'id': id, 'attestation': [] }; context.req.session.challenge = registrationOptions.challenge; context.req.session.username = username; registrationOptions.status = 'ok'; return new Response(registrationOptions); }else if( event.path == '/attestation/result'){ var body = JSON.parse(event.body); console.log(body); var attestationExpectations = { challenge: context.req.session.challenge, origin: FIDO_ORIGIN, factor: "either" }; body.rawId = new Uint8Array(base64url.toBuffer(body.rawId)).buffer; var regResult = await f2l.attestationResult(body, attestationExpectations); console.log(regResult); var credId = base64url.encode(regResult.authnrData.get('credId')); var counter = regResult.authnrData.get('counter'); database[context.req.session.username].attestation.push({ publickey : regResult.authnrData.get('credentialPublicKeyPem'), counter : counter, fmt: regResult.authnrData.get('fmt'), credId : credId }); if(regResult.audit.complete) { database[context.req.session.username].registered = true return new Response({ 'status': 'ok', credId: credId, counter: counter }); } else { return new Response({ 'status': 'failed', 'message': 'Can not authenticate signature!' }); } } }; function randomBase64URLBuffer(len){ len = len || 32; let buff = crypto.randomBytes(len); return base64url(buff); }以下の部分は、環境に合わせて、変更してください。
・process.env.FIDO_RP_NAME
・process.env.FIDO_ORIGIN次は、クライアント側ソースです。
Base64URLエンコードには以下のモジュールを使わせていただきました。Base64URL-ArrayBuffer
https://github.com/herrjemand/Base64URL-ArrayBufferHTMLは以下の通りです。
index.html<!DOCTYPE html> <html lang="ja"> <head> <meta http-equiv="Content-Type" content="text/html; charset=utf-8" /> <meta http-equiv="Content-Security-Policy" content="default-src * data: gap: https://ssl.gstatic.com 'unsafe-eval' 'unsafe-inline'; style-src * 'unsafe-inline'; media-src *; img-src * data: content: blob:;"> <meta name="format-detection" content="telephone=no"> <meta name="msapplication-tap-highlight" content="no"> <meta name="apple-mobile-web-app-capable" content="yes" /> <meta name="viewport" content="user-scalable=no, initial-scale=1, maximum-scale=1, minimum-scale=1, width=device-width"> <!-- jQuery (necessary for Bootstrap's JavaScript plugins) --> <script src="https://ajax.googleapis.com/ajax/libs/jquery/1.12.4/jquery.min.js"></script> <!-- Latest compiled and minified CSS --> <link rel="stylesheet" href="https://maxcdn.bootstrapcdn.com/bootstrap/3.3.7/css/bootstrap.min.css" integrity="sha384-BVYiiSIFeK1dGmJRAkycuHAHRg32OmUcww7on3RYdg4Va+PmSTsz/K68vbdEjh4u" crossorigin="anonymous"> <!-- Optional theme --> <link rel="stylesheet" href="https://maxcdn.bootstrapcdn.com/bootstrap/3.3.7/css/bootstrap-theme.min.css" integrity="sha384-rHyoN1iRsVXV4nD0JutlnGaslCJuC7uwjduW9SVrLvRYooPp2bWYgmgJQIXwl/Sp" crossorigin="anonymous"> <!-- Latest compiled and minified JavaScript --> <script src="https://maxcdn.bootstrapcdn.com/bootstrap/3.3.7/js/bootstrap.min.js" integrity="sha384-Tc5IQib027qvyjSMfHjOMaLkfuWVxZxUPnCJA7l2mCWNIpG9mGCD8wGNIcPD7Txa" crossorigin="anonymous"></script> <title>FIDO Demo Server</title> <script src="js/methods_utils.js"></script> <script src="js/vue_utils.js"></script> <script src="dist/js/vconsole.min.js"></script> <script src="https://cdn.jsdelivr.net/npm/js-cookie@2/src/js.cookie.min.js"></script> <script src="https://unpkg.com/vue"></script> </head> <body> <div id="top" class="container"> <h1>FIDO Demo Server</h1> <div class="alert alert-info" role="alert">{{message}}</div> <div class="form-inline"> <label>username</label> <input type="text" class="form-control" v-model="username"> </div> <button class="btn btn-default" v-on:click="start_register()">登録開始</button> <div v-if="attestation != null"> <label>rp.name</label> {{attestation.rp.name}}<br> <label>user.displayName</label> {{attestation.user.displayName}}<br> <label>user.id</label> {{attestation_encode.user.id}}<br> <label>challenge</label> {{attestation_encode.challenge}}<br> <label>attestation</label> {{attestation.attestation}}<br> <button class="btn btn-default" v-on:click="do_register()">登録実行</button> </div> <div> <div v-if="registered"> <label>credId</label> {{register_credId}}<br> <label>counter</label> {{register_counter}}<br> </div> <button class="btn btn-default" v-on:click="start_login()">ログイン開始</button> </div> <div v-if="assertion != null"> <div v-for="(cred, index) of assertion_encode.allowCredentials"> <label>cred.id[{{index}}]</label> {{cred.id}}<br> </div> <label>challenge</label> {{assertion_encode.challenge}}<br> <button class="btn btn-default" v-on:click="do_login()">ログイン実行</button> </div> <div v-if="logined"> <label>credId</label> {{login_credId}}<br> <label>counter</label> {{login_counter}}<br> </div> <div class="modal fade" id="progress"> <div class="modal-dialog"> <div class="modal-content"> <div class="modal-header"> <h4 class="modal-title">{{progress_title}}</h4> </div> <div class="modal-body"> <center><progress max="100" /></center> </div> </div> </div> </div> </div> <script src="dist/js/base64url-arraybuffer.js"></script> <script src="js/start.js"></script> </body>Javascript部分です。
start.js'use strict'; //var vConsole = new VConsole(); const base_url = "【サーバのURL】"; var vue_options = { el: "#top", data: { progress_title: '', message: "", username: 'test', attestation : null, attestation_encode: { user: {} }, register_credId: null, register_counter: -1, registered : false, assertion : null, assertion_encode: { allowCredentials: [] }, login_credId: null, login_counter: -1, logined : false }, computed: { }, methods: { start_register: function(){ this.registered = false; var param = { username: this.username, userVerification: true }; this.progress_open(); do_post( base_url + '/attestation/options', param ) .then(json =>{ this.progress_close(); console.log(json); if( json.status != 'ok'){ alert(json.message); return; } this.attestation_encode.challenge = json.challenge; this.attestation_encode.user.id = json.user.id; json.challenge = base64url.decode(json.challenge); json.user.id = base64url.decode(json.user.id); this.attestation = json; this.message = '登録の準備ができました。'; }) .catch(error =>{ this.progress_close(); alert(error); }); }, do_register: function(){ return navigator.credentials.create({ publicKey: this.attestation }) .then(response =>{ var result = publicKeyCredentialToJSON(response); this.progress_open(); return do_post(base_url + '/attestation/result', result ) }) .then((response) => { this.progress_close(); if(response.status !== 'ok'){ alert(json.message); return; } if( response.status == 'ok'){ this.register_credId = response.credId; this.register_counter = response.counter; this.registered = true; this.message = '登録が完了しました。'; }else{ throw 'registration error'; } }) .catch(error =>{ this.progress_close(); alert(error); }); }, start_login: function(){ this.logined = false; var param = { username: this.username, }; this.progress_open(); do_post( base_url + '/assertion/options', param ) .then(json =>{ this.progress_close(); console.log(json); if( json.status != 'ok'){ alert(json.message); return; } this.assertion_encode.challenge = json.challenge; json.challenge = base64url.decode(json.challenge); for(var i = 0 ; i < json.allowCredentials.length ; i++ ) { this.assertion_encode.allowCredentials[i] = { id: json.allowCredentials[i].id }; json.allowCredentials[i].id = base64url.decode(json.allowCredentials[i].id); } this.assertion = json; this.message = 'ログインの準備ができました。'; }) .catch(error =>{ this.progress_close(); alert(error); }); }, do_login: function(){ return navigator.credentials.get({ publicKey: this.assertion }) .then(response =>{ var result = publicKeyCredentialToJSON(response); this.progress_open(); return do_post(base_url + '/assertion/result', result ) }) .then((response) => { this.progress_close(); if(response.status !== 'ok') throw new Error(`Server responed with error. The message is: ${response.message}`); console.log('sendWebAuthnResponse received: ', response); if( response.status == 'ok'){ this.login_credId = response.credId; this.login_counter = response.counter; this.logined = true; this.message = 'ログインが成功しました。'; }else{ throw 'login error'; } }) .catch(error =>{ this.progress_close(); alert(error); }); } }, created: function(){ }, mounted: function(){ proc_load(); } }; vue_add_methods(vue_options, methods_utils); var vue = new Vue( vue_options ); function do_post(url, body){ // const headers = new Headers( { "Content-Type" : "application/json; charset=utf-8" } ); const headers = new Headers( { "Content-Type" : "application/json" } ); return fetch(url, { method : 'POST', credentials: 'include', body : JSON.stringify(body), headers: headers }) .then((response) => { if( !response.ok ) throw 'status is not 200.'; return response.json(); }); } function publicKeyCredentialToJSON(pubKeyCred){ if(pubKeyCred instanceof Array) { let arr = []; for(let i of pubKeyCred) arr.push(publicKeyCredentialToJSON(i)); return arr } if(pubKeyCred instanceof ArrayBuffer) { return base64url.encode(pubKeyCred) } if(pubKeyCred instanceof Object) { let obj = {}; for (let key in pubKeyCred) { obj[key] = publicKeyCredentialToJSON(pubKeyCred[key]); } return obj } return pubKeyCred }以下の部分は、環境に合わせて書き換えてください。
・【サーバのURL】fido2-lib の修正
下記に示すように、fido2-libの実装をいじらないとうまく動きませんでした。
lib/validator.js// 172行目あたり // 変更前 if (typeof req.response.userHandle !== "string" && !(req.response.userHandle instanceof ArrayBuffer) && req.response.userHandle !== undefined) { throw new TypeError("expected 'response.userHandle' to be base64 String, ArrayBuffer, or undefined"); } // 変更後 if (typeof req.response.userHandle !== "string" && !(req.response.userHandle instanceof ArrayBuffer) && // modified by poruruba req.response.userHandle != null && req.response.userHandle !== undefined) { throw new TypeError("expected 'response.userHandle' to be base64 String, ArrayBuffer, or undefined"); }lib/utils.js// 183行目あたり // 変更前 function bufEqual(a, b) { var len = a.length; if (len !== b.length) { return false; } for (var i = 0; i < len; i++) { if (a.readUInt8(i) !== b.readUInt8(i)) { return false; } } return true; } // 変更後 function bufEqual(a, b) { // modified by poruruba if (!(a instanceof ArrayBuffer && b instanceof ArrayBuffer)) { throw new Error("expected bufEqual to be of type ArrayBuffer"); } var len = a.byteLength; if (len !== b.byteLength) { return false; } for (var i = 0; i < len; i++) { if (a[i] !== b[i]) { return false; } } return true; }lib/parser.js// 249行目あたり // 変更前 let userHandle; if (msg.response.userHandle !== undefined) { userHandle = coerceToArrayBuffer(msg.response.userHandle, "response.userHandle"); if (userHandle.byteLength === 0) { userHandle = undefined; } } let sigAb = coerceToArrayBuffer(msg.response.signature, "response.signature"); let ret = new Map([ ["sig", sigAb], ["userHandle", userHandle], ["rawAuthnrData", msg.response.authenticatorData], ...parseAuthenticatorData(msg.response.authenticatorData) ]); // 変更後 let userHandle; // modified by poruruba // if (msg.response.userHandle !== undefined) { if (msg.response.userHandle !== undefined && msg.response.userHandle !== null) { userHandle = coerceToArrayBuffer(msg.response.userHandle, "response.userHandle"); if (userHandle.byteLength === 0) { userHandle = undefined; } } let sigAb = coerceToArrayBuffer(msg.response.signature, "response.signature"); let ret = new Map([ ["sig", sigAb], ["userHandle", userHandle], // modified by poruruba // ["rawAuthnrData", msg.response.authenticatorData], ["rawAuthnrData", coerceToArrayBuffer(msg.response.authenticatorData, "authnrDataArrayBuffer")], ...parseAuthenticatorData(msg.response.authenticatorData) ]);動作確認
Windows10のChromeブラウザで実施してみました。
以下は、TitanセキュリティキーをUSB端子に挿した場合です。index.htmlを開きます。
usernameに適当なユーザ名を入力して、「登録開始」ボタンを押下します。
「登録開始」ボタンを押下すると、以下が表示されます。
Titanセキュリティキーの表面の金属のところを指で触ります。
以下が表示されますので、「許可」ボタンを押下して進めます。
これで登録完了です。
さあログインしましょう。
「ログイン開始」ボタンを押下すると、以下のようになります。
そして、「ログイン実行」ボタンを押下します。
登録時と同様に、Titanセキュリティキーの表面の金属のところを指で触ります。
以下のように表示されて、ログイン完了です。
Androidでもやってみます。
こちらはBLEでやってみました。NFCでも似たような感じでした。事前に、BLEデバイスとしてペアリングしておく必要があるようです。
ペアリングは、デバイスのボタンを5秒間長押しするとペアリングが開始されます。それでは、始めましょう。AndroidのChromeからindnex.htmlを開きます。
「登録開始」ボタンを押下します。
「登録実行」ボタンを押下します。
デバイスにあるボタンを押します。
登録完了です。
次はログインです。
「ログイン開始」ボタンを押下すると以下の画面になります。
「ログイン実行」ボタンを押下します。
デバイスにあるボタンを押します。
ログインできました!
制限事項
・WindowsでBLEを使って認証しようとしましたが、うまくいきませんでした。原因不明です。
・https://github.com/apowers313/fido2-lib をみたら、Androidの指紋認証Attestationが実装されているではないかっ!以上
- 投稿日:2019-08-16T19:17:38+09:00
QualityForwardのAPIを操作するNode.jsライブラリ
QualityForwardはテスト管理クラウドサービスです。ExcelやGoogleスプレッドシートような一覧形式でテストを一括作成したり、APIから操作もできます。APIはRESTfulなものでシンプルな作りですが、直接URLを叩くような使い方は殆どしないでしょう。
そこで少しでも使いやすくするためにNode.jsライブラリを作り始めました。まだテストスイートの操作しかできませんが、紹介します。
リポジトリ
リポジトリは以下のURLです。ライセンスはMIT Licenseとなっています。
使い方
まず初期化します。APIキーで初期化します。
import { QualityForward, TestSuite} from 'qualityforward-node';
const client = new QualityForward(API_KEY);
テストスイート取得
TypeScriptで書いています。JavaScriptで利用も可能です。
const testSuites: TestSuite[] = await client.getTestSuites();
const testSuite: TestSuite = testSuites[0];
テストスイート作成、更新
作成と更新は同じsaveメソッドです。
const testSuite: TestSuite = client.TestSuite();
testSuite.name = 'Test suite name';
if (await testSuite.save()) {
  // 作成成功
} else {
  // 作成失敗
}

testSuite.name = '新しいテストツイート名';
if (await testSuite.save()) {
  // 更新成功
} else {
  // 更新失敗
}
テストスイート削除
if (await testSuite.destroy()) {
  // 削除成功
} else {
  // 削除失敗
}
まとめ
ライブラリがあれば、外部システムとの連携であったり、社内データ連係も簡単になるはずです。ぜひお試しください。
- 投稿日:2019-08-16T18:50:18+09:00
Node.jsとExpressで簡単なAPI作成、UIでデータ操作
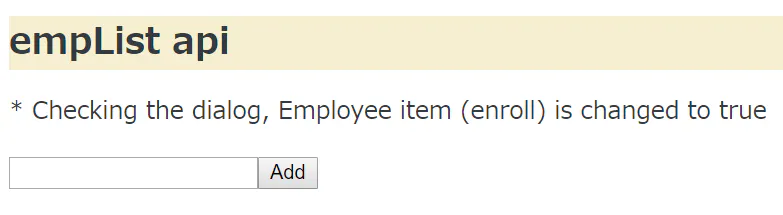
APIを利用することはよくありますが、作成することがあまりないため、Node.js + Expressで従業員名のリストを表示するAPIを作成しました。
またリストをUIで追加・削除する機能や、在籍している従業員のダイアログにチェックを入れることで、enroll(登録)の項目をTrueにする機能も備えます。
※イメージ
今回ほとんどこちらの記事を参考にしました。
https://sbfl.net/blog/2018/08/25/nodejs-express-webapi/#APInode.jsの実行環境は既に用意されているものとします。
Expressセットアップ
Node.jsの有名なフレームワークである、Expressを使います。
ディレクトリ作成
$ mkdir new_api
$ cd new_api/
プロジェクトを初期化
$ npm init
expressインストール
npm install --save express
Web APIの作成(index.js)
API作成のためindex.jsというファイル名でnew_apiディレクトリに記載・保存します。
// Load each module
const express = require('express');
const multer = require('multer');
const uuidv4 = require('uuid/v4');

// Create instance
const app = express();
// Interpreting browser data with multer
app.use(multer().none());
// Publish contents of 'web' folder
app.use(express.static('web'));

// empList data
const empList = [];

// Return data in json format when accessing http://ServerIP:3000/api/v1/list
app.get('/api/v1/list', (req, res) => {
    res.json(empList);
});

// Add items when sending data to http://ServerIP:3000/api/v1/add
app.post('/api/v1/add', (req, res) => {
    const empData = req.body;
    const empTitle = empData.title;
    const id = uuidv4();
    const empItem = {
        id,
        title: empTitle,
        enroll: false
    };
    empList.push(empItem);
    console.log('Add: ' + JSON.stringify(empItem));

    res.json(empItem);
});

// Delete an item when it is sent to http://ServerIP:3000/api/v1/delete
app.delete('/api/v1/item/:id', (req, res) => {
    const index = empList.findIndex((item) => item.id === req.params.id);

    if(index >= 0) {
        const deleted = empList.splice(index, 1);
        console.log('Delete: ' + JSON.stringify(deleted[0]));
    }

    res.sendStatus(200);
});

// When the check mark is checked, enroll item is set to true.
app.put('/api/v1/item/:id', (req, res) => {
    const index = empList.findIndex((item) => item.id === req.params.id);
    if(index >= 0) {
        const item = empList[index];
        if(req.body.enroll) {
            item.enroll = req.body.enroll === 'true';
        }
        console.log('Edit: ' + JSON.stringify(item));
    }

    res.sendStatus(200);
});

// Listen
app.listen(3000, () => console.log('Listening on port 3000'));
コード解説(index.js)
簡単に何が記載されているか説明します。
・expressモジュールだけでなく、ブラウザによるデータ操作のためにmulter、uuidモジュールも読み込んでします。
・app.use(express.static('web')); は「"web"というディレクトリにあるコンテンツを読み込んでください」という指示です。
・http://ServerIP:3000/api/v1/list と指定すると従業員リストを表示します。
※WebAPIは一般的に/api/APIバージョン/機能名の形式をとることが多い。
・res.json(empItem); でJSON形式でデータを返しています。
・app.listen(3000, () => console.log('Listening on port 3000')); でポート3000でListenします。UIの作成(index.html)
index.jsで"web"というディレクトリにあるコンテンツを読み込む記載をしました。
そのためディレクトリを作成します。mkdir webwebディレクトリの中に、index.htmlというファイル名で以下を記載・保存します。
<!DOCTYPE html>
<html lang="ja">
<head>
    <meta http-equiv="content-type"
        content="text/html; charset=UTF-8">
    <title>empList api</title>
    <style>
    body { font-size:12pt; color:#343A41; }
    h1 { font-size:18pt; background-color:#F6EFD1; }
    pre { background-color:#F2F1F3; }
    </style>
</head>
    <h1>empList api</h1>
    <p>* Checking the dialog, Employee item (enroll) is changed to true</p>
    <div>
        <ul id="emp-container"></ul>
        <input id="new-emp-item-title"><button id="new-emp-item-add-button">Add</button>
    </div>

    <script>
        function checkboxListener(event) {
            const checkbox = event.currentTarget;
            const id = checkbox.dataset.id;
            const body = new FormData();
            body.append('enroll', checkbox.checked.toString());

            // Access the API with the DELETE method
            fetch(`./api/v1/item/${id}`, { method: 'PUT', body })
                .then(() => fetchEmpList());
        }

        // Function called when the Delete button is pressed
        function deleteButtonListener(event) {
            const button = event.currentTarget;
            const id = button.dataset.id;

            // Access the API with the DELETE method
            fetch(`./api/v1/item/${id}`, { method: 'DELETE' })
                .then(() => fetchEmpList());
        }
        // Function to draw the emp list
        function renderEmpList(empList) {

            // get id = "emp-container" element
            const empContainer = document.querySelector('#emp-container');

            // Erase all contents of container
            const deleteButtonList = empContainer.querySelectorAll('.delete-button');
            deleteButtonList.forEach((button) => button.removeEventListener('click', deleteButtonListener));
            const checkboxList = empContainer.querySelectorAll('.checkbox');
            checkboxList.forEach((checkbox) => checkbox.removeEventListener('change', checkboxListener));
            empContainer.innerHTML = '';

            // For each element of JSON
            for(const item of empList) {
                const li = document.createElement('li');
                const label = document.createElement('label');
                const checkbox = document.createElement('input');
                checkbox.classList.add('checkbox');
                checkbox.type = 'checkbox';
                checkbox.checked = item.enroll;
                checkbox.dataset.id = item.id;
                checkbox.addEventListener('change', checkboxListener);
                const text = new Text(item.title);
                const deleteButton = document.createElement('button');
                deleteButton.innerText = 'Delete';
                deleteButton.classList.add('delete-button');
                deleteButton.dataset.id = item.id;
                deleteButton.addEventListener('click', deleteButtonListener);
                // Add checkbox, text and delete button to label
                label.appendChild(checkbox);
                label.appendChild(text);
                label.appendChild(deleteButton);
                // Add the previous label to the list element
                li.appendChild(label);
                // Add a list element to a emp list
                empContainer.appendChild(li);
            }
        }

        // Function that draws a emp list from the API
        async function fetchEmpList() {

            // Get JSON from API
            return fetch('./api/v1/list')
                .then((response) => response.json())
                .then((empList) => {
                    renderEmpList(empList);
                })
        }

        // Function to POST a new Emp item to the API
        async function postNewEmpItem(empItem) {

            // Add title text to the transmitted data 'title'
            const body = new FormData();
            body.append('title', empItem.title);

            // Send data to the Web API via POST using the Fetch API
            return fetch('./api/v1/add', {
                method: 'POST',
                body
            }).then((response) => response.json());
        }
        const newEmpItemTitleInput = document.querySelector('#new-emp-item-title');
        const newEmpAddButton = document.querySelector('#new-emp-item-add-button');

        // POST a new Emp item when the Add button is clicked
        newEmpAddButton.addEventListener('click', (event) => {
            const title = newEmpItemTitleInput.value;

            // If title is not empty
            if(title) {

                // Update List
                postNewEmpItem({title}).then((item) => fetchEmpList());
            }
        });

        // Initial data reading
        fetchEmpList();
    </script>
</body>
</html
コード解説(index.html)
基本的に何かのイベント発生時にAPIにアクセスし、リストに反映させています。
実際にブラウザで操作して動きを確認します。まずサーバ起動させます。
node index.jsそしてブラウザで以下表示させます。
http://サーバのIP:3000/
すると以下の画面が表示されます。
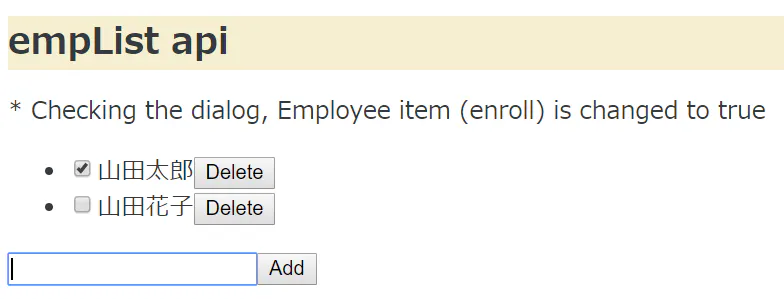
左下に何か入力し「Add」ボタンを追加すると、リストに表示されます。
片方にチェックを入れてみます。
そこでブラウザで以下指定します。
http://サーバのIP:3000/api/v1/list
するとJSON形式でデータが表示されました。チェックを入れたほうのenrollの項目はTrueと表示されています。
ただDBにデータを格納していないため、これだけでは再起動するとデータが消えてしまいます。
EJSのテンプレートを使ったり、MySQLとの接続も試してみたいと思います。


- 投稿日:2019-08-16T16:17:45+09:00
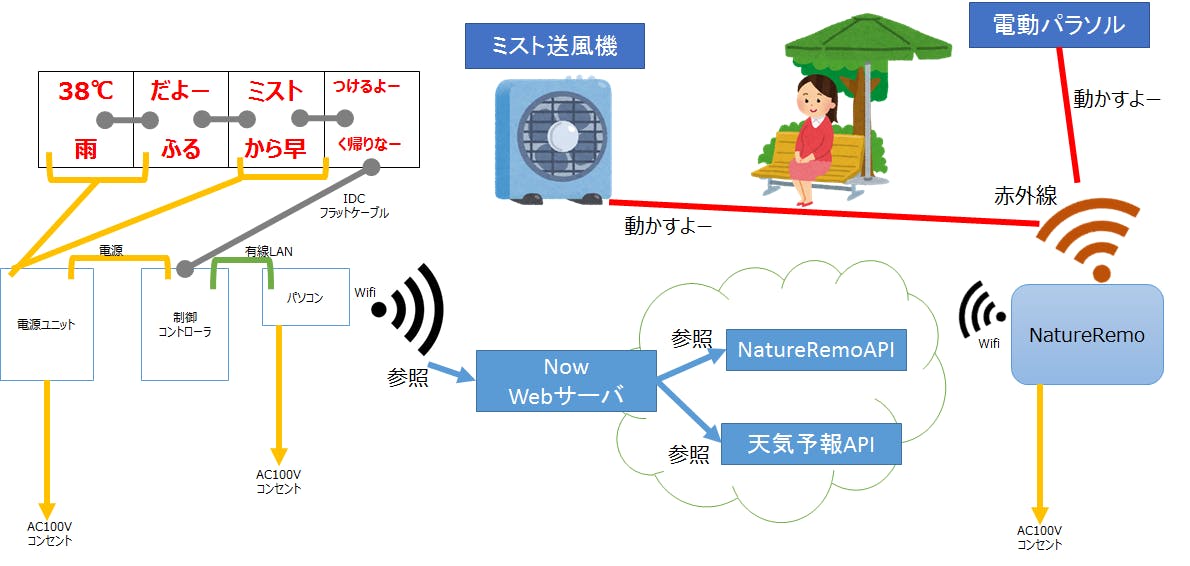
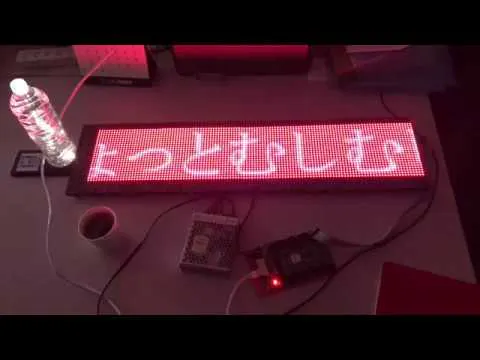
夏の暑さ対策! NatureRemoから取得した温度と湿度、不快指数を電光掲示板で表現してミスト装置や日よけを動かす
概要
不快指数を電光掲示板に表示させて、
不快指数の値からミスト送風機や日よけ、ヒーターを動かすようにする。作ったきっかけ
サービスエリアや公園、公共機関に暑さ対策として、ミスト送風機がたまに置いてあるが、管理の人が手動で電源入れていた。
管理人がいなければミストも動かないので、そこらへんの人の手間をなくしていきたい。
また、天気予報と連動してゲリラ雷雨の注意を電光掲示板で促すことができると良いと思った。概念図(接続イメージ付き)
機能
①NatureRemoから温度・湿度を取得する 済
②取得した温湿度を電光掲示板に表示する 済
③天気予報APIを使用して天候の注意を表示させる 未完成
④不快指数の値によって送風機・ヒーターを動かす 未完成課題
・温度から判定して送風機やヒーターを動かすので安全面で ☓
・室外に設置するため防滴・防水対応が必要使用した部材
操作コントローラ・温度・湿度センサー
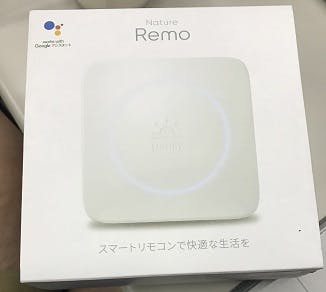
・NatureRemo 税込 10,778円
温度・湿度を捉えることができ、赤外線リモコンの代わりになって操作できるため。購入先:Amazon https://nature.global/
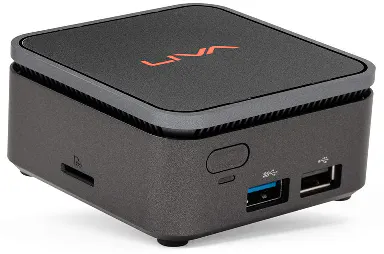
電光掲示板 操作用
小型パソコン LIVA Q2
有線LANポートで電光掲示板コントローラと繋ぐ
NatureRemo側のAPIはインターネット必須のため、無線LANでインターネットに繋げる
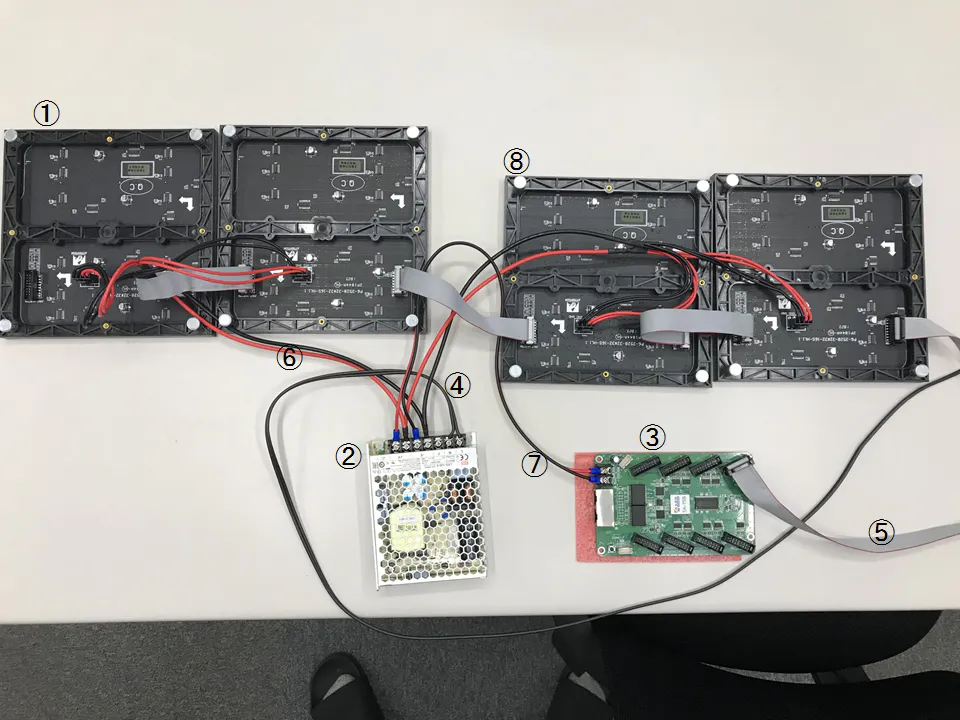
電光掲示板の操作ソフトはWindowsのみ対応電光掲示板
①LEDマトリクスパネル P6 RGB 32×32 4枚 × 4,300円
購入先:akibaピカリ館LED https://www.akiba-led.jp/product/1162②スイッチング電源 MEAN WELL 5V LRSシリーズ LRS100-5 1個 × 3,360円
※配線間違えると危ないので注意すること!
購入先:akibaピカリ館LED https://www.akiba-led.jp/product/1640③LEDマトリクスパネルコントローラー 5A-75 [8052] 1台 × 7,980円
購入先:akibaピカリ館LED https://www.akiba-led.jp/product/1188④プラグ付き電源コード VFF0.75mm2 [6224] 1本 × 390円
購入先:akibaピカリ館LED https://www.akiba-led.jp/product/383⑤IDC フラットケーブル 16P 50cm コネクター付き [6486] 1本
パネル購入すると付属で15cm×4本がついてくる?
購入先:akibaピカリ館LED https://www.akiba-led.jp/product/1201⑥LEDパネル用RGB用電源線2コネクタ お兄さんに聞いたら出してくれた
購入先:akibaピカリ館LED⑦赤黒平行線 これもお兄さんに聞いたら出してくれた
スイッチング電源からコントローラに電源供給する線
購入先:akibaピカリ館LED https://www.akiba-led.jp/product/303⑧LEDパネル取り付け用マグネットボルトM3 × 16個 × 25円
※磁力が強力なのでコントローラには近づけないこと!
購入先:akibaピカリ館LED https://www.akiba-led.jp/product/1197配線
③のLEDマトリクスパネルコントローラーからLANポート経由でパソコンに繋げる
デモ ※クリックするとYoutube
http://www.youtube.com/watch?v=pJDLxknZCiY
元ネタを真似したところ
プログラム側
・Node.js
・デプロイ環境はNowを使用
・NatureRemoAPI
明るさの値も取れるが、今回のテーマとしては使わない。[今後の予定]
・天気予報APIServer.jsconst webClient = require('request'); const express = require('express'); const app = express(); module.exports = (req, res) => { // 室温を取得 webClient.get({ url: "https://api.nature.global/1/devices", headers: { "Authorization": "Bearer [API-KEY]" } }, function(error, response, body){ status=body; const obj = JSON.parse(body); // jsonを分解する処理 function getValue(obj) { if (typeof obj === 'object') { let strValue = ''; let strTemp = obj['newest_events']['te']['val'] let strHu = obj['newest_events']['hu']['val'] let striL = obj['newest_events']['il']['val'] let strFukai =0 let strMessage="しょきち" strValue= '現在の温度:'+obj['newest_events']['te']['val'] + '℃ \n' ; strValue += '湿度:' + obj['newest_events']['hu']['val'] + '% \n ' ; //strValue += '明るさ' + obj['newest_events']['il']['val'] + '\n' ; strFukai=Math.round(0.81 * strTemp + 0.01 * strHu *(0.99*strTemp-14.3)+46.3); if(strFukai<=55){ strMessage="<span style='background-color:#0000ff' color:#ffffff;>寒い!((´д`)) ブルブル…</span>" } else if(strFukai >= 56 && strFukai <=60){ strMessage=" 肌寒いよー" } else if(strFukai >=61 && strFukai <=65){ strMessage=" いい感じの気候(*′∀`)v" } else if(strFukai >=66 && strFukai <=70){ strMessage=" ちょうどよい~(´∀`~)スズスィー" } else if(strFukai >=71 && strFukai <=75){ strMessage=" まだ我慢できる暑さかなー" } else if(strFukai >=76 && strFukai <=80){ strMessage="<span style='background-color:#ff0000; color:#ffffff;'> ちょっとむしむしするねー</span>" } else if(strFukai >=81 && strFukai <=85){ strMessage="<span style='background-color:#ff0000; color:#ffffff;'> 暑い!水分補給して!</span>" } else if(strFukai>=86){ strMessage="<span style='background-color:#ff0000; color:#ffffff;'> ヤバい!!!!!!!!</span>" }else{ strMessage="<span style='background-color:#ff0000; color:#ffffff;'> あつい!</span>" } strValue +="不快指数:" + strFukai ; strValue += strMessage; return strValue; } else { return obj; } } // 出力結果 console.log(getValue(obj[0])); var strHTML =""; strHTML ="<meta http-equiv='refresh' content='60' > <body bgcolor='#000000' text='#FF9900'><font face='MS P明朝,MS 明朝' size='+2'><Marquee scrollamount='2'>" + getValue(obj[0])+ "</Marquee></font>" res.send(strHTML) }); }

- 投稿日:2019-08-16T15:59:39+09:00
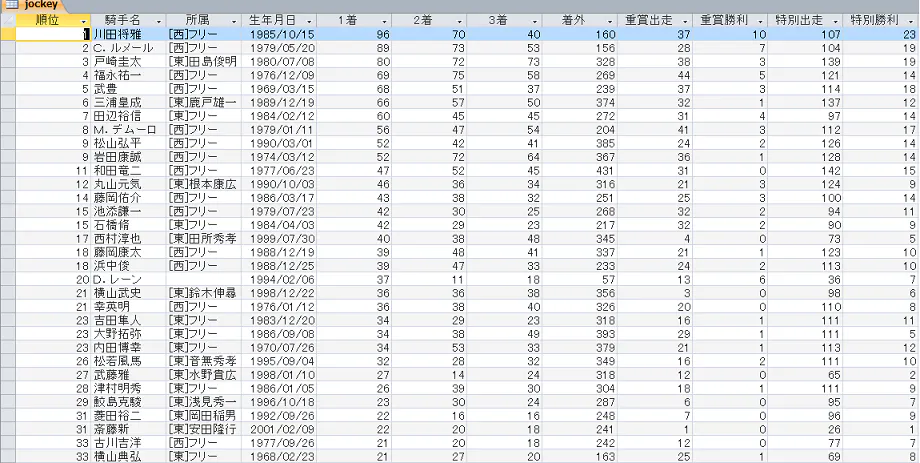
日経競馬をスクレイピングしてDBを構築しよう
はじめに
あっというまに夏休みが終わるね(-.-)
なんにもやってない夏休みはつまらないので、Webからデータを作るスクレイピング入門みたいなのやります。
日経競馬からデータを持ってきて、Microsoft Accessへデータをロードするまでの簡単なサンプルを説明します。スクレイピングやったことない人のために。ガンガン応用してください。
盛夏前提
- OS : Windows7以上
- PoweShellのターミナルで実行
- VSCodeでコード編集
- node.js環境構築済み
- Microsoft Accessは2010以上
アプリ構成
№ アプリ 機能 1 jockey_leading_get.js リーディング騎手データのスクレイピング 2 jockey_leading_tocsv.js リーディング騎手データのCSVファイル変換 3 jockey_leading_table.js リーディング騎手データのAccessテーブル作成 4 jockey_leading_load.js リーディング騎手データのcsvのテーブルへロード jockey_leading_get.js
var request = require('request');
var Iconv = require('iconv').Iconv;
var fs = require('fs');
const file = ".\\jockey_leading.html";

var options = {
    url: 'https://db.netkeiba.com/?pid=jockey_leading',
    encoding: null,
    method: 'GET'
}

/**
 *  AppendFile
 * @param {String} path
 * @param {String} data
 */
function AppendFile(path, data) {
    fs.appendFile(path, data, function (err) {
      if (err) {
          throw err;
      }
    })
}

request(options, function (error, response, body) {
    if (!error && response.statusCode == 200) {
        var iconv = new Iconv('EUC-JP', 'UTF-8//TRANSLIT//IGNORE');
        body = iconv.convert(body).toString();
        AppendFile(file,body);
    }
})
説明
- リーディング騎手データを「jockey_leading.html」として保存。
- 日経競馬のページがEUC-JPのため、npm iconvをインストールしてUTF-8にコード変換。
iconv install
npm install iconv --savenode-gypのrebuildで失敗したら、ここを参照。
実行
node jockey_leading_get.js結果
PS C:\Users\~> ls jockey_leading.html


    ディレクトリ: C:\Users\~


Mode                LastWriteTime     Length Name
----                -------------     ------ ----
-a---        2019/08/15     15:22      97440 jockey_leading.html
jockey_leading_tocsv.js
/**
 *  @param {String} html
 */
function htmltocsv(html){
    const XMLHttpRequest = require("xmlhttprequest").XMLHttpRequest;
    const http = new XMLHttpRequest();
    const file = ".\\jockey_leading.csv";
    UnlinkFile(file);
    http.open("GET", html, true);
    http.responseType = "document";
    http.send(null);
    var csv = [];
    http.onreadystatechange = function() {
      if(http.readyState == 4 && http.status==200) {
            var data = http.responseText;
            var lines = data.split( '\n' );
            var sw = 0;
            var body = 0;
            var output = '';
            // header
            const head1 = '順位,騎手名,所属,生年月日,1着,2着,3着,着外,重賞,,特別,,平場,,芝,,ダート,,勝率,連対率,複勝率,収得賞金(万円),代表馬,順位変動' + '\n';
            const head2 = ',,,,,,,,出走,勝利,出走,勝利,出走,勝利,出走,勝利,出走,勝利,,,,,' + '\n';
            csv.push(head1);
            csv.push(head2);
            for ( var i = 0; i < lines.length; i++ ) {
                // 空行は無視する
                if ( lines[i] == '' ) {
                    continue;
                }
                // <table 抽出
                if ( sw == 0 & lines[i].substr(0,6) == '<table' ) { sw = -1; }
                if ( sw == -1 ) {
                    // body start keyword
                    if (lines[i].substr(0,11) == '<td nowrap>') { body = -1; }
                    if ( body == -1 ) {
                        if ( lines[i] == '</tr><tr>' ) {
                            csv.push(output.substr(0, output.length - 1) + '\n');
                            var output = '';
                        } else {
                            output = output + '"' + body_htmltocsv(lines[i]) + '",';
                        }
                    }
                }
                if ( sw == -1 & lines[i].substr(0,8) == '</table>' ) { sw = 0; }
            }
       }
       for ( var i = 0; i < csv.length; i++) { AppendFileSync(file, csv[i]); }
    }
}

/**
 *  AppendFileSync
 * @param {Sting} path
 * @param {Sting} data
 */
function AppendFileSync(path, data) {
    const fs = require("fs");
    fs.appendFileSync(path, data, function (err) {
      if (err) {
          throw err;
      }
    })
}

/**
 * @param {String} path
 */
function UnlinkFile(path) {
    const fs = require("fs");
    fs.unlink(path, function(err) {
        if (err) {
            console.log(err);
        }
    })
}

/**
 *
 * @param {String} data
 *
 */
function body_htmltocsv(data) {

    var pos = data.indexOf("</a>");
    // </a>がない
    if ( pos == -1 ) {
        var data = data.replace('<td nowrap>', '');
        var data = data.replace('</td>', '');
    } else {
        var pos = data.indexOf('<td nowrap>');
        // 先頭が<td nowrap>
        if ( pos == 0 ) {
            var pos = data.indexOf('>',12);
            var pos2 = data.indexOf('<',13);
            var data = data.substr( pos + 1, pos2 - pos -1 );
        } else {
            var pos = data.indexOf('<td class="txt_l" nowrap>');
            // 先頭が<td class="txt_l" nowrap>
            if ( pos == 0 ) {
                var pos = data.indexOf('[東]');
                var pos2 = data.indexOf('[西]');
                // [東][西]を含む
                if ( pos != -1 || pos2 != -1 ) {
                    var pos = data.indexOf('>',29);
                    var pos2 = data.indexOf('<',30);
                    if ( pos != -1 ) {
                        var data = '[東]' + data.substr( pos + 1, pos2 - pos -1 );
                    } else {
                        var data = '[西]' + data.substr( pos + 1, pos2 - pos -1 );
                    }
                } else {
                    var pos = data.indexOf('>',25);
                    var pos2 = data.indexOf('<',26);
                    var data = data.substr( pos + 1, pos2 - pos -1 );
                }
            }
        }
    }
    return data;
}

htmltocsv('file:' + '.\\jockey_leading.html');
説明
- npm xmlhttprequestをインストール。直接htmlをfsで読み込んでもbody_htmltocsv関数は動作可能ですが、あえて将来httpからダイレクトにcsv化をもくろんで。
- ヘッダー2行をスキップしてもいいかも、後続の「jockey_leading_load.js」ではヘッダー2行をスキップしてテーブルにロード。
- http.responseTextを'\n'でsplitして1行ずつ処理します。
- <table ~</table>を処理
- <td nowrap>~</tr>を処理
- jockey_leading.htmlのテーブルを解析して、各要素をbody_htmltocsv関数で取出し配列(csv[])に格納。
- 出力ファイル「jockey_leading.csv」
- 出力する前に「jockey_leading.csv」は削除、ファイル有無は判定しない。無くても続行。
- cvsの書き出しは同期処理にしなければ、並びがバラバラになるので、必ずappendFileSyncで書出します。
xmlhttprequest install
npm install xmlhttprequest -save実行
node jockey_leading_tocsv.js結果
PS C:\Users\~> ls jockey_leading.csv


    ディレクトリ: C:\Users\~


Mode                LastWriteTime     Length Name
----                -------------     ------ ----
-a---        2019/08/15     15:23       9331 jockey_leading.csv
jockey_leading_table.js
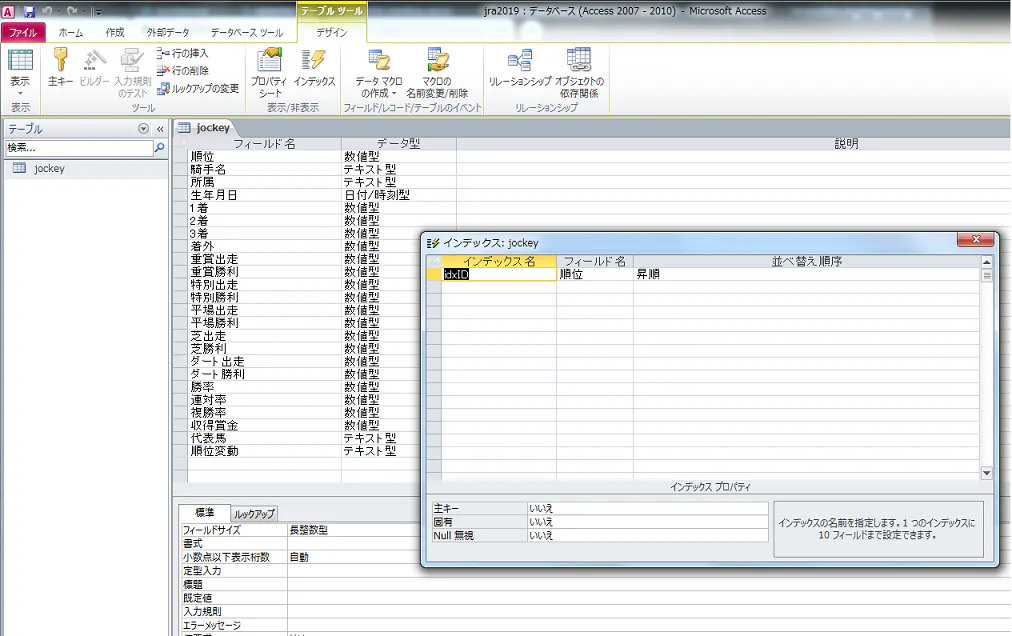
const check_jockey = "SELECT Name FROM MSysObjects WHERE Name = 'jockey';"
const create_table_jockey = "CREATE TABLE jockey (" +
"順位 INT NOT NULL," +
"騎手名 char(20) NOT NULL," +
"所属 char(26)," +
"生年月日 DATE," +
"1着 INT," +
"2着 INT," +
"3着 INT," +
"着外 INT," +
"重賞出走 INT," +
"重賞勝利 INT," +
"特別出走 INT," +
"特別勝利 INT," +
"平場出走 INT," +
"平場勝利 INT," +
"芝出走 INT," +
"芝勝利 INT," +
"ダート出走 INT," +
"ダート勝利 INT," +
"勝率 DOUBLE," +
"連対率 DOUBLE," +
"複勝率 DOUBLE," +
"収得賞金 DOUBLE," +
"代表馬 char(20)," +
"順位変動 char(4)" +
");"
const create_index_jockey = "CREATE INDEX idxID ON jockey (順位 ASC);"
const ADODB = require('node-adodb');
const connection = ADODB.open('Provider=Microsoft.ACE.OLEDB.12.0;Data Source=jra2019.accdb;');

// Table Exist Check
connection
  .query(check_jockey)
  .then(data => {
    // Create Table
    if (data.length == 0) {
      connection
      .execute(create_table_jockey)
      .then(data => {
        // Create Index
        connection
        .execute(create_index_jockey)
        .then(data => {
        })
        .catch(error => {
          console.log(error);
        });
      })
      .catch(error => {
        console.log(error);
      });
    }
  })
  .catch(error => {
    console.log(error);
  });
説明
- ADODBでDB操作するので、node-adodbをインストールします。
- Microsoft Access のテーブル格納は必ずしもロード順にならないので、インデックスを設定します。
- AccessのMSysObjectsを読取、「jockey」テーブルの存在チェックを行います。
- 実行するまえに、「jra2019.accdb」を作成します。
MSysObjectsへ読みとり権限を付与する
- Microsoft Accessで「jra2019.accdb」を作成。
- 「jra2019.accdb」を開く。
- Ctl+gで「Microsoft Visual Basic for Application」を開く。
- イミディトウィンドウに以下のコマンド
?currentuser()
Admin
CurrentProject.Connection.Execute "GRANT SELECT ON MSysObjects TO Admin;"
- currentuserでaccdbのユーザを確認して、MSsysObjectsにアクセス権限を付与します。
- これを行わないと、外部からMSsysObjectsを読み取れません。
- Microsoft Accessが旧mdbの場合 "Provider=Microsoft.Jet.OLEDB.4.0;Data Source=xxxxx.mdb;"
node-adodb install
npm install node-adodb --save実行
node jockey_leading_table.js結果
下記の通り、テーブルが作成されればOKです。
jockey_leading_load.js
async function loadcsv(table, data) {
    const ADODB = require('node-adodb');
    const connection = ADODB.open('Provider=Microsoft.ACE.OLEDB.12.0;Data Source=jra2019.accdb;');
    try {
        await connection.execute('INSERT INTO ' + table + ' VALUES(' + data + ');');
    } catch (error) {
        console.error(error);
    }
}

function jockeyload() {
    const fs = require('fs');
    const file = ".\\jockey_leading.csv";
    var data = new String();
    data = fs.readFileSync(file, 'utf8');
    var lines = data.split( '\n' );
    for ( var i = 0; i < lines.length - 1; i++ ) {
        if (i < 2) {
            continue;
        }
        loadcsv('jockey', lines[i]);
    }
}

jockeyload();
説明
- node-adodbでCSVをテーブルにインサートします。
- loadcsvは同期処理(async~await)にします。これをやらないと、csvがバラバラに格納されます。
- jockey_leading.csvを同期(readFileSync)で読取、'\n'でsplitします。
- splitしたデータをロードします。
実行
node jockey_leading_load.js結果
下記のエラーコードは無視してください。
process:
   { code: -2147467259,
     message: 'マシン \'xxxxxxx\' のユーザー \'Admin\' がデータベースを開けない状態、またはロックできない状態にしています。' },
  exitCode: 0 }
jockey
まとめ
スクレイピングをnode.jsとJavaScriptで構築する入門をやってみました。
いわずもがな、初学者向けです。不明点が多々あると思います。
俺だったこうやる的なご意見もありそうです。
とりあえず、目的は達成しています。
AccessをMySQLに置き換えるとか、コードはALLフリーなので色々改造して、さらなるスクレイピングワールドへ。
- 投稿日:2019-08-16T13:57:05+09:00
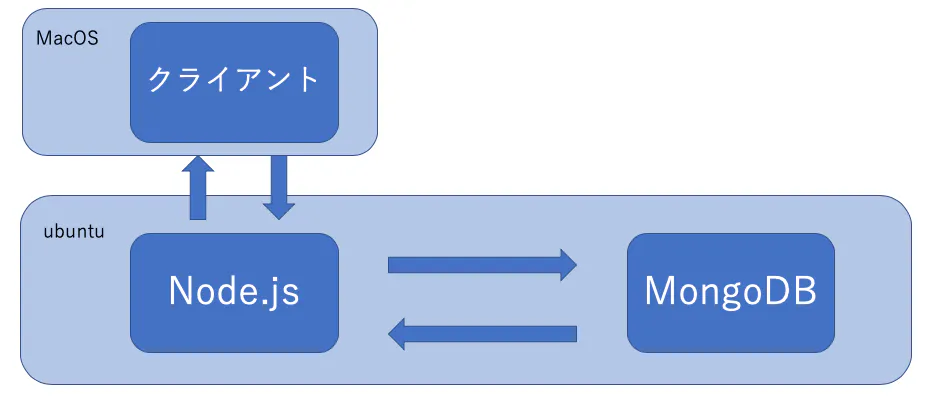
ブラウザからNode.js(webサーバ)にアクセスした時のみMongoDBにアクセスできない
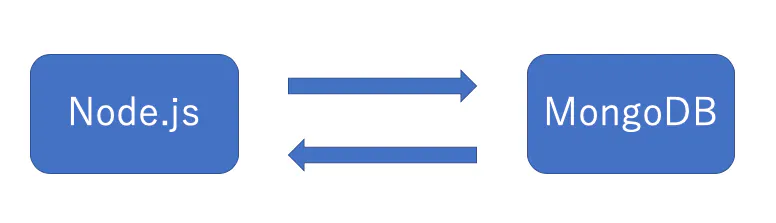
今、Node.jsをwebサーバとして、クライアントからリクエストがあればファイルを返すことや、DBにアクセスして取得したデータを返すということを行っている。
その一つの処理となっているDBアクセスで躓いている。できたこと
Node.jsからMongoDBにアクセスかつデータ取得は実現できた。
sample.js
sample.jsconst MongoClient = require('mongodb').MongoClient; const assert = require('assert'); // Connection URL const url = 'mongodb://localhost:27017'; // Database Name const dbName = 'study'; //結果 var value; const client = new MongoClient(url,{useNewUrlParser: true}); const findDocuments = function(db, callback) { // Get the documents collection const collection = db.collection('user'); // Find some documents collection.find({}).toArray(function(err, docs) { assert.equal(err, null); console.log("Found the following records"); value=docs console.log(value); callback(docs); }); } // Use connect method to connect to the server client.connect(function(err) { assert.equal(null, err); console.log("Connected correctly to server"); const db = client.db(dbName); findDocuments(db, function() { client.close(); }); });実行結果
hasegawa@hasegawa-W76OC:~/デスクトップ/akiyama/Node.js$ sudo node sample.js
[sudo] hasegawa のパスワード:
[ { _id: 5d5364026ed8a1d78076d1f4,
    dist:
     [ 456,
       442,
       //省略
       461,
       461,
       ... 1900 more items ],
    rot:
     [ 0.05797865190578781,
       0.14626504446713978,
       //省略
       19.726678416929172,
       ... 1900 more items ] } ]
やりたいこと
実際やりたいことは
1. クライアントからサーバにhtmlファイルをリクエスト
2. サーバはhtmlファイルを返す
3. そのhtmlファイルに仕込まれたコードでサーバに再びリクエスト
4. サーバはMongoDBにアクセスし、データを取得して返すしかし、「できたこと」で使ったコードをそのまま使ってもMongoDBにアクセスできない。
webserver.js
webserver.js// 必要なファイルを読み込み var http = require('http'); var url = require('url'); var fs = require('fs'); var server = http.createServer(); // http.createServerがrequestされたら、(イベントハンドラ) server.on('request', function (req, res) { // Responseオブジェクトを作成し、その中に必要な処理を書いていき、条件によって対応させる var Response = { "renderHTML": function () { var template = fs.readFile('./template/index.html', 'utf-8', function (err, data) { // HTTPレスポンスヘッダを出力する res.writeHead(200, { 'content-Type': 'text/html' }); // HTTPレスポンスボディを出力する res.write(data); res.end(); }); }, "getThree": function () { var template = fs.readFile('./js/three.js-master/build/three.min.js', 'utf-8', function (err, data) { // HTTPレスポンスヘッダを出力する res.writeHead(200, { 'content-Type': 'text/javascript' }); // HTTPレスポンスボディを出力する res.write(data); res.end(); }); }, "getOrbit": function () { var template = fs.readFile('./js/OrbitControls.js', 'utf-8', function (err, data) { // HTTPレスポンスヘッダを出力する res.writeHead(200, { 'content-Type': 'text/javascript' }); // HTTPレスポンスボディを出力する res.write(data); res.end(); }); }, "getValue": function () { const MongoClient = require('mongodb').MongoClient; const url = 'mongodb://localhost:27017'; // Database Name const dbName = 'study'; //結果 var value; const client = new MongoClient(url,{useNewUrlParser: true}); const findDocuments = function(db, callback) { // Get the documents collection const collection = db.collection('user'); // Find some documents collection.find({}).toArray(function(err, docs) { assert.equal(err, null); console.log("Found the following records"); value=docs console.log(value); callback(docs); }); } // Use connect method to connect to the server client.connect(function(err) { assert.equal(null, err); console.log("Connected correctly to server"); const db = client.db(dbName); findDocuments(db, function() { client.close(); }); }); // HTTPレスポンスヘッダを出力する res.writeHead(200, { 'content-Type': 'text/html', 'Access-Control-Allow-Origin': '*' }); console.log("レスポンス"); //console.log(result); // HTTPレスポンスボディを出力する res.write(value); res.end(); } }; // urlのpathをuriに代入 var uri = url.parse(req.url).pathname; console.log(uri); // URIで行う処理を分岐させる if (uri === "/") { // URLが「http://localhost:8080/」の場合、"renderHTML"の処理を行う Response["renderHTML"](); return; } else if (uri === "/js/three.js-master/build/three.min.js") { // URLが「http://localhost:8080/js/three.js-master/build/three.min.js」の場合、"getThree"の処理を行う Response["getThree"](); return; } else if (uri === "/js/OrbitControls.js") { // URLが「http://localhost:8080/js/OrbitControls.js」の場合、"getOrbit"の処理を行う Response["getOrbit"](); return; } else if (uri === "/get_value") { // URLが「http://localhost:8080/get_value」の場合、"getThree"の処理を行う Response["getValue"](); return; }; }); // 指定されたポート(1234)でコネクションの受け入れを開始する server.listen(1234); console.log('Server running at http://localhost:80/');index.html
index.html<html> <head> <script type="text/javascript" src="js/three.js-master/build/three.min.js"></script> <script type="text/javascript" src="js/OrbitControls.js"></script> </head> <body> <div id="WebGL-area"></div> <script type="text/javascript"> function getValue() { //promiseを使うことで簡潔に記述できる return new Promise((resolve, reject) => { //resolveまたはrejectの結果を返す var req = new XMLHttpRequest(); // HTTPでファイルを読み込むためのXMLHttpRrequestオブジェクトを生成、サーバと非同期通信するためのAPI req.open("get", "http://***:1234/get_value", false); req.setRequestHeader("Access-Control-Allow-Origin", "*"); //受信が成功した時に呼び出されるイベント req.onload = () => { //通信が正常に終了したかを確認する if (req.readyState === 4 && req.status === 200) { resolve(req.responseType); } else { alert(req.status); reject(new Error(req.statusText)); } }; //受信が失敗した時に呼び出されるイベント req.onerror = () => { reject(new Error(req.statusText)); }; req.send(null); // HTTPリクエストの発行 }); } async function init() { var scene = new THREE.Scene(); var renderer = new THREE.WebGLRenderer(); renderer.setSize(900, 600); document.getElementById("WebGL-area").appendChild(renderer.domElement); var camera = new THREE.PerspectiveCamera(45, 1.5, 0.1, 1000); camera.position.set(30, 45, 30); camera.lookAt(scene.position); var controls = new THREE.OrbitControls(camera); controls.autoRotate = true; //自動周回 // 座標軸を表示 var axes = new THREE.AxisHelper(100); scene.add(axes); //形状オブジェクトの宣言と生成 var geometry= new THREE.Geometry(); var value; var dis=[]; var rot=[]; //dis,rot = await getCSV(); value = await getValue(); dis=value.dist; rot=value.rot; //dis=value.slice(0,2000); //rot=value.slice(2001,4000); //alert(dis[0]); //alert(rot[0]); //alert(dis); //alert(rot); // for(var i=0;i<1000;i++){ // geometry.vertices[i]= new THREE.Vector3((data[i][0] * Math.cos( data[i][1] * (Math.PI / 180) ))/2, // 0, // (data[i][0] * Math.sin( data[i][1] * (Math.PI / 180) ))/2); // } for(var i=0;i<2000;i++){ var x=(dis[i] * Math.cos( rot[i] * (Math.PI / 180) ))/2; var y=(dis[i] * Math.sin( rot[i] * (Math.PI / 180) ))/2; //alert(x); //alert(y); geometry.vertices[i]= new THREE.Vector3(x,0,y); } //材質オブジェクトの宣言と生成 var material=new THREE.ParticleBasicMaterial({color: 0xFF0000, size: 10.0}); //点オブジェクトの生成 var particles = new THREE.ParticleSystem(geometry,material); //点オブジェクトのシーンへの追加 scene.add(particles); render(); function render() { controls.update(); requestAnimationFrame(render); renderer.render(scene, camera); } } window.onload = init </script> </body> </html>実行結果
hasegawa@hasegawa-W76OC:~/デスクトップ/akiyama/Node.js$ sudo node webServer.js
[sudo] hasegawa のパスワード:
Server running at http://localhost:80/
/
/js/three.js-master/build/three.min.js
/js/OrbitControls.js
/get_value
レスポンス
_http_outgoing.js:595
    throw new ERR_INVALID_ARG_TYPE('first argument',
    ^

TypeError [ERR_INVALID_ARG_TYPE]: The first argument must be one of type string or Buffer. Received type undefined
    at write_ (_http_outgoing.js:595:11)
    at ServerResponse.write (_http_outgoing.js:567:10)
    at Object.getValue (/home/hasegawa/デスクトップ/akiyama/Node.js/webServer.js:91:17)
    at Server.<anonymous> (/home/hasegawa/デスクトップ/akiyama/Node.js/webServer.js:115:29)
    at Server.emit (events.js:198:13)
    at parserOnIncoming (_http_server.js:677:12)
    at HTTPParser.parserOnHeadersComplete (_http_common.js:109:17)
実行結果をみるとclient.connectに入ることができていないことがわかります。
確認したこと
サーバとDBだけのやりとりだとできているので、おそらくネットワーク的な問題。
- クライアントとサーバ両方のファイアウォールをオフ
hasegawa@hasegawa-W76OC:/etc$ sudo ufw status
状態: 非アクティブ
- ポート番号 mongodbのポート番号がLISTENになっていることを確認
hasegawa@hasegawa-W76OC:/etc$ netstat -an | grep 27017
tcp        0      0 127.0.0.1:27017         0.0.0.0:*               LISTEN
unix  2      [ ACC ]     STREAM     LISTENING     1073161  /tmp/mongodb-27017.sock
127.0.0.1:27017となっているのはこのPCからしかアクセスできないということか。
結局今回はこのPCからアクセスしているから問題ないのか。
- 投稿日:2019-08-16T11:57:08+09:00
npmのpm2 v3.xは、再起動すると停止したプロセスも動き出す
仕様です。
pm2でプロセスを登録する→stopする→pm2 saveする→pm2 killする→pm2 resurrectする→stopしたプロセスが起動状態になる。
pm2 resurrectはプロセスとモジュールのステータスを復元しない。もしくは、pm2 saveはプロセスとモジュールのステータスを保存しない。
次のpm2バージョン4では直るらしい。リリースまだかな
2019/05/29に、4.xで直します と作者がコメントして、実際修正コードがコミットされている。
https://github.com/Unitech/pm2/issues/3625#issuecomment-496701095

- 投稿日:2019-08-16T03:01:51+09:00
Alexa APL, 第11回 タッチ対応 その5(画面更新(SetValueとFrame))
はじめに
Alexaを搭載した画面付きデバイスの画面レイアウトを作成します。
画像、および商品名をリストアップした画面(商品リスト)を作成し、商品をタッチすると、その商品の詳細(詳細画面)に切り替わり、もう一度タッチするとリストに戻るレイアウトを作成します。
TouchWrapperコンポーネントを使って、タッチを検出し、SetValueで値を変更します。
「詳細画面」はFrameを使って表示します。
第10回では、画面半分を詳細表示に使って表示していましたが、今回は画面(Container)を「商品リスト」と「詳細画面」の二つを用意して、「詳細画面」の表示、非表示を切り替えることで今回のレイアウトを実現します。
今回の記事は第10回の焼き直しですみません。今回実施する内容
画像、および商品名をリストアップした画面(商品リスト)を作成し、商品をタッチすると、その商品の詳細(詳細画面)に切り替わり、もう一度タッチするとリストに戻るレイアウトを作成します。
TouchWrapperコンポーネントを使って、タッチを検出し、SetValueで値を変更します。
「詳細画面」はFrameを使って表示します。
中型デバイス(Echo Show用)
商品リスト
詳細画面
環境
OS:Windows 10 JP
Alexaスキル言語:Node.js
Editor:Visual Studio Code
APLバージョン:1.0, 1.1参考
・Alexa ハローAPL、Alexaスキルの画面への対応
第1回のAlexa APLの記事です。タイトル通り、ハローAPLを表示させるだけのAPLです。・Alexa APL, 第6回 シーケンス(Sequence)を使ったレイアウト
第6回のAlexa APLの記事です。Sequenceを使って画面レイアウトを作成するAPLの紹介です。・Alexa APL, 第10回 タッチ対応 その4(画面更新(SetValue))
第10回のAlexa APLの記事です。SetValueを使って画面レイアウトを作成するAPLの紹介です。・APLコマンド
AmazonのAPLドキュメントにあるAPLコマンドの説明です。・標準コマンド
AmazonのAPLドキュメントにあるコマンドの説明です。SendEventやSpeakItemの説明があります。用語
APL
Alexa Presentation Language
amazonの画面つきのAlexaの画面表示用の言語。
JSONを使用した記載方法です。
インターネットのホームページはHTMLとCSSで作成しますが、AlexaはAPLで作成するということです。APLオーサリングツール
APL作成を視覚的に見ながらAPLのJSONファイルを作成するツール。
サンプルテンプレートも準備されており、その中から選択していくだけで、だいたいの画面は作成できる。前提条件
前提条件はとくにないといえばないですが、本まとめを読むにあたり、以下がわかっていることが前提です。
・alexa developer consoleのアカウントがある
・Alexaスキルを開発したことがある
・JSONの記載方法を知っている
・「Alexa ハローAPL、Alexaスキルの画面への対応」、「Alexa APL, 第6回 シーケンス(Sequence)を使ったレイアウト」、および「第10回 タッチ対応 その5(画面更新(SetValue))」の記事をみている画面を作成してみる
商品のリストアップとその詳細を示すが面のレイアウトを作成します。
SetValueを使ったレイアウトの作成
これから作成する「レイアウト画面」はこんな感じです。
Containerの配下にSequenceとFrameがありますが、Sequence部分は、第10回で作成したものと同じです。
Frame部分が今回の変更箇所です。
Frame部分は強調で示します。
- APLオーサリングツールを起動して「最初から作成」を選択する。
- 「レイアウト画面」の「mainTemplate」を選択し、「Container」を追加する。
- 「レイアウト画面」で、「Container」を選択し、「Sequence」を追加する。
「レイアウト画面」の「Sequence」を選択し、「詳細設定画面」で、以下をそれぞれ設定する。
・ data:${payload.sample.sampleArray}
・ height:100vh「レイアウト画面」で、「Sequence」を選択し、「Container」を追加する。
「レイアウト画面」の「Container」を選択し、「TouchWrapper」を追加する。
「レイアウト画面」の「Container」を選択し、「詳細設定画面」で、以下を設定する。
・ direction:row「レイアウト画面」で、「Container」を選択し、「Image」を追加する。
「レイアウト画面」の「Image」を選択し、以下をそれぞれ設定する。
・ source:${data.imageURL}
・ width:20vw
・ height:20vh「レイアウト画面」で、「Container」を選択し、「Text」を追加する。
「レイアウト画面」の「Text」を選択し、「詳細設定画面」で、以下を設定する。
・ text:${data.text}12. 「レイアウト画面」の一番上の「Container」を選択し、「TouchWrapper」を追加する。
13. 「レイアウト画面」の二番目の「TouchWrapper」を選択し、「詳細設定画面」で、以下を設定する。
・ display:invisible
・ id:msgBoxId
・ width:100vw
・ height:100vh
・ position:absolute
displayをinvisibleに設定し、初期状態は非表示にします。
positionはabsoluteに設定し、商品リストとは切り離し絶対位置で設定します。
14. 「レイアウト画面」の二番目の「TouchWrapper」を選択し、「Frame」を追加する。
15. 「レイアウト画面」の「Frame」を選択し、「詳細設定画面」で、以下を設定する。
・ backgroundColor:rgba(grey, 1.0)
・ width:100vw
・ height:100vh
16. 「レイアウト画面」の「Frame」を選択し、「Container」を追加する。
17. 「レイアウト画面」の上で作成した「Container」を選択し、「詳細設定画面」で、以下を設定する。
・ alignItems:center
・ direction:row
・ justifyContent:center
・ width:100vw
・ height:100vh
18. 「レイアウト画面」の上で作成した「Container」を選択し、「Image」を追加する。
19. 「レイアウト画面」の上で作成した「Image」を選択し、「詳細設定画面で、以下を設定する。
・ id:imageId
・ width:50vw
・ height:50vh
20. 「レイアウト画面」の上で作成した「Container」を選択し、「Text」を追加する。
21. 「レイアウト画面」の「Text」を選択し、「詳細設定画面」で、以下を設定する。
・ id:textId
・ width:50vw
22. APL JSONの画面を開いて、一番目の「TouchWrapper」の記載を以下の通り、onPressのtypeにSetValueを設定し、以下の通りにする。第10回とmsgBoxIdにSetValueを実施するところが違います。一番目TouchWrapperのAPL... "type": "TouchWrapper", "onPress": [ { "type": "SetValue", "componentId": "msgBoxId", "property": "display", "value": "normal" }, { "type": "SetValue", "componentId": "imageId", "property": "source", "value": "${data.imageURL}" }, { "type": "SetValue", "componentId": "textId", "property": "text", "value": "${data.detail}" } ], ...23. APL JSONの画面を開いて、二番目の「TouchWrapper」の記載を以下の通り、
onPressのtypeにSetValueを設定し、以下の通りにする。二番目TouchWrapperのAPL... "type": "TouchWrapper", "onPress": [ { "type": "SetValue", "componentId": "msgBoxId", "property": "display", "value": "invisible" }, ...JSONデータの作成
以下の通り、JSONデータを作成する。
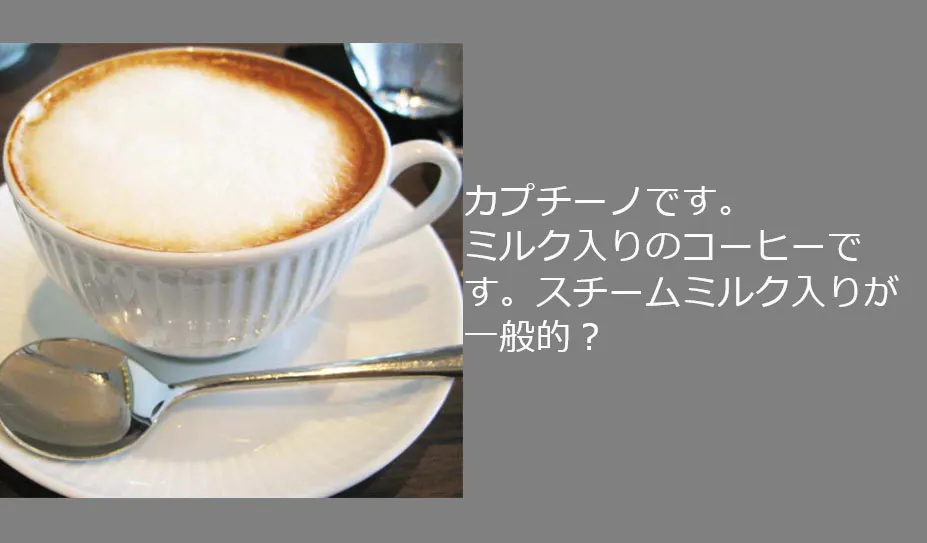
JSONデータ{ "sample": { "sampleArray": [ { "text": "コーヒー", "detail": "コーヒーです。", "imageURL": "https://coffee_480x480.jpg" }, { "text": "カプチーノ", "detail": "カプチーノです。<br>ミルク入りのコーヒーです。スチームミルク入りが一般的?", "imageURL": "https://cappuccino_480x480.jpg" }, { "text": "カフェラテ", "detail": "カフェラテです。<br>ミルク入りのコーヒーです。スチームミルク入りが一般的?<br>カプチーノとはミルクの量が違う?", "imageURL": "https://latte_480x480.jpg" }, { "text": "エスプレッソ", "detail": "エスプレッソです。<br>加圧して抽出したもので、コーヒーよりもかなり濃いです。", "imageURL": "https://espresso_480x480.jpg" } ] } }SetValueの説明、Frameの説明
TouchWrapperのonPressにSetValueを設定することで今回の機能を実現します。
第10回でSetValueの説明はしましたので、ここでは説明していない部分をかいつまんで説明します。・ 一番目の
TouchWrapperのonPressで、詳細画面のTouchWrapperのdisplayをnormalにすることで、画面を表示させます。
・ 二番目のTouchWrapperのonPressで、詳細画面のTouchWrapperのdisplayをinvisibleにすることで、画面を非表示にします。・
Frameは今回初めて使ってみましたが、背景色をつけるために使いました。
Frameの上にContainerを載せました。Frame単体では、ContainerにあるようなalignItems、direction、justifyContentがないためです。
なお、TouchWrapperやFrame、Containerすべてにwidthとheightを設定したのは、明示的に画面全体を埋めて商品リストなどを誤ってタッチさせないためです。APLソースコード
出来上がったAPLのフルソースコードとデータJSONを載せます。実際にスキルで表示を試す場合は、Alexa ハローAPL、Alexaスキルの画面への対応を参考しに実施します。
APL{ "document": { "type": "APL", "version": "1.1", "settings": {}, "theme": "dark", "import": [], "resources": [], "styles": {}, "onMount": [], "graphics": {}, "commands": {}, "layouts": {}, "mainTemplate": { "parameters": [ "payload" ], "items": [ { "type": "Container", "items": [ { "type": "Sequence", "height": "100vh", "data": "${payload.sample.sampleArray}", "items": [ { "type": "TouchWrapper", "onPress": [ { "type": "SetValue", "componentId": "msgBoxId", "property": "display", "value": "normal" }, { "type": "SetValue", "componentId": "imageId", "property": "source", "value": "${data.imageURL}" }, { "type": "SetValue", "componentId": "textId", "property": "text", "value": "${data.detail}" } ], "items": [ { "type": "Container", "direction": "row", "items": [ { "type": "Image", "width": "20vw", "height": "20vh", "source": "${data.imageURL}" }, { "type": "Text", "text": "${data.text}" } ] } ] } ] }, { "display": "invisible", "type": "TouchWrapper", "id": "msgBoxId", "width": "100vw", "height": "100vh", "onPress": { "type": "SetValue", "componentId": "msgBoxId", "property": "display", "value": "invisible" }, "item": [ { "type": "Frame", "width": "100vw", "height": "100vh", "items": [ { "type": "Container", "width": "100vw", "height": "100vh", "alignItems": "center", "direction": "row", "justifyContent": "center", "item": [ { "type": "Image", "id": "imageId", "width": "50vw", "height": "50vw" }, { "type": "Text", "id": "textId", "width": "50vw" } ] } ], "backgroundColor": "rgba(grey,1.0)" } ], "position": "absolute" } ] } ] } }, "datasources": { "sample": { "sampleArray": [ { "text": "コーヒー", "detail": "コーヒーです。", "imageURL": "https://coffee_480x480.jpg" }, { "text": "カプチーノ", "detail": "カプチーノです。<br>ミルク入りのコーヒーです。スチームミルク入りが一般的?", "imageURL": "https://cappuccino_480x480.jpg" }, { "text": "カフェラテ", "detail": "カフェラテです。<br>ミルク入りのコーヒーです。スチームミルク入りが一般的?<br>カプチーノとはミルクの量が違う?", "imageURL": "https://latte_480x480.jpg" }, { "text": "エスプレッソ", "detail": "エスプレッソです。<br>加圧して抽出したもので、コーヒーよりもかなり濃いです。", "imageURL": "https://espresso_480x480.jpg" } ] } } }おわりに
今回はSetValueとFrameを使った画面レイアウトを紹介しました。
この方法はなかなか他のサイトでは記載されておらず、だいたいPagerを使って別のページに移るというのが多かったのですが、試してみましたら動きました。
Pagerも悪くはないとは思いますが、スワイプで画面が移動するのが自分が作成したいものとイメージと違っており、今回のレイアウトにしました。
Pagerはまだ使ったことがないので、またそのうち試してみます。