- 投稿日:2019-07-11T23:26:15+09:00
cssで記述する基本的なレスポンシブ(メディアクエリ)
この記事で説明していること
- メディアクエリについて
- メディアクエリの書き方
- その他
メディアクエリについて
メディアクエリとは、Webページの見栄えを記述するCSS3で追加された仕様の一つで、表示された画面環境に応じて適用するスタイルを切り替えることが出来る機能のこと。
画面サイズに応じてcssを変更することが出来る。
メディアクエリの書き方
<link rel="stylesheet" href="css/style.css" media="screen">上記コードをhtmlに記載
@media screen and (min-width:299px){
  /*299px以下で適用する内容*/
}

@media screen and (min-width:300px){
  /*300px以上で適用する内容*/
}

@media screen and (min-width:600px){
  /*600px以上で適用する内容*/
}
上記コードをcssに記載
これで各画面サイズごとにcssを変更することが出来ます。
- 投稿日:2019-07-11T22:38:14+09:00
わたしがRailsチュートリアルで学んだこと【6章】
注意:プログラミング歴31日の初心者が書いています
注意:間違っていたら優しく教えてください(喜びます)
「Ruby on Rails チュートリアル実例を使ってRailsを学ぼう」
https://railstutorial.jp/素晴らしいチュートリアルに感謝します。
6.1.1 データベースの移行
リレーショナルデータベースについて
テーブル型になっているデータベース。
よくあるデータベースの形です。
1つの行は1つのIDを示しており、それぞれのIDがnameやemailといったデータを持ちます。マイグレーションについて
マイグレーションはデータベースへの追加や変更を行います。
rails generate model User name:string email:stringでUserモデル(データベース)が自動生成されますが、user.rbはまだ空っぽです。
そのかわり、db/migrateディレクトリにマイグレーションファイルが生成されています。rails db:migrate上記を実行することで、テーブルの作成を行います。
また、このマイグレーションファイルを使ってテーブルへの変更を元に戻す(ロールバックする)ことも可能です。rails db:rollback上記を実行すると、テーブルの作成を元に戻すことが可能です。
マイグレーションやロールバックを行うたびに
dbディレクトリ内のdevelopment.sqlite3というファイルが更新されます。「DB browser」を利用してデータベースの中身を確認することができます。
https://sqlitebrowser.org/dl/6.1.3 ユーザーオブジェクトを作成する
User.new
=> #<User id: nil, name: nil, email: nil, created_at: nil, updated_at: nil>
作成したUserクラスに対して、
.newメソッドを使用すると、Userオブジェクト(Userインスタンス)を作成できます。
引数なしで呼び出した場合、id、name、created_at、updated_atのプロパティはいずれもnillです。user = User.new(name: "Michael Hartl", email: "mhartl@example.com") => #<User id: nil, name: "Michael Hartl", email: "mhartl@example.com", created_at: nil, updated_at: nil>引数に
nameと
ただし、id、created_at、updated_atのプロパティはいずれもnillです。
.newで作成したオブジェクトに対して.saveメソッドを使用することで、データベースに保存されます。
id、created_at、updated_atのプロパティは、この段階で決定されます。User.create(name: "A Nother", email: "another@example.org") #<User id: 2, name: "A Nother", email: "another@example.org", created_at: "2016-05-23 19:18:46", updated_at: "2016-05-23 19:18:46">
.createメソッドを使用すれば、.newと.saveを同時に行うことができます。
.destroyメソッドは、反対にオブジェクトを削除します。6.1.4 ユーザーオブジェクトを検索する
User.find(1) #id==1 のオブジェクトを返す
.find()を使用すると、引数に合致するオブジェクトを返します。User.find_by(email: "mhartl@example.com")特定の属性で検索する場合は、
.find_byが有効です。user.email => "mhartl@example.net" user.email = "foo@bar.com" => "foo@bar.com" user.reload.email => "mhartl@example.net"
.プロパティ名でそのオブジェクトのプロパティにアクセスし、上書きすることも可能です。
また、.reloadを実行すると、データベースの情報を元にオブジェクトを再読み込みするので、.save前であれば変更が取り消されたように見えます。
(実際は、保存前のデータをDBから再読み込みしているだけ)6.2 ユーザーを検証する
6.2.1 有効性を検証する
require 'test_helper'

class UserTest < ActiveSupport::TestCase

  def setup
    @user = User.new(name: "Example User", email: "user@example.com")
  end

  test "should be valid" do
    assert @user.valid?
  end
end
UserTestクラス内の
setupメソッドは、テストが実行される直前に実行されます。
ここでは、Userオブジェクトがちゃんと作成できるかを確認するために、.newして
@userインスタンス変数に格納しています。"should be valid"と名付けられたテストでは、
.valid?メソッドで@userが有効かどうかを確認します。
.valid?メソッドは、後述する「バリデーション」を確認し、オブジェクトにエラーがない場合はtrueが返され、そうでなければfalseが返されます。ここでは何もバリデーションを設定していないので、
@user.valid?はtrueになります。6.2.2 存在性を検証する
 test "name should be present" do
    @user.name = "     "
    assert_not @user.valid?
 end
まず、
@user.nameにからの文字列を代入しています。名無しです。
assert_notは、引数がfailseもしくはnillのとき成功となります。ここで注意したいのは、あなたはまだバリデーションをなにも設定していないので、名前が空欄だろうがなんだろうが、
.@user.valid?はtrueだということです。空欄を認めないバリデーションを設定しない限り、
.@user.valid?はtrueなので、assert_notを含むテストは失敗します。6.2.4 フォーマットを検証する
%w[]について
Rubyの%記法と呼ばれているものです。
以下にまとまっています。
『Rubyで%記法(パーセント記法)を使う』 @mogulla3
https://qiita.com/mogulla3/items/46bb876391be07921743
%w[]は配列を作ります。スペースで区切りを指定します。
カンマやクオーテーションを省略して配列を作ることができます。test "email validation should accept valid addresses" do valid_addresses = %w[user@example.com USER@foo.COM A_US-ER@foo.bar.org first.last@foo.jp alice+bob@baz.cn] valid_addresses.each do |valid_address| @user.email = valid_address assert @user.valid?, "#{valid_address.inspect} should be valid" end endこのテストでは、
まず、
valid_addressに有効と思われるメールアドレスの例を配列として定義します。次に、
.eachメソッドで配列の中身をひとつずつ取り出してassertにかけます。assertメソッドの第2引数は、エラーメッセージになっています。assartが失敗した際に呼び出されます。
ちなみに、
.inspectメソッドはオブジェクトや配列などに対して使用すると、対象の型に沿った文字列を返します。正規表現について
validates :email, format: { with: /<regular expression>/ }formatというオプションは引数に「正規表現(regex)」をとります。
正規表現は、文字列のマッチングに使うと便利な言語です。/\A[\w+\-.]+@[a-z\d\-.]+\.[a-z]+\z/i上記はメールアドレスを正規表現で表したものです。
「英数字の組み合わせ」@「英数字の組み合わせ」.「英数字の組み合わせ」という内容です。
6.2.5 一意性を検証する
  test "email addresses should be unique" do
    duplicate_user = @user.dup
    @user.save
    assert_not duplicate_user.valid?
  end
@user.dupの.dupメソッドはオブジェクトのコピーを作成して返すメソッドです。
@userのコピーを作成し、変数duplicate_userに格納しています。
@userと同じ情報を持つオブジェクトは、作成できてはなりません。
duplicate_user.valid?がtrueつまり有効なメールアドレスとして判定されると、テストは失敗します。
@userと同じ情報を持つオブジェクトの作成を許可しないよう、Userクラスにバリデーションを追加してテストが通るように修正します。データベースのインデックスを追加する
class AddIndexToUsersEmail < ActiveRecord::Migration[5.0]
  def change
    add_index :users, :email, unique: true
  end
end
add_indexはRailsの関数です。テーブルにインデックスを追加します。add_index :users, :email, unique: true
第一引数はインデックスを追加するテーブル名(
users)第二引数はインデックスを追加するカラム名(
第三引数はオプション追加(
unique: true)以下のようなオプションを設定できます。
:name #インデックスの名前
:unique #trueを指定するとユニークなインデックス
:length #インデックスに含まれるカラムの長さ
例えば、あるメールアドレスを使ってログインする場合、
- インデックスを使わない場合だと、データベースの隅から隅まで検索をおこなわなければいけません。
* インデックスを貼っておけば、アルファベット順に検索したり、長さ順に検索したりできます。
このチュートリアルでは、ユニークであることを保証するためにインデックスを使っています。
6.32: email属性を小文字に変換してメールアドレスの一意性を保証する
class User < ApplicationRecord
  before_save { self.email = email.downcase }#コレ
  validates :name,  presence: true, length: { maximum: 50 }
  VALID_EMAIL_REGEX = /\A[\w+\-.]+@[a-z\d\-.]+\.[a-z]+\z/i
  validates :email, presence: true, length: { maximum: 255 },
                    format: { with: VALID_EMAIL_REGEX },
                    uniqueness: { case_sensitive: false }
end
before_saveはデータベースへの保存前に、引数の関数(コールバック関数)を実行します。
before_saveはnewされるたびに起動するので、selfはnewしたインスタンス自身です。自分自身のメールアドレスに対して.downcaseで小文字に変換します。なお、
self.email = self.email.downcaseの右辺
selfを省略した書き方になっています。6.33: リスト 6.32のメールアドレスの小文字化に対するテスト
  test "email addresses should be saved as lower-case" do
    mixed_case_email = "Foo@ExAMPle.CoM"
    @user.email = mixed_case_email
    @user.save
    assert_equal mixed_case_email.downcase, @user.reload.email
  end
まず、テスト用に
"Foo@ExAMPle.CoM"大文字小文字を含むアドレスを用意
@user.emailに上書きし、.saveでデータベースに保存する...けど、でも、データベースへの保存の前に、Userクラスの
before_save { self.email = email.downcase }が起動。小文字にしてから@userは保存される。「
"Foo@ExAMPle.CoM"に.downcaseを使用した文字列」と、「データベースに保存された文字列」が同じかどうかassert_equalで検証する。【補足】メールアドレスの検証まとめ
- メールアドレスの長さは255文字を上限とするバリデーション追加
- 正規表現でメールアドレスを表現し、それに合わない文字列はNGとするバリデーション追加
- 大文字・小文字を区別せず、ユニークであるようバリデーション追加
- データベース内でもユニークであることを保証するため、インデックスをモデルに追加
- データベースへの保存の際に、データベースに保存される直前にすべての文字列を小文字に変換し、大文字・小文字の区別をさらに安全にする
6.3.1 ハッシュ化されたパスワード
class User < ApplicationRecord
  before_save { self.email = email.downcase }
  validates :name, presence: true, length: { maximum: 50 }
  VALID_EMAIL_REGEX = /\A[\w+\-.]+@[a-z\d\-.]+\.[a-z]+\z/i
  validates :email, presence: true, length: { maximum: 255 },
                    format: { with: VALID_EMAIL_REGEX },
                    uniqueness: { case_sensitive: false }
  has_secure_password #これ
end
Railsにおいてパスワードの実装は、以下をまず実装する。
データベースに
password_digestカラムを追加するモデルに
has_secure_passwordを追加するbcryptをGemfileに追加する(よりセキュアに)
テストコード内の仮想インスタンスのプロパティに
password: "文字列", password_confirmation: "文字列"を追加する(has_secure_passwordによって仮想属性が追加されているため)6.3.3 パスワードの最小文字数
多重代入について
  test "password should be present (nonblank)" do
    @user.password = @user.password_confirmation = " " * 6
    assert_not @user.valid?
  end

  test "password should have a minimum length" do
    @user.password = @user.password_confirmation = "a" * 5
    assert_not @user.valid?
  end
passwordとpassword_confirmationの2つの属性に同時に代入を行っています。
上のテストは、スペースが6文字続く場合
下のテストは、パスワードが5文字しかない場合
がfalseになるようテストしています。
- 投稿日:2019-07-11T22:21:47+09:00
【Rails】ログイン機能について
sessionを使用したrailsのログイン機能についてのメモです。
ログイン機能の概要
sessionにユーザの情報があるかどうかを判断します。
sessionにユーザの情報が無い場合
→サインイン(ユーザ登録画面)へ
sessionにユーザの情報がある場合
→ログイン後のページを表示というのがログイン機能基本的な流れかなと思います。
railsでは、sessionにユーザの情報を自動で暗号化して保持することができるので、こちらで考えることは少なくて済みます。
ユーザ登録について簡単にあとめた記事も公開しているので、参考にしてください。
コントローラ
ログイン機能で実装するのは、new,create,destroyのアクションです。
下記のコードがログイン機能のコントローラです。
session.rbclass SessionsController < ApplicationController def new end def create email = params[:session][:email].downcase password = params[:session][:password] if login(email, password) flash[:success] = 'ログインにしました' redirect_to @user else flash.now[:danger] = 'ログインに失敗しました' render 'new' end end def destroy session[:user_id] = nil flash[:success] = 'ログアウトしました' redirect_to root_url end private def login(email, password) @user = User.find_by(email: email) if @user && @user.authenticate(password) session[:user_id] = @user.id return true else return false end end endcreateアクションでは、ログインに成功すると、ユーザの詳細画面へ、ログインに失敗すればもう一度ログイン画面へとページ移行するようになっています。
login(email, password)では、入力されたemailとpasswordを引数に取り、ユーザが登録しているかどうかの確認を行っています。
view画面
ログイン画面です。CSSを適用していない最低限の画面です。笑
index.html<%= form_for(:session, url: login_path) do |f| %> <div class="form-group"> <%= f.label :email, 'Email' %> <%= f.email_field :email, class: 'form-control' %> </div> <div class="form-group"> <%= f.label :password, 'Password' %> <%= f.password_field :password, class: 'form-control' %> </div> <%= f.submit 'Log in', class: 'btn btn-primary btn-block' %> <% end %> <p>New user? <%= link_to 'サインアップ画面', signup_path %></p>超見にくいですが、最低限のログイン画面です。
サインアップ画面は、ユーザ登録に記述してあります。
ログイン後の画面ですが、
下記のコードの中にログイン後に表示したいコードを記述します。<% if logged_in? %> ログイン後に表示したいコード <% end %>ログイン要求画面
ユーザがログインしていない場合に、ログインを要求する機能です。
アプリケーションコントローラに実装し、どのコントローラからでも呼び出せるようにします。
application_controller.rbclass ApplicationController < ActionController::Base def require_user_logged_in unless logged_in? redirect_to login_url end end def current_user @current_user ||= User.find_by(id: session[:user_id]) end def logged_in? !!current_user end endrequire_user_logged_inによって、ユーザがログインしているかどうか判別するコードです。
アプリケーションコントローラに記述しているので、ほかのコントローラでも呼び出すことが出来ます
before_actioの中に記述するのがスマートです。before_action :require_user_logged_in, only: [:index, :show]以上です!これでログイン機能が実装できているはず!

- 投稿日:2019-07-11T19:54:09+09:00
【Rails】Active Storageで拡張子のvalidateを作成する時の注意点
はじめに
タイトル通りActive Storageで拡張子に関するvalidateを作成したところ、Userがサインアップする時にエラーが出てしまった。
事象
Userモデルに以下のような感じで、Active Storageでアップロードするimageに対して拡張子を指定するvalidateを作成した。
user.rbclass User < ApplicationRecord has_one_attached :image validate :image_content_type def image_content_type extension = ['image/png', 'image/jpg', 'image/jpeg'] errors.add(:image, "の拡張子が間違っています") unless image.content_type.in?(extension) endところがこの後、userを新規アカウント登録させようとすると以下のエラーが出てしまった。
content_type delegated to attachment, but attachment is nil
原因
今回の場合はUserをcreateする時にemailとpasswordしかpostしないので、
当然imageはparamsに乗らないため、image.attached?はfalseになります。
上記のエラーはimageがattachedされてないのにcontent_typeを呼び出したことによるエラーっぽいです。解決方法
image.attached?がfalseの時はvalidateしないようにすれば解決なので、user.rbclass User < ApplicationRecord has_one_attached :image validate :image_content_type, if: :was_attached? def image_content_type extension = ['image/png', 'image/jpg', 'image/jpeg'] errors.add(:image, "の拡張子が間違っています") unless image.content_type.in?(extension) end def was_attached? self.image.attached? endこれで無事Userがcreate出来るようになりました。

- 投稿日:2019-07-11T19:06:38+09:00
form_forメソッド生成されるinputタグ+「post」httpメソッドで送られる値について
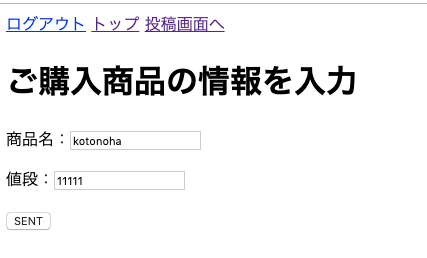
items_controller.rbclass ItemsController < ApplicationController def index # itemsテーブルの中身すべてを@itemsインスタンス変数に代入 @items = Item.all end # 新しいユーザーを登録する画面に移動 def new # itemsテーブルに紐付いたインスタンスを作成し、インスタンス変数に代入 @item = Item.new end # new.htmlからpostで送信されたデータを受け取る def create # binding.pry Item.create(name: item_params[:name], price: item_params[:price]) end # Strong Parameter private def item_params params.require(:item).permit(:name, :price) end endnew.html.erb<%= form_for @item, method: :post do |f| %> <h1>ご購入商品の情報を入力</h1> <p>商品名:<%= f.text_field :name %></p> <p>値段:<%= f.text_field :price %></p> <input type="submit" value="SENT"> <% end %>上記のようなcontrollerファイルと、erbファイルがあったとする。
疑問に思ったこと
①
<%= form_for @item, method: :post do |f| %>
↑この1行だけでitems_controller.rbのcreateアクションにデータを飛ばせるって謎だな・・・(腑に落ちない)人生逆転サロンで質問してみると、どうやらform_forメソッドが略されている模様。
↓略されているバージョン
new.html.erb<%= form_for @item, method: :post do |f| %> <h1>ご購入商品の情報を入力</h1> <p>商品名:<%= f.text_field :name %></p> <p>値段:<%= f.text_field :price %></p> <input type="submit" value="SENT"> <% end %>↓略されていないバージョン
new.html.erb<%= form_for @item, as: :item, url: items_path, html: { class: "new_item", id: "new_item" } do |f| %> <h1>ご購入商品の情報を入力</h1> <p>商品名:<%= f.text_field :name %></p> <p>値段:<%= f.text_field :price %></p> <input type="submit" value="SENT"> <% end %>略されていないバージョンで、実際にどういうHTMLが生成されているか見てみよう。
http<form class="new_item" id="new_item" action="/items" accept-charset="UTF-8" method="post"><input name="utf8" type="hidden" value="✓"><input type="hidden" name="authenticity_token" value="gO1KEJfKfbzGU8aLVT6KnfErKHBdoTwXU97YPBXa/+Qm+XK+MTTOZVFJJ9AMINdRMaEIpq/oop1vPQL/ODMGIg=="> <h1>ご購入商品の情報を入力</h1> <p>商品名:<input type="text" name="item[name]" id="item_name"></p> <p>値段:<input type="text" name="item[price]" id="item_price"></p> <input type="submit" value="SENT"> </form>
- 投稿日:2019-07-11T19:06:38+09:00
form_forメソッド作成されるhtmlについて
items_controller.rbclass ItemsController < ApplicationController def index # itemsテーブルの中身すべてを@itemsインスタンス変数に代入 @items = Item.all end # 新しいユーザーを登録する画面に移動 def new # itemsテーブルに紐付いたインスタンスを作成し、インスタンス変数に代入 @item = Item.new end # new.htmlからpostで送信されたデータを受け取る def create # binding.pry Item.create(name: item_params[:name], price: item_params[:price]) end # Strong Parameter private def item_params params.require(:item).permit(:name, :price) end endnew.html.erb<%= form_for @item, method: :post do |f| %> <h1>ご購入商品の情報を入力</h1> <p>商品名:<%= f.text_field :name %></p> <p>値段:<%= f.text_field :price %></p> <input type="submit" value="SENT"> <% end %>上記のようなcontrollerファイルと、erbファイルがあったとする。
疑問に思ったこと
<%= form_for @item, method: :post do |f| %>
↑この1行だけでitems_controller.rbのcreateアクションにデータを飛ばせるって謎だな・・・(腑に落ちない)人生逆転サロンで質問してみると、どうやらform_forメソッドが略されている模様。
↓略されているバージョン
new.html.erb<%= form_for @item, method: :post do |f| %> <h1>ご購入商品の情報を入力</h1> <p>商品名:<%= f.text_field :name %></p> <p>値段:<%= f.text_field :price %></p> <input type="submit" value="SENT"> <% end %>↓略されていないバージョン
new.html.erb<%= form_for @item, as: :item, url: items_path, html: { class: "new_item", id: "new_item" } do |f| %> <h1>ご購入商品の情報を入力</h1> <p>商品名:<%= f.text_field :name %></p> <p>値段:<%= f.text_field :price %></p> <input type="submit" value="SENT"> <% end %>略されていないバージョンで、実際にどういうHTMLが生成されているか見てみよう↓
(略されているバージョンでも同じHTMLが作成されることは確認済み)ブラウザ上で作成されたHTML<form class="new_item" id="new_item" action="/items" accept-charset="UTF-8" method="post"><input name="utf8" type="hidden" value="✓"><input type="hidden" name="authenticity_token" value="gO1KEJfKfbzGU8aLVT6KnfErKHBdoTwXU97YPBXa/+Qm+XK+MTTOZVFJJ9AMINdRMaEIpq/oop1vPQL/ODMGIg=="> <h1>ご購入商品の情報を入力</h1> <p>商品名:<input type="text" name="item[name]" id="item_name"></p> <p>値段:<input type="text" name="item[price]" id="item_price"></p> <input type="submit" value="SENT"> </form>上記を1つずつ紐解いていくと・・・
url: items_path→action="/items"
html: { class: "new_item", id: "new_item" }→class="new_item" id="new_item"
f.text_field :name→<input type="text" name="item[name]" id="item_name">
f.text_field :price→<input type="text" name="item[price]" id="item_price">「ん???じゃあ、
as: :itemは何をしているの・・・?」と新たな疑問が浮かんだ
調べるとas:はform_forのオプションであり、これを指定することでparamsのハッシュのキーを上書きできるのだ
as: :kotonohaに修正↓<%= form_for @item, as: :kotonoha, url: items_path, html: { class: "new_item", id: "new_item" } do |f| %> <h1>ご購入商品の情報を入力</h1> <p>商品名:<%= f.text_field :name %></p> <p>値段:<%= f.text_field :price %></p> <input type="submit" value="SENT"> <% end %>
params.require(:kotonoha)に修正↓class ItemsController < ApplicationController def index # itemsテーブルの中身すべてを@itemsインスタンス変数に代入 @items = Item.all end # 新しいユーザーを登録する画面に移動 def new # itemsテーブルに紐付いたインスタンスを作成し、インスタンス変数に代入 @item = Item.new end # new.htmlからpostで送信されたデータを受け取る def create # binding.pry Item.create(name: item_params[:name], price: item_params[:price]) end # Strong Parameter private def item_params params.require(:kotonoha).permit(:name, :price) end end上記でフォームのデータを飛ばしてみる
binding.pryで中身を見ると下記のようにデータを取り出せる
[1] pry(#<ItemsController>)> params
=> <ActionController::Parameters {"utf8"=>"✓", "authenticity_token"=>"Fxno0T/Z44CIOmfkHAdxph2I9yHZUFtDI2Nsj5SC4X9aDep+aAgPAQeVJJJ+v5S3ePjpmW5t0SVN7NgkLcEGCw==", "kotonoha"=>{"name"=>"kotonoha", "price"=>"11111"}, "controller"=>"items", "action"=>"create"} permitted: false>
[2] pry(#<ItemsController>)> params[:kotonoha]
=> <ActionController::Parameters {"name"=>"kotonoha", "price"=>"11111"} permitted: false>
[3] pry(#<ItemsController>)> params[:kotonoha][:name]
=> "kotonoha"
これは面白い・・・(むずかしいですな〜〜〜!)
参考記事↓
https://techracho.bpsinc.jp/hachi8833/2017_04_20/38378
- 投稿日:2019-07-11T16:56:41+09:00
【Everyday Rails 6章】AWS Cloud9でヘッドレスドライバ使用時のエラー対処
Cloud9だとChromeエラーで詰まったので、PhantomJSを使うことにした
『Everyday Rails -RSpecによるRailsテスト入門』の第6章「フィーチャスペックで UI をテストする」をAWSのCloud9を使って進めていたところ、「JavaScript を使った操作をテストする」付近からChrome周りのエラーが出てしまいテストが通らなくなった。
エラー内容としては以下の記事のものを一通り確認。
AWS Cloud9でCapybara+Selenium+Chrome設定時のエラーとその対処法について[ Everyday Rails 6章 ]上記の対応を試すが、通らない。。。
書籍を読み進めたら「Chrome使えなかったらPhantomJS使ってね」との記述があったので、その通りに追加。
Gemfilegroup :test do gem 'capybara', '~> 2.15.4' gem 'poltergeist', '~> 1.15.0' gem 'launchy', '~> 2.4.3' endspec/support/capybara.rbrequire 'capybara/poltergeist' Capybara.javascript_driver = :poltergeist実行するとエラー。
Cliver::Dependency::NotFound:
Could not find an executable ["phantomjs"] on your path.
そもそもCloud9にPhantomjsをインストールする必要があった。。。
結論、以下の記事でインストールできました
- Install PhantomJS on Amazon Linux
- インストール手順
- PhantomJSをインストールする(Amazon Linux)
- 上の記事を日本語で説明してくださっている記事がありました!
実際のターミナル
$ sudo yum install fontconfig freetype freetype-devel fontconfig-devel libstdc++
Loaded plugins: priorities, update-motd, upgrade-helper
amzn-main                                                                            | 2.1 kB  00:00:00
amzn-updates                                                                         | 2.5 kB  00:00:00
1063 packages excluded due to repository priority protections
Package fontconfig-2.8.0-5.8.amzn1.x86_64 already installed and latest version
Package freetype-2.3.11-15.14.amzn1.x86_64 already installed and latest version
Package libstdc++48-4.8.5-28.142.amzn1.x86_64 already installed and latest version
Resolving Dependencies
--> Running transaction check
---> Package fontconfig-devel.x86_64 0:2.8.0-5.8.amzn1 will be installed
---> Package freetype-devel.x86_64 0:2.3.11-15.14.amzn1 will be installed
--> Finished Dependency Resolution

Dependencies Resolved

============================================================================================================
 Package                      Arch               Version                        Repository             Size
============================================================================================================
Installing:
 fontconfig-devel             x86_64             2.8.0-5.8.amzn1                amzn-main             210 k
 freetype-devel               x86_64             2.3.11-15.14.amzn1             amzn-main             411 k

Transaction Summary
============================================================================================================
Install  2 Packages

Total download size: 621 k
Installed size: 3.0 M
Is this ok [y/d/N]: y
Downloading packages:
(1/2): fontconfig-devel-2.8.0-5.8.amzn1.x86_64.rpm                                   | 210 kB  00:00:00
(2/2): freetype-devel-2.3.11-15.14.amzn1.x86_64.rpm                                  | 411 kB  00:00:00
------------------------------------------------------------------------------------------------------------
Total                                                                       1.1 MB/s | 621 kB  00:00:00
Running transaction check
Running transaction test
Transaction test succeeded
Running transaction
  Installing : freetype-devel-2.3.11-15.14.amzn1.x86_64                                                 1/2
  Installing : fontconfig-devel-2.8.0-5.8.amzn1.x86_64                                                  2/2
  Verifying  : fontconfig-devel-2.8.0-5.8.amzn1.x86_64                                                  1/2
  Verifying  : freetype-devel-2.3.11-15.14.amzn1.x86_64                                                 2/2

Installed:
  fontconfig-devel.x86_64 0:2.8.0-5.8.amzn1            freetype-devel.x86_64 0:2.3.11-15.14.amzn1

Complete!
$ wget https://bitbucket.org/ariya/phantomjs/downloads/phantomjs-1.9.8-linux-x86_64.tar.bz2 --2019-07-11 06:53:28-- https://bitbucket.org/ariya/phantomjs/downloads/phantomjs-1.9.8-linux-x86_64.tar.bz2 Resolving bitbucket.org (bitbucket.org)... 18.205.93.2, 18.205.93.0, 18.205.93.1, ... Connecting to bitbucket.org (bitbucket.org)|18.205.93.2|:443... connected. HTTP request sent, awaiting response... 302 Found Location: https://bbuseruploads.s3.amazonaws.com/ariya/phantomjs/downloads/phantomjs-1.9.8-linux-x86_64.tar.bz2?Signature=1RMK0UmboxwRxkZ2nr12vRCWvQU%3D&Expires=1562829028&AWSAccessKeyId=AKIAIQWXW6WLXMB5QZAQ&versionId=null&response-content-disposition=attachment%3B%20filename%3D%22phantomjs-1.9.8-linux-x86_64.tar.bz2%22 [following] --2019-07-11 06:53:28-- https://bbuseruploads.s3.amazonaws.com/ariya/phantomjs/downloads/phantomjs-1.9.8-linux-x86_64.tar.bz2?Signature=1RMK0UmboxwRxkZ2nr12vRCWvQU%3D&Expires=1562829028&AWSAccessKeyId=AKIAIQWXW6WLXMB5QZAQ&versionId=null&response-content-disposition=attachment%3B%20filename%3D%22phantomjs-1.9.8-linux-x86_64.tar.bz2%22 Resolving bbuseruploads.s3.amazonaws.com (bbuseruploads.s3.amazonaws.com)... 52.216.82.32 Connecting to bbuseruploads.s3.amazonaws.com (bbuseruploads.s3.amazonaws.com)|52.216.82.32|:443... connected. HTTP request sent, awaiting response... 200 OK Length: 13163325 (13M) [application/x-tar] Saving to: ‘phantomjs-1.9.8-linux-x86_64.tar.bz2’ phantomjs-1.9.8-linux-x86_ 100%[========================================>] 12.55M 55.2MB/s in 0.2s 2019-07-11 06:53:28 (55.2 MB/s) - ‘phantomjs-1.9.8-linux-x86_64.tar.bz2’ saved [13163325/13163325]$ sudo mkdir -p /opt/phantomjs$ bzip2 -d phantomjs-1.9.8-linux-x86_64.tar.bz2$ sudo tar -xvf phantomjs-1.9.8-linux-x86_64.tar --directory /opt/phantomjs/ --strip-components 1 phantomjs-1.9.8-linux-x86_64/bin/ phantomjs-1.9.8-linux-x86_64/bin/phantomjs phantomjs-1.9.8-linux-x86_64/examples/ phantomjs-1.9.8-linux-x86_64/examples/scandir.js phantomjs-1.9.8-linux-x86_64/examples/technews.coffee phantomjs-1.9.8-linux-x86_64/examples/tweets.js phantomjs-1.9.8-linux-x86_64/examples/rasterize.coffee phantomjs-1.9.8-linux-x86_64/examples/pagecallback.js phantomjs-1.9.8-linux-x86_64/examples/printheaderfooter.js phantomjs-1.9.8-linux-x86_64/examples/follow.js phantomjs-1.9.8-linux-x86_64/examples/run-jasmine.coffee phantomjs-1.9.8-linux-x86_64/examples/module.js phantomjs-1.9.8-linux-x86_64/examples/waitfor.coffee phantomjs-1.9.8-linux-x86_64/examples/stdin-stdout-stderr.coffee phantomjs-1.9.8-linux-x86_64/examples/pizza.js phantomjs-1.9.8-linux-x86_64/examples/seasonfood.coffee phantomjs-1.9.8-linux-x86_64/examples/unrandomize.js phantomjs-1.9.8-linux-x86_64/examples/modernizr.js phantomjs-1.9.8-linux-x86_64/examples/waitfor.js phantomjs-1.9.8-linux-x86_64/examples/direction.js phantomjs-1.9.8-linux-x86_64/examples/arguments.coffee phantomjs-1.9.8-linux-x86_64/examples/render_multi_url.js phantomjs-1.9.8-linux-x86_64/examples/run-qunit.js phantomjs-1.9.8-linux-x86_64/examples/printheaderfooter.coffee phantomjs-1.9.8-linux-x86_64/examples/ipgeocode.js phantomjs-1.9.8-linux-x86_64/examples/ipgeocode.coffee phantomjs-1.9.8-linux-x86_64/examples/version.js phantomjs-1.9.8-linux-x86_64/examples/movies.js phantomjs-1.9.8-linux-x86_64/examples/child_process-examples.js phantomjs-1.9.8-linux-x86_64/examples/loadurlwithoutcss.coffee phantomjs-1.9.8-linux-x86_64/examples/version.coffee phantomjs-1.9.8-linux-x86_64/examples/seasonfood.js phantomjs-1.9.8-linux-x86_64/examples/server.js phantomjs-1.9.8-linux-x86_64/examples/countdown.js phantomjs-1.9.8-linux-x86_64/examples/rasterize.js phantomjs-1.9.8-linux-x86_64/examples/injectme.js phantomjs-1.9.8-linux-x86_64/examples/run-jasmine.js phantomjs-1.9.8-linux-x86_64/examples/post.js phantomjs-1.9.8-linux-x86_64/examples/imagebin.coffee phantomjs-1.9.8-linux-x86_64/examples/pizza.coffee phantomjs-1.9.8-linux-x86_64/examples/hello.coffee phantomjs-1.9.8-linux-x86_64/examples/features.js phantomjs-1.9.8-linux-x86_64/examples/movies.coffee phantomjs-1.9.8-linux-x86_64/examples/tweets.coffee phantomjs-1.9.8-linux-x86_64/examples/injectme.coffee phantomjs-1.9.8-linux-x86_64/examples/features.coffee phantomjs-1.9.8-linux-x86_64/examples/colorwheel.coffee phantomjs-1.9.8-linux-x86_64/examples/walk_through_frames.js phantomjs-1.9.8-linux-x86_64/examples/printmargins.coffee phantomjs-1.9.8-linux-x86_64/examples/printmargins.js phantomjs-1.9.8-linux-x86_64/examples/scandir.coffee phantomjs-1.9.8-linux-x86_64/examples/loadspeed.coffee phantomjs-1.9.8-linux-x86_64/examples/printenv.js phantomjs-1.9.8-linux-x86_64/examples/serverkeepalive.coffee phantomjs-1.9.8-linux-x86_64/examples/fibo.coffee phantomjs-1.9.8-linux-x86_64/examples/echoToFile.coffee phantomjs-1.9.8-linux-x86_64/examples/netlog.js phantomjs-1.9.8-linux-x86_64/examples/useragent.coffee phantomjs-1.9.8-linux-x86_64/examples/child_process-examples.coffee phantomjs-1.9.8-linux-x86_64/examples/weather.coffee phantomjs-1.9.8-linux-x86_64/examples/direction.coffee phantomjs-1.9.8-linux-x86_64/examples/module.coffee phantomjs-1.9.8-linux-x86_64/examples/printenv.coffee phantomjs-1.9.8-linux-x86_64/examples/simpleserver.js phantomjs-1.9.8-linux-x86_64/examples/fibo.js phantomjs-1.9.8-linux-x86_64/examples/imagebin.js phantomjs-1.9.8-linux-x86_64/examples/colorwheel.js phantomjs-1.9.8-linux-x86_64/examples/technews.js phantomjs-1.9.8-linux-x86_64/examples/hello.js phantomjs-1.9.8-linux-x86_64/examples/echoToFile.js phantomjs-1.9.8-linux-x86_64/examples/postserver.coffee phantomjs-1.9.8-linux-x86_64/examples/page_events.coffee phantomjs-1.9.8-linux-x86_64/examples/postserver.js phantomjs-1.9.8-linux-x86_64/examples/weather.js phantomjs-1.9.8-linux-x86_64/examples/countdown.coffee phantomjs-1.9.8-linux-x86_64/examples/netsniff.coffee phantomjs-1.9.8-linux-x86_64/examples/detectsniff.js phantomjs-1.9.8-linux-x86_64/examples/render_multi_url.coffee phantomjs-1.9.8-linux-x86_64/examples/useragent.js phantomjs-1.9.8-linux-x86_64/examples/walk_through_frames.coffee phantomjs-1.9.8-linux-x86_64/examples/post.coffee phantomjs-1.9.8-linux-x86_64/examples/arguments.js phantomjs-1.9.8-linux-x86_64/examples/simpleserver.coffee phantomjs-1.9.8-linux-x86_64/examples/run-qunit.coffee phantomjs-1.9.8-linux-x86_64/examples/outputEncoding.coffee phantomjs-1.9.8-linux-x86_64/examples/phantomwebintro.js phantomjs-1.9.8-linux-x86_64/examples/follow.coffee phantomjs-1.9.8-linux-x86_64/examples/loadspeed.js phantomjs-1.9.8-linux-x86_64/examples/page_events.js phantomjs-1.9.8-linux-x86_64/examples/loadurlwithoutcss.js phantomjs-1.9.8-linux-x86_64/examples/sleepsort.js phantomjs-1.9.8-linux-x86_64/examples/sleepsort.coffee phantomjs-1.9.8-linux-x86_64/examples/netlog.coffee phantomjs-1.9.8-linux-x86_64/examples/outputEncoding.js phantomjs-1.9.8-linux-x86_64/examples/serverkeepalive.js phantomjs-1.9.8-linux-x86_64/examples/phantomwebintro.coffee phantomjs-1.9.8-linux-x86_64/examples/server.coffee phantomjs-1.9.8-linux-x86_64/examples/universe.js phantomjs-1.9.8-linux-x86_64/examples/pagecallback.coffee phantomjs-1.9.8-linux-x86_64/examples/stdin-stdout-stderr.js phantomjs-1.9.8-linux-x86_64/examples/detectsniff.coffee phantomjs-1.9.8-linux-x86_64/examples/unrandomize.coffee phantomjs-1.9.8-linux-x86_64/examples/netsniff.js phantomjs-1.9.8-linux-x86_64/ChangeLog phantomjs-1.9.8-linux-x86_64/README.md phantomjs-1.9.8-linux-x86_64/LICENSE.BSD phantomjs-1.9.8-linux-x86_64/third-party.txt$ sudo ln -s /opt/phantomjs/bin/phantomjs /usr/bin/phantomjsいざテスト実行
成功!
tasks_spec.rbの実行$ bin/rspec spec/features/tasks_spec.rb Running via Spring preloader in process 20323 /home/ec2-user/.rvm/gems/ruby-2.6.3/gems/activerecord-5.1.1/lib/active_record/connection_adapters/abstract_adapter.rb:81: warning: deprecated Object#=~ is called on Integer; it always returns nil Tasks You're running an old version of PhantomJS, update to >= 2.1.1 for a better experience. user toggles a task Finished in 1.99 seconds (files took 0.30678 seconds to load) 1 example, 0 failures
- 投稿日:2019-07-11T16:56:41+09:00
【Everyday Rails 6章 JavaScriptテスト】AWS Cloud9でChromeエラーが出たときの対処法
追記(2019/07/12)
【2019年7月版・動画付き】Cloud9上でEveryday Railsの
js: true付きのフィーチャスペックを実行する手順以下の記事を投稿した翌日、翻訳者の伊藤さんより超迅速に対処方法の記事が公開されました!!
ありがとうございますはじめに
『Everyday Rails -RSpecによるRailsテスト入門』の第6章「フィーチャスペックで UI をテストする」をCloud9を使って進めていたところ、「JavaScript を使った操作をテストする」付近からChrome周りのエラーが出てしまいテストが通らなくなった。
実行環境
- Amazon Linux AMI release 2018.03
- Ruby 2.6.3
- Chrome 75
エラー内容としては以下の記事のものを一通り確認。
AWS Cloud9でCapybara+Selenium+Chrome設定時のエラーとその対処法について[ Everyday Rails 6章 ]上記の対応を試すが、通らない。。。
PhantomJSを使うことにした
書籍を読み進めたら「Chrome使えなかったらPhantomJS使ってね」との記述があったので、その通りに追加。
Gemfilegroup :test do gem 'capybara', '~> 2.15.4' gem 'poltergeist', '~> 1.15.0' gem 'launchy', '~> 2.4.3' endspec/support/capybara.rbrequire 'capybara/poltergeist' Capybara.javascript_driver = :poltergeist実行するとエラー。
Cliver::Dependency::NotFound:
Could not find an executable ["phantomjs"] on your path.
そもそもCloud9にPhantomjsをインストールする必要があった。。。
結論、以下の記事でインストールできました
- Install PhantomJS on Amazon Linux
- インストール手順
- PhantomJSをインストールする(Amazon Linux)
- 上の記事を日本語で説明してくださっている記事がありました!
実際のターミナル
$ sudo yum install fontconfig freetype freetype-devel fontconfig-devel libstdc++
Loaded plugins: priorities, update-motd, upgrade-helper
amzn-main                                                                            | 2.1 kB  00:00:00
amzn-updates                                                                         | 2.5 kB  00:00:00
1063 packages excluded due to repository priority protections
Package fontconfig-2.8.0-5.8.amzn1.x86_64 already installed and latest version
Package freetype-2.3.11-15.14.amzn1.x86_64 already installed and latest version
Package libstdc++48-4.8.5-28.142.amzn1.x86_64 already installed and latest version
Resolving Dependencies
--> Running transaction check
---> Package fontconfig-devel.x86_64 0:2.8.0-5.8.amzn1 will be installed
---> Package freetype-devel.x86_64 0:2.3.11-15.14.amzn1 will be installed
--> Finished Dependency Resolution

Dependencies Resolved

============================================================================================================
 Package                      Arch               Version                        Repository             Size
============================================================================================================
Installing:
 fontconfig-devel             x86_64             2.8.0-5.8.amzn1                amzn-main             210 k
 freetype-devel               x86_64             2.3.11-15.14.amzn1             amzn-main             411 k

Transaction Summary
============================================================================================================
Install  2 Packages

Total download size: 621 k
Installed size: 3.0 M
Is this ok [y/d/N]: y
Downloading packages:
(1/2): fontconfig-devel-2.8.0-5.8.amzn1.x86_64.rpm                                   | 210 kB  00:00:00
(2/2): freetype-devel-2.3.11-15.14.amzn1.x86_64.rpm                                  | 411 kB  00:00:00
------------------------------------------------------------------------------------------------------------
Total                                                                       1.1 MB/s | 621 kB  00:00:00
Running transaction check
Running transaction test
Transaction test succeeded
Running transaction
  Installing : freetype-devel-2.3.11-15.14.amzn1.x86_64                                                 1/2
  Installing : fontconfig-devel-2.8.0-5.8.amzn1.x86_64                                                  2/2
  Verifying  : fontconfig-devel-2.8.0-5.8.amzn1.x86_64                                                  1/2
  Verifying  : freetype-devel-2.3.11-15.14.amzn1.x86_64                                                 2/2

Installed:
  fontconfig-devel.x86_64 0:2.8.0-5.8.amzn1            freetype-devel.x86_64 0:2.3.11-15.14.amzn1

Complete!
$ wget https://bitbucket.org/ariya/phantomjs/downloads/phantomjs-1.9.8-linux-x86_64.tar.bz2 --2019-07-11 06:53:28-- https://bitbucket.org/ariya/phantomjs/downloads/phantomjs-1.9.8-linux-x86_64.tar.bz2 Resolving bitbucket.org (bitbucket.org)... 18.205.93.2, 18.205.93.0, 18.205.93.1, ... Connecting to bitbucket.org (bitbucket.org)|18.205.93.2|:443... connected. HTTP request sent, awaiting response... 302 Found Location: https://bbuseruploads.s3.amazonaws.com/ariya/phantomjs/downloads/phantomjs-1.9.8-linux-x86_64.tar.bz2?Signature=1RMK0UmboxwRxkZ2nr12vRCWvQU%3D&Expires=1562829028&AWSAccessKeyId=AKIAIQWXW6WLXMB5QZAQ&versionId=null&response-content-disposition=attachment%3B%20filename%3D%22phantomjs-1.9.8-linux-x86_64.tar.bz2%22 [following] --2019-07-11 06:53:28-- https://bbuseruploads.s3.amazonaws.com/ariya/phantomjs/downloads/phantomjs-1.9.8-linux-x86_64.tar.bz2?Signature=1RMK0UmboxwRxkZ2nr12vRCWvQU%3D&Expires=1562829028&AWSAccessKeyId=AKIAIQWXW6WLXMB5QZAQ&versionId=null&response-content-disposition=attachment%3B%20filename%3D%22phantomjs-1.9.8-linux-x86_64.tar.bz2%22 Resolving bbuseruploads.s3.amazonaws.com (bbuseruploads.s3.amazonaws.com)... 52.216.82.32 Connecting to bbuseruploads.s3.amazonaws.com (bbuseruploads.s3.amazonaws.com)|52.216.82.32|:443... connected. HTTP request sent, awaiting response... 200 OK Length: 13163325 (13M) [application/x-tar] Saving to: ‘phantomjs-1.9.8-linux-x86_64.tar.bz2’ phantomjs-1.9.8-linux-x86_ 100%[========================================>] 12.55M 55.2MB/s in 0.2s 2019-07-11 06:53:28 (55.2 MB/s) - ‘phantomjs-1.9.8-linux-x86_64.tar.bz2’ saved [13163325/13163325]$ sudo mkdir -p /opt/phantomjs$ bzip2 -d phantomjs-1.9.8-linux-x86_64.tar.bz2$ sudo tar -xvf phantomjs-1.9.8-linux-x86_64.tar --directory /opt/phantomjs/ --strip-components 1 phantomjs-1.9.8-linux-x86_64/bin/ phantomjs-1.9.8-linux-x86_64/bin/phantomjs phantomjs-1.9.8-linux-x86_64/examples/ phantomjs-1.9.8-linux-x86_64/examples/scandir.js phantomjs-1.9.8-linux-x86_64/examples/technews.coffee phantomjs-1.9.8-linux-x86_64/examples/tweets.js phantomjs-1.9.8-linux-x86_64/examples/rasterize.coffee phantomjs-1.9.8-linux-x86_64/examples/pagecallback.js phantomjs-1.9.8-linux-x86_64/examples/printheaderfooter.js phantomjs-1.9.8-linux-x86_64/examples/follow.js phantomjs-1.9.8-linux-x86_64/examples/run-jasmine.coffee phantomjs-1.9.8-linux-x86_64/examples/module.js phantomjs-1.9.8-linux-x86_64/examples/waitfor.coffee phantomjs-1.9.8-linux-x86_64/examples/stdin-stdout-stderr.coffee phantomjs-1.9.8-linux-x86_64/examples/pizza.js phantomjs-1.9.8-linux-x86_64/examples/seasonfood.coffee phantomjs-1.9.8-linux-x86_64/examples/unrandomize.js phantomjs-1.9.8-linux-x86_64/examples/modernizr.js phantomjs-1.9.8-linux-x86_64/examples/waitfor.js phantomjs-1.9.8-linux-x86_64/examples/direction.js phantomjs-1.9.8-linux-x86_64/examples/arguments.coffee phantomjs-1.9.8-linux-x86_64/examples/render_multi_url.js phantomjs-1.9.8-linux-x86_64/examples/run-qunit.js phantomjs-1.9.8-linux-x86_64/examples/printheaderfooter.coffee phantomjs-1.9.8-linux-x86_64/examples/ipgeocode.js phantomjs-1.9.8-linux-x86_64/examples/ipgeocode.coffee phantomjs-1.9.8-linux-x86_64/examples/version.js phantomjs-1.9.8-linux-x86_64/examples/movies.js phantomjs-1.9.8-linux-x86_64/examples/child_process-examples.js phantomjs-1.9.8-linux-x86_64/examples/loadurlwithoutcss.coffee phantomjs-1.9.8-linux-x86_64/examples/version.coffee phantomjs-1.9.8-linux-x86_64/examples/seasonfood.js phantomjs-1.9.8-linux-x86_64/examples/server.js phantomjs-1.9.8-linux-x86_64/examples/countdown.js phantomjs-1.9.8-linux-x86_64/examples/rasterize.js phantomjs-1.9.8-linux-x86_64/examples/injectme.js phantomjs-1.9.8-linux-x86_64/examples/run-jasmine.js phantomjs-1.9.8-linux-x86_64/examples/post.js phantomjs-1.9.8-linux-x86_64/examples/imagebin.coffee phantomjs-1.9.8-linux-x86_64/examples/pizza.coffee phantomjs-1.9.8-linux-x86_64/examples/hello.coffee phantomjs-1.9.8-linux-x86_64/examples/features.js phantomjs-1.9.8-linux-x86_64/examples/movies.coffee phantomjs-1.9.8-linux-x86_64/examples/tweets.coffee phantomjs-1.9.8-linux-x86_64/examples/injectme.coffee phantomjs-1.9.8-linux-x86_64/examples/features.coffee phantomjs-1.9.8-linux-x86_64/examples/colorwheel.coffee phantomjs-1.9.8-linux-x86_64/examples/walk_through_frames.js phantomjs-1.9.8-linux-x86_64/examples/printmargins.coffee phantomjs-1.9.8-linux-x86_64/examples/printmargins.js phantomjs-1.9.8-linux-x86_64/examples/scandir.coffee phantomjs-1.9.8-linux-x86_64/examples/loadspeed.coffee phantomjs-1.9.8-linux-x86_64/examples/printenv.js phantomjs-1.9.8-linux-x86_64/examples/serverkeepalive.coffee phantomjs-1.9.8-linux-x86_64/examples/fibo.coffee phantomjs-1.9.8-linux-x86_64/examples/echoToFile.coffee phantomjs-1.9.8-linux-x86_64/examples/netlog.js phantomjs-1.9.8-linux-x86_64/examples/useragent.coffee phantomjs-1.9.8-linux-x86_64/examples/child_process-examples.coffee phantomjs-1.9.8-linux-x86_64/examples/weather.coffee phantomjs-1.9.8-linux-x86_64/examples/direction.coffee phantomjs-1.9.8-linux-x86_64/examples/module.coffee phantomjs-1.9.8-linux-x86_64/examples/printenv.coffee phantomjs-1.9.8-linux-x86_64/examples/simpleserver.js phantomjs-1.9.8-linux-x86_64/examples/fibo.js phantomjs-1.9.8-linux-x86_64/examples/imagebin.js phantomjs-1.9.8-linux-x86_64/examples/colorwheel.js phantomjs-1.9.8-linux-x86_64/examples/technews.js phantomjs-1.9.8-linux-x86_64/examples/hello.js phantomjs-1.9.8-linux-x86_64/examples/echoToFile.js phantomjs-1.9.8-linux-x86_64/examples/postserver.coffee phantomjs-1.9.8-linux-x86_64/examples/page_events.coffee phantomjs-1.9.8-linux-x86_64/examples/postserver.js phantomjs-1.9.8-linux-x86_64/examples/weather.js phantomjs-1.9.8-linux-x86_64/examples/countdown.coffee phantomjs-1.9.8-linux-x86_64/examples/netsniff.coffee phantomjs-1.9.8-linux-x86_64/examples/detectsniff.js phantomjs-1.9.8-linux-x86_64/examples/render_multi_url.coffee phantomjs-1.9.8-linux-x86_64/examples/useragent.js phantomjs-1.9.8-linux-x86_64/examples/walk_through_frames.coffee phantomjs-1.9.8-linux-x86_64/examples/post.coffee phantomjs-1.9.8-linux-x86_64/examples/arguments.js phantomjs-1.9.8-linux-x86_64/examples/simpleserver.coffee phantomjs-1.9.8-linux-x86_64/examples/run-qunit.coffee phantomjs-1.9.8-linux-x86_64/examples/outputEncoding.coffee phantomjs-1.9.8-linux-x86_64/examples/phantomwebintro.js phantomjs-1.9.8-linux-x86_64/examples/follow.coffee phantomjs-1.9.8-linux-x86_64/examples/loadspeed.js phantomjs-1.9.8-linux-x86_64/examples/page_events.js phantomjs-1.9.8-linux-x86_64/examples/loadurlwithoutcss.js phantomjs-1.9.8-linux-x86_64/examples/sleepsort.js phantomjs-1.9.8-linux-x86_64/examples/sleepsort.coffee phantomjs-1.9.8-linux-x86_64/examples/netlog.coffee phantomjs-1.9.8-linux-x86_64/examples/outputEncoding.js phantomjs-1.9.8-linux-x86_64/examples/serverkeepalive.js phantomjs-1.9.8-linux-x86_64/examples/phantomwebintro.coffee phantomjs-1.9.8-linux-x86_64/examples/server.coffee phantomjs-1.9.8-linux-x86_64/examples/universe.js phantomjs-1.9.8-linux-x86_64/examples/pagecallback.coffee phantomjs-1.9.8-linux-x86_64/examples/stdin-stdout-stderr.js phantomjs-1.9.8-linux-x86_64/examples/detectsniff.coffee phantomjs-1.9.8-linux-x86_64/examples/unrandomize.coffee phantomjs-1.9.8-linux-x86_64/examples/netsniff.js phantomjs-1.9.8-linux-x86_64/ChangeLog phantomjs-1.9.8-linux-x86_64/README.md phantomjs-1.9.8-linux-x86_64/LICENSE.BSD phantomjs-1.9.8-linux-x86_64/third-party.txt$ sudo ln -s /opt/phantomjs/bin/phantomjs /usr/bin/phantomjsいざテスト実行
tasks_spec.rbの実行$ bin/rspec spec/features/tasks_spec.rb Running via Spring preloader in process 20323 /home/ec2-user/.rvm/gems/ruby-2.6.3/gems/activerecord-5.1.1/lib/active_record/connection_adapters/abstract_adapter.rb:81: warning: deprecated Object#=~ is called on Integer; it always returns nil Tasks You're running an old version of PhantomJS, update to >= 2.1.1 for a better experience. user toggles a task Finished in 1.99 seconds (files took 0.30678 seconds to load) 1 example, 0 failures
- 投稿日:2019-07-11T15:34:31+09:00
Railsで動的なセレクトボックスを作る最も簡単な方法。
主に使用する言語はRuby(on Rails), JSです。
動的なセレクトボックスとは?
https://qiita.com/jnchito/items/59a5f6bea3d7be84b839
伊藤さんの書いているこちらの記事を見てみてください。
ここで記述されているセレクトボックスのように親要素が選択された時に子要素のセレクトボックスの中身が選択された親要素に紐づいている子要素になるというものをここでは動的なセレクトボックスと呼んでいます。
上記の記事ではルーティングを設定したり、ajaxの記述をしたりと色々していますが、ある要素を使えばこのセレクトボックスは簡単に実装できます。
結論:template要素を使う
ここでもCategory, SubCategoryのモデルでアソシエーションを組んで実装していきましょう。
class Category < ApplicationRecord
  has_many :sub_categories
end
class SubCategory < ApplicationRecord belongs_to :category endこのアソシエーションによってCategoryモデルとSubCategoryモデルで1対多の関係性を築けました。
次はビューファイルの編集です。
= f.collection_select :category, Category.all, :id, :name, include_blank: "カテゴリーを選択してください"

- Category.all.each do |category|
 %template{id: "sub-category-of-category#{category.id}"}
  = f.collection_select :sub_category, categroy.sub_categories, :id, :name, include_blank: "サブカテゴリーを選択してください"
今の状況はこんな感じです。
<select name="category" id="category">
 <option value="1">カテゴリー1</option>
 .
 .
 .
</select>
<template id="sub-category-of-category1">#document-fragment</template>
<template id="sub-category-of-category2">#document-fragment</template>
<template id="sub-category-of-category3">#document-fragment</template>
<template id="sub-category-of-category4">#document-fragment</template>
<template id="sub-category-of-category5">#document-fragment</template>
.
.
.
template要素とは何か??
template要素は、ページの読み込み時に描画されず、後で JavaScript を使用してインスタンスを生成できるクライアント側のコンテンツを保持するメカニズムです。
(引用元:https://developer.mozilla.org/ja/docs/Web/HTML/Element/template )簡単にいうと、JavaScriptで操作して本文へと挿入しない限りはデベロッパーツールのHTML上には表示されるがビューの見た目には何も影響しないということです。
なのでjsファイル内での記述も書いていきましょう。
今回はjQueryで書いていきます。jsファイル内の記述
$(document).on('turbolinks:load', function() {
 $(document).on('change', '#category', function() {
  let categoryVal = $('#category').val();
  if (categoryVal !== "") {
   let selectedTemplate = $(`#sub-category-of-category${categoryVal}`);
   $('#category').after(selectedTemplate.html());
  };
 });
});
ただ、このままだと初めは親要素のセレクトボックスしかなく、親要素を選択した際に子要素のセレクトボックスが現れるといった記述になることに加えて、一度選択して二度目の選択をする際に新しいセレクトボックスが生成されるという状況になってしまう。
少しビューファイルとjsファイルをいじってそれを直していきます。
= f.collection_select :category, Category.all, :id, :name, include_blank: "カテゴリーを選択してください"

= f.select :sub_category, [], include_blank: "サブカテゴリーを選択してください", class: "default-sub-category-select"

- Category.all.each do |category|
 %template{id: "sub-category-of-category#{category.id}"}
  = f.collection_select :sub_category, categroy.sub_categories, :id, :name, include_blank: "サブカテゴリーを選択してください"
これでページの読み込み時に親要素と子要素(option要素は何もない)が出来上がっている状況である。
ちなみにこの時のデフォルトで表示されている子要素のセレクトボックスのidが'sub_category'になっているということだけ覚えておいていただきたい。(jsファイルでの記述に使うから。)
そこからjsファイルの編集にうつる。
$(document).on('turbolinks:load', function() {
 //HTMLが読み込まれた時の処理
 let categoryVal = $('#category').val();
 //一度目に検索した内容がセレクトボックスに残っている時用のif文
 if (categoryVal !== "") {
  let selectedTemplate = $(`#sub-category-of-category${categoryVal}`);
  $('#sub_category').remove();
  $('#category').after(selectedTemplate.html());
 };

 //先ほどビューファイルに追加したもともとある子要素用のセレクトボックスのHTML
 let defaultSubCategorySelect = `<select name="sub_category" id="sub_category">
<option value>サブカテゴリーを選択してください</option>
</select>`;

 $(document).on('change', '#category', function() {
  let categoryVal = $('#category').val();
  //親要素のセレクトボックスが変更されてvalueに値が入った場合の処理
  if (categoryVal !== "") {
   let selectedTemplate = $(`#sub-category-of-category${categoryVal}`);
   //デフォルトで入っていた子要素のセレクトボックスを削除
   $('#sub_category').remove();
   $('#category').after(selectedTemplate.html());
  }else {
   //親要素のセレクトボックスが変更されてvalueに値が入っていない場合(include_blankの部分を選択している場合)
   $('#sub_category').remove();
   $('#category').after(defaultSubCategorySelect);
  };
 });
});
これで最初のビューに親要素・子要素のセレクトボックスが存在し、親要素が選択されていない場合はoption要素が何もないデフォルトのセレクトボックスが表示され、親要素が選択された際にその要素と紐づいた子要素が入ったセレクトボックスが現れるようになったと思う。ただIEがtemplate要素に対応してないみたいなの見たきがしないでもないからその辺りは注意してください。
リファクタリングはまた今度します。
- 投稿日:2019-07-11T12:31:44+09:00
Rails6 のちょい足しな新機能を試す51(MySQL default編)
はじめに
Rails 6 に追加されそうな新機能を試す第51段。 今回は、
MySQL default編です。
Rails 6 では、 MySQL 8.0.13 以降のデータベースの場合に マイグレーションのカラムを追加するときに default オプションで式を指定できるようになりました。
言い換えると、MySQL 8.0.13 以降で カラムの default に式が使えるようになったことに、Rails が対応したということになります。Ruby 2.6.3, Rails 6.0.0.rc1, MySQL 8.0.16 で確認しました。Rails 6.0.0.rc1 は
gem install rails --prereleaseでインストールできます。$ rails --version Rails 6.0.0.rc1今回は、IPアドレスをソートして表示する機能を作ってみたいと思います。
rails プロジェクトを作る
$ rails new rails6_0_0rc1
$ cd rails6_0_0rc1
scaffold で CRUD の機能を作る
scaffold で Host の CRUD を作成します。
カラムatonは、IPアドレスを数値に変換した値を保存します。$ bin/rails g scaffold Host ip aton:integermigration ファイルを編集する
migration ファイルを編集します。
ipカラムにnull: falseを指定します。
atonのデフォルト値は、MySQL の関数INET_ATON()を使ってipのカラムを変換した値にします。
atonにlimit: 5を指定しているのは、255.255.255を数値に変換した時に正しい値が保存されるようにするためです。db/migrate/20190706063437_create_hosts.rbclass CreateHosts < ActiveRecord::Migration[6.0] def change create_table :hosts do |t| t.string :ip, null: false t.integer :aton, limit: 5, default: -> { '(inet_aton(ip))' } t.timestamps end end end
HostController#indexを変更するIPアドレスをソートして表示するために、
orderを追加します。
ソートのキーはatonにします。app/controllers/hosts_controller.rbclass HostsController < ApplicationController ... def index @hosts = Host.all.order(:aton) end ... endseed データを作る
1件ずつブラウザでデータを登録するのは面倒なので、seed データを作っておきます。
db/seeds.rbHost.create( [ { ip: '192.168.1.1' }, { ip: '192.168.2.1' }, { ip: '192.168.9.1' }, { ip: '192.168.10.1' }, { ip: '192.168.20.1' }, { ip: '192.168.99.1' }, { ip: '192.168.120.1' } ] )データベースを作る
データベースを作って seed データを登録します。
$ bin/rails db:create db:migrate db:seedrails server を実行して Host の一覧を表示する
rails server を実行します。
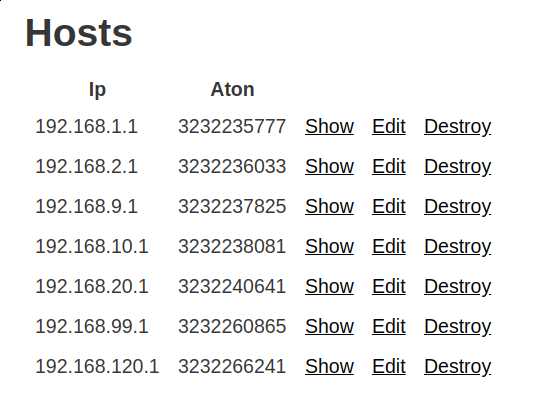
$ bin/rails shttp://localhost:3000/hosts で一覧画面を表示します。
IPアドレスの順番にソートされています。
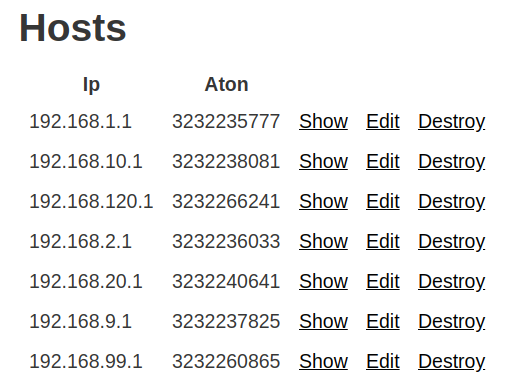
ちなみに
orderで:ipを指定すると文字列としてソートされてしまいます。
その他
ツッコミどころの多いソースかも知れませんが、今回は、あくまで default で式が使えることを確認する目的ですので見逃してください。
あと、今回は試してませんが、インデックスでも式を使うことができるようになっています。試したソース
試したソースは以下にあります。
https://github.com/suketa/rails6_0_0rc1/tree/try051_mysql_default_expression参考情報
- 投稿日:2019-07-11T12:04:25+09:00
Railsのseeds.rbの書き方
はじめに
Userモデルで書いてみます。
書き方
timesを使って書いてみる。
seeds.rbif Rails.env == "development" 10.times do |i| User.create!(email: "test#{i + 1}@example.com", password: "password", password_confirmation: "password") end end作成したユーザー↓
[1] pry(main)> User.all
  User Load (1.2ms)  SELECT "users".* FROM "users"
=> [#<User id: 1, email: "test1@example.com", created_at: "2019-07-11 02:13:55", updated_at: "2019-07-11 02:13:55">,
 #<User id: 2, email: "test2@example.com", created_at: "2019-07-11 02:13:55", updated_at: "2019-07-11 02:13:55">,
 #<User id: 3, email: "test3@example.com", created_at: "2019-07-11 02:13:56", updated_at: "2019-07-11 02:13:56">,
 #<User id: 4, email: "test4@example.com", created_at: "2019-07-11 02:13:56", updated_at: "2019-07-11 02:13:56">,
 #<User id: 5, email: "test5@example.com", created_at: "2019-07-11 02:13:56", updated_at: "2019-07-11 02:13:56">,
 #<User id: 6, email: "test6@example.com", created_at: "2019-07-11 02:13:56", updated_at: "2019-07-11 02:13:56">,
 #<User id: 7, email: "test7@example.com", created_at: "2019-07-11 02:13:56", updated_at: "2019-07-11 02:13:56">,
 #<User id: 8, email: "test8@example.com", created_at: "2019-07-11 02:13:56", updated_at: "2019-07-11 02:13:56">,
 #<User id: 9, email: "test9@example.com", created_at: "2019-07-11 02:13:56", updated_at: "2019-07-11 02:13:56">,
 #<User id: 10, email: "test10@example.com", created_at: "2019-07-11 02:13:56", updated_at: "2019-07-11 02:13:56">]
範囲オブジェクトを使って書いて見る
上と同じ結果になります。
seeds.rbif Rails.env == "development" (1..10).each do |i| User.create!(email: "test#{i}@example.com", password: "password", password_confirmation: "password") end endcreate と create!
create!を使ったほうがいいと思います。
createだとvalidationに失敗したときに例外が発生しないため、思わぬ不具合が起きました。今回、emailのバリデーションに一意性を追加しているのですが、createではエラーが出ず、ユーザーも最初の1人しか作成されませんでした。
createでrails db:seedを実行する
seeds.rbif Rails.env == "development" (1..10).each do |i| User.create(email: "test@example.com", password: "password", password_confirmation: "password") end end$ rails db:seed $作成したユーザー↓
[1] pry(main)> User.all
  User Load (2.9ms)  SELECT "users".* FROM "users"
=> [#<User id: 1, email: "test@example.com", created_at: "2019-07-11 02:33:34", updated_at: "2019-07-11 02:33:34">]
create!でrails db:seedを実行
create!であればちゃんとエラーが出ました。
seeds.rbif Rails.env == "development" (1..10).each do |i| User.create!(email: "test@example.com", password: "password", password_confirmation: "password") end end$ rails db:seed rails aborted! ActiveRecord::RecordInvalid: Validation failed: Email has already been taken /Users/sakakin/rails/sample_sql/db/seeds.rb:3:in `block in <main>' /Users/sakakin/rails/sample_sql/db/seeds.rb:2:in `<main>' /Users/sakakin/rails/sample_sql/bin/rails:9:in `<top (required)>' /Users/sakakin/rails/sample_sql/bin/spring:15:in `<top (required)>' bin/rails:3:in `load' bin/rails:3:in `<main>' Tasks: TOP => db:seed (See full trace by running task with --trace)以上です。
- 投稿日:2019-07-11T11:41:34+09:00
#Ruby #Rails + #rspec で rspec-benchmark gem を ”使わず" に速度検証・ベンチマークテストをする
Speed test and benchmark test "do not use" with rspec-benchmark gem with #Ruby #Rails + #rspec
ポイント
- rspec を使うと色々とテストデータを作成/自動削除などしてくれるので、新しい仕組みを用意しなくて良い
- rspec-benchmark gem がなぜかうまく動かなかった
- 以下の例はデータ生成などはしていないが、 FactoryBot を組み合わせたりすると便利
速度を検証する
require 'benchmark'

describe 'sleep 5 seconds ( expect speed )' do
  subject do
    Benchmark.realtime { sleep 5 }
  end

  it { is_expected.to be < 6 }
end

# sleep 5 seconds ( expect speed )
#  should be < 6
速度は検証せず、標準出力で結果確認だけをする
require 'benchmark'

describe 'sleep 5 seconds ( not expect speed but stdout benchmark result )' do
  subject do
    Benchmark.realtime { sleep 5 }
  end

  it { puts subject }
end

# sleep 5 seconds ( not expect speed but stdout benchmark result )
# 5.003996700048447
#  example at ./spec/some_spec.rb:18
速度検証をしつつ、標準出力で結果も確認する
require 'benchmark'

describe 'sleep 5 seconds ( expect subject result and stdout benchmark result )' do
  subject do
    sleep 5
    true
  end

  it do
    subject_result = nil
    benchmark_time = Benchmark.realtime { subject_result = subject }
    puts benchmark_time

    expect(subject_result).to be true
    expect(benchmark_time).to be < 6
  end
end


# sleep 5 seconds ( expect subject result and stdout benchmark result )
# 5.005656399996951
#   should be < 6
結果の例
rspec -fd some_benchmark_spec.rb
Original by Github issue

- 投稿日:2019-07-11T02:32:38+09:00
ある社内SEが初めて作ったWebサービスの構成と昨今の何でもAWSに物申す
本番システム構成
サービス本体
Webサーバ:Nginx
APサーバ:Puma
DB:PostgreSQL
プログラム:Ruby on Rails
OS:CentOS7
を
さくらのクラウドで動かす。バッチ処理
C#.NET
他省略。たいしたことやってない。を
さくらのクラウドで動かす。DBをサービス本体と共有して、やり取りしてる。今の時代はマイクロサービス的なAPI経由なんでしょうけど、
まあいつか・・・検証環境
社内のそこらへんにあったWindowsPCにVMWareを入れて、その上に上記環境入れて動いています。
WMwareめっちゃいいですよ。壊れても消せばいいし、ファイルコピーすれば他のPC
もっていってもすぐに復元するし。バックアップもファイルコピーしておけばよいし。重いけど。
(ほんとはどっかーとかでやるのが一番いいって分かってる。分かってるんよ!まあいつか・・・)
社内SEの人はWindowsオンリーの人ばかりだと思います。ただ、Webサービス作るにあたっては
どうしてもLinux系のOSに慣れる必要がどうしてもあります。なぜか。
本番環境は結局CentOS7を想定していたので、Windowsだとわけわからないエラーが出ます。
(実際にありました。Windowsではちゃんと動くのに検証環境持っていったら、動かないやつ。
この時の原因はWindowsでしか動作しないPing系のGemを入れていたためでした。分からんて。
そんなん。2日間かかりました。原因調べるの。)
まあ、でも開発はWindowsでしてますがね。てへ。話は戻して、ちなみに本番は
今どきのクラウドサーバにおいて動かしてます。
でも、
AWSじゃないよさくらだよ。なぜか。
日本のサービスだから、とっても分かりやすい。マニュアルも全部日本語やし、
初めてだったが、かなりスムーズに構築できた。
みんなクラウドと言えばAWSみたいな感じですが、取っつきやすさ、課金の
分かりやすさ(従量課金ではない)はさくらがダントツ。
※ちなみにうちの経営者はAWSで!ってミーハーな感じで言ってきてたので、
従量課金で24時間動かしてたら、かなりコストいっちゃいますよ~
想定よりかなりいっちゃう可能性ありますよ~。にやにや。とやんわり伝えたら、
さくらで了承してくれました。ちょっと言いたいこと(AWSに物申す。AWS信者にも。)
はっきり言って小規模の会社で、社内運用並み+αくらいのものであれば、
オンプレミス環境でもあまり問題にならないと思います。
(電源管理、インターネットの帯域管理、Windowsなら勝手に再起動しないでがある程度
求められますが、まあ稼働率90%あればええやん的な。ゆるい感じ。
かけるコストと内容と運用する時間とのバランスを考えると上記のような考えは全然ありです。
今までもこうしてきて、クレームほぼないし。お金を追加で払わなくてよいし。
ほんとに24時間絶対動かさないかんっていうやつであれば、じゃあクラウド考えましょうで良い。)
まあでも経営者はやたらとクラウドでって言うので、これも時代の流れでしょうか。
最初オンプレでも全然OKだと私は思います。なんかやばくなってきてからクラウドに移せばいいし。
オンプレミスからクラウドに移すっていう経験もとても良いものですよ♪また、Webサービス作って、AWSに上げて、いい感じに構成してって、一般ピーポーからしたら
ものすごいハードル高い。
ローカルでもぎりぎり動いているのに、CentOSの理解に一苦労、AWSのドキュメント読みこんで、
AWSの理解に二苦労、ぐぐっても英語ばかりで三苦労ってなると、ほぼ挫折するはず。一般ぴーぽーは。
だから、ほぼ日本語で押し通せて、一番挫折しなさそうな Ruby → さくら という選択になりました。
ただ、さくらもしっかりしたクラウドで他のも似たようなもんだと考えると、
今ならたぶんAWSでも大丈夫な自信が無駄にあります。ということで、一般ぴーぽー社内SEがWebサービス作るなら・・・
- Ruby(on Rails) と さくら で決まり!一番挫折しない組み合わせですよ。ほんとにお勧め。
- DBは何でもいいよ。好きなの。お勧めはPostgreSQL
- エディタはVSCodeを使いましょう。
- Teraterm(SSHでCentOSに入るためのツール。コピペが簡単にできるからとっても重宝する。)
- WinSCP(ファイル転送ソフトだが、CentOSのファイルも見れる。ディレクトリ構成が一目瞭然
最後に
昨今の日本は生産性の向上が叫ばれていますが、ポイントとなるのは開発側の人間ではないです。
導入する側のITリテラシーにかかっています。そして導入側をリードするのが我々社内SEです。
実は生産性の向上に一番寄与するのが我々社内SEのはずなんです。業務フローも分かっていて、
ITの知識もあり、間に入って仕様の調整、工数調整できるのは我々です。
逆に社内SEがしっかりしていないところは、いわゆるベンダーの言いなり価格、言いなり仕様に
なります。自分もベンダー側の人間だったことがあるので・・・
結果、現場で使われない、意味不明な仕様の実装、無駄なお金が飛びます。ただ、上記のしっかりしている社内SEになるには
レガシーな知識にとらわれず、最新のIT知識・その知識を持って簡単なサービスの実装
ができるほどの力は持っていないといけません。と私は思います。と私は思ったからこそ
今更Webサービス作ったりしています。
色々やっていると、実はフルスタックF/W(RubyだとRails)で全て作るような時代は
とうの昔に過ぎ去っており、サーバーサイドとクライアントサイドに明確に分けて
サーバーサイドはAPI実装が基本、クライアントサイドはSPAでの実装が基本というのが今の時代だそうです。
いわゆるマイクロサービス的な~♪ PayPayも3か月で組んだそうですよ。マイクロサービス的な
開発で。昔は考えられなかったのですが、インターネットの速度が劇的に向上したからこそ、こういうのが
できる時代になったんでしょうね。まだまだ私はレガシー社内SEだったということで、今回のお話の締めにしたいと思います。
ああ、書いてすっきりした。
- 投稿日:2019-07-11T01:53:26+09:00
assert_difference~ヘルスケアwebサービスを自分で作る医者の日記~
13章 終わりまで長い、、、
assert_differenceは 引数に渡してものが、do以下によって変わっているかどうかをしらべるもの
test "associated microposts should be destroyed" do
    @user.save
    @user.microposts.create!(content: "Lorem ipsum")
    assert_difference 'Micropost.count', -1 do
      @user.destroy
    end
  end
次回13.2から