- 投稿日:2021-03-01T20:31:42+09:00
(C#)配列の宣言時、要素数を変数で指定する方法。
C#はマクロ定義ができないそうですね。
同じ要素数の配列を何度も宣言したいと思い、変数名を要素数に入力してみたんですがうまくいきませんでした。
int maxObjectNum = 10;
Object[] Objects = new Object[maxObjectNum];
上のように変数で指定するとエラーですが、
const int maxObjectNum = 10;
Object[] Objects = new Object[maxObjectNum];
このように定数にするといけるみたいです。
("変数で指定する方法"ではないですね、ごめんなさい)
- 投稿日:2021-03-01T20:20:07+09:00
C#のArrayもList<T>と同じ様に扱いたい
はじめに
最近はコレクションを処理するのに、LINQばかり使っているので、
Arrayのメソッドを呼び出すことはあまりないのだけれど、稀にArrayのメソッドを呼び出したい時があります。でも、
var items = new[] { 5, 3, 7, 9, 1, 4 };
Array.ForEach(items, Console.WriteLine);
て書くのはなんかイヤです。やっぱり、
var items = new[] { 5, 3, 7, 9, 1, 4 };
items.ForEach(Console.WriteLine);
って書きたいです。
拡張メソッドを定義しよう
そんな時は拡張メソッドの出番です。以下の様な拡張メソッドを定義することで、
ArrayのメソッドもList<T>と同じ様な感覚でコードを書くことができます。public static class ArrayExtensions { public static void ForEach<T>(this T[] array, Action<T> action) { Array.ForEach(array, action); } public static void Sort<T>(this T[] array) where T : IComparable<T> { Array.Sort(array); } }ArrayExtensionsが定義されている名前空間をusingすれば、以下の様な記述が可能になります。
var items = new[] { 5, 3, 7, 9, 1, 4 };
items.Sort();
items.ForEach(Console.WriteLine);
結果は以下の通り。
1
3
4
5
7
9
IndexOfやFindAllなどのメソッドも同様に拡張メソッドにすれば使い勝手もよくなります。
おわりに
まあ、LINQあるのでこういった拡張メソッドを書く必要性もあまり無いんですけどね。
昔書いたブログ記事を読み直していて、拡張メソッドで遊んでいたことを懐かしく思い出したので、こんな記事を書いてみました。
- 投稿日:2021-03-01T18:13:35+09:00
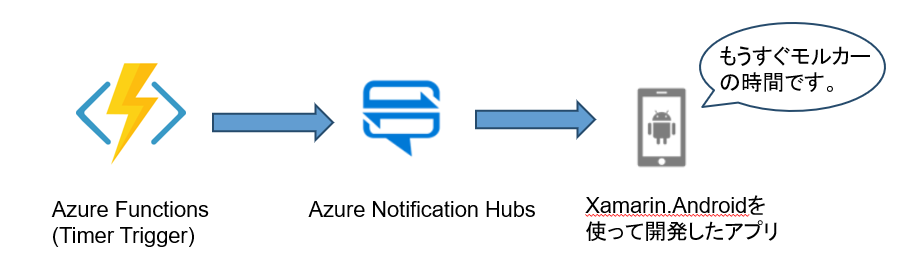
Azure Notification Hubsを使ってXamarin.Android アプリにプッシュ通知を試す
はじめに
最近AZ-204を受験して合格しました。
普段仕事で使わない機能についてかなり問われたのですが、
そのなかでAzure Notification Hubsをしっかり使ってみたいなと思ったので試してみました。
Xamarin.Androidも今回初めて使用。環境とか必要なもの
- Visual Studio 2019
- Azureのアカウント
- Googleのアカウント
私の携帯がAndroidということと、macを持っていなかったので今回Androidを採用しました。
作ってみたもの
Xamarin.Android側のアプリの発行はしていないので、デバックでのみの確認ですが。。。
Azure Functionsのタイマートリガーを使って、毎週火曜日の7:25に
もうすぐモルカーが始まるプッシュ通知を送信。
つくりかた
公式のチュートリアルを基本的に参考にして作ったのですが、うまくいかないところがあり、
こちらのサイトAzure Notification HubsでXamarin.FormsアプリにPush通知 メモ (Android編)を真似て作ったらうまくいきました。Firebase プロジェクトを作成
Googleのアカウントを持っていれば無料で作れました。
作成方法はMSの公式チュートリアル通りです。Azureポータルから通知ハブの作成
こちらもMSの公式チュートリアル通りに作成しました。
Xamarin.Android アプリを作成し、通知ハブに接続
Visual Studio プロジェクトを作成し、NuGet パッケージを追加する、Google Services JSON ファイルを追加するという部分までは、MSの公式チュートリアル通りに作成しました。
その先のソースコードはAzure Notification HubsでXamarin.FormsアプリにPush通知 メモ (Android編)を参考にして作成しています。
Firebase Cloud Messaging の登録
AndroidManifest.xml<?xml version="1.0" encoding="utf-8"?> <manifest xmlns:android="http://schemas.android.com/apk/res/android" android:versionCode="1" android:versionName="1.0" package="Google Firebase ConsoleでプロジェクトにFirebase Cloud Messagingを追加するときに入力したパッケージ名"> <uses-sdk android:minSdkVersion="21" android:targetSdkVersion="29" /> <uses-permission android:name="android.permission.INTERNET" /> <uses-permission android:name="com.google.android.c2dm.permission.RECEIVE" /> <uses-permission android:name="android.permission.WAKE_LOCK" /> <uses-permission android:name="android.permission.GET_ACCOUNTS" /> <application android:allowBackup="true" android:icon="@mipmap/ic_launcher" android:label="@string/app_name" android:roundIcon="@mipmap/ic_launcher_round" android:supportsRtl="true" android:theme="@style/AppTheme"></application> <uses-permission android:name="android.permission.ACCESS_NETWORK_STATE" /> </manifest>定数値を定義
Constants.csクラスを作成し、定数値を定義します。
Constants.cspublic static class Constants { public const string ListenConnectionString = "Azureで作成したNotification Hub内のAccess Policiesの名前(DefaultListenSharedAccessSignature)"; public const string NotificationHubName = "Azureで作成したNotification Hubの名前"; }MainActivity.csの編集
MainActivity.cs[Activity(Label = "@string/app_name", Theme = "@style/AppTheme", MainLauncher = true)] public class MainActivity : AppCompatActivity { public const string TAG = "MainActivity"; internal static readonly string CHANNEL_ID = "my_notification_channel"; protected override void OnCreate(Bundle savedInstanceState) { base.OnCreate(savedInstanceState); if (Intent.Extras != null) { foreach (var key in Intent.Extras.KeySet()) { if (key != null) { var value = Intent.Extras.GetString(key); Log.Debug(TAG, "Key: {0} Value: {1}", key, value); } } } IsPlayServicesAvailable(); CreateNotificationChannel(); } public override void OnRequestPermissionsResult(int requestCode, string[] permissions, [GeneratedEnum] Android.Content.PM.Permission[] grantResults) { Xamarin.Essentials.Platform.OnRequestPermissionsResult(requestCode, permissions, grantResults); base.OnRequestPermissionsResult(requestCode, permissions, grantResults); } public bool IsPlayServicesAvailable() { int resultCode = GoogleApiAvailability.Instance.IsGooglePlayServicesAvailable(this); if (resultCode != ConnectionResult.Success) { if (GoogleApiAvailability.Instance.IsUserResolvableError(resultCode)) Log.Debug(TAG, GoogleApiAvailability.Instance.GetErrorString(resultCode)); else { Log.Debug(TAG, "This device is not supported"); Finish(); } return false; } Log.Debug(TAG, "Google Play Services is available."); return true; } private void CreateNotificationChannel() { if (Build.VERSION.SdkInt < BuildVersionCodes.O) { // Notification channels are new in API 26 (and not a part of the // support library). There is no need to create a notification // channel on older versions of Android. return; } var channelName = CHANNEL_ID; var channelDescription = string.Empty; var channel = new NotificationChannel(CHANNEL_ID, channelName, NotificationImportance.Default) { Description = channelDescription }; var notificationManager = (NotificationManager)GetSystemService(NotificationService); notificationManager.CreateNotificationChannel(channel); } }MyFirebaseMessagingService.csの追加
ここでは受信したメッセージの処理をしています。
SetContentTitleのところを変えてあげれば、push通知時のタイトルが変えられますね。MyFirebaseMessagingService.cs[Service] [IntentFilter(new[] { "com.google.firebase.MESSAGING_EVENT" })] [IntentFilter(new[] { "com.google.firebase.INSTANCE_ID_EVENT" })] public class MyFirebaseMessagingService : FirebaseMessagingService { const string TAG = "MyFirebaseMsgService"; NotificationHub hub; public override void OnMessageReceived(RemoteMessage message) { Log.Debug(TAG, "From: " + message.From); if (message.GetNotification() != null) { //These is how most messages will be received Log.Debug(TAG, "Notification Message Body: " + message.GetNotification().Body); SendNotification(message.GetNotification().Body); } else { //Only used for debugging payloads sent from the Azure portal SendNotification(message.Data.Values.First()); } } void SendNotification(string messageBody) { var intent = new Intent(this, typeof(MainActivity)); intent.AddFlags(ActivityFlags.ClearTop); var pendingIntent = PendingIntent.GetActivity(this, 0, intent, PendingIntentFlags.OneShot); var notificationBuilder = new NotificationCompat.Builder(this, MainActivity.CHANNEL_ID); notificationBuilder.SetContentTitle("FCM Message") .SetSmallIcon(Resource.Drawable.ic_launcher) .SetContentText(messageBody) .SetAutoCancel(true) .SetShowWhen(false) .SetContentIntent(pendingIntent); var notificationManager = NotificationManager.FromContext(this); notificationManager.Notify(0, notificationBuilder.Build()); } public override void OnNewToken(string token) { Log.Debug(TAG, "FCM token: " + token); SendRegistrationToServer(token); } void SendRegistrationToServer(string token) { // Register with Notification Hubs hub = new NotificationHub(Constants.NotificationHubName, Constants.ListenConnectionString, this); var tags = new List<string>() { }; var regID = hub.Register(token, tags.ToArray()).RegistrationId; Log.Debug(TAG, $"Successful registration of ID {regID}"); } }Azure Functionsのタイマートリガー作成
私はVisual Studioから作成したものをAzureで発行しました。
こちらの方の作成記事がわかりやすくていいかもです。TestFunction.cs[FunctionName("TestFunction")] public static async Task Run([TimerTrigger("0 25 7 * * 2")]TimerInfo myTimer, ILogger log) { NotificationHubClient _hub = NotificationHubClient.CreateClientFromConnectionString("Azureで作成したNotification Hub内のAccess Policiesの名前(DefaultListenSharedAccessSignature)", "Azureで作成したNotification Hubの名前"); string message = "もうすぐモルカーの時間です。"; var androidMessage = "{\"data\":{\"message\": \"" + message + "\"}}"; await _hub.SendFcmNativeNotificationAsync(androidMessage); }本当はhubの情報は違うクラスに持っといたほうがいいですが、今回お試しだったので直書きしてます。
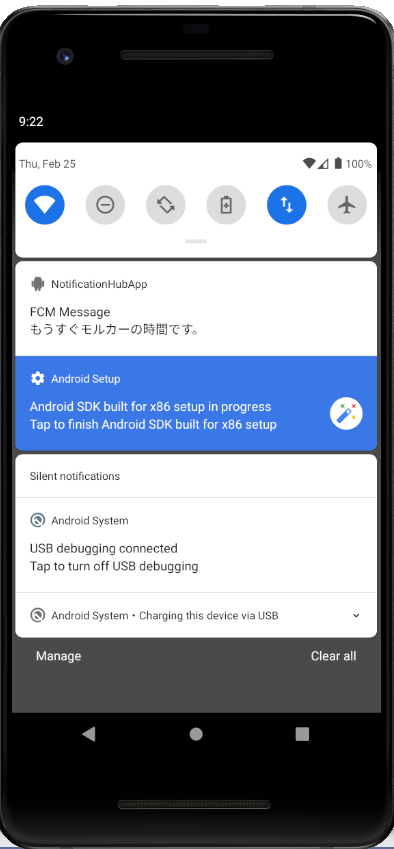
試してみる
AzureFunctionsからテストで動かしているので時間がおかしいですが。
すごく寂しい感じなので、画像とかも載せたいですね。
さいごに
Xamarinをよくわかってないのもあってか、公式のチュートリアル通りにやってもうまくいかず、???となったのですが、最初に紹介したサイトのおかげでうまく通知させることまでひとまずできました。
AZ-204とりあえず取ったはいいのですが、このテストで出てきた他の機能ももう少し見てみたいところです。参考URL
- 投稿日:2021-03-01T17:21:37+09:00
Debug.Log()に複数の変数を入れる
- 投稿日:2021-03-01T14:45:02+09:00
スマートデバイスプログラミング④(上からランダムに降ってくるボールを拾ってスコアを競うゲーム)
UnityとGameCanvasのダウンロード
1:UnityHubをDLしてインストール。(一部のwindows環境では拡張子を.exeに変更する必要があります)
2:UnityHubを起動して、Unity2019.3.11f1をインストール。
3:GameCanvasのダウンロード
https://github.com/sfc-sdp/GameCanvas-Unity/
でGameCanvasをダウンロード4:追加画像をダウンロードしてAssetsに追加
http://web.sfc.keio.ac.jp/~wadari/sdp/k04_res.zipGame.csの編集
Assets内のGame.csを別エディタで編集
using Sequence = System.Collections.IEnumerator;

/// <summary>
/// ゲームクラス。
/// </summary>
public sealed class Game : GameBase
{
  const int BALL_NUM = 30;
  int[] ball_x = new int [BALL_NUM];
  int[] ball_y = new int [BALL_NUM];
  int[] ball_col = new int [BALL_NUM];
  int[] ball_speed = new int [BALL_NUM];
  int ball_w = 24;
  int ball_h = 24;
  int player_x = 304;
  int player_y = 448;
  int player_speed = 3;
  int player_w = 32;
  int player_h = 32;
  int player_img = 4;
  int score = 0;
  int time = 1800;
  int player_col = 4;
  int combo = 0;

    /// <summary>
    /// 初期化処理
    /// </summary>
    public override void InitGame()
    {
      gc.SetResolution(640, 480);
      for(int i =0 ; i < BALL_NUM ; i ++ )
      {
        resetBall(i);
      }
    }

    /// <summary>
    /// 動きなどの更新処理
    /// </summary>
    public override void UpdateGame()
    {
      time = time - 1;

      for(int i =0 ; i < BALL_NUM ; i ++ )
      {
        ball_y[i] = ball_y[i] + ball_speed[i];
        if(ball_y[i]> 480){
          resetBall(i);
        }

        if(gc.CheckHitRect(ball_x[i],ball_y[i],ball_w,ball_h,player_x,player_y,player_w,player_h)){
          if(time>=0){
            score=score+ball_col[i];//ballごとに違った点数を加える
            if(player_col == ball_col[i]) {
              combo++;
              score+= combo;
            }
            else {
              combo = 0;
            }

            player_col = ball_col[i];
          }
          resetBall(i);
        }

      }
      if(gc.GetPointerFrameCount(0) > 0 ){
        if(gc.GetPointerX(0) > 320) {
          player_x += player_speed;
          player_img = 4;
        }
        else {
          player_x -= player_speed;
          player_img = 5;
        }
      }
      if(player_x<=0){
        player_x=0;
      }
      if(player_x>=616){
        player_x=616;
      }


    }

    /// <summary>
    /// 描画の処理
    /// </summary>
    public override void DrawGame()
    {
      gc.ClearScreen();

      for(int i =0 ; i < BALL_NUM ; i ++ ){
        gc.DrawImage(ball_col[i],ball_x[i],ball_y[i]);
      }

      gc.SetColor(0,0,0);
      if(time>=0){
        gc.DrawString("time:"+time,0,0);
      }
      else {
        gc.DrawString("finished!!",0,0);
      }
      gc.DrawString("score:"+score,0,24);
      gc.DrawString("combo:"+combo,0,48);

      //gc.DrawClipImage(player_img,player_x,player_y,0,64,32,32);
      if(time>=0){
        int u = 32+ ((time%60)/30)*32;//0.5秒ごとにユーザー画像を切り替えx
        int v = (player_col - 1) *32;//最初4 色に応じてユーザーの色の画像を指定y
        gc.DrawClipImage(player_img,player_x,player_y, u,v,32,32);
      }
      else {
        gc.DrawClipImage(player_img,player_x,player_y, 96,(player_col - 1) *32,32,32);
      }


    }
    void resetBall(int id){
      ball_x[id] = gc.Random(0,616);
      ball_y[id] = -gc.Random(24,480);
      ball_speed[id] = gc.Random(3,6);
      ball_col[id] = gc.Random(1,3);
    }
}
- 投稿日:2021-03-01T14:43:49+09:00
スマートデバイスプログラミング③(制限時間内にボールを反射させてブロックを壊すゲーム)
UnityとGameCanvasのダウンロード
1:UnityHubをDLしてインストール。(一部のwindows環境では拡張子を.exeに変更する必要があります)
2:UnityHubを起動して、Unity2019.3.11f1をインストール。
3:GameCanvasのダウンロード
https://github.com/sfc-sdp/GameCanvas-Unity/
でGameCanvasをダウンロードGame.csの編集
Assets内のGame.csを別エディタで編集
using Sequence = System.Collections.IEnumerator;

/// <summary>
/// ゲームクラス。
/// </summary>
public sealed class Game : GameBase
{
  int ball_x;
  int ball_y;
  int ball_speed_x;
  int ball_speed_y;
  int player_x;
  int player_y;
  int player_w;
  int player_h;

  const int BLOCK_NUM = 50;
  int[] block_x = new int [BLOCK_NUM];
  int[] block_y = new int [BLOCK_NUM];
  bool[] block_alive_flag = new bool [BLOCK_NUM];
  int block_w = 64;
  int block_h = 20;
  int time ;

    /// <summary>
    /// 初期化処理
    /// </summary>
    public override void InitGame()
    {
      gc.SetResolution(640, 480);
      ball_x = 0;
      ball_y = 0;
      ball_speed_x = 3;
      ball_speed_y = 3;
      player_x = 270;
      player_y = 460;
      player_w = 100;
      player_h = 20;

      for(int i =0 ; i < BLOCK_NUM ; i ++ )
      {
        block_x[i] = (i % 10 ) * block_w;
        block_y[i] = (i / 10 ) * block_h;
        block_alive_flag[i] = true;
      }
      time = 0;
    }

    /// <summary>
    /// 動きなどの更新処理
    /// </summary>
    public override void UpdateGame()
    {
      if(countBlock()!=0){
        time++;
      }
      player_y = gc.GetPointerY(0) - player_h/2;

      ball_x = ball_x + ball_speed_x;
      ball_y = ball_y + ball_speed_y;

      if( ball_x < 0 ) {
        ball_x = 0;
        ball_speed_x = -ball_speed_x;
      }

      if( ball_y < 0 ) {
        ball_y = 0;
        ball_speed_y = -ball_speed_y;
      }

      if( ball_x > 616 ) {
        ball_x = 616;
        ball_speed_x = -ball_speed_x;
      }

      if( ball_y > 456 ) {
        ball_y = 456;
        ball_speed_y = -ball_speed_y;
      }
      if(gc.GetPointerFrameCount(0) > 0 ){
        player_x = gc.GetPointerX(0) - player_w/2;
      }

      if(gc.CheckHitRect(ball_x,ball_y,24,24,player_x,player_y,player_w,player_h)){
        if(ball_speed_y>0){
          ball_speed_y = -ball_speed_y;
        }
      }

      for(int i = 0; i<BLOCK_NUM; i++){
        if(gc.CheckHitRect(ball_x,ball_y,24,24,block_x[i],block_y[i],block_w,block_h)){
          block_alive_flag[i]=false;
        }
      }
    }

    /// <summary>
    /// 描画の処理
    /// </summary>
    public override void DrawGame()
    {
      // 画面を白で塗りつぶします
        gc.ClearScreen();

        // 0番の画像を描画します
        gc.DrawImage(0, 0, 0);

          gc.DrawImage(1,ball_x,ball_y);

        gc.SetColor(0, 0, 255);
        gc.FillRect(player_x,player_y,player_w,player_h);


        for(int i = 0; i<BLOCK_NUM; i++){
          if(block_alive_flag[i]){
            gc.FillRect(block_x[i],block_y[i],block_w,block_h);
          }
        }


        gc.DrawString("time:"+time,60,0);
        if(countBlock()==0){
          gc.DrawString("clear",60,30);
        }


    }
    int countBlock(){
      int num = 0;
      for(int i =0 ; i < BLOCK_NUM ; i ++ ){
        if(block_alive_flag[i]){
          num++;
        }
      }
      return num;
    }
}
- 投稿日:2021-03-01T14:42:28+09:00
スマートデバイスプログラミング②(ランダムにカードを出して得点を競うゲーム)
UnityとGameCanvasのダウンロード
1:UnityHubをDLしてインストール。(一部のwindows環境では拡張子を.exeに変更する必要があります)
2:UnityHubを起動して、Unity2019.3.11f1をインストール。
3:GameCanvasのダウンロード
https://github.com/sfc-sdp/GameCanvas-Unity/
でGameCanvasをダウンロードGame.csの編集
Assets内のGame.csを別エディタで編集
using Sequence = System.Collections.IEnumerator;

/// <summary>
/// ゲームクラス。
/// </summary>
public sealed class Game : GameBase
{
    // 変数の宣言
    int money;
    const int CARD_TYPE = 10;
    int[] card_count = new int [CARD_TYPE];
    string[] card_name =
         {"A","B","C","D","E","F","G","H","I","J"};
    bool isComplete;
    int new_card ;

    /// <summary>
    /// 初期化処理
    /// </summary>

    ///起動時に一回だけ呼ばれる・・初期化設定用
    public override void InitGame()
    {
      resetValue();
    }

    /// <summary>
    /// 動きなどの更新処理
    /// </summary>

    //1フレームごとに呼ばれる・動きの処理を入れる
    public override void UpdateGame()
    {
        //タップした時の処理
        if (gc.GetPointerFrameCount(0)==1 && ! isComplete) {
             money -= 100;
             if (gc.Random(0,3)==0){
             new_card = gc.Random(0,4);
           }else{
             new_card = gc.Random(5,9);
           }
             card_count[new_card]++;


           for (int i = 0; i < 5; i++) {
             if (card_count[i] > 4){
               isComplete = true;
             }
           }
        }
        //長押しした時の処理
        if(gc.GetPointerFrameCount(0) >= 120){
          resetValue();
        }
    }

    /// <summary>
    /// 描画の処理
    /// </summary>

    //1フレームごとに呼ばれる・描画の処理
    public override void DrawGame()
    {
      gc.ClearScreen();
      gc.SetColor(255,0,0);
      gc.SetFontSize(36);
      gc.DrawString("money:"+money,60, 40);

      if(new_card >= 0){
        gc.DrawString("new:"+card_name[new_card],60, 80);
      }

      for(int i=0 ; i< CARD_TYPE ; i++){
        gc.DrawString(card_name[i] + ":" + card_count[i],60, 120+i*80);
      }

      if(isComplete ){
        gc.DrawString("complete!!",60, 920);
      }

    }
    void resetValue(){
      money = 10000;
      for (int i = 0; i < CARD_TYPE; i++) {
        card_count[i] = 0;
      }
      isComplete = false;
      new_card = -1;
    }
}
- 投稿日:2021-03-01T14:29:41+09:00
スマートデバイスプログラミング①(制限時間内にクリックした回数を競争するゲーム)
UnityとGameCanvasのダウンロード
1:UnityHubをDLしてインストール。(一部のwindows環境では拡張子を.exeに変更する必要があります)
2:UnityHubを起動して、Unity2019.3.11f1をインストール。
3:GameCanvasのダウンロード
https://github.com/sfc-sdp/GameCanvas-Unity/
でGameCanvasをダウンロードGame.csの編集
Assets内のGame.csを別エディタで編集
using Sequence = System.Collections.IEnumerator;

/// <summary>
/// ゲームクラス。
/// </summary>
public sealed class Game : GameBase
{
    // 変数の宣言
    int sec = 0;

    int time = 600;
    int score = 0;

    /// <summary>
    /// 初期化処理
    /// </summary>
    public override void InitGame()
    {
        // キャンバスの大きさを設定します
        gc.SetResolution(720, 1280);
    }

    /// <summary>
    /// 動きなどの更新処理
    /// </summary>
    public override void UpdateGame()
    {
        // 起動からの経過時間を取得します
        sec = (int)gc.TimeSinceStartup;

        time = time - 1;
        if(gc.GetPointerFrameCount(0)==1){
          if(time >= 0){
            score = score + 1;
          }
        }
        if(gc.GetPointerDuration(0) >= 2.0f){
          time =600;
          score =0;
        }
    }

    /// <summary>
    /// 描画の処理
    /// </summary>
    public override void DrawGame()
    {
        // 画面を白で塗りつぶします
        gc.ClearScreen();

        // 0番の画像を描画します
        gc.DrawImage(0, 0, 0);

        // 黒の文字を描画します
        gc.SetColor(0, 0, 0);
        gc.SetFontSize(48);
        gc.DrawString("この文字と青空の画像が", 40, 160);
        gc.DrawString("見えていれば成功です", 40, 270);
        gc.DrawRightString($"{sec}s", 630, 10);

        if(time >= 0 ){
          gc.DrawString("time:"+time,60,0);
        }
        else {
          gc.DrawString("finished!!",60,0);
        }
        gc.DrawString("score:"+score,60,60);
    }
}
- 投稿日:2021-03-01T14:03:02+09:00
(C#) if文なしでじゃんけん
元ネタ
概要
剰余算(%)を活用して、if文なしでの
勝敗の判定を行う。剰余算(%)を活用すると、値を円環させた形で値を範囲内に丸めることが出来る。簡単で非常に便利で、応用方法もたくさんあるので、布教の意味も含めて兼ねて書いてみた。
剰余算による対戦結果表
ぶっちゃけExcelでテストした(笑)
player pc (cpu) calc result mod (result) output (label) 0 (✊) 0 (✊) 0 - 0 0 0 [0] あいこ 0 (✊) 1 (✌) 0 - 1 -1 2 [2] 勝ち 0 (✊) 2 (?) 0 - 2 -2 1 [1] 負け 1 (✌) 0 (✊) 1 - 0 1 1 [1] 負け 1 (✌) 1 (✌) 1 - 1 0 0 [0] あいこ 1 (✌) 2 (?) 1 - 2 -1 2 [2] 勝ち 2 (?) 0 (✊) 2 - 0 2 2 [2] 勝ち 2 (?) 1 (✌) 2 - 1 1 1 [1] 負け 2 (?) 2 (?) 2 - 2 0 0 [0] あいこ
- 2つの手の差のベクトルを自然数に正規化して、テーブルにマッピングさせるイメージ。
あいこ、負け、勝ち、の3パターンのため、3の余りを求めて、0 ~ 2に丸める。- マイナスの場合は
除数を加えてプラス化さてから余りを求めることで、円環位置をズらさず丸める。※ ExcelのMOD関数は、はなっからプラス側で値を返すとか、面倒くさいなお前。
ソース
ソース (ピックアップ)
ピックアップprivate static int GetResult(int palyer_hand, int pc_hand) { // (1) 基となる差を求める。 int result = palyer_hand - pc_hand; // (2) 除数であまりを求め、±除数の範囲に収める。 result %= 3; // (3) 除数を1回加えることでプラス化。 result += 3; // (4) 再度除数であまりを求め、+除数の範囲に収める。 result %= 3; return result; }ソース (全体)
@ri_ さんに倣って、入力想定文字列は
グー、チョキ、パー。
@tadsan さんに習って、出力は絵文字に置き換え。
(+ 検証用に総当りで結果を出力)
if文なしでじゃんけん(C#) - paiza.IO
https://paiza.io/projects/SDonsIDtCzfYQh6O_lXVbgIdeone.com
https://ideone.com/OuRqbrC#using System; using System.Collections.Generic; public class Hello{ private static readonly Dictionary<string, int> HAND_CODE_DICT = new Dictionary<string, int>() { {"グー", 0}, {"チョキ", 1}, {"パー", 2}, }; private static readonly string[] HAND_LABELS = new string[] {"✊", "✌", "?"}; private static readonly string[] RESULT_LABELS = new string[] { "あいこ", "あなたの負け", "あなたの勝ち" }; private static int GetResult(int palyer_hand, int pc_hand) { int result = palyer_hand - pc_hand; // -3 < n < 3 result %= 3; // 0 < n < 6 result += 3; // 0 <= n < 3 result %= 3; return result; } public static void Main(){ // Your code here! System.Console.WriteLine("Hellow C#"); foreach(string player_hand in new string[]{"グー", "チョキ", "パー"}) { foreach(string pc_hand in new string[]{"グー", "チョキ", "パー"}) { int player_hand_code = HAND_CODE_DICT[player_hand]; int pc_hand_code = HAND_CODE_DICT[pc_hand]; int result_code = GetResult(player_hand_code, pc_hand_code); System.Console.WriteLine(string.Format("[{0} v.s. {1}] {2}", new object[] { HAND_LABELS[player_hand_code], HAND_LABELS[pc_hand_code], RESULT_LABELS[result_code], })); } } } }outputHellow C# [✊ v.s. ✊] あいこ [✊ v.s. ✌] あなたの勝ち [✊ v.s. ?] あなたの負け [✌ v.s. ✊] あなたの負け [✌ v.s. ✌] あいこ [✌ v.s. ?] あなたの勝ち [? v.s. ✊] あなたの勝ち [? v.s. ✌] あなたの負け [? v.s. ?] あいこあとがき
剰余算の活用は、ゲーム系では昔から結構使われるんじゃないかな。シンプルな算術演算のためCPUコストも少なく。コードも複雑にはならないので、結構美味しいテクニック。
私が今まで剰余算をよく使ったのは。
- キャラクターのアニメーションのループ
- メニュー画面などでの、画面選択肢のループ
- キャラクターの向き(角度)のループ
- テーブル表示で行を交互に色付け
業務系ではあんま活用したいシーンがない様で。(4)で剰余算使っていたときに、年配のSEに驚かれたことがある。
なお、『
連想配列はズルくない?』とも思ったけど、まぁご愛嬌で。(入力文字列をコード化するしてるだけだから許して)そう言えば、『
計算機は計算が得意』 で 『条件分岐は苦手』と言う定説は昔からあるけど。コスト的には何倍あるのだろう?