- 投稿日:2020-11-14T14:25:16+09:00
今日から始める Edge AI
今日から始める Edge AI
はじめに
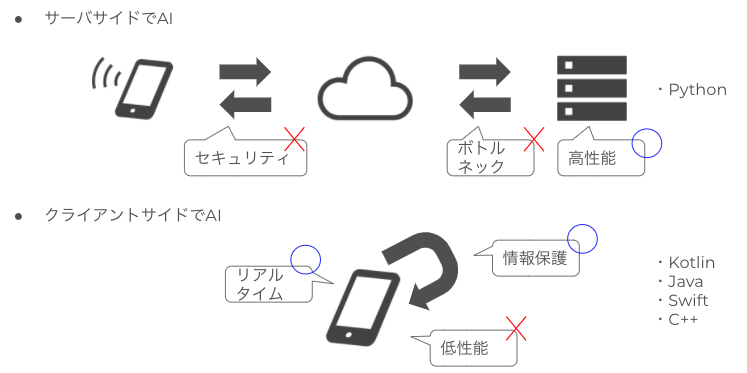
ディープラーニングに始まる AI ブームはまだまだ全然終わりそうもないですが、世の中の興味関心は良いモデルを作ることに加えて、モデルで推論することにも注目されてきているように思います。日本で MLOps という言葉が使われだしたのは昨年(2019 年)くらいで、ようやく機械学習を実用化する重要性が認識され始めて嬉しい限りです。機械学習を実用化するための重要な要素のひとつに、推論を実行する環境があります。Web サービスであればサーバサイド(クラウド)で実行することも可能ですが、ネットワーク帯域やリアルタイム性やセキュリティの問題で、デバイスやクライアントサイドで推論することもあります。コンピューティングリソースが豊富なサーバサイドに比べ、デバイスサイドではクラウドのようなスケールアウトはできませんし、電力消費も気にしなければなりません。サーバサイド推論とデバイスサイド推論でそれでも Edge AI を実用化するメリットや用途は多々あります。たとえば自動運転のようにネットワーク遅延を許容できない用途では、リアルタイム推論が可能な Edge AI が必須になります。スマホでも AR を用いたゲームでは、実世界を認識しつつ演出を表現するため、デバイスサイドでの演算が必要です。Edge AI はユーザの近くで便利なツールを提供するために重要な技術となってきているのです。
他方で Edge AI が広まっているかというと、まだまだ全然広まっていないように思えます。機械学習や AI 界隈で活動しているのに、Edge AI という単語を聞いたことがないというエンジニアもいるのではないでしょうか? デバイスサイドで AI の推論を行う試み自体は、2016 年くらいには研究されてきていて、ディープラーニングのバイナリ化等で計算量を減らして推論を軽くする方法が提唱されています。モデルのバイナリ化は今でも有効な手段です。ディープラーニング専用のデバイス向けチップセット(Edge TPU 等)が開発されたり、Android/iOS に推論用チップセットが導入されたりと、Edge AI は密かに身近な存在になってきています。
前置きが長くなりましたが、今回の投稿では 2020 年冬時点の Edge AI の動向をまとめます。Edge AI は理論、ライブラリ、チップセット、実装含めて幅広い技術開発が進んでいます。全般的に整理することで、Edge AI の理解と実用化に寄与していきたいと思います。
Edge AI の全体像
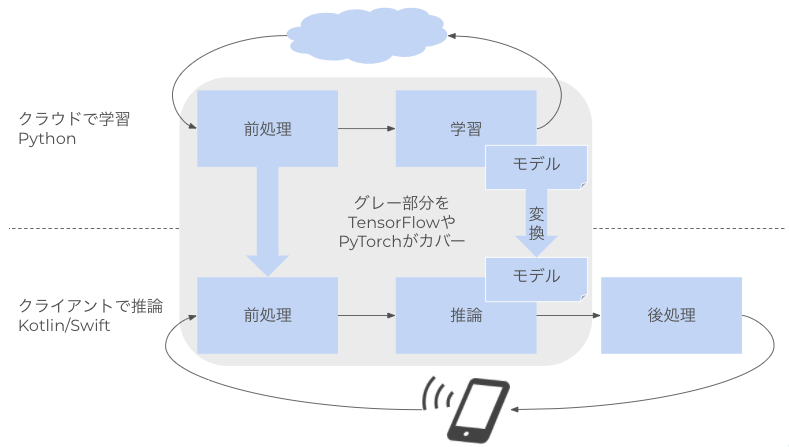
Edge AI では推論をデバイスサイド(スマホや Web ブラウザやマシン)で実行します(スマホの中で学習する技術もありますが、今回は割愛します)。そのためにはデバイス側に学習済みモデルを配布し、モデルをロードして推論するランタイムが必要になります。スマホであれば TensorflowLite や PyTorch Mobile や MediaPipe がその技術になります。加えてディープラーニングのテンソル演算を効率的に実行する演算器も必要になります。サーバサイドであれば GPU を使いますが、デバイスサイドでは GPU か、テンソル演算に特化させたチップセットや FPGA を使います。デバイスは一般的にサーバサイドに比べて計算リソースが貧弱なため、軽量なモデルの活用や、モデル自体の軽量化(計算量削減)が必要になります。MobileNet に代表される軽量モデルや、バイナリ化や枝刈り(Pruning)に代表される軽量化が活用されます。配布するモデルの管理も必要です。モデルの再学習やアルゴリズムの変更によって新しいモデルを使う必要がある場合、サーバサイドであればサーバを停止して(または停止せずに)モデルを入れ替えることが可能です。しかし Edge AI の場合、モデルがデバイス側に配布されてしまっているため、モデルの更新にはデバイスでのモデルダウンロードが必要になります。配布システムには ML Kit(旧 Firebase ML Kit)や AWS Greengrass を活用することができます。
これらの技術について、以下では具体例含めて解説していきます。
スマホの Edge AI
スマホは Edge AI の重要な使い所の一つです。スマホではカメラやテキスト入力、音声入力で Edge AI が活用されます。スマホで AI を動かすためのライブラリは、汎用的なライブラリでは Tensorflow Lite、PyTorch Mobile、MediaPipe が用意されています。
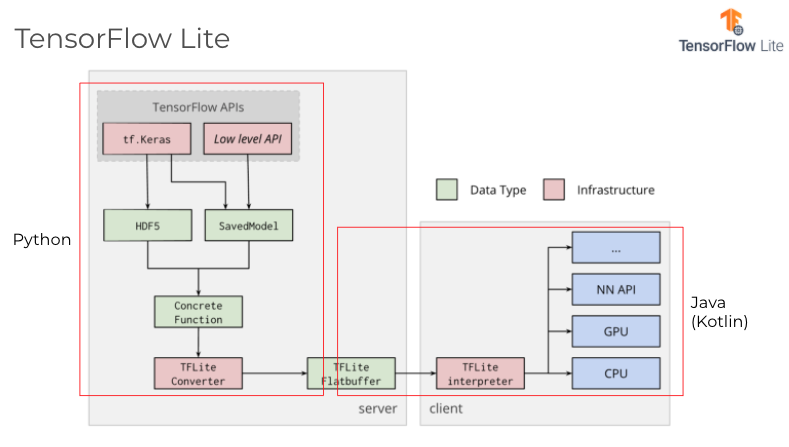
Tensorflow Lite
Tensorflow Lite は Tensorflow をベースにしたデバイス推論用のランタイムです。Android、iOS、マイコン で使用可能です。Tensorflow で学習したモデルを TFLite Converter で変換して Tensorflow Lite 用のモデルファイル(.tflite)を生成することができます。量子化や枝刈りにも対応しており、OS に拘らずにスマホで推論する場合は最有力な選択肢になるライブラリです。加えて豊富なサンプルモデルやアプリが提供されており、自ら学習せずともある程度動作可能なモデルを使える点は魅力的です。
サンプルモデル
サンプルアプリTFLite Converter は Python API とコマンドラインツールが提要されています。公式には Python API の使用が推奨されています。TFLite Converter では Tensorflow や tf.keras の学習済みモデルを TFLite 用に変換します。書き方は以下のようになります。
import tensorflow as tf

# saved_modelを変換
converter = tf.lite.TFLiteConverter.from_saved_model(export_dir)
tflite_model = converter.convert()
with open('model.tflite', 'wb') as f:
    f.write(tflite_model)

# kerasモデルを変換
keras_model = tf.keras.models.load_model(filepath)
converter = tf.lite.TFLiteConverter.from_keras_model(keras_model)
keras_tflite_model = converter.convert()
with open('keras_model.tflite', 'wb') as f:
    f.write(keras_tflite_model)
変換されたモデルは Android や iOS で tflite ライブラリでロードして推論に使うことができます。Android であれば以下のようなコード例になります。
class TFLiteActivity : AppCompatActivity() {
    /*モデルをロード*/
    private fun initializeTFLite(device: String = "NNAPI", numThreads: Int = 4) {
        val delegate = when (device) {
            "NNAPI" -> NnApiDelegate()
            "GPU" -> GpuDelegate()
            "CPU" -> "" }
        if (delegate != "") tfliteOptions.addDelegate(delegate)

        tfliteOptions.setNumThreads(numThreads)
        tfliteModel = FileUtil.loadMappedFile(this, tflite_model_path)
        tfliteInterpreter = Interpreter(tfliteModel, tfliteOptions)
        inputImageBuffer = TensorImage(tfliteInterpreter.getInputTensor(0).dataType())
        outputProbabilityBuffer = TensorBuffer.createFixedSize(
            tfliteInterpreter.getOutputTensor(0).shape(),
            tfliteInterpreter.getInputTensor(0).dataType())

        probabilityProcessor = TensorProcessor
            .Builder()
            .add(NormalizeOp(0.0f, 1.0f))
            .build()
    }

    /*推論*/
    @WorkerThread
    override fun analyzeImage(image: ImageProxy, rotationDegrees: Int): Map<String, Float> {
        val bitmap = Utils.imageToBitmap(image)
        val cropSize = Math.min(bitmap.width, bitmap.height)
        inputImageBuffer.load(bitmap)
        val inputImage = ImageProcessor
            .Builder()
            .add(ResizeWithCropOrPadOp(cropSize, cropSize))
            .add(ResizeOp(224, 224, ResizeMethod.NEAREST_NEIGHBOR))
            .add(NormalizeOp(127.5f, 127.5f))
            .build()
            .process(inputImageBuffer)

        tfliteInterpreter.run(inputImage!!.buffer, outputProbabilityBuffer.buffer.rewind())
        val labeledProbability: Map<String, Float> = TensorLabel(
            labelsList, probabilityProcessor.process(outputProbabilityBuffer)
        ).mapWithFloatValue
        return labeledProbability
    }
}
コード量も少なく Tensorflow Lite を使用できるため、Edge AI を始めるにはちょうど良いライブラリになっていると思います。
演算については Tensorflow の一部の演算子は Tensorflow Lite ではサポートされていません。
https://www.tensorflow.org/lite/guide/ops_compatibilityPyTorch Mobile
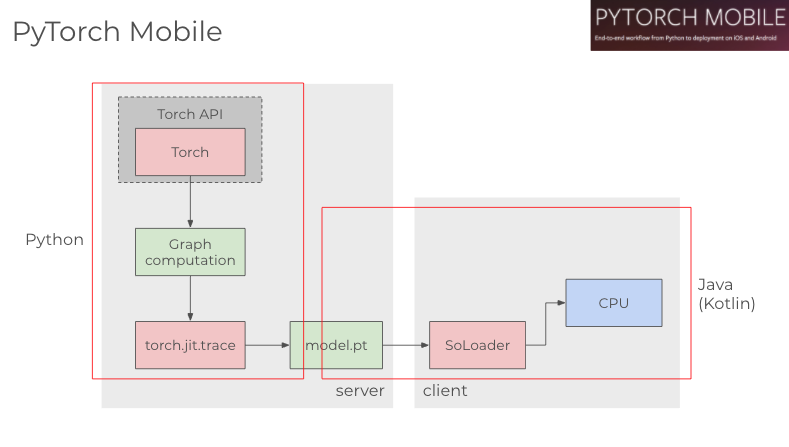
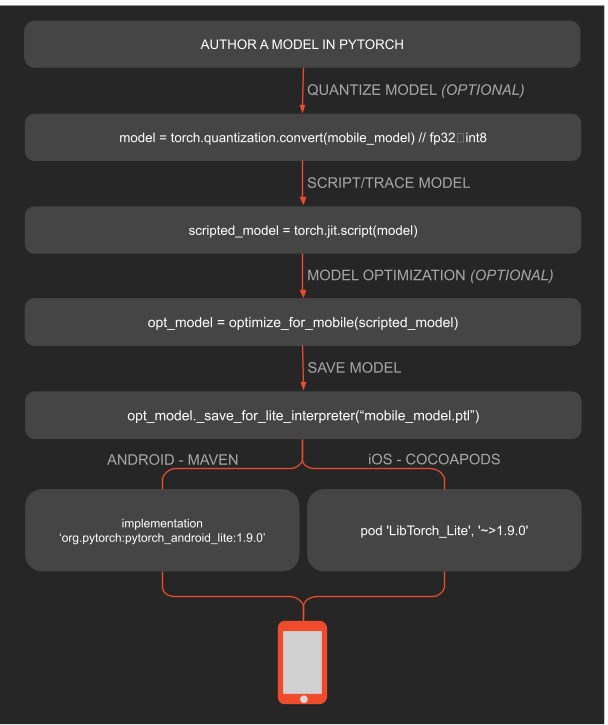
PyTorch Mobile は PyTorch をベースにしたスマホ推論用のランタイムです。これも Android、iOS をサポートしています。PyTorch Mobile は Pytorch のモデルを torchscript で jit コンパイルして.pt ファイルとして使う様になっています。2019 年にリリースされて以降、あまりアップデートがないのが不安でしたが、2020 年の Torch Developer Day で Android の NNAPI、iOS の Metal API のサポートを発表しました。それまで CPU のみで推論可能だった PyTorch Mobile が、GPU や専用プロセッサへのデリゲートが可能になりました。モデル学習の最有力が Pytorch である現場では、Pytorch で学習したモデルをスマホにインストールしてパフォーマンスが出るなら使いたい次第です。
PyTorch ではモデルの変換を torch.jit.trace で実行します。
import torch
import torchvision

model = torchvision.models.resnet18(pretrained=True)
model.eval()
example = torch.rand(1, 3, 224, 224)
traced_script_module = torch.jit.trace(model, example)
traced_script_module.save("model.pt")
変換されたモデルは Android や iOS で tflite ライブラリでロードして推論に使うことができます。Android であれば以下のようなコード例になります。
class PyTorchActivity : AppCompatActivity() {
    /*モデルをロード*/
    private fun initializePyTorch() {
        val pytorchModule = Module.load(Utils.assetFilePath(
            this,
            pytorch_mobile_model_path))
        val mInputTensorBuffer = Tensor.allocateFloatBuffer(3 * 224 * 224)
        val mInputTensor = Tensor.fromBlob(
            mInputTensorBuffer,
            longArrayOf(1, 3, 224L, 224L)
        )
    }

    /*推論*/
    @WorkerThread
    override fun analyzeImage(image: ImageProxy, rotationDegrees: Int): Map<String, Float> {
        TensorImageUtils.imageYUV420CenterCropToFloatBuffer(
            image.image,
            rotationDegrees,
            224,
            224,
            TensorImageUtils.TORCHVISION_NORM_MEAN_RGB,
            TensorImageUtils.TORCHVISION_NORM_STD_RGB,
            mInputTensorBuffer,
            0
        )
        val outputModule = pytorchModule.forward(IValue.from(mInputTensor)).toTensor()
        val scores = outputModule.dataAsFloatArray
        val labeledProbability: MutableMap<String, Float> = mutableMapOf()
        for (i in 0 until labelsList.size - 1) {
            labeledProbability[labelsList[i + 1]] = score[i]
        }
        return labeledProbability
    }
}
Android の PyTorch Mobile はSoLoaderという Facebook 製のネイティブコードローダーで実行されています。
MediaPipe
続いて MediaPipe です。MediaPipe は Tensorflow Lite や PyTorch Mobile と違い、特定のディープラーニングライブラリから派生したものではありません。Google が開発しているスマホや Web ブラウザ向けのクロスプラットフォームなデータストリーミングエンジンで、スマホのカメラやマイクをインターフェイスとして入力された生データのデコーディングから前処理、推論、後処理までを一連のストリーミングとしてカバーするランタイムになっています。使えるモデルは Tensorflow Lite に制限されますが、推論時に課題となるデータ入力、前処理、後処理と推論の隔たりを統合しようとするライブラリで、使い勝手さえ良ければ(Bazel に依存しなければ)最高のランタイムになると思います。
スマホアプリに推論を組み込む UI は多々ありますが、MediaPipe ではその活用例も豊富に公開しています。
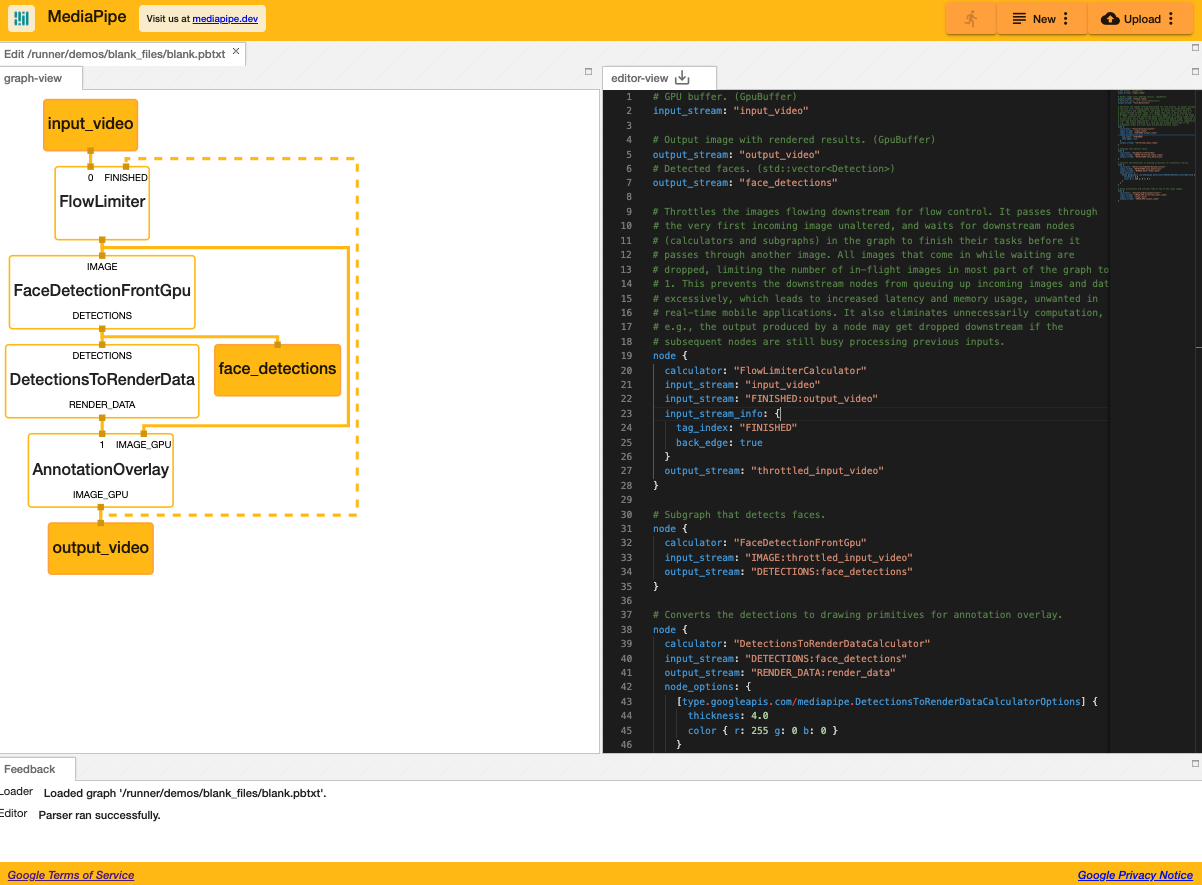
サンプルMediaPipe では以下のような計算グラフを設計し、この計算グラフを bazel で変換して使用します。変換結果は Android であれば.aar ファイル、iOS であれば.ipa ファイルになります。
# MediaPipe graph that performs face mesh with TensorFlow Lite on GPU. # GPU buffer. (GpuBuffer) input_stream: "input_video" # Output image with rendered results. (GpuBuffer) output_stream: "output_video" # Detected faces. (std::vector<Detection>) output_stream: "face_detections" # Throttles the images flowing downstream for flow control. It passes through # the very first incoming image unaltered, and waits for downstream nodes # (calculators and subgraphs) in the graph to finish their tasks before it # passes through another image. All images that come in while waiting are # dropped, limiting the number of in-flight images in most part of the graph to # 1. This prevents the downstream nodes from queuing up incoming images and data # excessively, which leads to increased latency and memory usage, unwanted in # real-time mobile applications. It also eliminates unnecessarily computation, # e.g., the output produced by a node may get dropped downstream if the # subsequent nodes are still busy processing previous inputs. node { calculator: "FlowLimiterCalculator" input_stream: "input_video" input_stream: "FINISHED:output_video" input_stream_info: { tag_index: "FINISHED" back_edge: true } output_stream: "throttled_input_video" } # Subgraph that detects faces. node { calculator: "FaceDetectionFrontGpu" input_stream: "IMAGE:throttled_input_video" output_stream: "DETECTIONS:face_detections" } # Converts the detections to drawing primitives for annotation overlay. node { calculator: "DetectionsToRenderDataCalculator" input_stream: "DETECTIONS:face_detections" output_stream: "RENDER_DATA:render_data" node_options: { [type.googleapis.com/mediapipe.DetectionsToRenderDataCalculatorOptions] { thickness: 4.0 color { r: 255 g: 0 b: 0 } } } } # Draws annotations and overlays them on top of the input images. node { calculator: "AnnotationOverlayCalculator" input_stream: "IMAGE_GPU:throttled_input_video" input_stream: "render_data" output_stream: "IMAGE_GPU:output_video" }Visualizerというツールで pbtxt で表現したグラフを可視化することが可能です。
上記は顔認識のグラフになっています。入力画像に対して顔を検知(Detection)し、検知した位置にオーバレイ(DetectionsToRender→AnnotationOverlay)を被せて画面に出力する、という一連のプロセスを表現しています。MediaPipe の良いところは、Edge AI を推論だけで終わらせず、入力 → 前処理 → 推論 → 後処理 → 出力までの一連の流れを組み込める点です。
ここまでスマホのランタイムについて書いてきましたが、OS(iOS、Android)側の動きを書いていきます。
iOS
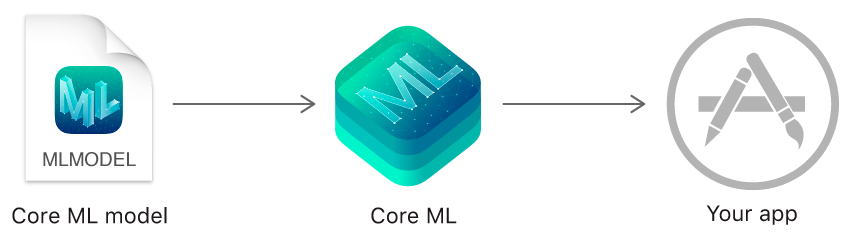
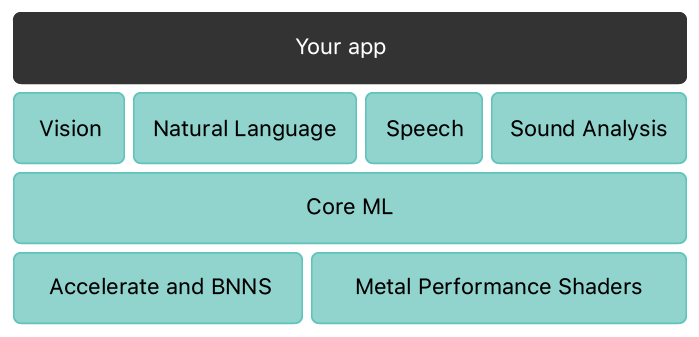
まず iOS では各種 ML モデルをアプリに統合するためのフレームワークとして CoreML を提供しています。CoreML は Tensorflow Lite のようなスマホ向けのモデルだけでなく、ONNX や Pytorch、XGBoost、Scikit-learn といった多様なライブラリのモデルの推論をサポートしたツールです。モデルを coremltools で CoreML フォーマットに変換することで、ネイティブアプリにロードして推論を行うことができるようになっています。演算は自動的に(?)ニューラルエンジンという iPhone 特有の演算器にデリゲートされるようになっており、高速な推論と低消費電力を実現しています。更に一部のモデル(ニューラルネットワークの分類や最近傍)をデバイス側で更新(fine tuning)することができるようになっています。iOS で機械学習を使いたい場合は CoreML で始めるのが最も良い選択肢でしょう。
Android
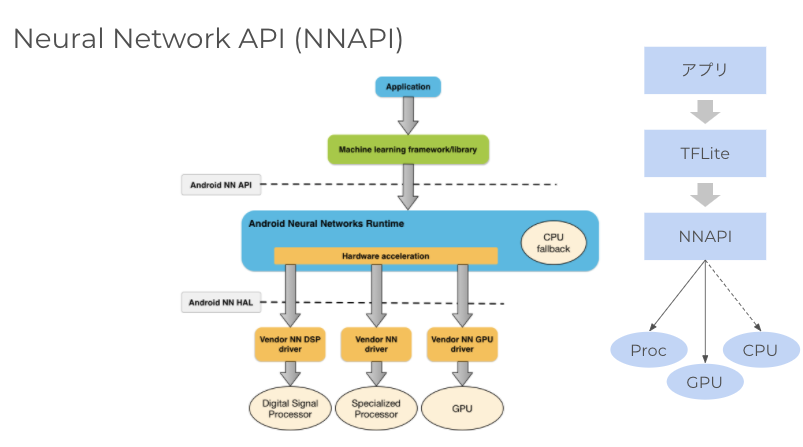
Android では推論用の API として NNAPI(Android Neural Networks API)を提供しています。NNAPI は機械学習の処理に特化した Android C API で、Android8.1(API レベル 27)以降で使用可能です。NNAPI ではデバイスのハードウェア性能や負荷状況に応じてニューラルネットワークの処理を適切なデバイス(GPU、DSP、専用プロセッサ)にデリゲート(委譲)します。デリゲートできない処理は CPU で実行する仕組みです。iOS と違って多様なデバイスが販売される Android 特有の戦略と言えます。
Web ブラウザ
Tensorflow.js
Web ブラウザでも AI で学習や推論することが可能です。Web ブラウザで AI を動かす主な言語は Javascript で、有力なライブラリはTensorflow.jsになります。学習も推論も Web ブラウザ(端末)で実行することになるため、スマホにおける Edge AI のように端末のリソースをフル活用することはできません。しかし Web ブラウザが有する演算基盤としてWebGLやWASMを有効活用することで高速化を実現します。
推論モデルにはtf.keras モデルやsaved modelを Tensorflow.js 用に変換して使用することが可能です。モデルはニューラルネットワーク構造や Weight 含めて JSON 形式に変換され、クライアント端末にダウンロードされて使用されます。変換にはコマンドラインツールのtensorflowjs_converterを使います。
変換例は以下のとおりです。# saved modelを変換 tensorflowjs_converter \ --input_format=tf_saved_model \ --output_node_names='MobilenetV1/Predictions/Reshape_1' \ --saved_model_tags=serve \ /mobilenet/saved_model \ /mobilenet/web_model # Kerasモデルを変換 tensorflowjs_converter \ --input_format keras \ path/to/my_model.h5 \ path/to/tfjs_target_dirサンプルデモにあるとおり、Web ブラウザでも多様な体験を作ることが可能です。
Tensorflow.js のコード例は以下になります。Javascript として HTML に組み込むことが可能です。(参考元)<script src="https://cdn.jsdelivr.net/npm/@tensorflow/tfjs@1.0.1"> </script> <script src="https://cdn.jsdelivr.net/npm/@tensorflow-models/mobilenet@1.0.0"> </script> <img id="img" src="cat.jpg"></img> <script> const img = document.getElementById('img'); // Load the model. mobilenet.load().then(model => { // Classify the image. model.classify(img).then(predictions => { console.log('Predictions: '); console.log(predictions); }); }); </script>まはた.js ファイルとして記述することも可能です。(参考元)
import * as tf from "@tensorflow/tfjs";

import { IMAGENET_CLASSES } from "./imagenet_classes";

const MOBILENET_MODEL_PATH =
  "https://storage.googleapis.com/tfjs-models/tfjs/mobilenet_v1_0.25_224/model.json";

const IMAGE_SIZE = 224;
const TOPK_PREDICTIONS = 10;

let mobilenet;
const mobilenetDemo = async () => {
  status("Loading model...");

  mobilenet = await tf.loadLayersModel(MOBILENET_MODEL_PATH);
  mobilenet.predict(tf.zeros([1, IMAGE_SIZE, IMAGE_SIZE, 3])).dispose();

  status("");

  const catElement = document.getElementById("cat");
  if (catElement.complete && catElement.naturalHeight !== 0) {
    predict(catElement);
    catElement.style.display = "";
  } else {
    catElement.onload = () => {
      predict(catElement);
      catElement.style.display = "";
    };
  }
};

async function predict(imgElement) {
  status("Predicting...");
  const logits = tf.tidy(() => {
    const img = tf.browser.fromPixels(imgElement).toFloat();

    const offset = tf.scalar(127.5);

    const normalized = img.sub(offset).div(offset);

    const batched = normalized.reshape([1, IMAGE_SIZE, IMAGE_SIZE, 3]);

    return mobilenet.predict(batched);
  });
}
ml5.js
Tensorflow.js の使い方はスクリプトタグから Tensorflow.js をそのまま使用する方法と、ml5.jsから使用する方法の 2 通りがあります。ml5.js は Web 向けに機械学習をより使いやすくするためのライブラリです。ml5.js はp5.jsというデザイナー向けの Javascript と親和性高いコーディングになっています。ml5.js では画像や言語、音声といったメディアで頻繁に使われる分類や変換の API を用意しており、より感覚的に Javascript で AI を使えるようになっています。
ml5.js による推論は以下のようなコードになります。(参考元)
let classifier;

let img;

function preload() {
  classifier = ml5.imageClassifier("MobileNet");
  img = loadImage("images/bird.png");
}

function setup() {
  createCanvas(400, 400);
  classifier.classify(img, gotResult);
  image(img, 0, 0);
}

function gotResult(error, results) {
  if (error) {
    console.error(error);
  } else {
    console.log(results);
    createDiv(`Label: ${results[0].label}`);
    createDiv(`Confidence: ${nf(results[0].confidence, 0, 2)}`);
  }
}
モデルと軽量化
デバイス(スマホ、家電、自動車、機械等々)で推論するためにはモデルを軽量化する工夫が必要です。デバイスは一般的にサーバほど計算リソースや電力が豊富ではないため、計算量やモデルの容量を削減することで、デバイスの継続や応答性能を確保します。軽量化の工夫としては量子化(quantization)、枝刈り(pruning)、共有(sharing)、蒸留(distillation)が有名です。
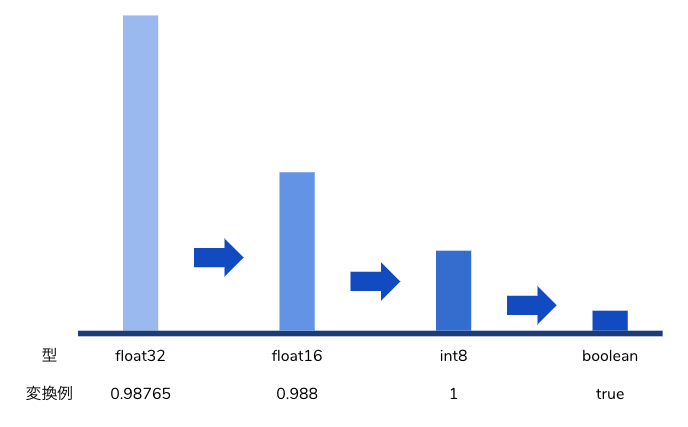
量子化では重みのビット幅を軽量なものに削減します。たとえばモデルを作成する時点では float32 で学習し、推論前にモデルを float16 や int8 や 1bit(boolean)に変換することでモデルの容量や計算量を削減することができます。量子化によってニューラルネットワークの演算が学習時と推論時で多少ずれるため、計算効率化とトレードオフで精度が劣化する可能性があります。プロダクトとして高速化と精度劣化の妥協点を求めることが重要です。
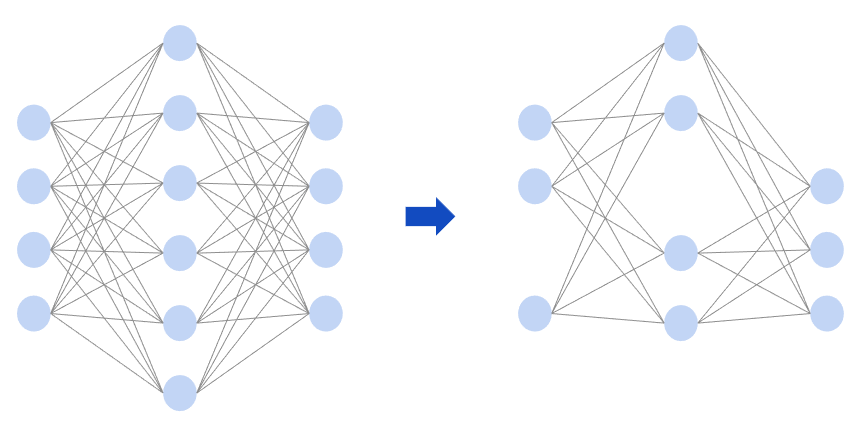
枝刈りはニューラルネットワークのノードから重要性の低いものを削除する手法です。ネットワークの一部を削除することで、モデルを軽量化し、計算量や容量を削減します。量子化同様、効率化とトレードオフで精度が劣化する可能性があります。枝刈りの対象となるノードは一般的に重みが低いノードを言われています。枝刈りでは学習と枝刈りを繰り返し行うことで精度の維持と計算量の削減を目指します。
共有では重みを複数のノード間で共有します。重みを共有することでモデルの容量を削減することができます。他方でモデルの計算量は削減されないため、高速化が見込めるものではありません。
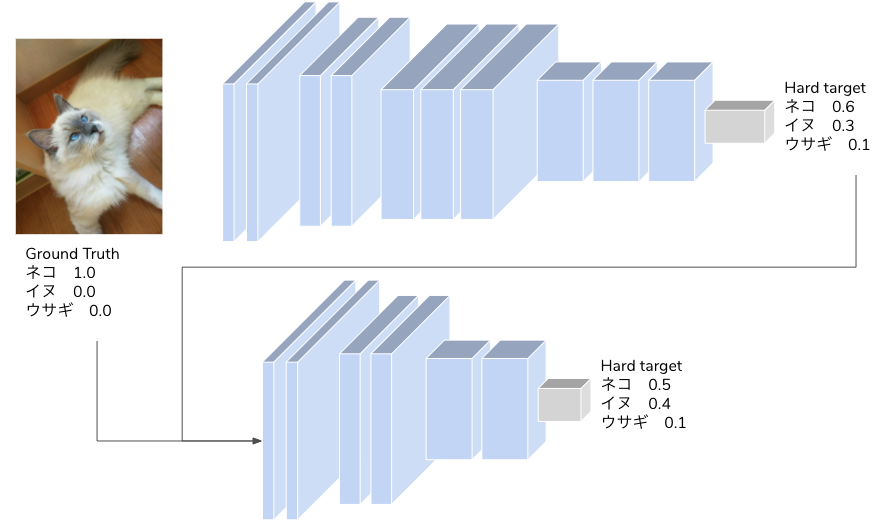
蒸留では学習方法を工夫することで軽量モデルの精度を改善する手法です。蒸留では最初に精度の良い大容量モデルで学習を行い、大容量モデルの推論結果を目的変数とします。大容量モデルが学習した正解データ(Hard target)と推論結果(Soft target)を用いて、軽量モデルを大容量モデルに近づくように学習させる手法が蒸留です。大容量モデルの推論結果は各ラベルに対する確率で表現されるため、軽量モデルはラベルの確率から各データのラベルに対する類似性を学習します。例えばあるネコの画像があり、Soft target としてネコ 60%、イヌ 30%、ウサギ 10%という分布になっていた場合、そのネコ画像がネコ:イヌ:ウサギ=6:3:1 という特徴を持っていると学習するというものです。
サービス
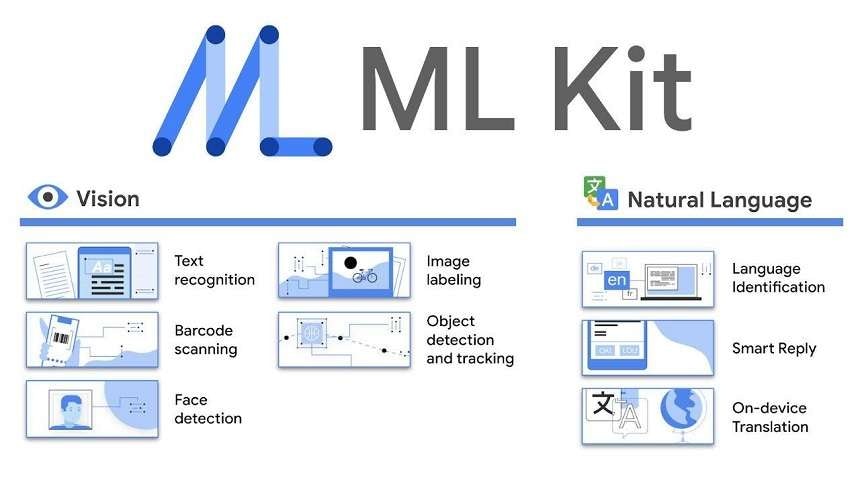
Edge AI を支えるサービスで有名なのは Google MLKit(旧 Firebase MLKit)です。MLKit は Android/iOS 向けにモデルの配布や推論、学習、ログ収集といった Edge AI に必要なサービスを提供する SDK です。MLKit から学習済みモデルや独自モデルを Android/iOS にダウンロードし、MLKit の SDK が提供するライブラリで、アプリ内で容易に推論を実行することが可能です。スマホ端末へのモデルの配布という Edge AI の課題を解決し、推論ラッパーまで提供されている便利なサービスになります。現在サポートされているモデルは Tensorflow Lite に限られます。
MLKit の便利な点は汎用的に使えるモデルを標準提供している点です。自らモデルを用意しなくても、MLKit の提供する API からモデルを取得して活用することができます。たとえば物体検知を使いたい場合、SSD や YOLO のモデルを用意しなくても、以下のコードで実行することが可能です。
private class ObjectDetection : ImageAnalysis.Analyzer {
    val options = FirebaseVisionObjectDetectorOptions.Builder()
        .setDetectorMode(FirebaseVisionObjectDetectorOptions.STREAM_MODE)
        .enableClassification()
        .build()
    val objectDetector = FirebaseVision.getInstance().getOnDeviceObjectDetector(options)

    private fun degreesToFirebaseRotation(degrees: Int): Int = when(degrees) {
        0 -> FirebaseVisionImageMetadata.ROTATION_0
        90 -> FirebaseVisionImageMetadata.ROTATION_90
        180 -> FirebaseVisionImageMetadata.ROTATION_180
        270 -> FirebaseVisionImageMetadata.ROTATION_270
        else -> throw Exception("Rotation must be 0, 90, 180, or 270.")
    }

    override fun analyze(imageProxy: ImageProxy?, degrees: Int) {
        val mediaImage = imageProxy?.image
        val imageRotation = degreesToFirebaseRotation(degrees)
        if (mediaImage != null) {
            val image = FirebaseVisionImage.fromMediaImage(mediaImage, imageRotation)
            objectDetector.processImage(image)
                    .addOnSuccessListener { detectedObjects ->
                        for (obj in detectedObjects) {
                            val id = obj.trackingId
                            val bounds = obj.boundingBox
                            val category = obj.classificationCategory
                            val confidence = obj.classificationConfidence
                            // Do Something
                        }
                    }
                    .addOnFailureListener { e ->
                        // Do Something
                    }
        }
    }
}
まとめ
Edge AI の全体像と使い方を図とサンプルコードで説明しました。Edge AI はスマホだけでなく、自動車や機械、家電等々、様々な場面で活躍する可能性を秘めたテクノロジーです。技術的にも今後成長していく領域なので、ぜひ広まってほしいと思っています。
- 投稿日:2020-11-14T14:00:56+09:00
[English] Converting PyTorch, ONNX, Caffe, and OpenVINO (NCHW) models to Tensorflow / TensorflowLite (NHWC) in a snap
1. Introduction
By following the steps in this article, you will finally be able to convert PyTorch's high-precision Semantic Segmentation
U^2-Netinto TensorFlow Lite. It looks like the diagram below.
TensorFlow is insanely unwieldy. The latest very interesting models that are released daily are PyTorch implementations across the board, and why don't you implement them in TensorFlow! I think about this on a regular basis. It's quite tedious to reimplement and re-train every single model in TensorFlow, even though we know in advance that the model will be accurate and perform well from the paper's benchmark results. There may be a discrepancy between what you think "TensorFlow is difficult to handle" and what I think is difficult to handle, but in general, I think the following are the bottlenecks.
- While all other frameworks are
NCHWstyle, only TensorFlow isNHWCstyle- The
NHWC formatis difficult to convert to other frameworks because of the default- Operations with the same processing, same name and different interfaces are scattered all over the place and are super chaotic
- The latest interesting implementations feel relatively few and far between
- The syntax is difficult
But I think there are some good points as well. Here are some of the good things I consider to be true.
- Tuning the model for the device for a high performance experience
- Wide range of optimizations for execution environments such as TensorFlow.js, TensorRT, TF-TRT, TensorFlow Lite and MediaPipe
- The structure of the model is very beautiful when properly optimized.
Yes, 3. is completely my hobby. In this article, I'd like to share some of my expertise on how to take advantage of the advantages of TensorFlow while also counteracting the disadvantages. The training will be done on a framework of your choice and the reasoning will be optimized on TensorFlow. That's what I'm going to aim for.
For the muddy know-how on model conversions that I wrote in the last issue, click here [Tensorflow Lite] Various Neural Network Model quantization methods for Tensorflow Lite (Weight Quantization, Integer Quantization, Full Integer Quantization, Float16 Quantization, EdgeTPU). As of May 05, 2020. The title is in English, but the content is in Japanese. An English version is also available here. [English ver.] [Tensorflow Lite] Various Neural Network Model quantization methods for Tensorflow Lite (Weight Quantization, Integer Quantization, Full Integer Quantization, Float16 Quantization, EdgeTPU). As of May 05, 2020.
2. Various tools for model transformation
Wouldn't it be nice to be able to convert models between frameworks and run interesting models on the framework of your choice? The following tools are currently available for model conversion. For the purposes of this article, ONNX is only used as a temporary relay framework to freeze the PyTorch model. By the way, the main difference between my crude conversion tool (openvino2tensorflow) and the main tools below is that the
NCHW formatIt's a place where you can convert toNHWC formatstraight away, and even performquantization.
onnx-tensorflowTool to convert ONNX to TensorFlowtensorflow-onnxTool to convert Tensorflow to ONNXonnx2kerasA tool to convert ONNX to Kerastflite2onnxTool to convert TensorFlowLite to ONNXsklearn-onnxA tool to convert sklearn to ONNXonnx-mlirTool to convert ONNX to MLIRkeras-onnxA tool to convert Keras to ONNXonnx-tensorrtTool to convert ONNX to TensorRTonnx-coremlTool to convert ONNX to CoreMLonnx-simplifierTool for optimizing the ONNX model structureOpenVINO Deep Learning Deployment Toolkit (DLDT) - Model OptimizerConversion of TensorFlow, ONNX, MXNet, and Caffe to OpenVINO IR format and other useful toolkitscoremltoolsTools for converting various frameworks to CoreML modelsMMdnna comprehensive and cross-framework tool to converttorch2tfliteIt uses ONNX and TF2 as bridge between Torch and TFLiteopenvino2tensorflowTool to convert OpenVINO IR models to TensorFlowPINTO_model_zooModel collections for PyTorch (ONNX), Caffe, TensorFlow, TensorflowLite, CoreML, TF-TRT and TFJS. A large number of model conversion scripts have been committed3. The pain of converting from NCHW-formatted models to NHWC-formatted models
As you'll see when you try it, none of the tools, other than my own tools mentioned in the previous section, can convert
NCHW formattoNHWC formatvery well. Even if you can, you'll often have a lot of garbage Transpose layers embedded in it. Conversion fromNHWC formattoNCHW formatis generally supported. If you want to convert NCHW format to NHWC format neatly, you need to extract the weight information recorded in the model as a Numpy array and transpose it to all of them, which is very time-consuming. I've actually converted a number of models by hand, but I make a lot of mistakes anyway. Anybody can convert a huge model or a model with complex structure (e.g., a model with many branches) manually, but mistakes are inevitable. Anyway, it's hard. It's crazy hard.「Yes! It took me two days to finally convert!」
↓
「Ah...What's this? I've done some trash refining...」It makes my heart sick. I tried to do a manual
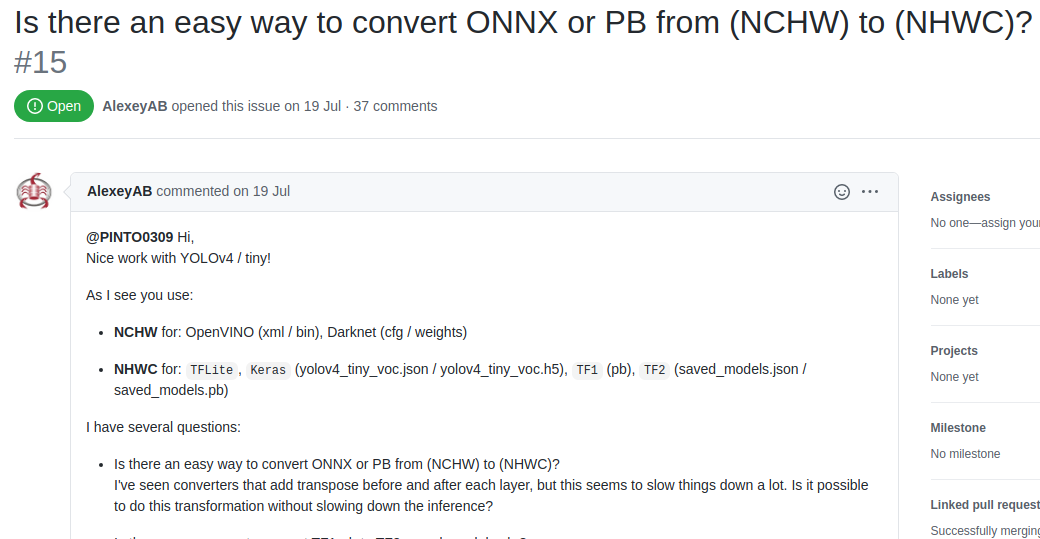
TensorFlow Litetransformation ofPyTorch's EfficientDet-D0with success, but there was so much disjointing in the nature of the model that I felt like throwing up.Regarding the NCHW to NHWC conversion, there was actually a history of direct discussions between the author of the YoloV4 paper, Alexey, and myself. So far, it's a long-lived issue that has played catch-up 37 times, but if you're interested in how it came about, it might be interesting to take a peek at it.
GitHub issue: Is there an easy way to convert ONNX or PB from (NCHW) to (NHWC)?
4. Why convert via OpenVINO?
In this article, I will perform the NCHW to NHWC conversion, optimizing the model in the following sequence:
PyTorch->ONNX->OpenVINO->TensorFlow / Tensorflow Lite. It does not convert from ONNX or any other NCHW format to TensorFlow's NHWC format all at once. To put it simply, because the Model Optimizer of OpenVINO is quite excellent, I dare to incorporate the conversion to OpenVINO into my workflow only once.There are five advantages of going through a one-time conversion to OpenVINO in my opinion, as follows.
- The Model Optimizer of OpenVINO optimizes the model during the conversion process by itself
- OpenVINO itself, as a dedicated inference framework, is specialized in the role of inference and inter-framework conversion, so it is sophisticated as a common format.
- Supports transformations of many frameworks, including PyTorch(ONNX), TensorFlow, Caffe, MXNet, and more.
- All operation information and connections between operations are output in a simple, human-readable XML file so that the structure of the trained model can be easily rewritten later using an editor.
- It's incorporated into OpenCV.
As for #5, it's hard to call it a benefit.
By the way, Alexey explains the usefulness of
openvino2tensorflowin the comments section of an article in Russian calledHow to pack your neurons into a coffee machine.
Как запихать нейронку в кофеварку - How to pack your neurons into a coffee machine5. The beauty of the model structure
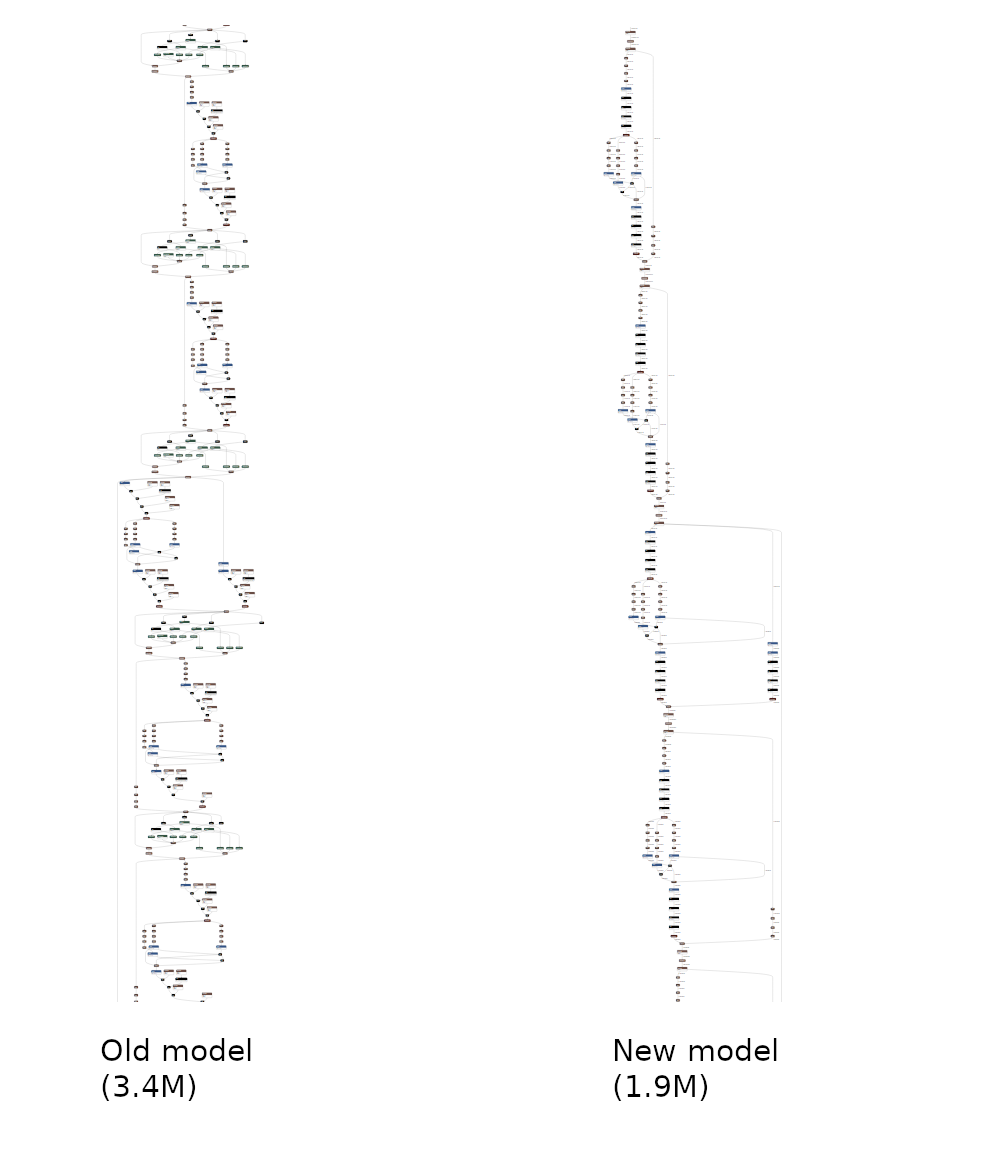
An important factor in generating a deep learning model is
1. Size
2. Precision
3. The beauty of the structure
I'm sorry. I'm probably the only one who gives beauty as a determining factor. I have a collection of models, so I found myself addingBeautyas an element of pursuit before long as I continued working on it. So what doesBeautymean? If you look at the diagram below, you may be able to get a better idea of what I'm talking about. Just for looks, when you convert to the TensorFlow Lite format, the activation functions and BatchNormarization are merged into Convolution and neatly packaged into an ONNX model about two-thirds the size of the original.The model used for the conversion test from ONNX to TensorFlow Lite is the ONNX model, a 3D skeletal detection model
ThreeDPoseUnityBarracudabyDigital- Standard Co. If you want to use it for your hobby or research, please release it as a free program, but if you want to use it for commercial purposes, there are restrictions. Therefore, please read the LICENSE clause carefully before using it.
https://digital-standard.com/threedpose/models/Resnet34_3inputs_448x448_20200609.onnx
ONNX OpenVINO TFLite 6. Conversion procedure
Converts a model in the following way:
PyTorch->ONNX->OpenVINO->TensorFlow / Tensorflow Lite. Here are the steps I've incorporated into my own workflow based on the advice I received on OSS.6-1. Installing TensorFlow and OpenVINO
Install TensorFlow and OpenVINO. TensorFlow and OpenVINO must be installed with
v2.3.1or later, and OpenVINO must be installed with2021.1or later.Installing_TensorFlow$ sudo pip3 install tensorflow==2.3.1 --upgradeThe installation procedure for OpenVINO differs depending on the OS. Follow the instructions below to install OpenVINO. The supported OpenVINO versions for this procedure are
2021.1or later.
Linux - 2021.1+
https://docs.openvinotoolkit.org/latest/openvino_docs_install_guides_installing_openvino_linux.htmlWindows - 2021.1+
https://docs.openvinotoolkit.org/latest/openvino_docs_install_guides_installing_openvino_windows.html6-2. Installing openvino2tensorflow
Install my own tool
openvino2tensorflowto automatically convert OpenVINO IR models to TensorFlow saved_models, .pb files, .tflite files and .h5 files. You can install the latest package by simply running the following command. I am fixing bugs and adding more layers of support on an almost daily basis, so I recommend that you run this every time you start working on it.Installing_openvino2tensorflow$ sudo pip3 install openvino2tensorflow --upgrade【Reference】 GitHub: https://github.com/PINTO0309/openvino2tensorflow
6-3. Installing PyTorch
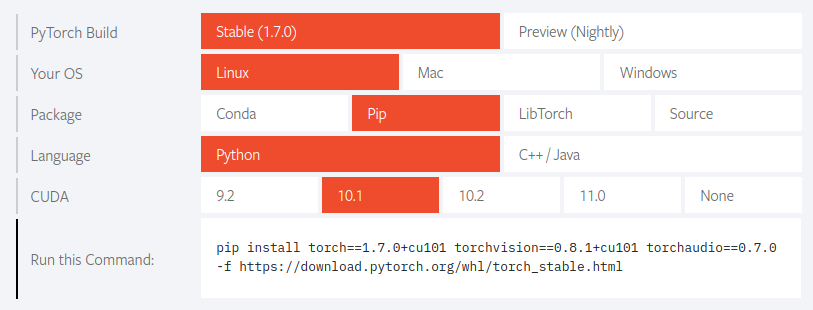
Please select the appropriate version of the installer for your environment from the website below. In my case, I used the following specifications. The only thing to note is that you need to select the appropriate version of CUDA in your environment.
Installing_PyTorch$ sudo pip3 install torch==1.7.0+cu101 \ torchvision==0.8.1+cu101 torchaudio==0.7.0 \ -f https://download.pytorch.org/whl/torch_stable.html6-4. Installing the ONNX Runtime
Installing_onnxruntime$ sudo pip3 install onnxruntime --upgrade【Reference】 GitHub https://github.com/microsoft/onnxruntime
6-5. Installing ONNX Simplifier
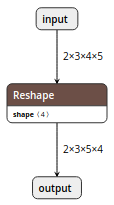
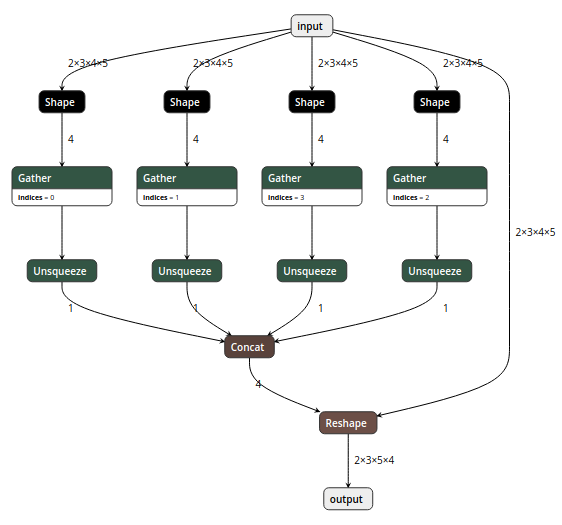
As you may have felt if you've ever output an ONNX model, the ONNX model structure is quite redundant. For example, the structure in the figure below is
This is what happens when you convert ONNX. Ahhh... It's not beautiful.
When you put the ONNX model into theONNX Simplifierthat we are introducing here, it optimizes the size and structure of the overall model weights at the same time. The following figure shows how it works. It's easy to see how well it's been optimized.
Installation_of_ONNX_Simplifier$ sudo pip3 install onnx-simplifier --upgrade【Reference】 GitHub: https://github.com/daquexian/onnx-simplifier
6-6. PyTorch -> ONNX conversion
Now, let's finally get to the real work of model conversion. This article describes a special procedure for converting PyTorch to ONNX. In this procedure, I will leave you with a relatively simple and accurate model
U^2-Net (Youth Square Net). I won't mention TorchScript, so if you're curious, here's an article Using TorchScript to save PyTorch models - Qiita - hirune924 is very helpful.6-6-1. Clone the sample repository used for the conversion procedure
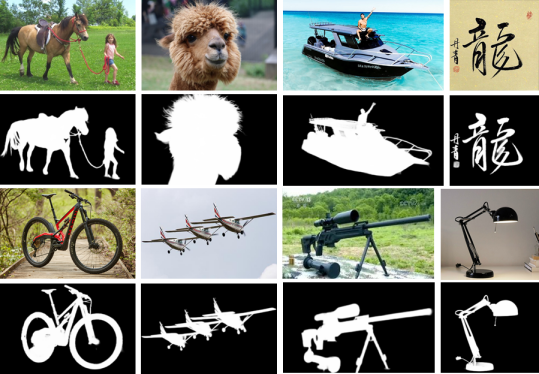
Clone the repository of the PyTorch implementation of the
U^2-Netmodel of high-precision Semantic Segmentation. An image of Semantic Segmentation with U^2-Net is shown below. It's incredibly detailed and cool.
Clone_of_U^2-Net$ git clone https://github.com/NathanUA/U-2-Net.git $ cd U-2-Net6-6-2. Generate onnx using pytorch_to_onnx.py, a backend module of OpenVINO's model_downloader
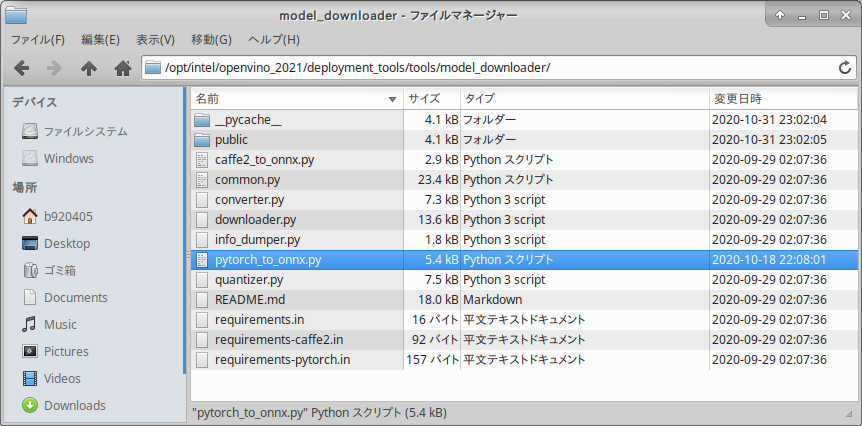
OpenVINO's bundled tool
model_downloaderdownloads various models and converts them to ONNX by calling the module for automatic conversion to OpenVINO IR on the back end. You can find out what it looks like, but you'll find that it's provided by a mere Python script. This special procedure usespytorch_to_onnx.py, called bymodel_downloader, to convert PyTorch's model to ONNX straight away. The advantage is that in most cases, with the exception of the very specific PyTorch model, you can easily convert .pth to ONNX with a single command without having to make any changes to the PyTorch program.
Now, let's try to convert the sample PyTorch modelU^2-Net. The parameters of the model conversion scriptpytorch_to_onnx.pyare as follows.
No. Parameter Meaning 1 import-module Specify the part of the .py file name that contains the model structure without the .py part. If there are model files several levels down in the folder hierarchy, you can use folder_name1.folder_name2.u2netto specify the name of the folder separated by"."Example: For u2net.py in the current hierarchy, specifyu2net.2 model-name Specify the CLASS name of the model in the .py file in No.1. Example: class U2NETP(nn.Module):ofU2NETP3 input-shape Specifies the input resolution of the model in NCHW format, separated by commas with no spaces. 4 weights Specify the relative or absolute path to the .pth file where the PyTorch weights are stored. 5 output-file Specifies the name of the ONNX file after exporting. 6 input-names Specify the name of the model's input variables. In most cases, the argument name specified in the forward function of No.1 is OK. To specify more than one variable, separate them with a comma-separated list with no spaces. For example: "x,y,z"7 output-names Specify the name of the model's output variable. In most cases, the name of the variable specified in the return statement of the forward function in No.1 is fine. To specify more than one variable, separate them with a comma without spaces. Example: "out1,out2,out3,out4"Execute the following commands directly under the cloned repository folder.
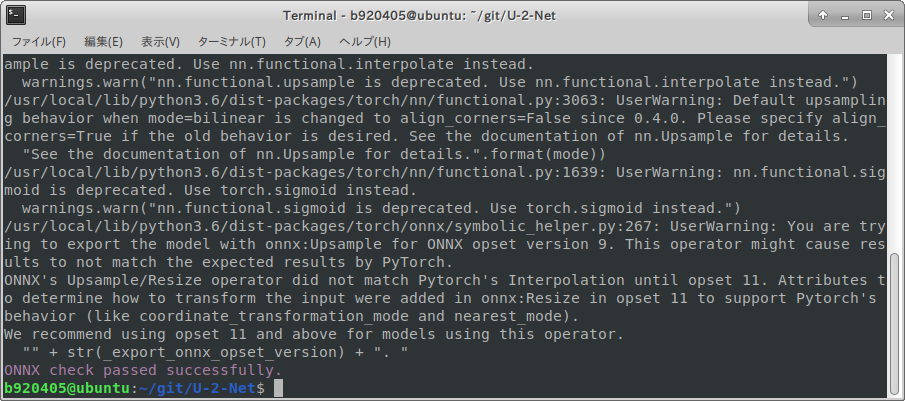
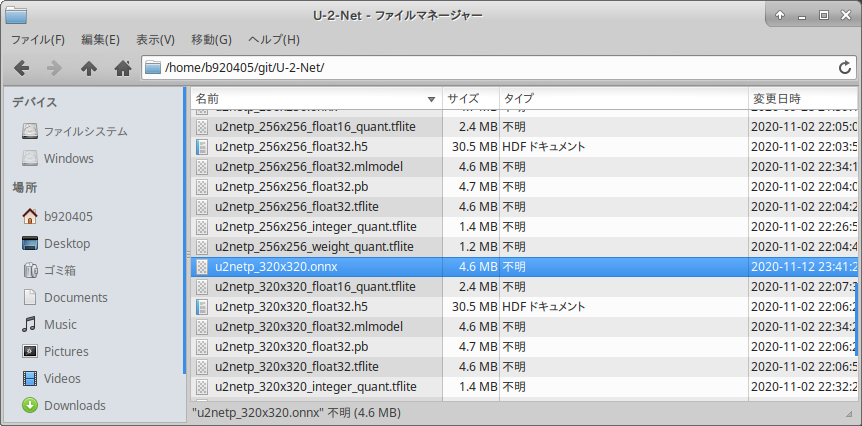
ONNX_conversion_of_.pth_files_by_pytorch_to_onnx.py$ python3 ${INTEL_OPENVINO_DIR}/deployment_tools/tools/model_downloader/pytorch_to_onnx.py \ --import-module model.u2net \ --model-name U2NETP \ --input-shape 1,3,320,320 \ --weights saved_models/u2netp/u2netp.pth \ --output-file u2netp_320x320.onnx \ --input-names "x" \ --output-names "F.sigmoid(d0),F.sigmoid(d1),F.sigmoid(d2),F.sigmoid(d3),F.sigmoid(d4),F.sigmoid(d5),F.sigmoid(d6)"It is successful if
ONNX check passed successfully.is displayed as shown in the following figure.
u2netp_320x320.onnxis generated properly.
6-7. Optimizing the ONNX Model
All you have to do is specify the ONNX file you just generated as a parameter and execute the following command.
Perform_optimization_of_ONNX_models$ python3 -m onnxsim u2netp_320x320.onnx u2netp_320x320_opt.onnxIt's optimized like crazy. The more complex the model, the more effective it is.
Before optimization u2netp_320x320.onnx After optimization u2netp_320x320_opt.onnx 【Reference】 GitHub https://github.com/daquexian/onnx-simplifier
6-8. ONNX -> OpenVINO IR conversion
Now, take
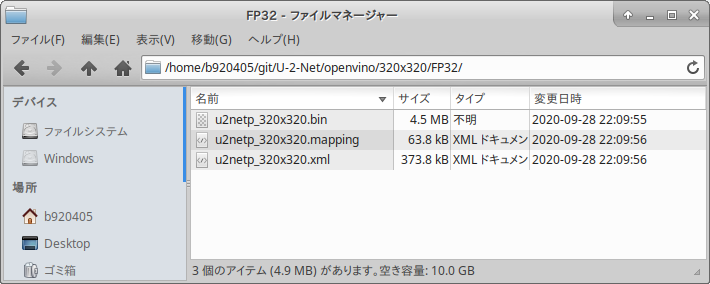
u2netp_320x320_opt.onnx, which was optimized and generated earlier, and convert it to IR format using OpenVINO's converter. Execute the following command. If you want to convert Caffe's model, just follow the steps from here.Conversion_to_OpenVINO_IR_format$ python3 ${INTEL_OPENVINO_DIR}/deployment_tools/model_optimizer/mo.py \ --input_model u2netp_320x320_opt.onnx \ --input_shape [1,3,320,320] \ --output_dir openvino/320x320/FP32 \ --data_type FP32Three files have been generated:
.bin.mapping.xml.
See below for the parameters you can specify formodel_optimizer.6-9. OpenVINO IR -> TensorFlow / TensorFlow Lite conversion
Now for the last step. Use my homemade miscellaneous tool,
openvino2tensorflowto generate NHWC-formatted TensorFlow / TensorFlow Lite saved_model, .pb, .h5 and .tflite from an NCHW-formatted IR model. Execute the following command.
No. Parameter Meaning 1 model_path The relative or absolute path to the xml file of the IR model. The xml and bin files must be in the same folder. 2 model_output_path You can specify a relative or absolute path to the output destination of the converted model file in NHWC format. 3 output_saved_model True or False. To output as saved_model, specify True.4 output_h5 True or False. To output in .h5 format, specify True.5 output_weight_and_json True or False. To output weights and JSON, specify True.6 output_pb True or False. To output in .pb format, specify True.7 output_no_quant_float32_tflite True or False. To output in .tflite Float32 precision, specify True.8 output_weight_quant_tflite True or False. To quantize a .tflite weight, specify True.9 output_float16_quant_tflite True or False. To float16-quantize a .tflite weight, specify True.10 replace_swish_and_hardswish True or False. To swap Swish and Hard-Swish in the activation function, specify True. This is for performance verification of EfficientDet.11 debug Enable debug mode. Output the configuration information of a specific layer in the middle of conversion by debugging print. 12 debug_layer_number Specify the number of the layer whose shape you want to verify by debugging print. Valid only if --debugis specified.Generate_TensorFlow_format_(NHWC)_models_from_OpenVINO_IR_format_(NCHW)$ openvino2tensorflow \ --model_path openvino/320x320/FP32/u2netp_320x320.xml \ --model_output_path saved_model_320x320 \ --output_saved_model True \ --output_h5 True \ --output_pb True \ --output_no_quant_float32_tflite True \ --output_weight_quant_tflite True \ --output_float16_quant_tflite TruePyTorch (NCHW) -> ONNX (NCHW) -> OpenVINO (NCHW) -> TensorFlow Lite (NHWC) conversion is complete. What do you think, was it easy? If you use this tool in saved_model format, you can convert to TFJS, TF-TRT or CoreML with a single OSS tool. Click here for additional instructions. GitHub - PINTO0309/PINTO_model_zoo I've committed a lot of sample scripts, so if you're curious about them, you can use them as a reference. As of 14.11.2020, 71 different models have been converted and committed.
Model Structure of TFLite model_float32.tflite 【Reference】 https://github.com/PINTO0309/openvino2tensorflow
7. Finally
I'm not a believer in TensorFlow. The reason why I am so insistent on converting to TensorFlow models in spite of this is that TensorFlow has a rich set of supported runtime environments. I'm not averse to PyTorch because of the wealth of interesting models it has to offer, but I'm not a fan of it at the moment because of the number of tricky models that can't be exported to ONNX. You may suggest that I should just use TorchScript, but I can't understand and can't stand the frequent errors that occur despite the model output function provided as a standard feature of the framework itself.(For now.) I think that as it becomes more sophisticated, it will become easier to use and more accessible.
8. Reference Articles