- 投稿日:2020-10-21T22:57:09+09:00
【Unity】Fungusでゲーム制作(7) 会話ウィンドウ・選択肢のUIを作り変える
Fungusの基本的な使い方に関しては第1回の記事で解説しておりますので、まだの方はそちらからお読み下さい。
前回はセーブ・ロード機能を作りました。
今回は、Fungusの会話ウィンドウや選択肢のUIを作り変える方法について解説したいと思います。会話ウィンドウのUIを作り変える
Fungusメニューの「Create」→「Say Dialog」を選択するとSay Dialogというものが追加されます。これが新しい会話ウィンドウのUIになります。
HierarchyビューでこのSay Dialogの中身を確認してみましょう。以下のようになっています。
- Panel: 背景部
- NameText: キャラの名前表記
- Image: キャラのPortraitが表示される場所
- StoryText:文章表記
- Continue:改ページ表記(右下の三角)
これらの中身を変更すればそのままゲームに反映されます。
色々いじって試してみるのもいいと思いますが、ここではとりあえず一例として、サウンドノベル風の画面いっぱいに文章が表示されるようなUIを作ってみたいと思います。まずはPanelを画面いっぱいに広げます。Panelを選択し、Rect Transformコンポーネントの左上の四角をクリックすると以下のような表が出てくると思います。これはuGUIの部品の座標やサイズの設定の仕方を決めるためのものです。一番右下の上下に矢印が伸びているものを選択してみてください。
その状態で、Left, Top, Right, Bottomの各欄を全て0にすれば、画面全体をカバーするようになります。
次に下にスクロールしてImageコンポーネントのSource Image欄でNoneを選択、Color欄は黒にしつつA(アルファ値)をある程度小さくします。これで半透明のスクリーンができます。
同じ要領でStoryTextの位置・サイズもいい感じに調節してみましょう。またStoryTextのTextコンポーネントからフォントを変更したりもできるので色々試してみてください。
以下のような物が作れると思います。
さて、地の文を描写するシーンではこれでいいでしょうが、会話シーンだと元のUIの方がよさそうですね。こんなときのために、任意にUIを切り替えることができるようになっていますので試してみましょう。もう一つSay Dialogを作ります。中身はデフォルトのままでOKです。最初に使わない方は非Active化しておきましょう。
そしてUIを切り替えたいところにSet Say Dialogコマンドを追加します。
Say Dialog欄に変更したいSay Dialogを指定するだけでOKです。切り替わるのを確認してみましょう。選択肢のUIを作り変える
Fungusメニューの「Create」→「Menu Dialog」を選択するとMenu Dialogが出てきます。
これもHierarchyビューから中身を確認してみましょう。
- OptionButton(0〜5): 選択肢のボタンになります。
- これらを内包しているButtonGroupにはVertical Layout Groupというコンポーネントがついていますが、これは子のGameObjectを縦に並べるためのものです。Layout Groupは他にも種類はありますがここでは詳しく解説しないので必要なら調べてみてください。
- TimeoutSlider: 時間制限付き選択肢(詳しくは次回解説の予定)で使う時間制限ゲージです。
いじり方についてはSay Dialogと同じで、並んでいるものの配置を変えたりImageを入れ替えたりすればゲームに反映されます。
他のMenu Dialogとの切り替えももちろん可能です。Set Menu Dialogコマンドを使います。
こちらもMenu Dialog欄に切り替えたいMenu Dialogを指定すればOKです。今回はFungusにおける会話ウィンドウ、選択肢のUIを作り変える方法について解説いたしました。
次回はリアルタイム性のあるイベント、具体的には時間制限のある選択肢やQTE的なものの作り方について取り扱いたいと思います。


- 投稿日:2020-10-21T17:34:29+09:00
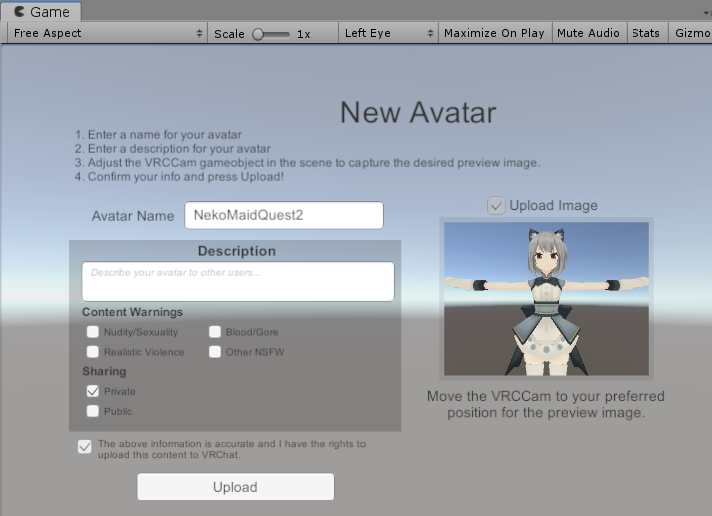
Quest対応の5000ポリNecoMaidアバターをVRChatへアップロードする方法(Quest2で動作確認した)
はじめに
Quest対応の5000ポリNecoMaidアバターをVRChatにアップロードする備忘録になります。
システム環境
- Windows 10
- Oculus Quest2
- Unity 2018.4.20f1
- VRCSDK2
導入
1.Unityプロジェクトを作成します。
2.VRCSDK2-2020.09.25.00.08_Public.unitypackageをインポートします。
3.ダウンロードした5000porynecomaidをフォルダごとProjectビューのAssetsフォルダにD&Dします。
4.5000porynecomaid1.1.unitypackageをダブルクリックして、インポートします。
5.5000porynecomaid設定済プレハブをHierarchyビューへD&Dします。
6.VRChat SDKのControl Panelを開き、VRChatのアカウントでログインします。
7.Builderを開き、Switch Build Target to Androidをクリックします。
※ Unity HubからAndroid Build Supportを追加しておく必要があります。
8.アップロードします。
9.Windowsでもアップロードしておきましょう。
10.Quest2でVRChatを起動し、アバターが確認できればOKです。
かわいい!


- 投稿日:2020-10-21T15:35:38+09:00
【Unity】デフォルトで配列とListを並び替え可能にするエディタ拡張【ReorderableList】
https://t.co/UV7XdLWg9z
— su10@ハイパーカジュアルゲーム開発 (@su10_dev) October 20, 2020
入れるだけで配列とListをReorderableにしてくれるエディタ拡張作った。
Odinみたいに簡単にカスタマイズとかできないけど、素のUnityの状態よりはマシかな。 pic.twitter.com/PLONGK4Avx
ーー 2020/10/22追記 ーー
ScriptableObjectを選択したときに表示がバグる不具合を確認したので直るまで使用しないでください。
というかQiitaって記事を公開したら限定公開にできないのね。。ーー 追記ここまでーー
はじめに
Odin を入れると自動で配列や
Listが並び替え可能かつ様々な拡張が可能になって便利なのですが、Odinは最近ライセンスが変更されて会社利用しにくくなりました(詳細はPricingのページ参照)。コガネブログ様の記事によるとUnity2020.2bからはデフォルトで配列や
ListがReorderableになるらしいのですが、OdinなしのUnity2019でも特別な対応無しで並べ替え可能にしたかったのでいろいろ調べました。ソースコード
Gistにも載せてますが、大して長くもないので全文掲載しておきます。適当に
Assets/Editor/とかに入れると自動で適用されます。配列・List側がクラスを継承したり特別な属性を付与する必要もありません。コードはこちらを元にUnity2019で表示がおかしかったのを修正&リファクタリングしたものです。
ReorderableListEditor.cs/* MIT License Copyright (c) 2018 ANURAG DEVANAPALLY Permission is hereby granted, free of charge, to any person obtaining a copy of this software and associated documentation files (the "Software"), to deal in the Software without restriction, including without limitation the rights to use, copy, modify, merge, publish, distribute, sublicense, and/or sell copies of the Software, and to permit persons to whom the Software is furnished to do so, subject to the following conditions: The above copyright notice and this permission notice shall be included in all copies or substantial portions of the Software. THE SOFTWARE IS PROVIDED "AS IS", WITHOUT WARRANTY OF ANY KIND, EXPRESS OR IMPLIED, INCLUDING BUT NOT LIMITED TO THE WARRANTIES OF MERCHANTABILITY, FITNESS FOR A PARTICULAR PURPOSE AND NONINFRINGEMENT. IN NO EVENT SHALL THE AUTHORS OR COPYRIGHT HOLDERS BE LIABLE FOR ANY CLAIM, DAMAGES OR OTHER LIABILITY, WHETHER IN AN ACTION OF CONTRACT, TORT OR OTHERWISE, ARISING FROM, OUT OF OR IN CONNECTION WITH THE SOFTWARE OR THE USE OR OTHER DEALINGS IN THE SOFTWARE. */ #if UNITY_EDITOR using System.Collections.Generic; using System.Reflection; using UnityEditor; using UnityEditorInternal; using UnityEngine; // SEE: https://github.com/andeart/UnityLabs.ReorderableListEditor namespace Andeart.ReorderableListEditor { /// <summary> /// Custom editor to allow re-orderable lists/arrays in Unity Inspector automatically. /// This custom editor overrides Unity's default SerializedProperty drawing for arrays and lists. /// This is inspired by Valentin Simonov's blog article here: /// http://va.lent.in/unity-make-your-lists-functional-with-reorderablelist/ , along with additional tweaks/functionality. /// </summary> /// <inheritdoc /> [CustomEditor(typeof(Object), true)] [CanEditMultipleObjects] public class ReorderableListEditor : Editor { private Dictionary<string, ReorderableListProperty> _reorderableListDict; protected virtual void OnEnable() { _reorderableListDict = new Dictionary<string, ReorderableListProperty>(); } protected virtual void OnDestroy() { _reorderableListDict.Clear(); _reorderableListDict = null; } public override void OnInspectorGUI() { var propertyValueColor = GUI.color; serializedObject.Update(); var property = serializedObject.GetIterator(); if (property.NextVisible(true)) { do { GUI.color = propertyValueColor; DrawProperty(property); } while (property.NextVisible(false)); } serializedObject.ApplyModifiedProperties(); } private void DrawProperty(SerializedProperty property) { var isPropertyMonoBehaviourId = property.name.Equals("m_Script") && property.type.Equals("PPtr<MonoScript>") && (property.propertyType == SerializedPropertyType.ObjectReference) && property.propertyPath.Equals("m_Script"); if (isPropertyMonoBehaviourId) { EditorGUI.BeginDisabledGroup(true); EditorGUILayout.PropertyField(property); EditorGUI.EndDisabledGroup(); return; } if (property.isArray && property.propertyType != SerializedPropertyType.String) { this.DrawListProperty(property); } else { EditorGUILayout.PropertyField(property, property.isExpanded); } } private void DrawListProperty(SerializedProperty property) { var reorderableListProperty = this.GetReorderableList(property); if (reorderableListProperty.property.isExpanded == false) { reorderableListProperty.DoListHeader(); } else { reorderableListProperty.DoLayoutList(); } EditorGUILayout.GetControlRect(true, -2f); } private ReorderableListProperty GetReorderableList(SerializedProperty property) { if (_reorderableListDict.TryGetValue(property.name, out var reorderableListProperty)) { reorderableListProperty.property = property; return reorderableListProperty; } reorderableListProperty = new ReorderableListProperty(property); _reorderableListDict[property.name] = reorderableListProperty; return reorderableListProperty; } private class ReorderableListProperty { private const float HeaderLeftMargin = 10f; private const float ElementTopMargin = 2f; private const float ElementLeftMargin = 9f; private const float ElementVerticalMargin = 4f; private static readonly FieldInfo ReorderableListDefaultsField = typeof(ReorderableList).GetField("s_Defaults", BindingFlags.Static | BindingFlags.NonPublic); private static readonly MethodInfo DoListHeaderMethod = typeof(ReorderableList).GetMethod("DoListHeader", BindingFlags.Instance | BindingFlags.NonPublic | BindingFlags.InvokeMethod); private ReorderableList _list; private SerializedProperty _property; public SerializedProperty property { get => _property; set { _property = value; _list.serializedProperty = _property; } } public ReorderableListProperty(SerializedProperty property) { _property = property; _list = new ReorderableList(_property.serializedObject, _property, true, true, true, true); _list.drawHeaderCallback += this.OnDrawHeader; _list.drawElementCallback += this.OnDrawElement; _list.elementHeightCallback += this.OnElementHeight; _list.onCanRemoveCallback += this.OnCanRemove; } ~ReorderableListProperty() { _property = null; _list = null; } private void OnDrawHeader(Rect rect) { _property.isExpanded = EditorGUI.Foldout( new Rect(rect.x + HeaderLeftMargin, rect.y, rect.width, rect.height), _property.isExpanded, _property.displayName, true, EditorStyles.foldout ); } private void OnDrawElement(Rect rect, int index, bool active, bool focused) { rect.y += ElementTopMargin; rect.height = EditorGUIUtility.singleLineHeight; var propertyChild = _property.GetArrayElementAtIndex(index); if (propertyChild.propertyType == SerializedPropertyType.Generic) { rect.x += ElementLeftMargin; rect.width -= ElementLeftMargin; EditorGUI.LabelField(rect, propertyChild.displayName); } EditorGUI.PropertyField(rect, propertyChild, GUIContent.none, true); _list.elementHeight = rect.height + ElementVerticalMargin; } private float OnElementHeight(int index) { return Mathf.Max( EditorGUIUtility.singleLineHeight, EditorGUI.GetPropertyHeight(_property.GetArrayElementAtIndex(index), GUIContent.none, true) ) + ElementVerticalMargin; } private bool OnCanRemove(ReorderableList list) { return 0 < _list.count; } public void DoListHeader() { if (ReorderableListDefaultsField.GetValue(null) == null) { ReorderableListDefaultsField.SetValue(null, new ReorderableList.Defaults()); } var rect = GUILayoutUtility.GetRect(0.0f, _list.headerHeight, GUILayout.ExpandWidth(true)); DoListHeaderMethod.Invoke(_list, new object[] {rect}); } public void DoLayoutList() { _list.DoLayoutList(); } } } } #endif所感
[CustomEditor(typeof(Object), true)]なカスタムエディタを書けばデフォルトのInspector表示も変更できるの知らなかった。参考
- UnityLabs.ReorderableListEditor
- Unity: make your lists functional with ReorderableList
- 【Unity】【エディタ拡張】ReorderableListの使い方(LIGHT11)
- ReorderableListのすすめ - Synamon's Engineer blog
- カスタムエディタが楽に書けるやつ
- Reorderable List
- Odinみたいに多機能だけどカスタムエディタを書くか継承が必要なやつ
- 投稿日:2020-10-21T01:34:49+09:00
MultiUserCapabilitiesTutorialsやーる(HoloLens2、MRTK2.4.0、Photon2.22、AzureSpatialAnchors2.2.1)
はじめに
マルチデバイスでオブジェクトの共有ができるチュートリアルをやっていきます。公式のドキュメントはこちらです。Photonでオブジェクトを共有して、Azure Spatial Anchorsでオブジェクトの位置合わせるという感じです。ビルドでちょっとハマったので備忘録です。
開発環境
- Windows 10
- HoloLens 2
- Unity Hub
- Unity 2019.4.1f1
- MRTK 2.4.0
- Azure Spatial Anchors 2.2.1
- AR Foundation 2.1.8
- PUN 2 FREE 2.22
導入
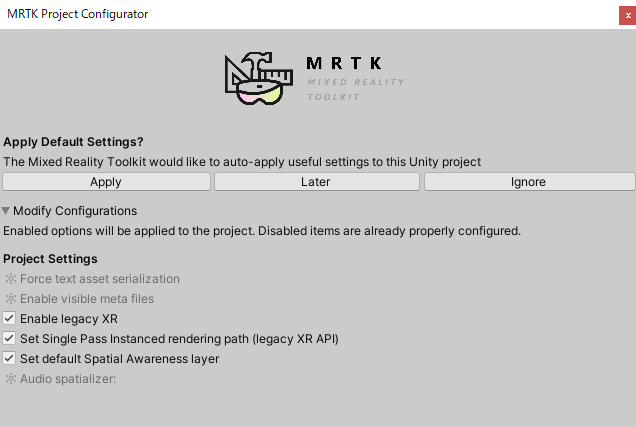
1.Unityプロジェクトを作成し、Microsoft.MixedReality.Toolkit.Unity.Foundation.2.4.0.unitypackageをインポートします。
2.MRTK Project Configuratorが表示されたら、Applyします。
3.こちらもApplyします。
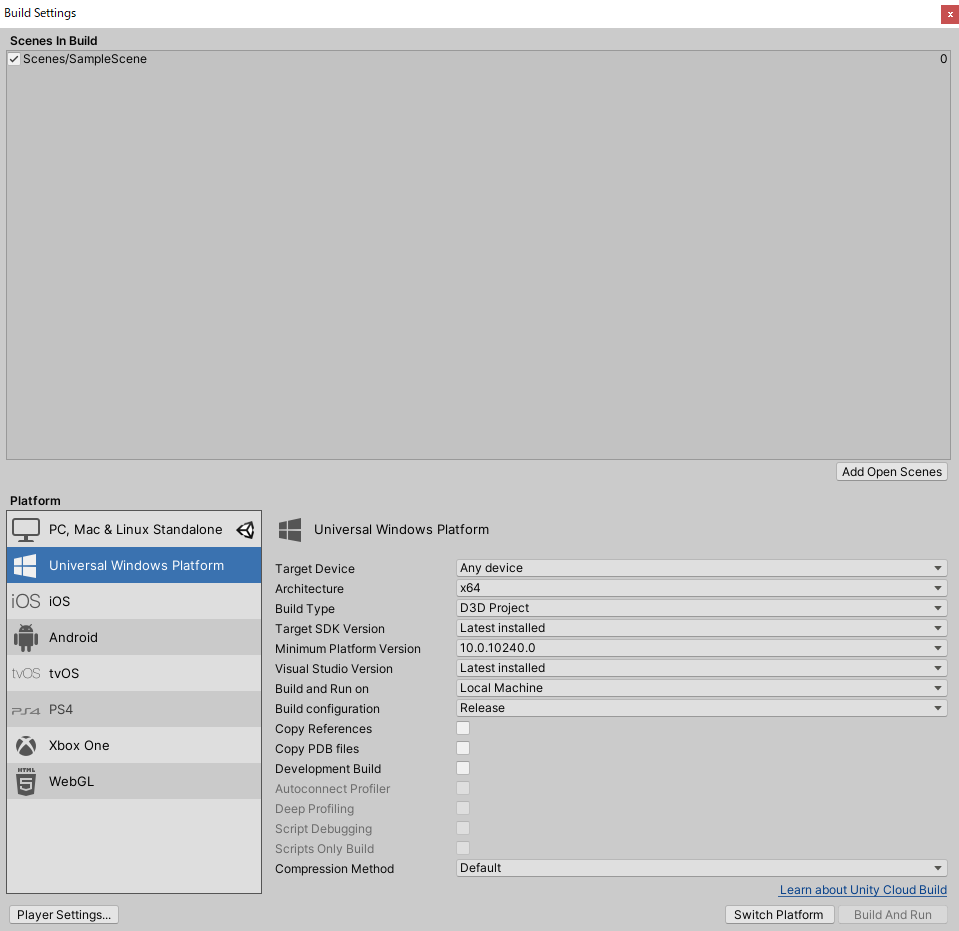
4.File -> Build Settingsを開き、UWPを選んで、Switch Platformをクリックします。
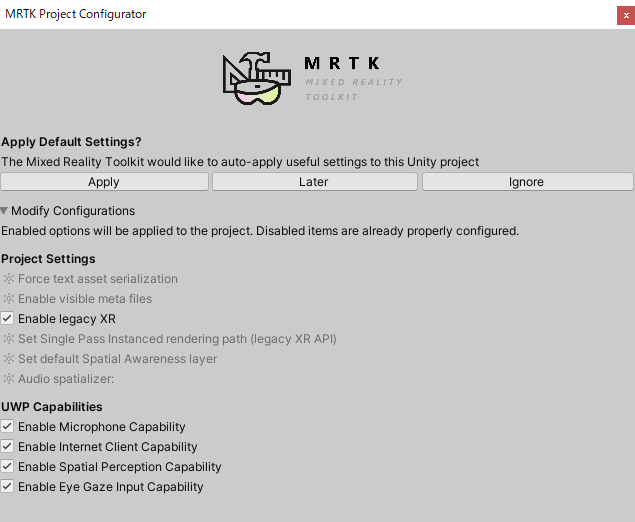
5.Applyします。
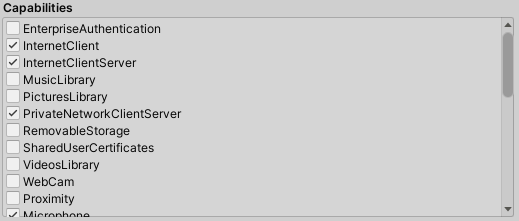
6.Build Settings->Player Settingsをクリックし、Publishing Settings->CapabilitiesのInternetClient、InternetClientServer、PrivateNetworkClientServer、Microphone、SpatialPerception、GazeInputにチェックを入れます。
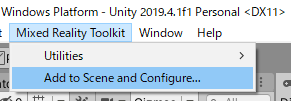
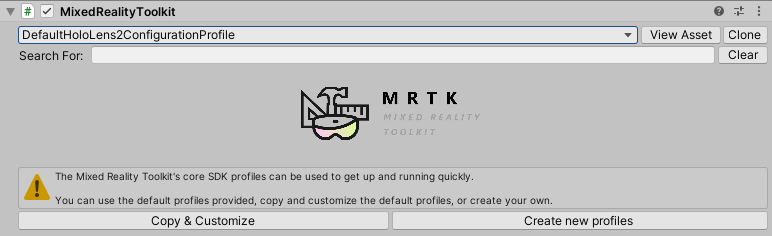
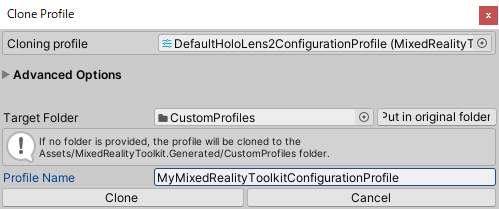
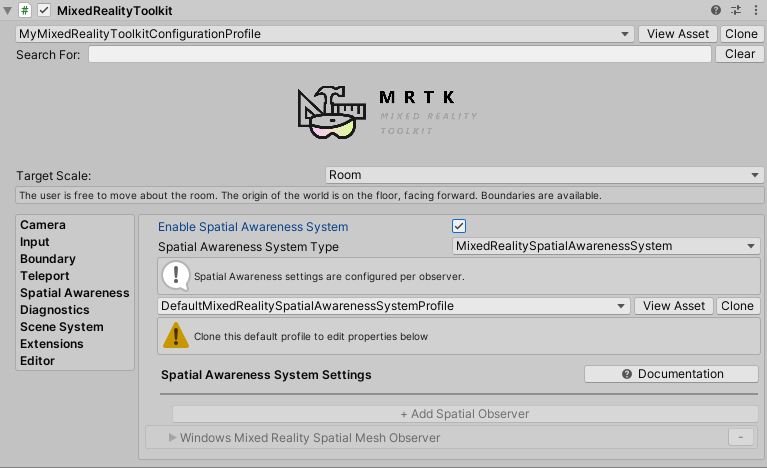
7.Mixed Reality ToolkitからAdd to Scene and Configureをクリックし、Hierarchyビューに配置されたMixedRealityToolkitを選択します。Inspector ViewからDefaultHoloLens2ConfigurationProfileをクローンします。
8.任意の名前を付けます。
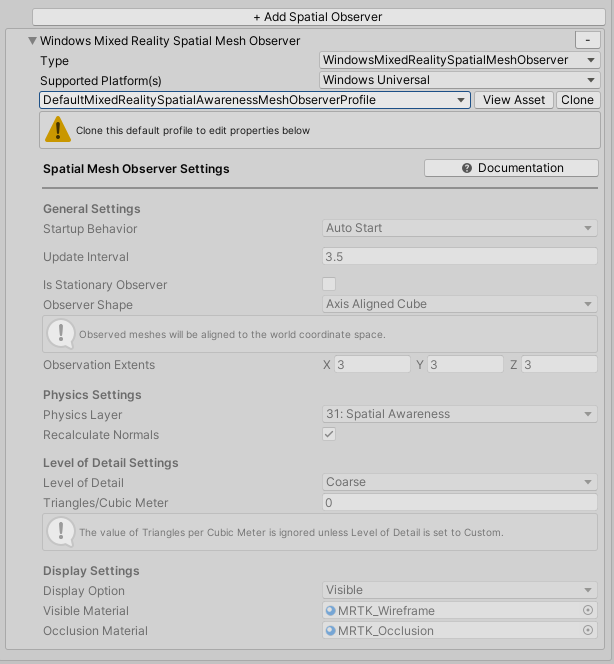
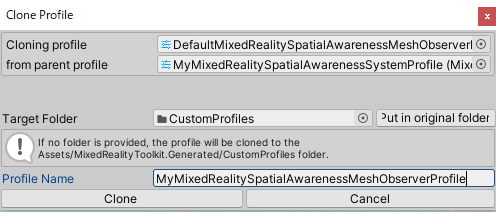
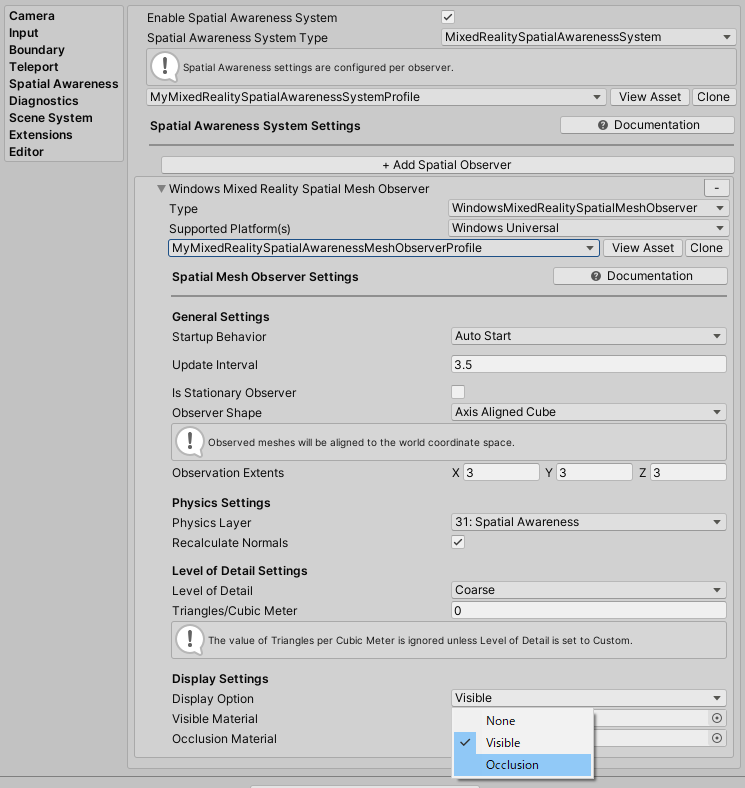
9.Spatial AwarenessのEnable Spatial Awareness Systemにチェックを入れ、DefaultMixedRealitySpatialAwarenessSystemProfileをクローンします。
10.任意の名前を付けます。
11.DefaultMixedRealitySpatialAwarenessMeshObserverProfileをクローンします。
12.任意の名前を付けます。
13.Display OptionでOcculusionを選択します。
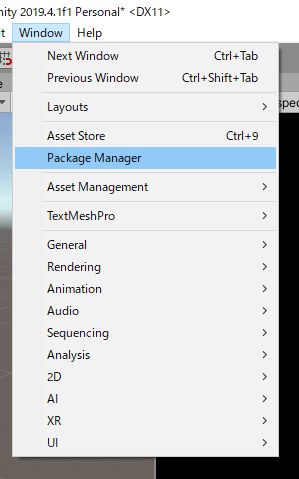
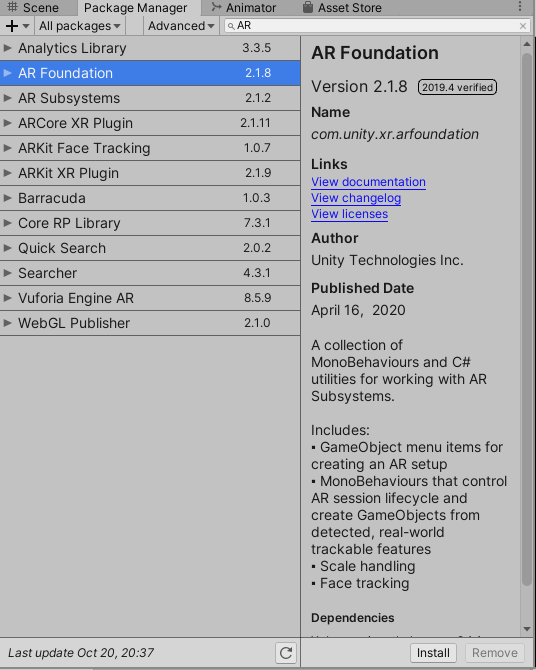
14.Window->Package ManagerからAR Foundationをインストールします。
15.公式サイトにある下記のunitypackageをインポートします。
AzureSpatialAnchors.unitypackage (version 2.2.1)
MRTK.HoloLens2.Unity.Tutorials.Assets.GettingStarted.2.4.0.unitypackage
MRTK.HoloLens2.Unity.Tutorials.Assets.AzureSpatialAnchors.2.4.0.unitypackage
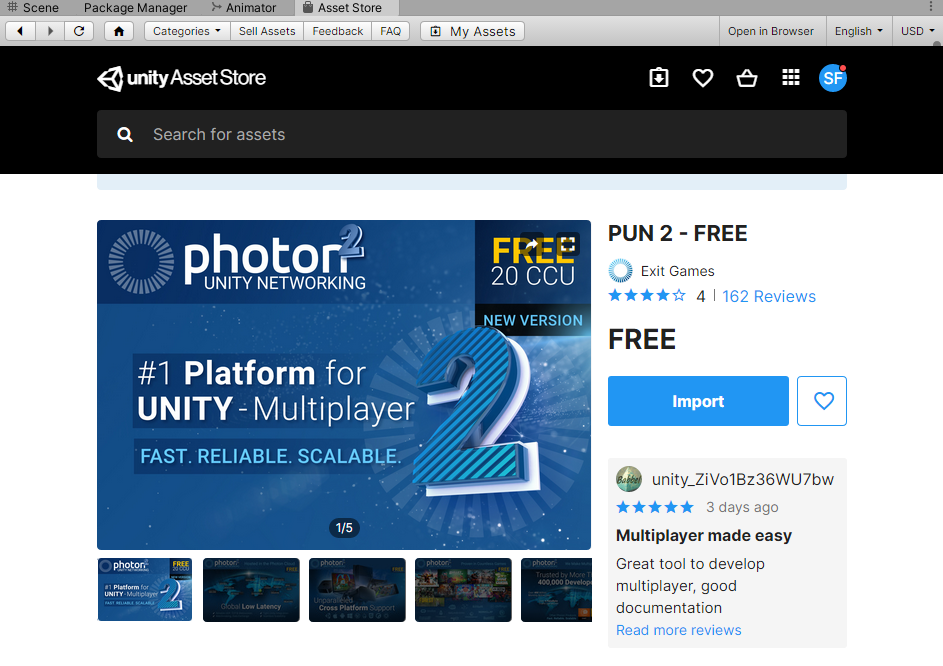
MRTK.HoloLens2.Unity.Tutorials.Assets.MultiUserCapabilities.2.4.0.unitypackage16.Window->Asset Store からPUN 2 - Freeを検索、インポートします。
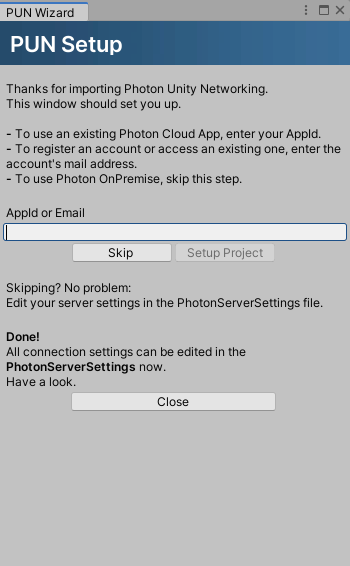
17.セットアップウィザードは一旦閉じてOKです。
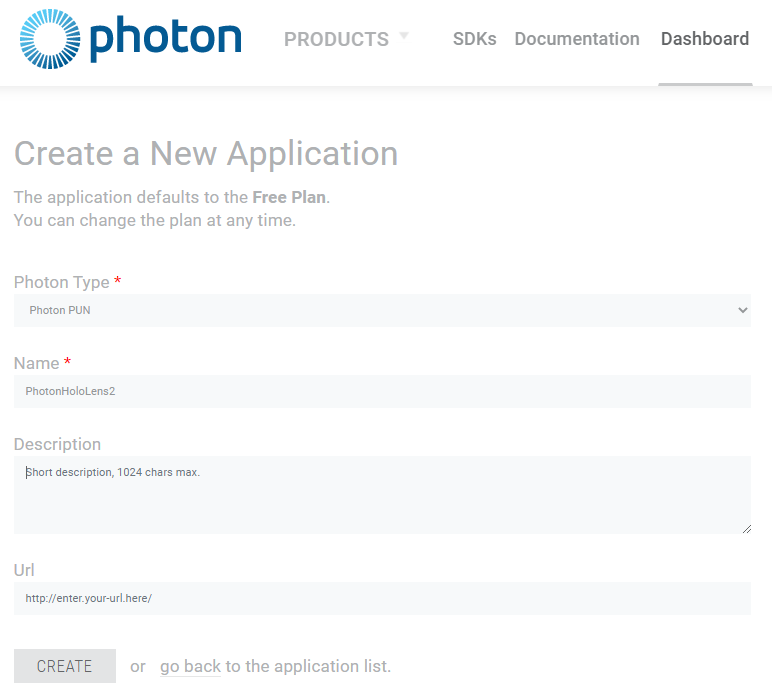
18.Photon Dashboardを開き、Photon Type: Photon PUN、Nameは任意の新しいアプリケーションを作成します。
19.作成したPhoton PUNアプリケーションのApp IDをコピーします。
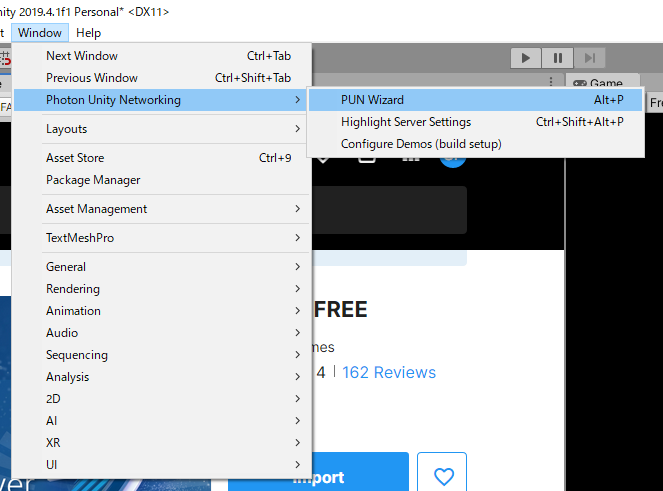
20.Window->Photon Unity Networking->PUN Wizardを開き、
21.Setup Projectをクリック。
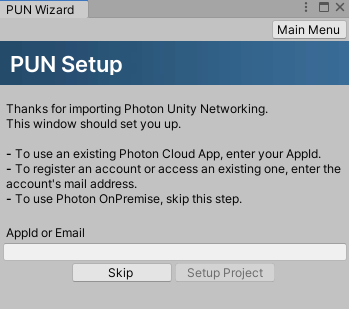
22.App IDを入れて、Setup Projectをクリックします。
23.TMP Importerが表示されたらインポートします。
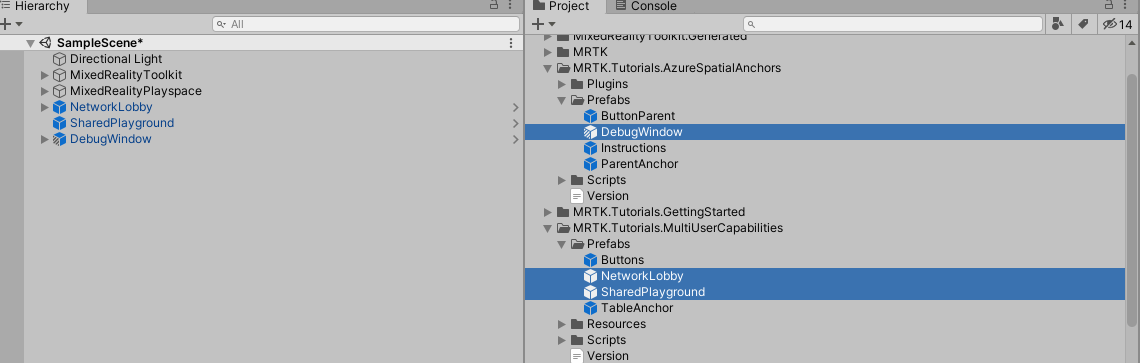
24.ProjectビューからAssetsのMRTK.Tutorials.AzureSpatialAnchors->Prefabs->DebugWindowとMRTK.Tutorials.MultiUserCapabilities->PrefabsのNetworkLobbyとSharePlaygroundをHierarchyにD&Dします。
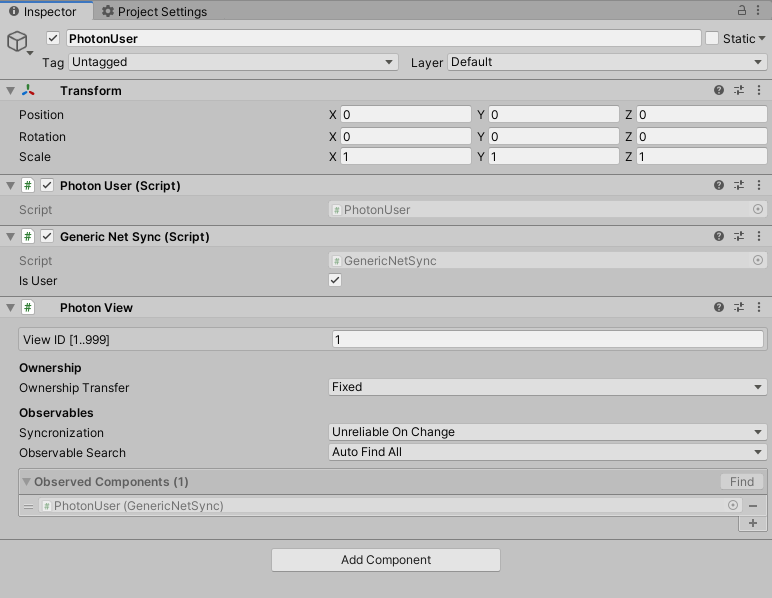
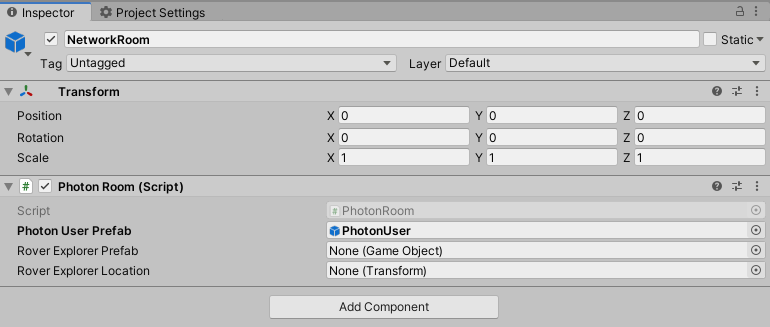
25.HierarchyからCreate Empty->GameObjectを作り、名前をPhotonUserとします。PhotonUserのInspectorViewからPhotonUserとGenericNetSyncとPhotonViewをAddComponentします。GenericNetSyncのIsUserにチェックを入れます。
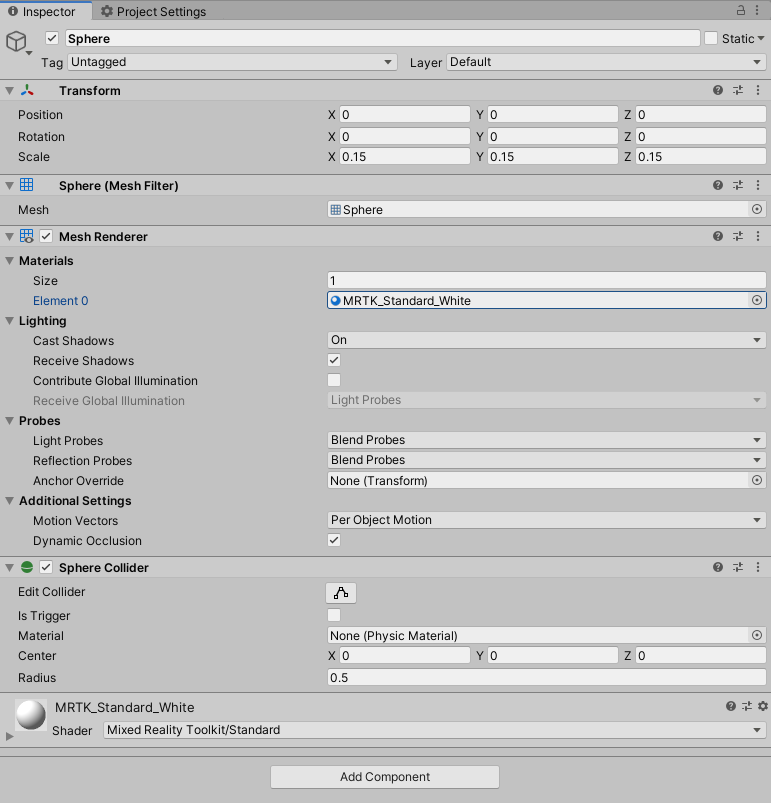
26.PhotonUserに子オブジェクトのSphereを作成、MeshRendererのElement 0にMRTK_Standard_Whiteをアタッチします。
27.PhotonUserをMRTK.Tutorials.MultiUserCapabilities->ResourcesへD&Dし、Hierarchyビューから削除します。
28.NetworkRoomにPrefab化したPhotonUserをアタッチします。
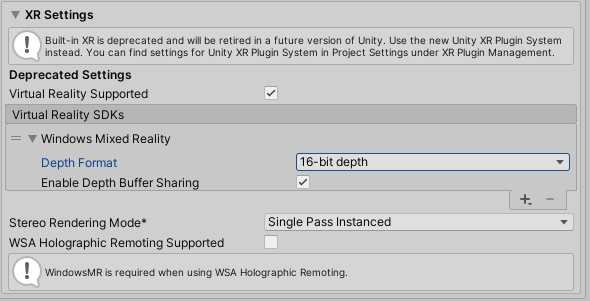
29.Player SettingsのXR Settingsを忘れずに。
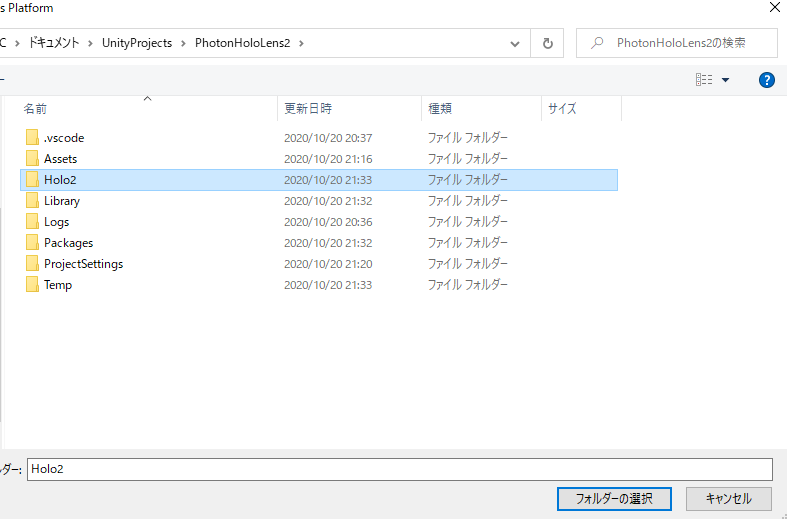
30.BuildSettingsからビルドします。
31.Holo2フォルダを作成し、選択します。
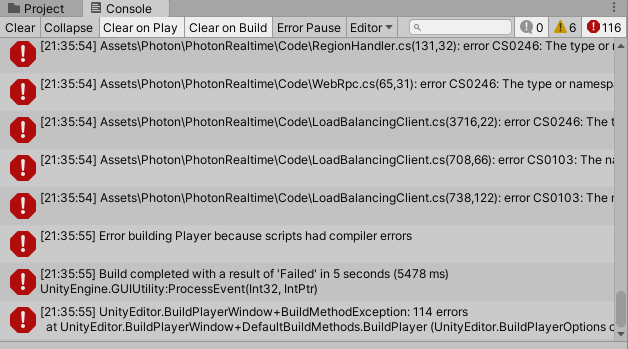
32.エラーが出ました。
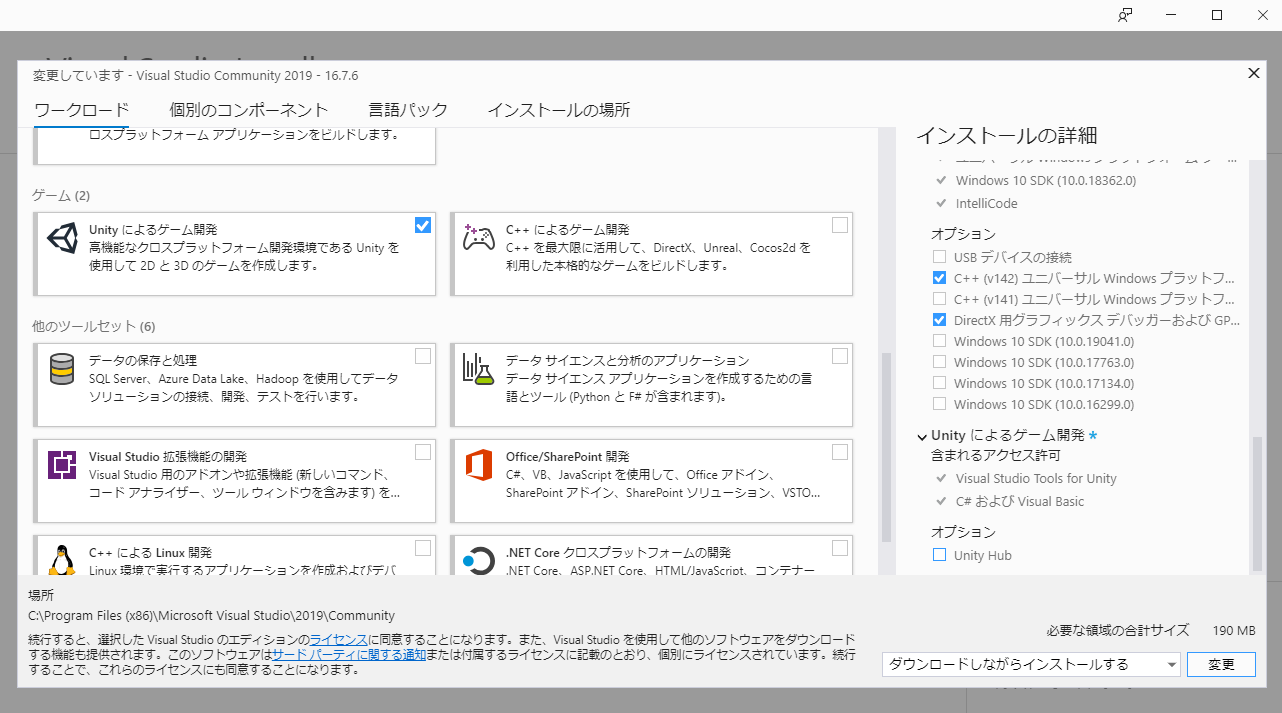
33.Unityによるゲーム開発にチェックをいれて、Visual Studio 2019を更新しましたがエラーは出たままでした。
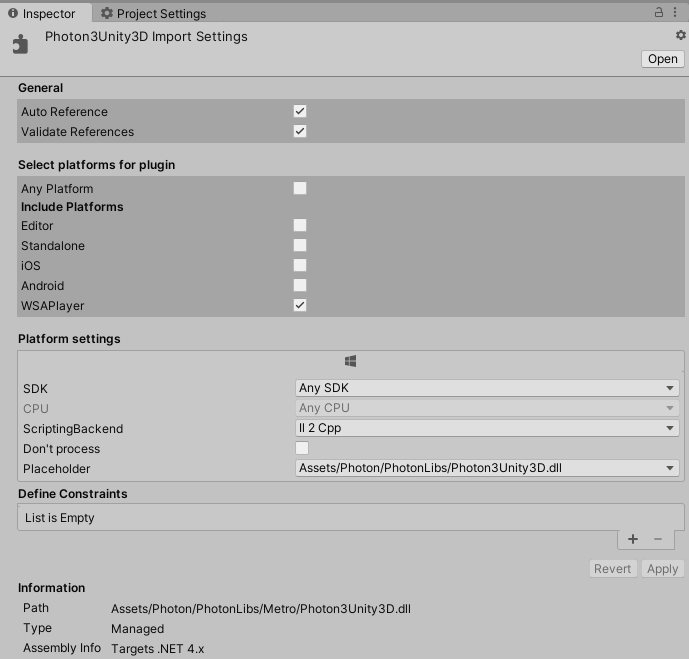
34.ProjectビューのPhoton->Photon Chatフォルダを消して、Photon->PhotonLibs->Metro->Photon3Unity3D.dllを選択、InspectorViewでScriptingBackendをIl2Cppにするとビルドできました。
PUN 2 UWP Build Errors
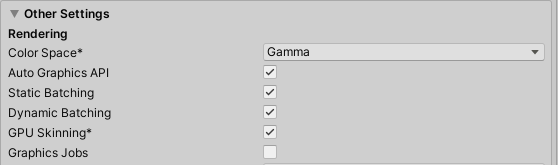
35.Player Settings->Other Settins->Graphics Jobsのチェックも外しておきます。
35.ビルドしてできた.slnファイルをVisual Studio 2019で開き、Release/ARMで実機へデプロイします。
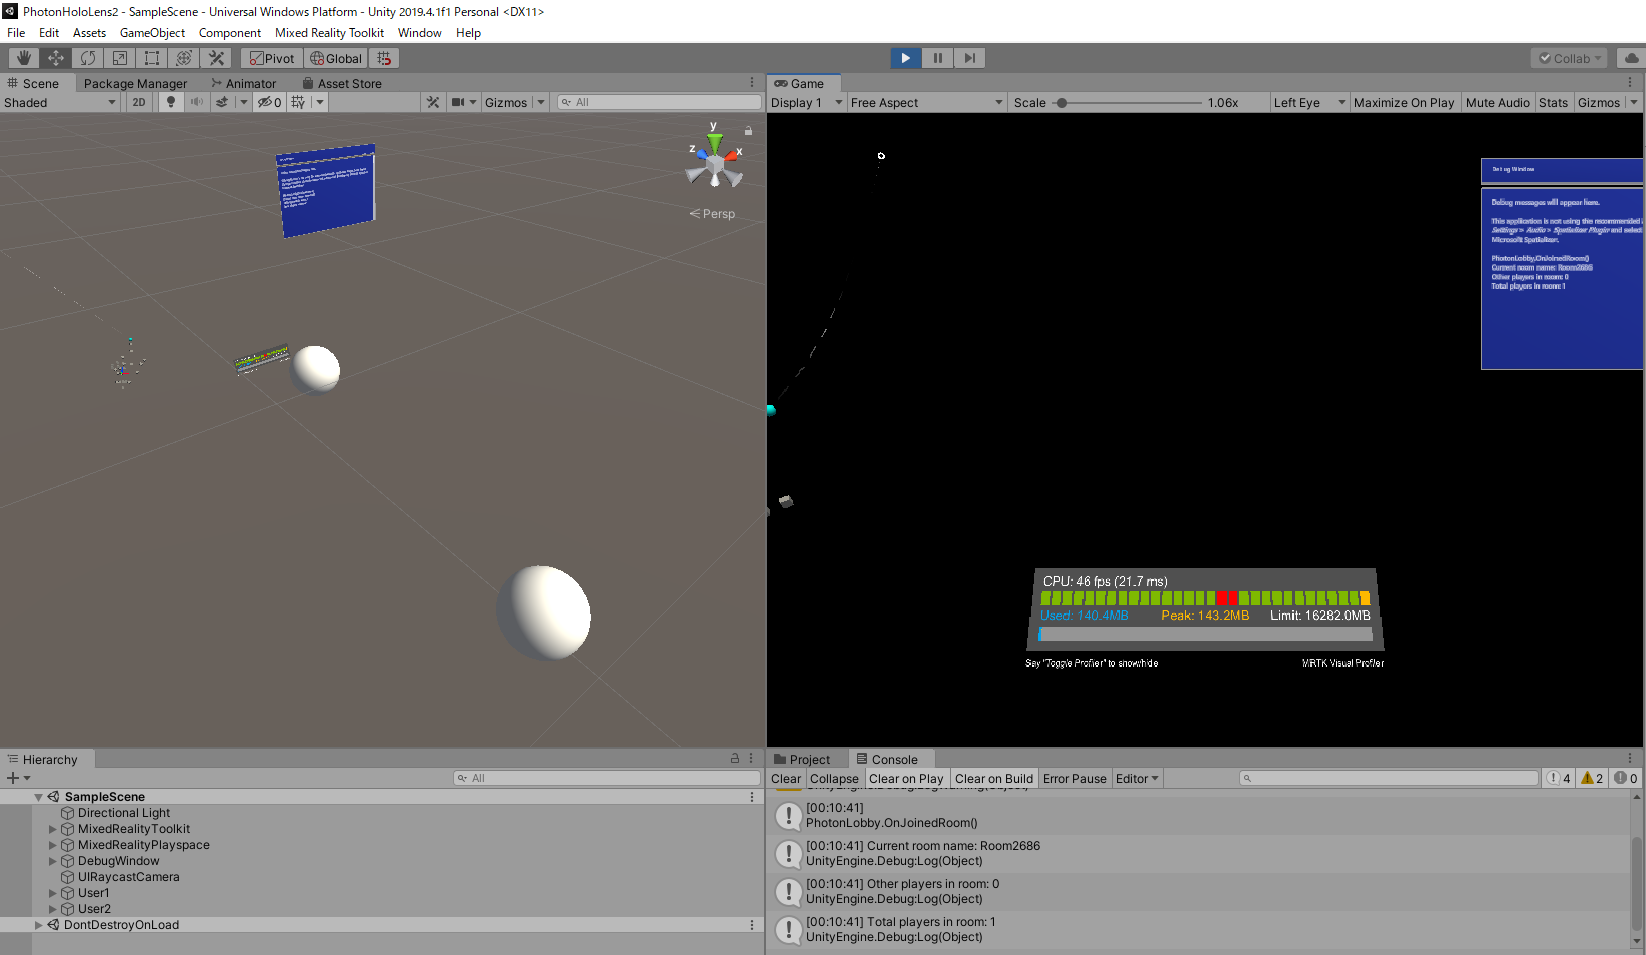
36.HoloLens2とUnityEditorをスタートし、Sphereが共有できることを確かめましょう!
これでPhotonを用いてオブジェクトの共有ができました。
Azure Spatial Anchorsを用いて現実世界の同じ位置に表示して共有する方法(続く)


- 投稿日:2020-10-21T01:34:49+09:00
MultiUserCapabilitiesTutorialsやーる(HoloLens2、Unity2019.4.1f1、MRTK2.4.0、Photon2.22、AzureSpatialAnchors2.2.1)
はじめに
マルチデバイスでオブジェクトの共有ができるチュートリアルをやっていきます。公式のドキュメントはこちらです。Photonでオブジェクトを共有して、Azure Spatial Anchorsでオブジェクトの位置合わせるという感じです。ビルドでちょっとハマったので備忘録です。
開発環境
- Windows 10
- HoloLens 2
- Unity Hub
- Unity 2019.4.1f1
- MRTK 2.4.0
- Azure Spatial Anchors 2.2.1
- AR Foundation 2.1.8
- PUN 2 FREE 2.22
導入
1.Unityプロジェクトを作成し、Microsoft.MixedReality.Toolkit.Unity.Foundation.2.4.0.unitypackageをインポートします。
2.MRTK Project Configuratorが表示されたら、Applyします。
3.こちらもApplyします。
4.File -> Build Settingsを開き、UWPを選んで、Switch Platformをクリックします。
5.Applyします。
6.Build Settings->Player Settingsをクリックし、Publishing Settings->CapabilitiesのInternetClient、InternetClientServer、PrivateNetworkClientServer、Microphone、SpatialPerception、GazeInputにチェックを入れます。
7.Mixed Reality ToolkitからAdd to Scene and Configureをクリックし、Hierarchyビューに配置されたMixedRealityToolkitを選択します。Inspector ViewからDefaultHoloLens2ConfigurationProfileをクローンします。
8.任意の名前を付けます。
9.Spatial AwarenessのEnable Spatial Awareness Systemにチェックを入れ、DefaultMixedRealitySpatialAwarenessSystemProfileをクローンします。
10.任意の名前を付けます。
11.DefaultMixedRealitySpatialAwarenessMeshObserverProfileをクローンします。
12.任意の名前を付けます。
13.Display OptionでOcculusionを選択します。
14.Window->Package ManagerからAR Foundationをインストールします。
15.公式サイトにある下記のunitypackageをインポートします。
AzureSpatialAnchors.unitypackage (version 2.2.1)
MRTK.HoloLens2.Unity.Tutorials.Assets.GettingStarted.2.4.0.unitypackage
MRTK.HoloLens2.Unity.Tutorials.Assets.AzureSpatialAnchors.2.4.0.unitypackage
MRTK.HoloLens2.Unity.Tutorials.Assets.MultiUserCapabilities.2.4.0.unitypackage16.Window->Asset Store からPUN 2 - Freeを検索、インポートします。
17.セットアップウィザードは一旦閉じてOKです。
18.Photon Dashboardを開き、Photon Type: Photon PUN、Nameは任意の新しいアプリケーションを作成します。
19.作成したPhoton PUNアプリケーションのApp IDをコピーします。
20.Window->Photon Unity Networking->PUN Wizardを開き、
21.Setup Projectをクリック。
22.App IDを入れて、Setup Projectをクリックします。
23.TMP Importerが表示されたらインポートします。
24.ProjectビューからAssetsのMRTK.Tutorials.AzureSpatialAnchors->Prefabs->DebugWindowとMRTK.Tutorials.MultiUserCapabilities->PrefabsのNetworkLobbyとSharePlaygroundをHierarchyにD&Dします。
25.HierarchyからCreate Empty->GameObjectを作り、名前をPhotonUserとします。PhotonUserのInspectorViewからPhotonUserとGenericNetSyncとPhotonViewをAddComponentします。GenericNetSyncのIsUserにチェックを入れます。
26.PhotonUserに子オブジェクトのSphereを作成、MeshRendererのElement 0にMRTK_Standard_Whiteをアタッチします。
27.PhotonUserをMRTK.Tutorials.MultiUserCapabilities->ResourcesへD&Dし、Hierarchyビューから削除します。
28.NetworkRoomにPrefab化したPhotonUserをアタッチします。
29.Player SettingsのXR Settingsを忘れずに。
30.BuildSettingsからビルドします。
31.Holo2フォルダを作成し、選択します。
32.エラーが出ました。
33.Unityによるゲーム開発にチェックをいれて、Visual Studio 2019を更新しましたがエラーは出たままでした。
34.ProjectビューのPhoton->Photon Chatフォルダを消して、Photon->PhotonLibs->Metro->Photon3Unity3D.dllを選択、InspectorViewでScriptingBackendをIl2Cppにするとビルドできました。
PUN 2 UWP Build Errors
35.Player Settings->Other Settins->Graphics Jobsのチェックも外しておきます。
35.ビルドしてできた.slnファイルをVisual Studio 2019で開き、Release/ARMで実機へデプロイします。
36.HoloLens2とUnityEditorをスタートし、Sphereが共有できることを確かめましょう!
これでPhotonを用いてオブジェクトの共有ができました。
Azure Spatial Anchorsを用いて現実世界の同じ位置に表示して共有する方法(続く)


- 投稿日:2020-10-21T00:56:13+09:00
OpenCV For UnityのVideoWriterExampleが録画できなかったときの対処法
はじめに
Unityの有料アセット、OpenCV For UnityのSampleのVideoWriterExampleが、録画できなくて困ったときの話です。
自分がうまくいった対処法と、関係なかったけど検討したことをその後ろにつらつら書いていきます。OpenCV For Unityの公式情報色々
- OpenCV For Unity - 公式サイト
- OpenCV For Unity - AssetStore
- OpenCV For Unity - GitHub
- OpenCV For Unity - DEMO WebGL
今回の録画できない問題の詳細
現象
- 録画した動画(コーデック:mjpeg / コンテナ:avi)が破損してて、PC上でもUnity上でも再生できない。具体的には、Consoleに出る録画データ情報が空、0ばっかり(CAP_PROP_FORMAT: 0, CAP_PROP_POS_MSEC: 0, CAP_PROP_FRAME_COUNT: 0)
- Recボタンを押しても1フレームしか赤くならない。
やりたいこと
- 録画した動画が破損せず、再生できるようにしたい
- Recボタンを一回押すと赤くなって録画が始まり、もう一回押すと録画が終了するようにしたい
環境
- Windows 10
- Unity 2019.4.4f1
- OpenCV For Unity 2.4.0
対処法紹介の前に初期設定
OpenCV For Unityの初期設定
この2つは、OpenCV For Unityに必須っぽいのでやりましょう!
- エディタ画面上 > Tools > OpenCV for Unity > Set Plugin Import Settings を押す
- Projectsで、OpenCV for Unity内のStreamingAssetsをAssets直下に移動する
…よく見ると、Assetに入ってるReadme.pdfに書いてあります。
VideoWriter.ioの初期設定
さらに、VideoWriterExampleはもう一作業します
- OpenCV Libraryをダウンロードして、「\opencv\build\x64\vc14\bin\opencv_videoio_ffmpeg430_64.dll」 をUnityのプロジェクトフォルダ直下(Assets、Library、Logsとかがある場所)に置く
…これもよく見ると、Assetに入ってるReadme.pdfに書いてあります。
If you want to use more video formats with the "Video Capture (string filename)" or
"VideoWriter" method, setup is required.
1)Download "OpenCV for Windows Version
4.3.0"(http://opencv.org/downloads.html).
2)Set PATH variable to "opencv_ffmpeg4.3.0.dll" or "opencv_ffmpeg4.3.0_64.dll".
if 32bit, "\path\to\opencv\build\x86\vc14\bin\".
if 64bit, "\path\to\opencv\build\x64\vc14\bin\".
Or
2)Copy to Project Folder.Readme読もう(自戒)
解決策 - Unityの画面比を固定する
解決策は、「GameViewの画面サイズをFreeAspectではなく、何か指定の画面サイズにすること」です。
私はStandAlone(1024*768)にしました。サンプルコードのVideoWriterExample.csのOnPostRenderの上から2つ目のif文の条件文を見ていただくと、recordingFrameRgbMat.width()とScreen.width、 recordingFrameRgbMat.height()とScreen.heightの値が一致していないと、自動でもう一度Recボタンが押されてしまい、スクリプト内で2度押しされて録画できないようになっています。
なんと、FreeAspectでは、recordingFrameRgbMatとScreenで1pixel誤差が生じることがあるようです。
FreeAspectでも、エディタ画面でGameViewの大きさをいじっていると、稀に誤差が発生せずに録画できちゃうこともあります。よくよく考えれば、録画画面領域の確保もせずに録画なんてできるわけないのですが…
Debug.LogError("Please fix the screen ratio of the Game View to recognize the recording area");
画面比固定しなさい!ってエラーが出るようにしてあげれば、他の人が同様のエラーに悩まされても解決できますね。
自分で例外処理を書くときは、例外処理されないための作業を促すエラー文を出すようにすると親切という学びを得ました。ちなみにこれで、Editor上もWebGL書き出し後も正常に録画と再生ができました。
VideoWriterExample.csvoid OnPostRender() { if (isRecording) { if (frameCount >= maxframeCount || recordingFrameRgbMat.width() != Screen.width || recordingFrameRgbMat.height() != Screen.height) { Debug.LogError("Please fix the screen ratio of the Game View to recognize the recording area"); OnRecButtonClick(); return; } frameCount++; // Take screen shot. screenCapture.ReadPixels(new UnityEngine.Rect(0, 0, Screen.width, Screen.height), 0, 0); screenCapture.Apply(); Utils.texture2DToMat(screenCapture, recordingFrameRgbMat); Imgproc.cvtColor(recordingFrameRgbMat, recordingFrameRgbMat, Imgproc.COLOR_RGB2BGR); Imgproc.putText(recordingFrameRgbMat, frameCount.ToString(), new Point(recordingFrameRgbMat.cols() - 70, 30), Imgproc.FONT_HERSHEY_SIMPLEX, 1.0, new Scalar(255, 255, 255), 2, Imgproc.LINE_AA, false); Imgproc.putText(recordingFrameRgbMat, "SavePath:", new Point(5, recordingFrameRgbMat.rows() - 30), Imgproc.FONT_HERSHEY_SIMPLEX, 0.8, new Scalar(0, 0, 255), 2, Imgproc.LINE_AA, false); Imgproc.putText(recordingFrameRgbMat, savePath, new Point(5, recordingFrameRgbMat.rows() - 8), Imgproc.FONT_HERSHEY_SIMPLEX, 0.5, new Scalar(255, 255, 255), 0, Imgproc.LINE_AA, false); writer.write(recordingFrameRgbMat); } }他に試したこと
出力先を見直す
サンプルコードのVideoWriterExample.csはStartRecordingという関数が作ってあり、その引数で出力先を設定しています。
絶対パスで指定するならこんな感じです。VideoWriterExample.cs//元の命令 StartRecording(Application.persistentDataPath + "/VideoWriterExample_output.avi"); //絶対パス StartRecording(Application.persistentDataPath + "@C:\Users\yourname\OpenCVForUnitySample\VideoWriterExample_output.avi");複数動画を録画できるようにしたければ、この辺いじればできそうですね。
コーデックとコンテナの設定を見直す
UnityでOpenCVを利用した動画再生をしてみたの著者さんが、コーデックとコンテナの組み合わせをどうすれば各プラットフォームで動くか確認して下さっています。
VideoWriterExample.cswriter.open(savePath, VideoWriter.fourcc('M', 'J', 'P', 'G'), 30, new Size(Screen.width, Screen.height));その他参考にしたサイト