- 投稿日:2020-09-08T19:50:09+09:00
Prism コードサンプル学習:02-Regions
Prism コードサンプル学習:02-Regions
はじめに
以下の記事の続きです。
https://qiita.com/mngreen/items/49767e120292896d393702-Regions
本サンプルではRegionManagerクラスを用いて、領域に名称を与えるサンプルのようです。
<Window x:Class="Regions.Views.MainWindow"
        xmlns="http://schemas.microsoft.com/winfx/2006/xaml/presentation"
        xmlns:x="http://schemas.microsoft.com/winfx/2006/xaml"
        xmlns:prism="http://prismlibrary.com/"
        Title="Shell" Height="350" Width="525">
    <Grid>
        <ContentControl prism:RegionManager.RegionName="ContentRegion" />
    </Grid>
</Window>
/// <summary> /// Interaction logic for App.xaml /// </summary> public partial class App : PrismApplication { protected override Window CreateShell() { return Container.Resolve<MainWindow>(); } protected override void RegisterTypes(IContainerRegistry containerRegistry) { } }ポイントとしては以下でしょうか。
- 前回はBootstrappprを利用していたが、そのBootstrapperを隠蔽するPrismApplicationクラスが利用されている
- PrismApplicationの基底クラスはこちら
- MainWindowでは、ContentControlコントロールに添付プロパティであるRegionManager.RegionNameプロパティに"ContentRegion"がセットされている
- RegionManagerはこちら
- 名前が設定されると、その領域を指定して画面遷移させられることができる
- 一番シンプルに使えるRequestNavigate()メソッド
- 引数で指定したregionNameにURIで指定したコンテンツが表示されるよう
- Qiitaの記事も参照
おわりに
今回はRegionManagerクラスのソースコードを読み、領域に名前を付ける方法が分かりました。
所感ですが、領域にRegionManagerを経由させて名前を定義し、コンテンツを色々登録しておけば後からビューをどんどん追加することもできそうです。
次回、03-CustomRegionsについて見ていこうと思います。
- 投稿日:2020-09-08T15:02:13+09:00
ASP.NET Core の IHttpClientFactory を使ったときに直接 HttpClient を DI したら何が渡されてくるのか
IHttpClientFactory のドキュメントを見ると IHttpClientFactory を受け取って CreateClient をするか、型指定されたクライアント機能を使って HttpClient を受け取るかという方法が書いてあるのですが、型指定されていない普通のクラスで HttpClient を DI してもらったらどうなるのか?というのが明示的に書いてないようなので調べてみました。(書いてあったらごめんなさい)
答えは以下のコードにありました。
IServiceCollection に対して AddHttpClient をすると、内部で HttpClient も登録されていて IHttpClientFactory の CreateClient(string.Empty) をした結果のインスタンスがわたってくるみたいです。
HttpClientFactoryServiceCollectionExtensions.cs// Register default client as HttpClient services.TryAddTransient(s => { return s.GetRequiredService<IHttpClientFactory>().CreateClient(string.Empty); });なので IHttpClientFactory を受け取って CreateClient するだけなら直接 HttpClient を受け取るようにしてしまってもよさそうですね。
ふぅ、すっきり。
- 投稿日:2020-09-08T13:55:02+09:00
Azure Functions で設定情報を使いたい
Azure Functions で設定情報を
IConfiguration型で扱いたい。欲を言えばIOptions<T>で扱いたいというケースについて。端的に言うとドキュメントに記載があります。以下のページにいくと Azure Functions での DI の仕方が書いてあって、その中には
IConfigurationがプラットフォームから提供されているのでそれを使う感じです。.NET Azure Functions で依存関係の挿入を使用する
やってみよう
Azure Functions のプロジェクトを作成したら
Microsoft.Azure.Functions.Extensionsを参照に追加します。そして、Startup.cs クラスを作ります。Startup クラスはMicrosoft.Azure.Functions.Extensions.DependencyInjection.FunctionsStartupクラスを継承して Configure メソッドで色々追加していきます。以下のクラスはプラットフォームで提供しているから使ってもいいよってドキュメントに書いてあります
- Microsoft.Extensions.Configuration.IConfiguration
- Microsoft.Azure.WebJobs.Host.Executors.IHostIdProvider
デバッガーで止めてみると色々 (96 個!?) 登録されてるみたいですけど、あんまり登録されてるからって使わない方がいいのかもしれないですね。
ここまで来たらこっちのもんです、適当に情報設定するためのクラスを定義します。例えば以下のように
public class Info
{
    public string Name { get; set; }
}
そして
local.settings.jsonにInfo:Nameというキーで適当な値を設定します。local.settings.json{ "IsEncrypted": false, "Values": { "AzureWebJobsStorage": "UseDevelopmentStorage=true", "FUNCTIONS_WORKER_RUNTIME": "dotnet", "Info:Name": "Hello world" } }そして Startup.cs で
AddOptionsメソッドで登録します。Startup.csusing FunctionApp2; using Microsoft.Azure.Functions.Extensions.DependencyInjection; using Microsoft.Extensions.Configuration; using Microsoft.Extensions.DependencyInjection; [assembly: FunctionsStartup(typeof(Startup))] namespace FunctionApp2 { public class Startup : FunctionsStartup { public override void Configure(IFunctionsHostBuilder builder) { builder.Services.AddOptions<Info>() .Configure<IConfiguration>((info, configuration) => configuration.Bind("Info", info)); } } }ここまでおぜん立てすると関数で利用できます。例えば、この Info の Name をそのまま返す関数を作るとこんな感じです。
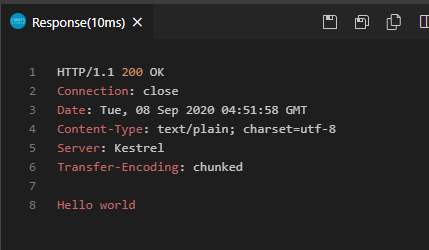
Function1.csusing System.Threading.Tasks; using Microsoft.AspNetCore.Mvc; using Microsoft.Azure.WebJobs; using Microsoft.Azure.WebJobs.Extensions.Http; using Microsoft.AspNetCore.Http; using Microsoft.Extensions.Logging; using Microsoft.Extensions.Options; namespace FunctionApp2 { public class Function1 { private readonly IOptions<Info> _info; public Function1(IOptions<Info> info) { _info = info; } [FunctionName("Function1")] public async Task<IActionResult> Run( [HttpTrigger(AuthorizationLevel.Function, "get", "post", Route = null)] HttpRequest req, ILogger log) { log.LogInformation(_info.Value.Name); return new OkObjectResult(_info.Value.Name); } } }実行してエンドポイントを叩くとこんな感じの結果になります。思った通りですね。
Azure にデプロイした後は、Function App の構成に
Info__Nameのように local.settings.json では:区切りで登録したものを以下のように__区切りで登録します。
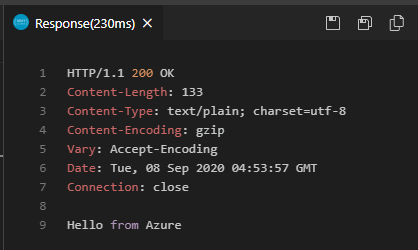
エンドポイントを叩くと以下のようになりました。ちゃんと値が取れてますね。
いい感じ。


- 投稿日:2020-09-08T13:00:39+09:00
[C#] クラスのメンバ(プロパティ)をインデクサを使って、リストのように扱う
データ型クラスのプロパティメンバを、リストのようにインデクサでアクセス出来るようにしたい。
題材
下記のUserInfoクラスのプロパティを、インデクサでアクセス出来るようにする。
class Program
{
  static void Main(string[] args)
  {
    var User=new UserInfo(new List<string>{"012","user","pass","xx@xx.com"});
  }

  public class UserInfo
  {
    public UserInfo(List<String> userList)
    {
      ID=userList[0];
      Name=userList[1];
      Password=userList[2];
      email=userList[3];
    }
    public string ID{get;set;}
    public string Name{get;set;}
    public string Password{get;set;}
    public string email{get;set;}
  }
}
前準備 添字でアクセス
class Program
{
  static void Main(string[] args)
  {
    var User=new UserInfo(new List<string>{"012","user","pass","xx@xx.com"});
    //添字でアクセス
    User["ID"]="dummy";
    if(User.ID=="dummy"){
      //成功
    }
  }

  public class UserInfo
  {
    public UserInfo(List<String> userList)
    {
      var properties = typeof(UserInfo).GetProperties();
      {
        for (var i = 0; i < userList.Count; i++)
        {
          var name = properties[i].Name;
          //userListでプロパティをまとめて初期化
          this[name] = userList[i];
        }
      }
    }
    public string ID{get;set;}
    public string Name{get;set;}
    public string Password{get;set;}
    public string email{get;set;}
    private string this[string propertyName]
    {
      get => typeof(UserInfo).GetProperty(propertyName).GetValue(this).ToString();
      set => typeof(UserInfo).GetProperty(propertyName).SetValue(this, value);
    }
  }
}
解説
string this[string propertyName]
このプロパティを追加することで、添字によるアクセスが可能になる。
get
typeof(クラス名).GetProperty(propertyName).GetValue(this)↑GetValueの戻り値はobject型なので、string型に変換している。
set
typeof(クラス名).GetProperty(propertyName).SetValue(this,value)コンストラクタ
typeof(UserInfo).GetProperties()クラスのプロパティを配列で取得。properties[i].Name各プロパティ名を取得出来るので、ループ処理が可能になる。このままだとあまり意味が無いので、インデクサでアクセス出来るようにする。
本番 インデクサでアクセス
下記をUserInfoクラスに追加
private List<string> NameList;
public string this[int num]
{
  get => this[NameList[num]];
  set => this[NameList[num]] = value;
}
NameListはプロパティ名一覧が入ったリストとして使います。
string this[int num]
this[string propertyName]をラッパー。
NameList[num]でthis[string propertyName]の添字に変換します。
これにより、インデクサでのアクセスが出来るようになります。全体像
class Program
{
  static void Main(string[] args)
  {
    var User=new UserInfo(new List<string>{"012","user","pass","xx@xx.com"});
    //添字でアクセス
    User["ID"]="dummy";
    if(User.ID=="dummy"){
      //成功
    }
    Console.WriteLine(User[2]);
    //pass
    foreach(var name)
    {
      Console.WriteLine(User.ToList());
      //012,user,pass,xx@xx.comの順に表示される
    }
  }

  public class UserInfo
  {
    public UserInfo(List<String> userList)
    {
      var properties = typeof(UserInfo).GetProperties();
      NameList=new List<string>();
      //propertiesから、各Name取り出し
      foreach (var (name, index) in properties.Select((prop, index) => (prop.Name, index)))
      {
        if(index == properties.length - 1)
        {
          //配列の最後はthisプロパティなので、スキップする
          break;
        }
        //UserInfoのプロパティ名のリストを作成
        NameList.Add(name);
        //全プロパティを初期化
        this[name] = headerlist[index];
      }
    }
    public string ID{get;set;}
    public string Name{get;set;}
    public string Password{get;set;}
    public string email{get;set;}
    private List<string> NameList;
    private string this[string propertyName]
    {
      get => typeof(UserInfo).GetProperty(propertyName).GetValue(this).ToString();
      set => typeof(UserInfo).GetProperty(propertyName).SetValue(this, value);
    }
    public string this[int num]
    {
      get => this[NameList[num]];
      set => this[NameList[num]] = value;
    }
    public List<string> ToList()
    {
      var res = new List<string>();
      NameList.ForEach(name => res.Add(this[name]));
      return res;
    }
  }
}
補足
public List<string> ToList()thisではリストを返さないため、別途リスト取得用のメソッドを設けています。
参考
- 投稿日:2020-09-08T13:00:39+09:00
[C#] インデクサを使って、クラスのメンバ(プロパティ)をリストのように扱う
データ型クラスのプロパティメンバを、リストのようにインデクサでアクセス出来るようにしたい。
題材
下記のUserInfoクラスのプロパティを、インデクサでアクセス出来るようにする。
UserInfo.cspublic class UserInfo { public UserInfo(List<String> userList) { ID=userList[0]; Name=userList[1]; Password=userList[2]; email=userList[3]; } public string ID{get;set;} public string Name{get;set;} public string Password{get;set;} public string email{get;set;} }前準備 添字でアクセス
userInfo.cspublic class UserInfo { public UserInfo(List<String> userList) { var properties = typeof(UserInfo).GetProperties(); { for (var i = 0; i < userList.Count; i++) { var name = properties[i].Name; //userListでプロパティをまとめて初期化 this[name] = userList[i]; } } } public string ID{get;set;} public string Name{get;set;} public string Password{get;set;} public string email{get;set;} private string this[string propertyName] { get => typeof(UserInfo).GetProperty(propertyName).GetValue(this).ToString(); set => typeof(UserInfo).GetProperty(propertyName).SetValue(this, value); } }解説
string this[string propertyName]
このプロパティを追加することで、添字によるアクセスが可能になる。
get
typeof(クラス名).GetProperty(propertyName).GetValue(this)↑GetValueの戻り値はobject型なので、string型に変換している。
set
typeof(クラス名).GetProperty(propertyName).SetValue(this,value)コンストラクタ
typeof(UserInfo).GetProperties()クラスのプロパティを配列で取得。properties[i].Name各プロパティ名を取得出来るので、ループ処理が可能になる。このままだとあまり意味が無いので、インデクサでアクセス出来るようにする。
本番1 インデクサでアクセス
下記をUserInfoクラスに追加
userInfo.csprivate List<string> NameList; public string this[int num] { get => this[NameList[num]]; set => this[NameList[num]] = value; }NameListはプロパティ名一覧が入ったリスト(プロパティ名のインデックス用途)として使います。
string this[int num]
this[string propertyName]をラッパー。
NameList[num]でthis[string propertyName]の添字に変換します。これにより、インデクサでのアクセスが出来るようになります。
ただ、これだけでは列挙型として使うことができません。
本番2 列挙可能にする
IEnumerableを継承し、IEnumerableインターフェイスを作成。
GetEnumeratorを実装することで、列挙型として扱えるようになります。
userInfo.cs// UsefInfoの変更、追加部分のみ記述 public class UserInfo : IEnumerable<string> { //GetEnumerator実装 public IEnumerator<string> GetEnumerator() { for (var i = 0; i < NameList.Count; i++) { yield return this[i]; } } //IEnumerable(非ジェネリック型)のGetEnumeratorも実装 System.Collections.IEnumerator System.Collections.IEnumerable.GetEnumerator() { return this.GetEnumerator(); } }全体像
UserInfo.cspublic class UserInfo : IEnumerable<string> { public UserInfo(List<String> userList) { var properties = typeof(UserInfo).GetProperties(); NameList = new List<string>(); //propertiesから、各Name取り出し foreach (var (name, index) in properties.Select((prop, index) => (prop.Name, index))) { if(index == properties.length - 1) { //配列の最後はthisプロパティなので、スキップする break; } //UserInfoのプロパティ名のリストを作成 NameList.Add(name); //全プロパティを初期化 this[name] = headerlist[index]; } } public string ID{get;set;} public string Name{get;set;} public string Password{get;set;} public string email{get;set;} //プロパティのインデックス用途 private List<string> NameList; //添字でのアクセス用 private string this[string propertyName] { get => typeof(UserInfo).GetProperty(propertyName).GetValue(this).ToString(); set => typeof(UserInfo).GetProperty(propertyName).SetValue(this, value); } //インデクサでのアクセス用 public string this[int num] { get => this[NameList[num]]; set => this[NameList[num]] = value; } //リスト型への代入用 public List<string> ToList() { var res = new List<string>(); NameList.ForEach(name => res.Add(this[name])); return res; } public IEnumerator<string> GetEnumerator() { for (var i = 0; i < NameList.Count; i++) { yield return this[i]; } } System.Collections.IEnumerator System.Collections.IEnumerable.GetEnumerator() { return this.GetEnumerator(); } }結果
var User=new UserInfo(new List<string>{"012","user","pass","xx@xx.com"});
//添字でアクセス
User[0] = "dummy";
if(User.ID == "dummy")
{
    //一致
}
Console.WriteLine(User[3]);
//xx@xx.com

foreach(var val in User)
{
  Console.WriteLine(val);
  //012
  //user
  //pass
  //xx@xx.com
}
var list=User.ToList()
//list:{"012","user","pass","xx@xx.com"}
インデクサでのアクセス、foreachでのループが出来るようになりました。
出来ましたが、手順が多く冗長な気がします。
もっといいやり方があれば教えて頂けるとありがたいです。参考