- 投稿日:2020-07-30T20:27:25+09:00
事前にデータ投入をしたMySQL Docker containerを作成したいが、/docker-entrypoint-initdb.dで毎回実行時にimportするには時間がかかりすぎる。予めimageに含めてしまおう。
事前にデータが投入されたMySQLのDocker containerを作る方法はMySQL | Docker Hubに書かれているように、
Initializing a fresh instance
When a container is started for the first time, a new database with the specified name will be created and initialized with the provided configuration variables. Furthermore, it will execute files with extensions .sh, .sql and .sql.gz that are found in /docker-entrypoint-initdb.d. Files will be executed in alphabetical order. You can easily populate your mysql services by mounting a SQL dump into that directory and provide custom images with contributed data. SQL files will be imported by default to the database specified by the MYSQL_DATABASE variable.
/docker-entrypoint-initdb.dにsqlファイルをおいておけば実行時によしなにimportしてくれる。ただ、自分のプロジェクトでは大きめのsqlをimportする必要があり、実行時にimportするのでは時間がかかりすぎるので、予めimageにimportしておくことにした。
DockerfileFROM mysql:5.7 COPY test.sql /tmp/ RUN /bin/bash -c "/usr/bin/mysqld_safe --skip-grant-tables &" \ && sleep 5 \ && mysql -u root -e "CREATE DATABASE test" \ && mysql -u root test < /tmp/test.sql \ && rm -rf /tmp/test.sql参考
- 投稿日:2020-07-30T20:05:11+09:00
Spring Bootで書籍管理Webアプリを作ろう part2
はじめに
どうも、プログラミング勉強中の大学生、@Ikuto19です。今回は前回の続き(part1)からやっていこうと思います。前回のおさらいを簡単に説明した後、作成手順を解説して実際にアプリを作っていきます。
前回のおさらいと解説
前回について
part1では、書籍管理アプリの作成のための準備と流れを掴んでもらうためにテストアプリの作成と公開をしました。具体的には、Spring Frameworkを使うためのツールのインストールやHerokuへのアカウント登録などを行いました。
これ以降の注意点!!
このpartからコードやアノテーションの役割について説明していきますが、僕自身Spring Frameworkに触れるのが初めてです。要するに初心者なので、詳しい説明はできません。あくまで僕の解釈をざっくり説明することになるので、この記事を見てくださっている同じ初心者の方は鵜呑みにしないでください。大まかには合っているが、厳密には違うなんてことがあると思うので、ご自身でも調べてください。逆に上級者の方は前回でも言った通り、どんどん指摘してください。
前回のコードの解説
App.java
このApp.javaがwebアプリの実行を行ってくれています。なので、このメイン関数を含んでいなければ、アプリは起動しません。クラス名はなんでもいいんですが、僕はAppと名付けました。
もし、クラス名を違うものにするなら中身の「App.class」を「クラス名.class」にしてください。
@SpringBootApplicationについて、Springドキュメント日本語訳の「6.@SpringBootApplicationアノテーションの使用」では以下のように書かれていました。@EnableAutoConfiguration: Spring Boot の自動構成メカニズムを有効にする
@ComponentScan: アプリケーションが配置されているパッケージで @Component スキャンを有効にする (ベストプラクティスを見る)
@Configuration: コンテキストに追加の Bean を登録したり、追加の構成クラスをインポートしたりできます。僕なりにまとめて解釈すると、こんな感じかと思いました。
@SpringBootApplication→ 以下の3つの機能をまとめたもの
@EnableAutoConfiguration→ 自動で構成するかどうか@ComponentScan→ コンポーネントスキャンを行う@Configuration→ Beanへの登録またはクラスのインポートApp.javapackage com.app; import org.springframework.boot.SpringApplication; import org.springframework.boot.autoconfigure.SpringBootApplication; @SpringBootApplication public class App { public static void main(String[] args) { SpringApplication.run(App.class, args); } }IndexController.java
IndexController.javaはMVCモデルにおけるControllerにあたるものです。
Controllerはユーザーの入力に基づいて、ModelとViewを制御するというものですが、今回はURLが"/"のときにindex.htmlを表示するようにしています。
「model.setAttribute("message", message)」で、呼び出されたhtmlファイルの中でmessageに格納されている文字列を扱うことができる。
@Controller→ Controllerとなるクラスに付与@GetMapping("(URL)")→ "(URL)"にGETリクエストを行うIndexController.javapackage com.app.controller; import org.springframework.stereotype.Controller; import org.springframework.ui.Model; import org.springframework.web.bind.annotation.GetMapping; import org.springframework.web.bind.annotation.RequestMapping; @Controller public class IndexController { @GetMapping("/") public String getIndexPage(Model model) { String message = "Hello, World!!"; model.addAttribute("message",message); return "index"; } }index.html
「xmlns:th=~」の部分はテンプレートエンジンであるThymeleafを使うためのものだと解釈しました。これによって、controllerから値や文字列をHTML上でも扱うことができる。
「th:text="${message}」で格納されているmessageの中身(文字列)を表示できる。index.html<!DOCTYPE html> <html lang="en" xmlns:th="http://www.thymeleaf.org"> <meta charset="UTF-8"> <head> <title>テストアプリ</title> </head> <body> <p th:text="${message}"></p> </body> </html>Procfile
Java:Spring BootアプリのHerokuデプロイを試してみました
こちらの方の書き方をそのまま真似ました。\$JAVA_OPTSや--server.port=$PORTについて調べたのですが、あまりヒットしなくてわかりませんでした。
ざっくりですが、Heroku Dev CenterのThe Procfileを見る限り、「アプリのタイプ:実行コマンド」の書き方をするんだと勝手に思っています。Procfileweb: java $JAVA_OPTS -jar target/*.jar --server.port=$PORT作成手順
- プロジェクトの作成
- ホーム画面の実装
- DB認証によるログイン画面と画面遷移の実装
- ホーム画面から書籍検索・書籍情報表示・書影表示のページへの画面遷移実装
- 書籍検索後、DBから登録・削除を行う機能の実装
- 動作確認
- CSSの適用
プロジェクト作成
前回の要領でプロジェクトを作成します。プロジェクト名は「BookManagement-webapp」で、それ以外は前回と同じ設定で作成します。ただし、BookManagementWebappApplication.javaを削除してください。
ホーム画面の実装
新規ファイルの作成
App.java
com.appパッケージに以下のApp.javaを作成して配置します。先ほど説明した通り、このクラスが実行されることでSpringアプリケーションが起動します。App.javapackage com.app; import org.springframework.boot.SpringApplication; import org.springframework.boot.autoconfigure.SpringBootApplication; @SpringBootApplication public class App { public static void main(String[] args) { SpringApplication.run(App.class, args); } }index.html
templatesフォルダにホーム画面となるindex.htmlを作成します。ホーム画面は以下の機能を持ちます。
- APIによる書籍の情報の取得(operateCollate.html)
- データベースの書籍情報の取得して表示(operateCheck.html)
- データベースの書影を取得して表示(operateCheck.html)
indexhtml<!DOCTYPE html> <html lang="en" xmlns:th="http://www.thymeleaf.org"> <meta charset="UTF-8"> <head> <title>書籍管理アプリ</title> </head> <body> <div class="main_container"> <div class=title> <h1>書籍管理 Web Application</h1> </div> <div class="middle_container"> <div class="contains collate"> <form method="get" action="operateCollate"> <input type="text" class="texts" name="isbn" value="" placeholder="ISBN コード"> <input class="submit" type="submit" value="書籍照合"> </form> </div> <div class="contains flexbox"> <form method="get" action="operateCheck"> <input class="submit" type="submit" value="書籍情報表示"> </form> <form method="get" action="operateCover"> <input class="submit" type="submit" value="書籍表紙表示"> </form> </div> </div> </div> </body> </html>実行確認
以下のように表示されると思います。
Spring SecurityのDB認証を用いたログイン実装
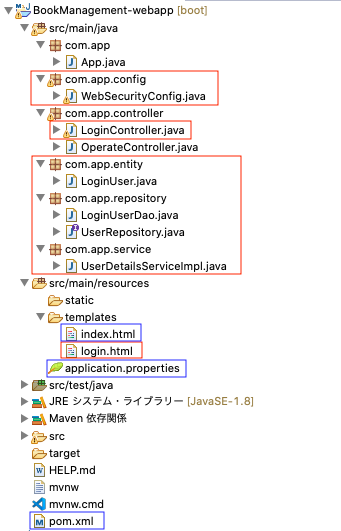
次にSpring SecurityのDB認証によるログインを実装していきます。修正するファイル(青色)、追加するファイル(赤色)は下記のようになります。このログイン認証はSpringSecurityで認証機能を実装①〜SpringSecurityで認証機能を実装③を参考にさせていただき、必要に応じて変更し作成します。なので、コードはほぼ同じかと思います。また、各ファイルに書かれているコメントはこの記事を書いた人のものなので削除しました。ですので、コメントを見たい場合はこの記事を読んでください。
新規ファイルの作成・既存ファイルの修正
WebSecurityConfig.java
このクラスでセキュリティに関する設定を行っています。configure-WebSecurityのconfigureメソッドで必要なファイルやフォルダを認証から除いています。configure-HttpSecurityのconfigureメソッドでは、認証成功時や失敗した時の画面遷移やアクセスできるユーザーの設定を行っています。最後のconfigure-AuthenticationManagerBuilderのconfigureメソッドで認証に関する設定を行っています。
アノテーション
@EnableWebSecurity→ Spring Securityを有効にする@Autowired→ 自動でオブジェクトを格納@Bean→ DIコンテナに登録する@Override→ オーバーライドを示す各メソッドのシグネチャ
- configure-WebSecurity → Web全体のセキュリティ設定
- configure-HttpSecurity → 各URLのセキュリティ設定
- configure-AuthenticationManagerBuilder → 認証関係の設定
WebSecurityConfig.javapackage com.app.config; import org.springframework.beans.factory.annotation.Autowired; import org.springframework.context.annotation.Bean; import org.springframework.context.annotation.Configuration; import org.springframework.security.config.annotation.authentication.builders.AuthenticationManagerBuilder; import org.springframework.security.config.annotation.web.builders.HttpSecurity; import org.springframework.security.config.annotation.web.builders.WebSecurity; import org.springframework.security.config.annotation.web.configuration.EnableWebSecurity; import org.springframework.security.config.annotation.web.configuration.WebSecurityConfigurerAdapter; import org.springframework.security.core.userdetails.User; import org.springframework.security.core.userdetails.UserDetails; import org.springframework.security.core.userdetails.UserDetailsService; import org.springframework.security.crypto.bcrypt.BCryptPasswordEncoder; import org.springframework.security.provisioning.InMemoryUserDetailsManager; import com.app.service.UserDetailsServiceImpl; @Configuration @EnableWebSecurity public class WebSecurityConfig extends WebSecurityConfigurerAdapter { @Autowired private UserDetailsServiceImpl userDetailsService; //パスワードの暗号化 @Bean public BCryptPasswordEncoder passwordEncoder() { BCryptPasswordEncoder bCryptPasswordEncoder = new BCryptPasswordEncoder(); return bCryptPasswordEncoder; } //CSS・Javascriptなどや外部の画像ファイルを扱えるようにしている @Override public void configure(WebSecurity web) throws Exception { web.ignoring().antMatchers( "/images/**", "/css/**", "/js/**" ); } @Override protected void configure(HttpSecurity http) throws Exception{ http .authorizeRequests() .anyRequest().authenticated() .and() .formLogin() .loginPage("/login") //ログインページのURL .loginProcessingUrl("/login") .usernameParameter("username") .passwordParameter("password") .defaultSuccessUrl("/index", true) //認証成功によって遷移するURL .failureUrl("/login?error") //認証失敗によって遷移するURL .permitAll() //全ユーザで接続可能 .and() .logout() .logoutUrl("/logout") //ログアウトページのURL .logoutSuccessUrl("/login?logout") //ログアウト成功後のURL .permitAll(); } @Autowired public void configure(AuthenticationManagerBuilder auth) throws Exception{ auth.userDetailsService(userDetailsService).passwordEncoder(passwordEncoder()); } }LoginController.java
URLが"/login"のとき、login.htmlを表示する。
LoginController.javapackage com.app.controller; import org.springframework.stereotype.Controller; import org.springframework.ui.Model; import org.springframework.web.bind.annotation.GetMapping; import org.springframework.web.bind.annotation.PostMapping; @Controller public class LoginController { @GetMapping("/login") public String getSignUp(Model model) { return "login"; } }LoginUser.java
- アノテーション
@Entity→ エンティティクラスに付与@Table(name = "(テーブル名)")→ アクセスするデータベースのテーブル名を指定@Column(name = "カラム名")→ テーブルのカラム名を指定@Id→ プライマリキー(今回はInteger型)LoginUser.javapackage com.app.entity; import javax.persistence.Column; import javax.persistence.Entity; import javax.persistence.Id; import javax.persistence.Table; @Entity @Table(name = "user") public class LoginUser { @Column(name = "user_id") @Id private Long userId; @Column(name = "user_name") private String userName; @Column(name = "password") private String password; public String getUserName() { return userName; } public void setUserName(String userName) { this.userName = userName; } public String getPassword() { return password; } public void setPassword(String password) { this.password = password; } public Long getUserId() { return userId; } public void setUserId(Long userId) { this.userId = userId; } }LoginUserDao.java
findUserメソッドでデータベースへアクセスし、ユーザー名が該当するユーザーオブジェクトを返します。
@Repository→ DBへアクセスするクラスに付与LoginUserDao.javapackage com.app.repository; import javax.persistence.EntityManager; import org.springframework.beans.factory.annotation.Autowired; import org.springframework.stereotype.Repository; import com.app.entity.LoginUser; @Repository public class LoginUserDao { @Autowired EntityManager em; public LoginUser findUser(String userName) { String query = ""; query += "SELECT * "; query += "FROM user "; query += "WHERE user_name = :userName "; return (LoginUser)em.createNativeQuery(query, LoginUser.class).setParameter("userName", userName).getSingleResult(); } }UserRepository.java
UserRepository.javapackage com.app.repository; import org.springframework.data.jpa.repository.JpaRepository; import org.springframework.stereotype.Repository; import com.app.entity.LoginUser; /* * <エンティティクラス, IDタイプ> */ @Repository public interface UserRepository extends JpaRepository<LoginUser, Integer>{}UserDetailsServiceImpl.java
@Service→ ビジネスロジックを行うクラスに付与UserDetailsServiceImpl.javapackage com.app.service; import java.util.ArrayList; import java.util.List; import org.springframework.beans.factory.annotation.Autowired; import org.springframework.security.core.GrantedAuthority; import org.springframework.security.core.authority.SimpleGrantedAuthority; import org.springframework.security.core.userdetails.User; import org.springframework.security.core.userdetails.UserDetails; import org.springframework.security.core.userdetails.UserDetailsService; import org.springframework.security.core.userdetails.UsernameNotFoundException; import org.springframework.security.crypto.bcrypt.BCryptPasswordEncoder; import org.springframework.stereotype.Service; import com.app.repository.LoginUserDao; import com.app.entity.LoginUser; @Service public class UserDetailsServiceImpl implements UserDetailsService{ @Autowired private LoginUserDao userDao; @Override public UserDetails loadUserByUsername(String userName) throws UsernameNotFoundException { LoginUser user = userDao.findUser(userName); if (user == null) throw new UsernameNotFoundException(userName + "はデータベースに存在しません."); List<GrantedAuthority> grantList = new ArrayList<GrantedAuthority>(); GrantedAuthority authority = new SimpleGrantedAuthority("USER"); grantList.add(authority); BCryptPasswordEncoder encoder = new BCryptPasswordEncoder(); UserDetails userDetails = (UserDetails)new User(user.getUserName(), encoder.encode(user.getPassword()),grantList); return userDetails; } }index.html
以下のものを「class="contains flexbox"」のdivタグの中の一番下に配置します。
index.html<form method="post" id="logout" th:action="@{/logout}"> <button type="submit">ログアウト</button> </form>login.html
login.html<!DOCTYPE html> <html xmlns:th="http://www.thymeleaf.org" xmlns:sec="http://www.thymeleaf.org/thymeleaf-extras-springsecurity3"> <head> <meta charset="UTF-8"> <title>LoginPage</title> </head> <body> <div class="main_container"> <p th:if="${param.error}" class="message">※ユーザー名かパスワードが違います</p> <p th:if="${param.logout}" class="message">※ログアウト済みです</p> <div class="login_container"> <form th:action="@{/login}" method="post"> <div class="buttons username"> <i class="fas fa-users"></i> <input class="texts" type="text" name="username" placeholder="username" /> </div> <div class="buttons pass"> <i class="fas fa-lock"></i> <input class="texts" type="password" name="password" placeholder="password" /> </div> <div class="submitButton"> <input class="submit" type="submit" value="ログイン" /> </div> </form> </div> </div> </body> </html>application.properties
application.propertiesspring.datasource.url=jdbc:mysql://localhost:3306/manageBook spring.datasource.username=(mysqlのユーザー名) spring.datasource.password=(mysqlのパスワード) spring.datasource.driver-class-name=com.mysql.jdbc.Driver spring.jpa.database=MYSQL spring.jpa.hibernate.ddl-auto=updatepom.xml
以下を追加で記述します。
pom.xml<dependency> <groupId>org.springframework.boot</groupId> <artifactId>spring-boot-starter-data-jpa</artifactId> </dependency> <dependency> <groupId>org.springframework.boot</groupId> <artifactId>spring-boot-starter-security</artifactId> </dependency> <dependency> <groupId>mysql</groupId> <artifactId>mysql-connector-java</artifactId> <scope>runtime</scope> </dependency>データベースの構築
インストール済みのMySQLに以下のコマンドを実行していきます。
terminal$ mysql -u (mysqlのユーザー名) -p Enter password: (mysqlのパスワード) mysql> create database manageBook; mysql> use manageBook mysql> create table user(user_id int auto_increment,user_name varchar(256),password varchar(256),PRIMARY KEY(user_id)); mysql> insert user value(1,"(好きな名前)","(好きなパスワード)"); mysql> select * from user;最後の「select * from user;」でテーブルの中身を確認すると、下記のようになっていると思います。
確認できたら、quitコマンドでログアウトしてください。terminalmysql> select * from user; +---------+-----------+---------------+ | user_id | user_name | password | +---------+-----------+---------------+ | 1 |(好きな名前) | (好きなパスワード)| +---------+-----------+---------------+ 1 row in set (0.04 sec) mysql> quit; Bye実行確認
Spring アプリケーション実行後、http://localhost:8080/login へアクセスして確認してください。おそらくログインできるようになっているかと思います。
終わりに
今回はここまでにします。次回で最後で、ホーム画面からの遷移やDBアクセス関係の機能の実装をします。
次回へ続く(part3) > 近々投稿参考サイト
Spring Bootでコンポーネントスキャンできなかった初歩的なミス | エンジニア2ねんせいのきろく
SpringSecurityで認証機能を実装① - Qiita
Spring BootでConfigurationクラスを用いてBean定義する方法 - Reasonable Code
Spring Security 使い方メモ 基礎・仕組み - Qiita