- 投稿日:2020-07-10T21:31:24+09:00
iOSアプリでWebRTC
自己紹介
iOSアプリエンジニア
iOSアプリ, Androidアプリ、web(java/ruby/php)を対応範囲広めにやっている感じ。
モチベーション
- 業務でWebRTCを使ったビデオ通話を実装することになった。
- だが、Twilio Voideo SDK(サーバーも含めてのビデオ通話サービス)を使ったものだったため、WebRTCをちゃんとわからなくても、サンプルとGetStartedの通りにやれば実装できてしまった。
- WebRTC自体、どういう感じで成り立っているのか知りたいと思い調べた。
WebRTCとは
Wikipediaより
- ウェブブラウザやモバイルアプリケーションにシンプルなAPI経由でリアルタイム通信(英: real-time communication; RTC)を提供する自由かつオープンソースのプロジェクトである。ウェブページ内で直接のピア・ツー・ピア通信によって、プラグインのインストールやネイティブアプリのダウンロードをせずに、ウェブブラウザ間のボイスチャット、ビデオチャット、ファイル共有が可能になる。
- 多分、技術的には2017年くらいで流行った印象
P2P通信をどのように実現しているか
- P2Pといっても直接通信しているわけではなく、サーバー経由で通信を実現している。
- SFU(Selective Forwarding Unit) = サーバーが、クライアントに映像/音声などを代理で受信、配信。
- MCU(Multipoint Control Unit) = サーバー側で1つの映像/音声などを合成して作成、配信。配信映像を合成するためCPU負荷高い。
現状のデバイスやブラウザサポート状況
- iOS: safari 11(iOS11)以降ではサポート。WKWebViewでは未だ非サポート。SFSafariViewControllerはiOS13で動作するらしい。
- Android: Android6,7辺り(android chromeではandroid7くらい)。Huawei系端末など、一部でH264コーデックの映像が非対応でうまく映像表示できないなどはあるかも。
- PC ブラウザでは、Chrome, Firefox, Safari, Edgeなど、だいたい動く。
WebRTCのサービス
- SkyWay, vonage, Twilioなど、webrtcをサーバー含めてビデオ通話サービスとして提供しているところがそれ用のSDKも出している。
- が今回は、GoogleWebRTC(多分公式ライブラリ)の実装方法見ながら理解を深めたい。
サンプル
今回は、この素晴らしいサンプルを利用して、実装を見ていく。
WebRTC公式ではfirebaseを利用したwebのサンプルコードがある。
https://webrtc.org/getting-started/firebase-rtc-codelab
どういうふうに実装されているか
接続
- シグナリング(ICE Candidate(通信経路の情報)とSDPの交換を中継)サーバーを介して通信の確立するためのやり取りを行う。
- サンプルではnodejsのサーバーがある
- サンプルでは、Googleが公開しているSTUN(NAT超えのためのプロトコル)サーバーが利用されている。
接続
- AudioTrack/VideoTrack/Data Channelの3本の通信ラインを作成する。
- クライアント同士で、Offer SDP と Answer SDPを交換する(シグナリングと呼ばれる)
- SDPには対応映像/音声コーデックが何が使えるか、ストリームID、port番号、IPアドレスなどが入ってる。
- SDPの交換はWebSocketで行われている。
SDP
v=0
o=- 7063950325015941208 2 IN IP4 127.0.0.1
s=-
t=0 0
a=group:BUNDLE 0 1 2
a=msid-semantic: WMS stream
m=audio 9 UDP/TLS/RTP/SAVPF 111 103 104 9 102 0 8 106 105 13 110 112 113 126
c=IN IP4 0.0.0.0
a=rtcp:9 IN IP4 0.0.0.0
a=ice-ufrag:Agzu
a=ice-pwd:mef2jhxanVddiHDLNvw7BMl9
a=ice-options:trickle renomination
a=fingerprint:sha-256 D7:E8:97:ED:96:EC:6D:8D:44:35:E8:51:A0:07:A0:EC:57:67:B9:76:16:31:1C:3E:6A:DF:A7:9D:E5:98:80:3A
a=setup:actpass
a=mid:0
a=extmap:1 urn:ietf:params:rtp-hdrext:ssrc-audio-level
a=extmap:2 http://www.webrtc.org/experiments/rtp-hdrext/abs-send-time
a=extmap:3 http://www.ietf.org/id/draft-holmer-rmcat-transport-wide-cc-extensions-01
a=extmap:4 urn:ietf:params:rtp-hdrext:sdes:mid
a=extmap:5 urn:ietf:params:rtp-hdrext:sdes:rtp-stream-id
a=extmap:6 urn:ietf:params:rtp-hdrext:sdes:repaired-rtp-stream-id
a=sendrecv
a=msid:stream audio0
a=rtcp-mux
a=rtpmap:111 opus/48000/2
a=rtcp-fb:111 transport-cc
a=fmtp:111 minptime=10;useinbandfec=1
a=rtpmap:103 ISAC/16000
a=rtpmap:104 ISAC/32000
a=rtpmap:9 G722/8000
a=rtpmap:102 ILBC/8000
a=rtpmap:0 PCMU/8000
a=rtpmap:8 PCMA/8000
a=rtpmap:106 CN/32000
a=rtpmap:105 CN/16000
a=rtpmap:13 CN/8000
a=rtpmap:110 telephone-event/48000
a=rtpmap:112 telephone-event/32000
a=rtpmap:113 telephone-event/16000
a=rtpmap:126 telephone-event/8000
a=ssrc:2493853505 cname:UcicltjXPgMMZ/9S
a=ssrc:2493853505 msid:stream audio0
a=ssrc:2493853505 mslabel:stream
a=ssrc:2493853505 label:audio0
m=video 9 UDP/TLS/RTP/SAVPF 96 97 98 99 100 101 127 124 125
c=IN IP4 0.0.0.0
a=rtcp:9 IN IP4 0.0.0.0
a=ice-ufrag:Agzu
a=ice-pwd:mef2jhxanVddiHDLNvw7BMl9
a=ice-options:trickle renomination
a=fingerprint:sha-256 D7:E8:97:ED:96:EC:6D:8D:44:35:E8:51:A0:07:A0:EC:57:67:B9:76:16:31:1C:3E:6A:DF:A7:9D:E5:98:80:3A
a=setup:actpass
a=mid:1
a=extmap:14 urn:ietf:params:rtp-hdrext:toffset
a=extmap:2 http://www.webrtc.org/experiments/rtp-hdrext/abs-send-time
a=extmap:13 urn:3gpp:video-orientation
a=extmap:3 http://www.ietf.org/id/draft-holmer-rmcat-transport-wide-cc-extensions-01
a=extmap:12 http://www.webrtc.org/experiments/rtp-hdrext/playout-delay
a=extmap:11 http://www.webrtc.org/experiments/rtp-hdrext/video-content-type
a=extmap:7 http://www.webrtc.org/experiments/rtp-hdrext/video-timing
a=extmap:8 http://tools.ietf.org/html/draft-ietf-avtext-framemarking-07
a=extmap:9 http://www.webrtc.org/experiments/rtp-hdrext/color-space
a=extmap:4 urn:ietf:params:rtp-hdrext:sdes:mid
a=extmap:5 urn:ietf:params:rtp-hdrext:sdes:rtp-stream-id
a=extmap:6 urn:ietf:params:rtp-hdrext:sdes:repaired-rtp-stream-id
a=sendrecv
a=msid:stream video0
a=rtcp-mux
a=rtcp-rsize
a=rtpmap:96 H264/90000
a=rtcp-fb:96 goog-remb
a=rtcp-fb:96 transport-cc
a=rtcp-fb:96 ccm fir
a=rtcp-fb:96 nack
a=rtcp-fb:96 nack pli
a=fmtp:96 level-asymmetry-allowed=1;packetization-mode=1;profile-level-id=640c34
a=rtpmap:97 rtx/90000
a=fmtp:97 apt=96
a=rtpmap:98 H264/90000
a=rtcp-fb:98 goog-remb
a=rtcp-fb:98 transport-cc
a=rtcp-fb:98 ccm fir
a=rtcp-fb:98 nack
a=rtcp-fb:98 nack pli
a=fmtp:98 level-asymmetry-allowed=1;packetization-mode=1;profile-level-id=42e034
a=rtpmap:99 rtx/90000
a=fmtp:99 apt=98
a=rtpmap:100 VP8/90000
a=rtcp-fb:100 goog-remb
a=rtcp-fb:100 transport-cc
a=rtcp-fb:100 ccm fir
a=rtcp-fb:100 nack
a=rtcp-fb:100 nack pli
a=rtpmap:101 rtx/90000
a=fmtp:101 apt=100
a=rtpmap:127 red/90000
a=rtpmap:124 rtx/90000
a=fmtp:124 apt=127
a=rtpmap:125 ulpfec/90000
a=ssrc-group:FID 2153314113 822817334
a=ssrc:2153314113 cname:UcicltjXPgMMZ/9S
a=ssrc:2153314113 msid:stream video0
a=ssrc:2153314113 mslabel:stream
a=ssrc:2153314113 label:video0
a=ssrc:822817334 cname:UcicltjXPgMMZ/9S
a=ssrc:822817334 msid:stream video0
a=ssrc:822817334 mslabel:stream
a=ssrc:822817334 label:video0
m=application 9 UDP/DTLS/SCTP webrtc-datachannel
c=IN IP4 0.0.0.0
a=ice-ufrag:Agzu
a=ice-pwd:mef2jhxanVddiHDLNvw7BMl9
a=ice-options:trickle renomination
a=fingerprint:sha-256 D7:E8:97:ED:96:EC:6D:8D:44:35:E8:51:A0:07:A0:EC:57:67:B9:76:16:31:1C:3E:6A:DF:A7:9D:E5:98:80:3A
a=setup:actpass
a=mid:2
a=sctp-port:5000
a=max-message-size:262144
コード
        let config = RTCConfiguration()
        config.iceServers = [RTCIceServer(urlStrings: iceServers)]

        // Unified plan is more superior than planB
        config.sdpSemantics = .unifiedPlan

        // gatherContinually will let WebRTC to listen to any network changes and send any new candidates to the other client
        config.continualGatheringPolicy = .gatherContinually

        let constraints = RTCMediaConstraints(mandatoryConstraints: nil,
                                              optionalConstraints: ["DtlsSrtpKeyAgreement":kRTCMediaConstraintsValueTrue])
        self.peerConnection = WebRTCClient.factory.peerConnection(with: config, constraints: constraints, delegate: nil)

        super.init()
        self.createMediaSenders()
        self.configureAudioSession()
        self.peerConnection.delegate = self
Offer SDP
- 最初に送るSDP。
- このとき、映像コーデック:H264, VP8 使えますなどが送信される。
    func offer(completion: @escaping (_ sdp: RTCSessionDescription) -> Void) {
        let constrains = RTCMediaConstraints(mandatoryConstraints: self.mediaConstrains,
                                             optionalConstraints: nil)
        self.peerConnection.offer(for: constrains) { (sdp, error) in
            guard let sdp = sdp else {
                return
            }

            self.peerConnection.setLocalDescription(sdp, completionHandler: { (error) in
                completion(sdp)
            })
        }
    }
Answer SDP
- Offer SDPを受けて返すSDP。
- 映像コーデックを受けてVP8対応してます、などが送られる。
    func answer(completion: @escaping (_ sdp: RTCSessionDescription) -> Void)  {
        let constrains = RTCMediaConstraints(mandatoryConstraints: self.mediaConstrains,
                                             optionalConstraints: nil)
        self.peerConnection.answer(for: constrains) { (sdp, error) in
            guard let sdp = sdp else {
                return
            }

            self.peerConnection.setLocalDescription(sdp, completionHandler: { (error) in
                completion(sdp)
            })
        }
    }
映像キャプチャと送信開始
    func startCaptureLocalVideo(renderer: RTCVideoRenderer) {
        // 接続時に準備したカメラの映像を取得して映像フレームを生成するインスタンス
        guard let capturer = self.videoCapturer as? RTCCameraVideoCapturer else {
            return
        }

        // ビデオキャプチャ対応しているデバイス(フロントカメラ)を取得
        guard
            let frontCamera = (RTCCameraVideoCapturer.captureDevices().first { $0.position == .front }),

            // フロントカメラの最大解像度を取得
            let format = (RTCCameraVideoCapturer.supportedFormats(for: frontCamera).sorted { (f1, f2) -> Bool in
                let width1 = CMVideoFormatDescriptionGetDimensions(f1.formatDescription).width
                let width2 = CMVideoFormatDescriptionGetDimensions(f2.formatDescription).width
                return width1 < width2
            }).last,

            // 最大フレームレートを取得
            let fps = (format.videoSupportedFrameRateRanges.sorted { return $0.maxFrameRate < $1.maxFrameRate }.last) else {
            return
        }

        // フロントカメラのキャプチャ開始、相手への送信開始
        capturer.startCapture(with: frontCamera,
                              format: format,
                              fps: Int(fps.maxFrameRate))

        // 自分の映像を描画
        // localVideoTrackは接続時に準備しているローカル側の映像トラックなので、localVideoTrackに入ってくるデータをrendererに流し込むための設定
        self.localVideoTrack?.add(renderer)
    }
映像レンダーセット
    func renderRemoteVideo(to renderer: RTCVideoRenderer) {
        // 相手の映像を描画
        // remoteVideoTrackは接続時に準備している相手側からの受信映像トラックなので、remoteVideoTrackに入ってくるデータをrendererに流し込むための設定
        self.remoteVideoTrack?.add(renderer)
    }
映像に画像を表示したいとき
映像に画像を表示したいとき
下記のようなやり方がある。
- 自分が送る映像フレームを画像にするパターン
- DataChannelを利用するパターン
自分が送る映像フレームを画像にするパターン
- 基本的には、GoogleWebRTCは、映像はフロント/バックカメラの映像を相手に流すふうに実装されている。
- だが、相手に流す映像がフレームごとにフックするためのdelegate(RTCVideoCapturerDelegate)が用意されているのでそれを利用する。
- このときに、RTCVideoSource#capturer()で、RTCVideoFrameを流し込む。
- 実装は後述。ここはサンプルでは無くて、独自実装。
DataChannelを利用するパターン
- データチャネルでは、RTCDataBuffer(バイナリデータを扱うクラス)の送受信が行えるので、それをお利用
- このデータを送られたら画像表示するとかを、送信側と受信側で仕様を決めて、処理する。
自分が送る映像フレームを画像にする
もともとこういう感じになっていたのを..
self.videoSource = WebRTCClient.factory.videoSource()
self.videoCapturer = RTCCameraVideoCapturer(delegate: self.videoSource)
こういう感じにする。
self.videoSource = WebRTCClient.factory.videoSource()

//self.videoCapturer = RTCCameraVideoCapturer(delegate: self.videoSource)
self.videoCapturer = RTCCameraVideoCapturer(delegate: self) //selfはRTCVideoCapturerDelegateを継承

// WebRTCClient WebRTCの処理を行うためのクラス
extension WebRTCClient: RTCVideoCapturerDelegate {
    // これが映像フレーム送信前にコールバックされる。
    func capturer(_ capturer: RTCVideoCapturer, didCapture frame: RTCVideoFrame) {
        self.captureVideoFrameChannel(videoSource: self.videoSource, videoCapturer: capturer, srcframe: frame)
    }
}
画像からフレームを作成して送信
    private func captureVideoFrameChannel(videoSource: RTCVideoSource, videoCapturer: RTCVideoCapturer) {
        let image = UIImage(named: "gundam")!

        func cvPixelBuffer(image: UIImage) -> CVPixelBuffer?
        {
            let width = image.cgImage!.width
            let height = image.cgImage!.height
            let options: [NSObject: Any] = [
                            kCVPixelBufferCGImageCompatibilityKey: true,
                            kCVPixelBufferCGBitmapContextCompatibilityKey: true,
                            ]
            var pxbufferTemp: CVPixelBuffer? = nil
            let status = CVPixelBufferCreate(kCFAllocatorDefault, width,
                                             height, kCVPixelFormatType_32ARGB, options as CFDictionary,
                &pxbufferTemp);
            guard let pxbuffer = pxbufferTemp, status == kCVReturnSuccess else {
                fatalError()
            }

            CVPixelBufferLockBaseAddress(pxbuffer, [])
            let pxdataTmp = CVPixelBufferGetBaseAddress(pxbuffer)
            guard let pxdata = pxdataTmp else {
                fatalError()
            }

            let rgbColorSpace = CGColorSpaceCreateDeviceRGB();
            guard let  context = CGContext(data: pxdata, width: width,
                                           height: height, bitsPerComponent: 8, bytesPerRow: 4 * width, space: rgbColorSpace,
                                           bitmapInfo: CGImageAlphaInfo.noneSkipFirst.rawValue) else {
                    fatalError()
            }
            context.draw(image.cgImage!, in: CGRect(origin: .zero, size: CGSize.init(width: width, height: height)))
            CVPixelBufferUnlockBaseAddress(pxbuffer, CVPixelBufferLockFlags(rawValue: 0))

            return pxbuffer
        }

        func cmSampleBuffer(image: UIImage) -> CMSampleBuffer {
            let pixelBuffer = cvPixelBuffer(image: image)
            var newSampleBuffer: CMSampleBuffer? = nil
            var timimgInfo: CMSampleTimingInfo = CMSampleTimingInfo.invalid
            var videoInfo: CMVideoFormatDescription? = nil
            CMVideoFormatDescriptionCreateForImageBuffer(allocator: nil, imageBuffer: pixelBuffer!, formatDescriptionOut: &videoInfo)
            CMSampleBufferCreateForImageBuffer(allocator: kCFAllocatorDefault, imageBuffer: pixelBuffer!, dataReady: true, makeDataReadyCallback: nil, refcon: nil, formatDescription: videoInfo!, sampleTiming: &timimgInfo, sampleBufferOut: &newSampleBuffer)
            return newSampleBuffer!
        }

        let pixelBuffer = CMSampleBufferGetImageBuffer(cmSampleBuffer(image: image))!
        let rtcpixelBuffer = RTCCVPixelBuffer(pixelBuffer: pixelBuffer)
        // これが映像フレームのデータ
        let videoFrame = RTCVideoFrame(
            buffer: rtcpixelBuffer,
            rotation: RTCVideoRotation._0,
            timeStampNs: Int64(Date().timeIntervalSince1970 * 1_000_000_000)
        )
        // ここで映像データ送信!
        videoSource.capturer(videoCapturer, didCapture: videoFrame)
    }
- 送信側は、映像フレーム送信時に、timestampも送っていて、受信側はそのタイムスタンプに沿ってレンダリングしている(多分)。
- だからRTCVideoFrameのtimestampが間違っていると、受信側で表示されない。
最後に
- 多分、まだiOSアプリで簡単に使えるクライアント用ライブラリは無い(と思われる)
- サーバー含めたサービスはいろいろあるので、それを使えば割と簡単にできる。
- 音声ももうちょっと実装見ていきたかった..
今回利用したソース
https://github.com/HikaruSato/WebRTC-iOS/tree/tutorial
reference(多謝!)
- https://gist.github.com/szktty/999a34c64cc4ea60de43c4c1adc93203
- https://gist.github.com/voluntas/67e5a26915751226fdcf
- https://qiita.com/mush/items/121e45fefed009b6ad5e
- 投稿日:2020-07-10T17:20:05+09:00
【2020年版】 Monaca/iOSでアプリが正常に動作しない人
最新のiOSで正常に動作しない場合は次を確認しよう!
きちんとWkWebViewでファイルを読み込めるようにしてますか?
そのままWKWebViewに切り替えても、pushPageは動作しませんよ。動くようにpluginの導入が必要です。
参考元ページ
※なんでもっと大々的に周知してくれないんだろう(涙WkWebViewに切り替えただけでは、ダメですよ。
iOSのビルド環境の設定は iOS 5.1.1 / Xcode 11.3にしてますか?してないと弾かれますよ。
- 投稿日:2020-07-10T17:20:05+09:00
【2020年版】 Monaca/iOSでアプリが正常に動作しない/Appleから却下される人【現在進行形】
最新のiOSで正常に動作しない場合は次を確認しよう!
きちんとWkWebViewでファイルを読み込めるようにしてますか?
そのままWKWebViewに切り替えても、pushPageは動作しませんよ。動くようにpluginの導入が必要です。
参考元ページ
※なんでもっと大々的に周知してくれないんだろう(涙WkWebViewに切り替えただけでは、ダメですよ。
iOSのビルド環境の設定は iOS 5.1.1 / Xcode 11.3にしてますか?してないと弾かれますよ。
APPのスクリーンショットをAppLaunchpadで生成しても、登録できない!
png画像が登録できない場合は、gimpとかで一回読み込みをして保存してみよう。
- 投稿日:2020-07-10T14:49:08+09:00
XcodeProjectのバージョン情報管理
名前 Info.plistキー名 Xcode->Targets->General->Identityでの名前 用途 典型例 バージョン CFBundleShortVersionString Version ユーザーから見たバージョン。App Storeで表示される 1.0 ビルド番号 CFBundleVersion Build 開発者が管理用に使うバージョン。App Store Connectにアップロードする際、既にアップロードされたものよりビルド番号を上げなくてはならない。 1.0.0 メモ
これに限ったことではないが、
Versionはユーザーが見るもの(本番で使われるもの)なので、開発中に適当な値などを入れるべきではないと思われる。なぜなら番号を直し忘れてしまうリスクがある。参考
stack overflow - What values should I use for CFBundleVersion and CFBundleShortVersionString?
iOSアプリバージョンについて
More the iPhone Development Playground
Swift Study - iOSアプリのバージョン番号とビルド番号を設定
正しく理解する iOS アプリのバージョニング
- 投稿日:2020-07-10T00:04:20+09:00
コーチマーク+アニメーションでスワイプで削除する操作を表現する
はじめに
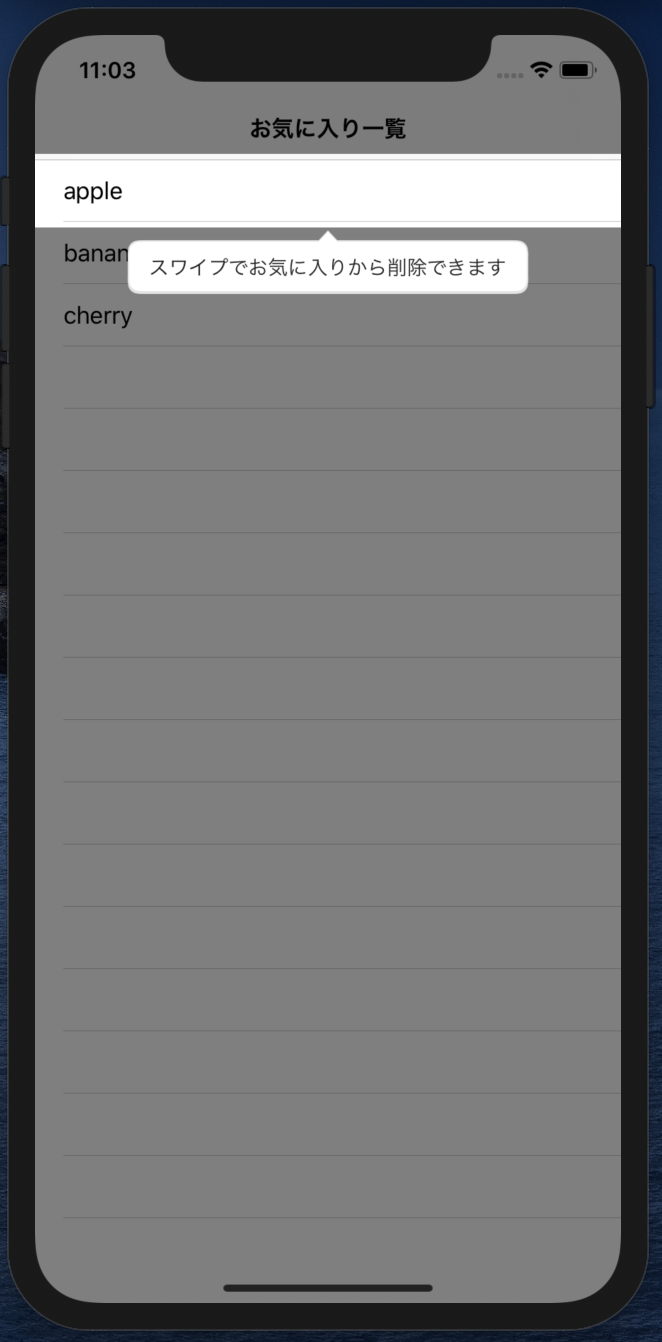
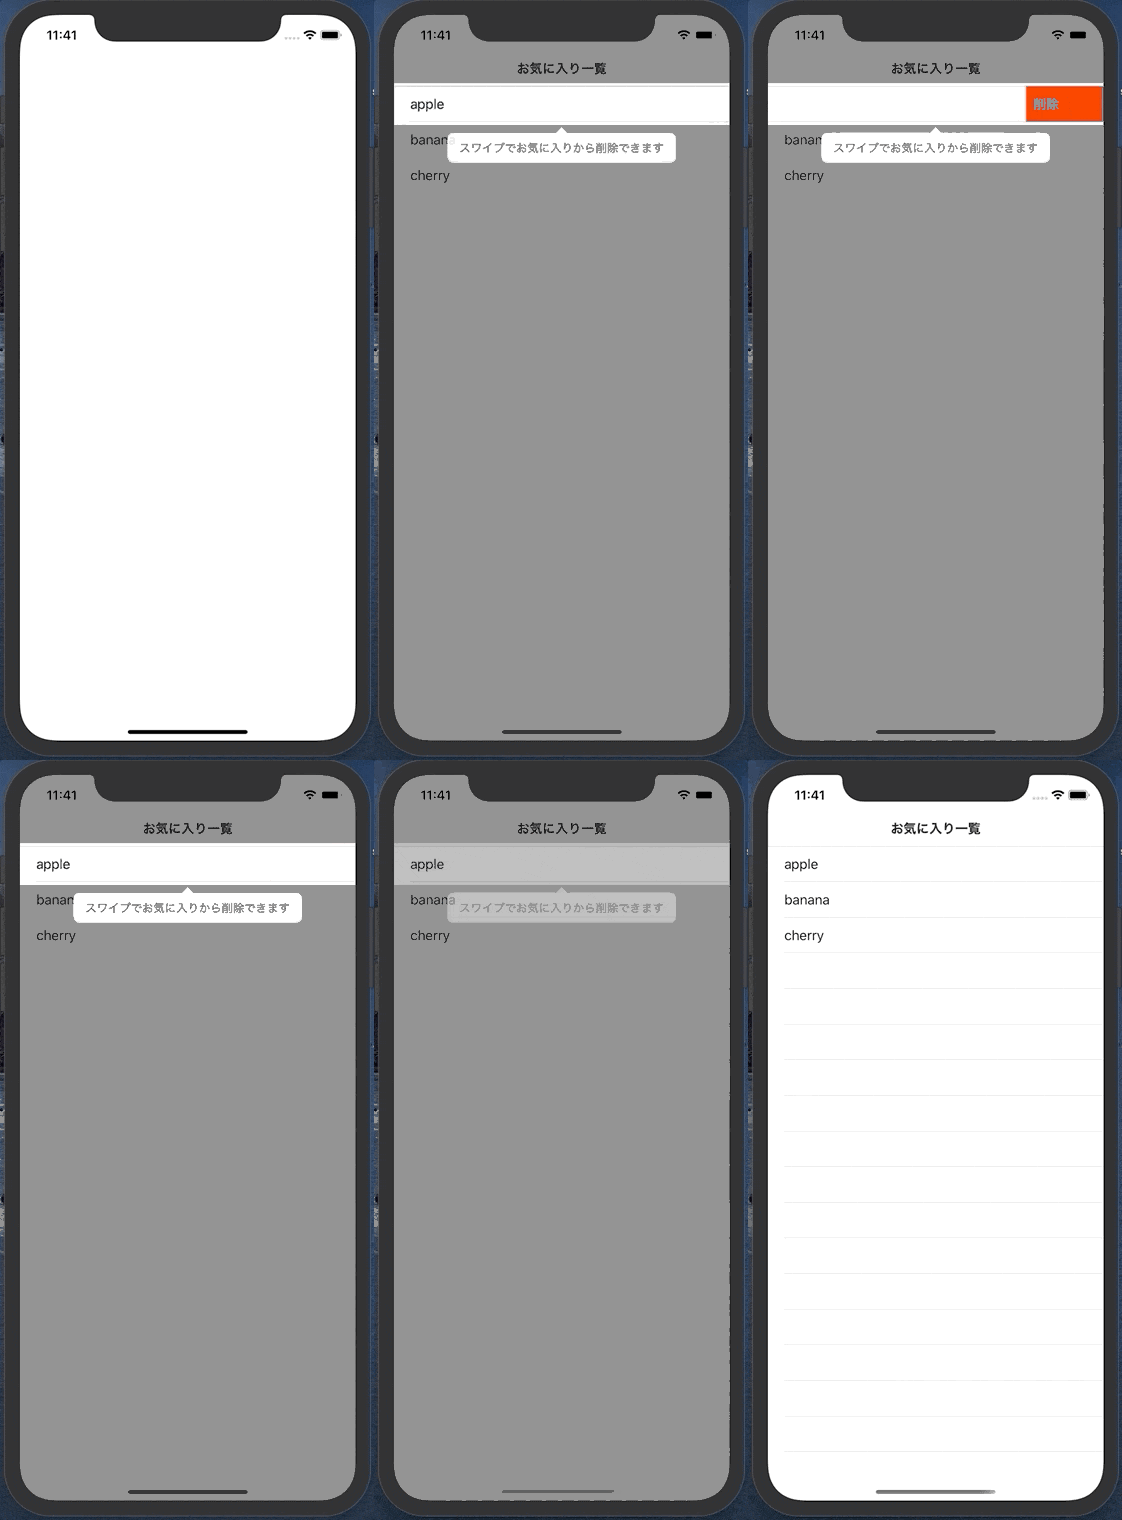
コーチマークとUIViewのアニメーションを組み合わせて、スワイプで削除する操作を表現してみました。
コーチマークについて
コーチマークとは・・・
実際の画面の上にオーバーレイや吹き出しを出して
画面上のボタンなどの使い方を案内してくれるやつです。アプリで初めて開く画面とかでときどきに見かけますね('・ω・`)
スワイプ削除
iOSのTableViewでは、セルをスワイプで削除する機能が簡単に実装できますし、
アプリユーザにとっても慣れている操作の一つではないかと思います(^ω^)ただ、削除ボタンみたいに目に見えてわかる機能ではないので、
ユーザ全員が当たり前のようにスワイプで削除できると認識してくれるとは限りません。。。そこで、初めて画面を開いた時にコーチマークを利用して、
スワイプで削除できるよっていうことを案内してみたいと思います!実装
今回は、Instructionsを使用してコーチマークを実装しました!
Instructionsの実装方法は、こちらの記事を参考にさせていただきましたm(_ _)m
→ swift 簡単でおしゃれなチュートリアルライブラリ,Instructions今回は、Carthageでライブラリを導入しました。
github "ephread/Instructions" ~> 2.0まずは、コーチマークを表示するところ
実装は、Instructionsのリポジトリにもサンプルがあったので、そちらを参考にしながら進めました。
CoachMarksControllerのdataSourceを実装して、
coachMarksController.start(in: )を呼んであげるだけでコーチマークを表示できました(⌒ω⌒)今回は、コーチマークのターゲットがTableViewCellなので、事前にIndexPathを指定して、
spotlightTargetViewにcellを保持するように実装してみました。ViewController.swift(初期設定)// コーチマークの初期設定 private func setupCoachMarksController() { self.coachMarksController.dataSource = self // オーバーレイをタップでもコーチマークを閉じれるようにする self.coachMarksController.overlay.isUserInteractionEnabled = true // コーチマークの背景色を設定 self.coachMarksController.overlay.backgroundColor = UIColor.black.withAlphaComponent(0.5) } /// コーチマークを表示する private func startCoachMarks() { let indexPath = IndexPath(row: 0, section: 0) // [section, row] = [0, 0]のCellがあれば、コーチマークを表示する if tableView.numberOfRows(inSection: indexPath.section) > indexPath.row, let cell = tableView.cellForRow(at: indexPath) { self.spotlightTargetView = cell self.coachMarksController.start(in: .currentWindow(of: self)) } }CoachMarksControllerのdataSourceの実装はこんな感じでシンプル
ViewController.swift(CoachMarksControllerDataSource実装部)extension ViewController: CoachMarksControllerDataSource { func numberOfCoachMarks(for coachMarksController: CoachMarksController) -> Int { return 1 } func coachMarksController(_ coachMarksController: CoachMarksController, coachMarkAt index: Int) -> CoachMark { // 吹き出しを表示する対象のビューを指定する return coachMarksController.helper.makeCoachMark(for: spotlightTargetView) } func coachMarksController(_ coachMarksController: CoachMarksController, coachMarkViewsAt index: Int, madeFrom coachMark: CoachMark) -> (bodyView: (UIView & CoachMarkBodyView), arrowView: (UIView & CoachMarkArrowView)?) { let coachViews = coachMarksController.helper.makeDefaultCoachViews(withArrow: true, withNextText: false, arrowOrientation: coachMark.arrowOrientation) coachViews.bodyView.hintLabel.text = "スワイプでお気に入りから削除できます" return (bodyView: coachViews.bodyView, arrowView: coachViews.arrowView) } }この状態だと、まだ分かりづらいかなーと思うので、アニメーションを加えていきます。
スワイプで削除風のアニメーションを実装
スワイプで削除するようなアニメーションを実装します。
アニメーションは、Stack Overflowの投稿を
パクらせて参考にさせていただきましたm(_ _)m
UITableView invoke swipe actions programmatically参考情報そのままだと少し使いづらいところがあったので、
アニメーション完了後の処理をクロージャで実装できるようにしています。動作
アニメーションを加えたら、いい感じになりました(^-^)v
(Gifの問題で、「削除」ラベルの色が実際と少し違っています。)完成したコード
以下、アニメーション完了後からオーバーレイのタップを許可するなどの微調整をした最終的なソースコードです。
(コーチマーク表示済みかどうかの判定は、UserDefaultsなどで実現できると思うので、省いています。)ViewController.swiftimport UIKit import Instructions final class ViewController: UIViewController { private let coachMarksController = CoachMarksController() // コーチマークでスポットライトが当たるView private var spotlightTargetView: UIView! private var spotlightTargetIndexPath: IndexPath? private var items = ["apple", "banana", "cherry"] @IBOutlet private weak var tableView: UITableView! { didSet { tableView.dataSource = self } } override func viewDidLoad() { super.viewDidLoad() self.setupCoachMarksController() } override func viewWillAppear(_ animated: Bool) { super.viewWillAppear(animated) self.navigationItem.title = "お気に入り一覧" } override func viewDidAppear(_ animated: Bool) { super.viewDidAppear(animated) self.startCoachMarks() } private func setupCoachMarksController() { self.coachMarksController.dataSource = self self.coachMarksController.delegate = self // コーチマークの背景色を設定 self.coachMarksController.overlay.backgroundColor = UIColor.black.withAlphaComponent(0.5) } /// コーチマークを表示する private func startCoachMarks() { let indexPath = IndexPath(row: 0, section: 0) // [section, row] = [0, 0]のCellがあれば、コーチマークを表示する if tableView.numberOfRows(inSection: indexPath.section) > indexPath.row, let cell = tableView.cellForRow(at: indexPath) { self.spotlightTargetView = cell self.spotlightTargetIndexPath = indexPath self.coachMarksController.start(in: .currentWindow(of: self)) } } } extension ViewController: UITableViewDataSource { func tableView(_ tableView: UITableView, numberOfRowsInSection section: Int) -> Int { return items.count } func tableView(_ tableView: UITableView, cellForRowAt indexPath: IndexPath) -> UITableViewCell { guard let cell = tableView.dequeueReusableCell(withIdentifier: "Cell") else { fatalError("Cell is nil.") } cell.textLabel?.text = items[indexPath.row] return cell } func tableView(_ tableView: UITableView, canEditRowAt indexPath: IndexPath) -> Bool { return true } func tableView(_ tableView: UITableView, commit editingStyle: UITableViewCell.EditingStyle, forRowAt indexPath: IndexPath) { if editingStyle == .delete { self.items.remove(at: indexPath.row) tableView.deleteRows(at: [indexPath], with: .automatic) } } } extension ViewController: CoachMarksControllerDataSource { func numberOfCoachMarks(for coachMarksController: CoachMarksController) -> Int { return 1 } func coachMarksController(_ coachMarksController: CoachMarksController, coachMarkAt index: Int) -> CoachMark { // 吹き出しを表示する対象のビューを指定する return coachMarksController.helper.makeCoachMark(for: spotlightTargetView) } func coachMarksController(_ coachMarksController: CoachMarksController, coachMarkViewsAt index: Int, madeFrom coachMark: CoachMark) -> (bodyView: (UIView & CoachMarkBodyView), arrowView: (UIView & CoachMarkArrowView)?) { let coachViews = coachMarksController.helper.makeDefaultCoachViews(withArrow: true, withNextText: false, arrowOrientation: coachMark.arrowOrientation) coachViews.bodyView.hintLabel.text = "スワイプでお気に入りから削除できます" return (bodyView: coachViews.bodyView, arrowView: coachViews.arrowView) } } extension ViewController: CoachMarksControllerDelegate { func coachMarksController(_ coachMarksController: CoachMarksController, didShow coachMark: CoachMark, afterChanging change: ConfigurationChange, at index: Int) { guard let targetIndexPath = self.spotlightTargetIndexPath else { return } UIView.animateRevealHideActionForRow(tableView: self.tableView, indexPath: targetIndexPath) { [weak self] in // アニメーション完了後、オーバーレイをタップでもコーチマークを閉じれるようにする self?.coachMarksController.overlay.isUserInteractionEnabled = true } } }UIView+.swiftimport UIKit extension UIView { /// TableViewのスワイプアクションの擬似的なアニメーション class func animateRevealHideActionForRow(tableView: UITableView, indexPath: IndexPath, completion: (() -> Void)? = nil) { guard let cell = tableView.cellForRow(at: indexPath) else { return } let swipeLabelWidth = UIScreen.main.bounds.width / 2 let swipeLabelFrame = CGRect(x: cell.bounds.size.width, y: 0, width: swipeLabelWidth, height: cell.bounds.size.height) var swipeLabel: UILabel? = .init(frame: swipeLabelFrame) swipeLabel?.text = " 削除" swipeLabel?.backgroundColor = .red swipeLabel?.textColor = .white cell.addSubview(swipeLabel!) UIView.animate(withDuration: 0.5, animations: { cell.frame = .init(x: cell.frame.origin.x - swipeLabelWidth / 2, y: cell.frame.origin.y, width: cell.bounds.size.width + swipeLabelWidth / 2, height: cell.bounds.size.height) }) { finished in UIView.animate(withDuration: 0.5, animations: { cell.frame = .init(x: cell.frame.origin.x + swipeLabelWidth / 2, y: cell.frame.origin.y, width: cell.bounds.size.width - swipeLabelWidth / 2, height: cell.bounds.size.height) }, completion: { finished in swipeLabel?.removeFromSuperview() swipeLabel = nil completion?() }) } } }さいごに
コーチマークでテキストを添えるだけでも親切だけど、動きをつけるとより親切かなと思いました!
(やり過ぎると、しつこいですけどね・・・)

