- 投稿日:2020-05-15T23:18:36+09:00
Windows Subsystem For Linux導入方法
- 投稿日:2020-05-15T23:15:03+09:00
ARM Architecture » Porting
もともと、Linux Kernelのソースコードの一部なので、GPLv2扱いになる(はずの認識)。
https://www.kernel.org/doc/html/latest/index.html
Licensing documentation
The following describes the license of the Linux kernel source code (GPLv2), how to properly mark the license of individual files in the source tree, as well as links to the full license text.
https://www.kernel.org/doc/html/latest/process/license-rules.html#kernel-licensing
https://www.kernel.org/doc/html/latest/arm/porting.html
Porting
Taken from list archive at http://lists.arm.linux.org.uk/pipermail/linux-arm-kernel/2001-July/004064.html
Initial definitions
The following symbol definitions rely on you knowing the translation that __virt_to_phys() does for your machine. This macro converts the passed virtual address to a physical address. Normally, it is simply:
以下のシンボル定義は、あなたがあなたのマシンに対して __virt_to_phys()が行う変換を知っていることものとします。 このマクロは、渡された仮想アドレスを物理アドレスに変換します。 通常、それは単純です:
phys = virt - PAGE_OFFSET + PHYS_OFFSETDecompressor Symbols
ZTEXTADDR
Start address of decompressor. There’s no point in talking about virtual or physical addresses here, since the MMU will be off at the time when you call the decompressor code. You normally call the kernel at this address to start it booting. This doesn’t have to be located in RAM, it can be in flash or other read-only or read-write addressable medium.
decompressorの開始アドレス。これは、仮想アドレスであるか物理アドレスであるかについては問わないが、decompressor codeを呼び出すときにはMMUはoffである。通常、kernelは起動を開始するときにこのアドレスを呼び出す。これは、RAMである必要はなく、flashあるいはほかの読み込み専用、読み書き可能なメディアであってもよい。
ZBSSADDR
Start address of zero-initialised work area for the decompressor. This must be pointing at RAM. The decompressor will zero initialise this for you. Again, the MMU will be off.
decompressorのために0で初期化されるワークメモリのスタートアドレス。これはRAM上になければならない。decompressorはこれを0で初期化するだろう。繰り返しとなるが、MMUはoffでなければならない。
ZRELADDR
This is the address where the decompressed kernel will be written, and eventually executed. The following constraint must be valid:
decompressed kernelが書き込まれる、実行されるアドレス。これは下記制約を満たさなければならない。
__virt_to_phys(TEXTADDR) == ZRELADDRThe initial part of the kernel is carefully coded to be position independent.
カーネルの初期化部分は、位置非依存のコードであることに注意深くコーディングされています。
INITRD_PHYS
Physical address to place the initial RAM disk. Only relevant if you are using the bootpImage stuff (which only works on the old struct param_struct).
initial RAM diskが置かれた物理アドレス。bootpImageを使用している場合にのみ関連します(古い構造体param_structでのみ機能します)。
INITRD_VIRT
Virtual address of the initial RAM disk. The following constraint must be valid:
initial RAM diskが置かれた仮想アドレス。これは下記制約を満たさなければならない。
__virt_to_phys(INITRD_VIRT) == INITRD_PHYSPARAMS_PHYS
Physical address of the struct param_struct or tag list, giving the kernel various parameters about its execution environment.
param_struct構造体やtag listの物理アドレスであって、実行完了に関する様々なパラメータをカーネルに提供します。
Kernel Symbols
PHYS_OFFSET
Physical start address of the first bank of RAM.
RAMのfirst bankが開始する物理アドレス。
PAGE_OFFSET
Virtual start address of the first bank of RAM. During the kernel boot phase, virtual address PAGE_OFFSET will be mapped to physical address PHYS_OFFSET, along with any other mappings you supply. This should be the same value as TASK_SIZE.
RAMのfirst bankが開始する仮想アドレス。kernelの起動フェイズの間、仮想アドレスPAGE_OFFSETは、ユーザーが指定した他のマッピングとともに、物理アドレスPHTS_OFFSETにマッピングされます。これは、TASK_SIZEと同じ値である必要があります。
TASK_SIZE
The maximum size of a user process in bytes. Since user space always starts at zero, this is the maximum address that a user process can access+1. The user space stack grows down from this address.
bytes単位での、ユーザープロセスの最大サイズ。ユーザー空間は常に0から始まるため、これはユーザープロセスがアクセスできるアドレス+1になります。ユーザー空間のスタックは、このアドレスから大きくなります。
Any virtual address below TASK_SIZE is deemed to be user process area, and therefore managed dynamically on a process by process basis by the kernel. I’ll call this the user segment.
TASK_SIZE未満の仮想アドレスは、ユーザープロセスの領域とみなされるため、カーネルにより、プロセス単位で動的に管理されます。これを、user segmentと呼びます。
Anything above TASK_SIZE is common to all processes. I’ll call this the kernel segment.
TASK_SIZEを超過するものは、全プロセスで共通になります。これは、kernel segmentと呼びます。
(In other words, you can’t put IO mappings below TASK_SIZE, and hence PAGE_OFFSET).
(言い換えれば、TASK_SIZE以降にIO mappingを置く事は出来ず、それゆえ、PAGE_OFFSET以降に置きます)
TEXTADDR
Virtual start address of kernel, normally PAGE_OFFSET + 0x8000. This is where the kernel image ends up. With the latest kernels, it must be located at 32768 bytes into a 128MB region. Previous kernels placed a restriction of 256MB here.
kernelの仮想空間上での開始アドレスであって、通常はPAGE_OFFSET + 0x8000です。これは、これがカーネルイメージの最終的な位置になります。最新のカーネルでは、32768 bytesから128MB のregionに置く必要があります。従来のkernelでは、256MBの制限があります。
DATAADDR
Virtual address for the kernel data segment. Must not be defined when using the decompressor.
kernelのdata segmentの仮想アドレス。decompressorを使う場合には、定義してはいけません。
VMALLOC_START / VMALLOC_END
Virtual addresses bounding the vmalloc() area. There must not be any static mappings in this area; vmalloc will overwrite them. The addresses must also be in the kernel segment (see above). Normally, the vmalloc() area starts VMALLOC_OFFSET bytes above the last virtual RAM address (found using variable high_memory).
vmalloc()領域の境界となる仮想アドレス。この領域に、静的マッピングがあってはいけません。vmallocはそれらを上書きします。アドレスはまた、kernel segment(前述)に含まれている必要があります。通常、vmalloc()領域は、VMALLOC_OFFSET bytesから開始し、(high_memoryの変数を用いて検出される)仮想アドレス上のRAM addressの末端上に位置します。
VMALLOC_OFFSET
Offset normally incorporated into VMALLOC_START to provide a hole between virtual RAM and the vmalloc area. We do this to allow out of bounds memory accesses (eg, something writing off the end of the mapped memory map) to be caught. Normally set to 8MB.
Architecture Specific Macros
BOOT_MEM(pram,pio,vio)
pram specifies the physical start address of RAM. Must always be present, and should be the same as PHYS_OFFSET.
pramは、RAMの物理的な開始アドレスを指定します。 常に存在している必要があり、PHYS_OFFSETと同じである必要があります。
pio is the physical address of an 8MB region containing IO for use with the debugging macros in arch/arm/kernel/debug-armv.S.
pioは、arch/arm/kernel/debug-armv.Sのデバッグマクロで使用するIOを含む8MB領域の物理アドレスです。
vio is the virtual address of the 8MB debugging region.
vioは、8MBのデバッグ領域の仮想アドレスです。
It is expected that the debugging region will be re-initialised by the architecture specific code later in the code (via the MAPIO function).
デバッグ領域は、コードの後半で(MAPIO関数を介して)architecture specific codeによって再初期化されることが予想されます。
BOOT_PARAMS
Same as, and see PARAMS_PHYS.
PARAMS_PHYSと同様なので参照してください。
FIXUP(func)
Machine specific fixups, run before memory subsystems have been initialised.
マシン固有の修正処理。memory subsystemsが初期化される前に実行されます。
MAPIO(func)
Machine specific function to map IO areas (including the debug region above).
マシン固有のIO areaのマッピング関数(前述の、debug regionを含む)
INITIRQ(func)
Machine specific function to initialise interrupts.
マシン固有の初期の割り込み関数。
- 投稿日:2020-05-15T21:35:10+09:00
パスワードのSHA-512暗号化を、実行環境をあまり気にせず自動化できるようにスクリプト化した。
動機
いまどきのLinuxでは、
/etc/shadow等に保存されるパスワードはSHA-512で暗号されている。たとえば、Dockerfileで、コンテナ内に一般ユーザを作成するときには、平文パスワードがファイルに記されるのは避けてDockerfileRUN useradd -p 'encrypted_password' accountnameとしたり、
DockerfileRUN echo 'accountname:encrypted_password' | chpasswd -eといったパスワード設定も行いたくなる。そうするとあらかじめSHA-512でパスワードを暗号化する必要があり、その方法はいくつか挙げられている。
ところが、いくつかある方法のうちどの方法が使えるかは実行環境にとても依存しているようである。
たとえばホストがmacOSのバージョンによっては
pythonやperlのcrypt関数がSHA-512に対応していない、とかopenssl,htpasswdは新しいバージョンでは対応しているがCentOS7に標準ではいっているものは対応していないとか、場合によって使い分けが必要のようだ。イメージをビルドする環境によっていちいち方法を探して変えるのはやっていられないと思うので、いくつかの方法を順次試していくスクリプトを作成した。ファイルの置き場は以下使い方
下記のような使い方を想定している。
初期ワスワード設定例# useradd -p "$(./passwd_sha512encrypt -u worker)" worker Enter password for worker: Enter password again for check. :作成済みアカウントへの設定例# ./passwd_sha512encrypt -f -u worker | chpasswd -e Enter password for worker: Enter password again for check. :これらの例の場合、プロンプトに従って標準入力から入力することになる。
useraddでは暗号化したパスワードのみ、chpasswdはアカウント名と暗号化したパスワードの対、と必要な情報が違うので-fオプションで出力を切り替える。もっとも、コンテナビルド等で何回もキーボード入力するのはやっていられないと思う。暗号化された物を保存しておく使い方が現実的である。ファイルに出力するオプション引数(
-o output-file)も設定しておいた。詳しい使い方は下記。help表示% ./passwd_sha512encrypt -h [Usage] % passwd_sha512encrypt [options] [username] [rawpassword] [Options] -o output : Set outputfile (default: stdout) -u username : Set username -p rawpassword : Set destenation -f : Output username:encrupted_password (Default output is encrupted_password only) -q : Skip type-miss check -v : verbose output -d : debug output -h : Show Help (this message)動作
内部では
openssl,htpassword,PHP,Python(Version 3→Version2の順),perlの順で、それぞれを環境変数PATHに含まれるディレクトリを順番に探して、SHA-512に対応しているものかどうかを判定して実行する。どれも対応していなかったら失敗する。この場合。
-oオプションで指定した出力されたファイルは作成されないので、このスクリプトの出力をシェルでリダイレクトする場合と動作が異なる。サイズ0のファイルが作成されないので、Makefileでファイルの依存関係を利用して処理を停めやすいと思う。
- 投稿日:2020-05-15T18:43:03+09:00
初心者がディスク使用率アラートに対応してディスク容量を確保するまで【tmpwatchコマンド】
注意
この記事はLinux初心者が書いてます。大切なデータが消えてしまう恐れがありますので、あくまでもこの記事は参考程度にしてください。
環境
CentOS7 / Apache2.4 / PHP5.4 / MariaDB5.5 / Zabbix Server4.4.6 / さくらのVPS 1G
はじまり
普段はサーバー監視がメインのお仕事ではありますが、
勉強の一環として個人でZabbixサーバーを立ち上げています。そのZabbixサーバーからこんなアラートが......
Problem started at hh:mm:ss on yyyy.mm.dd
Problem name: /: Disk space is critically low (used > 90%)
Host: Zabbix server
Severity: Average※一部情報は伏せてます
......読めば分かりますが、放置状態だったZabbixサーバーのディスク使用率が、90パーセントを超えてしまったようです。
※実は80パーセントを超えた段階でアラートが出てたのですが、完全に放置してました。てなわけで、とりあえずグラフの確認に行きます。
確かにディスクが逼迫しているので、とりあえずサーバーにログインして調査してみます。
調査
[root@hostname user]# df -h
Filesystem      Size  Used Avail Use% Mounted on
/dev/vda4        45G   40G  2.7G  94% /
devtmpfs        484M     0  484M   0% /dev
tmpfs           496M     0  496M   0% /dev/shm
tmpfs           496M   51M  446M  11% /run
tmpfs           496M     0  496M   0% /sys/fs/cgroup
/dev/vda2       477M  103M  345M  23% /boot
tmpfs           100M     0  100M   0% /run/user/1000
df コマンド でディスクの空き容量確認
-h オプション で単位の調整をしますとりあえず、/の空き容量がなさそうです。
[root@hostname user]# du -sh /*
0       /bin
101M    /boot
0       /dev
34M     /etc
84K     /home
0       /lib
0       /lib64
16K     /lost+found
4.0K    /media
4.0K    /mnt
8.0K    /opt
0       /proc
68K     /root
51M     /run
0       /sbin
4.0K    /srv
0       /sys
48K     /tmp
1.6G    /usr
24G     /var
du コマンド でファイル・ディレクトリが使用しているディスク容量を確認
-s オプション で必要な部分のみの表示
-h オプション で見やすく調整とりあえず、使用量が1番多い/varが原因のように思われます。
[root@hostname user]# du -sh /var/*
4.0K    /var/account
4.0K    /var/adm
120M    /var/cache
4.0K    /var/crash
20K     /var/db
8.0K    /var/empty
4.0K    /var/games
4.0K    /var/gopher
12K     /var/kerberos
311M    /var/lib
4.0K    /var/local
0       /var/lock
27G     /var/log
0       /var/mail
4.0K    /var/nis
4.0K    /var/opt
4.0K    /var/preserve
0       /var/run
116K    /var/spool
32K     /var/tmp
12K     /var/www
4.0K    /var/yp
同じようにduコマンドを使用しますが、今度は/varを調査、結果、/var/logに原因があると思われます。
[root@hostname user]# du -sh /var/log/*
4.0K    /var/log/anaconda
39M     /var/log/audit
0       /var/log/boot.log
12K     /var/log/boot.log-20200427
137M    /var/log/btmp
222M    /var/log/btmp-20200501
4.0K    /var/log/chrony
128K    /var/log/cron
164K    /var/log/cron-20200419
160K    /var/log/cron-20200426
160K    /var/log/cron-20200503
160K    /var/log/cron-20200510
36K     /var/log/dmesg
2.7M    /var/log/httpd
40K     /var/log/lastlog
0       /var/log/maillog
0       /var/log/maillog-20200426
4.0K    /var/log/maillog-20200503
0       /var/log/maillog-20200510
20K     /var/log/mariadb
236K    /var/log/messages
276K    /var/log/messages-20200419
272K    /var/log/messages-20200426
344K    /var/log/messages-20200503
280K    /var/log/messages-20200510
4.0K    /var/log/qemu-ga
4.0K    /var/log/rhsm
22M     /var/log/sa
55M     /var/log/secure
59M     /var/log/secure-20200419
44M     /var/log/secure-20200426
64M     /var/log/secure-20200503
63M     /var/log/secure-20200510
0       /var/log/spooler
0       /var/log/spooler-20200426
0       /var/log/spooler-20200503
0       /var/log/spooler-20200510
20K     /var/log/tuned
48K     /var/log/wtmp
4.0K    /var/log/yum.log
23G     /var/log/zabbix
次の階層を調査、やはり原因は/var/log/zabbixのようです(そもそもZabbixサーバーだし)。使用容量が明らか違います。
対策
さて、原因がわかったので、対策を考えます。
調べてみると、どうやらtmpwatchコマンドなるものが使えそうです。[root@hostname user]# yum -y install tmpwatchとりあえず、yumコマンドでtmpwatchコマンドをインストールします。
[root@hostname user]# tmpwatch -d -m 720 /var/log/zabbixtmpwatch コマンド で更新日が古いファイルを削除
-d オプション でディレクを除外
-m で時間指定します認識が間違っていなければ、720時間以上更新がないファイルを削除してくれるはずです。
再度、グラフの確認に行きます。
とりあえずディスク容量が多少は改善したかのように思われます。
コマンド実行後、90パーセントディスク使用率が90パーセントを下回ったというアラートも確認したので、とりあえずは成功ということで......。
(80パーセントは下回ってないが)追記
肝心なことを忘れてましたが、再起動をしてませんでした。
再起動の結果がコチラ
ちゃんと古いログファイルの削除ができたようです。
とりあえずこれで一安心


- 投稿日:2020-05-15T18:22:12+09:00
Linux & Pythonで自分自身のピークのメモリ使用量を取る
結論
いろいろ調べたのですが、これよりマシな方法が見つかりませんでした。
/procファイルシステムを使っているので、サポートしているプラットフォーム(Linux等)でしか動きません。import os import re def peak_memory(): pid = os.getpid() with open(f'/proc/{pid}/status') as f: # "VmHWM: 862168 kB" の形式になっている行を抜き出す for line in f: if not line.startswith('VmHWM:'): continue return int(re.search('[0-9]+', line)[0]) raise ValueError('Not Found')なぜピーク使用量か?
とある関数の内部で、一時的にメモリ使用量がハネ上がる現象が起きました。
その関数をプロファイリングしてメモリ使用量がハネ上がっている箇所を突き止めたいのであればmemory-profilerを使うのが良いかと思います。
今回、どこで増えるかは分かっていて、増えるのは仕方ないが、具体的にどれくらい増えるのかを調べたかったので、ピーク使用量を知る必要がありました。ピーク使用量を使わないとどうなるか。
現在のメモリ使用量であればpsutilで取れます。このへんを参照。
ですが、ピークではないので、例えばこういうコードのとき
現在の使用メモリを取るimport psutil def f(): a = [0] * 20000000 print(psutil.Process().memory_full_info()) f() print(psutil.Process().memory_full_info())以下のような結果になります。
あんまり変わらないpfullmem(rss=12406784, vms=18395136, shared=6369280, text=4096, lib=0, data=6225920, dirty=0, uss=8134656, pss=9319424, swap=0) pfullmem(rss=12619776, vms=18354176, shared=6385664, text=4096, lib=0, data=6184960, dirty=0, uss=8253440, pss=9438208, swap=0)
f()の中ではメモリをいっぱい使っているのですが、外では使っていないので、外からでは分からないんですね。fの中でも取ってみるimport psutil def f(): a = [0] * 20000000 print('inner: ', psutil.Process().memory_full_info()) print('before:', psutil.Process().memory_full_info()) f() print('after: ', psutil.Process().memory_full_info())この場合、以下のようになります。
真ん中だけいっぱい使っているbefore: pfullmem(rss=12476416, vms=18395136, shared=6443008, text=4096, lib=0, data=6225920, dirty=0, uss=8179712, pss=9407488, swap=0) inner: pfullmem(rss=172519424, vms=178356224, shared=6520832, text=4096, lib=0, data=166187008, dirty=0, uss=168300544, pss=169528320, swap=0) after: pfullmem(rss=12754944, vms=18354176, shared=6520832, text=4096, lib=0, data=6184960, dirty=0, uss=8298496, pss=9526272, swap=0)メモリを使っていそうなところに、ピンポイントでメモリ使用量を取るコードを入れられるなら、それでいいんですが、そうしたくなかったわけです。
今回の方法ではどうなったか?
ピーク使用量を取るimport os import re def peak_memory(): pid = os.getpid() with open(f'/proc/{pid}/status') as f: for line in f: if not line.startswith('VmHWM:'): continue return int(re.search('[0-9]+', line)[0]) raise ValueError('Not Found') def f(): a = [0] * 20000000 print('before:', peak_memory(), 'KB') f() print('after: ', peak_memory(), 'KB')結果、こうなりました。
afterで増えてるbefore: 9072 KB after: 165532 KBめでたしめでたし。
参考文献
コードについて
本記事に掲載されたコードを、自身・自社が開発されているPythonスクリプトに利用いただくのはご自由にどうぞ。
- 投稿日:2020-05-15T13:37:46+09:00
Linuxサーバー負荷検証
負荷検証するためのメモ
CPUに対して負荷をかける
# yesを使う場合
# 1プロセスで足りない場合は複数実行
yes > /dev/null &

# gzipを使う場合
# 1プロセスで足りない場合は複数実行
gzip -9 < /dev/urandom > /dev/null &

# opensslを使う場合
openssl speed -multi `grep processor /proc/cpuinfo|wc -l`
解説
&の意味: バックグラウンド実行
<bash_command> > /dev/nullの意味: 出力を破棄する。なにも表示されない。
<bash_command> < /dev/urandomの意味: 乱を生成しコマンドに対して引数として渡すメモリ負荷
以下の実行にyesコマンドの実行結果を/dev/nullにレンダリングし続けることで使用メモリを高めていく。
# 1プロセスで足りない場合は複数実行
/dev/null < $(yes) &

# malloc, free 関数を繰り返し実行するコマンド
# --vm で起動するプロセス数を指定する。
# --vm-bytes で確保するメモリを指定する。
# --vm-keep を指定すると、free を行わず確保したままにしてくれる。
stress --vm 2 --vm-bytes 1G --vm-keep
注意事項:
--vm-bytesの値が大きすぎる場合、メモリに乗らないためエラーとなる
その時は、--vm プロセス数×--vm-bytes数が合計のメモリサイズになるためプロセス数を増やすことで合計メモリを上げることができる。容量負荷
以下のコマンドにてファイル生成をすることができる。
全てNULL文字で埋まったファイルを生成する。注意事項
メモリに乗り切らないぐらいの大きさのbsを指定すると失敗する。
この場合にはbsの値を小さくして、countの値を大きくすることで対応する。
bs*countの値が最終的に出力されるファイルサイズとなる。# 100バイトのファイルを生成する dd bs=100 count=1 if=/dev/zero of=file1 # 102400バイトのファイルを生成する dd bs=1K count=100 if=/dev/zero of=file2 # 100000バイトのファイルを生成する dd bs=1KB count=100 if=/dev/zero of=file3ログファイルなどがボトルネックになっている場合は、削除or移動して空き容量を確保すること
# 最終更新日が90日以上経過している"*.log"ファイルの削除
find $TARGET_DIR -type f -name "*.log" -mtime +90 | xargs rm -f
最後には立ち上げたプロセスの分削除すること
jobs

# jobsの実行結果に出てくるプロセス分 引数を取り削除
kill %1 %2 %3 ... %N
- 投稿日:2020-05-15T10:12:59+09:00
Bitnami Redmine(Linux版)復旧手順
Bitnami Redmine(Linux版 ver.4.1.1-1)でブラウザがHTTP500エラーで開けなくなった。
備忘録として、バックアップ~リストア手順を残しておく。①バックアップ取得
チケットの添付ファイル
Bitnami\redmine-4.1.1.0\apps\redmine\htdocs\files
filesディレクトリを丸ごとコピーしてバックアップ先に格納しておくデータベース(チケットやプロジェクトなど設定全て)
データベースのバックアップ~復旧は、PhpMyAdminをブラウザで開き行う方法と、コマンドから行う方法がある。[PhpMyAdminで行う場合]
Bitnami redmine stack画面 > Open phpMyAdmin を選択
ID:root/Pass:password でログインできる画面左でダンプしたいデータベース『bitnami_redmine』を選択する
選択項目は「すべてをチェックする」「チェックしたものを:エクスポート」にて、
sql形式で任意の場所にエクスポートする[ターミナルからコマンドで実行したい場合]
Bitnami\redmine-4.1.1.0\apps\redmine\htdocs\config\database.yml
上記ymlファイルの内容をメモしておくproduction:
adapter:
database: ←データベース名
host:
username: ←ユーザ名
password: ←パスワードmysqldump -u (ユーザ名) -p (パスワード) (データベース名) > データ出力先
②アンインストール
Redmineの格納フォルダを削除
コマンド rm -rf /格納先のパス③再インストール
Bitnami redmineパッケージを再インストール
④リストア
[PhpMyAdminで行う場合]
1. Open phpMyAdmin からブラウザを開く
2. 画面左でデータベース『bitnami_redmine』を選択し、中のデータを全て削除する
3. ②でバックアップしたsplファイルをインポートする[コマンドで行う場合]
mysql -u (ユーザ名) -p (パスワード) (データベース名) > ダンプしたデータを指定
上記のユーザ名などはdatabase.ymlを再度確認すること[チケットの添付ファイルの復旧]
添付ファイルをfilesディレクトリに丸ごと格納
- 投稿日:2020-05-15T05:54:45+09:00
[メモ] Raspberry Pi ZeroをUSBケーブル一本でインターネット接続!(nfs使用、SDカード・キーボード・マウス・モニター必要なし)
概要
- Raspberry Pi ZeroをUSBケーブル一本でインターネット接続
- SDカード不要
- NFSでroot(
/)をマウントするので、NFSサーバ側をVirtualBoxのUbuntu20.04にて設定する。たまに、NFSマウントが失敗するっぽい(タイミング?)ので、モニターを接続してみたほうがよいかも?
参考: HOW TO RUN OR BOOT RASPBIAN ON A RASPBERRY PI ZERO WITHOUT AN SD-CARD
というかそのまま、Buster向けで確認したくらい環境
- Windows 10 (1909) 64bit
- Virtualbox 6.1.6 + ExtensionPack
- Vagrant 2.2.9
ubuntu/focal64(Ubuntu 20.04) |IP: 10.42.0.1/24- RPi Zero (Wでもいけるはず?)
- Raspbian:
2020-02-13-raspbian-buster-liteIP: 10.42.0.14/24手順
仮想環境のインストール
- PowerShellを管理者で起動 (Win+x, a, ALT+y)
Chocolatey インストール ( https://chocolatey.org/install)
コピペSet-ExecutionPolicy Bypass -Scope Process -Force; [System.Net.ServicePointManager]::SecurityProtocol = [System.Net.ServicePointManager]::SecurityProtocol -bor 3072; iex ((New-Object System.Net.WebClient).DownloadString('https://chocolatey.org/install.ps1'))Virtualbox + Extensionインストールして、ピン止め(勝手にバージョンアップさせない)
#choco pin remove --name virtualbox
#choco uninstall  -y virtualbox -x
cinst -y virtualbox --params "/ExtensionPack /NoQuickLaunch /NoRegister /NoPath"
choco pin add    --name virtualbox
vagrant他 インストール
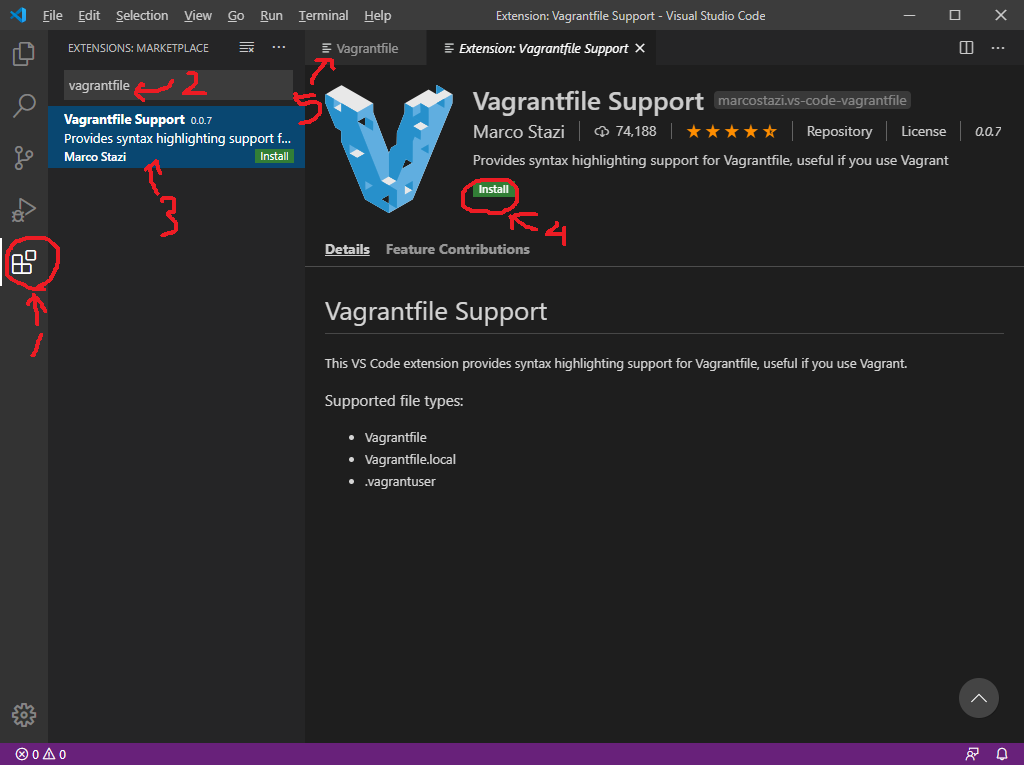
cinst -y vagrant vscode
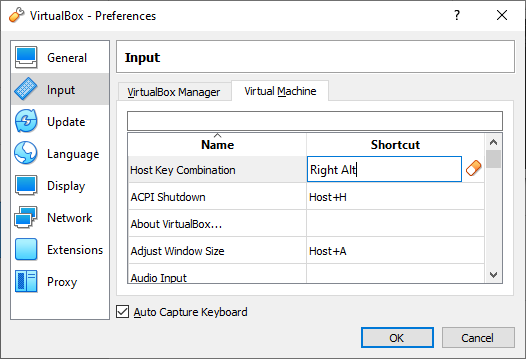
- (Hostキーの設定)右Ctrlがないキーボードの場合、一度、Virtualboxを起動して、メニュー > File > Preferences... > Input > [Virtual Machine] の Host Key Combination で、ほかのキー(例: 右Alt)にする。
一度、ホスト機(Windows10)再起動して、再度、PowerShellを管理者で起動
vagrantのプラグインインストール
vagrant plugin install vagrant-vbguest
vagrant plugin install vagrant-disksize
exitで終了仮想機(VMゲスト)の準備
- PowerShellを普通に起動 (Win+x, i)
- 作業フォルダ: C:\Vagrant\u20 を作って(
> mkdir C:\Vagrant\u20) 、移動('> cd C:\Vagrant\u20`)VSCodeで、以下の
Vagrantfileを作成(> code C:\Vagrant\u20\Vagrantfile).
ついでにプラグインを入れるVagrantfile# -*- mode: ruby -*- # vi: set ft=ruby : VB_NAME="u2004" VM_MEMORY=1024 VM_CORES=2 Vagrant.configure("2") do |config| config.vm.box = "ubuntu/focal64" config.vm.boot_timeout = 6000 config.vm.network "public_network" config.vm.provider "virtualbox" do |vb| #vb.gui = true # Virtualboxのウインドウが開きます vb.name = VB_NAME vb.memory = VM_MEMORY vb.cpus = VM_CORES vb.customize ['modifyvm', :id, '--usb', 'on'] vb.customize ['modifyvm', :id, '--usbehci', 'on' ] # USB 2.0 controller vb.customize ["modifyvm", :id, "--usbxhci", 'off' ] # USB 3.0 controller vb.customize ["usbfilter", "add", "0", "--target", :id, '--name', "Broadcom BCM2708 Boot","--vendorid","0a5c","--productid","2763", "--remote", "no"] # vb.customize ["usbfilter", "add", "1", "--target", :id, '--name', "Broadcom BCM2710 Boot","--vendorid","0a5c","--productid","2764", "--remote", "no"] # vb.customize ["usbfilter", "add", "2", "--target", :id, '--name', "Linux with usb RNDIS/Ethernet Gadget","--vendorid","0525","--productid","a4a2", "--remote", "no"] # end config.vm.provision "shell", privileged: true, inline: <<-SHELL sed -i -e 's/ console=ttyS0//g' /etc/default/grub.d/50-cloudimg-settings.cfg update-grub apt-get update apt install -y linux-modules-$(uname -r) linux-modules-extra-$(uname -r) apt install -y build-essential libusb-1.0-0-dev git unzip nfs-kernel-server SHELL end
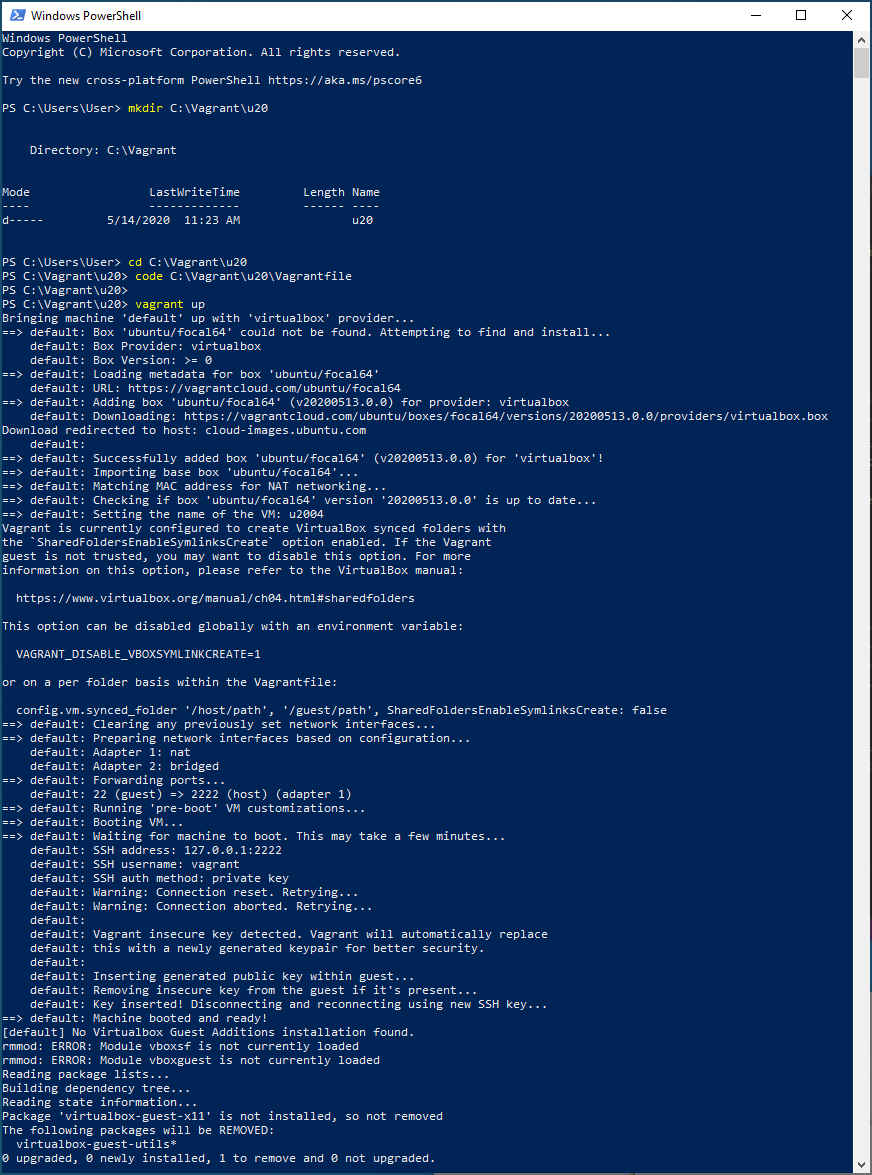
vagrant upで、仮想機起動しばらく待つ。20~30分くらい?
ubuntu/focal64イメージのダウンロード- こいつの起動がすごく時間かかる。grubのパラメータを変更する(
console=ttyS0を取り除く)とよいらしいので、vagrantのprovisionで行ってる。- ツールほかのダウンロードなど
- USB Ethernetのドライバのため、
linux-modules-extra-をインストールする
vagrant haltで、一度、シャットダウン.Vagrantfileの
vb.customize ["usbfilter", "add" ...のaddをmodifyに変更する.(3つともやる。下の画像は2つだけだが..3つ目を変更しようとしているとこ...)
vagrant upで起動、vagrant sshで、ログインRPiZeroを起動させるための準備
- 仮想機にログイン
usbboot/rpiboot のビルド
コピペcd ${HOME} && \ git clone --depth=1 https://github.com/raspberrypi/usbboot && \ cd usbboot && \ make && \ cd ${HOME}Raspbian liteのダウンロードと解凍
コピペcd ${HOME} && \ wget http://downloads.raspberrypi.org/raspbian_lite/images/raspbian_lite-2020-02-14/2020-02-13-raspbian-buster-lite.zip && \ unzip 2020-02-13-raspbian-buster-lite.zipRaspbian lite イメージのマウント.
こぴぺsudo losetup -P /dev/loop5 ${HOME}/2020-02-13-raspbian-buster-lite.img sudo mkdir -p /pi/{boot,root} sudo mount /dev/loop5p1 /pi/boot sudo mount /dev/loop5p2 /pi/root起動させるためのパッチ
コピペ# Edit /pi/boot/config.txt grep -e '^dtoverlay=dwc2$' /pi/boot/config.txt || echo -e "# enable OTG\ndtoverlay=dwc2\n# set initramfs\ninitramfs initrd.img followkernel" | sudo tee -a /pi/boot/config.txt #cmdline.txt #console=serial0,115200 console=tty1 root=PARTUUID=738a4d67-02 rootfstype=ext4 elevator=deadline fsck.repair=yes rootwait quiet init=/usr/lib/raspi-config/init_resize.sh echo 'otg.lpm_enable=0 console=serial0,115200 console=tty1 root=/dev/nfs nfsroot=10.42.0.1:/pi/root rw ip=10.42.0.14:10.42.0.1::255.255.255.0:pi:usb0:static elevator=deadline modules-load=dwc2,g_ether fsck.repair=yes rootwait g_ether.host_addr=5e:a1:4f:5d:cf:d2' | sudo tee /pi/boot/cmdline.txt cat <<'EOF' | sudo tee /pi/root/etc/fstab proc /proc proc defaults 0 0 10.42.0.1:/pi/root / nfs defaults 0 1 #PARTUUID=738a4d67-01 /boot vfat defaults 0 2 #PARTUUID=738a4d67-02 / EOF # /pi/root/etc/dhcpcd.conf grep -e '^interface usb0 #mt08$' /pi/root/etc/dhcpcd.conf || echo -e 'interface usb0 #mt08\nstatic ip_address=10.42.0.14/24\nstatic routers=10.42.0.1\nstatic domain_name_servers=8.8.8.8' | sudo tee -a /pi/root/etc/dhcpcd.conf # sshを自動起動させる cd /pi/root/etc/systemd/system/multi-user.target.wants sudo ln -s /lib/systemd/system/ssh.service ssh.service cd ${HOME} # initrdを持ってくる。 cd ${HOME} && \ wget "https://github.com/mt08xx/files/raw/master/2020-0512-1_RPIZero_initrd.img-4.19.97%2B" && \ sudo cp 2020-0512-1_RPIZero_initrd.img-4.19.97+ //pi/boot/initrd.imgUbuntu側設定
コピペ# NFSの設定 grep 10.42.0 /etc/exports || echo "/pi/root 10.42.0.14(rw,sync,no_subtree_check,no_root_squash)" | sudo tee -a /etc/exports sudo systemctl restart nfs-server.service sudo exportfs -rav # USB接続のEthernetに固定IP割り当てる。 # デバイス名が、usb0だったり、enx5ea14f5dcfd2だったりする.. cat << 'EOF' | sudo tee /etc/netplan/50-cloud-init.yaml # This file is generated from information provided by the datasource. Changes # to it will not persist across an instance reboot. To disable cloud-init's # network configuration capabilities, write a file # /etc/cloud/cloud.cfg.d/99-disable-network-config.cfg with the following: # network: {config: disabled} network: ethernets: enp0s3: dhcp4: true match: macaddress: 02:c2:ed:de:cc:93 set-name: enp0s3 usb0: dhcp4: no dhcp6: no addresses: [10.42.0.1/24] enx5ea14f5dcfd2: dhcp4: no dhcp6: no addresses: [10.42.0.1/24] version: 2 EOF #適応 sudo netplan generate sudo netplan apply # IP Forwading有効 sudo sed -i 's/#net.ipv4.ip_forward=1/net.ipv4.ip_forward=1/' /etc/sysctl.conf
exitで抜けて、vagrant haltで仮想機、いったん、シャットダウンRPiZeroを起動
- RPiZeroは接続しない
- PowerShellを普通に起動 (Win+x, i)
以下実行
# 作業フォルダに移動
cd C:\Vagrant\u20
# 仮想機起動
vagrant up
# 仮想機にログイン
vagrant ssh
以下実行
# IP forwarding の設定(保存しない)
sudo iptables -t nat -A POSTROUTING -o enp0s3 -j MASQUERADE
#
# Raspbian lite イメージのマウント
sudo losetup -P /dev/loop5 ${HOME}/2020-02-13-raspbian-buster-lite.img
sudo mkdir -p /pi/{boot,root}
sudo mount /dev/loop5p1 /pi/boot
sudo mount /dev/loop5p2 /pi/root
#
# rpiboot実行
cd ${HOME}
sudo usbboot/rpiboot -d /pi/boot/
RPiZeroのUSBポート(電源PWRの方ではない)と、PCを接続。
RPiZeroをテレビに接続して様子を見た方がよいかも。祈る
実行例
10.42.0.1:/pi/root on / type nfs ...となってます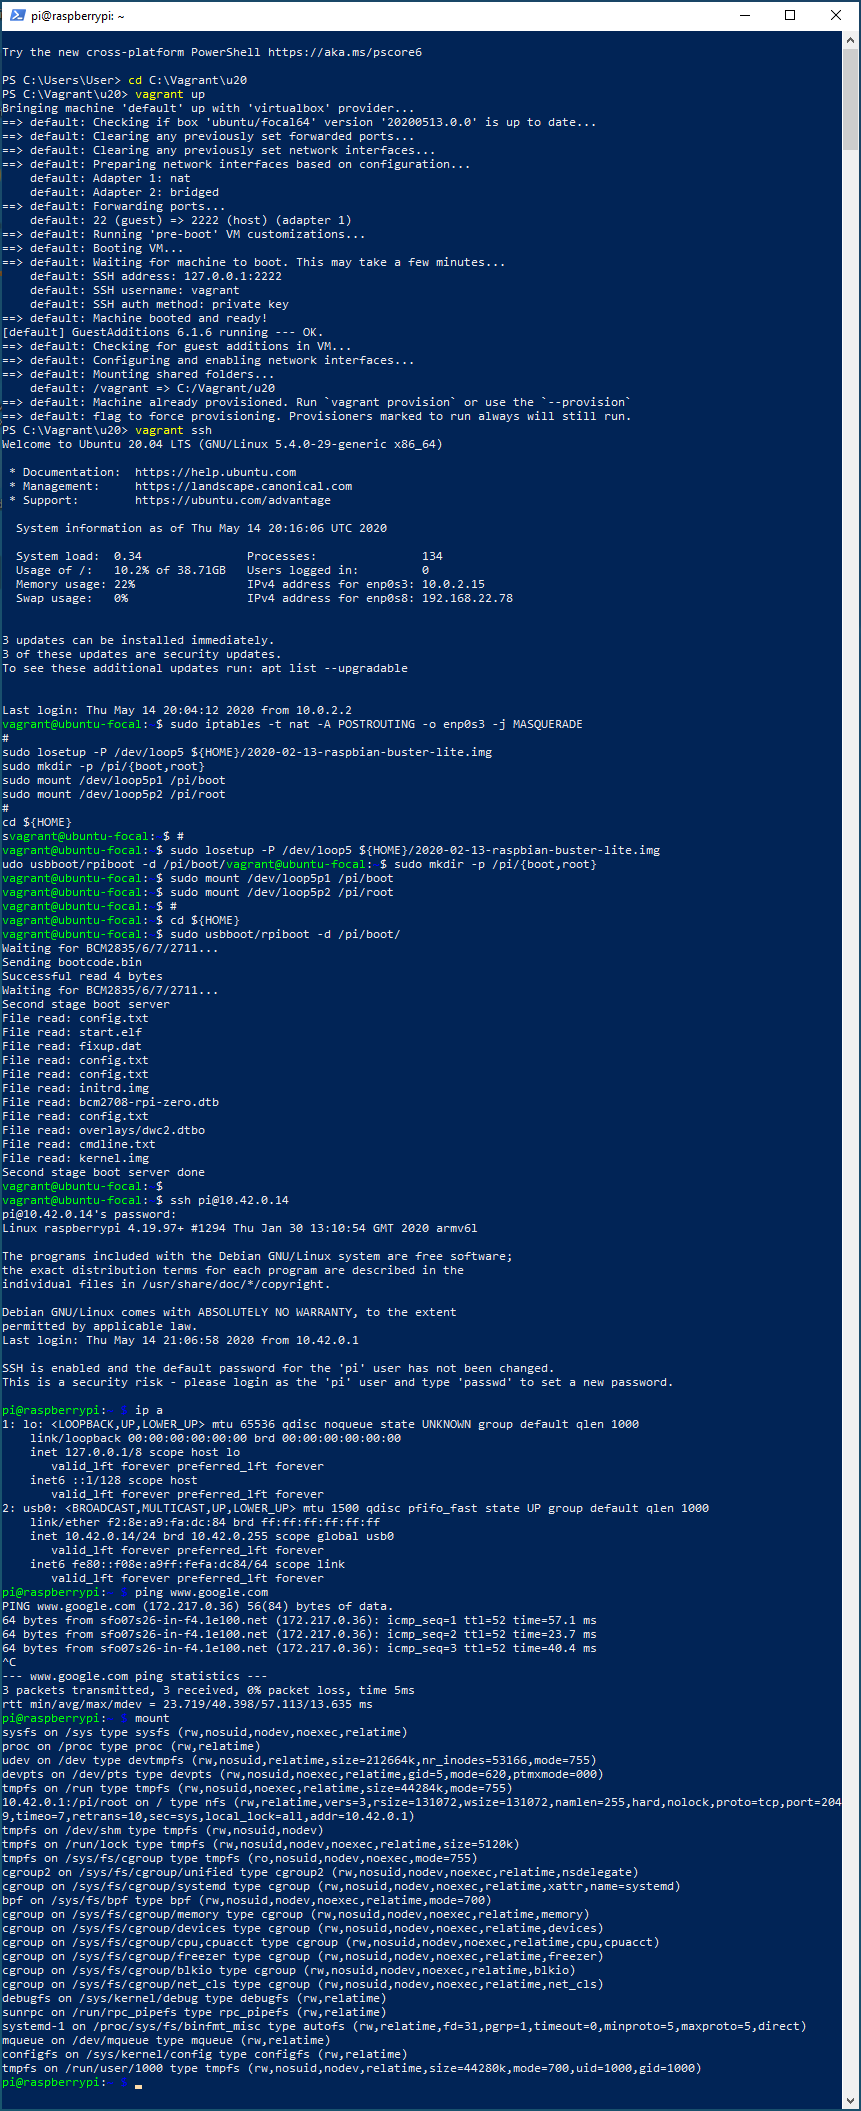
その他
- RPi4B に ubuntu 20.04 64bitをいれて、同様にして動きました(というか、RPi4Bで確認したほうが先..)
- swapはつかえない
- raspbianのimgファイルをマウントして使っているが、実使用時は、ファイルをコピーするんだと思う。
- デバイス名が、usb0だったり、enx5ea14f5dcfd2だったりするんだが..
- 複数のPiZeroが接続されたら? とか、その時のうまい設定とか、できたら、教えてください。
- SDを使う、前の記事、[メモ] Raspberry Pi ZeroをUSBケーブル一本でインターネット接続!(キーボード・マウス・モニター必要なし)、は
. もうそんな経つのか
initrd.imgの作り方
- RaspbianをSDにやいて、起動。
- RPi Zeroで起動
以下実行
## Make initramfs on "RPi-Zero"
sudo apt install -y initramfs-tools

grep -e '^g_ether$' /etc/initramfs-tools/modules || echo -e 'g_ether\nlibcomposite\nu_ether\nudc-core\nusb_f_rndis\nusb_f_ecm' | sudo tee -a /etc/initramfs-tools/modules

sudo update-initramfs -c -k `uname -r`
/boot/initrd.img-4.19.97+というファイルができるので、それをVMの/pi/boot/initrd.imgへコピー。

- 投稿日:2020-05-15T04:54:56+09:00
#Linux shellコマンド概要図鑑
基礎を知ろう
「教えられるまま、ターミナルやコマンドを使っていたけどそもそも、何ができるの?
基礎を知れば、作業がもっとできることが広がるのでは…?」という事で、ターミナルとは?
どんなコマンドがあって何が出来るの?
拙いながらに、調べてみました。?ボリュームがあるので、概要を簡単に
ということで、いざ本題へ!?
対象者:初心者・コマンド怖い・どんなコマンドあるのか概要を知りたい人
環境:Windows10・Linux・Visual Studio Code
もくじ
本題
ターミナル
https://www.sejuku.net/blog/4202
特別な文字(コマンド)にてパソコンの設定や操作を行う場所
- ターミナルショートカットキー
http://doi-t.hatenablog.com/entry/2015/03/28/011926
例:Ctrl + c コマンドの強制終了ディレクトリ
- pass
ファイルやフォルダ(ディレクトリ)が存在する場所
例:C:\Users\OWNER
- カレントディレクトリ
自分が今いるディレクトリ(フォルダ)
例:git-repositoryファイルにいるとき ?C:\Users\OWNER\git-repository- pwd
https://eng-entrance.com/linux-command-pwd
今、どの階層にいるのか(カレントディレクトリ)を表示する
例:/home/vagrant/bootcampssh
別のコンピューターを遠隔で操作する際、送信するファイルなどのデータが他者に読まれぬよう、暗号化する仕組み
- sshの作成から設定まで
https://blog.masahiko.info/entry/2019/06/15/202003
$ssh-keygeにてssh keyを発行し、仮想環境(別のコンピューターで遠隔操作)への接続を行う
? リンクはwindowsのsshの設定ですたぶん、よく使うコマンド
cd
https://eng-entrance.com/linux-command-cd
作業するディレクトリを移動するときのコマンド
例:cd 移動したいディレクトリ・ファイル名
? cdでerror発生した!違う階層にいる可能性が高い…。
cd test? 自分がいる階層にtest.txtファイルあるか?- lsで今の階層には何があるのか確認する
- 目的のファイルがある階層まで移動する
または、
cdコマンドで一気にディレクトリを移動しながらファイルへ飛ぶ
cd ディレクトリ1/ディレクトリ2/testls
https://www.atmarkit.co.jp/ait/articles/1606/27/news018.html
ファイルの一覧や詳細情報を表示する
例:lsls -la
頭にドットがついたファイル(隠しファイル)を含めたすべてのファイルの一覧と、権限やタイムスタンプなど詳細情報を表示す
例:ls -laコマンド実行例例:drwxrwxr-x 4 vagrant vagrant 4096 5月 4 18:57 . drwxr-xr-x 11 vagrant vagrant 4096 5月 3 16:17 .. drwxrwxr-x 8 vagrant vagrant 4096 5月 4 18:56 .git -rw-rw-r-- 1 vagrant vagrant 26 5月 4 18:56 README.md -rw-rw-r-- 1 vagrant vagrant 866 5月 4 18:58 sheet_shell.md drwxrwxr-x 2 vagrant vagrant 4096 5月 4 18:57 shell
mkdir
https://eng-entrance.com/linux-command-mkdir
mkdir:make directory
ディレクトリ(フォルダ)の新規作成を行う
例:mkdir ディレクトリ名touch
https://eng-entrance.com/linux-command-touch
ファイルの新規作成を行う
例:touch ファイル名.拡張子(txt・log・rb...)rm
https://eng-entrance.com/linux_command_rm
rm:remove
ファイルやディレクトリ(フォルダ)を削除する
例:rm ディレクトリ1/ディレクトリ2/ディレクトリ・ファイル名
?同じディレクトリにファイルがあるとき:rm text.txtmv
https://eng-entrance.com/linux_command_mv
mv:move
ファイルやディレクトリ(フォルダ)の場所移動や名前の変更を行う
例:mv test.txt folder/test.txt
? test.txt が folderディレクトリ の test.txt へパイプ
https://qiita.com/b4b4r07/items/77c589f21a99db8bb682
配管みたいにコマンドを接続していくもの
例:コマンド1 | コマンド2
? コマンド1の結果をコマンド2が受け取り2つのコマンドを実行する
このコマンド、どこで使う?
ここからは、よく聞くけど、使い方がいまいちわからないコマンドを軽く紹介。
- ps
https://eng-entrance.com/linux-command-ps
linux上で今動いているプロセスを一覧表示する
プロセス:実行中のプログラム
https://eng-entrance.com/linux-process
例:ps---どう使う?---
ps aux
自分以外の実行中プロセスを含めた全てのプロセス一覧を確認
実行の妨げになるプロセスを見つける---使用オプション---
  a:ほかのユーザーの端末操作プロセスの表示
  u:ユーザー名・開始時刻・UPU・メモリの使用率などを表示
  x:いま実行しているプロセスを表示
- top
https://www.atmarkit.co.jp/ait/articles/1706/30/news018.html
現在実行中のプロセスをCPUの利用率が高い順番で表示
表示内容はリアルタイム更新
例:top オプション---どう使う?---
top -u ユーザー名
指定したユーザーのプロセス状況を確認する
top -p プロセスID
指定したプロセスの状況を確認する
top -d 更新間隔の秒数
指定した秒数の感覚でtopの内容を更新する---使用オプション---
  -u:表示するユーザーを名またはIDにて指定
  -p:表示するプロセスをIDにて指定
  -d:表示更新の感覚を秒数指定
- grep
https://26gram.com/linux-grep-command
指定した文字列が含まれる行の検索
例:grep 検索パターン ファイル名---どう使う?---
grep "指定ワード" file_A.txt file_B.txt file_C.txt
複数のファイルの中から指定ワードを検索する
grep "指定ワード" directoryA/fileA.txt
他のディレクトリのファイルから指定ワードを検索
コマンド | grep 指定ワード
最初のコマンドの結果から指定検索パターンで検索
例:ls -l | grep 指定ワード
? 今のディレクトリにあるファイルを一覧表示、
表示したファイルから指定したワードが含まれるファイル名を表示
---使用オプション----l:検索結果にファイル名のみ表示
- tail
https://26gram.com/linux-tail-command
ファイルの末尾内容を表示(デフォルトは10行分)
例:tail ファイル名---どう使う?---
tail directoryA/file_A.txt
他のディレクトリのファイルから末尾内容を表示
tail file_A.txt file_B.txt file_C.txt
複数のファイルの末尾内容をまとめて表示
tail *.txt
ファイル名に.txtが含まれるファイルの末尾内容をまとめて表示
tails -f fileA.txt
ログファイルのように、末尾に情報が追記されるファイルの内容をリアルタイムで監視
tail -n 5 fileA.txt
ファイルの末尾内容5行のみ表示
省略:fail -5 fileA.txt
?リアルタイム更新を終了:Ctrl+C---使用オプション---
-f:ファイルの内容を監視し、表示結果をリアルタイムで更新
-n:出力する行数を指定
- find
https://26gram.com/linux-find-command
ファイルやディレクトリ(フォルダ)を検索
例:find 検索対象 検索条件---どう使う?---
*(ワイルドカード)を使用したファイル名の指定をすると、キーワードの場所を指定(前とか後とか)
例:find . -name "shell*"
先頭にshellを含むファイルをカレントディレクトリから検索
find ディレクトリ名 -name 検索ワード
指定したディレクトリ内でファイルを検索
指定したワードの大文字・小文字を区別して検索
区別しない場合:-iname
find ディレクトリ名 -name 検索ワード -type d
指定したディレクトリ内でディレクトリを検索
find file_A.txt file_B.txt file_C.txt (-type f)
複数のファイルを検索する
find ./ -name "*.sh" -exec chmod 755 {} \;
.shがつくファイル全ての権限を755に変更
find ディレクトリ名 -empty
指定したディレクトリ内で、空のファイル・ディレクトリを表示
find ディレクトリ名 -ls
指定したディレクトリ内のファイル情報を表示---使用オプション---
-empty:サイズ0ファイル、空のディレクトリを検索
-exec:検索結果のファイルに指定したコマンドを実行
-ls:検索結果のファイルの情報を表示
-name:ファイルやディレクトリ名を指定し大文字・小文字を区別して検索
  -iname:ファイルやディレクトリ名を指定し大文字・小文字を区別せず検索
-type:指定したファイル種類に一致するファイルやディレクトリを検索
  -type f:ファイル
  -type d:ディレクトリ
- chmod
https://eng-entrance.com/linux-command-chmod
ファイルやフォルダのアクセス権権限(パーミッション)を設定
パーミッションは実行・書き込み変更・読み込みの設定が出来る
例:chmod パーミッション番号 ファイル名7 rwx 読み書き実行可 6 rw- 読み書き可 5 r-x 読み 実行可 4 r-- 読み可 3 -wx 書き実行可 2 -w- 書き可 1 --x 実行可 0 --- なし---どう使う?---
chmod -v 755(仮) file_A.txt | ls -la
指定したファイルのアクセス権限を変更し、確認する
chmod ユーザー 追加解除 アクセス権限 file_A.txtユーザー: 所有者 u グループ g その他ユーザー o すべてのユーザー a 追加解除: 追加 + 解除 - アクセス権限: 実行許可 x 書き込み許可 w 読み取り許可 r---使用オプション---
-v:コマンド実行の結果を表示
- chown
https://eng-entrance.com/linux-command-chown
ファイルやディレクトリの所有者を変更
例:chown 所有者 ファイル名(ディレクトリ名)---どう使う?---
chown -R 所有者名 ./
カレントディレクトリ下、すべてのファイルやディレクトリの所有者を変更---使用オプション---
-R:ディレクトリ内の所有者を変更
- &&
https://eng-entrance.com/linux-basic-and
複数のコマンドを実行(AND制御演算子)
?;と&&の違い:&&はコマンド1が成功したらコマンド2を実行する
例:toush test.txt && ls -la test.txt---どう使う?---
複数のコマンド実行したいとき
コマンド1が成功した後にコマンド2を実行させたいとき番外編:シェルスクリプト~作成から実行~
- シェルスクリプトファイルを実行する際の事前準備
?作成した.shファイルには、
ファイル内のスクリプトを実行するための権限がないため、権限を与える必要がある$ touch test.sh <!-- ファイルの作成 --> $ chmod 755 test.sh <!-- ファイルの権限変更 --> $ ./test.sh <!-- ファイルの実行 -->
省略系:作成と権限変更をまとめて実行:touch test.sh && chmod 755 test.shそのほか参考資料