- 投稿日:2020-04-06T21:08:02+09:00
GitLab で Unity の iOS アプリを自動ビルドするようにしてみた
GitLab で Unity の iOS アプリを自動ビルドするようにしてみた
GitLab で Unity の iOSアプリを自動ビルドするようにしてみました。
ipaファイルを配布するようにしたかったのですが、無料の範囲ではできないようです。
自動ビルドして作成した ipaファイルは Mac の Xcode を使って iPhone へインストールします。環境
- macOS Catalina 10.15.4
- GitLab CE 12.8.6(Windows10上の仮想サーバーで動かしています)
- GitLab Runner 12.9.0(Mac上で動かしています)
- Unity 2018.4.20f1
フォルダ構成
ファイル/フォルダ 内容 TestProject_Unity/ Unityプロジェクトフォルダ TestProject_Unity/.gitignore Git無視リストファイル TestAutoTest/TestProject_Unity/Assets/Editor/AppBuild.cs ビルド実行メソッドC#ファイル .gitlab-ci.yml GitLab CI 設定ファイル build.sh Unityプロジェクトのビルド用シェルスクリプトファイル build_xcode.sh Xcodeプロジェクトのビルド用シェルスクリプトファイル ExportOptions.plist xcodebuildのarchiveエクスポート用plistファイル README.md 説明ファイル 注意点
Unity で Identification の設定をする
Unity の Build Settings -> Player Settings で PlayerSettings を開きます。
iOS の Identification にある項目を設定します。
設定する内容は、Provisioning Profiles などで確認します。
- Bundle Identifier
- Signing Team ID
- Automatically Sign
※Automatically Sign にチェックを入れました。Provisioning Profiles の作成方法
Xcode の Preferences -> Accounts で Manage Certificatesボタンを押します。
右下の +ボタンから iOS Development で Provisioning Profile を作成します。Provisioning Profiles の確認方法
下記のフォルダに配置されている .mobileprovisionファイルを選択してスペースキーを押すと内容が表示されます。
~/Library/MobileDevice/Provisioning Profilesipaファイルの配布方法
- iOS Development の場合(無料の範囲内 ←今回はこっち)
Xcode で ipaファイルをインストール可能です。
Xcode の Window -> Devices and Simulators でウィンドウを開いてドラッグアンドドロップでインストールできます。
- iOS Distribution の場合(課金が必要のようだ)
iTunes で ipaファイルをインストール可能です。
iPhone のインストール時の信頼
iPhone の 一般 -> プロファイルとデバイス管理 -> デベロッパAPP で信頼します。
ExportOptions.plist について
xcodebuildコマンドの -exportOptionsPlistオプションで指定する plistファイルについては、下記のコマンドで確認できます。
xcodebuild -h今回 plistファイル内で使用した key については下記のとおりです。(Google翻訳つき)
compileBitcode : Bool
For non-App Store exports, should Xcode re-compile the app from bitcode? Defaults to YES.
App Store以外のエクスポートの場合、Xcodeはビットコードからアプリを再コンパイルする必要がありますか?デフォルトはYESです。method : String
Describes how Xcode should export the archive. Available options: app-store, validation, package, ad-hoc, enterprise, development, developer-id, and mac-application. The list of options varies based on the type of archive. Defaults to development.
Xcodeがアーカイブをエクスポートする方法について説明します。利用可能なオプション:app-store、検証、パッケージ、アドホック、エンタープライズ、開発、developer-id、mac-application。オプションのリストは、アーカイブのタイプによって異なります。デフォルトは開発です。provisioningProfiles : Dictionary
For manual signing only. Specify the provisioning profile to use for each executable in your app. Keys in this dictionary are the bundle identifiers of executables; values are the provisioning profile name or UUID to use.
手動署名のみ。アプリの各実行可能ファイルに使用するプロビジョニングプロファイルを指定します。この辞書のキーは、実行可能ファイルのバンドル識別子です。値は、使用するプロビジョニングプロファイル名またはUUIDです。signingCertificate : String
For manual signing only. Provide a certificate name, SHA-1 hash, or automatic selector to use for signing. Automatic selectors allow Xcode to pick the newest installed certificate of a particular type. The available automatic selectors are "Mac App Distribution", "iOS Distribution", "iOS Developer", "Developer ID Application", and "Mac Developer". Defaults to an automatic certificate selector matching the current distribution method.
手動署名のみ。署名に使用する証明書名、SHA-1ハッシュ、または自動セレクターを指定します。自動セレクターにより、Xcodeは特定のタイプの最新のインストール済み証明書を選択できます。利用可能な自動セレクターは、「Mac App Distribution」、「iOS Distribution」、「iOS Developer」、「Developer ID Application」、および「Mac Developer」です。デフォルトは、現在の配布方法に一致する自動証明書セレクターです。signingStyle : String
The signing style to use when re-signing the app for distribution. Options are manual or automatic. Apps that were automatically signed when archived can be signed manually or automatically during distribution, and default to automatic. Apps that were manually signed when archived must be manually signed during distribtion, so the value of signingStyle is ignored.
配布用にアプリに再署名するときに使用する署名スタイル。オプションは手動または自動です。アーカイブ時に自動的に署名されたアプリは、手動または配布時に自動的に署名でき、デフォルトでは自動です。アーカイブ時に手動で署名されたアプリは、配布時に手動で署名する必要があるため、signingStyleの値は無視されます。stripSwiftSymbols : Bool
Should symbols be stripped from Swift libraries in your IPA? Defaults to YES.
IPAのSwiftライブラリからシンボルを削除する必要がありますか?デフォルトはYESです。teamID : String
The Developer Portal team to use for this export. Defaults to the team used to build the archive.
このエクスポートに使用する開発者ポータルチーム。デフォルトでは、アーカイブの作成に使用されたチームになります。thinning : String
For non-App Store exports, should Xcode thin the package for one or more device variants? Available options: (Xcode produces a non-thinned universal app), (Xcode produces a universal app and all available thinned variants), or a model identifier for a specific device (e.g. "iPhone7,1"). Defaults to .
App Store以外のエクスポートの場合、Xcodeは1つ以上のデバイスバリアントのパッケージを薄くする必要がありますか?利用可能なオプション:(Xcodeは非薄型のユニバーサルアプリを生成します)、(Xcodeはユニバーサルアプリと利用可能なすべての薄型のバリアントを生成します)、または特定のデバイスのモデル識別子(例:「iPhone7,1」)。デフォルトはです。ファイルの内容
TestProject_Unity/.gitignore
/[Ll]ibrary/
/[Tt]emp/
/[Oo]bj/
/[Bb]uild/
/[Bb]uilds/
/Assets/AssetStoreTools*

# Autogenerated VS/MD solution and project files
ExportedObj/
*.csproj
*.unityproj
*.sln
*.suo
*.tmp
*.user
*.userprefs
*.pidb
*.booproj
*.svd

# Unity3D generated meta files
*.pidb.meta

# Unity3D Generated File On Crash Reports
sysinfo.txt

# Builds
*.apk
*.unitypackage

# Visual Studio
.vs
Release/
Debug/
.gitlab-ci.yml
stages:
  - build

job_build02:
  stage: build
  script:
    - echo "Start build"
    - chmod a+x ./build.sh
    - chmod a+x ./build_xcode.sh
    - ./build.sh iOS 2.3.4.5
    - ./build_xcode.sh iOS 2.3.4.5
    - echo "Finish build"
  tags:
    - mac
  artifacts:
    paths:
      - build_*.log
      - TestProject_Unity/Build/
    expire_in: 1 week
TestAutoTest/TestProject_Unity/Assets/Editor/AppBuild.cs
using UnityEditor;
using UnityEngine;
using UnityEditor.Build.Reporting;
using System;
using System.Collections.Generic;

public class AppBuild : MonoBehaviour
{
    static string[] GetSceneList()
    {
        List<string> sceneList = new List<string>();
        EditorBuildSettingsScene[] scenes = EditorBuildSettings.scenes;
        foreach (EditorBuildSettingsScene scene in scenes)
        {
            if (scene.enabled)
            {
                sceneList.Add(scene.path);
            }
        }
        return sceneList.ToArray();
    }

    static string GetArgument(string name)
    {
        string[] arguments = Environment.GetCommandLineArgs();
        for (int i = 0; i < arguments.Length; i++)
        {
            if (arguments[i].Contains(name))
            {
                return arguments[i + 1];
            }
        }
        return null;
    }

    public static void Build()
    {
        string locationPathName = "";
        BuildTarget target = BuildTarget.NoTarget;
        string bundleVersion = GetArgument("/version");;
        string platformName = GetArgument("/platform");
        switch (platformName.ToLower())
        {
            case "android":
                {
                    locationPathName = "Build/" + platformName + "_" + bundleVersion + ".apk";
                }
                break;
            case "ios":
                {
                    locationPathName = platformName + "Project_" + bundleVersion;
                }
                break;
            default:
                {
                    locationPathName = "Build/" + platformName + "_" + bundleVersion;
                }
                break;
        }
        target = (BuildTarget)Enum.Parse(typeof(BuildTarget), platformName);

        BuildPlayerOptions buildPlayerOptions = new BuildPlayerOptions();
        buildPlayerOptions.scenes = GetSceneList();
        buildPlayerOptions.locationPathName = locationPathName;
        buildPlayerOptions.target = target;
        buildPlayerOptions.options = BuildOptions.Development;

        PlayerSettings.bundleVersion = bundleVersion;

        BuildReport report = BuildPipeline.BuildPlayer(buildPlayerOptions);
        BuildSummary summary = report.summary;

        if (summary.result == BuildResult.Succeeded)
        {
            Debug.Log("Build succeeded: " + summary.totalSize + " bytes");
        }

        if (summary.result == BuildResult.Failed)
        {
            Debug.Log("Build failed");
        }
    }
}
build.sh
#!/bin/bash

SHELL_PATH=`pwd`
PLATFORM=$1
VERSION=$2

UNITY=/Applications/Unity/Hub/Editor/2018.4.20f1/Unity.app/Contents/MacOS/Unity
LOGFILE=build_${PLATFORM}.log
PROJECT_PATH=TestProject_Unity
EXECUTE_METHOD=AppBuild.Build

${UNITY} -batchmode -quit -logFile ${LOGFILE} -projectPath "${SHELL_PATH}/${PROJECT_PATH}" -executeMethod ${EXECUTE_METHOD} /platform ${PLATFORM} /version ${VERSION}
build_xcode.sh
#!/bin/bash

SHELL_PATH=pwd
PLATFORM=$1
VERSION=$2

SCHEME="Unity-iPhone"
UNITY_PROJECT_PATH="TestProject_Unity"
XCODE_PROJECT_PATH="${UNITY_PROJECT_PATH}/${PLATFORM}Project_${VERSION}/${SCHEME}.xcodeproj"
ARCHIVE_PATH="archive/${SCHEME}.xcarchive"
IPA_PATH="TestProject_Unity/Build/ipa"

EXPORT_OPTIONS_PLIST="ExportOptions.plist"
PROVISIONING_PROFILE="(Provisioning ProfileのUUID)"

mkdir -p ${ARCHIVE_PATH}

xcodebuild -project ${XCODE_PROJECT_PATH} -scheme ${SCHEME} archive -archivePath ${ARCHIVE_PATH}
xcodebuild -exportArchive -archivePath ${ARCHIVE_PATH} -exportPath ${IPA_PATH} -exportOptionsPlist ${EXPORT_OPTIONS_PLIST} PROVISIONING_PROFILE=${PROVISIONING_PROFILE}
ExportOptions.plist
<?xml version="1.0" encoding="UTF-8"?> <!DOCTYPE plist PUBLIC "-//Apple//DTD PLIST 1.0//EN" "http://www.apple.com/DTDs/PropertyList-1.0.dtd"> <plist version="1.0"> <dict> <key>compileBitcode</key> <false/> <key>method</key> <string>development</string> <key>provisioningProfiles</key> <dict> <key>(Bundle Identifier)</key> <string>(Provisioning ProfileのUUID)</string> </dict> <key>signingCertificate</key> <string>iOS Developer</string> <key>signingStyle</key> <string>automatic</string> <key>stripSwiftSymbols</key> <true/> <key>teamID</key> <string>(Signing Team ID)</string> <key>thinning</key> <string><none></string> </dict> </plist>まとめ
作成した ipaファイルを自由に配布はできないようです。
無料の範囲内では、Xcode を使ってインストールするしかなさそうです。
今回の自動ビルドで ipaファイルの作成までは自動化できるので時間の節約にはなるかと思います。
- 投稿日:2020-04-06T18:51:59+09:00
【爆速メモ執筆中】とりいそぎアイテムをもたせる設定(cluster)
※執筆段階では、unity経験者向けの記事となっております。
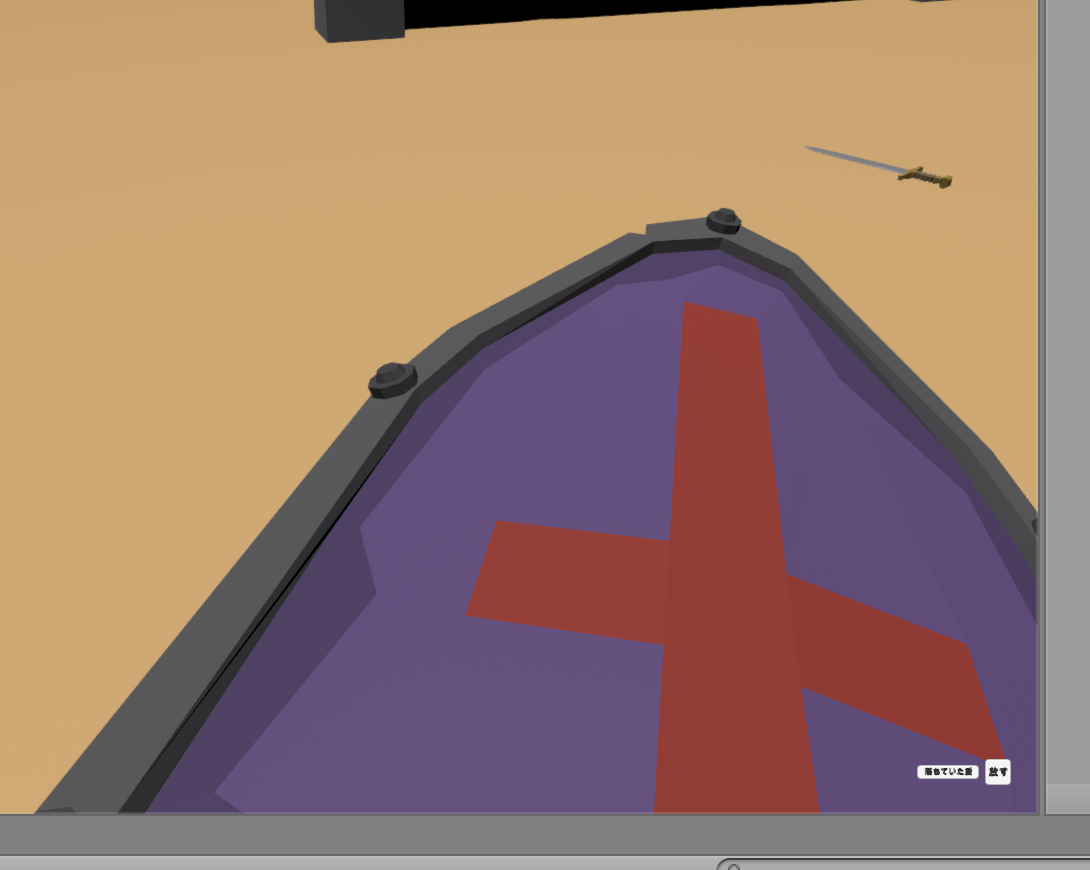
クリエイターキットのアプデで実装された「アイテム」機能で、
落ちている盾を、
このように持つことができます。
(持ち場所などの細かいことは別記事にて書く予定)
【やり方】
当該オブジェクトのインスペクターで、下図のようにコンポーネントを追加してください。
フィジクスマテリアルを追加すればバウンドするし、
Gripの設定をすることで、持つ場所を指定することもできます。
【公式ガイドはこちらから】
掴めるアイテムの作り方
https://creator.cluster.mu/2020/03/30/howto-item-create/


- 投稿日:2020-04-06T18:51:59+09:00
【爆速メモ】とりいそぎアイテムをもたせる設定(cluster)【ワールドアップロードしながら随時更新中】
※執筆段階では、まだまだunity経験者向けの記事となっております。
※できるだけ、unityの知識がなくても、爆速で実装できるようにしたいため加筆修正しています。
4/7(火)12時更新
クリエイターキットのアプデで実装された「アイテム」機能で、
落ちている盾を、
このように持つことができます。
イメージ的には、通常のunityにおいて、rigidbodyの挙動が実装されて、
手軽に「持つ」行為ができるようになった、と思ってください。(しかもマテリアル次第では投げることもできる)
(持ち場所などの細かいことは別記事にて書く予定)
【やり方】
当該オブジェクトのインスペクターで、下図のようにコンポーネントを追加してください。
「超爆速でアイテム化したい」という場合は、
1. [item] で検索して、
2. [Grabbable Item]コンポーネント を追加してください。
必要なコンポーネントが全部ついてきます。
フィジクスマテリアルを追加すればバウンドするし、
Gripの設定をすることで、持つ場所を指定することもできます。
【コンポーネントの設定について】
そのまま持つ、放る
デフォで[Grabbable Item]コンポーネントの追加で完了
そのまま持つ、放ったらけっこう跳ねるやつ
コライダーのマテリアルで、フィジクスマテリアルでいい感じに跳ねるやつを追加する
(爆速で跳ねさせたい場合は、ItemSampleシーンにある、HighBounceを流用しよう!!)
重力無効
use gravity オフ
is kinematic オフ
物理演算無効
use gravity オフ
is kinematic オン
(ジョジョのスタンド、クラフトワークみたいなことができる)
当たり判定がない
コライダーのis triggerをオン
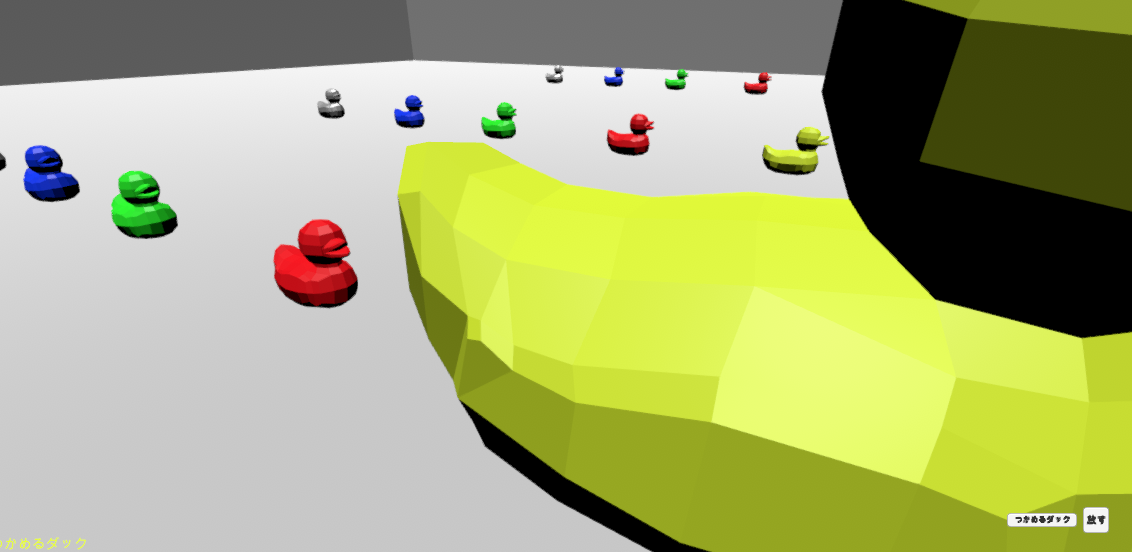
rigidbodyのおさらいも兼ねてアップロードしたワールドはこちら。
【DuckBouncing!!】
『BouncingDuckSimulator』的なワールドを作ってみました。
みんなで投げ合いっこしようぜ!!
https://cluster.mu/w/2af23816-8183-45ea-b397-9f2362c0f29e
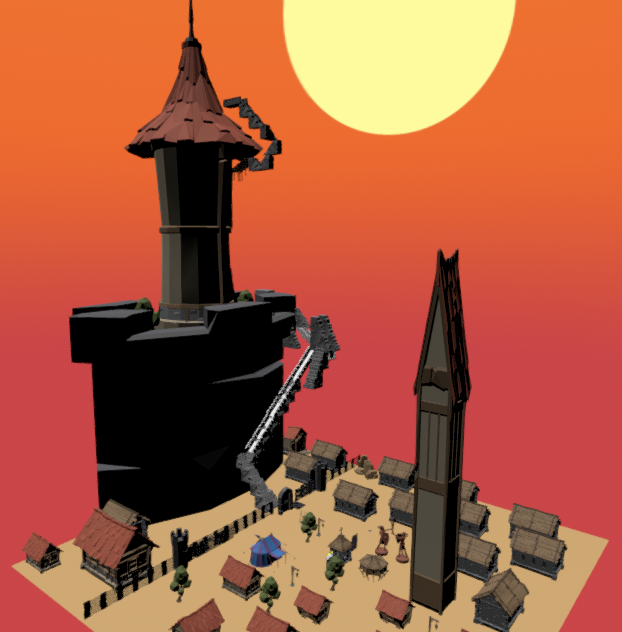
現在作成中の、中世的な世界観かつ、アイテム化したオブジェクトを配置した、上を目指すワールドはコチラ
【中世的な世界観】
https://cluster.mu/w/d2692923-c0ec-46ac-ae76-096259ffe27f
【公式ガイドはこちらから】
掴めるアイテムの作り方
https://creator.cluster.mu/2020/03/30/howto-item-create/
- 投稿日:2020-04-06T09:26:57+09:00
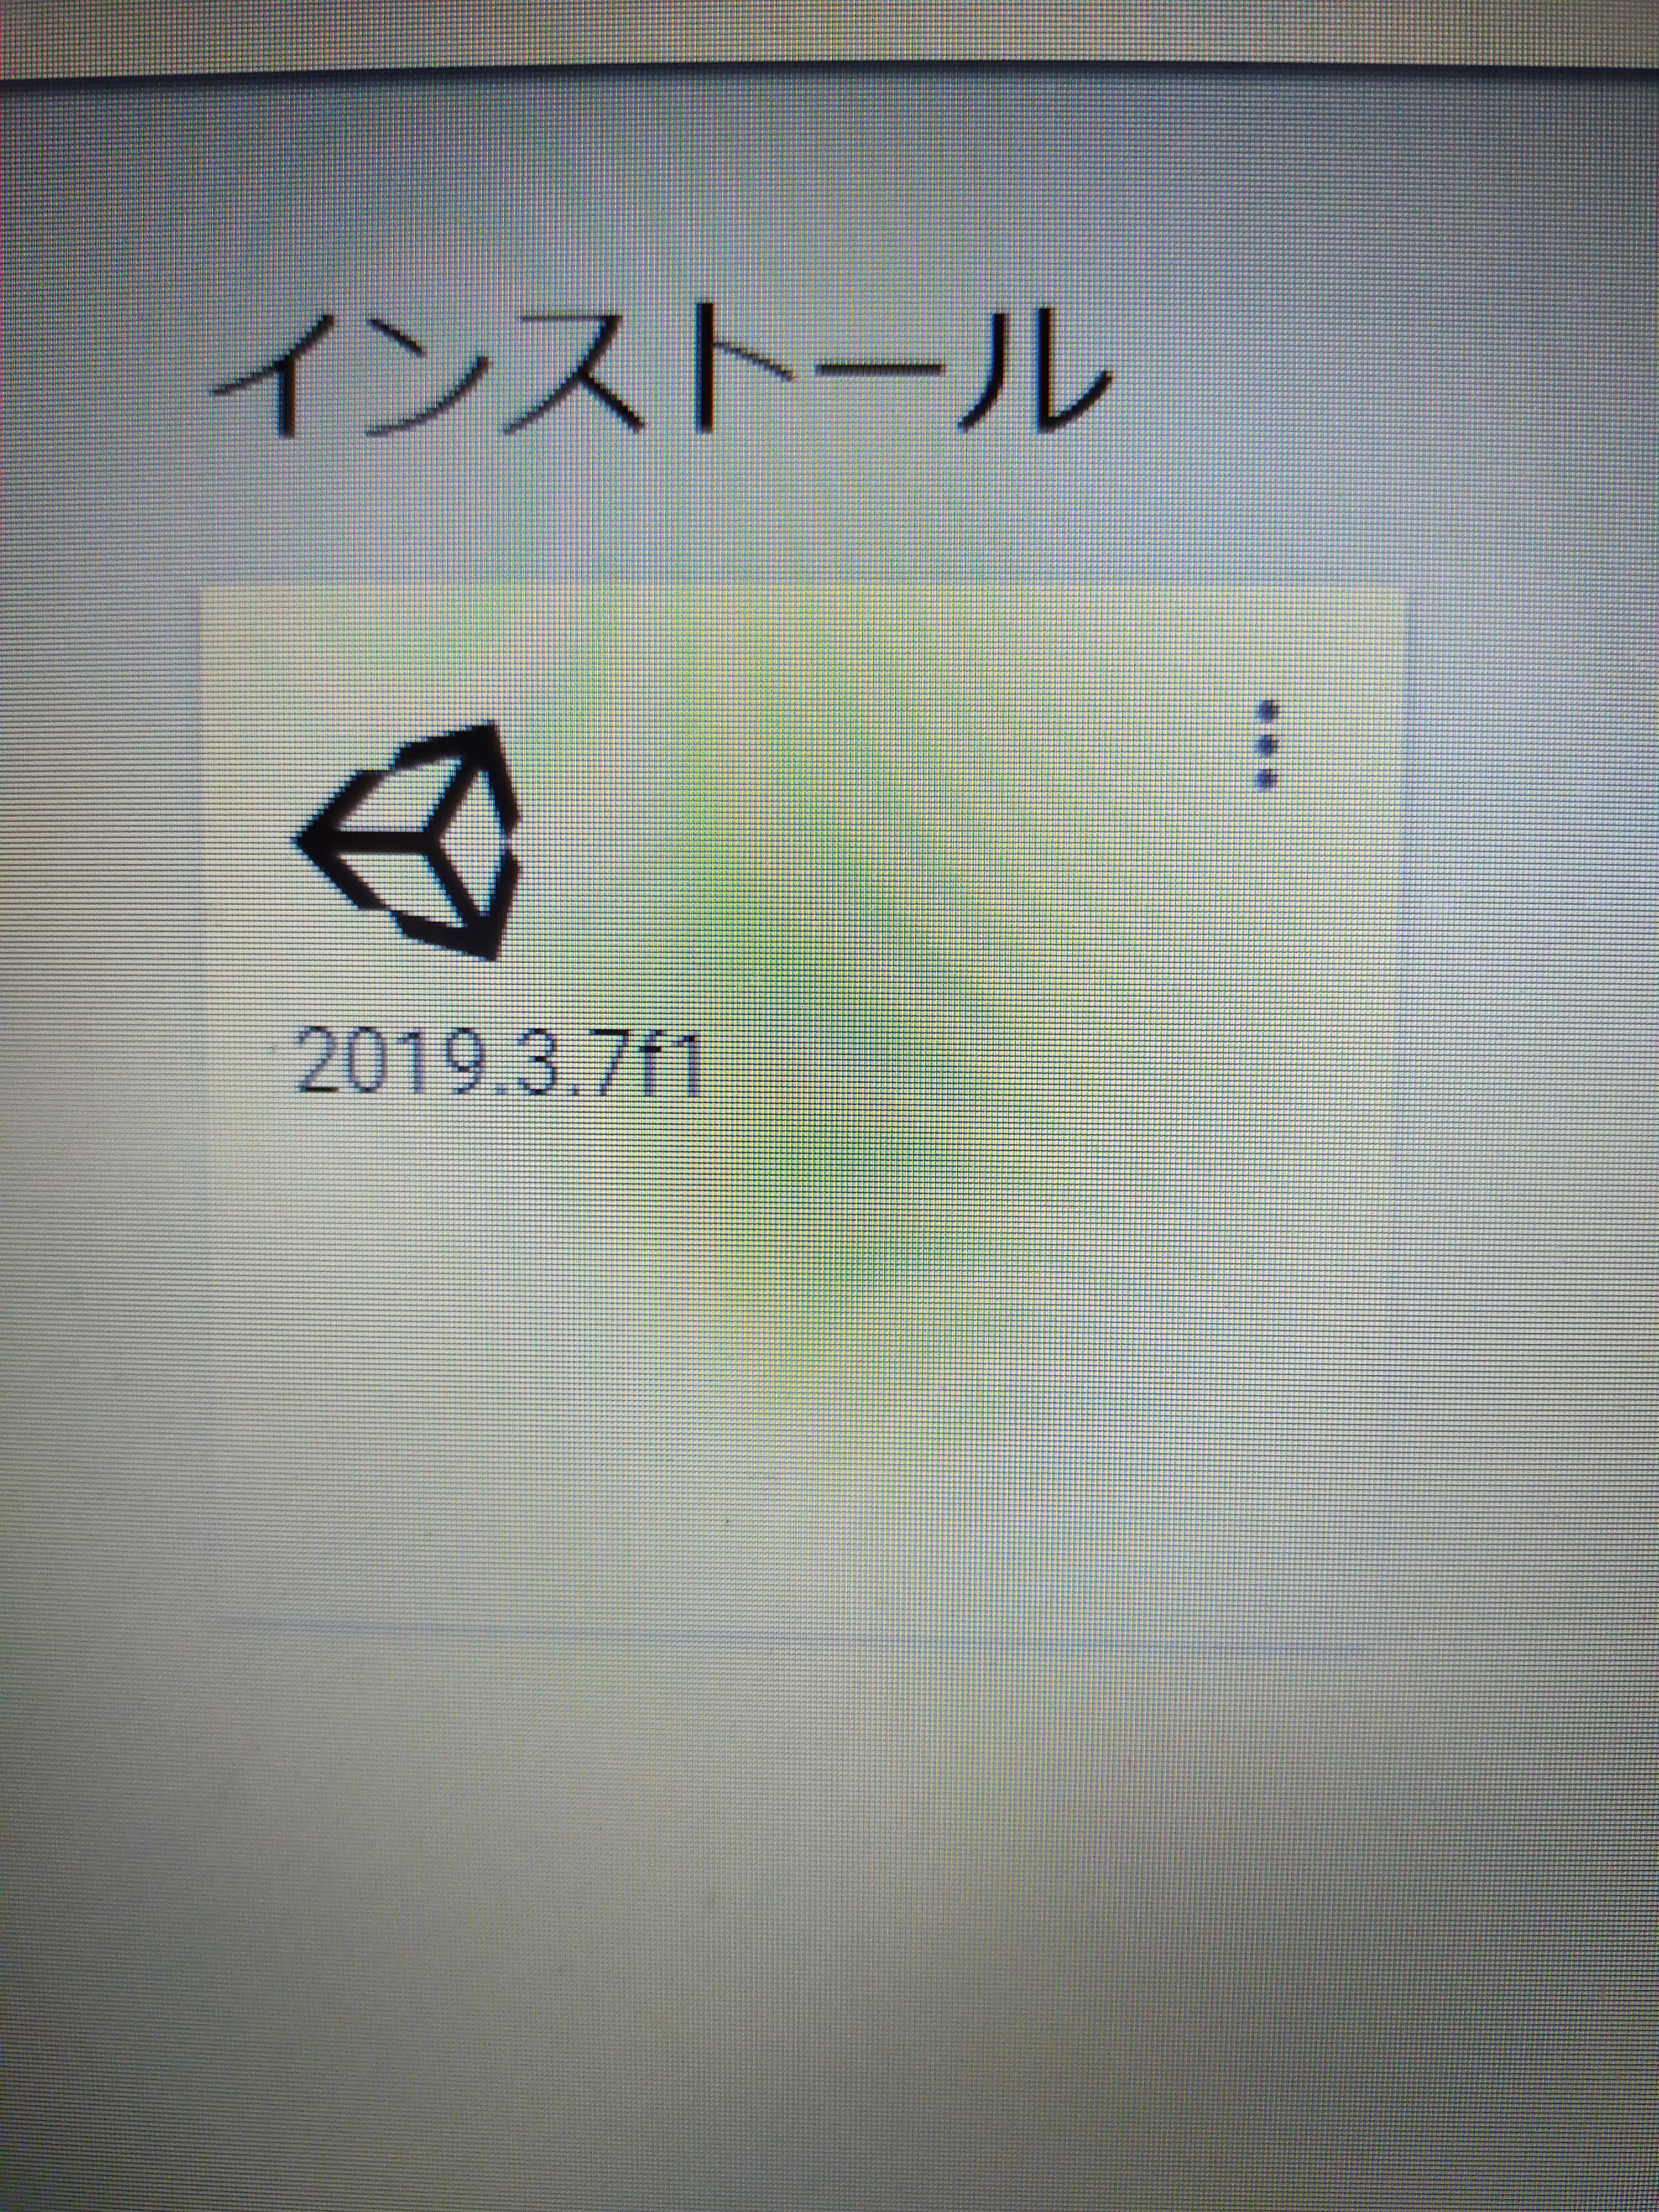
高専生がゲーム開発してみた#2(Unity Hubの話)
ばばーん!Unity2019.3.7f1を入手しました!(今更。)
なぜこのごろになってUnity2019.3.7f1を入手したかと言うと、Unity2018.2.8f1を入手した際、標準アセットをダウンロードし忘れて、使い勝手が悪くなってたので、標準アセットゲットのついでに更新しました。
で、その時ちょっと戸惑った事があったので紹介します。
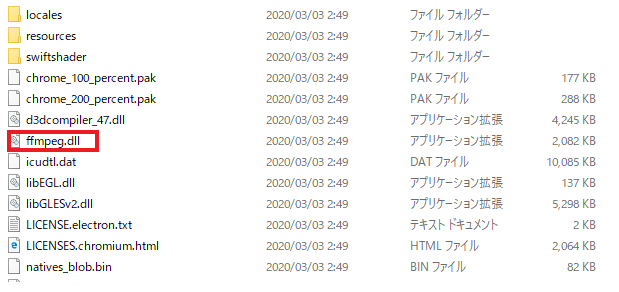
Unity Hubをダウンロードし終えて、さぁ使うぞ!とUnity Hubをタスクバーにピン留めしたところ···「ffmpeg.dllが見つかりません」と表示されて、Unity Hubが使えませんでした。で、いろいろやってみたところ、
このffmpeg.dllと言うのとUnityHubを同じファイルに同居させないとダメっぽいです。
- 投稿日:2020-04-06T00:38:31+09:00
Ubuntu 19.10でUnity Hubをランチャに登録・アイコンを表示
UbuntuでUnity Hubを使う場合、公式HPからAppImageファイルをダウンロードし、実行権限を与えた上で実行します。
これはインストール形式ではないので、Unity Hubは初回実行時にdesktopファイルを配置するための確認ダイアログを出してきます。出てきます。出て……え?
出てきません。Dockのアイコンも透明な状態で表示されてません。
解決策
AppImageファイルには
--appimage-extractというコマンドラインスイッチがあります。
--helpでは表示されません。--appimage-helpでAppImageのオプションを確認できます。
--appimage-mountで中身を確認すると、unityhub.desktopとunityhub.pngが入っていることが確認できます。取り出してファイルパスをいじってdesktop-file-installでランチャーに登録しちゃいましょう。./UnityHub.AppImage --appimage-extract unityhub.*
- 投稿日:2020-04-06T00:38:31+09:00
Ubuntu 19.10でUnity Hubをランチャーに登録・アイコンを表示
UbuntuでUnity Hubを使う場合、公式HPからAppImageファイルをダウンロードし、実行権限を与えた上で実行します。
これはインストール形式ではないので、Unity Hubは初回実行時にdesktopファイルを配置するための確認ダイアログを出してきます。出てきます。出て……え?
出てきません。Dockのアイコンも透明な状態で表示されてません。
解決策
AppImageファイルには
--appimage-extractというコマンドラインスイッチがあります。
--helpでは表示されません。--appimage-helpでAppImageのオプションを確認できます。
--appimage-mountで中身を確認すると、unityhub.desktopとunityhub.pngが入っていることが確認できます。取り出してファイルパスをいじってdesktop-file-installでランチャーに登録しちゃいましょう。./UnityHub.AppImage --appimage-extract unityhub.*