- 投稿日:2020-02-14T22:05:03+09:00
SwiftUIのおすすめ参考サイトまとめ
無料
Hacking with swift
https://www.hackingwithswift.com/quick-start/swiftui
Medium(一部有料)
https://medium.com/tag/swiftui
Liquidcoder
Kavsoft
https://kavsoft.tech/index.html
https://www.reddit.com/r/SwiftUI/
有料
DesignCode
https://designcode.io/swiftui?promo=learnswiftui
動画
Hacking with swift
https://www.youtube.com/channel/UCmJi5RdDLgzvkl3Ly0DRMlQ
Kavsoft
https://www.youtube.com/channel/UCsuV4MRk_aB291SrchUVb4w/playlists
DesignCode
https://www.youtube.com/playlist?list=PLDaHCLWmCcQLL-3YDxnPgG8VENNUiJ0Nv
- 投稿日:2020-02-14T21:02:12+09:00
StoryboardでSegueによる画面遷移を行う(macOS)
概要
- iOSと同じノリで
segueを作ってshowを設定すると、残念ながらosxでは別ウィンドウで表示されてしまいます。- 今回は同じウィンドウにて遷移させたいので、実装は下記の通り行います。
macOS アプリで画面遷移 (View Controller の切り替え)
今回目標とする画面遷移処理は、最終的に NSView の入れ替えを行えばよくて
最低限に必要な処理は以下2点
- 表示されている View の superview に、次に表示したい View を追加
- 表示されている View を superview から切り離す
アクションメソッド内に上記処理があれば画面遷移できる
必要に応じてアニメーションをはさめばいいちなみに、NSWindow.contentView を入れ替えるのではなく contentView の subview の入れ替えを行う
参考
- macOS アプリで画面遷移 (View Controller の切り替え)
- 主に参考にしています
- OS X アプリでStoryboardとSegueを利用する ビューを切り替える編
- macOSアプリ用の設定ウィンドウの作成方法 - Qiita
- ウィンドウサイズの変更とアニメーションを参考に
GitHub
実装
Storyboard
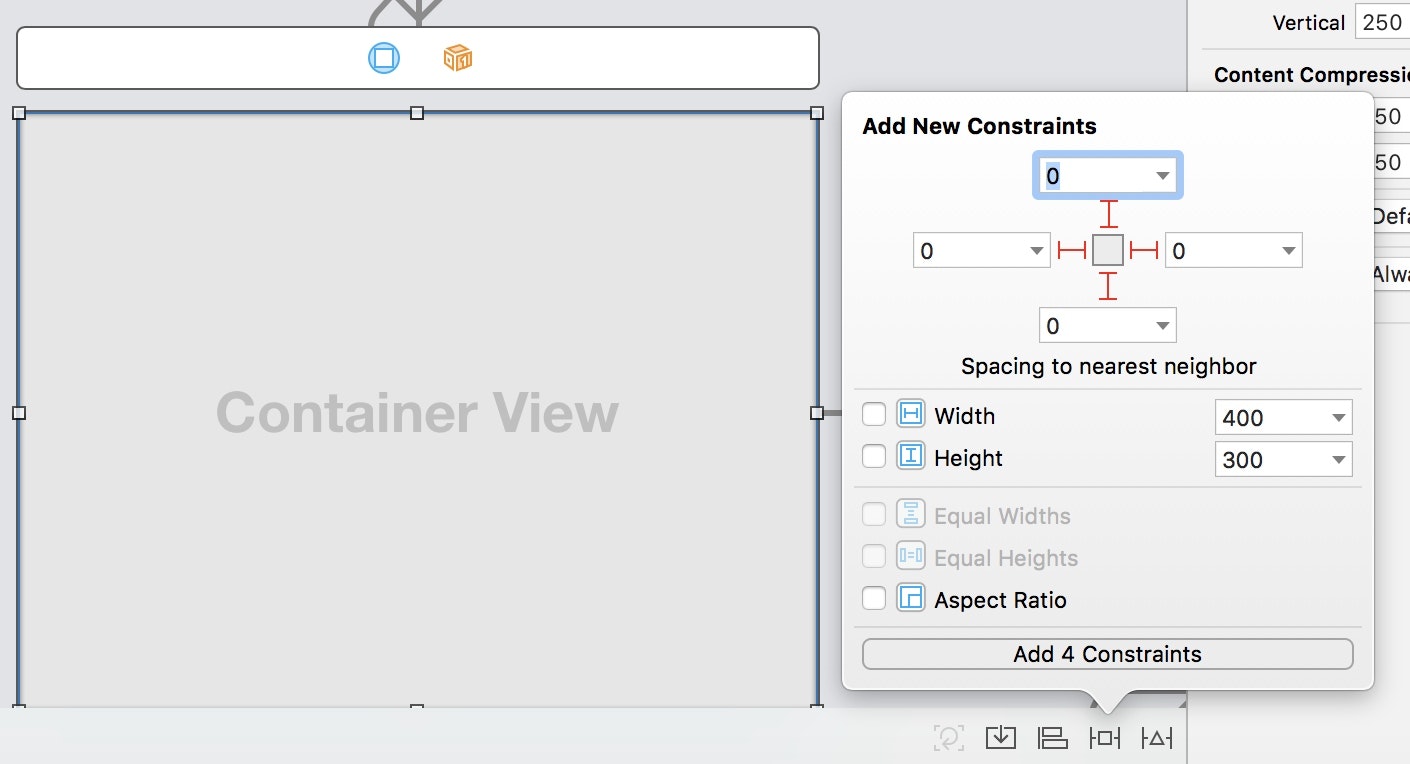
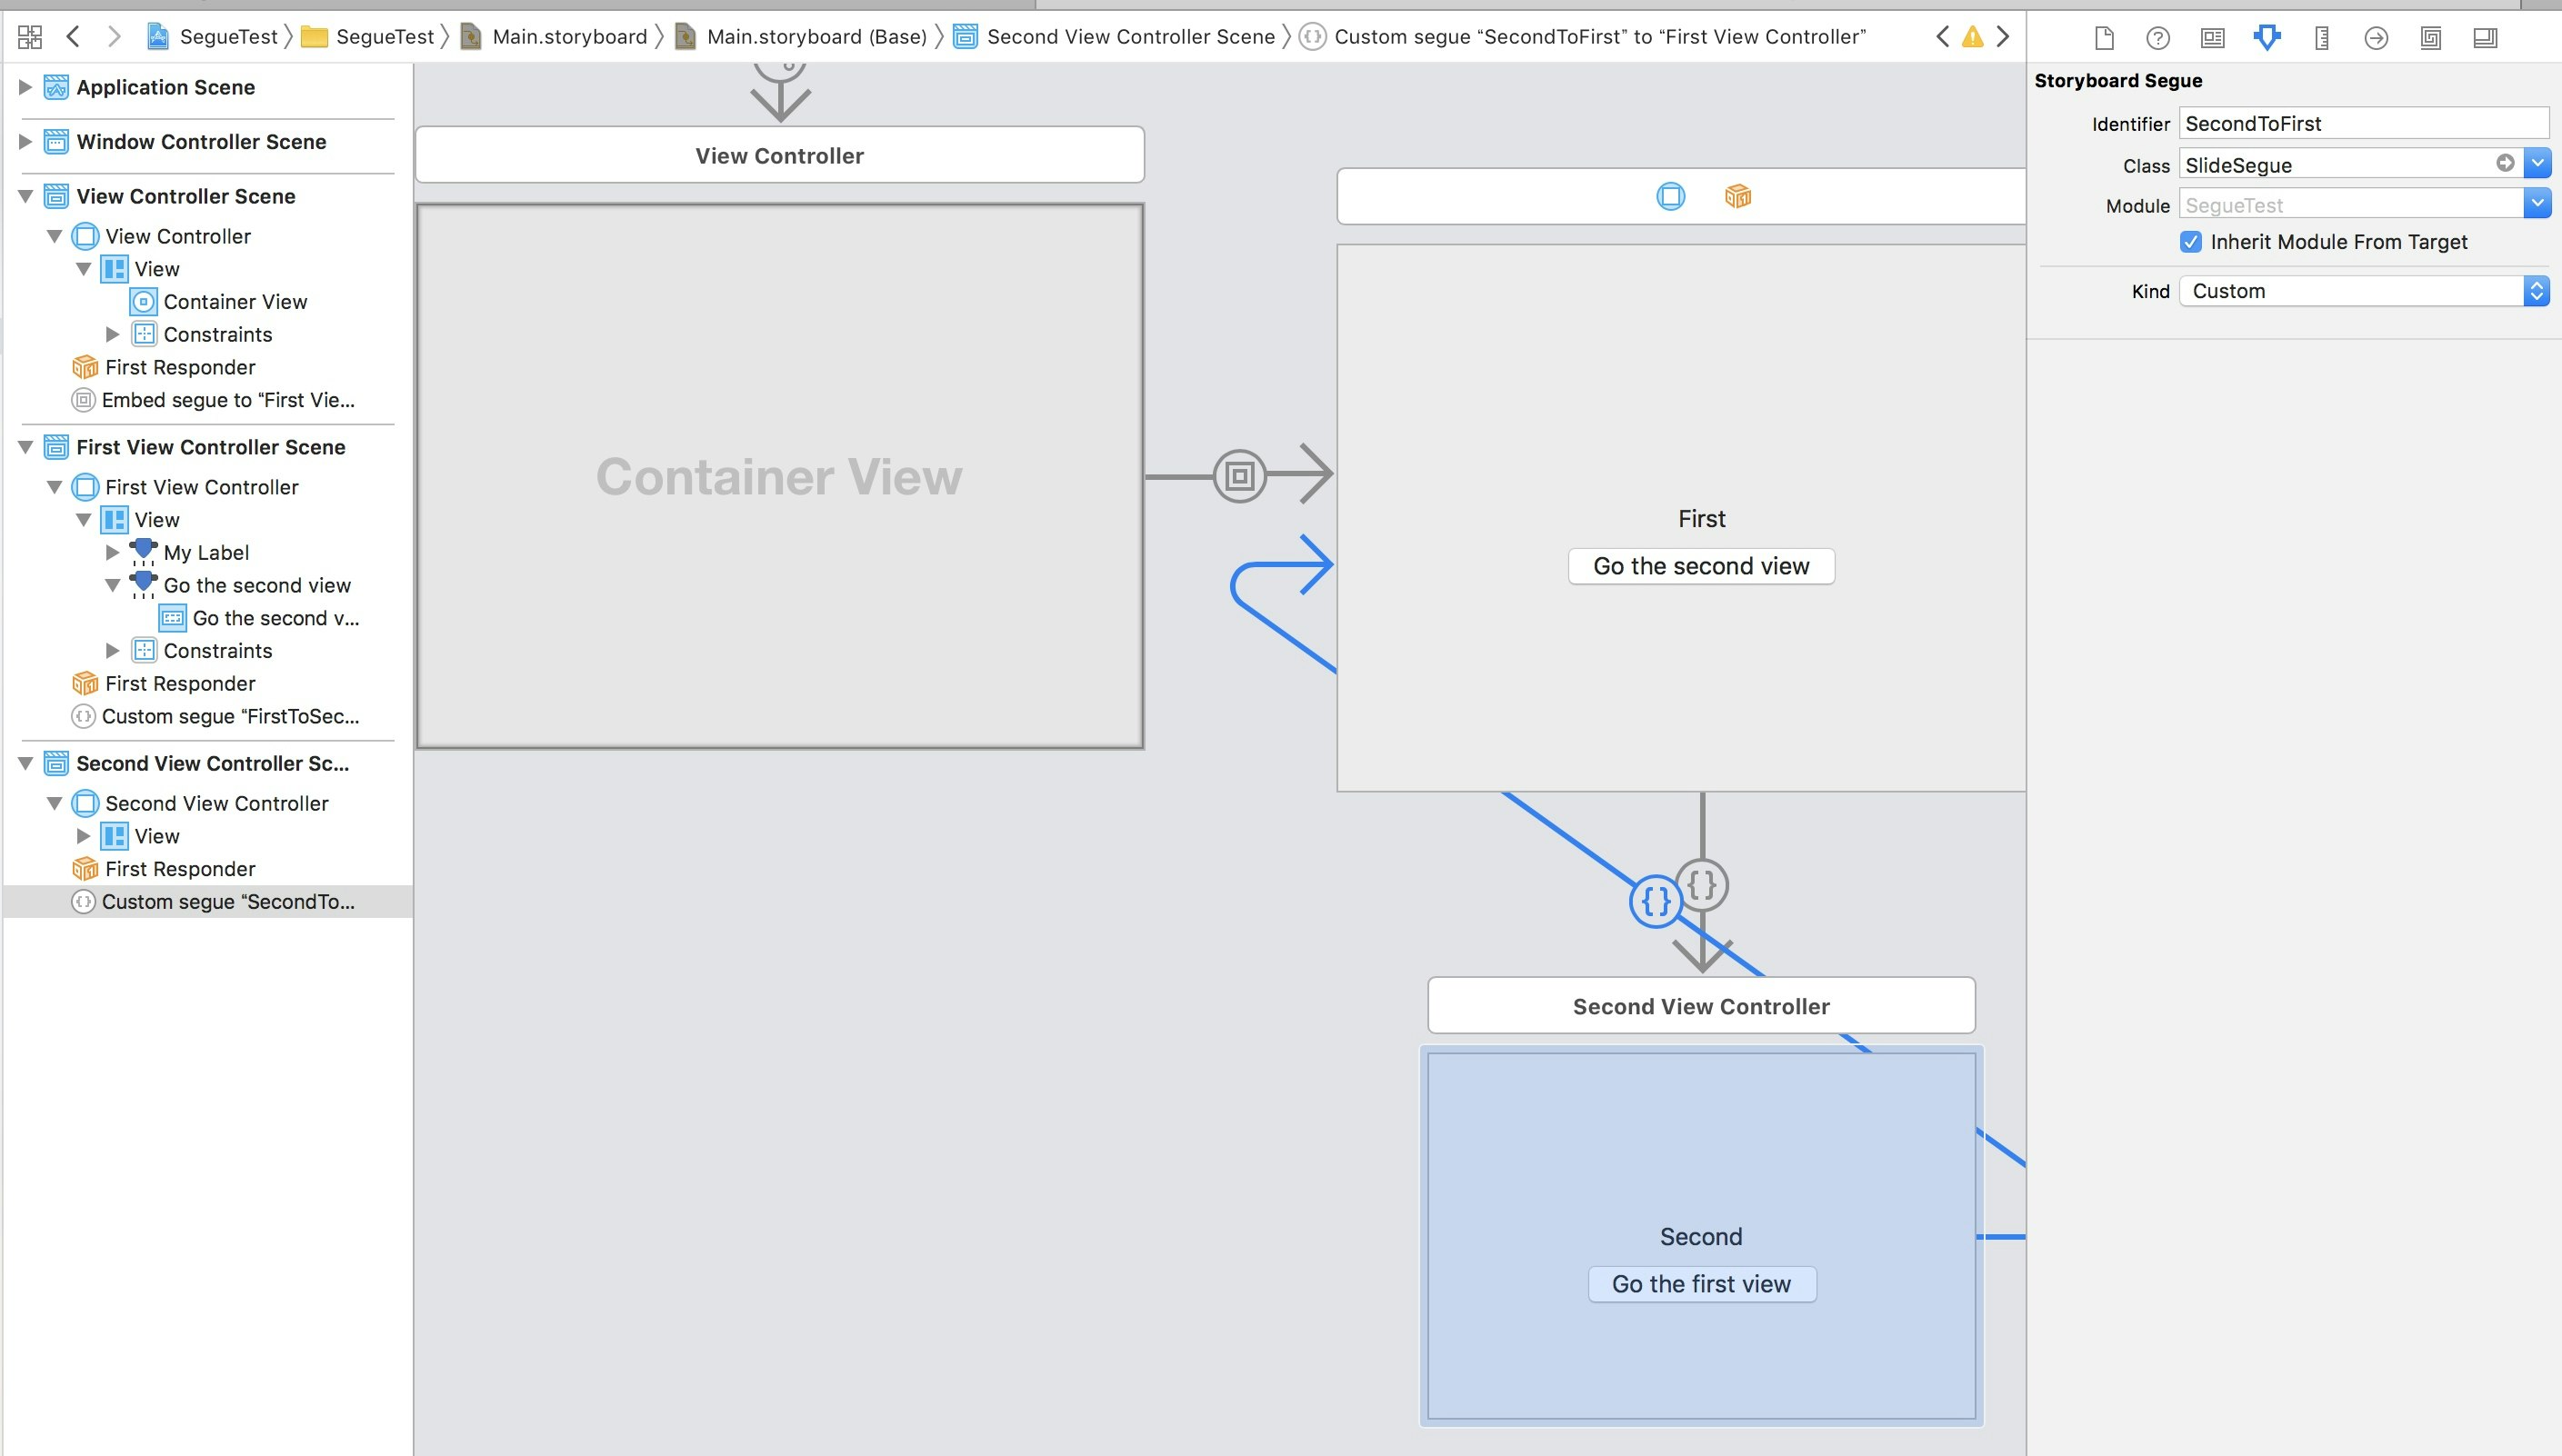
- 初期に配置されている
ViewControllerにContainer Viewを配置します。- 下記の通り画面全体に広がるように
Constrainsを追加します
embedしたViewが全画面に広がるように下記を設定します
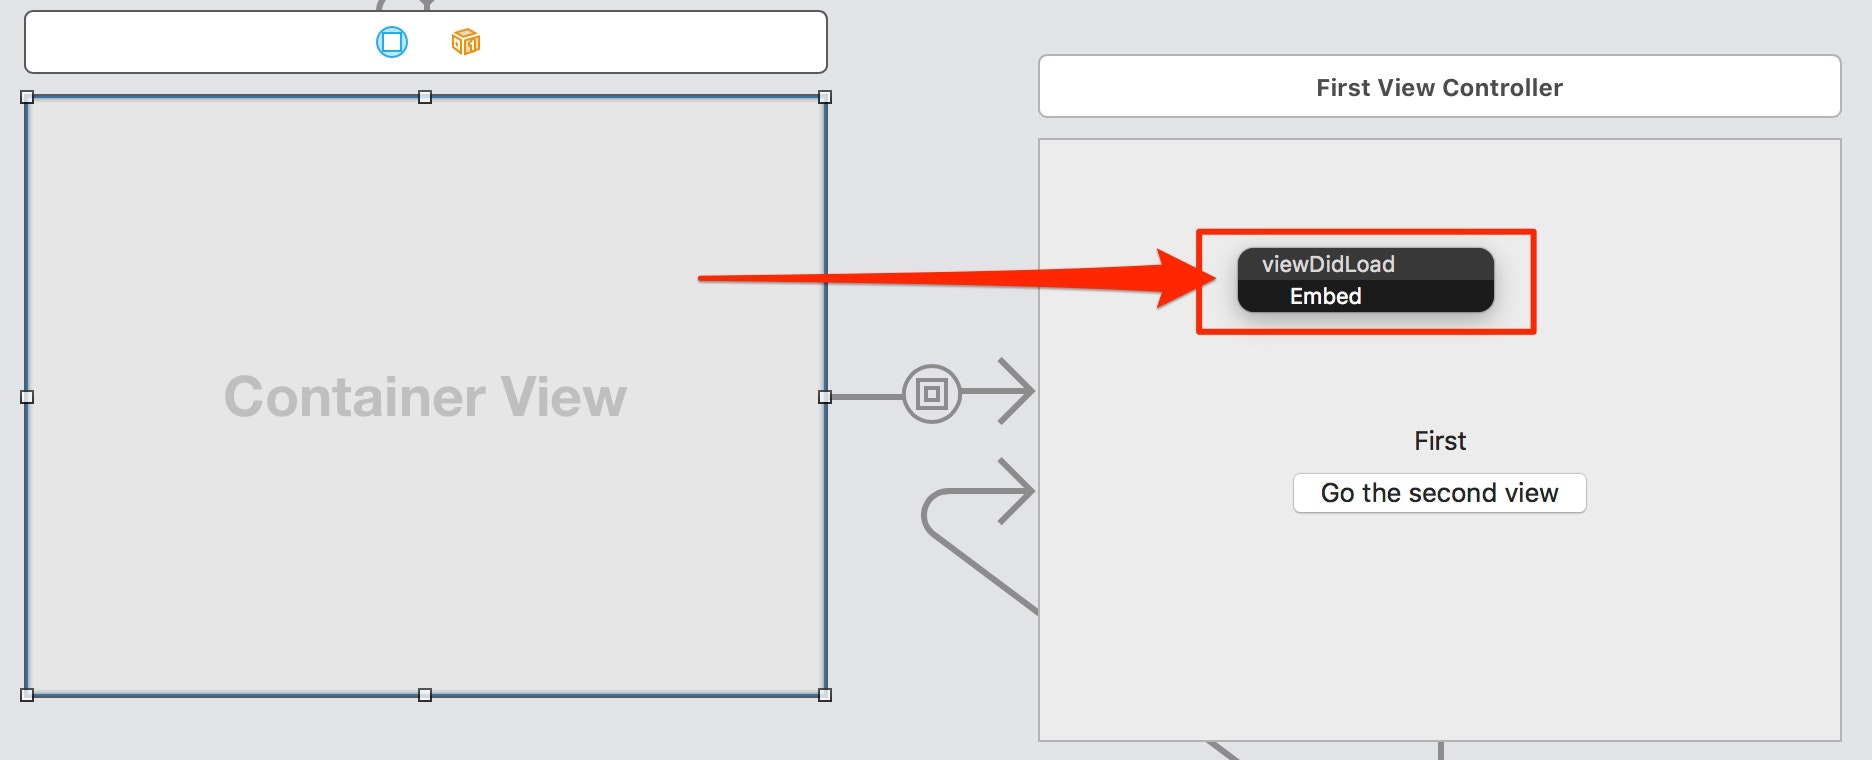
- バインディングで
Embedに指定します。
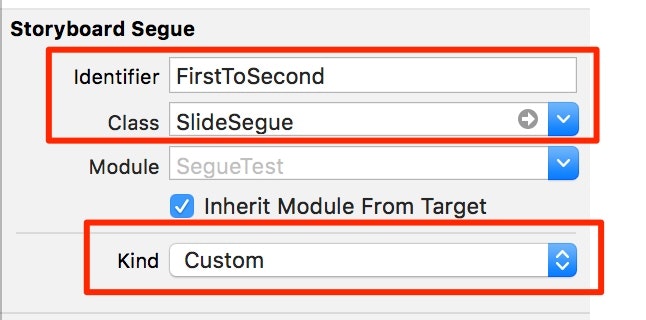
- View間のSegueを作成します。
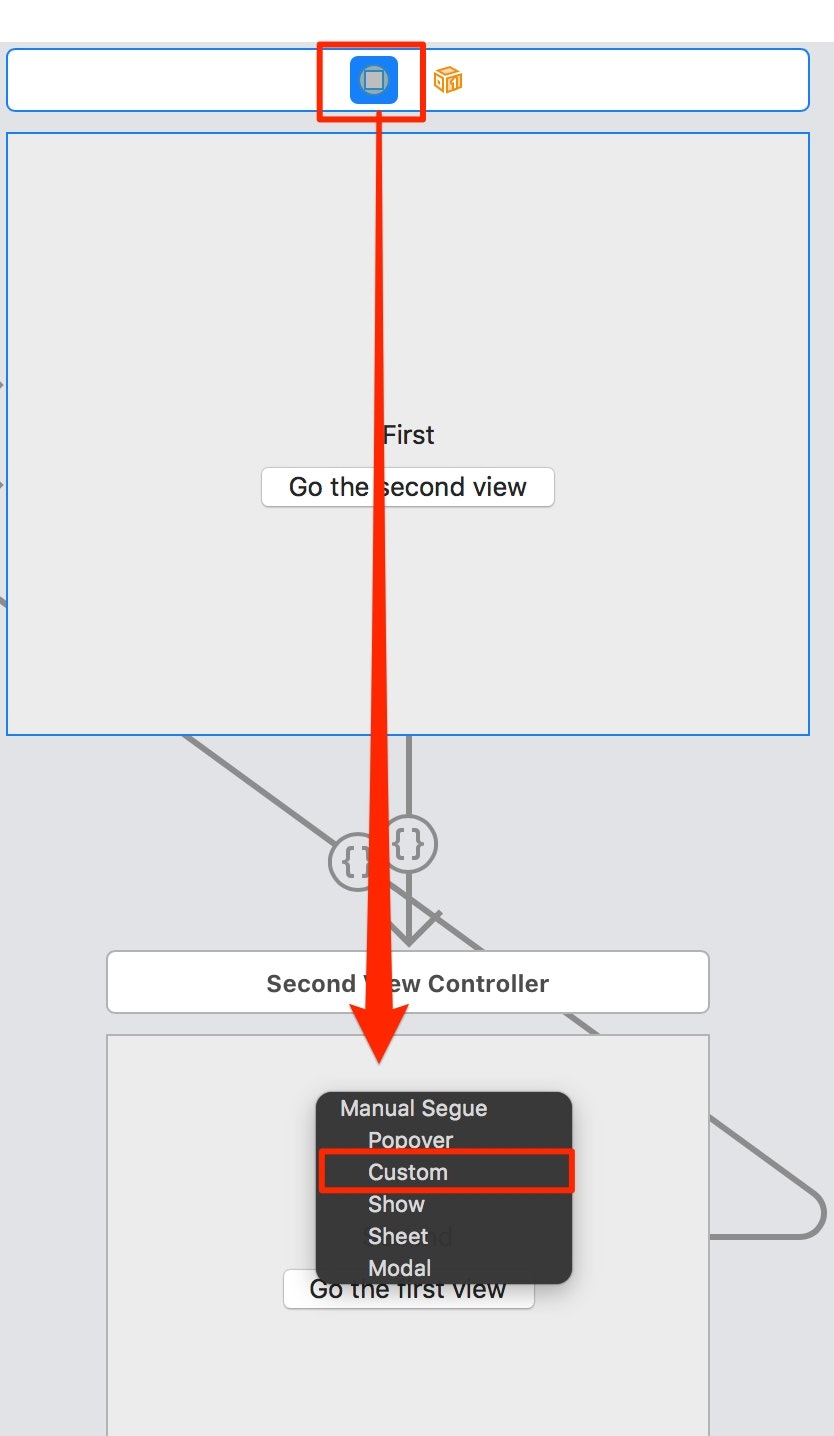
- ここで
Showとすると別ウィンドウで開かれてしまうので、今回はCustomを指定し、コードで遷移処理をゴリゴリ書いていきます。
Segueにはidentifierと後で定義するカスタムクラスを設定します。
- 逆方向の
Segueも今回設定しておきます。- Storyboardでの設定は以上です。
FirstViewController / SecondViewController
@IBAction func debugButtonClicked(_ sender: Any) {
    performSegue(withIdentifier: "FirstToSecond", sender: "This is a message from FirstViewController")
}
- ボタンを押したときに
Segueが実行されるようにします。
identifierでStoryboard上で作成したSegueを識別していますsenderに遷移先へ渡したいオブジェクトを指定します- これは次の
prepare(for segue: NSStoryboardSegue, sender: Any?)で実際に使用しますoverride func prepare(for segue: NSStoryboardSegue, sender: Any?) { if segue.identifier == "FirstToSecond" { let controller = segue.destinationController as! SecondViewController if let labelText = sender as? String { controller.labelText = labelText self.view.window?.title = "SecondView" } } }
- 上記のメソッドは
Segueが実行される前に呼ばれます- Segueが複数ある場合もあるので、
segue.identifier == "FirstToSecond"のように場合分けをします- 今回は遷移先の
SecondViewControllerにStringを設定し、ウィンドウタイトルを変更しています。SecondViewControllerも同じように実装しています。SlideSegue
- 今回のメインである
NSStoryboardSegueのカスタムクラスですclass SlideSegue: NSStoryboardSegue { override func perform() { // ① NSViewControllerの親子関係を設定 guard let sourceViewController = self.sourceController as? NSViewController, // 遷移前のViewController let destinationViewController = self.destinationController as? NSViewController, // 遷移後のViewController let parentViewController = sourceViewController.parent // ContainerViewを持つViewController else { print("downcasting or unwrapping error") return } // ② 遷移先のViewがViewControllerのChildに無いと、ContainerViewに設定できない? if (!parentViewController.children.contains(destinationViewController)) { parentViewController.addChild(destinationViewController) } // ③ 遷移後のウィンドウのFrameを計算 let window = sourceViewController.view.window! let contentsViewHeightOffset = sourceViewController.view.frame.height - destinationViewController.view.frame.height let titlebarHeight = window.frame.height - sourceViewController.view.frame.height // タイトルバーの高さ let newFrame = NSRect(x: window.frame.origin.x, y: window.frame.origin.y + contentsViewHeightOffset, width: destinationViewController.view.frame.width, height: destinationViewController.view.frame.height + titlebarHeight ) sourceViewController.view.superview?.addSubview(destinationViewController.view) // ContainerViewに追加 sourceViewController.view.removeFromSuperview() // 遷移前のビューを削除 // ④ 遷移後のViewのConstraintsを設定 destinationViewController.view.translatesAutoresizingMaskIntoConstraints = false destinationViewController.view.leadingAnchor.constraint(equalTo: parentViewController.view.leadingAnchor).isActive = true destinationViewController.view.trailingAnchor.constraint(equalTo: parentViewController.view.trailingAnchor).isActive = true destinationViewController.view.topAnchor.constraint(equalTo: parentViewController.view.topAnchor).isActive = true destinationViewController.view.bottomAnchor.constraint(equalTo: parentViewController.view.bottomAnchor).isActive = true // ⑤ アニメーション的にウィンドウを変形する destinationViewController.view.isHidden = true // ウィンドウサイズが変更された後に内容を表示するため NSAnimationContext.runAnimationGroup({ _ in window.animator().setFrame(newFrame, display: false) }, completionHandler: { [weak self] in destinationViewController.view.isHidden = false }) } }① NSViewControllerの親子関係を設定
NSStoryboardSegueクラスのPropertyから、今回使用するViewControllerを取得します。
- 今回一律
ViewControllerでキャストしてしまっているのがあまり良くなさそうではあります…Segue毎にそれぞれNSStoryboardSegueのカスタムクラスを作るのが本筋でしょうか?② 遷移先のViewがViewControllerのChildに無いと、ContainerViewに設定できない?
- ここに関する文献が見つからなかったので、そういうことかな?程度の理解です。
③ 遷移後のウィンドウのFrameを計算
- タイトルバーの位置が変わらない用にy座標を調整します
- またウィンドウのサイズは遷移先のViewの大きさ(IB上で設定したもの)になるようにしています。
- ウィンドウのFrameを維持したい場合は、ここを変更してください。
④ 遷移後のViewのConstraintsを設定
- ContainerViewのConstrainsと同じにすることで、Windowを変化する際コンテンツも変化させるように
⑤ アニメーション的にウィンドウを変形する
- 変形後にコンテンツ内容を表示するようにします。
- 設定ウィンドウと同じ実装です。

- 投稿日:2020-02-14T17:27:59+09:00
【Swift】UIImageViewにグリッド線を表示したい
バージョン
XCode 11.3.1
参考
https://qiita.com/Sa2Knight/items/4debc1f66db8cd958803
こちらのコードをfor in文でまとめたものになります。完成形
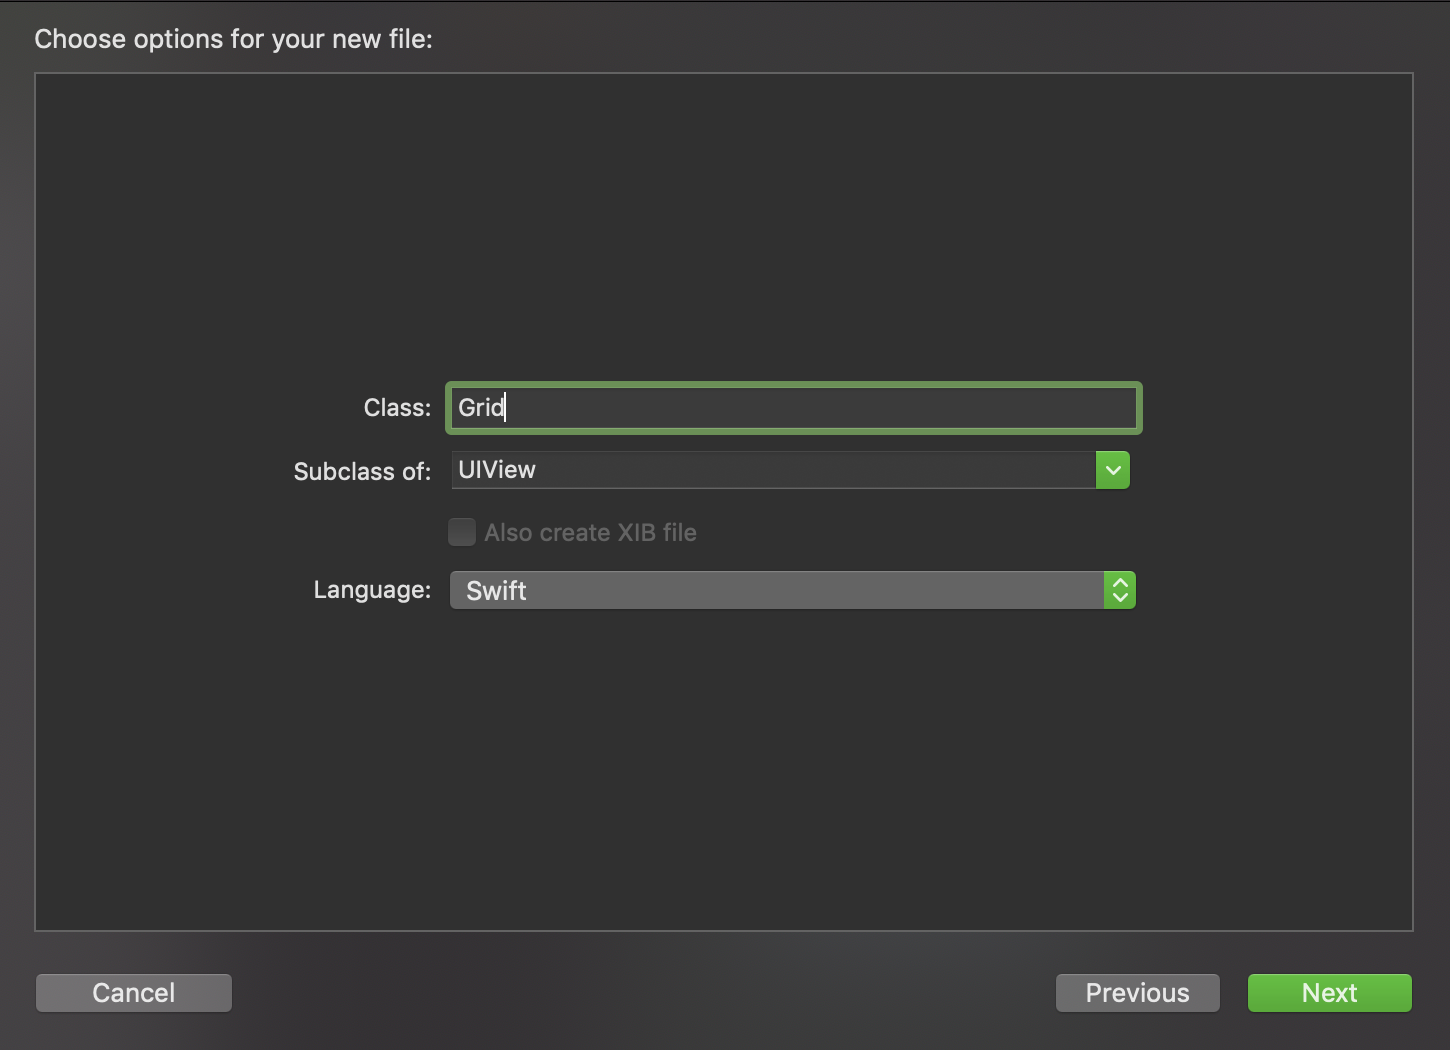
こんな感じでUIImageViewにグリッド線が表示されます。ファイルの準備
ストーリーボードの準備
Storyboard上にImageViewを配置したら、
classをGridViewに設定してあげます。(最初に作成したファイル)
また、表示するグリッド線が白なので、背景色を白以外に変えるか、
グリッド線の色を変えてください。
ここからは最初に作成したGrid.swiftファイルにコードを書いていきます。コード
//
//  Grid.swift

import UIKit

class GridView: UIView {
    // splitCountは偶数にする
    // 縦線:splitCountの数 - 1
    // 横線:splitCountの数 / 2 - 1
    let splitCount = 10

    override func draw(_ rect: CGRect) {
        let path = UIBezierPath()
        path.lineWidth = 1.5

        UIColor.white.setStroke()
        for x in 0...splitCount {
            for y in 0...splitCount {
                if x != y, x == 0, y < splitCount {
                    path.move(to: getPoint(rect, x: CGFloat(x), y: CGFloat(y)))
                    path.addLine(to: getPoint(rect, x: CGFloat(splitCount), y: CGFloat(y)))
                    path.stroke()
                } else if x < splitCount, x % 2 == 0, x != 0, y == 0 {
                    path.move(to: getPoint(rect, x: CGFloat(x), y: CGFloat(y)))
                    path.addLine(to: getPoint(rect, x: CGFloat(x), y: CGFloat(splitCount)))
                    path.stroke()
                }
            }
        }
    }
  /* View上の指定した区画の座標を取得 */
  private func getPoint(_ rect: CGRect, x: CGFloat, y: CGFloat) -> CGPoint {
    let width = rect.width / CGFloat(splitCount)
    let height = rect.height / CGFloat(splitCount)
    return CGPoint(x: width * x, y: height * y)
  }

}
定数splitCountの数値を変えるだけで
グリッド線の数を変更できます。


- 投稿日:2020-02-14T14:03:36+09:00
【Swift】PresentationControllerでモーダルを表示したい
バージョン
XCode: Version 11.3.1
参考
https://qiita.com/wai21/items/9b40192eb3ee07375016
こちらの記事を元にしています。こんな人向け
・モーダルを作りたくてPresentationControllerでモーダルを作る記事を
いくつか見たけど作れなかった方
・ストーリーボードでレイアウトを作成したい方こんなものが作れます
今回作成していくのは、PresentationControllerを使って
ViewControllerをモーダルのように表示させるものです。
なるべくやさしいことばと手順で説明していきます。
コードの実装から確認したい方は『4.コード実装』からご覧ください。
レイアウトは各々ストーリーボードから実装してください。用意するもの
1.プロジェクトファイル
2.Swiftファイル
・ModalViewController.swift(UIViewControllerを継承)
・PresentationController.swift(UIPresentationControllerを継承)
表示(プレゼン)のさせ方についての機能を提供してくれます。3.StoryBoard
ViewController(ModalViewController.swiftと紐付け)手順
1.プロジェクト作成
1.Create a new Xcode project
2.Single View App
3.User Interface を StoryBoardにする
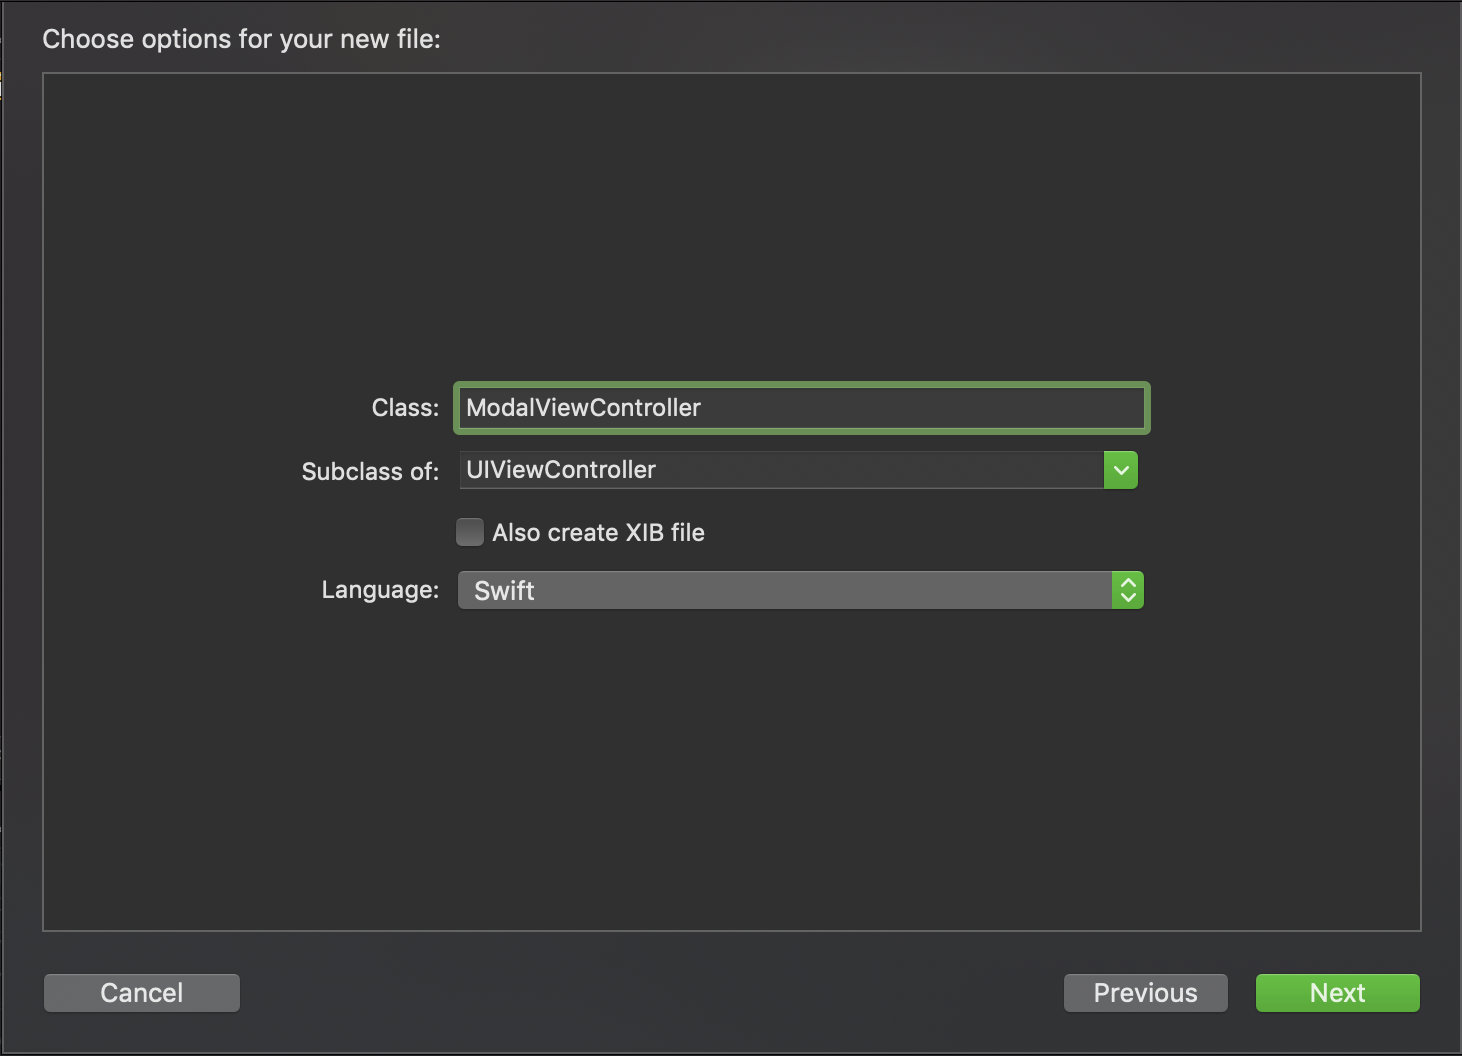
4.Product Name は自由2.ファイル作成
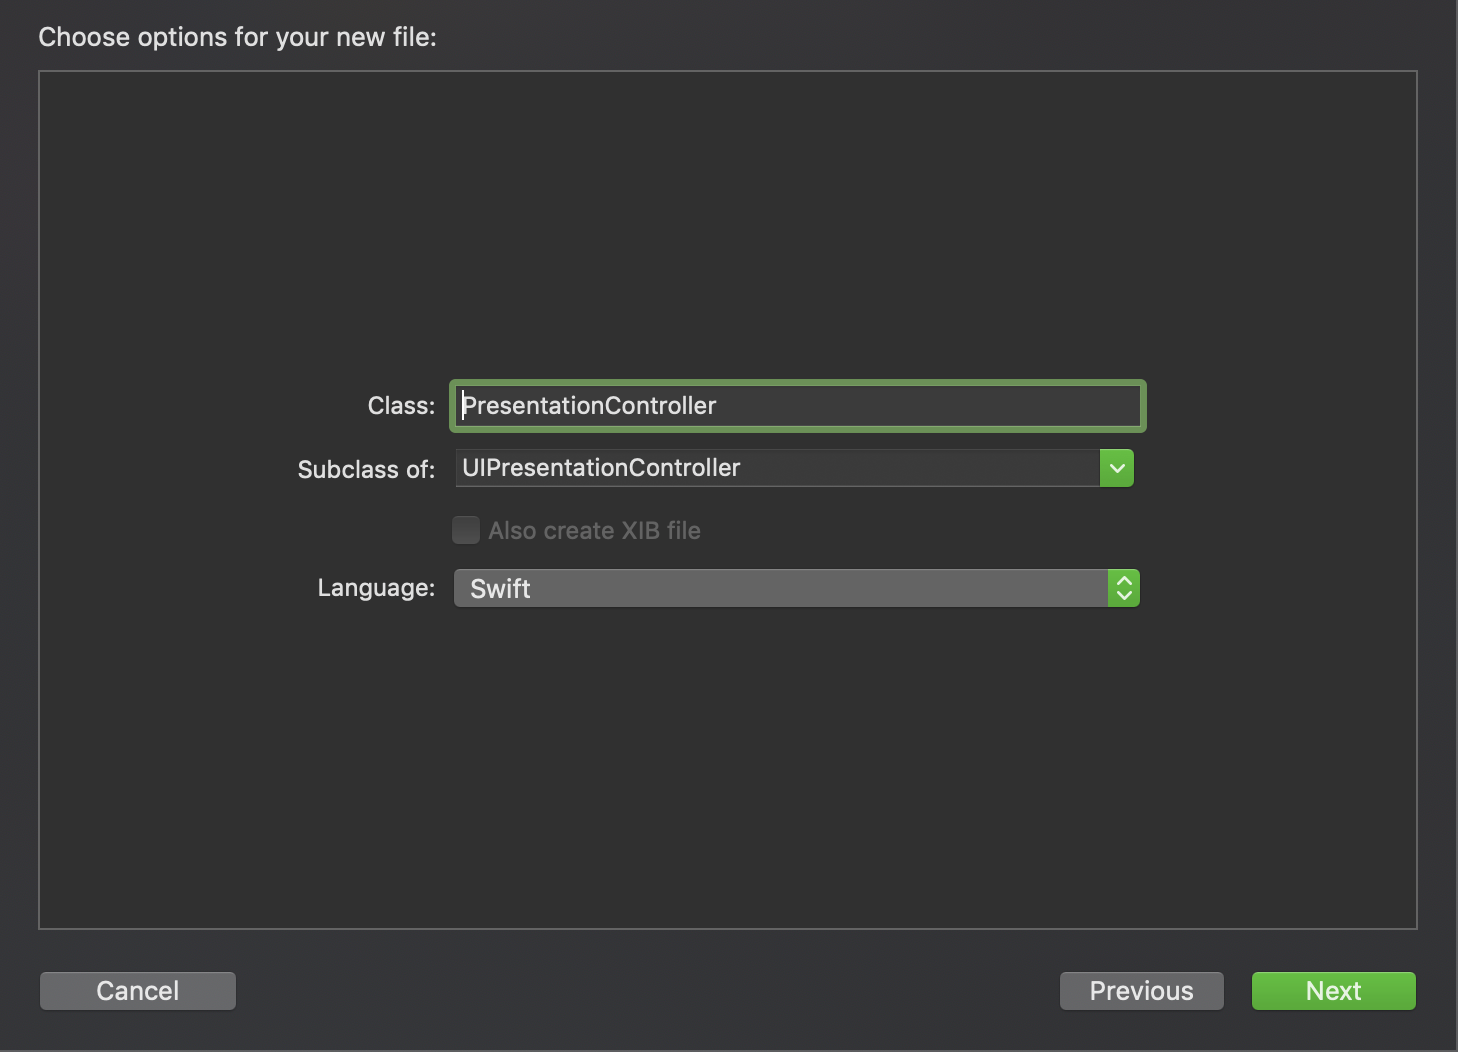
1.UIViewControllerを継承した"ModalViewController"を作成
2.UIPresentationControllerを継承した"PresentationController"を作成
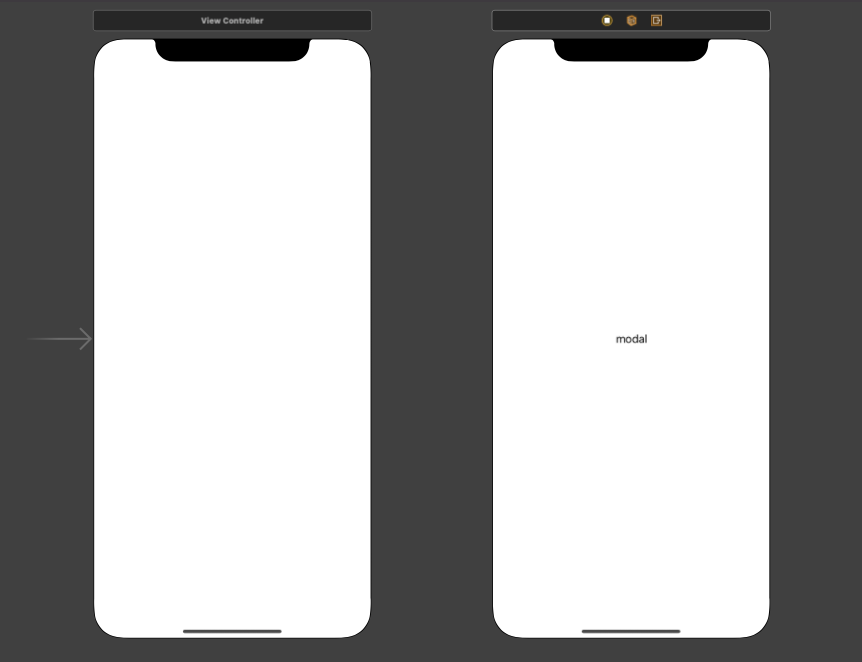
3.StoryBoard編
表示させたいModal用のViewControllerを配置します。
Segueで繋ぐ必要はありません。
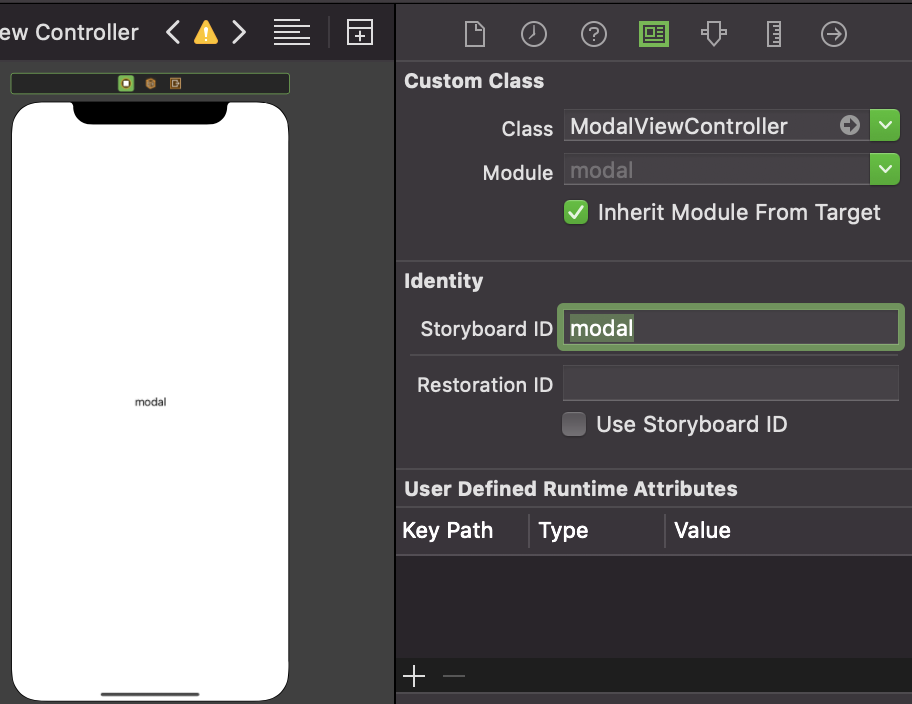
次に、配置したViewControllerをModalViewController.swiftと接続します。
わかりやすいように真ん中にLabelを配置して、文字をmodalとします。
また、Storyboard IDにもmodalを入れます。
4.コード実装
必要なものは揃ったので、コードを書いていきましょう。・ViewController.swift(元からある)
・ModalViewController.swift
・PresentationController.swift//ViewController.swift import UIKit class ViewController: UIViewController, UIViewControllerTransitioningDelegate { override func viewDidLoad() { super.viewDidLoad() // Do any additional setup after loading the view. } @IBAction func modalAction(_ sender: AnyObject) { let modalVC = self.storyboard?.instantiateViewController(withIdentifier: "modal") modalVC!.modalPresentationStyle = .custom modalVC!.transitioningDelegate = self present(modalVC!, animated: true, completion: nil) } func presentationController(forPresented presented: UIViewController, presenting: UIViewController?, source: UIViewController) -> UIPresentationController? { return PresentationController(presentedViewController: presented, presenting: presenting) } }ViewcontrollerにModalを表示するためのButtonを設置し、
modalActionとしてViewcontroller.swiftにIBAction接続します。
この時点でシュミレーターを起動し、ボタンを押すと
modalと表示されたModalViewControllerが出てきますね。・ViewController.swift(元からある)
・ModalViewController.swift
・PresentationController.swift//ModalViewController.swift import UIKit class ModalViewController: UIViewController { override func viewDidLoad() { super.viewDidLoad() // Do any additional setup after loading the view. }実際に表示されるモーダルと接続されたファイルです。
ポップアップ作成に必要なコードは特に無く、自分好みに実装していきます。
はじめにラベルを設置しているので、現時点ではそれが表示されます。・ViewController.swift(元からある)
・ModalViewController.swift
・PresentationController.swift//PresentationController.swift import UIKit class PresentationController: UIPresentationController { // 呼び出し元のView Controller の上に重ねるオーバレイView var overlayView = UIView() // 表示トランジション開始前に呼ばれる override func presentationTransitionWillBegin() { guard let containerView = containerView else { return } overlayView.frame = containerView.bounds overlayView.gestureRecognizers = [UITapGestureRecognizer(target: self, action: #selector(PresentationController.overlayViewDidTouch(_:)))] overlayView.backgroundColor = .black overlayView.alpha = 0.0 containerView.insertSubview(overlayView, at: 0) // トランジションを実行 presentedViewController.transitionCoordinator?.animate(alongsideTransition: {[weak self] context in self?.overlayView.alpha = 0.5 }, completion:nil) } // 非表示トランジション開始前に呼ばれる override func dismissalTransitionWillBegin() { presentedViewController.transitionCoordinator?.animate(alongsideTransition: {[weak self] context in self?.overlayView.alpha = 0.0 }, completion:nil) } // 非表示トランジション開始後に呼ばれる override func dismissalTransitionDidEnd(_ completed: Bool) { if completed { overlayView.removeFromSuperview() } } let margin = (x: CGFloat(40), y: CGFloat(220.0)) // 子のコンテナサイズを返す override func size(forChildContentContainer container: UIContentContainer, withParentContainerSize parentSize: CGSize) -> CGSize { return CGSize(width: parentSize.width - margin.x, height: parentSize.height - margin.y) } // 呼び出し先のView Controllerのframeを返す override var frameOfPresentedViewInContainerView: CGRect { var presentedViewFrame = CGRect() let containerBounds = containerView!.bounds let childContentSize = size(forChildContentContainer: presentedViewController, withParentContainerSize: containerBounds.size) presentedViewFrame.size = childContentSize presentedViewFrame.origin.x = margin.x / 2.0 presentedViewFrame.origin.y = margin.y / 2.0 return presentedViewFrame } // レイアウト開始前に呼ばれる override func containerViewWillLayoutSubviews() { overlayView.frame = containerView!.bounds presentedView?.frame = frameOfPresentedViewInContainerView presentedView?.layer.cornerRadius = 10 presentedView?.clipsToBounds = true } // レイアウト開始後に呼ばれる override func containerViewDidLayoutSubviews() { } // overlayViewをタップした時に呼ばれる @objc func overlayViewDidTouch(_ sender: UITapGestureRecognizer) { presentedViewController.dismiss(animated: true, completion: nil) } }レイアウトのサンプル
・ViewController.swift(元からある)
・ModalViewController.swift
・PresentationController.swift// ModalViewController.swift import UIKit class ModalViewController: UIViewController { @IBOutlet weak var modalTitle: UILabel! @IBOutlet weak var modalMessage: UILabel! @IBOutlet weak var modalMessageBottom: UILabel! @IBOutlet weak var modalImage: UIImageView! @IBOutlet weak var modalButton: UIButton! var timerCount = 0 override func viewDidLoad() { super.viewDidLoad() // Do any additional setup after loading the view. view.backgroundColor = .init(red: 255/255, green: 255/255, blue: 255/255, alpha: 1.0) modalImage.image = UIImage(named: "airpods") modalTitle.text = "ただいま画像を生成中です" modalTitle.textAlignment = .center modalMessage.text = "Airpodsのケースが発売されました!" modalMessage.textAlignment = .center modalMessageBottom.numberOfLines = 3 modalMessageBottom.textAlignment = .center modalMessageBottom.text = "アプリの最初の画面のメニューの\n『AirPodsケースカバー』\nからケースを作成できます♪" modalButton.setTitle("ポップアップを閉じる", for: .normal) //scheduledTimerで一定間隔(1秒)でself.textUpdateを呼び出す Timer.scheduledTimer(timeInterval: 1.0, target: self, selector: #selector(self.textUpdate), userInfo: nil, repeats: true) } @objc func textUpdate(){ if timerCount == 0{ modalTitle.text = "ただいま画像を生成中です." timerCount += 1 } else if timerCount == 1 { modalTitle.text = "ただいま画像を生成中です.." timerCount += 1 } else if timerCount == 2 { modalTitle.text = "ただいま画像を生成中です..." timerCount += 1 } else if timerCount == 3 { modalTitle.text = "ただいま画像を生成中です" timerCount -= 3 } } @IBAction func closeActionButton(_ sender: Any) { dismiss(animated: true, completion: nil) } }おわりに
いかがでしたでしょうか。
参考にしたサイトとほとんど同じですが、
ストーリーボードでレイアウトを作成したい方は
こちらの記事の方が合っているかと思います。


- 投稿日:2020-02-14T11:39:43+09:00
UIAppearanceの優先度
UIAppearance の基礎
これですべての
UILabelのtextColorが茶色に変わります。
(現実的にはUILabelのtextColorをUIAppearanceで設定するのは稀だと思いますが、あくまでサンプルとして)UILabel.appearance().textColor = .brown特定のView上にあるUILabelのtextColorを変える
View階層が1つだけの時
すべての
ViewA上のUILabelを変えたいなら、こんなふうに書けば良いですね。UILabel.appearance(whenContainedInInstancesOf: [ViewA.self]).textColor = .redView階層が2つ以上の時
SampleViewController上のViewA上のUILabelだけを変えたい時など、
階層が2つ以上の時は、対象となるViewから親View/ViewControllerを順に配列の要素に加えます。UILabel.appearance(whenContainedInInstancesOf: [ViewA.self, SampleViewController.self]).textColor = .red優先度
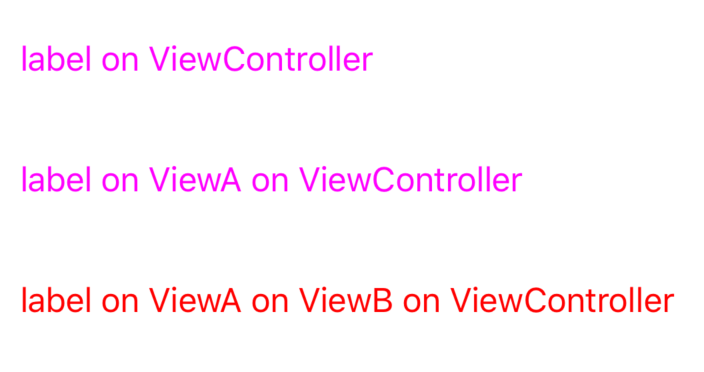
例えば以下のような階層構造の時
SampleViewController
┣ UILabel
┣ ViewA
┃ ┗ UILabel
┗ ViewB
  ┗ ViewA
    ┗ UILabel
このように設定するとどうなるでしょうか。
UILabel.appearance().textColor = .brown
UILabel.appearance(whenContainedInInstancesOf: [SampleViewController.self]).textColor = .magenta
UILabel.appearance(whenContainedInInstancesOf: [ViewA.self]).textColor = .blue
UILabel.appearance(whenContainedInInstancesOf: [ViewB.self, SampleViewController.self]).textColor = .red
この場合、より外側の要素での指定が優先され、以下のように解決されます。
ViewA上のUILabelはblueにはならず、
SampleViewController上のUILabelをmagentaにする処理が優先されます。
SampleViewController上のViewBのUILabelをredにする処理は、指定した順に解決され問題なく実行されます。参考