- 投稿日:2020-02-09T23:20:59+09:00
[Android Studio] アプリの全画面表示についてまとめてみる(ノッチ有り無し)
はじめに
アプリの全画面表示をしようとするとノッチの有り無しでやり方がちょっと違ったのでまとめてみます。
開発環境
Android Studio 3.5.3
フルスクリーン表示の方法
これは、ノッチ有り無しに関わらず同じです
styles.xmlにて、以下を記述しますstyles.xml<style name="AppTheme.FullScreen"> <!-- アクションバーを削除 --> <item name="windowActionBar">false</item> <item name="windowNoTitle">true</item> <!-- フルスクリーン --> <item name="android:windowFullscreen">true</item> <item name="android:windowContentOverlay">@null</item> </style>次に
AndroidManifest.xmlでthemeを設定すればOKですAndroidManifest.xml<application android:theme="@style/AppTheme.FullScreen"> <!-- Add --> <activity android:name=".MainActivity"> ... </activity> </application>結果
ここまでは、他のサイトと同じです
私は以下のサイトを参考にしました
【 Android アプリ開発 】全画面表示を行う方法 ( 通知バー非表示 )フルスクリーンにはなるんだが...
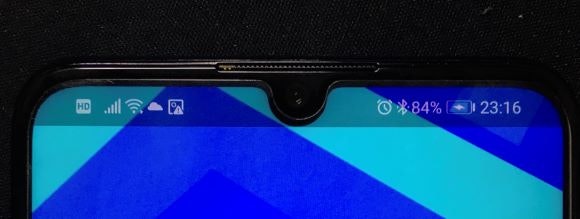
問題はここからです。ノッチ付きのスマホだと以下のようになります。
(画像はHuawei P30 Liteです)わかりづらくてすみません...。
よく見てみるとノッチの周りにViewが表示されません。
これを解決するにはもうひと手間加えますノッチ付きのスマホにおける全画面表示
styles.xmlの変更
styles.xmlを以下のように書き換えます。styles.xml<style name="AppTheme.FullScreen"> <item name="windowActionBar">false</item> <item name="windowNoTitle">true</item> <item name="android:windowFullscreen">true</item> <item name="android:windowContentOverlay">@null</item> <!-- Add --> <item name="android:windowLayoutInDisplayCutoutMode">shortEdges</item> </style>
windowLayoutInDisplayCutoutModeにshortEdgesを設定します。Activityの変更
使用するアクティビティにて、以下のコードを追加します
MainAcitivity.ktoverride fun onCreate(savedInstanceState: Bundle?) { super.onCreate(savedInstanceState) setContentView(R.layout.activity_main) // Add window.decorView.systemUiVisibility = View.SYSTEM_UI_FLAG_LAYOUT_FULLSCREEN }これでノッチ周辺にもViewが表示されます
結果
おまけ
ステータスバーを全画面上に表示する
styles.xmlを以下のように変更しますstyles.xml<style name="AppTheme.FullScreen"> <item name="windowActionBar">false</item> <item name="windowNoTitle">true</item> <item name="android:windowFullscreen">false</item> <!-- update --> <item name="android:windowContentOverlay">@null</item> <item name="android:windowLayoutInDisplayCutoutMode">shortEdges</item> <item name="android:windowTranslucentStatus">true</item> <!-- add --> </style>結果
参考サイト
https://developer.android.com/guide/topics/display-cutout
https://stackoverflow.com/questions/29311078/android-completely-transparent-status-bar
https://qiita.com/Futo23/items/7bf65c4158bec6f30ffb#1-stylexml%E3%82%92%E4%BF%AE%E6%AD%A3


- 投稿日:2020-02-09T16:50:07+09:00
Flutter EventChannel APIの使い方
はじめに
Flutter (Dart) とプラットフォーム (Android/iOSなど) 間の通信/呼び出しAPIについてまとめています。
- MethodChannel
- EventChannel ← 今回
- MessageChannel
1. EventChannelとは
プラットフォーム側からFlutter (Dart) 側にイベント通知するためのAPIの一つであるEventChannelについて解説します。
加速度センサーの値の変化やプラットフォーム側のイベントサイクルの変化など、プラットフォーム側で定期的もしくは突発的に発生するイベントをFlutter側に通知するためのAPIです。Flutterの仕組み的には、ここで解説しているPlatform Channelsを利用しています。
2. 基本フロー
実際のコードの説明の前にAPIの基本的なフローについて解説します。
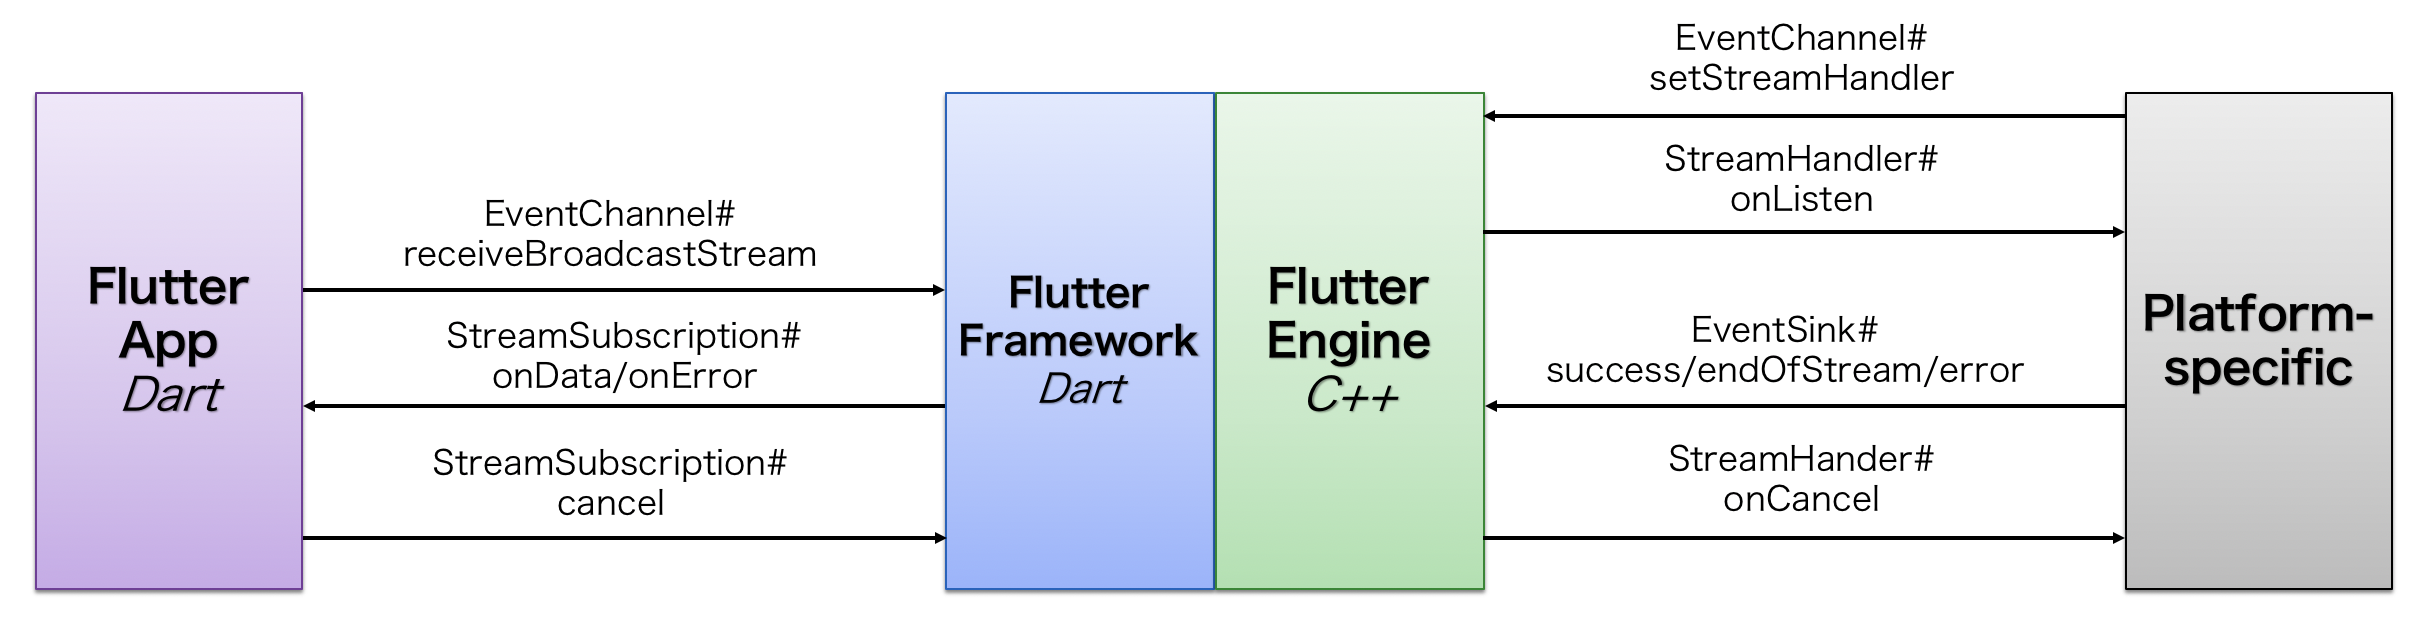
ただし、プラットフォーム毎に若干API名が異なる場合があるため (iOS) 、注意してください。2.1 プラットフォーム → Dart
EventChannelはプラットフォーム側からDart側へのみの一方通行の1対多?の通信APIです。MethodChannelとは異なり、逆方向は出来ません。AndroidフレームワークのBroadcastのイメージを持っていただければ分かり易いかと思います。
Dart側
- EventChannel#receiveBroadcastStreamでプラットフォーム側のイベント受信用のリスナーを登録
- 受信を終了時、StreamSubscription#cancelをコール
プラットフォーム側
- EventChannel#setStreamHandlerでイベントリスナーを登録
- EventChannelの初期化が完了後、onListerがコールされるので、その引数のEventSinkをローカルに保存
- EventSink#successでイベント送信
- 全てのイベント送信完了後にendOfStreamをコール
3. サンプルプロジェクト
実際のAPIの使い方は後述しますが、サンプルプロジェクトを以下に用意しています。そのまま動作確認可能ですので、参考にしてください。
ただし、正式に何かの機能を実装する場合にはプラグインの形で組み込んだ方が良いです。
https://github.com/Kurun-pan/flutter-eventchannel-example4. Flutter + Android (Kotlin) のコード解説
4.1 Dart側の実装
通信チャンネル作成
MethodChannel同様、EventChannelの通信チャンネルを作成します。引数に指定する文字列は他のアプリケーションと被らず、一意に決まるようにするために慣例で"アプリパッケージ名/チャンネル名"とするのが一般的な様子です。
イベント受信リスナーの登録
作成したチャンネルのreceiveBroadcastStreamでStreamSubscriptionインスタンスが取得出来ます。このインスタンスのlistenメソッドでイベント受信リスナーを登録します。
listenメソッドのcancelOnError引数は、プラットフォームからの送信イベントがエラー時に自動的に通信を終了 (cancel) するかどうかの設定です。
listenメソッドStreamSubscription<T> listen(void onData(T event), {Function onError, void onDone(), bool cancelOnError});受信終了
これ以上受信が不要になった場合には、StreamSubscription#cancelをコールします。すると、プラットフォーム側にもキャンセルされたことが通知され、通信が完全に終了します。
サンプルコード
Dartサンプルコードclass _MyHomePageState extends State<MyHomePage> { static const EventChannel _channel = const EventChannel('com.example.eventchannel/interop'); StreamSubscription _streamSubscription; String _platformMessage; void _enableEventReceiver() { _streamSubscription = _channel.receiveBroadcastStream().listen( (dynamic event) { print('Received event: $event'); setState(() { _platformMessage = event; }); }, onError: (dynamic error) { print('Received error: ${error.message}'); }, cancelOnError: true); } void _disableEventReceiver() { if (_streamSubscription != null) { _streamSubscription.cancel(); _streamSubscription = null; } } @override initState() { super.initState(); _enableEventReceiver(); } @override void dispose() { super.dispose(); _disableEventReceiver(); }4.2 プラットフォーム側の実装
チャンネル生成とイベントリスナー登録
EventChannelインスタンスを生成し、EventChannel#setStreamHandlerでイベントリスナーを登録します。
初期化処理
初期化処理が完了し、イベント送信の準備が出来たタイミングでコールされます。このタイミングでイベント送信に関する初期化処理などを行うと良いでしょう。
引数のEventSinkはローカルに保存しておき、必要なタイミングでイベント送信します。イベント送信
イベント送信例eventSink?.success("Android")のように引数を添えてイベント通知します。
イベント送信終了
全てのイベントを送信完了し、これ以上イベント送信が不要な場合にはendOfStreamを利用します。これをコールすることで、プラットフォーム側からのトリガーで通信を終了することが出来ます。コール後、onCancelのイベントリスナーがコールされます。
エラー発生時
想定外のエラーが発生するなどのこれ以上通信が不可になった場合など、EventSink#errorをコールすればDart側のStreamSubscription#onErrorがコールされます。
errorメソッドvoid error(String errorCode, String errorMessage, Object errorDetails)サンプルコード
Kotlinサンプルコードclass MainActivity: FlutterActivity() { private lateinit var channel: EventChannel var eventSink: EventSink? = null override fun configureFlutterEngine(@NonNull flutterEngine: FlutterEngine) { GeneratedPluginRegistrant.registerWith(flutterEngine) channel = EventChannel(flutterEngine.dartExecutor.binaryMessenger, "com.example.eventchannel/interop") channel.setStreamHandler( object : StreamHandler { override fun onListen(arguments: Any?, events: EventSink) { eventSink = events Log.d("Android", "EventChannel onListen called") Handler().postDelayed({ eventSink?.success("Android") //eventSink?.endOfStream() //eventSink?.error("error code", "error message","error details") }, 500) } override fun onCancel(arguments: Any?) { Log.w("Android", "EventChannel onCancel called") } }) } }
- 投稿日:2020-02-09T16:23:23+09:00
【Android】Navigation Componentを使った画面遷移のアニメーションをいい感じに書く
Navigation Componentを使って画面遷移のアニメーションをいい感じに書けないかなあと思い、試行錯誤してみたので記事にします。
はじめに
本記事の説明に、architecture-components-samplesの「NavigationBasicSample」を使わせていただきます。
https://github.com/myoshita/architecture-components-samples/tree/master/NavigationBasicSampleNavigationにおけるアニメーションの書き方
ドキュメントにもありますが、navigation.xml内の
Action内に書くことによって、簡単にアニメーションを追加することができます。
https://developer.android.com/guide/navigation/navigation-animate-transitions?hl=ja
app:----Animと書かれているやつです。
これにAnimResourceのxmlを指定することで画面遷移時にアニメーションします。navigation.xml<?xml version="1.0" encoding="utf-8"?> <navigation xmlns:android="http://schemas.android.com/apk/res/android" xmlns:app="http://schemas.android.com/apk/res-auto" xmlns:tools="http://schemas.android.com/tools" app:startDestination="@+id/title_screen"> <fragment android:id="@+id/title_screen" android:name="com.example.android.navigationsample.TitleScreen" android:label="fragment_title_screen" tools:layout="@layout/fragment_title_screen"> <action android:id="@+id/action_title_screen_to_register" app:destination="@id/register" app:popEnterAnim="@anim/slide_in_left" app:popExitAnim="@anim/slide_out_right" app:enterAnim="@anim/slide_in_right" app:exitAnim="@anim/slide_out_left"/> <action android:id="@+id/action_title_screen_to_leaderboard" app:destination="@id/leaderboard" app:popEnterAnim="@anim/slide_in_left" app:popExitAnim="@anim/slide_out_right" app:enterAnim="@anim/slide_in_right" app:exitAnim="@anim/slide_out_left"/> </fragment> <fragment android:id="@+id/register" android:name="com.example.android.navigationsample.Register" android:label="fragment_register" tools:layout="@layout/fragment_register"> <action android:id="@+id/action_register_to_match" app:destination="@id/match" app:popEnterAnim="@anim/slide_in_left" app:popExitAnim="@anim/slide_out_right" app:enterAnim="@anim/slide_in_right" app:exitAnim="@anim/slide_out_left"/> </fragment> <fragment android:id="@+id/leaderboard" android:name="com.example.android.navigationsample.Leaderboard" android:label="fragment_leaderboard" tools:layout="@layout/fragment_leaderboard"> <action android:id="@+id/action_leaderboard_to_userProfile" app:destination="@id/user_profile" app:popEnterAnim="@anim/slide_in_left" app:popExitAnim="@anim/slide_out_right" app:enterAnim="@anim/slide_in_right" app:exitAnim="@anim/slide_out_left"/> </fragment> <fragment android:id="@+id/match" android:name="com.example.android.navigationsample.Match" android:label="fragment_match" tools:layout="@layout/fragment_match"> <action android:id="@+id/action_match_to_in_game" app:destination="@id/in_game" app:popEnterAnim="@anim/slide_in_left" app:popExitAnim="@anim/slide_out_right" app:enterAnim="@anim/slide_in_right" app:exitAnim="@anim/slide_out_left"/> </fragment> <fragment android:id="@+id/user_profile" android:name="com.example.android.navigationsample.UserProfile" android:label="fragment_user_profile" tools:layout="@layout/fragment_user_profile"> <argument android:name="userName" android:defaultValue="name"/> <deepLink app:uri="www.example.com/user/{userName}" /> </fragment> <fragment android:id="@+id/in_game" android:name="com.example.android.navigationsample.InGame" android:label="Game" tools:layout="@layout/fragment_in_game"> <action android:id="@+id/action_in_game_to_resultsWinner" app:destination="@id/results_winner" app:popUpTo="@+id/match" app:popUpToInclusive="false" app:popEnterAnim="@anim/slide_in_left" app:popExitAnim="@anim/slide_out_right" app:enterAnim="@anim/fade_in" app:exitAnim="@anim/fade_out"/> <action android:id="@+id/action_in_game_to_gameOver" app:destination="@id/game_over" app:popUpTo="@id/match" app:popUpToInclusive="false" app:popEnterAnim="@anim/slide_in_left" app:popExitAnim="@anim/slide_out_right" app:enterAnim="@anim/fade_in" app:exitAnim="@anim/fade_out"/> </fragment> <fragment android:id="@+id/results_winner" android:name="com.example.android.navigationsample.ResultsWinner" tools:layout="@layout/fragment_results_winner"> <action android:id="@+id/action_results_winner_to_leaderboard" app:destination="@id/leaderboard" app:popUpTo="@id/title_screen"/> <action android:id="@+id/action_results_winner_to_match" app:popUpTo="@id/match"/> </fragment> <fragment android:id="@+id/game_over" android:name="com.example.android.navigationsample.GameOver" android:label="fragment_game_over" tools:layout="@layout/fragment_game_over"> <action android:id="@+id/action_game_over_to_match" app:popUpTo="@id/match"/> </fragment> </navigation>微妙なところ
navigation.xmlを見ていただくとお分かりかと思いますが、コードが長くなってしまいます。
今回の例は画面の数が少ないですが、画面数が多くなりactionの数も増えるとさらにコードが見にくくなりそうです。
なんとかして可読性を高めたい。そもそもどうやって画面遷移しているのか
Navigationでは、Fragmentのtransaction等の処理は
FragmentNavigatorが行っています。FragmentNavigator.java@Navigator.Name("fragment") public class FragmentNavigator extends Navigator<FragmentNavigator.Destination>この
Navigator.Name("fragment")というのが、navigation.xmlにあった<fragment>を指します。
他に<dialog>というのもありますが、これはDialogFramgmentNavigatorを呼び出すということになります。
つまり、タグを指定することで呼び出すNavigatorを変えることができるということになります。Navigatorにアニメーションの処理を委譲する
となれば、アニメーションの処理をしてくれる
Navigatorを作ってそれを呼び出せばコードをスッキリさせられそうです。
FragmentNavigatorを継承したNavigatorを作ります。
slide_inとslide_outを使っているアニメーションをまとめてみましょう。CustomFragmentNavigator.kt@Navigator.Name("fragment_slide_in_out") class CustomFragmentNavigator( context: Context, manager: FragmentManager, containerId: Int ) : FragmentNavigator(context, manager, containerId) { override fun navigate( destination: Destination, args: Bundle?, navOptions: NavOptions?, navigatorExtras: Navigator.Extras? ): NavDestination? { val customNavOptions = navOptions { launchSingleTop = navOptions?.shouldLaunchSingleTop() ?: false anim { popEnter = R.anim.slide_in_left // アニメーションを指定する popExit = R.anim.slide_out_right enter = R.anim.slide_in_right exit = R.anim.slide_out_left } } return super.navigate(destination, args, customNavOptions, navigatorExtras) } }
navigateをoverrideしてアニメーションのリソースを指定したnavOptionsを作成し、super.navigate()に渡すだけです。
あとは@Navigator.Nameで指定した名前をnavigation.xmlに書くことで遷移時にアニメーションするようになります。ただ、この
Navigatorを使って移動できるようにするには、NavigatorをNavControllerに追加する必要があります。NavHostFragmentを作成する
CustomNavigatorをNavControllerに追加するために、NavHostFragmentを継承したFragmentを作成します。
追加する処理はonCreateNavController内で行います。CustomNavHostFragment.ktclass CustomNavHostFragment : NavHostFragment() { override fun onCreateNavController(navController: NavController) { super.onCreateNavController(navController) navController.navigatorProvider += CustomFragmentNavigator( requireContext(), childFragmentManager, id ) } }
navigatorProvider +=というのは、JavaでいうとgetNavigatorProvider().addNavigator(navigator)を指します。
Kotlin便利ですね。
(https://developer.android.com/guide/navigation/navigation-add-new?hl=ja#kotlin)NavigatorProvider.ktinline operator fun NavigatorProvider.plusAssign(navigator: Navigator<out NavDestination>) { addNavigator(navigator) }実はここが一番悩んだところで、どのタイミングで追加すればいいんだろうと思い調べていたら、
NavHostFragment#onCreateNavControllerのドキュメントに書いてました。If you support any custom destination types, their Navigator should be added here to ensure it is available before the navigation graph is inflated / set.
https://developer.android.com/reference/androidx/navigation/fragment/NavHostFragment#onCreateNavController作成した2つを使って書き換える
あとは既存のコードを書き換えていきます。
まずは、NavHostFragmentを、作成したCustomNavHostFragmentに書き換えます。activity_main.xml<FrameLayout xmlns:android="http://schemas.android.com/apk/res/android" xmlns:app="http://schemas.android.com/apk/res-auto" xmlns:tools="http://schemas.android.com/tools" android:layout_width="match_parent" android:layout_height="match_parent" android:background="@android:color/background_light" tools:context="com.example.android.navigationsample.MainActivity"> <fragment android:id="@+id/my_nav_host_fragment" android:name="com.example.android.navigationsample.CustomNavHostFragment" android:layout_width="match_parent" android:layout_height="match_parent" app:defaultNavHost="true" app:layout_constraintBottom_toBottomOf="parent" app:layout_constraintEnd_toEndOf="parent" app:layout_constraintStart_toStartOf="parent" app:layout_constraintTop_toTopOf="parent" app:navGraph="@navigation/navigation"/> </FrameLayout>そして、
fragmentタグをfragment_slide_in_outに書き換えてアニメーションの指定を消します。navigation.xml<?xml version="1.0" encoding="utf-8"?> <navigation xmlns:android="http://schemas.android.com/apk/res/android" xmlns:app="http://schemas.android.com/apk/res-auto" xmlns:tools="http://schemas.android.com/tools" app:startDestination="@+id/title_screen"> <fragment_slide_in_out android:id="@+id/title_screen" android:name="com.example.android.navigationsample.TitleScreen" android:label="fragment_title_screen" tools:layout="@layout/fragment_title_screen"> <action android:id="@+id/action_title_screen_to_register" app:destination="@id/register"/> <action android:id="@+id/action_title_screen_to_leaderboard" app:destination="@id/leaderboard"/> </fragment_slide_in_out> <fragment_slide_in_out android:id="@+id/register" android:name="com.example.android.navigationsample.Register" android:label="fragment_register" tools:layout="@layout/fragment_register"> <action android:id="@+id/action_register_to_match" app:destination="@id/match"/> </fragment_slide_in_out> <fragment_slide_in_out android:id="@+id/leaderboard" android:name="com.example.android.navigationsample.Leaderboard" android:label="fragment_leaderboard" tools:layout="@layout/fragment_leaderboard"> <action android:id="@+id/action_leaderboard_to_userProfile" app:destination="@id/user_profile"/> </fragment_slide_in_out> <fragment_slide_in_out android:id="@+id/match" android:name="com.example.android.navigationsample.Match" android:label="fragment_match" tools:layout="@layout/fragment_match"> <action android:id="@+id/action_match_to_in_game" app:destination="@id/in_game"/> </fragment_slide_in_out> <fragment android:id="@+id/user_profile" android:name="com.example.android.navigationsample.UserProfile" android:label="fragment_user_profile" tools:layout="@layout/fragment_user_profile"> <argument android:name="userName" android:defaultValue="name"/> <deepLink app:uri="www.example.com/user/{userName}" /> </fragment> <fragment android:id="@+id/in_game" android:name="com.example.android.navigationsample.InGame" android:label="Game" tools:layout="@layout/fragment_in_game"> <action android:id="@+id/action_in_game_to_resultsWinner" app:destination="@id/results_winner" app:popUpTo="@+id/match" app:popUpToInclusive="false" app:popEnterAnim="@anim/slide_in_left" app:popExitAnim="@anim/slide_out_right" app:enterAnim="@anim/fade_in" app:exitAnim="@anim/fade_out"/> <action android:id="@+id/action_in_game_to_gameOver" app:destination="@id/game_over" app:popUpTo="@id/match" app:popUpToInclusive="false" app:popEnterAnim="@anim/slide_in_left" app:popExitAnim="@anim/slide_out_right" app:enterAnim="@anim/fade_in" app:exitAnim="@anim/fade_out"/> </fragment> <fragment android:id="@+id/results_winner" android:name="com.example.android.navigationsample.ResultsWinner" tools:layout="@layout/fragment_results_winner"> <action android:id="@+id/action_results_winner_to_leaderboard" app:destination="@id/leaderboard" app:popUpTo="@id/title_screen"/> <action android:id="@+id/action_results_winner_to_match" app:popUpTo="@id/match"/> </fragment> <fragment android:id="@+id/game_over" android:name="com.example.android.navigationsample.GameOver" android:label="fragment_game_over" tools:layout="@layout/fragment_game_over"> <action android:id="@+id/action_game_over_to_match" app:popUpTo="@id/match"/> </fragment> </navigation>まだfade in/outのアニメーションが残っていますが、少しスッキリしたコードになりました。
おわりに
アニメーションの処理を
Navigatorに委譲することでxml内で指定する必要がなくなるという内容でした。
- 投稿日:2020-02-09T14:28:47+09:00
adventcalender ARCoreを触って、サンプルを作ってみる 12/11分として記載
2020/02/08 記事の構成を記載
こんにちは、コロナです。
今回は、ARの学習をしたくてARCoreのサンプルを作成しようのコーナーです。
ARCoreって何?
UnityがAndroid向けにゲームを拡張するために用意してくれたSDKになります。
Unity側の紹介ページ
https://unity3d.com/jp/partners/google/arcoreissueこれからの課題
google側に記載されているSDKの消化をしていく
https://developers.google.com/ar/develop/unity/quickstart-androidSDKの取り込んで成功した時のスクショ
サンプルシーンを取り込んでの動作確認とスクショ
プロジェクトの設定について、確認と必要であれば設定
Android環境として実際にビルドをする
ありがとうございました