- 投稿日:2020-02-06T23:40:58+09:00
FirebaseFunctionsでPush通知をHTTP関数呼び出しで送信する
はじめに
今回はFirebaseFunctionsのhttp関数を使用して特定のデバイスにPush通知を送る実装を行なっていきます。実装前に下記の準備項目が必要になります。
事前準備
- Firebaseプロジェクト
- Firebase/Messaging導入済のiosプロジェクト
- APNsのFirebaseアップロード
FirebaseCLIインストール
まずは、FirebaseCLIをインストールすることでFunctionsのDeployやプロジェクトの切り替えなどをCLIで操作できるようにします。今回はnpmでインストールを行います。
npmインストール
とりあえず最新のものをnodebrewで取得してきてPathを通すとこまで終わらせます。
    $ brew install nodebrew
    $ nodebrew install-binary 13.7.0
    $ nodebrew use  v7.0.0
    $ echo 'export PATH=$HOME/.nodebrew/current/bin:$PATH' >> ~/.bash_profile
    $ source ~/.bash_profile
firebase-toolsインストール
1.npmでfirebase-toolsをインストールします。
$ npm install -g firebase-tools2.firebase-toolsコマンドを使用して、操作を行うユーザの認証をします。下記のコマンドを実行するとWebブラウザが立ち上がるので、Firebaseプロジェクトで編集権限のあるアカウントでログインを行います。
$ firebase login3.firebaseのプロジェクトを
useコマンドを使って指定します。この操作によりfirebase/functionsなどのデプロイ先を変更できたりします。$ firebase use firebase_project_idFunctionsプロジェクト作成
今回はFunctionsのみ使用するので下記のコマンドでプロジェクトを立ち上げます。
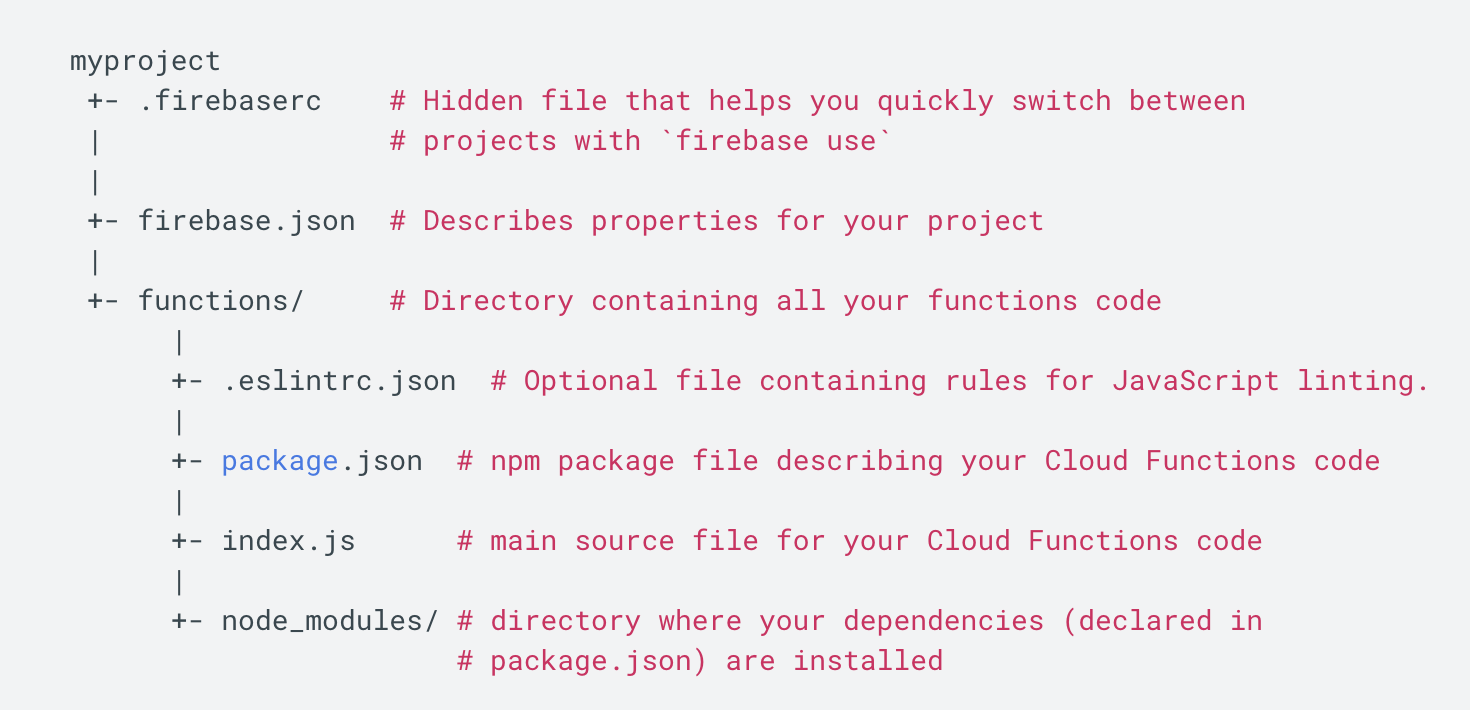
$ firebase init functionsすると下記のような構造のプロジェクトが立ち上がるので、主に
index.jsを編集して関数を作成して行きます。
参照: https://firebase.google.com/docs/functions/get-started?hl=ja
FirebaseAdminSDKインストール
1.sdkの情報などを保存する
package.jsonを作成します。$ npm init2.firebase-admin npmパッケージをインストールします。
$ npm install firebase-admin --save3.次に
firebase-adminを初期化をするためにローカルの環境変数にFirebaseサービスアカウントの秘密鍵を生成したファイルへのパスを指定します。これを設定することでSDKの初期化時にキーが参照され、プロジェクトでの認証が完了します。CIなどでブランチごとにDeploy先を変更させたい時はどうやって秘密鍵を参照させるのがベストなんでしょうか?$ export GOOGLE_APPLICATION_CREDENTIALS="/home/user/Downloads/service-account-file.json"参照: https://firebase.google.com/docs/admin/setup?hl=ja
4.
index.jsに移動してsdkの初期化コードを追加します。index.jsconst functions = require('firebase-functions'); const admin = require('firebase-admin'); admin.initializeApp();node.jsの実装
index.jsconst functions = require('firebase-functions'); const admin = require('firebase-admin'); admin.initializeApp(); //onRequestでhttpからの呼び出しを可能にします。 exports.push = functions.https.onRequest((request, response) => { if (request.query.device_token !== undefined && request.body.message !== undefined) { const device_token = request.query.device_token const message = request.body.message const payload = { notification: { body: message, badge: "1", sound:"default", } }; switch (request.method) { case 'POST': push(device_token, payload, response); break default: response.status(400).send({ error: 'Invalid request method' }) break } } else { response.status(400).send({ error: 'Invalid request parameters' }) } }) function push(token, payload, response) { const options = { priority: "high", }; //FCMにAdminSDKを介してPush通知を送信します。 admin.messaging().sendToDevice(token, payload, options) .then(pushResponse => { console.log("Successfully sent message:", pushResponse); response.status(200).send({message: 'Successfully sent message'}) }) .catch(error => { response.status(400).send({ error: 'Error sending message' }) }); }swiftの実装
AppDelegate.swiftimport UIKit import Firebase import UserNotifications import FirebaseMessaging @UIApplicationMain class AppDelegate: UIResponder, UIApplicationDelegate { var window: UIWindow? private var mainTabViewController: MainTabViewController? func application(_ application: UIApplication, didFinishLaunchingWithOptions launchOptions: [UIApplication.LaunchOptionsKey: Any]?) -> Bool { //環境ごとにプロジェクトを変えてるためplistを変更しています。 let filePath = Bundle.main.path(forResource: Config.Server.instance.firebaseInfoPlistName, ofType:"plist") //Forced Unwrapping? FirebaseApp.configure(options: FirebaseOptions(contentsOfFile:filePath!)!) initFirebaseMessaging() initRemoteNotification(application) window = UIWindow(frame: UIScreen.main.bounds) window!.makeKeyAndVisible() navigate() return true } func navigate(_ isTrial: Bool = false) { guard let window = window else { assert(false) return } let previousVC = window.rootViewController for v in window.subviews { v.removeFromSuperview() } let vc = MainTabViewController() mainTabViewController = vc window.rootViewController = vc if let previousVC = previousVC { previousVC.dismiss(animated: false) { previousVC.view.removeFromSuperview() } } } private func initRemoteNotification(_ application: UIApplication) { UNUserNotificationCenter.current().delegate = self let authOptions: UNAuthorizationOptions = [.alert, .badge, .sound] //TODO: Relocate requestAuthorization method. UNUserNotificationCenter.current().requestAuthorization(options: authOptions, completionHandler: {_, _ in }) application.registerForRemoteNotifications() } private func initFirebaseMessaging() { //DelegateでdeviceTokenの変更を監視します。 Messaging.messaging().delegate = self //明示的にdeviceTokenを取得します。 InstanceID.instanceID().instanceID { (result, error) in if let error = error { //TODO: Error handling. print("Error fetching remote instance ID: \(error)") } else if let result = result { //TODO: Send token to parnovi api for update user fcm token. if authorized == true print("Remote instance ID token: \(result.token)") } } } } extension AppDelegate: UNUserNotificationCenterDelegate { func userNotificationCenter(_ center: UNUserNotificationCenter, willPresent notification: UNNotification, withCompletionHandler completionHandler: @escaping (UNNotificationPresentationOptions) -> Void) { completionHandler([.badge, .sound, .alert]) } func userNotificationCenter(_ center: UNUserNotificationCenter, didReceive response: UNNotificationResponse, withCompletionHandler completionHandler: @escaping () -> Void) { completionHandler() } } extension AppDelegate: MessagingDelegate { //Observe firebase messaging token. func messaging(_ messaging: Messaging, didReceiveRegistrationToken fcmToken: String) { } }FunctionsのDeploy
実際に関数をデプロイしてPush通知を送信してみます。
$ firebase deploy --only functionsswiftの
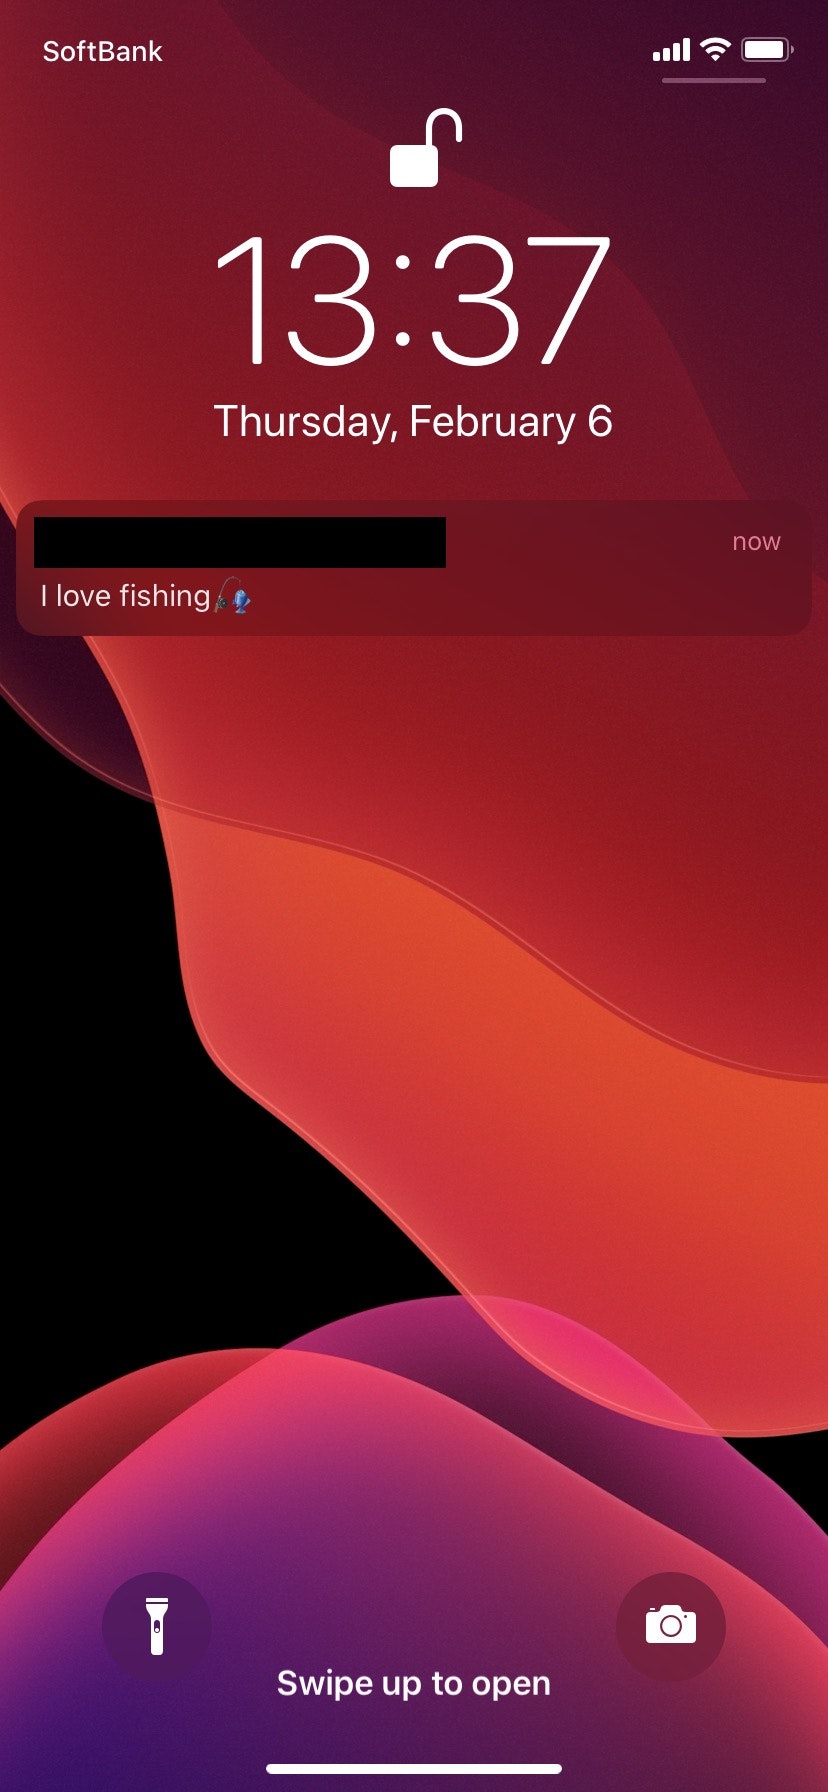
InstanceID.instanceID().instanceIDで取得したDeviceTokenを使ってcurlで実際にPushを送信してみます。$ curl -X POST https://yout-functions-url/push?device_token=your-device-token -d "message=I love fishing?"結果
さいごに
今回はテスト的に実行できるようにするため、httpリクエストに認証は設定していませんでしたが、また実装し直したら編集しようと思います。また、CIなどを使ってfirebase/functionsなどをデプロイするとき、どのようにFirebaseプロジェクトの秘密鍵を参照させるのがベストなのでしょうか。。
- 投稿日:2020-02-06T22:21:06+09:00
Node.jsの関数をBashでパイプぽく使えるコマンド
Node.jsの関数をBashで使おうと思うことがあるのでしょうか……?
私は今まではありませんでした。@takuya_1stさんのnodeの関数をbashシェルで使えるようにする。という記事が面白かったのでコマンドを作ってみました。

下記コマンドでインストールできます。
$ npm i -g @amanoese/nodep使い方
例えば、下記のようにしてQueryStringを無駄にEncode,Decodeした後にJSONに変換することができます。
$ echo -n 'a=b' | nodep encodeURIComponent @ decodeURIComponent @ "require('querystring').parse" @ JSON.stringify
{"a":"b"}
Node関数同士の接続は bash の "|" ではなく "@" になります。
また、元の記事の方ではNode.jsの関数を実際にコマンドとして利用できるようにしていましたが、
コマンドが増えて煩雑になりそうかつ登録で名前の衝突とかしそうと感じたので、1つのコマンド内で処理が完結するようにできるようにしています。少し実用的な使い方?
下記のように使えばjqでは処理できない?JSONぽいJavaScriptオブジェクトを処理するとき役に立つかもしれません。
$ echo -n '{a:1}' | sed 's/^/x=/' | nodep eval @ JSON.stringify | jq .
{
  "a": 1
}
感想
Node.jsの関数がつかえるとたのしいですね。
余談
パイプライン演算子の実装がきたら下記のようなコマンドにしてJavaScriptぽくしたほうが面白いかもしれません。
$ echo -n 'a=b' | nodep '$stdin |> encodeURIComponent |> decodeURIComponent |> require("querystring").parse |> JSON.stringify'あと、npmでインストールできますが、このコマンドはShellScriptでできています。
- 投稿日:2020-02-06T20:00:55+09:00
CircleCI 2.1 設定サンプル(Node + MySQL)
環境
- Circle CI 2.1
- Node + MySQL(ですが、主にCircle CIの設定のため、←の環境には大きく依存していません)
設定例
version: 2.1

executors:
  default:
    docker:
      - image: circleci/node:10.18.0-buster
  extended:
    docker:
      - image: circleci/node:10.18.0-buster
      - image: circleci/mysql:5.7
        environment:
          MYSQL_ALLOW_EMPTY_PASSWORD: 'yes'
          MYSQL_DATABASE: your_database_name_comes_here

commands:
  restore_node_dependencies:
    steps:
      - restore_cache:
          name: Restore node dependencies cache
          keys:
            - v1-node-dependencies-{{ checksum "yarn.lock" }}
            - v1-node-dependencies
  install_node_dependencies:
    steps:
      - run:
          name: Install node dependencies
          command: yarn install --frozen-lockfile
  save_node_dependencies:
    steps:
      - save_cache:
          name: Save node dependencies cache
          key: v1-node-dependencies-{{ checksum "yarn.lock" }}
          paths:
            - node_modules
  wait_for_db_start_up:
    steps:
      - run:
          name: Wait for db start up
          command: dockerize -wait tcp://127.0.0.1:3306 -timeout 1m
  run_test:
    steps:
      - run:
          name: Run test
          command: yarn run test

jobs:
  build:
    executor: default
    steps:
      - checkout
      - restore_node_dependencies
      - install_node_dependencies
      - save_node_dependencies
  test:
    executor: extended
    steps:
      - checkout
      - restore_node_dependencies
      - wait_for_db_start_up
      - run_test

workflows:
  build_and_test:
    jobs:
      - build
      - test:
          requires:
            - build
ポイント
2.1の機能(executors、commands)を使って、設定をわかりやすくする。executorを最適化する。
- 例えば、DBのセットアップは数十秒かかるので(※実測で20秒程)、不要なところでは行わない。
- 上記の例では、
build(yarn install)にDBは不要なので、DBが無いexecutor(= default)を使っています。executorの名前(defaultやextended)は任意です。- テスト実行前に、DBの起動待ちをする(
dockerize -wait)。step内でnameを付ける。
- 無くてもいいですが、その場合はCircleCIのデフォルトが使われます。
restore_cacheなどは全てRestoring Cacheとなり、中を見ないとどのステップか分からなくなるので、付けています。参照先
yarn installに--frozen-lockfileオプションを付ける
- https://circleci.com/docs/ja/2.0/yarn/
- https://classic.yarnpkg.com/ja/docs/cli/install/#toc-yarn-install-frozen-lockfile
version: 2.1ではworkflowsの version 指定は不要。その他
- ソースコードが大きくなってきたら、ソースコードのキャッシュも検討する(※デフォルトでやっておいてもいいかもしれない)。
- 投稿日:2020-02-06T17:31:19+09:00
[Node]mysql2でRDS証明書更新対応した
対象
- mysql2を使用している
- DBへ接続するのオプションに、
ssl: "Amazon RDS"を使ってる更新方法
以下のコマンドでパッケージのアップデートを行う
npm up mysql2何が変わる?
constansに指定されている証明書が変更される
以下はnode-mysql2のGithubhttps://github.com/sidorares/node-mysql2/blob/master/lib/constants/ssl_profiles.js
確認
開発プロジェクト内の
node_modules > mysql2 > lib > constans > ssl_profile.js
を確認して
Updated for 2015となっている場合RDSの証明書更新に合わせて更新する様にしましょう。'use strict'; // Certificate for Amazon RDS (Updated for 2015) exports['Amazon RDS'] = { ca: [ ...省略
- 投稿日:2020-02-06T14:56:55+09:00
文字列で記載している年月日を日付として取得し前日、翌日を表示させる方法
環境
node.js 8.11.4
MariaDB 10.3.10.0やりたいこと
MariaDBに登録しているYYYYMMDD(VARCHAR)をdate型に変換して前日および翌日を取得し、HTMLで表示させる。
やったこと
//date.parseで変換 NaN
//var ddate = Date.parse(days);
//console.log(ddate.toString());//newDateで変換 Invalid Date
var ddate = new Date('YYYYMMDD');
console.log(ddate.toString());初歩的な質問でしたら大変申し訳ございませんが何卒よろしくお願い申し上げます。
- 投稿日:2020-02-06T13:54:16+09:00
【2020年2月】direnv+nvmでプロジェクトごとのnode.jsのバージョンを【強制】【固定】
- 投稿日:2020-02-06T13:54:16+09:00
【2020年2月】プロジェクトごとのnode.jsのバージョンを、direnv+nvmで【強制】【固定】
- 投稿日:2020-02-06T10:51:14+09:00
SlackからGitHub Actionsにパラメータを渡して実行する
以下のサービスを組み合わせて、ポチポチCIツールを作成します。
- Slack
- GitHub Actions、REST API v3
- AWS Lambda ( Node.js 12.x (@slack/bolt 1.5.0) )
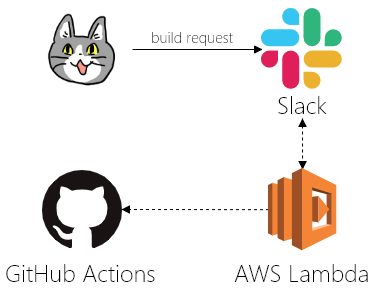
外観図
Slackに対してリクエストすると、SlackとLambdaがやりとりをしてGitHubに命令を出してくれます。
素材
猫の顔: https://kumamine.blogspot.com/2019/12/blog-post_27.html
Slack: Cacoo内の素材
AWS Lambda: Cacoo内の素材
GitHub: Cacoo内の素材GitHub ActionsのJobを外部から実行する
GitHub Actionsはプルリク作成やコミットプッシュなどの何らかの「トリガー」で走るCIツールです。
GitHubのAPIを利用し、「トリガー」を発生させることで、外部からActionsのJobを実行することができます。準備
GitHub ActionsをWebAPIから実行するための準備を行います。
- Github Actions用のリポジトリを作成して、ローカルにcloneしておきます。
https://help.github.com/ja/github/getting-started-with-github/create-a-repo- GitHub REST API v3を利用するためにアクセストークンを作成します。権限には
repoを付加しておきましょう。
https://help.github.com/ja/github/authenticating-to-github/creating-a-personal-access-token-for-the-command-line- GitHubからcloneしてきたプロジェクト上に、Github Actionsのワークフロー構文ファイルを作成します。作成したファイルはデフォルトブランチ(いわゆるmasterブランチ)に置きましょう。
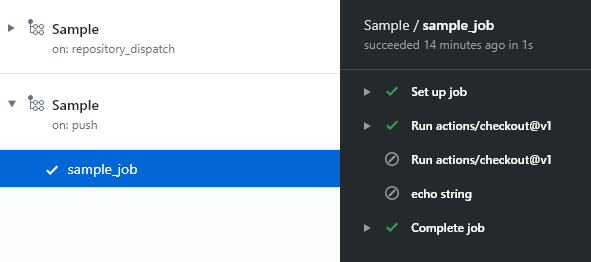
.github/workflows/main.yml# Actionの名前 name: Sample # Jobが実行されるトリガー # pushされた場合、もしくはイベント種別が「hoge」のリポジトリディスパッチイベントが作成された場合に実行する on: push: repository_dispatch: types: [hoge] jobs: sample_job: runs-on: ubuntu-latest name: sample_job steps: - uses: actions/checkout@v1 # ブランチが指定されていた場合は、指定されているブランチを利用する - if: github.event.client_payload uses: actions/checkout@v1 with: ref: ${{ github.event.client_payload.ref }} # 「echo_string」要素が指定されていた場合は、その要素の内容を表示する - if: github.event.client_payload.echo_string name: echo string run: echo ${{ toJSON(github.event.client_payload.echo_string) }}Github ActionsのJobを端末から実行する
準備ができたら、端末からGitHub Actionsに文字列を渡して、Jobのログ上に表示させてみましょう。
# 扱いやすいように変数にアクセストークンを代入する
GITHUB_TOKEN={アクセストークン}

# 実行ブランチ
BRANCH={ブランチ名}

# Actionの実行
curl -X POST https://api.github.com/repos/:owner/:repo/dispatches \
     -H "Authorization: token $GITHUB_TOKEN" \
     -H "Accept: application/vnd.github.everest-preview+json" \
     --data "{\"event_type\": \"hoge\", \"client_payload\": {\"ref\": \"$BRANCH\", \"echo_string\": \"hugahuga\"}}"
curlコマンドの--dataの、
event_typeには、ワークフロー構文ファイルのon.repository_dispatch.typesの文字列を指定します。
client_payload.refには、実行するブランチ名称を指定します。
client_payload.echo_stringには、表示する文字列を指定します。curlで実行した場合の結果
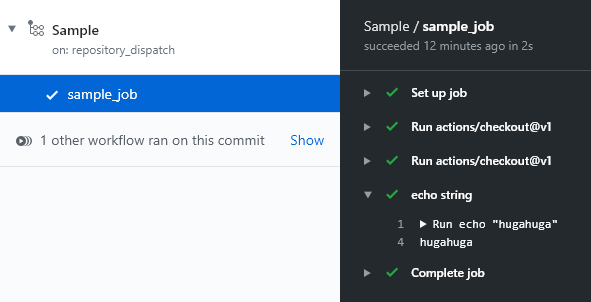
下図はGithub Actions上の実行結果です。
curlコマンドの--dataで指定したclient_payload.echo_stringの文字列が表示されます。
pushした場合の結果
ブランチの切り替えも文字列の表示も行いません。
pushされたブランチで処理が行われます。
ここまでの作業で察した方もいらっしゃると思いますが、デフォルトブランチ上にワークフロー構文ファイルが存在しないと、Jobが実行されません。理由は、APIがデフォルトブランチに対してイベントを発生させているためです。ではどこでブランチが切り替わっているのかというと、Github ActionsのJob中で切り替わっています。
ブランチに対してイベントを発生させるAPIも存在するのですが、本来の使い方ではない上に、意味のないログがプルリクなどに残ってしまうため、今回はdispatchesイベントを採用しました。※ GitHub Actions用のAPIも用意されているようですが、まだパブリックベータ版のようですし、ジョブが実行できるわけではないみたいです。内容が頻繁に変更される可能性があるため、マスターがリリースされ次第、都合がよさそうであれば記事内容を書き換えようかなと思っています。(2020.02.02)
参考
https://developer.github.com/v3/repos/#create-a-repository-dispatch-event
https://help.github.com/ja/actions/automating-your-workflow-with-github-actions/events-that-trigger-workflows
https://swfz.hatenablog.com/entry/2020/01/23/080000
https://qiita.com/proudust/items/51599abd2b107b708e1eSlackにモーダルウィンドウを表示して、入力値を取得する
Slackから提供されているWebAPIを組み合わせることで、モーダルウィンドウなどのインターフェースを実装することができます。
今回はそのラッパーであるBoltフレームワークを利用して実装していきます。準備
- Slackのワークスペースを作成します。
https://slack.com/intl/ja-jp/help/articles/206845317- SlackのAppsを作成します。https://api.slack.com/apps から
Create New Appを押して、App NameとDevelopment Slack Workspaceの項目を入力してCreate Appを押せばOKです。(2020.02.02現在)
https://api.slack.com/start/overview- Features > OAuth & Permissions > Scopes > Bot Token Scopes に
app_mentioned:read、chat:write、commandsを追加します。
https://api.slack.com/apps/{APP_ID}/oauth- Settings > Install App からアプリをワークスペースにインストールします。
https://api.slack.com/apps/{APP_ID}/install-on-teamアプリをハンドリングするサーバの作成
今回はServerless FrameworkとAWS Lambdaを利用してサーバを作成します。
まずは、端末で以下のコマンドを実行し、プロジェクトを作成します。# プロジェクトの作成 npm init # ライブラリのインストール npm install serverless \ aws-serverless-express \ dotenv \ @slack/bolt \ axios # サーバーレスフレームワークプロジェクトの作成 npx serverless create --template aws-nodejsサーバーレスの設定を追加します。
serverless.ymlservice: sample provider: name: aws runtime: nodejs12.x region: ap-northeast-1 functions: events: handler: handler.app timeout: 30 events: # Bolt App - http: method: post path: /slack/events # OAuth Flow - http: method: get path: /slack/installation - http: method: get path: /slack/oauth内部のロジックを作成します。
/repos/:owner/:repo/dispatchesの部分は「Github ActionsのJobを外部から実行する」で利用したリポジトリを指定してください。handler.js'use strict'; // ------------------------------ // AWS Lambda handler // ------------------------------ require('dotenv').config(); const { App, LogLevel, ExpressReceiver } = require('@slack/bolt'); const expressReceiver = new ExpressReceiver({ signingSecret: process.env.SLACK_SIGNING_SECRET }); const app = new App({ token: process.env.SLACK_BOT_TOKEN, receiver: expressReceiver, logLevel: LogLevel.DEBUG }); const awsServerlessExpress = require('aws-serverless-express'); const server = awsServerlessExpress.createServer(expressReceiver.app); module.exports.app = (event, context) => { console.log('⚡️ Bolt app is running'); console.log(event); awsServerlessExpress.proxy(server, event, context) } app.error(printCompleteJSON); // ------------------------------ // Application Logic // ------------------------------ // slash commandでモーダルウィンドウを表示するためのロジック app.command('/build', async ({ ack, body, context }) => { ack(); const result = app.client.views.open({ "token": context.botToken, "trigger_id": body.trigger_id, "view": { "type": "modal", "callback_id": "task-modal", "private_metadata": JSON.stringify(body), "title": { "type": "plain_text", "text": "Github Actions", "emoji": true }, "submit": { "type": "plain_text", "text": "Submit", "emoji": true }, "close": { "type": "plain_text", "text": "Cancel", "emoji": true }, "blocks": [ { "type": "input", "block_id": "input-title", "element": { "type": "plain_text_input", "action_id": "input", "initial_value": body.text }, "label": { "type": "plain_text", "text": "branch", "emoji": true }, "optional": false }, { "type": "input", "block_id": "input-description", "element": { "type": "plain_text_input", "action_id": "input", "multiline": true }, "label": { "type": "plain_text", "text": "echo string", "emoji": true }, "optional": true } ] } }); console.log( await result); }); // モーダルウィンドウから送信された値を受け取って、処理を行うロジック app.view('task-modal', async ({ body, ack, context }) => { // モーダルウィンドウでのデータ送信イベントを確認 ack(); // ユーザーにメッセージを送信 try { app.client.chat.postMessage({ token: context.botToken, channel: body['user']['id'], text: 'Build request received!' }); } catch (error) { console.error(error); } // ------------------------------ // axios flow // ------------------------------ const axiosBase = require('axios'); const axios = axiosBase.create({ baseURL: 'https://api.github.com', headers: { "Authorization": `token ${process.env.GITHUB_TOKEN}`, "Accept": "application/vnd.github.everest-preview+json" } }); const requestBody = JSON.stringify({ event_type: "hoge", client_payload: { ref: body.view.state.values['input-title'].input.value, echo_string: body.view.state.values['input-description'].input.value } }); // GitHubへのリクエスト処理 axios.post('/repos/:owner/:repo/dispatches', requestBody) .then(response => (this.info = response)) .catch(function(e) { console.log(e); }); }); function printCompleteJSON(error) { console.log(JSON.stringify(error)); }環境変数ファイルを作成して、センシティブな情報を入力します。
SLACK_SIGNING_SECRET: Features > OAuth & Permissions > OAuth Tokens & Redirect URLs > Tokens for Your Workspace > Bot User OAuth Access Token ( https://api.slack.com/apps/{APP_ID}/oauth )
SLACK_BOT_TOKEN: Basic Information > App Credentials > Signing Secret
GITHUB_TOKEN: GitHub REST API v3を利用するためにアクセストークン# .envファイルの作成 touch .env.envSLACK_SIGNING_SECRET=xxxxxxxxxx SLACK_BOT_TOKEN=xoxb-xxxxxxxxxx GITHUB_TOKEN=xxxxxxxxxx作成し終わったらデプロイします。
$ serverless deploy
 :
endpoints:
  POST - https://xxx.execute-api.ap-northeast-1.amazonaws.com/dev/slack/events
  GET - https://xxx.execute-api.ap-northeast-1.amazonaws.com/dev/slack/installation
  GET - https://xxx.execute-api.ap-northeast-1.amazonaws.com/dev/slack/oauth
# => デプロイ後のURLをメモしておく
中身はこれで完成です。
Slackのコマンドの設定を行う
- Features > Interactive Components > Interactivity を有効化します。また、Request URL にデプロイ後のPOST URL(
https://xxx.execute-api.ap-northeast-1.amazonaws.com/dev/slack/events)を貼り付けて保存します。
https://api.slack.com/apps/{APP_ID}/interactive-messages- Features > Slash Commands で
/buildというスラッシュコマンドを作成します。URLにはhttps://xxx.execute-api.ap-northeast-1.amazonaws.com/dev/slack/eventsを設定します。
https://api.slack.com/apps/{APP_ID}/slash-commands- Features > Event Subscriptions へアクセスし、有効化します。Enable Events > Request URL には
https://xxx.execute-api.ap-northeast-1.amazonaws.com/dev/slack/eventsを設定します。Subscribe to bot events にはapp_mentionを追加します。
https://api.slack.com/apps/{APP_ID}/event-subscriptions- アプリを再インストールします。
https://api.slack.com/apps/{APP_ID}/install-on-teamここまでの設定は「参考」の1つ目の
seratchさんの手順書と、2つ目のチュートリアルがとても参考になります。
また、開発のノウハウも書かれていますので一読をオススメします。SlackからGitHub Actionsにパラメータを渡して実行する
- ワークスペースの適当なチャンネルにアプリを追加します。
- テキストボックスに
/buildと打ち込み、送信します。- モーダルウィンドウが現れるので、項目を入力し、Submitボタンを押します。
- うまく設定できていれば、GitHub ActionsのJobが実行されます。
以上です。おつかれさまでした。
参考
https://github.com/seratch/bolt-starter
https://slack.dev/bolt/ja-jp/tutorial/getting-started
https://github.com/okimurak/slack-bolt-sample-app-aws
https://api.slack.com/dialogs
https://api.slack.com/surfaces/modals/using
https://dev.classmethod.jp/tool/slack-multistep-modal-example/おわりに
うまく組み込めば、スマホから手軽に緊急対応できるようになっていいかもしれませんね。
それと、GitHub ActionsのJob終了時に、Slackに通知を送るようにすると色々と捗るかも。また、時間がある時に少しいじってみようと思います。

- 投稿日:2020-02-06T06:07:28+09:00
Fix: WSUS Connection Error Reset Server Node On Windows Server 2012
Error: Connection Error
An error occurred trying to connect the WSUS server. The error can happen for a number of reasons. Check connectivity with the server. Please contact your network administrator if the problem persists
Click Reset server node to try to connect to the server again.
Follow the below steps to Fix: WSUS Connection Error Reset Server Node On Windows Server 2012:
Open IIS
Click on Application Pools
Click on WsusPool
Click Advanced Settings
Scroll down and increase the Private Memory Limit and decrease the Regular Time Interval.Read More https://www.itsmarttricks.com/fix-wsus-connection-error-reset-server-node-on-windows-server-2012/