- 投稿日:2019-12-03T21:59:22+09:00
[iOS] アプリクラッシュでリジェクトされた際のクラッシュレポート復元方法
はじめに
iOSアプリのストア申請時、アプリがクラッシュするとリジェクトされますよね。
そこで添付されたクラッシュログを復元する方法に手間取ったので、どのように解決したかを紹介します。なぜ手間取ったか
調べると、dSYMからクラッシュログを復元する方法はたくさん出てきます。
私の環境では、CIでビルドからAppStoreConnectへのアップロードまで行っていた為、dSYMはAppStoreConnectからダウンロードしていました。
そのdSYMとアップルが送ってくれたクラッシュログの紐付けうまくいかず、手間取ってしまいました。一般的には
クラッシュログ(xxx.crash)と、予め保存しておいたdSYM(アプリ名.app.dSYM)を、
symbolicatecrashに食わせてやると、復元できます。私の環境
AppStoreConnectからダウンロードしたdSYMは、
appDsyms.zipというZIPファイルで、解凍すると中には[ランダムな文字列?].dSYMというファイルが多数入っています。
つまり、dSYMが複数あるような状況で、どのdSYMをsymbolicatecrashに食わせれば良いかが判断できなかった訳です。手順
アップルが送ってくれたクラッシュログを確認すると、以下のような文字列が一番上に記述してあると思います。
{
"app_name":[アプリ名],
"timestamp":[日付],
"app_version":[アプリバージョン],
"slice_uuid":"f1a3f12a-gca0-3ad8-97d1-f450de9a6a9b", ←ランダムな文字列?
 〜 以下、略 〜
}
ここの
slice_uuidに記載された文字列がキモです。
ダウンロードしたappDsyms.zipを解凍すると、f1a3f12a-gca0-3ad8-97d1-f450de9a6a9b.dSYMというファイルが存在していると思いますので、そのdSYMとクラッシュログをsymbolicatecrashで食わせてあげればクラッシュした箇所を特定することができます!クラッシュログの復元方法(
symbolicatecrashの使い方)については、以下の記事を参考にさせていただきました。
https://qiita.com/ruwatana/items/cc470eb229d267d693b0おわりに
手元にdSYMが無く、ダウンロードしてきたdSYMも複数あって絶望したのですが、なんとか解決できました。
私と同じように、手元にdSYMファイルがないような状況に陥っている方の参考になれば幸いです。
- 投稿日:2019-12-03T13:34:38+09:00
【Xcode】複数プロジェクトでのソースの共通化
複数のプロジェクトでソースを共通化する
Xcodeは英語だらけなのでシェアしておく
共通化とは
ここでいう共通化は参照のことです。
元となるAというプロジェクトのソースを、他のプロジェクトBから参照する方法です。やり方
- 参照先のプロジェクトを開く
- ProjectNavigatorに参照元のプロジェクトから参照したいファイルをドラッグ&ドロップ
- コピーするか参照するかを選択するダイアログがでるので「Create folder reference」にチェックをいれてfinishを押す
- これで参照の設定が完了です。
ソースをいじった場合に、参照されているすべてのプロジェクトで変更がかかるようになります。
プロジェクトを複製してコピーアプリを作成する場合などに使いましょう。
- 投稿日:2019-12-03T12:09:52+09:00
iOSで開発/本番環境を分けてFirebaseを運用するTips
iOS Advent Calendar 2019の4日目の@shtnkgmです!
本記事ではiOSで開発/本番環境を分けてFirebaseを利用するTipsを紹介します。
環境を分けて利用したいユースケースは以下のようなものが挙げられます。
開発/本番環境によって運用者を分けたい
例)開発環境と本番環境を利用するチームが異なる開発環境を本番環境と区別することで本番環境に影響なく開発をしやすくしたい
例)テスト時に開発環境へのPush通知を間違って本番環境に送らないようにしたい本番環境の計測数値に開発時のものが含まれないようにしたい
例)AnalyticsやPerformance Monitoring, Crashlyticsの分析精度を高めたい実現方法
Firebaseで開発/リリース環境を分ける
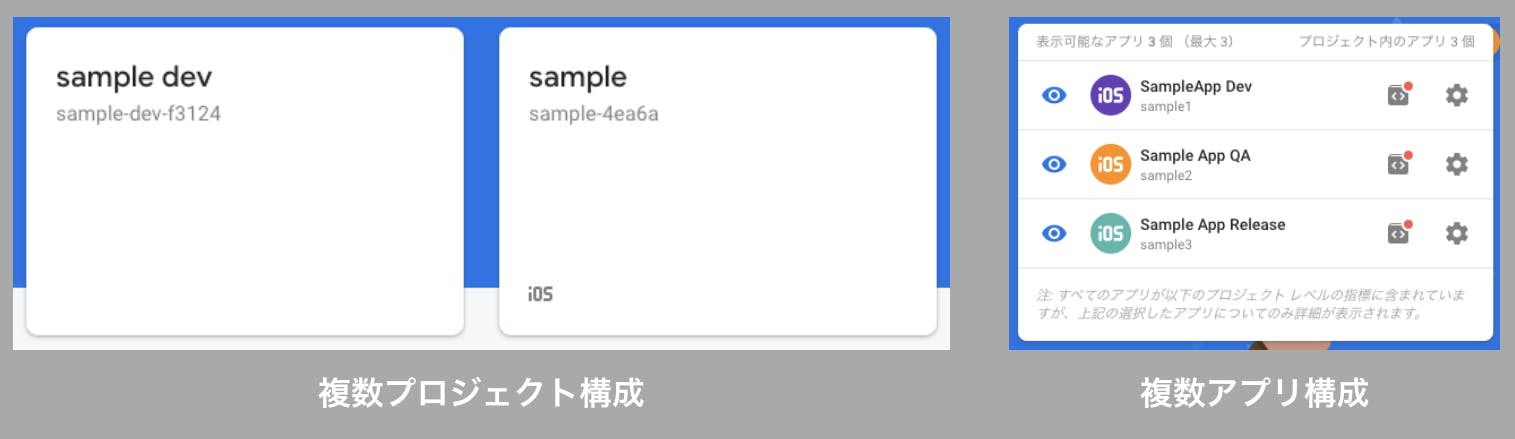
まずはFirebase側の環境を分ける必要があります。Firebase側の環境を分けるには、以下のいずれかの方法で実現できます。
- Firebaseプロジェクトを環境毎に複数作成する
- 同プロジェクト内にアプリを環境毎に複数作成する
プロジェクト単位で分割した場合はユーザー権限設定も個別に行えますが、アナリティクスは同時にまとめて見られなくなるなどの違いがあるので、運用方法を想定して決めると良いかと思います。
GoogleService-Info.plistを環境毎に分ける
通常の設定ではセットアップ時にFirebase Consoleから
GoogleService-Info.plistという構成ファイルをダウンロードし、それがデフォルトで読み込まれます。
環境毎に構成ファイルは異なるため、構成ファイルを切り替える必要があり、以下の2種類の方法があります。
- 環境毎のGoogleService-Info.plistを別々のディレクトリに配置し、Target MembershipによってTargetで切り替える
- 環境毎のGoogleService-Info.plistを別々のファイル名にする
Targetが環境によって別れていれば前者でも問題ありませんが、後者のファイル名を区別する方法が分かりやすいためオススメです。
別々のファイル名にする例)
- GoogleService-Info-dev.plist(開発環境)
- GoogleService-Info-qa.plist(QA環境)
- GoogleService-Info-release.plist(本番環境)
注意
ファイル名で区別する場合は、デフォルトの
GoogleService-Info.plistというファイル名は利用しないほうが良さそうです。
公式ドキュメントのFirebase / アナリティクスのレポートの信頼性を確保するにアナリティクスが失われる可能性があると記述があります。環境毎に構成ファイルを指定する
環境毎にTargetが分かれている場合は、Build Settingsの
Preprocessor Macrosのマクロで以下のように構成ファイル名を分岐させると良いです。let configFileName: String #if DEBUG configFileName = "GoogleService-Info-dev" #elseif QA configFileName = "GoogleService-Info-qa" #else configFileName = "GoogleService-Info-release" #endif構成ファイルは以下のように
configure(options:)メソッドで指定できます。guard let filePath = Bundle.main.path(forResource: "Firebase/\(configFileName)", ofType: "plist"), let options = FirebaseOptions(contentsOfFile: filePath) else { fatalError("Firebase plist file is not found.") } FirebaseApp.configure(options: options)CrashlyticsへのdSYMアップロード
クラッシュ分析用にFirebase Crashlyticsを利用している場合、シンボルファイル(dSYM)をアップロードする必要があります。
アップロード処理はFastlaneで自動化すると便利です。Fastlaneではupload_symbols_to_crashlyticsというアクションが利用できます。
以下のように、アクションのパラメータに構成ファイルのパスやdSYMファイルの保存先を指定します。upload_symbols_to_crashlytics( plistName = configuration == "Release" ? "GoogleService-Info-release.plist" : "GoogleService-Info-qa.plist" gsp_path: "./YourApp/Path/#{plistName}", dsym_path: ENV['DSYM_PATH'] )
gsp_pathには環境毎の構成ファイルのパスを指定します。dsym_pathにはCI環境でビルドした際のdSYMファイルの保存パスを指定します。利用しているCIサービスによっては環境変数として与えられていることもあります。おわりに
本記事ではiOSで開発/本番環境を分けてFirebaseを運用するTipsについて紹介しました。
Firebaseの環境を複数に分けると、設定を環境毎に柔軟に行える反面、同じ設定をFirebase Consoleで重複して行う必要があるので、手間を減らすいい方法がないかなと思っています。
本記事と関連する内容で何かアドバイスやご意見があればコメントに記載いただけると嬉しいです。以上iOS Advent Calendar 2019の4日目の記事でした。
参考

- 投稿日:2019-12-03T09:01:02+09:00
SwiftUI Christmas?
今年もクリスマスが近いてきました。
昨年はCore Animationを使ってクリスマスツリーを作成してみました。
https://qiita.com/shiz/items/10cb712a26620f2e3bdcそこで
今年はSwiftUIを使ってクリスマスツリーを作成したいと思います。SwiftUIの要素はたくさん使用していますが
drawingGroupに注目したいと思います。Shapeに適合させツリーのパーツを作成する
まずツリーに必要なパーツを作っていきます。
図形をShapeプロトコルに適合させたstructとして定義して
それを組み合わせてViewを構築します。星
こちらは下記のサイトを参照させて頂きました。
https://www.hackingwithswift.com/quick-start/swiftui/how-to-draw-polygons-and-stars
pathメソッドの中でPathクラスを生成します。
Pathの指定はUIBezierPathと似たような形で設定できます。
コード
struct Star: Shape {
    let corners: Int
    let smoothness: CGFloat

    func path(in rect: CGRect) -> Path {
        guard corners >= 2 else { return Path() }

        let center = CGPoint(x: rect.width / 2, y: rect.height / 2)

        var currentAngle = -CGFloat.pi / 2

        let angleAdjustment = .pi * 2 / CGFloat(corners * 2)

        let innerX = center.x * smoothness
        let innerY = center.y * smoothness

        var path = Path()

        path.move(to: CGPoint(x: center.x * cos(currentAngle), y: center.y * sin(currentAngle)))

        var bottomEdge: CGFloat = 0

        for corner in 0..<corners * 2  {
            let sinAngle = sin(currentAngle)
            let cosAngle = cos(currentAngle)
            let bottom: CGFloat

            if corner.isMultiple(of: 2) {
                bottom = center.y * sinAngle
                path.addLine(to: CGPoint(x: center.x * cosAngle, y: bottom))
            } else {
                bottom = innerY * sinAngle
                path.addLine(to: CGPoint(x: innerX * cosAngle, y: bottom))
            }
            if bottom > bottomEdge {
                bottomEdge = bottom
            }
            currentAngle += angleAdjustment
        }
        let unusedSpace = (rect.height / 2 - bottomEdge) / 2
        let transform = CGAffineTransform(translationX: center.x, y: center.y + unusedSpace)
        return path.applying(transform)
    }
}
木
次に木の部分です。
木の形の部分
まずは緑の部分の三角形Triangleを定義します。
コード
struct Triangle: Shape {
    func path(in rect: CGRect) -> Path {
        Path { path in
            let middle = rect.midX
            let width: CGFloat = rect.size.width
            let height = rect.height
            path.move(to: CGPoint(x: middle, y: 0))
            path.addLine(to: CGPoint(x: middle + (width / 2), y: height))
            path.addLine(to: CGPoint(x: middle - (width / 2), y: height))
            path.addLine(to: CGPoint(x: middle, y: 0))
        }
    }
}
白い線状の飾り
木の上にある飾りを作成します。
今回は
addQuadCurveを使用して
ちょっと曲線にしています。https://developer.apple.com/documentation/swiftui/path/3271274-addquadcurve
コード
struct Slope: Shape {
    func path(in rect: CGRect) -> Path {
        Path { path in
            path.move(to: CGPoint(x: rect.minX, y: rect.midY))
            path.addQuadCurve(to: CGPoint(x: rect.maxX, y: rect.maxY),
                              control: CGPoint(x: rect.midX * 0.8, y: rect.midY * 0.8))
        }
    }
}
球状の飾り
次に球状の飾りを作ります。
これはCircleに
GradientとLinierGradientを使って
色をグラデーションしています。https://developer.apple.com/documentation/swiftui/gradient
https://developer.apple.com/documentation/swiftui/lineargradient
Gradientの初期化時にグラデーションさせたい色を指定します。
変化させる位置を直接指定することもできますが
指定しない場合は
フレームワークで自動で調整してくれるようです。
LinearGradientは
Gradientと開始と終了位置を指定します。
コード
struct BallView: View {
    let gradientColors = Gradient(colors: [Color.pink, Color.purple])
    var body: some View {
        let linearGradient = LinearGradient(
            gradient: gradientColors,
            startPoint: .top, endPoint: .bottom)
        return Circle()
            .fill(linearGradient)
    }
}
そしてこれを複数組み合わせてViewを作ります。
GeometryReaderを使って
Viewの中に規則的にBallViewを配置しています。https://developer.apple.com/documentation/swiftui/geometryreader
三角形をはみ出さないように
maskを使用してBallViewを描画する範囲を限定しています。
https://developer.apple.com/documentation/swiftui/view/3278595-mask
コード
struct BallsSlopeView<Mask: View>: View {
    let drawArea: Mask
    var body: some View {
        GeometryReader { gr in
            ForEach(1...10, id: \.self) { index in
                BallView()
                    .position(
                        self.getPosition(at: index,
                                         midX: gr.frame(in: .local).maxX,
                                         midY: gr.frame(in: .local).maxY))
                    .frame(height: 20)
            }
        }
        .mask(drawArea)
    }

    private func getPosition(at index: Int, midX: CGFloat, midY: CGFloat) -> CGPoint{
        let x = midX * CGFloat(1 - CGFloat(index) * 0.1)
        let y = midY * CGFloat(1 - CGFloat(index) * 0.05)
        return CGPoint(x: x, y: y)
    }
}
組み合わせる
最後に上記で作った部品を組み合わせます。
すべてを
ZStackでグループにして重ねます。
白い飾りの部分では
rotationEffectを活用することで
少し回転させて木にかかっているようにしています。https://developer.apple.com/documentation/swiftui/scaledshape/3273943-rotationeffect
コード
struct TreeView: View {
    var body: some View {
        GeometryReader { gr in
            ZStack(alignment: .center) {
                Triangle()
                    .foregroundColor(Color.green)
                Slope()
                    .stroke(lineWidth: 20)
                    .mask(Triangle())
                    .foregroundColor(Color.white)
                Slope()
                    .stroke(lineWidth: 20)
                    .rotationEffect(Angle.degrees(300))
                    .mask(Triangle())
                    .foregroundColor(Color.white)
                BallsSlopeView(drawArea: Triangle())
            }
        }
    }
}
土台
次に土台の部分を作ります。
Rectangleの中に白い線のShapeを載せます。白い線は
Shapeで作成します。
コード
struct FoundationLine: Shape {
    func path(in rect: CGRect) -> Path {
        Path { path in
            path.move(to: CGPoint(x: 0, y: rect.maxY / 3))
            path.addLine(to: CGPoint(x: rect.maxX, y: rect.maxY / 3))
            path.move(to: CGPoint(x: 0, y: rect.maxY * 2 / 3))
            path.addLine(to: CGPoint(x: rect.maxX, y: rect.maxY * 2 / 3))
            path.move(to: CGPoint(x: rect.width / 3, y: 0))
            path.addLine(to: CGPoint(x: rect.width / 3, y: rect.maxY))
            path.move(to: CGPoint(x: rect.width * 2 / 3, y: 0))
            path.addLine(to: CGPoint(x: rect.width * 2 / 3, y: rect.maxY))
        }
    }
}
上記で作った白い線と
RectangleをZStackでグループにします。
コード
struct FoundationView: View {
    var body: some View {
        GeometryReader { gr in
            ZStack {
                Rectangle()
                    .foregroundColor(Color.red)
                FoundationLine()
                    .stroke(lineWidth: 3)
                    .foregroundColor(Color.white)
                    .mask(Rectangle())
            }
            .frame(width: gr.size.width / 3, height: gr.size.width / 3)
        }
    }
}
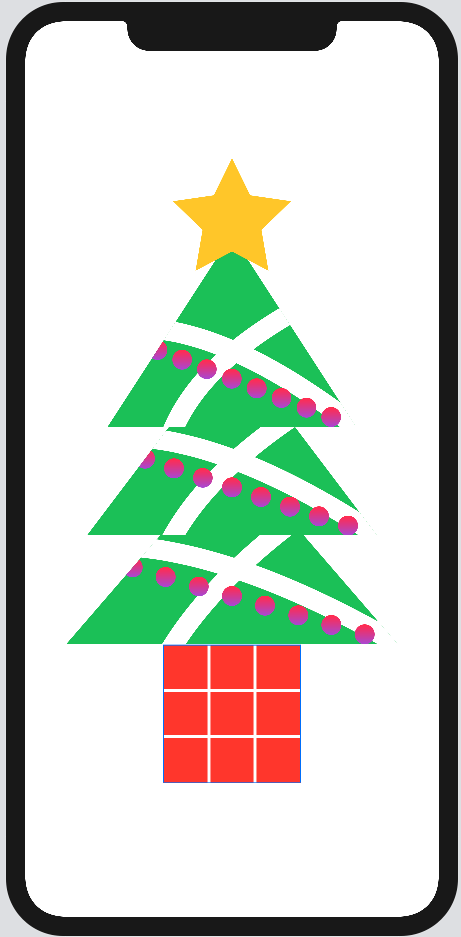
クリスマスツリーを組み立てる
ではこれまで作ったものを組み合わせます。
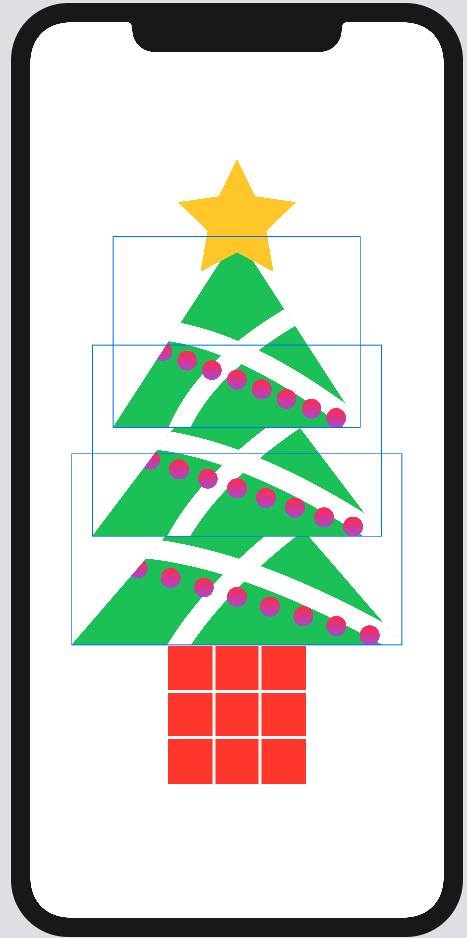
星と個々の木が少しづつ重なるように位置の調整をしています。また
そのままですと
木の三角の重なり方が
逆になってしまう(上の頂点の部分が上に重なって見える)ため
zIndexで重なり方を変更しています。
https://developer.apple.com/documentation/swiftui/view/3278679-zindex
コード
struct ChristmasTree: View {
    var body: some View {
        GeometryReader { gr in
            VStack(spacing: -12) {
                VStack(spacing: -(gr.size.width * 0.1)) {
                    Star(corners: 5, smoothness: 0.5)
                        .foregroundColor(Color.yellow)
                        .frame(width: gr.size.width * 0.3,
                               height: gr.size.width * 0.3)
                        .zIndex(2)
                    ZStack {
                        VStack(spacing: -(gr.size.width / 5)) {
                            TreeView()
                                .frame(width: gr.size.width * 0.6)
                                .zIndex(3)
                            TreeView()
                                .frame(width: gr.size.width * 0.7)
                                .zIndex(2)
                            TreeView()
                                .frame(width: gr.size.width * 0.8)
                                .zIndex(1)
                        }
                        .frame(height: gr.size.height * 0.5)
                        .foregroundColor(Color.green)
                    }
                    .zIndex(1)
                }
                FoundationView()
                    .frame(height: gr.size.height * 0.2)
            }
        }
    }
}
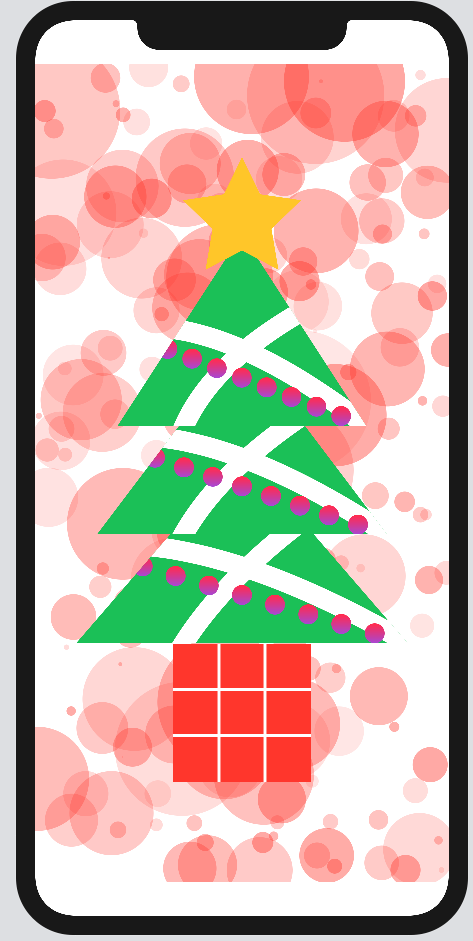
背景
次に背景を作成していきます。
Circleをランダムな大きさとopacityと位置に配置します。
コード
struct Particles: View {
    var body: some View {
        GeometryReader { gr in
            ZStack {
                ForEach(0...200, id: \.self) { _ in
                    Circle()
                        .foregroundColor(.red)
                        .opacity(.random(in: 0.1...0.4))
                        .frame(width: .random(in: 10...100),
                               height: .random(in: 10...100))
                        .position(x: .random(in: 0...gr.size.width),
                                  y: .random(in: 0...gr.size.height))
                }
            }
        }
    }
}
背景にアニメーションを設定する
せっかくなので背景にアニメーションをつけて
もう少し豪華(?)にしてみます。今回は
interactiveSpringというAnimationを利用しました。※
値は色々と触ってみて
こんな感じなのかなと思った値を設定しているので
適当です。https://developer.apple.com/documentation/swiftui/animation/3344959-interactivespring
画面表示時にアニメーションを起こすための処理
SwiftUIのアニメーションを設定する上で注意したい点として
単純にアニメーションを設定しただけでは
アニメーションが起動しません。これを画面表示時に発生させるためには
例えば@Stateを付けたの変数を
onAppearの中で変更することで
Viewの中の値を動的に変更させて再レンダリングさせるなどの
処理が必要になります。
コード
struct Particles: View {
    // レンダリングを起こすために必要
    @State private var scaling = false

    var animation: Animation {
        Animation
            .interactiveSpring(response: 5, dampingFraction: 0.5)
            .repeatForever()
            .speed(.random(in: 0.05...0.9))
            .delay(.random(in: 0...2))
    }

    var body: some View {
        GeometryReader { gr in
            ZStack {
                ForEach(0...200, id: \.self) { _ in
                    Circle()
                        .foregroundColor(.red)
                        .opacity(.random(in: 0.1...0.4))
                        .animation(self.animation)
                        // この値を変化させることで再レンダリングを起こしている
                        .scaleEffect(self.scaling ? .random(in: 0.1...2) : 1)
                        .frame(width: .random(in: 10...100),
                               height: .random(in: 10...100))
                        .position(x: .random(in: 0...gr.size.width),
                                  y: .random(in: 0...gr.size.height))
                }
            }
            .onAppear {
                // レンダリングを起こすために必要
                self.scaling = true
            }
        }
    }
}
パフォーマンスを向上させる
画面としては上記で完成ですが
一つ問題があります。上記のアニメーションの処理を行ったことによって
メモリの使用量がどんどん増えていきます。
※ この後もずっと増えていきます。
これは
ZStackの中の各Viewが描画をする際に
それぞれでレイヤーを構築します。そうするとその分のメモリを使用する結果
CPUへの負荷大きくなります。これはアプリのパフォーマンスの低下を招くことがあります。
そこで
drawingGroupを使って負荷を減らすことができます。drawingGroup
https://developer.apple.com/documentation/swiftui/group/3284805-drawinggroup
このメソッドは
Viewの中の全てのViewを
画面上には見えないオフスクリーン上で
Metal APIを使用して
一つのイメージにまとめて描画し
最終的な内容を画面に出力するようにしてくれます。こうすることでメモリへの負荷を軽減させて
パフォーマンスを向上させることができます。
コード
struct Particles: View {
    // レンダリングを起こすために必要
    @State private var scaling = false

    var animation: Animation {
        Animation
            .interactiveSpring(response: 5, dampingFraction: 0.5)
            .repeatForever()
            .speed(.random(in: 0.05...0.9))
            .delay(.random(in: 0...2))
    }

    var body: some View {
        GeometryReader { gr in
            ZStack {
                ForEach(0...200, id: \.self) { _ in
                    Circle()
                        .foregroundColor(.red)
                        .opacity(.random(in: 0.1...0.4))
                        .animation(self.animation)
                        // この値を変化させることで再レンダリングを起こしている
                        .scaleEffect(self.scaling ? .random(in: 0.1...2) : 1)
                        .frame(width: .random(in: 10...100),
                               height: .random(in: 10...100))
                        .position(x: .random(in: 0...gr.size.width),
                                  y: .random(in: 0...gr.size.height))
                }
            }
            // ここに設定をする
            .drawingGroup()
            .onAppear {
                // レンダリングを起こすために必要
                self.scaling = true
            }
        }
    }
}
※
一つ注意点として
drawingGroupのドキュメントに下記のような記載あります。Views backed by native platform views don’t render into the image.native platform viewsには
drawingGroupは効果がないようです。このnative platform viewsとは
何を指すのかわからなかったのですが
twitter上でAppleの方が回答されていた内容によると
NSViewやUIViewのことのようです。https://twitter.com/jsh8080/status/1137045666939768833
まとめ
アドベントカレンダーのネタとして
クリスマスツリーを作っていく中で
SwiftUIの機能についていくつか見ていきました。SwiftUIは宣言的に小さい部品を作り
それを組み合わせていくことができるので
再利用性が高く読みやすいなと改めて感じました。


- 投稿日:2019-12-03T07:10:35+09:00
[SwiftUI]sheetで遷移するView間で値を引き渡す
はじめに
この記事はジーズアカデミーAdvent Calendar 2019 3日目の記事です。
こんにちは!Dev(週末コース)8期の@Ryu0823といいます。
ジーズではWebコースで、最後のDemo dayも参加できなかったのですが、卒業してからもいろいろな言語をかじり、最近はSwiftUIでアプリを制作しています。
SwiftUIはSwiftより簡単かつわかりやすいと感じていますが、まだ新しい言語のためできないこともあったり、情報も少ないのが現状です。
そこで今回は、sheetで遷移する場合にView間で値を渡す方法を探すのに苦労したので、備忘録的に書いてみます。
完成形は↓
やることと初期状態
FirstViewからsheetとしてSecondViewを表示し、SecondViewで入力された値をFirstViewに表示します。
struct FirstView: View {
    var body: some View {
        VStack {
            Text("Hello") // <-SecondViewで入力された値を表示する
            Button(action: {
                print("Button tapped.") // <-SecondViewへ遷移する
            }) {
                Text("Button")
            }
        }
    }
}

struct SecondView: View {
    @State var userName = ""

    var body: some View {
        NavigationView {
            Form {
                Section(header: Text("What is your name?")) {
                    TextField("Name", text: $userName) // <-ここで入力された値をFirstViewへ戻す
                }
            }
            .navigationBarTitle("SecondView", displayMode: .inline)
            // FirstViewへ戻る処理が必要
        }
    }
}
FirstViewからsheetとしてSecondViewを表示
struct FirstView: View {
    // SecondViewの表示/非表示のState
    @State var showSecondView = false

    var body: some View {
        VStack {
            Text("Hello") // <-SecondViewで入力された値を表示する

            Button(action: {
                // SecondViewの表示/非表示の切り替え
                self.showSecondView.toggle()
            }) {
                Text("Tell your name")
                }
            }
            .sheet(isPresented: self.$showSecondView) {
                // SecondViewを表示
                SecondView(isPresent: self.$showSecondView)
            }
        }
    }
}

struct SecondView: View {
    @State var userName = ""
    // SecondViewの表示/非表示
    @Binding var isPresent: Bool

    var body: some View {
        NavigationView {
            Form {
                Section(header: Text("What is your name?")) {
                    TextField("Name", text: $userName) // <-ここで入力された値をFirstViewへ戻す
                }
            }
            .navigationBarTitle("SecondView", displayMode: .inline)
            // FirstViewへ戻る
            .navigationBarItems(trailing:
                Button(action: {
                    self.isPresent = false
                }) {
                    Text("Done")
                }
            )
        }
    }
}
View間で値を連携する
ObservableObjectを定義
View間で連携したい変数を、ObservableObject classを継承したclassのpropertyとして定義
final class ViewModel: ObservableObject {
    @Published var name = ""
}
FirstViewにObservedObjectを追加
struct FirstView: View {
    @State var showSecondView = false
    // ViewModelをObservedObjectとして初期化
    @ObservedObject var userName = ViewModel()

    var body: some View {
        VStack {
            // ObservedObjectのname propertyを表示(SecondViewの値を表示したい)
            Text("Hello \(self.userName.name)")

            Button(action: {
                self.showSecondView.toggle()
            }) {
                Text("Tell your name")
                }
            }
            .sheet(isPresented: self.$showSecondView) {
                // SecondViewを表示
                SecondView(isPresent: self.$showSecondView)
            }
        }
    }
}
FirstViewで初期化したObservedObjectをSecondViewと共有する
SecondViewではFirstViewと同じObservedObjectを見る必要があります。
そのため、SecondViewではViewModel classを指定するだけで、初期化はしません。
初期化すると別のObservedObjectが作成され、View間で値の共有ができません。
(私はここでつまった?)struct SecondView: View { @Binding var isPresent: Bool // FirstViewから呼び出す際にFirstViewで初期化したViewModel変数を指定 @ObservedObject var userName: ViewModel var body: some View { NavigationView { Form { Section(header: Text("What is your name?")) { TextField("Name", text: $userName.name) } } .navigationBarTitle("SecondView", displayMode: .inline) .navigationBarItems(trailing: Button(action: { self.isPresent = false }) { Text("Done") } ) } } }最後にFirstView内のSecondView初期化を修正
SecondViewで定義したuserName propertyにFirstViewのuserNameが入ります。
これでSecondViewのTextFieldに入力した値がFirstViewに連携されます。SecondView(isPresent: self.$showSecondView, userName: self.userName)終わりに & SwiftUI参考リンク
まだまだ勉強中ですが、この記事が少しでも役に立てば幸いです!
SwiftUIやSwiftそのほかモバイル向け言語やってる方いたらお気軽にSNSで繋がりましょう!最後にSwiftUI学習の参考サイトを載せておきます。
・100 days of SwiftUI - Hacking with Swift
#100daysOfSwiftUIでTwitterに毎日勉強したことを投稿してます。
・The SwiftUI Lab
SwiftUIはまだ出来たばかりなので、ドキュメントが未整備な部分もあるのですが、このサイトではかなり詳しく解説してくれています。

- 投稿日:2019-12-03T03:06:49+09:00
[Pythonista]iPhone単体でAPN構成プロファイル作るやつ作った
つくった
世の中にはAPNを頻繁に変える人もいるらしい
深夜に1時間半ぐらいで作った
なのでちゃんと動くか分からないこんな感じ
iPhone単体でAPNのプロファイル作るやつできた
— ᴜᴢᴋ (@uzk17) December 2, 2019
要Pythonistahttps://t.co/IG7VQxyGOc pic.twitter.com/5HyxOSOpyhコード
なるべく単一のコードで済むようにしたのでいろいろアレ
適当に作ったのでいろいろアレapn.py# -*- coding: utf-8 -*- import ui import time import base64 import console import clipboard import webbrowser from http.server import HTTPServer, CGIHTTPRequestHandler class Handler(CGIHTTPRequestHandler): cgi_directories = ["./"] class apnui(ui.View): def __init__(self): self.main_view = ui.View(frame=(0, 0, ui.get_screen_size()[ 0], ui.get_screen_size()[1])) self.main_view.name = 'APN Settings' self.main_view.background_color = 'white' space = 45 self.nameui = ui.TextField(frame=(self.main_view.width*0.2, space, self.main_view.width*0.8, 30)) self.nameui.alignment = ui.ALIGN_RIGHT self.main_view.add_subview(self.nameui) name_t = ui.TextView(frame=(0, space, self.main_view.width*0.2, 30)) name_t.alignment = ui.ALIGN_LEFT name_t.text = 'Name' self.main_view.add_subview(name_t) self.passwd = ui.TextField( frame=(self.main_view.width*0.2, space*2, self.main_view.width*0.8, 30)) self.passwd.alignment = ui.ALIGN_RIGHT self.main_view.add_subview(self.passwd) passwd_t = ui.TextView(frame=(0, space*2, self.main_view.width*0.2, 30)) passwd_t.alignment = ui.ALIGN_LEFT passwd_t.text = 'Password' self.main_view.add_subview(passwd_t) self.uname = ui.TextField( frame=(self.main_view.width*0.2, space*3, self.main_view.width*0.8, 30)) self.uname.alignment = ui.ALIGN_RIGHT self.uname.text = '' self.main_view.add_subview(self.uname) uname_t = ui.TextView(frame=(0, space*3, self.main_view.width*0.2, 30)) uname_t.alignment = ui.ALIGN_LEFT uname_t.text = 'UserName' self.main_view.add_subview(uname_t) self.button = ui.Button() self.button.frame = (self.main_view.width*0.1, space*5, self.main_view.width*0.8, 30) self.button.title = 'Complete' self.button.action = self.button_tapped self.button.background_color = (0, 0, 0, 0.5) self.button.tint_color = ('white') self.main_view.add_subview(self.button) self.main_view.present('sheet') def button_tapped(self, sender): apnbase = '<?xml version="1.0" encoding="UTF-8"?><!DOCTYPE plist PUBLIC "-//Apple//DTD PLIST 1.0//EN" "http://www.apple.com/DTDs/PropertyList-1.0.dtd"><plist version="1.0"><dict> <key>ConsentText</key> <dict> <key>default</key> <string>ASEINet APN Configuration profile</string> </dict> <key>PayloadContent</key> <array> <dict> <key>AttachAPN</key> <dict> <key>Name</key> <string>{0}</string> <key>AuthenticationType</key> <string>CHAP</string> <key>Username</key> <string>{1}</string> <key>Password</key> <string>{2}</string> </dict> <key>APNs</key> <array> <dict> <key>Name</key> <string>{0}</string> <key>AuthenticationType</key> <string>CHAP</string> <key>Username</key> <string>{1}</string> <key>Password</key> <string>{2}</string> </dict> </array> <key>PayloadDisplayName</key> <string></string> <key>PayloadIdentifier</key> <string>com.aseinet.cellular</string> <key>PayloadOrganization</key> <string>ASEINet.NE.JP</string> <key>PayloadType</key> <string>com.apple.cellular</string> <key>PayloadUUID</key> <string>6B08253E-D5BB-4FC4-A5CD-825FB965B5AA</string> <key>PayloadVersion</key> <integer>1</integer> </dict> </array> <key>PayloadDisplayName</key> <string>ASEINet APN Profile (Ver. 1.2)</string> <key>PayloadDescription</key> <string>Apply APN-setting to your iOS device.</string> <key>PayloadIdentifier</key> <string>com.aseinet</string> <key>PayloadOrganization</key> <string>ASEINet.NE.JP</string> <key>PayloadRemovalDisallowed</key> <false/> <key>PayloadType</key> <string>Configuration</string> <key>PayloadUUID</key> <string>560EB0FF-BE89-46C7-8DC9-6CA77E1A4453</string> <key>PayloadVersion</key> <integer>1</integer></dict></plist>'.format(self.nameui.text,self.uname.text,self.passwd.text) path_w = './apn.mobileconfig' apnbase = apnbase.replace(' ','') with open(path_w, mode='w') as f: f.write(apnbase) console.alert('WebServer Start','Copied url to clipboard','OK',hide_cancel_button=True) self.button.title = 'Running Server...' time.sleep(1) clipboard.set('http://localhost:8080') #console.alert('Running server...') PORT = 8080 httpd = HTTPServer(("", PORT), Handler) httpd.serve_forever() v = apnui()おわりに
需要あんのか?これ
Pythonistaが落ちるのはご愛嬌
- 投稿日:2019-12-03T02:02:07+09:00
去年の自分にマサカリを投げる
まえがき
こんにちはrenです。
世間は12月。すっかりアドカレの季節ですね。アドカレといえば去年のアドカレではこんな記事を書きました。
iOSアプリでよく見るチュートリアル画面を作成するえ、なにこれ。
読みづらすぎる。ということで、去年の自分にマサカリを投げることにしました。
本編
まず、前回のコードを見返してみましょう。
ViewController.swift
// ViewController.swift
import UIKit

class ViewController: UIViewController{

    var tutorialCollectionView: UICollectionView!
    var layout: UICollectionViewFlowLayout!

    override func viewDidLoad() {
        super.viewDidLoad()

        let viewWidth = self.view.frame.width
        let viewHeight = self.view.frame.height

        let collectionViewFrame = CGRect (x: 0, y: 0, width: viewWidth, height: viewHeight)

        // CollectionViewのレイアウトを生成
        layout = UICollectionViewFlowLayout()

        // Cell一つ一つの大きさを設定
        layout.itemSize = CGSize(width: viewWidth, height: viewHeight)

        // Cellの行間隔を設定
        layout.minimumLineSpacing = 0

        // Cellの列間隔を設定
        layout.minimumInteritemSpacing = 0

        // CollectionViewのスクロールの方向を横にする
        layout.scrollDirection = .horizontal

        // CollectionViewを生成
        tutorialCollectionView = UICollectionView(frame: collectionViewFrame, collectionViewLayout: layout)

        // Cellに使われるクラスを登録
        tutorialCollectionView.register(CustomUICollectionViewCell.self, forCellWithReuseIdentifier: "CustomCell")

        // dataSourceを自身に設定
        tutorialCollectionView.dataSource = self

        // ページングさせる
        tutorialCollectionView.isPagingEnabled = true

        // ScrollIndicatorを非表示にする
        tutorialCollectionView.showsHorizontalScrollIndicator = false

        // CollectionViewをViewに追加する
        self.view.addSubview(tutorialCollectionView)

    }

    override func viewDidAppear(_ animated: Bool) {
        // ViewDidLoadではSafeAreaが取得できないのでここでリサイズ
        let safeArea = self.view.safeAreaInsets
        let viewWidth = self.view.frame.width
        let viewHeight = self.view.frame.height
        let collectionViewFrame = CGRect (x: safeArea.left, y: safeArea.top, width: viewWidth - safeArea.left, height: viewHeight - safeArea.top - safeArea.bottom)

        layout.itemSize = CGSize(width: viewWidth - safeArea.left, height: viewHeight - safeArea.top - safeArea.bottom)

        tutorialCollectionView.frame = collectionViewFrame

    }

}

extension ViewController: UICollectionViewDataSource {

    // Cellの数を設定
    func collectionView(_ collectionView: UICollectionView, numberOfItemsInSection section: Int) -> Int {
        return 5
    }

    // Cellに値を設定する
    func collectionView(_ collectionView: UICollectionView, cellForItemAt indexPath: IndexPath) -> UICollectionViewCell {

        let cell : CustomUICollectionViewCell = collectionView.dequeueReusableCell(withReuseIdentifier: "CustomCell", for: indexPath as IndexPath) as! CustomUICollectionViewCell

        // Cellに応じてbackgroundColorを変更
        switch indexPath.row {
        case 0:
            cell.backgroundColor = UIColor.blue
        case 1:
            cell.backgroundColor = UIColor.orange
        case 2:
            cell.backgroundColor = UIColor.yellow
        case 3:
            cell.backgroundColor = UIColor.green
        case 4:
            cell.backgroundColor = UIColor.red
        default:
            break
        }

        cell.textLabel?.text = "\(indexPath.row + 1)ページ目"

        return cell
    }

}
CustomUICollectionViewCell.swift
// CustomUICollectionViewCell
import UIKit

class CustomUICollectionViewCell : UICollectionViewCell{

    var textLabel : UILabel?

    required init(coder aDecoder: NSCoder) {
        super.init(coder: aDecoder)!
    }

    override init(frame: CGRect) {
        super.init(frame: frame)

        // UILabelを生成.
        textLabel = UILabel(frame: CGRect(x:0, y:0, width:frame.width, height:frame.height))
        textLabel?.text = "nil"
        textLabel?.textAlignment = NSTextAlignment.center

        // Cellに追加.
        self.contentView.addSubview(textLabel!)
    }

}
うん。読みづらい。
どんなところが読みづらいのか、説明していきます。
viewDidLoadに処理書きすぎoverride func viewDidLoad() { super.viewDidLoad() let viewWidth = self.view.frame.width let viewHeight = self.view.frame.height let collectionViewFrame = CGRect (x: 0, y: 0, width: viewWidth, height: viewHeight) // CollectionViewのレイアウトを生成 layout = UICollectionViewFlowLayout() // Cell一つ一つの大きさを設定 layout.itemSize = CGSize(width: viewWidth, height: viewHeight) // Cellの行間隔を設定 layout.minimumLineSpacing = 0 // Cellの列間隔を設定 layout.minimumInteritemSpacing = 0 // CollectionViewのスクロールの方向を横にする layout.scrollDirection = .horizontal // CollectionViewを生成 tutorialCollectionView = UICollectionView(frame: collectionViewFrame, collectionViewLayout: layout) // Cellに使われるクラスを登録 tutorialCollectionView.register(CustomUICollectionViewCell.self, forCellWithReuseIdentifier: "CustomCell") // dataSourceを自身に設定 tutorialCollectionView.dataSource = self // ページングさせる tutorialCollectionView.isPagingEnabled = true // ScrollIndicatorを非表示にする tutorialCollectionView.showsHorizontalScrollIndicator = false // CollectionViewをViewに追加する self.view.addSubview(tutorialCollectionView) }処理を分割してみましょう
    override func viewDidLoad() {
        super.viewDidLoad()

        let viewWidth = self.view.frame.width
        let viewHeight = self.view.frame.height

        let collectionViewFrame = CGRect (x: 0, y: 0, width: viewWidth, height: viewHeight)

        // CollectionViewのレイアウトをセット
        layout = setLayout(width: viewWidth, height: viewHeight)

        // CollectionViewを生成
        tutorialCollectionView = UICollectionView(frame: collectionViewFrame, collectionViewLayout: layout)

        // CollectionViewを設定
        setupTutorialCollectionView()

        // CollectionViewをViewに追加する
        self.view.addSubview(tutorialCollectionView)

    }

    func setLayout(width: CGFloat, height: CGFloat) -> UICollectionViewFlowLayout {
        // CollectionViewのレイアウトを生成
        let layout = UICollectionViewFlowLayout()

        // Cell一つ一つの大きさを設定
        layout.itemSize = CGSize(width: width, height: height)

        // Cellの行間隔を設定
        layout.minimumLineSpacing = 0

        // Cellの列間隔を設定
        layout.minimumInteritemSpacing = 0

        // CollectionViewのスクロールの方向を横にする
        layout.scrollDirection = .horizontal

        return layout
    }

    func setupTutorialCollectionView() {
        // Cellに使われるクラスを登録
        tutorialCollectionView.register(CustomUICollectionViewCell.self, forCellWithReuseIdentifier: "CustomCell")

        // dataSourceを自身に設定
        tutorialCollectionView.dataSource = self

        // ページングさせる
        tutorialCollectionView.isPagingEnabled = true

        // ScrollIndicatorを非表示にする
        tutorialCollectionView.showsHorizontalScrollIndicator = false
    }
だいぶマシにはなりましたね。
UICollectionViewDataSourceを直接ViewControllerに準拠させているextension ViewController: UICollectionViewDataSource { // Cellの数を設定 func collectionView(_ collectionView: UICollectionView, numberOfItemsInSection section: Int) -> Int { return 5 } // Cellに値を設定する func collectionView(_ collectionView: UICollectionView, cellForItemAt indexPath: IndexPath) -> UICollectionViewCell { let cell : CustomUICollectionViewCell = collectionView.dequeueReusableCell(withReuseIdentifier: "CustomCell", for: indexPath as IndexPath) as! CustomUICollectionViewCell // Cellに応じてbackgroundColorを変更 switch indexPath.row { case 0: cell.backgroundColor = UIColor.blue case 1: cell.backgroundColor = UIColor.orange case 2: cell.backgroundColor = UIColor.yellow case 3: cell.backgroundColor = UIColor.green case 4: cell.backgroundColor = UIColor.red default: break } cell.textLabel?.text = "\(indexPath.row + 1)ページ目" return cell } }これでは
ViewControllerの仕事が増えすぎてしまいます。
こういう時はUICollectionViewのカスタムクラスを作りましょう。import UIKit class TutorialCollectionView: UICollectionView { override init(frame: CGRect, collectionViewLayout layout: UICollectionViewLayout) { super.init(frame: frame, collectionViewLayout: layout) } required init?(coder: NSCoder) { fatalError("init(coder:) has not been implemented") } } extension TutorialCollectionView: UICollectionViewDataSource { // Cellの数を設定 func collectionView(_ collectionView: UICollectionView, numberOfItemsInSection section: Int) -> Int { return 5 } // Cellに値を設定する func collectionView(_ collectionView: UICollectionView, cellForItemAt indexPath: IndexPath) -> UICollectionViewCell { let cell : CustomUICollectionViewCell = collectionView.dequeueReusableCell(withReuseIdentifier: "CustomCell", for: indexPath as IndexPath) as! CustomUICollectionViewCell // Cellに応じてbackgroundColorを変更 switch indexPath.row { case 0: cell.backgroundColor = UIColor.blue case 1: cell.backgroundColor = UIColor.orange case 2: cell.backgroundColor = UIColor.yellow case 3: cell.backgroundColor = UIColor.green case 4: cell.backgroundColor = UIColor.red default: break } cell.textLabel?.text = "\(indexPath.row + 1)ページ目" return cell } }ここに先程
viewDidLoadから抜き出したsetupTutorialCollectionViewを移動させます。import UIKit class TutorialCollectionView: UICollectionView { override init(frame: CGRect, collectionViewLayout layout: UICollectionViewLayout) { super.init(frame: frame, collectionViewLayout: layout) setup() } required init?(coder: NSCoder) { fatalError("init(coder:) has not been implemented") } func setup() { // Cellに使われるクラスを登録 tutorialCollectionView.register(CustomUICollectionViewCell.self, forCellWithReuseIdentifier: "CustomCell") // dataSourceを自身に設定 self.dataSource = self // ページングさせる self.isPagingEnabled = true // ScrollIndicatorを非表示にする self.showsHorizontalScrollIndicator = false // BackgroundColorを白にする。 self.backgroundColor = .white } } extension TutorialCollectionView: UICollectionViewDataSource { // Cellの数を設定 func collectionView(_ collectionView: UICollectionView, numberOfItemsInSection section: Int) -> Int { return 5 } // Cellに値を設定する func collectionView(_ collectionView: UICollectionView, cellForItemAt indexPath: IndexPath) -> UICollectionViewCell { let cell : CustomUICollectionViewCell = collectionView.dequeueReusableCell(withReuseIdentifier: "CustomCell", for: indexPath as IndexPath) as! CustomUICollectionViewCell // Cellに応じてbackgroundColorを変更 switch indexPath.row { case 0: cell.backgroundColor = UIColor.blue case 1: cell.backgroundColor = UIColor.orange case 2: cell.backgroundColor = UIColor.yellow case 3: cell.backgroundColor = UIColor.green case 4: cell.backgroundColor = UIColor.red default: break } cell.textLabel?.text = "\(indexPath.row + 1)ページ目" return cell } }
UICollectionViewをTutorialCollectionViewに変更override func viewDidLoad() { super.viewDidLoad() let viewWidth = self.view.frame.width let viewHeight = self.view.frame.height let collectionViewFrame = CGRect (x: 0, y: 0, width: viewWidth, height: viewHeight) // CollectionViewのレイアウトをセット layout = setLayout(width: viewWidth, height: viewHeight) // TutorialCollectionViewを生成 tutorialCollectionView = TutorialCollectionView(frame: collectionViewFrame, collectionViewLayout: layout) // CollectionViewをViewに追加する self.view.addSubview(tutorialCollectionView) } func setLayout(width: CGFloat, height: CGFloat) -> UICollectionViewFlowLayout { // CollectionViewのレイアウトを生成 let layout = UICollectionViewFlowLayout() // Cell一つ一つの大きさを設定 layout.itemSize = CGSize(width: width, height: height) // Cellの行間隔を設定 layout.minimumLineSpacing = 0 // Cellの列間隔を設定 layout.minimumInteritemSpacing = 0 // CollectionViewのスクロールの方向を横にする layout.scrollDirection = .horizontal return layout }
cellForItemAtでCellの設定をしている// Cellに値を設定する func collectionView(_ collectionView: UICollectionView, cellForItemAt indexPath: IndexPath) -> UICollectionViewCell { let cell : CustomUICollectionViewCell = collectionView.dequeueReusableCell(withReuseIdentifier: "CustomCell", for: indexPath as IndexPath) as! CustomUICollectionViewCell // Cellに応じてbackgroundColorを変更 switch indexPath.row { case 0: cell.backgroundColor = UIColor.blue case 1: cell.backgroundColor = UIColor.orange case 2: cell.backgroundColor = UIColor.yellow case 3: cell.backgroundColor = UIColor.green case 4: cell.backgroundColor = UIColor.red default: break } cell.textLabel?.text = "\(indexPath.row + 1)ページ目" return cell }せっかくカスタムセルを作っているので、セルの設定もセル側にやってもらったほうが処理がスッキリします。
import UIKit

class CustomUICollectionViewCell : UICollectionViewCell{

    var textLabel : UILabel?

    required init(coder aDecoder: NSCoder) {
        super.init(coder: aDecoder)!
    }

    override init(frame: CGRect) {
        super.init(frame: frame)

        // UILabelを生成.
        textLabel = UILabel(frame: CGRect(x:0, y:0, width:frame.width, height:frame.height))
        textLabel?.text = "nil"
        textLabel?.textAlignment = NSTextAlignment.center

        // Cellに追加.
        self.contentView.addSubview(textLabel!)
    }

    func setCell(indexPath: IndexPath) {
        // Cellに応じてbackgroundColorを変更
        switch indexPath.row {
        case 0:
            self.backgroundColor = UIColor.blue
        case 1:
            self.backgroundColor = UIColor.orange
        case 2:
            self.backgroundColor = UIColor.yellow
        case 3:
            self.backgroundColor = UIColor.green
        case 4:
            self.backgroundColor = UIColor.red
        default:
            break
        }

        pageNumberLabel.text = "\(indexPath.row + 1)ページ目"
    }

}
// Cellに値を設定する func collectionView(_ collectionView: UICollectionView, cellForItemAt indexPath: IndexPath) -> UICollectionViewCell { let cell: CustomUICollectionViewCell = collectionView.dequeueReusableCell(withReuseIdentifier: "CustomCell", for: indexPath as IndexPath) as! CustomUICollectionViewCell cell.setCell(indexPath: indexPath) return cell }細かいところですが、必要でないのなら
Optionalは使わないようにしましょう。import UIKit class CustomUICollectionViewCell : UICollectionViewCell{ var textLabel = UILabel() // Optionalでなくてよい required init(coder aDecoder: NSCoder) { super.init(coder: aDecoder)! } override init(frame: CGRect) { super.init(frame: frame) // UILabelを生成. textLabel = UILabel(frame: CGRect(x:0, y:0, width:frame.width, height:frame.height)) textLabel.text = "nil" textLabel.textAlignment = NSTextAlignment.center // Cellに追加. self.contentView.addSubview(textLabel) } func setCell(indexPath: IndexPath) { // Cellに応じてbackgroundColorを変更 switch indexPath.row { case 0: self.backgroundColor = UIColor.blue case 1: self.backgroundColor = UIColor.orange case 2: self.backgroundColor = UIColor.yellow case 3: self.backgroundColor = UIColor.green case 4: self.backgroundColor = UIColor.red default: break } pageNumberLabel.text = "\(indexPath.row + 1)ページ目" } }強制キャスト
as!もできるだけ使わないほうが安全です。// Cellに値を設定する func collectionView(_ collectionView: UICollectionView, cellForItemAt indexPath: IndexPath) -> UICollectionViewCell { guard let cell: CustomUICollectionViewCell = collectionView.dequeueReusableCell(withReuseIdentifier: "CustomCell", for: indexPath as IndexPath) as? CustomUICollectionViewCell else { return UICollectionViewCell() } cell.setCell(indexPath: indexPath) return cell }
CustomUICollectionViewCellでは役割が分かりづらい
TutorialCollectionViewCellに変更しましょう。import UIKit class TutorialCollectionViewCell: UICollectionViewCell { ・・・ }// Cellに値を設定する func collectionView(_ collectionView: UICollectionView, cellForItemAt indexPath: IndexPath) -> UICollectionViewCell { guard let cell = collectionView.dequeueReusableCell(withReuseIdentifier: "TutorialCollectionViewCell", for: indexPath as IndexPath) as? TutorialCollectionViewCell else { return UICollectionViewCell() } cell.setCell(indexPath: indexPath) return cell }
identifierがハードコーディングになっているので、定数にしましょう。import UIKit class TutorialCollectionViewCell: UICollectionViewCell { public static let identifier = "TutorialCollectionViewCell" var textLabel = UILabel() ・・・ }class TutorialCollectionView: UICollectionView { override init(frame: CGRect, collectionViewLayout layout: UICollectionViewLayout) { super.init(frame: frame, collectionViewLayout: layout) setup() } required init?(coder: NSCoder) { fatalError("init(coder:) has not been implemented") } func setup() { // Cellに使われるクラスを登録 tutorialCollectionView.register(TutorialCollectionViewCell.self, forCellWithReuseIdentifier: TutorialCollectionViewCell.identifier) // dataSourceを自身に設定 self.dataSource = self // ページングさせる self.isPagingEnabled = true // ScrollIndicatorを非表示にする self.showsHorizontalScrollIndicator = false // BackgroundColorを白にする。 self.backgroundColor = .white } }// Cellに値を設定する func collectionView(_ collectionView: UICollectionView, cellForItemAt indexPath: IndexPath) -> UICollectionViewCell { guard let cell = collectionView.dequeueReusableCell(withReuseIdentifier: TutorialCollectionViewCell.identifier, for: indexPath as IndexPath) as? TutorialCollectionViewCell else { return UICollectionViewCell() } cell.setCell(indexPath: indexPath) return cell }
viewDidAppearでリサイズしている現在の
ViewControllerを確認します。
viewDidLoadで初期化したものをviewDidAppearでリサイズしていますね。
この書き方は冗長に思えます。import UIKit class ViewController: UIViewController { var tutorialCollectionView: UICollectionView! var layout: UICollectionViewFlowLayout! override func viewDidLoad() { super.viewDidLoad() let viewWidth = self.view.frame.width let viewHeight = self.view.frame.height let collectionViewFrame = CGRect (x: 0, y: 0, width: viewWidth, height: viewHeight) // CollectionViewのレイアウトをセット layout = setLayout(width: viewWidth, height: viewHeight) // TutorialCollectionViewを生成 tutorialCollectionView = TutorialCollectionView(frame: collectionViewFrame, collectionViewLayout: layout) // CollectionViewをViewに追加する self.view.addSubview(tutorialCollectionView) } override func viewDidAppear(_ animated: Bool) { // ViewDidLoadではSafeAreaが取得できないのでここでリサイズ let safeArea = self.view.safeAreaInsets let viewWidth = self.view.frame.width let viewHeight = self.view.frame.height let collectionViewFrame = CGRect (x: safeArea.left, y: safeArea.top, width: viewWidth - safeArea.left, height: viewHeight - safeArea.top - safeArea.bottom) layout.itemSize = CGSize(width: viewWidth - safeArea.left, height: viewHeight - safeArea.top - safeArea.bottom) tutorialCollectionView.frame = collectionViewFrame } func setLayout(width: CGFloat, height: CGFloat) -> UICollectionViewFlowLayout { // CollectionViewのレイアウトを生成 let layout = UICollectionViewFlowLayout() // Cell一つ一つの大きさを設定 layout.itemSize = CGSize(width: width, height: height) // Cellの行間隔を設定 layout.minimumLineSpacing = 0 // Cellの列間隔を設定 layout.minimumInteritemSpacing = 0 // CollectionViewのスクロールの方向を横にする layout.scrollDirection = .horizontal return layout } }
viewWillLayoutSubviewsで初期化すればリサイズをする必要場なくなります。import UIKit class ViewController: UIViewController { var tutorialCollectionView: UICollectionView! var layout: UICollectionViewFlowLayout! override func viewDidLoad() { super.viewDidLoad() } override func viewWillLayoutSubviews() { let viewWidth = self.view.frame.width let viewHeight = self.view.frame.height let collectionViewFrame = CGRect (x: 0, y: 0, width: viewWidth, height: viewHeight) // CollectionViewのレイアウトをセット layout = setLayout(width: viewWidth, height: viewHeight) // TutorialCollectionViewを生成 tutorialCollectionView = TutorialCollectionView(frame: collectionViewFrame, collectionViewLayout: layout) // CollectionViewをViewに追加する self.view.addSubview(tutorialCollectionView) } func setLayout(width: CGFloat, height: CGFloat) -> UICollectionViewFlowLayout { // CollectionViewのレイアウトを生成 let layout = UICollectionViewFlowLayout() // Cell一つ一つの大きさを設定 layout.itemSize = CGSize(width: width, height: height) // Cellの行間隔を設定 layout.minimumLineSpacing = 0 // Cellの列間隔を設定 layout.minimumInteritemSpacing = 0 // CollectionViewのスクロールの方向を横にする layout.scrollDirection = .horizontal return layout } }暗黙的アンラップ型
!はあまり使わないようにしましょう。import UIKit class ViewController: UIViewController { lazy var tutorialCollectionView = TutorialCollectionView() var layout = UICollectionViewFlowLayout() override func viewDidLoad() { super.viewDidLoad() } override func viewWillLayoutSubviews() { let viewWidth = self.view.frame.width let viewHeight = self.view.frame.height let collectionViewFrame = CGRect (x: 0, y: 0, width: viewWidth, height: viewHeight) // CollectionViewのレイアウトをセット layout = setLayout(width: viewWidth, height: viewHeight) // TutorialCollectionViewを生成 tutorialCollectionView = TutorialCollectionView(frame: collectionViewFrame, collectionViewLayout: layout) // CollectionViewをViewに追加する self.view.addSubview(tutorialCollectionView) } func setLayout(width: CGFloat, height: CGFloat) -> UICollectionViewFlowLayout { // CollectionViewのレイアウトを生成 let layout = UICollectionViewFlowLayout() // Cell一つ一つの大きさを設定 layout.itemSize = CGSize(width: width, height: height) // Cellの行間隔を設定 layout.minimumLineSpacing = 0 // Cellの列間隔を設定 layout.minimumInteritemSpacing = 0 // CollectionViewのスクロールの方向を横にする layout.scrollDirection = .horizontal return layout } }最後にアクセス修飾子を付けたら完成です。
リファクタ後
ViewController
import UIKit

class ViewController: UIViewController {

    private lazy var tutorialCollectionView = TutorialCollectionView()
    private var layout = UICollectionViewFlowLayout()

    override func viewDidLoad() {
        super.viewDidLoad()
    }

    override func viewWillLayoutSubviews() {
        setTutorialCollectionView()
    }

    private func setTutorialCollectionView() {
        let safeArea = self.view.safeAreaInsets
        let viewWidth = self.view.frame.width
        let viewHeight = self.view.frame.height

        let collectionViewFrame = CGRect (x: safeArea.left,
                                          y: safeArea.top,
                                          width: viewWidth - safeArea.left - safeArea.right,
                                          height: viewHeight - safeArea.top - safeArea.bottom)

        // CollectionViewのレイアウトをセット
        layout = setLayout(width: viewWidth, height: viewHeight)

        // CollectionViewを生成
        tutorialCollectionView = TutorialCollectionView(frame: collectionViewFrame, collectionViewLayout: layout)

        // CollectionViewをViewに追加する
        self.view.addSubview(tutorialCollectionView)
    }

    private func setLayout(width: CGFloat, height: CGFloat) -> UICollectionViewFlowLayout {
        // CollectionViewのレイアウトを生成
        let layout = UICollectionViewFlowLayout()

        // Cell一つ一つの大きさを設定
        layout.itemSize = CGSize(width: width, height: height)

        // Cellの行間隔を設定
        layout.minimumLineSpacing = 0

        // Cellの列間隔を設定
        layout.minimumInteritemSpacing = 0

        // CollectionViewのスクロールの方向を横にする
        layout.scrollDirection = .horizontal

        return layout
    }

}
TutorialCollectionView
import UIKit

class TutorialCollectionView: UICollectionView {

    override init(frame: CGRect, collectionViewLayout layout: UICollectionViewLayout) {
        super.init(frame: frame, collectionViewLayout: layout)
        setup()
    }

    required init?(coder: NSCoder) {
        fatalError("init(coder:) has not been implemented")
    }

    private func setup() {
        // Cellに使われるクラスを登録
        self.register(TutorialCollectionViewCell.self, forCellWithReuseIdentifier: TutorialCollectionViewCell.identifier)

        // dataSourceを自身に設定
        self.dataSource = self

        // ページングさせる
        self.isPagingEnabled = true

        // ScrollIndicatorを非表示にする
        self.showsHorizontalScrollIndicator = false

        // BackgroundColorを白にする。
        self.backgroundColor = .white
    }
}

extension TutorialCollectionView: UICollectionViewDataSource {
    // Cellの数を設定
    func collectionView(_ collectionView: UICollectionView, numberOfItemsInSection section: Int) -> Int {
        return 5
    }

    // Cellに値を設定する
    func collectionView(_ collectionView: UICollectionView, cellForItemAt indexPath: IndexPath) -> UICollectionViewCell {
        // Cellを取得
        guard let cell: TutorialCollectionViewCell = collectionView.dequeueReusableCell(withReuseIdentifier: TutorialCollectionViewCell.identifier, for: indexPath as IndexPath) as? TutorialCollectionViewCell else { return UICollectionViewCell() }
        // Cellに値を設定する
        cell.setCell(indexPath: indexPath)

        return cell
    }

}
TutorialCollectionViewCell
import UIKit

class TutorialCollectionViewCell: UICollectionViewCell {

    public static let identifier = "TutorialCollectionViewCell"

    private var pageNumberLabel = UILabel()

    override init(frame: CGRect) {
        super.init(frame: frame)
        addLabel()
    }

    required init?(coder: NSCoder) {
        fatalError("init(coder:) has not been implemented")
    }

    private func addLabel() {
        // UILabelを生成.
        pageNumberLabel = UILabel(frame: CGRect(x:0, y:0, width:frame.width, height:frame.height))
        pageNumberLabel.text = ""
        pageNumberLabel.textAlignment = NSTextAlignment.center

        // Cellに追加.
        self.contentView.addSubview(pageNumberLabel)
    }

    public func setCell(indexPath: IndexPath) {
        // Cellに応じてbackgroundColorを変更
        switch indexPath.row {
        case 0:
            self.backgroundColor = UIColor.blue
        case 1:
            self.backgroundColor = UIColor.orange
        case 2:
            self.backgroundColor = UIColor.yellow
        case 3:
            self.backgroundColor = UIColor.green
        case 4:
            self.backgroundColor = UIColor.red
        default:
            break
        }

        pageNumberLabel.text = "\(indexPath.row + 1)ページ目"
    }

}
ソースコードはGitHubにあげました
https://github.com/renchild8/TutorialCollectionView