- 投稿日:2019-12-03T23:04:36+09:00
ユーザー視点のプログラムを書くために(1)
ユーザー視点のプログラムってなんだろう?
今日もシステムは稼働しています。
さて、どうでしょう。
もし、ログインしてとある画面を操作してみたら、なかなか応答が返ってこないなぁ、、、
ということが起きたら。これにはいくつかの影響が考えられるでしょう。
- プログラムの処理が終わっていない
- メモリ枯渇によるDBの応答不能、エラー
- 上記原因によるWebサーバの停止
- ホスティングサービス上の障害、メンテナンス
- etc
そして最悪なのが、自分が書いたプログラムがその原因だったのパターンですよね。
そうならないようにユーザー視点のプログラムを書けるようになりましょう。
そうすれば、自分の書いたプログラムが常に生きている状態となり、
ユーザーに喜んでもらえるシステムを維持することができます。(私的)良いプログラムの3点セット
- プログラム行数が短い
- 処理時間が短い
- メモリ使用が最適化されている まずはこの3つを意識すれば、大体運用上死なないプログラムになります。 コードレビューやリファクタリングする際も、 この視点を持つことでより良いプログラムにできると思います。
※プログラムの行数を短くするのはリファクタリングのテクニックが
該当するのでリーダブルコードを読むといいよ!処理時間を短くする
文字連結時にはStringではなくStringBuilderを使う
Stringで文字列する場合
String name = "クアッカ";
name += "ワラビー";
name += "様";
コンパイル時
String name = new StringBuilder("クアッカ").toString();
name += new StringBuilder(name).append("ワラビー").toString();
name += new StringBuilder(name).append("様").toString();
このように、各オブジェクトが無駄に生成されてしまうことがわかります。
つまりメモリの使用量が一時的に増えます。
※実際はこのぐらいの文字列であれば大差ないですが、
もし巨大な文字列出力する際に、Stringを使ってしまえば、
サーバー上のメモリを逼迫してしまうことになるでしょう。突然訪れるメモリ切れ
俺たちの戦いはこれからだ…!
来週に続かせてもらおうと思います。
- 投稿日:2019-12-03T22:25:26+09:00
Swift Network.framework Study 20191203
Study
Network.framework
Study:Client側環境
Client:Swift、Xcode
Server:Java、NetBeansClient Source Swift
import Foundation
import Network

func startConnection() {
    let myQueue = DispatchQueue(label: "ExampleNetwork")
    let connection = NWConnection(host: "localhost", port: 7777, using: NWParameters.tcp)
    connection.stateUpdateHandler = { (newState) in
        switch(newState) {
        case .ready:
            print("ready")
            sendMessage(connection)
        case .waiting(let error):
            print("waiting")
            print(error)
        case .failed(let error):
            print("failed")
            print(error)
        default:
            print("defaults")
            break
        }
    }
    connection.start(queue: myQueue)
}

func sendMessage(_ connection: NWConnection) {
    let data = "Example Send Data".data(using: .utf8)
    let completion = NWConnection.SendCompletion.contentProcessed { (error: NWError?) in
        print("送信完了")
    }
    connection.send(content: data, completion: completion)
}

startConnection()

while true {
    sleep(1)
}
最後のループとか格好悪い。
Server Source Java
package example.java.network;

import java.net.ServerSocket;
import java.net.Socket;
import java.util.Scanner;

public class ExampleServerSocket {
    public static void main(String[] args) {
        try {
            ServerSocket serverSocket = new ServerSocket(7777);
            System.out.println("socket create");
            Socket socket = serverSocket.accept();
            System.out.println("accept");
            Scanner scanner = new Scanner(socket.getInputStream());
            while(scanner.hasNext() == true) {
                System.out.println(scanner.nextLine());
            }
        }
        catch(Exception e) {
            System.out.println(e);
        }
    }
}
久々でScannerのhasNext()条件を忘れている。確認して改良しないと。
- 投稿日:2019-12-03T22:19:50+09:00
新卒でJava Silverに合格した体験記
2019年3月にOracle Certified Java Programmer, Silver SE 8 認定資格を取得していて、これから受験しようと思っている人のためになればと思い、記事を作成しました。
Java Silverとは
Oracle社が提供しているJava技術者向けの資格の1つで、今回僕が受けたテストは、「Oracle Certified Java Programmer, Silver SE 8 認定資格」です。
公式によるとOracle Certified Java Programmer, Silver SE 8 認定資格は、Javaアプリケーション開発に必要とされる基本的なプログラミング知識を有し、上級者の指導のもとで開発作業を行うことができる開発初心者向け資格です。
https://www.oracle.com/jp/education/certification/jse8-2489021-ja.htmlこの試験のレベルは入社してからJavaの基礎的な研修を受けて、業務を数ヶ月こなせば初見でも全く分からない問題はないかなといった感じです。
オブジェクト指向がまったく分からない状態で、Java Silverの勉強を始めるのは少ししんどいかもです。
また、受験料が3万弱するので、落ちると悲惨です。。確実にとりましょう!(Oracleの資格は一回落ちても、無料で再度受験できるキャンペーンをやっていることがあるので、申し込む時に忘れずに。)勉強を始める前の僕のレベル
IDE(Eclipse)を使って、なんとかJavaのコードはかけるが、基礎的な型の継承やポリモーフィズムやカプセル化などの理解は曖昧って感じでした。
試験勉強の仕方
自分は2018年9月から2019年3月までにJava Silverに合格することを会社の自分の目標にしていて、Javaプログラマ Silver SE 8 スピードマスター問題集を購入して、最初はコツコツと出勤時のお昼時間や業務中に空いている時間で勉強していました。
ですが、だらだらと勉強をしてしまっていたせいで、気付いたら1月も終わろうとしていました。笑
そこからやばいと思い本気で勉強を始めました。本気の時の勉強
- 出社時のお昼時間
- 業務中の空いた時間
- 平日は退社してから、カフェで2時間勉強
- 休日は予定がなかったら、3〜4時間ぐらい
こんな感じで60時間程度は学習にあてました。
Javaプログラマ Silver SE 8 スピードマスター問題集は3〜4周取り組みました。
1周目で分からなかった問題にチェックマークをつけて、2周目で再度解けなかった問題に取組み、最後の演習問題で分からなかった章の問題に次の周で取り組むといった具合で問題集を解いていました。
他には、TECH ProjinにJava Silverの問題があったので、その問題を解いたりしていました。出題範囲
1章 Javaの基礎
2章 Javaのデータ型の操作
3章 演算子と判定構造の使用
4章 配列の作成と使用
5章 ループ構造の使用
6章 メソッドとカプセル化の操作
7章 継承の操作
8章 例外の処理
9章 Java APIの主要なクラスの操作のような構成になっていてます。
ここで効率的に試験に受かりたいと考えている人は、9章で出てくるラムダ式は捨てちゃってください。
ラムダ式は内容が難しい割には、2問ぐらいしか出ませんので、この問題を捨てて他の問題をしっかりと取れれば平気です。勉強中の感想
普段、IDEを使ってJavaをかいていたので、いざテキストに記載されているJavaの問題を解くと、自分って全然理解できてないなと感じることが多々ありました。
会社の先輩がVimでJavaをかいてみるとJavaに対する理解が深まると言っていた意味がわかりました。IDEってめちゃくちゃ便利だと思った記憶があります。受験した感想
基本的に参考書と同じような問題が多く、しっかりと参考書で対策しておけば、落ちないかなといった印象です。(自分は70%しか取れなかったので、あんまり大きなことは言えませんが。笑)
SE8から導入されたラムダ式やDate and Time APIはあんまり出題されないし問題形式が参考書と同じなので、あまり理解せずとも問題の形式で解ける感じでした。
試験時間はしっかりと対策しておけば、30分以上余るような感じでした。
自分は慎重に解いていたので、20分ぐらいしか余らなかったです。合否について
合否は試験後30分ぐらいで、CertViewで分かるようになっています。
僕の場合は、合格通知と領収書を会社に提出する必要があったので、領収書を自宅に送付してもらいましたが、2週間ぐらいかかったので余裕を持って領収書の申請をしましょう。
合格通知は結果が分かり次第、ダウンロードできるようになります。
これらの作業をする際にログインパスワードを忘れたりしてしまうとかなりめんどくさいことになるみたいなので、アカウント作成時はしっかりとID・パスワードはメモっておきましょう。まとめ
- 試験対策用に参考書を買って、理解できるまで徹底的に取り組めば受かります
- ラムダ式は捨ててOKです
- 再受講できるキャンペーンがある時は申し込む時に忘れずに申請しましょう
- 領収書は取り寄せないといけないので、早めに申請しましょう
- 投稿日:2019-12-03T21:59:40+09:00
ArangoDBとJavaのデータマッピングを調べてみた
はじめに
オークファンでは一部でArangoDBを使用しています。
ArangoDBとは、DocumentDBとGraphDBのいいとこ取りした、ハイブリッドなNoSQLのデータベースです。*DocumentDBやGraphDBがなんぞやというのは置いておきます。
オークファンでは、商品の情報や販売情報などのデータを活用したサービスづくりをしています。
私が所属しているチームでは、商品ごとに異なる性質の情報(スペックなど)や、メーカーやカテゴリーといったデータの関連を考慮したデータを扱いたい場合に、ArangoDBのようなデータベースが適していると考え、使用しています。
一方で、それらのデータを参照したり集計したりするソフトウェアを作成する場合には、JavaもしくはKotlinを採用しています。
そのためArangoDBに対してプログラムからアクセスする場合には、ArangoDBから提供されているJavaAPIを介して行います。ArangoDBはJavaではないです。扱うデータは基本的にJSONの形式となります。
当然ですがデータ型の定義はプログラムと異なることになります。Javaで自然に使用しているデータ型がArangoDBに入れた場合に、ArangoDBが扱える型(JSONの形式)に変わってしまい、データ利用時に意図しない型変換に悩まされないよう、テストしてみました。
前提
各種バージョンについては下記のとおりです。
- Java:11
- ArangoDB:3.4.1
Java → ArangoDB
ArangoDBへ格納は、
BaseDocumentクラスを使用し、addAttribute()メソッドでデータをセットします。格納したデータをArangoDBのWebUIで確認し格納された状態を確認します。
Javaの型 →ArangoDBの型 備考 int 数値(整数) Integer 数値(整数) long 数値(整数) Long 数値(整数) float 数値(小数) ※ データが崩れた Float 数値(小数) ※ データが崩れた double 数値(小数) Double 数値(小数) BigDecimal 文字列 boolean 真偽値(true/false) Boolean 真偽値(true/false) LocalDate 文字列 ISO8601形式 LocalDateTime 文字列 ISO8601形式 OffsetDateTime 文字列 ISO8601形式 ZonedDateTime 文字列 ISO8601(拡張)形式 List 配列 Map オブジェクト オブジェクト内の型は上記マッピングと同様 ArangoDB → Java
ArangoDBにWebUIからデータを格納し、Javaで取得したときのデータ型は下記のようになりました。
ArangoDBの型 →Javaの型 備考 文字列 String 数値(整数) Long 数値(小数) Double 真偽値(true/false) Boolean 配列 ArrayList 中の型は他と同様 オブジェクト HashMap 中の型は他と同様 Java → ArangoDB → Java
JavaでArangoDBに格納したデータを、Javaで取得したときのデータ型の変化の流れは下記のようになりました。
Javaの型 →ArangoDBの型 →Javaの型 備考 int 数値(整数) Long Integer 数値(整数) Long long 数値(整数) Long Long 数値(整数) Long float 数値(小数) Double ※ データが崩れた Float 数値(小数) Double ※ データが崩れた double 数値(小数) Double Double 数値(小数) Double BigDecimal 文字列 String boolean 真偽値(true/false) Boolean Boolean 真偽値(true/false) Boolean LocalDate 文字列 String ISO8601形式 LocalDateTime 文字列 String ISO8601形式 OffsetDateTime 文字列 String ISO8601形式 ZonedDateTime 文字列 String ISO8601(拡張)形式 List 配列 ArrayList 中の型は他と同様 Map オブジェクト HashMap オブジェクト内の型は上記マッピングと同様 まとめ
JavaAPIでArangoDBを使う場合は、ちょっと注意が必要だと分かりました。
気にせず使えるのは
- 整数はLong型
- 小数はDouble型
- 真偽値はBoolean型
- ListやMapのコレクションクラス
ちょっと拡張したくなるのは
- BigDecimalで扱いたい場合
- ArangoDBに入れる場合には文字列にシリアライズされる
- ArangoDBから取得する場合は文字列として取得されるので、文字列をデシリアライズする
- Java8以降のDateTimeAPIを使用する場合
- ArangoDBに入れる際は文字列にシリアライズされる
- ArangoDBから取得する場合は文字列として取得されるので、文字列をデシリアライズする
実は小数の計算はもっとややこしかったりします。。。興味のある方は( ̄ー ̄)ニヤリ
- 投稿日:2019-12-03T21:29:41+09:00
API等で取得した情報をMySQLのデータベースに格納するときに、2バイト文字が文字化けしてしまったときに確認すること
はじめに
取得した2バイト文字が文字化けしてしまい、色々確認して解消したというメモに近いものです。
環境
- MySQL
- Java
JavaのHttp Clientを利用してAPIを取得したデータを、
JDBCドライバーを利用してMySQLに接続し、DBに入れようとしています。そのいち
テーブルを作成した際に、お決まりの呪文を唱えているか。
お決まりの呪文は、以下の通りです。set character_set_client = utf8; set character_set_connection = utf8; CREATE TABLE `TABLE_NAME` ( (略) ) DEFAULT CHARSET=utf8';ポイントはSQLを流す前に呪文を唱えることですが、
心配性な方は、CREATE TABLE文の終わりでも呪文を唱えましょう。そのに
HttpClientでリクエストをビルドする際、呪文を唱えているか
HttpClient client = HttpClient.newBuilder().version(Version.HTTP_2).build();
Builder requestBuilder = HttpRequest.newBuilder().uri(uri).setHeader("Content-type","application/json; charset=UTF-8");
HttpRequest request = requestBuilder.build();
setHeaderの後ろあたりの、
charset=UTF-8が、呪文です。そのさん
JDBCドライバーの設定情報で、呪文を唱えているか
dbconnection.propertiesdriver.class.name=com.mysql.jdbc.Driver uri=jdbc:mysql://mysql.test.com/mydb?useUnicode=true&characterEncoding=utf8上記の
mysql.test.comが接続先で、mydbがデータベース名です。
その後の?useUnicode=true&characterEncoding=utf8に注目してください。
呪文を唱えています。さいごに
私の場合は、そのさん で解決しました。
似たようなことを、まったく同じ環境で実装したことがあるのですが、その時は文字化けしなかったです・・・
- 投稿日:2019-12-03T19:12:20+09:00
Mavenのscopeに何を書いたら良いのかわからなかったので調べてみた
Maven使うときにpom.xmlにimportするとき、だいたいネットから拾ってコピーしてくるけど、ものによってタグが異なることに躓いたので、メモ。
公式(Dependency Scope : Maven – Introduction to the Dependency Mechanism)によると、主に5種類のパターンがある。(依存型pom - dependencyManagement でのみ使える、Maven 2.0.9で追加された
importを含めると6種類)
scopeの種類 説明 compile scope の指定を省略した場合のデフォルト値です。全ての状況でクラスパスに追加されます。 provided ライブラリが JDK やコンテナによって提供される場合に指定します。コンパイル時のみクラスパスに追加されます。 runtime 実行時のみに必要な場合に指定します。テストの実行および通常の実行のときにクラスパスに追加されます。 test テストのときのみ必要な場合に指定します。テストのコンパイルと実行のときにクラスパスに追加されます。 system 明示的にクラスパスに追加する場合に指定します。このスコープのライブラリは常に有効であるとみなされ、リポジトリの検索は行われません。 ピンポイントでは、下記のようなJDBCについてscopeがあったりなかったりする例があったため迷ったが、Mavenの依存範囲 - CodeFlowによるとruntimeが良いようだ。
<dependency>
    <groupId>mysql</groupId>
    <artifactId>mysql-connector-java</artifactId>
    <version>6.0.6</version>
    <scope>runtime</scope>
</dependency>
- 投稿日:2019-12-03T18:22:03+09:00
Javaでレベルの低い文字列比較の話
この記事は静大情報LT大会 Advent Calendar 2019 3日目の記事です。
はじめに
レベルの低い話です
Javaがとりあえず普通並みにできると読みやすいです。
文字列比較したことがあればとりあえず読めます。復習(?)
Javaで文字列比較を行うときは、 「==」で比較してはいけません。
String#equalsメソッドを使いましょう。public class Test { public static void main(String[] args) { String a = "HelloWorld"; String b = "Hello"; b += "World"; System.out.println(a == b); // false System.out.println(a.equals(b)); // true } }ちょっとまってくれ「==」でもtrueになるけど
public class Test {
    public static void main(String[] args) {
        String a = "HelloWorld";
        String b = "HelloWorld";

        System.out.println(a == b);       // true
        System.out.println(a.equals(b));  // true
    }
}
なんでだ?
「==」の仕組み
JVM
「==」はよくアドレスの場所の比較といわれていますが詳しく見ていきましょう。
Javaにおいて「==」は、多くの場合コンパイル時に、JVMの命令の一つ、「if_acmpne」や「if_acmpeq」などに変換されます。
JVMというのはJavaのファイルをコンパイルしたときにclassファイルというのがたくさん生成されますよね?そのclassファイルを解釈して実行するのが、Java仮想マシン(JVM)というものです。
classファイルは多くの人間が読めない(読める人もまれによくいる)フォーマットですが、JVM(コンピュータ)には読みやすいようになっています。
JVMはシンプルな命令を複数組み合わせて複雑なプログラムを実現しているため、Javaでは一つの命令に過ぎないものが、JVMでは多くの場合、複数の命令に変換されます。
JVM命令とオペランドスタック
では、「if_acmpne」や「if_acmpeq」がどういう命令なのかというと、オペランドスタックから二つ取り出してそれらが一致しているかを調べ、指定のプログラムの行へと番号にジャンプする命令です。
オペランドスタック……?
JVMはスタックマシンと言われ、レジスタを使わず、「スタック」という装置を用いて各種演算を行います。
※スタック……上から値を入れて入れたものから順に取り出すことのできる装置(トランプの山札のようなもの)オペランドスタックは作業領域のようなものです。
四則演算などにはちょうど良いため、よく使われます。
(逆ポーランド記法など)例えば以下のような仕組みで5+12を計算することができます。
しかし、Javaでのオペランドスタックは1つ分の要素が32bitまでしかありません。
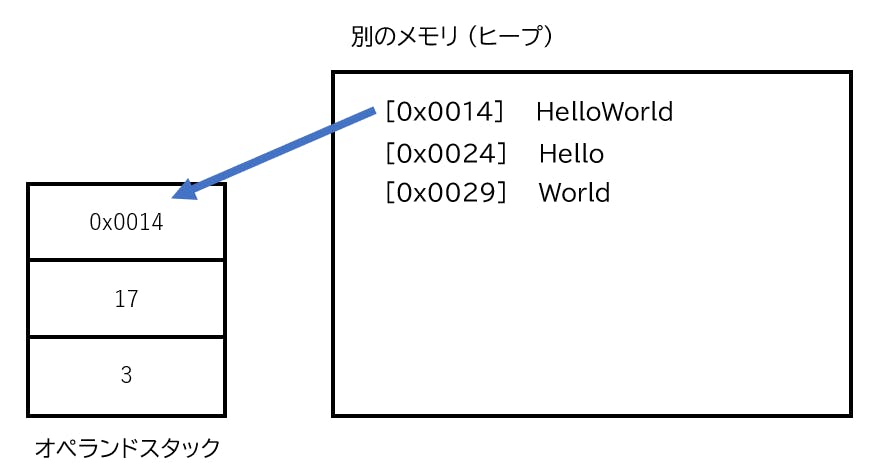
※32bit=2^32の数まで扱えるという意味です。1文字をJavaで表すとき、このオペランドスタックの1要素分(=32bit)消費します。
文字列は可変サイズです。1文字を扱う時もあれば、この記事のように数百文字扱う場合があります。つまり、オペランドスタック1要素分(=32bit)では到底、すべての文字を扱うことができません。そのため、文字列は別のメモリに保存しておき、そのメモリのアドレス(コンピュータ上の住所)をオペランドスタックに保存します。これによりオペランドスタック1要素分(=32bit)で足りるようになります。
※別のメモリとそれを用いたオペランドスタックのイメージ(0xに特に意味はないです)
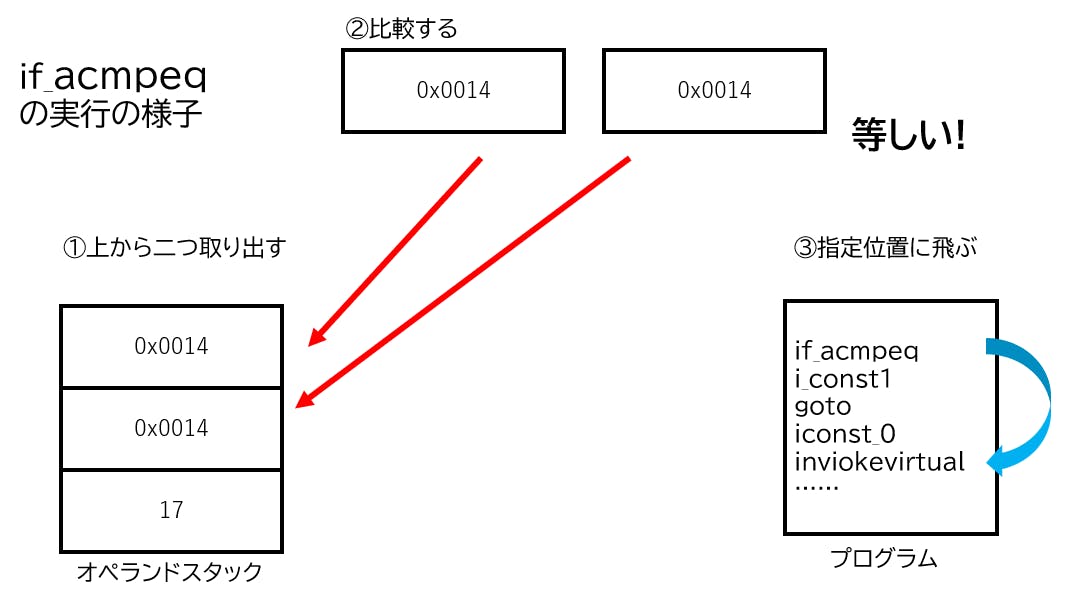
if_acmpeq / if_acmpne
先ほど述べた通り、「if_acmpne」や「if_acmpeq」はオペランドスタックから二つ取り出し、それら2つが、「if_acmpeq」なら等しい、「if_acmpne」では等しくない時、別の指定された行へとジャンプします。(ジャンプはよくあるGOTO命令みたいなやつです)
つまり、「if_acmpeq」なら、オペランドスタック上にあるアドレスの数値が等しければ、ジャンプ命令が発生するわけです。
このページ2つめのソースコード(「ちょっとまってくれ」のところ)でいうと、同じアドレスに"HelloWorld"が格納されていたため、trueと表示されるわけです。trueになるってことは……
同じところに格納されているのか
そうだ。
じゃあこれはどうなると思いますか?
命名が適当なのは勘弁してくださいpublic class Test { public static void main(String[] args) { String a = "HelloWorld"; method1(a); } public static void method1(String c) { String k = "HelloWorld"; System.out.println(k == c); } }答えは、「true」になります。
クラス定数領域
Javaのクラスファイルには定数領域があります。
この定数領域には、コンパイルするときに、主に文字列などが格納されます。マジックナンバーやマジック文字列(?)のようなものは、この定数領域に格納され、JVMがクラスファイルを読み込んだ時に、メモリに読み込まれ利用されます。
たとえばSystem.out.println("Hello Ja! Ja!");のような、"Hello Ja! Ja!" などは、定数領域に格納されて、そこから文字列が読み込まれます。
また、Javaのコンパイラは賢いので、同じ文字列が2回出てきたとしても、前に1回以上使われているなら、同じ定数領域から読み込まれます。
つまり、先ほどのコードでは、たとえメソッドが違ったとしても、同じクラスの定数領域の「Hello World」という文字列を参照していたため、アドレスが同じになっていたのです。先ほどのクラスファイルの定数領域、バイナリで見るとちゃんと「HelloWorld」が保存されている
余談だが、このページの1こめのソースコードは、わざと格納領域を別にするために"Hello"と"World"の2つに分けて文字列を書いた。
Javaのコンパイラではそこまでは計算してくれないようだ。Cのコンパイラなどではここまでやってくれるのもよくある。equalsは?
Stringクラスでオーバーライドしていて、中身をしっかり比較するコードになっている
イメージコードは下のような感じ。原文ママではない。@Override public boolean equals(String str) { if(this.length() != str.length()) { return false; } for(int i = 0; i < str.length(); i++) { if(this.charAt(i) != str.charAt(i)) { //charAtで任意のn文字目をとりだせる return false; } } return true; }線形でちゃんと前から順に文字を1つ1つ比較している。
1文字は32bitに収まるので問題ない。まとめ
文字列を比較するときはequalsメソッドを使おう。
「==」でtrueになるときは、同じところに格納されてるんだね。ふ~~~ん。明日のアドベントカレンダーの記事もよろピ!。
静大情報LT大会 Advent Calendar 2019


- 投稿日:2019-12-03T16:31:09+09:00
BOM付きのCSVインポート
こんにちは、エンジニアのミスダです。今回は、csvインポートでBOM付きのUTF-8の書き込み、読み込みに挑戦したことを記載します!
背景
業務系のシステムを開発していると一括で「データを作成したい!」って要望を受けます。。。
そんな時、私は、csvでのインポートを最初に考えます。APIを作成すると相手にも開発コストがかかりますしね。ここで結構問題になるのは、csvの編集方法です。
Microsoft Excelを利用してないですか?やはり、編集しやすいですよね!問題
Microsoft Excelの利用を考えて際に、Shift-JISでCSVを作成すれば編集できます。もし、DBがUTF-8だと、サーバー側で文字コードのコンバートが必要になります。こうなると、文字コードとの戦いです。正直、勝てる気がしません。
そんな時、BOM(byte order mark)付きのUTF-8であれば、Microsoft Excelで文字化けしないで開けるようです!
BOM付きでUTF-8ファイルの生成
今回は、JAVAでファイルの生成します。UTF-8の場合は、ファイルの先頭が【0xEF 0xBB 0xBF】になります。
import java.io.*;
import java.util.Arrays;
import java.util.List;

public class Main {

    /**
     * BOM付きのCSVファイルを作成(文字コードはUTF-8)
     *
     * @param
     * @return
     */
    public static void main(String[] args) {
        File file = new File("ファイルのパス");
        List header = Arrays.asList("りんご","みかん","バナナ","イチゴ","メロン","ぶどう");
        try(FileOutputStream fos = new FileOutputStream(file);
            OutputStreamWriter osw = new OutputStreamWriter(fos, "UTF-8");
            PrintWriter writer = new PrintWriter(osw)){
            //BOM付与
            fos.write(0xef);
            fos.write(0xbb);
            fos.write(0xbf);

            header.forEach(c -> {
                writer.print(c);
                writer.print(",");
            });
        } catch (IOException e) {
            System.out.println("ファイルの生成に失敗。");
        }
    }

}
ファイルのインポート
生成したファイルが確実にBOM付きのUTF-8であればいいですが、そうでない場合もあります。判定を入れて読み込みします。
import java.io.*;
import java.nio.charset.StandardCharsets;
import org.apache.commons.codec.binary.Hex;


public class Main {

    /**
     * BOM付きのCSVファイルを読み込み(文字コードはUTF-8)
     *
     * @param
     * @return
     */
    public static void main(String[] args) {
        File file = new File("ファイルのパス");

        try (FileInputStream fs = new FileInputStream(file);
             InputStreamReader isr = new InputStreamReader(fs, StandardCharsets.UTF_8);
             LineNumberReader lnr = new LineNumberReader(isr)) {
            //1行目
            String row = lnr.readLine();
            if (row != null && !row.isEmpty()) {
                //先頭文字を取得
                String bom = row.substring(0, 1);
                //先頭文字をバイトを文字に変換する(Apache Commons CodecのHexクラスを利用)
                String bomByte = new String(Hex.encodeHex(bom.getBytes()));
                if ("efbbbf".equals(bomByte)) {
                    //BOMを排除
                    row = row.substring(1);
                }
                System.out.println(row);
            }
            //2行目から情報を分割する
        } catch (Exception e) {
            System.out.println("ファイルの読み込みに失敗。");
        }
    }
}
まとめ
MacOS、WindowsOS共に、Microsoft Excelで開いて文字化けもしてないし、編集もできた!あとは、テキストファイルを利用して編集してくれてる方かなと思います。そこは、サポートしていくしかないかな。
- 投稿日:2019-12-03T13:47:27+09:00
Javaによる任意の文字列作成コード
import java.util.Random;

public class Test {
    public static void main(final String[] args) {
        final String romaji = "abcdefghijklmnopqrstuvwxyz";
        final String number = "0123456789";
        final String generator = romaji + romaji.toUpperCase() +number;
        System.out.println(getStr(generator, 10));
        System.out.println(getStr(generator, 10));
        System.out.println(getStr(generator, 10));
    }

    private static String getStr(final String input, final int length) {
        final Random random = new Random();
        final int num = input.length();
        final StringBuilder sb = new StringBuilder();
        final char[] chars = input.toCharArray();
        for (int i = 0; i < 10; i++) {
            sb.append(chars[random.nextInt(num)]);
        }

        return sb.toString();
    }
}
- 投稿日:2019-12-03T11:03:48+09:00
Java / 文字列と変数の比較でヌルポになるのを避ける
やりたいこと
DBが取得したフラグのようなものを条件分岐する場合、以下のようなコードを書きがち。
class Playground {
    public static void main(String[ ] args) {

        //DBから取得したデータだとする
        String item_flag = "0";

        if(item_flag.equals("0")){
            System.out.println("通常品");
        }
    }
}
ただし、item_flagにnullが入った場合は、
class Playground {
    public static void main(String[ ] args) {

        String item_flag = null;

        if(item_flag.equals("0")){
            System.out.println("通常品");
        }
    }
}
NullPointerExceptionで例外が発生する
解決方法
比較を逆にする
条件式を逆にしてあげれば、NullPointerExceptionになることはない。
class Playground {
    public static void main(String[ ] args) {

        String item_flag = null;

        if("0".equals(item_flag)){
            System.out.println("通常品");
        }
    }
}
素直にnull判定する
class Playground {
    public static void main(String[ ] args) {

        String item_flag = null;

        if(item_flag != null && item_flag.equals("0")){
            System.out.println("通常品");
        }
    }
}
Objects.equalsを使う
Objects.equalsを使うと、NullPointerExceptionを発生せず、正しく値を比較できる。
[コメントでご教示いただいたので追記しました]class Playground { public static void main(String[ ] args) { String item_flag = null; if(Objects.equals(item_flag,"0"){ System.out.println("通常品"); } } }その他の例
そのほかにも、
Optionalで包むとかStringUtilsを使うなどがあります。
詳しくはコメント欄をご覧くださいまとめ
"0"はStringでかつ、不変でnullになることはありえないが、item_flagは可変で、nullになる可能性がある。
nullに.equalsを生やすと、上記のようにNullPointerExceptionが発生する可能性がある。以上のことを注意し、Objects.equalsを積極的に利用する。
または、nullになり得ない変数に.equalsを生やすか、null判定を先に実行すること。
- 投稿日:2019-12-03T09:12:36+09:00
ScalaでつくるCloud Dataflowテンプレート
はじめに
以前にCloud Dataflowについて以下の記事を書きました。
https://qiita.com/yuyu_hf/items/e8e738f542e1f30d7be4記事内では当時Apache Beamに慣れていたわけでもないので、ScalaではなくJavaを使用しましたが、Java、Scala、Scala+Scioのどれを使うか検討する際に、一目で比較できるようなものがあれば良いなと思い簡単な処理でそれぞれ試してみました
BigQueryの特定のカラムを抽出し、GCSに吐き出すとてもシンプルな処理です
テンプレート作成(Java編)
プロジェクト作成
mvn archetype:generate \
    -DarchetypeGroupId=org.apache.beam \
    -DarchetypeArtifactId=beam-sdks-java-maven-archetypes-examples \
    -DgroupId=com.example \
    -DartifactId=bigquery-to-gcs \
    -Dversion="0.1" \
    -DinteractiveMode=false \
    -Dpackage=com.example
ライブラリ管理
pom.xml
pom.xml<?xml version="1.0" encoding="UTF-8"?> <!-- Licensed to the Apache Software Foundation (ASF) under one or more contributor license agreements. See the NOTICE file distributed with this work for additional information regarding copyright ownership. The ASF licenses this file to You under the Apache License, Version 2.0 (the "License"); you may not use this file except in compliance with the License. You may obtain a copy of the License at http://www.apache.org/licenses/LICENSE-2.0 Unless required by applicable law or agreed to in writing, software distributed under the License is distributed on an "AS IS" BASIS, WITHOUT WARRANTIES OR CONDITIONS OF ANY KIND, either express or implied. See the License for the specific language governing permissions and limitations under the License. --> <project xmlns="http://maven.apache.org/POM/4.0.0" xmlns:xsi="http://www.w3.org/2001/XMLSchema-instance" xsi:schemaLocation="http://maven.apache.org/POM/4.0.0 http://maven.apache.org/xsd/maven-4.0.0.xsd"> <modelVersion>4.0.0</modelVersion> <groupId>com.example</groupId> <artifactId>dataflow-bigquerytogcs</artifactId> <version>0.1</version> <packaging>jar</packaging> <properties> <beam.version>2.16.0</beam.version> <bigquery.version>v2-rev20181104-1.27.0</bigquery.version> <google-clients.version>1.27.0</google-clients.version> <hamcrest.version>2.1</hamcrest.version> <jackson.version>2.9.10</jackson.version> <joda.version>2.10.3</joda.version> <junit.version>4.13-beta-3</junit.version> <maven-compiler-plugin.version>3.7.0</maven-compiler-plugin.version> <maven-exec-plugin.version>1.6.0</maven-exec-plugin.version> <maven-jar-plugin.version>3.0.2</maven-jar-plugin.version> <maven-shade-plugin.version>3.1.0</maven-shade-plugin.version> <mockito.version>3.0.0</mockito.version> <pubsub.version>v1-rev20181105-1.27.0</pubsub.version> <slf4j.version>1.7.25</slf4j.version> <spark.version>2.4.4</spark.version> <hadoop.version>2.7.3</hadoop.version> <maven-surefire-plugin.version>2.21.0</maven-surefire-plugin.version> <nemo.version>0.1</nemo.version> <flink.artifact.name>beam-runners-flink-1.8</flink.artifact.name> </properties> <repositories> <repository> <id>apache.snapshots</id> <name>Apache Development Snapshot Repository</name> <url>https://repository.apache.org/content/repositories/snapshots/</url> <releases> <enabled>false</enabled> </releases> <snapshots> <enabled>true</enabled> </snapshots> </repository> </repositories> <build> <plugins> <plugin> <groupId>org.apache.maven.plugins</groupId> <artifactId>maven-compiler-plugin</artifactId> <version>${maven-compiler-plugin.version}</version> <configuration> <source>1.8</source> <target>1.8</target> </configuration> </plugin> <plugin> <groupId>org.apache.maven.plugins</groupId> <artifactId>maven-surefire-plugin</artifactId> <version>${maven-surefire-plugin.version}</version> <configuration> <parallel>all</parallel> <threadCount>4</threadCount> <redirectTestOutputToFile>true</redirectTestOutputToFile> </configuration> <dependencies> <dependency> <groupId>org.apache.maven.surefire</groupId> <artifactId>surefire-junit47</artifactId> <version>${maven-surefire-plugin.version}</version> </dependency> </dependencies> </plugin> <!-- Ensure that the Maven jar plugin runs before the Maven shade plugin by listing the plugin higher within the file. --> <plugin> <groupId>org.apache.maven.plugins</groupId> <artifactId>maven-jar-plugin</artifactId> <version>${maven-jar-plugin.version}</version> </plugin> <!-- Configures `mvn package` to produce a bundled jar ("fat jar") for runners that require this for job submission to a cluster. --> <plugin> <groupId>org.apache.maven.plugins</groupId> <artifactId>maven-shade-plugin</artifactId> <version>${maven-shade-plugin.version}</version> <executions> <execution> <phase>package</phase> <goals> <goal>shade</goal> </goals> <configuration> <finalName>${project.artifactId}-bundled-${project.version}</finalName> <filters> <filter> <artifact>*:*</artifact> <excludes> <exclude>META-INF/LICENSE</exclude> <exclude>META-INF/*.SF</exclude> <exclude>META-INF/*.DSA</exclude> <exclude>META-INF/*.RSA</exclude> </excludes> </filter> </filters> <transformers> <transformer implementation="org.apache.maven.plugins.shade.resource.ServicesResourceTransformer"/> </transformers> </configuration> </execution> </executions> </plugin> </plugins> <pluginManagement> <plugins> <plugin> <groupId>org.codehaus.mojo</groupId> <artifactId>exec-maven-plugin</artifactId> <version>${maven-exec-plugin.version}</version> <configuration> <cleanupDaemonThreads>false</cleanupDaemonThreads> </configuration> </plugin> </plugins> </pluginManagement> </build> <profiles> <profile> <id>direct-runner</id> <activation> <activeByDefault>true</activeByDefault> </activation> <!-- Makes the DirectRunner available when running a pipeline. --> <dependencies> <dependency> <groupId>org.apache.beam</groupId> <artifactId>beam-runners-direct-java</artifactId> <version>${beam.version}</version> <scope>runtime</scope> </dependency> </dependencies> </profile> <profile> <id>portable-runner</id> <activation> <activeByDefault>true</activeByDefault> </activation> <!-- Makes the PortableRunner available when running a pipeline. --> <dependencies> <dependency> <groupId>org.apache.beam</groupId> <artifactId>beam-runners-reference-java</artifactId> <version>${beam.version}</version> <scope>runtime</scope> </dependency> </dependencies> </profile> <profile> <id>apex-runner</id> <!-- Makes the ApexRunner available when running a pipeline. --> <dependencies> <dependency> <groupId>org.apache.beam</groupId> <artifactId>beam-runners-apex</artifactId> <version>${beam.version}</version> <scope>runtime</scope> </dependency> <!-- Apex depends on httpclient version 4.3.6, project has a transitive dependency to httpclient 4.0.1 from google-http-client. Apex dependency version being specified explicitly so that it gets picked up. This can be removed when the project no longer has a dependency on a different httpclient version. --> <dependency> <groupId>org.apache.httpcomponents</groupId> <artifactId>httpclient</artifactId> <version>4.3.6</version> <scope>runtime</scope> <exclusions> <exclusion> <groupId>commons-codec</groupId> <artifactId>commons-codec</artifactId> </exclusion> </exclusions> </dependency> <!-- Apex 3.6 is built against YARN 2.6. Version in the fat jar has to match what's on the cluster, hence we need to repeat the Apex Hadoop dependencies here. --> <dependency> <groupId>org.apache.hadoop</groupId> <artifactId>hadoop-yarn-client</artifactId> <version>${hadoop.version}</version> <scope>runtime</scope> </dependency> <dependency> <groupId>org.apache.hadoop</groupId> <artifactId>hadoop-common</artifactId> <version>${hadoop.version}</version> <scope>runtime</scope> </dependency> </dependencies> </profile> <profile> <id>dataflow-runner</id> <!-- Makes the DataflowRunner available when running a pipeline. --> <dependencies> <dependency> <groupId>org.apache.beam</groupId> <artifactId>beam-runners-google-cloud-dataflow-java</artifactId> <version>${beam.version}</version> <scope>runtime</scope> </dependency> </dependencies> </profile> <profile> <id>flink-runner</id> <!-- Makes the FlinkRunner available when running a pipeline. --> <dependencies> <dependency> <groupId>org.apache.beam</groupId> <!-- Please see the Flink Runner page for an up-to-date list of supported Flink versions and their artifact names: https://beam.apache.org/documentation/runners/flink/ --> <artifactId>${flink.artifact.name}</artifactId> <version>${beam.version}</version> <scope>runtime</scope> </dependency> </dependencies> </profile> <profile> <id>spark-runner</id> <!-- Makes the SparkRunner available when running a pipeline. Additionally, overrides some Spark dependencies to Beam-compatible versions. --> <properties> <netty.version>4.1.17.Final</netty.version> </properties> <dependencies> <dependency> <groupId>org.apache.beam</groupId> <artifactId>beam-runners-spark</artifactId> <version>${beam.version}</version> <scope>runtime</scope> </dependency> <dependency> <groupId>org.apache.beam</groupId> <artifactId>beam-sdks-java-io-hadoop-file-system</artifactId> <version>${beam.version}</version> <scope>runtime</scope> </dependency> <dependency> <groupId>org.apache.spark</groupId> <artifactId>spark-streaming_2.11</artifactId> <version>${spark.version}</version> <scope>runtime</scope> <exclusions> <exclusion> <groupId>org.slf4j</groupId> <artifactId>jul-to-slf4j</artifactId> </exclusion> </exclusions> </dependency> <dependency> <groupId>com.fasterxml.jackson.module</groupId> <artifactId>jackson-module-scala_2.11</artifactId> <version>${jackson.version}</version> <scope>runtime</scope> </dependency> <!-- [BEAM-3519] GCP IO exposes netty on its API surface, causing conflicts with runners --> <dependency> <groupId>org.apache.beam</groupId> <artifactId>beam-sdks-java-io-google-cloud-platform</artifactId> <version>${beam.version}</version> <exclusions> <exclusion> <groupId>io.grpc</groupId> <artifactId>grpc-netty</artifactId> </exclusion> <exclusion> <groupId>io.netty</groupId> <artifactId>netty-handler</artifactId> </exclusion> </exclusions> </dependency> </dependencies> </profile> <profile> <id>gearpump-runner</id> <dependencies> <dependency> <groupId>org.apache.beam</groupId> <artifactId>beam-runners-gearpump</artifactId> <version>${beam.version}</version> <scope>runtime</scope> </dependency> </dependencies> </profile> <profile> <id>samza-runner</id> <dependencies> <dependency> <groupId>org.apache.beam</groupId> <artifactId>beam-runners-samza</artifactId> <version>${beam.version}</version> <scope>runtime</scope> </dependency> </dependencies> </profile> <profile> <id>nemo-runner</id> <dependencies> <dependency> <groupId>org.apache.nemo</groupId> <artifactId>nemo-compiler-frontend-beam</artifactId> <version>${nemo.version}</version> </dependency> <dependency> <groupId>org.apache.hadoop</groupId> <artifactId>hadoop-common</artifactId> <version>${hadoop.version}</version> <exclusions> <exclusion> <groupId>org.slf4j</groupId> <artifactId>slf4j-api</artifactId> </exclusion> <exclusion> <groupId>org.slf4j</groupId> <artifactId>slf4j-log4j12</artifactId> </exclusion> </exclusions> </dependency> </dependencies> </profile> <profile> <id>jet-runner</id> <dependencies> <dependency> <groupId>org.apache.beam</groupId> <artifactId>beam-runners-jet-experimental</artifactId> <version>${beam.version}</version> <scope>runtime</scope> </dependency> </dependencies> </profile> </profiles> <dependencies> <!-- Adds a dependency on the Beam SDK. --> <dependency> <groupId>org.apache.beam</groupId> <artifactId>beam-sdks-java-core</artifactId> <version>${beam.version}</version> </dependency> <!-- Adds a dependency on the Beam Google Cloud Platform IO module. --> <dependency> <groupId>org.apache.beam</groupId> <artifactId>beam-sdks-java-io-google-cloud-platform</artifactId> <version>${beam.version}</version> </dependency> <!-- Dependencies below this line are specific dependencies needed by the examples code. --> <dependency> <groupId>com.google.api-client</groupId> <artifactId>google-api-client</artifactId> <version>${google-clients.version}</version> <exclusions> <!-- Exclude an old version of guava that is being pulled in by a transitive dependency of google-api-client --> <exclusion> <groupId>com.google.guava</groupId> <artifactId>guava-jdk5</artifactId> </exclusion> </exclusions> </dependency> <dependency> <groupId>com.google.apis</groupId> <artifactId>google-api-services-bigquery</artifactId> <version>${bigquery.version}</version> <exclusions> <!-- Exclude an old version of guava that is being pulled in by a transitive dependency of google-api-client --> <exclusion> <groupId>com.google.guava</groupId> <artifactId>guava-jdk5</artifactId> </exclusion> </exclusions> </dependency> <dependency> <groupId>com.google.http-client</groupId> <artifactId>google-http-client</artifactId> <version>${google-clients.version}</version> <exclusions> <!-- Exclude an old version of guava that is being pulled in by a transitive dependency of google-api-client --> <exclusion> <groupId>com.google.guava</groupId> <artifactId>guava-jdk5</artifactId> </exclusion> </exclusions> </dependency> <dependency> <groupId>com.google.apis</groupId> <artifactId>google-api-services-pubsub</artifactId> <version>${pubsub.version}</version> <exclusions> <!-- Exclude an old version of guava that is being pulled in by a transitive dependency of google-api-client --> <exclusion> <groupId>com.google.guava</groupId> <artifactId>guava-jdk5</artifactId> </exclusion> </exclusions> </dependency> <dependency> <groupId>joda-time</groupId> <artifactId>joda-time</artifactId> <version>${joda.version}</version> </dependency> <!-- Add slf4j API frontend binding with JUL backend --> <dependency> <groupId>org.slf4j</groupId> <artifactId>slf4j-api</artifactId> <version>${slf4j.version}</version> </dependency> <dependency> <groupId>org.slf4j</groupId> <artifactId>slf4j-jdk14</artifactId> <version>${slf4j.version}</version> <!-- When loaded at runtime this will wire up slf4j to the JUL backend --> <scope>runtime</scope> </dependency> <!-- Hamcrest and JUnit are required dependencies of PAssert, which is used in the main code of DebuggingWordCount example. --> <dependency> <groupId>org.hamcrest</groupId> <artifactId>hamcrest-core</artifactId> <version>${hamcrest.version}</version> </dependency> <dependency> <groupId>org.hamcrest</groupId> <artifactId>hamcrest-library</artifactId> <version>${hamcrest.version}</version> </dependency> <dependency> <groupId>junit</groupId> <artifactId>junit</artifactId> <version>${junit.version}</version> </dependency> <!-- The DirectRunner is needed for unit tests. --> <dependency> <groupId>org.apache.beam</groupId> <artifactId>beam-runners-direct-java</artifactId> <version>${beam.version}</version> <scope>test</scope> </dependency> <dependency> <groupId>org.mockito</groupId> <artifactId>mockito-core</artifactId> <version>${mockito.version}</version> <scope>test</scope> </dependency> </dependencies> </project>テンプレート
BigqeuryToGCS.javapackage com.example; import com.google.api.services.bigquery.model.TableRow; import org.apache.beam.sdk.Pipeline; import org.apache.beam.sdk.io.TextIO; import org.apache.beam.sdk.io.gcp.bigquery.BigQueryIO; import org.apache.beam.sdk.options.PipelineOptions; import org.apache.beam.sdk.options.PipelineOptionsFactory; import org.apache.beam.sdk.transforms.DoFn; import org.apache.beam.sdk.transforms.ParDo; public class BigqeuryToGCS { public interface BigQueryToGCSOptions extends PipelineOptions {} public static void main(final String[] args) { final BigQueryToGCSOptions options = PipelineOptionsFactory.fromArgs(args) .withValidation() .as(BigQueryToGCSOptions.class); final Pipeline pipeline = Pipeline.create(options); pipeline.apply("Read from BigQuery", BigQueryIO.readTableRows() .fromQuery("SELECT * FROM <DB>.<Table>")) .apply(ParDo.of(new DoFn<TableRow, String>() { @ProcessElement public void processElement(final ProcessContext c) { final TableRow row = c.element(); final String col = String.valueOf(row.get("<Column Name>")); c.output(col); } })) .apply(TextIO.write().to("<GCS URL for output files>")); pipeline.run(); } }テンプレートの実行
 mvn compile exec:java \
    ~/dataflow-intro
    -Dexec.mainClass=com.example.BigqueryToGCS \
    -Dexec.args="--project=<Project Name> \
    --tempLocation=<GCS URL> \
    --gcpTempLocation=<GCS URL> \
    --runner=DataflowRunner \
    --jobName=BigqueryToGCS" \
    -Pdataflow-runner
テンプレート作成(Scala編)
次にJavaで作ったプロジェクトをScalaに書き直して行きます
ライブラリ管理
Scalaではsbtを使うので、ライブラリの管理はbuild.sbtで行います。実行に必要な最小限のライブラリだけ入れたいので以下のように設定します
build.sbtname := "<Project Name>" version := "0.0.1" scalaVersion := "2.12.10" val beamVersion = "2.5.0" libraryDependencies ++= Seq( "com.google.cloud.dataflow" % "google-cloud-dataflow-java-sdk-all" % beamVersion )テンプレート
BigqeuryToGCS.scalapackage com.hello import com.google.api.services.bigquery.model.TableRow import org.apache.beam.runners.dataflow.DataflowRunner import org.apache.beam.runners.dataflow.options.DataflowPipelineOptions import org.apache.beam.runners.dataflow.options.DataflowPipelineWorkerPoolOptions.AutoscalingAlgorithmType import org.apache.beam.sdk.io.gcp.bigquery.BigQueryIO import org.apache.beam.sdk.Pipeline import org.apache.beam.sdk.options.{ PipelineOptions, PipelineOptionsFactory } import org.apache.beam.sdk.options.PipelineOptionsFactory import org.apache.beam.sdk.util.Transport import org.apache.beam.sdk.transforms.{ DoFn, ParDo } import DoFn.ProcessElement import org.apache.beam.sdk.io.TextIO import scala.util.{ Failure, Success, Try} class ColumnDoFn extends DoFn[TableRow, String] { @ProcessElement def processElement(c: ProcessContext) { val input = c.element() val col = String.valueOf(input.get("<Column>")) c.output(col) } } object BigqueryToGCS { def main(args: Array[String]) :Unit = { trait BigQueryToGCSOptions extends PipelineOptions with DataflowPipelineOptions val options = PipelineOptionsFactory.create().as(classOf[BigQueryToGCSOptions]) options.setProject("<Project>") options.setRunner(classOf[DataflowRunner]) options.setRegion("asia-northeast1") options.setZone("asia-northeast1-a") options.setNumWorkers(1) options.setAutoscalingAlgorithm(AutoscalingAlgorithmType.NONE) options.setWorkerMachineType("n1-standard-1") options.setStagingLocation("<GCS URL for staging>") options.setGcpTempLocation("<GCS URL for tmp>") options.setTempLocation("<GCS URL for tmp>") val p = Pipeline.create(options) p.apply("", BigQueryIO.readTableRows().fromQuery("SELECT * FROM <DB>.<Table>")) .apply("", ParDo.of(new ColumnDoFn)) .apply("", TextIO.write().to("<GCS URL for output files>")) p.run() } }テンプレートの実行
sbt "runMain com.hello.BigqueryToGCS --project=<Project Name> --runner=DataflowRunner -Pdataflow-runner"テンプレート作成(Scala+Scio編)
Scioとは、Spotify社によって開発されているApache BeamとCloud Dataflow用のScala APIです
プロジェクト作成
sbt new spotify/scio.g8ライブラリ管理
scioのテンプレートにBigqueryのライブラリが足りないので追加します
build.sbtimport sbt._ import Keys._ val scioVersion = "0.7.4" val beamVersion = "2.11.0" val scalaMacrosVersion = "2.1.1" lazy val commonSettings = Defaults.coreDefaultSettings ++ Seq( organization := "example", // Semantic versioning http://semver.org/ version := "0.1.0-SNAPSHOT", scalaVersion := "2.12.10", scalacOptions ++= Seq("-target:jvm-1.8", "-deprecation", "-feature", "-unchecked"), javacOptions ++= Seq("-source", "1.8", "-target", "1.8") ) lazy val paradiseDependency = "org.scalamacros" % "paradise" % scalaMacrosVersion cross CrossVersion.full lazy val macroSettings = Seq( libraryDependencies += "org.scala-lang" % "scala-reflect" % scalaVersion.value, addCompilerPlugin(paradiseDependency) ) lazy val root: Project = project .in(file(".")) .settings(commonSettings) .settings(macroSettings) .settings( name := "yuyu_hf", description := "yuyu_hf", publish / skip := true, run / classLoaderLayeringStrategy := ClassLoaderLayeringStrategy.Flat, libraryDependencies ++= Seq( "com.spotify" %% "scio-core" % scioVersion, "com.spotify" %% "scio-test" % scioVersion % Test, "com.spotify" %% "scio-bigquery" % scioVersion, "org.apache.beam" % "beam-runners-direct-java" % beamVersion, // optional dataflow runner "org.apache.beam" % "beam-runners-google-cloud-dataflow-java" % beamVersion, "org.slf4j" % "slf4j-simple" % "1.7.25" ) ) .enablePlugins(PackPlugin) lazy val repl: Project = project .in(file(".repl")) .settings(commonSettings) .settings(macroSettings) .settings( name := "repl", description := "Scio REPL for yuyu_hf", libraryDependencies ++= Seq( "com.spotify" %% "scio-repl" % scioVersion ), Compile / mainClass := Some("com.spotify.scio.repl.ScioShell"), publish / skip := true ) .dependsOn(root)テンプレート
BigqeuryToGCS.scalapackage example import com.spotify.scio.bigquery._ import com.spotify.scio.ContextAndArgs object BigqueryToGCS { @BigQueryType.fromQuery("SELECT * FROM [<Project>:<DB>.<Table>]") class Row def main(cmdlineArgs: Array[String]): Unit = { val (sc, args) = ContextAndArgs(cmdlineArgs) sc.typedBigQuery[Row]() .map(r => r.sepal_length.getOrElse("")) .saveAsTextFile("<GCS URL for output files>") sc.close } }テンプレートの実行
sbt "runMain example.BigqueryToGCS --project=<Project Name> --runner=DataflowRunner"感想
個人的にApache Beamに慣れるのに時間がかかったので最初は世の中にサンプルコードの多いJavaで書いていました。JavaのコードをまずScalaに変換するところから始めるだけでもきっかけとして良いと思いますし、Scalaらしいコードがかける人であればJavaよりも綺麗に中間データの処理ができるかもしれません。Scioにするかどうかはライブラリの更新頻度とチーム状況を見て考えると良いと思います。
参考文献
- 投稿日:2019-12-03T02:30:46+09:00
Spring Boot + Swagger2.0の触り心地を確かめてみる
https://start.spring.io/ からwebのみを選択してパパッと作成
Swaggerはなかったので、Maven Repositoryから持ってきた
versionなどはbuild.gradle参照してもらいたいサンプルコード
https://github.com/ririkku/swagger-demo試せる最小構成
コード全量
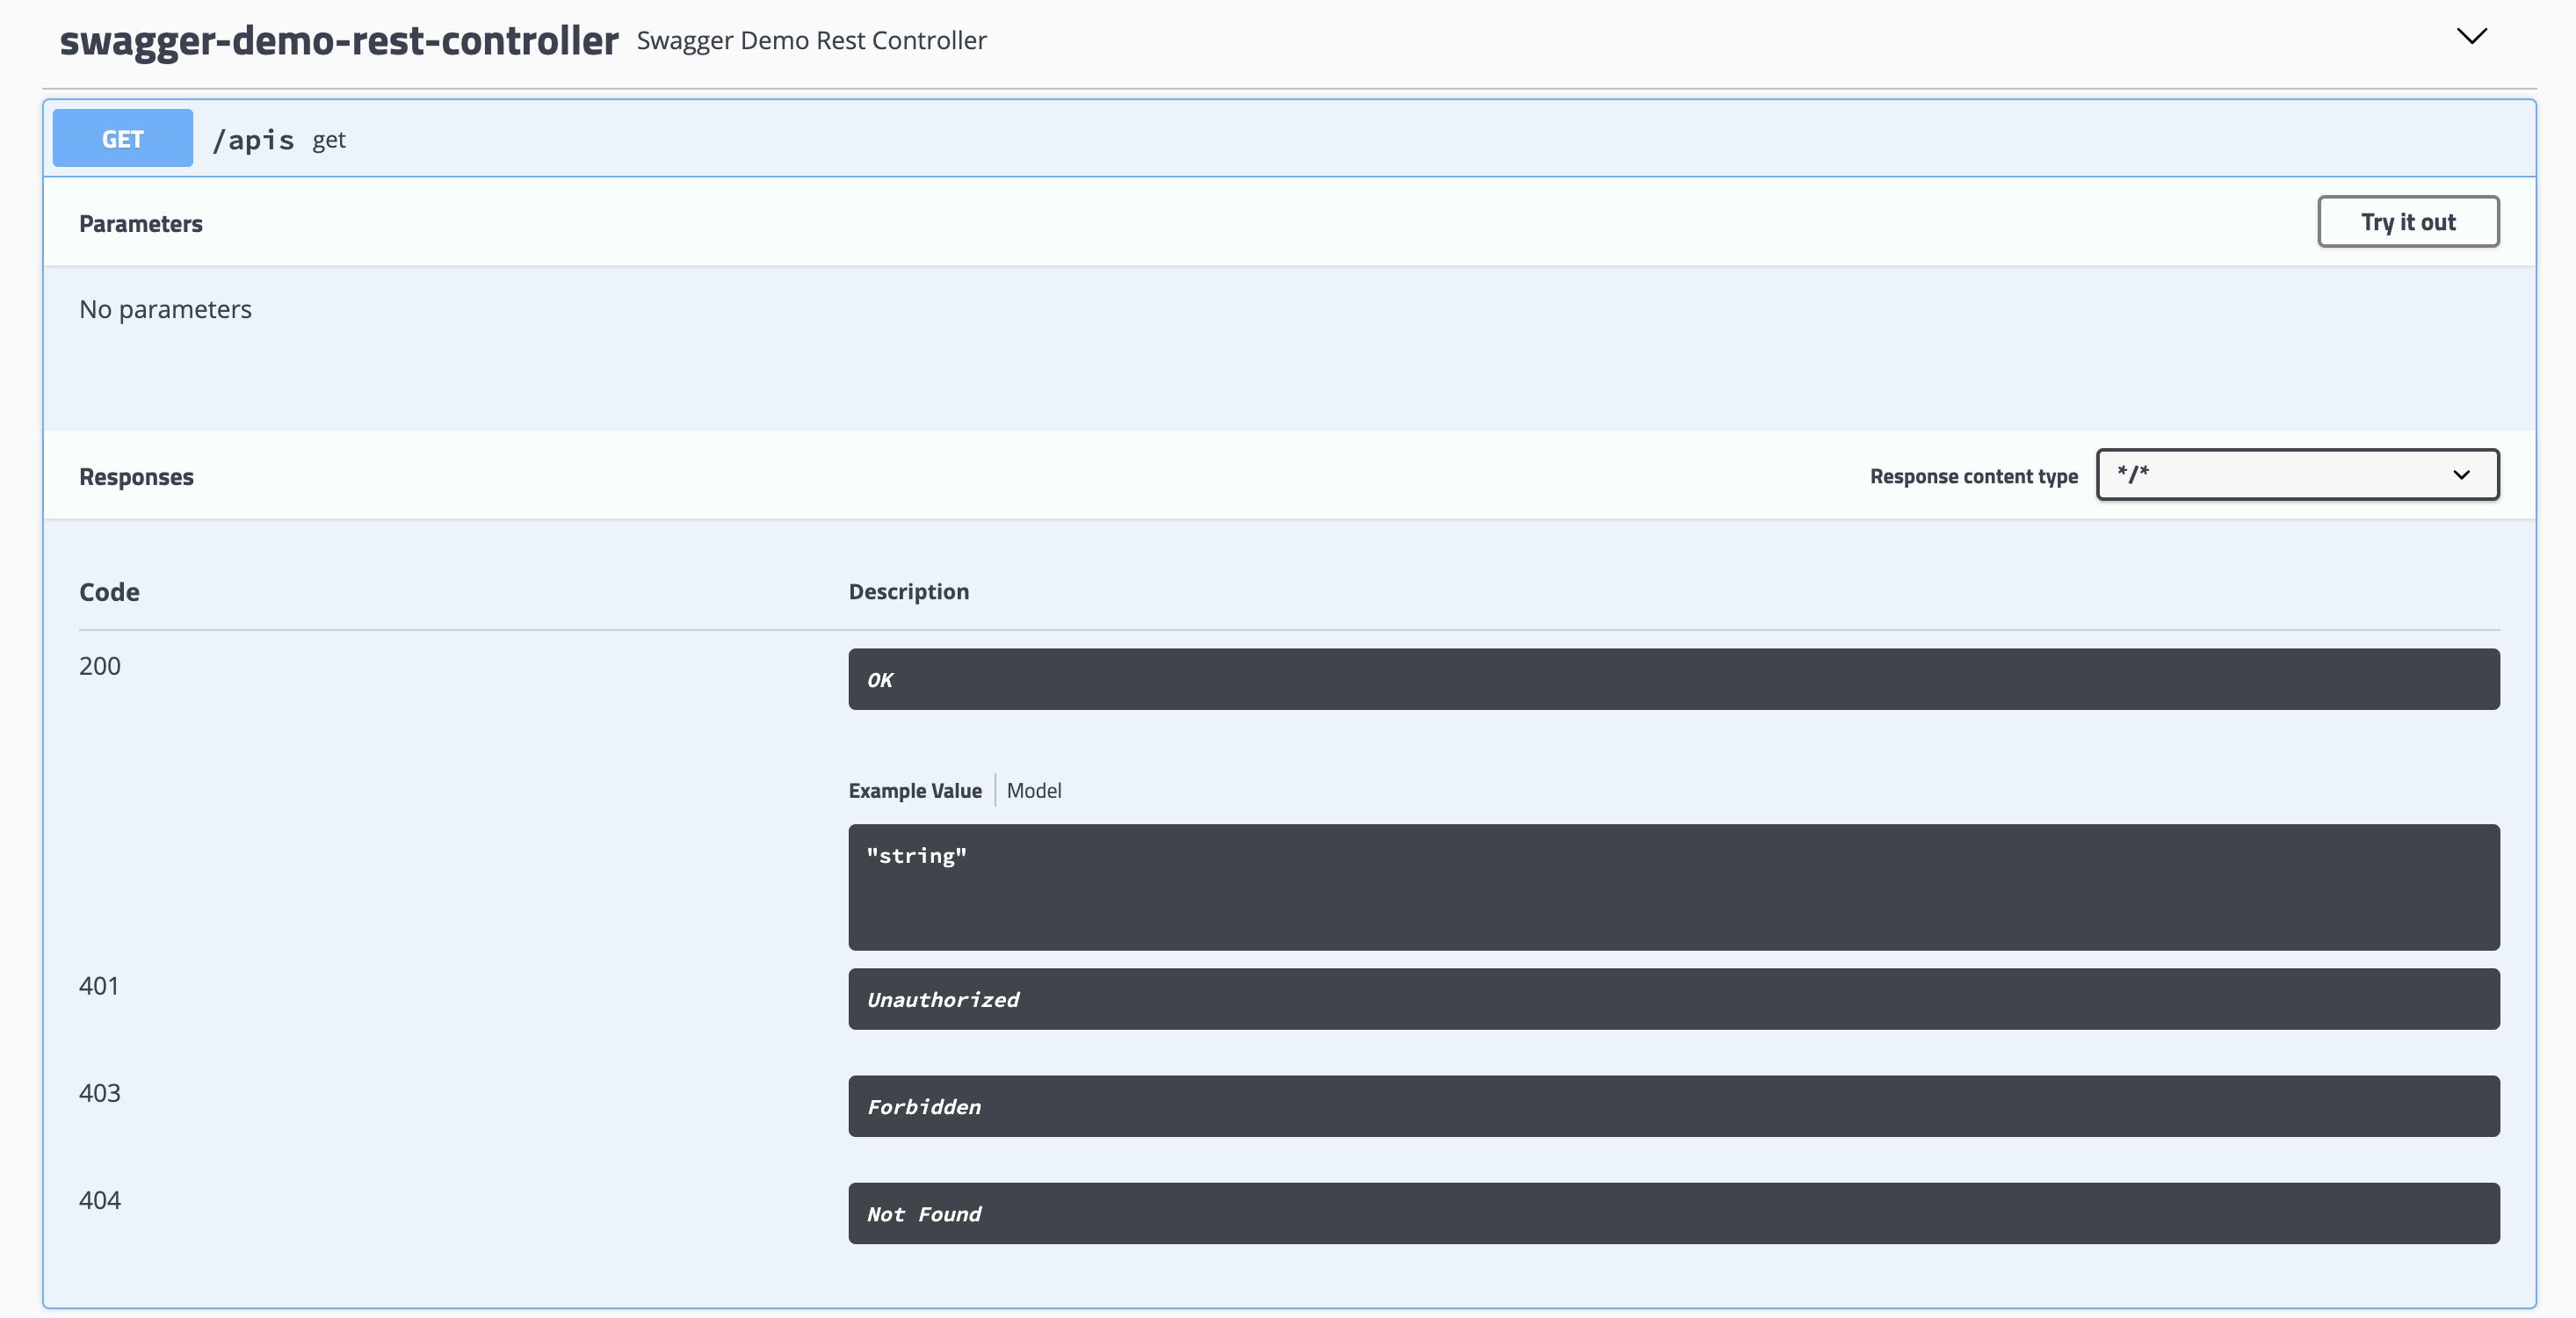
build.gradleplugins { id 'org.springframework.boot' version '2.2.1.RELEASE' id 'io.spring.dependency-management' version '1.0.8.RELEASE' id 'java' } group = 'com.example' version = '0.0.1-SNAPSHOT' sourceCompatibility = '1.8' repositories { mavenCentral() } dependencies { implementation 'org.springframework.boot:spring-boot-starter-web' // Swaggerで必要な最低限 implementation "io.springfox:springfox-swagger2:2.9.2" implementation "io.springfox:springfox-swagger-ui:2.9.2" testImplementation('org.springframework.boot:spring-boot-starter-test') { exclude group: 'org.junit.vintage', module: 'junit-vintage-engine' } } test { useJUnitPlatform() }SwaggerDemoApplication.javaimport org.springframework.boot.SpringApplication; import org.springframework.boot.autoconfigure.SpringBootApplication; @SpringBootApplication public class SwaggerDemoApplication { public static void main(String[] args) { SpringApplication.run(SwaggerDemoApplication.class, args); } }SwaggerDemoConfiguration.javaimport org.springframework.context.annotation.Bean; import org.springframework.context.annotation.Configuration; import springfox.documentation.builders.PathSelectors; import springfox.documentation.spi.DocumentationType; import springfox.documentation.spring.web.plugins.Docket; import springfox.documentation.swagger2.annotations.EnableSwagger2; @Configuration @EnableSwagger2 // swagger2.0を使用 public class SwaggerDemoConfiguration { @Bean public Docket petApi() { return new Docket(DocumentationType.SWAGGER_2) // Swagger2.0を使用します宣言 .select() .paths(PathSelectors.ant("/apis/**")) .build(); } }SwaggerDemoRestController.javaimport org.springframework.web.bind.annotation.GetMapping; import org.springframework.web.bind.annotation.RequestMapping; import org.springframework.web.bind.annotation.RestController; @RestController @RequestMapping("apis") public class SwaggerDemoRestController { @GetMapping public String get() { return "get"; } }確認
普段はIntellij IDEAから起動しているけど、その環境じゃない人もいるかもだから Gradleで起動する
./gradlew bootRun
ローカルホストでアクセス
http://localhost:8080/swagger-ui.html
(入りきらなかったので2分割)
雑感
UIいいじゃん!!!
コードもそんなに書いてないし、実用的かも
でも色々お節介な感じはする、ちょっとカスタマイズしてみようHeaderっぽいところをカスタマイズ
コード(変更ファイル)
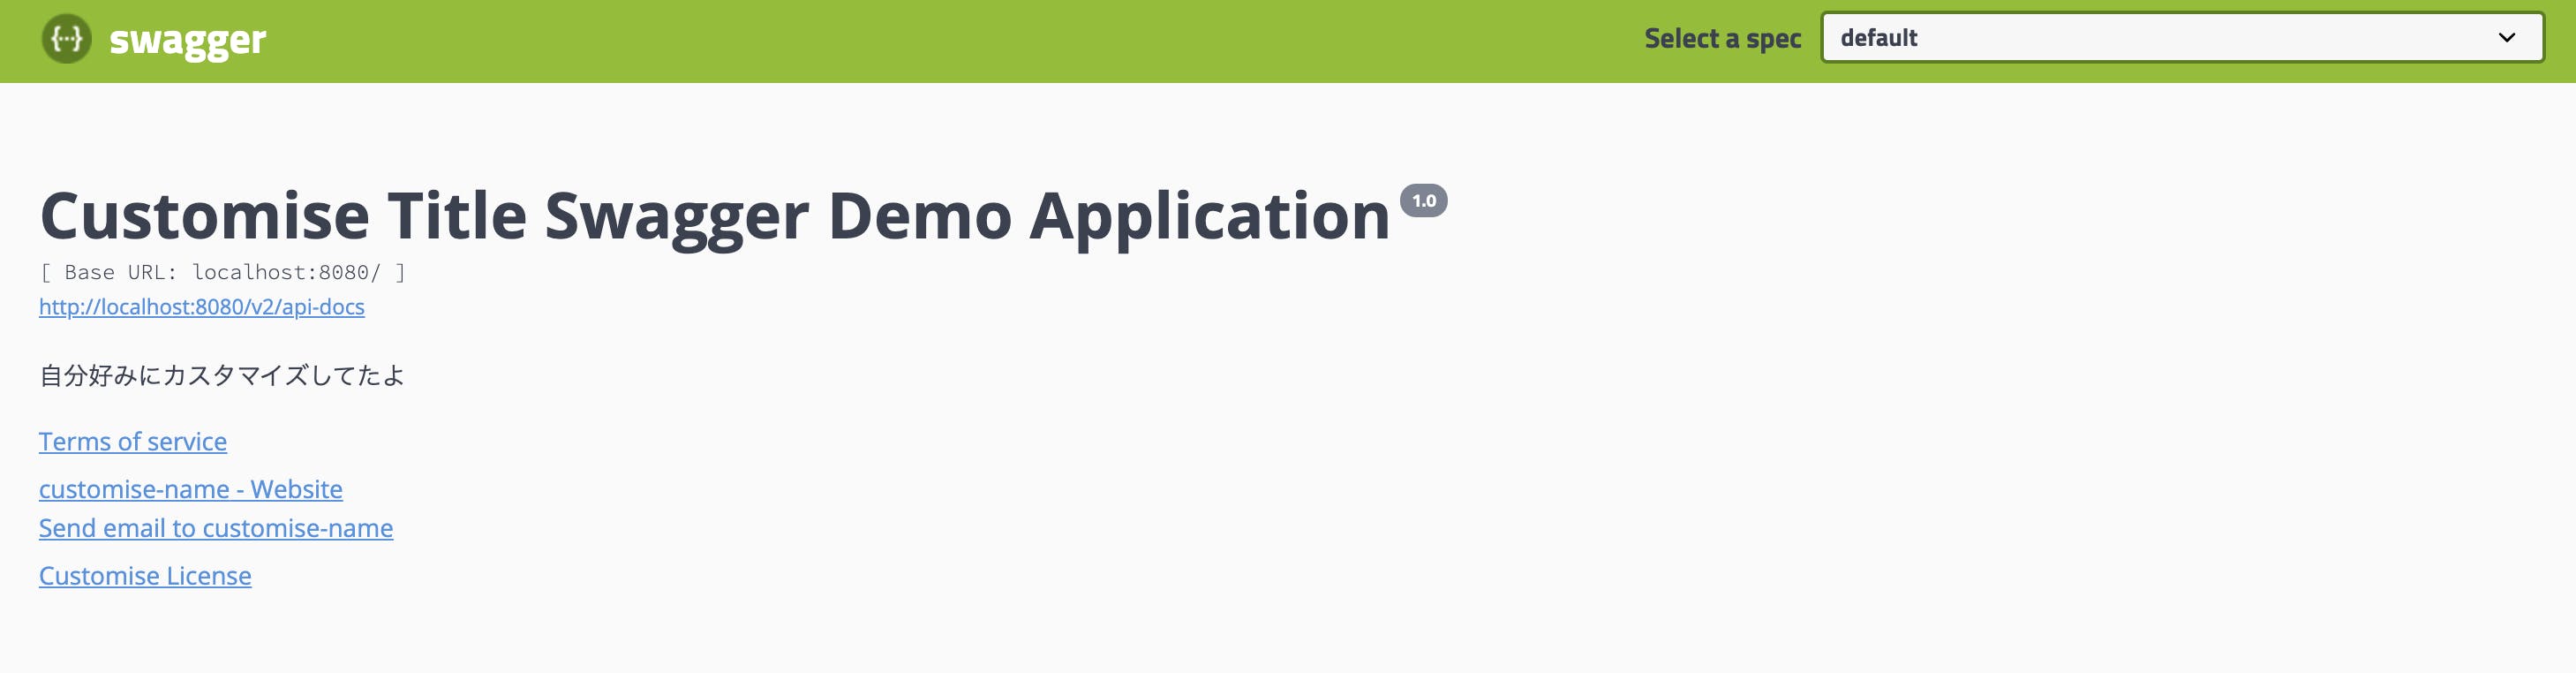
SwaggerDemoConfiguration.javaimport org.springframework.context.annotation.Bean; import org.springframework.context.annotation.Configuration; import springfox.documentation.builders.ApiInfoBuilder; import springfox.documentation.builders.PathSelectors; import springfox.documentation.service.Contact; import springfox.documentation.spi.DocumentationType; import springfox.documentation.spring.web.plugins.Docket; import springfox.documentation.swagger2.annotations.EnableSwagger2; @Configuration @EnableSwagger2 // swagger2.0を使用 public class SwaggerDemoConfiguration { @Bean public Docket petApi() { return new Docket(DocumentationType.SWAGGER_2) // Swagger2.0を使用します宣言 .select() .paths(PathSelectors.ant("/apis/**")) .build() .apiInfo(new ApiInfoBuilder() .title("Customise Title Swagger Demo Application") .description("自分好みにカスタマイズしてたよ") .contact(new Contact("customise-name", "http://customise-contact", "customise-email")) .version("1.0") .termsOfServiceUrl("http://customise.com") .license("Customise License").licenseUrl("http://customise-license-url") // licenseのみだとテキスト、licenseUrl設定するとリンクになる .build()); } }確認
雑感
Customiseのサフィックスをつけた場所が書き換えてみた箇所
Base URLとhttp//localhost:8080/v2/api-docsの部分は変えられないのかな?って感想
あと、ApiInfoBuilderクラスにはextensionsが設定できるよう
独自に何かプラグインを作成したい時とか使用するのかな?(https://swagger.io/docs/specification/2-0/swagger-extensions/)
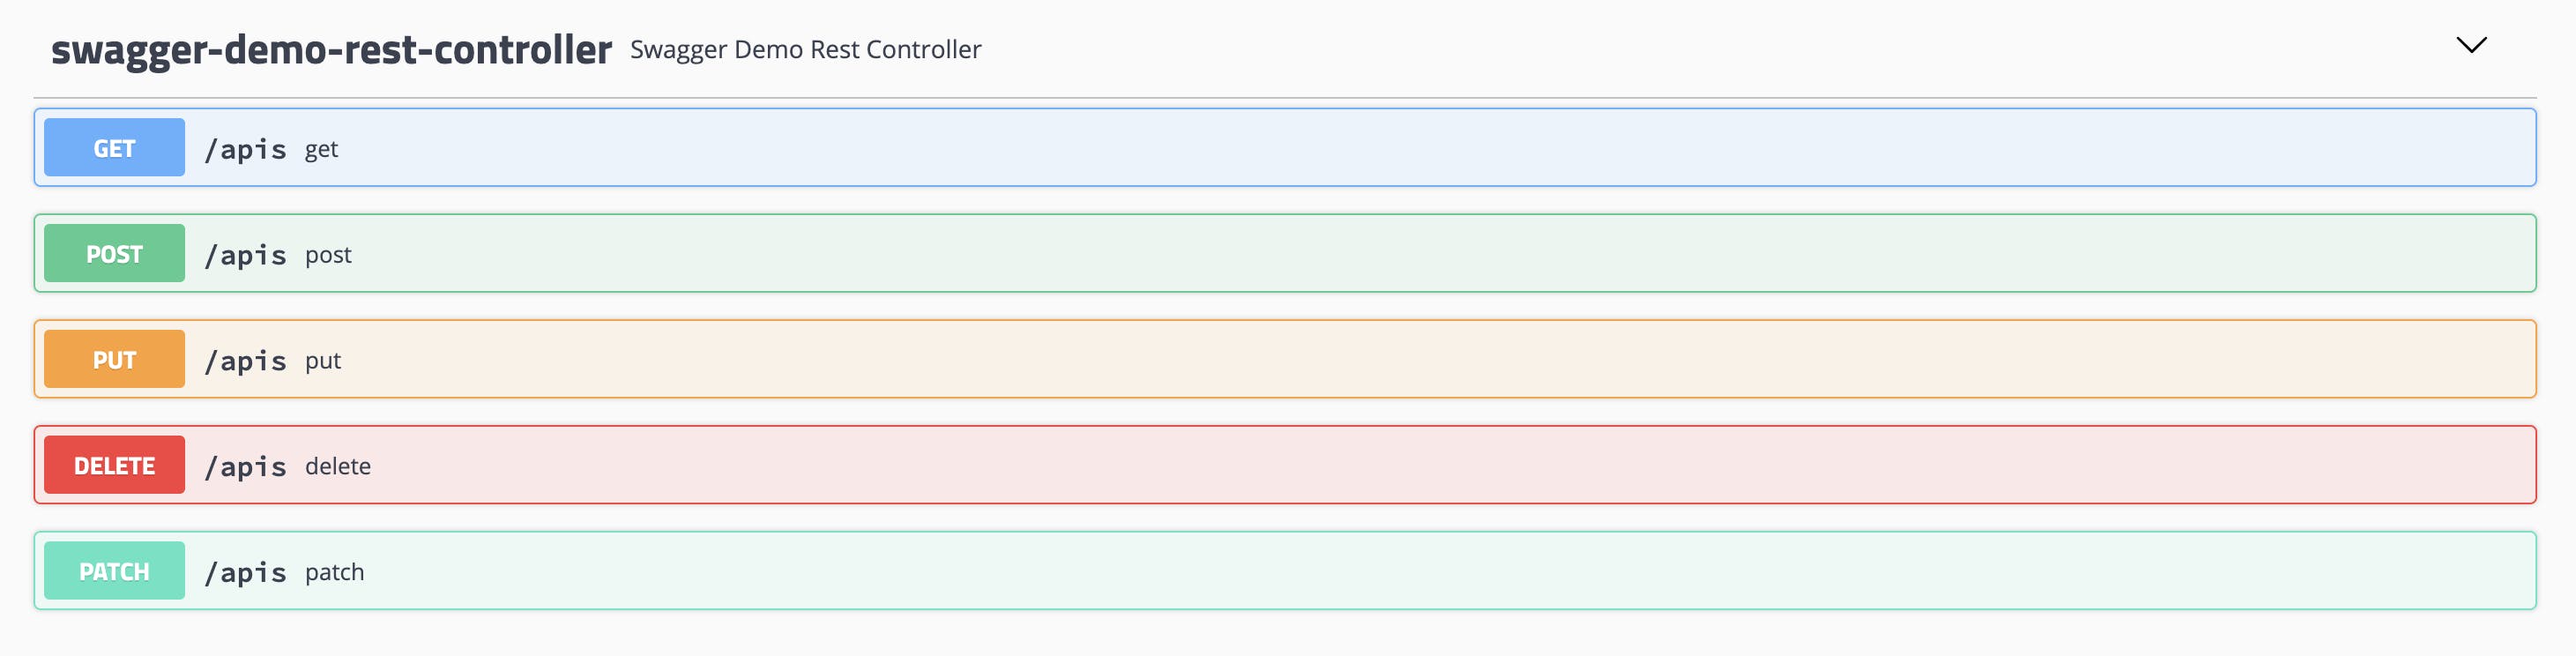
そういやHttpメソッドってどんな感じに出るんだろうHTTPメソッドのUI確認
コード(変更ファイル)
SwaggerDemoRestController.javaimport org.springframework.web.bind.annotation.*; @RestController @RequestMapping("apis") public class SwaggerDemoRestController { @GetMapping public String get() { return "get"; } @PostMapping public void post() { } @DeleteMapping public void delete() { } @PutMapping public void put() { } @PatchMapping public void patch() { } }確認
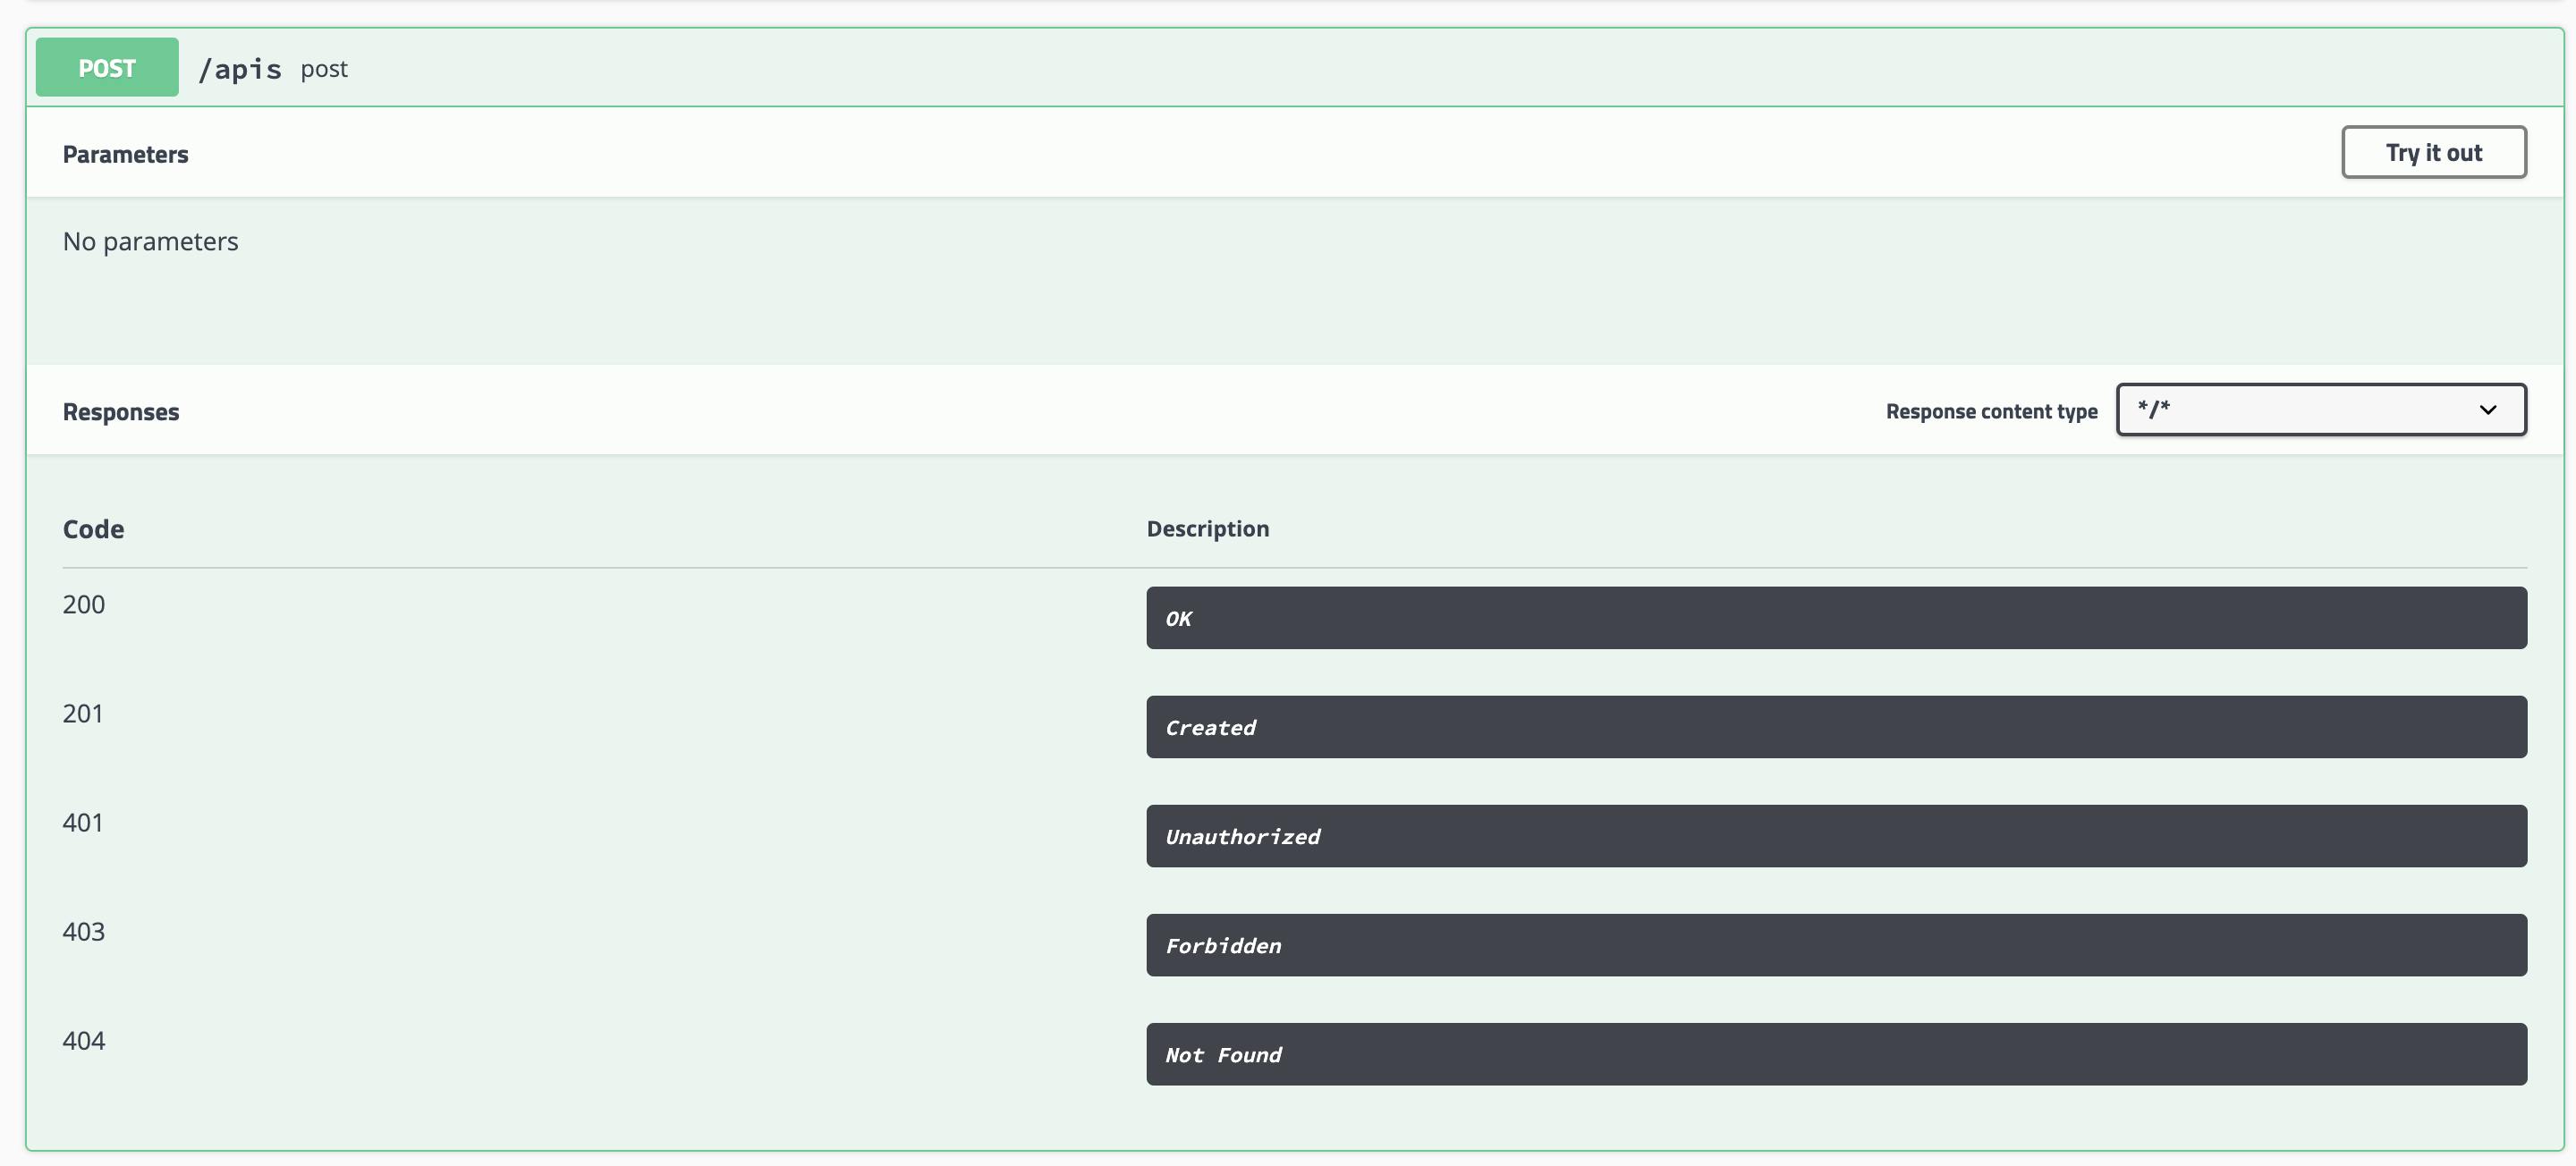
さっきはGET見たから次は気分でPOST
雑感
カラフルで見やすい(PATCHとか使わんやろ)
APIの詳細は色々勝手に考慮してくれる模様(ステータスコードとか)
次は詳細部分をカスタマイズしてみようエンドポイントのカスタマイズ
心機一転、新しいクラスを作成した
@PathVariableはクラスにバインドしたり、@RequestParamはStringにバインドしたりはわざと!コード
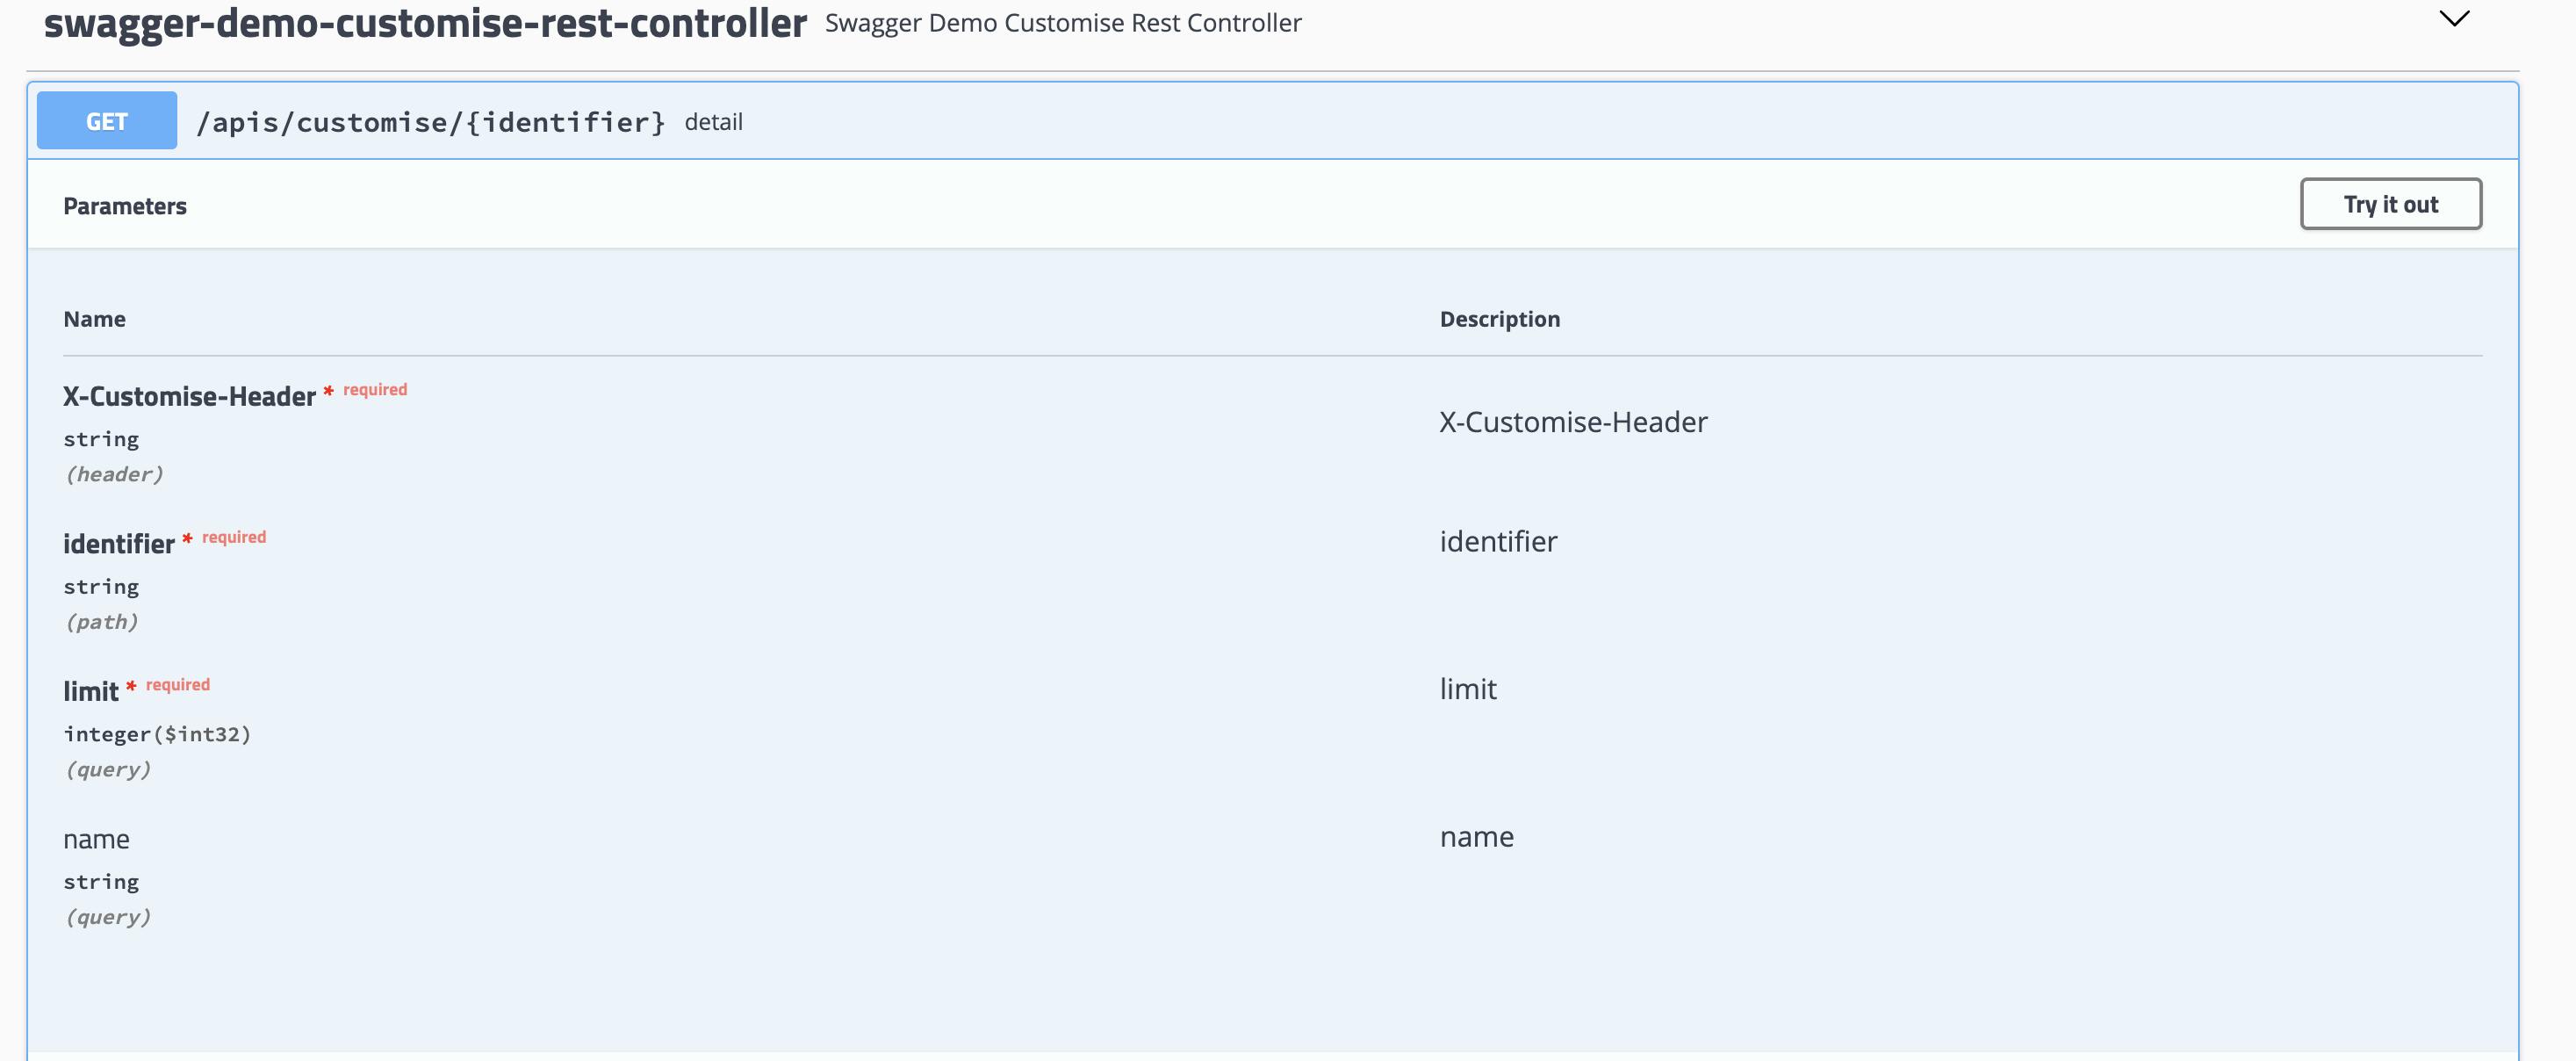
Identifier.javapublic class Identifier { private String value; public Identifier(String value) { this.value = value; } public String value() { if (value == null) return ""; return value; } }SwaggerDemoCustomiseRestController.javaimport org.springframework.web.bind.annotation.*; @RestController @RequestMapping("apis/customise") public class SwaggerDemoCustomiseRestController { @GetMapping("{identifier}") public String detail(@RequestHeader("X-Customise-Header") String customiseHeader, @PathVariable("identifier") Identifier identifier, @RequestParam(value = "name", required = false) String name, @RequestParam("limit") int limit) { return identifier.value(); } }確認
@RequestHeader、@PathVariable、@RequestParamを入れてみた
必須はものには、requiredが付くようになった、便利だね
ちなみに、
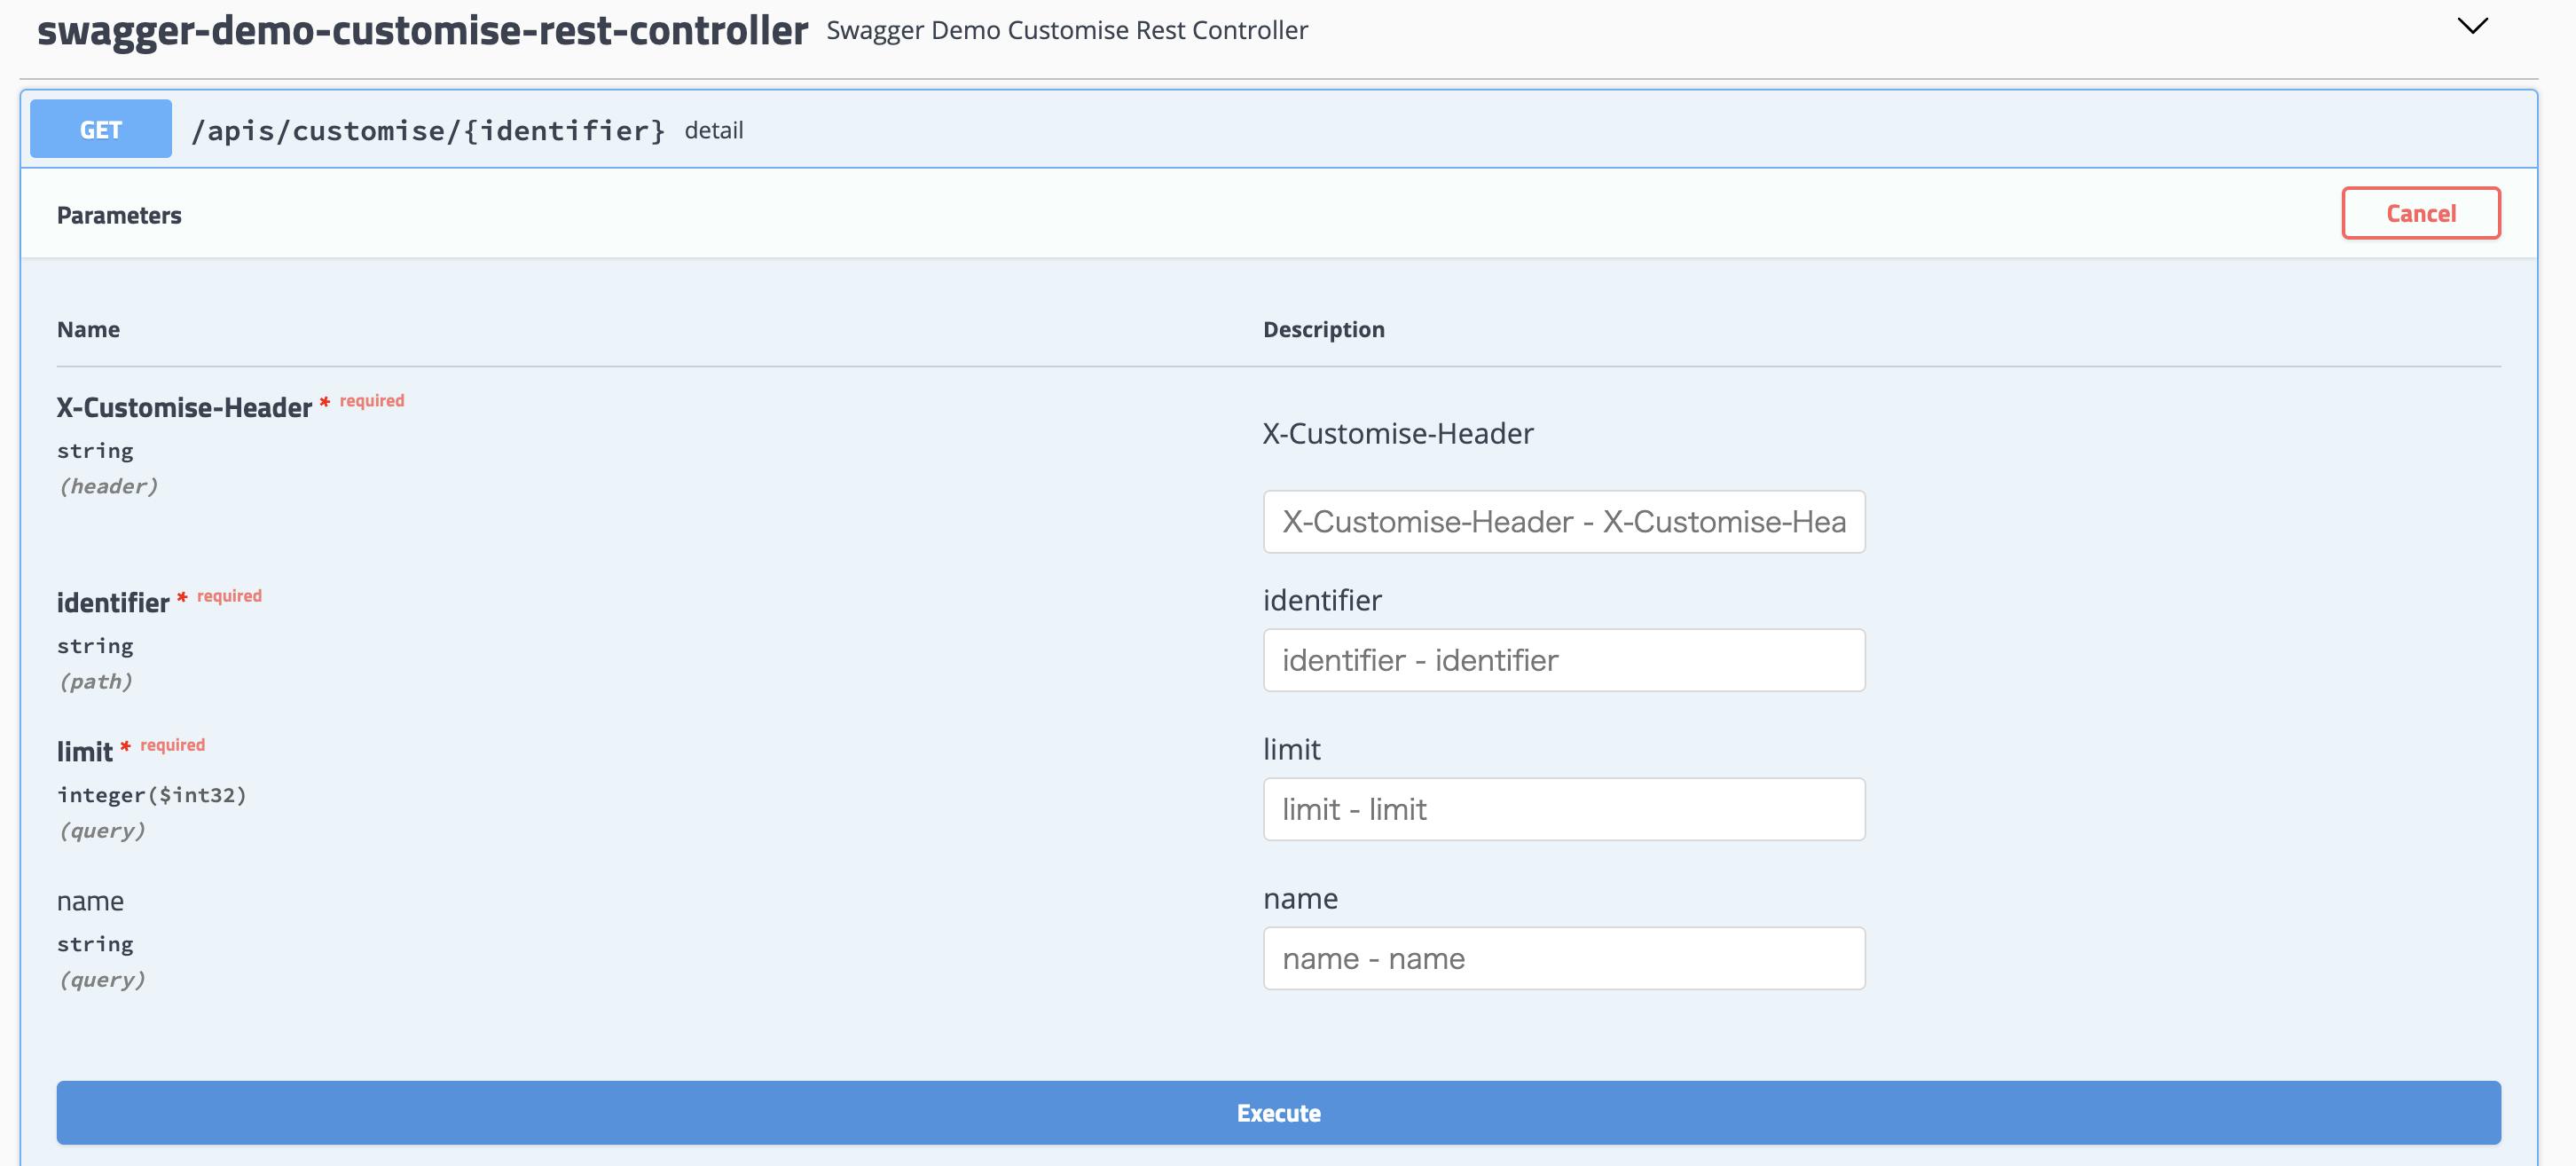
Try it outボタンを押すと以下の表示なって値を入れて検証できるようになった!
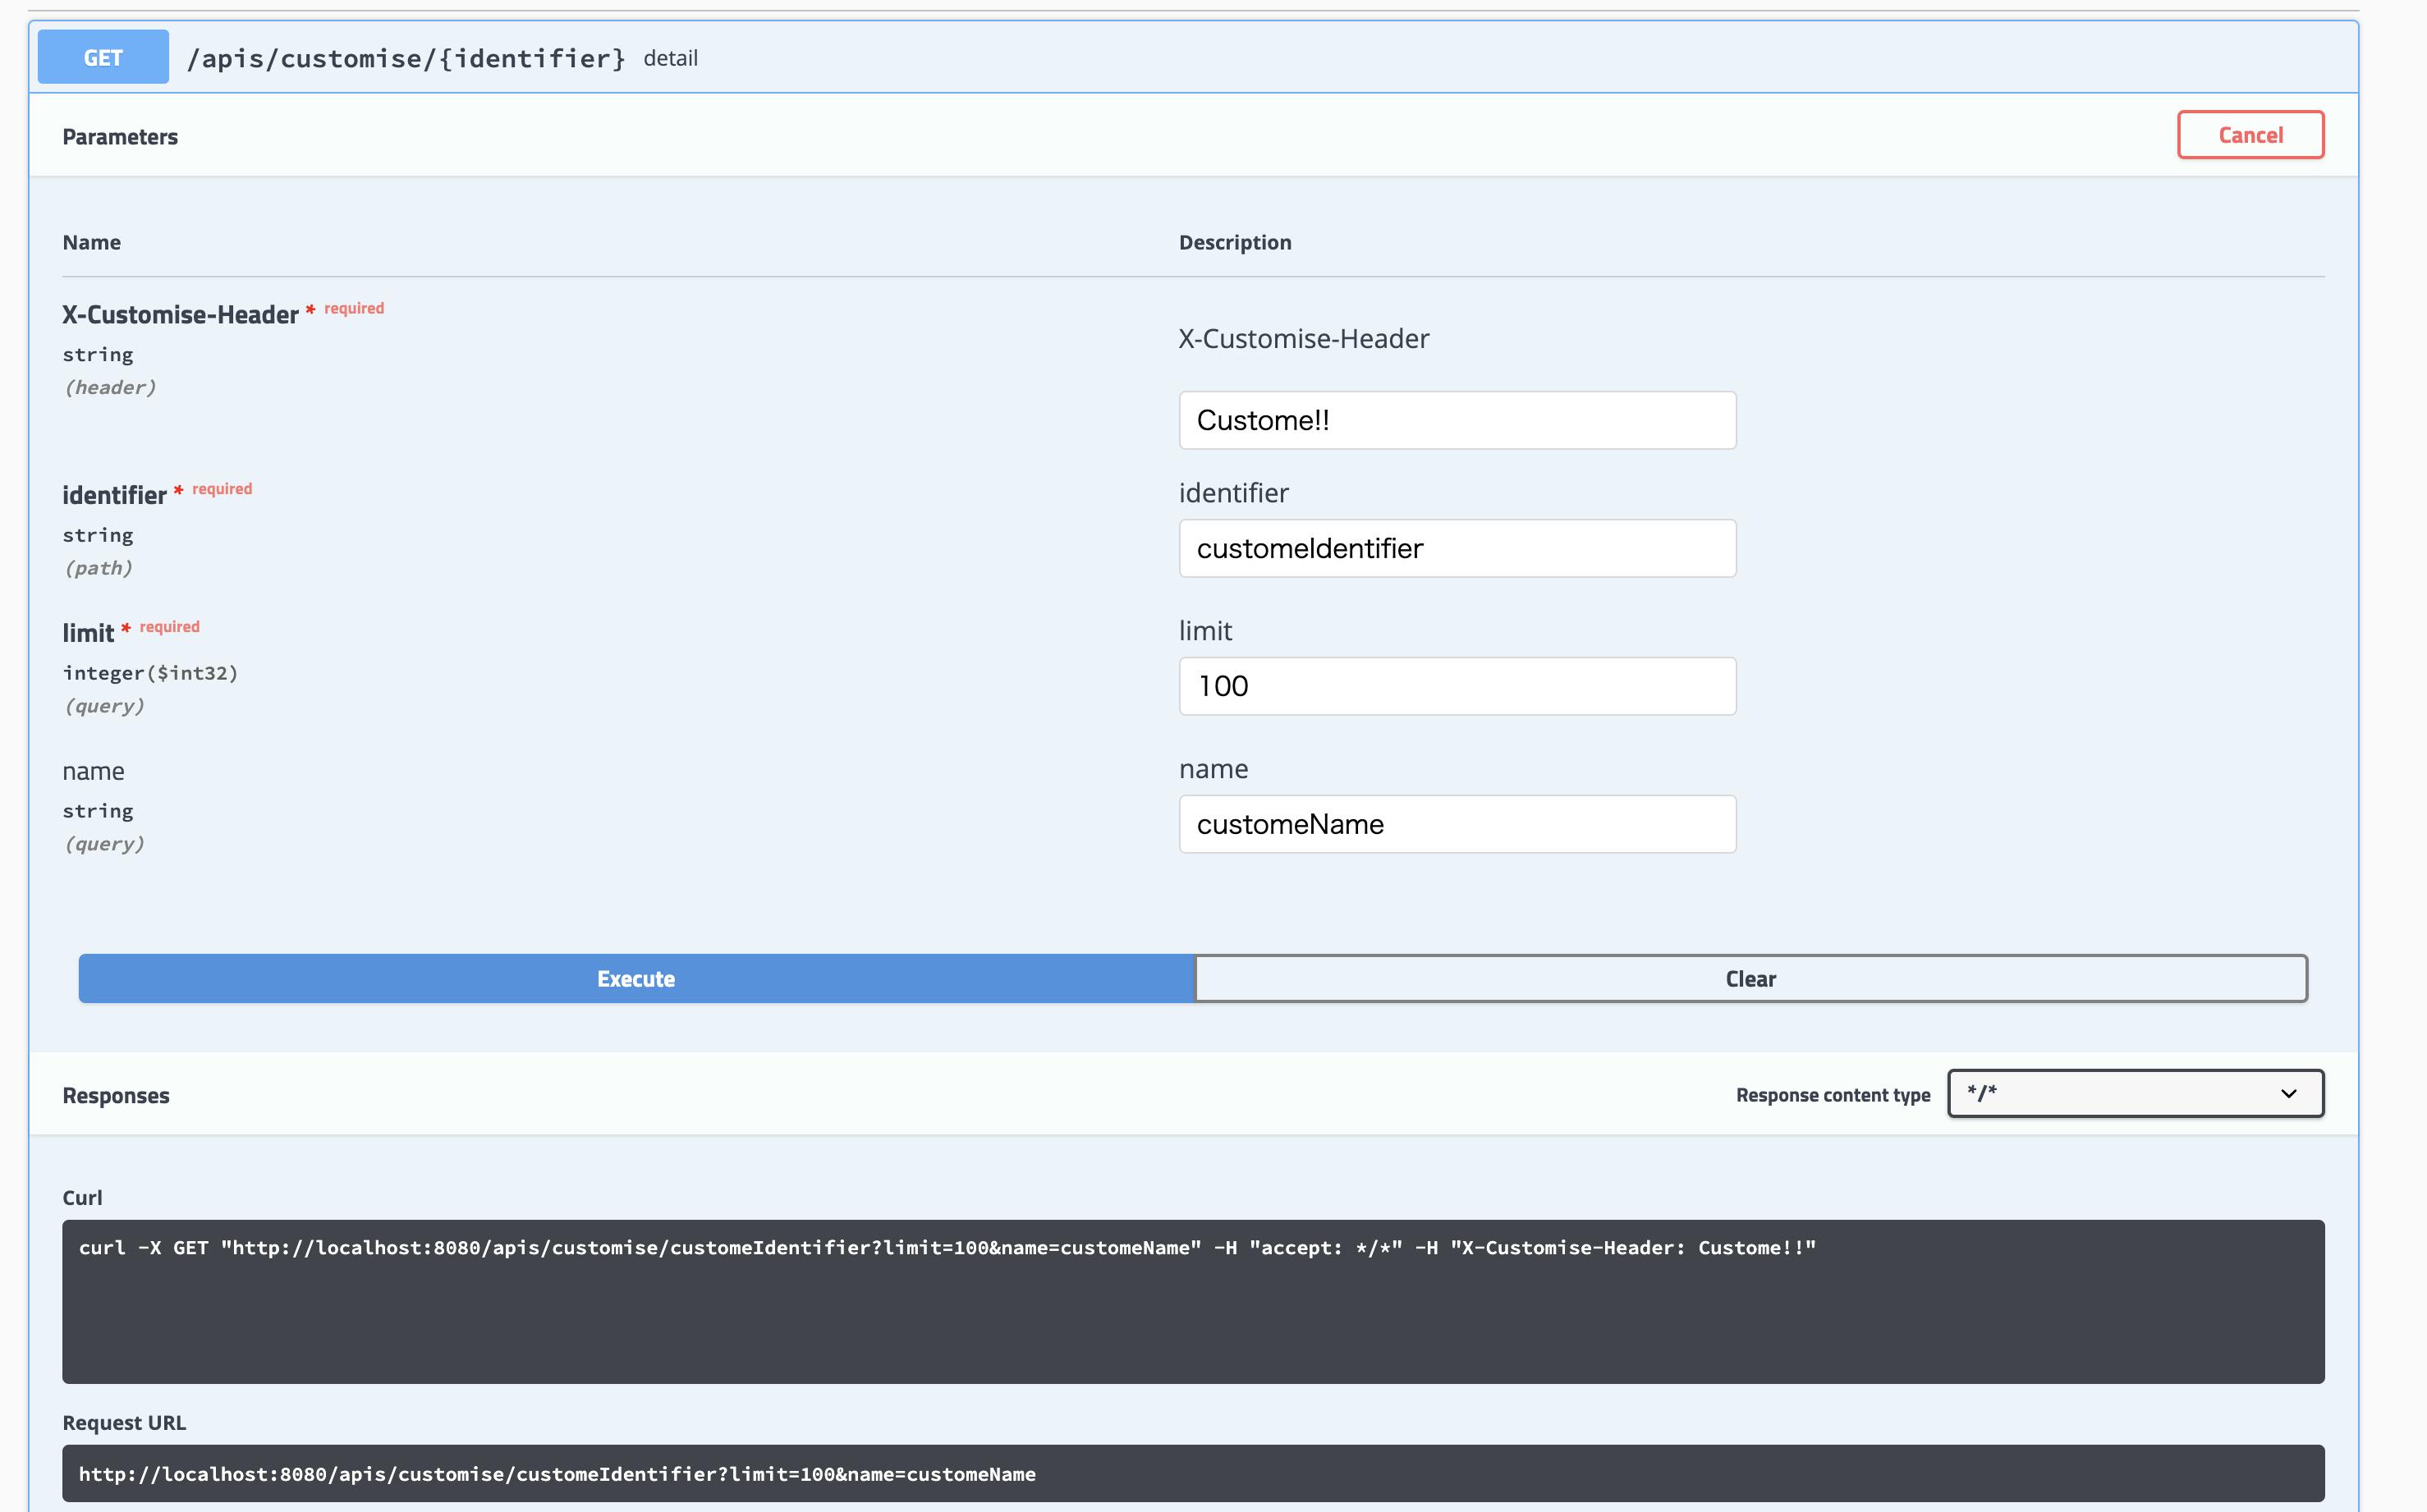
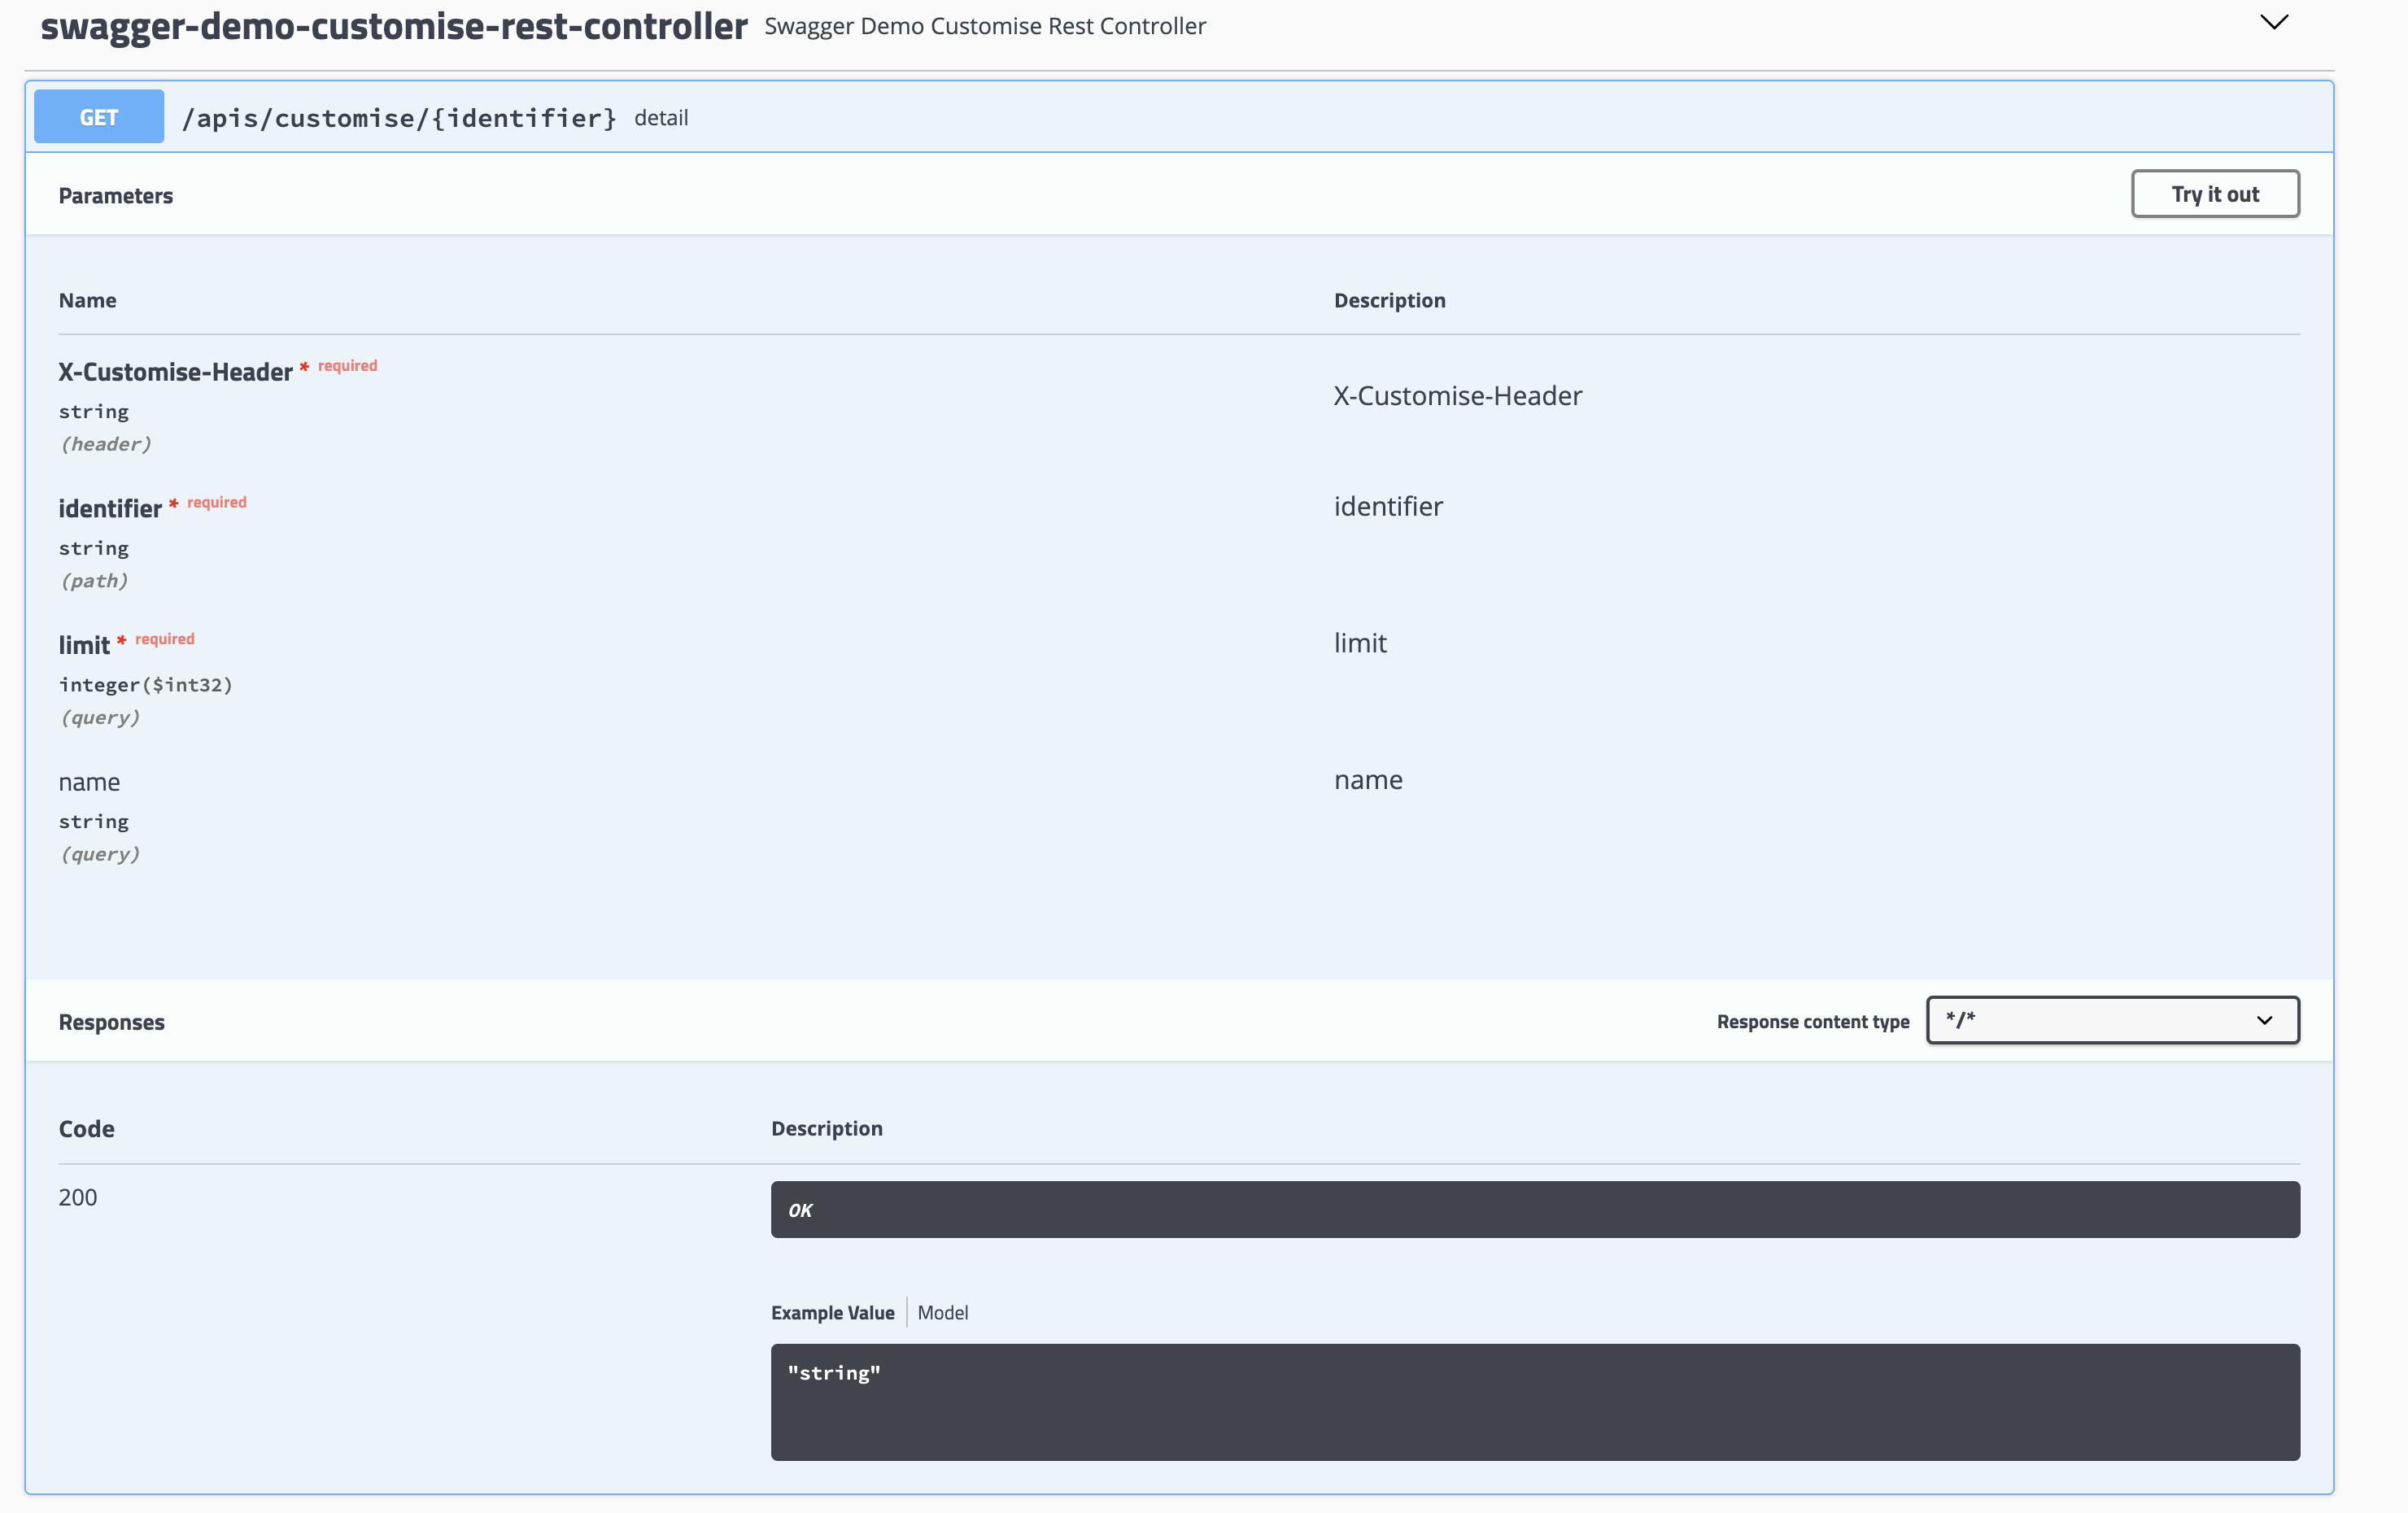
Executeを押すと、curl、Request URL、ResponseCode、ResponseBody、ResponseHeadersが返ってくる!
雑感
だいぶ便利に見える
次は勝手に生成されるレスポンスステータスを自分が欲しいものだけにしてみようレスポンスステータスの指定
useDefaultResponseMessagesを設定することで、デフォルトが200のみ設定されるようコード(変更ファイル)
SwaggerDemoConfiguration.javaimport org.springframework.context.annotation.Bean; import org.springframework.context.annotation.Configuration; import springfox.documentation.builders.ApiInfoBuilder; import springfox.documentation.builders.PathSelectors; import springfox.documentation.service.Contact; import springfox.documentation.spi.DocumentationType; import springfox.documentation.spring.web.plugins.Docket; import springfox.documentation.swagger2.annotations.EnableSwagger2; @Configuration @EnableSwagger2 // swagger2.0を使用 public class SwaggerDemoConfiguration { @Bean public Docket petApi() { return new Docket(DocumentationType.SWAGGER_2) // Swagger2.0を使用します宣言 .select() .paths(PathSelectors.ant("/apis/**")) .build() .useDefaultResponseMessages(false) // <- 追加 .apiInfo(new ApiInfoBuilder() .title("Customise Title Swagger Demo Application") .description("自分好みにカスタマイズしてたよ") .contact(new Contact("customise-name", "http://customise-contact", "customise-email")) .version("1.0") .termsOfServiceUrl("http://customise.com") .license("Customise License").licenseUrl("http://customise-license-url") // licenseのみだとテキスト、licenseUrl設定するとリンクになる .build()); } }確認
雑感
お節介が消えてくれた
次は実際に使いそうなケースのAPIを全部盛りで定義してみよう実用的なエンドポイント定義
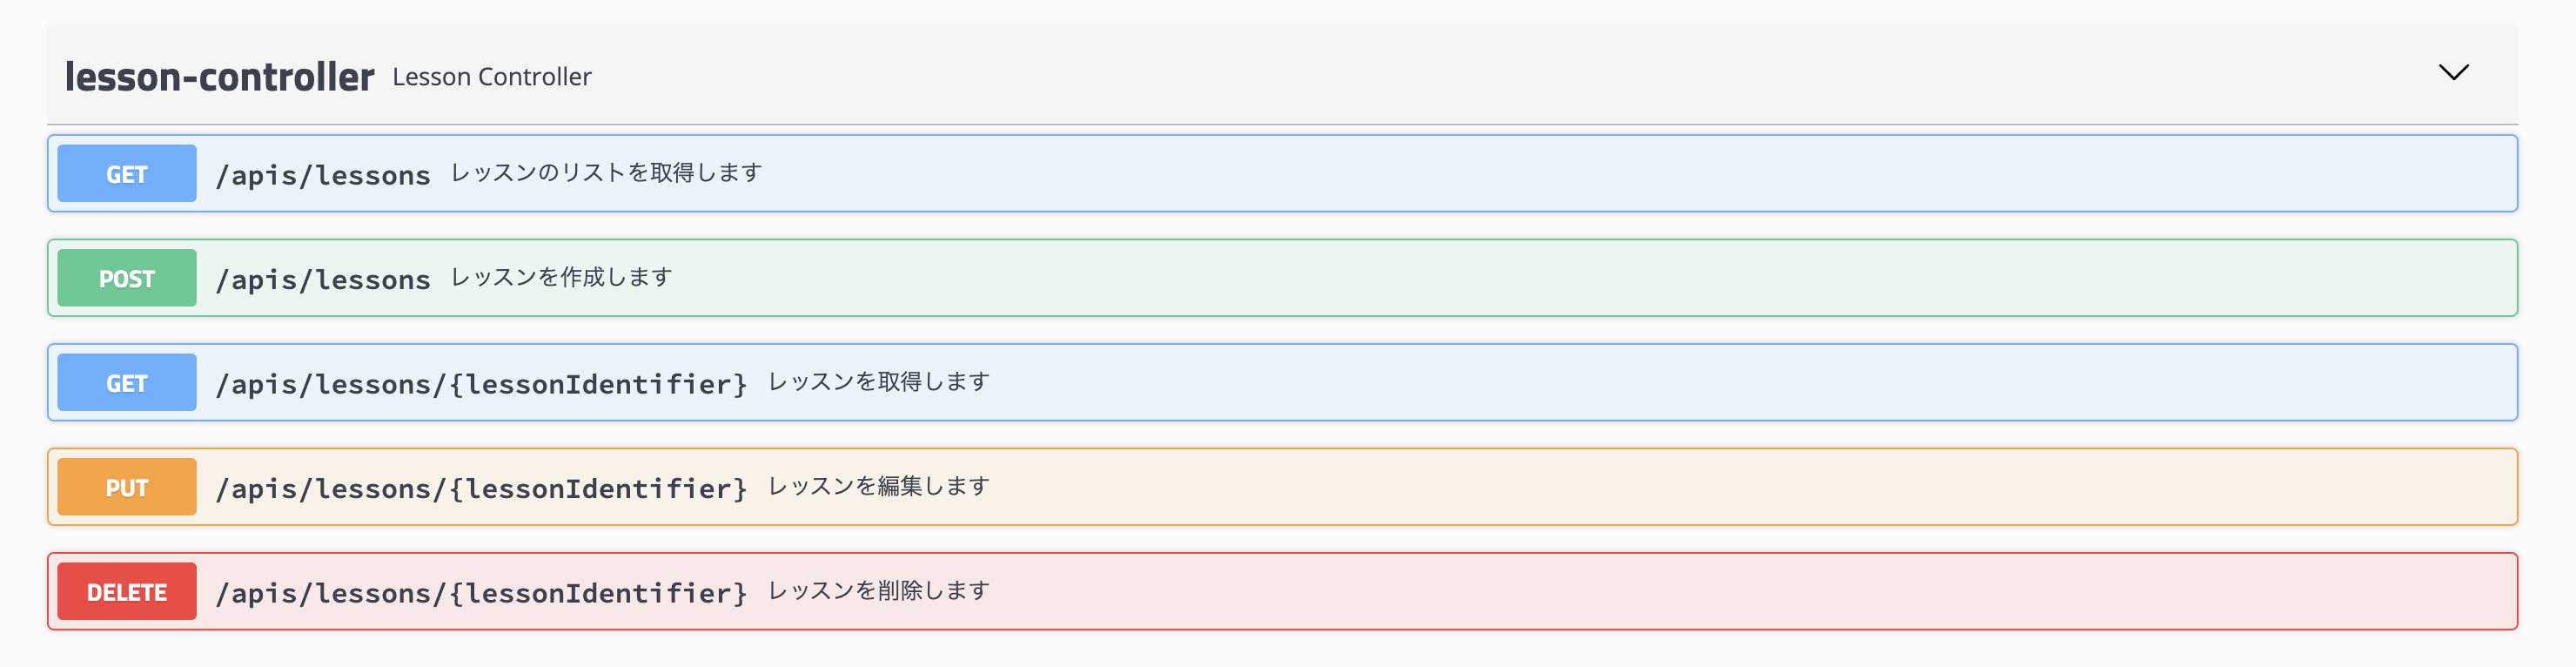
Swaggerでみたいだけだから、処理内容は適当of適当
コード
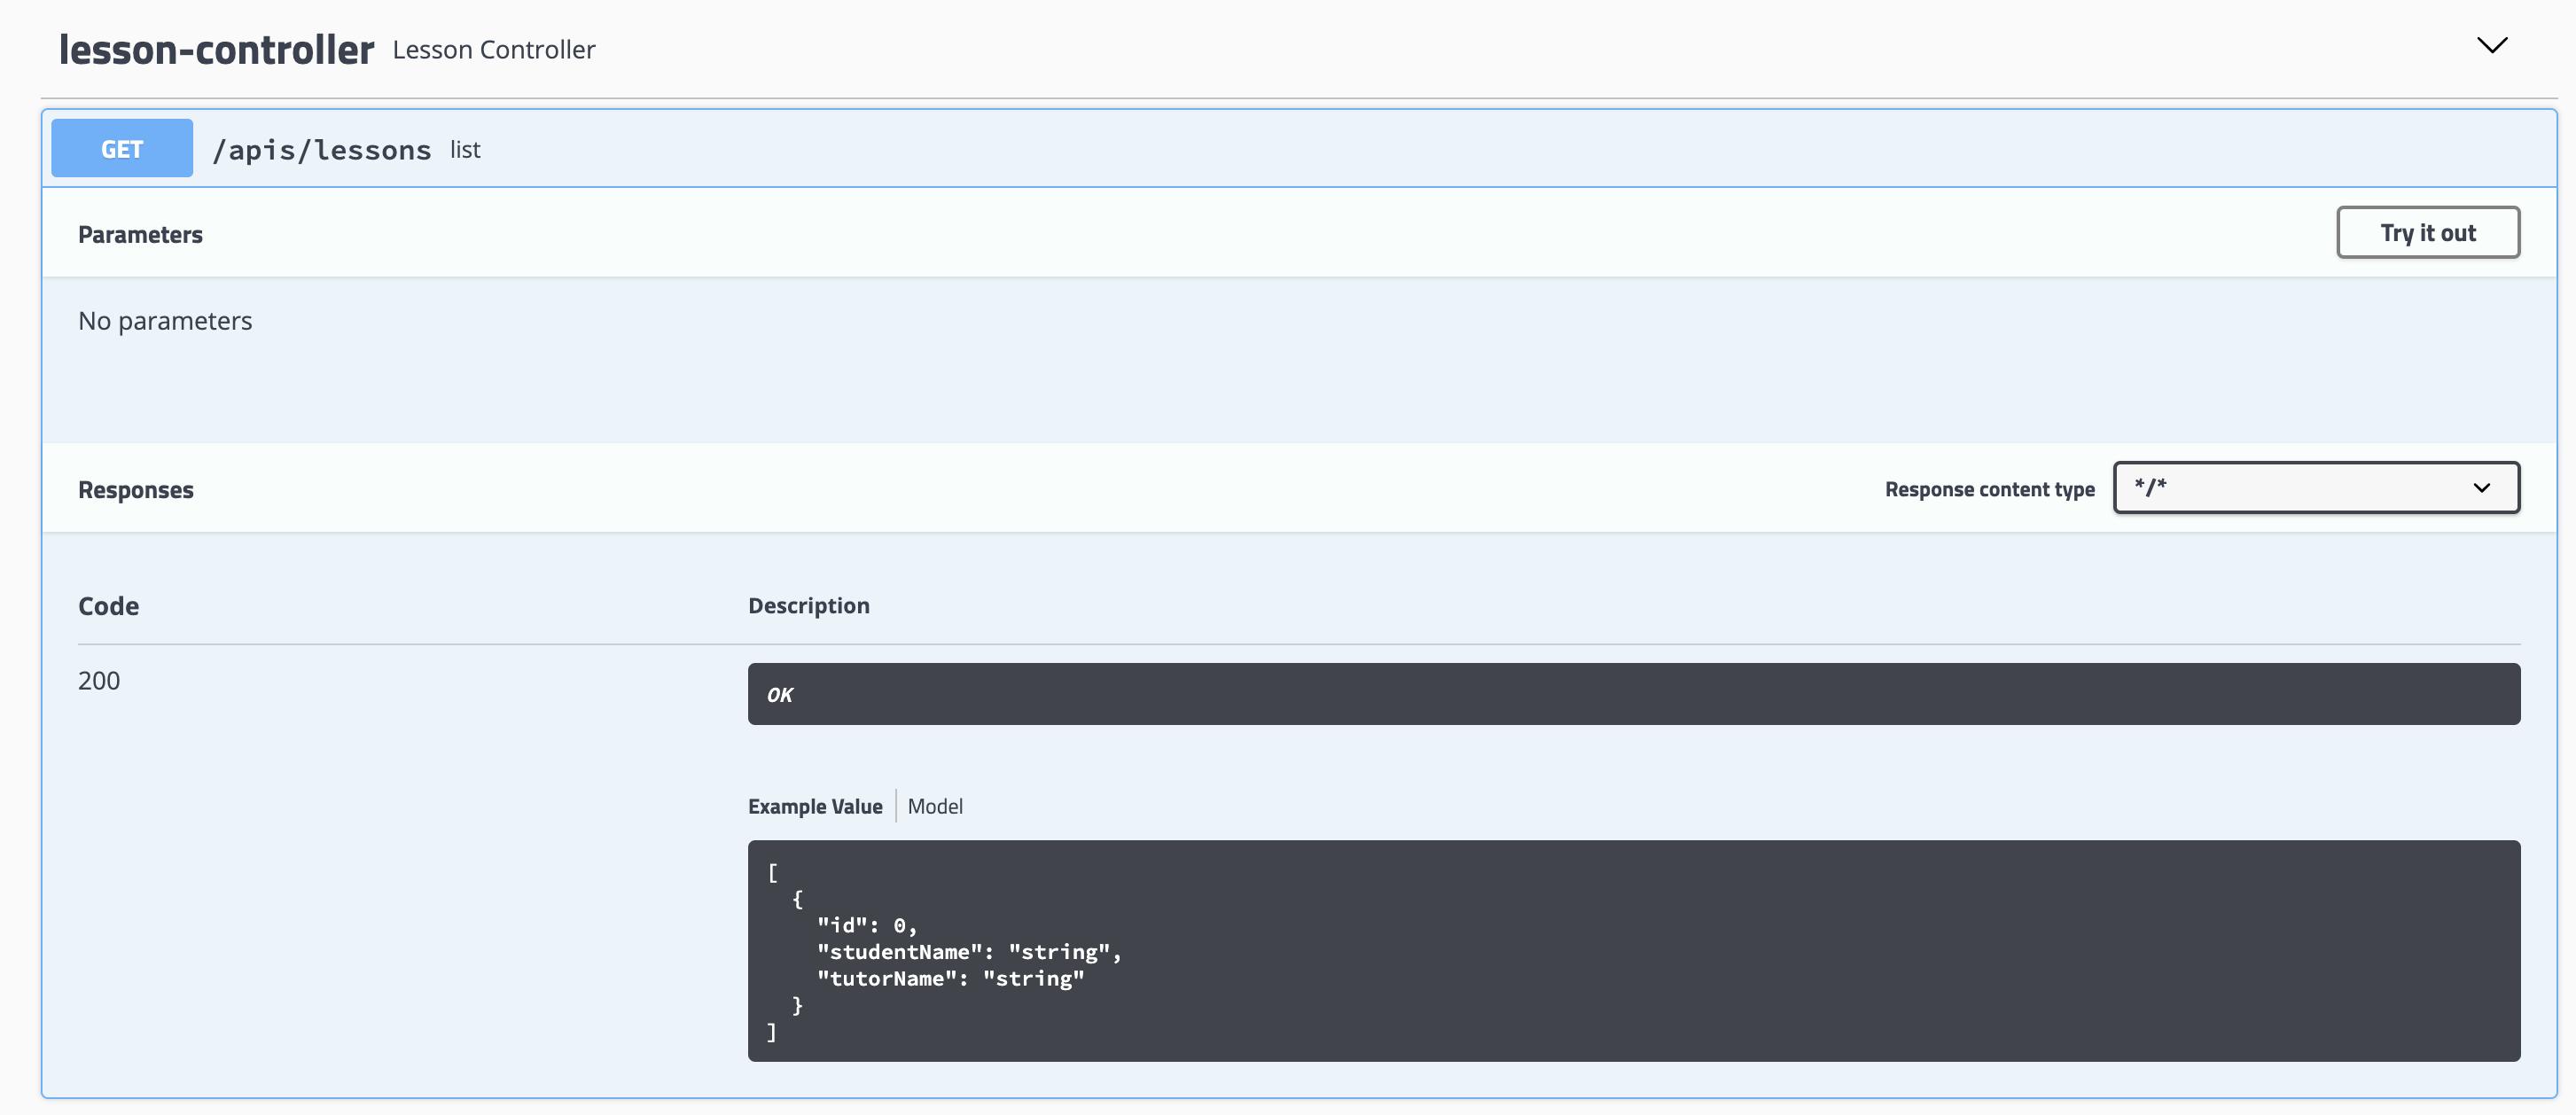
LessonIdentifier.javaclass LessonIdentifier { private Integer value; LessonIdentifier(String value) { this.value = Integer.valueOf(value); } LessonIdentifier(int value) { this.value = value; } Integer value() { if (value == null) return 0; return value; } }LessonRequest.javapublic class LessonRequest { private String studentName; private String tutorName; public LessonRequest(String studentName, String tutorName) { this.studentName = studentName; this.tutorName = tutorName; } public String getStudentName() { return studentName; } public String getTutorName() { return tutorName; } }LessonResponse.javapublic class LessonResponse { private int id; private String studentName; private String tutorName; LessonResponse(int id, String studentName, String tutorName) { this.id = id; this.studentName = studentName; this.tutorName = tutorName; } public int getId() { return id; } public String getStudentName() { return studentName; } public String getTutorName() { return tutorName; } }LessonIdentifierResponse.javapublic class LessonIdentifierResponse { private int value; LessonIdentifierResponse(LessonIdentifier lessonIdentifier) { this.value = lessonIdentifier.value(); } public int getValue() { return value; } }ErrorResponse.javapublic class ErrorResponse { private String message; public ErrorResponse(String message) { this.message = message; } public String getMessage() { return message; } }LessonController.javaimport io.swagger.annotations.ApiResponse; import io.swagger.annotations.ApiResponses; import org.springframework.http.HttpStatus; import org.springframework.web.bind.annotation.*; import java.util.Arrays; import java.util.List; @RestController @RequestMapping("apis/lessons") public class LessonController { @ApiResponse(code = 400, message = "Bad Request", response = ErrorResponse.class) @GetMapping @ResponseStatus(HttpStatus.OK) public List<LessonResponse> list() { // 取得処理 return Arrays.asList( new LessonResponse(1, "studentName1", "tutorName1"), new LessonResponse(2, "studentName2", "tutorName2"), new LessonResponse(3, "studentName3", "tutorName3")); } @ApiResponses(value = { @ApiResponse(code = 400, message = "Bad Request", response = ErrorResponse.class), @ApiResponse(code = 404, message = "Not Found", response = ErrorResponse.class)}) @GetMapping("{lessonIdentifier}") @ResponseStatus(HttpStatus.OK) public LessonResponse detail(@PathVariable("lessonIdentifier") LessonIdentifier lessonIdentifier) { // 取得処理 return new LessonResponse(1, "studentName1", "tutorName1"); } @ApiResponses(value = { @ApiResponse(code = 400, message = "Bad Request", response = ErrorResponse.class), @ApiResponse(code = 404, message = "Not Found", response = ErrorResponse.class)}) @PostMapping @ResponseStatus(HttpStatus.CREATED) public LessonIdentifierResponse add(@RequestBody LessonRequest lessonRequest) { // 追加処理 return new LessonIdentifierResponse(new LessonIdentifier(4)); } @ApiResponses(value = { @ApiResponse(code = 400, message = "Bad Request", response = ErrorResponse.class), @ApiResponse(code = 404, message = "Not Found", response = ErrorResponse.class)}) @DeleteMapping("{lessonIdentifier}") @ResponseStatus(HttpStatus.NO_CONTENT) public void delete(@PathVariable("lessonIdentifier") LessonIdentifier lessonIdentifier) { // 削除処理 } @ApiResponses(value = { @ApiResponse(code = 400, message = "Bad Request", response = ErrorResponse.class), @ApiResponse(code = 404, message = "Not Found", response = ErrorResponse.class)}) @PutMapping("{lessonIdentifier}") @ResponseStatus(HttpStatus.OK) public LessonResponse edit(@PathVariable("lessonIdentifier") LessonIdentifier lessonIdentifier, @RequestBody LessonRequest lessonRequest) { // 編集処理 return new LessonResponse(1, "EditStudentName1", "EditTutorName1"); } }確認
たくさんあるので、一部だけ
Example Valueがいい感じに出るようになった
あとResponseStatusが指定したもののみ!
雑感
いい感じに使えそうなところまできた
APIの説明とか書きたくね?となったので、書いてみるエンドポイントの説明を詳細化
@ApiOperationを追加してみたコード(変更ファイル)
LessonController.javaimport io.swagger.annotations.ApiOperation; import io.swagger.annotations.ApiResponse; import io.swagger.annotations.ApiResponses; import org.springframework.http.HttpStatus; import org.springframework.web.bind.annotation.*; import java.util.Arrays; import java.util.List; @RestController @RequestMapping("apis/lessons") public class LessonController { @ApiOperation(value = "レッスンのリストを取得します", notes = "検索条件なしで全件取ることで、あなたのブラウザの時を止めます。") @ApiResponse(code = 400, message = "Bad Request", response = ErrorResponse.class) @GetMapping @ResponseStatus(HttpStatus.OK) public List<LessonResponse> list() { // 取得処理 return Arrays.asList( new LessonResponse(1, "studentName1", "tutorName1"), new LessonResponse(2, "studentName2", "tutorName2"), new LessonResponse(3, "studentName3", "tutorName3")); } @ApiOperation(value = "レッスンを取得します", notes = "ID指定したレッスンを取得します") @ApiResponses(value = { @ApiResponse(code = 400, message = "Bad Request", response = ErrorResponse.class), @ApiResponse(code = 404, message = "Not Found", response = ErrorResponse.class)}) @GetMapping("{lessonIdentifier}") @ResponseStatus(HttpStatus.OK) public LessonResponse detail(@PathVariable("lessonIdentifier") LessonIdentifier lessonIdentifier) { // 取得処理 return new LessonResponse(1, "studentName1", "tutorName1"); } @ApiOperation(value = "レッスンを作成します", notes = "作成した後はIDを返します!") @ApiResponses(value = { @ApiResponse(code = 400, message = "Bad Request", response = ErrorResponse.class), @ApiResponse(code = 404, message = "Not Found", response = ErrorResponse.class)}) @PostMapping @ResponseStatus(HttpStatus.CREATED) public LessonIdentifierResponse add(@RequestBody LessonRequest lessonRequest) { // 追加処理 return new LessonIdentifierResponse(new LessonIdentifier(4)); } @ApiOperation(value = "レッスンを削除します", notes = "何も返さないよ") @ApiResponses(value = { @ApiResponse(code = 400, message = "Bad Request", response = ErrorResponse.class), @ApiResponse(code = 404, message = "Not Found", response = ErrorResponse.class)}) @DeleteMapping("{lessonIdentifier}") @ResponseStatus(HttpStatus.NO_CONTENT) public void delete(@PathVariable("lessonIdentifier") LessonIdentifier lessonIdentifier) { // 削除処理 } @ApiOperation(value = "レッスンを編集します", notes = "編集後のレッスンを返します!") @ApiResponses(value = { @ApiResponse(code = 400, message = "Bad Request", response = ErrorResponse.class), @ApiResponse(code = 404, message = "Not Found", response = ErrorResponse.class)}) @PutMapping("{lessonIdentifier}") @ResponseStatus(HttpStatus.OK) public LessonResponse edit(@PathVariable("lessonIdentifier") LessonIdentifier lessonIdentifier, @RequestBody LessonRequest lessonRequest) { // 編集処理 return new LessonResponse(1, "EditStudentName1", "EditTutorName1"); } }確認
詳細が出るようになった!
雑感
けど、
@ApiOperationとか@ApiResponseとかに書いてるメッセージとか長くなってしまうの嫌すぎるな。。。
別ファイルにできないだろうかってことで試してみる別ファイルにメッセージを定義する
コード
application.propertiesLessonController.list.value=レッスンのリストを取得します LessonController.list.notes=検索条件なしで全件取ることで、あなたのブラウザの時を止めます LessonController.detail.value=レッスンを取得します LessonController.detail.notes=ID指定したレッスンを取得します LessonController.add.value=レッスンを作成します LessonController.add.notes=作成した後はIDを返します! LessonController.delete.value=レッスンを削除します LessonController.delete.notes=何も返さないよ LessonController.edit.value=レッスンを編集します LessonController.edit.notes=編集後のレッスンを返します!LessonController.javaimport io.swagger.annotations.ApiOperation; import io.swagger.annotations.ApiResponse; import io.swagger.annotations.ApiResponses; import org.springframework.http.HttpStatus; import org.springframework.web.bind.annotation.*; import java.util.Arrays; import java.util.List; @RestController @RequestMapping("apis/lessons") public class LessonController { @ApiOperation(value = "${LessonController.list.value}", notes = "${LessonController.list.notes}") @ApiResponse(code = 400, message = "Bad Request", response = ErrorResponse.class) @GetMapping @ResponseStatus(HttpStatus.OK) public List<LessonResponse> list() { // 取得処理 return Arrays.asList( new LessonResponse(1, "studentName1", "tutorName1"), new LessonResponse(2, "studentName2", "tutorName2"), new LessonResponse(3, "studentName3", "tutorName3")); } @ApiOperation(value = "${LessonController.detail.value}", notes = "${LessonController.detail.notes}") @ApiResponses(value = { @ApiResponse(code = 400, message = "Bad Request", response = ErrorResponse.class), @ApiResponse(code = 404, message = "Not Found", response = ErrorResponse.class)}) @GetMapping("{lessonIdentifier}") @ResponseStatus(HttpStatus.OK) public LessonResponse detail(@PathVariable("lessonIdentifier") LessonIdentifier lessonIdentifier) { // 取得処理 return new LessonResponse(1, "studentName1", "tutorName1"); } @ApiOperation(value = "${LessonController.add.value}", notes = "${LessonController.add.notes}") @ApiResponses(value = { @ApiResponse(code = 400, message = "Bad Request", response = ErrorResponse.class), @ApiResponse(code = 404, message = "Not Found", response = ErrorResponse.class)}) @PostMapping @ResponseStatus(HttpStatus.CREATED) public LessonIdentifierResponse add(@RequestBody LessonRequest lessonRequest) { // 追加処理 return new LessonIdentifierResponse(new LessonIdentifier(4)); } @ApiOperation(value = "${LessonController.delelte.value}", notes = "${LessonController.delete.notes}") @ApiResponses(value = { @ApiResponse(code = 400, message = "Bad Request", response = ErrorResponse.class), @ApiResponse(code = 404, message = "Not Found", response = ErrorResponse.class)}) @DeleteMapping("{lessonIdentifier}") @ResponseStatus(HttpStatus.NO_CONTENT) public void delete(@PathVariable("lessonIdentifier") LessonIdentifier lessonIdentifier) { // 削除処理 } @ApiOperation(value = "${LessonController.edit.value}", notes = "${LessonController.edit.notes}") @ApiResponses(value = { @ApiResponse(code = 400, message = "Bad Request", response = ErrorResponse.class), @ApiResponse(code = 404, message = "Not Found", response = ErrorResponse.class)}) @PutMapping("{lessonIdentifier}") @ResponseStatus(HttpStatus.OK) public LessonResponse edit(@PathVariable("lessonIdentifier") LessonIdentifier lessonIdentifier, @RequestBody LessonRequest lessonRequest) { // 編集処理 return new LessonResponse(1, "EditStudentName1", "EditTutorName1"); } }確認
問題なく出てそう!
雑感
メッセージを1ファイルにまとめたいときはすごく便利だな
ただ、やりすぎないようにしないとよくある複雑なメッセージファイルになりがちだから、気をつけて使おうまとめ
とりあえず便利そうだというのはわかった
けど、Build後とか、本番環境にswagger-uiへアクセスして欲しくない場合とか微妙に調べきれてない箇所があるので後々調べてみる参考