- 投稿日:2019-11-27T23:23:21+09:00
docker-compose upでPythonのログが出力されない
結論
-uオプションで解決したdocker-compose.ymlcommand: python -u main.py経緯
以下のようなファイルをdocker-compose.ymlの
commandに指定したらログに何も出力されなかった。1import time print('hoge') while True: print('fuga') time.sleep(1)原因調査のために部分的に切り分けていきます。
docker-compose runだと動作するdocker-compose run python bashで入ったbash内で立ち上げたpythonインタプリタ内でも動作する最終的にpythonスクリプトを何行かづつコメントアウトしたりして、ついに
while True:以下が問題らしい事がわかりました。2標準出力とバッファリング
Pythonの
print()などによる標準出力はすぐには出力されずバッファリングされ、タイミングを見て出力されます。つまり、
while True:によって実行がいつまで経っても終了せず、またバッファが一杯になることもないため、出力を受け取るdocker-composeに結果が渡されなかったということでした。
pythonにはバッファリングを無効化するためのオプション-uがあり、これを指定することで解決できました。参考:
Python 3 で標準出力のブロックバッファリングを止める方法 - Qiita
head コマンドの不思議な挙動と標準入出力のバッファリング - CUBE SUGAR CONTAINER
- 投稿日:2019-11-27T22:21:02+09:00
0から学ぶDocker
チーム開発をしていて「Dockerイメージを作る」「Dockerコンテナをデプロイする」という言葉を聞くけど、そもそもDockerって何だ...?となった体験からまとめ記事を書きました。
0から学んで書いた記事なので違うことがあればご指摘ください。Dockerを使う理由
そもそもなぜDockerを使う必要があるの?と思いましたが、開発をしているとこんな悲しみがあります。
- 開発環境整えるのにめちゃくちゃ時間がかかる
- 手元では動いたのにデプロイしたら動かない
これらを解決するのがDockerです。
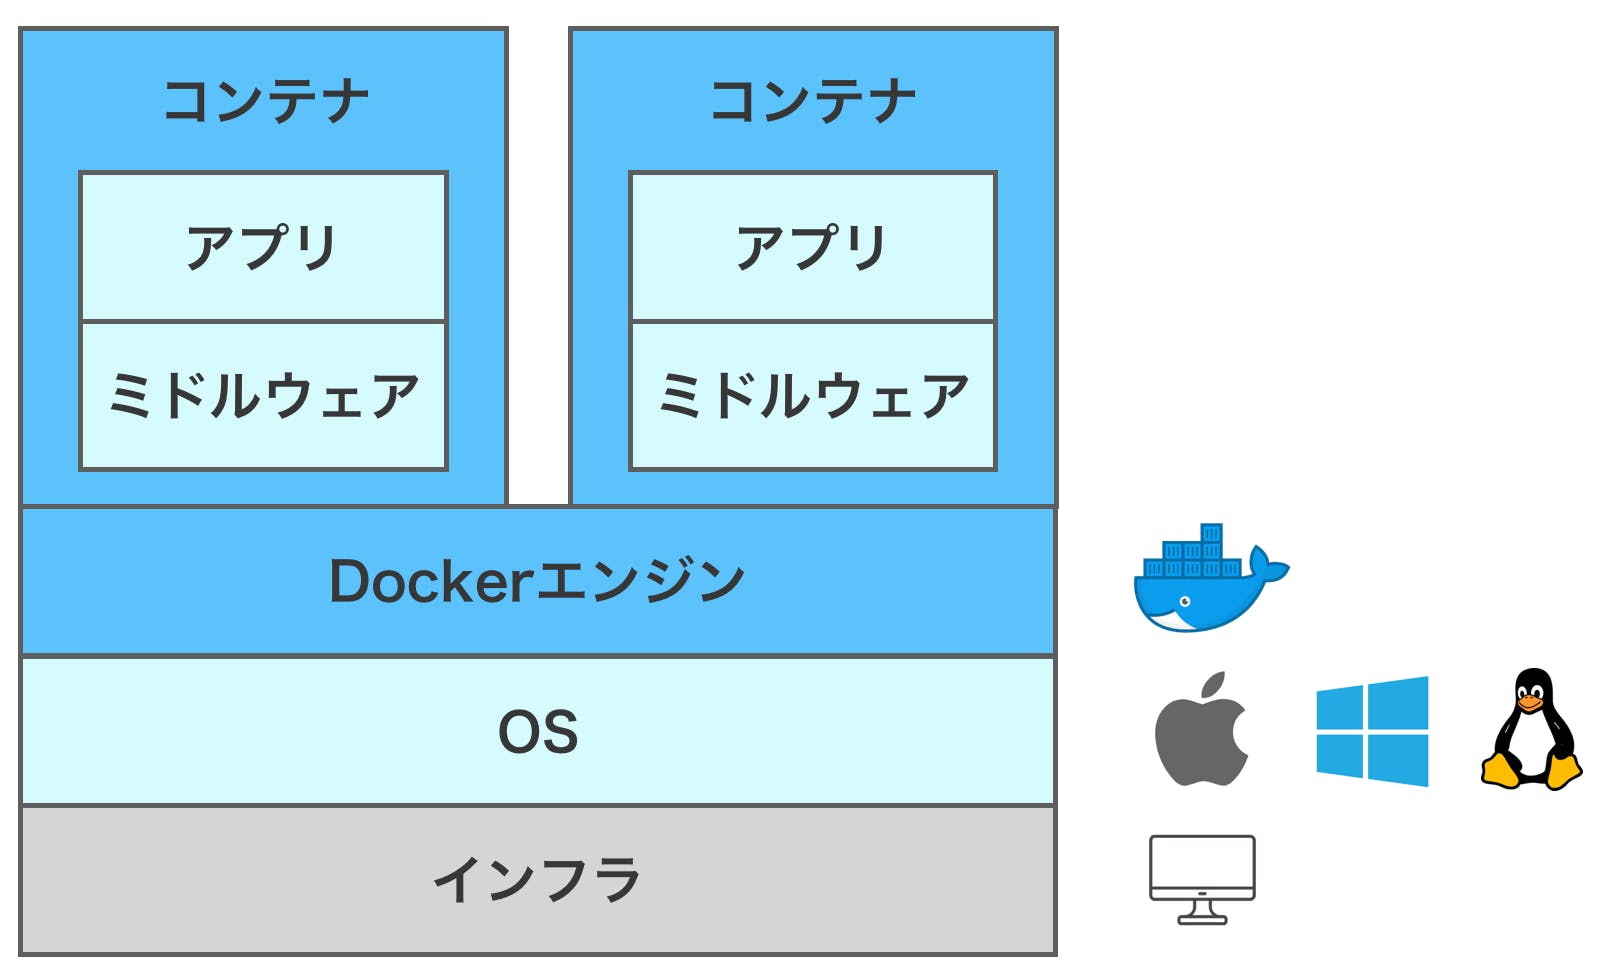
Dockerの構成図
必要な情報をコンテナにまとめているので手元でコンテナを動かせば手軽に開発環境を整えられるし、コンテナをデプロイすれば開発環境と本番環境との差異を小さくできます。
- Dockerエンジン
- Dockerコンテナ・イメージを管理するDockerそのもの
- コンテナ
- Dockerエンジン上で動く仮想環境
- この中でアプリケーションが動く
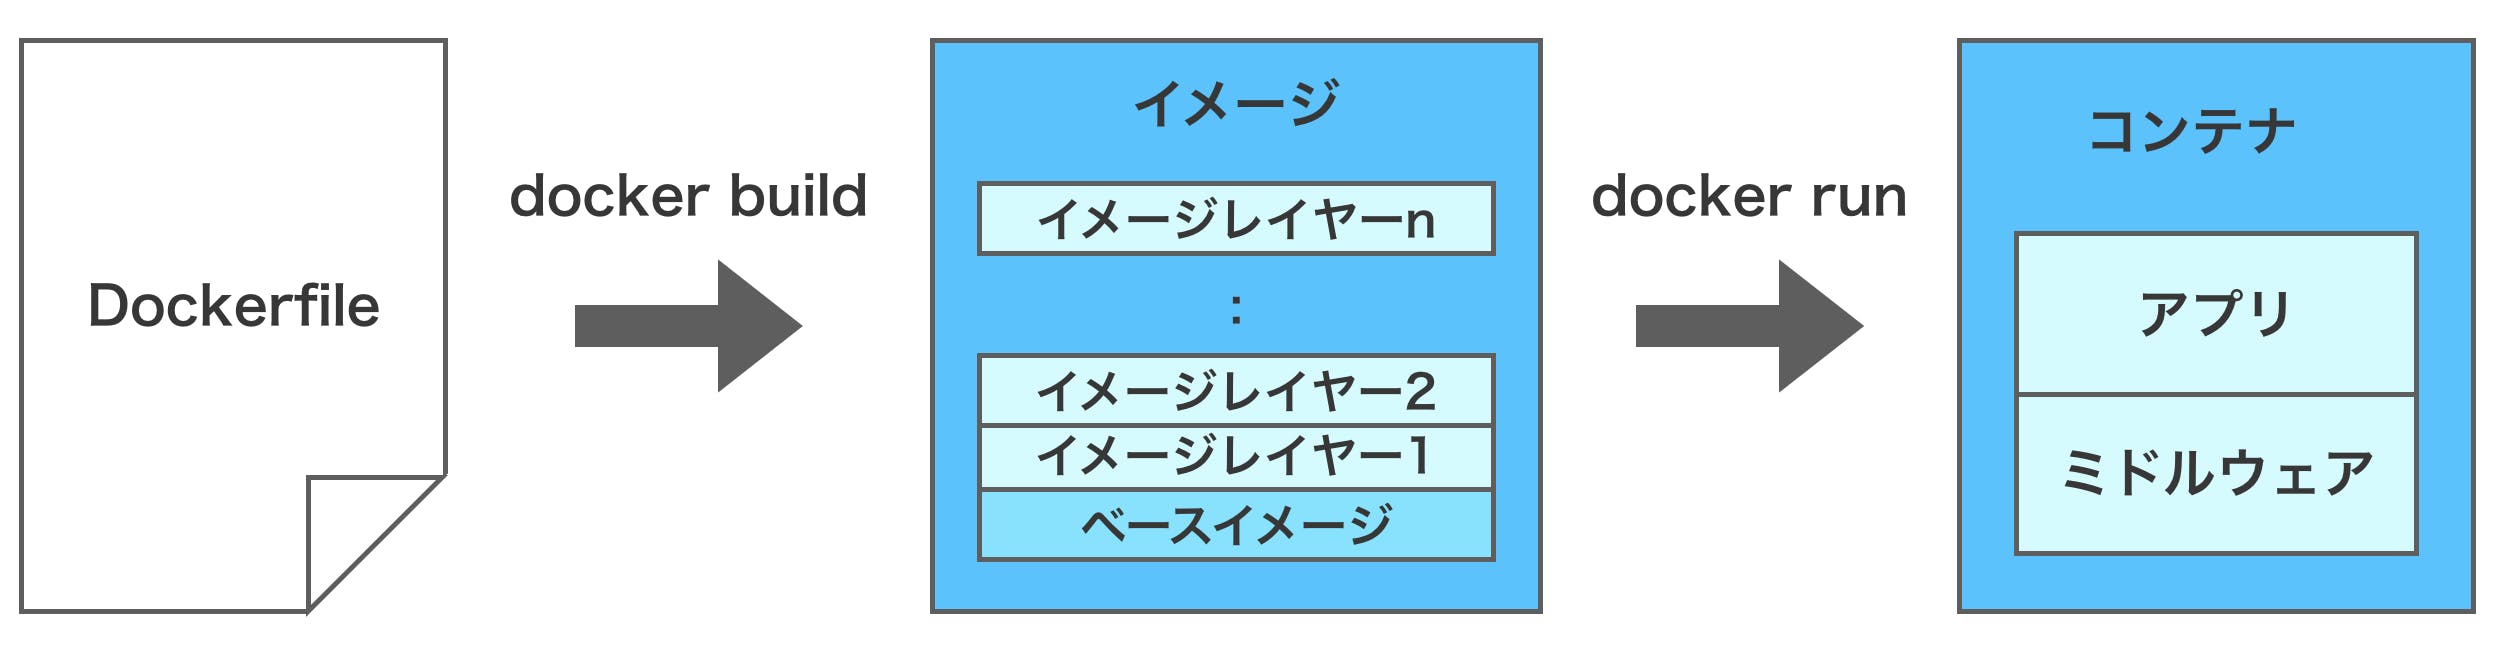
コンテナの作り方
- Dockerfile
- イメージを作るための設計図
- イメージ
- コンテナを作るための設計図
- Dockerfileに書かれている各行が各イメージの層にあたる
コンテナによる仮想化のメリット
仮想化というとVirtualBoxなどをイメージしますが、仮想化には種類があります。
- コンテナによる仮想化
- 仮想マシンによる仮想化
- ホストOS型(VirtualBoxはこれ)
- ハイパーバイザー型
仮想マシンによる仮想化はGB単位でリソースを占有するのに対して、コンテナはMB単位なのでとても軽くて速いという特徴があります。
最後に
以上、ざっくりとしたDockerまとめ記事でした。
今後備忘録としてDockerコマンド解説記事も書きたい気持ち。

- 投稿日:2019-11-27T19:21:14+09:00
MacでKubernetesの環境構築
前書き
K8sの勉強メモとして残します
k8sの中、比較的に敷居低いminikubeを使用します
公式サイトインストール
Get Startedボタンをクリックして、macosを選択してくださいインストールの方法は二つがありまして、どれを選んでも大丈夫です。
brew install minikube
or
curl -LO https://storage.googleapis.com/minikube/releases/latest/minikube-darwin-amd64 \
  && sudo install minikube-darwin-amd64 /usr/local/bin/minikube
インストール終了後、ターミナルで
minikubeを実行すると、以下の出力が確認できるはずです$ minikube Minikube is a CLI tool that provisions and manages single-node Kubernetes clusters optimized for development workflows. Basic Commands: start Starts a local kubernetes cluster status Gets the status of a local kubernetes cluster stop Stops a running local kubernetes cluster delete Deletes a local kubernetes cluster dashboard Access the kubernetes dashboard running within the minikube cluster Images Commands: docker-env Sets up docker env variables; similar to '$(docker-machine env)' cache Add or delete an image from the local cache. Configuration and Management Commands: addons Modify minikube's kubernetes addons config Modify minikube config profile Profile gets or sets the current minikube profile update-context Verify the IP address of the running cluster in kubeconfig. Networking and Connectivity Commands: service Gets the kubernetes URL(s) for the specified service in your local cluster tunnel tunnel makes services of type LoadBalancer accessible on localhost ... 省略minikubeのバージョンも確認できます
$ minikube version
minikube version: v1.5.2
commit: 792dbf92a1de583fcee76f8791cff12e0c9440ad-dirty
minikubeサービススタート
minikube startでサービス立ち上げ可能ですが、その前にvirtralBoxがインストールされてることを確認してください
virtralBox公式サイトなぜ
virtralBoxが必要なのか、minikubeの本質がminikubeのサービスを維持するためのコンテナが多数実行してる仮想マシンのようなものですminikube start --vm-driver=virtualbox
--vm-driver=virtualboxつけない場合hyperkitで起動することになりますスタート実行し終了後、
minikube ssh実行すれば以下のものが確認できるはずです$ minikube ssh _ _ _ _ ( ) ( ) ___ ___ (_) ___ (_)| |/') _ _ | |_ __ /' _ ` _ `\| |/' _ `\| || , < ( ) ( )| '_`\ /'__`\ | ( ) ( ) || || ( ) || || |\`\ | (_) || |_) )( ___/ (_) (_) (_)(_)(_) (_)(_)(_) (_)`\___/'(_,__/'`\____)kubectlインストール
kubectlは何でしょうか、簡単に言うと、Kubernetesコマンドラインツールです
以下のコマンドでインストールできます
curl -LO https://storage.googleapis.com/kubernetes-release/release/v1.16.0/bin/darwin/amd64/kubectlインストール終了後、移動して、実行可能な権限を与えます
mv kubectl /usr/local/bin
sudo chmod +x /usr/local/bin/kubectl
その後、kubectlのバージョンを確認してみましょう、以下の出力確認できたらオーケーです
~ $ kubectl version
Client Version: version.Info{Major:"1", Minor:"16", GitVersion:"v1.16.0", GitCommit:"2bd9643cee5b3b3a5ecbd3af49d09018f0773c77", GitTreeState:"clean", BuildDate:"2019-09-18T14:36:53Z", GoVersion:"go1.12.9", Compiler:"gc", Platform:"darwin/amd64"}
Server Version: version.Info{Major:"1", Minor:"16", GitVersion:"v1.16.2", GitCommit:"c97fe5036ef3df2967d086711e6c0c405941e14b", GitTreeState:"clean", BuildDate:"2019-10-15T19:09:08Z", GoVersion:"go1.12.10", Compiler:"gc", Platform:"linux/amd64"}
以上、環境構築終わりました
webでminibukeを確認
minikube dashboard
- 投稿日:2019-11-27T17:50:05+09:00
ゼロからEC2+DockerでWordpressをnginx-proxyを利用してサブドメインに構築(SSL対応)
はじめに
この記事では,ゼロからEC2とDockerを使って,Wordpressを nginx-proxyを利用してサブドメインに構築していきます.もちろんドメインでもできます.また,
nginx-proxy-lets-encryptを用いてSSL化も行っています.
注意としては,AWSコンソールのUIは頻繁に変更されているので,もしかしたら異なっている可能性があります.この記事の目的
他にもたくさんのEC2でWordpressを構築している記事を見てきましたが
- SSL化をしていない
- Dockerを使っていない
- サブドメインでなくドメインを使用している
といったものが多く,非常に苦労しました.
なのでこの記事はできるだけ丁寧に細かく記載しましたので,誰かの役に立てることを願っています.技術
- EC2(Ubuntu18.04)
- Docker(ngix-proxy, wordpress, nginx-proxy-lets-encrypt, mysql)
- Route53
EC2の設定
EC2インスタンスの起動
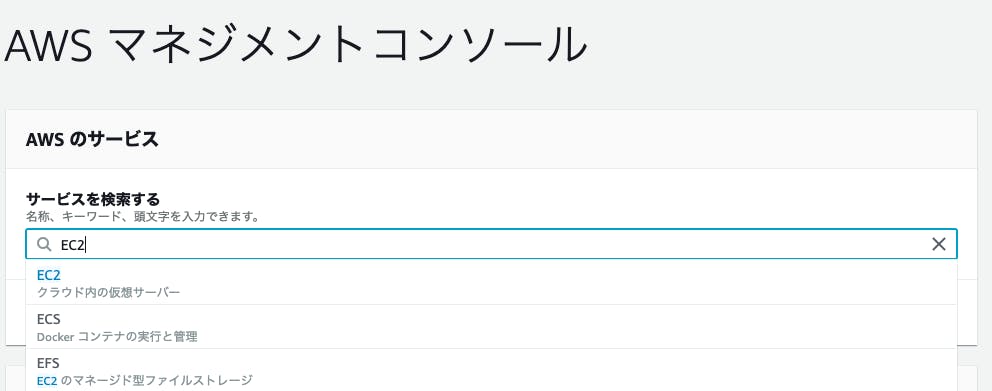
AWSコンソールにアクセスして,
EC2と検索してページ移動します.
左側のメニューでインスタンスをクリックします.
上の方にあるインスタンスの作成ボタンをクリックします.
色々作れますが,今回はUbuntu18.04を作っていきます.64ビット(x86)にチェックを入れて,青の選択ボタンを押します.
t2.microに選択を入れて,右下にある
確認と作成という青いボタンを押します.(細かい設定がしたい場合は,次のステップ:インスタンスの詳細と設定ボタンを押すと設定できます.Wordpressを使う場合は,インスタンスサイズはt2.micro以上にしておきましょう.)ページ遷移して,右下にある
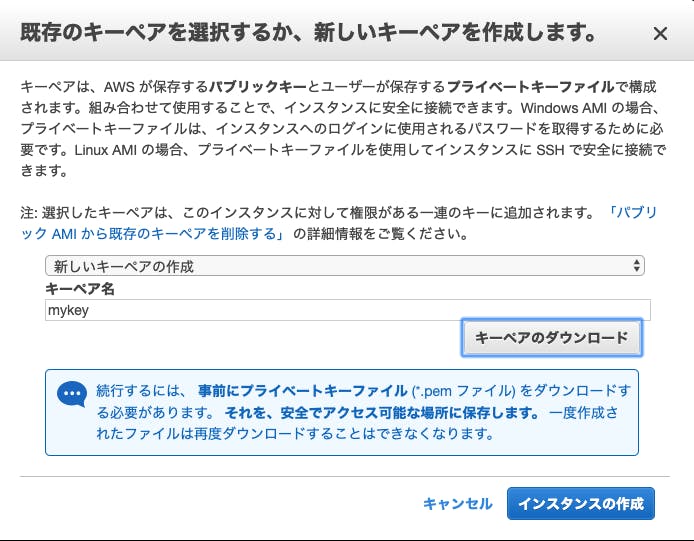
起動ボタンを押します.次にダイヤログでキーペアを作成するか聞かれます.
新しいキーペアの作成を選択し,適当なキーペア名をつけ,キーペアのダウンロードボタンを押します.このキーペアがSSHでログインする際に必要になります.ダウンロードが終わったら,インスタンスの作成ボタンを押して,数分待つとインスタンスが起動します.
EC2のサーバーにログイン
ブラウザのEC2インスタンスのページで作成した
インスタンスの状態という項目がrunningになったら.ログインしていきます.
Macのターミナルを開いて,ダウンロードしたmykey.pemのあるディレクトリまで移動します.($ lsと打ってmykey.pemが出てきたらok)
次のようにコマンドを打ちます.
XXXXXの部分にはパブリック DNS (IPv4)が入ります.ブラウザでインスタンスにチェックを入れると下の方にメニューが表示されます.その中にパブリック DNS (IPv4)があります.(etc.ec2-9-999-99-99.ap-northeast-0.compute.amazonaws.com)$ chmod 400 mykey.pem $ ssh ubuntu@XXXXX -i mykey.pem -p 22もしsshコマンドで失敗した時は
$ sudo ssh ubuntu@XXXXX -i mykey.pem -p 22とsudoをつけたらうまくいくかもしれません.これでターミナルのユーザー部分が
ubuntu@〇〇〇〇みたいになっていたら,ログイン成功です.(〇〇〇〇にはサーバーのIPアドレスが入ります.)EC2にパスワード,キーペアなしでログイン(任意)
EC2にログインするたびに,パスワードやキーペアを使うのは非常に手間です.
お前らのSSH Keysの作り方は間違っているを参考に設定しておきましょう.セキュリティを高める(任意)
この記事ではubuntuユーザーで話を進めていますが,通常rootやデフォルトユーザー(ubuntu)ではログインできないようにしたり,sshのポート番号を変更してセキュリティを高めます.
そこそこセキュアなlinuxサーバーを作るを参考に対策をしておきましょう.Dockerのインストール
参考文献 : Ubuntuにdockerをインストールする
公式の通り順番にコマンドを実行していきます.
まだDockerが何かよくわかっていない方は創好リナのDocker入門講座(Youtube,2018/07/29公開)がわかりやすいです.
$ sudo apt-get update

$ sudo apt-get install -y \
    apt-transport-https \
    ca-certificates \
    curl \
    software-properties-common

$ curl -fsSL https://download.docker.com/linux/ubuntu/gpg | sudo apt-key add -

$ sudo apt-key fingerprint 0EBFCD88

$ sudo add-apt-repository \
   "deb [arch=amd64] https://download.docker.com/linux/ubuntu \
   $(lsb_release -cs) \
   stable"

$ sudo apt-get update

$ sudo apt-get install -y docker-ce

$ docker version
Client: Docker Engine - Community
 Version:           19.03.5
 API version:       1.40
 Go version:        go1.12.12
 Git commit:        633a0ea838
 Built:             Wed Nov 13 07:29:52 2019
 OS/Arch:           linux/amd64
 Experimental:      false
Got permission denied while trying to connect to the Docker daemon socket at unix:///var/run/docker.sock: Get http://%2Fvar%2Frun%2Fdocker.sock/v1.40/version: dial unix /var/run/docker.sock: connect: permission denied
最後のコマンドで
permission deniedというエラーが起きています.dockerグループにユーザーを追加する
参考文献 : dockerコマンド実行時にエラー"Got permission denied while trying to connect to the Docker daemon socket"が出るとき
これはdockerグループにユーザーを追加することで直ります.
$ sudo gpasswd -a [ユーザー名] docker
Adding user ubuntu to group docker

$ exit
dockerグループに追加した後,一回
exitコマンドを使ってユーザーからログアウトしましょう.再びユーザーにログインしてdocker versionコマンドを入力しGot permission denied~のエラーが消えていることを確認しましょう.$ docker version Client: Docker Engine - Community Version: 19.03.5 API version: 1.40 Go version: go1.12.12 Git commit: 633a0ea838 Built: Wed Nov 13 07:29:52 2019 OS/Arch: linux/amd64 Experimental: false Server: Docker Engine - Community Engine: Version: 19.03.5 API version: 1.40 (minimum version 1.12) Go version: go1.12.12 Git commit: 633a0ea838 Built: Wed Nov 13 07:28:22 2019 OS/Arch: linux/amd64 Experimental: false containerd: Version: 1.2.10 GitCommit: b34a5c8af56e510852c35414db4c1f4fa6172339 runc: Version: 1.0.0-rc8+dev GitCommit: 3e425f80a8c931f88e6d94a8c831b9d5aa481657 docker-init: Version: 0.18.0 GitCommit: fec3683これでDockerのインストールは完了です.
Docker Composeのインストール
参考文献 : 【WordPress】DockerでWordPress開発環境を爆速で構築する【Docker Compose】
Dockerはコンテナ型の仮想環境です.ではDocker Composeは何かというと,
- bulid, run, startなどを楽にしてくれる
- 複数のコンテナを1つのyamlファイルで定義できる
というメリットがあります.次のコマンドでDocker Composeがインストールできます.
$ sudo curl -L "https://github.com/docker/compose/releases/download/1.24.0/docker-compose-$(uname -s)-$(uname -m)" -o /usr/local/bin/docker-compose
 % Total    % Received % Xferd  Average Speed   Time    Time     Time  Current
                                 Dload  Upload   Total   Spent    Left  Speed
100   617    0   617    0     0   2063      0 --:--:-- --:--:-- --:--:--  2063
100 15.4M  100 15.4M    0     0  4361k      0  0:00:03  0:00:03 --:--:-- 5899k
なお,コマンドの
1.24.0の部分はDocker ComposeのGithubを確認して,適宜変更してください.インストールできているか確認します.
$ docker-compose --version
-bash: /usr/local/bin/docker-compose: Permission denied
権限がないよっと言われしまったので,
chmodコマンドを打ち,再度確認します.$ sudo chmod +x /usr/local/bin/docker-compose $ docker-compose --version docker-compose version 1.24.0, build 0aa59064これでDocker Composeが使えるようになりました.
EC2のセキュリティグループの設定
EC2のセキュリティグループでHTTPとHTTPSを許可しておかないと,Wordpressを動かしてもブラウザでアクセスすることができません.
AWSコンソールでEC2のページに移動し,作成したインスタンスをクリックします.
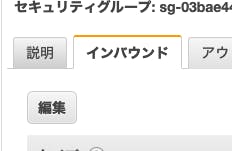
そして,下の方に表示されるインスタンスの説明項目の中にセキュリティグループというのがあるのでクリックします.
ページ移動して下のメニューの
インバウンドをクリックし,編集というボタンがあるのでクリックします.
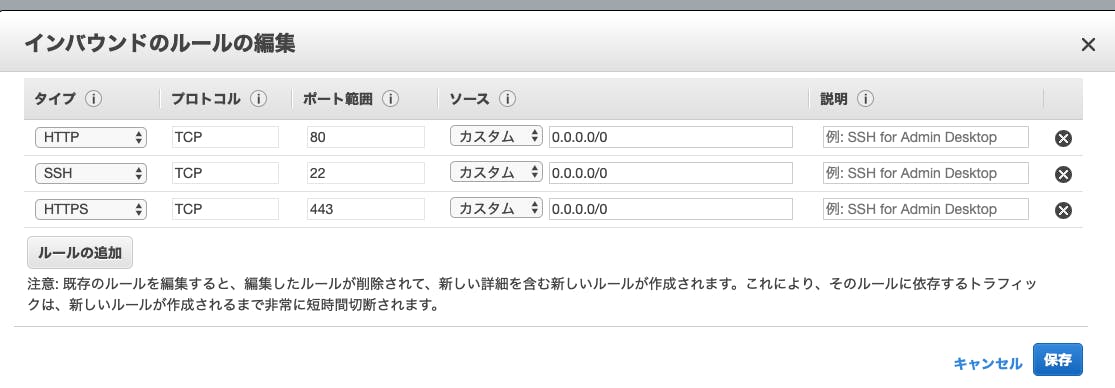
デフォルトではSSHしかないのでHTTPとHTTPSを追加します.また,SSHのポートは0.0.0.0/0になっており(どこからでもログイン出来る),攻撃を受ける可能性が高いのでソースを
任意の場所かマイIPに変更しておきましょう.(下の画像は0.0.0.0/0のままですが)
例えば自分の家でマイIPを選択すると,自分の家のwifiからしかSSH出来ないようになります.
最後に保存を押して,EC2インスタンスを再起動しておきましょう.
Route53の設定
Route53ではドメインとサブドメインの設定をしていきます.ドメインやサブドメインがよくわかっていない方は独自ドメイン?サブドメイン?ドメインについて理解しよう!に目を通しておきましょう.
Route53でドメイン取得とDNSの登録はAWSだけで独自ドメインを取得して自分のWebページを公開するまで[画像で解説] 2018冬を参考に導入しましょう.
4 Aレコードが増えたことを確認までやればOKです.
なお,ドメインの取得後やDNSの登録後は反映に数時間かかる場合があります.僕は.ioのドメインを使いますが,好きなものをつかってOKです.次にサブドメインを設定します.
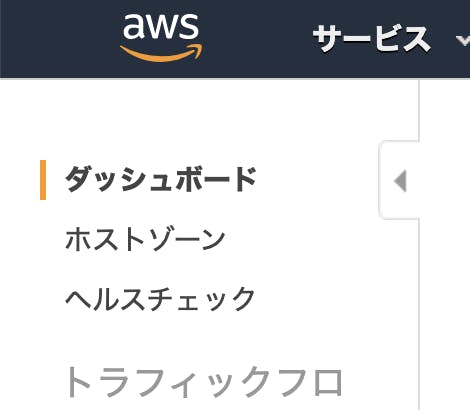
まずRoute53のページにいくと,左のメニューがダッシュボードになっているので,ホストゾーンを選択します.
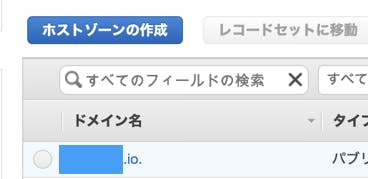
次に登録しているドメイン名をクリックします.
レコードセットの作成ボタンを押します.
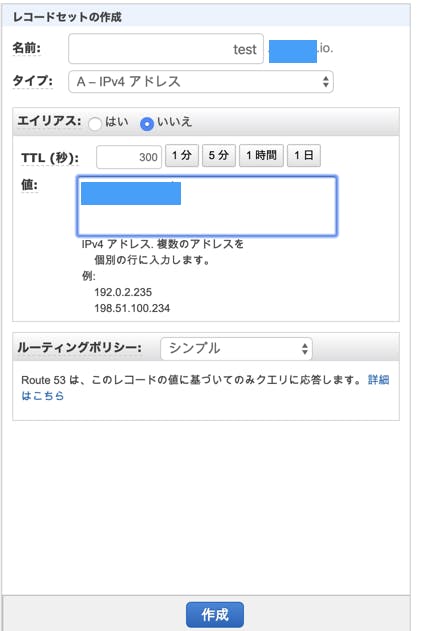
レコードセットの作成というメニューが表示されるので,名前にはサブドメインに設定したい名前,値にはEC2のIPv4 パブリック IPを入力し,タイプはAのままにしておいて作成ボタンを押します.
EC2にドメインが割り当てられているか確認するには,ターミナルで
$ host [test.XXX.io.]
[test.XXX.io.] has address 54.123.456.987
と表示されると思います.
[test.XXX.io.]には先ほどのドメインまたはサブドメインを入力し,54.123.456.987の部分がEC2のIPv4 パブリック IPと一致していたらOKです.Dockerでngix-proxy, wordpress, nginx-proxy-lets-encrypt, mysqlを導入
ngix-proxyはnginxで楽にvirtualhostなどを設定できるやつです.nginx-proxy-lets-encryptはngix-proxyで構築したWordpressなどにlet's EncryptのSSL証明書を簡単に取得してくれます.emacsのインストール(任意)
vim派の人はしなくて良いです.
ファイルをいじるのでemacsを入れておきます.
まずEC2にログインします.$ sudo apt-get install emacs $ emacs --version GNU Emacs 25.2.2 Copyright (C) 2017 Free Software Foundation, Inc. GNU Emacs comes with ABSOLUTELY NO WARRANTY. You may redistribute copies of GNU Emacs under the terms of the GNU General Public License. For more information about these matters, see the file named COPYING.Docker Composeにコードを書いていく
ngix-proxy, wordpress, nginx-proxy-lets-encrypt,mysqlを導入していきます.
EC2にログインして以下のようにディレクトリ,ファイルを作成します.(名前は特に気にしなくて良い)
proxyディレクトリにはngix-proxy, nginx-proxy-lets-encryptを書いて,testディレクトリにはwordpress,mysqlについて書いてあります.wordpress/ ├── proxy │ └── docker-compose.yml └── test └── docker-compose.ymlwordpress/proxy/docker-compose.ymlversion: '3' # proxy services: nginx-proxy: image: jwilder/nginx-proxy container_name: nginx-proxy ports: - "80:80" - "443:443" volumes: - html:/usr/share/nginx/html - dhparam:/etc/nginx/dhparam - vhost:/etc/nginx/vhost.d - certs:/etc/nginx/certs:ro - /var/run/docker.sock:/tmp/docker.sock:ro - /srv/docker/nginx-proxy-with-encrypt/log:/var/log/nginx labels: - "com.github.jrcs.letsencrypt_nginx_proxy_companion.nginx_proxy" restart: always letsencrypt: image: jrcs/letsencrypt-nginx-proxy-companion container_name: nginx-proxy-lets-encrypt depends_on: - "nginx-proxy" volumes: - certs:/etc/nginx/certs:rw - vhost:/etc/nginx/vhost.d - html:/usr/share/nginx/html - /var/run/docker.sock:/var/run/docker.sock:ro volumes: certs: html: vhost: dhparam: networks: default: external: name: common_linkwordpress/test/docker-compose.ymlversion: '3.3' services: db: image: mysql:5.7 volumes: - db_data:/var/lib/mysql environment: MYSQL_ROOT_PASSWORD: somewordpress MYSQL_DATABASE: wordpress MYSQL_USER: wordpress MYSQL_PASSWORD: wordpress wordpress: depends_on: - db image: wordpress:latest container_name: test environment: WORDPRESS_DB_HOST: db:3306 WORDPRESS_DB_USER: wordpress WORDPRESS_DB_PASSWORD: wordpress VIRTUAL_HOST: [test.XXX.io.] LETSENCRYPT_HOST: [test.XXX.io.] LETSENCRYPT_EMAIL: [自分のメールアドレス] volumes: db_data: {} networks: default: external: name: common_link
[test.XXX.io.]にはRoute53で登録したドメインまたはサブドメイン,[自分のメールアドレス]には自分のメールアドレスを入力します.container_nameはtestになっていますが好きな名前をつけてOKです.さらに他のサブドメインでWordpressを作りたい時は,
:wordpress/test/docker-compose.ymlを複製していく感じです.その際はtestディレクトリではなく,名前を変えて新しいディレクトリを作成してください.また,ドメインまたはサブドメイン名も変更しておきましょう.共有ネットワークの作成
次に共有ネットワークを作成します.
$ docker network create --driver bridge common_linkDocker立ち上げ
最後に
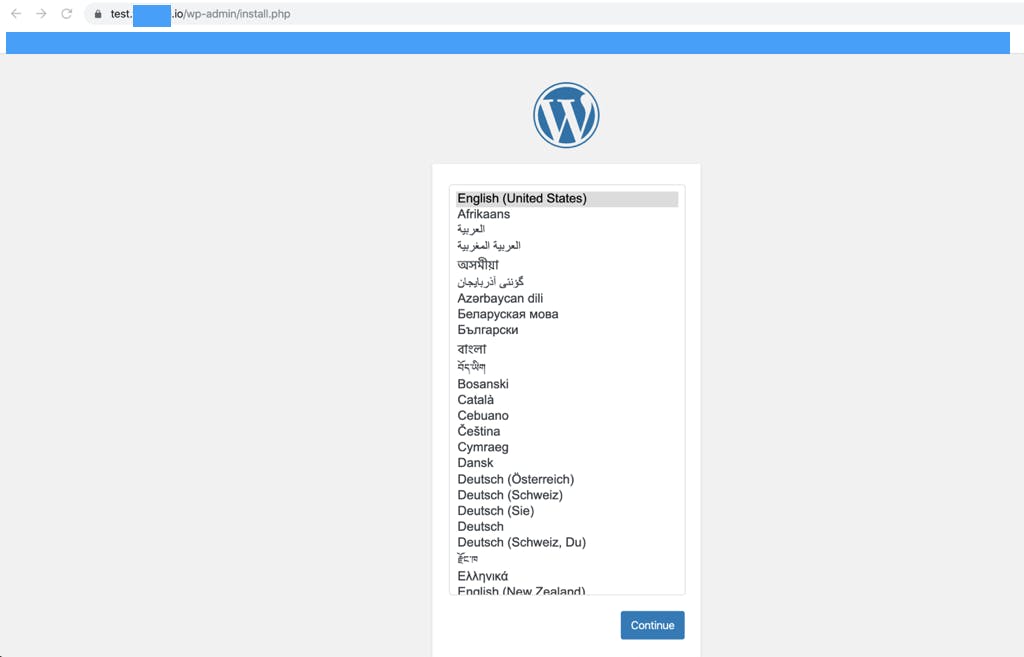
proxyディレクトリとtestディレクトリのdockerを立ち上げます.$ pwd /home/ubuntu/wordpress $ cd proxy/ $ docker-compose up -d $ cd ../test/ $ docker-compose up -dそして自分のドメインまたはサブドメイン(
[test.XXX.io.])をブラウザで検索して,Wordpressの初期画面が表示されたら成功です.ちゃんとSSL化もしています.
困ったときの対処
ブラウザでアクセスしても
タイムアウトまたはこのサイトにアクセスできませんとなるこれはEC2のセキュリティグループでHTTPとHTTPSを許可していない可能性があります.また,セキュリティグループを再設定した後はインスタンスを再起動する必要があります.
ブラウザでアクセスすると
Internal Server Errorと表示されるこれはDockerの設定が間違えている可能性があります.
docker-compose.ymlや共有ネットワークをもう一度チェックしましょう.
Wordpressを作るのではなく,nginxが立ち上がるか確かめてみると良いかもしれません.
適当にtmpディレクトリを作ってnginxが動くか確認しましょう.wordpress/tmp/docker-compose.ymlversion: '3' # service services: web: image: nginx container_name: nginx_test environment: VIRTUAL_HOST: LETSENCRYPT_HOST: [test.XXX.io.] LETSENCRYPT_EMAIL: [自分のメールアドレス] restart: always networks: default: external: name: common_link


- 投稿日:2019-11-27T13:19:40+09:00
今更ながらRe:VIEWに手を出す
黒歴史
PDFで配布する資料の作成のため、いろんなものを試してきた。
Word
デザインの指定がすごい面倒。
たまに崩れたり、項番のインデントがうまくいかなかったりでまず先に捨てた。TeX
学生時代のノリで使っていたが、
「他のメンバーが誰もメンテできない」
と理由で(それはどうかと思いつつ)却下。
Markdown to PDF
VSCodeの拡張機能からインストール。
単ページの印刷はちょうどよかった。ただし、章立ての文章などは作れないので、
併用し続けることにした。Gitbook
長らくお世話になっていたツール。詳しくはこの記事を参照。
デザインのカスタマイズも可能で、Web/PDFの両出力が可能であった。ただし、問題点が2点あり、
画像サイズをうまく変更できない
正確には変更できるが、WebとPDF両対応の方法がなかったsection/subsectionがうまく動かない
改ページを入れると項番がずれる。
PDF化する際に結局うまくいかなかった。Pandoc
インストールが少し戸惑うが、PDF出力前提であればきちんとした物が作れる。
しばらくはこれを使用していた。
たどり着いた真理
PDFとWeb両対応はやめよう。
新しい選択肢を試す
Re:VIEW
実際に技術系同人誌を作成するにも使われているらしく、
結構高性能。始め方
とてもいいDockerImageがあったので、
何も考えずにそちらを使用します。Dockerのインストール
省略。
プロジェクトの作成
以下のコマンドでプロジェクトを作成します。
% docker run -it -v $(pwd):/work vvakame/review /bin/bash -c "cd work && review-init introduction-of-review"ビルド
以下のファイルを作成します。
pdf.sh#!/bin/bash docker run -it -v $(pwd):/work vvakame/review /bin/bash -c "cd /work && rake pdf"作成後、実行権限を与えましょう。
% chmod +x pdf.shあとは、以下のコマンドを打ち込むだけでPDFが生成されます。
% ./pdf.sh簡単にそれっぽい文章が出てくるので、
書き始めるには良さそう。ただ、Pandocの方が生Markdownをそのまま変換できるので楽っちゃー楽。
比較はまた今度。
- 投稿日:2019-11-27T13:07:04+09:00
Dockerコマンドメモ(fish)
Dockerコマンドメモ(fish)
最近dockerとfishをよく使う。
fishでdockerのコマンドを実行しようとしたらbash,zshばかり…。
docker+bashとかの情報はよくあるけど、docker+fishはないことが多いので、メモしておきます。
まあ、kubernetesが主流になって使わないかもだけど・・・。Kill all running containers
fishdocker kill (docker ps -q)Delete all stopped containers (including data-only containers)
fishdocker rm (docker ps -a -q)Delete all ‘untagged/dangling’ () images
fishdocker rmi (docker images -q -f dangling=true)Delete ALL images
fishdocker rmi (docker images -q)
- 投稿日:2019-11-27T12:10:38+09:00
Dockerを使って自分の環境を汚さずにjupyter notebookを使う方法
Dockerのインストール
Dockerがインストールされてない場合はインストールします。
DockerをMacにインストールする(更新: 2019/7/13) - Qiita
(Option) Dockerの補完コマンドを使う
Dockerのコマンドは長いものが多いのでシェル上で補完できるようにした方がいいです。
コマンドライン補完 — Docker-docs-ja 17.06.Beta ドキュメント
Docker for macのタブ補完 - ytooyamaのブログ
やり方はいっぱいGoogle先生が教えてくれるのでやってみてください。
jupyterイメージをpull
Dockerをインストールしたら
pullコマンドでjupyterのイメージをダウンロードさせます。docker pull jupyter/datascience-notebookdocker-compose.ymlの編集
version: '3'
services:
  jupyter:
    volumes:  # カレントディレクトリをdockerコンテナ内のmyappディレクトリにマウント
      - .:/myapp
    working_dir: /myapp  # コンテナのデフォルトのワーキングdirをmyappへ
    ports:
      - "8888:8888"  # コンテナ側:ホストマシン側
    image: "jupyter/datascience-notebook"
    container_name: "notebook"  # コンテナ名(設定すれば再起動時に楽)
volumesのところを↑のようにすることで、このyamlファイルをおいた場所でjupyter notebookを起動できます。
/myappのところは好きに名前変えてください。
Pythonでゴリゴリデータをいじりたいときなど、いじりたいディレクトリ内に作りましょう。docker-compose up で起動
ここまでできたらそのままの場所で
docker-compose upとします。
ターミナルにnotebookが起動したURLがプリントされるのでそこへ行けばjupyter notebookが使えるはずです。
- 投稿日:2019-11-27T11:51:16+09:00
dockerコンテナ内のmysqlでダンプを取るとき
- 投稿日:2019-11-27T11:49:52+09:00
Nuxt + ExpressでDockerの状態を見てみる
自己紹介
Ateam Lifestyle Advent Calendar 2019 の7日目は
株式会社エイチームライフスタイル 名古屋開発部でエンジニアとしてアルバイトをしている @takaHAL が担当します!概要
Nuxt.js と ExpressでAPIを作ってDockerの状態を取得してみます。
利用したもの
Nuxt.js (v2.12.0)
Vuetify.js
Express
Docker
プロジェクト作成
$ yarn create nuxt-app dockerstatusいくつか質問されますが下記を選択しました
? Choose custom server framework
- Express
? Choose UI framework
- Vuetify.js
ディレクトリ移動 します
$ cd dockerstatusサーバー起動
$ yarn run dev確認
Nuxt
下記にアクセス
http://localhost:3000/
画面が表示されました。
Express
デフォルトで作成されているindex.jsを見ます.
server/index.jsconst express = require('express') const consola = require('consola') const { Nuxt, Builder } = require('nuxt') const app = express() // Import and Set Nuxt.js options const config = require('../nuxt.config.js') config.dev = process.env.NODE_ENV !== 'production' async function start () { // Init Nuxt.js const nuxt = new Nuxt(config) const { host, port } = nuxt.options.server // Build only in dev mode if (config.dev) { const builder = new Builder(nuxt) await builder.build() } else { await nuxt.ready() } // Give nuxt middleware to express app.use(nuxt.render) // Listen the server app.listen(port, host) consola.ready({ message: `Server listening on http://${host}:${port}`, badge: true }) } start()
message: Server listening on http://${host}:${port}
の内容がterminal上に出ていればOKです。
ExpressでAPIを作成
docker psの内容を取得します.
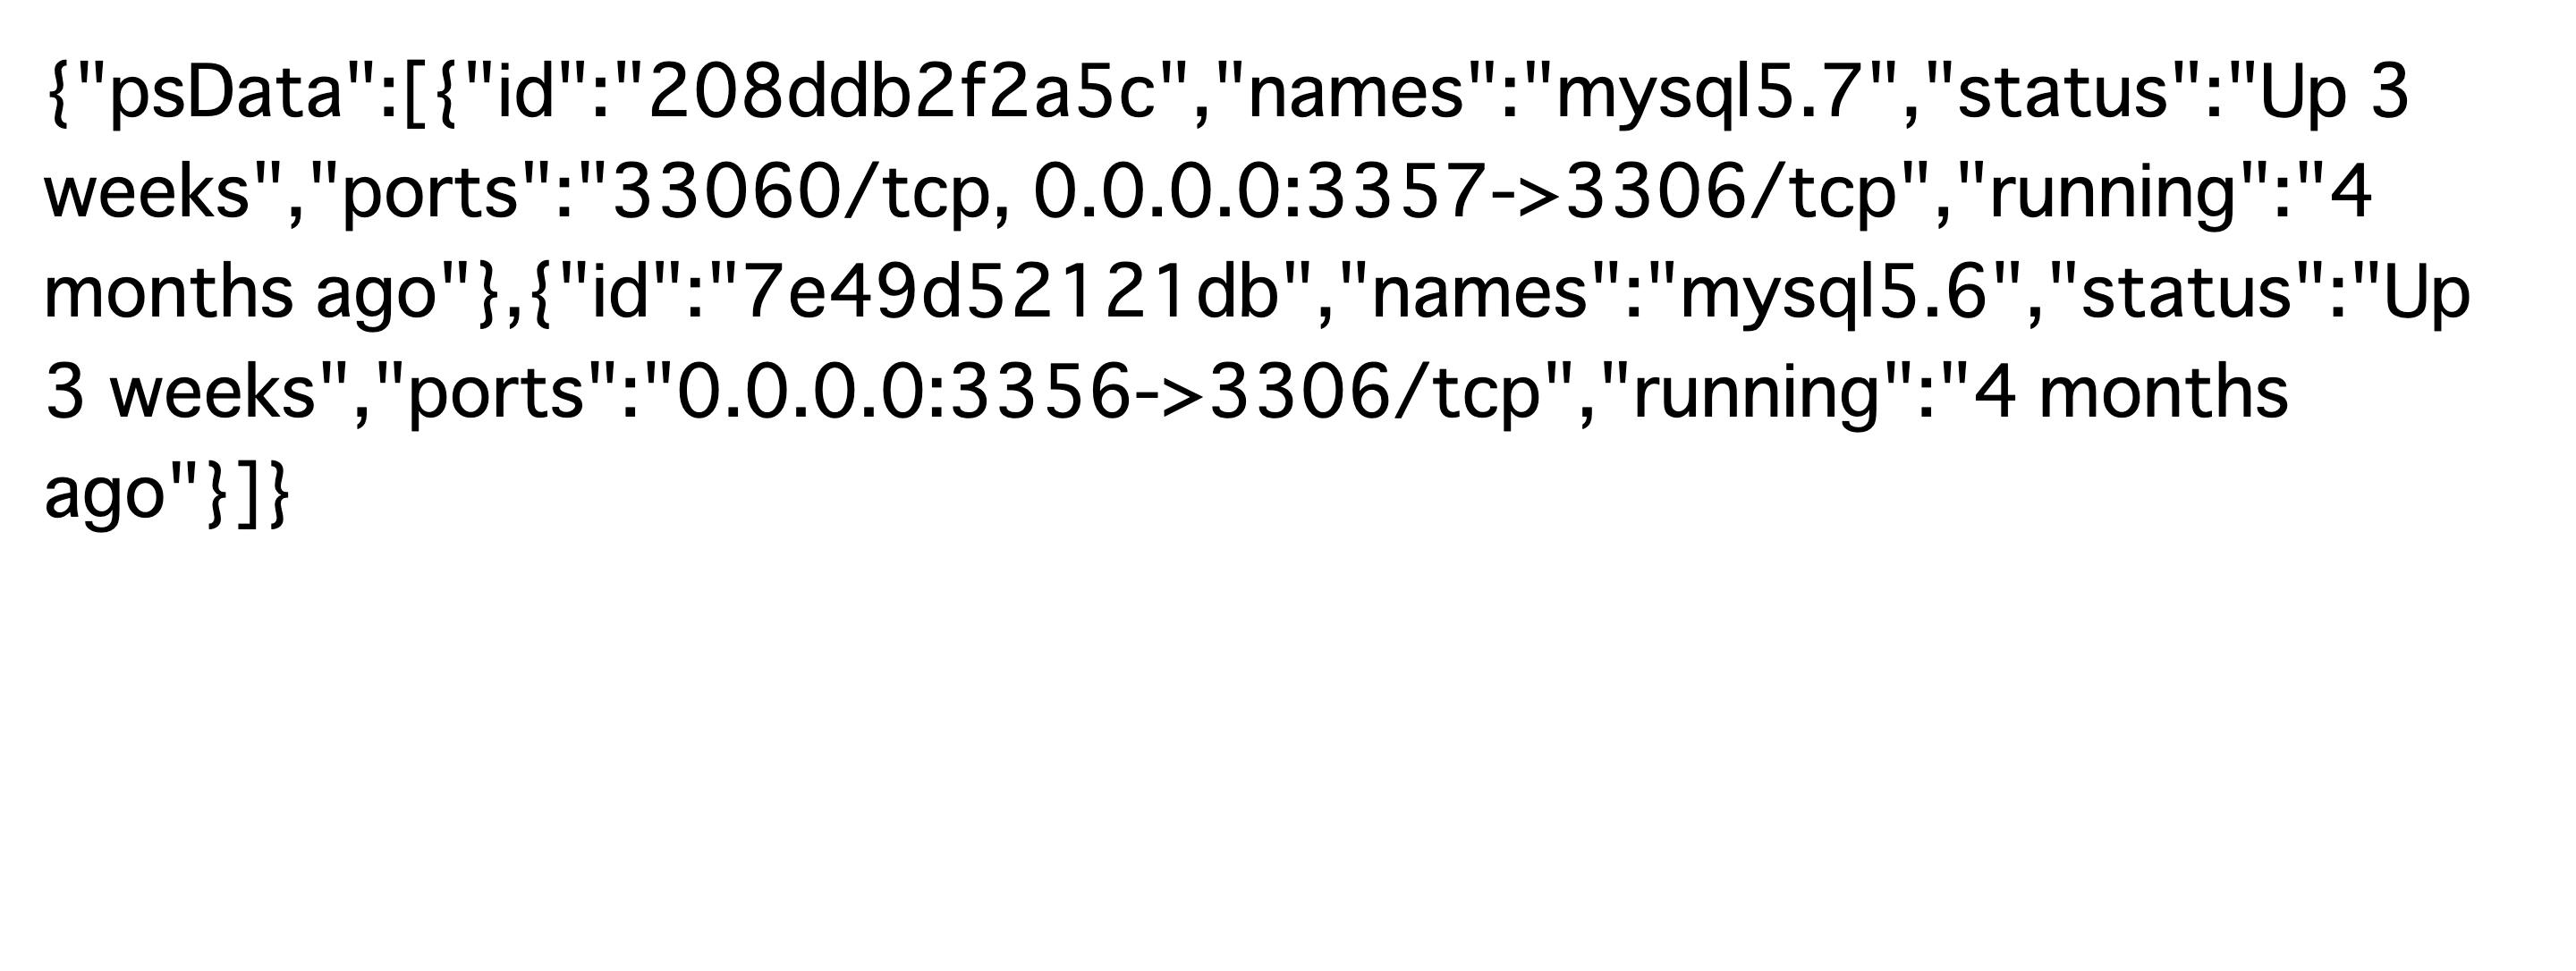
server/index.js// 追記 app.get('/dockerPs', function (req, res) { const ps = dockerPs() const psData = [] ps.split(/\r?\n/g).forEach((item) => { if (item.length !== 0) { psData.push({ id: JSON.parse(item).ID, names: JSON.parse(item).Names, status: JSON.parse(item).Status, ports: JSON.parse(item).Ports, running: JSON.parse(item).RunningFor }) } }) res.send({ psData }) }) const dockerPs = () => { const execSync = require('child_process').execSync const data = execSync( '/usr/local/bin/docker ps --format "{{json .}}"' ).toString() return data }この状態で下記にアクセスしましょう
http://localhost:3000/dockerPs
僕の場合はMySQLの5.6と5.7を使用しているため下記のような結果が得られました。
今回作成したAPIを叩くと結果がJSON形式で帰ってきます
Nuxt側からAPIを叩く!
index.vueに記述していきます。
pages/index.vue<template> <v-layout column justify-center align-center > <v-flex xs12 sm8 md6 > <div class="text-center"> <logo /> <vuetify-logo /> </div> <v-card> <v-card-title class="headline"> Welcome to the Vuetify + Nuxt.js template </v-card-title> <v-card-text> <p>Vuetify is a progressive Material Design component framework for Vue.js. It was designed to empower developers to create amazing applications.</p> <p> For more information on Vuetify, check out the <a href="https://vuetifyjs.com" target="_blank" > documentation </a>. </p> <p> If you have questions, please join the official <a href="https://chat.vuetifyjs.com/" target="_blank" title="chat" > discord </a>. </p> <p> Find a bug? Report it on the github <a href="https://github.com/vuetifyjs/vuetify/issues" target="_blank" title="contribute" > issue board </a>. </p> <p>Thank you for developing with Vuetify and I look forward to bringing more exciting features in the future.</p> <div class="text-xs-right"> <em><small>— John Leider</small></em> </div> <hr class="my-3"> <a href="https://nuxtjs.org/" target="_blank" > Nuxt Documentation </a> <br> <a href="https://github.com/nuxt/nuxt.js" target="_blank" > Nuxt GitHub </a> </v-card-text> <v-card-actions> <v-spacer /> <v-btn color="primary" nuxt to="/inspire" > Continue </v-btn> </v-card-actions> </v-card> </v-flex> </v-layout> </template> <script> import axios from 'axios' import Logo from '~/components/Logo.vue' import VuetifyLogo from '~/components/VuetifyLogo.vue' export default { components: { Logo, VuetifyLogo }, asyncData () { axios.get('http://localhost:3000/dockerPs').then((res) => { console.log(res.data) }) } } </script>下記が追記項目になります。
import axios from 'axios'
    .
    .
    .
export default {
    .
    .
    .
  asyncData () {
    axios.get('http://localhost:3000/dockerPs').then((res) => {
      console.log(res.data)
    })
  }
}
F12を押してconsoleを確認してみましょう
取得できていますね。
利用しているDockerのコマンドについて
今回利用しているもの
docker ps --format "{{json .}}"
docker psコマンドの結果をJSON文字列としてエンコードしています。成果物
これらの内容を元に以下のものを制作しました
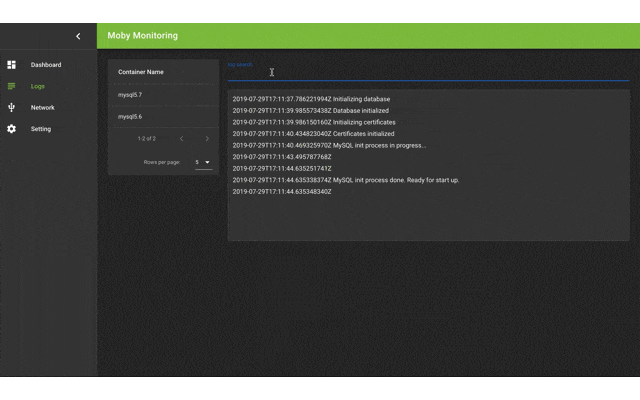
コンテナの状態などを可視化したり
ログを表示・検索したり
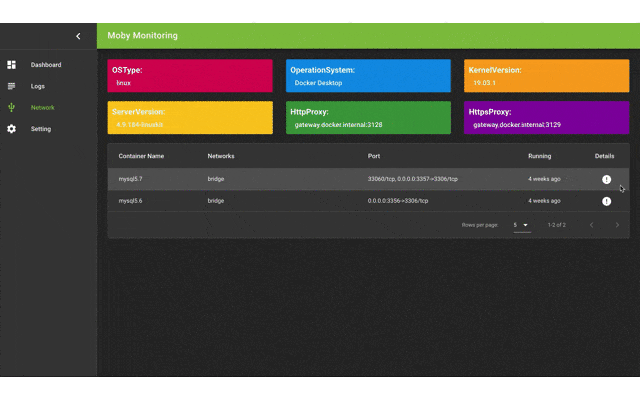
Port番号などの情報を見たり
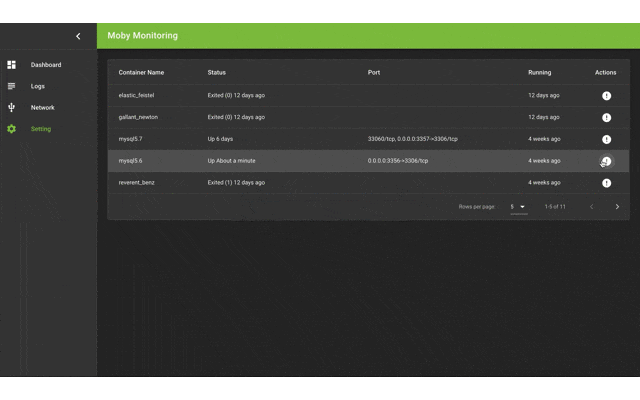
コンテナの停止・起動・再起動をボタンで行うようにしたり
まとめ
自分の手でコマンドから得た結果を可視化してみるというのはとても楽しくDockerへの理解も少し深まり、Dockerのコマンドを色々と調べるいい機会にもなりました。
また、今回僕は使いませんでしたがGrafanaというものを使えば見た目もかっこいい感じに作れるみたいなので使ってみても面白いかもしれませんAteam Lifestyle Advent Calendar 2019 の 8日目は、@snd-07 がお送りします!!どんなネタを用意してくるのか楽しみです!!
そんな"挑戦"を大事にするエイチームグループでは、一緒に働けるチャレンジ精神旺盛な仲間を募集しています。興味を持たれた方はぜひエイチームグループ採用サイトを御覧ください。
https://www.a-tm.co.jp/recruit/


- 投稿日:2019-11-27T11:12:45+09:00
Golang - Incorrect CPU Numbers of GOMAXPROCS in Docker
The runtime.GOMAXPROCS(??) will read the host machine's CPU numbers instead of container's (--cpus=??). We can use UBER's automaxprocs to solve it.
go get -u go.uber.org/automaxprocsimport _ "go.uber.org/automaxprocs" func main() { // Your application logic here. }https://github.com/uber-go/automaxprocs
https://mp.weixin.qq.com/s/Lk1EbiT7WprVOyX_dXYMyg
http://vearne.cc/archives/39195
https://colobu.com/2017/10/11/interesting-things-about-GOMAXPROCS/
- 投稿日:2019-11-27T08:54:40+09:00
【Rails on Docker】Modelの全件取得(all)ができなくなって困った
Problem
rails consoleでとあるモデルをallで全件取得しようとしたところ以下のエラーに遭遇。[1] pry(main)> User.all Member Load (9.3ms) SELECT "users".* FROM "users" ORDER BY "users"."created_at" ASC less: unrecognized option: X BusyBox v1.30.1 (2019-10-26 11:23:07 UTC) multi-call binary. Usage: less [-EFIMmNSRh~] [FILE]... 1 FROM ruby:2.6.5-alpine3.10 View FILE (or stdin) one screenful at a time -E Quit once the end of a file is reached -F Quit if entire file fits on first screen -I Ignore case in all searches -M,-m Display status line with line numbers and percentage through the file -N Prefix line number to each line -S Truncate long lines -R Remove color escape codes in input -~ Suppress ~s displayed past EOFなんかできるモデルとできないモデルがあって困った。
なんとなく件数が少ないモデルは見えるけど多いモデルはエラーになる。Trouble Shooting
結論からいえば、Alpine LinuxをベースとしてDocker上でRailsを動かしていたのですが、Alpine Linuxには
lessが標準装備されていないためこうなるらしい。
hirbとか使っているからpager機能がついているのかな...その時less使ってるのかな...
まぁとりあえず復旧だ。DockerfileRUN apk add --update --no-cache lessdocker-compose buildエラー出なくなった。
Reference
- 投稿日:2019-11-27T08:15:56+09:00
ローカルマシンでSonarQubeサーバを起動してソースコード解析を実行する(Docker)
件名の通りです。環境はLinuxを想定してます。
まずは、以下の内容で、Makefileを用意します。
run-sonar: ### start sonarqube server.
    docker rm -f sonarqube || true
    docker run -d --name sonarqube \
        -p 9000:9000 \
        -v sonar-conf:/opt/sonarqube/conf \
        -v sonar-data:/opt/sonarqube/data \
        -v sonar-logs:/opt/sonarqube/logs \
        -v sonar-extensions:/opt/sonarqube/extensions \
        sonarqube
    # access to http://localhost:9000 after started(a few minitus)

scan: ### analysis with sonar-scanner, send result to sonarqube server.
    docker run --rm \
        --volume `pwd`:/workspace \
        --link sonarqube \
        satotka/sonar-scanner \
            -Dsonar.sources=. \
            -Dsonar.host.url=http://sonarqube:9000 \
            -Dsonar.projectKey=app-dev \
            -Dsonar.exclusions=static/**/bootstrap.css
Localマシン上で、SonarQubeのサーバをDockerで起動。
make run-sonarサーバが起動した事を確認し、ソースコードを解析します。
make scan以上。