- 投稿日:2019-11-24T22:20:15+09:00
BottomNavigationViewのアイテムを動的に隠す
はじめに
業務において「条件に応じてBottomNavigationViewのアイテムを隠す」
という要件があって調べたので備忘録として残しておきます。実装方法
最初はVisibilityを触って非表示にする方法を調べていましたが、remoteItemを使うのが正解のようです。
mBottomNavigationView.getMenu().removeItem(R.id.item_name);結果
「カリキュラム」というメニューを隠してみました。
通常時
通常はBottomNavigationが4つのメニューアイテムを持っています。
removeItemで隠した時
このようにカリキュラムのメニューが隠れ、3つのメニューアイテムとなりました。
参考


- 投稿日:2019-11-24T21:43:24+09:00
Androidで文字を点滅するメソッドができてうれしい
こんにちはヨースケです。文字列の一致に"=="を使っていました(笑)。equalsですね!
初めて作ったアプリで実装
この文字を点滅させるメソッドは、初めてアプリを公開した時に実装したものになります。計算問題付き電卓←このアプリは名前の通り電卓に計算問題を出す機能を付けたアプリとなっています。計算問題がスタートするとタイマーをスタートさせ、全10問クリアするとタイマーがストップしそのタイムで点滅するようにしました。また、答え終わると過去のクリアタイムを表示するようにしています。
ソースコード
あんまり長ったらしくなってもよくないので稚拙なコードではありますが自分自身の備忘録として貼っておきます。
Quest.javapublic class Quest extends AppCompatActivity { private final Handler handler = new Handler(); //タイマーを表示 private TextView timerText; ...中略... //全問正解するとtimer_stop()を呼びます //タイマーストップ public void timer_stop() { handler.removeCallbacks(runnable); timerText.setTextColor(Color.RED); count = 0; insert_db(); result_tweet(); init(); } //止めたタイムをチカチカさせるメソッド private void init() { new Thread(new Runnable() { @Override public void run() { int time = 500; try { Thread.sleep(time); } catch (Exception e) { } handler.post(new Runnable() { @Override public void run() { if (timerText.getVisibility() == View.VISIBLE) { timerText.setVisibility(View.INVISIBLE); } else { timerText.setVisibility(View.VISIBLE); } init(); } }); } }).start(); } }このinit()メソッドで止めたタイマーをチカチカ点滅させています。この→テキストビューを点滅させる方法を参考にプログラムを組んだので大体の流れしか分からず、Threadやhandlerのところも勉強不足なのでまだまだ勉強が足りないなぁーと反省。(メソッド名ェ...)
現在は3つ目のアプリ、「一日日記(福岡編)」(仮題)を開発中です。ひと段落着いたときや投稿したいなーとなったときに書いていくのでよろしくお願いしますね(^ ^)。ちなみにTwitterもやっていますので気軽にフォローよろしくお願いします!→Twitterのアカウント
参考URL:
テキストビューを点滅させる方法:https://codeday.me/jp/qa/20190108/126818.html
- 投稿日:2019-11-24T19:11:10+09:00
CameraXでImageProxyを扱おうとすると 'Image is already closed' でクラッシュする
はじめに
CameraXで撮影した画像をBitmapに変換しようとした時に以下のエラーで苦しめられたのでメモっておきます。
java.lang.IllegalStateException: Image is already closedかいけつ
撮影時のリスナーである
onCaptureSuccess内でコンストラクタを呼んでたのが原因でした。failed
override fun onCaptureSuccess(image: ImageProxy?, rotationDegrees: Int) {
    super.onCaptureSuccess(image, rotationDegrees)
    // do
}
success
override fun onCaptureSuccess(image: ImageProxy?, rotationDegrees: Int) {
    // do
}
なんでか
onCaptureSuccessの内部の実装を見ると中でImageProxyをcloseさせていたためでした。ImageCapture.javapublic void onCaptureSuccess(ImageProxy image, int rotationDegrees) { image.close(); }おわりに
ちゃんと使うなら標準ライブラリ使えよってことですかね・・・
- 投稿日:2019-11-24T18:23:53+09:00
WindowInsetを理解する
android:fitSystemWindowsとか、setOnApplyWindowInsetsListenerとかStatusBarとかNavigationBarとかDrawerLayoutとか、SYSTEM_UI_FLAG_..とか難しいですよね??それを紐解いていきたいです。
それを理解していくにはAndroidでonApplyWindowInsets()がどのように呼ばれているのかを理解していく必要があります。最初にまとめ
- ViewツリーでonApplyWindowInsets()が深さ優先で呼ばれる。
- 他のレイアウトでWindowInsetがconsumeされると意図した場所でonApplyWindowInsets()が呼ばれないので注意
- setSystemUiVisibilityでSYSTEM_UI_FLAG_LAYOUT_HIDE_NAVIGATIONなどを設定するとアプリのレイアウトがstatusbarなどに食い込むようになる
- setOnApplyWindowInsetsListenerでinsets.systemWindowInsetTopなどで、その食い込んでいる高さがわかるので、レイアウトにpaddingを設定してあげれば良い。
- レイアウトに元から設定されているpaddingを考慮してあげるように、chrisbanes/insetterなどを使おう
- RecyclerViewでpaddingも描画するには
clipToPadding="false"を使おうonApplyWindowInsets()の呼ばれ方
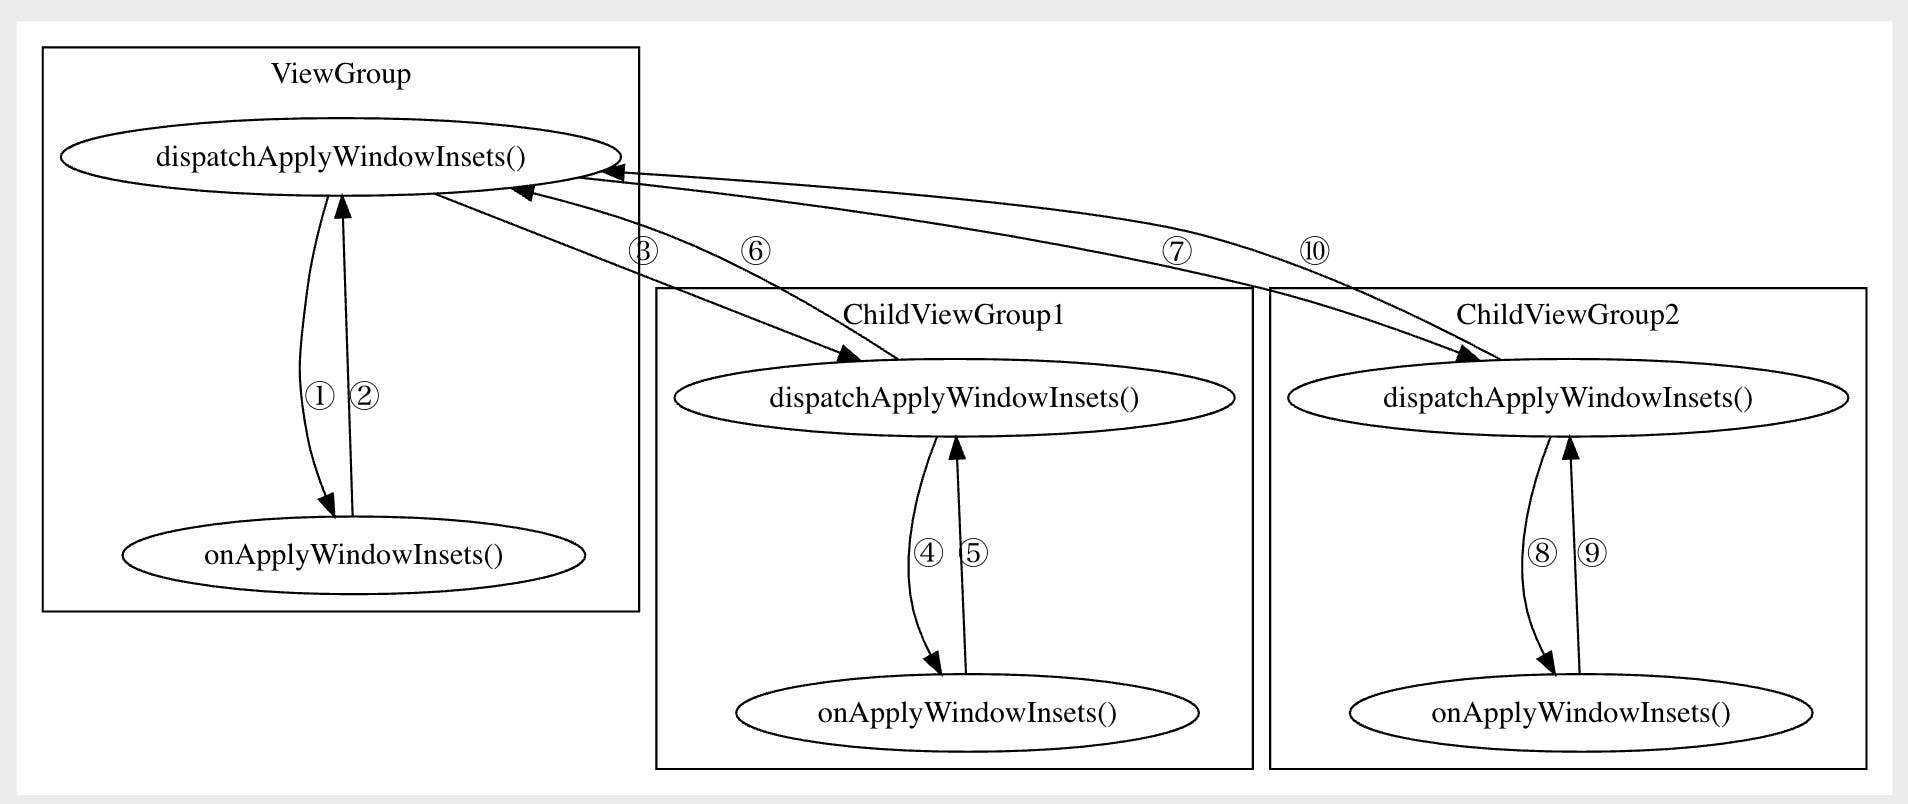
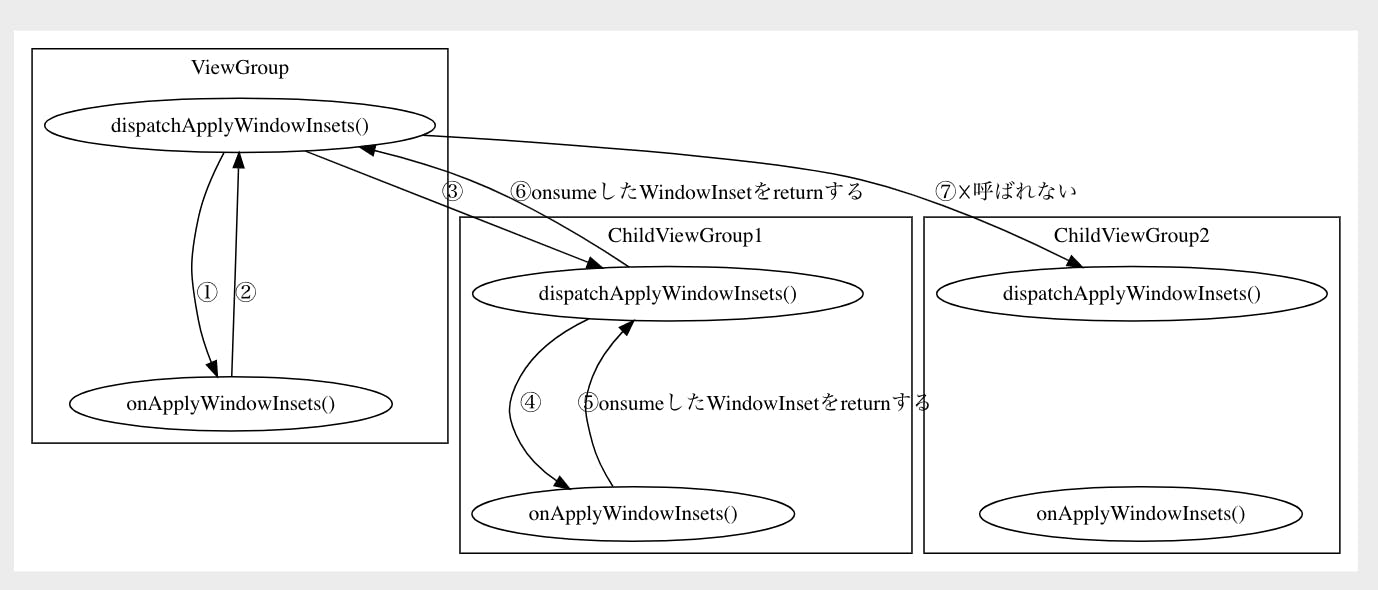
まずレイアウトの初期段階でViewRootImplの中でdispatchApplyInsets()が呼ばれ、そこからdispatchApplyWindowInsets()が呼ばれます。
木の上のレイアウトから深さ優先探索で呼ばれていきます。
図
dot

digraph G {

    size=7

    subgraph cluster_0 {

        cluster_0_dispatch[label="dispatchApplyWindowInsets()"]

        cluster_0_apply[label="onApplyWindowInsets()"]

        label = "ViewGroup";

    }

    subgraph cluster_1 {

        cluster_1_dispatch[label="dispatchApplyWindowInsets()"]

        cluster_1_apply[label="onApplyWindowInsets()"]

        label = "ChildViewGroup1";

    }

    subgraph cluster_2 {

        cluster_2_dispatch[label="dispatchApplyWindowInsets()"]

        cluster_2_apply[label="onApplyWindowInsets()"]

        label = "ChildViewGroup2";

    }

    cluster_0_dispatch -> cluster_0_apply [label="①"]

    cluster_0_apply -> cluster_0_dispatch [label="②"]

    cluster_0_dispatch -> cluster_1_dispatch [label="③"]

    cluster_1_dispatch -> cluster_1_apply [label="④"]

    cluster_1_apply -> cluster_1_dispatch [label="⑤"]

    cluster_1_dispatch -> cluster_0_dispatch [label="⑥"]

    cluster_0_dispatch -> cluster_2_dispatch [label="⑦"]

    cluster_2_dispatch -> cluster_2_apply [label="⑧"]

    cluster_2_apply -> cluster_2_dispatch [label="⑨"]

    cluster_2_dispatch -> cluster_0_dispatch [label="⑩"]

}
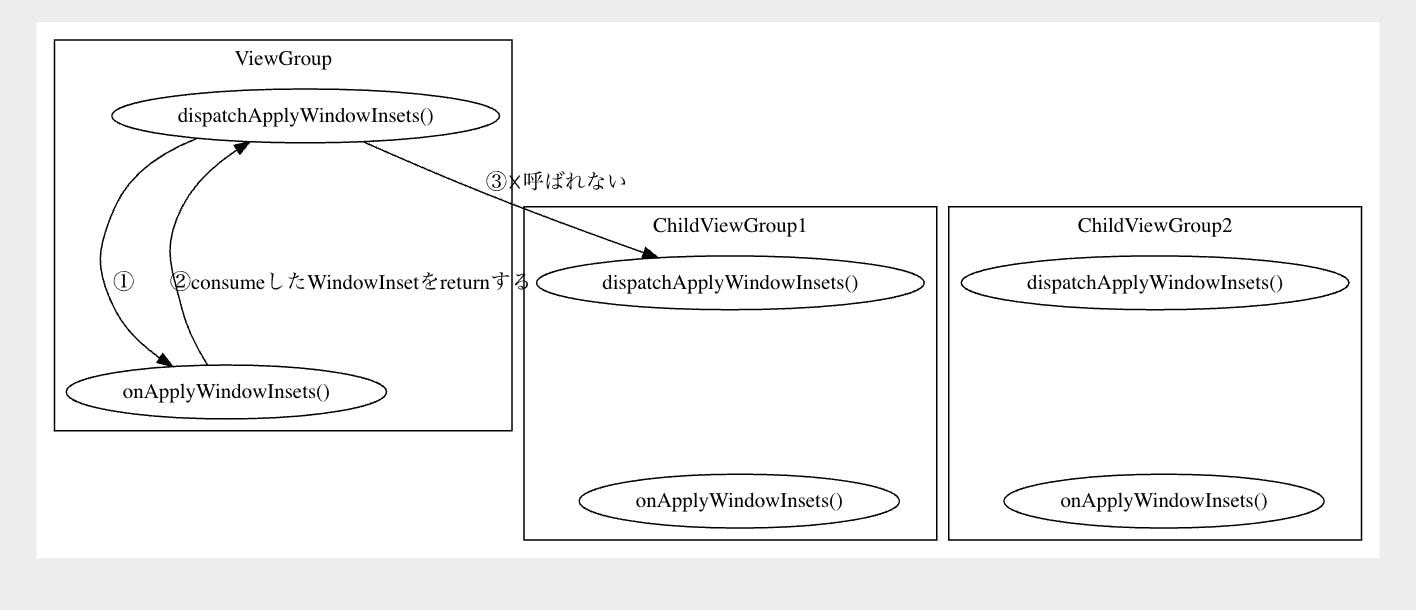
将来的には常に上記の動きになりそうですが、現在は以下のような動きが入っています。
(https://github.com/aosp-mirror/platform_frameworks_base/blob/android10-release/core/java/android/view/View.java の sBrokenInsetsDispatchを参照 )
WindowInsetsをconsumeしたインスタンスを返した場合は他のメソッドは呼ばなくなっています。
WindowInsetsをconsumeとはどういうことなのかはもう少し後で出てきます。
図
dot

digraph G {

    size=7

    subgraph cluster_0 {

        cluster_0_dispatch[label="dispatchApplyWindowInsets()"]

        cluster_0_apply[label="onApplyWindowInsets()"]

        label = "ViewGroup";

    }

    subgraph cluster_1 {

        cluster_1_dispatch[label="dispatchApplyWindowInsets()"]

        cluster_1_apply[label="onApplyWindowInsets()"]

        label = "ChildViewGroup1";

    }

    subgraph cluster_2 {

        cluster_2_dispatch[label="dispatchApplyWindowInsets()"]

        cluster_2_apply[label="onApplyWindowInsets()"]

        label = "ChildViewGroup2";

    }

    cluster_0_dispatch -> cluster_0_apply [label="①"]

    cluster_0_apply -> cluster_0_dispatch [label="②"]

    cluster_0_dispatch -> cluster_1_dispatch [label="③"]

    cluster_1_dispatch -> cluster_1_apply [label="④"]

    cluster_1_apply -> cluster_1_dispatch [label="⑤onsumeしたWindowInsetをreturnする"]

    cluster_1_dispatch -> cluster_0_dispatch [label="⑥onsumeしたWindowInsetをreturnする"]

    cluster_0_dispatch -> cluster_2_dispatch [label="⑦☓呼ばれない"]

    cluster_2_dispatch -> cluster_2_apply [label="⑧",style = invis]

    cluster_2_apply -> cluster_2_dispatch [label="⑨",style = invis]

    cluster_2_dispatch -> cluster_0_dispatch [label="⑩",style = invis]

}
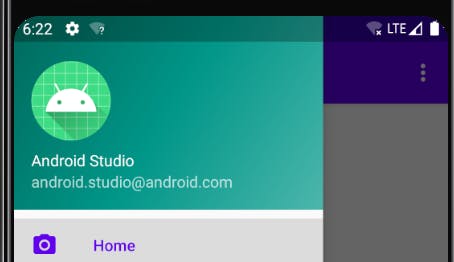
DrawerLayoutから見るonApplyWindowInsets()の実装方法
DrawerLayoutでは見て分かる通り、StatusBarに食い込んでレイアウトを表示しています
まずはView.javaの中のdispatchApplyWindowInsets()の実際のコードを確認してみましょう。
mOnApplyWindowInsetsListenerがあればそれを使うし、なければ、View.onApplyWindowInsets()を使うようになっています。View.dispatchApplyWindowInsets()public WindowInsets dispatchApplyWindowInsets(WindowInsets insets) { try { mPrivateFlags3 |= PFLAG3_APPLYING_INSETS; if (mListenerInfo != null && mListenerInfo.mOnApplyWindowInsetsListener != null) { return mListenerInfo.mOnApplyWindowInsetsListener.onApplyWindowInsets(this, insets); } else { return onApplyWindowInsets(insets); } } finally { mPrivateFlags3 &= ~PFLAG3_APPLYING_INSETS; } }つまり、
setOnApplyWindowInsetsListener()でリスナーを追加することで、onApplyWindowInsets()を実装したのと同じことができます。DrawerLayoutのコンストラクタ内でこのリスナーを使って、処理を行っているので、見ていきましょう。以下の2つのことを行っています
① setOnApplyWindowInsetsListenerを使っており、setChildInsets内で自分でpaddingを設定して、consumeしたinsetを返す
② setSystemUiVisibilityでの設定
SYSTEM_UI_FLAG_LAYOUT_FULLSCREENによって、アプリコンテンツのレイアウトが上部に食い込みます。そしてstatusBarの大きさなどが入ったinsetがonApplyWindowInsets()で渡ってきて、自分でpaddingを設定できる。という感じになります。DrawerLayoutのコンストラクタ内if (ViewCompat.getFitsSystemWindows(this)) { if (Build.VERSION.SDK_INT >= 21) { // ① setOnApplyWindowInsetsListener(new View.OnApplyWindowInsetsListener() { @Override public WindowInsets onApplyWindowInsets(View view, WindowInsets insets) { final DrawerLayout drawerLayout = (DrawerLayout) view; drawerLayout.setChildInsets(insets, insets.getSystemWindowInsetTop() > 0); return insets.consumeSystemWindowInsets(); } }); // ② setSystemUiVisibility(View.SYSTEM_UI_FLAG_LAYOUT_STABLE | View.SYSTEM_UI_FLAG_LAYOUT_FULLSCREEN); final TypedArray a = context.obtainStyledAttributes(THEME_ATTRS); try { mStatusBarBackground = a.getDrawable(0); ... }ちなみにSYSTEM_UI_FLAG_LAYOUT_FULLSCREENではなくSYSTEM_UI_FLAG_LAYOUT_HIDE_NAVIGATIONを使うことでレイアウトの領域をStatusBarとNavigationBarの領域も含むようにする事ができます。
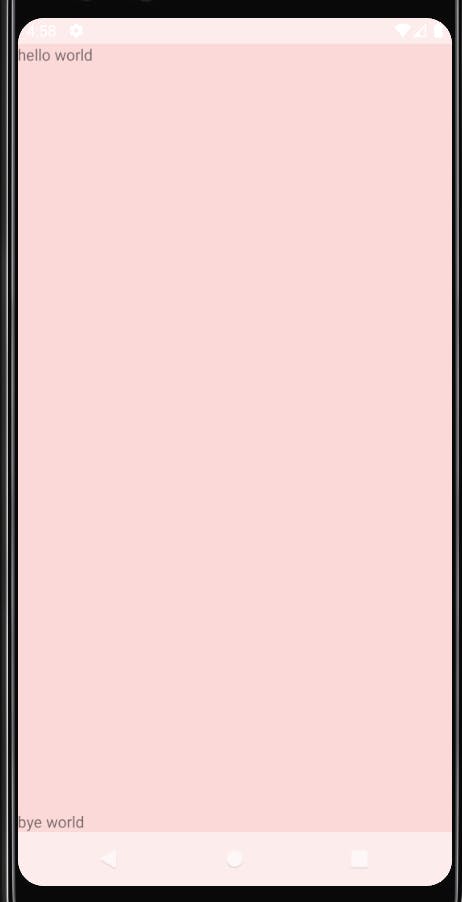
つまりアプリだと以下のようにするといい感じにできます。
将来的にconsumeが使われないようになりそうなのと、chris banes氏も使っていないようなのでconsumeは使っていません。
    <style name="AppTheme" parent="Theme.AppCompat.Light.NoActionBar">
        <!-- Customize your theme here. -->
        <item name="colorPrimary">@color/colorPrimary</item>
        <item name="colorPrimaryDark">@color/colorPrimaryDark</item>
        <item name="colorAccent">@color/colorAccent</item>
        <item name="android:statusBarColor">#80FFFFFF</item> // **半分白く**
        <item name="android:navigationBarColor">#80FFFFFF</item>  // **半分白く**
    </style>
<FrameLayout xmlns:android="http://schemas.android.com/apk/res/android" xmlns:tools="http://schemas.android.com/tools" android:id="@+id/root" android:layout_width="match_parent" android:layout_height="match_parent" android:background="#22ff0000" // **デバッグ用に赤くする** tools:context=".MainActivity"> <TextView android:layout_width="match_parent" android:layout_height="wrap_content" android:text="hello world" /> <TextView android:layout_width="match_parent" android:layout_height="wrap_content" android:layout_gravity="bottom" android:text="bye world" /> </FrameLayout>override fun onCreate(savedInstanceState: Bundle?) { super.onCreate(savedInstanceState) setContentView(R.layout.activity_main) val root = findViewById<View>(R.id.root) root.setOnApplyWindowInsetsListener { v, insets -> root.updatePadding( top = insets.systemWindowInsetTop, bottom = insets.systemWindowInsetBottom ) return@setOnApplyWindowInsetsListener insets } root.systemUiVisibility = View.SYSTEM_UI_FLAG_LAYOUT_STABLE or // **レイアウトの領域をStatusBarとNavigationBarの領域も含むようにする** View.SYSTEM_UI_FLAG_LAYOUT_HIDE_NAVIGATION }chrisbanes/insetterはなにをするか?
今回の記事のきっかけになった記事が以下です。
以下のブログで、chrisbanes/insetterについての紹介があります。
https://chris.banes.dev/2019/04/12/insets-listeners-to-layouts/現在の方法だと、paddingがViewに設定されていた場合にupdatePaddingの呼び出しによって上書きされておかしくなってしまうので、最初にViewに設定されているpaddingを保存しておいて、それとsystemWindowInsetBottomなどを合わせてpaddingを設定してくれるというものです。
<FrameLayout xmlns:android="http://schemas.android.com/apk/res/android"
    xmlns:tools="http://schemas.android.com/tools"
    android:id="@+id/root"
    android:paddingTop="16dp"  // **このpaddingが上書きされてしまうのを解決する**
    android:layout_width="match_parent"
    android:layout_height="match_parent"
    android:background="#22ff0000"
    tools:context=".MainActivity">
RecyclerViewをいい感じに表示するには?
clipToPadding="false"によってpadding内も描画させることによって、スクロールもでき、またコンテンツを表示しておくことができます。
    <androidx.recyclerview.widget.RecyclerView
        android:id="@+id/recycler"
        android:background="#22ff0000"
        android:clipToPadding="false"  // ← padding内も描画される
        android:orientation="vertical"
        app:layoutManager="androidx.recyclerview.widget.LinearLayoutManager"
        android:layout_width="match_parent"
        android:layout_height="match_parent" />
override fun onCreate(savedInstanceState: Bundle?) { super.onCreate(savedInstanceState) setContentView(R.layout.activity_main) val recyclerView = findViewById<RecyclerView>(R.id.recycler) recyclerView.setOnApplyWindowInsetsListener { v, insets -> recyclerView.updatePadding( top = insets.systemWindowInsetTop, bottom = insets.systemWindowInsetBottom ) return@setOnApplyWindowInsetsListener insets } recyclerView.systemUiVisibility = View.SYSTEM_UI_FLAG_LAYOUT_STABLE or View.SYSTEM_UI_FLAG_LAYOUT_HIDE_NAVIGATION
コードを読んだメモ
Android 10のコードをちょっと読んでみました。
Viewのメソッドとして、onApplyWindowInsetというメソッドがあります。
まず、AndroidアプリのViewツリーは以下のようなViewの構造になっています
ViewRootImpl (ViewParentだが、Viewではない)

  DecorView

    View (statusBarBackground)

    アプリのレイアウト

    View (navigationBarBackground)
まずレイアウトの初期段階でViewRootImplの中でdispatchApplyInsets()が呼ばれるようです。
LAYOUT_IN_DISPLAY_CUTOUT_MODE_ALWAYSとかめちゃくちゃ気になりますが、一旦無視します。
host.dispatchApplyWindowInsets(insets);というところで、DecorViewのdispatchApplyWindowInsetsが呼び出されます。
java:ViewRootImpl

    void dispatchApplyInsets(View host) {

        Trace.traceBegin(Trace.TRACE_TAG_VIEW, "dispatchApplyInsets");

        WindowInsets insets = getWindowInsets(true /* forceConstruct */);

        final boolean dispatchCutout = (mWindowAttributes.layoutInDisplayCutoutMode

                == LAYOUT_IN_DISPLAY_CUTOUT_MODE_ALWAYS);

        if (!dispatchCutout) {

            // Window is either not laid out in cutout or the status bar inset takes care of

            // clearing the cutout, so we don't need to dispatch the cutout to the hierarchy.

            insets = insets.consumeDisplayCutout();

        }

        // *** ここでDecorViewのdispatchApplyWindowInsetsを呼ぶ ***

        host.dispatchApplyWindowInsets(insets);

        Trace.traceEnd(Trace.TRACE_TAG_VIEW);

    }
DecorViewはViewGroupを継承しているため、ViewGroupのdispatchApplyWindowInsetsが呼ばれます。
View.sBrokenInsetsDispatchなど気になる処理がありますが、まずは親クラスのViewのdispatchApplyWindowInsets(insets)が呼ばれます。
java:ViewGroup

    @Override

    public WindowInsets dispatchApplyWindowInsets(WindowInsets insets) {

        insets = super.dispatchApplyWindowInsets(insets); // まずViewのdispatchApplyWindowInsets(insets)を呼び出す。

        if (View.sBrokenInsetsDispatch) {

            return brokenDispatchApplyWindowInsets(insets);

        } else {

            return newDispatchApplyWindowInsets(insets);

        }

    }
NEW_INSETS_MODE_FULLになっていないか、targetSdkVersionがAndroid 10以上でなければ、sBrokenInsetsDispatchがtureになります。
新しい仕組みにはcosumeで呼ぶのをやめたりする仕組みがなく、古い仕組みにはconsumeという仕組みで呼ばなくなるというのがあるようです。
java

sBrokenInsetsDispatch = ViewRootImpl.sNewInsetsMode != NEW_INSETS_MODE_FULL

                    || targetSdkVersion < Build.VERSION_CODES.Q;

...

    @Override

    public WindowInsets dispatchApplyWindowInsets(WindowInsets insets) {

        insets = super.dispatchApplyWindowInsets(insets);

        if (View.sBrokenInsetsDispatch) {

            return brokenDispatchApplyWindowInsets(insets);

        } else {

            return newDispatchApplyWindowInsets(insets);

        }

    }

    private WindowInsets brokenDispatchApplyWindowInsets(WindowInsets insets) {

        if (!insets.isConsumed()) {

            final int count = getChildCount();

            for (int i = 0; i < count; i++) {

                insets = getChildAt(i).dispatchApplyWindowInsets(insets);

                if (insets.isConsumed()) {

                    break;

                }

            }

        }

        return insets;

    }

    private WindowInsets newDispatchApplyWindowInsets(WindowInsets insets) {

        final int count = getChildCount();

        for (int i = 0; i < count; i++) {

            getChildAt(i).dispatchApplyWindowInsets(insets);

        }

        return insets;

    }
- 投稿日:2019-11-24T17:28:00+09:00
Kubernetes上でdocker-androidを動かすためのyaml
---
apiVersion: v1
kind: Service
metadata:
 name: android
spec:
 type: NodePort
 ports:
   - name: android-vnc
     port: 6080
     nodePort: 30680
   - name: android-console
     port: 5554
     nodePort: 30554
   - name: android-adb
     port: 5555
     nodePort: 30555
   - name: android-appium
     port: 4723
     nodePort: 30723
 selector:
   app: android
---
apiVersion: v1
kind: Pod
metadata:
 name: android
 labels:
   app: android
spec:
 containers:
 - name: android
   image: budtmo/docker-android-x86-8.0
   securityContext:
     privileged: true
   ports:
     - name: android-vnc
       containerPort: 6080
     - name: android-console
       containerPort: 5554
     - name: android-adb
       containerPort: 5555
     - name: android-appium
       containerPort: 4723
   resources:
     requests:
       memory: "2048Mi"
       cpu: "2000m"
     limits:
       memory: "4192Mi"
       cpu: "4000m"
- 投稿日:2019-11-24T16:30:43+09:00
WSLでAndroid CTSを動かす
WSLでもAndroid CTS を動かせるかテストしてみた。結論としてはそこそこ動く。
はじめに
試してみた背景・・。
CTSはLinux環境の実行が想定されているが、実行用のラッパーとなるシェルスクリプトから先はjavaが多く使われていて、
過去にはCTSツール内のシェルスクリプト相当のバッチファイルを用意してあげればWindowsでもそこそこ動いていた。
制約のある環境は使うべきではないと考えて完全にLinuxで実行するようにしていたが、
ふとWSLを使えばバッチファイルよりは手軽にWindowsから実行する環境が作れるのではと思い試してみた。
そこそこ動くが、WSL性質上Linuxと異なるところでfailしたりうまく動かない箇所が想定されるため、Linux環境があればあえてWSL使うべきではない。以下はWindows10ホスト側にはadbインストール済み。
WSLもインストール済みの環境を使用している。WSL自体のインストール手順は割愛。
WSL環境にopenjdk、adb、aaptをインストール、CTSをダウンロード展開・実行する手順として記載。確認環境
- Windows10
- WSL Ubuntu 18.04 (WSL)
- openjdk 1.8.0_222
- adb (1.0.41) ※ホストのWindows側のadb.exeのデーモンを介して動作させる必要があるため、ホストにも別途adbが必要。
- aapt (v0.2-5747142)
- テスト用のAndroid端末(MO-01K Android 8.0)
WSL環境にて必要なツールをインストール
java 1.8実行環境(openjdk8)
sudo apt install openjdk-8-jre-headless
sudo apt install p7zip-full
sdk-tools、adb、aaptをインストール
adbはplatform-toolsのzipをダウンロード展開するだけで良いが、
aaptはAndroidのSDKマネージャーを介してダウンロードする必要がある。
今回の環境はWSLであり、Android StudioのGUIは使えないため、sdkmanagerのコマンドラインツールでインストールを実施。# sdk-toolsを"~/android-sdk"に展開 mkdir ~/android-sdk cd android-sdk # sdk-tools, platform-toolsをダウンロード wget https://dl.google.com/android/repository/sdk-tools-linux-4333796.zip wget https://dl.google.com/android/repository/platform-tools-latest-linux.zip 7z x ./sdk-tools-linux-4333796.zip 7z x ./platform-tools-latest-linux.zip # aaptインストール cd tools ./bin/sdkmanager --install "build-tools;29.0.2" # ⇒"~/android-sdk/build-tools/29.0.2"にインストール展開される。 # adb(platform-tools)、aapt(build-tools/<version>)にパスを通す。 # 必要に応じて ~/.bashrc にも記載しておくこと。 export PATH=~/android-sdk/platform-tools:$PATH export PATH=~/android-sdk/build-tools/29.0.2:$PATH # adb、aaptにパスが通っているかバージョンを表示して確認。 adb version aapt versionWSL側のadbで端末が認識することを確認
WSL側のadbを動作させる際、ホストのWindows側のadb.exeのデーモンを介して動作させる必要がある。
Windows側で先にadb devicesでAndroid端末が認識していることを確認すること。
先にWSL側のadbデーモンを動かしてしまった場合、ホスト側(コマンドプロンプトから)とWSL側のadbデーモンをadb kill-serverで止めてから、ホスト側でadb devicesでAndroid端末が認識することを確認する。CTSツールをダウンロード、実行
今回はAndroid8.0の端末にて実行したため8.0のツールをダウンロード。
ツールはこちらに公開されている。
https://source.android.com/compatibility/cts/downloadsCTSツールダウンロード、展開
# CTSダウンロード
mkdir work
cd work
wget https://dl.google.com/dl/android/cts/android-cts-8.0_r21-linux_x86-arm.zip
7z x android-cts-8.0_r21-linux_x86-arm.zip -oandroid-cts-8.0_r21-linux_x86-arm
cd android-cts-8.0_r21-linux_x86-arm/android-cts/tools
CTSモジュール単体実行
適当にモジュールのテストを1つ選んで実行。
./cts-tradefed
cts-tf > run cts -m CtsAadbHostTestCases --skip-device-info --skip-preconditions --skip-all-system-status-check --abi arm64-v8a
11-24 15:51:27 I/ResultReporter: Invocation finished in 2m 55s. PASSED: 11, FAILED: 0, MODULES: 1 of 1制限事項
Linuxに近い実行環境のWSLといっても、WSLの性質上、やはりLinuxではないため一部動作しないテストがある。
見つけたものでは、CtsUsbTestsはlsusbが動作しないWSLではpassできない。補足
WSL環境での内容として記載しているが、
通常のUbuntu Linuxホスト環境でもほぼ同じ手順で実施できるはず。参考URL
[CTSについて]https://source.android.com/compatibility/cts
[android sdk-toolsダウンロード先]https://developer.android.com/studio/index.html
[andorid platform-toolsダウンロード先]https://developer.android.com/studio/releases/platform-tools
[CTSダウンロード先]https://source.android.com/compatibility/cts/downloads
[sdkmanagerの使い方]https://developer.android.com/studio/command-line/sdkmanager
- 投稿日:2019-11-24T15:11:48+09:00
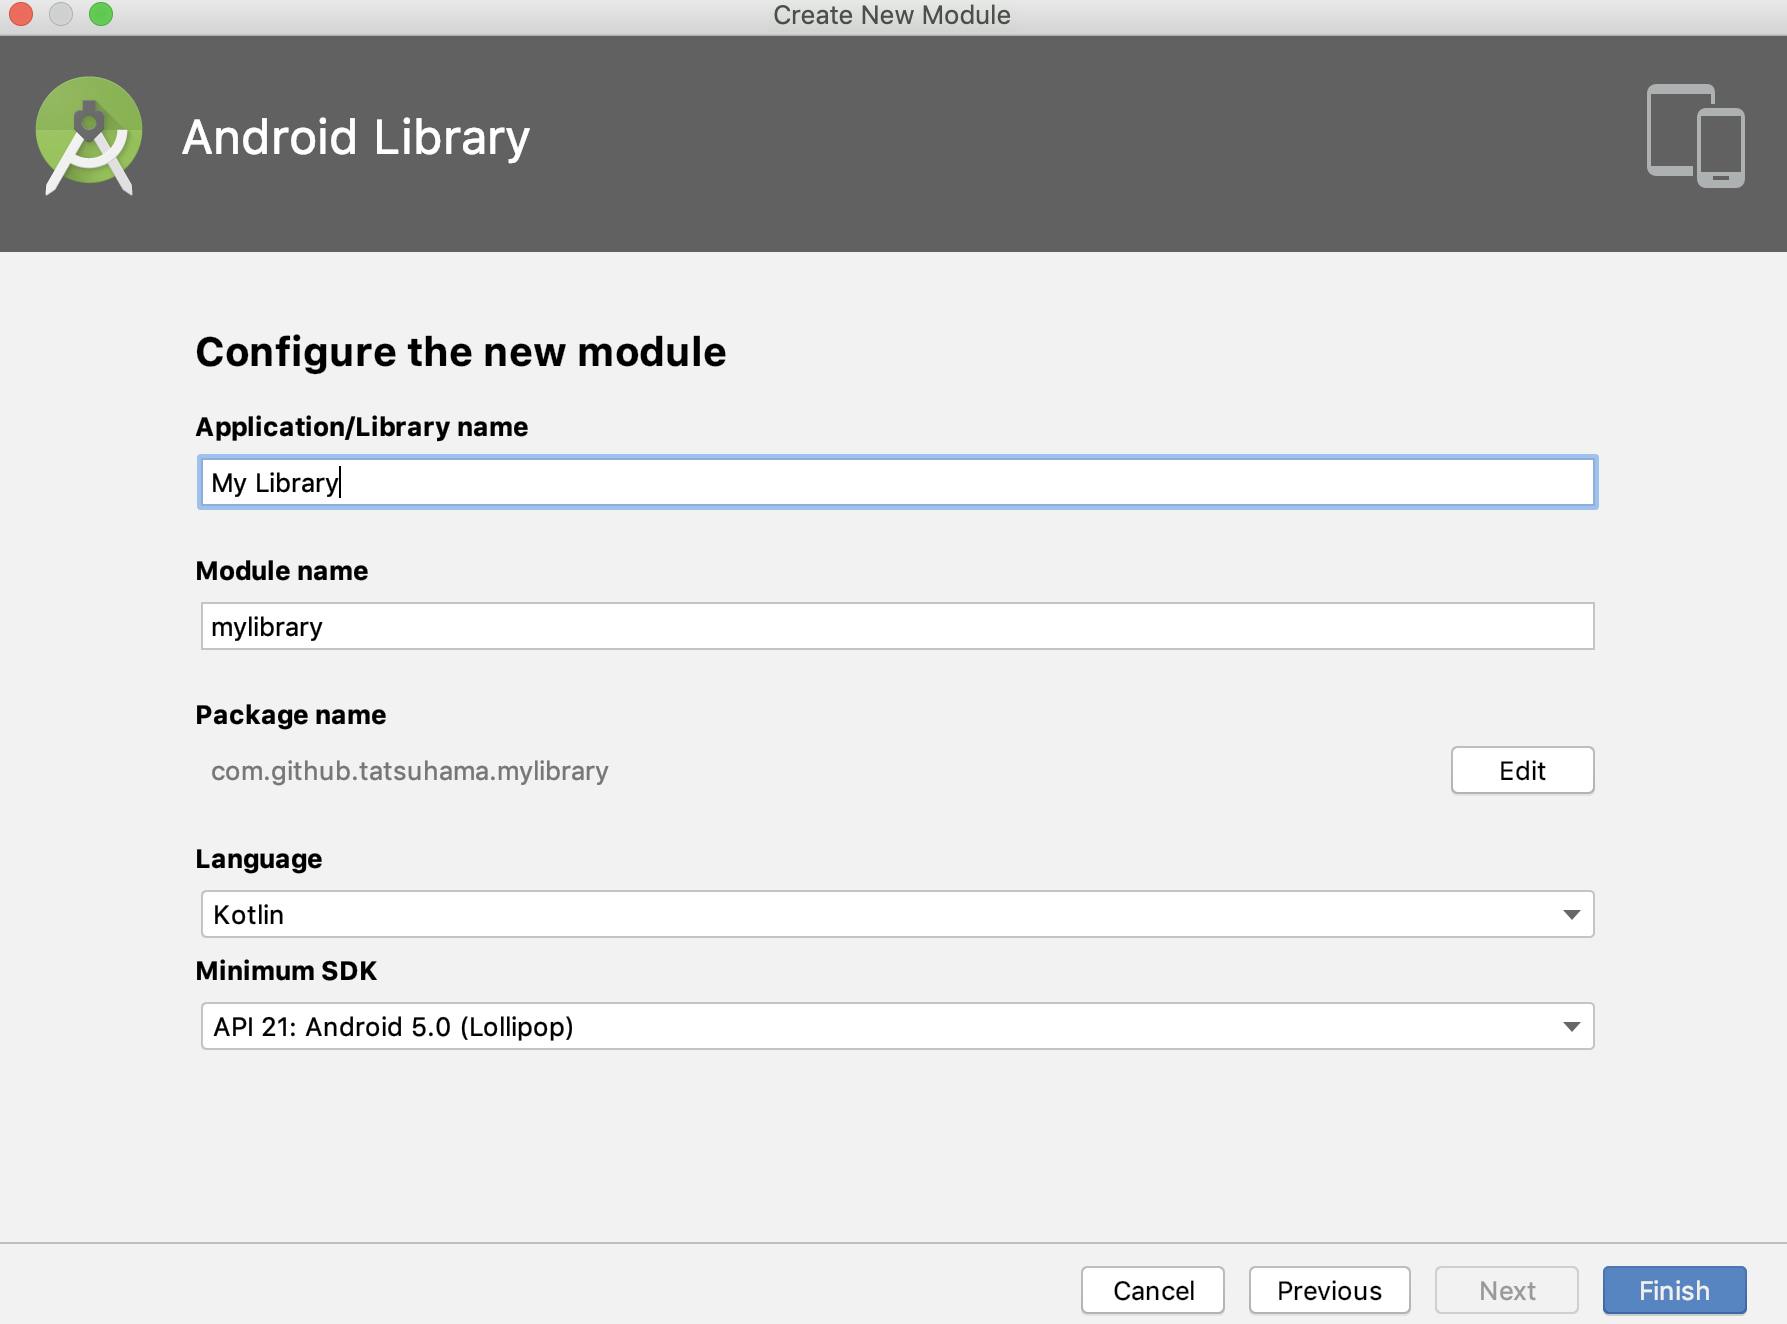
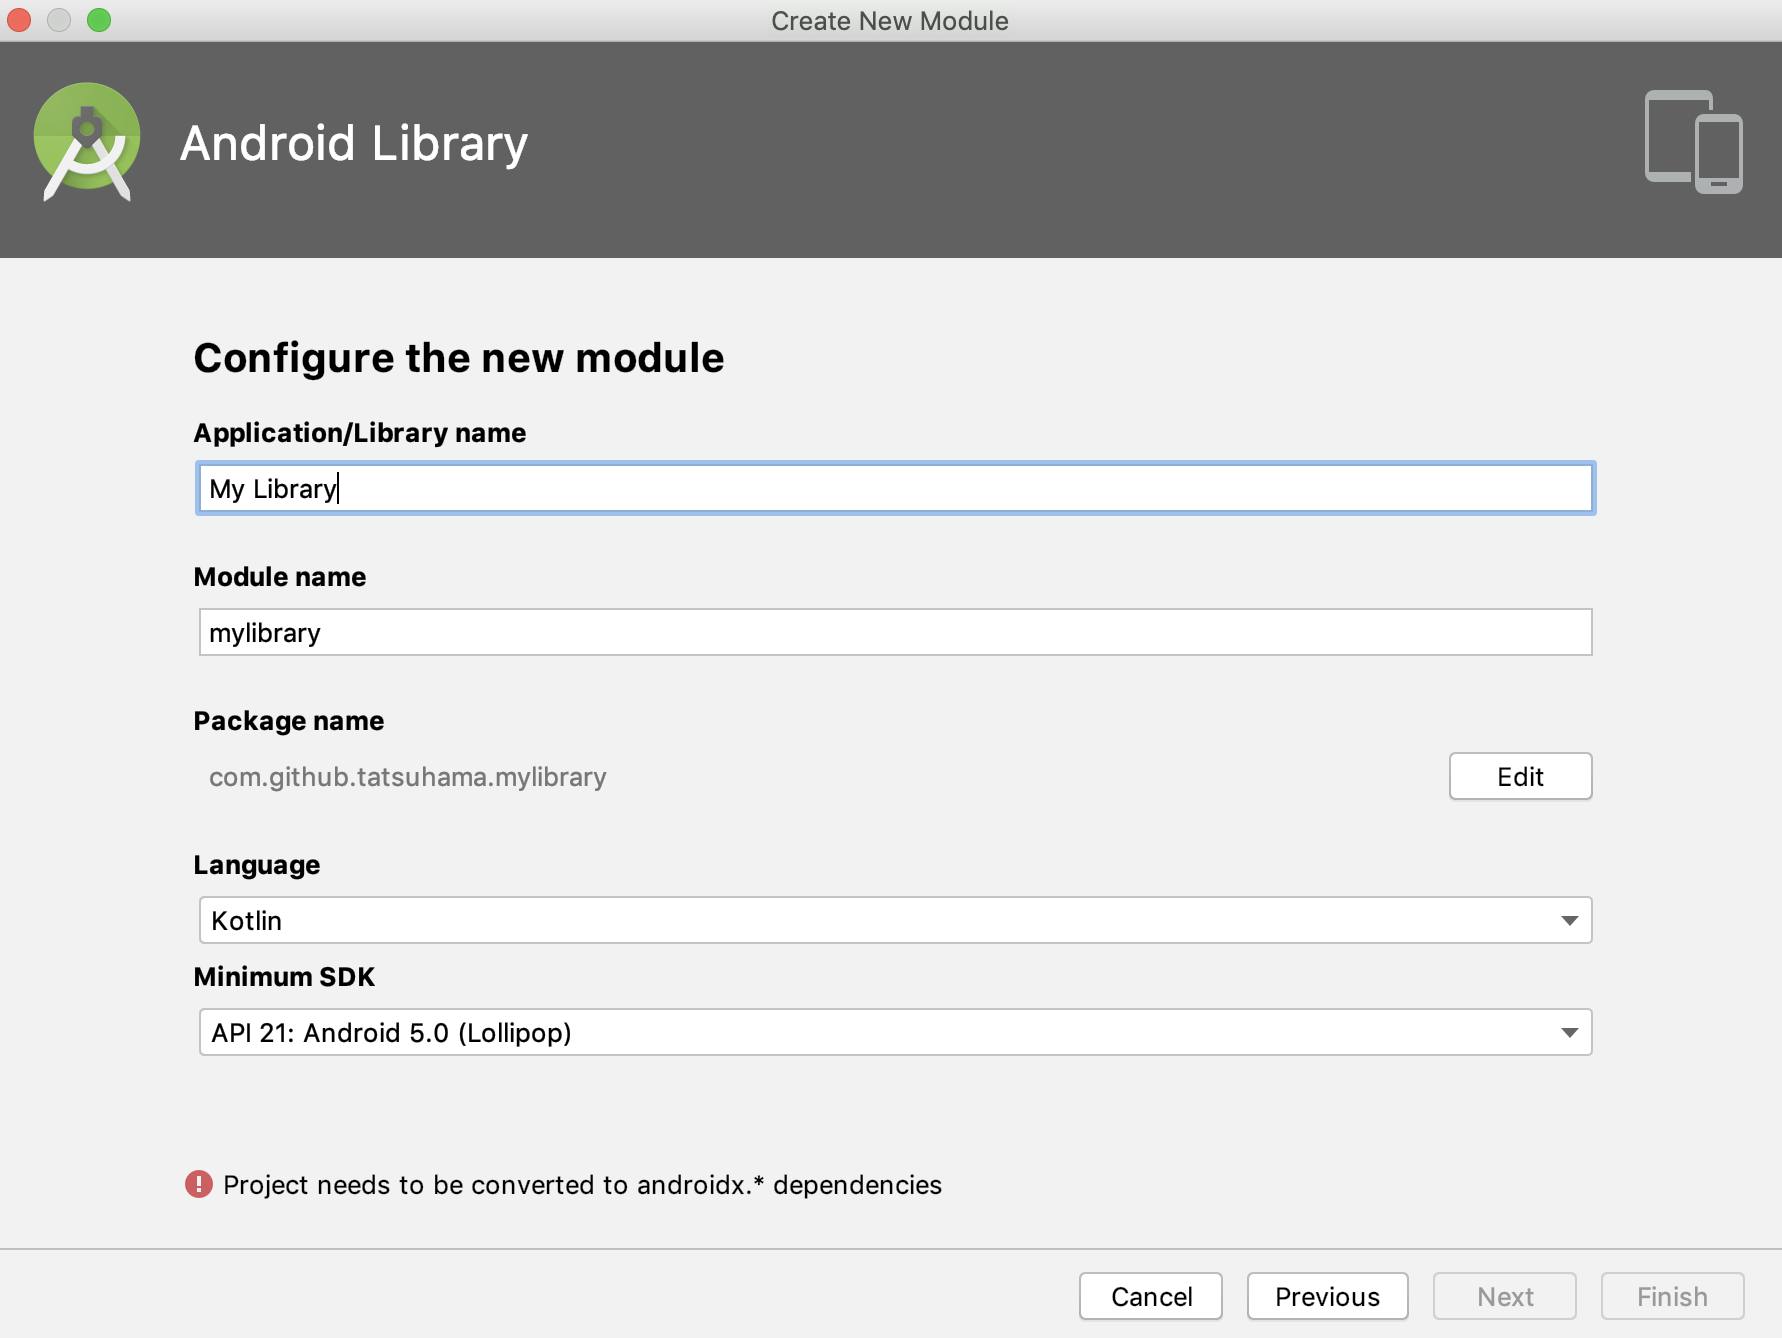
Project needs to be cconverted to androidx.* dependencies が出て module が追加できないときの workaround
はじめに
まだ AndroidX に移行できていない Android の project で、Android Studio (恐らく 3.5 以降)でモジュールを新規追加しようとしたときに、
Project needs to be cconverted to androidx.* dependenciesが表示されて module が追加できないケースに遭遇しました。
AndroidX 対応を推奨しますが、取り急ぎ module を追加できるようにする workaround があったので紹介します。
Workaround
gradle.propertiesにandroid.useAndroidX=trueを一旦追加する。- Android Studio で module を追加する(追加できる)
- 1. で追加した
android.useAndroidX=trueを差し戻す- 追加した module の AndroidX 依存をなくす
です。
4. 追加した module の AndroidX 依存をなくす
について、補足します。
project 全体が AndroidX 対応していないにも関わらず、
android.useAndroidX=trueにより AndroidX 対応しているかのように見せかけて module を追加したので、追加された module は AndroidX に対応しています。
しかしながら、project 全体は AndroidX 対応していないので、不整合が発生してしまいます。例えば、
testInstrumentationRunnerが既存 module だとandroid.support.test.runner.AndroidJUnitRunnerなのに、追加された module はandroidx.test.runner.AndroidJUnitRunnerだったりします。このような点を既存 module に揃えることで、
Project needs to be cconverted to androidx.* dependenciesが出て module が追加できない問題は回避することが可能です。さいごに
AndroidX に移行しましょう。
- 投稿日:2019-11-24T12:02:11+09:00
androidxライブラリの移行で困ったことと対処法
問題
AndroidでMQTTを使う場合に重宝するPahoだが、pahoライブラリ使用側をandroidxに移行してもpaho自体はandroidxライブラリを取り込んでいないようでExceptionが吐かれてしまった。
環境は、pahoのandroid.serviceの1.1.1を使っている状態。implementation 'org.eclipse.paho:org.eclipse.paho.android.service:1.1.1'吐かれたException。
java.lang.NoClassDefFoundError: Failed resolution of: Landroid/support/v4/content/LocalBroadcastManager;
at org.eclipse.paho.android.service.MqttAndroidClient.registerReceiver(MqttAndroidClient.java:450)
対処法
今回のケースではLocalBroadcastManagerが古いsupport.v4を参照しているため、以下を追加。
gradle.propertiesandroid.enableJetifier=true android.useAndroidX=trueapp/build.gradleimplementation 'androidx.localbroadcastmanager:localbroadcastmanager:1.0.0'もっと汎用的な解決法は、これを追加するでも良いかもしれない(未確認)
implementation 'androidx.legacy:legacy-support-v4:1.0.0'
- 投稿日:2019-11-24T06:54:13+09:00
Visual Studio 2019のC#・Android環境にて、指定した画像中に任意のファイルを埋め込む。コードのサンプルです。
表題の通り
Visual Studio 2019のC#にて、
Visual Studio 2019のC#にて、直接バイナリを叩いて指定した画像中に任意のファイル情報を埋め込む。
ステガノグラフィーに関する。コードのサンプルでございます。特段、NuGetなどで他のプラグインや
別途外部dllを必要としないようにしています。概要
任意のファイルを、画像に埋め込む際に
バイナリを以下のように、直接叩いています。1.指定した画像のバイナリを一旦すべて読み込む。
2.埋め込む任意のファイルのバイナリも、すべて読み込む。
3.画像の各バイナリを8桁の2進数にして、11111111とのようにする。
4.8桁の2進数の内、下位4桁をバッサリと切り捨て、1111----とのようにする。
5.埋め込むファイルの各バイナリを8桁の2進数にして、00000000とのようにする。
6.8桁の2進数の内、上位4桁と下位4桁に分割して、0000/0000とのようにする。
7.画像の各バイナリを上位4桁の2進数に、
埋め込むファイルの下位4桁を結合して、11110000とのようにする。
8.上記のように、画像の2バイトにつき、埋め込むファイル1バイトが埋まっていく。
9.埋め込みが終わった画像バイナリから、画像に戻す。
10.可逆圧縮であるpng形式で、出力する。そして、埋め込んだファイルを取り出す際は、
この逆をしています。今回は、キリ良く4ビットの深度で埋め込んでいます。
4ビット深度なら、(幅x高さx4)/2 バイトの情報が入る。はずなのですが
550kBを超えると、下記のコードでは問題が生じるので、修正中です。尚、1ビット深度~7ビット深度で、好みの深さで埋め込めます。
深度が浅いほど、容量が減る半面、画像が荒くならないです。
1ビット深度なら、荒さが目立たず、入っているとは、気づきにくいです。また、今回は、サンプルなので
ARGBすべてのビットに対して埋め込んでいますが、
必要に応じて、必要な部分だけ選択して埋め込むことも可能です。また、この方法により、
画像しか送受信できない環境や、
exeなど直接メールに添付できないような環境でも、
画像に一旦、埋め込むことで、やり取りすることが可能になります。※ただし、やり取りの過程で画像が加工されたりしてしまうと、
内部の情報が壊れるため、
画像が加工されずに、そのままやり取りできる環境が必要になります。注意事項
※この記事でのコードは、
最低限の記述にとどめているため、解放など不十分な部分や、
記述を省略している箇所があります。※コード中のURLは、参考にさせていただきましたサイト様のものでございます。
勝手ながら、参考にさせていただいたサイト様には、この場にて厚く御礼致します。下準備
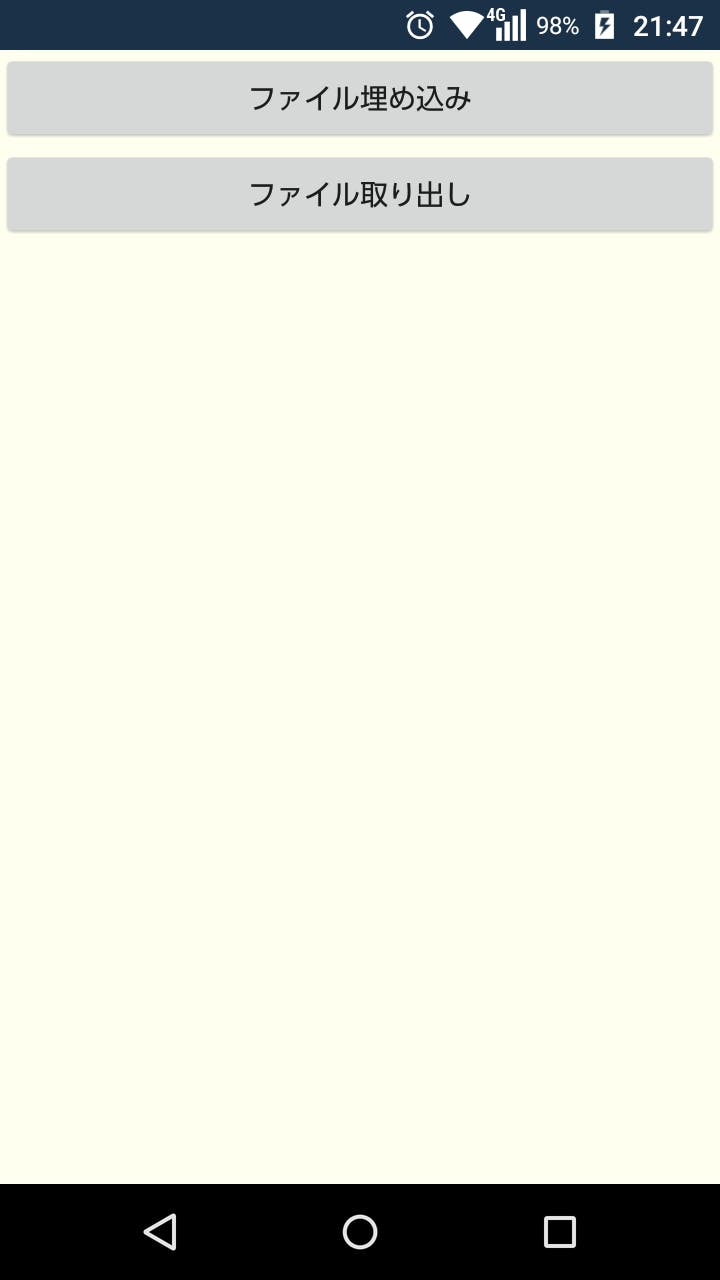
記事本題のC#のコードを使用するために、
下記のxmlレイアウトを使用しています。GM_world.xml<?xml version="1.0" encoding="utf-8"?> <LinearLayout xmlns:android="http://schemas.android.com/apk/res/android" xmlns:app="http://schemas.android.com/apk/res-auto" xmlns:tools="http://schemas.android.com/tools" android:layout_width="match_parent" android:layout_height="match_parent" android:orientation="vertical" android:id="@+id/back1" > <Button android:id="@+id/btn1" android:layout_width="match_parent" android:layout_height="wrap_content" /> <Button android:id="@+id/btn2" android:layout_width="match_parent" android:layout_height="wrap_content" /> </LinearLayout>要は、埋め込み用のボタンと
取り出し用のボタン2つを
下図のように用意致したレイアウトとしております。
本題
標題にある機能のための
Visual Studio 2019 C#での
Android開発環境でのコードは、以下の通りでございます。MainActivity.csusing System; using System.Collections.Generic; using System.IO; using System.Text; using Android.App; using Android.Content; using Android.Graphics; using Android.OS; using Android.Support.V7.App; using Android.Widget; namespace App2 { [Activity(Label = "@string/app_name", Theme = "@style/AppTheme.NoActionBar", MainLauncher = true)] public class MainActivity : AppCompatActivity { readonly string Output_DirName = Android.OS.Environment.GetExternalStoragePublicDirectory(Android.OS.Environment.DirectoryDcim).ToString(); Bitmap BaseImage = null; //基礎側のバイト配列の現在位置を格納 int base_cnt = 0; public async System.Threading.Tasks.Task Output_Sukashi_Bitmap_Making(Android.Net.Uri fileUris) { //★指定ファイルを画像に埋めて暗号化するところ //出力画像を組み立てるところ string err_str = "0"; //どこでエラーになったかを把握するための文字列 try { //基礎となる画像のロード if (BaseImage == null) { err_str = "WebClient"; using (System.Net.WebClient webClient = new System.Net.WebClient()) { //今回は、ネット空間からDLする。 err_str = "DownloadDataTaskAsync"; byte[] imageBytes = await webClient.DownloadDataTaskAsync(new Uri("https://blog-imgs-110.fc2.com/o/y/k/oyk3865b/2017_05_03_290.jpg")); err_str = "imageBytes : " + (imageBytes == null); if (imageBytes != null && imageBytes.Length > 0) { err_str = "DecodeByteArrayAsync"; BaseImage = await BitmapFactory.DecodeByteArrayAsync(imageBytes, 0, imageBytes.Length); Array.Clear(imageBytes, 0, imageBytes.Length); } } } //色設定をARGB8888に統一する。 //https://stackoverflow.com/questions/7320392/how-to-draw-text-on-image Android.Graphics.Bitmap.Config bitmapConfig = Android.Graphics.Bitmap.Config.Argb8888; BaseImage = BaseImage.Copy(bitmapConfig, true); //Bitmapのバイナリ置き換えの準備 //https://qiita.com/aymikmts/items/7139fa6c4da3b57cb4fc err_str = "byteBuffer"; Java.Nio.ByteBuffer byteBuffer = Java.Nio.ByteBuffer.Allocate(BaseImage.ByteCount); err_str = "CopyPixelsToBuffer"; BaseImage.CopyPixelsToBuffer(byteBuffer); err_str = "Flip"; byteBuffer.Flip(); err_str = "bmparr"; //基礎Bitmapのバイナリへの置き換え byte[] bmparr = new byte[byteBuffer.Capacity()]; err_str = "Get"; byteBuffer.Duplicate().Get(bmparr); err_str = "Clear"; byteBuffer.Clear(); //埋め込むファイルの名前の取得 string filename = Get_FileName_From_Uri(fileUris); //埋め込むファイルのバイナリ格納 List<byte> bs = new List<byte>(); //埋め込むファイルのバイナリを格納 //https://stackoverflow.com/questions/2436385/android-getting-from-a-uri-to-an-inputstream-to-a-byte-array/2436413 err_str = "Err_3 " + filename; using (Stream inputStream = ContentResolver.OpenInputStream(fileUris)) { err_str = "Err_4 " + filename; int bufferSize = 1024; using (Java.IO.BufferedInputStream stream = new Java.IO.BufferedInputStream(inputStream, bufferSize)) { //ファイルを開く int len = 0; //読み込み用バッファの準備 //https://stackoverflow.com/questions/2436385/android-getting-from-a-uri-to-an-inputstream-to-a-byte-array/2436413 byte[] buffer = new byte[bufferSize]; //ファイルを読み込む //http://d.hatena.ne.jp/curest/20090829/1251532479 err_str = "Err_5 " + filename; while ((len = stream.Read(buffer, 0, buffer.Length)) != -1) { if (len <= 0) { break; }//終端で出る else if (len == bufferSize) { //1024満願の場合 bs.AddRange(buffer); //埋め込むデータのバイナリをそのまま全てリストに読み込む } else { //終端手前の場合 byte[] temp_buf = new byte[len]; Array.Copy(buffer, 0, temp_buf, 0, len); bs.AddRange(temp_buf); //埋め込むデータのバイナリを必要分だけリストに読み込む Array.Clear(temp_buf, 0, temp_buf.Length); } } //閉じる err_str = "Err_6 " + filename; stream.Close(); } err_str = "Err_7 " + filename; inputStream.Close(); } //冒頭には、埋め込んだファイル情報を入れる byte[] name_data = Encoding.UTF8.GetBytes(filename); //名前のサイズ4バイト byte[] size_data = BitConverter.GetBytes((Int32)name_data.Length); //基礎の埋め込み開始位置の初期化 base_cnt = 0; //※※※今回は、下位4ビットに埋め込んでいくとする。※※※ //→つまり、4バイト埋めるのには、2倍の8バイト領域が必要 err_str = "埋め込んでいく"; for (int i = 0; i < (size_data.Length); i++) { data_umekomi(ref bmparr[base_cnt], ref bmparr[base_cnt + 1], size_data[i]); } //続いて、名前バイナリを埋め込む err_str = "name_data"; for (int i = 0; i < (name_data.Length); i++) { data_umekomi(ref bmparr[base_cnt], ref bmparr[base_cnt + 1], name_data[i]); } //いったん初期化 err_str = "Array.Clear"; Array.Clear(size_data, 0, size_data.Length); //次に、埋め込むファイル本体のサイズ err_str = "BitConverter.GetBytes"; size_data = BitConverter.GetBytes((Int32)bs.Count); err_str = "size_data"; for (int i = 0; i < (size_data.Length); i++) { data_umekomi(ref bmparr[base_cnt], ref bmparr[base_cnt + 1], size_data[i]); } //埋め込み側のバイナリ本体を埋め込む err_str = "byteary.Length"; for (int i = 0; i < (bs.Count); i++) { //安全装置 if (base_cnt + 1 > bmparr.Length - 1) { Toast.MakeText(Application.Context, "埋め込められる容量 " + i.ToString() + "B を超えました。", ToastLength.Long).Show(); break; } data_umekomi(ref bmparr[base_cnt], ref bmparr[base_cnt + 1], bs[i]); } //string check_filepath = System.IO.Path.Combine(Output_DirName, "check1.txt"); //await System.IO.File.WriteAllBytesAsync(check_filepath, bs.ToArray()); //set_SendBroadcast_state(check_filepath); bs.Clear(); //最後に適当に乱数を埋める err_str = "System.Random()"; System.Random rnd = new System.Random(); //乱数を配列に埋め込む Array.Clear(size_data, 0, size_data.Length); size_data = new byte[bmparr.Length - base_cnt]; rnd.NextBytes(size_data); for (int i = 0; i < (size_data.Length); i++) { //安全装置 if (base_cnt + 1 > bmparr.Length - 1) { break; } data_umekomi(ref bmparr[base_cnt], ref bmparr[base_cnt + 1], size_data[i]); } //埋め込んだバイナリを再びBitmapに戻す準備 err_str = "CreateBitmap"; Bitmap bitmap = Bitmap.CreateBitmap(BaseImage.Width, BaseImage.Height, bitmapConfig); //埋め込んだバイナリを再びBitmapに戻す err_str = "Wrap"; byteBuffer = Java.Nio.ByteBuffer.Wrap(bmparr); err_str = "CopyPixelsFromBuffer"; bitmap.CopyPixelsFromBuffer(byteBuffer); //埋め込み前画像の解放 BaseImage.Recycle(); BaseImage.Dispose(); BaseImage = null; //解放 byteBuffer.Clear(); byteBuffer.Dispose(); //出来上がった画像の保存パスの作成 err_str = "bitmap_save " + (bitmap == null) + " " + bmparr.Length; //+ " " + byteBuffer.Capacity(); string filepath = System.IO.Path.Combine(Output_DirName, "kikikanri.png"); //出来上がった画像の保存出力 err_str = "bitmap_save"; bitmap_save(bitmap, filepath, true, this); //出来上がった画像を開く err_str = "open_start_file"; open_start_file(filepath, this); //できた画像の解放 bitmap.Recycle(); bitmap.Dispose(); Array.Clear(bmparr, 0, bmparr.Length); } catch { //エラー時の表示 Toast.MakeText(Application.Context, err_str, ToastLength.Long).Show(); } } public async System.Threading.Tasks.Task Input_Sukashi_Bitmap_Making(Android.Net.Uri filePath) { //★埋めたファイルを復号するところ string err_str = "Input_Sukashi_Bitmap_Making"; try { //指定した画像を開く err_str = "DecodeStream"; Bitmap bitmap = null; using (var inputStream = ContentResolver.OpenInputStream(filePath)) { // URI指定の場合 //http://www.united-bears.co.jp/blog/archives/909 bitmap = BitmapFactory.DecodeStream(inputStream, null, null); inputStream.Close(); } //Bitmapのバイナリ置き場の準備 //https://qiita.com/aymikmts/items/7139fa6c4da3b57cb4fc err_str = "byteBuffer3"; Java.Nio.ByteBuffer byteBuffer = Java.Nio.ByteBuffer.Allocate(bitmap.ByteCount); err_str = "CopyPixelsToBuffer3 " + (bitmap == null) + " " + bitmap.ByteCount; bitmap.CopyPixelsToBuffer(byteBuffer); err_str = "Flip3"; byteBuffer.Flip(); err_str = "bmparr3"; //基礎Bitmapのバイナリの格納 byte[] bmparr = new byte[byteBuffer.Capacity()]; err_str = "Get3"; byteBuffer.Duplicate().Get(bmparr); err_str = "Clear3"; byteBuffer.Clear(); bitmap.Recycle(); bitmap.Dispose(); //埋め込むファイルのバイナリ格納用リスト err_str = "List<byte>"; List<byte> bs = new List<byte>(); //各初期化 bs.Clear(); base_cnt = 0; err_str = "名前のサイズを取得"; do { //まずは、埋め込んだファイルの名前のサイズを取得[Int32 = s4バイト固定] bs.Add(data_toridashi(bmparr[base_cnt], bmparr[base_cnt + 1])); } while (bs.Count < 4); //4バイト貯まるまでループ err_str = "名前領域の取り出し"; Int32 data_size = BitConverter.ToInt32(bs.ToArray()); bs.Clear(); do { //埋め込んだファイルの名前を取得 bs.Add(data_toridashi(bmparr[base_cnt], bmparr[base_cnt + 1])); } while (bs.Count < data_size); //先に取得したサイズまでループ //UTF8にてバイナリを文字列に戻す err_str = "出力先パスの完成"; string load_filepath = System.Text.Encoding.UTF8.GetString(bs.ToArray()); load_filepath = System.IO.Path.Combine(Output_DirName, load_filepath); err_str = "本体バイナリのサイズを取得"; bs.Clear(); do { //埋め込んだファイルのサイズの取得[4バイト固定] bs.Add(data_toridashi(bmparr[base_cnt], bmparr[base_cnt + 1])); } while (bs.Count < 4); data_size = BitConverter.ToInt32(bs.ToArray()); err_str = "本体バイナリの取得"; bs.Clear(); do { //埋め込んだファイルのバイナリの取得 bs.Add(data_toridashi(bmparr[base_cnt], bmparr[base_cnt + 1])); if (bs.Count == data_size) { break; } } while (bs.Count < data_size); //先に取得したファイルサイズが貯まるまで周回 //string check_filepath = System.IO.Path.Combine(Output_DirName, "check2.txt"); //await System.IO.File.WriteAllBytesAsync(check_filepath, bs.ToArray()); //set_SendBroadcast_state(check_filepath); err_str = "ファイルに書き出す"; await System.IO.File.WriteAllBytesAsync(load_filepath, bs.ToArray()); bs.Clear(); //復号したファイルを開く err_str = "open_start_file3"; open_start_file(load_filepath, this); //復号したファイルをPCからも見えるようにする。 err_str = "set_SendBroadcast_state3"; set_SendBroadcast_state(load_filepath); } catch { //エラー時の表示 Toast.MakeText(Application.Context, err_str, ToastLength.Long).Show(); } } public string Get_FileName_From_Uri(Android.Net.Uri uri) { //Uriから、ファイルバスを取得する。 //https://qiita.com/CUTBOSS/items/3476e164b86a63b02b2e //安全装置 if (null == uri) { return null; } //スキームの取得 string scheme = uri.Scheme; //スキームによる分岐 string fileName = null; switch (scheme) { case "content": String[] projection = { Android.Provider.MediaStore.MediaColumns.DisplayName }; Android.Database.ICursor cursor = this.ContentResolver.Query(uri, projection, null, null, null); if (cursor != null) { if (cursor.MoveToFirst()) { fileName = cursor.GetString( cursor.GetColumnIndexOrThrow(Android.Provider.MediaStore.MediaColumns.DisplayName)); } cursor.Close(); } break; case "file": fileName = new Java.IO.File(uri.Path).Name; break; default: break; } return fileName; } private void data_umekomi(ref byte base1, ref byte base2, byte umekomi_byte) { //指定されたバイト数値にデータを埋め込む所 //基礎画像の下位4ビットをカットする。 string base1_str = Convert.ToString(base1, 2).PadLeft(8, '0'); //8桁の二進数にする。 base1_str = base1_str.Substring(0, 4); //上位4ビットのみ取得。 string base2_str = Convert.ToString(base2, 2).PadLeft(8, '0'); //8桁の二進数にする。 base2_str = base2_str.Substring(0, 4); //上位4ビットのみ取得。 //空いた下位4ビットにデータを埋め込む string umekomi_str = Convert.ToString(umekomi_byte, 2).PadLeft(8, '0'); //8桁の二進数にする。 base1_str = base1_str + umekomi_str.Substring(0, 4); //下位4ビットに埋め込む base1 = Convert.ToByte(base1_str, 2); //2進数からbyteに変換 base2_str = base2_str + umekomi_str.Substring(4, 4); //下位4ビットに埋め込む base2 = Convert.ToByte(base2_str, 2); //2進数からbyteに変換 //基礎側のバイナリは2つ進む base_cnt += 2; } private byte data_toridashi(byte base1, byte base2) { //指定されたバイト数値からデータを取り出す所 //基礎画像の上位4ビットをカットする。 string base1_str = Convert.ToString(base1, 2).PadLeft(8, '0'); //8桁の二進数にする。 base1_str = base1_str.Substring(4, 4); //下位4ビットのみ取得。 string base2_str = Convert.ToString(base2, 2).PadLeft(8, '0'); //8桁の二進数にする。 base2_str = base2_str.Substring(4, 4); //下位4ビットのみ取得。 //空いた下位4ビットにデータを埋め込む string toridashi_str = base1_str + base2_str; //基礎側のバイナリは2つ進む base_cnt += 2; return Convert.ToByte(toridashi_str, 2); //2進数からbyteに変換 } public void bitmap_save(Bitmap bitmap, string filePath, bool SendBroadcast_flg, Activity ac) { //指定場所に画像の保存 try { if (!System.IO.Directory.Exists(System.IO.Path.GetDirectoryName(filePath))) { //保存先フォルダがない場合 //作る System.IO.Directory.CreateDirectory(System.IO.Path.GetDirectoryName(filePath)); } if (bitmap.Width <= 0 || bitmap.Height <= 0) { //大きさのない画像の場合 return; //出る } //ファイル書き込み using (System.IO.FileStream fos = System.IO.File.Create(filePath)) { if (System.IO.Path.GetExtension(filePath).ToLower() == ".jpg" || System.IO.Path.GetExtension(filePath).ToLower() == ".tmp") { //JPEG保存の場合 bitmap.Compress(Bitmap.CompressFormat.Jpeg, 100, fos); } else if (System.IO.Path.GetExtension(filePath).ToLower() == ".png") { //PNG保存の場合 bitmap.Compress(Bitmap.CompressFormat.Png, 100, fos); } else { bitmap.Compress(Bitmap.CompressFormat.Webp, 100, fos); } fos.Close(); }; //PCからも見られるように設定する場合。 if (SendBroadcast_flg && (System.IO.Path.GetExtension(filePath).ToLower() != ".tmp")) { //一時ファイルでない場合 set_SendBroadcast_state(filePath); } //↓★ここで解放してはならない //bitmap.Dispose(); } catch { } } public void set_SendBroadcast_state(string Output_Path) { //PCからも見られるように設定する。 //https://qiita.com/wasnot/items/ae1e6282d2c33626b604 //https://developer.xamarin.com/api/member/Android.Content.Context.SendBroadcast/p/Android.Content.Intent/ //https://bluefish.orz.hm/sdoc/android_file.html#%E6%96%B0%E8%A6%8F%E3%83%95%E3%82%A9%E3%83%AB%E3%83%80%E4%BD%9C%E6%88%90 try { if (System.IO.File.Exists(Output_Path)) { //安全措置 using (Java.IO.File j_file = new Java.IO.File(Output_Path)) { Android.Net.Uri uri = Android.Net.Uri.FromFile(j_file); Intent mediaScanIntent = new Intent(Intent.ActionMediaScannerScanFile, uri); Application.Context.SendBroadcast(mediaScanIntent); mediaScanIntent.Dispose(); uri.Dispose(); } } } catch { } } public void open_start_file(string filepath, Activity ac) { //指定のファイルを開く int err_flg = 0; try { //ファイルが存在するかの確認 if (System.IO.File.Exists(filepath)) { err_flg = 100; string application = "image/jpeg"; //初期は画像 Android.Net.Uri uri; using (Java.IO.File file = new Java.IO.File(filepath)) { file.SetReadable(true); err_flg = 103; if (System.IO.Path.GetExtension(filepath).ToLower().Contains(".pdf")) { //PDFの場合 application = "application/pdf"; } else if (System.IO.Path.GetExtension(filepath).ToLower().Contains(".zip")) { //zipの場合 application = "application/zip"; } else if (System.IO.Path.GetExtension(filepath).ToLower().Contains(".xlsx")) { //xlsxの場合 //https://developer.mozilla.org/ja/docs/Web/HTTP/Basics_of_HTTP/MIME_types/Complete_list_of_MIME_types application = "application/vnd.openxmlformats-officedocument.spreadsheetml.sheet"; } else if (System.IO.Path.GetExtension(filepath).ToLower().Contains(".ods")) { //odsの場合 application = "application/vnd.oasis.opendocument.spreadsheet"; } else if (System.IO.Path.GetExtension(filepath).ToLower().Contains(".png")) { //pngの場合 application = "image/png"; } err_flg = 1; // ストレージとカメラの権限の確認 if (Build.VERSION.SdkInt >= BuildVersionCodes.M) { //Android6.0以上の場合 //作ったファイルを開きたい //https://www.petitmonte.com/java/android_fileprovider.html //https://stackoverflow.com/questions/40462245/fileprovider-xamarin-not-displaying-file //https://stackoverflow.com/questions/50072057/android-proper-way-to-share-public-files-between-apps err_flg = 100; uri = Android.Support.V4.Content.FileProvider.GetUriForFile( Application.Context, Application.Context.PackageName + ".provider", file); err_flg = 101; Intent intent = new Intent(Intent.ActionView); intent.SetDataAndType(uri, application); intent.SetFlags(ActivityFlags.NoHistory); intent.SetFlags(ActivityFlags.GrantReadUriPermission); err_flg = 102; Intent intent2 = Intent.CreateChooser(intent, "Open File"); if (intent2.ResolveActivity(ac.PackageManager) != null) { err_flg = 103; Application.Context.StartActivity(intent2); } else { //開けるファイルがない場合 Toast.MakeText(Application.Context, "この環境には、" + System.IO.Path.GetExtension(filepath).ToLower() + "形式ファイルを開けるアプリがありません。" + Convert.ToChar(13) + Convert.ToChar(10) + "アプリをインストールするか、他の環境で開いてください。", ToastLength.Long).Show(); } } else { //Android6.0未満の場合 uri = Android.Net.Uri.FromFile(file); Intent intent = new Intent(Intent.ActionView); err_flg = 2; intent.SetDataAndType(uri, application); intent.SetFlags(ActivityFlags.NoHistory); intent.SetFlags(ActivityFlags.ClearWhenTaskReset | ActivityFlags.NewTask); err_flg = 4; //ちゃんと開けるアプリがあるのかを確認 //https://developer.android.com/guide/components/intents-filters?hl=ja if (intent.ResolveActivity(ac.PackageManager) != null) { err_flg = 5; //実行 Application.Context.StartActivity(intent); } else { //開けるファイルがない場合 Toast.MakeText(Application.Context, "この環境には、" + System.IO.Path.GetExtension(filepath).ToLower() + "形式ファイルを開けるアプリがありません。" + Convert.ToChar(13) + Convert.ToChar(10) + "アプリをインストールするか、他の環境で開いてください。", ToastLength.Long).Show(); } } } } } catch { //エラー時は無視 Toast.MakeText(Application.Context, "エラー発生:" + err_flg.ToString(), ToastLength.Long).Show(); } } //権限がなければ上がる bool no_Permission_flg = false; protected override void OnCreate(Bundle savedInstanceState) { base.OnCreate(savedInstanceState); // Set our view from the "main" layout resource SetContentView(Resource.Layout.activity_main); // ストレージ権限の確認 try { if (Build.VERSION.SdkInt >= BuildVersionCodes.M) { //Android6.0以上の場合のみ string[] Manifest_Permissions = { Android.Manifest.Permission.WriteExternalStorage, Android.Manifest.Permission.ReadExternalStorage, Android.Manifest.Permission.Internet }; //各権限をループ foreach (System.String Permission_str in Manifest_Permissions) { //https://docs.microsoft.com/ja-jp/xamarin/android/app-fundamentals/permissions?tabs=windows //https://www.petitmonte.com/java/android_fileprovider.html if (ApplicationContext.CheckCallingOrSelfPermission(Permission_str) != Android.Content.PM.Permission.Granted) { //許可されていない場合 no_Permission_flg = true; // ストレージの権限の許可を求めるダイアログを表示する if (Android.Support.V4.App.ActivityCompat.ShouldShowRequestPermissionRationale(this, Permission_str)) { //Android.Support.V4.App.ActivityCompat.RequestPermissions(this, // new string[] { Permission_str }, (int)Android.Content.PM.RequestedPermission.Required); Android.Support.V4.App.ActivityCompat.RequestPermissions(this, Manifest_Permissions, (int)Android.Content.PM.RequestedPermission.Required); } else { Toast toast = Toast.MakeText(ApplicationContext, "アプリ実行の権限が必要です", ToastLength.Long); toast.Show(); Android.Support.V4.App.ActivityCompat.RequestPermissions(this, Manifest_Permissions, (int)Android.Content.PM.RequestedPermission.Required); } } } } Button btn1 = FindViewById<Button>(Resource.Id.btn1); btn1.Text = "ファイル埋め込み"; btn1.Click += delegate { if (!no_Permission_flg) { //権限がなければ無効 //https://developer.xamarin.com/recipes/android/data/files/selecting_a_gallery_image/ using (Intent imageIntent = new Intent(Intent.ActionGetContent)) { //埋め込みファイル選択 imageIntent.SetType("*/*"); //複数画像選択可能で固定 //https://stackoverflow.com/questions/19585815/select-multiple-images-from-android-gallery imageIntent.PutExtra(Intent.ExtraAllowMultiple, false); imageIntent.SetAction(Intent.ActionGetContent); StartActivityForResult( Intent.CreateChooser(imageIntent, "画像に埋め込むファイルを選択してください。"), 0); } } }; Button btn2 = FindViewById<Button>(Resource.Id.btn2); btn2.Text = "ファイル取り出し"; btn2.Click += delegate { if (!no_Permission_flg) { //権限がなければ無効 //https://developer.xamarin.com/recipes/android/data/files/selecting_a_gallery_image/ using (Intent imageIntent = new Intent(Intent.ActionGetContent)) { //埋め込みファイル選択 imageIntent.SetType("image/png"); //複数画像選択可能で固定 //https://stackoverflow.com/questions/19585815/select-multiple-images-from-android-gallery imageIntent.PutExtra(Intent.ExtraAllowMultiple, false); imageIntent.SetAction(Intent.ActionGetContent); StartActivityForResult( Intent.CreateChooser(imageIntent, "埋め込んだ画像ファイルを選択してください。"), 1); } } }; } catch { } } protected override async void OnActivityResult(int requestCode, Result resultCode, Intent data) { base.OnActivityResult(requestCode, resultCode, data); string err_str = "0"; LinearLayout back1 = FindViewById<LinearLayout>(Resource.Id.back1); try { if (requestCode == 0 || requestCode == 1) { //◆◆◆以下、画像選択時のイベント◆◆◆ if (resultCode == Result.Ok) { //OK(ズドン) //複数画像を選択した場合。 back1.SetBackgroundColor(Color.Indigo); await System.Threading.Tasks.Task.Delay(5); //URIの記憶 //サムネイルにしたい画像のURIの格納 Android.Net.Uri selected_fileuri = null; //初期化 err_str = "selected_fileuris.Clear"; if (data.ClipData != null) { //複数選択された場合 if (data.ClipData.ItemCount > 0) { selected_fileuri = data.ClipData.GetItemAt(0).Uri; } } else if (data.Data != null) { //1つだけの選択時 selected_fileuri = data.Data; } err_str = "selected_fileuri"; //ポジフィルムの作成時 if (requestCode == 0) { //URI指定の場合 await Output_Sukashi_Bitmap_Making(selected_fileuri); } else { //今度は、埋め込んだファイルを復号する。 await Input_Sukashi_Bitmap_Making(selected_fileuri); } back1.SetBackgroundColor(Color.Ivory); await System.Threading.Tasks.Task.Delay(5); } } } catch { //全体を通しての、エラー時 Android.Widget.Toast.MakeText(Application.Context, err_str, Android.Widget.ToastLength.Long).Show(); } } } }なお、埋め込んだファイルが確実に復号できているかを確認するために
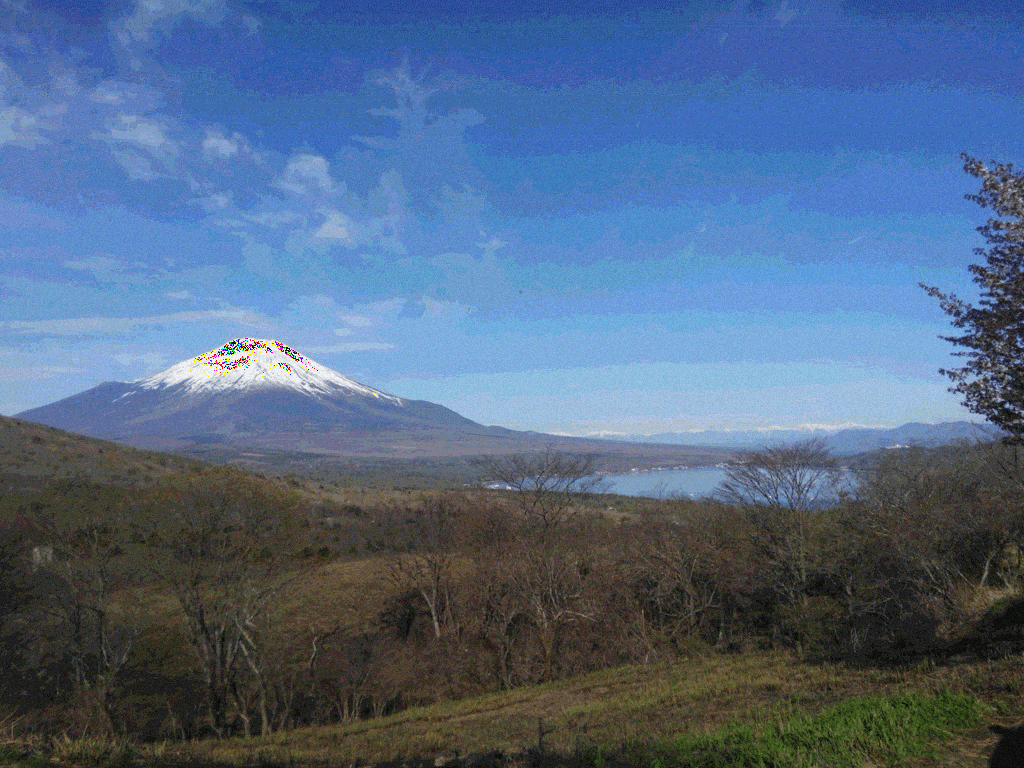
CRC-32等のハッシュ値を併せて埋め込んでおくと、より確実に思います。サンプル
上記のコードで、
画像に、私作成であり
Vector様のサイトで公開している
『オフタイマー弐式』という、
Windowsソフトの、exeファイルを
埋め込んでおります。
exeファイルは、直接だったり
zipに圧縮してメールでやり取りしようとしても、
セキュリティにて、止められたりしますが画像に埋め込んであるので
途中で加工さえされなければ、
そこは、すり抜けます。人に見られたくないファイルの
保存にも向きますが、消えると困る大切なファイルの埋め込みには向かないと
私は感じております。