- 投稿日:2020-03-05T23:51:24+09:00
Vue.js/Blazorの文法比較サンプル集
必要に駆られて調べた分のみですが、Vue.jsとBlazor WebAssemblyにおいて同様の動作を実現するための方法についてまとめました。分離元
VueVsBlazorにソースコードをまとめています。ちなみにVue.jsではTypeScriptを採用しています。
動作サンプルページ
文法の比較
ここでのサンプルは全てルーター上の1ページとして表現しています。
土台となるルーターの実装例から順に比較していきます。R. ルーター
3ページの切り替えができるルーター。
Vue.jsでは/src/router.index.tsをページが増えるたびに追加する必要があります。Vue.js
コンポーネント+ルーター配置└─src │ App.vue │ main.ts │ shims-tsx.d.ts │ shims-vue.d.ts │ ├─components │ NavMenu.vue │ ├─router │ index.ts │ └─views Index.vue PageA.vue PageB.vuerouter/index.tsimport Vue from "vue"; import VueRouter from "vue-router"; import Index from "@/views/Index.vue"; import PageA from "@/views/PageA.vue"; import PageB from "@/views/PageB.vue"; Vue.use(VueRouter); const routes=[ { path: "/", name: "Index", component: Index }, { path: "/PageA", name: "PageA", component: PageA }, { path: "/PageB", name: "PageB", component: PageB } ]; const router=new VueRouter({ mode: "history", base: process.env.BASE_URL, routes }); export default router;App.vue<template> <main style=display:flex> <NavMenu /> <div class=v-hr></div> <router-view/> </main> </template> <style scoped> .v-hr{ margin: 0 10px; border-right: 5px solid #CCC; height: 100vh; } </style> <script lang:ts> import {Component,Vue} from "vue-property-decorator"; import NavMenu from "@/components/NavMenu.vue"; @Component({ components:{ NavMenu } }) export default class App extends Vue{} </script>NavMenu.vue<template> <nav> <ol type="1" start="0"> <li><router-link to="/">index</router-link></li> <li><router-link to="/PageA">PageA</router-link></li> <li><router-link to="/PageB">PageB</router-link></li> </ol> </nav> </template> <style scoped> .router-link-exact-active{ color: #FF0000; font-weight: bold; } </style>PageA.vue<template> <div> <h1>PageA</h1> </div> </template>PageB.vue<template> <div> <h1>PageB</h1> </div> </template>Blazor
コンポーネント配置│ App.razor │ MainLayout.razor │ ├─Pages │ Index.razor │ PageA.razor │ PageB.razor │ └─Shared NavMenu.razorApp.razor<Router AppAssembly="@typeof(Program).Assembly"> <Found Context="routeData"> <RouteView RouteData="@routeData" DefaultLayout="@typeof(MainLayout)" /> </Found> <NotFound> <LayoutView Layout="@typeof(MainLayout)"> <p>Sorry, there's nothing at this address.</p> </LayoutView> </NotFound> </Router>MainLayout.razor@inherits LayoutComponentBase <main style=display:flex> <NavMenu /> <div class=v-hr></div> @Body </main> <style> .v-hr{ margin: 0 10px; border-right: 5px solid #CCC; height: 100vh; } </style>NavMenu.razor<div> <ol type="1" start="0"> <li><NavLink Match="NavLinkMatch.All" href="./">index</NavLink></li> <li><NavLink Match="NavLinkMatch.All" href="./PageA">PageA</NavLink></li> <li><NavLink Match="NavLinkMatch.All" href="./PageB">PageB</NavLink></li> </ol> </div> <style> nav .active{ color: #FF0000; font-weight: bold; } </style>Index.razor@page "/" <div> <h1>Hello Blazor!</h1> </div>PageA.razor@page "/PageA" <div> <h1>PageA</h1> </div>PageA.razor@page "/PageB" <div> <h1>PageA</h1> </div>0. 最小のコンポーネント
コンポーネントの内容はただのhtmlから可能です。
Vue.jsはtemplateタグで囲み、1つのブロックのみとする必要があります。Vue.js
Index.vue<template> <div> <h1>Hello Vue.js!</h1> </div> </template>Blazor
Index.razor@page "/" <div> <h1>Hello Blazor!</h1> </div>1. スタイルシート
BlazorはCSSに対する特別な構文がないので諦めてbodyに直置きすることにしました。
Vue.js
StyleBlock.vue<template> <div id=index> <h1>Hello Vue.js!</h1> </div> </template> <style scoped> div#index{ color: #0000FF; } </style>Blazor
StyleBlock.razor@page "/StyleBlock" <div id=index> <h1>Hello Blazor!</h1> </div> <style> div#index{ color: #0000FF; } </style>2. コードブロック/スクリプトの埋め込み
Vue.jsではscriptタグ内(TypeScriptを使う場合はlang=ts要)に、
Blazorでは@codeブロック内にスクリプト処理を記述します。
コードブロックで定義している変数はhtml内に埋め込むことができます。
(Vue.jsは{{hoge}}(thisは常に付加される)、C#は@hogeで呼び出し)Vue.js
ScriptBlock.vue<template> <div> <h1>{{title}}</h1> </div> </template> <script lang=ts> import {Component,Vue} from "vue-property-decorator"; @Component export default class ScriptBlock extends Vue{ title="Hello Vue.js!"; } </script>Blazor
ScriptBlock.razor@page "/ScriptBlock" <div> <h1>@title</h1> </div> @code{ string title="Hello Blazor!"; }3. html中への数式埋め込み
html中に埋め込めるのは変数のみではありません。
数式を埋め込むこともできます。
Vue.js{{}}内ではグローバルオブジェクトを扱えないことについて注意します。
Blazorでの@のエスケープは@@と記述します。Vue.js
Formula.vue<template> <div> <h1>10!={{10*9*8*7*6*5*4*3*2*1}}</h1> </div> </template>Blazor
Formula.razor@page "/Formula" <div> <h1>10!=@(10*9*8*7*6*5*4*3*2*1)</h1> </div>4. ライフサイクルメソッド
Vue.js/Blazorにはhtmlのonload/unonloadのように
コンポーネントの状態でフックされるライフサイクルメソッドというものがあります。
項目 Vue.js Blazor 初期化前 beforeCreate ― 初期化後 created OnInitialized
OnInitializedAsyncレンダリング前 beforeMount OnParametersSet
OnParametersSetAsyncレンダリング後 mounted OnAfterRender
OnAfterRenderAsync※1変更前 beforeUpdate ― 変更後 updated OnAfterRender
OnAfterRenderAsync※1アクティブ化時 activated ― 非アクティブ化時 deactivated ― 破棄前 beforeUpdate ― 破棄時 beforeDestroy Dispose※2
- ※1: firstRender引数で初回かどうか判別。
- ※2: ページリロード時には動作しない。
初期化処理は大体レンダリング後に該当する処理で間に合う気がします。
Blazorはデストラクタがページ更新時に動作しないので注意が必要です。
(その場合、現状としてはjsのunonloadをなんとか使うしかない?)Vue.js
LifeCycle.vue<template> <div> <h1>{{title}}</h1> </div> </template> <script lang=ts> import {Component,Vue} from "vue-property-decorator"; @Component export default class LifeCycle extends Vue{ title="Hello Vue.js!"; async mounted(){ await new Promise(res=>setTimeout(res,5000)); this.title+=" 5s passed!"; } } </script>Blazor
LifeCycle.razor@page "/LifeCycle" <div> <h1>@title</h1> </div> @code{ string title="Hello Blazor!"; protected override async Task OnAfterRenderAsync(bool firstRender){ if(!firstRender) return; await Task.Delay(5000); title+=" 5s passed!"; StateHasChanged(); } }5. DOM API
Vue.jsではブラウザ依存のDOM APIをそのまま使用することができます。
BlazorではJavaScriptに頼らずDOM APIを扱うことは不可能なので
JavaScriptのメソッドを呼び出す必要があります。JavaScriptを使うにはIJSRuntimeをinjectして
IJSRuntime.InvoveAsync・IJSRuntime.InvokeVoidAsyncメソッドを呼び出します。プロパティの類には一切取得できないのでその用途にはevalを使うか
別にjsファイルを用意して関数として呼び出す必要があります。Vue.js
UseDOMAPI.vue<template> <div> <h1>Alert</h1> </div> </template> <script lang=ts> import {Component,Vue} from "vue-property-decorator"; @Component export default class UseDOMAPI extends Vue{ async mounted(){ var title=document.title; alert(title); } } </script>Blazor
UseDOMAPI.razor@page "/UseDOMAPI" <div> <h1>Alert</h1> </div> @inject IJSRuntime js @code{ protected override async Task OnAfterRenderAsync(bool firstRender){ if(!firstRender) return; var title=await js.InvokeAsync<string>("eval","document.title"); await js.InvokeVoidAsync("alert",title); } }6. 双方向バインディング
Vue.js/Blazorではdocument.element.valueを直接操作する代わりに変数と要素の値をバインド(同期)します。
Vue.jsではv-modelを、Blazorでは@bindを属性に指定します。Vue.js
BindingInput.vue<template> <div> <h1>{{title}}</h1> <input v-model="title"> </div> </template> <script lang=ts> import {Component,Vue} from "vue-property-decorator"; @Component export default class BindingInput extends Vue{ title="Hello Vue.js!"; } </script>Blazor
BindingInput.razor@page "/BindingInput" <div> <h1>@title</h1> <input @bind="title"> </div> @code{ string title="Hello Blazor!"; }7. 片方向バインディング
変数からdocument.element.valueを一方的に更新することもできます。
Vue.jsではv-bind:valueを属性に指定します。
v-bind:は:のように省略することができるので:valueと書けます。
Blazorではvalueに変数として割り当てることができます。Vue.js
BindingInputOneWay.vue<template> <div> <h1>{{title}}</h1> <input :value="title"> </div> </template> <script lang=ts> import {Component,Vue} from "vue-property-decorator"; @Component export default class BindingInputOneWay extends Vue{ title="Hello Vue.js!"; async mounted(){ for(;;){ await new Promise(res=>setTimeout(res,2000)); this.title+=">"; } } } </script>Blazor
BindingInputOneWay.razor@page "/BindingInputOneWay" <div> <h1>@title</h1> <input value=@title> </div> @code{ string title="Hello Blazor!"; protected override async Task OnAfterRenderAsync(bool firstRender){ if(!firstRender) return; for(;;){ await Task.Delay(2000); title+=">"; StateHasChanged(); } } }8.イベントハンドラ
イベントハンドラはそれぞれちょいちょい表記が異なるので通常のhtmlについても併記します。
Vue.jsではonclick属性の代わりにv-on:click属性を使用します。
v-on:は@と表記することもできるので@clickと書くことが出ます。Blazorでは通常のイベント名に@を付けたものがイベント属性となります。
つまりこの例では@onclick属性です。Vue.js、Blazorどちらでも指定するものはメソッド名のみでメソッド呼び出しを意味する"()"は不要です。
HTML
<html>
<body>
    <button onclick="openDialog()">Click Me!</button>

    <script>
        var title="Hello HTML!";

        function openDialog(){
            alert(title);
        }
    </script>
</body>
</html>
Vue.js
EventHandler.vue<template> <div> <button @click="openDialog">Click Me!</button> </div> </template> <script lang=ts> import {Component,Vue} from "vue-property-decorator"; @Component export default class EventHandler extends Vue{ title="Hello Vue.js!"; openDialog(){ alert(this.title); } } </script>Blazor
Index.razor@page "/EventHandler" <div> <button @onclick="openDialog">Click Me!</button> </div> @inject IJSRuntime js @code{ string title="Hello Blazor!"; async void openDialog(){ await js.InvokeVoidAsync("alert",title); } }9. onchangeイベント
Vue.jsでは@chengeイベントとv-modelを同時に使うことができますが、
Blazorでは@onchangeイベントと@bindを同時に使うことはできません。
厳密には動作は異なりますが、@onclickイベントと僅かに遅延させることで同じような動作を得ることができます。Vue.js
OnChangeEvent.vue<template> <div> <h1>Check: {{isChecked}}</h1> <input id=chk type=checkbox v-model="isChecked" @change="chkChange"> <label for=chk>CheckBox</label> </div> </template> <script lang=ts> import {Component,Vue} from "vue-property-decorator"; @Component export default class OnChangeEvent extends Vue{ isChecked=false; chkChange(){ alert(`Check: ${this.isChecked}`); } } </script>Blazor
OnChangeEvent.razor@page "/OnChangeEvent" <div> <h1>Check: @isChecked</h1> <input id=chk type=checkbox @bind="isChecked" @onclick="chkChange"> <label for=chk>CheckBox</label> </div> @inject IJSRuntime js; @code{ bool isChecked=false; async Task chkChange(){ await Task.Delay(1); await js.InvokeVoidAsync("alert",$"Check: {isChecked}"); } }10. スタイルバインディング
スクリプトによるスタイルの変更はhtmlではdocument.element.styleの変更によって行われていました。
Vue.js/Blazorではその代わり属性に直接値をバインドさせることで変更を行います。Vue.jsではv-bind:style属性にJSON形式の文字列で渡します。
変更したいスタイルのキーに対してスタイルの文字列を返す処理を書き込むか
スタイルの含まれる文字列変数を割り当てます。Blazorではstyle属性に渡す文字列を直接編集することでスタイルの変更が可能です。
Vue.js
BindingStyle.vue<template> <div> <h1>Check: {{isChecked}}</h1> <input id=chk type=checkbox v-model="isChecked"> <label for=chk>CheckBox</label> <div :style="{color: isChecked? 'blue': 'red'}"> Change Style! </div> </div> </template> <script lang=ts> import {Component,Vue} from "vue-property-decorator"; @Component export default class BindingStyle extends Vue{ isChecked=false; } </script>Blazor
BindingStyle.razor@page "/BindingStyle" <div> <h1>Check: @isChecked</h1> <input id=chk type=checkbox @bind="isChecked">@("" )<label for=chk>CheckBox</label> <div style=@("color:"+(isChecked? "blue": "red"))> Change Style! </div> </div> @code{ bool isChecked=false; }11. クラスバインディング
クラスについてもスタイルと同様にバインドできます。
Vue.jsではv-bind:class属性にJSON形式の文字列で渡します。
変更したいclass名のキーに対してboolean値を割り当てて行います。Blazorではスタイルの変更と同様にclass属性に渡す文字列を直接編集します。
Vue.js
BindingClass.vue<template> <div> <h1>Check: {{isChecked}}</h1> <input id=chk type=checkbox v-model="isChecked"> <label for=chk>CheckBox</label> <div :class="{clsA: isChecked, clsB: !isChecked}"> Change Style! </div> </div> </template> <style scoped> .clsA{ color: blue; font-size: 1.5em; text-decoration: underline solid; } .clsB{ color: red; font-size: 1.0em; font-style: italic; } </style> <script lang=ts> import {Component,Vue} from "vue-property-decorator"; @Component export default class BindingClass extends Vue{ isChecked=false; } </script>Blazor
BindingClass.razor@page "/BindingClass" <div> <h1>Check: @isChecked</h1> <input id=chk type=checkbox @bind="isChecked">@("" )<label for=chk>CheckBox</label> <div class=@(isChecked? "clsA": "clsB")> Change Style! </div> </div> <style> .clsA{ color: blue; font-size: 1.5em; text-decoration: underline solid; } .clsB{ color: red; font-size: 1.0em; font-style: italic; } </style> @code{ bool isChecked=false; }12. if(場合分け)
Vue.js/Blazorでは場合分けで表示状態を変更できます。
Vue.jsではv-if属性を対象の要素に含めると表示状態を変更できます。
v-ifで表示の切り替えを行うとライフサイクルが働くこととなります。
コンポーネントの状態を保ったまま表示切替を行いたい場合はv-showを使います。
(内部的にdisplay: none;を使っています)Blazorでは@ifを使います。
動作としてはVue.jsにおけるv-ifと同様です。
コンポーネントの状態を保つ場合はstyle/class属性で直接隠すようにします。Vue.js
IfAndShow.vue<template> <div> <h1>Check: {{isChecked}}</h1> <input id=chk type=checkbox v-model="isChecked"> <label for=chk>CheckBox</label> <div v-if="isChecked"> <input> </div> <div v-show="isChecked"> <input> </div> </div> </template> <script lang=ts> import {Component,Vue} from "vue-property-decorator"; @Component export default class IfAndShow extends Vue{ isChecked=false; } </script>Blazor
IfAndShow.razor@page "/IfAndShow" <div> <h1>Check: @isChecked</h1> <input id=chk type=checkbox @bind="isChecked">@("" )<label for=chk>CheckBox</label> @if(isChecked){ <div> <input> </div> } <div style=@("display:"+(isChecked? "": "none"))> <input> </div> </div> @code{ bool isChecked=false; }13. foreach(繰り返し)
Vue.js/Blazorでは同じ構成のタグであれば繰り返して表示させることができます。
Vue.jsではv-for属性を繰り返したい要素に含めます。
これはtemplateタグを無名のタグとして使い、囲んでループさせても問題ありません。
大体の主流なブラウザではオブジェクトの順序は一定となりますが、仕様上で保障されていないので注意してください。
(Mapも一応使えますが情報量が少なくて少し怪しいです。
書き方はv-for="[key,value] of list]"と通常のfor文っぽく書くと使えるようです)Blazorでは@for/@foreachを使います。
v-bind:key/@keyについて
ループで生成されるリストにはコンポーネントの同一性などを担保するためにkey属性の追加が推奨されます。
動作が高速になるとも言われます。
v-bind:keyはVue.js、@keyはBlazorにおける表記方法です。
Vue.js
BlazorVue.js
ForEachLoop.vue<template> <div> <div v-for="(isChecked,key) in dict"> <input :id="key" type=checkbox v-model="dict[key]" :key="key"> <label :for="key">{{key}}</label> </div> </div> </template> <script lang=ts> import {Component,Vue} from "vue-property-decorator"; @Component export default class ForEachLoop extends Vue{ dict:{[s:string]:boolean}={ A:true, B:true, C:true, D:false, E:false }; } </script>Blazor
ForEachLoop.razor@page "/ForEachLoop" <div> @foreach(var (key,isChecked) in dict){ <div> <input id=@key type=checkbox @bind="dict[key]" @key="key">@("" )<label for=@key>@key</label> </div> } </div> @code{ Dictionary<string,bool> dict=new Dictionary<string,bool>{ {"A",true}, {"B",true}, {"C",true}, {"D",false}, {"E",false} }; }14. コンポーネントの追加
Vue.js/Blazorではhtmlタグ中に自作の要素(コンポーネント)を埋め込むことをできます。
Blazorでは自動で全てのコンポーネントを読み込みますが、
Vue.jsではimport文で読み込むコンポーネントを指定する必要があります。Vue.js
ComponentA.vue<template> <div> <h3>ComponentA</h3> <textarea></textarea> </div> </template>ComponentB.vue<template> <div> <input id=chk type=checkbox> <label for=chk>ComponentB</label> </div> </template>AddComponent.vue<template> <div> <ComponentA /> <ComponentB /> </div> </template> <script lang=ts> import {Component,Vue} from "vue-property-decorator"; import ComponentA from "@/components/ComponentA.vue"; import ComponentB from "@/components/ComponentB.vue"; @Component({ components:{ ComponentA, ComponentB } }) export default class AddComponent extends Vue{} </script>Blazor
ComponentA.razor<div> <h3>ComponentA</h3> <textarea></textarea> </div>ComponentB.razor<div> <input id=chk type=checkbox> <label for=chk>ComponentB</label> </div>AddComponent.razor@page "/AddComponent" <div> <ComponentA /> <ComponentB /> </div>15. コンポーネントの属性
Vue.js/Blazorでは子コンポーネントに属性を与え、
与えられた子コンポーネント中でプロパティとして使用することができます。
Vue.jsでは@Prop、Blazorでは[Parameter]で属性名を指定します。Vue.js
ComponentC.vue<template> <div :style="{color: color}"> Input Attribute={{msg}} </div> </template> <script lang=ts> import {Component,Prop,Vue} from "vue-property-decorator"; @Component export default class ComponentC extends Vue{ @Prop() private msg:string; @Prop() private color:string; } </script>ComponentAttribute.vue<template> <div> <ComponentC msg="View Message" color="#FF00FF" /> </div> </template> <script lang=ts> import {Component,Vue} from "vue-property-decorator"; import ComponentC from "@/components/ComponentC.vue"; @Component({ components:{ ComponentC } }) export default class ComponentAttribute extends Vue{} </script>Blazor
ComponentC.razor<div style=@($"color: {color}")> Input Attribute=@msg </div> @code{ [Parameter] public string msg{get;set;} [Parameter] public string color{get;set;} }ComponentAttribute.razor@page "/ComponentAttribute" <div> <ComponentC msg="View Message" color="#FF00FF" /> </div>16. コンポーネントのメソッド呼び出し
Vue.js/Blazorでは子コンポーネント中のメンバーを呼び出すことができます。
Vue.jsではref属性、Blazorでは@ref属性でバインドする変数名を指定します。
クラス中でも使用するためにそれぞれ宣言が必要です。Vue.js
Toast.vue<template> <dialog :open="isShow"> {{msg}} </dialog> </template> <script lang=ts> import {Component,Vue,Prop} from "vue-property-decorator"; @Component export default class Toast extends Vue{ isShow=false; msg=""; public async show(msg:string){ this.msg=msg; this.isShow=true; await new Promise(res=>setTimeout(res,1500)); this.isShow=false; } } </script>ComponentMethod.vue<template> <div> <Toast ref="toast" /> <button @click="viewToast">Click Me!</button> </div> </template> <script lang=ts> import {Component,Vue} from "vue-property-decorator"; import Toast from "@/components/Toast.vue"; @Component({ components:{ Toast } }) export default class ComponentMethod extends Vue{ $refs!:{toast: Toast}; async viewToast(){ await this.$refs.toast.show("View Torst!"); } } </script>Blazor
Toast.razor<dialog open=@isShow> @msg </dialog> @code{ bool isShow=false; string msg=""; public async Task show(string msg){ this.msg=msg; isShow=true; StateHasChanged(); await Task.Delay(2500); isShow=false; StateHasChanged(); } }ComponentMethod.razor@page "/ComponentMethod" <div> <Toast @ref="toast" /> <button @onclick="viewToast">Click Me!</button> </div> @code{ Toast toast; async Task viewToast(){ await toast.show("View Toast!"); } }17. 状態管理コンテナ
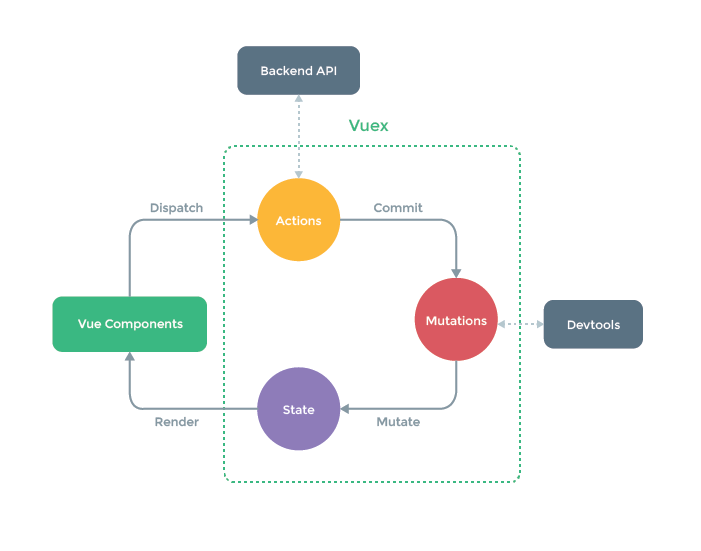
どのコンポーネントからでも参照できるグローバル変数のようなもの。
ここでは変数の読み書き程度の極々簡単のみ行っています。Vue.jsでは公式なライブラリとしてVuexが存在します。
Blazorでは特にそのようなものは存在しませんが、Blazorの基本機能のみで同じようにコンテナを扱う方法が存在します。
参考1 参考2詳細については割愛し、動作例のみ記載します。
Vue.js
/src/store/index.tsimport Vue from "vue"; import Vuex from "vuex"; Vue.use(Vuex); export default new Vuex.Store({ state:{ books: [] as string[], date: null as Date }, mutations:{ setBooks(state,books:string[]){ state.books=books; }, setDate(state,date:Date){ state.date=date; } } });BooksInput.vue<template> <div> <div><textarea v-model="bookList" id="bookList"></textarea></div> <button @click="setBooks">Set Books!</button> </div> </template> <style scoped> #bookList{ height: 300px; width: 300px; } </style> <script lang=ts> import {Component,Vue,Prop} from "vue-property-decorator"; import store from "@/store"; @Component export default class BooksInput extends Vue{ bookList=""; public setBooks(){ store.commit("setBooks",this.bookList.split(/\r|\n|\r\n/).filter(s=>s!="")); store.commit("setDate",new Date()); alert("setBooks!"); } } </script>StateContainer.vue<template> <div> <BooksInput /> <button @click="getBooks">Get Books!</button> <h3>BookLists ({{date}})</h3> <ul> <li v-for="book in books" :key="book">{{book}}</li> </ul> </div> </template> <script lang=ts> import {Component,Vue} from "vue-property-decorator"; import BooksInput from "@/components/BooksInput.vue"; import store from "@/store"; @Component({ components:{ BooksInput } }) export default class StateContainer extends Vue{ books:string[]=[]; date:Date=null; getBooks(){ this.books=store.state.books; this.date=store.state.date; } } </script>Blazor
BlazorではProgram.csにサービスとしてコンテナを登録する必要があります。
これは本記事の/設定ファイル/Program.csにて記述しています。/Store/AppStore.csusing System; public class AppState{ public string[] books{get;private set;}=new string[]{}; public DateTime? date{get;private set;}=null; public void setBooks(string[] books){ this.books=books; NotifyStateChanged(); } public void setDate(DateTime date){ this.date=date; NotifyStateChanged(); } public event Action OnChange; private void NotifyStateChanged()=>OnChange?.Invoke(); }BooksInput.razor<div > <div><textarea @bind="bookList" id="bookList"></textarea></div> <button @onclick="setBooks">Set Books!</button> </div> <style> #bookList{ height: 300px; width: 300px; } </style> @inject IJSRuntime js; @inject AppState state; @code{ string bookList=""; public void setBooks(){ state.setBooks(Array.FindAll(bookList.Replace("\r\n","\n").Split(new[]{'\n','\r'}),s=>s!="")); state.setDate(DateTime.Now); js.InvokeVoidAsync("alert","setBooks!"); } }StateContainer.razor@page "/StateContainer" <div> <BooksInput /> <button @onclick="getBooks">Get Books!</button> <h3>BookLists (@date)</h3> <ul> @foreach(var book in books){<li @key="book">@book</li>} </ul> </div> @inject AppState state; @implements IDisposable; @code{ protected override void OnInitialized(){state.OnChange+=StateHasChanged;} public void Dispose(){state.OnChange-=StateHasChanged;} string[] books={}; DateTime? date=null; void getBooks(){ books=state.books; date=state.date; } }18. JSONの読み込み
Vue.js/BlazorではJSONファイルを読み込んで表示することができます。
(クライアントサイドなので書き込みはできません)Vue.jsではrequire関数を使用し、JSONファイルを/src/assets/以下に配置します。
BlazorではHttpClient.GetJsonAsyncを使用し、JSONファイルを/wwwroot/以下に配置します。ここでは次のJSONファイルを読み込みします。
weapons.json[ "大剣", "太刀", "片手剣", "双剣", "ハンマー", "狩猟笛", "ランス", "ガンランス", "スラッシュアックス", "チャージアックス", "操虫棍", "ライトボウガン", "ヘビィボウガン", "弓" ]Vue.js
ReadJSON.vue<template> <div> <h3>Read JSON</h3> <ul> <li v-for="value in list" :key="value">{{value}}</li> </ul> </div> </template> <script lang=ts> import {Component,Vue} from "vue-property-decorator"; @Component export default class ReadJSON extends Vue{ list:string[]=[]; mounted(){ this.list=require("@/assets/weapons.json"); } } </script>Blazor
ReadJSON.razor@page "/ReadJSON" <div> <h3>Read JSON</h3> <ul> @foreach(var value in list){<li @key="value">@value</li>} </ul> </div> @inject HttpClient http; @code{ string[] list={}; protected override async Task OnAfterRenderAsync(bool firstRender){ if(!firstRender) return; list=await http.GetJsonAsync<string[]>("Assets/weapons.json?0"); StateHasChanged(); } }19. テキストファイルの読み込み
Vue.jsのみではプレーンなテキストファイルを読み込むことはできません。
読み込む方法としてVue.jsの公式でaxiosを使うことを提案しています。
プロジェクトにはyarnやnpmで追加が可能です。また、この方法でもJSONを読み込めますが、少々ファイルの扱いが異なるので注意が必要です。
| メソッド | パス | 備考
| axios.get | /public/ | 個別の静的ファイルとして扱う
| require | /src/assets | ビルド時jsファイルとともに結合される一方、BlazorにおいてはJSONと同様にHttpClient.GetStringAsyncを用いて読み込みます。
Vue.js
ReadText.vue<template> <div> <h3>Read Text</h3> <pre>{{text}}</pre> </div> </template> <script lang=ts> import {Component,Vue} from "vue-property-decorator"; import axios from "axios"; @Component export default class ReadText extends Vue{ text=""; async mounted(){ this.text=await axios.get("./kimigayo.txt?0").then(v=>v.data); } } </script>Blazor
ReadText.razor@page "/ReadText" <div> <h3>Read Text</h3> <pre>@text</pre> </div> @inject HttpClient http; @code{ string text=""; protected override async Task OnAfterRenderAsync(bool firstRender){ if(!firstRender) return; text=await http.GetStringAsync("./kimigayo.txt?0"); StateHasChanged(); } }まとめ
以上、Vue.jsとBlazor文法の比較についてまとめてみました。
styleの仕様など、どうにもならない部分はありますが、大部分はほぼ同じように書けるのではないかと思います。
まだ、速度の面で苦しいなぁと感じていますが今後のBlazorに期待したいと思います。
- 投稿日:2020-03-05T22:48:55+09:00
laravel vue
<template>
    <div class="container">
     <!-- v-modelで変数と入力値を同期させる -->
        <input v-model="condition" class="form-control filter" type="text" placeholder="filter">
        <div class="list-group">
            <!-- v-forで条件に合致したタスクを繰り返し表示する -->
            <div v-for="task in matched" :key="task.id"
                 class="list-group-item list-group-item-action flex-column align-items-start">
                <div class="d-flex w-100 justify-content-between">
                    <h5 class="mb-1">{{ task.title }}</h5>
                    <small class="text-muted">{{ task.created_at }}</small>
                </div>
                <p class="mb-1">{{ task.content }}</p>
            </div>
        </div>
    </div>
</template>

<script>
    export default {
        name: "TasksComponents.vue",
        data: function () {
            return {
                condition: null, //フィルタ条件
                tasks: [] //タスクの配列
            }
        },
        created() {
            //インスタンス生成時にapiからタスク一覧を取得して変数に格納
            axios.get('/api/task').then(response => {
                this.tasks = response.data
            })
        },
        computed: {
            matched: function () {
                //conditionの値が変更されると自動的に呼び出される
                return this.tasks.filter(function (element) {
                    //タイトルにcondionの値を含むものでフィルタ
                    return !this.condition || element.title.indexOf(this.condition) !== -1
                }, this)
            }
        }
    }
</script>

<style scoped>
    .filter {
        margin: 1em 0em;
    }
</style>
- 投稿日:2020-03-05T22:46:53+09:00
Vuetify + zxcvbnでパスワード強度メーター付きのパスワードフォームを作る
マテリアルデザインをお手軽に使えるVuetifyとパスワード強度チェッカーのzxcvbnを使って、パスワード強度メーター付きのパスワード入力フォームをさくっと作ります。
サンプル
CodePenで作っています。
See the Pen
Vuetify Password Form With Password Strength Meter by harasho (@harashoo)
on CodePen.
解説
zxcvbnについて
zxcvbnはDropbox社製のパスワード強度チェックライブラリです。
https://github.com/dropbox/zxcvbn実際に試してみると、以下のようにパスワード強度をチェックしてくれます。
$ npm install zxcvbn
$ node

> const zxcvbn = require('zxcvbn');
> zxcvbn('password');
{
  password: 'password',
  guesses: 3,
  guesses_log10: 0.4771212547196623,
  sequence: [
    {
      pattern: 'dictionary',
      i: 0,
      j: 7,
      token: 'password',
      matched_word: 'password',
      rank: 2,
      dictionary_name: 'passwords',
      reversed: false,
      l33t: false,
      base_guesses: 2,
      uppercase_variations: 1,
      l33t_variations: 1,
      guesses: 2,
      guesses_log10: 0.30102999566398114
    }
  ],
  calc_time: 9,
  crack_times_seconds: {
    online_throttling_100_per_hour: 108,
    online_no_throttling_10_per_second: 0.3,
    offline_slow_hashing_1e4_per_second: 0.0003,
    offline_fast_hashing_1e10_per_second: 3e-10
  },
  crack_times_display: {
    online_throttling_100_per_hour: '2 minutes',
    online_no_throttling_10_per_second: 'less than a second',
    offline_slow_hashing_1e4_per_second: 'less than a second',
    offline_fast_hashing_1e10_per_second: 'less than a second'
  },
  score: 0,
  feedback: {
    warning: 'This is a top-10 common password',
    suggestions: [ 'Add another word or two. Uncommon words are better.' ]
  }
}
今回は上記の返ってきたオブジェクトにある
scoreを使います。> zxcvbn('password').score 0 > zxcvbn('hoge').score 1 > zxcvbn('Tr0ub4dour&3').score 2※ zxcvbnについては、こちらの翻訳記事が詳しいです。
パスワード強度メーターの実装
ここから、コードを一部抜粋して解説します。
パスワード強度メーターの見た目部分はVuetifyのProgress Linearを使っています。
:color="score.color"と:value="score.value"には、下記で定義している算出プロパティscoreの値が入ります。html<v-progress-linear :background-opacity="opacity" :color="score.color" :value="score.value" ></v-progress-linear>次にパスワード強度メーターのロジックについてです。
jscomputed: { score() { // zxcvbnで入力されたパスワードの強度をチェックしています。 const result = zxcvbn(this.password); // switch文を使って、パスワードのスコアによって、返すcolorとvalueを分岐しています。 // ここで使っているcolorの値はVuetifyで定義されているものです。 switch (result.score) { case 4: return { color: "light-blue", value: 100 }; case 3: return { color: "light-green", value: 75 }; case 2: return { color: "yellow", value: 50 }; case 1: return { color: "orange", value: 25 }; default: return { color: "red", value: 0 }; } } }
パスワード強度のバリデーションの実装
フォームはVuetifyのPassword Inputを利用しています。
v-text-fieldのpropsのrulesを使って、下記で定義しているバリデーションを適用しています。
html<v-text-field v-model="password" :append-icon="showPassword ? 'mdi-eye' : 'mdi-eye-off'" :rules="[rules.required, rules.min, rules.strength]" validate-on-blur :type="showPassword ? 'text' : 'password'" label="Password" class="mb-6" @click:append="showPassword = !showPassword" ></v-text-field>
パスワード強度のバリデーションのロジック部分です。jsrules: { // required と min はVuetifyドキュメントのサンプルに入っていたものなので、説明を省略します。 required: value => !!value || 'Enter a password', min: v => v.length >= 8 || 'Use 8 characters or more for your password', // パスワード強度のバリデーションです。 // zxcvbn(v).scoreで入力値のスコアを算出して、許容するスコア (ここでは3) と比較しています。 strength: v => zxcvbn(v).score >= 3 || 'Please choose a stronger password. Try a mix of letters, numbers, and symbols.' },安全性を高める
パスワードの安全性をより高めたい場合は、パスワードの長さにもバリデーションをかけると良いです。次の参考サイトでは12文字以上を推奨しています。
https://www.jpcert.or.jp/pr/stop-password.htmlおまけ
サンプルではパスワード強度のスコアごとに色を変えていますが、単色のほうがスッキリしていて良いかなと思い、単色バージョンも作りました。
See the Pen Vuetify Password Form With Password Strength Meter (Monochromatic) by harasho (@harashoo) on CodePen.
- 投稿日:2020-03-05T22:42:05+09:00
vue getters
import { mapState } from 'vuex' // #1 ヘルパーをインポートする
export default {
// #2 算出プロパティを宣言する
computed: mapState({
loginAlias: 'login', // loginAlias: state => state.loginと同義
deviceAlias: 'device' // deviceAlias: state => state.deviceと同義
})
}
- 投稿日:2020-03-05T19:43:45+09:00
[Vue.js] vue-momentで日付をフォーマットする
インストール
npm install vue-momentVueプロジェクトにインポート
main.jsVue.use(require('vue-moment'));.vueファイルで使う
or演算子|の右辺でフォーマット形式を指定します。
App.vue{{ new Date() }} // 05 2020 19:38:33 GMT+0900 (日本標準時) {{ new Date() | moment("dddd, MMMM, Do, YYYY, h:mm:ss a") }} // Thursday, March, 5th, 2020, 7:38:33 pm {{ new Date() | moment("YYYY/MM/DD") }} // 2020/03/05参考にしたサイト
vue-moment - npm
https://www.npmjs.com/package/vue-moment
- 投稿日:2020-03-05T19:22:51+09:00
VuetifyでRedmineのダッシュボードを作成する時にテーマをこんな感じにすると便利かもというお話
はじめに
さて、私の職場ではRedmineが稼働してまして、さらにそのデータを見やすく加工したダッシュボードを作成して、大型ディスプレイに表示してるんですけど。
そのダッシュボード、今まではAngularで作ってたんですが、Vue.jsも勉強したいしVuetifyでマテリアルデザインを満喫したいし……ということで、現在リプレースの真っ最中です。Vue.jsもたのしー!
その過程で覚えた小ネタをひとつ。テーマにカスタムカラーを追加する
Vuetifyとは、Vue.jsベースのフレームワークで、ダッシュボードみたいなWebアプリを作るのに最適なんですけど。
このVuetify、「テーマ」という機能を持っていて、これがRedmineのデータの表示にとても便利なんです。
具体的に言うと……
チケットの一覧なんかを表示する際、チケットのステータスやトラッカーの値によって色を変えたい……ってこと、良くあるじゃないですか。
そんな時、「tracker1」とか「status1」なんていう名前のカスタムカラーを簡単に追加できます。
こんな感じで、plugins/vuetify.jsを編集しましょう。plugins/vuetify.jsimport Vue from 'vue'; import Vuetify from 'vuetify/lib'; import colors from 'vuetify/lib/util/colors'; // 追加 Vue.use(Vuetify); export default new Vuetify({ theme: { // 追加 themes: { light: { // トラッカー tracker1: colors.red.base, // バグ tracker2: colors.amber.base, // 機能 tracker3: colors.blue.base, // サポート // ステータス status1: colors.red.accent1, // 新規 status2: colors.blue.lighten5, // 進行中 status3: colors.green.lighten5, // 解決 status4: colors.amber.lighten5, // フィードバック status5: colors.grey.lighten1, // 終了 status6: colors.grey.lighten1, // 対応中 } } }, });で、コンポーネント側ではこんな感じでカラーを指定します。
Hoge.vue<v-list-item :class="'status'+issue.status.id"> <v-list-item-title> <v-chip dark v-text="'#'+issue.id" :color="'tracker'+issue.tracker.id"/> {{issue.subject}} </v-list-item-title> </v-list-item>こんな感じで、ステータスやトラッカーの値に応じた色を簡単に適用できますよ。
今までは似たような事をSassで定義してたんですけど、断然こっちの方が手軽ですねー。とっても便利。
- 投稿日:2020-03-05T18:15:33+09:00
100日後にリファクタリングするVuex(Vuexの使い方を間違えた件)
PrAha Inc. CEO、時々エンジニアのdowannaです。
nuxt initしたら勝手に付いてくるため無意識に使いがちなVuexですが、本来の用途を理解せず使うと、ただ労力が増えるだけで、さほど意味のない構成になります。僕は見事にそれをやりました。そんな僕を反面教師に、Vuexとの正しい付き合い方を感じてもらえたら幸いです。
この記事で伝えたいこと
Vuexは「複数のcomponentでstateを共有すること」が本来の意図されたユースケースで、stateをcomponent間で共有しない場合は、無理にvuexを使わなくても構わない
Vuexは「複数componentでstateを共有すること」を想定
公式サイトにもある通り、Vuexは「複数componentでstateを共有する時」を想定しています。
が、僕が作ったアプリケーションではnuxtのpage単位にVuexのstoreを分割しました。
hogehoge.com/a
hogehoge.com/bという2つのpageがあったとすると、こんな構成でした
nuxt
├──-pages
    ├──a.vue
    ├──b.vue
├──-store
    ├──a.js
    ├──b.js
page/Aからdispatchされたactionはstore/Aでハンドリング
page/Bからdispatchされたactionはstore/Bでハンドリングこんな具合にstore同士がお互いにやり取りをしない構成になっていましたが、特にcomponentを跨がないデータを取り扱うだけであればpageの中にdataとして持っても構わないわけです。単純にpageのロジックをstoreに移すだけではメリットは少なく、以下のようなデメリットが気になり始めました。
Vuexのデメリットが目立つように
Publicなストアである
Vuexは他のpageからも容易に編集できるグローバルなpublicストアなので、いつどこから編集されるか分かりません。
開発ツールでデバッグして追うことは出来ますが、pageのなかにdataとして持っていた方が、変更の呼び出し箇所が限定されて保守性も高まるでしょう。
グローバルストアに四方八方からガンガンデータを突っ込む、という一番やってはいけない事をやってしまった。
コードジャンプが効かない
Vuexを使う場合はメソッドの呼び出しではなく文字列をキーに使ったイベント送信になるためコードジャンプが効きません。
一見地味なデメリットに見えますが、ずっと開発しているとイライラしてきます。あと一括で変更したい時にRename Symbol(VSCodeならF2)が効かないのでいちいちgrepして置換する必要が生じます。
this.$store.dispatch('a/doSomething') // <- 変更箇所を探るためにはgrepするしかないdispatchやmutationの記述量が増えた
pageのdataとして保持していればapi呼び出しの一行で終わるところ、VuexだとAPIと通信するたびにdispatchして、mutationして、stateに反映する必要が生じます
// ====== Vuexなし ====== //
const result = await get('/a') // たった1行だ!

// ====== Vuexあり ====== //
// page/a.vue
this.$store.dispatch('a/doSomething')

// store/a.js
export const state = () => ({
  result: ''
})

export const actions = {
  async doSomething({ commit }) {
    const data = await get('/a')
    commit('setSomething', data)
  }
}

export const mutations = {
  setSomething(state, data) {
    state.result = data.result
  }
}
更にpage/a.vueでmapSetterしてstoreからdataに取り出さなければいけない・・・この辺りからVuexを使うのではなくVuexに使われている感覚に陥ってきます
dispatchした結果を待つときにfluxパターンが崩壊する
APIに対するget('/a')の結果を待ってから処理を継続したい時、こんな感じでdispatchを待ちたくなります
const data = await this.$store.dispatch('a/doSomething')が、これはfluxパターンに違反しています
Vue components から dispatch された actionが逆流することになるからです。正しくfluxパターンでdispatchの結果を待つのであれば、dispatchの結果変化するstateを監視する必要が生じます。が、返却値は必要無いのに、処理を待ちたい時まで無駄なstate変数が増えるのはイマイチです。
こんな感じのデメリットに殴り続けられながら、現状の構成で得られるメリットが殆ど無いことに気づいた時、僕はもう限界だと気づき、Vuexをやめたくなった。
そもそも、どうしてVuexを使い始めたのか?
component間でデータを共有しない以上、ただ手続きを煩雑にするだけのグローバルストアと化してしまったわけですが、そもそもなぜ僕はVuexを使ったのでしょうか。
nuxtに最初から入っていたから自然と使ってしまったと、人のせいにしてみます。
それは冗談ですが、当初は「APIにリクエストを投げる作業とか、ビューから描画以外のロジックを切り出すのにちょうどいいぞ」と考えていました。componentは出来る限りビューの描画に専念させたい。責務を分担したい。清純な動機でVuexを使い始めました。
しかし結論から言うと「APIにリクエストを投げる作業を切り出す」に関してはVuexを入れなくても、APIServiceみたいなクラスをpluginとして定義することや、utilにAPI呼び出しを切り出すことで実現できます。
//infrastructure/apiService.js

export default class APIService {
  constructor(axios) {
    this.axios = axios
  }
  get(url, options = {}) {
    return this.axios.$get(url, options)
  }
}
コイツをextendしたラッパーを用意して...
// infrastructure/settingAPIService.js

import APIService from './apiService'
export default class SettingAPIService extends APIService {
  getUserSettings() {
    return this.get('/settings')
  }
}
pluginとして注入すれば
// plugins/apiService.js
export default ({ $axios }, inject) => {
  const settingAPIService = new SettingAPIService($axios)
  inject('settingAPIService', settingAPIService)
}
componentからapiServiceを呼び出せるようになります。これでAPI呼び出しの詳細(axiosに関する知識とか)はpageから切り出されました。
// pages/a.vue
const setting = await this.$settingAPIService.getUserSettings()
pluginとして定義すると多少はパフォーマンスも悪化すると思いますが、自分たちが書いているコード量しかないので、pluginにしてもさほど変化はないと考えました。ここまでやらなくても、utilに用意したメソッドを呼び出してもいいと思います。
総括
pageのdataで事足りるのにVuexを採用した結果
・Publicなグローバルストアが量産されて、保守性が落ちた
・コードジャンプが効かずイライラした
・無駄にコードの記述量が増えた
・dispatchした結果を待つ時にfluxパターンが崩壊する、もしくは無駄にstateが肥大化して保守性が犠牲になる教訓:何かを使う時は、それが想定されているユースケースをちゃんと調べよう
100日後にリファクタリングします
- 投稿日:2020-03-05T17:55:51+09:00
チーム開発でコードの書き方やクラス設計の認識を合わすためにやったこと
対象のユーザ
- チーム開発をしている人
- チーム開発に悩んでる人
- レガシーコードをなんとかしたい人
- コード全体を一気にリプレイスできない人
はじめに
今プラハという会社でPRANETというエンジニアのSNSを開発しているrevenue-hackです。
PRANETはフロントにVue.js, Nuxt, バックエンドにTypeScript, Express, DBにNeo4j, Cloud Firestoreを採用しています。課題について
- コードを書く場所が人によってバラバラ
- 変数名やカプセル化の加減が人によって違う
- PRで一度議論が起きたことが他のPRでも起きていて、チーム全体の認識が合わない
このようなことが起きていて、チームの開発スピードが一向に上がらないという問題が起きていました。
どのように解決したか?
弊社ではPR道場というものを取り入れました。
PR道場とは
- 誰かのPRで起きた議論は他のPRでも起きていく可能性が高い
- どこに書くべきか、どう書くべきか人によって意見が分かれる
そういったものを解決するために弊社で週1で行っている提案会議です。
ではPR道場での実例を2つほど紹介します。
コミットメッセージに関する提案
(課題) resolve conflictした時、どこを修正したのかわからない
(提案)
  ・’resolve conflict’ってコミット名は禁止
  ・fix:の記法に沿って、どこを修正したのか記載する
背景として最近conflict修正を失敗してバグを生んでいたため、コミットメッセージでどの部分のconflictがおかしくなっていたのか追えなくなっていました。
そこでコミットメッセージを正すことで、conflictの変更もコミットメッセージからわかるようにしました。こういったライトなものでも共通認識を持つことで、問題解決につながっていきます。
エラーハンドリングの方法について
また実装レベルの提案だとエラーハンドリングの仕方についての提案です。
Repository層でfindしてDBからリソースが取得できなかったときはundefinedを返す(エラーを返すのではなく)
 ・配列は空配列を返す
 ・SettingRepoImplでユーザの設定が取得できないときにエラーを吐いていた
 ・Repoではundefinedを返して、ルーター辺りでhttp response errorを作るように変えた
 ・理由
  ・404なのか500なのか区別つかない
 ・異なるハンドリングされる可能性のあるエラーには気をつける(404と500)
エラーハンドリングは1つ必ず決まった正解があるわけではなく、チーム単位やプロジェクト単位また個人単位でも異なってきて、処理の方法に差が出る部分です。
その部分をチームで提案という周知することで、コードの品質を担保することができます。
また今回のケースでは議論が発展し、404や500だけでなく400のケースもチェックするべきではないか?その場合はどのように処理するのが良いか?
など更に深ぼった話に発展し、結果的にRepository層では400, 500, 404のエラーを区別できるようにエラーclassを作り、それをthrowするようにしました。
この提案でチーム全体のコード規約を決めることができ、また提案の背景を知ることで個々の設計力や、コーディング力が上がってきました。PR道場(改)
ただPR道場をやっていて一点課題が出てきました。
それはPR道場をやっていると設計に詳しい人やTypeScriptやVueに詳しい人など、喋る人が偏っていて、
これだと結局話さない人がどの程度理解しているかわかりません。
そこで、PR道場で出されたお題を、出した人以外の人が話すことにしました。
メリットとしては
- 発言者が偏らないことで、全体の周知度が見えやすくなる
- 理解していない人がなにが理解できていないのかはっきりわかるようになる
- 誰が読んでも説明できるぐらい後世に伝えやすい形で残るドキュメントが残る
があります。
こうすることでコード規約の決め事の場から、全員が理解してコードを書けるよう成長する場にすることができました。まとめ
今回チーム開発を改良したことで良かったこととして、
- 全体としてのコードを書く上での共通認識がある程度固まった
- (どうしてこの提案をしたのか背景を知ることで)チーム全体の設計力が上がった
- 共通認識を作ったことでPRレビュー時の意見割れが減りPRレビューが開発スピードのボトルネックになりにくくなった
です。
是非チームで取り入れて、チーム全体の開発力向上につながれば良いなと思います。
- 投稿日:2020-03-05T15:38:27+09:00
Nuxt + Vue Property Decorator で ルーティングのパラメーターをバリデーションする
TypeScript + Nuxt + Vue Property Decoratorで開発していたところ、ルーティングのパラメーターバリデーションでハマったので備忘録として残します。問題点
Nuxt.jsでルーティングのパラメーターが数値であれば表示、それ以外ならNot Foundとする、という処理を実現したい場合、以下のように記述すれば期待通りの結果になります。export default { validate ({ params }) { return /^\d+$/.test(params.id) } }これを
TypeScript + Vue Property Decoratorを使って書く場合はどうすればいいでしょうか。
素直に以下のように記述すると、validateはユーザー定義のメソッドとして扱われてしまうため、動作してくれません。import { Vue, Component } from 'vue-property-decorator'; @Component export default class Index extends Vue { validate({ params }: { params: any }) { return /^\d+$/.test(params.id); } // その他処理 }Vue Router 固有のメソッドを設定する
Component.registerHooksにvalidateを追加すれば期待通りの動作をしてくれます。import { Vue, Component } from 'vue-property-decorator'; // 追加 Component.registerHooks(['validate']); @Component export default class Index extends Vue { validate({ params }: { params: any }) { return /^\d+$/.test(params.id); } // その他処理 }
vue-property-decoratorのComponentに認識させたいVueプラグインのメソッドを追加すればOK
簡単ですね。別解
別解というか、
Nuxt + TypeScriptで開発する場合、こちらのほうがベターなのかもしれませんが、vue-property-decoratorの代わりに、nuxt-property-decoratorを利用します。npm i -S nuxt-property-decoratorimport { Vue, Component } from 'nuxt-property-decorator'; @Component export default class Index extends Vue { validate({ params }: { params: any }) { return /^\d+$/.test(params.id); } // その他処理 }
Nuxt Property DecoratorはVue Property Decoratorのラッパーであり、内部でプラグインメソッドを設定しているので、registerHooks()を記述する必要がなくなりました。特に理由がないのであれば、
Nuxt Property Decoratorを利用するほうが良さそうです。参考
- 投稿日:2020-03-05T11:52:35+09:00
【Nuxt.js】JSONファイルを読み込み共通データ作成する
Nuxt.js、VuetifyでWebサイトを作成していたときにグローバルナビやフッターナビなど同じ項目で流用でき、まとめておくようなデータを作成できないかと思いました。
下記にそのときの方法をまとめてみました。
グローバルナビを作成
Headerにグローバルナビを設置するとき下記のように配置していました。
header.vue<template lang="pug"> v-app-bar v-layout v-btn(href="about") about v-btn(text href="case") case v-btn(text href="price") price v-btn(text href="help") help v-btn(text href="information") information </template>この形でも表示されるのですが、フッターにも同じメニュー」を並べたり、他にも流用して使えないかとおもいました。
JSONデータの作成
まず流用できるデータとしてこのようなJSONデータを作成します。
menu.json[ { "id": 1, "category": "about", "link": "about" }, { "id": 2, "category": "case", "link": "case" }, { "id": 3, "category": "price", "link": "price" }, { "id": 4, "category": "help", "link": "help" } { "id": 5, "category": "information", "link": "information" } ]JSONデータの読み込み
JSONを読み込み表示させるだけなら下記のような書き方で表示することができます。
header.vue<template lang="pug"> v-app-bar v-layout v-btn(v-for="(menu, index) in menus" v-bind:key="menu.id" :href="menu.link") | {{ menu.category }} </template> <script> import menus from '@/assets/json/menu.json' export default { data () { return { menus: menus } } } </script>Vuexを使用する
Nuxt.jsで共通データを作成するならVuexを利用すると便利なので使っていきます。
Storeにデータを作成
Storeにmenu.jsonを読み込ませていきます。
Nuxt.js ではstoreディレクトリ内にモジュールと対応するファイルを持つことができます。
モジュールモードstore/json.jsimport jsonData from '@/assets/json/menu.json' // 状態の管理 export const state = () => ({ data: jsonData, }) // getters export const getters = { getAll: (state) => { return state.data }, }gettersはこのように増やしていくことも可能です。
export const getters = {
  getAll: (state) => {
    return state.data
  },
  getAll2: (state) => {
    return state.data2
  },
}
共通データを呼び出す
先程作成したデータを表示さえたいファイルに下記のように書き込みます。
mapGettersで呼び出し、v-forで繰り返し表示させます。header.vue<template lang="pug"> v-app-bar v-layout v-btn( v-for="(menu, index) in getAll" v-bind:key="menu.id" :href="menu.link") | {{ menu.category }} </template> <script> import { mapGetters } from 'vuex' export default { computed: { ...mapGetters({ getAll: 'json/getAll', }), }, } </script>これで最初に書いたメニューと同じ表示になります。
また、このデータを流用しほかの部分でも使うことが可能になりました。
- 投稿日:2020-03-05T11:15:21+09:00
[GitHub] 東京都公式 新型コロナウイルス対策サイトがプルリク募集してる[COVID-19]
東京都公式 新型コロナウイルス対策サイトのリポジトリが、GitHub上に公開されています。
Issueは大歓迎、Pull Requestは受け入れ体制を今調整しているそうです。
※追記 Pull Requestに対するレビュー、受け入れ既に始まってます。行動規範が最強にかっこいいので是非一読を。
序文だけ引用(一部言葉を補ってます。)我々はなぜここにいるのか
・ 都民の生命と健康を守るため
・ 正しいデータをオープンに国内/海外の人に伝えるため
・ 正しいものを正しく、ともに作るプロセスの効果を具体的に示すため主にVue.js (nuxt.js)で作成されているようなので、
貢献したい方は、ReadMeとHow to contributeを確認するといいと思います。一言
東京都がこういう運用できるということに驚きました。すごい。
Vtuberの公式サイトをプルリクで作るを思い出す。リンク

- 投稿日:2020-03-05T09:21:31+09:00
実践!令和 500円貯金(投資)をするといくら貯まるのか?(Vue.jsでのグラフ&テーブル表示)
はじめに
昨年2019年、元号が「平成」→「令和」に変更されました。普段、元号使わないし、「いま平成何年だっけ?」と考えるのは、煩わしいと思っていました。しかし、予想以上に令和への改元が盛り上がり、時代の節目として、元号ってよいものだと思いました。そう思った人も多かったのではないでしょうか。
そこで、「令和」のテーマで何かできないかな、と考えはじめました。平成は約30年。令和は何年の続くのかは、今のところ誰にもわかりませんが、この令和の期間中、「令和500円貯金」と称して、500円貯金をしようと思いました。
「令和500円貯金」とは
- 500円貯金:わかりやすく1年間を360日とすると、500円を毎日貯金箱にいれたとすると、18万円になります。(毎日きっかり500円というわけではなく、わかりやすさ重視で、1年360日(年間18万)・1ヶ月30日(1万5千円)とします。)
- 貯金箱に貯金していても、おもしろくないので、時代に合わせて「投資」にしようということで、「令和500円積立投資」とします。
- 令和の時代、ずっと積み立てを実施します。(令和元年は5月からですが、わかりやすく1月から実施)
- 平成と同じく30年だったとすると、18万×30年=540万となります。
※数年前に、500円玉で貯金をしたことがあります。500円玉が手元に来るたびに貯金箱にいれてました。貯金箱がいっぱいになるまでやり、結構頑張ったつもりでしたが、結果9万円前後で、頑張りと貯金箱の重さのわりにはそんなでもないなぁ、と思った記憶があります。
「元号」TIPS
- 先日、天皇誕生がありましたが、今上天皇は60歳(還暦)になられたそうです。(そうすると、令和とどのくらいなのでしょうか・・・)
- 元号の平均は、5.5年らしいです(650年から、平成の最後の年である2018年までの1368年間で247の元号。平均すると「5.5年」)
【日本の元号の長さランキング】
1位:昭和: 約62年
2位:明治: 約44年
3位:応永: 約33年(室町時代)
4位:平成: 約31年
5位:延暦: 約23年(奈良時代)では、いくらになるのか?
モチベーションをあげるため(自動積立をしますので、モチベーションも何もないのですが)、最終的にはいくらくらいになるのかをプログラムで計算してみたいと思います。
実際には、プログラムを作らなくても、積立シミュレーション(下記のURLは楽天)で簡単にできます。
https://www.rakuten-sec.co.jp/web/fund/saving/simulation/EXCELでもできると思いますが、ポチポチとパラメータを変更したいですし、勉強になりますから、Vue.jsで「複数軸グラフ」と「テーブル」を表示し、パラメータを変えるとリアクティブに表示が変わるものを作ってみたいと思います。
使用技術
インストール
npm install vue-chartjs chart.js
npm install bootstrap-vueサイト・コード
- 入力パラメータ: 積立期間(年)・毎日積立金額(円)・利回り(%)
- グラフ:「横軸」現在からの積立期間・「縦軸」金額(万円)
- テーブル:元本・評価額・利益
パラメータを変更したり、ポチポチすると、グラフやテーブルの表示が変化します。(グラフをみると、やはりポイントは投資年数と利回りである、ということが一目瞭然です)
コード:グラフの表示部分
App.vue<template> <b-container> <!-- グラフ表示 --> <chart :chart-data="datacollection" :options="options"></chart> </b-container> </template> <script> import Chart from './Chart.js' export default { components: { Chart }, data () { return { datacollection: {}, options: {} } }, mounted () { this.makeData() }, methods: { makeData () { // データ作成 // 省略 } // グラフにセットする this.datacollection = { labels: yearLabels, //データ作成部分で作ったデータ datasets: [ { label: '元本', data: dataset1, //データ作成部分で作ったデータ backgroundColor: 'lightblue' }, { label: '評価額', data: dataset2, //データ作成部分で作ったデータ borderColor: 'lightgreen', fill: false, type: 'line' } ] }, this.options = { maintainAspectRatio: false, elements: { point: { radius: 5, // 点の大きさ hoverRadius: 10 // 点の大きさ(マウスホバー時) } }, scales: { yAxes: [ { ticks: { suggestedMin: 0, stepSize: 10 } } ] } } } } } </script>
全体のコード
App.vue<template> <b-container> <br><h2>令和500円積み立て</h2><br> <!-- パラメータ設定 --> <b-row> <b-col> <b-form-group label-cols-sm="5" label="積立期間(年):" label-align-sm="right" label-for="how-long-year"> <b-form-input v-model="howlongyear" v-on:change="makeData()" type="number" id="how-long-year"></b-form-input> </b-form-group> </b-col> <b-col> <b-form-group label-cols-sm="5" label="毎日積立金額(円):" label-align-sm="right" label-for="how-much-day"> <b-form-input v-model="howmuchday" v-on:change="makeData()" type="number" id="how-much-day"></b-form-input> </b-form-group> </b-col> <b-col> <b-form-group label-cols-sm="5" label="利回り(%):" label-align-sm="right" label-for="interest"> <b-form-input v-model="interest" v-on:change="makeData()" type="number" id="interest"></b-form-input> </b-form-group> </b-col> </b-row> <span>※1年は360日として計算</span> <!-- グラフ表示 --> <chart :chart-data="datacollection" :options="options"></chart> <br><hr><br> <!-- テーブル表示 --> <b-table small bordered striped head-variant="dark" :fields="fields" :items="items" class="text-center"></b-table> </b-container> </template> <script> import Chart from './Chart.js' export default { components: { Chart }, data () { return { howlongyear: 20, howmuchday: 500, interest: 3, datacollection: {}, options: {}, fields: ['No', '年', '元本', '評価額', '利益'], items: [] } }, mounted () { this.makeData() }, methods: { makeData () { // 1年で積み立てる金額(毎日積立金額 * 360) var yearset = this.howmuchday * 360 var yearLabels = [] var dataset1 = [] var dataset2 = [] this.items = [] var date = new Date() var yyyy = date.getFullYear() var principal, calcresult, calcmath, resultset for(var i = 1; i <= this.howlongyear; i++){ if (i == 1){ yearLabels.push(yyyy) calcresult = yearset * (1 + (this.interest / 100)) } else { yearLabels.push(yyyy += 1) calcresult = (yearset + calcmath) * (1 + (this.interest / 100)) } // data1 を追加 principal = (yearset * i) / 10000 dataset1.push(principal) // data2 を追加 calcmath = Math.round(calcresult * 10) / 10 resultset = Math.round( (calcmath / 10000) * 10) / 10 dataset2.push(resultset) var num = resultset - principal var gain = Math.round(num * 10) / 10 var tableset = { 'No': i, '年': yyyy, '元本': principal + '万円', '評価額': resultset + '万円', '利益': gain + '万円', } this.items.push(tableset) } // グラフにセットする this.datacollection = { labels: yearLabels, datasets: [ { label: '元本', data: dataset1, backgroundColor: 'lightblue' }, { label: '評価額', data: dataset2, borderColor: 'lightgreen', fill: false, type: 'line' } ] }, this.options = { maintainAspectRatio: false, elements: { point: { radius: 5, // 点の大きさ hoverRadius: 10 // 点の大きさ(マウスホバー時) } }, scales: { yAxes: [ { ticks: { suggestedMin: 0, stepSize: 10 } } ] } } } } } </script>Chart.jsimport { Bar, mixins } from 'vue-chartjs' const { reactiveProp } = mixins export default { extends: Bar, mixins: [reactiveProp], props: ['options'], mounted () { // this.chartData is created in the mixin. // If you want to pass options please create a local options object this.renderChart(this.chartData, this.options) } }実践中!(暴落中!)
- 2019年(=令和元年)より、投資信託に自動積立でスタートしています。
- 2020年2月末現在、元本:15,000円×14カ月=210,000円、評価額:213,408円(+3,408円)(+約1.6%)となっています。
- コロナショックにより暴落中ですが、かろうじてプラスです。(積立ては、こういうときによいですね。値動きについて一切気になりません)
まとめ
- Vue.jsで2軸グラフを作成しました。
- 令和の時代が終わるとき(20年後?30年後?)に500円貯金(投資)がどのようになっているのか、とても楽しみです。
参考URL


- 投稿日:2020-03-05T01:29:54+09:00
Vue.jsのComposition APIについて自分なりに考えてみたメモ
何があった?
気が付くと今年にはVue.js 3.0が出るらしい。
しかも、今までの書式とは結構変わってしまうらしい…。何と言う事でしょう、巧1の仕業か!?
Composition APIを調べてみて思った事
Vue.js 3.0から導入される新機能の大玉はComposition APIと言う仕組みらしいです。
なんでもTypeScriptとの相性を解消するためだったり2とか、高速化の為だったりとか。当初、Vue.js 2.xでも完璧超人3に感じてたので、わざわざ新しい書式なんて要らないんじゃないかな?
…と思ったのですが、Composition APIを少し触ってみて結構いいんじゃないと思ったのと、自分なりに思う所が出てきたので、そういった部分をメモしてみたいと思います。setupについて
Composition APIではテンプレートで使用する要素をsetupでreturnする仕様になっているらしい。
また、いくつかの解説(それは公式も)ではsetup内に関数を入れているみたいだけど、setupと言う名前だし、あんまり業務ロジック的な関数は中に入れたくない4気がします。
出来れば
defineComponentの外に配置したいな思いました5。逆に
reactiveやref、computedなどは、setupの外でも使用可能だけど、これらはsetup()の中で指定するほうが見渡しが良くなるような感じもする…。<script> import { reactive } from '@vue/composition-api' const state = { name: 'てすと', price: 1000, text: '' } const method = { taxCalculator(price){ const taxRate = 1.1 return Math.floor(price * taxRate) } } export default defineComponent({ setup() { const data = reactive(state) return { data, method } } }) </script>例えば、こんな感じ?
setup関数の第二引数について
setup関数の第二引数内には、「root, parent, refs, attrs, listeners, isServer, ssrContext, emit, slots」など含まれているけど、今までmethodの中でバンバン
this.$emitなんて書いてきたので、なんか違和感を感じました。なんかこの第二引数の内容って、ちょっと隠したい物の置き方みたいに感じます6。
それにemitを使うためにsetup内に関数を書くのは、ちょっとやりたくないかなって思いました。
でも、emitは割とよく使うし…どうすればいいんだろうと考えました。emitの使い方を考える
↑で書いたみたいに、setup内でemitを含んだ関数は書きたくない!!!
それでふと、他にemit出来る場所って結局templateの中しかないと思った時に、なんとなくもともとemitはtemplateから直接呼びたいものなのではないかと思いました7。
<template>
 <dl>
  <dt>名前入力</dt>
  <dd>
   <input
    type="text"
    @input="$emit('input', method.extractionValue($event))"
   />
  </dd>
 </dl>
</template>
こういう感じにemitは直接templateから指定して、引数からメソッドを呼んで必要に応じて成型した戻り値を親コンポーネントへ送ります。
分岐からのemitの場合
ただ時々ある、ボタン押してからstateの条件に応じてemitの選り分け等を行う場合にはtemplateからのemitでは辛いかもと思う時があります。
自分の考えとしては、選り分け処理は親コンポーネントに任せてとりあえず値を親に送り付けるという方法が良いのではないかと思います。今までは、↓のように分岐してからemitしてた。
<template>
 <button @click="submit()">送信</button>
</template>
submit () { if (this.flag > 1) { this.$emit('submit') } }でもこれからはtemplateでとりあえず、親へ送っちゃう
<template>
<button @click="$emit('submit', status)">送信</button>
</template>
// これは親コンポーネントの処理 function submit(status){ if (this.status > 1) { // 条件に応じての処理 } }routeについて
routerじゃなくてrouteの方もemitとよく似てます。
これも結局templateから普通に呼べるので、メソッドを呼ぶときに引数に加えてあげればいいかなと思います。<input type="number" @input="$emit('input', hoge($route.name))" >ただ、ページの一番最初にAPI呼ぶときのパラメータとかで必要だったりするので、そういう場合はsetupの第二引数を使って呼ぶ必要があるかもしれません。
setup(props, { root }){
 cosnt pageName = root.$route.name
 axios.get(`/api/hogehoge/${pageName}`).then(...)
}
storeとかrouterについて
これらは普通にimportしちゃうのが良い感じだと思いました。
import store from '@/store'
import router from '@/router'

function hoge () {
 store.dispatch('fugafuga')
 router.push('hogehoge')
}
axiosはどうする?
vueの公式サイトでもaxiosをvueのインスタンスの中に突っ込んで、
this.$axiosみたいな呼び方をするのがメジャーかなって思いましたが、これも普通にimportして使うのが良いかもしれません。Componentの参照方法について
storeやrouter、axiosをimportするようになると、コンポーネントのためのimportと混在してちょっと見通しが悪い気がします。
なので、コンポーネントはrouter.jsみたいな感じに書いちゃった方が、さっぱりするかもしれません。
※これは完全に個人的な思いつきでやっていますので、特に参考になりません。import { defineComponent } from '@vue/composition-api' import axios from '@/axios' export default defineComponent({ components: { Hoge: () => import('./Hoge.vue'), Fuga: () => import('./Fuga.vue'), }, setup() { // ... } }…と言う夢を見た
と言う感じにComposition APIを学んだ結果、こんな夢を見てしまったわけですが、特にemitなどのあしらい方はそのままvue.js 2.xでも実践できるなと思いました。
もしかしたら、vue.jsは自分が思ってる以上にTemplateに焦点を当てて考えるべきなのかもと思いました。
そして、この夢が良いのかどうかを検証するためにも実践していきたいと思ったのでした…。ここまで、駄文を読んでくれた人がいましたら、ありがとうございました。
注意事項
この記事はある種の夢でありチラシの裏でありポエムの様なものです。
参考にならないなと思った場合は、そっ閉じしてくれると嬉しいです。