- 投稿日:2020-03-05T23:51:24+09:00
Vue.js/Blazor/Angularの文法比較サンプル集
ある程度の文法のVue.js/Blazor/Angularにおいて同様の動作を実現するための方法についてまとめました。分離元
VueVsBlazorにソースコードをまとめています。ちなみにVue.jsではTypeScriptを採用しています。
動作サンプルページ
Vue.js Sample
Blazor Sample
Angular Sample文法の比較
ここでのサンプルは全てルーター上の1ページとして表現しています。
土台となるルーターの実装例から順に比較していきます。0. 最小のコンポーネント
コンポーネントの内容はただのhtmlから可能です。
Vue.js
templateタグで囲みます。
1つのブロックのみとする必要があります。Index.vue<template> <div> <h1>Hello Vue.js!</h1> </div> </template>Blazor
特別考慮する点はありません。
書いた分だけhtmlとして動きます。
通常、scriptタグは使用できません。Index.razor@page "/" <div> <h1>Hello Blazor!</h1> </div>Angulae
TypeScript内にhtmlをテンプレートとして挿入します。
htmlやcssはファイルを分ける方が主流のようですが、ここでは同一ファイルとして扱います。Index.component.tsconst template=` <div> <h1>Hello Angular!</h1> </div> `; import {Component} from "@angular/core"; @Component({ selector: "Index", template: template }) export class IndexComponent{}1. スタイルシート
Vue.js
styleタグで囲むことでスタイルを記述できます。
style scopedを使うことでコンポーネント内に「スコープ」を作ることができます。StyleBlock.vue<template> <div id=index> <h1>Hello Vue.js!</h1> </div> </template> <style scoped> div#index{ color: #0000FF; } </style>Blazor
CSSに関するBlazor特有の仕組みはありません。
諦めてbodyにstyleタグを置いています。
まぁ、大体のブラウザでは動きます。
html的には良いのか悪いのかわかりませんが。StyleBlock.razor@page "/StyleBlock" <div id=index> <h1>Hello Blazor!</h1> </div> <style> div#index{ color: #0000FF; } </style>Angular
htmlの中にstyleを記述することが認められています。
ここでは示しませんが別ファイルからインポートすることも可能です。StyleBlock.component.tsconst template=` <div id=index> <h1>Hello Angular!</h1> </div> <style> div#index{ color: #0000FF; } </style> `; import {Component} from "@angular/core"; @Component({ selector: "StyleBlock", template: template }) export class P1StyleBlockComponent{}2. コードブロック/スクリプトの埋め込み
コードブロックで定義している変数はhtml内に埋め込むことができます。
(Vue.js/Angularは{{hoge}}(thisは常に付加される)、C#は@hogeで呼び出し)Vue.js
scriptタグ内(TypeScriptを使う場合はlang=ts要)に記述します。
ScriptBlock.vue<template> <div> <h1>{{title}}</h1> </div> </template> <script lang=ts> import {Component,Vue} from "vue-property-decorator"; @Component export default class ScriptBlock extends Vue{ title="Hello Vue.js!"; } </script>Blazor
@codeブロック内にスクリプト処理を記述します。
ScriptBlock.razor@page "/ScriptBlock" <div> <h1>@title</h1> </div> @code{ string title="Hello Blazor!"; }Angular
そもそもTypeScriptベースなので特筆よることはあまり無いでしょうか。
○○.component.tsのクラス内に処理を記述します。ScriptBlock.component.tsconst template=` <div> <h1>{{title}}</h1> </div> `; import {Component} from "@angular/core"; @Component({ selector: "ScriptBlock", template: template }) export class P2ScriptBlockComponent{ title="Hello Vue.js!"; }3. html中への数式埋め込み
html中に埋め込めるのは変数のみではありません。
数式を埋め込むこともできます。Vue.js
{{}}内ではグローバルオブジェクトを扱えないことについて注意します。
Formula.vue<template> <div> <h1>10!={{10*9*8*7*6*5*4*3*2*1}}</h1> </div> </template>Blazor
@のエスケープは@@と記述します。
Formula.razor@page "/Formula" <div> <h1>10!=@(10*9*8*7*6*5*4*3*2*1)</h1> </div>Angular
Vue.jsと同様に{{}}内でグローバルオブジェクトを扱うことはできません。
Formula.component.tsconst template=` <div> <h1>10!={{10*9*8*7*6*5*4*3*2*1}}</h1> </div> `; import {Component} from "@angular/core"; @Component({ selector: "Formula", template: template }) export class P3FormulaComponent{}4. ライフサイクルメソッド
Vue.js/Blazorにはhtmlのonload/unonloadのように
コンポーネントの状態でフックされるライフサイクルメソッドというものがあります。
項目 Vue.js Blazor Angular 初期化前 beforeCreate ― constructor※3 初期化後 created OnInitialized
OnInitializedAsync― レンダリング前 beforeMount OnParametersSet
OnParametersSetAsync― レンダリング後 mounted OnAfterRender
OnAfterRenderAsync※1ngOnInit 変更前 beforeUpdate ― ngDoCheck
ngAfterViewInit変更後 updated OnAfterRender
OnAfterRenderAsync※1ngAfterViewChecked アクティブ化時 activated ― ― 非アクティブ化時 deactivated ― ― 破棄前 beforeUpdate ― ― 破棄時 beforeDestroy Dispose※2 ngOnDestroy
- ※1: firstRender引数で初回かどうか判別。
- ※2: ページリロード時には動作しない。
- ※3: サービスの登録にも使用される。
- ※4: Angularは効果がわかりにくいものが多いのでわかるものだけ。
Vue.jsのライフサイクル
Blazorのライフサイクル
Angularのライフサイクル初期化処理は大体レンダリング後に該当する処理で間に合う気がします。
Blazorはデストラクタがページ更新時に動作しないので注意が必要です。
(その場合、現状としてはjsのunonloadをなんとか使うしかない?)Vue.js
LifeCycle.vue<template> <div> <h1>{{title}}</h1> </div> </template> <script lang=ts> import {Component,Vue} from "vue-property-decorator"; @Component export default class LifeCycle extends Vue{ title="Hello Vue.js!"; async mounted(){ await new Promise(res=>setTimeout(res,5000)); this.title+=" 5s passed!"; } } </script>Blazor
LifeCycle.razor@page "/LifeCycle" <div> <h1>@title</h1> </div> @code{ string title="Hello Blazor!"; protected override async Task OnAfterRenderAsync(bool firstRender){ if(!firstRender) return; await Task.Delay(5000); title+=" 5s passed!"; StateHasChanged(); } }Angular
LifeCycle.component.tsconst template=` <div> <h1>{{title}}</h1> </div> `; import {Component,OnInit} from "@angular/core"; @Component({ selector: "LifeCycle", template: template }) export class P4LifeCycleComponent implements OnInit{ title="Hello Angular!"; async ngOnInit(){ await new Promise(res=>setTimeout(res,5000)); this.title+=" 5s passed!"; } }5. DOM API
言語にJavaScript/TypeScriptを選択しているフレームワークでは
ブラウザ依存のDOM APIをそのまま使用することができます。Vue.js
UseDOMAPI.vue<template> <div> <h1>Alert</h1> </div> </template> <script lang=ts> import {Component,Vue} from "vue-property-decorator"; @Component export default class UseDOMAPI extends Vue{ async mounted(){ var title=document.title; alert(title); } } </script>Blazor
BlazorではJavaScriptに頼らずDOM APIを扱うことは不可能なので
JavaScriptのメソッドを呼び出す必要があります。JavaScriptを使うにはIJSRuntimeをinjectして
IJSRuntime.InvoveAsync・IJSRuntime.InvokeVoidAsyncメソッドを呼び出します。プロパティの類には一切取得できないのでその用途にはevalを使うか
別にjsファイルを用意して関数として呼び出す必要があります。UseDOMAPI.razor@page "/UseDOMAPI" <div> <h1>Alert</h1> </div> @inject IJSRuntime js @code{ protected override async Task OnAfterRenderAsync(bool firstRender){ if(!firstRender) return; var title=await js.InvokeAsync<string>("eval","document.title"); await js.InvokeVoidAsync("alert",title); } }Angular
UseDOMAPIconst template=` <div> <h1>Alert</h1> </div> `; import {Component,OnInit} from "@angular/core"; @Component({ selector: "UseDOMAPI", template: template }) export class P5UseDOMAPIComponent implements OnInit{ ngOnInit(){ var title=document.title; alert(title); } }6. 双方向バインディング
Vue.js/Blazor/Angularではdocument.element.valueを直接操作する代わりに変数と要素の値をバインド(同期)します。
Vue.jsではを、Blazorでは@bindを属性に指定します。Vue.js
v-model属性を使用します。
BindingInput.vue<template> <div> <h1>{{title}}</h1> <input v-model="title"> </div> </template> <script lang=ts> import {Component,Vue} from "vue-property-decorator"; @Component export default class BindingInput extends Vue{ title="Hello Vue.js!"; } </script>Blazor
@bind属性を使用します。
BindingInput.razor@page "/BindingInput" <div> <h1>@title</h1> <input @bind="title"> </div> @code{ string title="Hello Blazor!"; }Angular
[(ngModel)]属性を使用します。
[]はスクリプト処理によって値が変更され、
()は人為的な操作により値に変更を与えられることを示します。BindingInput.component.tsconst template=` <div> <h1>{{title}}</h1> <input [(ngModel)]="title"> </div> `; import {Component} from "@angular/core"; @Component({ selector: "BindingInput", template: template }) export class P6BindingInputComponent{ title="Hello Angular!"; }7. 片方向バインディング
変数からdocument.element.valueを一方的に更新することもできます。
Vue.js
v-bind:valueを属性に指定します。
v-bind:はスクリプト処理によって値が変更されることを示します。
v-bind:は:のように省略することができるので:valueと書けます。BindingInputOneWay.vue<template> <div> <h1>{{title}}</h1> <input :value="title"> </div> </template> <script lang=ts> import {Component,Vue} from "vue-property-decorator"; @Component export default class BindingInputOneWay extends Vue{ title="Hello Vue.js!"; async mounted(){ for(;;){ await new Promise(res=>setTimeout(res,2000)); this.title+=">"; } } } </script>Blazor
valueへ直接@で変数として割り当てることができます。
BindingInputOneWay.razor@page "/BindingInputOneWay" <div> <h1>@title</h1> <input value=@title> </div> @code{ string title="Hello Blazor!"; protected override async Task OnAfterRenderAsync(bool firstRender){ if(!firstRender) return; for(;;){ await Task.Delay(2000); title+=">"; StateHasChanged(); } } }Angular
[ngModel]属性を使用します。
前項の[(ngModel)]から()(人為的な変更)を外したものとなります。BindingInputOneWayconst template=` <div> <h1>{{title}}</h1> <input [ngModel]="title"> </div> `; import {Component,OnInit} from "@angular/core"; @Component({ selector: "BindingInputOneWay", template: template }) export class P7BindingInputOneWayComponent implements OnInit{ title="Hello Angular!"; async ngOnInit() { for(;;){ await new Promise(res=>setTimeout(res,2000)); this.title+=">"; } } }8.イベントハンドラ
イベントハンドラはそれぞれちょいちょい表記が異なるので通常のhtmlについても併記します。
Vue.js/Blazorでは指定するものはメソッド名のみでメソッド呼び出しを意味する"()"は不要です。HTML
<html>
<body>
    <button onclick="openDialog()">Click Me!</button>

    <script>
        var title="Hello HTML!";

        function openDialog(){
            alert(title);
        }
    </script>
</body>
</html>
Vue.js
onclick属性の代わりにv-on:click属性を使用します。
v-on:は人為的な操作により値に変更を与えられることを示します。
v-on:は@と表記することもできるので@clickと書くことが出ます。EventHandler.vue<template> <div> <button @click="openDialog">Click Me!</button> </div> </template> <script lang=ts> import {Component,Vue} from "vue-property-decorator"; @Component export default class EventHandler extends Vue{ title="Hello Vue.js!"; openDialog(){ alert(this.title); } } </script>Blazor
通常のイベント名に@を付けたものがイベント属性となります。
つまりこの例では@onclick属性です。EventHandler.razor@page "/EventHandler" <div> <button @onclick="openDialog">Click Me!</button> </div> @inject IJSRuntime js @code{ string title="Hello Blazor!"; async void openDialog(){ await js.InvokeVoidAsync("alert",title); } }Angular
onclick属性の代わりに(click)属性を使用します。
EventHandler.component.tsconst template=` <div> <button (click)="openDialog()">Click Me!</button> </div> `; import {Component} from "@angular/core"; @Component({ selector: "EventHandler", template: template }) export class P8EventHandlerComponent{ title="Hello Angular!"; openDialog(){ alert(this.title); } }9. onchangeイベント
Vue.js/Angularでは@chenge/(change)イベントとv-model/[(ngModel)]を同時に使うことができますが、
Blazorでは@onchangeイベントと@bindを同時に使うことはできません。Changeイベントは双方向バインディングの操作で内部的に使用されているため、
プロパティ(get/set)を咬ませることでイベントの発火を受け取ることができます。Vue.js
OnChangeEvent.vue<template> <div> <h1>Check: {{isChecked}}</h1> <input id=chk type=checkbox v-model="chkChange"> <label for=chk>CheckBox</label> </div> </template> <script lang=ts> import {Component,Vue} from "vue-property-decorator"; @Component export default class OnChangeEvent extends Vue{ isChecked=false; get chkChange(){return this.isChecked;} set chkChange(value:boolean){ this.isChecked=value; alert(`Check: ${this.isChecked}`); } } </script>Blazor
OnChangeEvent.razor@page "/OnChangeEvent" <div> <h1>Check: @isChecked</h1> <input id=chk type=checkbox @bind="chkChange">@("" )<label for=chk>CheckBox</label> </div> @inject IJSRuntime js; @code{ bool isChecked=false; bool chkChange{ get{return isChecked;} set{ isChecked=value; _=js.InvokeVoidAsync("alert",$"Check: {isChecked}"); } } }Angular
OnChangeEvent.component.tsconst template=` <div> <h1>Check: {{isChecked}}</h1> <input id=chk type=checkbox [(ngModel)]="chkChange"> <label for=chk>CheckBox</label> </div> `; import {Component} from "@angular/core"; @Component({ selector: "OnChangeEvent", template: template }) export class P9OnChangeEventComponent{ isChecked=false; get chkChange(){return this.isChecked;} set chkChange(value:boolean){ this.isChecked=value; alert(`Check: ${this.isChecked}`); } }10. スタイルバインディング
スクリプトによるスタイルの変更はhtmlではdocument.element.styleの変更によって行われていました。
Vue.js/Blazor/Angularではその代わり属性に直接値をバインドさせることで変更を行います。Vue.js
v-bind:style属性にJSON形式の文字列で渡します。
変更したいスタイルのキーに対してスタイルの文字列を返す処理を書き込むか
スタイルの含まれる文字列変数を割り当てます。BindingStyle.vue<template> <div> <h1>Check: {{isChecked}}</h1> <input id=chk type=checkbox v-model="isChecked"> <label for=chk>CheckBox</label> <div :style="{color: isChecked? 'blue': 'red'}"> Change Style! </div> </div> </template> <script lang=ts> import {Component,Vue} from "vue-property-decorator"; @Component export default class BindingStyle extends Vue{ isChecked=false; } </script>Blazor
style属性に渡す文字列を変更することでスタイルの変更を行います。
(CSSそのものの書式で文字列として与える必要があります)BindingStyle.razor@page "/BindingStyle" <div> <h1>Check: @isChecked</h1> <input id=chk type=checkbox @bind="isChecked">@("" )<label for=chk>CheckBox</label> <div style=@("color:"+(isChecked? "blue": "red"))> Change Style! </div> </div> @code{ bool isChecked=false; }Angular
[style.○○]属性に渡す文字列を変更することでスタイルの変更を行います。
○○には変更したスタイルを記述します。BindingStyle.component.tsconst template=` <div> <h1>Check: {{isChecked}}</h1> <input id=chk type=checkbox [(ngModel)]="isChecked"> <label for=chk>CheckBox</label> <div [style.color]="isChecked? 'blue': 'red'"> Change Style! </div> </div> `; import {Component} from "@angular/core"; @Component({ selector: "BindingStyle", template: template }) export class P10BindingStyleComponent{ isChecked=false; }11. クラスバインディング
クラスについてもスタイルと同様にバインドできます。
Vue.js
v-bind:class属性にJSON形式の文字列で渡します。
変更したいクラス名のキーに対してboolean値を割り当てて行います。BindingClass.vue<template> <div> <h1>Check: {{isChecked}}</h1> <input id=chk type=checkbox v-model="isChecked"> <label for=chk>CheckBox</label> <div :class="{clsA: isChecked, clsB: !isChecked}"> Change Style! </div> </div> </template> <style scoped> .clsA{ color: blue; font-size: 1.5em; text-decoration: underline solid; } .clsB{ color: red; font-size: 1.0em; font-style: italic; } </style> <script lang=ts> import {Component,Vue} from "vue-property-decorator"; @Component export default class BindingClass extends Vue{ isChecked=false; } </script>Blazor
スタイルの変更と同様にclass属性に渡す文字列を直接編集します。
BindingClass.razor@page "/BindingClass" <div> <h1>Check: @isChecked</h1> <input id=chk type=checkbox @bind="isChecked">@("" )<label for=chk>CheckBox</label> <div class=@(isChecked? "clsA": "clsB")> Change Style! </div> </div> <style> .clsA{ color: blue; font-size: 1.5em; text-decoration: underline solid; } .clsB{ color: red; font-size: 1.0em; font-style: italic; } </style> @code{ bool isChecked=false; }Angular
[class.○○]属性にboolean値を割り当てて適用/不適用を切り替えます。
○○には対応するクラス名を記述します。const template=`
Check: {{isChecked}}
CheckBox
Change Style!
`;
import {Component} from "@angular/core";
@Component({
selector: "BindingClass",
template: template
})
export class P11BindingClassComponent{
isChecked=false;
}
```12. if(場合分け)
Vue.js/Blazor/Angularでは場合分けで表示状態を変更できます。
Vue.js
v-if属性を対象の要素に含めると表示状態を変更できます。
v-ifで表示の切り替えを行うとライフサイクルが働くこととなります。
コンポーネントの状態を保ったまま表示切替を行いたい場合はv-showを使います。
(内部的にdisplay: none;を使っています)IfAndShow.vue<template> <div> <h1>Check: {{isChecked}}</h1> <input id=chk type=checkbox v-model="isChecked"> <label for=chk>CheckBox</label> <div v-if="isChecked"> <input> </div> <div v-show="isChecked"> <input> </div> </div> </template> <script lang=ts> import {Component,Vue} from "vue-property-decorator"; @Component export default class IfAndShow extends Vue{ isChecked=false; } </script>Blazor
@ifを使います。
動作としてはVue.jsにおけるv-ifと同様です。
コンポーネントの状態を保つ場合はstyle/class属性で直接隠すようにします。IfAndShow.razor@page "/IfAndShow" <div> <h1>Check: @isChecked</h1> <input id=chk type=checkbox @bind="isChecked">@("" )<label for=chk>CheckBox</label> @if(isChecked){ <div> <input> </div> } <div style=@("display:"+(isChecked? "": "none"))> <input> </div> </div> @code{ bool isChecked=false; }Angular
*ngIf属性を使用します。
コンポーネントの状態を保って非表示にする場合は[style.display]属性に"none"を与えます。IfAndShow.component.tsconst template=` <div> <h1>Check: {{isChecked}}</h1> <input id=chk type=checkbox [(ngModel)]="isChecked"> <label for=chk>CheckBox</label> <div *ngIf="isChecked"> <input> </div> <div [style.display]="isChecked? '': 'none'"> <input> </div> </div> `; import {Component} from "@angular/core"; @Component({ selector: "IfAndShow", template: template }) export class P12IfAndShowComponent{ isChecked=false; }13. foreach(繰り返し)
Vue.js/Blazor/Angularでは同じ構成のタグであれば繰り返して表示させることができます。
v-bind:key/@keyについて
ループで生成されるリストにはコンポーネントの同一性などを担保するためにkey属性の追加が推奨されます。
(Blazorでは推奨されてない?)
動作が高速になるとも言われます。
v-bind:keyはVue.js、@keyはBlazorにおける表記方法です。
Vue.js
BlazorVue.js
v-for属性を繰り返したい要素に含めます。
これはtemplateタグを無名のタグとして使い、囲んでループさせても問題ありません。
大体の主流なブラウザではオブジェクトの順序は一定となりますが、仕様上で保障されていないので注意してください。
(Mapも一応使えますが情報量が少なくて少し怪しいです。
書き方はv-for="[key,value] of list]"と通常のfor文っぽく書くと使えるようです)ForEachLoop.vue<template> <div> <div v-for="(isChecked,key) in dict"> <input :id="key" type=checkbox v-model="dict[key]" :key="key"> <label :for="key">{{key}}</label> </div> </div> </template> <script lang=ts> import {Component,Vue} from "vue-property-decorator"; @Component export default class ForEachLoop extends Vue{ dict:{[s:string]:boolean}={ A:true, B:true, C:true, D:false, E:false }; } </script>Blazor
@for/@foreachを使います。
ForEachLoop.razor@page "/ForEachLoop" <div> @foreach(var (key,isChecked) in dict){ <div> <input id=@key type=checkbox @bind="dict[key]" @key="key">@("" )<label for=@key>@key</label> </div> } </div> @code{ Dictionary<string,bool> dict=new Dictionary<string,bool>{ {"A",true}, {"B",true}, {"C",true}, {"D",false}, {"E",false} }; }Angular
*ngFor属性を繰り返したい要素に含めます。
Vue.jsのtemplateと同様にng-containerを~要素として使用できます。ForEachLoopconst template=` <div> <div *ngFor="let v of dict | keyvalue"> <input [id]="v.key" type=checkbox [(ngModel)]="dict[v.key]"> <label [for]="v.key">{{v.key}}</label> </div> </div> `; import {Component} from "@angular/core"; @Component({ selector: "ForEachLoop", template: template }) export class P13ForEachLoopComponent{ dict:{[s:string]:boolean}={ A:true, B:true, C:true, D:false, E:false }; }14. コンポーネントの追加
Vue.js/Blazor/Angularではhtmlタグ中に自作の要素(コンポーネント)を埋め込むことをできます。
Blazorでは自動で全てのコンポーネントを読み込みますが、
Vue.jsではimport文で読み込むコンポーネントを指定する必要があります。
Angularではapp.modile.tsに記載します。Vue.js
AddComponent.vue<template> <div> <ComponentA /> <ComponentB /> </div> </template> <script lang=ts> import {Component,Vue} from "vue-property-decorator"; import ComponentA from "@/components/ComponentA.vue"; import ComponentB from "@/components/ComponentB.vue"; @Component({ components:{ ComponentA, ComponentB } }) export default class AddComponent extends Vue{} </script>ComponentA.vue<template> <div> <h3>ComponentA</h3> <textarea></textarea> </div> </template>ComponentB.vue<template> <div> <input id=chk type=checkbox> <label for=chk>ComponentB</label> </div> </template>Blazor
AddComponent.razor@page "/AddComponent" <div> <ComponentA /> <ComponentB /> </div>ComponentA.razor<div> <h3>ComponentA</h3> <textarea></textarea> </div>ComponentB.razor<div> <input id=chk type=checkbox> <label for=chk>ComponentB</label> </div>Angular
AddComponent.component.tsconst template=` <div> <ComponentA></ComponentA> <ComponentB></ComponentB> </div> `; import {Component} from "@angular/core"; @Component({ selector: "AddComponent", templateUrl: template }) export class P14AddComponentComponent{}ComponentA.component.tsconst template=` <div> <h3>ComponentA</h3> <textarea></textarea> </div> `; import {Component} from "@angular/core"; @Component({ selector: "ComponentA", template: template }) export class ComponentAComponent{}ComponentB.component.tsconst template=` <div> <input id=chk type=checkbox> <label for=chk>ComponentB</label> </div> `; import {Component} from "@angular/core"; @Component({ selector: "ComponentB", templateUrl: template }) export class ComponentBComponent{}15. コンポーネントの属性
Vue.js/Blazor/Angularでは子コンポーネントに属性を与え、
与えられた子コンポーネント中でプロパティとして使用することができます。
Vue.jsでは@Prop、Blazorでは[Parameter]、Angularでは@Inputで属性名を指定します。Vue.js
ComponentAttribute.vue<template> <div> <ComponentC msg="View Message" color="#FF00FF" /> </div> </template> <script lang=ts> import {Component,Vue} from "vue-property-decorator"; import ComponentC from "@/components/ComponentC.vue"; @Component({ components:{ ComponentC } }) export default class ComponentAttribute extends Vue{} </script>ComponentC.vue<template> <div :style="{color: color}"> Input Attribute={{msg}} </div> </template> <script lang=ts> import {Component,Prop,Vue} from "vue-property-decorator"; @Component export default class ComponentC extends Vue{ @Prop() private msg:string; @Prop() private color:string; } </script>Blazor
ComponentAttribute.razor@page "/ComponentAttribute" <div> <ComponentC msg="View Message" color="#FF00FF" /> </div>ComponentC.razor<div style=@($"color: {color}")> Input Attribute=@msg </div> @code{ [Parameter] public string msg{get;set;} [Parameter] public string color{get;set;} }Angular
ComponentAttribute.component.tsconst template=` <div> <ComponentC msg="View Message" color="#FF00FF"></ComponentC> </div> `; import {Component} from "@angular/core"; @Component({ selector: "ComponentAttribute", template: template }) export class P15ComponentAttributeComponent{}ComponentC.component.tsconst template=` <div [style.color]="color"> Input Attribute={{msg}} </div> `; import {Component,Input} from "@angular/core"; @Component({ selector: "ComponentC", template: template }) export class ComponentCComponent{ @Input() private msg: string; @Input() private color: string; }16. コンポーネントのメソッド呼び出し
Vue.js/Blazor/Angularでは子コンポーネント中のメンバーを呼び出すことができます。
Vue.js
ref属性でバインドする変数名を指定します。
クラス中でも使用するために宣言が必要です。Toast.vue<template> <dialog :open="isShow"> {{msg}} </dialog> </template> <script lang=ts> import {Component,Vue,Prop} from "vue-property-decorator"; @Component export default class Toast extends Vue{ isShow=false; msg=""; public async show(msg:string){ this.msg=msg; this.isShow=true; await new Promise(res=>setTimeout(res,1500)); this.isShow=false; } } </script>ComponentMethod.vue<template> <div> <Toast ref="toast" /> <button @click="viewToast">Click Me!</button> </div> </template> <script lang=ts> import {Component,Vue} from "vue-property-decorator"; import Toast from "@/components/Toast.vue"; @Component({ components:{ Toast } }) export default class ComponentMethod extends Vue{ $refs!:{toast: Toast}; async viewToast(){ await this.$refs.toast.show("View Torst!"); } } </script>Blazor
@ref属性でバインドする変数名を指定します。
クラス中でも使用するために宣言が必要です。Toast.razor<dialog open=@isShow> @msg </dialog> @code{ bool isShow=false; string msg=""; public async Task show(string msg){ this.msg=msg; isShow=true; StateHasChanged(); await Task.Delay(2500); isShow=false; StateHasChanged(); } }ComponentMethod.razor@page "/ComponentMethod" <div> <Toast @ref="toast" /> <button @onclick="viewToast">Click Me!</button> </div> @code{ Toast toast; async Task viewToast(){ await toast.show("View Toast!"); } }Angular
コンポーネントをインポートし、クラス内で@ViewChildデコレータを割り当てることで使用します。
17. 状態管理コンテナ
どのコンポーネントからでも参照できるグローバル変数のようなもの。
ここでは変数の読み書き程度の極々簡単のみ行っています。Vue.jsでは公式なライブラリとしてVuexが存在します。
Blazorでは特にそのようなものは存在しませんが、Blazorの基本機能のみで同じようにコンテナを扱う方法が存在します。
参考1 参考2
Angularではサービスをコンテナとして使用することができます。詳細については割愛し、動作例のみ記載します。
Vue.js
StateContainer.vue<template> <div> <BooksInput /> <button @click="getBooks">Get Books!</button> <h3>BookLists ({{date}})</h3> <ul> <li v-for="book in books" :key="book">{{book}}</li> </ul> </div> </template> <script lang=ts> import {Component,Vue} from "vue-property-decorator"; import BooksInput from "@/components/BooksInput.vue"; import store from "@/store"; @Component({ components:{ BooksInput } }) export default class StateContainer extends Vue{ books:string[]=[]; date:Date=null; getBooks(){ this.books=store.state.books; this.date=store.state.date; } } </script>BooksInput.vue<template> <div> <div><textarea v-model="bookList" id="bookList"></textarea></div> <button @click="setBooks">Set Books!</button> </div> </template> <style scoped> #bookList{ height: 300px; width: 300px; } </style> <script lang=ts> import {Component,Vue,Prop} from "vue-property-decorator"; import store from "@/store"; @Component export default class BooksInput extends Vue{ bookList=""; public setBooks(){ store.commit("setBooks",this.bookList.split(/\r|\n|\r\n/).filter(s=>s!="")); store.commit("setDate",new Date()); alert("setBooks!"); } } </script>/src/store/index.tsimport Vue from "vue"; import Vuex from "vuex"; Vue.use(Vuex); export default new Vuex.Store({ state:{ books: [] as string[], date: null as Date }, mutations:{ setBooks(state,books:string[]){ state.books=books; }, setDate(state,date:Date){ state.date=date; } } });Blazor
Program.csにサービスとしてコンテナを登録する必要があります。
StateContainer.razor@page "/StateContainer" <div> <BooksInput /> <button @onclick="getBooks">Get Books!</button> <h3>BookLists (@date)</h3> <ul> @foreach(var book in books){<li @key="book">@book</li>} </ul> </div> @inject AppState state; @implements IDisposable; @code{ protected override void OnInitialized(){state.OnChange+=StateHasChanged;} public void Dispose(){state.OnChange-=StateHasChanged;} string[] books={}; DateTime? date=null; void getBooks(){ books=state.books; date=state.date; } }BooksInput.razor<div > <div><textarea @bind="bookList" id="bookList"></textarea></div> <button @onclick="setBooks">Set Books!</button> </div> <style> #bookList{ height: 300px; width: 300px; } </style> @inject IJSRuntime js; @inject AppState state; @code{ string bookList=""; public void setBooks(){ state.setBooks(Array.FindAll(bookList.Replace("\r\n","\n").Split(new[]{'\n','\r'}),s=>s!="")); state.setDate(DateTime.Now); js.InvokeVoidAsync("alert","setBooks!"); } }/Store/AppStore.csusing System; public class AppState{ public string[] books{get;private set;}=new string[]{}; public DateTime? date{get;private set;}=null; public void setBooks(string[] books){ this.books=books; NotifyStateChanged(); } public void setDate(DateTime date){ this.date=date; NotifyStateChanged(); } public event Action OnChange; private void NotifyStateChanged()=>OnChange?.Invoke(); }Angular
StateContainer.component.tsconst template=` <div> <BooksInput></BooksInput> <button (click)="getBooks()">Get Books!</button> <h3>BookLists ({{date}})</h3> <ul> <li *ngFor="let book of books">{{book}}</li> </ul> </div> `; import {Component} from "@angular/core"; import {StoreService} from "../../store.service"; @Component({ selector: "StateContainer", template: template }) export class P17StateContainerComponent{ constructor( private store:StoreService ){}; books:string[]=[]; date:Date=null; getBooks(){ this.books=this.store.books; this.date=this.store.date; } }BooksInput.component.tsconst template=` <div> <div><textarea [(ngModel)]="bookList" id="bookList"></textarea></div> <button (click)="setBooks()">Set Books!</button> </div> <style> #bookList{ height: 300px; width: 300px; } </style> `; import {Component} from "@angular/core"; import {StoreService} from "../../store.service"; @Component({ selector: "BooksInput", template: template }) export class BooksInputComponent{ constructor( private store:StoreService ){} bookList=`たのしいさんすう たのしいこくご たのしいどうとく かぐやひめ シンデレラ うらしまたろう かちかちやま`; public setBooks(){ this.store.books=this.bookList.split(/\r|\n|\r\n/).filter(s=>s!=""); this.store.date=new Date(); alert("setBooks!"); } }store.service.tsimport {Injectable} from "@angular/core"; @Injectable({ providedIn: "root" }) export class StoreService{ books:string[]=[]; date:Date=null; }18. JSONの読み込み
Vue.js/Blazor/AngularではJSONファイルを読み込んで表示することができます。
(クライアントサイドなので書き込みはできません)ここでは次のJSONファイルを読み込みします。
weapons.json[ "大剣", "太刀", "片手剣", "双剣", "ハンマー", "狩猟笛", "ランス", "ガンランス", "スラッシュアックス", "チャージアックス", "操虫棍", "ライトボウガン", "ヘビィボウガン", "弓" ]Vue.js
require関数を使用し、JSONファイルを/src/assets/以下に配置します。
ReadJSON.vue<template> <div> <h3>Read JSON</h3> <ul> <li v-for="value in list" :key="value">{{value}}</li> </ul> </div> </template> <script lang=ts> import {Component,Vue} from "vue-property-decorator"; @Component export default class ReadJSON extends Vue{ list:string[]=[]; mounted(){ this.list=require("@/assets/weapons.json"); } } </script>Blazor
HttpClient.GetJsonAsyncを使用し、JSONファイルを/wwwroot/以下に配置します。
ReadJSON.razor@page "/ReadJSON" <div> <h3>Read JSON</h3> <ul> @foreach(var value in list){<li @key="value">@value</li>} </ul> </div> @inject HttpClient http; @code{ string[] list={}; protected override async Task OnAfterRenderAsync(bool firstRender){ if(!firstRender) return; list=await http.GetJsonAsync<string[]>("Assets/weapons.json?0"); StateHasChanged(); } }Angular
HttpClientモジュールのgetメソッドを使用します。
使用するにはadd.module.tsにサービスを追加する必要があります。
JSONファイルの配置パスは/src/assets/以下とする必要があります。ReadJSON.component.tsconst template=` <div> <h3>Read JSON</h3> <ul> <li *ngFor="let value of list">{{value}}</li> </ul> </div>`; import {Component,OnInit} from "@angular/core"; import {HttpClient} from "@angular/common/http"; @Component({ selector: "ReadJSON", template: template }) export class P18ReadJSONComponent implements OnInit{ constructor( private http:HttpClient ){} list:string[]=[]; async ngOnInit(){ this.list=await new Promise(res=>this.http.get("./assets/weapons.json?0").subscribe(res)); } }19. テキストファイルの読み込み
Vue.js
Vue.jsのみではプレーンなテキストファイルを読み込むことはできません。
読み込む方法としてVue.jsの公式でaxiosを使うことを提案しています。
プロジェクトにはyarnやnpmで追加が可能です。また、この方法でもJSONを読み込めますが、少々ファイルの扱いが異なるので注意が必要です。
| メソッド | パス | 備考
| axios.get | /public/ | 個別の静的ファイルとして扱う
| require | /src/assets | ビルド時jsファイルとともに結合されるReadText.vue<template> <div> <h3>Read Text</h3> <pre>{{text}}</pre> </div> </template> <script lang=ts> import {Component,Vue} from "vue-property-decorator"; import axios from "axios"; @Component export default class ReadText extends Vue{ text=""; async mounted(){ this.text=await axios.get("./kimigayo.txt?0").then(v=>v.data); } } </script>Blazor
JSONと同様にHttpClient.GetStringAsyncを用いて読み込みます。
```vue:ReadText.razor
@page "/ReadText"Read Text
@text@inject HttpClient http;
@code{
string text="";protected override async Task OnAfterRenderAsync(bool firstRender){ if(!firstRender) return; text=await http.GetStringAsync("./kimigayo.txt?0"); StateHasChanged(); }}
```Angular
JSONと同様にHttpClient.getを使用できます。
テキストファイルを読み込むには引数に{responseType:"text"}を加える必要があります。ReadText.component.tsconst template=` <div> <h3>Read Text</h3> <pre>{{text}}</pre> </div> `; import {Component,OnInit} from "@angular/core"; import {HttpClient} from "@angular/common/http"; @Component({ selector: "ReadText", template: template }) export class P19ReadTextComponent implements OnInit { constructor( private http:HttpClient ){} text=""; async ngOnInit(){ this.text=await new Promise(res=>this.http.get("./assets/kimigayo.txt?0",{responseType:"text"}).subscribe(res)); } }R. ルーター
最後に今回使ったルーターの例を示します。
Vue.js
/src/router.index.tsをページが増えるたびに追加する必要があります。
router/index.tsimport Vue from "vue"; import VueRouter from "vue-router"; import Index from "@/views/Index.vue"; import PageA from "@/views/PageA.vue"; import PageB from "@/views/PageB.vue"; Vue.use(VueRouter); const routes=[ {path: "/", name: "Index", component: Index}, {path: "/PageA", name: "PageA", component: PageA}, {path: "/PageB", name: "PageB", component: PageB} ]; const router=new VueRouter({ mode: "history", base: process.env.BASE_URL, routes }); export default router;App.vue<template> <main style=display:flex> <NavMenu /> <div class=v-hr></div> <router-view/> </main> </template> <style scoped> .v-hr{ margin: 0 10px; border-right: 5px solid #CCC; height: 100vh; } </style> <script lang:ts> import {Component,Vue} from "vue-property-decorator"; import NavMenu from "@/components/NavMenu.vue"; @Component({ components:{ NavMenu } }) export default class App extends Vue{} </script>NavMenu.vue<template> <nav> <ol type="1" start="0"> <li><router-link to="/">index</router-link></li> <li><router-link to="/PageA">PageA</router-link></li> <li><router-link to="/PageB">PageB</router-link></li> </ol> </nav> </template> <style scoped> .router-link-exact-active{ color: #FF0000; font-weight: bold; } </style>Blazor
MainLayout.razor@inherits LayoutComponentBase <main style=display:flex> <NavMenu /> <div class=v-hr></div> @Body </main> <style> .v-hr{ margin: 0 10px; border-right: 5px solid #CCC; height: 100vh; } </style>NavMenu.razor<div> <ol type="1" start="0"> <li><NavLink Match="NavLinkMatch.All" href="./">index</NavLink></li> <li><NavLink Match="NavLinkMatch.All" href="./PageA">PageA</NavLink></li> <li><NavLink Match="NavLinkMatch.All" href="./PageB">PageB</NavLink></li> </ol> </div> <style> nav .active{ color: #FF0000; font-weight: bold; } </style>Angular
/src/app/app-routing.module.tsをページが増えるたびに追加する必要があります。
app-routing.module.tsimport {NgModule} from "@angular/core"; import {Routes, RouterModule} from "@angular/router"; import {IndexComponent} from "./pages/Index/Index.component"; import {PageAComponent} from "./pages/PageA/PageA.component"; import {PageBComponent} from "./pages/PageB/PageB.component"; const routes: Routes=[ {path: "", component: IndexComponent}, {path: "PageA", component: PageAComponent}, {path: "PageB", component: PageBComponent}, ]; @NgModule({ imports: [RouterModule.forRoot(routes)], exports: [RouterModule] }) export class AppRoutingModule { }app.component.tsconst template=` <main style=display:flex> <NavMenu></NavMenu> <div class=v-hr></div> <router-outlet></router-outlet> </main> <style> .v-hr{ margin: 0 10px; border-right: 5px solid #CCC; height: 98vh; } </style> `; import {Component} from "@angular/core"; @Component({ selector: "app-root", template: template }) export class AppComponent{}NavMenu.component.tsconst template=` <nav> <ol type="1" start="0"> <li><a routerLinkActive="active" [routerLinkActiveOptions]="{exact:true}" routerLink="/">index</a></li> <li><a routerLinkActive="active" [routerLinkActiveOptions]="{exact:true}" routerLink="/PageA">PageA</a></li> <li><a routerLinkActive="active" [routerLinkActiveOptions]="{exact:true}" routerLink="/PageB">PageB</a></li> </ol> </nav> <style> .active{ color: #FF0000; font-weight: bold; } </style> `; import {Component} from "@angular/core"; @Component({ selector: "NavMenu", templateUrl: template }) export class NavMenuComponent{}まとめ
以上、Vue.jsとBlazor(+Angular)の文法の比較についてまとめてみました。
styleの仕様など、どうにもならない部分はありますが、大部分はほぼ同じように書けるのではないかと思います。
まだ、速度の面で苦しいなぁと感じていますが今後のBlazorに期待したいと思います。
- 投稿日:2020-03-05T23:51:24+09:00
Vue.js/Blazorの文法比較サンプル集
必要に駆られて調べた分のみですが、Vue.jsとBlazor WebAssemblyにおいて同様の動作を実現するための方法についてまとめました。分離元
VueVsBlazorにソースコードをまとめています。ちなみにVue.jsではTypeScriptを採用しています。
動作サンプルページ
文法の比較
ここでのサンプルは全てルーター上の1ページとして表現しています。
土台となるルーターの実装例から順に比較していきます。R. ルーター
3ページの切り替えができるルーター。
Vue.jsでは/src/router.index.tsをページが増えるたびに追加する必要があります。Vue.js
コンポーネント+ルーター配置└─src │ App.vue │ main.ts │ shims-tsx.d.ts │ shims-vue.d.ts │ ├─components │ NavMenu.vue │ ├─router │ index.ts │ └─views Index.vue PageA.vue PageB.vuerouter/index.tsimport Vue from "vue"; import VueRouter from "vue-router"; import Index from "@/views/Index.vue"; import PageA from "@/views/PageA.vue"; import PageB from "@/views/PageB.vue"; Vue.use(VueRouter); const routes=[ { path: "/", name: "Index", component: Index }, { path: "/PageA", name: "PageA", component: PageA }, { path: "/PageB", name: "PageB", component: PageB } ]; const router=new VueRouter({ mode: "history", base: process.env.BASE_URL, routes }); export default router;App.vue<template> <main style=display:flex> <NavMenu /> <div class=v-hr></div> <router-view/> </main> </template> <style scoped> .v-hr{ margin: 0 10px; border-right: 5px solid #CCC; height: 100vh; } </style> <script lang:ts> import {Component,Vue} from "vue-property-decorator"; import NavMenu from "@/components/NavMenu.vue"; @Component({ components:{ NavMenu } }) export default class App extends Vue{} </script>NavMenu.vue<template> <nav> <ol type="1" start="0"> <li><router-link to="/">index</router-link></li> <li><router-link to="/PageA">PageA</router-link></li> <li><router-link to="/PageB">PageB</router-link></li> </ol> </nav> </template> <style scoped> .router-link-exact-active{ color: #FF0000; font-weight: bold; } </style>PageA.vue<template> <div> <h1>PageA</h1> </div> </template>PageB.vue<template> <div> <h1>PageB</h1> </div> </template>Blazor
コンポーネント配置│ App.razor │ MainLayout.razor │ ├─Pages │ Index.razor │ PageA.razor │ PageB.razor │ └─Shared NavMenu.razorApp.razor<Router AppAssembly="@typeof(Program).Assembly"> <Found Context="routeData"> <RouteView RouteData="@routeData" DefaultLayout="@typeof(MainLayout)" /> </Found> <NotFound> <LayoutView Layout="@typeof(MainLayout)"> <p>Sorry, there's nothing at this address.</p> </LayoutView> </NotFound> </Router>MainLayout.razor@inherits LayoutComponentBase <main style=display:flex> <NavMenu /> <div class=v-hr></div> @Body </main> <style> .v-hr{ margin: 0 10px; border-right: 5px solid #CCC; height: 100vh; } </style>NavMenu.razor<div> <ol type="1" start="0"> <li><NavLink Match="NavLinkMatch.All" href="./">index</NavLink></li> <li><NavLink Match="NavLinkMatch.All" href="./PageA">PageA</NavLink></li> <li><NavLink Match="NavLinkMatch.All" href="./PageB">PageB</NavLink></li> </ol> </div> <style> nav .active{ color: #FF0000; font-weight: bold; } </style>Index.razor@page "/" <div> <h1>Hello Blazor!</h1> </div>PageA.razor@page "/PageA" <div> <h1>PageA</h1> </div>PageA.razor@page "/PageB" <div> <h1>PageA</h1> </div>0. 最小のコンポーネント
コンポーネントの内容はただのhtmlから可能です。
Vue.jsはtemplateタグで囲み、1つのブロックのみとする必要があります。Vue.js
Index.vue<template> <div> <h1>Hello Vue.js!</h1> </div> </template>Blazor
Index.razor@page "/" <div> <h1>Hello Blazor!</h1> </div>1. スタイルシート
BlazorはCSSに対する特別な構文がないので諦めてbodyに直置きすることにしました。
Vue.js
StyleBlock.vue<template> <div id=index> <h1>Hello Vue.js!</h1> </div> </template> <style scoped> div#index{ color: #0000FF; } </style>Blazor
StyleBlock.razor@page "/StyleBlock" <div id=index> <h1>Hello Blazor!</h1> </div> <style> div#index{ color: #0000FF; } </style>2. コードブロック/スクリプトの埋め込み
Vue.jsではscriptタグ内(TypeScriptを使う場合はlang=ts要)に、
Blazorでは@codeブロック内にスクリプト処理を記述します。
コードブロックで定義している変数はhtml内に埋め込むことができます。
(Vue.jsは{{hoge}}(thisは常に付加される)、C#は@hogeで呼び出し)Vue.js
ScriptBlock.vue<template> <div> <h1>{{title}}</h1> </div> </template> <script lang=ts> import {Component,Vue} from "vue-property-decorator"; @Component export default class ScriptBlock extends Vue{ title="Hello Vue.js!"; } </script>Blazor
ScriptBlock.razor@page "/ScriptBlock" <div> <h1>@title</h1> </div> @code{ string title="Hello Blazor!"; }3. html中への数式埋め込み
html中に埋め込めるのは変数のみではありません。
数式を埋め込むこともできます。
Vue.js{{}}内ではグローバルオブジェクトを扱えないことについて注意します。
Blazorでの@のエスケープは@@と記述します。Vue.js
Formula.vue<template> <div> <h1>10!={{10*9*8*7*6*5*4*3*2*1}}</h1> </div> </template>Blazor
Formula.razor@page "/Formula" <div> <h1>10!=@(10*9*8*7*6*5*4*3*2*1)</h1> </div>4. ライフサイクルメソッド
Vue.js/Blazorにはhtmlのonload/unonloadのように
コンポーネントの状態でフックされるライフサイクルメソッドというものがあります。
項目 Vue.js Blazor 初期化前 beforeCreate ― 初期化後 created OnInitialized
OnInitializedAsyncレンダリング前 beforeMount OnParametersSet
OnParametersSetAsyncレンダリング後 mounted OnAfterRender
OnAfterRenderAsync※1変更前 beforeUpdate ― 変更後 updated OnAfterRender
OnAfterRenderAsync※1アクティブ化時 activated ― 非アクティブ化時 deactivated ― 破棄前 beforeUpdate ― 破棄時 beforeDestroy Dispose※2
- ※1: firstRender引数で初回かどうか判別。
- ※2: ページリロード時には動作しない。
初期化処理は大体レンダリング後に該当する処理で間に合う気がします。
Blazorはデストラクタがページ更新時に動作しないので注意が必要です。
(その場合、現状としてはjsのunonloadをなんとか使うしかない?)Vue.js
LifeCycle.vue<template> <div> <h1>{{title}}</h1> </div> </template> <script lang=ts> import {Component,Vue} from "vue-property-decorator"; @Component export default class LifeCycle extends Vue{ title="Hello Vue.js!"; async mounted(){ await new Promise(res=>setTimeout(res,5000)); this.title+=" 5s passed!"; } } </script>Blazor
LifeCycle.razor@page "/LifeCycle" <div> <h1>@title</h1> </div> @code{ string title="Hello Blazor!"; protected override async Task OnAfterRenderAsync(bool firstRender){ if(!firstRender) return; await Task.Delay(5000); title+=" 5s passed!"; StateHasChanged(); } }5. DOM API
Vue.jsではブラウザ依存のDOM APIをそのまま使用することができます。
BlazorではJavaScriptに頼らずDOM APIを扱うことは不可能なので
JavaScriptのメソッドを呼び出す必要があります。JavaScriptを使うにはIJSRuntimeをinjectして
IJSRuntime.InvoveAsync・IJSRuntime.InvokeVoidAsyncメソッドを呼び出します。プロパティの類には一切取得できないのでその用途にはevalを使うか
別にjsファイルを用意して関数として呼び出す必要があります。Vue.js
UseDOMAPI.vue<template> <div> <h1>Alert</h1> </div> </template> <script lang=ts> import {Component,Vue} from "vue-property-decorator"; @Component export default class UseDOMAPI extends Vue{ async mounted(){ var title=document.title; alert(title); } } </script>Blazor
UseDOMAPI.razor@page "/UseDOMAPI" <div> <h1>Alert</h1> </div> @inject IJSRuntime js @code{ protected override async Task OnAfterRenderAsync(bool firstRender){ if(!firstRender) return; var title=await js.InvokeAsync<string>("eval","document.title"); await js.InvokeVoidAsync("alert",title); } }6. 双方向バインディング
Vue.js/Blazorではdocument.element.valueを直接操作する代わりに変数と要素の値をバインド(同期)します。
Vue.jsではv-modelを、Blazorでは@bindを属性に指定します。Vue.js
BindingInput.vue<template> <div> <h1>{{title}}</h1> <input v-model="title"> </div> </template> <script lang=ts> import {Component,Vue} from "vue-property-decorator"; @Component export default class BindingInput extends Vue{ title="Hello Vue.js!"; } </script>Blazor
BindingInput.razor@page "/BindingInput" <div> <h1>@title</h1> <input @bind="title"> </div> @code{ string title="Hello Blazor!"; }7. 片方向バインディング
変数からdocument.element.valueを一方的に更新することもできます。
Vue.jsではv-bind:valueを属性に指定します。
v-bind:は:のように省略することができるので:valueと書けます。
Blazorではvalueに変数として割り当てることができます。Vue.js
BindingInputOneWay.vue<template> <div> <h1>{{title}}</h1> <input :value="title"> </div> </template> <script lang=ts> import {Component,Vue} from "vue-property-decorator"; @Component export default class BindingInputOneWay extends Vue{ title="Hello Vue.js!"; async mounted(){ for(;;){ await new Promise(res=>setTimeout(res,2000)); this.title+=">"; } } } </script>Blazor
BindingInputOneWay.razor@page "/BindingInputOneWay" <div> <h1>@title</h1> <input value=@title> </div> @code{ string title="Hello Blazor!"; protected override async Task OnAfterRenderAsync(bool firstRender){ if(!firstRender) return; for(;;){ await Task.Delay(2000); title+=">"; StateHasChanged(); } } }8.イベントハンドラ
イベントハンドラはそれぞれちょいちょい表記が異なるので通常のhtmlについても併記します。
Vue.jsではonclick属性の代わりにv-on:click属性を使用します。
v-on:は@と表記することもできるので@clickと書くことが出ます。Blazorでは通常のイベント名に@を付けたものがイベント属性となります。
つまりこの例では@onclick属性です。Vue.js、Blazorどちらでも指定するものはメソッド名のみでメソッド呼び出しを意味する"()"は不要です。
HTML
<html>
<body>
    <button onclick="openDialog()">Click Me!</button>

    <script>
        var title="Hello HTML!";

        function openDialog(){
            alert(title);
        }
    </script>
</body>
</html>
Vue.js
EventHandler.vue<template> <div> <button @click="openDialog">Click Me!</button> </div> </template> <script lang=ts> import {Component,Vue} from "vue-property-decorator"; @Component export default class EventHandler extends Vue{ title="Hello Vue.js!"; openDialog(){ alert(this.title); } } </script>Blazor
Index.razor@page "/EventHandler" <div> <button @onclick="openDialog">Click Me!</button> </div> @inject IJSRuntime js @code{ string title="Hello Blazor!"; async void openDialog(){ await js.InvokeVoidAsync("alert",title); } }9. onchangeイベント
Vue.jsでは@chengeイベントとv-modelを同時に使うことができますが、
Blazorでは@onchangeイベントと@bindを同時に使うことはできません。
厳密には動作は異なりますが、@onclickイベントと僅かに遅延させることで同じような動作を得ることができます。Vue.js
OnChangeEvent.vue<template> <div> <h1>Check: {{isChecked}}</h1> <input id=chk type=checkbox v-model="isChecked" @change="chkChange"> <label for=chk>CheckBox</label> </div> </template> <script lang=ts> import {Component,Vue} from "vue-property-decorator"; @Component export default class OnChangeEvent extends Vue{ isChecked=false; chkChange(){ alert(`Check: ${this.isChecked}`); } } </script>Blazor
OnChangeEvent.razor@page "/OnChangeEvent" <div> <h1>Check: @isChecked</h1> <input id=chk type=checkbox @bind="isChecked" @onclick="chkChange"> <label for=chk>CheckBox</label> </div> @inject IJSRuntime js; @code{ bool isChecked=false; async Task chkChange(){ await Task.Delay(1); await js.InvokeVoidAsync("alert",$"Check: {isChecked}"); } }10. スタイルバインディング
スクリプトによるスタイルの変更はhtmlではdocument.element.styleの変更によって行われていました。
Vue.js/Blazorではその代わり属性に直接値をバインドさせることで変更を行います。Vue.jsではv-bind:style属性にJSON形式の文字列で渡します。
変更したいスタイルのキーに対してスタイルの文字列を返す処理を書き込むか
スタイルの含まれる文字列変数を割り当てます。Blazorではstyle属性に渡す文字列を直接編集することでスタイルの変更が可能です。
Vue.js
BindingStyle.vue<template> <div> <h1>Check: {{isChecked}}</h1> <input id=chk type=checkbox v-model="isChecked"> <label for=chk>CheckBox</label> <div :style="{color: isChecked? 'blue': 'red'}"> Change Style! </div> </div> </template> <script lang=ts> import {Component,Vue} from "vue-property-decorator"; @Component export default class BindingStyle extends Vue{ isChecked=false; } </script>Blazor
BindingStyle.razor@page "/BindingStyle" <div> <h1>Check: @isChecked</h1> <input id=chk type=checkbox @bind="isChecked">@("" )<label for=chk>CheckBox</label> <div style=@("color:"+(isChecked? "blue": "red"))> Change Style! </div> </div> @code{ bool isChecked=false; }11. クラスバインディング
クラスについてもスタイルと同様にバインドできます。
Vue.jsではv-bind:class属性にJSON形式の文字列で渡します。
変更したいclass名のキーに対してboolean値を割り当てて行います。Blazorではスタイルの変更と同様にclass属性に渡す文字列を直接編集します。
Vue.js
BindingClass.vue<template> <div> <h1>Check: {{isChecked}}</h1> <input id=chk type=checkbox v-model="isChecked"> <label for=chk>CheckBox</label> <div :class="{clsA: isChecked, clsB: !isChecked}"> Change Style! </div> </div> </template> <style scoped> .clsA{ color: blue; font-size: 1.5em; text-decoration: underline solid; } .clsB{ color: red; font-size: 1.0em; font-style: italic; } </style> <script lang=ts> import {Component,Vue} from "vue-property-decorator"; @Component export default class BindingClass extends Vue{ isChecked=false; } </script>Blazor
BindingClass.razor@page "/BindingClass" <div> <h1>Check: @isChecked</h1> <input id=chk type=checkbox @bind="isChecked">@("" )<label for=chk>CheckBox</label> <div class=@(isChecked? "clsA": "clsB")> Change Style! </div> </div> <style> .clsA{ color: blue; font-size: 1.5em; text-decoration: underline solid; } .clsB{ color: red; font-size: 1.0em; font-style: italic; } </style> @code{ bool isChecked=false; }12. if(場合分け)
Vue.js/Blazorでは場合分けで表示状態を変更できます。
Vue.jsではv-if属性を対象の要素に含めると表示状態を変更できます。
v-ifで表示の切り替えを行うとライフサイクルが働くこととなります。
コンポーネントの状態を保ったまま表示切替を行いたい場合はv-showを使います。
(内部的にdisplay: none;を使っています)Blazorでは@ifを使います。
動作としてはVue.jsにおけるv-ifと同様です。
コンポーネントの状態を保つ場合はstyle/class属性で直接隠すようにします。Vue.js
IfAndShow.vue<template> <div> <h1>Check: {{isChecked}}</h1> <input id=chk type=checkbox v-model="isChecked"> <label for=chk>CheckBox</label> <div v-if="isChecked"> <input> </div> <div v-show="isChecked"> <input> </div> </div> </template> <script lang=ts> import {Component,Vue} from "vue-property-decorator"; @Component export default class IfAndShow extends Vue{ isChecked=false; } </script>Blazor
IfAndShow.razor@page "/IfAndShow" <div> <h1>Check: @isChecked</h1> <input id=chk type=checkbox @bind="isChecked">@("" )<label for=chk>CheckBox</label> @if(isChecked){ <div> <input> </div> } <div style=@("display:"+(isChecked? "": "none"))> <input> </div> </div> @code{ bool isChecked=false; }13. foreach(繰り返し)
Vue.js/Blazorでは同じ構成のタグであれば繰り返して表示させることができます。
Vue.jsではv-for属性を繰り返したい要素に含めます。
これはtemplateタグを無名のタグとして使い、囲んでループさせても問題ありません。
大体の主流なブラウザではオブジェクトの順序は一定となりますが、仕様上で保障されていないので注意してください。
(Mapも一応使えますが情報量が少なくて少し怪しいです。
書き方はv-for="[key,value] of list]"と通常のfor文っぽく書くと使えるようです)Blazorでは@for/@foreachを使います。
v-bind:key/@keyについて
ループで生成されるリストにはコンポーネントの同一性などを担保するためにkey属性の追加が推奨されます。
動作が高速になるとも言われます。
v-bind:keyはVue.js、@keyはBlazorにおける表記方法です。
Vue.js
BlazorVue.js
ForEachLoop.vue<template> <div> <div v-for="(isChecked,key) in dict"> <input :id="key" type=checkbox v-model="dict[key]" :key="key"> <label :for="key">{{key}}</label> </div> </div> </template> <script lang=ts> import {Component,Vue} from "vue-property-decorator"; @Component export default class ForEachLoop extends Vue{ dict:{[s:string]:boolean}={ A:true, B:true, C:true, D:false, E:false }; } </script>Blazor
ForEachLoop.razor@page "/ForEachLoop" <div> @foreach(var (key,isChecked) in dict){ <div> <input id=@key type=checkbox @bind="dict[key]" @key="key">@("" )<label for=@key>@key</label> </div> } </div> @code{ Dictionary<string,bool> dict=new Dictionary<string,bool>{ {"A",true}, {"B",true}, {"C",true}, {"D",false}, {"E",false} }; }14. コンポーネントの追加
Vue.js/Blazorではhtmlタグ中に自作の要素(コンポーネント)を埋め込むことをできます。
Blazorでは自動で全てのコンポーネントを読み込みますが、
Vue.jsではimport文で読み込むコンポーネントを指定する必要があります。Vue.js
ComponentA.vue<template> <div> <h3>ComponentA</h3> <textarea></textarea> </div> </template>ComponentB.vue<template> <div> <input id=chk type=checkbox> <label for=chk>ComponentB</label> </div> </template>AddComponent.vue<template> <div> <ComponentA /> <ComponentB /> </div> </template> <script lang=ts> import {Component,Vue} from "vue-property-decorator"; import ComponentA from "@/components/ComponentA.vue"; import ComponentB from "@/components/ComponentB.vue"; @Component({ components:{ ComponentA, ComponentB } }) export default class AddComponent extends Vue{} </script>Blazor
ComponentA.razor<div> <h3>ComponentA</h3> <textarea></textarea> </div>ComponentB.razor<div> <input id=chk type=checkbox> <label for=chk>ComponentB</label> </div>AddComponent.razor@page "/AddComponent" <div> <ComponentA /> <ComponentB /> </div>15. コンポーネントの属性
Vue.js/Blazorでは子コンポーネントに属性を与え、
与えられた子コンポーネント中でプロパティとして使用することができます。
Vue.jsでは@Prop、Blazorでは[Parameter]で属性名を指定します。Vue.js
ComponentC.vue<template> <div :style="{color: color}"> Input Attribute={{msg}} </div> </template> <script lang=ts> import {Component,Prop,Vue} from "vue-property-decorator"; @Component export default class ComponentC extends Vue{ @Prop() private msg:string; @Prop() private color:string; } </script>ComponentAttribute.vue<template> <div> <ComponentC msg="View Message" color="#FF00FF" /> </div> </template> <script lang=ts> import {Component,Vue} from "vue-property-decorator"; import ComponentC from "@/components/ComponentC.vue"; @Component({ components:{ ComponentC } }) export default class ComponentAttribute extends Vue{} </script>Blazor
ComponentC.razor<div style=@($"color: {color}")> Input Attribute=@msg </div> @code{ [Parameter] public string msg{get;set;} [Parameter] public string color{get;set;} }ComponentAttribute.razor@page "/ComponentAttribute" <div> <ComponentC msg="View Message" color="#FF00FF" /> </div>16. コンポーネントのメソッド呼び出し
Vue.js/Blazorでは子コンポーネント中のメンバーを呼び出すことができます。
Vue.jsではref属性、Blazorでは@ref属性でバインドする変数名を指定します。
クラス中でも使用するためにそれぞれ宣言が必要です。Vue.js
Toast.vue<template> <dialog :open="isShow"> {{msg}} </dialog> </template> <script lang=ts> import {Component,Vue,Prop} from "vue-property-decorator"; @Component export default class Toast extends Vue{ isShow=false; msg=""; public async show(msg:string){ this.msg=msg; this.isShow=true; await new Promise(res=>setTimeout(res,1500)); this.isShow=false; } } </script>ComponentMethod.vue<template> <div> <Toast ref="toast" /> <button @click="viewToast">Click Me!</button> </div> </template> <script lang=ts> import {Component,Vue} from "vue-property-decorator"; import Toast from "@/components/Toast.vue"; @Component({ components:{ Toast } }) export default class ComponentMethod extends Vue{ $refs!:{toast: Toast}; async viewToast(){ await this.$refs.toast.show("View Torst!"); } } </script>Blazor
Toast.razor<dialog open=@isShow> @msg </dialog> @code{ bool isShow=false; string msg=""; public async Task show(string msg){ this.msg=msg; isShow=true; StateHasChanged(); await Task.Delay(2500); isShow=false; StateHasChanged(); } }ComponentMethod.razor@page "/ComponentMethod" <div> <Toast @ref="toast" /> <button @onclick="viewToast">Click Me!</button> </div> @code{ Toast toast; async Task viewToast(){ await toast.show("View Toast!"); } }17. 状態管理コンテナ
どのコンポーネントからでも参照できるグローバル変数のようなもの。
ここでは変数の読み書き程度の極々簡単のみ行っています。Vue.jsでは公式なライブラリとしてVuexが存在します。
Blazorでは特にそのようなものは存在しませんが、Blazorの基本機能のみで同じようにコンテナを扱う方法が存在します。
参考1 参考2詳細については割愛し、動作例のみ記載します。
Vue.js
/src/store/index.tsimport Vue from "vue"; import Vuex from "vuex"; Vue.use(Vuex); export default new Vuex.Store({ state:{ books: [] as string[], date: null as Date }, mutations:{ setBooks(state,books:string[]){ state.books=books; }, setDate(state,date:Date){ state.date=date; } } });BooksInput.vue<template> <div> <div><textarea v-model="bookList" id="bookList"></textarea></div> <button @click="setBooks">Set Books!</button> </div> </template> <style scoped> #bookList{ height: 300px; width: 300px; } </style> <script lang=ts> import {Component,Vue,Prop} from "vue-property-decorator"; import store from "@/store"; @Component export default class BooksInput extends Vue{ bookList=""; public setBooks(){ store.commit("setBooks",this.bookList.split(/\r|\n|\r\n/).filter(s=>s!="")); store.commit("setDate",new Date()); alert("setBooks!"); } } </script>StateContainer.vue<template> <div> <BooksInput /> <button @click="getBooks">Get Books!</button> <h3>BookLists ({{date}})</h3> <ul> <li v-for="book in books" :key="book">{{book}}</li> </ul> </div> </template> <script lang=ts> import {Component,Vue} from "vue-property-decorator"; import BooksInput from "@/components/BooksInput.vue"; import store from "@/store"; @Component({ components:{ BooksInput } }) export default class StateContainer extends Vue{ books:string[]=[]; date:Date=null; getBooks(){ this.books=store.state.books; this.date=store.state.date; } } </script>Blazor
BlazorではProgram.csにサービスとしてコンテナを登録する必要があります。
これは本記事の/設定ファイル/Program.csにて記述しています。/Store/AppStore.csusing System; public class AppState{ public string[] books{get;private set;}=new string[]{}; public DateTime? date{get;private set;}=null; public void setBooks(string[] books){ this.books=books; NotifyStateChanged(); } public void setDate(DateTime date){ this.date=date; NotifyStateChanged(); } public event Action OnChange; private void NotifyStateChanged()=>OnChange?.Invoke(); }BooksInput.razor<div > <div><textarea @bind="bookList" id="bookList"></textarea></div> <button @onclick="setBooks">Set Books!</button> </div> <style> #bookList{ height: 300px; width: 300px; } </style> @inject IJSRuntime js; @inject AppState state; @code{ string bookList=""; public void setBooks(){ state.setBooks(Array.FindAll(bookList.Replace("\r\n","\n").Split(new[]{'\n','\r'}),s=>s!="")); state.setDate(DateTime.Now); js.InvokeVoidAsync("alert","setBooks!"); } }StateContainer.razor@page "/StateContainer" <div> <BooksInput /> <button @onclick="getBooks">Get Books!</button> <h3>BookLists (@date)</h3> <ul> @foreach(var book in books){<li @key="book">@book</li>} </ul> </div> @inject AppState state; @implements IDisposable; @code{ protected override void OnInitialized(){state.OnChange+=StateHasChanged;} public void Dispose(){state.OnChange-=StateHasChanged;} string[] books={}; DateTime? date=null; void getBooks(){ books=state.books; date=state.date; } }18. JSONの読み込み
Vue.js/BlazorではJSONファイルを読み込んで表示することができます。
(クライアントサイドなので書き込みはできません)Vue.jsではrequire関数を使用し、JSONファイルを/src/assets/以下に配置します。
BlazorではHttpClient.GetJsonAsyncを使用し、JSONファイルを/wwwroot/以下に配置します。ここでは次のJSONファイルを読み込みします。
weapons.json[ "大剣", "太刀", "片手剣", "双剣", "ハンマー", "狩猟笛", "ランス", "ガンランス", "スラッシュアックス", "チャージアックス", "操虫棍", "ライトボウガン", "ヘビィボウガン", "弓" ]Vue.js
ReadJSON.vue<template> <div> <h3>Read JSON</h3> <ul> <li v-for="value in list" :key="value">{{value}}</li> </ul> </div> </template> <script lang=ts> import {Component,Vue} from "vue-property-decorator"; @Component export default class ReadJSON extends Vue{ list:string[]=[]; mounted(){ this.list=require("@/assets/weapons.json"); } } </script>Blazor
ReadJSON.razor@page "/ReadJSON" <div> <h3>Read JSON</h3> <ul> @foreach(var value in list){<li @key="value">@value</li>} </ul> </div> @inject HttpClient http; @code{ string[] list={}; protected override async Task OnAfterRenderAsync(bool firstRender){ if(!firstRender) return; list=await http.GetJsonAsync<string[]>("Assets/weapons.json?0"); StateHasChanged(); } }19. テキストファイルの読み込み
Vue.jsのみではプレーンなテキストファイルを読み込むことはできません。
読み込む方法としてVue.jsの公式でaxiosを使うことを提案しています。
プロジェクトにはyarnやnpmで追加が可能です。また、この方法でもJSONを読み込めますが、少々ファイルの扱いが異なるので注意が必要です。
| メソッド | パス | 備考
| axios.get | /public/ | 個別の静的ファイルとして扱う
| require | /src/assets | ビルド時jsファイルとともに結合される一方、BlazorにおいてはJSONと同様にHttpClient.GetStringAsyncを用いて読み込みます。
Vue.js
ReadText.vue<template> <div> <h3>Read Text</h3> <pre>{{text}}</pre> </div> </template> <script lang=ts> import {Component,Vue} from "vue-property-decorator"; import axios from "axios"; @Component export default class ReadText extends Vue{ text=""; async mounted(){ this.text=await axios.get("./kimigayo.txt?0").then(v=>v.data); } } </script>Blazor
ReadText.razor@page "/ReadText" <div> <h3>Read Text</h3> <pre>@text</pre> </div> @inject HttpClient http; @code{ string text=""; protected override async Task OnAfterRenderAsync(bool firstRender){ if(!firstRender) return; text=await http.GetStringAsync("./kimigayo.txt?0"); StateHasChanged(); } }まとめ
以上、Vue.jsとBlazor文法の比較についてまとめてみました。
styleの仕様など、どうにもならない部分はありますが、大部分はほぼ同じように書けるのではないかと思います。
まだ、速度の面で苦しいなぁと感じていますが今後のBlazorに期待したいと思います。
- 投稿日:2020-03-05T22:56:17+09:00
Qiitaに投稿した記事のリンクを楽にWordPressに送りたい #4-2
シリーズ
Qiitaに投稿した記事のリンクを楽にWordPressに送りたい #1
Qiitaに投稿した記事のリンクを楽にWordPressに送りたい #2
Qiitaに投稿した記事のリンクを楽にWordPressに送りたい #3
Qiitaに投稿した記事のリンクを楽にWordPressに送りたい #4環境
IDE:VisualStudio2019
アプリケーション:ASP.Net Core WebAPI
フレームワーク:.NET Core 3.1Dockerで実行してみる
前回の続きになります。
VisualStudio プロジェクトを右クリック → 追加 → Dockerサポート
するとDockerfileが作成され、自動的に内容が記述されます。
もう起動できるのでは!?
Dockerイメージを作成します。
docker build -t test .
※testはタグ名
ここで
COPY failed:のエラーになってしまった・・・Dockerファイルを覗くと、COPYのところが 今実行しているディレクトリの1つ上からの相対パスにみてとれる
1つ上の階層に行き、
-fオプションでDockerfileをパス指定して実行すると、エラーが無くなりました。
カレントディレクトリにファイルがある場合は指定はいらないようです。
最後の「.」はおそらくDockerfileのパスが相対的にどこからか だと思います。カレントなので「.」です。
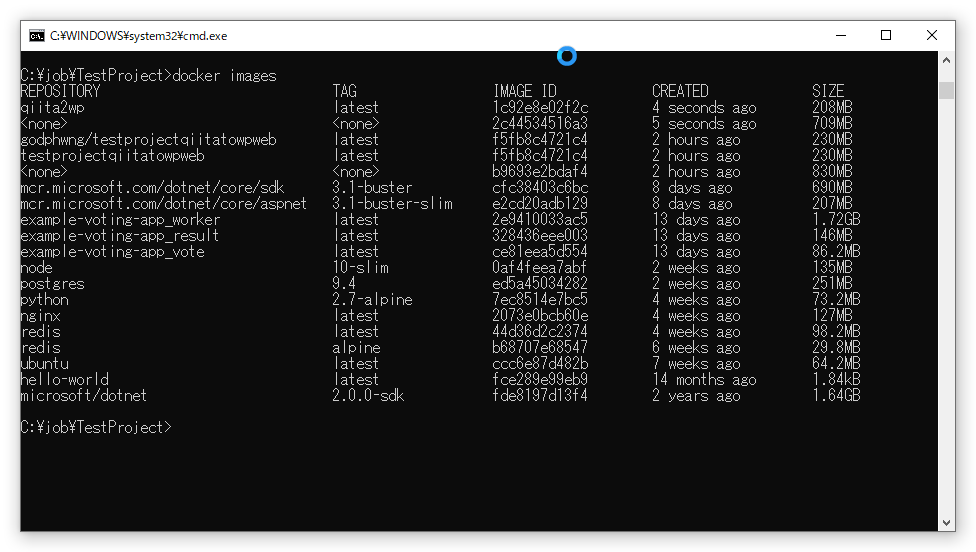
docker imagesでイメージが作成されたことを確認します。(一番上。-t でタグ付けしたため)
docker run --name qiita2wp -d -p 5000:80 qiita2wpで起動
動作確認
GETにアクセス
http://localhost:5000/qiita2wpweb/get
エラーがでないので、正常に動いていそう・・・
それにGETではOKしか返していなかったので・・・前回POSTを確認してみる
ブックマークレットのURLを前回のとは少し変えてます。(httpで5000で立てたので・・・)
javascript:var xhr=new XMLHttpRequest();xhr.open("POST","http://localhost:5000/qiita2wpweb/post");xhr.onreadystatechange=function(){if(this.readyState==4){alert("リクエスト完了");}};xhr.send(null);GitHub
外部の公開サーバーに配置したいが・・・
このアプリをQiitaのWebhookから呼べるように、外部に公開したいのですが
サーバーレンタルするなり、クラウド契約するなり、すぐにはできないのとお金がかかりそう・・・WordPressは先輩が借りているところのを使わせてもらっているのですが
そこにこのアプリも置かせてもらえたらいいな・・・確認しよ・・・
外部公開している場所に置けた場合は、Webhookからの呼び出しの手順もやってみようと思います。
→置けませんでしたーw
ローカルでたまに動かして、記事を同期しようと思います。
- 投稿日:2020-03-05T22:30:49+09:00
【.NET】キャンセル可能な非同期処理【Task】
前提
- C#の
Taskの処理を途中で中断できるようにします。- Windows Forms想定。多分Unityでもそのまま使えると思います(未検証)
- 処理のキャンセルはUIから行われる想定です。つまり、
- 画面上には「少々お待ちください」の旨のテキストが表示されている
- その画面には「キャンセル」ボタンがあり、ユーザーがボタンを押すと、すぐに処理が中断され、操作可能な状態に復帰する
要件
- 任意のタイミングでキャンセル可能であること
- システムのあちこちで必要になる処理であることを想定し、あまり複雑な使い方にならないこと
- システムのあちこちで必要になる処理であることを想定し、ある程度の汎用的な使い方ができること
- 非同期処理内部(=別スレッド)で発生した例外を捕捉できること
- 後述しますが妥協しています
実装
キャンセル可能Taskの利用側using System; using System.Data.Entity; using System.Windows.Forms; // 画面 partial class MainForm : Form { // 後述の、キャンセル可能な非同期処理 private CancelableTask CancelableTask { get; } = new CancelableTask(); // 画面初期表示 private async void Load(object sender, EventArgs e) { // DBからデータを読み込んで画面に表示します try { // 少々お待ちください画面を表示します(詳細割愛) PleaseAWaitScreen.Visible = true; CancelButton.Visible = true; // 「データベースのTable1というテーブルからデータを全件読み込んでdata1に保存する」旨の処理 // ユーザーによって中止ボタンが押された場合、※Bに飛ぶため、※A以降の処理は実行されません。 // なおその場合でもタスク内の非同期処理自体は中断されないことに注意が必要です。 // そのまま最後まで実行されても問題ないように作る必要があります Table1[] data1 = await CancelableTask.Wait(() => new MyDbContext().Table1.ToArray()); // ※A // 読み込んだデータを画面に表示します DataGrid.DataSource = data1; MessageBox.Show($"{data1.Length}件のデータを読み込みました。"); } catch (OperationCanceledException) { // ※B // キャンセルされたときにここに来ます MessageBox.Show("読み込みを中断しました。"); } catch (Exception ex) { // OperationCanceledException 以外の例外発生時の処理 MessageBox.Show($"エラーが発生しました。: {ex}"); } PleaseAWaitScreen.Visible = false; CancelButton.Visible = false; } // 「少々お待ちください」画面に表示される処理中止ボタンの処理 private void CancelButton_Click(object sender, EventArgs e) { CancelableTask.Cancel(); } }上述の例で使っているキャンセル可能Taskクラスの定義using System; using System.Threading.Tasks; public class CancelableTask { // Taskの中止を行うためのオブジェクト private CancellationTokenSource Cancellation { get; set; } // Wait()の処理の中止 public void Cancel() => Cancellation?.Cancel(); // 中止可能非同期処理 public async Task<T> Wait(Func<T> func) { Cancellation = new CancellationTokenSource(); var task = new Task(func, Cancellation.Token); // 0.1秒ごとにtaskの状況を確認してエラーorキャンセルor正常終了をします task.Start(); while(true) { await Task.Delay(100); // キャンセル // Cancel()メソッド実行後ならば OperationCanceledException が送出されます Cancellation.Token.ThrowIfCancellationRequested(); // エラー // Task内(=別スレッド)で発生した例外は AggregateException にラッピングされているため、 // 実際に何が原因でエラーとなったかを知るには InnerException プロパティを参照します if (task.Exception != null) throw task.Exception.InnerException; // 正常終了 // IsCompletedはタスクが 完了or例外orキャンセル となった場合にtrueになりますが、 // 後者2つは上の条件分岐で処理しているため、正常終了の場合のみこの分岐内に入ります if (task.IsCompleted) return await task; } } }妥協点
キャンセル前に送出された例外はcatchできますが、キャンセル後のはできません。
上記CancelableTask.Wait()の実装ではThrowIfCancellationRequestedとtask.Exception.InnerExceptionのうち先に発生した方しかthrowできないことに依ります。try { await CancelableTask.Wait(() => { throw new Exception(); // キャンセル前に発生した例外はcatch可能(※Bへ飛ぶ) System.Threading.Thread.Sleep(1000); // このタイミングでキャンセルされたものとします System.Threading.Thread.Sleep(1000); throw new Exception(); // キャンセル後に発生した例外はcatchできない }); } catch (OperationCanceledException) { } catch (Exception ex) { // ※B }厳密に例外を捉えるなら、上記のように0.1秒ごとにキャンセル判定をするのでなく、キャンセルされてもよいタイミングでのみ
ThrowIfCancellationRequestedを呼ぶようにする必要があります。partial class MainForm : Form { private CancellationTokenSource Cancellation { get; set; } private async void Load(object sender, EventArgs e) { try { PleaseAWaitScreen.Visible = true; CancelButton.Visible = true; Cancellation = new CancellationTokenSource(); Table1[] data1 = await Task.Run(() => new MyDbContext().Table1.ToArray(), Cancellation.Token); // キャンセルされてもよいタイミング Cancellation.Token.ThrowIfCancellationRequested(); DataGrid.DataSource = data1; MessageBox.Show($"{data1.Length}件のデータを読み込みました。"); } catch (OperationCanceledException) { MessageBox.Show("読み込みを中断しました。"); } catch (Exception ex) { MessageBox.Show($"エラーが発生しました。: {ex}"); } PleaseAWaitScreen.Visible = false; CancelButton.Visible = false; } private void CancelButton_Click(object sender, EventArgs e) { Cancellation?.Cancel(); } }ただしこの場合、ユーザーが中止ボタンを押しても
Task.Runが完了するまでUIに復帰できません。
- 投稿日:2020-03-05T17:04:46+09:00
ASP.NET Core MVCでFullCalendarを表示
はじめに
ASP.NET Core MVC(.NET Core 3.1)でFullCalendarを表示する方法について説明します。
プロジェクト作成
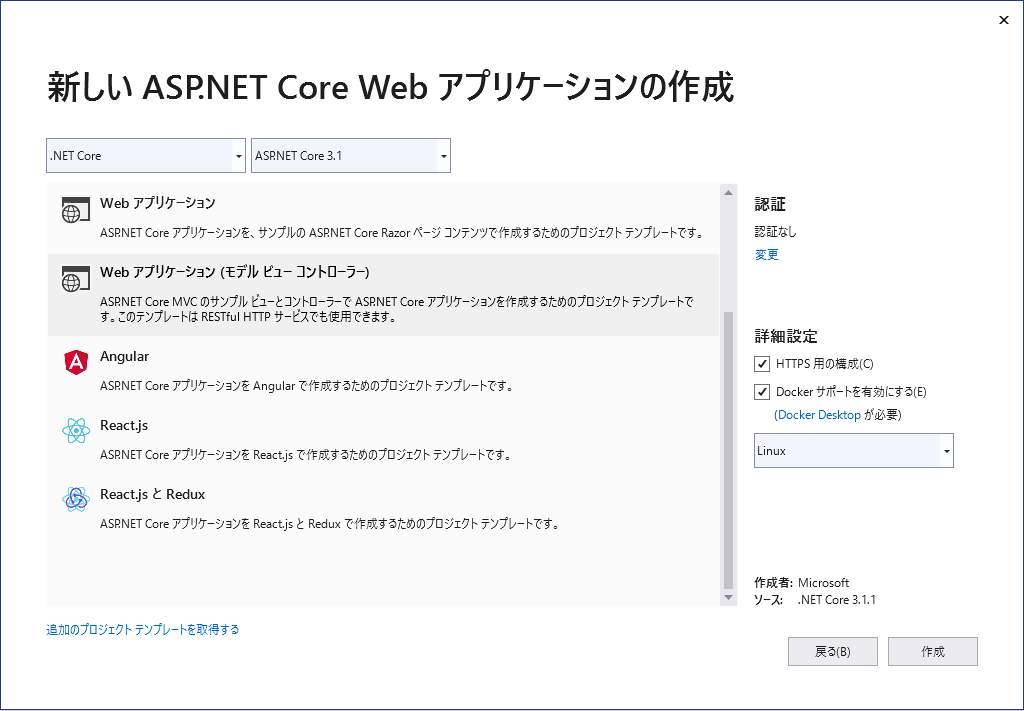
- VS2019で「ASP.NET Core Web アプリケーション」のプロジェクトを選択。
- 種類の選択で「Web アプリケーション(モデル ビュー コントローラー)」を選択。
FullCalendarのダウンロードとセットアップ
- https://fullcalendar.io/ からzipファイルのダウンロード。
- zipを解答し、packages内のディレクトリを作成したプロジェクトの「wwwroot\lib」内にコピー。
例:wwwroot\lib\fullcalendar-4.4.0\packagesFullCalendarの設定
今回は解答したzip内の「examples\daygrid-views.html」を参考に設定。
表示するカレンダーの種類によって、参照するcssとjsが変わる。_Layout.cshtml内の設定。
_Layout.cshtml<head> ~ <link href="~/lib/fullcalendar-4.4.0/packages/core/main.css" rel="stylesheet" /> <link href="~/lib/fullcalendar-4.4.0/packages/daygrid/main.css" rel="stylesheet" /> <link href="~/lib/fullcalendar-4.4.0/packages/timegrid/main.css" rel="stylesheet" /> <link href="~/lib/fullcalendar-4.4.0/packages/list/main.css" rel="stylesheet" /> </head> <body> ~ <script src="~/lib/fullcalendar-4.4.0/packages/core/main.js"></script> <script src="~/lib/fullcalendar-4.4.0/packages/interaction/main.js"></script> <script src="~/lib/fullcalendar-4.4.0/packages/daygrid/main.js"></script> <script src="~/lib/fullcalendar-4.4.0/packages/timegrid/main.js"></script> <script src="~/lib/fullcalendar-4.4.0/packages/list/main.js"></script> @RenderSection("Scripts", required: false) </body>Index.cshtmlの設定
Index.cshtml@*どこか適当な場所に記述。ここにカレンダーが表示される*@ <div id="calendar"></div> @section Scripts { <script type="text/javascript"> document.addEventListener('DOMContentLoaded', function() { var calendarEl = document.getElementById('calendar'); var calendar = new FullCalendar.Calendar(calendarEl, { plugins: [ 'interaction', 'dayGrid', 'timeGrid', 'list' ], header: { left: 'prev,next today', center: 'title', right: 'dayGridMonth,timeGridWeek,timeGridDay,listMonth' }, defaultDate: '2020-02-12', navLinks: true, // can click day/week names to navigate views businessHours: true, // display business hours editable: true, events: '@Url.Action("GetAllEvents")' }); calendar.render(); }); </script> }HomeController.csの設定
HomeController内に追記する。HomeController.cspublic IActionResult GetAllEvents(DateTime start, DateTime end) { var events = new List<Event> { new Event { Title = "てすと", Start = DateTime.Parse("2020-02-18 00:00:00"), End = DateTime.Parse("2020-02-20 00:00:00"), } }; return new JsonResult(events); }Eventクラス
Event.cspublic class Event { public string Title { get; set; } public DateTime Start { get; set; } public DateTime End { get; set; } }FullCalendarの表示
あとは実行すればカレンダーが表示されます。
GetAllEventsのstartとendには表示されるカレンダーの始まりと終わりの日付が入ってくるので、
それを利用すればGetAllEvents内で範囲内のイベントの取得が可能になります。(DBを参照するなど)ハマったこと
GetAllEventsで返すJsonResultは配列の必要があるのですが、
それに気が付かずにずっとEventクラスをそのまま返していて、なかなかイベントが表示されずにハマりました。
- 投稿日:2020-03-05T15:38:46+09:00
マイクロサービスアーキテクチャでデスクトップアプリを作ってみた知見と感想
はじめに
MicroServicesを意識してGoogleカレンダー風な何かを作成して得られた知見を投稿しようかと思います。
主な環境
- VSCode
- .NET Core
- C#, F#, WPF, ASP.NET Core
- MagicOnion
- ConsoleAppFramework
- ProcessX
成果物
CalendarAppForMicroservicesLearning
概要
2020年にWebフロントエンドを勉強する人が作るべきたったひとつのアプリ
にてGoogleカレンダーが教材として良さげということだったので検討してみました。
参考にしたところはカレンダーの予定の中にToDoリストのタスクを混ぜ込んで表示できる機能です。
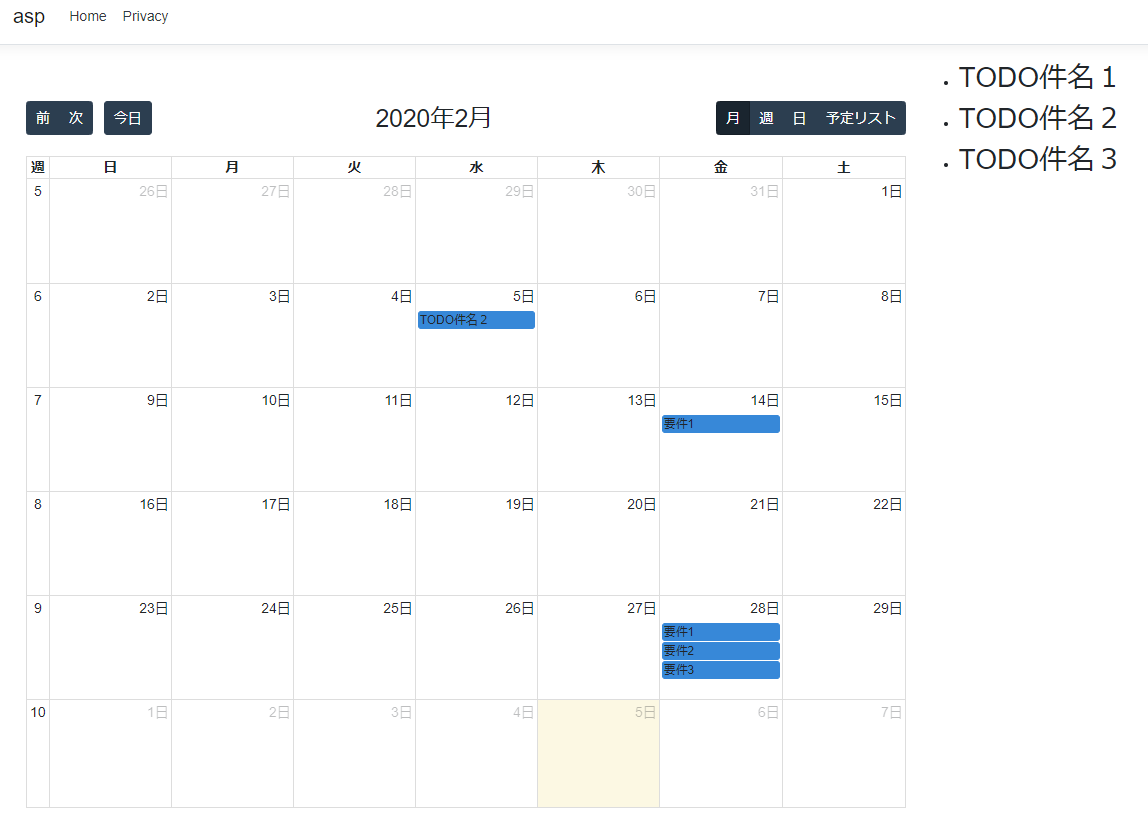
画面的には
こんな感じで2カラムで右はTODOリスト。左はカレンダー表示で、予定と終わったTODOがまぜこぜに表示するような感じで考えました。
マイクロサービスの機能分け
TODOを取り扱う機能(TODOサービス)とカレンダーを取り扱う機能(カレンダーサービス)のふたつが必要だと考えました。
カレンダー表示の際にTODOの内容を知っていないといけないので、カレンダーサービスはTODOサービスを知っていないといけないのかなと思い、
と想像したのですが、マイクロサービス同士が依存するのは良くないと思いとりあえずお互いに関与しない方向で検討しました。(後述しますがBFFという考え方でなんとかなりました)
フロントエンド
マイクロサービスで構築した際に利点になるのはフロントエンドを選ばないところだと思ったので、デスクトップアプリとWebアプリを用意してみました。このほかにはスマホアプリとかコンソールアプリとかありそうな気はしてます。
マイクロサービスとフロントエンドの関係
何も考えずに想像したら
となってしまい、N対Nになってつらいなあと思っていたら
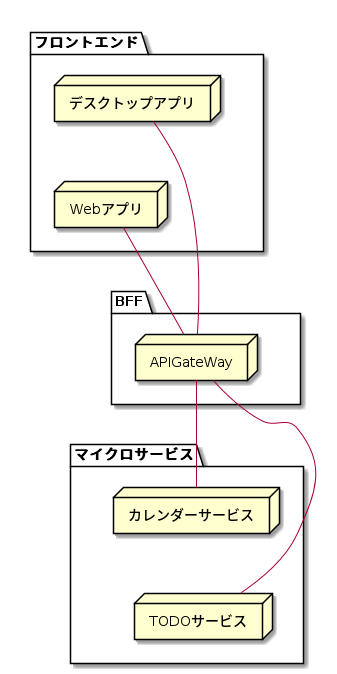
マイクロサービスアーキテクチャにおけるAPIコールの仕方とHTMLレンダリング
の記事が参考になりました。どうやらあいだにAPIGateWayとかBFF(Backends For Frontends)を用意すればすっきりするそうです。
こうすればフロントエンドはBFFに、TODOとカレンダーを混ぜ込んだ一覧をください、とお願いすればマイクロサービスを気にすることなく情報を手に入れられます。
こんな感じでひとつのAPIGawaWayで全部こなすようになるとAPIGateWayが大変なことになるそうなのでフロントエンドのアプリ一つに専用のBFFを用意してあげたほうが良いそうです。マイクロサービスのエントリーポイント
マイクロサービスのエントリーポイントってみなさん何を想像しますでしょうか。
私はマイクロサービスとやりとりをするための方法としては、マイクロサービスがWebサーバ立ててhttpclientで通信する、しか想像できていなかったんですが実際に作ってみるといろいろできました。
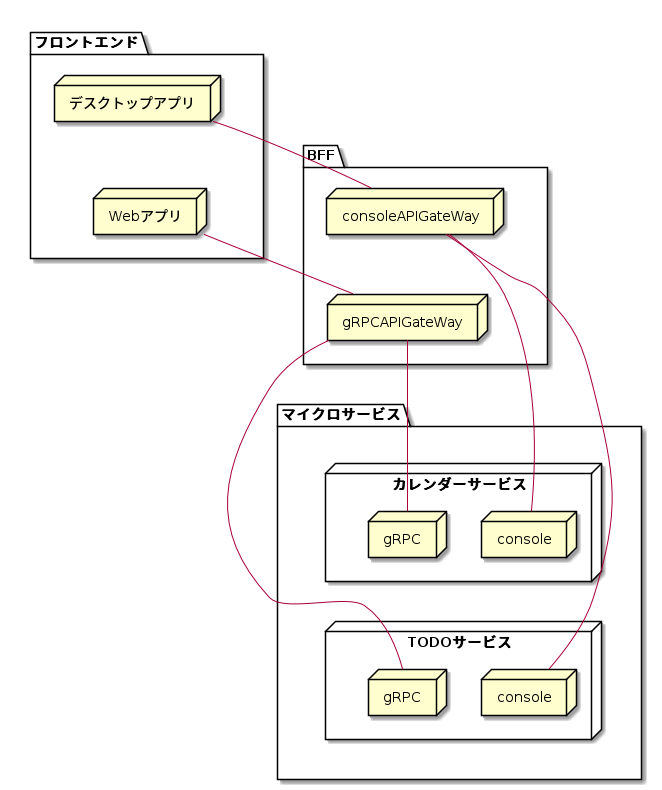
とりあえず今回用意してみたのはコンソールアプリとgRPCです。
例えば特にスケールとかを気にしない状況で、デスクトップアプリみたいに同一資源上にいるのであれば、マイクロサービスをコンソールアプリ化して、使用する側はプロセス実行を行い、実行結果をjsonとかで標準出力でもらえばやりとりできます。
また、gRPCを用意すればメソッドを非同期で呼び出すような感覚でマイクロサービスやBFFとやりとりできます。全体構成図
フロントエンドのアプリ一つに専用のBFFを用意したほうが良いといっておきながら今回はエントリーポイントの分け方で作ってしまいました。
実業務では通信手段としてWeb(Http)、gRPC、コンソールetcなどからひとつ選ぶはずです。結果
WPF
ちょうど良いライブラリがなくお手製でくそみたいなUIで申し訳ないのですが
Webアプリ
FullCalendarとList.jsを使わせていただきました。
作ってみた感想とまとめ
- デスクトップアプリでもマイクロサービス風に組めた(良い悪いはわからない)
- 最初にマイクロサービスの分割を間違えるとつらい(と思う)
- MagicOnionが便利すぎる
- ConsoleAppFrameworkとProcessXの連携も素晴らしい
- POCO(Plain Old CLR Object)作るのがちょっと面倒(DDD的集約 <-> POCO <--> json で変換している)
- C#大統一理論まであと少し(domainの再定義しなくて良いのは嬉しい。後はWebフロントエンドさえ何とかなれば。。)
- フロントエンドは画面の表現に集中できる
参考
- 投稿日:2020-03-05T14:15:42+09:00
個人サービスの運用コストについて
はじめに
個人サービスをリリースして1年半、ようやく利益が出てきたので、運用した知見と運用コストについて公開したいと思います。
運用しているサービスについて
洋楽にまつわる最新情報を更新、配信、投稿出来る音楽総合メディアです。
流入
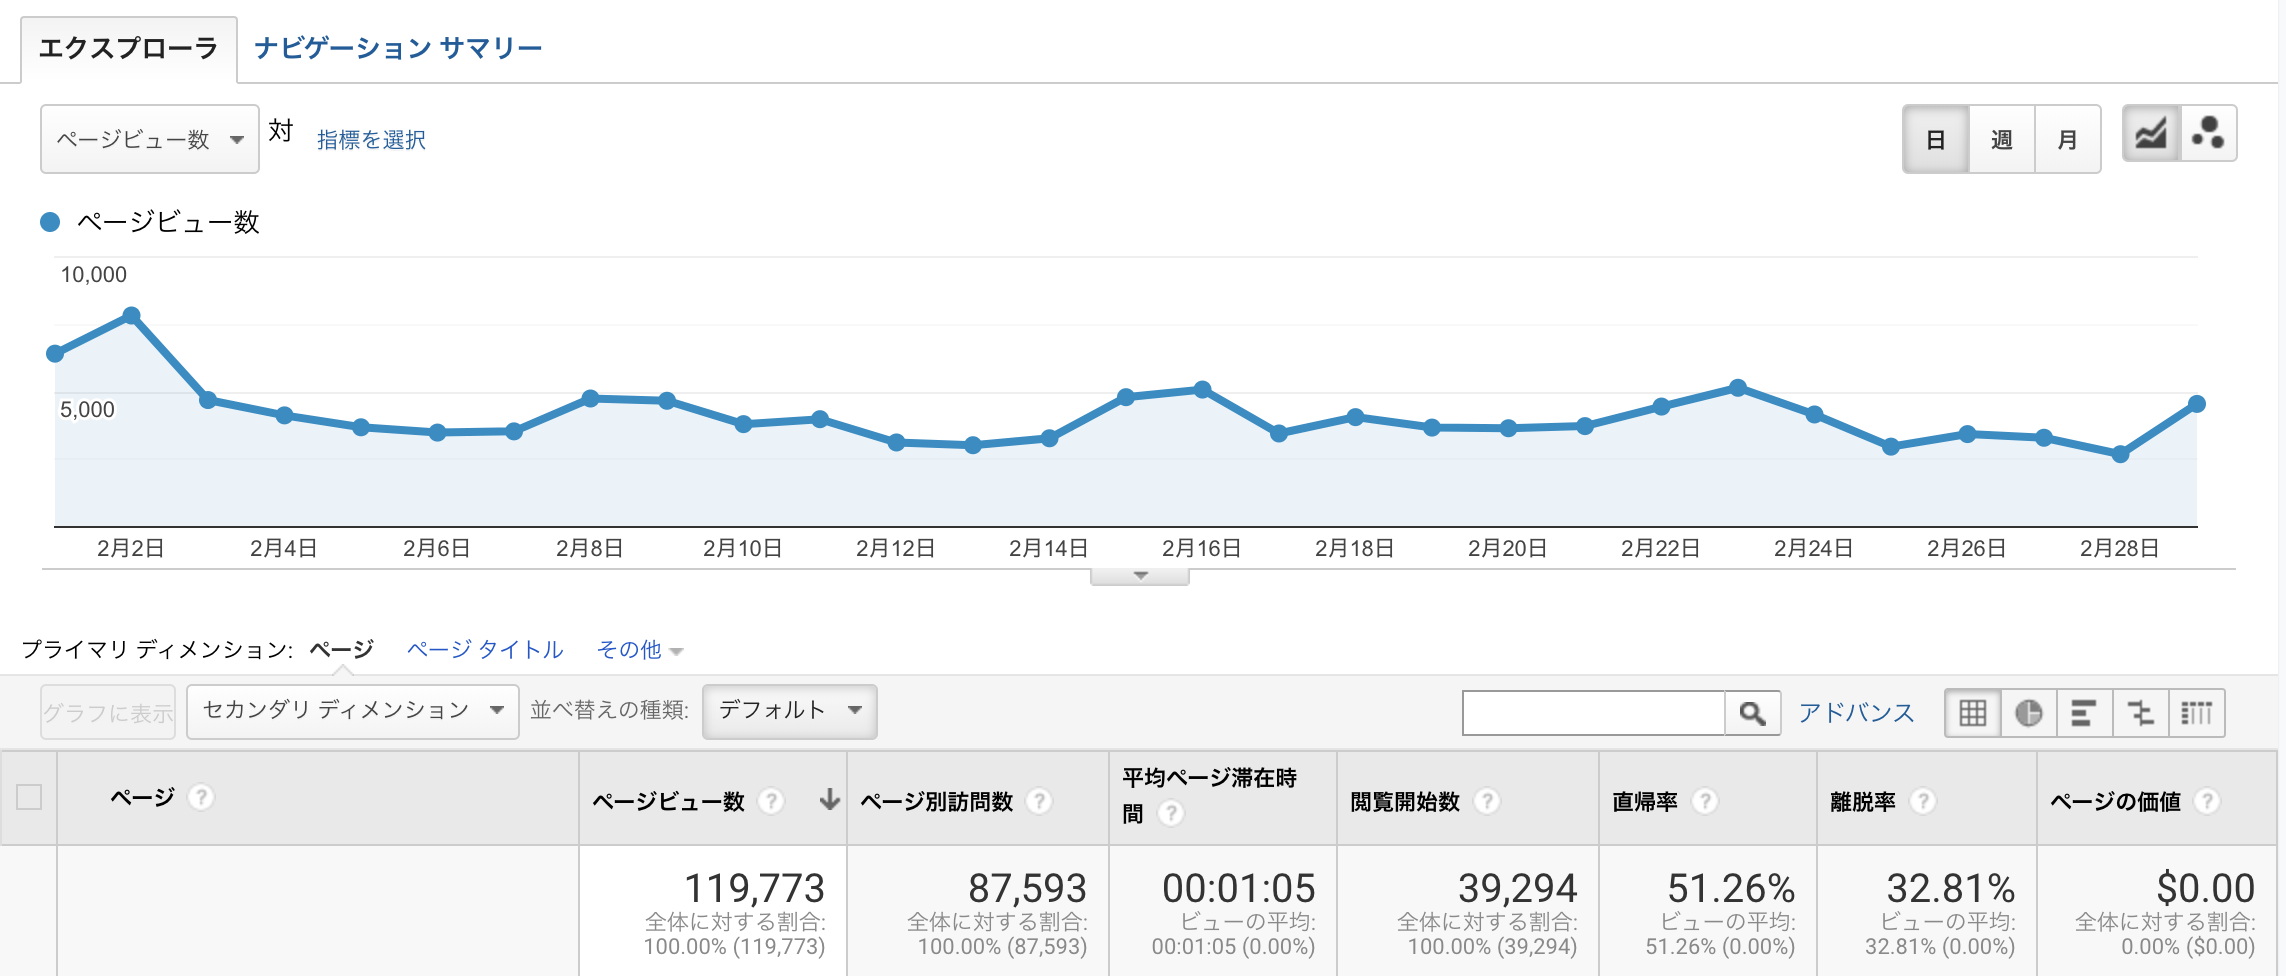
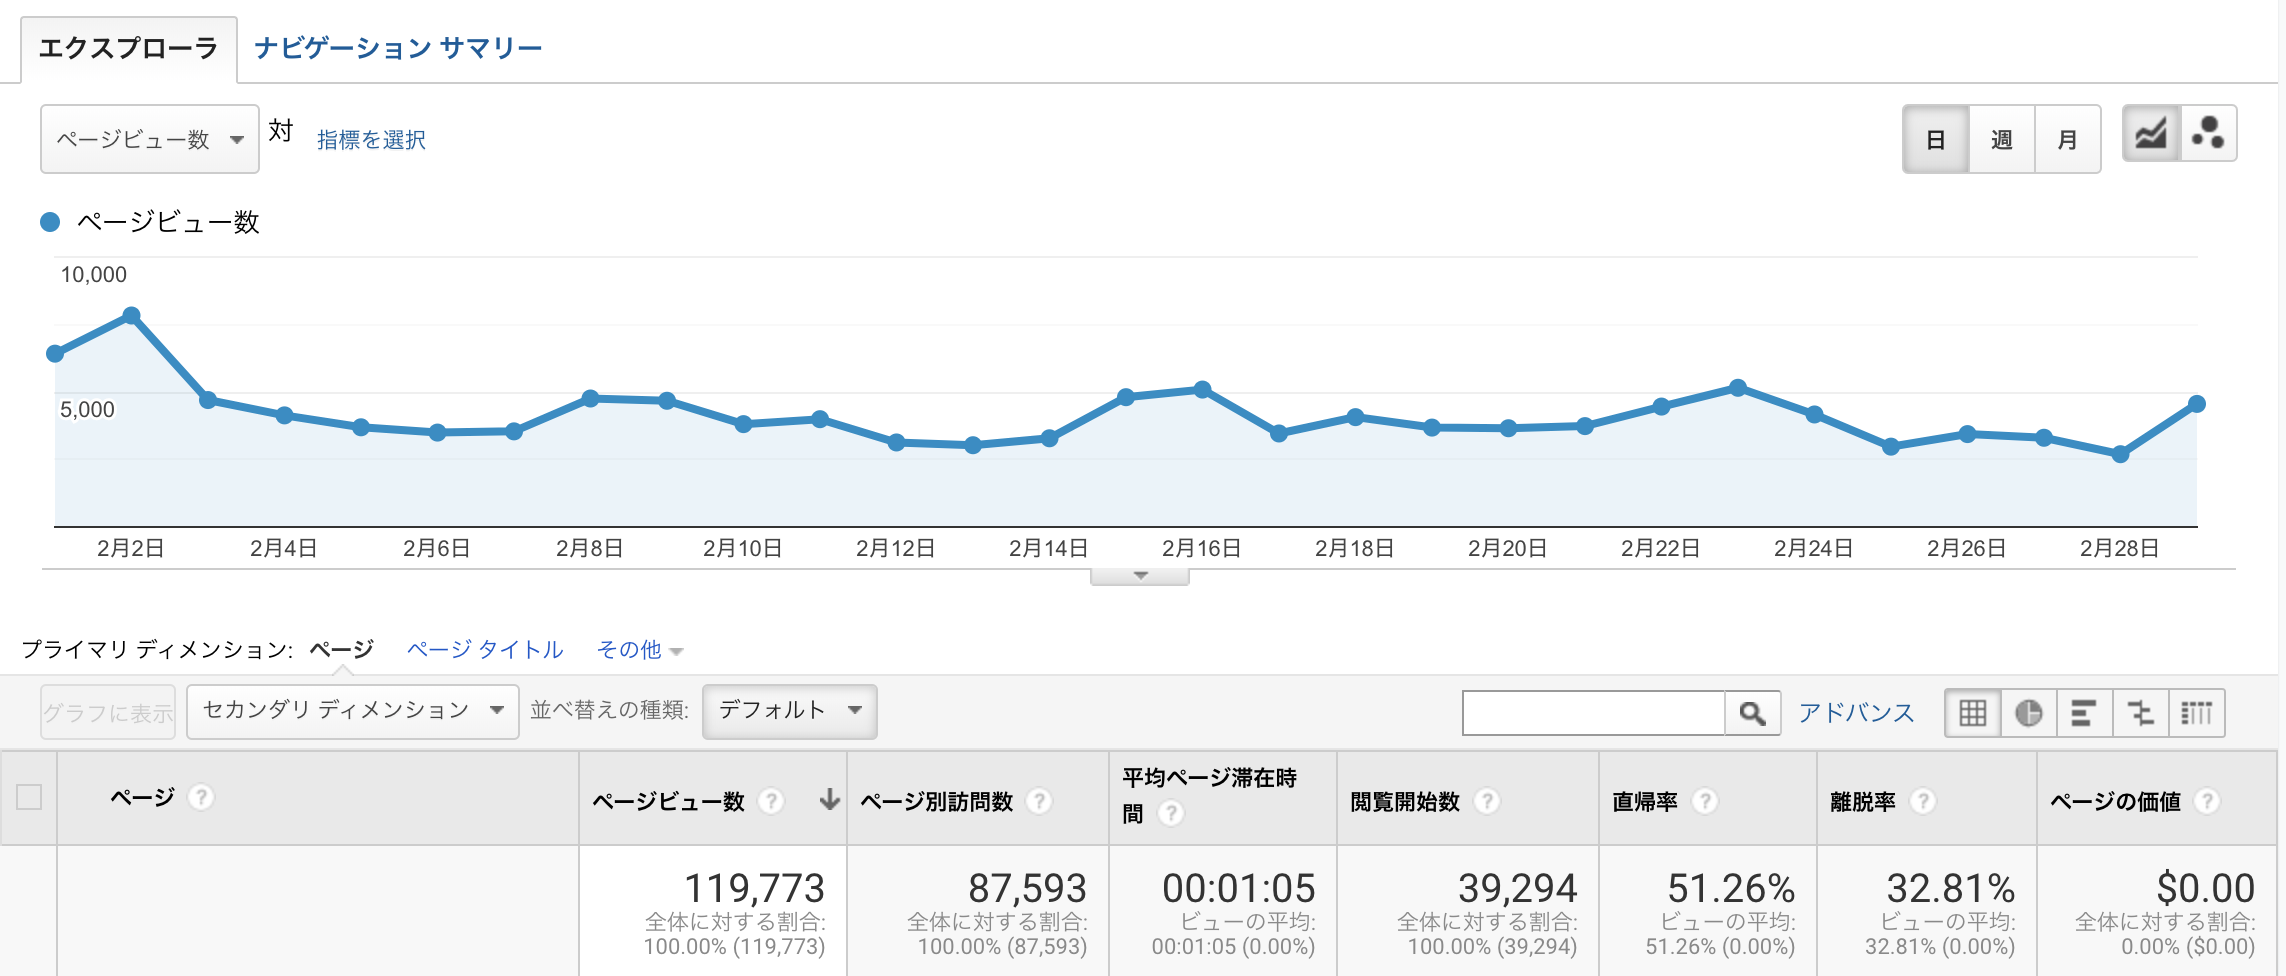
PV
おかげさまで10万PVほどありました。特にバズったということもなく、毎日同じようなアクセス数がありました。
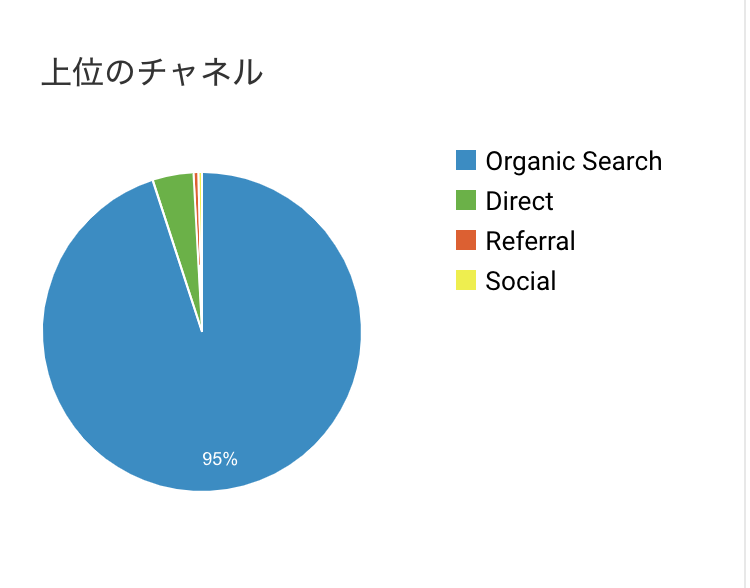
流入元
恥ずかしながらSEOの影響でorganic searchがほぼ数を占めています。自分のブログやTwitterでアウトプットはしているものの、やり方が悪いのか、そもそもセンスがないのか、あまり効果が出ていません。逆に流入の見込みが立てやすいので計画が立てやすいかもしれません(後付け
諸経費
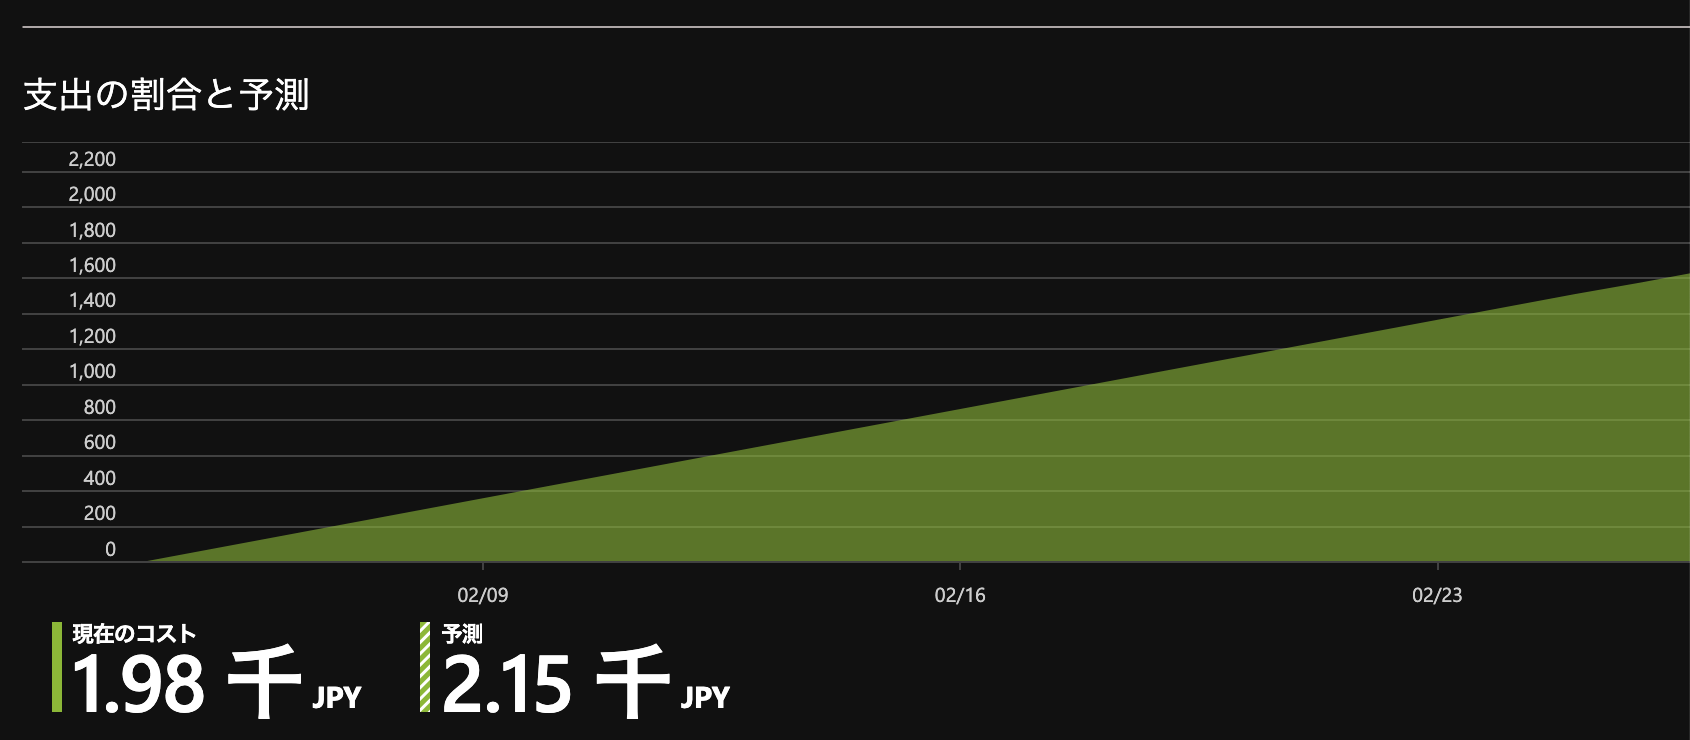
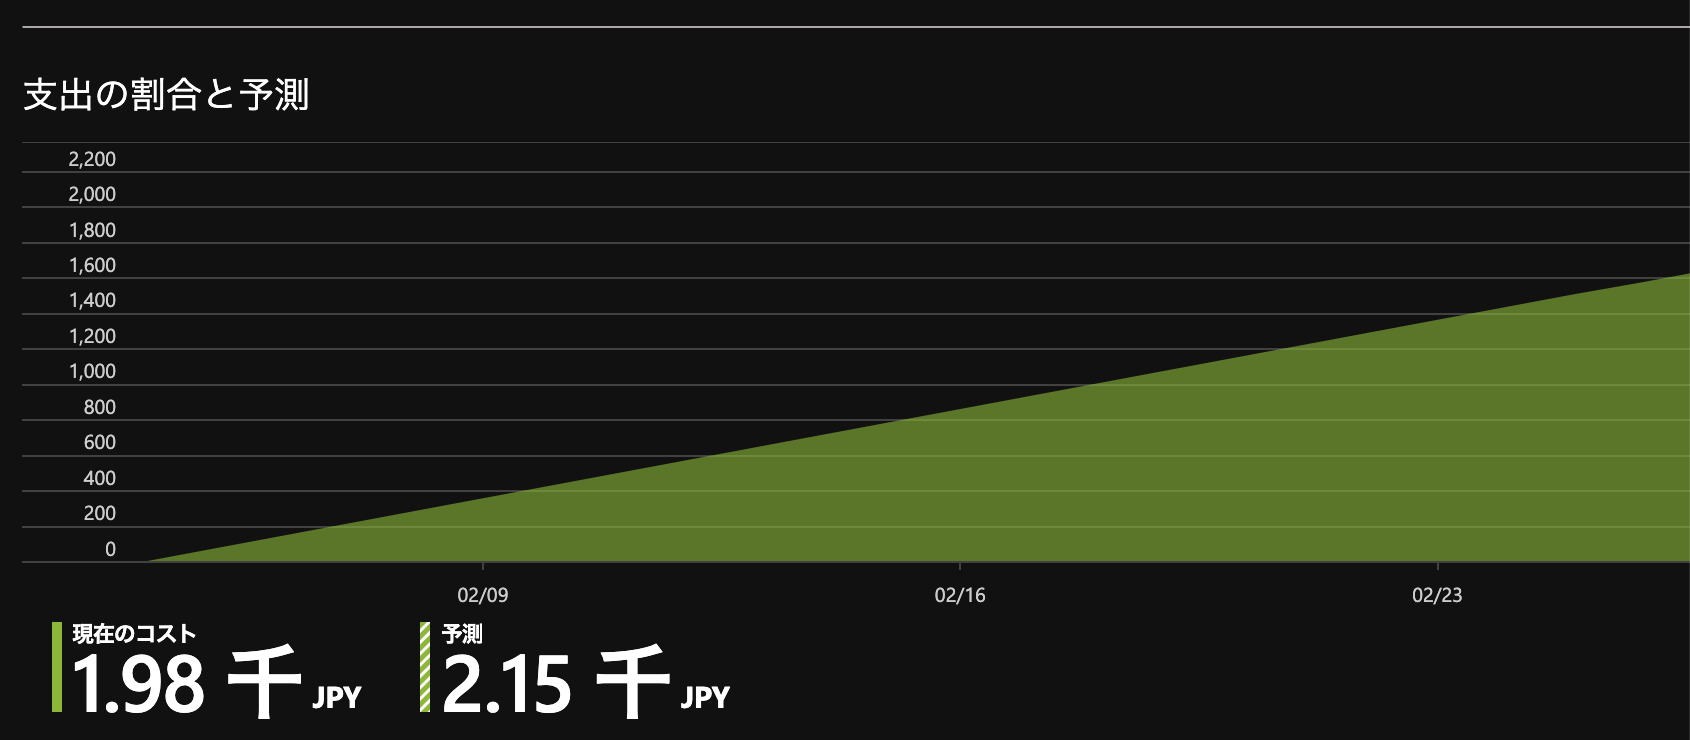
サーバー代 + データベース諸々
2月は¥2,000ちょっとですみました。AzureのApp Service on Linuxというやつを使っていて、現在値下げ中なのでこの価格になります。余談ですが、昨年の12月末に値下げ終了告知をしていたのですが、今年の1月末まで延び、さらには今年の7月末までと値下げ期間がどんどん延びています。このまま続いてくれれば良いのですが。。Azureは若干高い印象があるので値下げが終わったらDocker化して他のサービスに移行してやろうかと思ってます。
ドメイン代
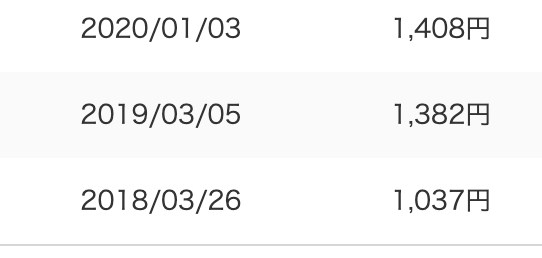
お名前.comを利用しています。大体¥1,500ぐらいです。年々高くなっているのはなんでですかね?
SSL
Let's Encryptを利用しています。無料なのでお金掛かってません。
開発費
全て自分でやっているので0円ですが、全て外注したらいくらかかるのだろう。。
キャンペーン費
サービスの性質上、ユーザーが投稿してくれる形で成り立ってるので毎月数名にamazonギフト券を還元しています。楽しんで記事を書いてくれる方がほとんどなのですが、運営している本人が「このサービス使ってもあまり利益ないな」と感じているのでその懺悔としてお気持ち程度に。。
負荷
平均応答時間
PageSpeed Insightsでは200ミリ秒以下は遅いと判断されるので、まぁ許容範囲かと思います。ところどころ負荷が高いところがみられますが、1日1回定期タスクが動いている影響です。
サーバーの応答時間は 200 ミリ秒以下に抑える必要があります。
CPU
10%以下に抑えられているので大丈夫でしょう。ところどころ負荷が高いところがみられますが、1日1回定期タスクが動いている影響です。
メモリ
64%とまぁまぁ使っている状況です。まだプランを変えずに踏ん張れるレベルかと思います。
データベース
DTUというAzure特有の単位なのですが、1%程度なのでほぼほぼ問題ないかと思います。
DTU(Database Transaction Unit)という単位で定義され、CPU、メモリ、I/Oの組み合わせからなります。
DTUが大きくなるほど、コンピューティングリソースが多く使えるようになり、標準で付属するストレージ、追加できるストレージも大きくなります。後述するように、ダウンタイムを発生させずにスケールの変更ができます。収益
GoogleAdSenseのみの収益となります。金額は
6,188円
でした。
※ キャプチャ載せて違反とか食らったら困るので載せらせません?♀️
まとめ
今は利益出ていますが、これまでは収益がほぼなかったので諸経費がそのまま掛かってました。やっと利益が出たので定期的にユーザーさんに大して還元出来る状況になったのはよかったと思います。私は「サービスを使うユーザーの利益がなければ陳腐化する」というポリシーを持ってサービスを運用しているので、ユーザーの利益が「お金」である以上は儲かるまでの敷居が高くなります。なので、利益をどこに持っていくかが鍵となりますが、そんなこと気にせずにこのぐらいのお金を投資出来るよーという方に個人サービスを作って欲しいと思います!
- 投稿日:2020-03-05T14:15:42+09:00
個人サービスの運用コストがどのぐらいかかるか検証した
はじめに
個人サービスをリリースして1年半、ようやく利益が出てきたので、運用した知見と運用コストについて公開したいと思います。
運用しているサービスについて
洋楽にまつわる最新情報を更新、配信、投稿出来る音楽総合メディアです。
流入
PV
おかげさまで10万PVほどありました。特にバズったということもなく、毎日同じようなアクセス数がありました。
流入元
恥ずかしながらSEOの影響でorganic searchがほぼ数を占めています。自分のブログやTwitterでアウトプットはしているものの、やり方が悪いのか、そもそもセンスがないのか、あまり効果が出ていません。逆に流入の見込みが立てやすいので計画が立てやすいかもしれません(後付け
諸経費
サーバー代 + データベース諸々
2月は¥2,000ちょっとですみました。AzureのApp Service on Linuxというやつを使っていて、現在値下げ中なのでこの価格になります。余談ですが、昨年の12月末に値下げ終了告知をしていたのですが、今年の1月末まで延び、さらには今年の7月末までと値下げ期間がどんどん延びています。このまま続いてくれれば良いのですが。。Azureは若干高い印象があるので値下げが終わったらDocker化して他のサービスに移行してやろうかと思ってます。
ドメイン代
お名前.comを利用しています。大体¥1,500ぐらいです。年々高くなっているのはなんでですかね?
SSL
Let's Encryptを利用しています。無料なのでお金掛かってません。
開発費
全て自分でやっているので0円ですが、全て外注したらいくらかかるのだろう。。
キャンペーン費
サービスの性質上、ユーザーが投稿してくれる形で成り立ってるので毎月数名にamazonギフト券を還元しています。楽しんで記事を書いてくれる方がほとんどなのですが、運営している本人が「このサービス使ってもあまり利益ないな」と感じているのでその懺悔としてお気持ち程度に。。
負荷
平均応答時間
PageSpeed Insightsでは200ミリ秒以下は遅いと判断されるので、まぁ許容範囲かと思います。ところどころ負荷が高いところがみられますが、1日1回定期タスクが動いている影響です。
サーバーの応答時間は 200 ミリ秒以下に抑える必要があります。
CPU
10%以下に抑えられているので大丈夫でしょう。ところどころ負荷が高いところがみられますが、1日1回定期タスクが動いている影響です。
メモリ
64%とまぁまぁ使っている状況です。まだプランを変えずに踏ん張れるレベルかと思います。
データベース
DTUというAzure特有の単位なのですが、1%程度なのでほぼほぼ問題ないかと思います。
DTU(Database Transaction Unit)という単位で定義され、CPU、メモリ、I/Oの組み合わせからなります。
DTUが大きくなるほど、コンピューティングリソースが多く使えるようになり、標準で付属するストレージ、追加できるストレージも大きくなります。後述するように、ダウンタイムを発生させずにスケールの変更ができます。収益
GoogleAdSenseのみの収益となります。金額は
6,188円
でした。
※ キャプチャ載せて違反とか食らったら困るので載せらせません?♀️
まとめ
今は利益出ていますが、これまでは収益がほぼなかったので諸経費がそのまま掛かってました。やっと利益が出たので定期的にユーザーさんに大して還元出来る状況になったのはよかったと思います。私は「サービスを使うユーザーの利益がなければ陳腐化する」というポリシーを持ってサービスを運用しているので、ユーザーの利益が「お金」である以上は儲かるまでの敷居が高くなります。なので、利益をどこに持っていくかが鍵となりますが、そんなこと気にせずにこのぐらいのお金を投資出来るよーという方に個人サービスを作って欲しいと思います!
- 投稿日:2020-03-05T12:40:19+09:00
C#初心者のWPF備忘録 P.01 ~MVVMパターンと基本のBinding~
※本記事はC#やWPFはあまり経験がないけれど、他の言語は触ったことがある方にお勧めします
※本記事は初心者の備忘録ですWPFとMVVMパターンのプログラミング
早速ですがWPFはMVVMというプログラミングの構造(?)で書かれるようです。
MVVMはModel-View-ViewModelの大文字部分をつなげたもので
Model・・・見た目(UI)には関係のないロジックの部分
View・・・見た目(UI)に関係するデザインの部分
ViewModel・・・ModelとViewの間に立ちModelとViewを直接結ばない役割をもつ部分
という解釈をしています。
(MVVMについては様々な考え方があるようです)
WPFではView(見た目)は基本的にXAML(ザムルと読むようです)を使って書きます。
基本的な書き方は中身のように開始タグと終了タグで挟みます。
例えばLabelであれば
<Label>Hello World!</Label>
と書くことで"Hello World!"と書かれたLabelを置くことができます。
また、TextBoxのように中身が必要のないものについては
<TextBox></TextBox>
と中身を省略するか
<TextBox />
のように書くこともできます。
ModelとViewModelはC#を使って記述するようですが、C#の記述についてはここでは省略します。ModelとViewの分離と基本のBinding
なぜMVVMという構造をとろうとするのかという話になりますが
ロジック(Model)部分と見た目(View)を分けたいから、ということのようです。
さっそく一つプロジェクトを作成しコードを書いてみます。MainWindow.xaml<Window x:Class="BIBOROKU_001.MainWindow" xmlns="http://schemas.microsoft.com/winfx/2006/xaml/presentation" xmlns:x="http://schemas.microsoft.com/winfx/2006/xaml" xmlns:d="http://schemas.microsoft.com/expression/blend/2008" xmlns:mc="http://schemas.openxmlformats.org/markup-compatibility/2006" xmlns:local="clr-namespace:BIBOROKU_001" mc:Ignorable="d" Title="MainWindow" Height="450" Width="800"> <StackPanel> <TextBox Name="NameBox" TextChanged="TextChanged" /> <TextBlock Name="Morining" /> <TextBlock Name="Noon" /> <TextBlock Name="Evening" /> </StackPanel> </Window>MainWindow.xaml.cs///usingは省略しています namespace BIBOROKU_001 { /// <summary> /// MainWindow.xaml の相互作用ロジック /// </summary> public partial class MainWindow : Window { public MainWindow() { InitializeComponent(); } private void TextChanged(object sender, TextChangedEventArgs e) { if(NameBox.Text != "") { Morining.Text = NameBox.Text + "さん、おはようございます!"; Noon.Text = NameBox.Text + "さん、こんにちは!"; Evening.Text = NameBox.Text + "さん、こんばんは!"; } else { Morining.Text = ""; Noon.Text = ""; Evening.Text = ""; } } } }WindowsFormアプリケーションなんかではこのようにTextBoxのTextChangedイベントに絡めて
TextBlockの中身を書き換えるような記述になると思います。ただこのような記述は修正が大変で
XAML側の"NameBox"という名前を"NameBox1"にしたいとなると、それに合わせてC#側のコードも
書き換えなければなりません。これが分離できていない、という一例だと思います。
そこで新たにMainWindowWPF.xamlというウィンドウを作って次のように書いてみます。MainWindowWPF.xaml<Window x:Class="BIBOROKU_001.MainWindowWPF" xmlns="http://schemas.microsoft.com/winfx/2006/xaml/presentation" xmlns:x="http://schemas.microsoft.com/winfx/2006/xaml" xmlns:d="http://schemas.microsoft.com/expression/blend/2008" xmlns:mc="http://schemas.openxmlformats.org/markup-compatibility/2006" xmlns:local="clr-namespace:BIBOROKU_001" mc:Ignorable="d" Title="MainWindowWPF" Height="450" Width="800"> <StackPanel> <TextBox Text="{Binding InputName,Mode=OneWayToSource,UpdateSourceTrigger=PropertyChanged}" /> <TextBlock Text="{Binding Morining,Mode=OneWay,UpdateSourceTrigger=PropertyChanged}" /> <TextBlock Text="{Binding Noon,Mode=OneWay,UpdateSourceTrigger=PropertyChanged}" /> <TextBlock Text="{Binding Evening,Mode=OneWay,UpdateSourceTrigger=PropertyChanged}" /> </StackPanel> </Window>なにやら少しにぎやかになってきました。
MainWindow.xamlと比べName="xxxxx"という記述が
なくなり代わりにText="{Binding xxxx}"となっています。Bindは結びつけるといった意味ですのでTextBoxを例にすると<TextBox Text="{Binding InputName, Mode=OneWayToSource, UpdateSourceTrigger=PropertyChanged}" />
TextBoxのTextは
①InputNameに結び付けて
②ModeはOneWayToSource(ソース方向への一方通行)
③UpdateSourceTriggerはPropertyChanged(プロパティが変わったら)
という意味のようです。
ModeにはほかにTwoWayやOneWay(ソースからの一方通行)などが
UpdateSourceTriggerにはExplicitやLostFocusなどがあるようです。
またこのときのC#側の記述はMainWindowWPF.xaml.cs///usingは省略しています namespace BIBOROKU_001 { /// <summary> /// MainWindowWPF.xaml の相互作用ロジック /// </summary> public partial class MainWindowWPF : Window { public MainWindowWPF() { InitializeComponent(); this.DataContext = new MainWindowWPFVM(); } ///実際にはここから先は分離して別ファイルに public class MainWindowWPFVM : INotifyPropertyChanged { public MainWindowWPFVM() { } private string _InputName; public string InputName { get { return _InputName; } set { _InputName = value; RaisePropertyChanged(); RaisePropertyChanged("Morining"); RaisePropertyChanged("Noon"); RaisePropertyChanged("Evening"); } } public string Morining { get { if (InputName != "") return InputName + "さん、おはようございます!"; else return ""; } } public string Noon { get { if (InputName != "") return InputName + "さん、こんにちは!"; else return ""; } } public string Evening { get { if (InputName != "") return InputName + "さん、こんばんは!"; else return ""; } } //INotifyPropertyChanged実装 public event PropertyChangedEventHandler PropertyChanged = delegate { }; //INotifyPropertyChanged.PropertyChangedイベントを発生させる private void RaisePropertyChanged([CallerMemberName]string propertyName = "") { if (propertyName != null) PropertyChanged(this, new PropertyChangedEventArgs(propertyName)); } } } }こちらもにぎやかですね。ただ
MainWindowWPFの中はずいぶんとすっきりしました。
唯一増えたのはthis.DataContext = new MainWindowWPFVM();の部分だけです。
Context自体は"文脈"のような意味があるようですが、分かりにくいのでここでは"情報"と捉えると
この(MainWindowWPF)データの情報はMainWindowWPFVMのインスタンスにありますよ
という感じでしょうか。
そしてそのMainWindowWPFVM内には、XAML側でBindingしたInputNameやMorining,Noon,Eveningといったプロパティが含まれています。ただし単にプロパティを定義しただけではだめで、プロパティが変わったら変更通知をしなければならないようです。
INotifyPropertyChangedとRaisePRopertyChangedというのがそれにあたるようですが、今回は省略します。今回のまとめ
初回ということで、WPFとMVVMパターンについて、基本的なBindingについて書きました。
1.構造をModel-View-ViewModelに分ける
2.ViewではViewModelクラスのインスタンスの生成しDataContextにBindingする
3.Bindingではプロパティを変更したら変更した通知がないと更新されない今回はこのあたりで失礼します。
- 投稿日:2020-03-05T02:50:45+09:00
Qiitaに投稿した記事のリンクを楽にWordPressに送りたい #4
シリーズ
Qiitaに投稿した記事のリンクを楽にWordPressに送りたい #1
Qiitaに投稿した記事のリンクを楽にWordPressに送りたい #2
Qiitaに投稿した記事のリンクを楽にWordPressに送りたい #3環境
IDE:VisualStudio2019
アプリケーション:ASP.Net Core WebAPI
フレームワーク:.NET Core 3.1Webアプリに移行する
前回の続きになります。
#3で作成したコンソールアプリの処理をWebAPI側から呼び出してみたいと思います。
設計
ASP.NET CoreでWebAPIを作成
↓
「#3で作成した処理」を呼び出す処理を実装
↓
その処理をブックマークレットから呼び出すASP.NET Core
Visual Studio のテンプレートから作成します。
デフォルトで作成されるWeatherForcastのクラス等はQiita2WPWebに書き換えました。
コントローラーの実装
using Microsoft.AspNetCore.Mvc; using Microsoft.Extensions.Logging; using System.Threading.Tasks; using TestProject.QiitaToWP; namespace TestProject.QiitaToWPWeb.Controllers { [ApiController] [Route("[controller]/[action]")] public class Qiita2WPWebController : ControllerBase { private readonly ILogger<Qiita2WPWebController> _logger; public Qiita2WPWebController(ILogger<Qiita2WPWebController> logger) { _logger = logger; } [HttpGet] public IActionResult Get() { return Ok(); } [HttpPost] public async Task<IActionResult> Post() { var q2wp = new Qiita2WP(); // Qiita2WPプロジェクトの方の処理を使いまわす await q2wp.Qiita2WPArticle(); return Ok(); } } }Routeの説明については以下が参考になりました。
ASP.NET Core でのコントローラー アクションへのルーティングWebAPIをブックマークレットから呼び出す。
以下の処理をブックマークレットで行います。
var xhr=new XMLHttpRequest();
xhr.open("POST","https://localhost:5001/qiita2wpweb/post", true);
xhr.onreadystatechange = function()
{
    if (this.readyState==4) {
        alert("リクエスト完了");
    }
};
xhr.send(null);
1行バージョン
javascript:var xhr=new XMLHttpRequest();xhr.open("POST","https://localhost:5001/qiita2wpweb/post");xhr.onreadystatechange=function(){if(this.readyState==4){alert("リクエスト完了");}};xhr.send(null);実行確認
ブックマークレットをクリックします。
追加されたことが確認できました。
GitHub
次回はDockerに乗せられるか試します。


