- 投稿日:2019-10-20T22:26:21+09:00
Vue.js + Laravelを使って英和辞書APIを使おう #1
英語版wikiを気軽に読みたい!
Vue.js+Laravelで
・Mediawikiを用いてwikiの記事をHTMLで引っ張ってくる
・ハイライトとか単語検索機能をつける
・単語の登録機能(単語帳みたいなの)をつけて後で復習しやすいようにする
みたいなアプリが出来たらなーと思って現在実装しています。
今回は単語検索機能について必死にググりながら実装していったものを記事にまとめます。実際に作ったもの(開発中)
http://wiki-learning.herokuapp.com
GitHub
https://github.com/customaddone/wikiLearning開発環境
使用ツール名 バージョン Laravel 6.1.0 Vue 6.4.1 Laravelのバージョンごとにresources/jsのディレクトリの構造が異なったりするようです。
実装するもの
Vue(単一コンポーネント)
- template
- 検索結果を表示するカード(ボタンで表示/非表示の切り替え可)
- カードの表示/非表示を切り替えるボタン
- script
- デ辞蔵(辞書API)で単語の検索、内容取得する機能
Laravel
- Controller
- デ辞蔵(辞書API)で単語の検索、内容取得する機能(Guzzleを用いる)
同一オリジンポリシー
ブラウザには、同一オリジンポリシーというものが適用されていて、異なるドメイン(例localhost -> en.wikipedia...(wikiAPIのドメイン))にアクセスしようとすると、「access-control-allow-origin ヘッダーに見つかりません。」とのエラーが出て弾かれます。
外部APIを使うということは、異なるドメイン(localhost -> 外部APIのドメイン)にアクセスしようとすることなので、何かしら対策をしないとアクセスを弾かれてAPIで外部APIからレスポンスを受け取れません。
対策としては
1 Chromeの拡張機能を使う
2 サーバーサイド(Laravel側)でページを取得
3 Jsonpを利用するなどの方法があるらしく、今回は「2 サーバーサイド(Laravel側)でページを取得」で対応しようと思います。
Guzzle
PHPにはGuzzleというライブラリがあり、これを用いるとPHPでHTTPリクエストを行うことができます。これでクロスドメイン通信が可能になります。
インストール
Composerでインストールしましょう。
$ composer require guzzlehttp/guzzleVue側
単一コンポーネントのscriptの部分に書いていきましょう
resources/js/components/WikiShow.Vue/* デ辞蔵を使って単語検索->ヒットすればIDを取得して単語のページを検索 Guzzleを使ってクロスオリジン通信を行う */ researchAxios: function (word) { return new Promise((resolve, reject) => { axios.get("/api/data/" + word) .then((response) => { /* 戻ってきたデータからIDを取得 */ var searchId = response.data.match(/(\d{6})/); this.searchWordId = searchId[0] /* IDを用いて単語のページを検索 */ axios.get("/api/datashow/" + this.searchWordId) .then((response) => { var means = response.data.match(/<div>(.*?)<\/div>/); this.translated = means[1]; resolve(); }) .catch(response => console.log(response)); }) .catch((response) => { console.log(response); reject(); }); }); },(Vueファイルはシンタックスハイライト効かなくて寂しい..)
この部分に注目してください。
axios.get("/api/data/" + word)
             .then((response) => {
axisのgetメソッドで(localhost~)/api/data/(word(検索したい語))のurlでLaravelにリクエストをしています。routes/api.phpにAPIのルーティングを設定しましょう。
routes/api.phpRoute::get("/data/{pass}", "ArticlesController@dict" );先ほどのリクエストでArticlesControllerのdictメソッドを呼べるようにルーティングしました。dictメソッドを実装していきましょう。
Laravel側
ここでGuzzleを使います。
app/Http/Controllers/ArticlesController.php<?php namespace App\Http\Controllers; use App\Article; use Illuminate\Http\Request; use GuzzleHttp\Client; class ArticlesController extends Controller { public function dict($pass) { $client = new \GuzzleHttp\Client(); $response = $client->request( 'GET', // レスポンスを返すurl(デ辞蔵のurl) $url = "http://public.dejizo.jp/NetDicV09.asmx/SearchDicItemLite", [ 'query' => [ 'Dic' => 'EJdict', 'Word' => $pass, 'Scope' => 'HEADWORD', 'Match' => 'STARTWITH', 'Merge' => 'AND', 'Prof' => 'JSON', 'PageSize' => 1, 'PageIndex' => 0 ]], // パラメーターがあれば設定 ); // レスポンスボディを取得 $responseBody = $response->getBody()->getContents(); return $responseBody; } }use GuzzleHttp\Client;Clientインスタンスを使用できるようにして
$client = new \GuzzleHttp\Client();インスタンスを生成
$response = $client->request(
    'GET',
    $url = "http://public.dejizo.jp/NetDicV09.asmx/SearchDicItemLite",
    [ 'query' => [
      'Dic' => 'EJdict',
      'Word' => $pass,
      'Scope' => 'HEADWORD',
      'Match' => 'STARTWITH',
      'Merge' => 'AND',
      'Prof' => 'JSON',
      'PageSize' => 1,
      'PageIndex' => 0
    ]],
// パラメーターがあれば設定
);
Vue側からパスの形で投げられたword + 各種検索条件をつけて$client->requestで指定のurlにリクエスト
// レスポンスボディを取得
$responseBody = $response->getBody()->getContents();
return $responseBody;
返ってきたレスポンスの内容を$responseBodyに収納してVue側にreturnする。
これでVue + Laravelで辞書APIを用いて入力した単語を検索する機能を
一通り実装できました。次回はビューと検索機能をより使いやすくするための細かい実装について書いて行こうと思います。
- 投稿日:2019-10-20T18:37:25+09:00
yarn install 時に Incorrect integrity when fetching from the cache とエラーが発生した時の対処法
問題
yarn install時に以下のエラーが発生した。error Incorrect integrity when fetching from the cache解決策
yarn cache clean上記のコマンドによりグローバルキャッシュが消去される。
参考文献
[yarn cacheに関して]
https://yarnpkg.com/lang/ja/docs/cli/cache/
- 投稿日:2019-10-20T18:24:53+09:00
Vue + TypeScript のプロジェクトを SonarQube で品質管理する
例
説明に使ったリポジトリ
https://github.com/sterashima78/vue-ts-sonarqube-exampleはじめに
コードの品質を評価するために多くに静的解析手法が提案されている。
これらの解析によって得られる指標を常に観察することで、コードの品質悪化をいち早く検知することが期待できる。
JavaScriptではPlato でいくつかの指標を算出することができると知っていたが、
メンテナンスが滞っていることに加えて、現在私がよく利用しているVueやTypescriptには対応していなかった。そんななかで、SonarQube それに代わるということを知ったので、 Vue + Typescript のプロジェクトに導入した。
本文書は、その導入方法を示したものになる。サンプルプロジェクトの準備
$ vue create vue-ts-sonerqube-example
Vue CLI v4.0.4
? Please pick a preset: Manually select features
? Check the features needed for your project: Babel, TS, Vuex, CSS Pre-processors, Linter, Unit
? Use class-style component syntax? No
? Use Babel alongside TypeScript (required for modern mode, auto-detected polyfills, transpiling JSX)? Yes
? Pick a CSS pre-processor (PostCSS, Autoprefixer and CSS Modules are supported by default): Sass/SCSS (with node-sass)
? Pick a linter / formatter config: Prettier
? Pick additional lint features: Lint on save, Lint and fix on commit
? Pick a unit testing solution: Jest
? Where do you prefer placing config for Babel, PostCSS, ESLint, etc.? In dedicated config files
SonarQube serverの準備
SonarQube は Java製のソフトウェアでJava11以上を要求する。
Docker imageもあるのだが、今回は以下のページでコミュニティーバージョン(ver 8.0)をダウンロードして実行することにした。
https://www.sonarqube.org/downloads/ダウンロードしてきた zip を解凍したら、bin以下に各OSごとの実行用ファイルがあるのでそれを実行する
windowsの場合はsonarqube-8.0\bin\windows-x86-64\StartSonar.batを実行すればいい。http://localhost:9000 を listenするのでブラウザからアクセスできる。
SonarQube のための設定
SonerQubeはソフトウェアのスキャン機能をもっており、そのスキャン結果をサーバに送信することで結果の閲覧ができる。
この時別のツールの結果を読み取らせることができるので、単体テスト結果とlint結果を読み取らせる。以下でそのための設定を行う。依存パッケージインストール
$ npm i -D jest-sonar-reporter sonarqube-scanner npm-run-alllint の設定
以下のタスクを追加する
package.json{ "scripts": { "lint:sonar": "eslint -f json -o report.json ." } }unit testの設定
以下を追加する
jest.config.jsmodule.exports = { testResultsProcessor: "jest-sonar-reporter", collectCoverageFrom: [ "src/**/*.{js,jsx,ts,tsx,vue}", "!<rootDir>/node_modules/" ] };以下のタスクを追加する
package.json{ "scripts": { "test:unit:sonar": "npm run test:unit -- --coverage" } }sonar-scannerの設定
SonerQubeの静的解析とデータ送信を行うsonar-scannerの設定をする。
以下のタスクを追加する
package.json{ "scripts": { "sonar:scan": "sonar-scanner", "sonar": "run-s test:unit:sonar lint:sonar sonar:scan" } }以下の設定ファイルを追加する
sonar-project.propertiessonar.projectKey=vue-ts-sonerqube-example sonar.projectName=vue-ts-sonerqube-example sonar.sources=src sonar.tests=tests sonar.test.inclusions=**/*tests*/** sonar.exclusions=**/*tests*/** sonar.testExecutionReportPaths=test-report.xml sonar.javascript.file.suffixes=.js,.jsx sonar.typescript.file.suffixes=.ts,.tsx,.vue sonar.typescript.lcov.reportPaths=coverage/lcov.info sonar.javascript.lcov.reportPaths=coverage/lcov.info sonar.eslint.reportPaths=report.jsonそのほかの設定は以下を参照する
https://docs.sonarqube.org/latest/analysis/scan/sonarscanner/
Scanの実行
$ npm run sonar以下にアクセスすると結果を閲覧できる。
http://localhost:9000/dashboard?id=vue-ts-sonerqube-example結果閲覧と対応
16件のセキュリティ警告があるので見てみる。
See Ruleを見ると警告についての詳細が出る。
target="_blank"で開かれたサイトに悪意があれば、元ページを操作される恐れがあるという。指摘通りに修正をして再度確認する。
指摘が消えた。
また、新たに生じた誤りなどはないことも示されている。終わりに
上記のような設定をCIに組み込むことで例えばレビュー前に誤りが作りこまれていないかを確認することができる。
これによってレビュー負荷も減ることが期待できる。


- 投稿日:2019-10-20T18:24:53+09:00
Vue + TypeScript のプロジェクトを SonarQubeで静的解析して 品質管理する
例
説明に使ったリポジトリ
https://github.com/sterashima78/vue-ts-sonarqube-exampleはじめに
コードの品質を評価するために多くに静的解析手法が提案されている。
これらの解析によって得られる指標を常に観察することで、コードの品質悪化をいち早く検知することが期待できる。
JavaScriptではPlato でいくつかの指標を算出することができると知っていたが、
メンテナンスが滞っていることに加えて、現在私がよく利用しているVueやTypescriptには対応していなかった。そんななかで、SonarQube それに代わるということを知ったので、 Vue + Typescript のプロジェクトに導入した。
本文書は、その導入方法を示したものになる。サンプルプロジェクトの準備
$ vue create vue-ts-sonerqube-example
Vue CLI v4.0.4
? Please pick a preset: Manually select features
? Check the features needed for your project: Babel, TS, Vuex, CSS Pre-processors, Linter, Unit
? Use class-style component syntax? No
? Use Babel alongside TypeScript (required for modern mode, auto-detected polyfills, transpiling JSX)? Yes
? Pick a CSS pre-processor (PostCSS, Autoprefixer and CSS Modules are supported by default): Sass/SCSS (with node-sass)
? Pick a linter / formatter config: Prettier
? Pick additional lint features: Lint on save, Lint and fix on commit
? Pick a unit testing solution: Jest
? Where do you prefer placing config for Babel, PostCSS, ESLint, etc.? In dedicated config files
SonarQube serverの準備
SonarQube は Java製のソフトウェアでJava11以上を要求する。
Docker imageもあるのだが、今回は以下のページでコミュニティーバージョン(ver 8.0)をダウンロードして実行することにした。
https://www.sonarqube.org/downloads/ダウンロードしてきた zip を解凍したら、bin以下に各OSごとの実行用ファイルがあるのでそれを実行する
windowsの場合はsonarqube-8.0\bin\windows-x86-64\StartSonar.batを実行すればいい。http://localhost:9000 を listenするのでブラウザからアクセスできる。
SonarQube のための設定
SonerQubeはソフトウェアのスキャン機能をもっており、そのスキャン結果をサーバに送信することで結果の閲覧ができる。
この時別のツールの結果を読み取らせることができるので、単体テスト結果とlint結果を読み取らせる。以下でそのための設定を行う。依存パッケージインストール
$ npm i -D jest-sonar-reporter sonarqube-scanner npm-run-alllint の設定
以下のタスクを追加する
package.json{ "scripts": { "lint:sonar": "eslint -f json -o report.json ." } }unit testの設定
以下を追加する
jest.config.jsmodule.exports = { testResultsProcessor: "jest-sonar-reporter", collectCoverageFrom: [ "src/**/*.{js,jsx,ts,tsx,vue}", "!<rootDir>/node_modules/" ] };以下のタスクを追加する
package.json{ "scripts": { "test:unit:sonar": "npm run test:unit -- --coverage" } }sonar-scannerの設定
SonerQubeの静的解析とデータ送信を行うsonar-scannerの設定をする。
以下のタスクを追加する
package.json{ "scripts": { "sonar:scan": "sonar-scanner", "sonar": "run-s test:unit:sonar lint:sonar sonar:scan" } }以下の設定ファイルを追加する
sonar-project.propertiessonar.projectKey=vue-ts-sonerqube-example sonar.projectName=vue-ts-sonerqube-example sonar.sources=src sonar.tests=tests sonar.test.inclusions=**/*tests*/** sonar.exclusions=**/*tests*/** sonar.testExecutionReportPaths=test-report.xml sonar.javascript.file.suffixes=.js,.jsx sonar.typescript.file.suffixes=.ts,.tsx,.vue sonar.typescript.lcov.reportPaths=coverage/lcov.info sonar.javascript.lcov.reportPaths=coverage/lcov.info sonar.eslint.reportPaths=report.jsonそのほかの設定は以下を参照する
https://docs.sonarqube.org/latest/analysis/scan/sonarscanner/
Scanの実行
$ npm run sonar以下にアクセスすると結果を閲覧できる。
http://localhost:9000/dashboard?id=vue-ts-sonerqube-example結果閲覧と対応
16件のセキュリティ警告があるので見てみる。
See Ruleを見ると警告についての詳細が出る。
遷移先から元ページにアクセスさせなくするためらしい。
指摘通りに修正をして再度確認する。
指摘が消えた。
また、新たに生じた誤りなどはないことも示されている。終わりに
上記のような設定をCIに組み込むことで例えばレビュー前に誤りが作りこまれていないかを確認することができる。
これによってレビュー負荷も減ることが期待できる。
- 投稿日:2019-10-20T18:24:53+09:00
Vue + TypeScript のプロジェクトを SonarQubeで品質管理する
例
説明に使ったリポジトリ
https://github.com/sterashima78/vue-ts-sonarqube-exampleはじめに
コードの品質を評価するために多くに静的解析手法が提案されている。
これらの解析によって得られる指標を常に観察することで、コードの品質悪化をいち早く検知することが期待できる。
JavaScriptではPlato でいくつかの指標を算出することができると知っていたが、
メンテナンスが滞っていることに加えて、現在私がよく利用しているVueやTypescriptには対応していなかった。そんななかで、SonarQube それに代わるということを知ったので、 Vue + Typescript のプロジェクトに導入した。
本文書は、その導入方法を示したものになる。サンプルプロジェクトの準備
$ vue create vue-ts-sonerqube-example
Vue CLI v4.0.4
? Please pick a preset: Manually select features
? Check the features needed for your project: Babel, TS, Vuex, CSS Pre-processors, Linter, Unit
? Use class-style component syntax? No
? Use Babel alongside TypeScript (required for modern mode, auto-detected polyfills, transpiling JSX)? Yes
? Pick a CSS pre-processor (PostCSS, Autoprefixer and CSS Modules are supported by default): Sass/SCSS (with node-sass)
? Pick a linter / formatter config: Prettier
? Pick additional lint features: Lint on save, Lint and fix on commit
? Pick a unit testing solution: Jest
? Where do you prefer placing config for Babel, PostCSS, ESLint, etc.? In dedicated config files
SonarQube serverの準備
SonarQube は Java製のソフトウェアでJava11以上を要求する。
Docker imageもあるのだが、今回は以下のページでコミュニティーバージョン(ver 8.0)をダウンロードして実行することにした。
https://www.sonarqube.org/downloads/ダウンロードしてきた zip を解凍したら、bin以下に各OSごとの実行用ファイルがあるのでそれを実行する
windowsの場合はsonarqube-8.0\bin\windows-x86-64\StartSonar.batを実行すればいい。http://localhost:9000 を listenするのでブラウザからアクセスできる。
SonarQube のための設定
SonerQubeはソフトウェアのスキャン機能をもっており、そのスキャン結果をサーバに送信することで結果の閲覧ができる。
この時別のツールの結果を読み取らせることができるので、単体テスト結果とlint結果を読み取らせる。以下でそのための設定を行う。依存パッケージインストール
$ npm i -D jest-sonar-reporter sonarqube-scanner npm-run-alllint の設定
以下のタスクを追加する
package.json{ "scripts": { "lint:sonar": "eslint -f json -o report.json ." } }unit testの設定
以下を追加する
jest.config.jsmodule.exports = { testResultsProcessor: "jest-sonar-reporter", collectCoverageFrom: [ "src/**/*.{js,jsx,ts,tsx,vue}", "!<rootDir>/node_modules/" ] };以下のタスクを追加する
package.json{ "scripts": { "test:unit:sonar": "npm run test:unit -- --coverage" } }sonar-scannerの設定
SonerQubeの静的解析とデータ送信を行うsonar-scannerの設定をする。
以下のタスクを追加する
package.json{ "scripts": { "sonar:scan": "sonar-scanner", "sonar": "run-s test:unit:sonar lint:sonar sonar:scan" } }以下の設定ファイルを追加する
sonar-project.propertiessonar.projectKey=vue-ts-sonerqube-example sonar.projectName=vue-ts-sonerqube-example sonar.sources=src sonar.tests=tests sonar.test.inclusions=**/*tests*/** sonar.exclusions=**/*tests*/** sonar.testExecutionReportPaths=test-report.xml sonar.javascript.file.suffixes=.js,.jsx sonar.typescript.file.suffixes=.ts,.tsx,.vue sonar.typescript.lcov.reportPaths=coverage/lcov.info sonar.javascript.lcov.reportPaths=coverage/lcov.info sonar.eslint.reportPaths=report.jsonそのほかの設定は以下を参照する
https://docs.sonarqube.org/latest/analysis/scan/sonarscanner/
Scanの実行
$ npm run sonar以下にアクセスすると結果を閲覧できる。
http://localhost:9000/dashboard?id=vue-ts-sonerqube-example結果閲覧と対応
16件のセキュリティ警告があるので見てみる。
See Ruleを見ると警告についての詳細が出る。
遷移先から元ページにアクセスさせなくするためらしい。
指摘通りに修正をして再度確認する。
指摘が消えた。
また、新たに生じた誤りなどはないことも示されている。終わりに
上記のような設定をCIに組み込むことで例えばレビュー前に誤りが作りこまれていないかを確認することができる。
これによってレビュー負荷も減ることが期待できる。
- 投稿日:2019-10-20T18:14:43+09:00
CSSアニメーションで揺らぐ円を描いてみる
CSSアニメーションで揺らぐ円を描いてみる
円の外側がゆらゆらしている円を描いてみます。
想定
理想形(結果)はこれです。
See the Pen ShakingBall by YamaOK (@yamaok) on CodePen.
素材
- html
- css
- css-animation
- Vue
仮説
ゆらゆらしている円を描くにはどうしたらいいのか?を考えてみます。
- 外側がそれっぽく波を打っていればいい?
- 波を打つ = 凸凹を表現してあげればよい?
- 角の丸み(border-radius)が異なるdivを適当な数、重ねて配置して回転すればよい?
- 重ねたときに水っぽく見えるように色の透過度を調整してあげる必要がありそう
実践
円を重ねる
複数のdivを作成し、重ねます。
0. サイズの指定は適当に・・・揺らぎの幅を少なくしたい=正方形/大きくしたい=長方形
1. 表示位置を絶対指定にすることで重なるよう調整します。
2. 真ん中寄せにして必ず画面中央にします。
3. 色の透過度を指定する.ball{ // 0. width:30em; height:30em; // 1. position:absolute; // 2. left:0px; top:0px; margin:0auto; // 3. background-color:rgba() }異なる角度の丸みを設定する
ここでVueを使います。
すべてhtmlで描くこともできますが、後々の設定変更に柔軟に対応できそうなのでVue側で制御してしまいます。
- 描画する円の数は、Vueで指定します(後々、どれくらいの円を描けばちょうどよいか調整するため)
- 描画する際の角の丸みについては、あまり角張るといけないのでこちらでいくつか定義します
- 回転のスピードにも ばらつきをもたせる ことで揺らぎをそれっぽくさせてみます
<html>
<body>
    <div id="content">
        <div id="animationBlock">
            <div id="contentName"><span>Hello World</span></div>
            <!--1. これで、ballCount(int)の数分だけdivを描画できます-->
            <template v-for="count of ballCount">
            <!--2. 可変にしたいスタイルの定義はVueで定義したメソッドで出力します-->
                <div class="ball" :style="getCss(count)"></div>
            </template>
        </div>
</body>
</html>
const balls = new Vue({ el:'#animationBlock', data:{ //1. とりあえず10個あればいいと思いましたが、各自でちょうど良い数を定義してください ballCount:10, //2. 丸み付けのパターンをいくつか定義します // 丸みは正方形の場合、一辺の半分で円になってしまいます // したがって、半分未満の長さを指定します features:[ {radius:13}, {radius:13.5}, {radius:14} ], }, methods: { getCss:function(wave){ //2. let feature = this.features[wave % this.features.length] //3. let duration = Math.floor(Math.random() * 10 % 5 + 2) return `border-radius:${feature.radius}em;animation-duration:${duration}s` } }, })まとめ
応用させれば似たような揺らぎをもたせることはできそうだなあと思います。
今回は定義しませんでしたが、アニメーションの開始をずらす Or 開始位置をずらすなどしても面白いかもしれません。できるかぎり可変にはしたつもりなので、皆さんの美的センスに合わせて改良してください。
例に描いたものはすべて自分のセンスですので・・・笑皆さんのお役に立てれば幸いです。
- 投稿日:2019-10-20T17:57:47+09:00
Vue.jsでコメント投稿機能を作ってみた。
1.はじめに
今回はjavascriptのフレームワーク、Vue.jsを使って投稿機能を作ってみました。vue.jsを学ぶ際によく題材として使われるToDo管理リストに少し手を加えたもので、映画の感想と評価点を投稿するサイトをイメージして作りました。
2.環境
今回も前回に引き続き、VSCodeを使用して書いていきます。
またVue.jsはVue.js公式ページのCDNのリンクを直接HTML内のbodyタグの一番下に埋め込んで使います。3.完成体
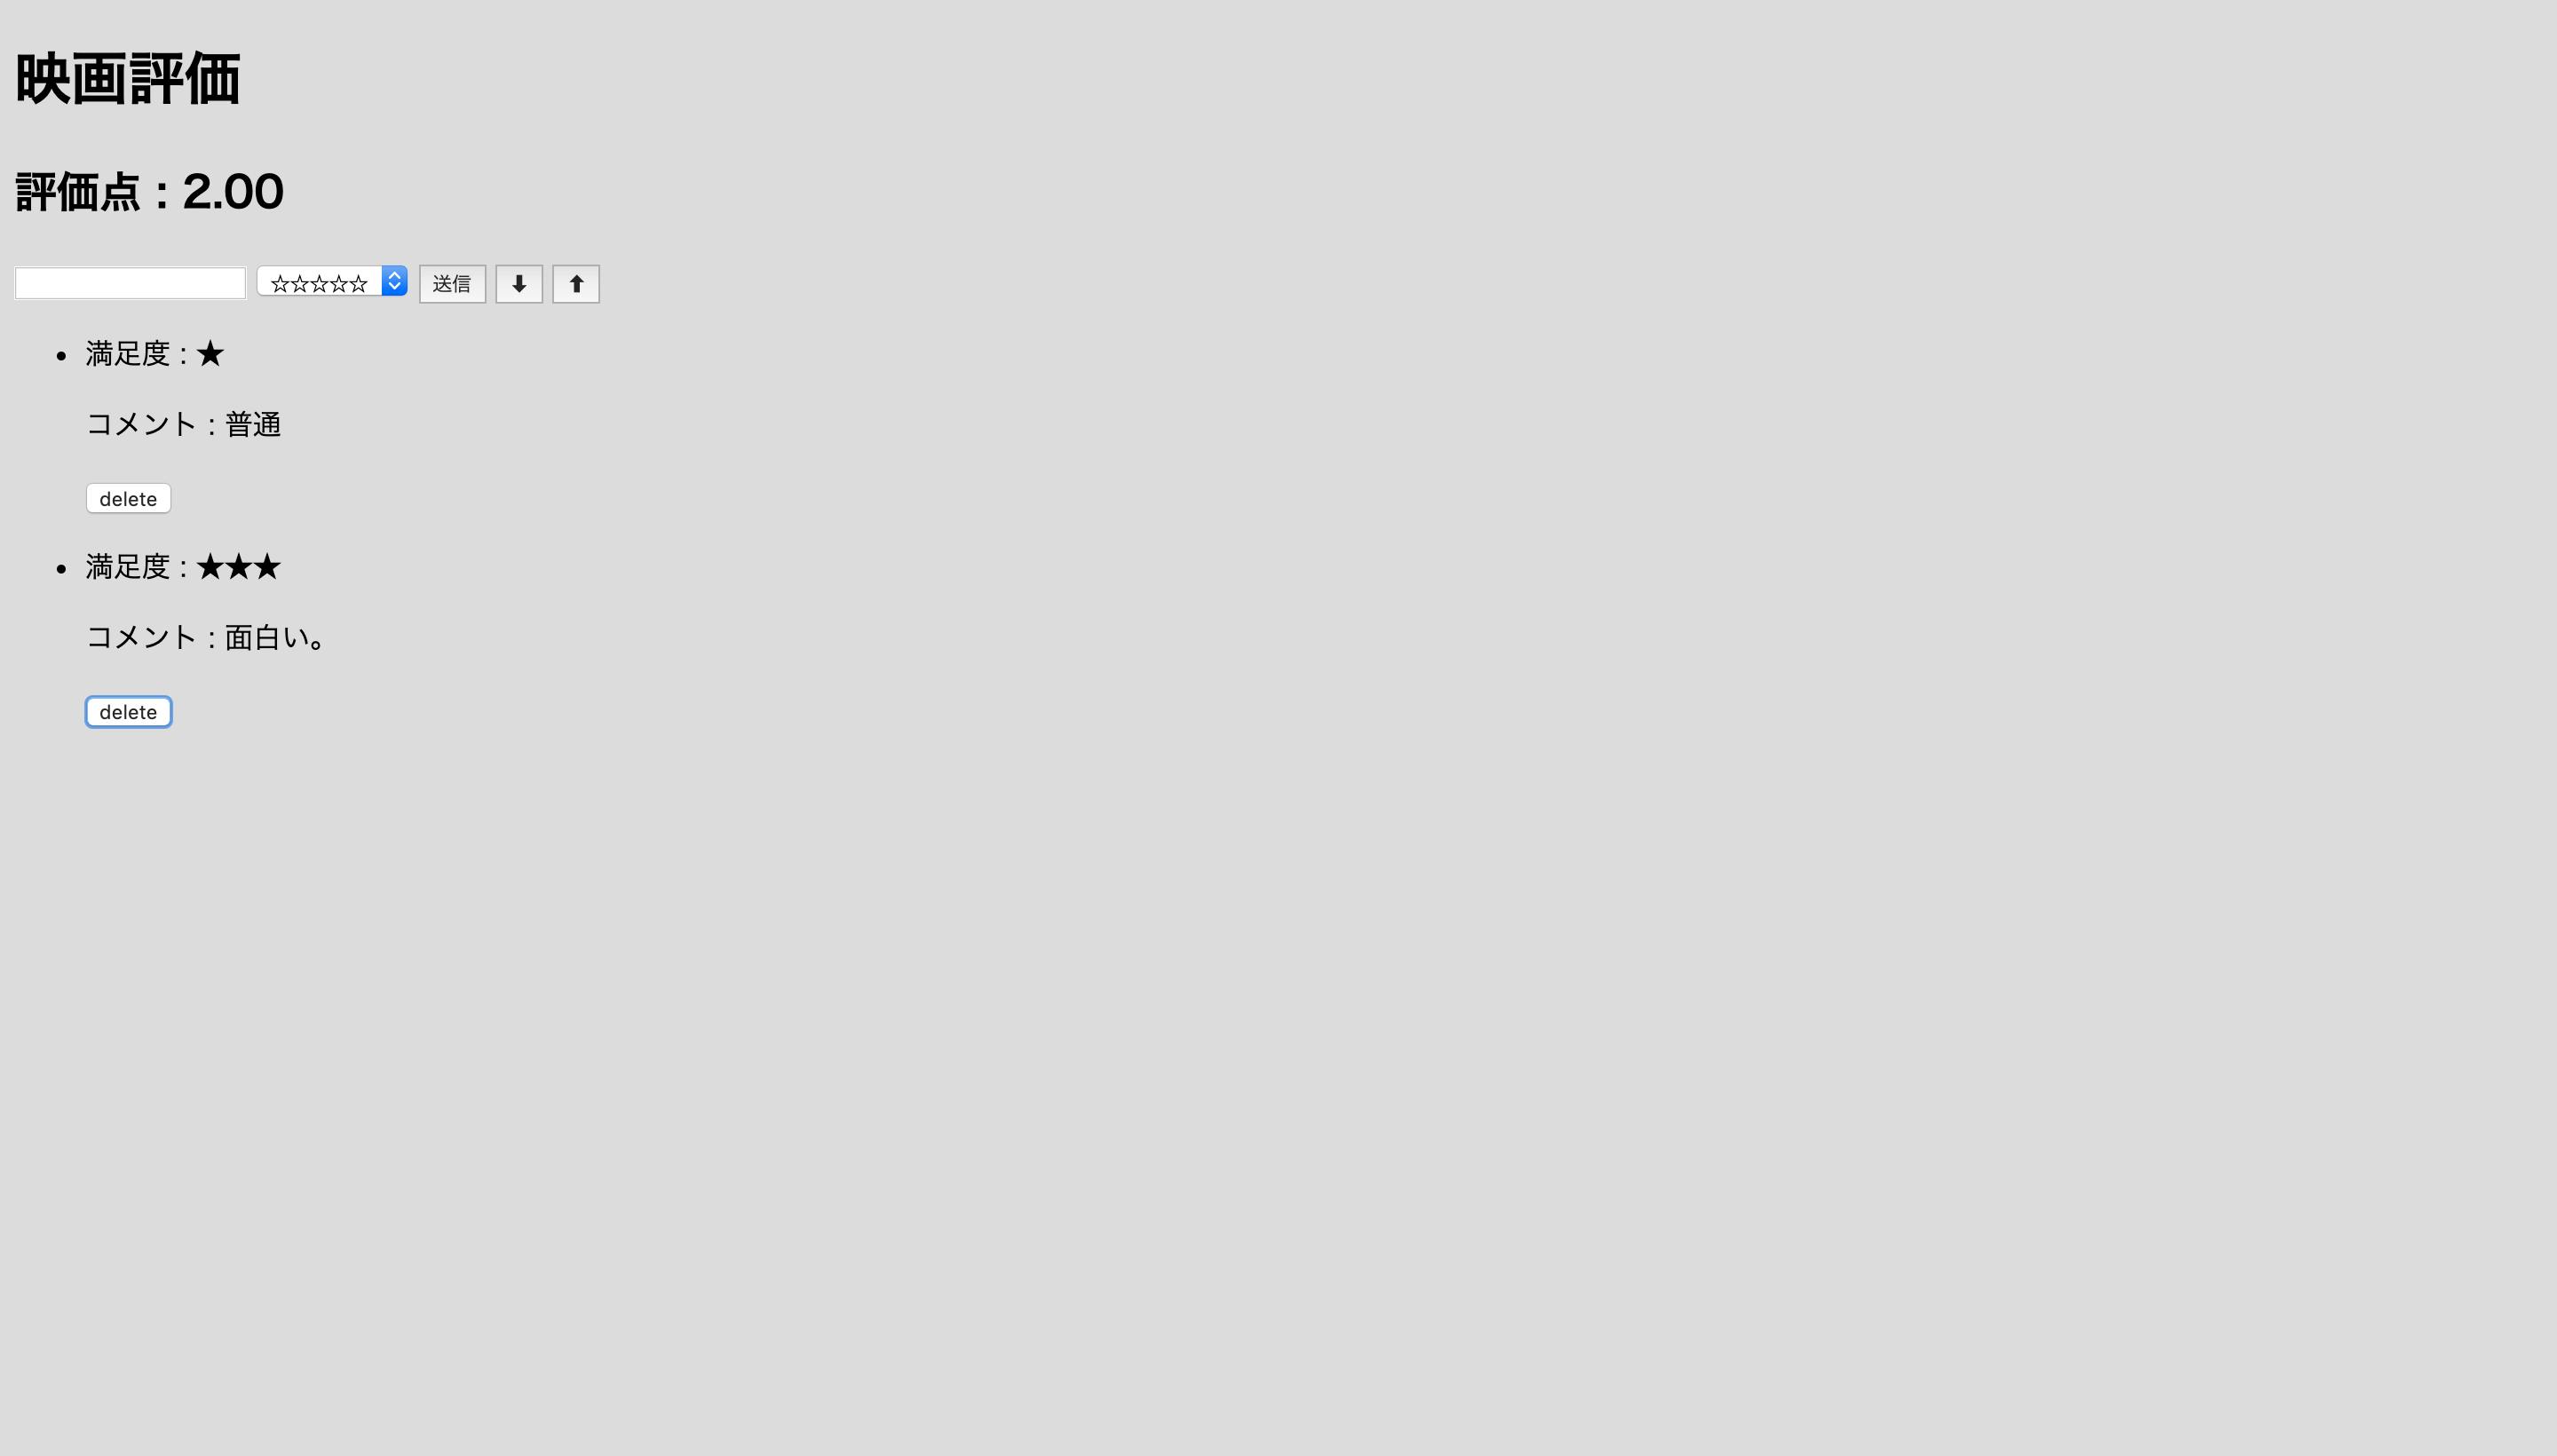
テキストボックスの中にコメントを打ち込み、隣の選択ボタンで星の数に応じた評価点を選択します。
送信ボタンを押すと投稿が完了しました。ちなみに、テキストボックスの中身が未入力の状態で送信ボタンを押しても投稿はされません。
二つ目の投稿をします。するとこの二つの投稿の評価数の平均を計算して評価点が3.50になりました。
三つ目の投稿をしても同じように評価点の平均点を計算します。しかし割り切れない数などある為、toFixedメソッドを使って小数点第二位までしか表示されません。そして今回は各投稿の下にあるdeleteボタンを押すと、
コメントが一つ消されました。
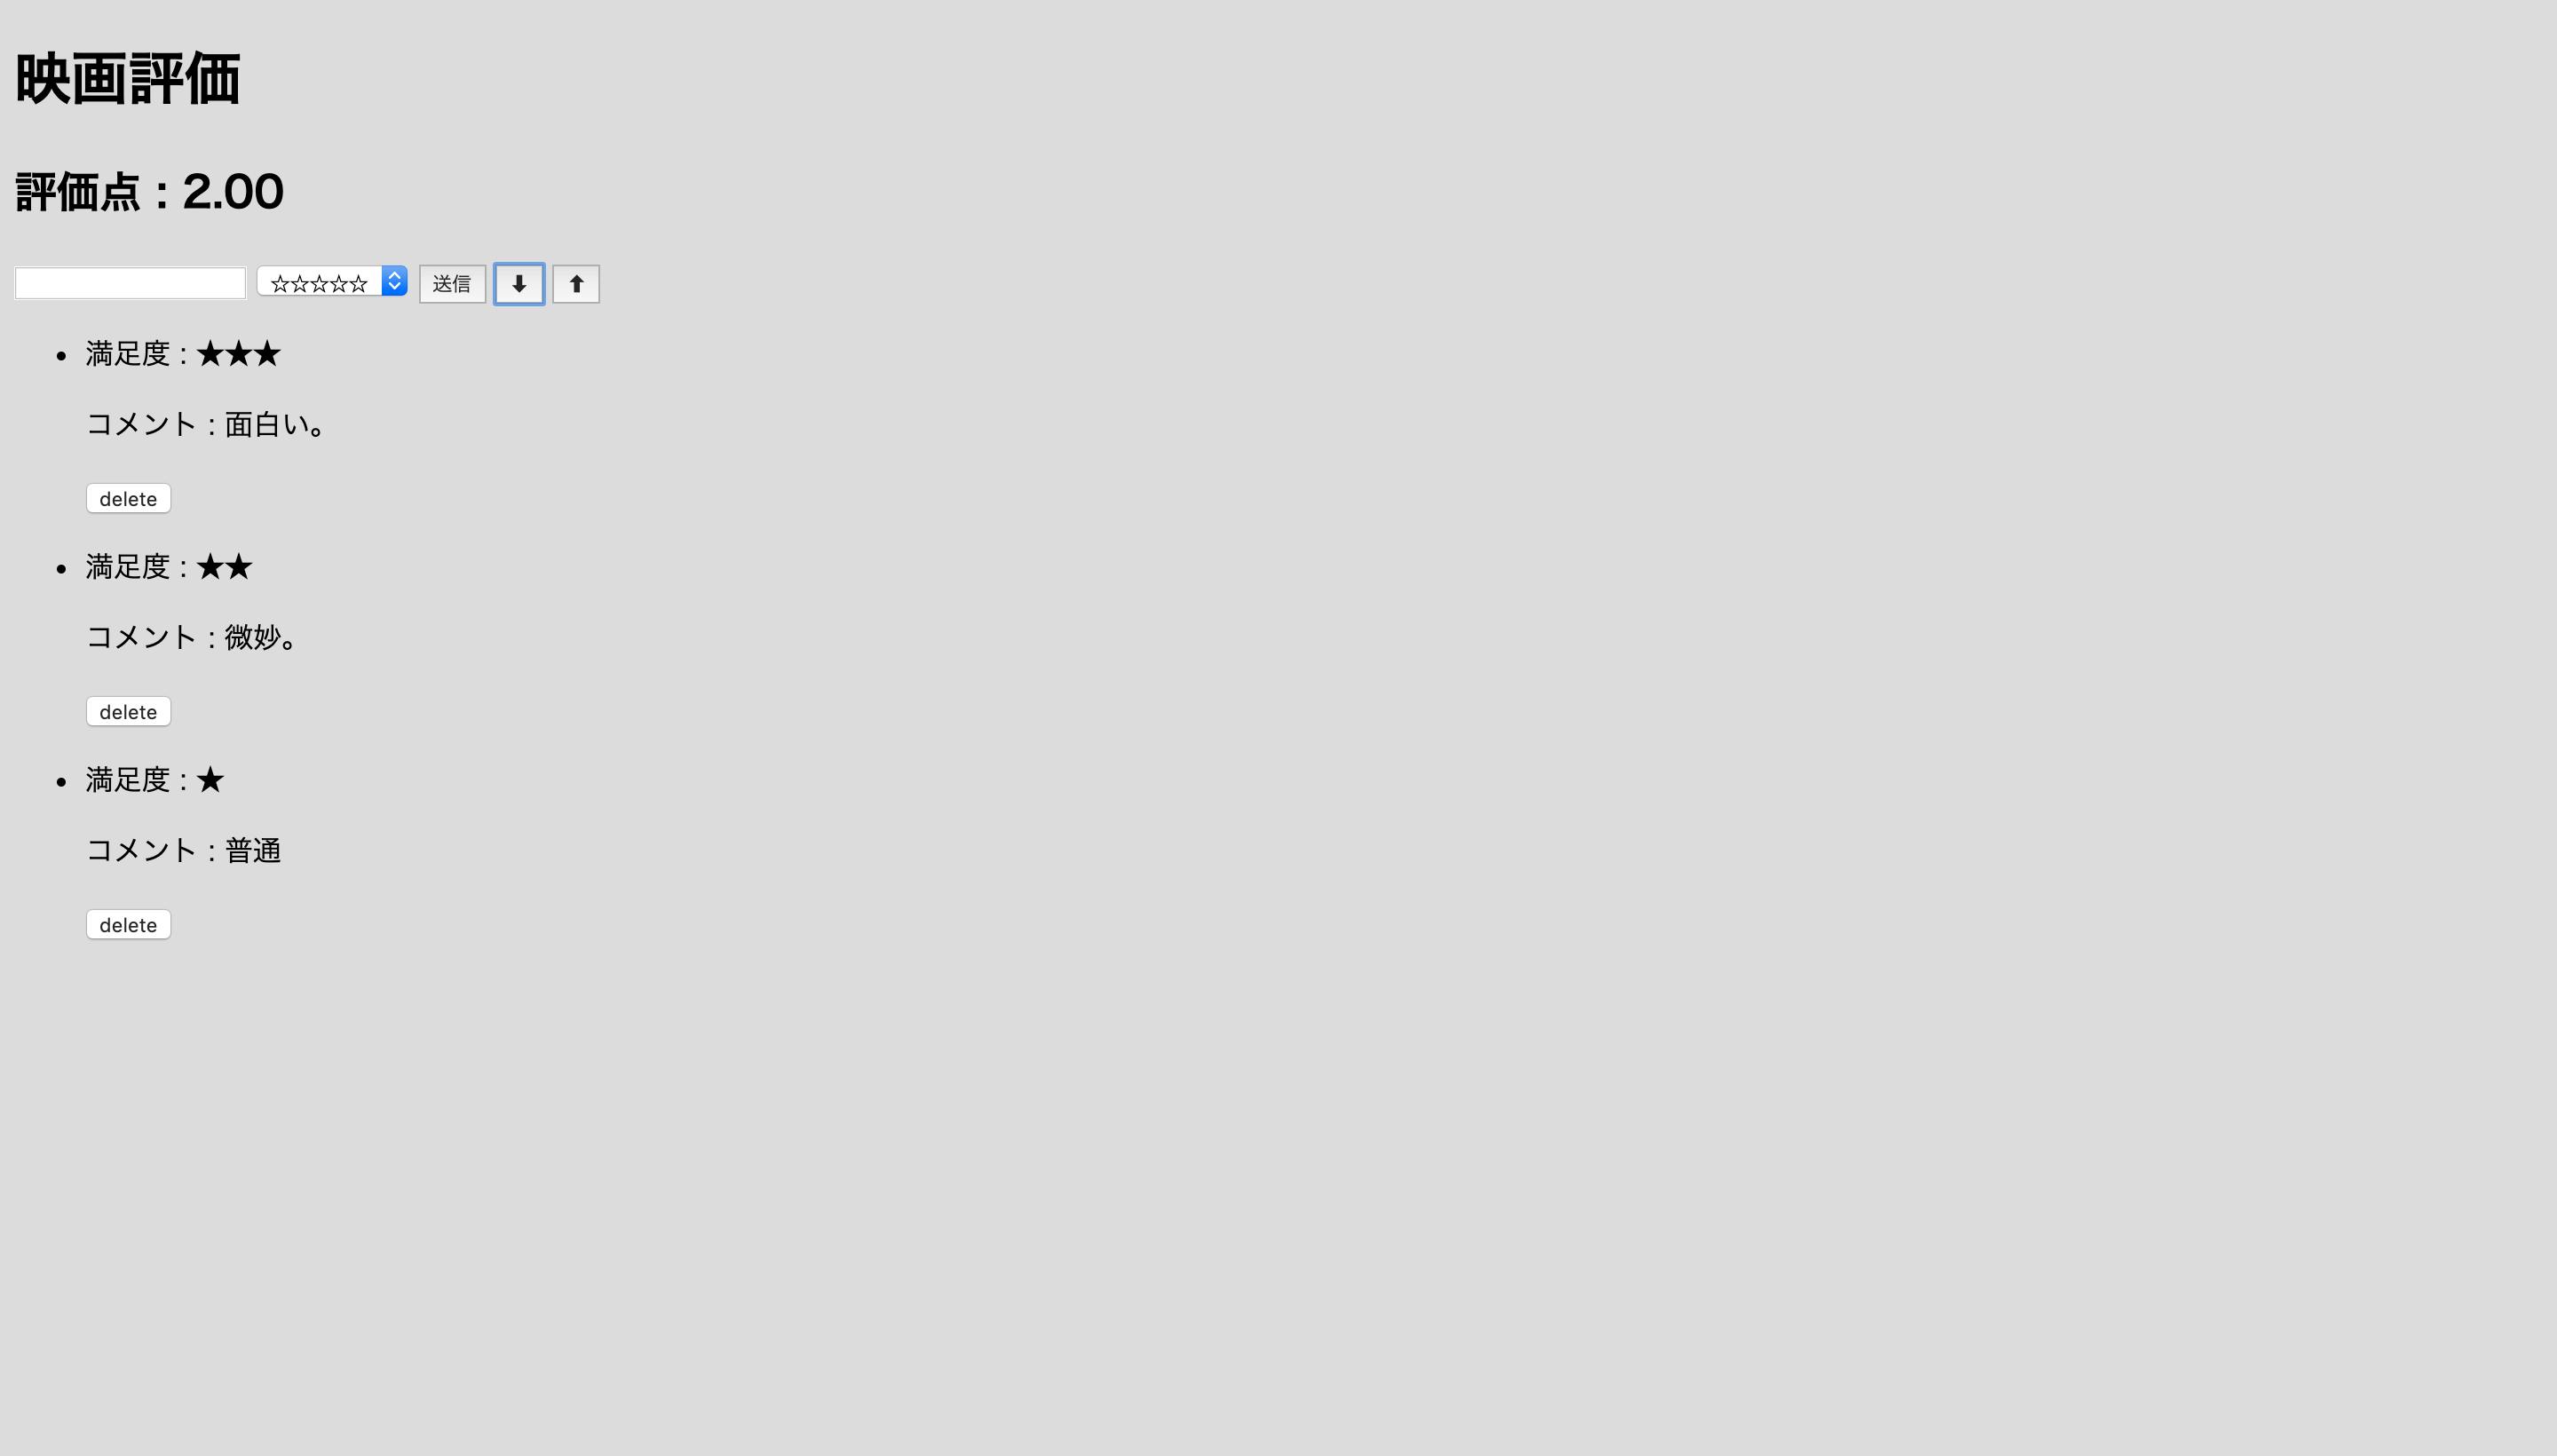
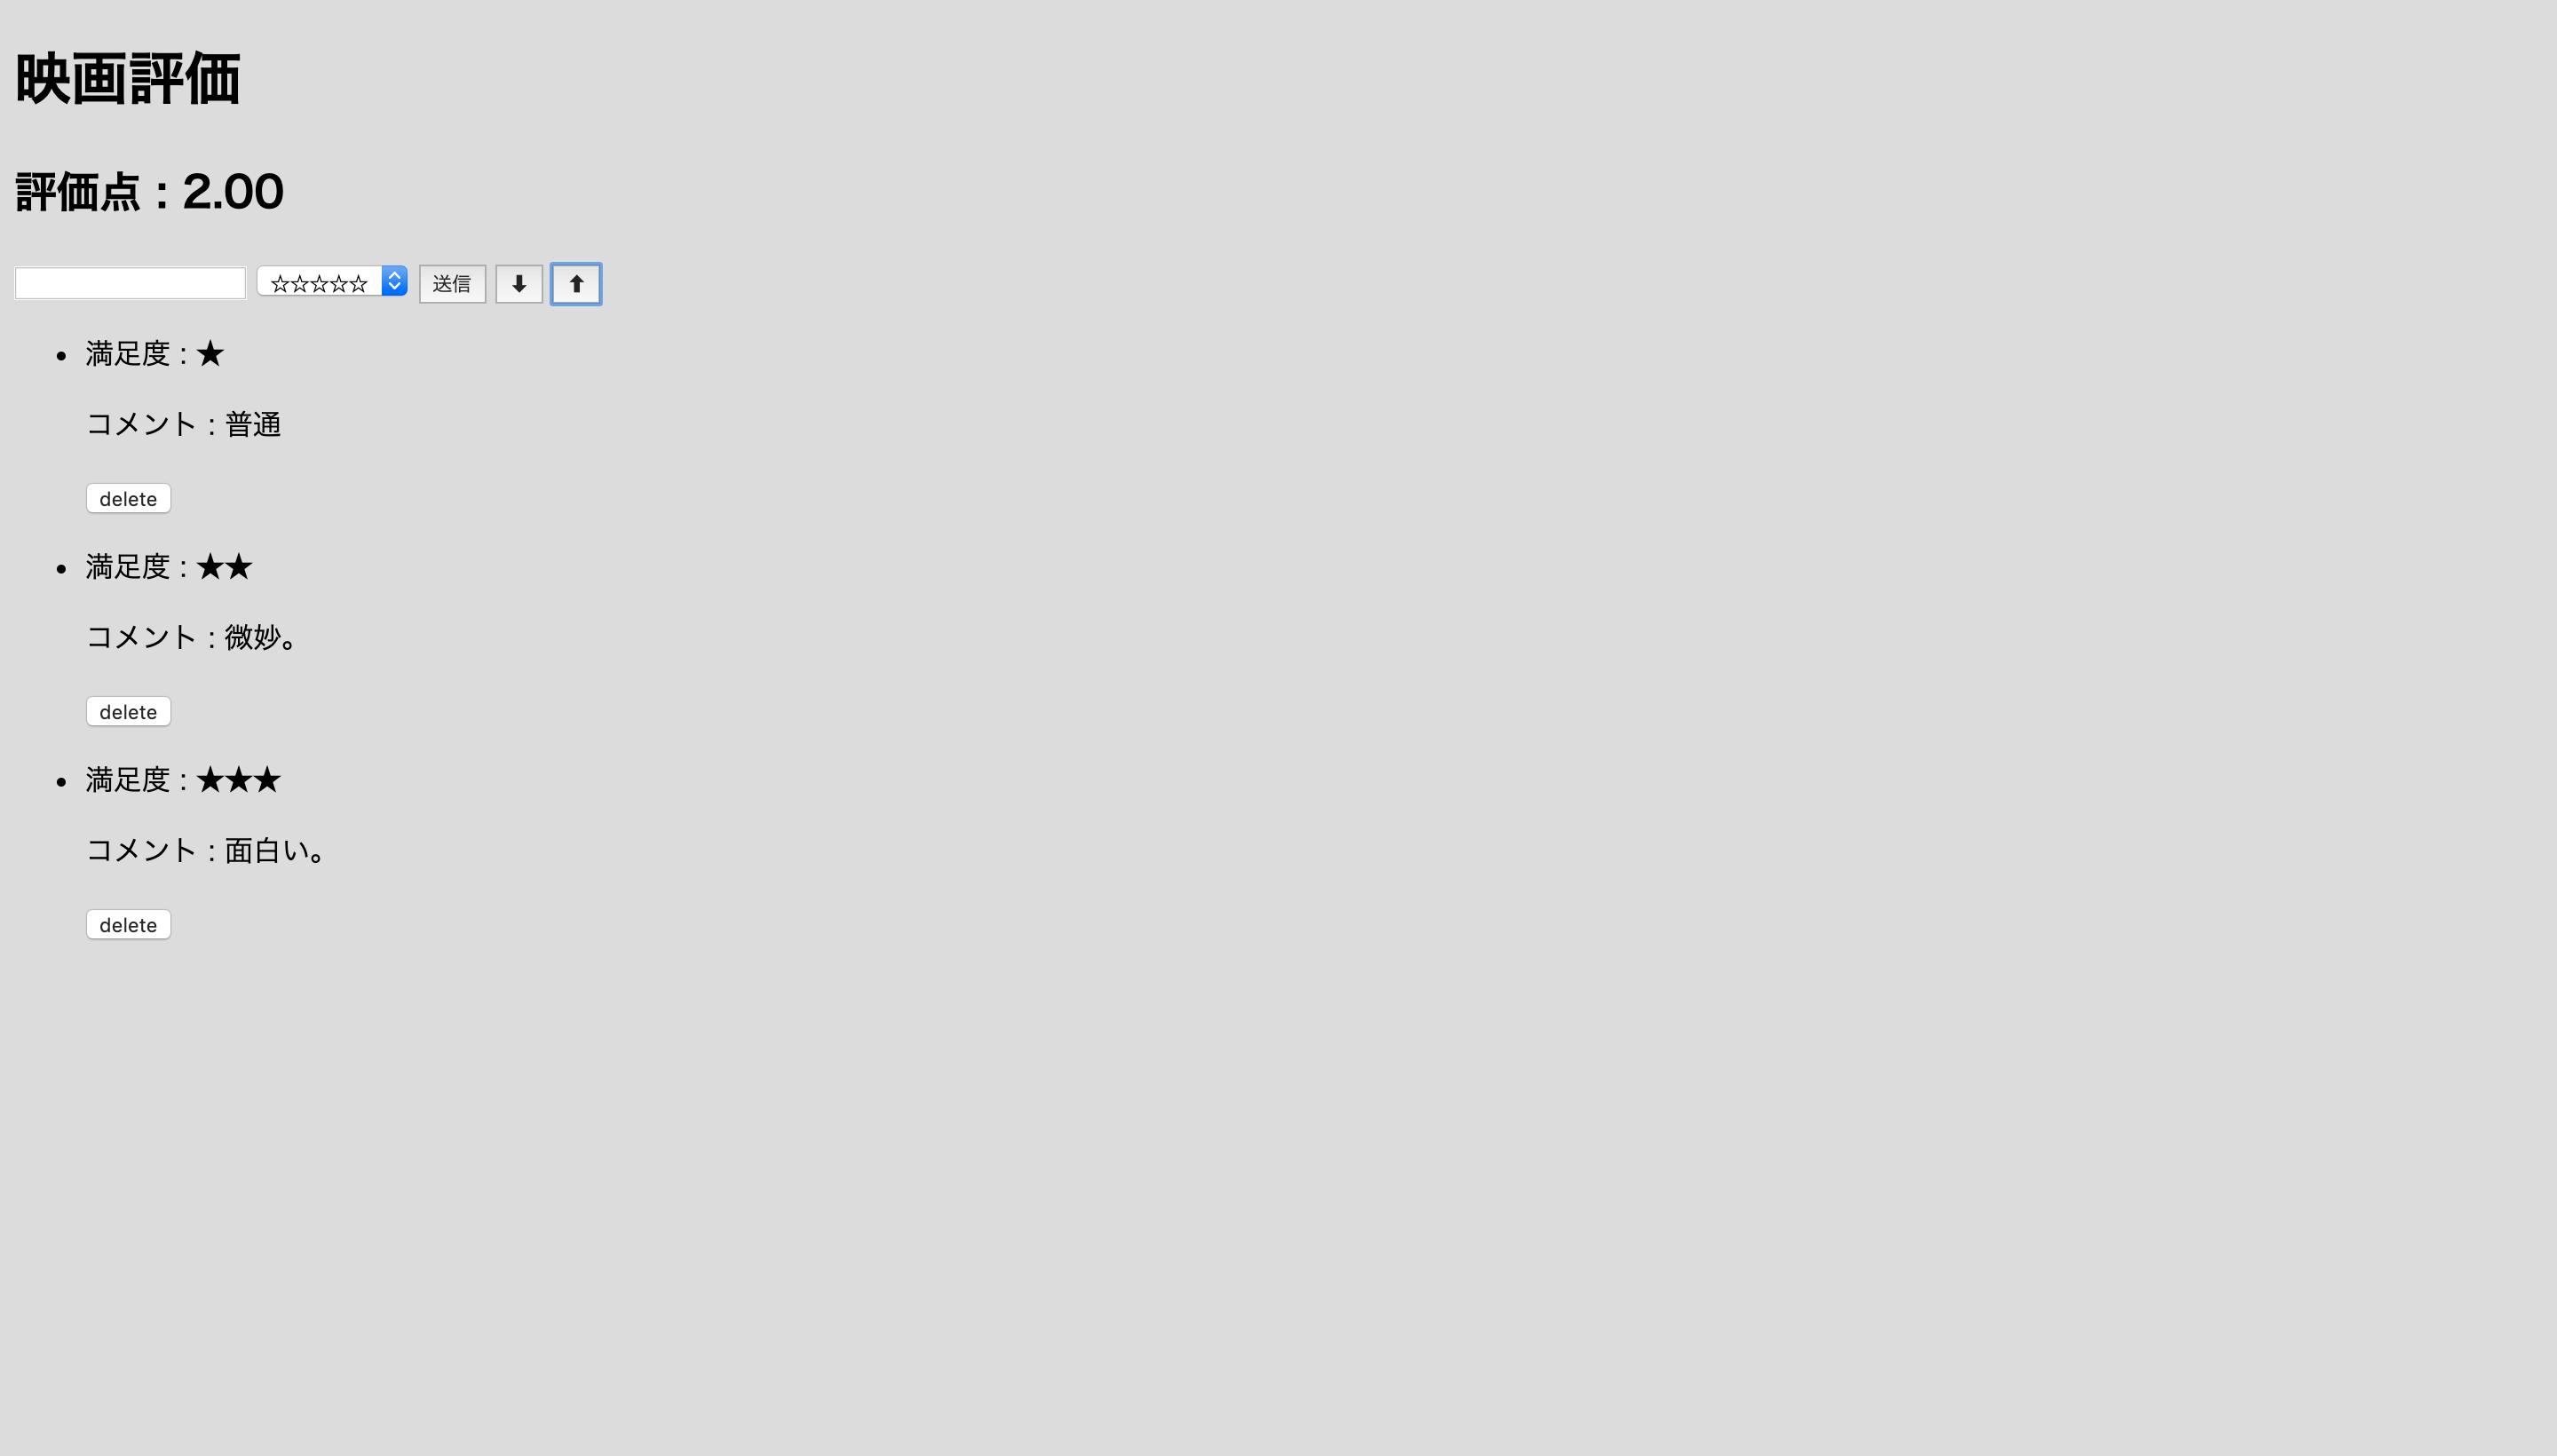
次に送信ボタンの横に⬇︎⬆︎のボタンがありますが押すと、各投稿の評価点をフックに投稿を並び替えてくれます。⬇︎ボタンで評価の高い順、
⬆︎ボタンで評価の低い順です。
4.完成コード
index.html<!DOCTYPE html> <html lang="en"> <head> <meta charset="UTF-8"> <meta name="viewport" content="width=device-width, initial-scale=1.0"> <title>投稿</title> </head> <body> <div class="container" id="app" v-cloak> <h1>評価</h1> <div v-if="length"> <h2>評価点 : {{averageScore}}</h2> </div> <form v-on:submit.prevent> <input type="textarea" v-model="comment"> <select v-model="rate"> <option value="0">☆☆☆☆☆</option> <option value="1">★☆☆☆☆</option> <option value="2">★★☆☆☆</option> <option value="3">★★★☆☆</option> <option value="4">★★★★☆</option> <option value="5">★★★★★</option> </select> <button v-on:click="submit">送信</button> <button v-on:click="sort">⬇︎</button> <button v-on:click="sortUp">⬆︎</button> </form> <div v-for="(comment , index) in comments"> <ul> <li>満足度 : <span>{{'★'.repeat(comment.rate)}}</span></li> <p>コメント : <span>{{comment.comment}}</span></p> <button v-on:click="deleteItem(index)">delete</button> </ul> </div> </div> <script src="https://cdn.jsdelivr.net/npm/vue/dist/vue.js"></script> <script src="main.js"></script> </body> </html>main.jslet app = new Vue({ //vueインスタンス生成 el: '#app', //id="app"が属性として使用されているタグ内で使える。(マウント) data: { comment: "", rate: 0, comments: [], sun: 0, length: false, //使いたい変数達 }, methods: { //各メソッドを格納。htmlを見てもらえると「v-on:click="メソッド名"」と記述されているところが複数箇所ありますが要素をクリックした際に下記のメソッドを実行するという意味です。 submit: function () { if (this.comment == "") return; if (this.comment.length > 100) return; let commentItem = { comment: this.comment, rate: this.rate } this.comments.unshift(commentItem); this.sun = this.sun + Number(commentItem.rate) this.comment = "" this.rate = 0 if (this.comments.length > 0) { this.length = true } }, deleteItem: function (index) { this.sun = this.sun - Number(this.comments[index].rate); this.comments.splice(index, 1); if (this.comments.length < 1) { this.length = false } }, sortUp:function(){ let arr = this.comments; arr.sort(function(a,b){ if (a.rate > b.rate) return 1; if (a.rate < b.rate) return -1; return 0; }) this.comments = arr; }, sort:function(){ let arr = this.comments; arr.sort(function(a,b){ if (a.rate > b.rate) return -1; if (a.rate < b.rate) return 1; return 0; }) this.comments = arr; }, }, computed:{ //算出プロパティと言います。変数averageScoreをhtml側で呼び出すと //自動的に関数内の処理を実行してくれます。他にも監視プロパティというものもありますが監視プロパティに比べて //処理結果をキャッシュしてくれるというのが大きな特徴です。 averageScore:function(){ return (this.sun/this.comments.length).toFixed(2) } } })終わりに
以上です。今回は前回に比べてスッキリした解説でしたが実際に手を動かして興味のある方はコピぺしながら勉強をしていただけると幸いです。


- 投稿日:2019-10-20T12:17:34+09:00
Vue + VuexでREST APIを叩いてリスト表示する方法
1. はじめに
だいぶ前にReact + ReduxでREST APIを叩いてリスト表示する方法という記事を書いたのですが、実際自分はVue派だったりするので、Vueでも同じことできるよっていうのを書いておこうと思います。
1-2. 作りたい機能概要
作るのは,React + ReduxでREST APIを叩いてリスト表示する方法でやったのと基本的には同じで、ユーザの投稿(Post)の一覧を表示する機能です。
サーバー側はGETリクエストすると、[ { id: '1', body: '朝ごはん食べた' }, { id: '2', body: '昼ごはん食べた' }, { id: '3', body: '夜ごはん食べた' }, ]という投稿の一覧を返します。それをリスト表示できればOKという感じです。
2. Vuexとは?
Vuex公式のドキュメントには、以下のようにあります。
Vuex は Vue.js アプリケーションのための 状態管理パターン + ライブラリです。
これは予測可能な方法によってのみ状態の変異を行うというルールを保証し、アプリケーション内の全てのコンポーネントのための集中型のストアとして機能します。Vueは、コンポーネントが一つであれば非常にシンプルなのですが、共通の状態を共有する複数のコンポーネントを持ったときに急に複雑になってしまいます。
プロパティ(props)が増えたり、それを孫でも使う、とかになると急に管理が面倒になりますし、親子コンポーネント間のデータの参照とかも必要になってくると、もう大変です。それを解決するのが、Vuexです。
Vuexでは、コンポーネントから共有している状態を抽出し、それをグローバルシングルトンで管理します。
つまり、どのコンポーネントも状態(data)にアクセスしたり、アクション(methods)をトリガーしたりできるようになります。イメージで言うと、手渡しでメモを回しながら管理すると、人が増えたりすると大変なので、ホワイトボードに張り出して管理しよう、って感じでしょうか。
この記事では実際にユーザの投稿をリスト表示するサンプルを作ってどんなものか理解したいと思います。
3. Vueプロジェクト生成
なにはともあれ、Vueのプロジェクトを作成してVuexを入れます。
プロジェクト作成は、vue-cliを使用すると簡単なので、それを使います。vue init vuex-sampleVuexは、yarnで。
yarn add vuex4. APIの準備
APIの準備は今回の記事では直接関係ないので、axiosでGETリクエストのモックを作成する
に切り出しておきます。
練習がてら同じ環境でやりたい方はこちらを参考にしてください。5. ストアの実装
store/index.jsを作成して、そこにStoreを以下の定義します。store/index.jsimport Vue from 'vue' import Vuex from 'vuex' Vue.use(Vuex) export default new Vuex.Store({ state: { posts: [ { id: 1, body: 'test1' }, { id: 2, body: 'test2' }, { id: 3, body: 'test3' } ] } });本当はAPIを叩いてデータ取得したいですが、まずはStoreの定義が出来ているかを確認するために、stateのpostsにダミーでデータを仕込んでいます。
そして、
main.jsでstoreを読み込みます。main.jsimport Vue from 'vue' import App from './App.vue' import store from './store'; Vue.config.productionTip = false new Vue({ store, render: h => h(App), }).$mount('#app')こうすることで、以下のようにして
storeをVueコンポーネントで使用することができるようになります。Post.vue<template> <div class="post"> <ul> <li v-for="post in posts" :key="post.id">{{ post.body }}</li> </ul> </div> </template> <script> export default { name: 'Post', computed: { posts () { return this.$store.state.posts }, } } </script>複数のステートを扱いはじめると、全部に対して算出プロパティを宣言すると冗長になるので、mapStateヘルパーが用意されています。
以下のようにすると、postsというプロパティを使用することが出来ます。Post.vue<script> import { mapState } from 'vuex'; export default { name: 'Post', computed: { ...mapState(['posts']) } } </script>ここまでで、一旦、サーバを起動して見ると、
postsが取得できていることがわかるかと思います。6. ミューテーションの実装
ミューテーションは、イベントみたいなもので、それをコミットすることでストアの状態を変更できます。
まず、Fluxでは、ミューテーションのタイプに定数を使用することが多いので、タイプを切り出して定義しておきます。
store/mutation-types.jsconst MUTATION_TYPES = { GET_POSTS_REQUEST: 'GET_POSTS_REQUEST', GET_POSTS_SUCCESS: 'GET_POSTS_SUCCESS', GET_POSTS_FAILURE: 'GET_POSTS_FAILURE' } export default MUTATION_TYPES次に、ミューテーションを実装します。
ここでは、リクエスト開始、成功、失敗というミューテーションを実装します。
↓のように、ES2015の算出プロパティ名を使用して、[定数]とすることで、定数を関数名として使用できます。
(定数にしなくても、普通にgetPostsRequest(state) {....}みたいな形でも定義できます。store/mutations.jsimport MUTATION_TYPES from './mutation-types' export const mutations = { [MUTATION_TYPES.GET_POSTS_REQUEST] (state) { state.isFetching = true }, [MUTATION_TYPES.GET_POSTS_SUCCESS] (state, posts) { state.isFetching = false state.posts = posts }, [MUTATION_TYPES.GET_POSTS_FAILURE] (state, err) { state.isFetching = false state.posts = null state.error = err } }ミューテーションがコミットされたときの処理を記述しています。
GET_POSTS_REQUESTでFetch中かどうかのフラグを変更し、GET_POSTS_SUCCESSで成功時にpostsにデータをセットし、GET_POSTS_FAILUREでエラー時の処理を実装しています。7. アクションの実装
次にアクションの実装です。
アクションは、
- ミューテーションをコミット
- 非同期処理を組み込める
ので、APIはここで叩きます。
store/actions.jsimport Api from '../apis/api' import MutationTypes from './mutation-types' export default { getPosts ({ commit }) { commit(MutationTypes.GET_POSTS_REQUEST) return Api.getPosts() .then(res => commit(MutationTypes.GET_POSTS_SUCCESS, res.data)) .catch(err => commit(MutationTypes.GET_POSTS_FAILURE, err)) } }リクエストの開始と、終了(成功と失敗)でミューテーションをコミットして状態を変更してます。
8. コンポーネントへの導入
コンポーネントへ導入する前に、ミューテーションとアクションを
store/index.jsでセットしてあげないといけません。store/index.jsimport Vue from 'vue' import Vuex from 'vuex' import { mutations } from './mutations' import actions from './actions' Vue.use(Vuex) export default new Vuex.Store({ state: { isFetching: false, posts: [], error: null }, mutations, actions });そして、
components/Post.vueで以下のようにして使用します。components/Post.vue<template> <div class="post"> <ul> <li v-for="post in posts" :key="post.id">{{ post.body }}</li> </ul> </div> </template> <script> import { mapState, mapActions } from 'vuex' export default { name: 'Post', computed: { ...mapState(['posts']) }, mounted () { this.$store.dispatch('getPosts') }, methods: { ...mapActions (['getPosts']) } } </script>算出プロパティで状態を監視し、メソッドでアクションを読み込んで、必要なタイミングでディスパッチしてあげると状態が更新されます。
ここまでやると、↓のような感じで表示できるようになったかと思います。
9. まとめ
これで簡単なVuexのアプリを実装できるようになりました。ソースコードも共有します。
これを機に、 Vuex公式ドキュメントを結構読み込んだんですが、Reduxのときと比べて楽でした。なんせ、日本語で書いてあるので。実装自体もReduxより個人的にはシンプルな気がしました。
参考

- 投稿日:2019-10-20T10:58:01+09:00
Nuxt.js + typescriptの新規開発案件で得た知見〜アーキテクチャ編〜
コンポーネント設計の知見
まずはcreate-nuxt-appでできるデフォルトの構成が以下
.
├── README.md
├── assets
│   └── README.md
├── components
│   ├── Logo.vue
│   ├── README.md
├── layouts
│   ├── README.md
│   └── default.vue
├── middleware
│   └── README.md
├── node_modules
├── nuxt.config.js
├── package-lock.json
├── package.json
├── pages
│   ├── README.md
│   └── index.vue
├── plugins
│   └── README.md
├── static
│   ├── README.md
│   └── favicon.ico
└── store
    └── README.md
今回の案件で作成したフォルダ構成が以下
C:.
├─.nuxt
│  ├─auth
│  │  └─schemes
│  ├─components
│  └─views
├─.storybook
├─.vscode
├─config
├─dist
│  └─app
│      ├─approval_request
│      ├─cost
│      ├─auth
│      ├─img
│      │  └─common
│      ├─prospect
│      ├─prospect_group
│      └─_nuxt
│          ├─fonts
│          └─img
├─mock
│  ├─api
│  │  └─mocks
│  │      └─profile
│  └─auth
│      └─static
├─node_modules
├─src
│  ├─assets
│  │  ├─js
│  │  │  └─utils
│  │  └─scss
│  ├─components
│  │  ├─atoms
│  │  │  ├─各atoms
│  │  ├─mixins
│  │  │  ├─page-base
│  │  │  └─tooltip-baseなど
│  │  └─organisms
│  │      └─各organisms
│  ├─containers
│  │  └─各containers
│  ├─layouts
│  ├─locales
│  ├─middleware
│  ├─pages
│  │  └─各pages
│  ├─plugins
│  ├─static
│  │  └─img
│  │      └─common
│  ├─store
│  │  ├─各store//それぞれの責務でファイルを分ける
│  │  │    └─action.ts
│  │  │    └─mutation.ts
│  │  │    └─index.ts
│  │  │    └─getter.ts
│  │  ├─modules
│  │  └─index.ts //まとめてexport
│  └─types
│      ├─各types
│      ├─util
│      ├─index.ts
│      └─state.ts
├─stories
└─test
    └─components
        └─atoms
デフォルトと特に違いが出る箇所
mockcomponentscontainersstoretypes
mock
- こちらはローカルで動作確認を行うためのモックの置き場。詳しくはNuxt.js + Expressでローカルサーバ構築
components(コンポーネントの設計)
- まずコンポーネント責務によって
Presentational ComponentsとContainer Componentsへ分ける
Presentational Components
- 見た目に対する部分
Container Components
- 処理に対する部分
表で表現すると
Presentational Components Container Components 目的 見た目(マークアップ, スタイル) 動作(データの取得、状態の更新) Store へのアクセス できない できる データの読込 Props Vuex の State の Getter を呼ぶ データの変更 Props から取得した Callback を呼ぶ Vuex の Action を Dispatch する コンポーネントの粒度
Category Directory State Storeへのアクセス 責務 Atoms src/components/atoms 持たない NG Presentational Component Molecules src/components/molecules 持つ NG Presentational Component Organisms src/components/organisms 持つ NG Presentational Component Templates src/layouts 持つ OK Container
ComponentPages src/pages 持つ OK Container
Component
- ここで使用している設計技術としてAtomic Designというものがある。
Atomic Design...責務を明確にしてレベルに分けてデザインする。
- Lv1:
Atoms(原子)←最小の単位- Lv2:
Molecules(分子)- Lv3:
Organisms(生体)- Lv4:
Templatesテンプレート- Lv5:
Pagesページ振る舞いの共通化
Presentational Components内でAPI呼び出しのためのstoreへのアクセスをしてしまうとContainer Componentの役割も担うことになってしまいメンテナンスがしにくい。そんな場合は
対象のAPI呼び出し専用のContainer Componentを作成し、それを親コンポーネントとして配置することでイベントとプロパティの受け渡しが可能になる。例)検索用ダイアログで動的に検索処理を走らせたい場面
- ダイアログとしての見た目(Presentational)と検索処理(Container)を分ける
こんなことがしたい時があると思います
こんな時は画面の描画部分とAPIコール(stateへのset)部分を分ける。
APIコール部分のContainer コンポーネントを用意
src/containers/search-container.vue<template> <div> <!-- eslint-disable-next-line --> <slot :search="search" :result="result"></slot> //① </div> </template> <script lang="ts"> import { Component, Getter, Vue } from 'nuxt-property-decorator' import { ClientFilter } from '~/store/domain/clients/actions' import { Client, PagedResources, PageRequest } from '~/types' @Component({}) export default class Search extends Vue { @Getter('domain/clients/search') result: PagedResources<Client[]> //② async search(filter: ClientFilter, pageRequest: PageRequest) { // eslint-disable-next-line await this.$store.dispatch('domain/clients/search', { //③ filter, pageRequest }) } } </script>
- ①. 要素を使用して子コンポーネントにイベントとプロパティを受け渡しができるようにする
- ②.検索結果を取得するgetter
- ③.検索 API を呼び出すためのアクションをディスパッチする
ダイアログコンポーネント(Presentational)
- こちらは見た目の部分なので検索イベントを Emit するだけ、結果は Prop から受け取るようにする。
src/components/organisms/dialog.vue<template> <el-dialog title="得意先選択" :visible.sync="visible" width="50%" :before-close="handleClose" > <cas-client-search-form :query="query" @search="search" ></cas-client-search-form> <cas-client-list v-if="resources" :clients="resources._embedded.results" :page-metadata="resources.page" :selectable="true" @select="handleSelect" @current-change="handlePageChange" @size-change="handleSizeChange" /> <span slot="footer" class="dialog-footer"> <el-button @click="hide">閉じる</el-button> </span> </el-dialog> </template> <script lang="ts"> import { Component, Prop, Vue, Watch } from 'nuxt-property-decorator' import { ComponentOptions } from 'vue' import ClientSearchForm from '~/components/organisms/client-search-form/client-search-form.vue' import ClientList from '~/components/organisms/client-list/client-list.vue' import { ClientFilter } from '~/store/domain/clients/actions' import { Client, PagedResources, PageRequest } from '~/types' @Component({ components: { ClientSearchForm, ClientList } } as ComponentOptions<Vue>) export default class ClientSelectDialog extends Vue { /** * 表示フラグ */ @Prop() visible /** * 検索結果 */ @Prop() result: PagedResources<Client[]> //① resources = this.result query = { keyword: '' } as ClientFilter page = 0 size = 10 search(form: ClientFilter) { /** * 検索イベント * @type {object} */ // eslint-disable-next-line this.$emit('search', form, { //② page: 0 } as PageRequest) } hide() { this.query = { keyword: '' } as ClientFilter /** * 表示切り替えイベント * @type {object} */ this.$emit('update:visible', false) } handleSelect(client: Client) { this.hide() /** * 選択イベント * @type {object} */ this.$emit('select', client) } handlePageChange(page: number) { this.page = page - 1 this.$emit('search', this.query, { page: this.page, size: this.size } as PageRequest) } handleSizeChange(size: number) { this.size = size this.$emit('search', this.query, { page: this.page, size: this.size } as PageRequest) } @Watch('visible') handleVisible() { this.resources = null } @Watch('result') handleResultChange() { this.resources = this.result } handleClose() { this.hide() } } </script>
- ①.検索結果がここに入ってくる
- ②.Containerへ検索APIのコールをしている(正しくは
お父さん、検索APIをコールしてねというメソッド)使いたい場所へ配置する
- 検索ダイアログを配置するとしたら何かのフォーム部品とかになるかと思うのでそんなイメージ
- コンテナでラップする
- v-slot で定義した名前を利用して親コンポーネントからスロットプパティを受け取る
src/components/organisms/なんとかform.vue<search-container v-slot="scope"> <dialog :visible.sync="clientSelectDialogVisible" :result="scope.result" @search="scope.search" @select="handleClientSelect" ></dialog> </search-container>storeの構成
- 今回はバックエンドが
静的型付け言語だったのでtypescriptを使用している- storeにフォーカスしてフォルダ構成を載せてみる
├─store
│  │  ├─各store//それぞれの責務でファイルを分ける
│  │  │    └─action.ts
│  │  │    └─mutation.ts
│  │  │    └─index.ts
│  │  │    └─getter.ts
│  │  ├─modules
│  │  └─index.ts //まとめてexport
- このように
action、mutation、getterをそれぞれ分割してindex.tsでまとめてexportしている- 中身はそれぞれ以下のようにしている(ソースコード自体はVueやNuxtの経験者の方ならご理解頂けると思うので解説はしていません)
- 登場する
RootState,PageRequestはtypes部分で紹介各モジュール/actions.tsimport { ActionTree } from 'vuex' import { hogeTransfer } from '~/types/hoge' import { hogeState } from '~/types/hoge/state' import { RootState } from '~/types/state' import '@nuxtjs/axios' import { PageRequest } from '~/types/util' //初期表示情報 const actions: ActionTree<hogeState, RootState> = { async describe({ commit }) { const response = await this.$axios.$post<hogeTransfer>( `/hoge/describe-myorg` ) commit('myorg', { myorg: response }) } } export default actions各モジュール/mutations.tsimport { MutationTree } from 'vuex' import { hogeState } from '~/types/hoge/state' const mutations: MutationTree<hogeState> = { myorg(state, { myorg }) { state.myorg = myorg } } export default mutations各モジュール/getters.tsimport { GetterTree } from 'vuex' import { hogeState } from '~/types/hoge/state' import { RootState } from '~/types/state' const getters: GetterTree<hogeState, RootState> = { myorg: state => state.myorg, } export default getters各モジュール/index.tsimport { Module } from 'vuex' import getters from './getters' import actions from './actions' import mutations from './mutations' import { hogeState } from '~/types/hoge/state' import { RootState } from '~/types/state' const state: hogeState = { myorg: null, } const hoge: Module<hogeState, RootState> = { namespaced: true, state, getters, actions, mutations } export default hoge
- あとは大元のindex.tsでmodulesに設定
index.tsimport Vuex, { StoreOptions } from 'vuex' import { RootState } from '~/types/state' import hoge from '~/store/hoge' const storeOptions: StoreOptions<RootState> = { modules: { hoge } } const store = () => new Vuex.Store<RootState>(storeOptions) export default store
- こうすることで
hoge.$storeでstoreにアクセス可能になるtypes
- storeの時と同じようにフォルダ構成をおさらい
│  └─types
│      ├─各types
│      └─util
util内は以下のようになってます. ├── AggregateRoot.ts ├── PageMetadata.ts ├── PageRequest.ts ├── PagedResources.ts └── index.ts
- こちらはバージョンはページ情報など主にメタデータを管理しています。
こちらのソースコードは先頭にも掲載していますがgithub:nuxt-typscriptで記載
あとは
types直下へ機能(コンポーネント)ごとにフォルダを切って扱うオブジェクト単位で型を定義。例としてマイページで使用する自分の所属する組織情報の型を
MyOrgTypeとして定義してみると。。。types/mypage/MyOrgType.tsimport { AggregateRoot } from '~/types/util' export interface MyOrgType extends AggregateRoot { header: string name: string id: string position: string items: string[] }
- index.tsを作成します。
types/mypage/index.tsimport { MyOrgType } from './MyOrgType' export { MyOrgTransfer, //扱うオブジェクトが増えるたびに書き足していく }
- state.tsを作成します
types/mypage/state.tsimport { MyOrgType, } from '~/types/mypage' export interface DomainData { mypage: MypageState } export interface MypageState { myorg: MyOrgTransfer //何かの履歴を表示するコンポーネント用の型とかが入ってくる想定 }
- こうすることでstoreの
getterやmutationsでstateを取得したり書き換えたりすることができます。一旦以上とします。(2019/10/19)
- まだ参画して3週間なのでその都度更新していきます。
- アーキテクチャ編と書いたものの、他の
編を書くかは検討中ww
- 投稿日:2019-10-20T05:12:26+09:00
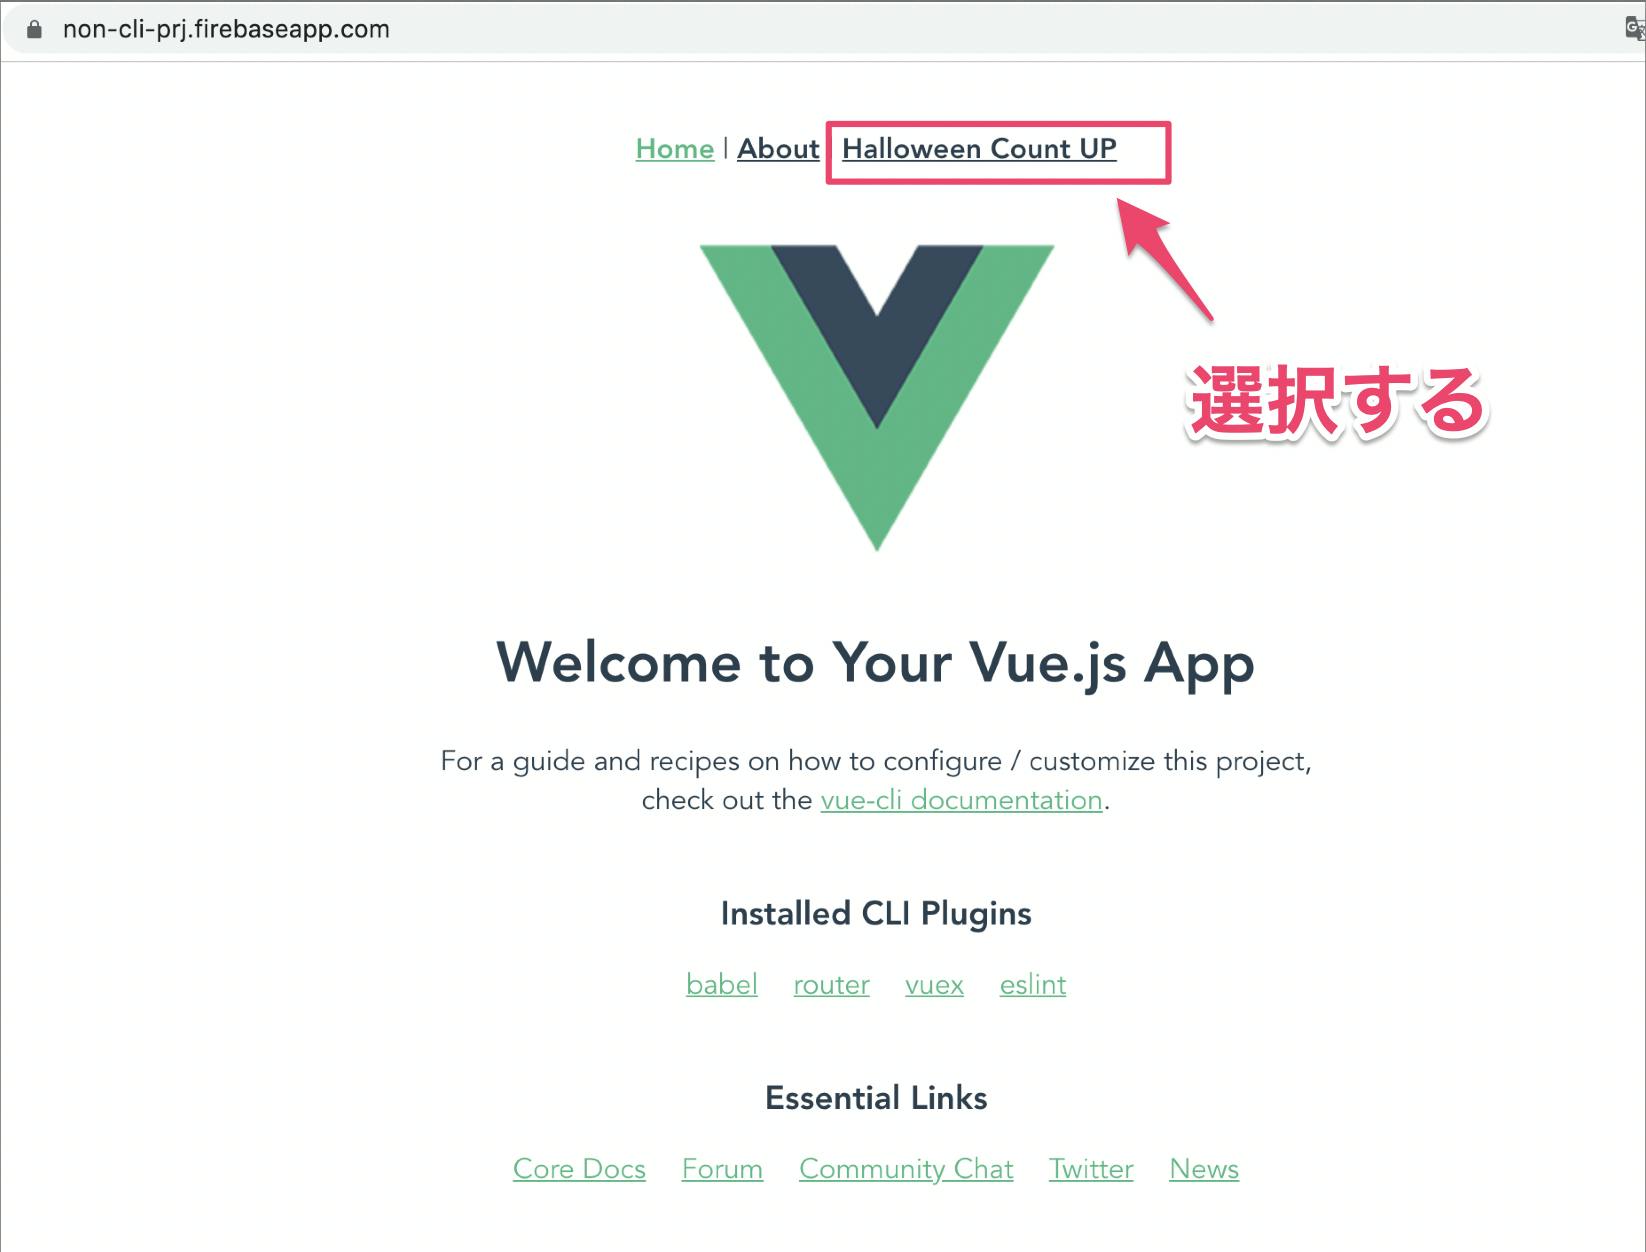
【Vue.js】カウントアップ(Firebase・Vue CLI v4.0.4)
環境メモ
⭐️Mac OS Mojave バージョン10.14
⭐️Firebase Hosting
⭐️Vue CLI v4.0.4Firebase HostingにVue CLI v4.0.4のプロジェクトで
VueJSのカウントアップを作成する。↓↓↓実際に動かした動画
https://twitter.com/nonnonkapibara/status/1185650513469038592
?Vue.js?
— non (@nonnonkapibara) October 19, 2019
Vue CLI(v4.0.4) でVue.js作って、
Firebase(FirebaseHosting) にデプロイしてみたよぉ?
【Vue.js】カウントアップ(Firebase・Vue CLI v4.0.4)https://t.co/W7sWcleX4A#Vue #vuejs #Firebase pic.twitter.com/ajUgvvvoSZ先に、プロジェクトを作成する。
詳細は、下記に記載しています。【Vue.js】FirebaseプロジェクトでVue CLI v4.0.4を作成する(Firebase・Vue CLI v4.0.4)
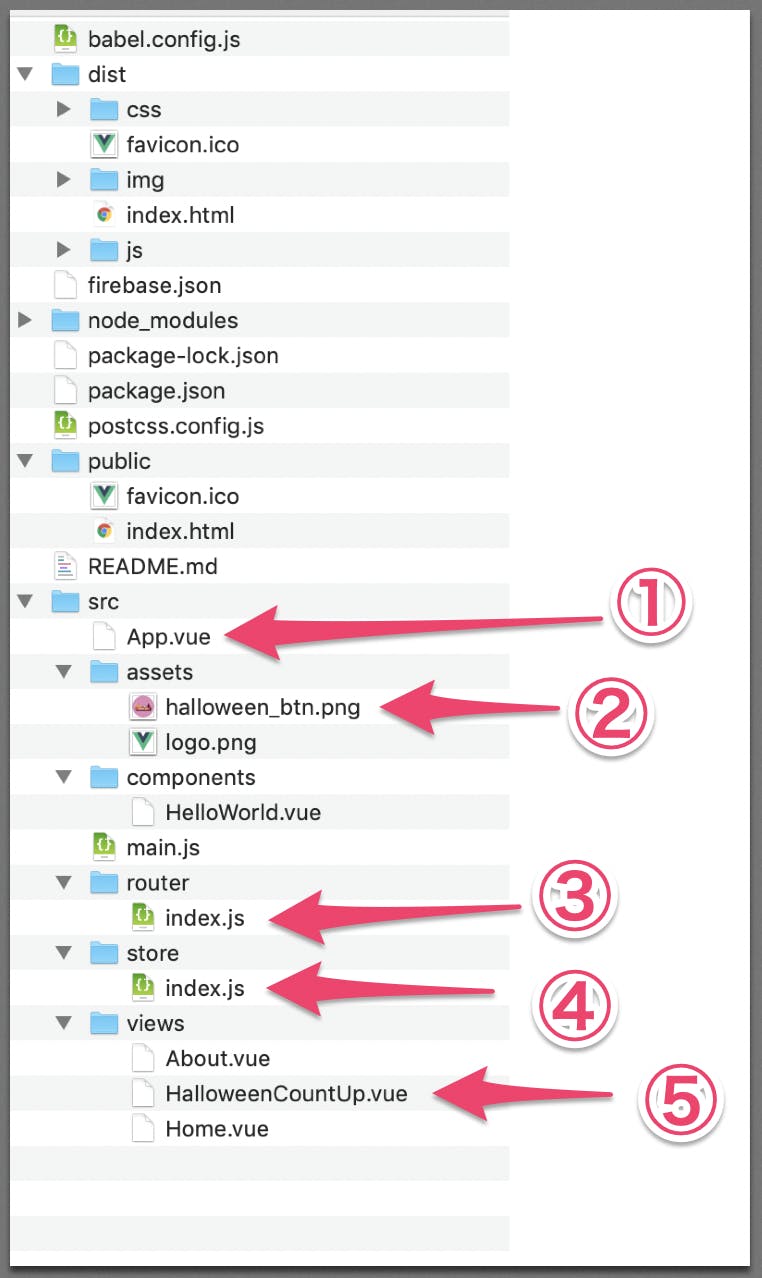
https://qiita.com/nonkapibara/items/6146106c524b652f49dbファイル構成
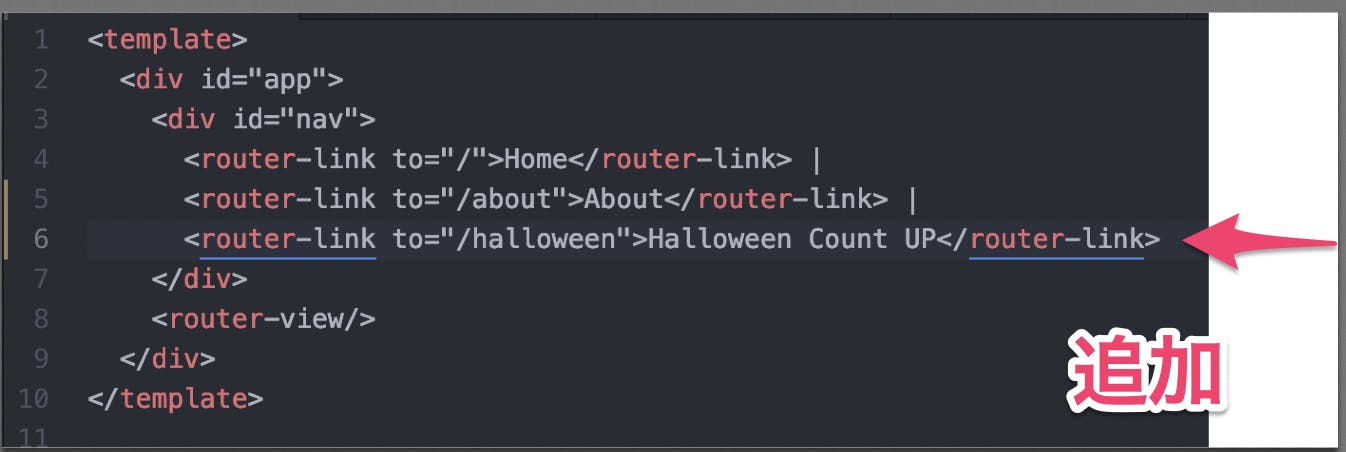
①App.vue
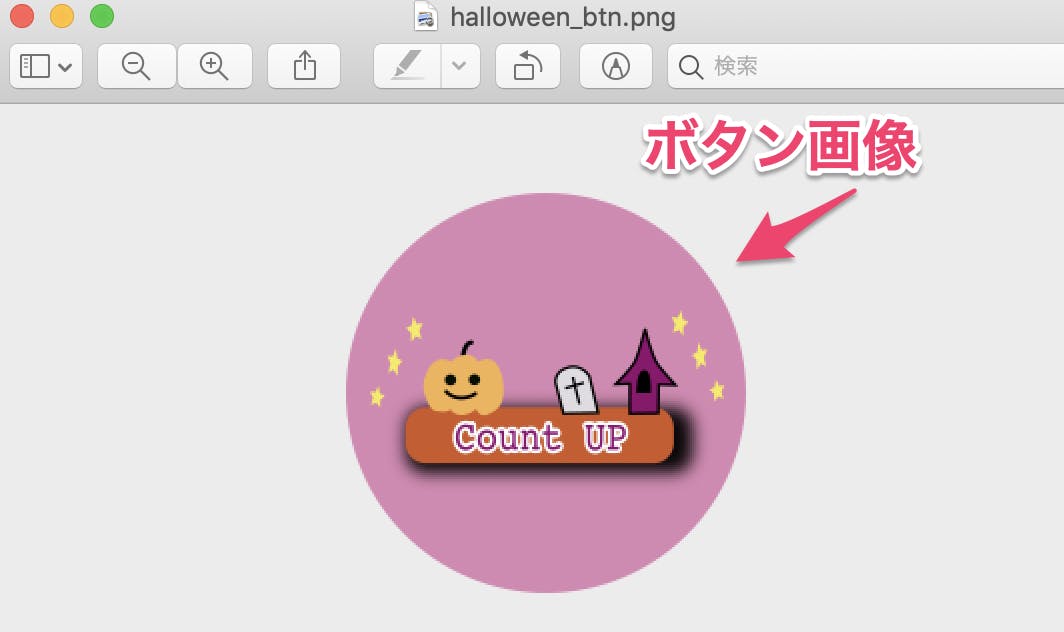
<template>
  <div id="app">
    <div id="nav">
      <router-link to="/">Home</router-link> |
      <router-link to="/about">About</router-link> |
      <router-link to="/halloween">Halloween Count UP</router-link>
    </div>
    <router-view/>
  </div>
</template>
②halloween_btn.png
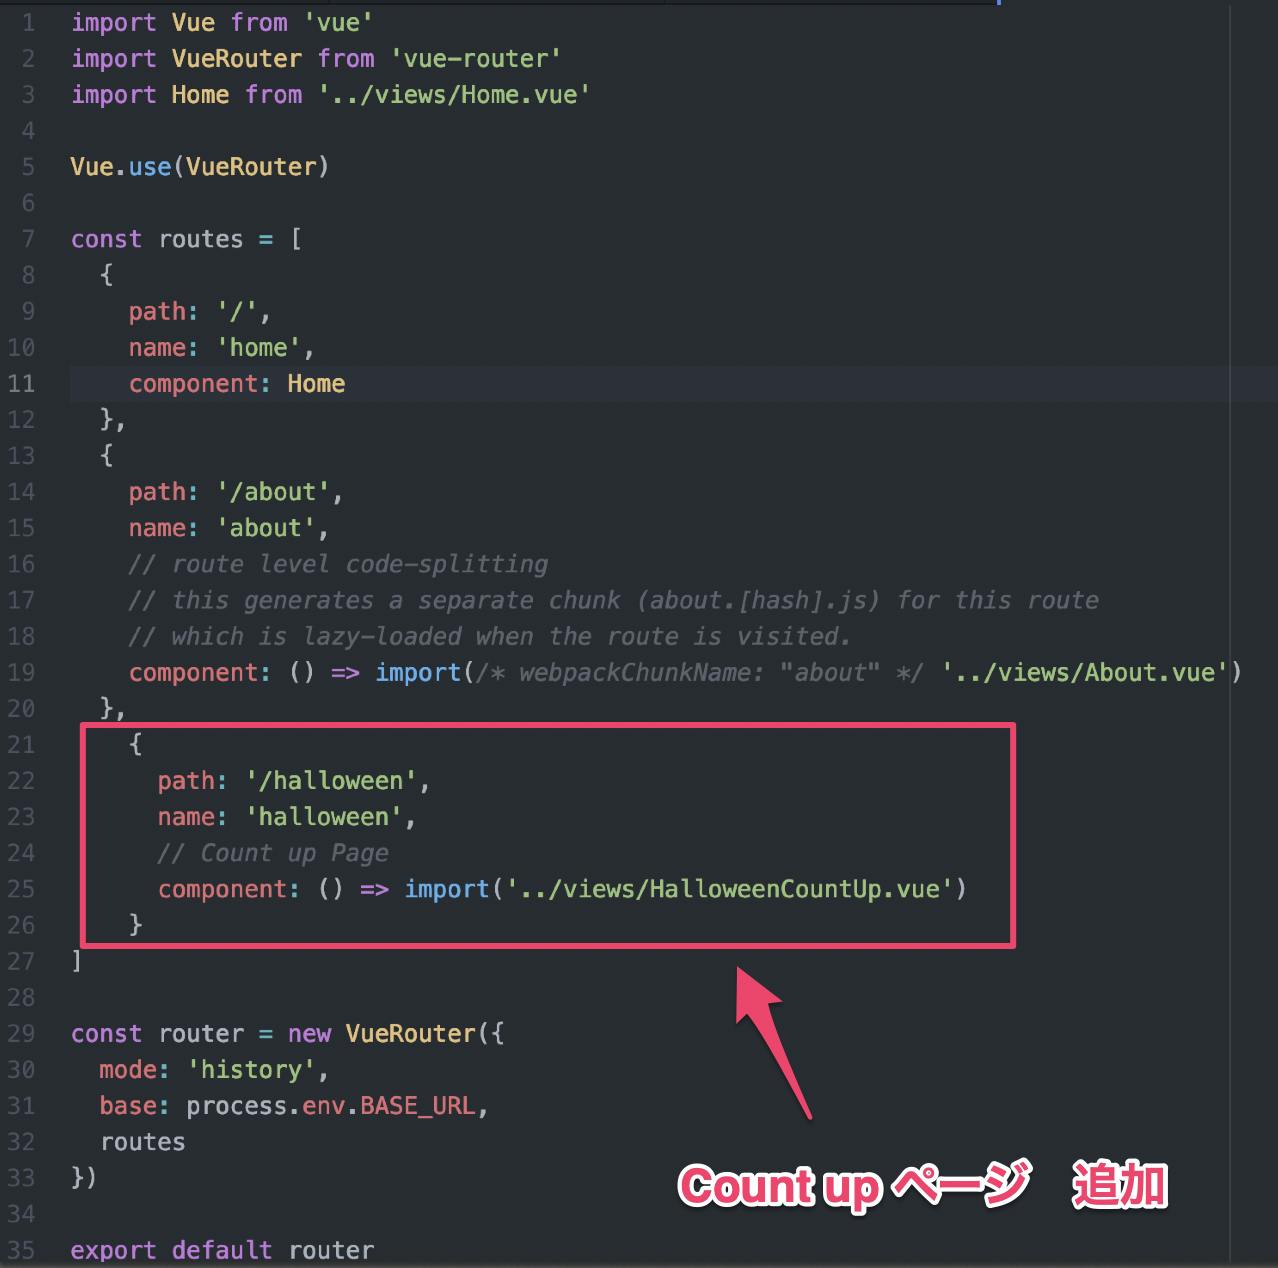
③ router - index.js
    {
      path: '/halloween',
      name: 'halloween',
      // Count up Page
      component: () => import('../views/HalloweenCountUp.vue')
    }
④ store - index.js
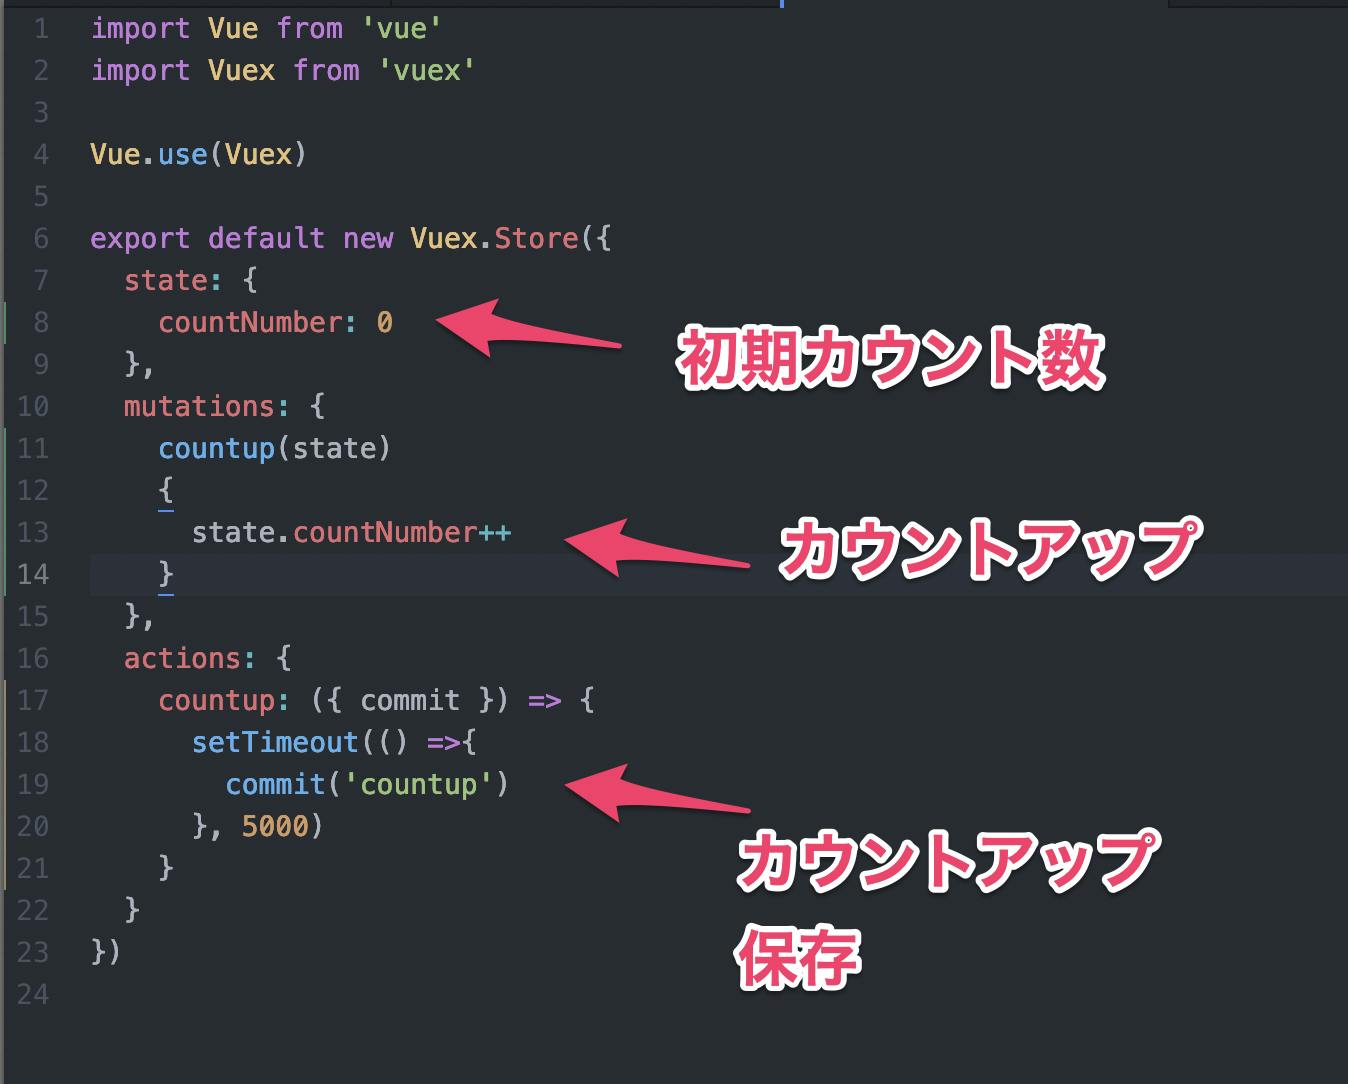
import Vue from 'vue'
import Vuex from 'vuex'

Vue.use(Vuex)

export default new Vuex.Store({
  state: {
    countNumber: 0
  },
  mutations: {
    countup(state)
    {
      state.countNumber++
    }
  },
  actions: {
    countup: ({ commit }) => {
      setTimeout(() =>{
        commit('countup')
      }, 5000)
    }
  }
})
⑤ views - HalloweenCountUp.vue
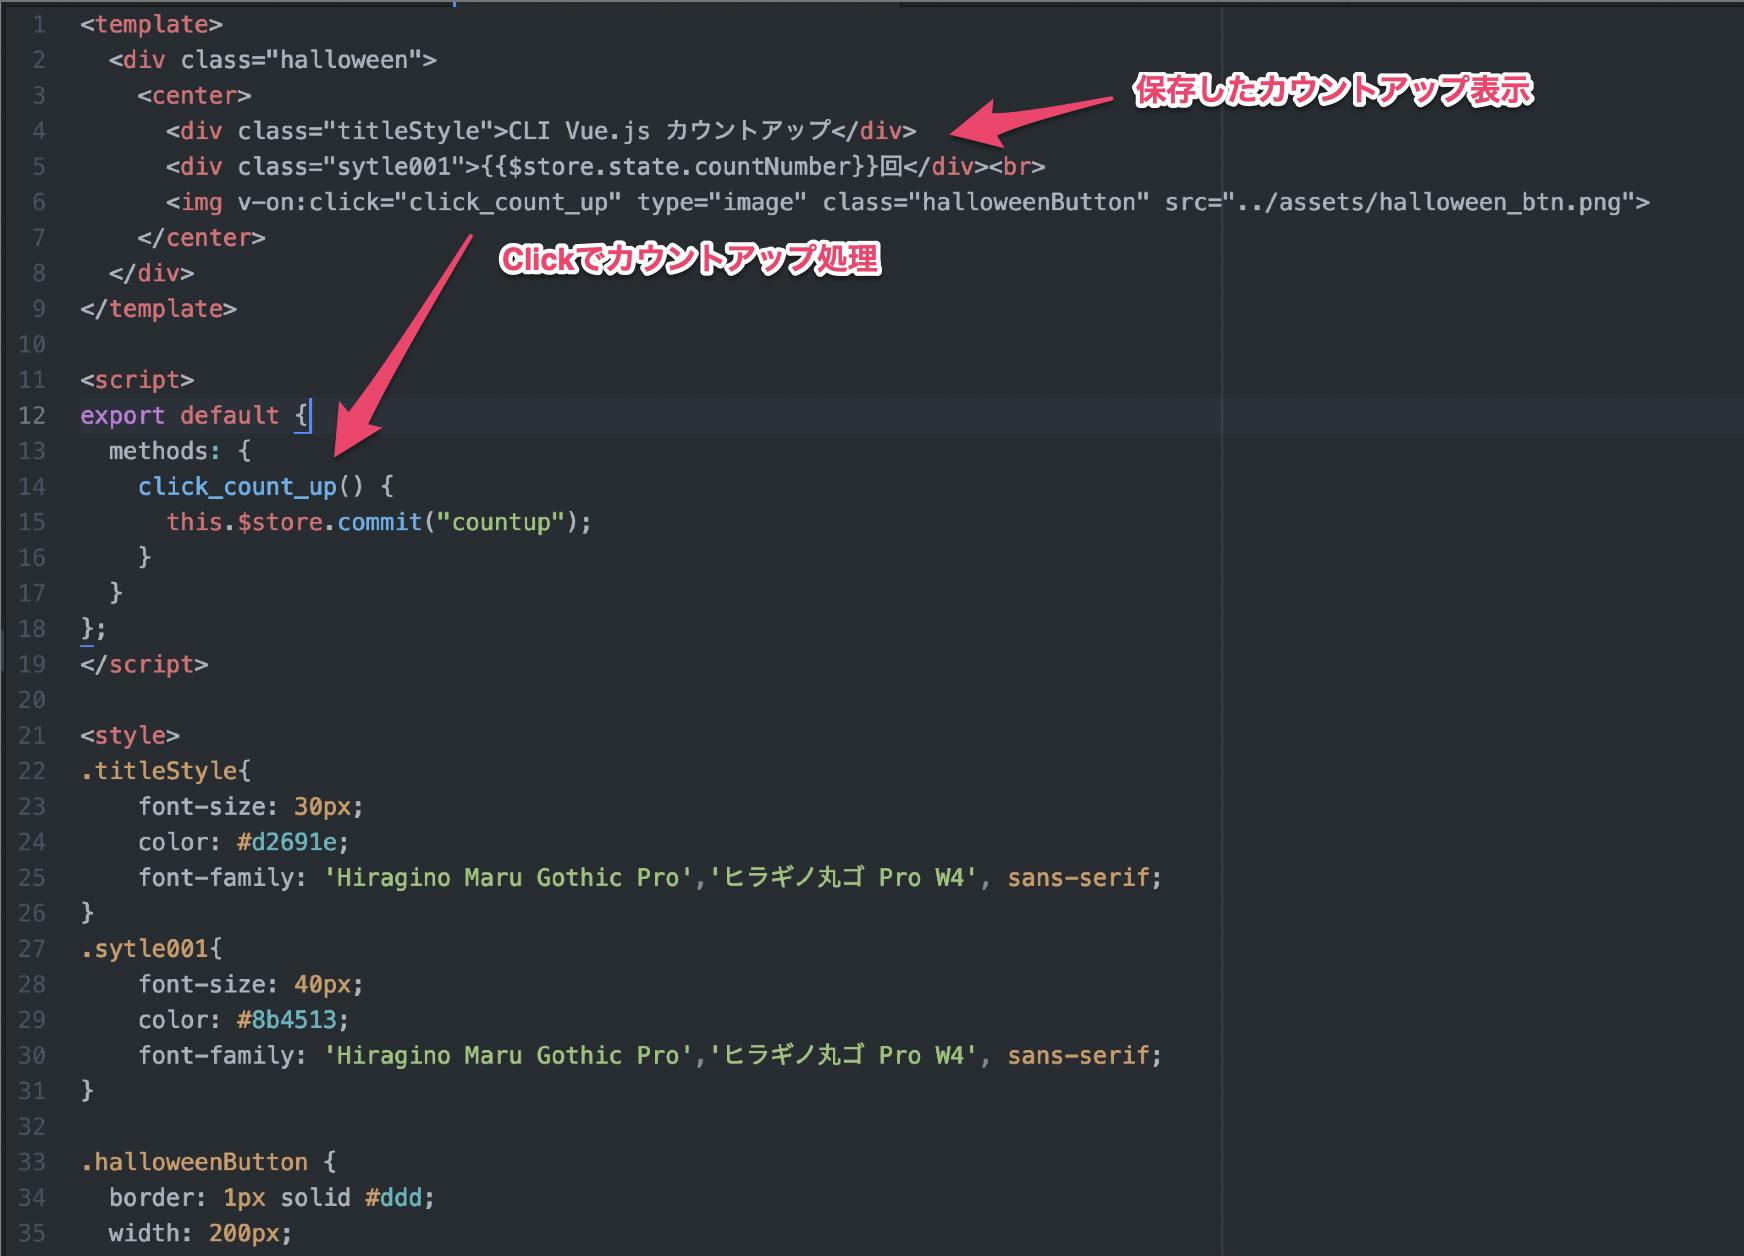
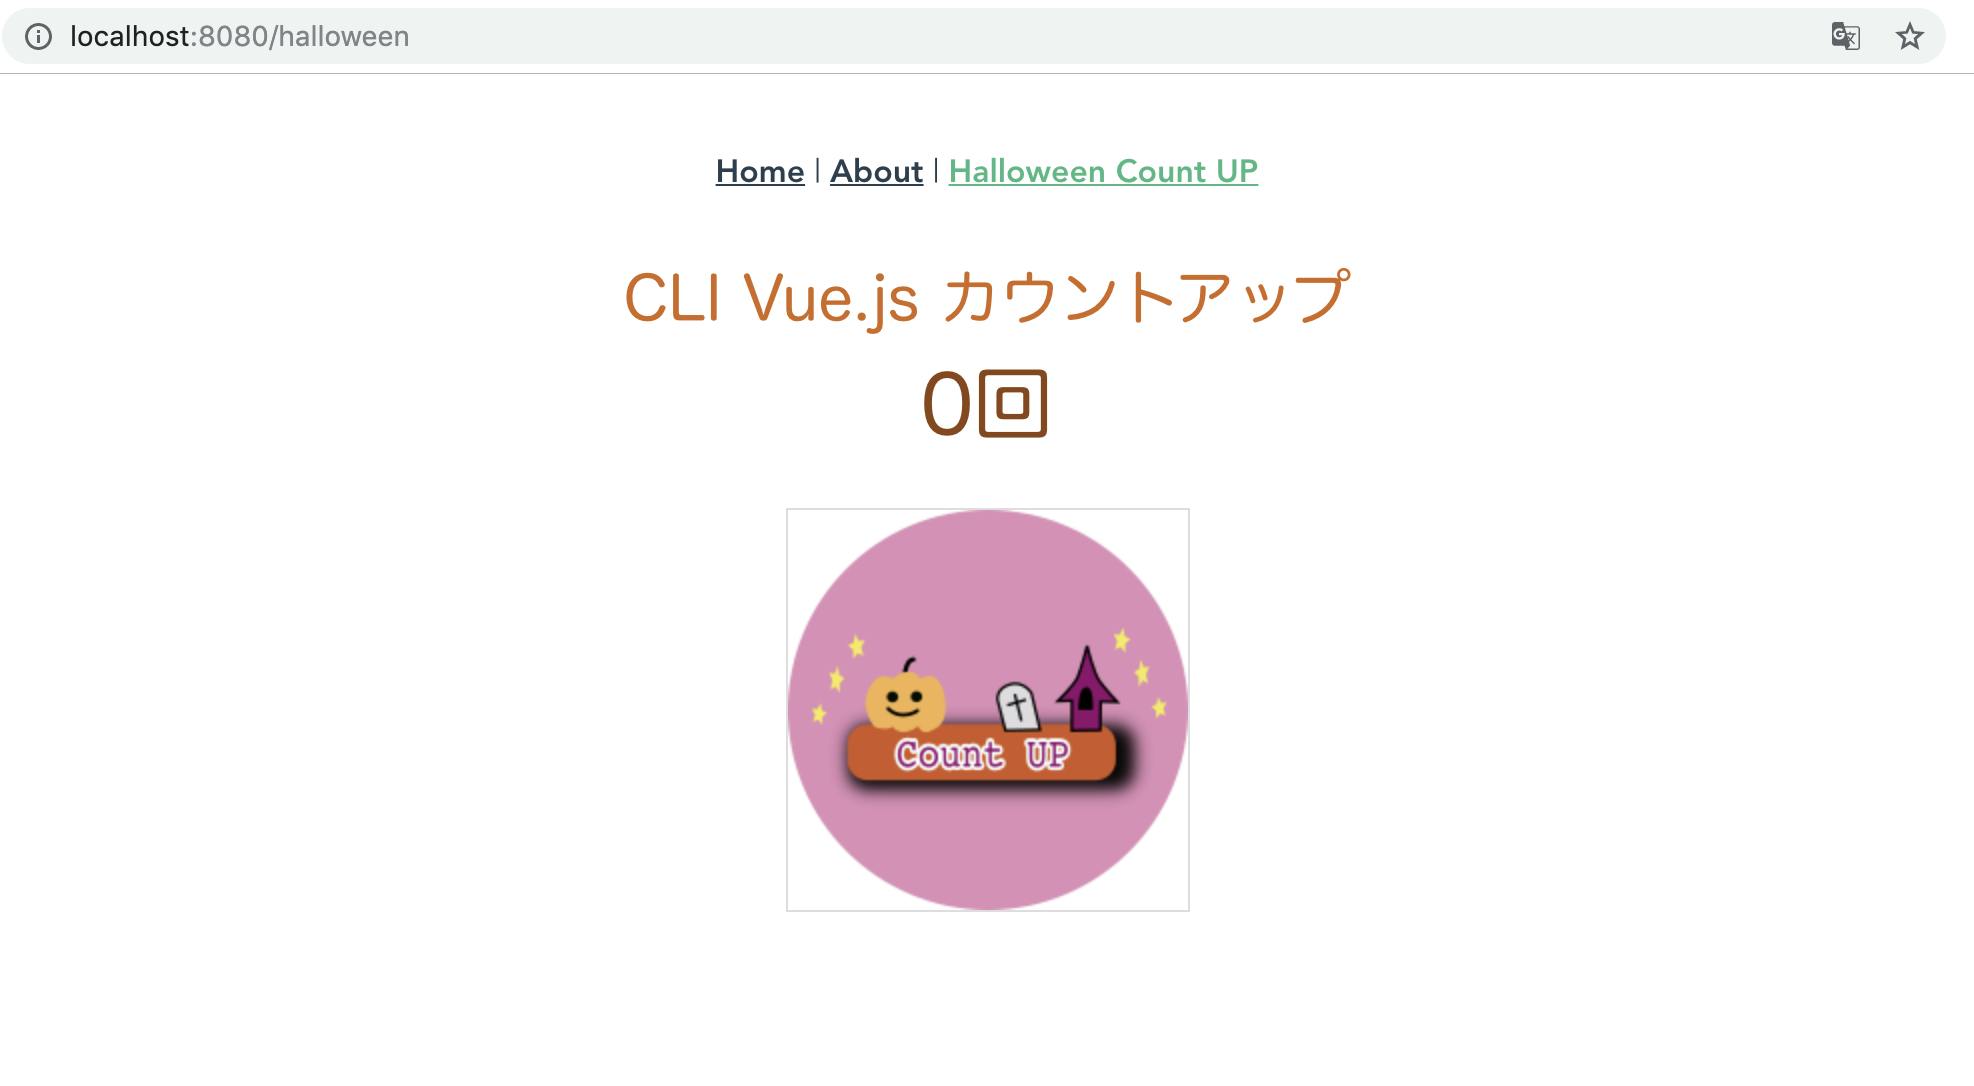
<template>
  <div class="halloween">
    <center>
            <div class="titleStyle">CLI Vue.js カウントアップ</div>
            <div class="sytle001">{{$store.state.countNumber}}回</div><br>
      <img v-on:click="click_count_up" type="image" class="halloweenButton" src="../assets/halloween_btn.png">
    </center>
  </div>
</template>

<script>
export default {
  methods: {
    click_count_up() {
      this.$store.commit("countup");
    }
  }
};
</script>
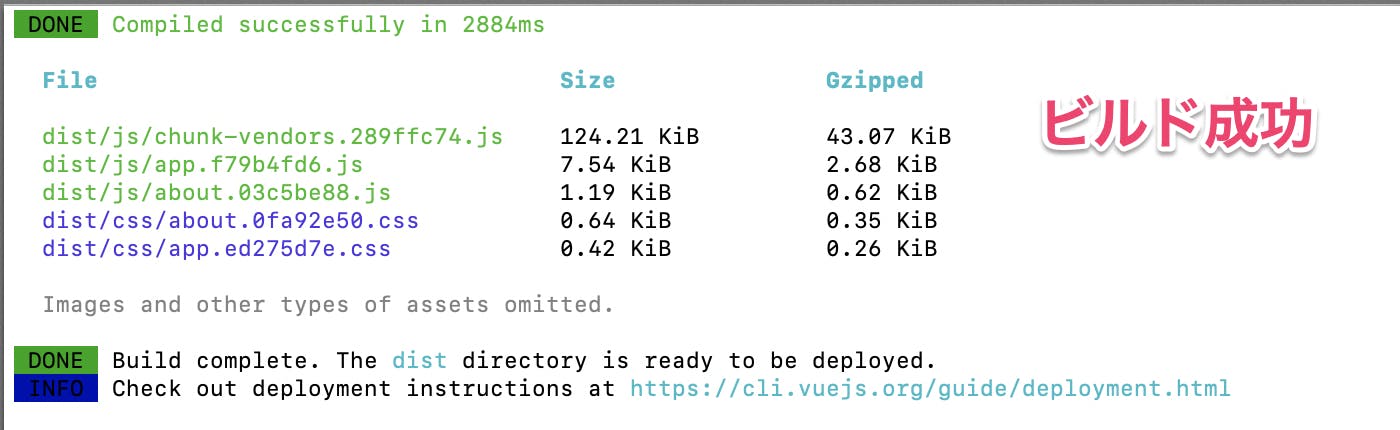
ビルドする
npm run buildビルド成功
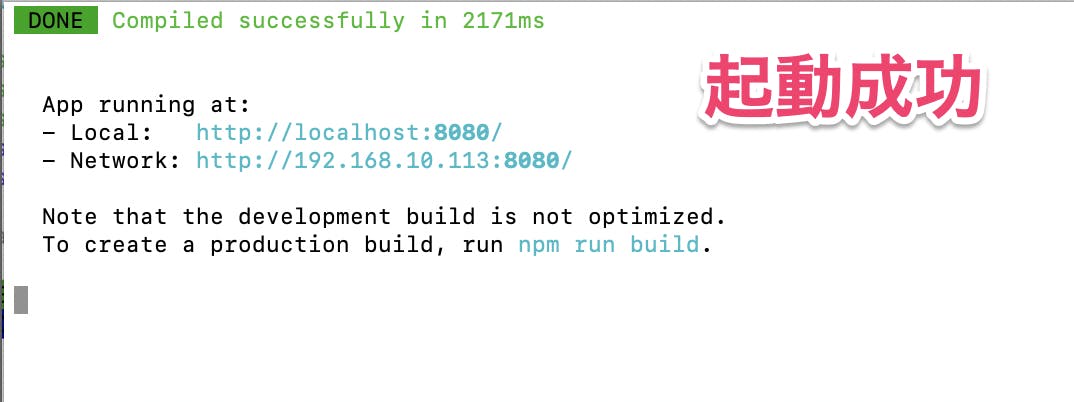
プロジェクトを起動する
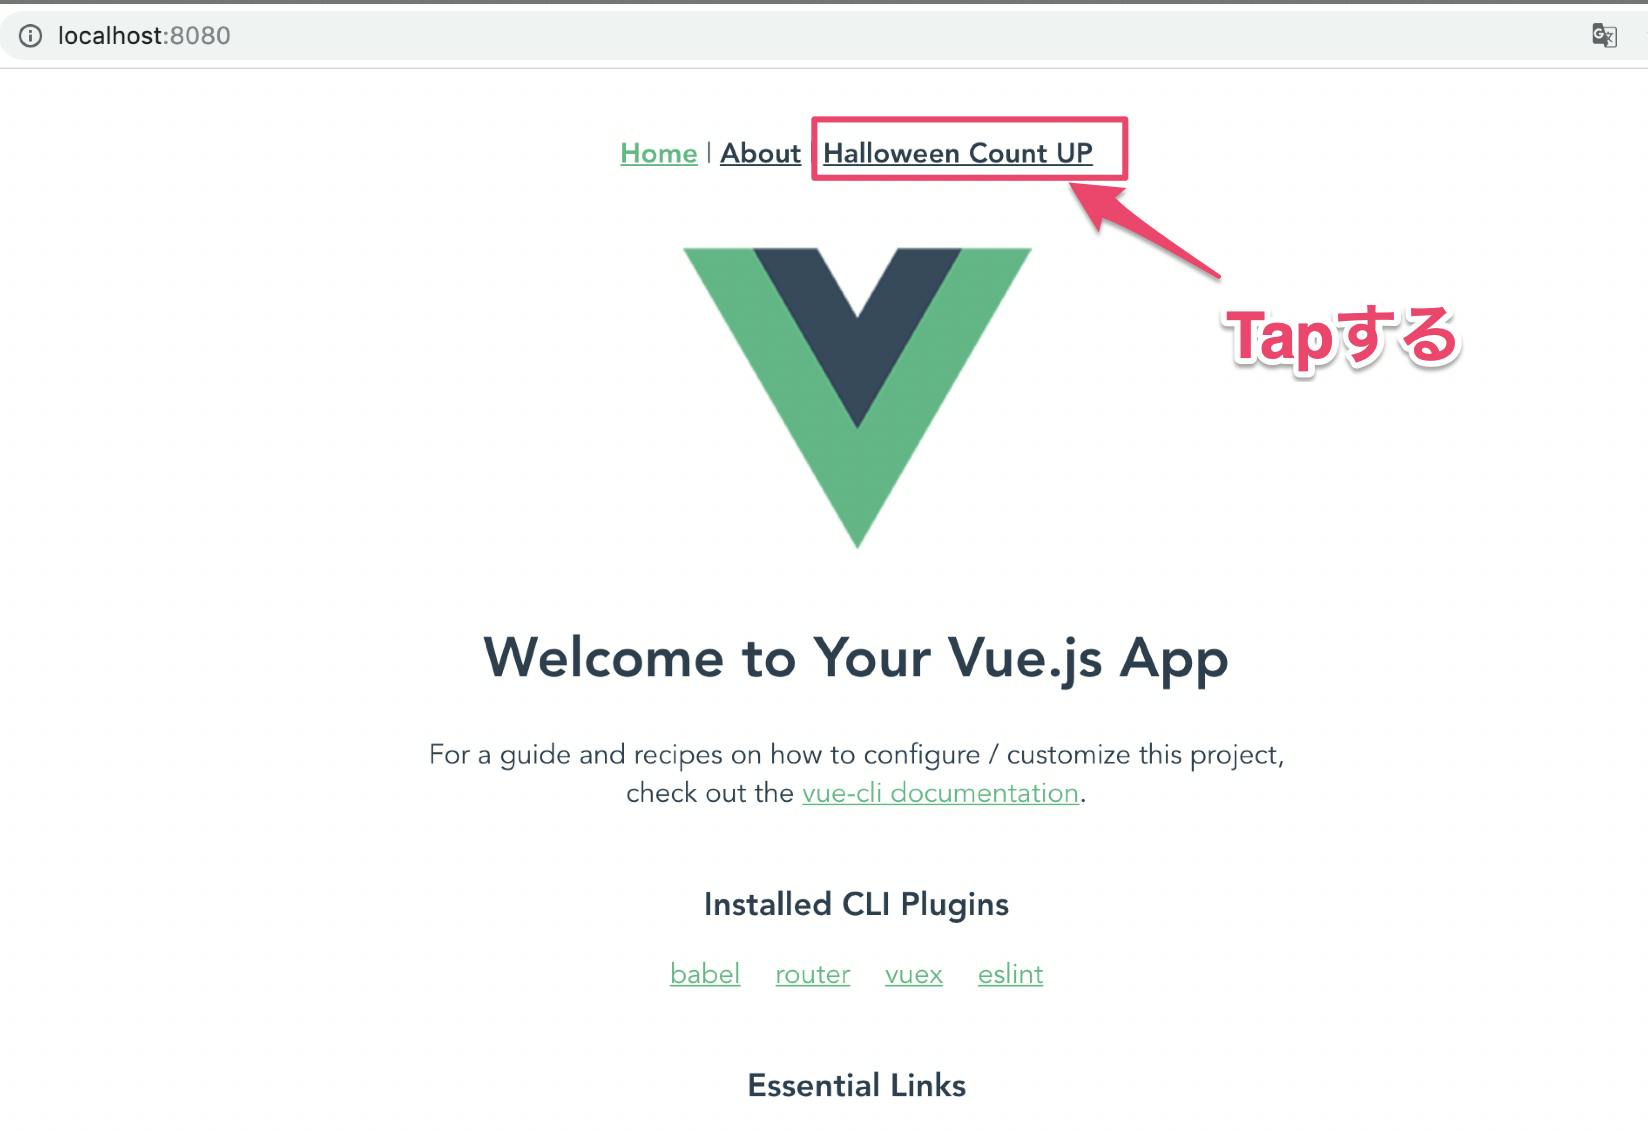
npm run serve
起動成功
TOP表示OK
カウントアップ画面表示OK
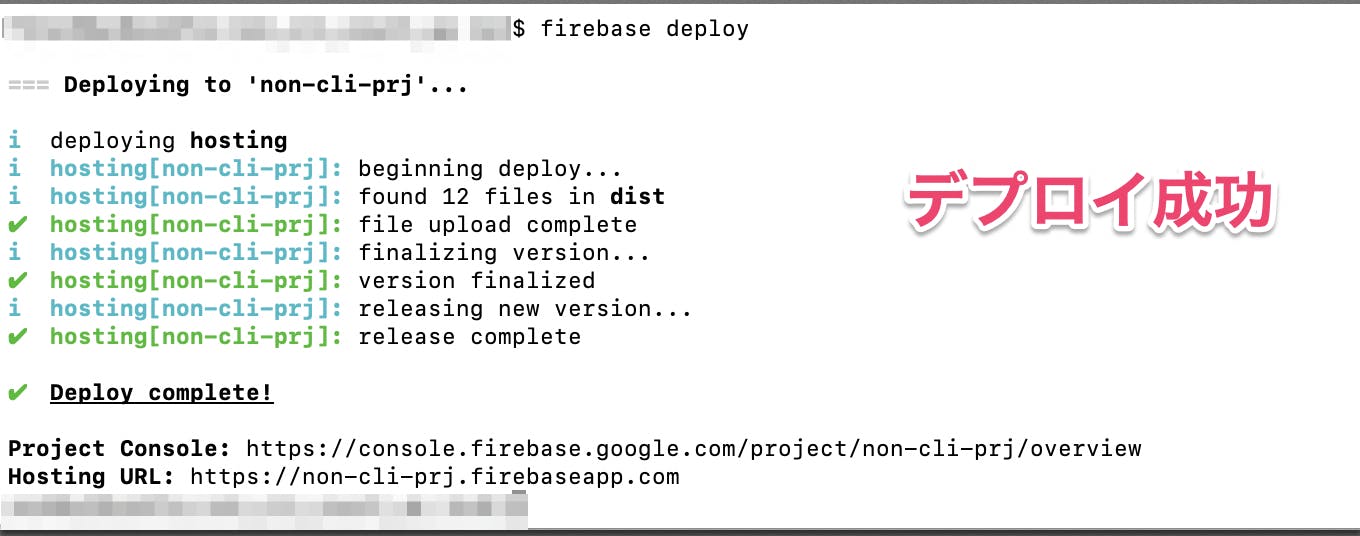
firebase のデプロイ
firebase deployデプロイ成功
Firebase TOP表示OK
カウントアップ画面表示OK
完成!!
?Vue.js?
— non (@nonnonkapibara) October 20, 2019
YouTubeの動画?APIリクエスト一覧表示?サンプル
作ってみたよぉ。
Vue CLI(v4.0.4) Vue.jsのaxiosでAPI通信?して、Firebase(FirebaseHosting) にデプロイ??
ちゃんと動いたよぉ?https://t.co/y7hw3zHRlI#Vue #vuejs #firebase pic.twitter.com/C5zCM6n78R


- 投稿日:2019-10-20T05:11:24+09:00
【Vue.js】FirebaseプロジェクトでVue CLI v4.0.4を作成する(Firebase・Vue CLI v4.0.4)
環境メモ
⭐️Mac OS Mojave バージョン10.14
⭐️Firebase Hosting
⭐️Vue CLI v4.0.4Firebase HostingにVue CLI v4.0.4のプロジェクトを作成する方法
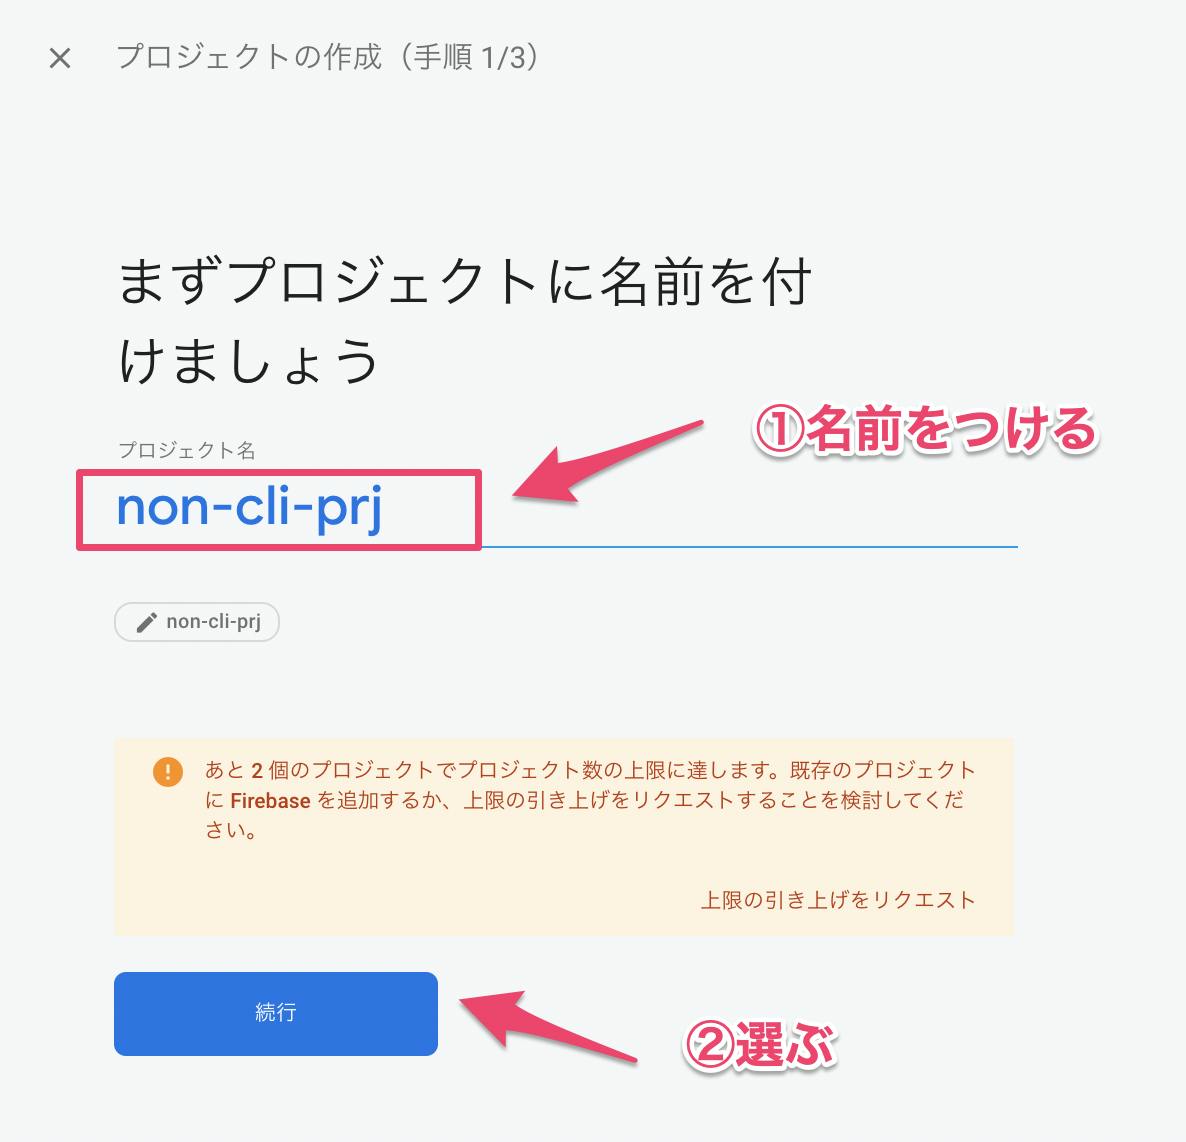
Firebaseプロジェクトを作成する
プロジェクト名をつける。
「続行」ボタンを押す
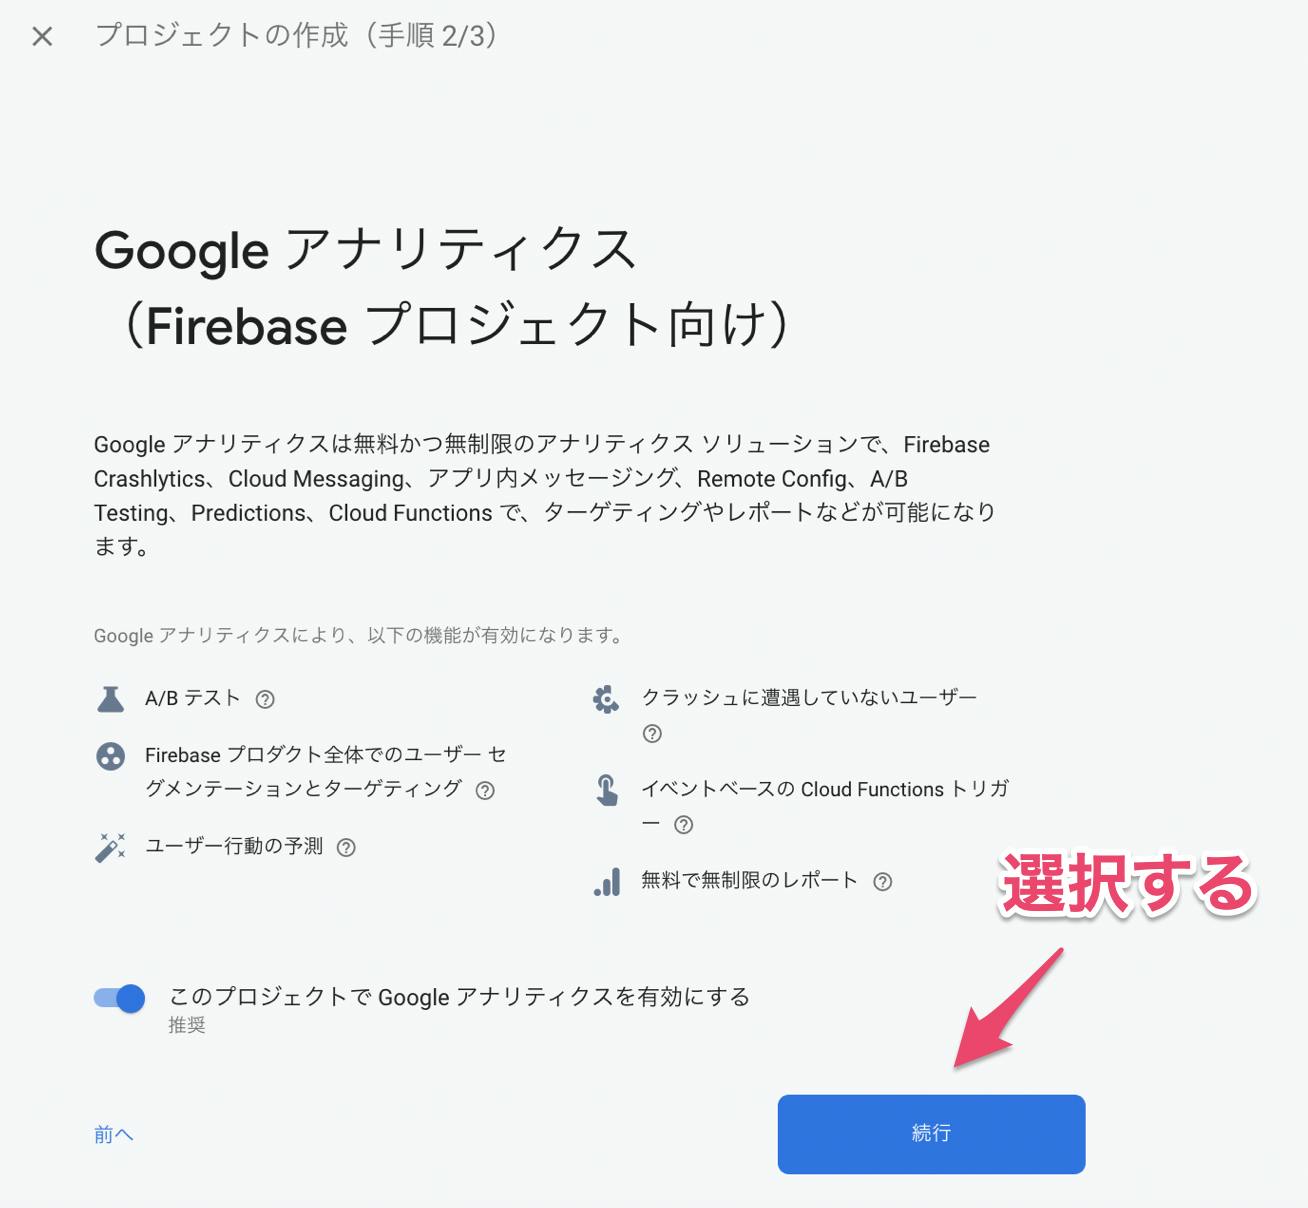
Googleアナリティクス
そのまま「続行」ボタンを押す
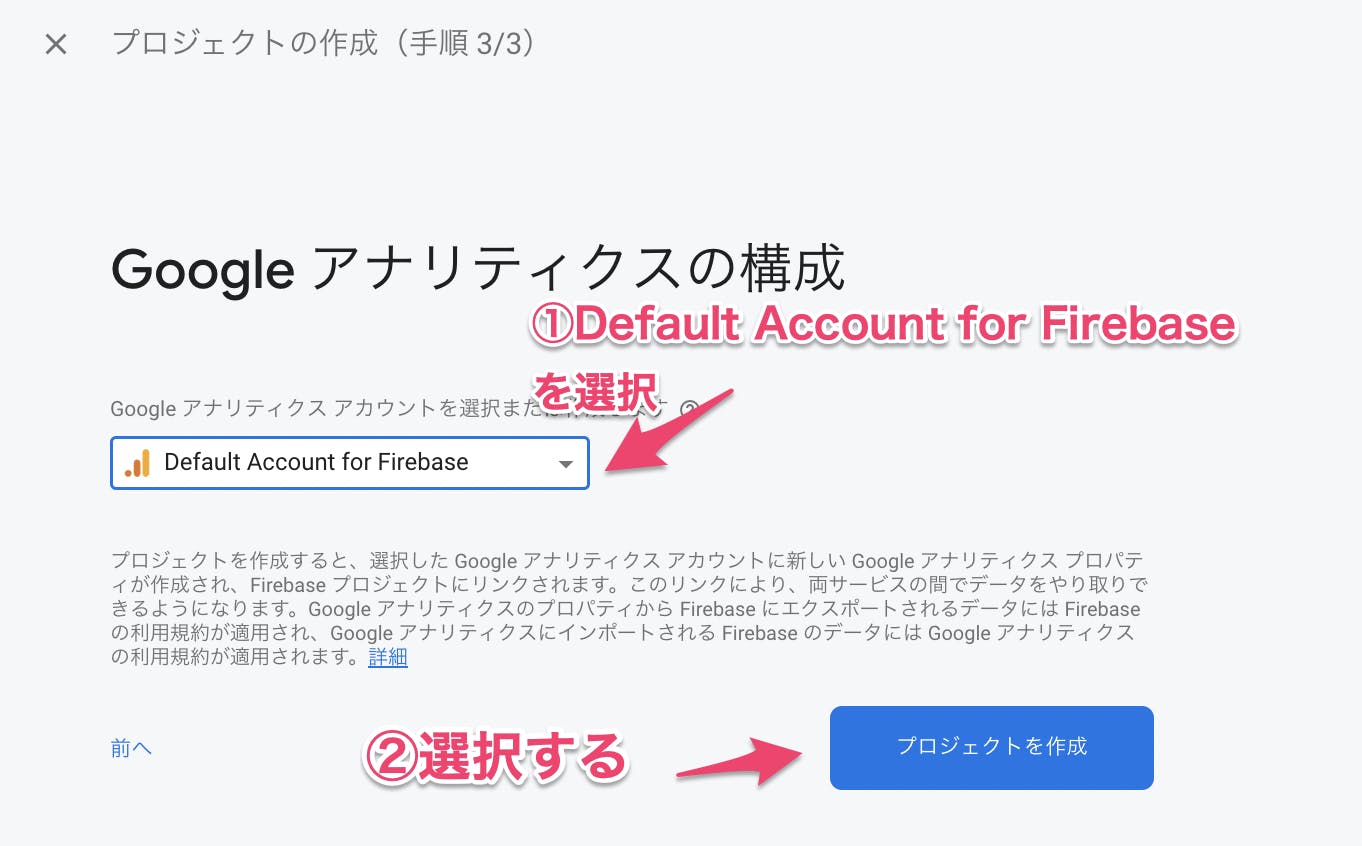
Googleアナリティクスの構成
「Default Account for Firebase」を選択し「プロジェクトを作成」ボタンを押す
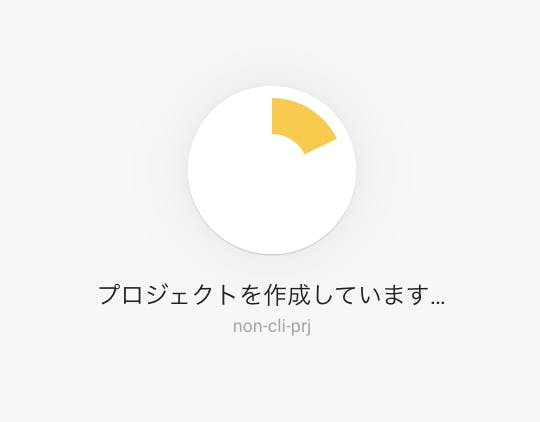
プロジェクト作成中
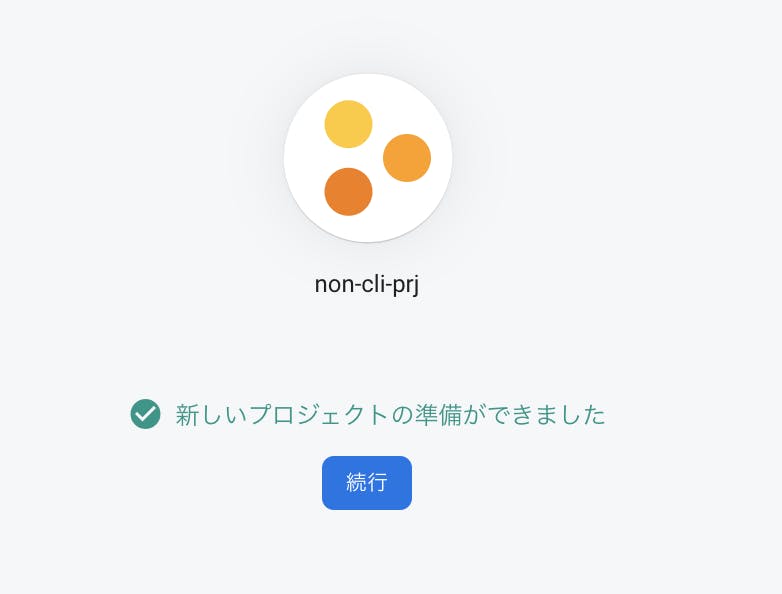
プロジェクト作成が終わり「続行」ボタンを押す
プロジェクト作成完了。
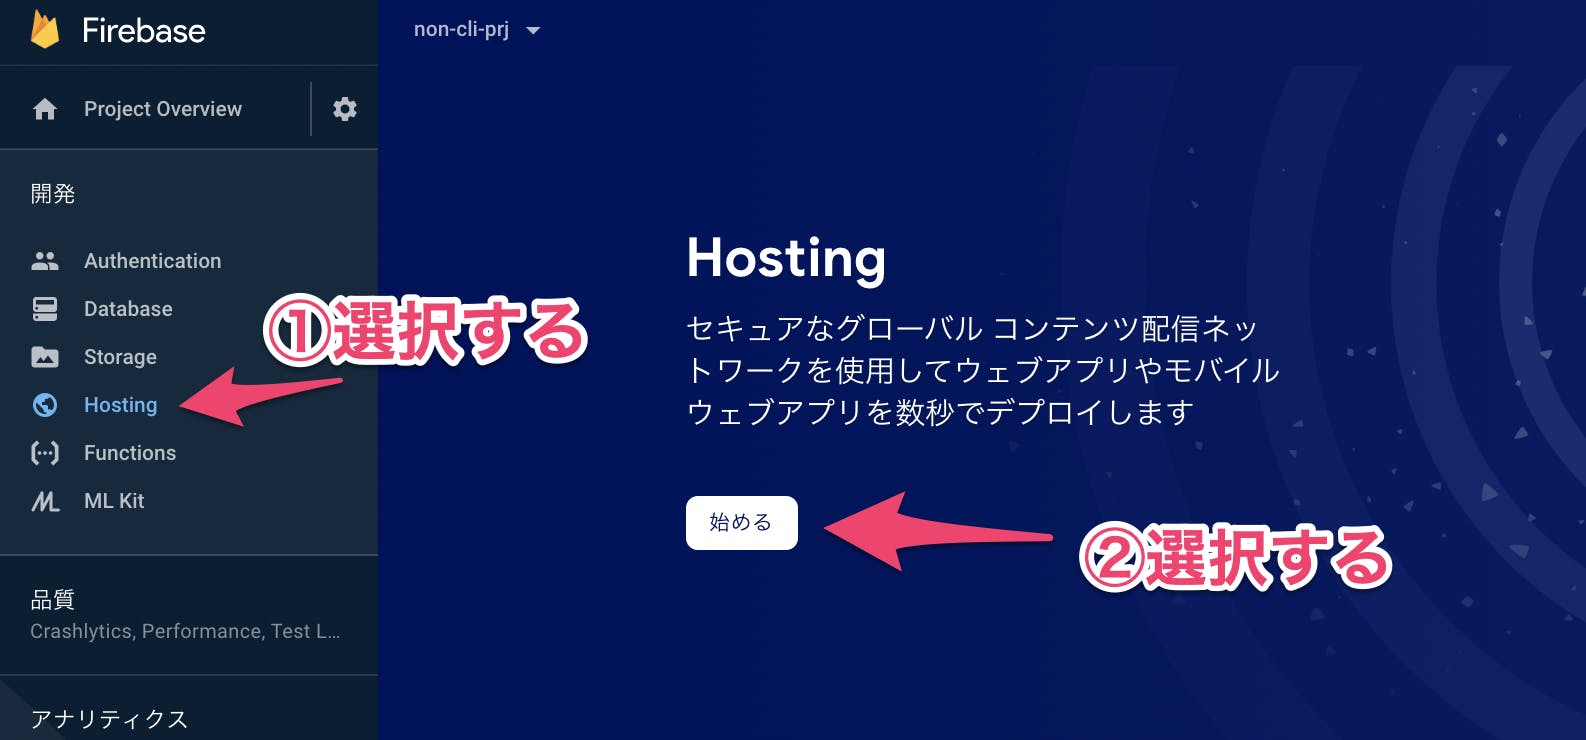
Firebase Hostingを作成する
Hostingを始める
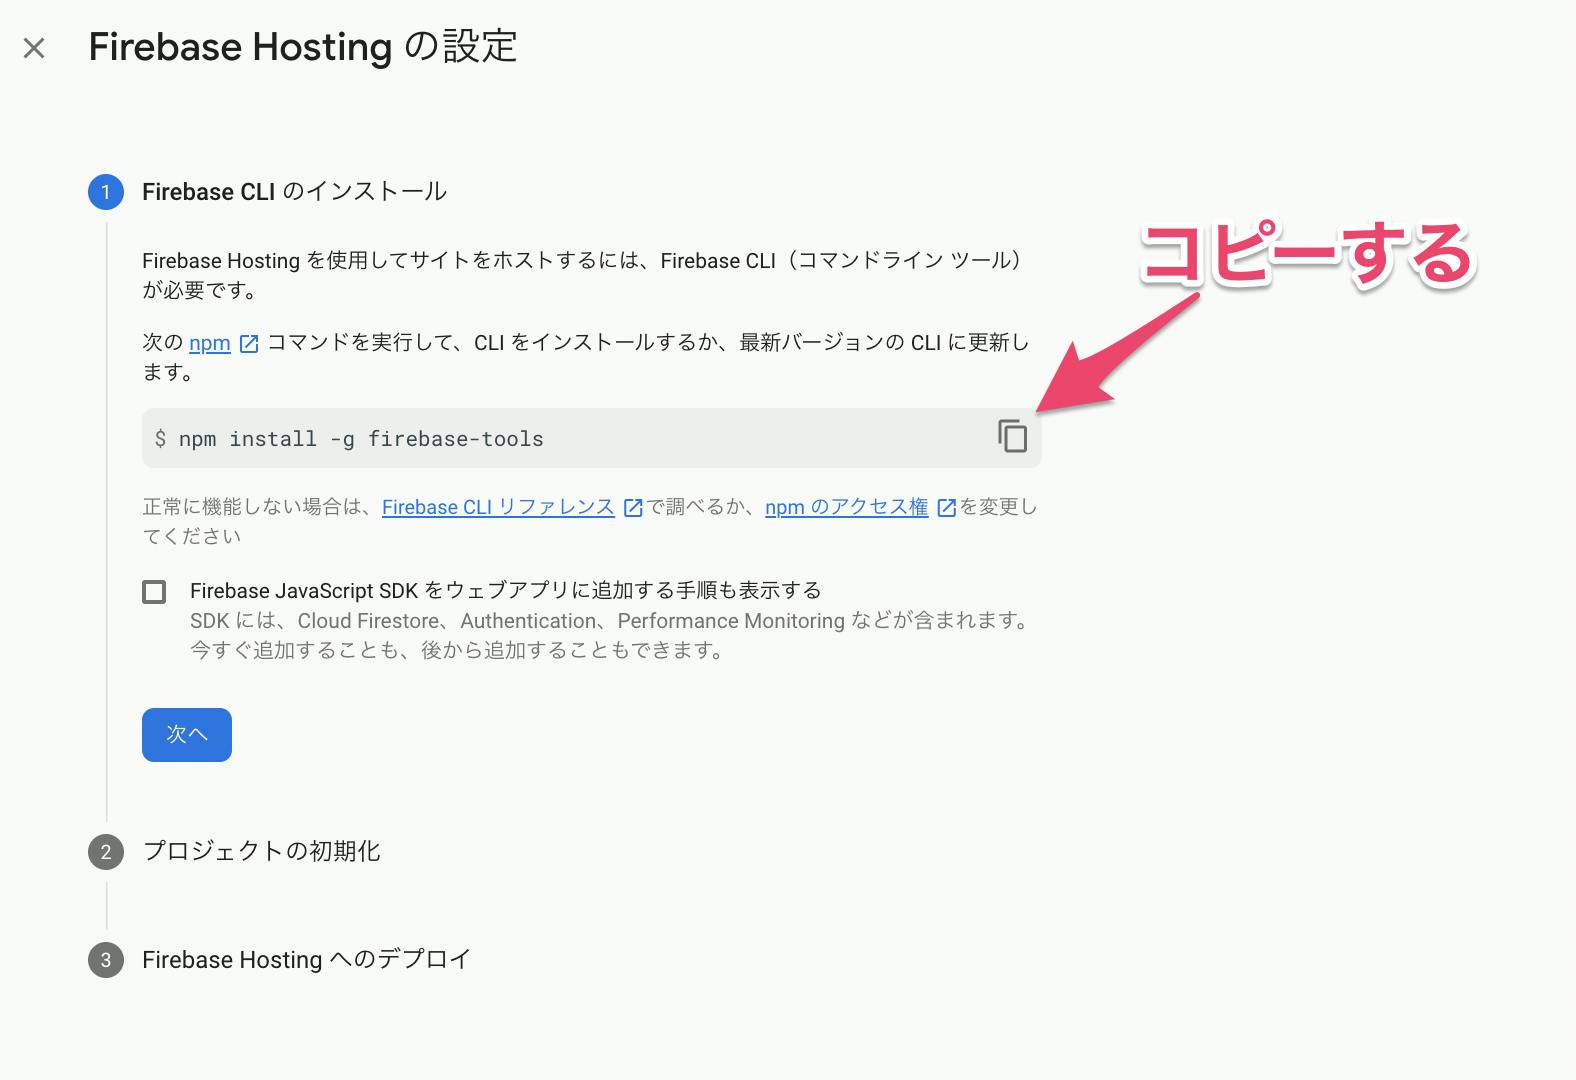
Firebase Hostingの設定でFirebase CLIのインストール
ターミナルを起動する
以下のコマンドをコピーして、ターミナルに貼り付ける
npm install -g firebase-tools
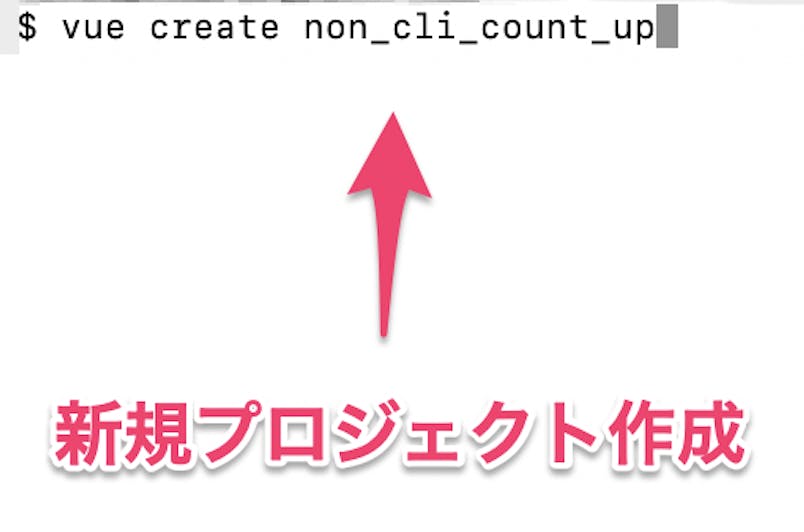
CLI Vue JS の新規プロジェクトを作成する
CLI Vue JSカウントアップを作ります。プロジェクト名「non_cli_count_up」を作ります。
vue create non_cli_count_up
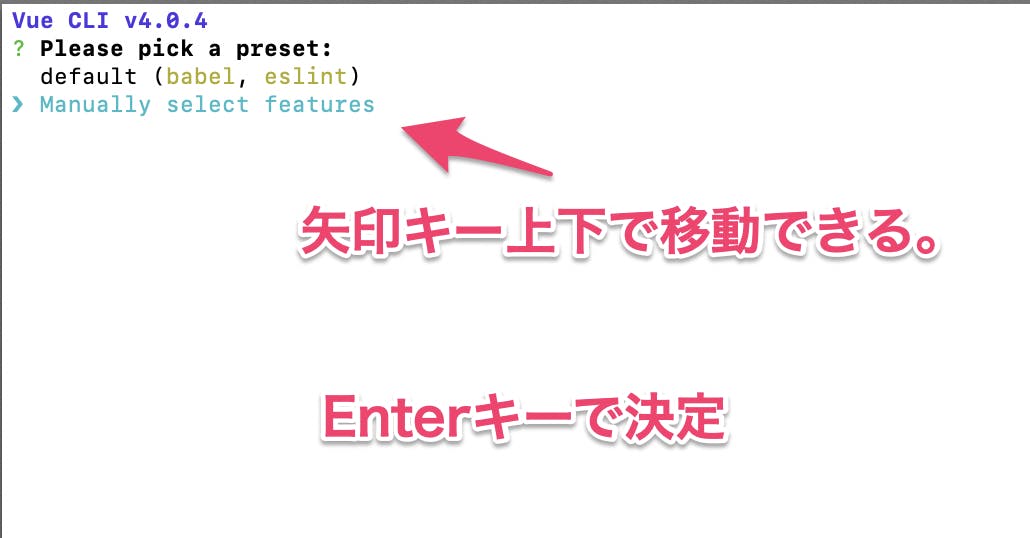
最初にどんなプラグインを一緒にインストールするかを聞かれます。
デフォルト「default」ではbabelとESlintが初期インストールされる設定で、手動「Manually select features」にするとパッケージが選択できる。
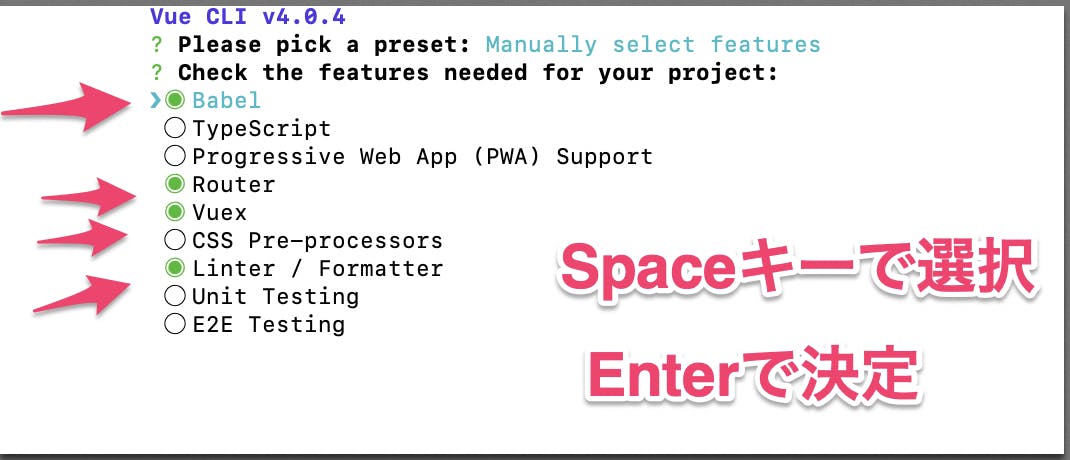
・Babel とは新しい文法で書いたコードを古いWebブラウザでも動作するように変換してくれるツール。
・TypeScript(タイプスクリプト)
・Progressive Web App (PWA) Support(プログレッシブウェブアプリ)アプリのようなウェブサイト
・vue-routerとはVuejsのルーターライブラリです。 Vue.js 公式ルータ。画面を読み込まずにURLとコンテンツが切り替わります
・Vuex は Vue.js アプリケーションのための 状態管理パターン + ライブラリ
・Css Pre-processors プリプロセッサー独自の 構文 で CSS を生成するプログラム
・Linter / formatter エラーや潜在的なバグを警告するもの
・Unit Testing 単体テスト
・E2E Testing開始から終了まで」が、期待通り動いているかをテストする矢印キーの上、下で、カーソル移動します。
Spaceキーで、選択・選択解除。
「a」キーですべて選択・選択解除。
「i」キーで
[space]キー現在の状態を反転。「Babel」「Router」「Vuex」「Linter」をSpaceキーで選択し、Enterキーで決定する
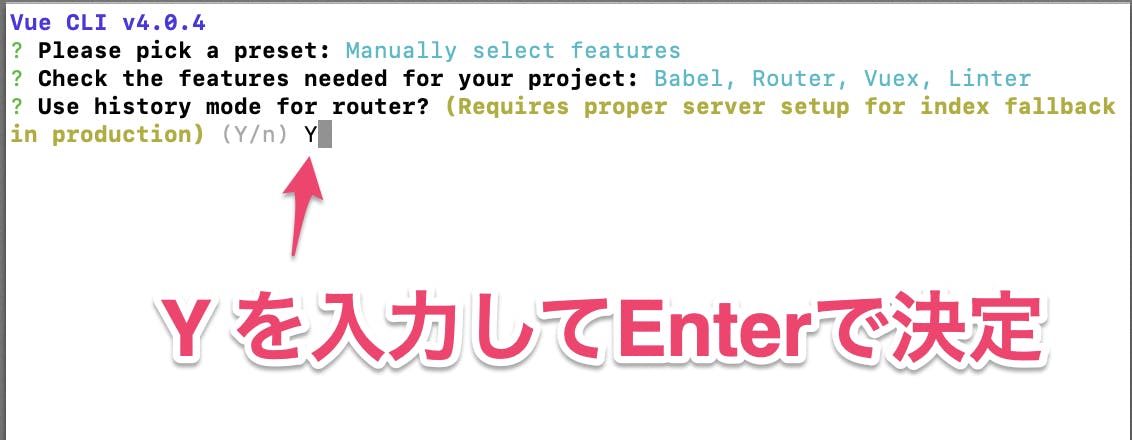
HTML5 History モードの選択
Vue Routerをhashモードで使う「n」か、Vue RouterのHistoryモードで使うか「Y」で選択する。
Vue RouterのHistoryモード、Yを選択する
詳細はHTML5 History モード参照
https://router.vuejs.org/ja/guide/essentials/history-mode.htmlESLintプリセットの選択
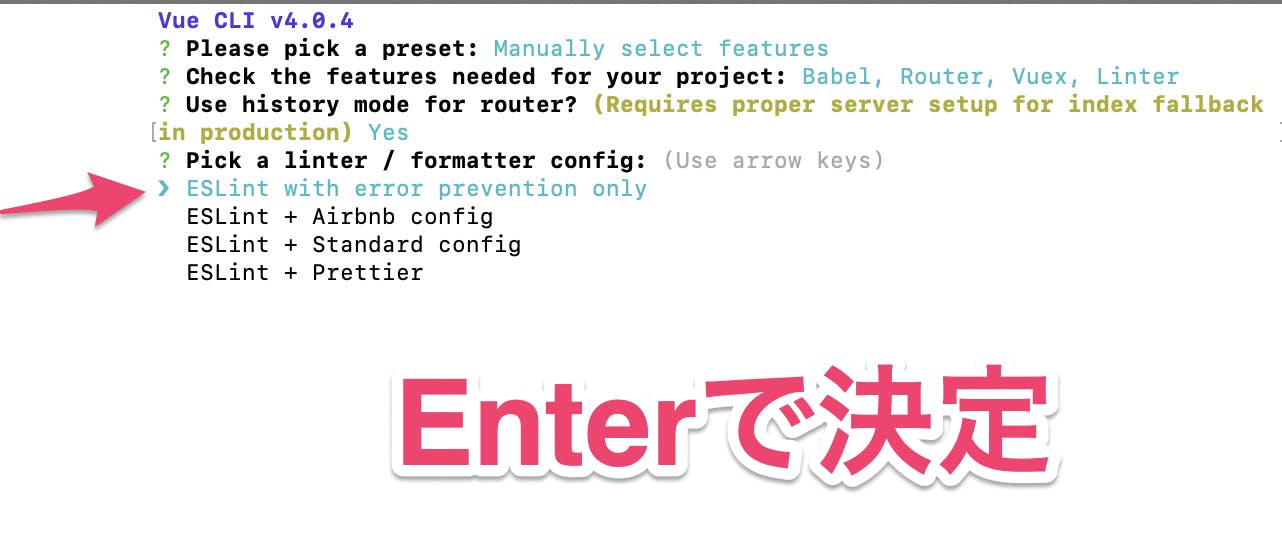
ESLintのプリセットを選択をする
・ESLint with error prevention only ーエラー防止のみ
・ESLint + Airbnb config
・ESLint + Standard config
・ESLint + Prettier Prettier「ESLint with error prevention only」 を選択する
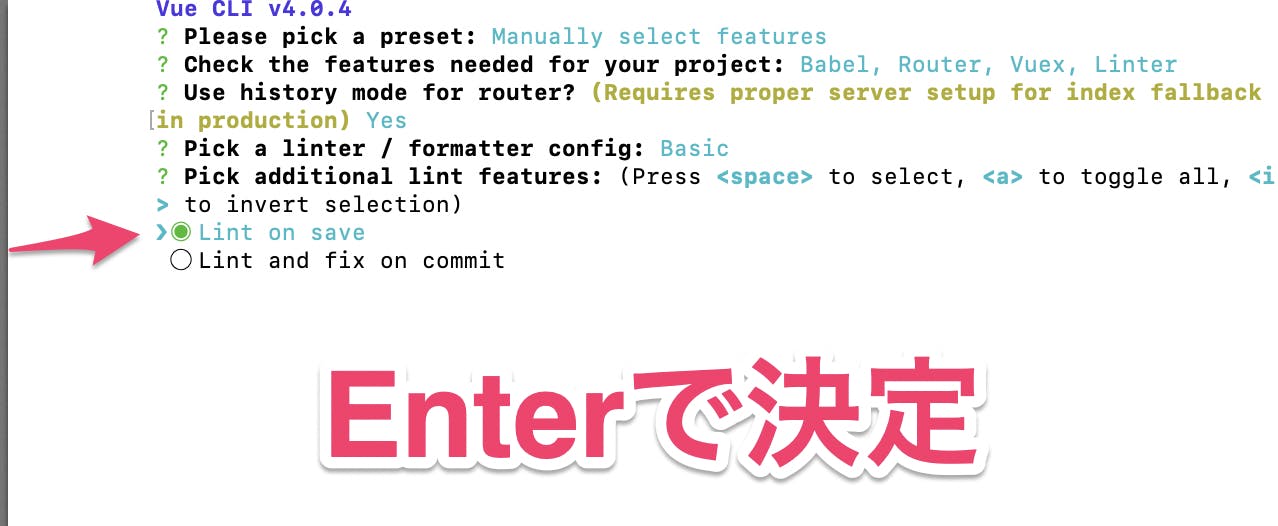
lint機能オプションの選択
Lintが実行されるタイミングを選択する。
・Lint on save 保存時にLint実行
・Lint and fix on commit コミット時にLint実行
「Lint on save」を選択する
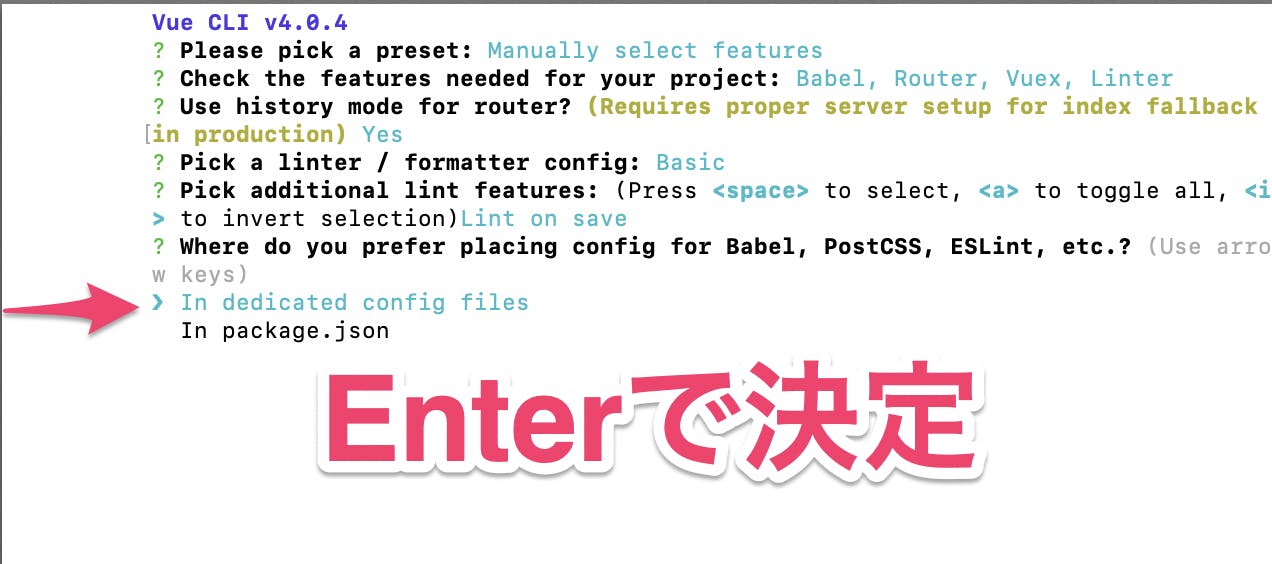
設定ファイル設置箇所の選択
Babel・PostCSS・ESLintなどの設定をどこに設置するかを選択する。
・In dedicated config filesー専用の設定ファイル内
・In package.jsonーpackage.json内
「In dedicated config files」を選択する
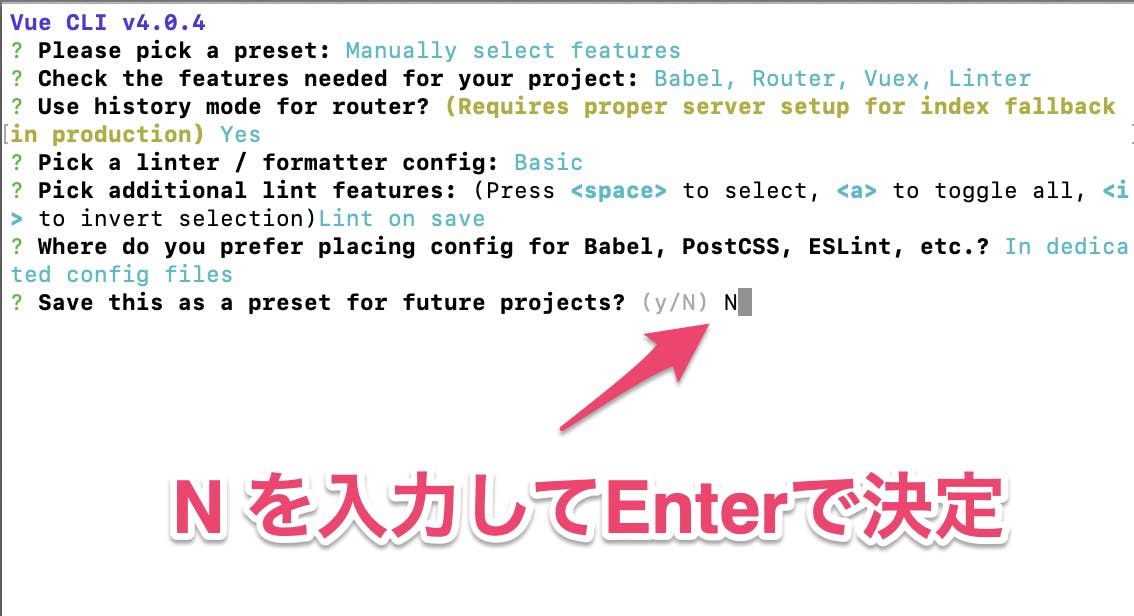
プリセット保存の選択
上記の設定内容を保存するかの有無
保存しない「N」を入力する
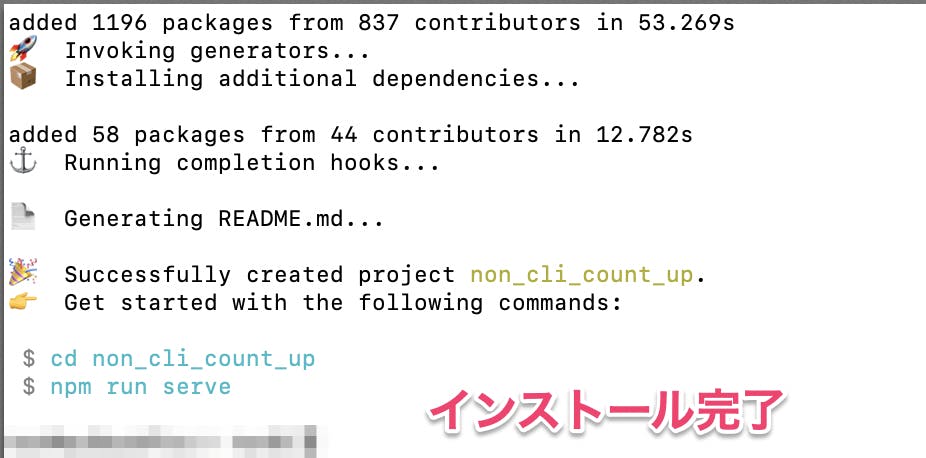
インストール完了
プロジェクトを移動する
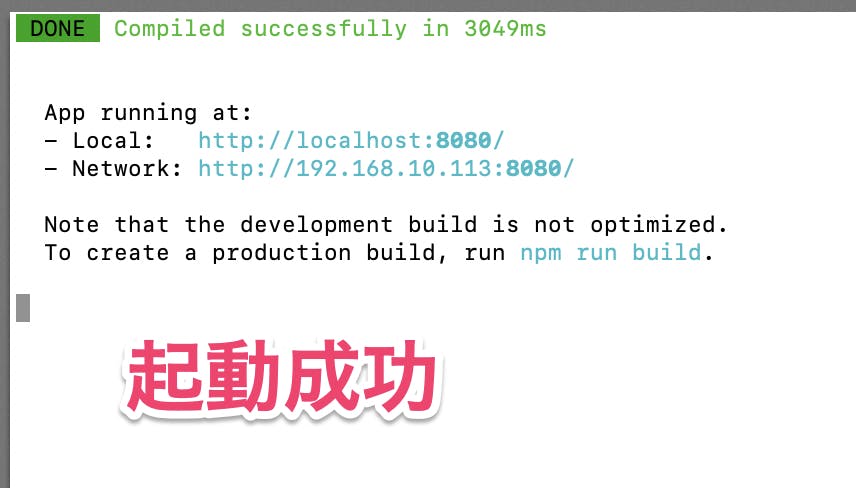
cd non_cli_count_upプロジェクトを起動する
npm run serve
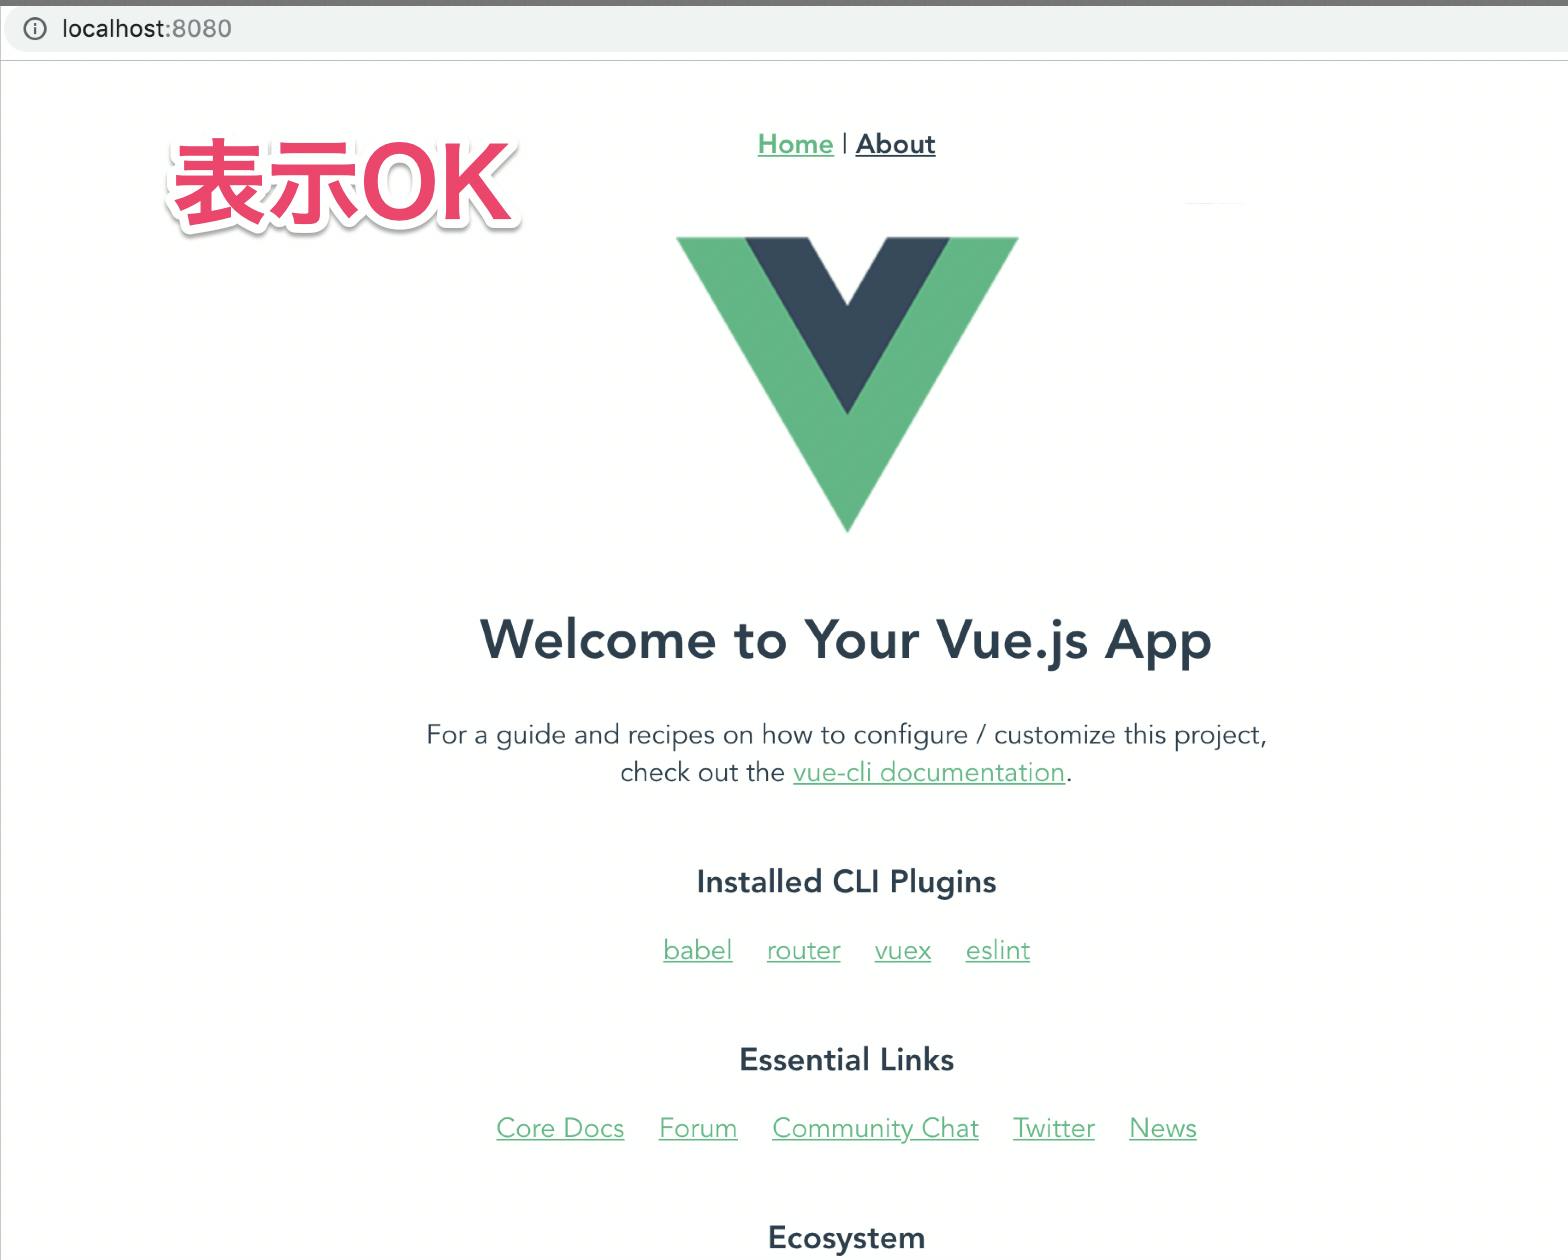
アクセスする
表示OK
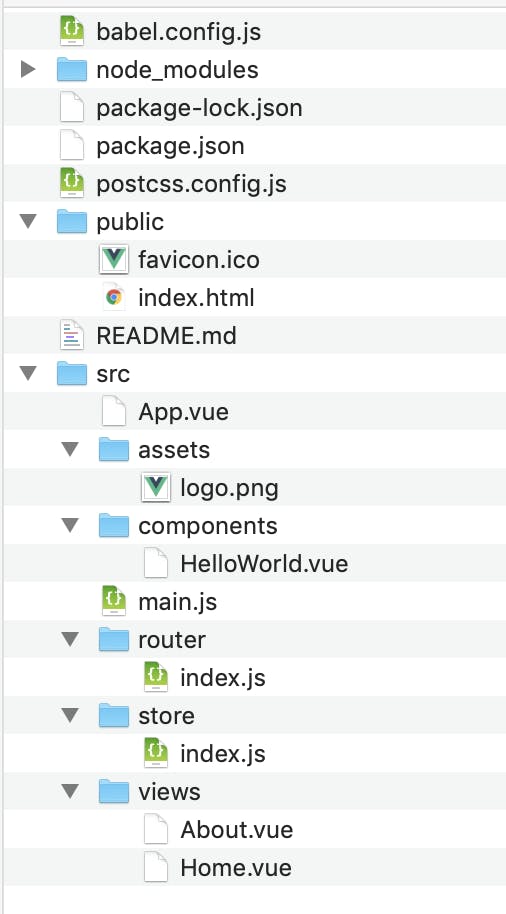
フォルダ構成
★起動
npm run serve★ビルド
npm run build★停止
「ctrl + c」 で停止できるプロジェクトの初期化
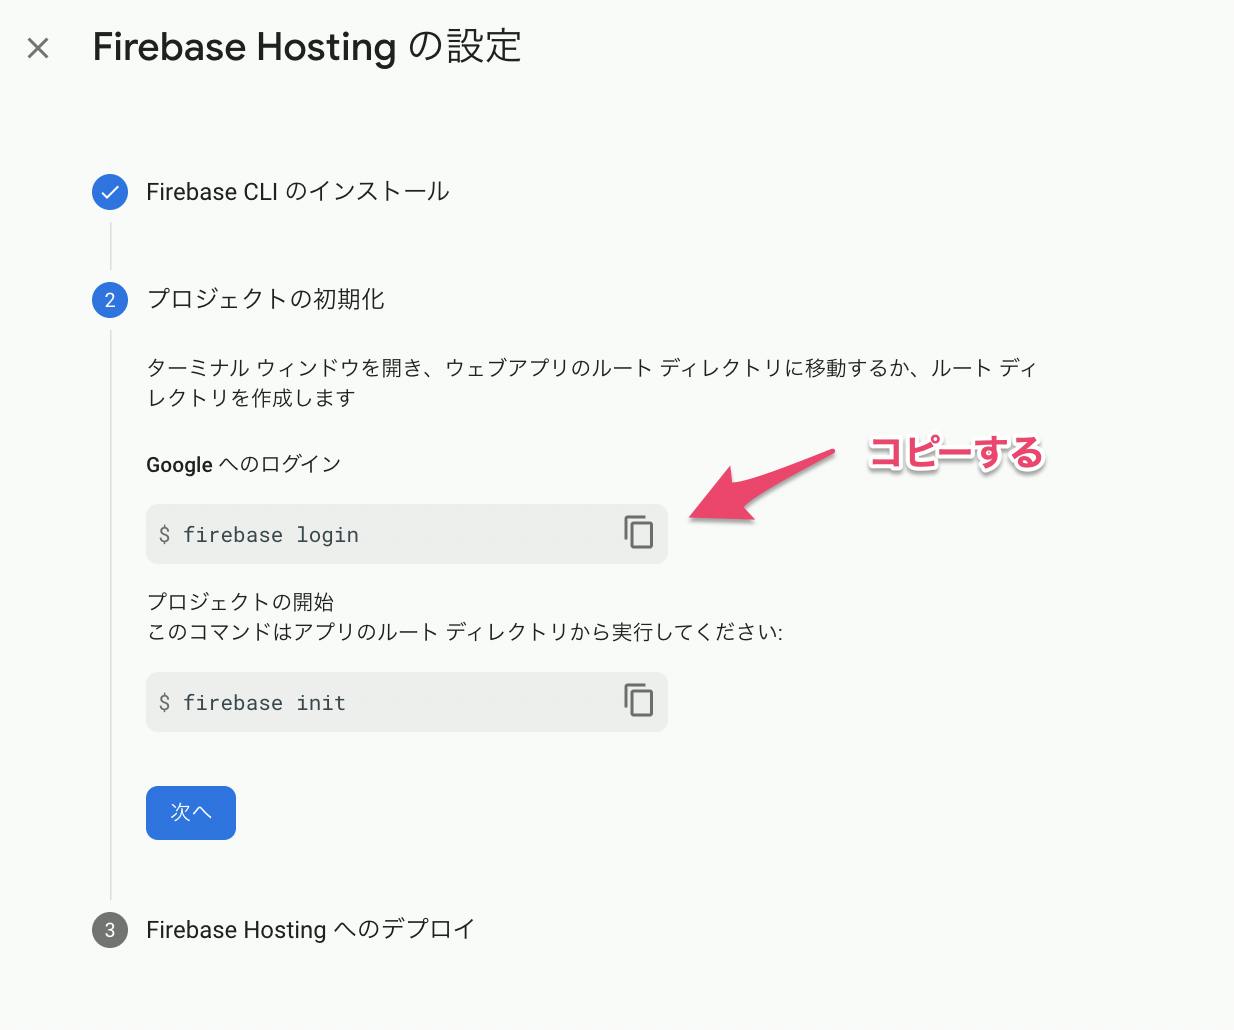
Firebaseにログインする
firebase login
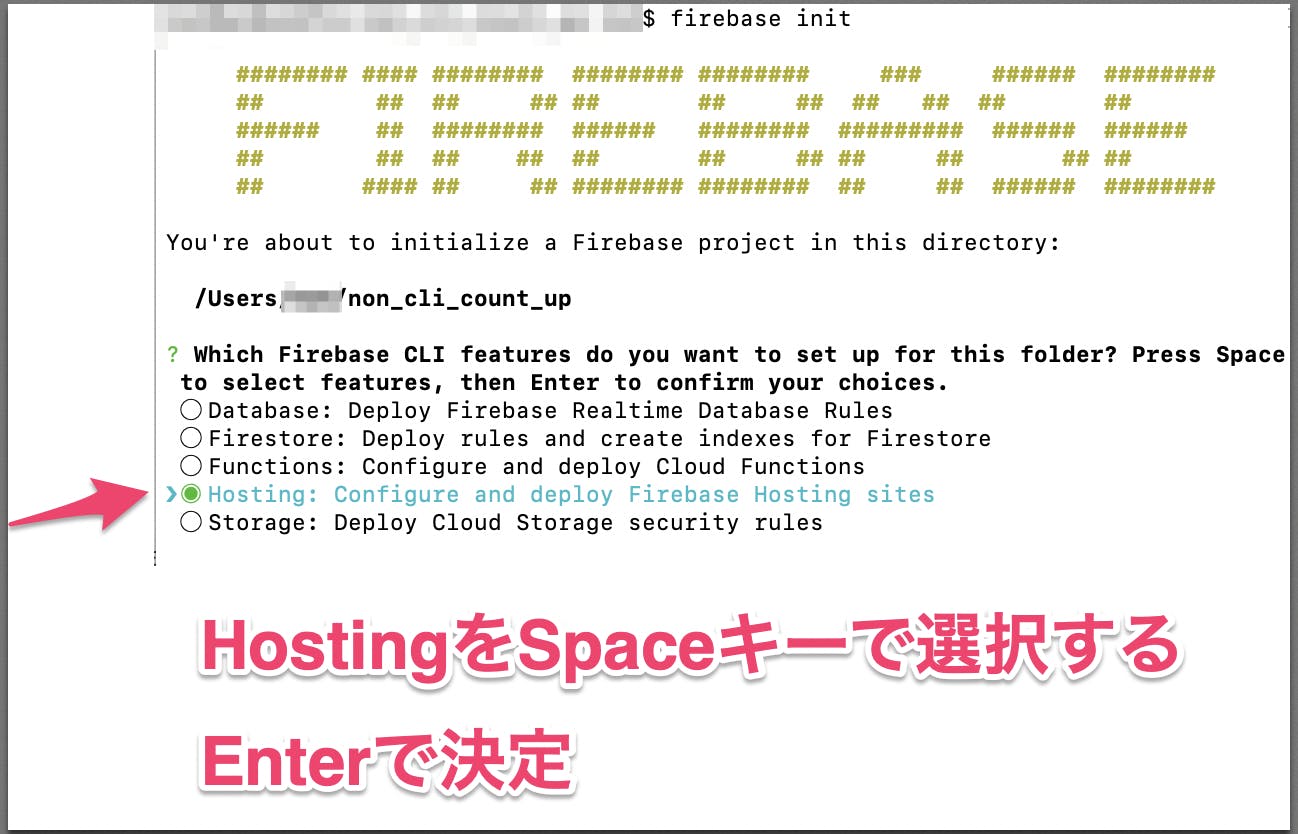
Firebaseの初期化をする
firebase init「Hosting」を選択する。Spaceキーで選択してEnterで決定。
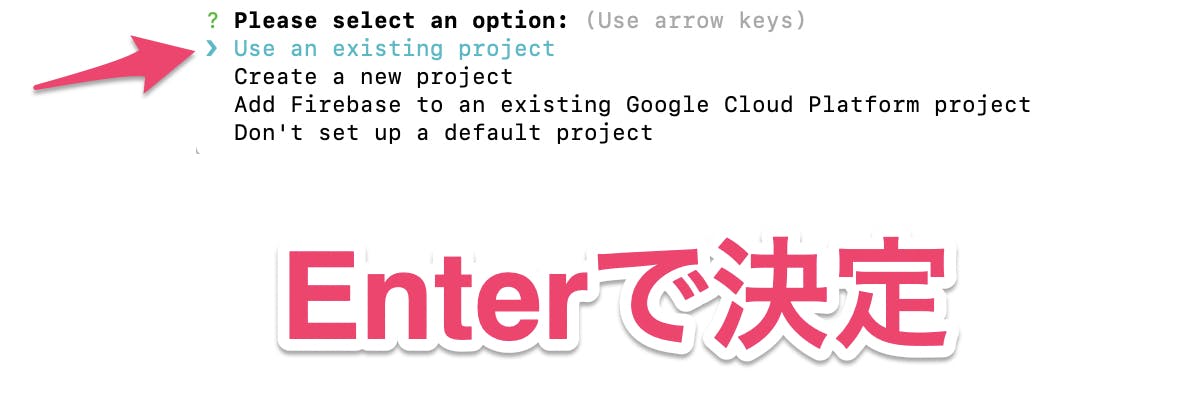
プロジェクトの設定
Please select an option: (Use arrow keys)
❯ Use an existing project 既存のプロジェクトを使用する
Create a new project 新しいプロジェクトを作成する
Add Firebase to an existing Google Cloud Platform project Firebaseを既存のGoogle Cloud Platformプロジェクトに追加します
Don't set up a default project
デフォルトのプロジェクトを設定しないでくださいここでは、「Use an existing project 」既存のプロジェクトを使用する
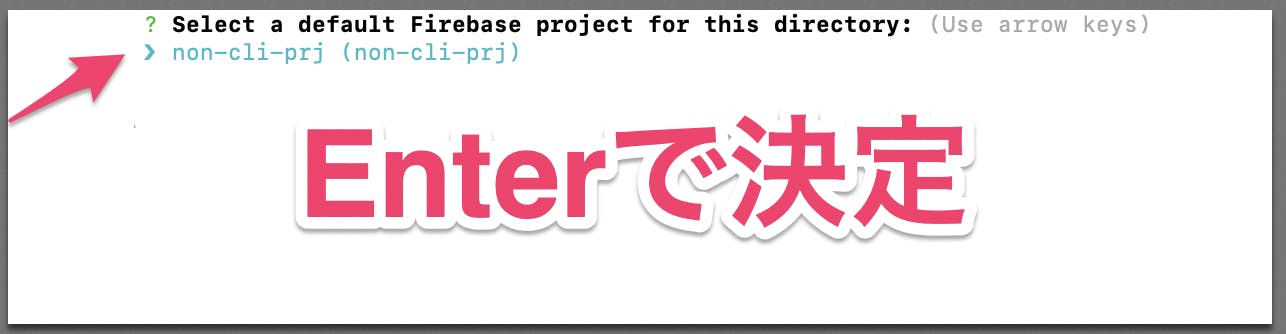
このディレクトリのデフォルトのFirebaseプロジェクトを選択する
Select a default Firebase project for this directory: (Use arrow keys)
❯ non-cli-prj (non-cli-prj)
ここでは、Firebaseのプロジェクトを選択する。
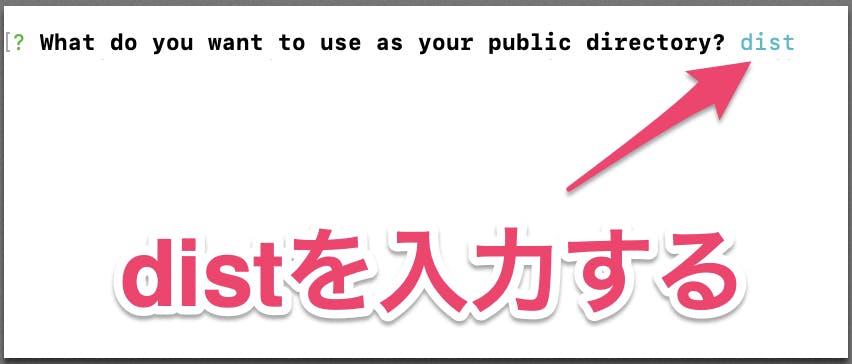
What do you want to use as your public directory?
パブリックディレクトリとして何を使用しますか?
本番用のディレクトリのフォルダを入力します。
「dist」を入力する
Configure as a single-page app (rewrite all urls to /index.html)?
単一ページのアプリとして構成します(すべてのURLを/index.htmlに書き換えます)
Yesの場合、firebase.json にrewrites設定が追記されます
Noの場合、404.htmlが作成されます。
ここでは、NOを選択します。
成功
firebase npm パッケージをインストールし、package.json ファイルに保存します。
npm install --save firebase
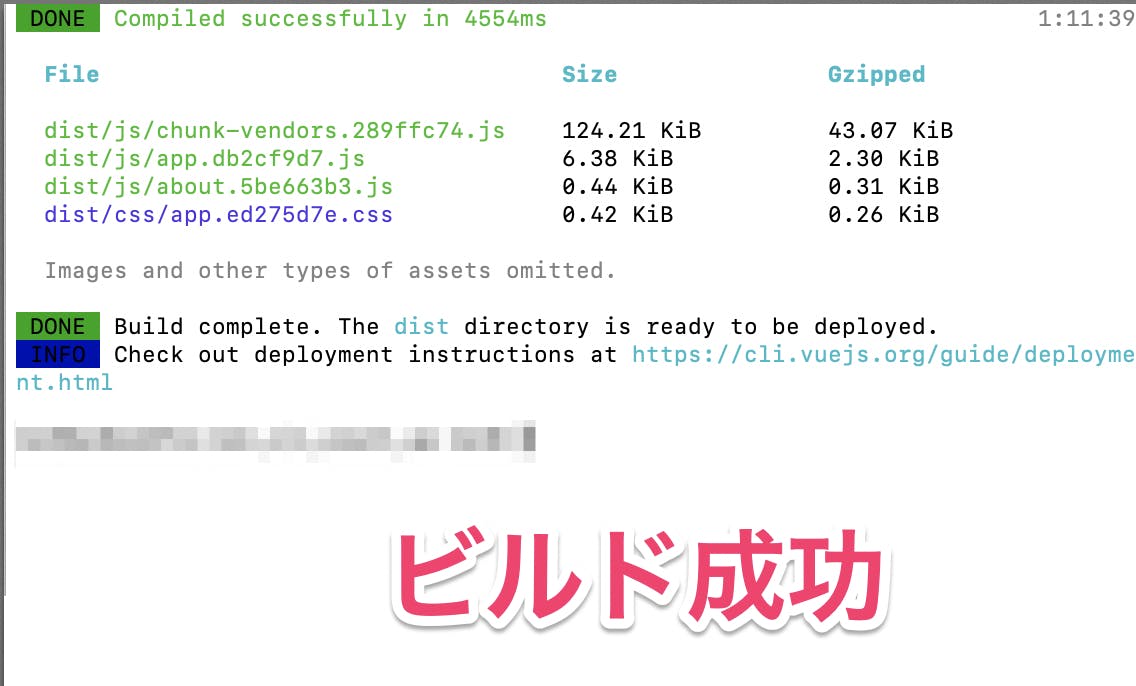
ビルド実施
npm run build
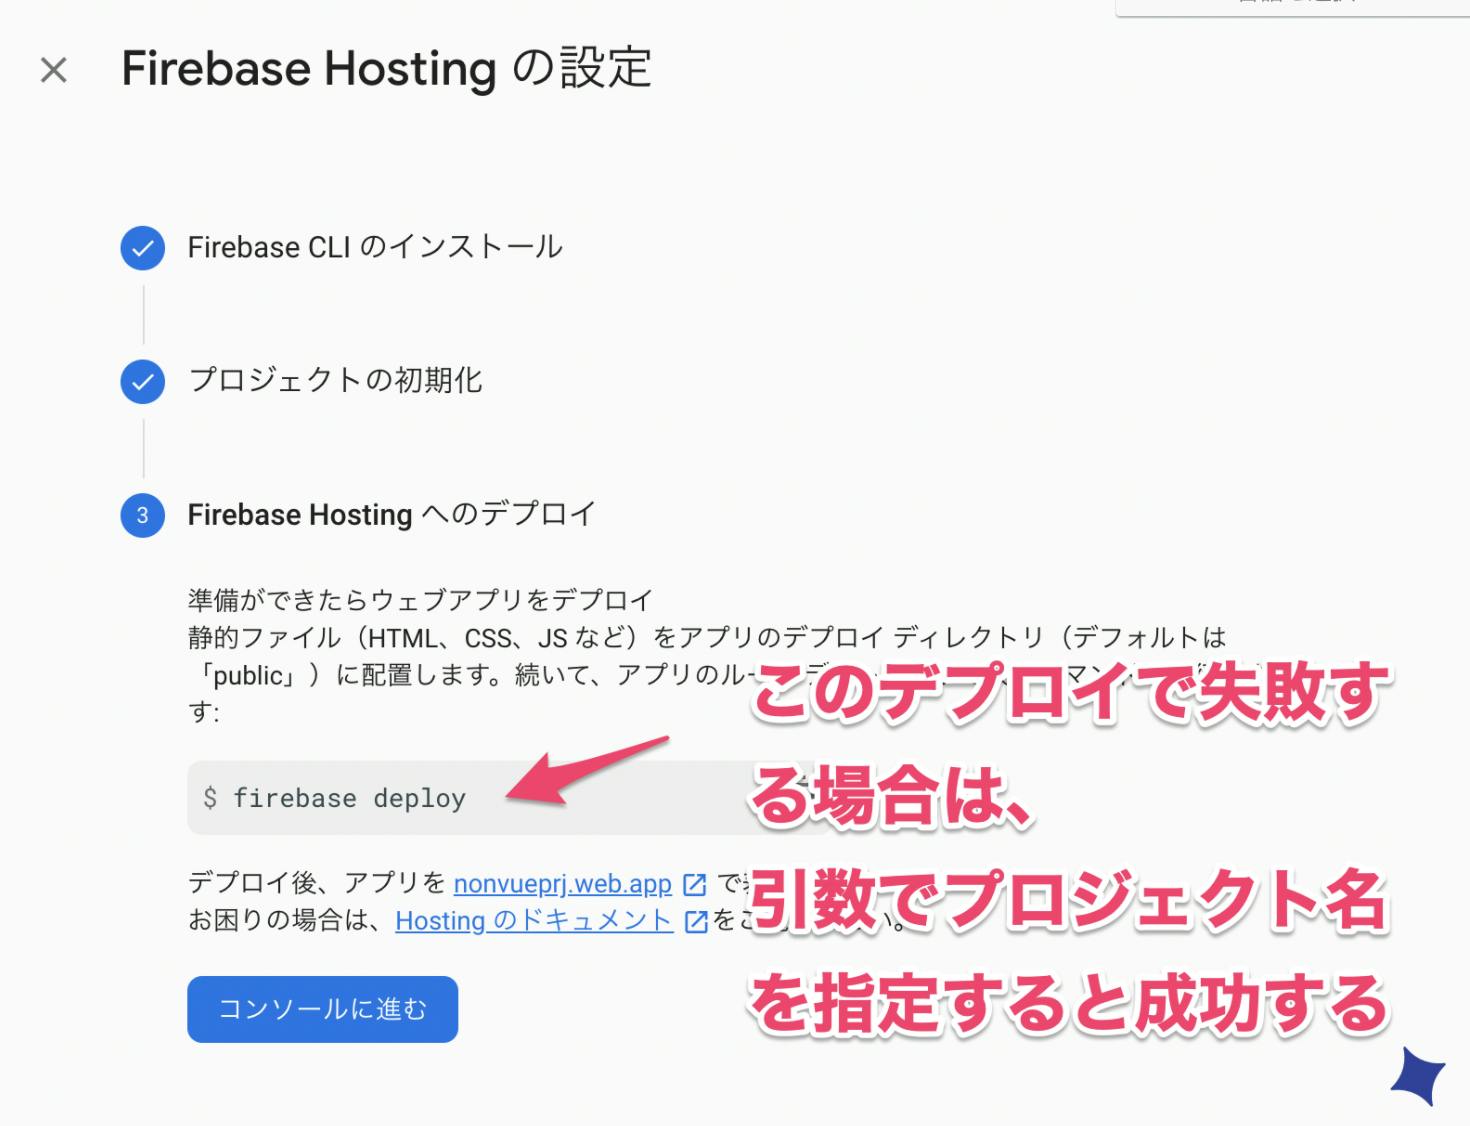
firebase のデプロイ
「firebase deploy」でデプロイが失敗する場合は、
Firebaseのプロジェクト名を引数にデプロイすると成功しました。
ここではプロジェクト名(non-cli-prj)firebase deploy --project non-cli-prj
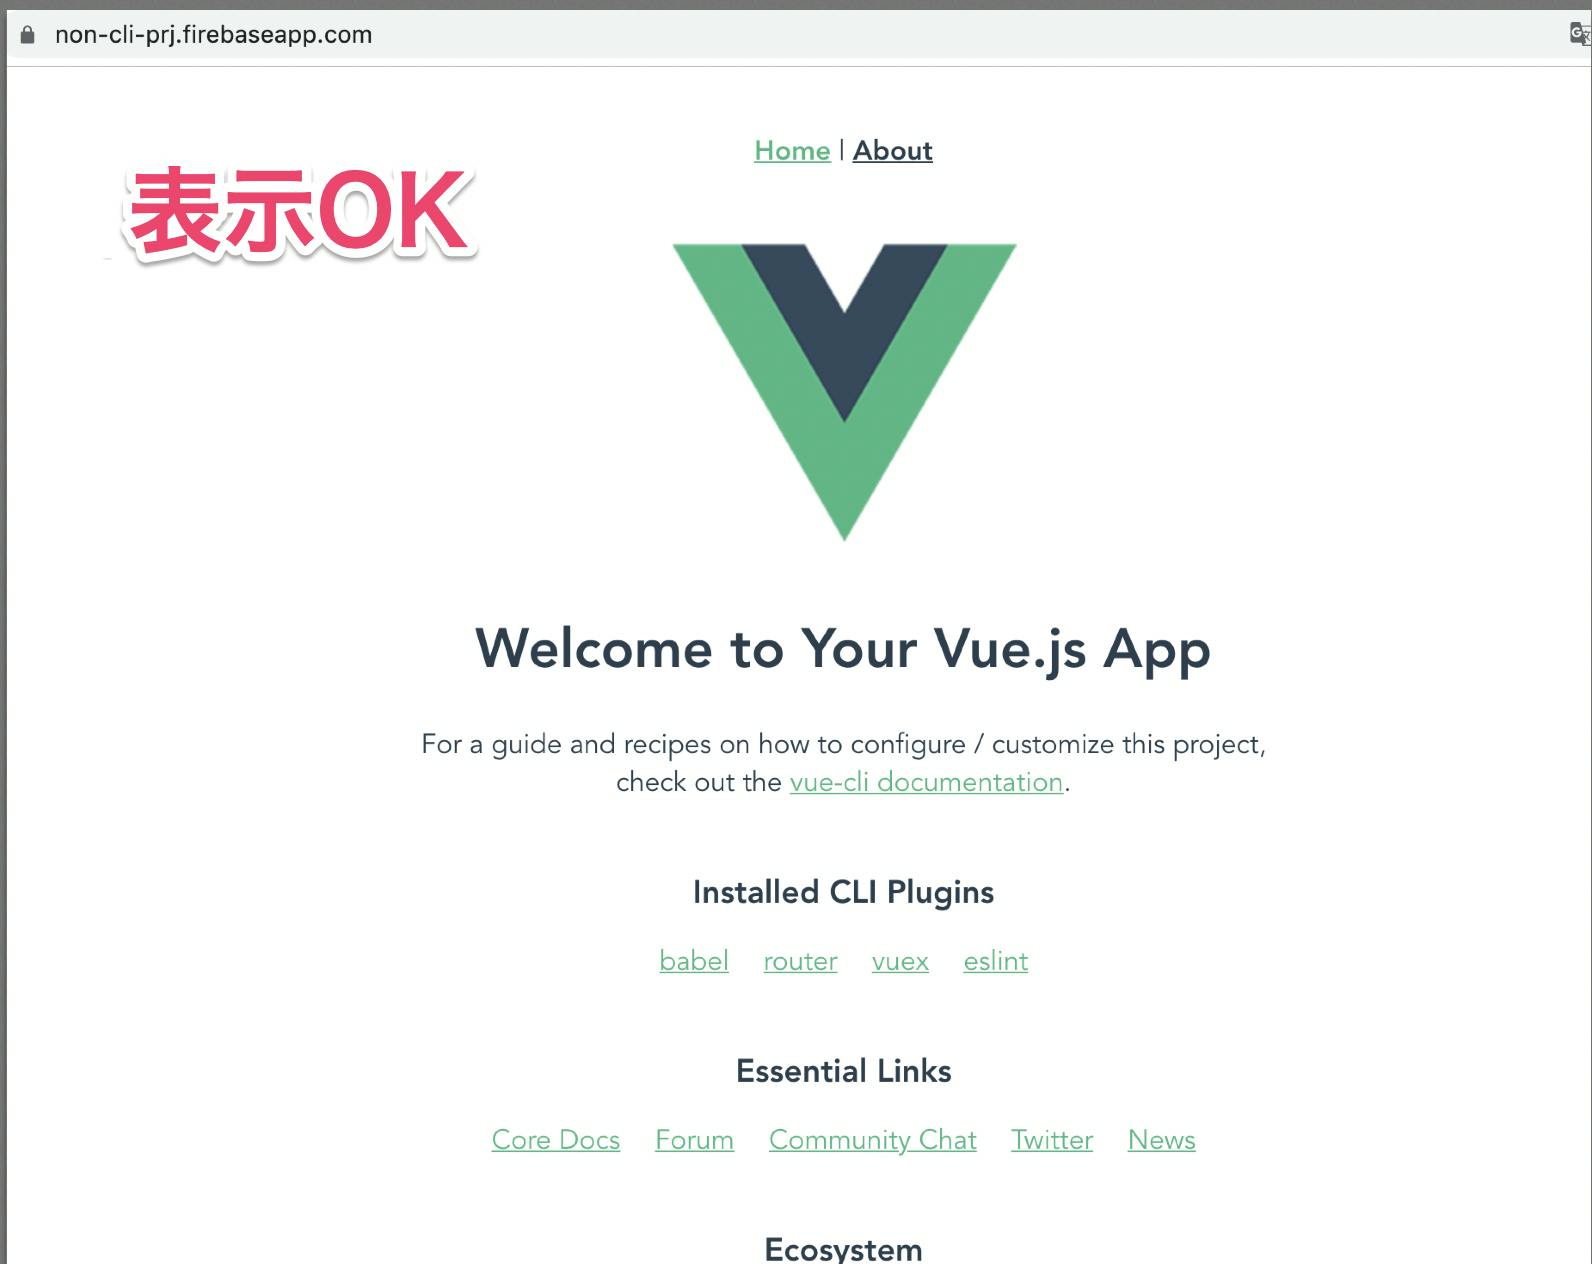
Firebase表示成功
ファイル構成
【Vue.js】カウントアップ(Firebase・Vue CLI v4.0.4)
https://qiita.com/nonkapibara/items/94a77629236796716ff4?Vue.js?
— non (@nonnonkapibara) October 19, 2019
Vue CLI(v4.0.4) でVue.js作って、
Firebase(FirebaseHosting) にデプロイしてみたよぉ?
【Vue.js】カウントアップ(Firebase・Vue CLI v4.0.4)https://t.co/W7sWcleX4A#Vue #vuejs #Firebase pic.twitter.com/ajUgvvvoSZ
?Vue.js?
— non (@nonnonkapibara) October 20, 2019
YouTubeの動画?APIリクエスト一覧表示?サンプル
作ってみたよぉ。
Vue CLI(v4.0.4) Vue.jsのaxiosでAPI通信?して、Firebase(FirebaseHosting) にデプロイ??
ちゃんと動いたよぉ?https://t.co/y7hw3zHRlI#Vue #vuejs #firebase pic.twitter.com/C5zCM6n78R