- 投稿日:2019-08-20T23:11:00+09:00
System specを使えるRuby on Rails開発環境をDockerで作る
Railsチュートリアルの2周目を、Docker環境でかつテストをRspecに代えて進めていたのですが、System specを導入しようとしたところで挫折…。
いろいろ調べたり、指導者の方に聞いたりして解決しましたので、同じように迷っている人の為になればと思い、書き残してみます。そもそもSystem specとはなんぞや?
System specについて知らない人はこちらの記事が参考になると思います。
rspec-rails 3.7の新機能!System Specを使ってみた簡単に説明すると、エンドツーエンド(E2E)テストを実行するための機能です。みなさんが実際にブラウザを利用するようにボタンやリンクを押してどの画面に遷移しただとか、その画面にはある特定のHTMLタグが含まれているかどうかなどをテストすることができます。
使ってみればわかると思いますが、とてもわかりやすく便利です。ちなみに、System specはrspec-rails 3.7以降から導入されたのですが、その前はFeature specというのが使われていました。実はほとんど同じなので、Feature specで進めても良いのですが、公式で推奨されているのでSystem specを使ってみたいと思います。
System(Feature) specで使えるいろいろな機能は以下の記事を参考にしてください。
使えるRSpec入門・その4「どんなブラウザ操作も自由自在!逆引きCapybara大辞典」さらにそもそもRSpecやDockerに詳しくない方へ
RSpec→使えるRSpec入門・その1「RSpecの基本的な構文や便利な機能を理解する」
Docker→【図解】Dockerの全体像を理解する -前編-
※ Dockerがインストールされていることを前提に話を進めますので、忘れずにインストールしておいてくだい。では、本題に入りましょう。
ちなみに、一から作成していくので、すでにRailsでDocker環境を持っている人は適宜置き換えて試してみてください。docker-composeを用いてRails Projectを作成する
完成版をおいておきます。
https://github.com/tegnike/system_specではまず、以下のファイルを作成しましょう。
- Dockerfile
- docker-compose.yml
- Gemfile
- Gemfile.lock
RailsのDocker環境作成に関しては以下の記事を参考にしています。
docker-compose で Rails の開発環境を作るDockerfileFROM ruby:2.4.2 RUN apt-get update -qq && apt-get install -y build-essential libpq-dev postgresql-client unzip RUN sh -c 'wget -q -O - https://dl-ssl.google.com/linux/linux_signing_key.pub | apt-key add -' && \ sh -c 'echo "deb [arch=amd64] http://dl.google.com/linux/chrome/deb/ stable main" >> /etc/apt/sources.list.d/google-chrome.list' && \ apt-get update && apt-get install -y google-chrome-stable RUN mkdir /app WORKDIR /tmp COPY Gemfile Gemfile COPY Gemfile.lock Gemfile.lock RUN bundle install ADD . /app WORKDIR /appSystem specではGoogle Chromをインストールしておく必要があるので、3行目のRUNでそれを実行しています。
docker-compose.ymldb: image: postgres expose: - "5432" web: build: . command: bundle exec rails s -p 3000 -b '0.0.0.0' volumes: - .:/app ports: - "3000:3000" links: - dbGemfilesource 'https://rubygems.org' gem 'rails', '~> 5.1.4'Gemfile.lockGemfile.lockは中身は空のまま、ファイルだけ作成ください。
ちなみに、Dockerfileの3行目のRUNでsystem specに必要なGoogle Chromeをwebコンテナにインストールしています。これらのファイルが用意できたら、それらがあるフォルダで以下のコマンドを実行してください。
$ docker-compose run web rails new . --force --database=postgresql --skip-testこのコマンドを実行することで、docker-compose.ymlに定義したwebコンテナを一時起動し、Rails Projectを作成することができます。
フォルダ下にRailsのファイルたちが追加されていますね。
では、更新されたGemfileにrspecでのテストに必要な下記のgemを追記しましょう。Gemfilegem 'therubyracer', platforms: :ruby # 先頭の"#"を消す ### 省略 ### group :development, :test do # Call 'byebug' anywhere in the code to stop execution and get a debugger console | gem 'byebug', platforms: [:mri, :mingw, :x64_mingw] # 元から書いてあります gem 'rspec-rails' # 追記 end group :test do gem 'capybara' # 追記 gem 'selenium-webdriver' # 追記 gem 'webdrivers' # 追記 gem 'launchy', '~> 2.4.3' # 追記 endでは、更新したGemfileをimageに含めるためにbuildを実行しましょう。
$ docker-compose build次に、database.ymlを編集します。
今回はデータベースにpostgresqlを使用するので、以下のように設定してください。config/database.ymldefault: &default adapter: postgresql encoding: unicode username: postgres # 追記 host: db # 追記 password: # 追記以下のコマンドでデータベースを作成します。
$ docker-compose run web rake db:createこれで一通り準備が整いましたので、下記のコマンドでコンテナを立ち上げてから
localhost:3000にアクセスすれば、お馴染みのYay! You're on Rails!を見ることができます。$ docker-compose up -dSystem specを導入する
では、System specを導入していきましょう。
まず、下記のコマンドを実行することでRSpecの設定ファイルであるspec_helper.rbとrails_helper.rbの2つのファイルが作成されます。$ docker-compose run web rails generate rspec:installそして
rails_helper.rbは以下のように修正してください。spec/rails_helper.rb# This file is copied to spec/ when you run 'rails generate rspec:install' require 'spec_helper' ENV['RAILS_ENV'] = 'test' require File.expand_path('../../config/environment', __FILE__) # Prevent database truncation if the environment is production abort("The Rails environment is running in production mode!") if Rails.env.production? require 'rspec/rails' require 'capybara/rspec' # Add additional requires below this line. Rails is not loaded until this point! # Requires supporting ruby files with custom matchers and macros, etc, in # spec/support/ and its subdirectories. Files matching `spec/**/*_spec.rb` are # run as spec files by default. This means that files in spec/support that end # in _spec.rb will both be required and run as specs, causing the specs to be # run twice. It is recommended that you do not name files matching this glob to # end with _spec.rb. You can configure this pattern with the --pattern # option on the command line or in ~/.rspec, .rspec or `.rspec-local`. # # The following line is provided for convenience purposes. It has the downside # of increasing the boot-up time by auto-requiring all files in the support # directory. Alternatively, in the individual `*_spec.rb` files, manually # require only the support files necessary. # Dir[Rails.root.join('spec', 'support', '**', '*.rb')].each { |f| require f } # Checks for pending migrations and applies them before tests are run. # If you are not using ActiveRecord, you can remove these lines. begin ActiveRecord::Migration.maintain_test_schema! rescue ActiveRecord::PendingMigrationError => e puts e.to_s.strip exit 1 end RSpec.configure do |config| # Remove this line if you're not using ActiveRecord or ActiveRecord fixtures config.fixture_path = "#{::Rails.root}/spec/fixtures" # If you're not using ActiveRecord, or you'd prefer not to run each of your # examples within a transaction, remove the following line or assign false # instead of true. config.use_transactional_fixtures = true # RSpec Rails can automatically mix in different behaviours to your tests # based on their file location, for example enabling you to call `get` and # `post` in specs under `spec/controllers`. # # You can disable this behaviour by removing the line below, and instead # explicitly tag your specs with their type, e.g.: # # RSpec.describe UsersController, :type => :controller do # # ... # end # # The different available types are documented in the features, such as in # https://relishapp.com/rspec/rspec-rails/docs config.infer_spec_type_from_file_location! # Filter lines from Rails gems in backtraces. config.filter_rails_from_backtrace! # arbitrary gems may also be filtered via: # config.filter_gems_from_backtrace("gem name") config.before(:each, type: :system) do driven_by :selenium_chrome end config.before(:each, type: :system, js: true) do driven_by :selenium_chrome end endもう1つ、
capybara.rbというファイルを作ります。これはまだ作成されていないので、specフォルダの下にsupportファイルを作り、その下に配置しましょう。spec/support/capybara.rbCapybara.default_driver = :selenium_chrome Capybara.javascript_driver = :selenium_chrome Capybara.register_driver :selenium_chrome do |app| options = ::Selenium::WebDriver::Chrome::Options.new options.add_argument('--headless') options.add_argument('--no-sandbox') options.add_argument('--disable-gpu') options.add_argument('--window-size=1400,1400') Capybara::Selenium::Driver.new(app, browser: :chrome, options: options) endこれでSystem specの設定は完了です。
System specでテストしてみよう!
せっかく作ったので試してみたいのですが、今のままだとモデルがなくてテストができないので、
scaffoldコマンドでUserモデルを作成します。ついでにマイグレーションも実行しましょう。※ ちなみに今回はSystem specが動くかどうか確認することを目的としていますので、複雑なテストは書きません。
$ docker-compose run web bin/rails g scaffold User name:string
$ docker-compose run web rake db:migrate
specフォルダ下にSystem spec用のフォルダを作成し、そこに
users_spec.rbを作成します。spec/system/users_spec.rbrequire 'rails_helper' RSpec.describe 'Users', type: :system, js: true do before do @user = User.create!(name: 'Test User') end it 'ユーザ名が表示されること' do visit user_path(@user) expect(page).to have_content @user.name end endでは、テストを実行してみましょう。
$ docker-compose up
$ docker-compose run web rspec spec/system/users_spec.rb
Starting system_spec_db_1 ... done
.

Finished in 5.18 seconds (files took 4.95 seconds to load)
1 example, 0 failures
はい、問題なく成功しました!
まとめ
この記事では、System Specを使えるDocker環境の構築を説明しました。
冒頭でも説明しましたが、Feature Specとほとんど一緒のSystem Specですが、確実に上位互換なので導入しておいて損はないでしょう(公式でも推奨されていますしね)。では、また。
参考
- 投稿日:2019-08-20T21:35:09+09:00
なぜBigDecimalでは高い精度で10進数を扱えるのか
- 「Floatだと丸め誤差が発生するから10進数を扱う精度が低い」
- 「BigDecimalだと丸め誤差が発生しないから10進数を扱う精度が高い」
という話に触れたのだが、その理由がぱっと理解できなかったので、ちょっと整理して考えてみた。((Rubyに限ったトピックではないが、ここではRubyをベースにした言葉をつかう。))
(前提)10進数の整数は2進数で正確に表現できる
10進数の1も10000000も-12345も、2進数で正確に表現できる。((データの固定長による制約とかはここでは無視する。))
10進数の小数はFloatでは正確に表現できない
10進数の0.1(0d0.1と表記する)を数直線上で表すと以下。
0  0d0.1                                  1
|----|------------------------------------|
一方、Floatがつかう目盛りは以下(2進数の0.1を0b0.1と表記する)。
0         0b0.01                            1
|-----|-----|----------|--------------------|
   0b0.001           0b0.1
2進数の世界からみると0d0.1というのはめちゃくちゃ曖昧な値なので、なんとかして2進数の組み合わせで表現しようとする(無限小数)。
しかしバイト数には制約があるので一定以下の桁の情報は捨てられる。
よって2進数では0d0.1を不正確にしか表現できない。
10進数の小数はBigDecimalでは正確に表現できる
BigDecimalでは、10進数の小数を直接2進数の小数で表現しようとはせず、以下の流れを経る。
0d0.1を表現したい
↓
それってつまり1*(10**-1)
↓
基数部の1と指数部の-1という情報によって0d0.1を表現する
一般化すると以下。
10進数の小数を表現したい
↓
それってつまりa*(10**b)  (10進数の小数は必ず整数a,bによりこの形で表現できる)
↓
基数部のa(整数)と指数部のb(整数)という情報によって10進数の小数を表現する
a*(10**b)に言い換える時点で、何も情報は失われていない。そして基数部と指数部の整数は、コンピュータ上で2進数で処理されたとしても、何も情報は失われない。
(なぜなら上述したとおり「10進数の整数は2進数でも正確に表現できる」から。)
よってBigDecimalでは10進数の小数を正確に表現することができる。
- 投稿日:2019-08-20T17:38:27+09:00
rubyのバージョンを上げようとしたら最新バージョンが表示されない
- 投稿日:2019-08-20T17:17:30+09:00
Ruby on Railsで'require': No such file to load -- ***_helper.rb(LoadError)と言われるとき
状況
ローカルでRuby on Rails Tutorialをやってる時に遭遇。
- チュートリアル通りのコマンド
rails generate controller Relationships後にテストを書き込んでrails tでエラー。- ファイル(***_helper.rb)は存在する。
- ファイルの名前を変えると動く。元に戻すと同じエラー。
エラーメッセージ
一部抜粋
~/.rvm/gems/ruby-2.6.3/gems/bootsnap-1.4.4/lib/bootsnap/load_path_cache/core_ext/kernel_require.rb:33:in `require': No such file to load -- relationships_helper.rb (LoadError)~/.rvm/gems/ruby-2.6.3/gems/actionpack-5.2.3/lib/abstract_controller/helpers.rb:151:in `rescue in block in modules_for_helpers': Missing helper file helpers/relationships_helper.rb (AbstractController::Helpers::MissingHelperError)結論
bundle update追記
Gemfileの
gem 'rails', '~> 5.2.3'の部分を下記に変更
gem 'rails'その後、
bundle update雑記
なんでファイル読み込んでくれなかったのか?謎
追記
bundle updateだけでは治らない。
- boosnap-load-path-cache,bootsnap-compile-cacheを削除しても治らない。
rails generate controller testgenのすぐ直後にrails tで同じエラー,前回治ったbundle updateで治らない。 → 別の要因(時間経過?何らかのversionのアップデート?模索中)結論に追記
- railsを最新版にしたら治った。
rails generate controller testgenのすぐ直後にrails tでもエラー起きない。- バージョンの互換性部分に問題があった?バージョン管理を適当にしていたから起きたかも。
- 投稿日:2019-08-20T15:59:43+09:00
CircleCIで複数のイメージを利用する場合の注意点
発生した事象
CICDフローにおいて、CircleCi上でrspecを実行するために準備として
rails db:createを実行した。
しかし、実行中にDB接続エラーが発生した。結論
CircleCIのジョブ実行において複数のイメージ指定する場合、DBの接続ホスト指定は
localhostを指定ではなく127.0.0.1を使おう。失敗時のエラーメッセージ
rails aborted!
Mysql2::Error::ConnectionError: Can't connect to local MySQL server through socket '/var/run/mysqld/mysqld.sock' (2 "No such file or directory")
良くあるrailsからDBへの接続エラーですね。
ローカルのmysqlを参照しにいこうとしている様子。現状の設定見直し
接続エラーなので、DBの接続情報の設定を見直してみる。
Circleciの
config.yml接続コマンドや環境変数や
RAILS_ENVも適切で問題なさそう。Ruby on Railsで利用している
database.yml設定ファイル上に、DB接続ホスト、ユーザ名、DB名が指定してあるため接続には問題なさそう。
調査
調査を進めると次の記事にヒットしました。
また、各コンテナ間の連携には localhost を使うことはできません。 127.0.0.1 を指定するようにすることと、Rails であれば config/database.yml で以下のような記述を追加することを忘れないようにしましょう。
https://tech.smarthr.jp/entry/2017/07/12/073000対応
上記の記事より、本件も同一事象と仮定しrailsで指定しているDBのhost指定を、
localhostではなく、127.0.0.1に変更し動作確認。jobの確認
#!/bin/bash -eo pipefail
bundle exec rails db:create
bundle exec rails db:migrate
bundle exec rspec
Created database 'hoge'
(中略)
Finished in 0.00373 seconds (files took 0.87988 seconds to load)
実行も完了し、ジョブも正常終了したのでOK!。
- 投稿日:2019-08-20T14:06:45+09:00
Windows で Ruby の 環境構築 を する
目的
- WindowsでRubyの開発環境を整えられるようにする。
この記事のターゲット
- WindowsにRubyの開発環境を立ち上げたい方
- Rubyのローカル開発環境の立ち上げがうまくいかず、あきらめたくなってきた方
ローカル開発環境で必要なもの
- MSYS2
- Ruby
MSYS2のインストール
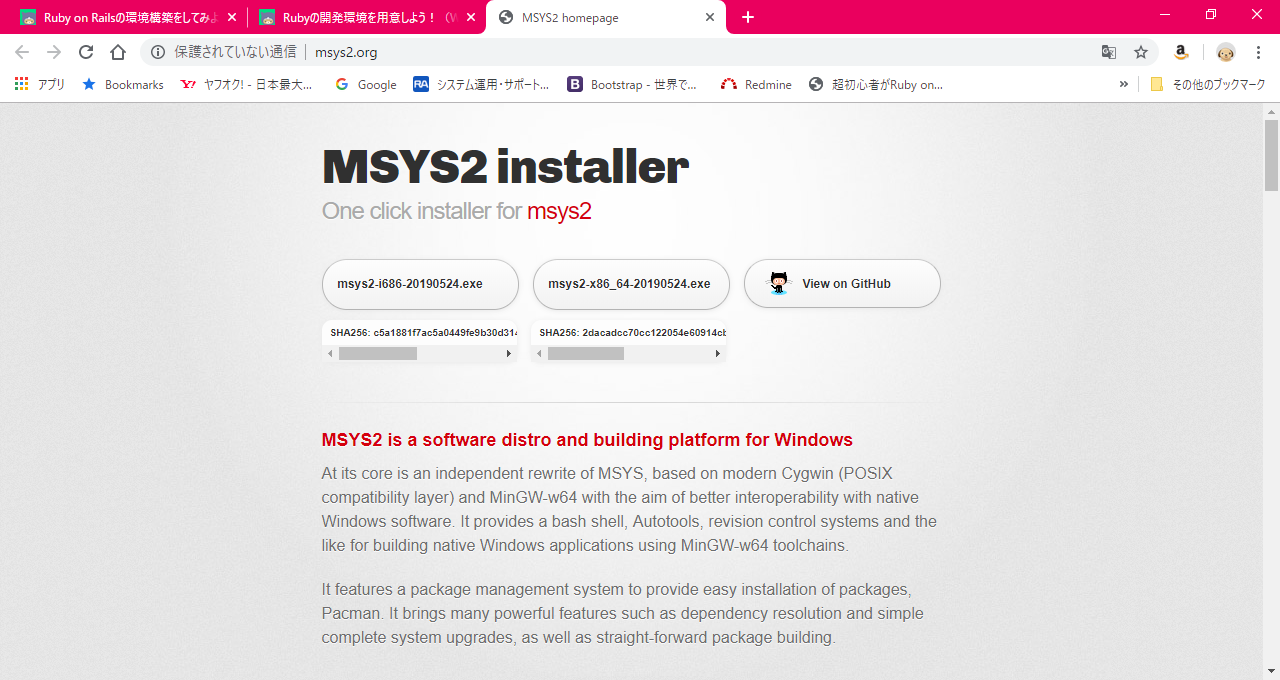
- 下記サイトにアクセス
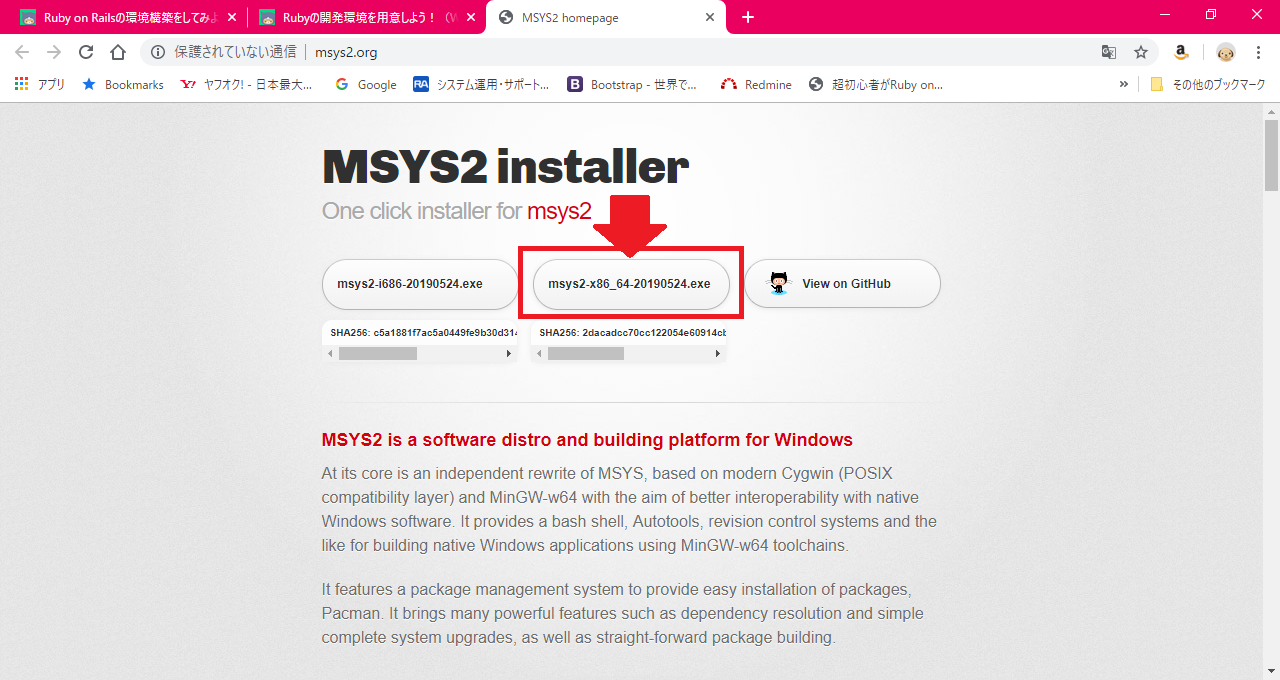
http://www.msys2.org/

- 画像の部分をクリック

- ダウンロードされる

- ダウンロードされたインストーラーを開く

- インストーラが開いたら「次へ」をクリック

- お好みのインストール先を選んで「次へ」をクリック

- ショートカットの設定は特にいじらず「次へ」をクリック
- インストールが始まる
- この画面出たらOK完了を押す

- 黒い画面でたら×でけす

Rubyのインストール
- 下記サイトにアクセス
https://github.com/oneclick/rubyinstaller2/releases/tag/rubyinstaller-2.5.1-1


- 画像の
rubyinstaller-2.5.1-1-x64.exeをクリック

- ダウンロード始まる

- ダウンロードされたインストーラを開く

I accept the Licenseを選択して「Next」をクリック
- インストール場所を聞かれるからお好みの場所選んで「Next」をクリック

- インストールが始まる

- 終わるとこの画面になるそのままFinishクリック

- 勝手にプロンプト開くので
3を入力してEnterを押下
- インストールが完了すると下記の画面になる

- プロンプトの画面を選択してEnterキーを押下するとプロンプトが消える
- 別のコマンドプロンプトを起動して
ruby -v打つ。実行下記の様になればOK
- PCを再起動する
まとめ
- WindowsでRubyの開発環境を構築することができた。
- なんでか最新のRubyだとインストールがうまくいかなかったためインストール実績のある2.5.1を選択した。
- 投稿日:2019-08-20T14:06:33+09:00
Rails 6.0.0 のAction Textを使ってみた(Herokuにデプロイするまで)
Rails6がついに来た!
というわけで,主要機能の1つ,Action Textを早速試してみました。
開発環境
- macOS Mojave 10.14.5
- Ruby 2.6.3
- Rails 6.0.0
- Yern 1.17.3
参考
手順
1. アプリの準備
YarnとWebpackが必要です。- MySQLを指定していますが,お好みで。
コンソール$ brew install yarn $ rails new action_text_sample -d mysql --webpack
Rails 6とimage_processingをインストールするためGemfileを編集します。
gem 'actiontext'はRails 6に標準実装されているので不要coffee-railsを5.0.0にしないと警告が出るので一応Gemfile- gem 'rails' - gem 'coffee-rails' + gem 'rails', '~> 6.0.0' + gem 'coffee-rails', '~> 5.0' + gem 'image_processing', '~> 1.9.3' - gem 'tzinfo-data', platforms: [:mingw, :mswin, :x64_mingw, :jruby]
bundle installがエラーになるので,bundle updateを使用Action Textをインストール- この記事では
scaffoldでサボりますが,お好みで。コンソール$ bundle update $ rails db:create $ rails g scaffold Post title:string $ rails action_text:install $ rails db:migrate2. Action Textの導入
- WebpackでJavaScriptを利用するためにタグを変更します。
(この作業をとばすとActionTextが反映されません)app/views/layouts/application.html.erb- <%= javascript_include_tag 'application', 'data-turbolinks-track': 'reload' %> + <%= javascript_pack_tag 'application' %>
- 上記作業でDELETEリクエストを送信できなくなる(削除ができなくなる)ので,
rails-ujsを追加します。コンソール$ yarn add rails-ujsapp/javascript/packs/application.js+ require("rails-ujs").start() require("trix") require("@rails/actiontext")
- リッチテキストエディタ導入のため,ビューなどの編集をします
config/routes.rbRails.application.routes.draw do root 'posts#index' # 追加 resources :posts endapp/models/posts.rbclass Article < ApplicationRecord has_rich_text :content # 追加 endapp/controllers/posts_controller.rbclass PostsController < ApplicationController private (略) def post_params params.require(:post).permit(:title, :content) # :contentを追加 end endapp/views/posts/_form.html.erb<div class="field"> <%= form.label :title %> <%= form.text_field :title %> </div> <!-- 以下を追加 --> <div class="field"> <%= form.label :content %> <%= form.rich_text_area :content %> </div> <!-- ここまで --> <div class="actions"> <%= form.submit %> </div> <% end %>app/views/posts/index.html<td><%= link_to 'Destroy', post, method: :delete, data: { confirm: 'Are you sure?' } %></td> </tr> <!-- 以下を追加 --> <tr> <td colspan="4"><%= post.content %></td> </tr> <!-- ここまで --> <% end %> </tbody> </table>app/views/posts/show.html<p> <strong>Title:</strong> <%= @post.title %> <%= @post.content %> # 追加 </p>
http://localhost:3000/posts/newにアクセスすると……こんな感じの投稿ができます。もちろん投稿一覧にも反映されます!
3. Herokuにデプロイする際の注意点
基本手順は以前の記事などを参照下さい。
画像ファイルは時間経過やデプロイした際に消去されてしまうので,S3などを使用する必要があります。
Herokuにデプロイする際,Rails 6.0.0の不具合なのか次のエラーが発生します。
エラー内容(略) remote: rake aborted! remote: ArgumentError: Missing `secret_key_base` for 'production' environment, set this string with `rails credentials:edit` (略) remote: ! remote: ! Precompiling assets failed. remote: ! (略)次のコマンドで,Herokuに環境変数をあらかじめ追加することでデプロイできるようになります。
コンソール$ heroku config:set SECRET_KEY_BASE=`ruby -rsecurerandom -e "puts SecureRandom.hex(64)"`ところがもう一つ問題が……
jsやcssが404エラーとなり反映されない不具合が出ています。この問題は伊藤さんの記事に書かれているように,Herokuへの環境変数追加で解消できます。
コンソール$ heroku config:set RAILS_SERVE_STATIC_FILES=1
- 投稿日:2019-08-20T14:03:26+09:00
rbenvの使い方
rbenv(アールビーエンブ)はRubyのバージョンを管理するgem
rbenv install version
で指定したversionのrubyをinstallしている。
現在インストールしたrubyのversionはrbenv versionsで確認できる。
現在反映されているrubyのversionはrbenv versionで確認できる。
rbenv local version
でrbenv install versionでinstallしたRubyの設定をlocal環境に反映させれる。
例)
.ruby-versionがバージョンを管理している。中身を除くと、あら単純!!
以下おまけ
rbenvでrubyをインストールするとbundlerがないので、gem install bundlerをする必要がある。その後、
bundle installを実行した。
もしかするとmysqlのインストールでエラーになるかも、、、
下記のを参考にした。
ファーストトライ
セカンドトライ
サードトライ
- 投稿日:2019-08-20T12:34:41+09:00
Rails6 のちょい足しな新機能を試す67(text size 編)
はじめに
Rails 6 に追加されそうな新機能を試す第67段。 今回は、
text size編です。
Rails 6 では、 ActiveRecord のマイグレーションファイルのtextに:sizeオプションを指定できるようになりました。Ruby 2.6.3, Rails 6.0.0.rc1, MySQL 8.0.16, PostgreSQL 10.7 で確認しました。Rails 6.0.0.rc1 は
gem install rails --prereleaseでインストールできます。(Rails 6.0.0 がリリースされましたが、 確認当時は、 Rails 6.0.0.rc1 が最新でした。悪しからず
)
$ rails --version
Rails 6.0.0.rc1
なんとなく手抜きで、 モデルを1つ作って確認してみます。
プロジェクトを作る
rails new rails6_0_0rc1
cd rails6_0_0rc1
model を作る
User モデルを作ります。
bin/rails g model User nameマイグレーションファイルを編集する
users テーブルの マイグレーションファイルに text 型のカラムを追加します。
db/migrate/20190726231951_create_users.rbclass CreateUsers < ActiveRecord::Migration[6.0] def change create_table :users do |t| t.string :name t.text :profile0 t.text :profile1, limit: 255 t.text :profile2, limit: 16777215 t.text :profile3, limit: 4294967295 t.text :profile4, size: :tiny t.text :profile5, size: :medium t.text :profile6, size: :long t.timestamps end end endMySQLを使ってマイグレーションを実行する
データベースに MySQLを使い、マイグレーションを実行します。
$ bin/rails db:create db:migrateschema.rb を確認する
schema.rb では、以下のようになります。
db/schema.rbcreate_table "users", options: "ENGINE=InnoDB DEFAULT CHARSET=utf8mb4 COLLATE=utf8mb4_0900_ai_ci", force: :cascade do |t| t.string "name" t.text "profile0" t.text "profile1", size: :tiny t.text "profile2", size: :medium t.text "profile3", size: :long t.text "profile4", size: :tiny t.text "profile5", size: :medium t.text "profile6", size: :long t.datetime "created_at", precision: 6, null: false t.datetime "updated_at", precision: 6, null: false endmysql で確認する
mysqlで確認すると以下のようになっていました。mysql> show create table users\G *************************** 1. row *************************** Table: users Create Table: CREATE TABLE `users` ( `id` bigint(20) NOT NULL AUTO_INCREMENT, `name` varchar(255) DEFAULT NULL, `profile0` text, `profile1` tinytext, `profile2` mediumtext, `profile3` longtext, `profile4` tinytext, `profile5` mediumtext, `profile6` longtext, `created_at` datetime(6) NOT NULL, `updated_at` datetime(6) NOT NULL, PRIMARY KEY (`id`) ) ENGINE=InnoDB DEFAULT CHARSET=utf8mb4 COLLATE=utf8mb4_0900_ai_ci |PostgreSQL では
limit: 4294967295を指定するとエラーになります。ArgumentError: No text type has byte size 4294967295. The limit on text can be at most 1GB - 1byte.ということで、以下のように修正して
db/migrate/20190726231951_create_users.rbclass CreateUsers < ActiveRecord::Migration[6.0] def change create_table :users do |t| t.string :name t.text :profile0 t.text :profile1, limit: 255 t.text :profile2, limit: 16777215 t.text :profile3 # , limit: 4294967295 t.text :profile4, size: :tiny t.text :profile5, size: :medium t.text :profile6, size: :long t.timestamps end end end試してみると
schema.rbは以下のようになります。db/schema.rb... create_table "users", force: :cascade do |t| t.string "name" t.text "profile0" t.text "profile1" t.text "profile2" t.text "profile3" t.text "profile4" t.text "profile5" t.text "profile6" t.datetime "created_at", precision: 6, null: false t.datetime "updated_at", precision: 6, null: false end ...試したソース
試したソースは以下にあります。
https://github.com/suketa/rails6_0_0rc1/tree/try067_text_size参考情報


