- 投稿日:2019-03-27T22:55:36+09:00
タブレットアプリとWeb上の両立プロジェクト開発(一)Node.jsをインストールします
タブレットアプリというのは、例えば、iPhoneやiPadなどの端末上で稼働しているアプリを指します。Webプロジェクトというのは、Webブラウザーで見ているウェブサイトを指します。
タブレットアプリの特徴は、随時にバックエンドのサーバに繋がりをしなくて、ネットワークがない場合はタブレットが独立に動いておいて、ネットワーク例えばWi-Fiが繋がった場合にはサーバに接続してタブレットのデータをサーバに同期しようとすることがあります。
ウェブサイトのほうも、頻繁にサーバへ接続することを下げる期待を持っていることがあります。
こういうことを実現するために、JavaScriptをメインにしているプロジェクトを作りたいです。
本章では、JavaScriptプロジェクトを作成する前の準備の一つとして、Node.jsをインストルします。npmインストル
npmとは、Node.js用に作られたライブラリやパッケージを管理する為のパッケージ管理ツールです。
nnpmをインストルする前に、Nodebrewをインストルすることが必要です。
Nodebrewは、Node.jsのバージョン管理ツールにあたります。#npmをインストル brew install nodebrew #Node.jsとnpmのインストール nodebrew install-binary latestもし、以下のエラーが出たら、下記のコマンドを実行して、ディレクトリを作成して、npmインストルを再度行います。
curl: (23) Failed writing body (0 != 941)
download failed: https://nodejs.org/dist/v7.10.0/node-v7.10.0-darwin-x64.tar.gzmkdir -p ~/.nodebrew/src nodebrew install-binary latest #以下が表示 Fetching: https://nodejs.org/dist/v11.12.0/node-v11.12.0-darwin-x64.tar.gz ######################################################################## 100.0% Installed successfully上記のコマンドで最新版がインストールされます。
Node.jsを有効にします。#バージョンの一覧を確認 nodebrew list #バージョンの一覧が表示 v11.12.0 current: none #current: noneとなっているため、必要なバージョンを有効化する。 nodebrew use v11.12.0 #バージョンの一覧を再確認 nodebrew list #以下が表示 v11.12.0 current: v11.12.0nodebrewが使いやすいように環境パスを通します。
echo 'export PATH=$HOME/.nodebrew/current/bin:$PATH' >> ~/.bash_profile
source ~/.bash_profile
#node.jsがインストル済かどうかを確認
node -v
#以下が表示
v11.12.0
#npmがインストル済かどうかを確認
npm -v
#以下が表示
6.7.0
上記ような各バージョーンが表示されたらNode.jsのインストールが終わりします。
- 投稿日:2019-03-27T22:55:36+09:00
タブレットとWeb両立プロジェクト開発(一)Node.jsをインストールします
タブレットプロジェクトというのは、例えば、iPhoneやiPadなどの端末上で稼働しているアプリを指します。Webプロジェクトというのは、Webブラウザーで見ているウェブサイトを指します。
タブレットアプリの特徴は、随時にバックエンドのサーバに繋がりをしなくて、ネットワークがない場合はタブレットが独立に動いておいて、ネットワーク例えばWi-Fiが繋がった場合にはサーバに接続してタブレットのデータをサーバに同期しようとすることがあります。
ウェブサイトのほうも、頻繁にサーバへ接続することを下げる期待を持っていることがあります。
こういうことを実現するために、JavaScriptをメインにしているプロジェクトを作りたいです。
本章では、JavaScriptプロジェクトを作成する前の準備の一つとして、Node.jsをインストルします。npmインストル
npmとは、Node.js用に作られたライブラリやパッケージを管理する為のパッケージ管理ツールです。
nnpmをインストルする前に、Nodebrewをインストルすることが必要です。
Nodebrewは、Node.jsのバージョン管理ツールにあたります。#npmをインストル brew install nodebrew #Node.jsとnpmのインストール nodebrew install-binary latestもし、以下のエラーが出たら、下記のコマンドを実行して、ディレクトリを作成して、npmインストルを再度行います。
curl: (23) Failed writing body (0 != 941)
download failed: https://nodejs.org/dist/v7.10.0/node-v7.10.0-darwin-x64.tar.gzmkdir -p ~/.nodebrew/src nodebrew install-binary latest #以下が表示 Fetching: https://nodejs.org/dist/v11.12.0/node-v11.12.0-darwin-x64.tar.gz ######################################################################## 100.0% Installed successfully上記のコマンドで最新版がインストールされます。
Node.jsを有効にします。#バージョンの一覧を確認 nodebrew list #バージョンの一覧が表示 v11.12.0 current: none #current: noneとなっているため、必要なバージョンを有効化する。 nodebrew use v11.12.0 #バージョンの一覧を再確認 nodebrew list #以下が表示 v11.12.0 current: v11.12.0nodebrewが使いやすいように環境パスを通します。
インストルした結果を確認します。echo 'export PATH=$HOME/.nodebrew/current/bin:$PATH' >> ~/.bash_profile source ~/.bash_profile #node.jsがインストル済かどうかを確認 node -v #以下が表示 v11.12.0 #npmがインストル済かどうかを確認 npm -v #以下が表示 6.7.0上記ような各バージョーンが表示されたらNode.jsのインストールが終わりします。
- 投稿日:2019-03-27T21:44:44+09:00
KubernetesとNode.jsでマイクロサービスを作成する 1/8
Node.jsとKubernetesを使い、マイクロサービスを作ってみたくなったので、このチュートリアルを作成してみました。
バグや修正した方がよい点などあれば気軽にコメントをおねがいします。本チュートリアルは以下の8章構成になっています。
- 第1章 概要
- 第2章 Tweetサービス
- 第3章 Userサービス
- 第4章 Webサービス
- 第5章 Docker
- 第6章 Kubernetes with minikube
- 第7章 Kubernetes with GCP
- 第8章 Kubernetes with AWS
第1章 概要
この章では本チュートリアルの概要について記載します。
目的
本チュートリアルは以下の目的で作成されています。
- Kubernetesを使い、実際にMicroserviceを構築することで、Kubernetesへの理解を深める
- 複数チームによる開発を考慮し、リポジトリや検証環境を構築する
- AWSのEKSとGCPのGKEを利用することで、PaaSでのKubernetes利用の知見を獲得する
作成するMicroserviceの概要
本チュートリアルではKubernetesとNode.jsを使い、TwitterライクなMicroserviceを構築します。
実装する機能としては下記になります。
- ログイン/ログアウト機能(GitHub認証)
- ツイート機能
- フォロー/アンフォロー機能
- タイムライン機能(自分 + フォローしているユーザーのツイート一覧)
構築するMicroserviceの概要図は下記のようになります。
BFF(Backend for Frontend)を採用し、Webサービスのサーバーサイドが各サービスとデータをやり取りする構成としています。
なお、Node.jsを採用した理由は下記のとおりです。
- ミドルウェアなしに単一のプロセスで起動できること
- Cloud Nativeなアプリケーションを作成する上で重要です
- なるべくメジャーな言語であること
- チュートリアル読者の実装ハードルを下げるため、各サービスとも共通した言語にしたい
各サービスについて
以下では、本チュートリアルで作成する3つのマイクロサービスについて説明します。
Webサービス
フロントエンド + BFFのサービスです。
ここでは、BFFはフロントエンドのチームが所有するものとしています。
GitHubを利用したOAuth2.0による認証機能を持ちます。Userサービス
ユーザーやフォロー関係を扱うサービスです。
REST APIを各サービスへ提供します。Tweetサービス
ツイートを扱うサービスです。
REST APIを各サービスへ提供します。採用技術
本チュートリアルで作成するサンプルにおいて使用する主要な技術を列挙しておきます。
詳細は各サービスの章で説明します。アーキテクチャ系
- Microservice
- 全体のアーキテクチャとして採用
- BFF(Backend for Frontend)
- フロントエンドと各サービスのAPI呼び出しパターンとして採用
- REST API
- サービス間通信のI/Fとして採用
- MongoDB
- NoSQLデータベース
- Userサービス、Tweetサービスのデータベースとして採用
実装系
- Node.js
- 今回は全サービスの言語として採用
- もちろん、Microserviceなので、各サービスで好きな言語を使用できる
- Nuxt.js
- Vue.jsを利用したSPA + SSRフレームワーク
- WebサービスでUIフレームワークとして採用
- Vuetify.js
- Vue.js向けのマテリアルデザインライブラリ
- UIの見た目をそれっぽくするためにNuxt.jsに組み込んで利用する
- Express.js
- Node.js製サーバーサイドのデファクトスタンダード
- WebサービスのBFF部分やUserサービス、TweetサービスのREST APIサーバーとして利用
- mongoose
- Node.jsからMongoDBを利用するためのライブラリ
- スキーマ定義も可能
第1章 まとめ
この章ではこれから作成するマイクロサービスの概要を紹介しました。
次の章からは実際に各サービスを作成していきます。次章: 第2章 Tweetサービス

- 投稿日:2019-03-27T19:45:26+09:00
Node.js&GraphQLの勉強 part1~基本操作~
GraphQLとは
簡単に言うとモダンなREST APIといったところ。
「クライアント ー REST API / GraphQL ー サーバー」のようにどちらもクライアントとサーバーの橋渡しをしている点と、HTTPメソッドで動く点は同じ。HTTPメソッドで動くということは、GraphQLもRest APIと同様にどのような言語/データベース/クライアントにも対応できるということ。Rest API との違いは、一つのエンドポイントで好きなデータを問い合わせできるという点。欲しいデータに対してその都度エンドポイントを変える必要が無く、リクエストに対してクライアント側で多様な GraphQL query なるものをくっつけてやれば、それで取得データを決定することができる。
例)
・REST API ⇒ GET/posts/123 とか GET/posts?author=3421 とか
・GraphQL ⇒ POST/graphql (w/ a graphQL query) オンリーこれはつまり以下のように言える
・REST API ⇒ エンドポイントをもとにサーバーが必要なデータを決定する
・GraphQL ⇒ GraphQL queryを利用してクライアントが必要なデータを決定するGraphQLの利点
1. 速い
GraphQL query の記述を変えればHTTPリクエスト1回で必要なデータをごっそりと取得できる ⇒ 速い2.柔軟
GraphQL query の記述を変えるだけでエンドポイントを増やさずに取得するデータの量や種類を決定できる(モバイルには少量のデータを送るとか)3.簡単
一つのエンドポイントしか管理しなくてよいからHello GraphQL
サーバー ⇒ クライアント で既存のデータを取得してみる
1 ) プロジェクトの初期化とBabelのインスト-ル
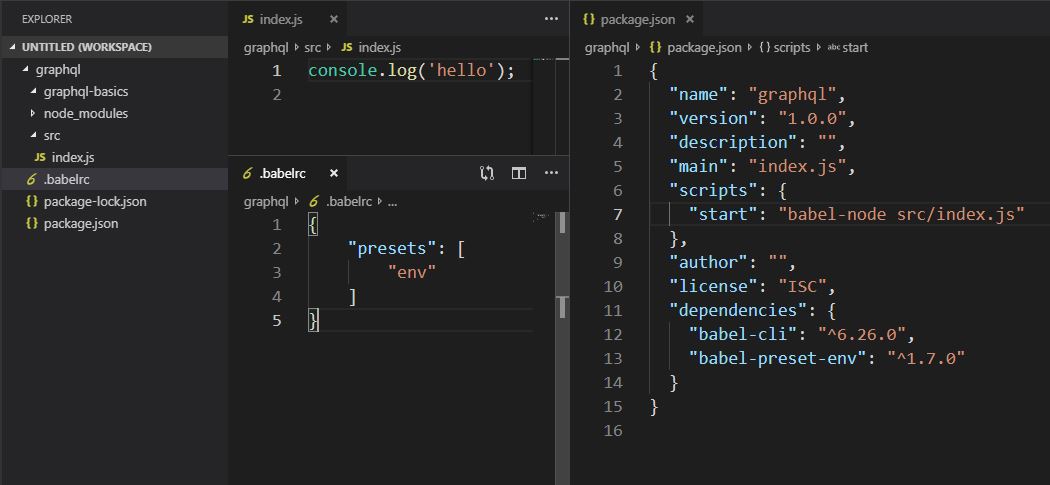
> npm init
> npm install babel-cli babel-preset-env
※ babel-cli:Babelのコンパイルに必要なコマンドを実行するのに必要
※ babel-preset-env:Babelに何をパースすべきか伝える
2 ) package.json / .babelrc / index.js を以下のように作成
3 ) 「npm run start」 でコンパイルしてBabelの動作確認> npm run start > graphql@1.0.0 start C:\Users\xxx\Desktop\GraphQL\graphql > babel-node src/index.js hello4 ) GraphQL Yogaのセットアップ
GraphQLはクエリがどのように働くかを決めているだけで実装そのものではない。
つまり、環境によってどのように実装するかを決めるのは開発者の仕事。例えるなら、JavascriptがECMAスクリプトでどのように働くかを記述されており、そのJavaScriptを動かすためにChromeはV8エンジンを、MozillaはSpiderMonkeyを実装しているといった感じ。
ということで、今回はまずGraphQLがNodejs上で動くような環境作りから始める必要があり、そのために GraphQL Yoga を使用する。GraphQL Yoga は多機能&高性能&簡単で人気。
> npm i graphql-yogaダミーのデータをサーバーに準備しつつセットアップ。
index.jsimport { GraphQLServer } from 'graphql-yoga'; // Type definition (Schema) const typeDefs = ` type Query { hello: String! name: String! } ` // Resolvers const resolvers = { Query : { hello() { return 'Hello GraphQL' }, name() { return 'Hugo' } } } const server = new GraphQLServer({ typeDefs, resolvers }) server.start(() => { console.log('server is up'); })
- typeDefs でサポートする型を定義する(スキーマの定義)
- resolvers でクエリに対する処理を定義する
- serverのインスタンスを作成する
- serverを立ち上げる
※ TypeDefsは「クエリ名: 型!」で定義する(末尾の「!」が無い場合は null 可能ということ)
5 ) 実行
>npm run start
> graphql@1.0.0 start C:\Users\xxx\Desktop\GraphQL\graphql
> babel-node src/index.js

server is up
この状態で「localhost:4000」につなぐと GraphQL の Playground につながるので、クエリの実行と Hello GraphQL を確認する。
6 ) ついでに Live Reload セットアップ
プロジェクトを保存する度にサーバーを自動でリロードするように設定する。> npm install nodemon --save-devnodemonをインストールしたら package.json の scripts を以下のように書き変える。
package.json"scripts": { "start": "nodemon src/index.js --exec babel-node" }index.jsを自動で実行しなおす、babel-nodeを通して。という意味になる。
これで「npm run start」を実行することで自動リロード状態になる。GraphQL Types
【Scalar Type】
5つのビルトイン type が存在する。
1. ID: ユニークなid
2. String: 文字列
3. Int: 整数
4. Float: 小数
5. Boolean: true/falseScalarType// Type definition (Schema) const typeDefs = ` type Query { id: ID! name: String! age: Int! height: Float! isAdult: Boolean! } `【Custom Type】
開発者が定義する type。
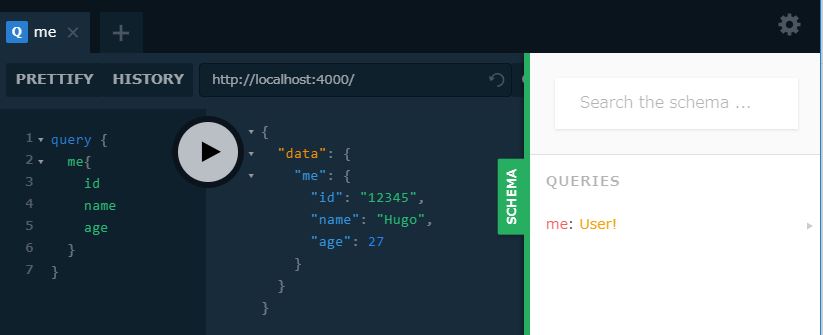
CustomType// Type definition (Schema) const typeDefs = ` type Query { me: User! } type User { id: ID! name: String! email: String! age: Int } ` // Resolvers const resolvers = { Query : { me(){ return { id: '12345', name: 'Hugo', email: 'hugo@example.com', age: 27 } } } } `※ クエリの形に注意
Resolver Operation Arguments
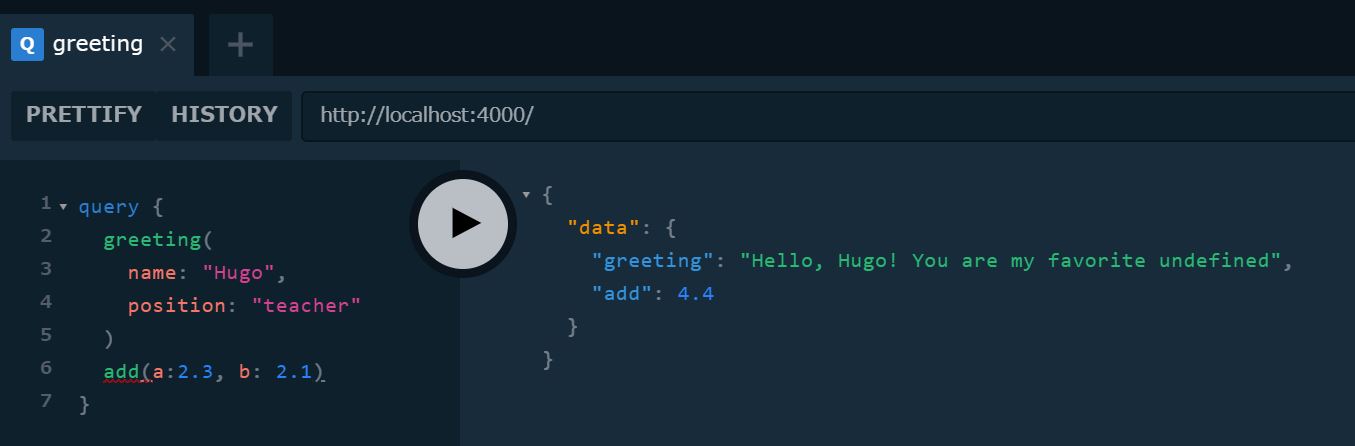
index.js// 引数に '!' が有る場合、その引数は required const typeDefs = ` type Query { greeting(name: String, position: String): String! add(a:Float!, b:Float!): Float! } ` const resolvers = { Query : { greeting(parent, args, ctx, info) { if(args.name && args.position) { return `Hello, ${args.name}! You are my favorite ${args.positino}`; } else { return 'Hello!' } }, add(parent, args){ return args.a + args.b } } }
Resolverには4つの引数が存在する
- parent : Type間にリレーションがある場合の親を指す
- args : operation arguments supplied
- ctx : contexutual data (ユーザの情報)
- info : サーバーに送信されたアクションの情報など
Array Type の扱い
【Arrays of Scalar types】
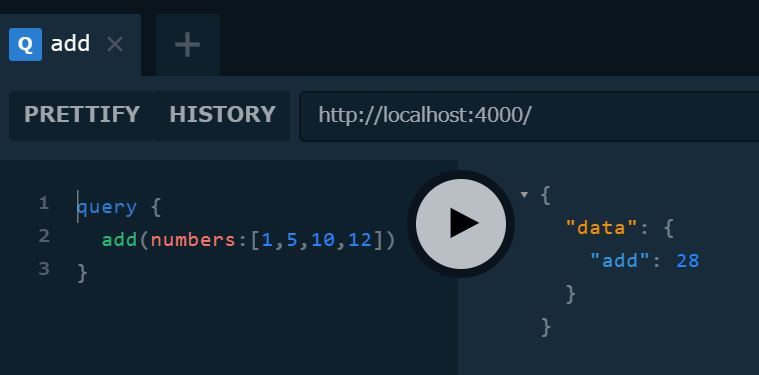
index.jsconst typeDefs = ` type Query { add(numbers: [Float!]!): Float! } ` const resolvers = { Query : { add(parent, args, ctx, info){ if(args.numbers.length === 0 ) { return 0 } return args.numbers.reduce( ( accumulator, currentValue ) => accumulator + currentValue ) } }
【Arrays of Custom types】
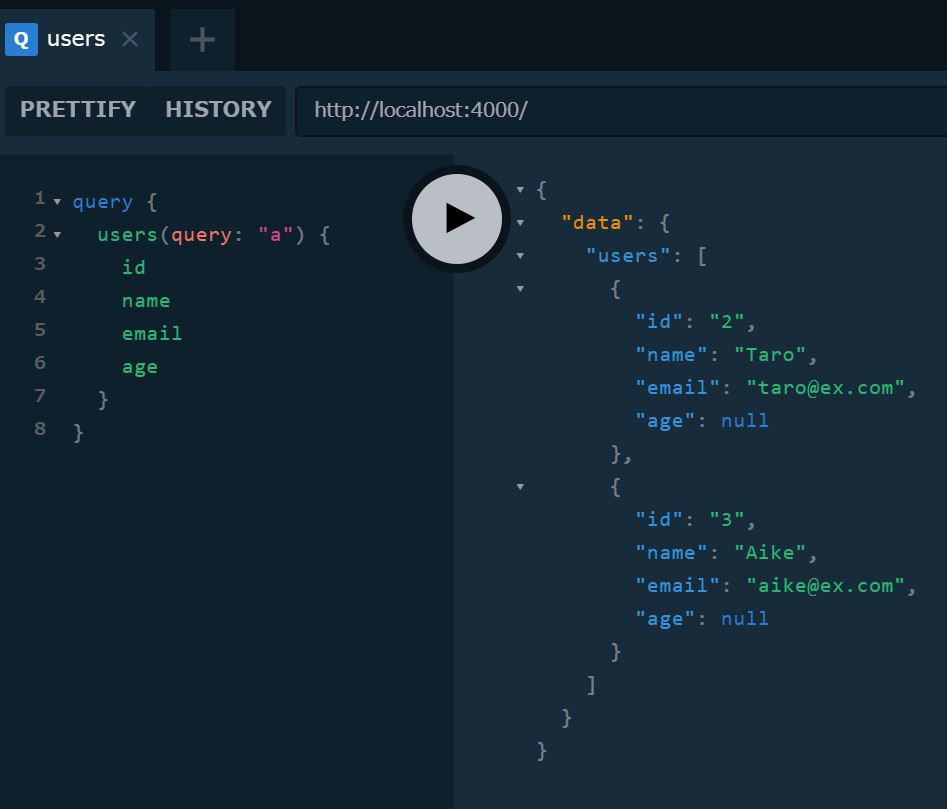
index.js// Demo data const users = [{ id: '1', name: 'Hugo', email: 'hugo@ex.com', age: 27 }, { id: '2', name: 'Taro', email: 'taro@ex.com' }, { id: '3', name: 'Aike', email: 'mike@ex.com' }] // Type definition (Schema) const typeDefs = ` type Query { users(query: String): [User!]! } type User { id: ID! name: String! email: String! age: Int } ` const resolvers = { Query : { users(parent, args, ctx, info) { if (!args.query){ return users } else { return users.filter(user => user.name.toLowerCase().includes(args.query)) } } }
Relation
Type の ID を追加することでリレーションが生まれる。
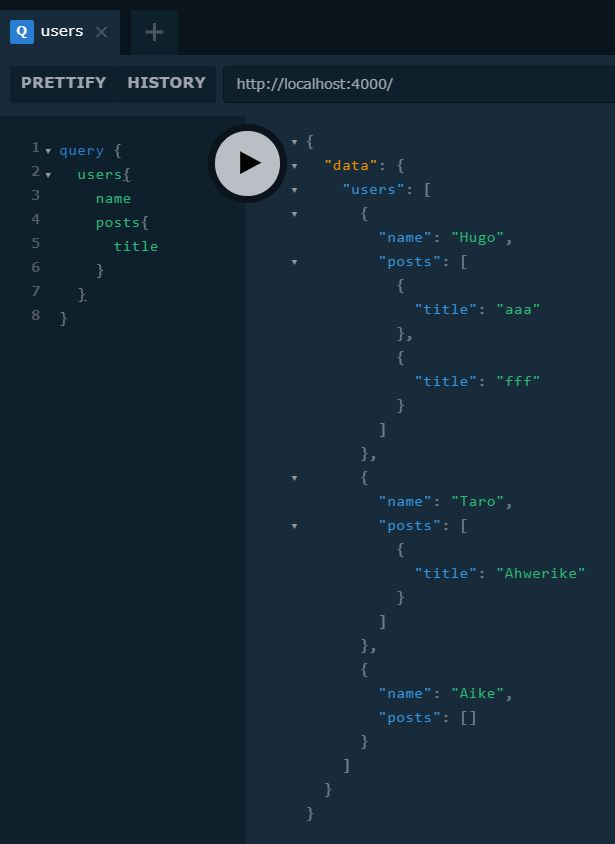
index.js// Demo data const users = [{ id: '1', name: 'Hugo', email: 'hugo@ex.com', age: 27 }, { id: '2', name: 'Taro', email: 'taro@ex.com' }, { id: '3', name: 'Aike', email: 'aike@ex.com' }] const posts = [{ id: '4', title: 'aaa', body: 'asdtfhaer', published: true, author: '1' /// 注目 }, { id: '5', title: 'fff', body: 'hrtea', published: true, author: '1' /// 注目 }, { id: '6', title: 'Ahwerike', body: 'aikreshe', published: true, author: '2' /// 注目 }] const typeDefs = ` type Query { users(query: String): [User!]! posts(query: String): [Post!]! } type User { id: ID! name: String! email: String! age: Int posts : [Post!]! /// 注目 } type Post { id: ID! title: String! body: String! published: Boolean! author: User! /// 注目 } `そして、Resolverにオブジェクトを追加することでクエリ時にリレーションをもつTypeを引きずってくることができる
index.jsconst resolvers = { Query : { users(parent, args, ctx, info) { return users // call posts() coded below (userの数だけcallする) }, posts(parent, args, ctx, info) { return posts // call author() coded below (postの数だけcallする) } }, Post: { author(parent, args, ctx, info) { return users.find(user => user.id === parent.author) // parentはPost // 自分(Post)のauthor(UserのID)とマッチするUserを返却 } }, User: { posts(parent, args, ctx, info) { return posts.filter(post => post.author === parent.id) // parentはUser // 自分(User)のIDとマッチするauthorをもつPostを返却 } } }
まとめ
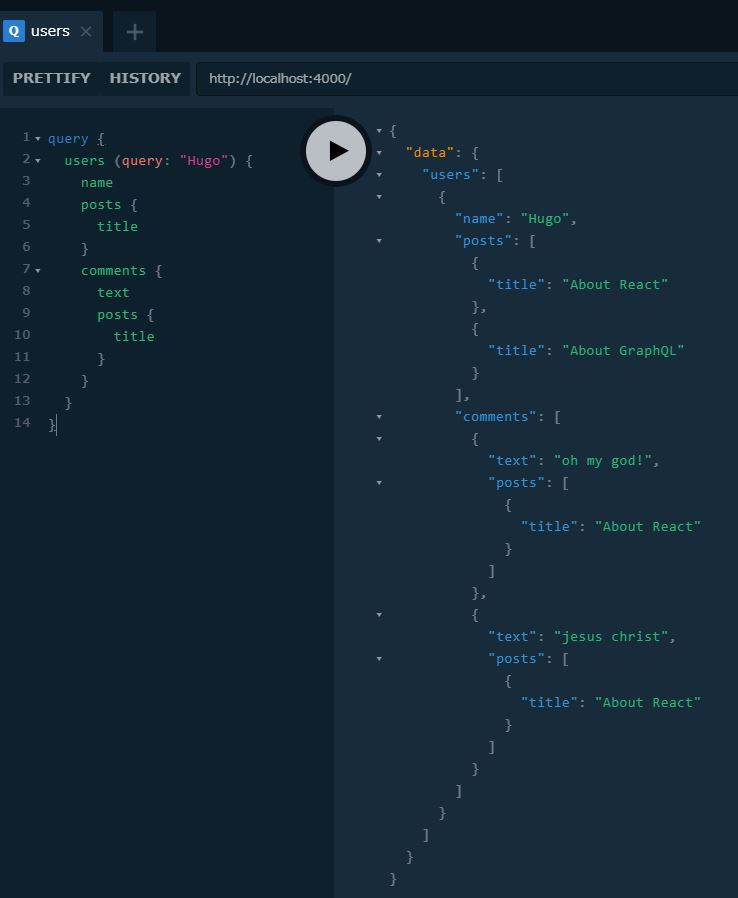
index.jsimport { GraphQLServer } from 'graphql-yoga'; // Demo data // Arrayをフィールドに持ったりなんかしないですよ const users = [{ id: '1', name: 'Hugo', email: 'hugo@ex.com', age: 27, }, { id: '2', name: 'Taro', email: 'taro@ex.com' }, { id: '3', name: 'Aike', email: 'aike@ex.com' }] const posts = [{ id: '4', title: 'About React', body: 'intriguing', published: true, author: '1' // userのID }, { id: '5', title: 'About GraphQL', body: 'Im now studying', published: true, author: '1' }, { id: '6', title: 'Money', body: 'very little', published: true, author: '2' }] const comments = [{ id: '11', text: 'oh my god!', author: '1', // userのID post: '4' // postのID }, { id: '21', text: 'jesus christ', author: '1', post: '4' }, { id: '31', text: 'goo goo dloo l doo', author: '2', post: '5' }, { id: '41', text: 'ironman', author: '3', post: '6' }] // Type definition (Schema) const typeDefs = ` type Query { users(query: String): [User!]! posts(query: String): [Post!]! comments: [Comment!]! } type User { id: ID! name: String! email: String! age: Int posts : [Post!]! comments: [Comment!]! } type Post { id: ID! title: String! body: String! published: Boolean! author: User! comments: [Comment!]! } type Comment { id: ID! text: String! author: User! posts: [Post!]! } ` // Resolvers const resolvers = { Query : { users(parent, args, ctx, info) { if (!args.query){ return users } else { return users.filter(user => user.name.toLowerCase().includes(args.query.toLowerCase())) } }, posts(parent, args, ctx, info) { if (!args.query){ return posts // call Post() coded below } else { return posts.filter(post => post.title.toLowerCase().includes(args.query)) } }, comments(parent, args, ctx, info){ return comments } }, Post: { author(parent, args, ctx, info) { return users.find(user => user.id === parent.author) // parentはPost }, comments(parent, args, ctx, info){ return comments.filter(comment => comment.post === parent.id) } }, User: { posts(parent, args, ctx, info) { return posts.filter(post => post.author === parent.id) // parentはUser }, comments(parent, args, ctx, info){ return comments.filter(comment => comment.author === parent.id) } }, Comment: { author(parent, args, ctx, info){ return users.find(user => user.id === parent.author) // parentはComment }, posts(parent, args, ctx, info){ return posts.filter(post => post.id === parent.post); } } } const server = new GraphQLServer({ typeDefs, resolvers }) server.start(() => { console.log('server is up'); })

- 投稿日:2019-03-27T19:45:26+09:00
Node.js&GraphQL part1~基本操作~
GraphQLとは
簡単に言うとモダンなREST APIといったところ。
「クライアント ー REST API / GraphQL ー サーバー」のようにどちらもクライアントとサーバーの橋渡しをしている点と、HTTPメソッドで動く点は同じ。HTTPメソッドで動くということは、GraphQLもRest APIと同様にどのような言語/データベース/クライアントにも対応できるということ。Rest API との違いは、一つのエンドポイントで好きなデータを問い合わせできるという点。欲しいデータに対してその都度エンドポイントを変える必要が無く、リクエストに対してクライアント側で多様な GraphQL query なるものをくっつけてやれば、それで取得データを決定することができる。
例)
・REST API ⇒ GET/posts/123 とか GET/posts?author=3421 とか
・GraphQL ⇒ POST/graphql (w/ a graphQL query) オンリーこれはつまり以下のように言える
・REST API ⇒ エンドポイントをもとにサーバーが必要なデータを決定する
・GraphQL ⇒ GraphQL queryを利用してクライアントが必要なデータを決定するGraphQLの利点
1. 速い
GraphQL query の記述を変えればHTTPリクエスト1回で必要なデータをごっそりと取得できる ⇒ 速い2.柔軟
GraphQL query の記述を変えるだけでエンドポイントを増やさずに取得するデータの量や種類を決定できる(モバイルには少量のデータを送るとか)3.簡単
一つのエンドポイントしか管理しなくてよいからHello GraphQL
サーバー ⇒ クライアント で既存のデータを取得してみる
1 ) プロジェクトの初期化とBabelのインスト-ル
> npm init
> npm install babel-cli babel-preset-env
※ babel-cli:Babelのコンパイルに必要なコマンドを実行するのに必要
※ babel-preset-env:Babelに何をパースすべきか伝える
2 ) package.json / .babelrc / index.js を以下のように作成
3 ) 「npm run start」 でコンパイルしてBabelの動作確認> npm run start > graphql@1.0.0 start C:\Users\xxx\Desktop\GraphQL\graphql > babel-node src/index.js hello4 ) GraphQL Yogaのセットアップ
GraphQLはクエリがどのように働くかを決めているだけで実装そのものではない。
つまり、環境によってどのように実装するかを決めるのは開発者の仕事。例えるなら、JavascriptがECMAスクリプトでどのように働くかを記述されており、そのJavaScriptを動かすためにChromeはV8エンジンを、MozillaはSpiderMonkeyを実装しているといった感じ。
ということで、今回はまずGraphQLがNodejs上で動くような環境作りから始める必要があり、そのために GraphQL Yoga を使用する。GraphQL Yoga は多機能&高性能&簡単で人気。
> npm i graphql-yogaダミーのデータをサーバーに準備しつつセットアップ。
index.jsimport { GraphQLServer } from 'graphql-yoga'; // Type definition (Schema) const typeDefs = ` type Query { hello: String! name: String! } ` // Resolvers const resolvers = { Query : { hello() { return 'Hello GraphQL' }, name() { return 'Hugo' } } } const server = new GraphQLServer({ typeDefs, resolvers }) server.start(() => { console.log('server is up'); })
- typeDefs でサポートする型を定義する(スキーマの定義)
- resolvers でクエリに対する処理を定義する
- serverのインスタンスを作成する
- serverを立ち上げる
※ TypeDefsは「クエリ名: 型!」で定義する(末尾の「!」が無い場合は null 可能ということ)
5 ) 実行
>npm run start
> graphql@1.0.0 start C:\Users\xxx\Desktop\GraphQL\graphql
> babel-node src/index.js

server is up
この状態で「localhost:4000」につなぐと GraphQL の Playground につながるので、クエリの実行と Hello GraphQL を確認する。
6 ) ついでに Live Reload セットアップ
プロジェクトを保存する度にサーバーを自動でリロードするように設定する。> npm install nodemon --save-devnodemonをインストールしたら package.json の scripts を以下のように書き変える。
package.json"scripts": { "start": "nodemon src/index.js --exec babel-node" }index.jsを自動で実行しなおす、babel-nodeを通して。という意味になる。
これで「npm run start」を実行することで自動リロード状態になる。GraphQL Types
【Scalar Type】
5つのビルトイン type が存在する。
1. ID: ユニークなid
2. String: 文字列
3. Int: 整数
4. Float: 小数
5. Boolean: true/falseScalarType// Type definition (Schema) const typeDefs = ` type Query { id: ID! name: String! age: Int! height: Float! isAdult: Boolean! } `【Custom Type】
開発者が定義する type。
CustomType// Type definition (Schema) const typeDefs = ` type Query { me: User! } type User { id: ID! name: String! email: String! age: Int } ` // Resolvers const resolvers = { Query : { me(){ return { id: '12345', name: 'Hugo', email: 'hugo@example.com', age: 27 } } } } `※ クエリの形に注意
Resolver Operation Arguments
index.js// 引数に '!' が有る場合、その引数は required const typeDefs = ` type Query { greeting(name: String, position: String): String! add(a:Float!, b:Float!): Float! } ` const resolvers = { Query : { greeting(parent, args, ctx, info) { if(args.name && args.position) { return `Hello, ${args.name}! You are my favorite ${args.positino}`; } else { return 'Hello!' } }, add(parent, args){ return args.a + args.b } } }
Resolverには4つの引数が存在する
- parent : Type間にリレーションがある場合の親を指す
- args : operation arguments supplied
- ctx : contexutual data (ユーザの情報)
- info : サーバーに送信されたアクションの情報など
Array Type の扱い
【Arrays of Scalar types】
index.jsconst typeDefs = ` type Query { add(numbers: [Float!]!): Float! } ` const resolvers = { Query : { add(parent, args, ctx, info){ if(args.numbers.length === 0 ) { return 0 } return args.numbers.reduce( ( accumulator, currentValue ) => accumulator + currentValue ) } }
【Arrays of Custom types】
index.js// Demo data const users = [{ id: '1', name: 'Hugo', email: 'hugo@ex.com', age: 27 }, { id: '2', name: 'Taro', email: 'taro@ex.com' }, { id: '3', name: 'Aike', email: 'mike@ex.com' }] // Type definition (Schema) const typeDefs = ` type Query { users(query: String): [User!]! } type User { id: ID! name: String! email: String! age: Int } ` const resolvers = { Query : { users(parent, args, ctx, info) { if (!args.query){ return users } else { return users.filter(user => user.name.toLowerCase().includes(args.query)) } } }
Relation
Type の ID を追加することでリレーションが生まれる。
index.js// Demo data const users = [{ id: '1', name: 'Hugo', email: 'hugo@ex.com', age: 27 }, { id: '2', name: 'Taro', email: 'taro@ex.com' }, { id: '3', name: 'Aike', email: 'aike@ex.com' }] const posts = [{ id: '4', title: 'aaa', body: 'asdtfhaer', published: true, author: '1' /// 注目 }, { id: '5', title: 'fff', body: 'hrtea', published: true, author: '1' /// 注目 }, { id: '6', title: 'Ahwerike', body: 'aikreshe', published: true, author: '2' /// 注目 }] const typeDefs = ` type Query { users(query: String): [User!]! posts(query: String): [Post!]! } type User { id: ID! name: String! email: String! age: Int posts : [Post!]! /// 注目 } type Post { id: ID! title: String! body: String! published: Boolean! author: User! /// 注目 } `そして、Resolverにオブジェクトを追加することでクエリ時にリレーションをもつTypeを引きずってくることができる
index.jsconst resolvers = { Query : { users(parent, args, ctx, info) { return users // call posts() coded below (userの数だけcallする) }, posts(parent, args, ctx, info) { return posts // call author() coded below (postの数だけcallする) } }, Post: { author(parent, args, ctx, info) { return users.find(user => user.id === parent.author) // parentはPost // 自分(Post)のauthor(UserのID)とマッチするUserを返却 } }, User: { posts(parent, args, ctx, info) { return posts.filter(post => post.author === parent.id) // parentはUser // 自分(User)のIDとマッチするauthorをもつPostを返却 } } }
まとめ
index.jsimport { GraphQLServer } from 'graphql-yoga'; // Demo data // Arrayをフィールドに持ったりなんかしないですよ const users = [{ id: '1', name: 'Hugo', email: 'hugo@ex.com', age: 27, }, { id: '2', name: 'Taro', email: 'taro@ex.com' }, { id: '3', name: 'Aike', email: 'aike@ex.com' }] const posts = [{ id: '4', title: 'About React', body: 'intriguing', published: true, author: '1' // userのID }, { id: '5', title: 'About GraphQL', body: 'Im now studying', published: true, author: '1' }, { id: '6', title: 'Money', body: 'very little', published: true, author: '2' }] const comments = [{ id: '11', text: 'oh my god!', author: '1', // userのID post: '4' // postのID }, { id: '21', text: 'jesus christ', author: '1', post: '4' }, { id: '31', text: 'goo goo dloo l doo', author: '2', post: '5' }, { id: '41', text: 'ironman', author: '3', post: '6' }] // Type definition (Schema) const typeDefs = ` type Query { users(query: String): [User!]! posts(query: String): [Post!]! comments: [Comment!]! } type User { id: ID! name: String! email: String! age: Int posts : [Post!]! comments: [Comment!]! } type Post { id: ID! title: String! body: String! published: Boolean! author: User! comments: [Comment!]! } type Comment { id: ID! text: String! author: User! posts: Post! } ` // Resolvers const resolvers = { Query : { users(parent, args, ctx, info) { if (!args.query){ return users } else { return users.filter(user => user.name.toLowerCase().includes(args.query.toLowerCase())) } }, posts(parent, args, ctx, info) { if (!args.query){ return posts // call Post() coded below } else { return posts.filter(post => post.title.toLowerCase().includes(args.query)) } }, comments(parent, args, ctx, info){ return comments } }, Post: { author(parent, args, ctx, info) { return users.find(user => user.id === parent.author) // parentはPost }, comments(parent, args, ctx, info){ return comments.filter(comment => comment.post === parent.id) } }, User: { posts(parent, args, ctx, info) { return posts.filter(post => post.author === parent.id) // parentはUser }, comments(parent, args, ctx, info){ return comments.filter(comment => comment.author === parent.id) } }, Comment: { author(parent, args, ctx, info){ return users.find(user => user.id === parent.author) // parentはComment }, posts(parent, args, ctx, info){ return posts.filter(post => post.id === parent.post); } } } const server = new GraphQLServer({ typeDefs, resolvers }) server.start(() => { console.log('server is up'); })
- 投稿日:2019-03-27T10:35:19+09:00
nodeでgoogle spreadsheetから値を取得する。
公式チュートリアルする
https://developers.google.com/sheets/api/quickstart/nodejs?hl=ja
https://docs.google.com/spreadsheets/d/1BxiMVs0XRA5nFMdKvBdBZjgmUUqptlbs74OgvE2upms/edit#gid=0
ここの値を取得するテスト。Step 1: Turn on the Google Sheets API
credentials.jsonをダウンロードしておく
自身の持っているgoogleアカウントの認証情報を取得Step 2: Install the client library
ライブラリを追加する
npm install googleapis@27 --saveStep 3: Set up the sample
Sampleコードをコピペする
sheets/quickstart/index.jsStep 4: Run the sample
node .途中で
Authorize this app by visiting this url: https://accounts.google.com/o/oauth2/v2/auth?acce....
と聞かれる。
そのURLをクリックすると、Quickstartアプリへ、Googleスプレットシート表示権限が与えられる。
どういうことじゃ?
許可をクリックすると、トークンが表示される。
トークンを入力すると、spreadsheetの値が表示される。自身の作ったSpreadsheetを参照する
spreadsheet_idとシート名を自身のspreadsheetに変えれば、動作する。