- 投稿日:2019-03-27T23:23:01+09:00
C#でのデバッグ
- 投稿日:2019-03-27T16:47:31+09:00
ABC093 C - Same Integers(300点)
問題概要
$3$ つの整数 $A,B,C$が与えられる。
以下の $2$ 種類の操作を好きな順で繰り返して $A,B,C$をすべて等しくするために必要な操作の最小回数を求めよ。
- $A,B,C$ のうち $2$ つを選んで、その両方を $1$ 増やす
- $A,B,C$ のうち $1$ つを選んで、その整数を $2$ 増やす
制約条件
- $0≤A,B,C≤50$
- 入力はすべて整数である
考えたこと
操作はどちらも足し算で$+1$または$+2$なので、$3$つの整数を大きい順に$A,B,C$とすると、最終的に全ての数が$C$または$C+1$となるように操作を繰り返すことになる。
足し算が何回必要かは $(C-A)/2$の商と剰余によってわかる。最小回数を求めるには$+2$の操作を優先するべきなので、まず$2$で割った商が$+2$の操作回数となり、剰余が$+1$の操作回数となる。
例えば$A=3, C=6$の時、$(C-A)/2$の商は$1$、剰余は$1$となり$+2$を1回、$+1$を1回すればよい。これを$(C-A)/2$と$(C-B)/2$の剰余の結果ごとに場合分けして書けばよい。(剰余だと考えうる場合の数は4通りなので。)
計算量は値の大小に左右されず、$O(1)$となる。
解答
c.csusing System; using System.Linq; class Program { static void Main(string[] args) { int[] s = Console.ReadLine().Split().Select(int.Parse).ToArray(); Array.Sort(s); Console.WriteLine(solve(s[0], s[1], s[2])); } static int solve(int a, int b, int c) { //a < b < c int count = 0; if ((c-b)%2 == 0 && (c-a)%2 == 0) { count += (c-b)/2+(c-a)/2; } else if (((c-b)%2 == 0 && (c-a)%2 == 1) || ((c-b)%2 == 1 && (c-a)%2 == 0)) { count += (c-b)/2 + (c-a)/2 + 2; } else { count += (c-b)/2 + (c-a)/2 + 1; } return count; } }
- 投稿日:2019-03-27T15:42:06+09:00
WPFでUndo(元に戻す)、やり直し(Redo)をお手軽実装 [UndoManager]
はじめに
テキストエディタや、ExcelやWordなどのアプリケーションに採用されてる「元に戻す」、「やり直し」操作の機能、便利ですよね。
MVVMアプリケーションでは、バインディング通知の処理を一部書き換えることにより、Undo(元に戻す)、やり直し(Redo)の機能を組み込むことが比較的簡単にできたりします。
当記事では、Infragistics社製のUndo/Redo フレームワークを利用して、Undo(元に戻す)、やり直し(Redo)の実装事例をご紹介したいと思います。アプリケーションサンプル
今回用意したサンプルはこちら。
入力系のコントロールを配置し、画面操作の履歴を保持、元に戻す。やり直すボタンをクリックすると入力内容の復元などを行っています。
サンプルコード
GitHub
https://github.com/furugen/wpf-samples-undoredo/tree/master/wpf-samples-undoredoMainWindow.xaml<Window xmlns:ig="http://schemas.infragistics.com/xaml" x:Class="wpf_samples_undoredo.MainWindow" xmlns="http://schemas.microsoft.com/winfx/2006/xaml/presentation" xmlns:x="http://schemas.microsoft.com/winfx/2006/xaml" xmlns:d="http://schemas.microsoft.com/expression/blend/2008" xmlns:mc="http://schemas.openxmlformats.org/markup-compatibility/2006" xmlns:local="clr-namespace:wpf_samples_undoredo" xmlns:igWPF="http://schemas.infragistics.com/xaml/wpf" mc:Ignorable="d" Title="MainWindow" Width="800"> <Grid> <Grid.ColumnDefinitions> <ColumnDefinition Width="100" x:Name="leftMenuArea"></ColumnDefinition> <ColumnDefinition Width="10"></ColumnDefinition> <ColumnDefinition Width="80*"></ColumnDefinition> </Grid.ColumnDefinitions> <Grid.RowDefinitions> <RowDefinition Height="Auto"></RowDefinition> <RowDefinition Height="10"></RowDefinition> <RowDefinition Height="*"></RowDefinition> </Grid.RowDefinitions> <ListView x:Name="listView" Grid.Row="0" Grid.Column="0" SelectedIndex="{Binding SelectedIndexOfListView}"> <ListViewItem> <TextBlock>AAA</TextBlock> </ListViewItem> <ListViewItem> <TextBlock>BBB</TextBlock> </ListViewItem> <ListViewItem> <TextBlock>CCC</TextBlock> </ListViewItem> </ListView> <GridSplitter Grid.Column="1" Width="10" HorizontalAlignment="Center" /> <Grid Grid.Row="0" Grid.Column="2"> <Grid.ColumnDefinitions> <ColumnDefinition Width="*"></ColumnDefinition> <ColumnDefinition Width="Auto"></ColumnDefinition> </Grid.ColumnDefinitions> <StackPanel Grid.Column="0"> <StackPanel Orientation="Horizontal" Margin="10"> <TextBlock Width="100">コンボボックス</TextBlock> <ComboBox x:Name="comboBox" Width="200" SelectedIndex="{Binding SelectedIndexOfComboBox}"> <ComboBoxItem>C1</ComboBoxItem> <ComboBoxItem>C2</ComboBoxItem> <ComboBoxItem>C3</ComboBoxItem> </ComboBox> </StackPanel> <StackPanel Orientation="Horizontal" Margin="10"> <TextBlock Width="100">テキストボックス</TextBlock> <TextBox x:Name="textBox" Width="200" Text="{Binding TextBoxValue}"> </TextBox> </StackPanel> <StackPanel Orientation="Horizontal" Margin="10"> <TextBlock Width="100">デートピッカー</TextBlock> <DatePicker Width="200" x:Name="datePicker" SelectedDate="{Binding DatePickerData}"/> </StackPanel> <StackPanel Orientation="Horizontal" Margin="10"> <TextBlock Width="100">ラジオボタン</TextBlock> <RadioButton x:Name="radioOnAttached" IsChecked="{Binding IsCheckedOfRadioOnAttached}" GroupName="TestRaadio" Content="添付あり"/> <RadioButton x:Name="radioNonAttached" IsChecked="{Binding IsCheckedOfRadioNonAttached}" GroupName="TestRaadio" Content="添付なし"/> </StackPanel> <StackPanel Orientation="Horizontal" Margin="10"> <TextBlock Width="100">チェックボックス</TextBlock> <CheckBox x:Name="checkBox" Content="完了済" IsChecked="{Binding IsCheckedOfCheckBox}"/> </StackPanel> </StackPanel> </Grid> <Grid Grid.Row="2" Grid.ColumnSpan="3" > <Grid.ColumnDefinitions> <ColumnDefinition></ColumnDefinition> <ColumnDefinition></ColumnDefinition> </Grid.ColumnDefinitions> <Grid Grid.Column="0"> <Grid.RowDefinitions> <RowDefinition Height="Auto"></RowDefinition> <RowDefinition Height="*"></RowDefinition> </Grid.RowDefinitions> <Button Margin="5" Grid.Row="0"> <ig:Commanding.Command> <ig:UndoManagerCommandSource CommandType="Undo" EventName="Click" ParameterBinding="{Binding UndoManager}"></ig:UndoManagerCommandSource> </ig:Commanding.Command> 元に戻す </Button> <TextBox Text="{Binding UndoHistory}" AcceptsReturn="True" Grid.Row="1" /> </Grid> <Grid Grid.Column="1"> <Grid.RowDefinitions> <RowDefinition Height="Auto"></RowDefinition> <RowDefinition Height="*"></RowDefinition> </Grid.RowDefinitions> <Button Margin="5" Grid.Row="0">先に進む <ig:Commanding.Command> <ig:UndoManagerCommandSource CommandType="Redo" EventName="Click" ParameterBinding="{Binding UndoManager}"></ig:UndoManagerCommandSource> </ig:Commanding.Command> </Button> <TextBox Text="{Binding RedoHistory}" AcceptsReturn="True" Grid.Row="1" /> </Grid> </Grid> </Grid> </Window>MainWindowViewModel.cspublic class MainWindowViewModel : INotifyPropertyChanged { public UndoManager UndoManager { get; set; } public MainWindowViewModel() { // 編集履歴を記録する対象に当ViewModelを指定します。 this.UndoManager = new UndoManager(); this.UndoManager.RegisterReference(this); } public void ShowHistory() { StringBuilder sb = new StringBuilder(); foreach (var historyItem in this.UndoManager.UndoHistory) { sb.AppendLine(historyItem.ShortDescription); } this.UndoHistory = sb.ToString(); sb.Clear(); foreach (var historyItem in this.UndoManager.RedoHistory) { sb.AppendLine(historyItem.ShortDescription); } this.RedoHistory = sb.ToString(); } #region 各プロパティ private string textBoxValue = ""; public string TextBoxValue { get { return this.textBoxValue; } set { this.SetProperty(ref textBoxValue, value); } } private DateTime? datePickerData; public DateTime? DatePickerData { get { return this.datePickerData; } set { this.SetProperty(ref datePickerData, value); } } private string redoHistory = ""; public string RedoHistory { get { return this.redoHistory; } set { if(redoHistory != value) { redoHistory = value; NotifyPropertyChanged(); } } } private string undoHistory = ""; public string UndoHistory { get { return this.undoHistory; } set { if (undoHistory != value) { undoHistory = value; NotifyPropertyChanged(); } } } private int selectedIndexOfListView; public int SelectedIndexOfListView { get { return this.selectedIndexOfListView; } set { this.SetProperty(ref selectedIndexOfListView, value); } } private int selectedIndexOfComboBox; public int SelectedIndexOfComboBox { get { return this.selectedIndexOfComboBox; } set { this.SetProperty(ref selectedIndexOfComboBox, value); } } private bool? isCheckedOfCheckBox = true; public bool? IsCheckedOfCheckBox { get { return this.isCheckedOfCheckBox; } set { this.SetProperty(ref isCheckedOfCheckBox, value); } } private bool? isCheckedOfRadioOnAttached = false; public bool? IsCheckedOfRadioOnAttached { get { return this.isCheckedOfRadioOnAttached; } set { this.SetProperty(ref isCheckedOfRadioOnAttached, value); } } private bool? isCheckedOfRadioNonAttached = true; public bool? IsCheckedOfRadioNonAttached { get { return this.isCheckedOfRadioNonAttached; } set { this.SetProperty(ref isCheckedOfRadioNonAttached, value); } } #endregion protected bool SetProperty<T>(ref T storage, T value, [CallerMemberName] string propertyName = null) { if (EqualityComparer<T>.Default.Equals(storage, value)) return false; // UndoManagerに変更値を登録 UndoManager.FromReference(this).AddPropertyChange(this, propertyName, storage, value); // UndoRedoの履歴を表示 this.ShowHistory(); storage = value; this.NotifyPropertyChanged(propertyName); return true; } public event PropertyChangedEventHandler PropertyChanged; private void NotifyPropertyChanged([CallerMemberName] String propertyName = "") { if (PropertyChanged != null) { PropertyChanged(this, new PropertyChangedEventArgs(propertyName)); } } }サンプルコードの解説
ソースコードが長いですが、プロパティの宣言によるものが多いです。
UndoMangagerを利用するうえでのポイントを紹介します。対象のViewModelを登録
Undo/Redoの対象となるViewModelを登録します。
csharp

this.UndoManager.RegisterReference(this);
編集履歴を登録
Undoに記憶させる履歴はPropetyChangeの通知時を行う際に、UndoManagerにも履歴を登録します。
共通的なメソッドにて、UndoManagerに登録することで各プロパティは意識せずに履歴管理を行うことができます。protected bool SetProperty<T>(ref T storage, T value, [CallerMemberName] string propertyName = null) { if (EqualityComparer<T>.Default.Equals(storage, value)) return false; // UndoManagerに変更値を登録 UndoManager.FromReference(this).AddPropertyChange(this, propertyName, storage, value); // UndoRedoの履歴を表示 this.ShowHistory(); storage = value; this.NotifyPropertyChanged(propertyName); return true; }例えば、テキストボックスにバインドしているTextBoxValueは、SetPropertyメソッドをコールし、バインド通知および履歴登録をしています。
        private string textBoxValue = "";
        public string TextBoxValue
        {
            get
            {
                return this.textBoxValue;
            }
            set
            {
                this.SetProperty(ref textBoxValue, value);
            }
        }
元に戻す、やり直しのコマンド
Undo/Redo用のコマンドが用意されているのでUndoManagerをパラメータで指定してあげればよしなに管理してくれます。
MainWindow.xaml<Button > <ig:Commanding.Command> <ig:UndoManagerCommandSource CommandType="Undo" EventName="Click" ParameterBinding="{Binding UndoManager}"></ig:UndoManagerCommandSource> </ig:Commanding.Command> 元に戻す </Button> <Button Margin="5" Grid.Row="0">やり直し <ig:Commanding.Command> <ig:UndoManagerCommandSource CommandType="Redo" EventName="Click" ParameterBinding="{Binding UndoManager}"></ig:UndoManagerCommandSource> </ig:Commanding.Command> </Button>まとめ
Undo/Redoの管理を実現してくれるUndo/Redo フレームワークの紹介でしたが如何でしょうか。
今回、ご紹介しきれませんでしたが、一連の操作の流れをまとめて履歴登録したり、記録の一時停止/再開する機能なども提供しているコンポーネントなので痒い所にもよく手が届きますよ。
入力画面でUndo/Redoを実装したい場合はぜひご検討くださいませ!
- 投稿日:2019-03-27T13:36:27+09:00
RegularExpressionAttributeを継承した独自ValidationでClient Validationしたい
半角英数のみなどの入力チェックをいちいち一からValidationを作るのは面倒。
とはいっても全ての項目にRegularExpressionAttributeをいちいち書くのも面倒。
そんな時、RegularExpressionAttributeを継承した独自Validationを作る場面は良くあると思います。実際に作ってみると確かにSever Validationは効くのだが、RegularExpressionAttributeで指定したときには効いていたClient Validationが動作しなくなります。
これは、独自Validationサブクラスを作成してプロパティに適用しただけだと、どのClient Validationを適用させるか判別できないためです。
独自ValidationサブクラスをValidatorProviderに登録すれば、Client Validationが動作します。AlphaNumberAttribute.cs/// <summary> /// データ フィールドの値が半角英数かを検証する。 /// </summary> { public AlphaNumberAttribute() : this(@"[a-zA-Z]+") { } public AlphaNumberAttribute(string pattern) : base(pattern) { ErrorMessageResourceName = nameof(Resources.Messages.AlphaNumber); ErrorMessageResourceType = typeof(Resources.Messages); } }Global.asax.cspublic class MvcApplication : System.Web.HttpApplication { protected void Application_Start() { AreaRegistration.RegisterAllAreas(); FilterConfig.RegisterGlobalFilters(GlobalFilters.Filters); RouteConfig.RegisterRoutes(RouteTable.Routes); BundleConfig.RegisterBundles(BundleTable.Bundles); ModelValidatorAdapterConfig.RegisterModelValidatorAdapters(); } }ModelValidatorAdapterConfig.cspublic static class ModelValidatorAdapterConfig { public static void RegisterModelValidatorAdapters() { // リソース名の設定 DefaultModelBinder.ResourceClassKey = nameof(Messages); // アダプターの設定 // 第1引数は独自Validationサブクラス、第2引数はRegularExpressionAttributeAdapter を指定 DataAnnotationsModelValidatorProvider.RegisterAdapter( typeof(AlphaNumberAttribute), typeof(RegularExpressionAttributeAdapter)); } }元ネタ
Inheriting from RequiredAttribute breaks client side validation on ASP.NET MVC 2 RC.
https://forums.asp.net/t/1528277.aspx?Inheriting+from+RequiredAttribute+breaks+client+side+validation+on+ASP+NET+MVC+2+RC+
- 投稿日:2019-03-27T12:20:34+09:00
YAD2U Unity&C#編
YAD2U C#編
yet another deepmimic to unity !
Other References
Environmental Setting
https://qiita.com/tanakataiki/items/40f54b3851c2ed3e09ecTensorflow Search
https://qiita.com/tanakataiki/items/8655c76b68933905f3eaUnity&C Sharp
https://qiita.com/tanakataiki/items/fbb3a4782add01d73428対象
- Unity(Mocapデータ,Kinematic tree,Animation)
- C#(物理エンジン,幾何学計算)
- mlagent(強化学習SDK)
を使い慣れている方
略語
Additional Task Objective=ATO(完全に非公認です)
Immitation Objective =IO(上に同じ)概要
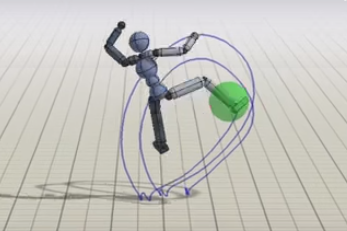
YAD2U yet another deepmimic to unity deepmimicの理論を用いた非公認プロジェクトです.
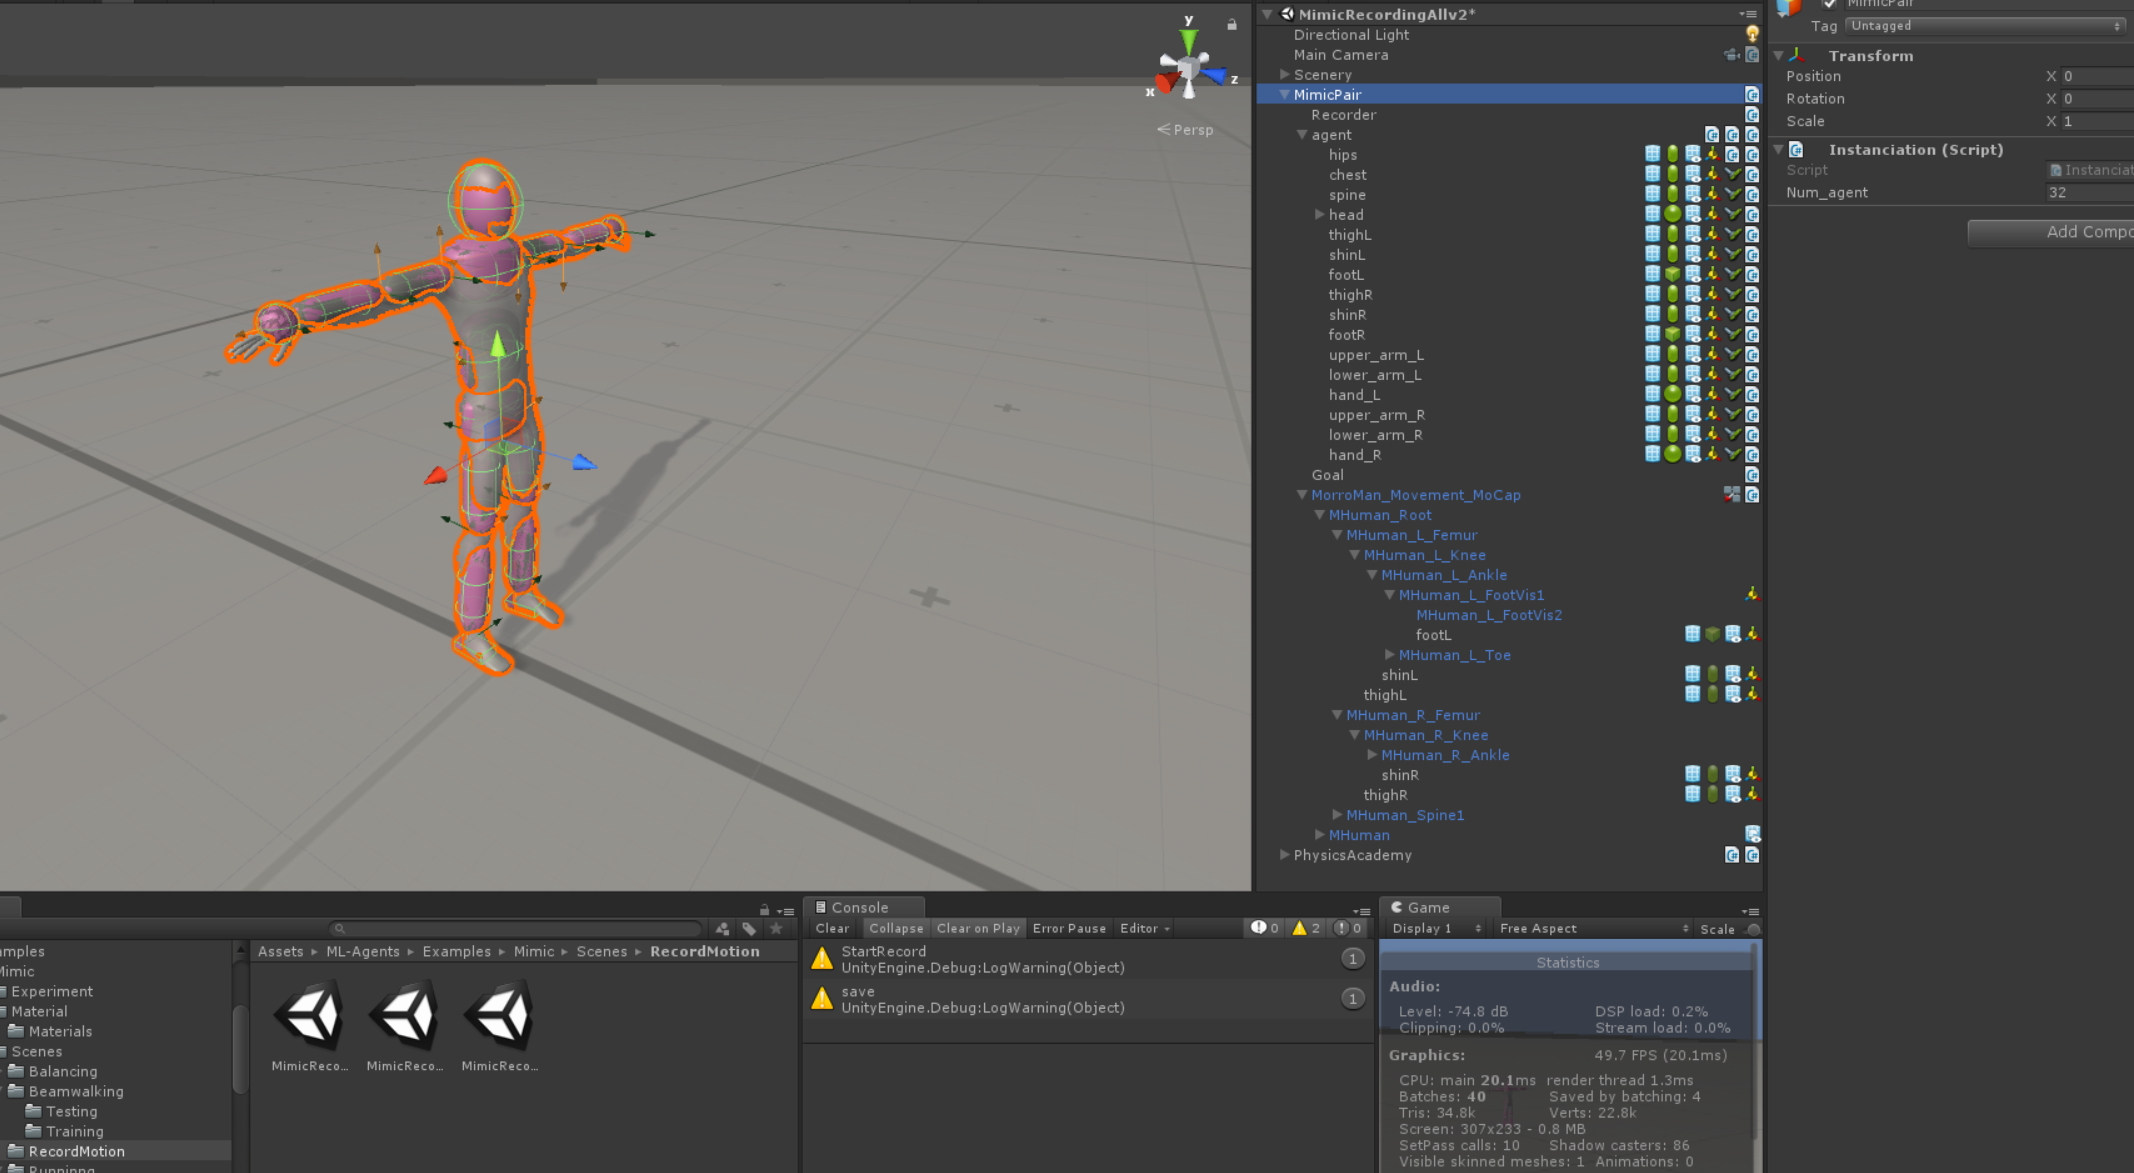
Unity Editor側
Scene内のParentから順に説明していきます.
Brainの設定
Stateを以下を参考にvector observationにより設定
https://qiita.com/tanakataiki/items/94c7778341a40438cc99#state
C#での実装は以下両手首は両前腕に固定しているため,Observationは冗長なので,はじきました.
https://github.com/tanakataiki/YAD2U/blob/01cf99dc03ada0a4db80263d3899a403a321101c/UnitySDK/Assets/ML-Agents/Examples/OneArmer/Scripts/OneArmerAgent.cs#L177
Actionは各関節のTargetRotationとしました.ETの実装
OnCollisionEnterの時にAgentをDoneして,終了します.その場合Penaltyとして,SetRewardを0にします.
ETは歩く場合足以外のCollisionに対して,ArmerAgentを動かす際はいりませんね.Mimic Pairについて
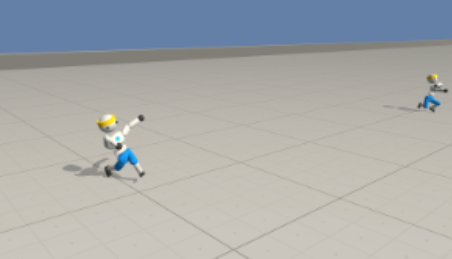
AgentとReference Record(IOの時) Goal(ATOの時今回はStrike)のセットになるように作成します.
これをInitialize Academy時に複数Instanciateすると並列分散学習ができるはず!
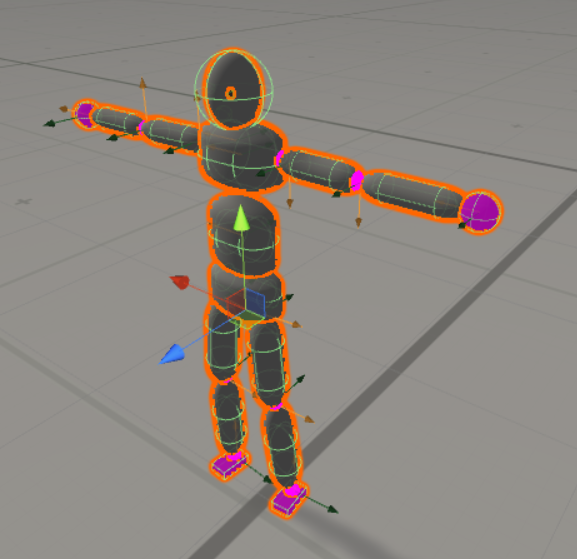
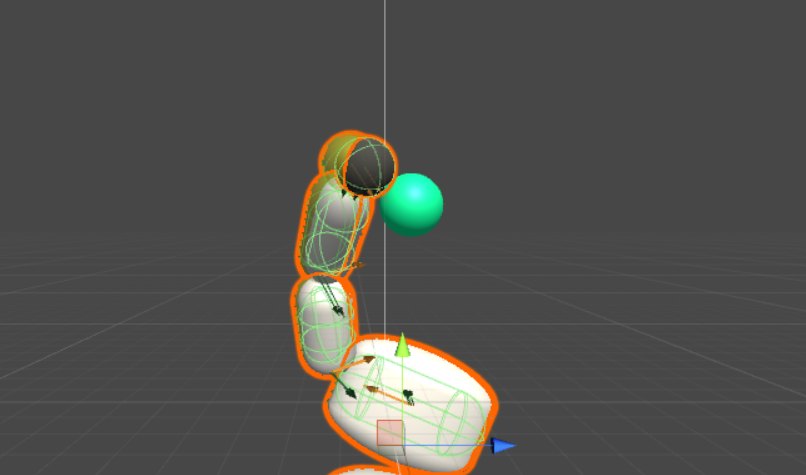
Agentの作成
作成したAgent赤いのはMaterialエラーです..なるべくMocapのアセットに近い体形にしました.
Agentの設定
Massを以下参考に設定
https://qiita.com/tanakataiki/items/94c7778341a40438cc99#body-parts-info
すべてKinematicsはFalseReferenceの設定
isKinematicはTrue
CollisionもOff
AnimationのKinematicTreeの中にそれぞれのPartsを入れ込む.Mimicの概要
https://qiita.com/tanakataiki/items/94c7778341a40438cc99#immitation-objective
ここに実装しておきました.
https://github.com/tanakataiki/YAD2U/blob/master/UnitySDK/Assets/ML-Agents/Examples/SharedAssets/Scripts/Mimic.csRecordの実装
ここに実装しておきました.
MocapDataや,自分で作成した,ImmitationしたいMotionをRecordし,学習時に読み込むことで,ReferenceMotionを再現することができます.
https://github.com/tanakataiki/YAD2U/blob/master/UnitySDK/Assets/ML-Agents/Examples/SharedAssets/Scripts/Recorder.csRSIの実装
RSIは今回TaskObjectiveも加味して,半分より前の状態すなわちArmerAgentではボールに触りに行く状態から始めています.
https://github.com/tanakataiki/YAD2U/blob/01cf99dc03ada0a4db80263d3899a403a321101c/UnitySDK/Assets/ML-Agents/Examples/SharedAssets/Scripts/Recorder.cs#L115Strikeの実装
https://qiita.com/tanakataiki/items/94c7778341a40438cc99#task-objetive
ここに実装しておきました.
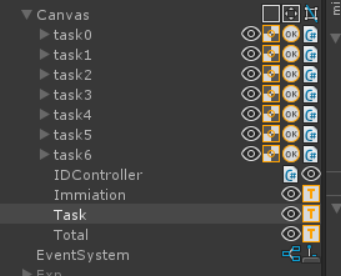
https://github.com/tanakataiki/YAD2U/blob/master/UnitySDK/Assets/ML-Agents/Examples/SharedAssets/Scripts/Strike.csSkill Selector UIの実装
こんな感じでスキルごとのボタンを用意しておきました
つぶやき
うまいなぁと思った点は,Strikeって1度Strikeできたかどうか判定するのに,LSTMやRNNなど,時系列を使うこともできるんだけど,ものすごく複雑になるので,今回はHitしたら,以降Stikeによる報酬は1に設定することで,それ以上無駄なStrikeをしなくなる.(逆にこのようなフラグを設定しないと,いつまでも触り続ける)
微妙だなぁと思った点は,Targetでかいし,芯をとらえていない.
まあ,ただ,芯をとらえるMotivationはImmitationに比べると,あまり大きく無くて,指示通りのこと以上はしてくれない.
確かに,Targetの距離からEndEffector(ここでは右足)が近づけばRewardはExpに比例して(表現あってる?)大きくなるけど,一定の範囲内に来れば1,になるので,Rewardの7割を占めるImmitationを優先し,残り3割のStrike判定ぎりぎりのところを狙って蹴るのはRewardを最大にするうえで,重要で,まあある意味賢い
TaskのRewardの割合を大きくすると,Immitationしなくなるため,やっぱり暴れる...以下はイメージです...
ここら辺の感覚は実装してみるとわかる.
筆者が頑張って追実装していた去年の9月ごろにはDeepmimicのOpenなRepositoryはなかったので,お,これは作るしか!とか思ってたんだけど,今となってはコードはGithubにあるし,詳細が見放題(HyperParameter論文と違くねとか結構思ったけど,試行錯誤の上なのかなあ.)
https://github.com/xbpeng/DeepMimic公式のDeepmimic(windows版)は依存環境が多く,環境構築が鬼めんどいので,結局途中であきらめた.誰か環境構築の記事書いて~~
- 投稿日:2019-03-27T00:13:59+09:00
C++から.NET!超超超入門
この記事はいったい...?
この記事は「Native C++ と .NETライブラリを CLI を使わずにどうしても連携させたい!!」という, とてもニッチな思いに応えるためのものです. 普通の人には必要のない技術情報です.
どうするの?
【DllExport】を利用して, .NETライブラリをC++から呼び出せるようにしてあげます.
なんてすばらしいアプリケーションなんだぁ~.最新版をダウンロードしておいてください.
How to
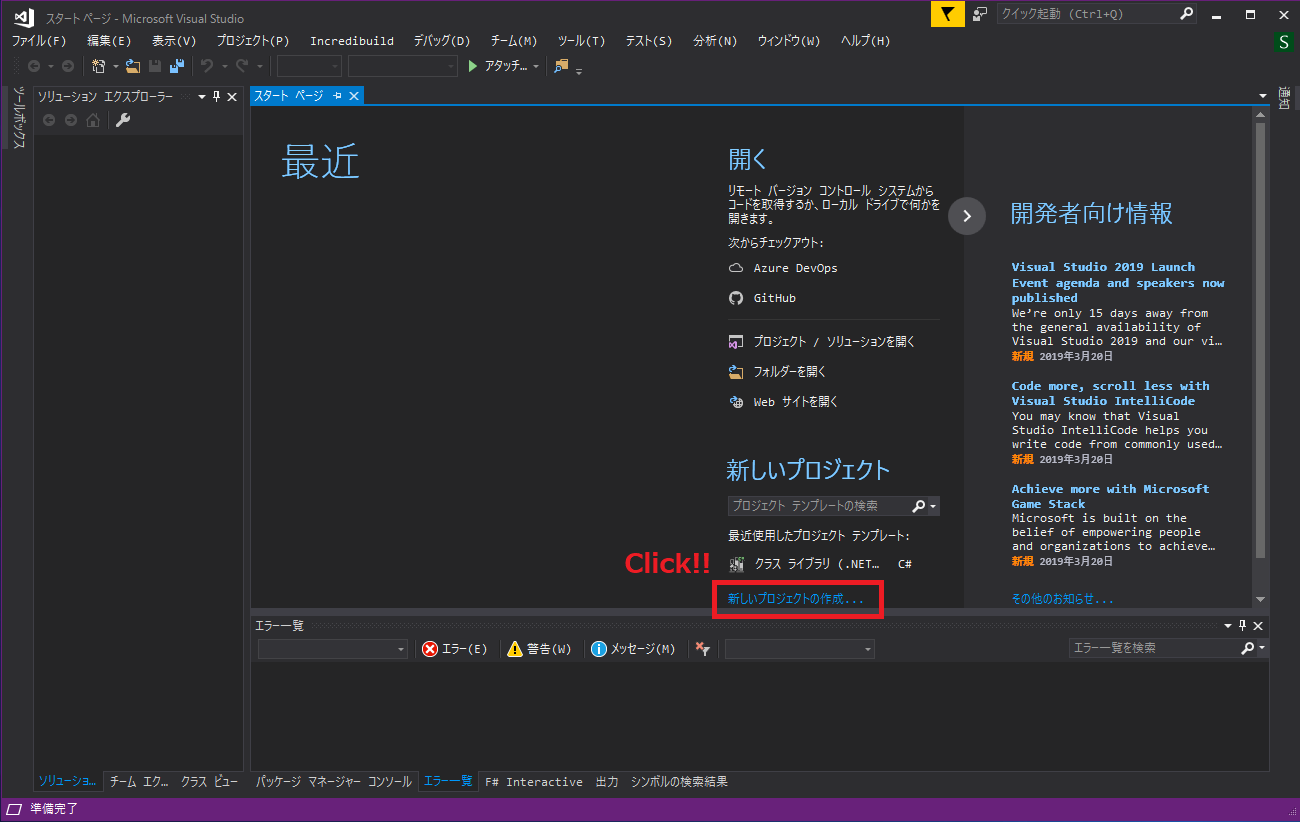
1. C#で .NET Framework ライブラリを作成します
まず, VisualStudioを起動して, 【新しいプロジェクトの作成...】を押下します.
【Visual C#】→【クラス ライブラリ (.NET Framework)】→【OK】の順に押下します.
必要であれば, プロジェクト名やソリューション名も変更します.
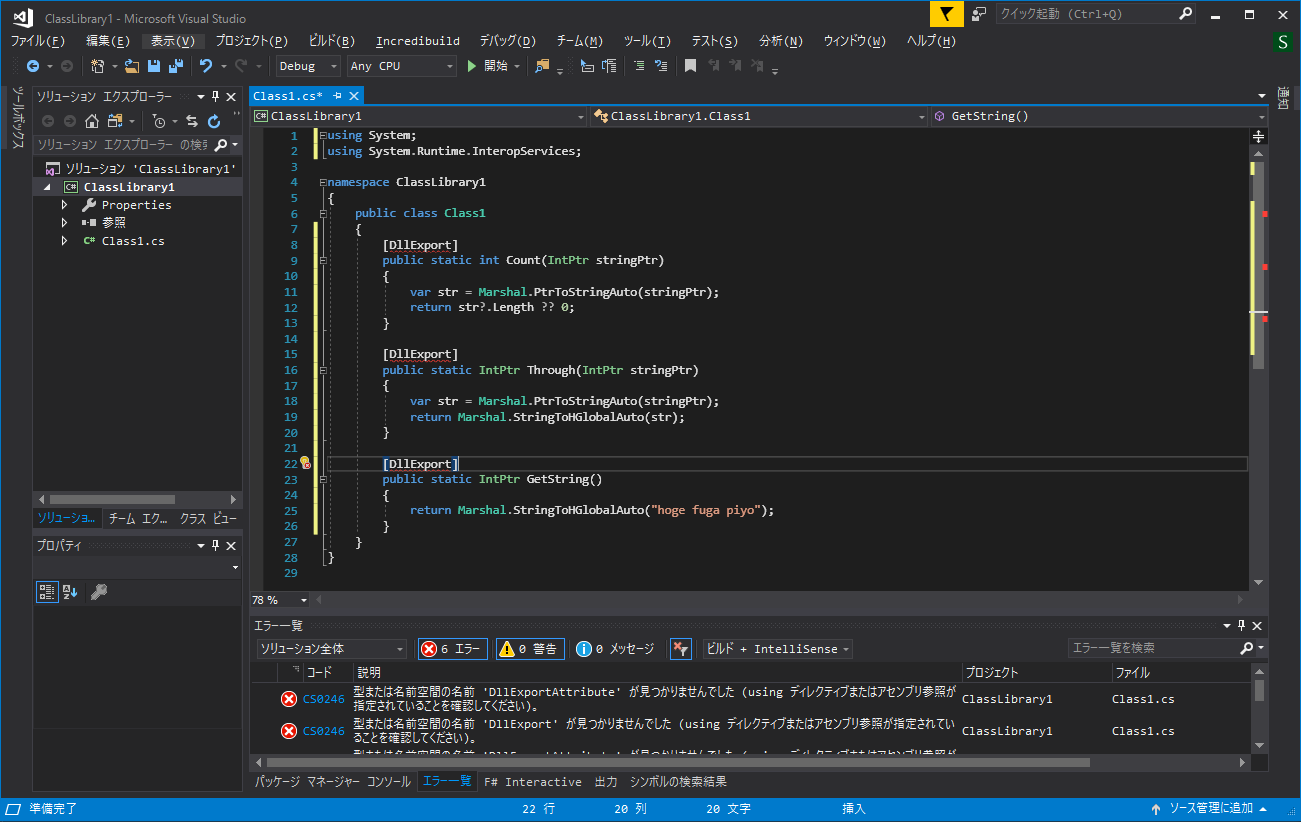
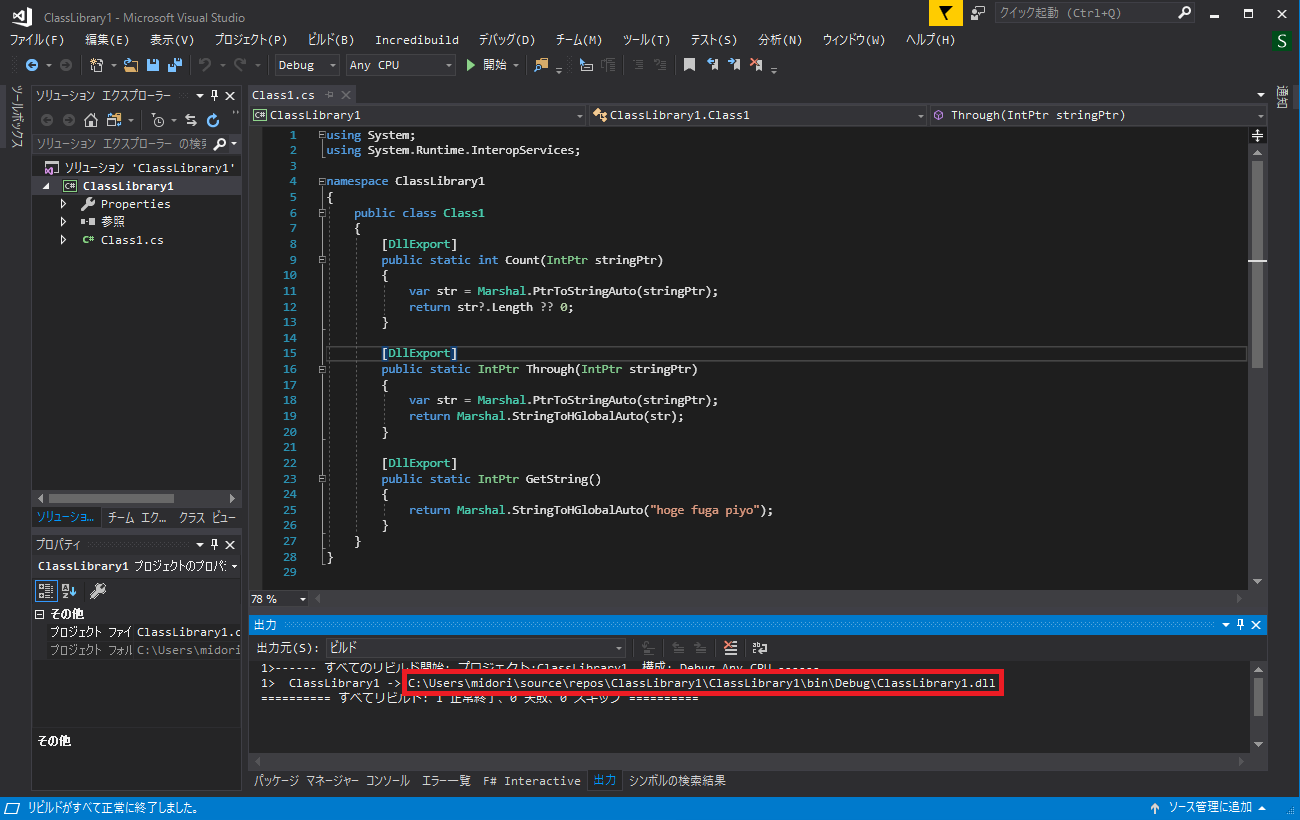
おもむろに以下のようなコードを記述します.
この時点ではエラーが発生していますが, あとで解消するので気にしないでください.
コピペ用
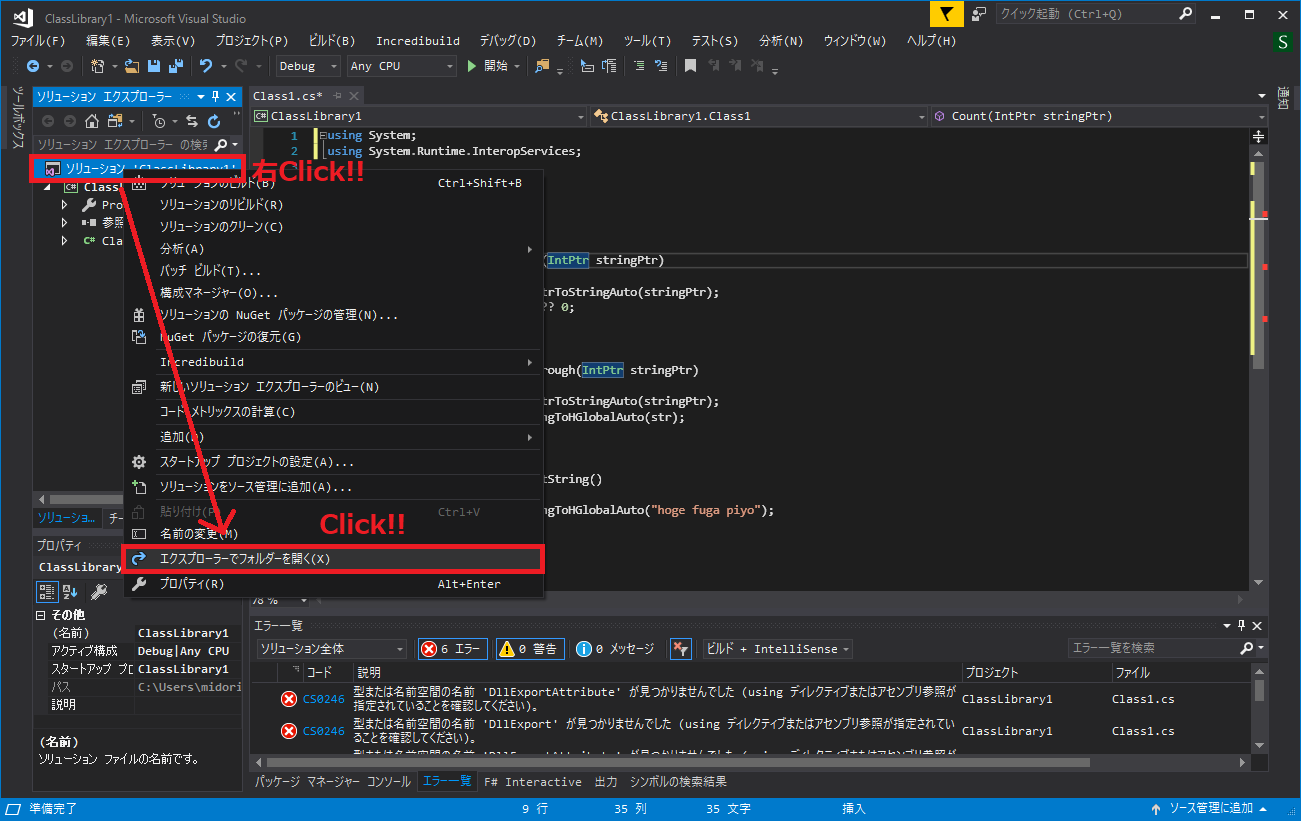
using System;
using System.Runtime.InteropServices;  // Marshalを使うのに必要

namespace ClassLibrary1
{
    public class Class1
    {
        [DllExport]
        public static int Count(IntPtr stringPtr)
        {
            var str = Marshal.PtrToStringAuto(stringPtr);    // IntPtrをstring型に変換
            return str?.Length ?? 0;                         // intやdoubleなどのプリミティブはそのままreturnでOK!!
        }

        [DllExport]
        public static IntPtr Through(IntPtr stringPtr)
        {
            var str = Marshal.PtrToStringAuto(stringPtr);    // IntPtrをstring型に変換
            return Marshal.StringToHGlobalAuto(str);         // string型をIntPtrに変換してreturn
        }

        [DllExport]
        public static IntPtr GetString()
        {
            return Marshal.StringToHGlobalAuto("hoge fuga piyo");    // string型をIntPtrに変換してreturn
        }
    }
}
ソリューションエクスプローラの【ソリューション】にカーソルを合わせて右クリックを押下し,
【エクスプローラーでフォルダーを開く】をクリックします.
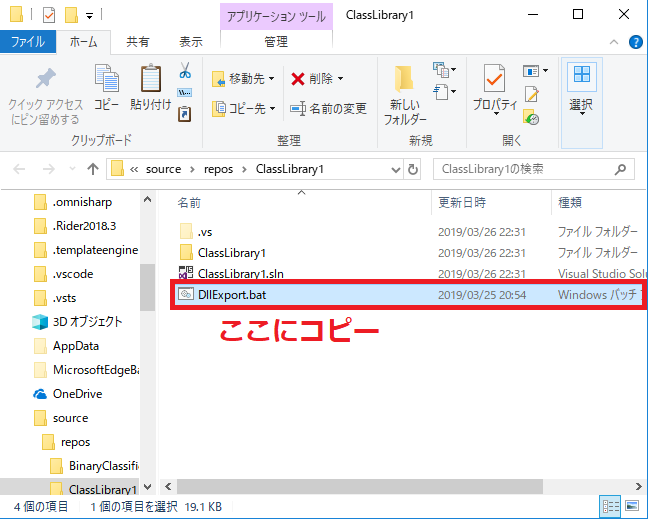
フォルダが表示されると思いますので, DllExport.batをコピーします.
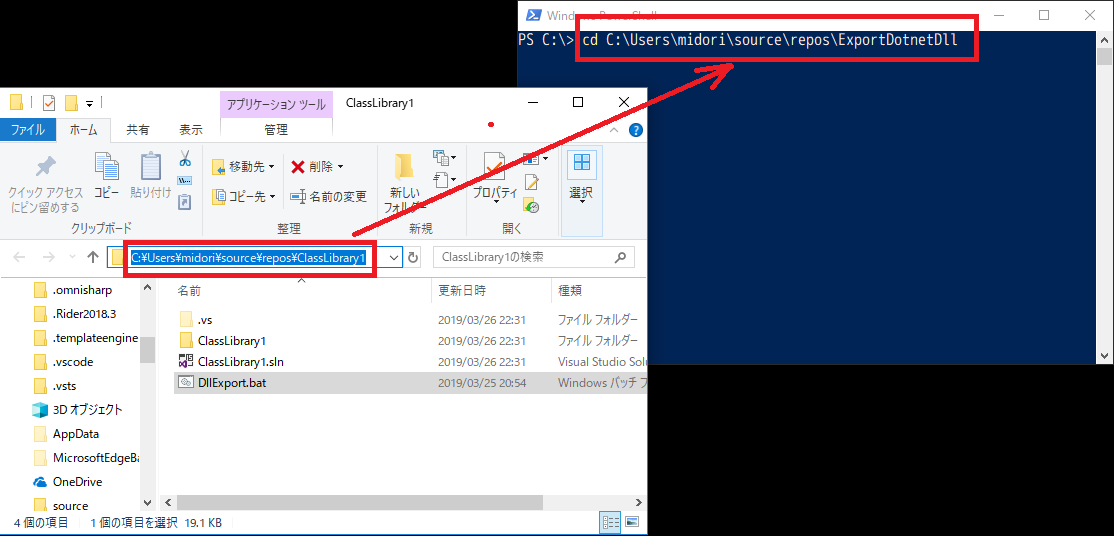
【PowerShell】または【コマンドプロンプト】を起動します.
サンプルではPowerShellを利用しています.【cd】コマンドを利用して, ソリューションファイルがあるフォルダに移動します.
エクスプローラのフォルダパスをクリックするとコピーできるので, それを貼り付けると楽ちんです.
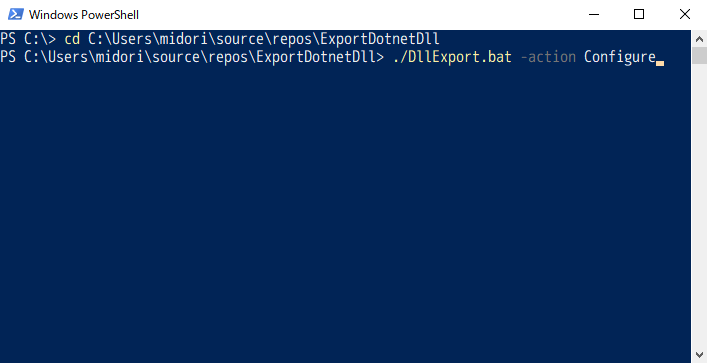
【cd [フォルダパス]】と入力できたらEnterキーを押下して, 実行しましょう.
【./DllExport.bat -action Configure】と入力してEnterキーを押下します.
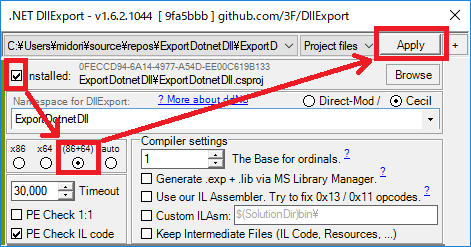
そうすると, 以下のようなウィンドウが起動するので,
【installed】→【(86+64)】→【Apply】の順に選択していきます.
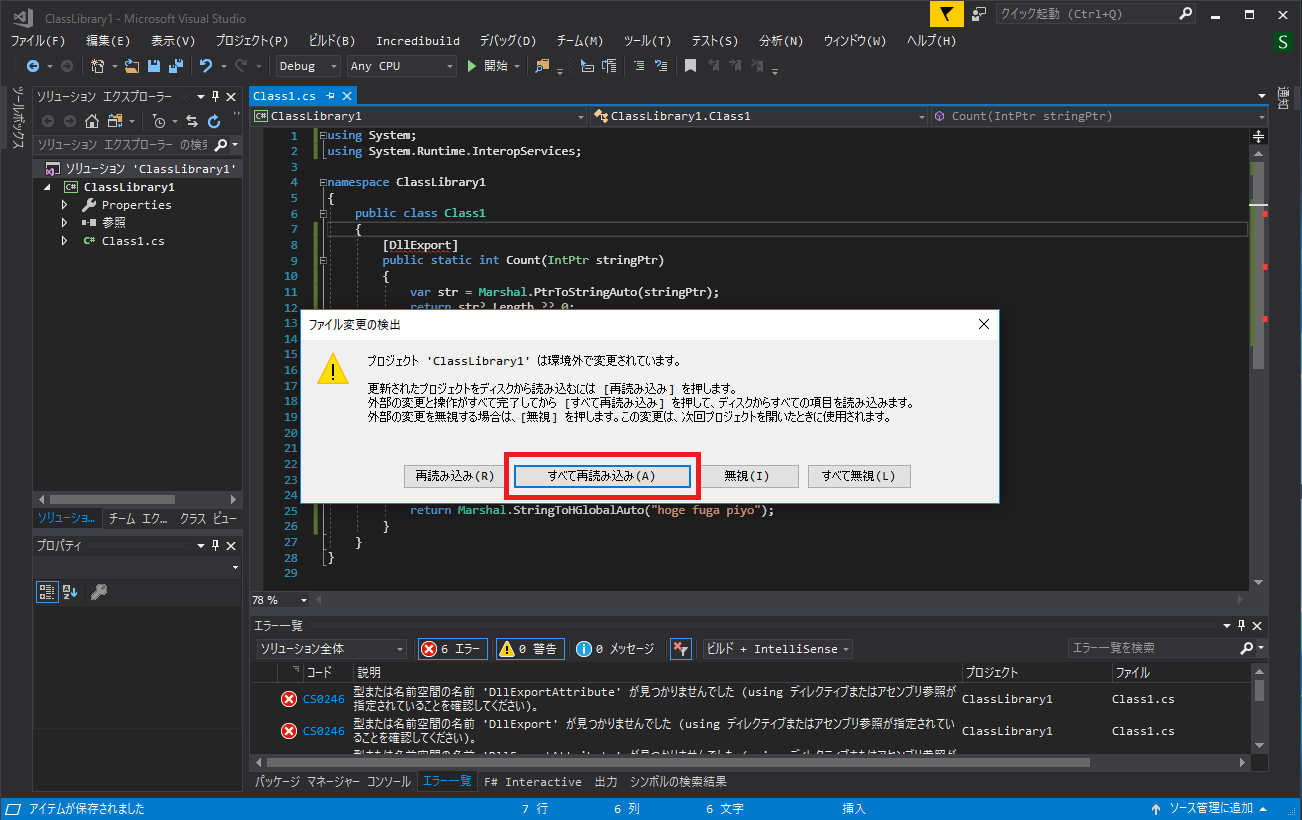
すぐに実行が完了するので, VisualStudioに戻ります.
すると, 以下のようなアラートが出てくるので, 【すべて再読み込み】を選択します.
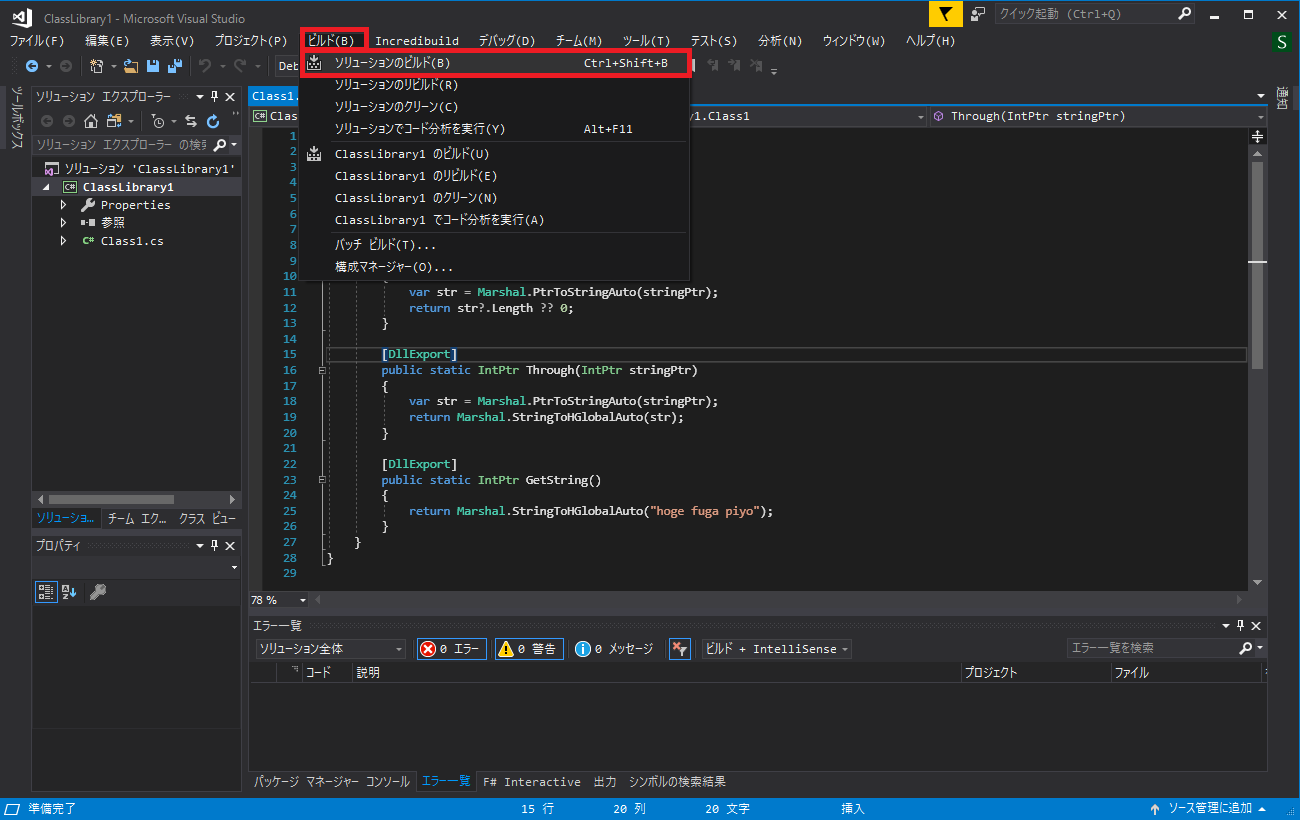
読み込みが完了すると先ほどまであったエラーが消えていると思います.
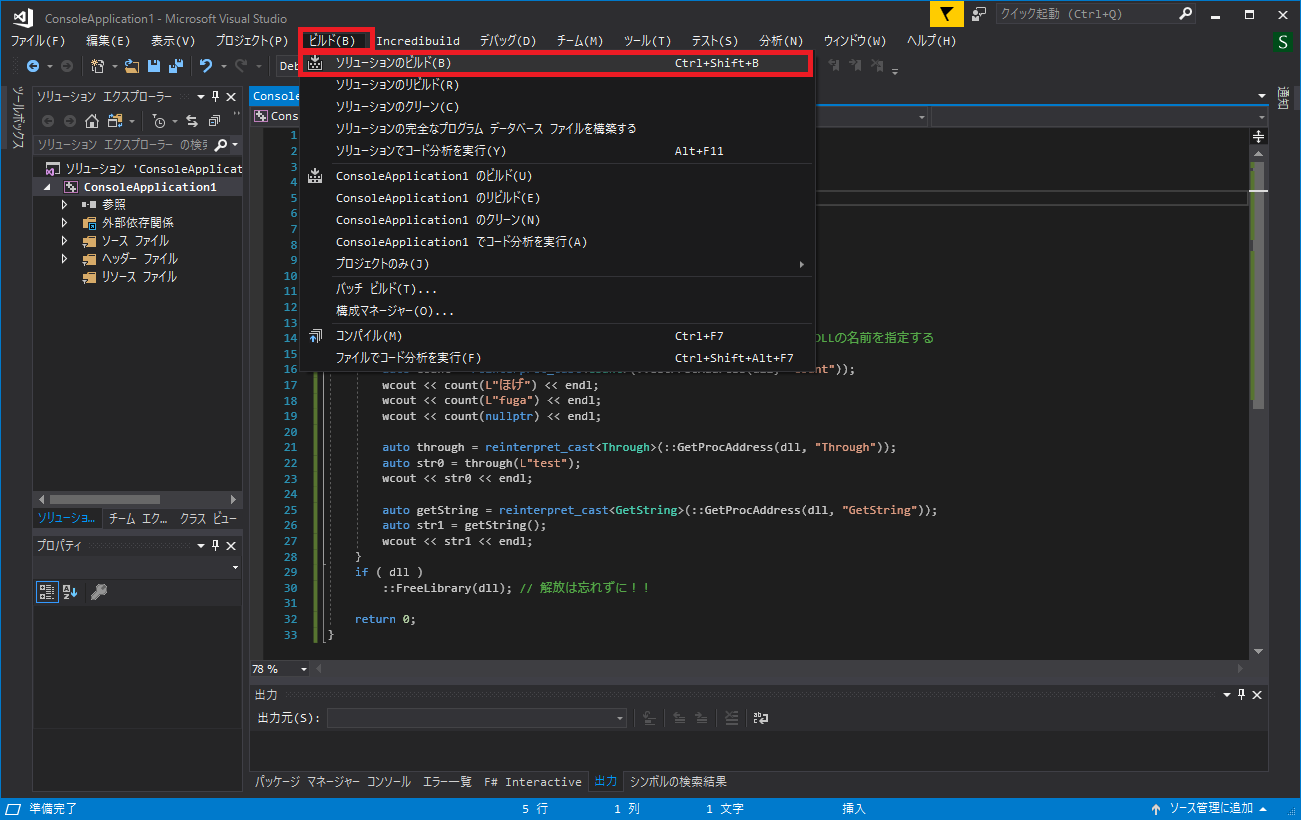
ここまでくれば, あとはビルドをするだけです!【ビルド】→【ソリューションのビルド】を選択してビルドします.
すると出力タブにビルドされたdllのパスが載っているので, そこをエクスプローラで開きます.
そこにdllの他に【x86】と【x64】フォルダができあがっています.
その中にあるdllがC++から直で呼び出せるようになっているので, C++から呼び出す際はこのフォルダ内のdllを利用します.
それぞれ【x86=32bit版】/【x64=64bit版】用なので, C++アプリでは適宜使い分けしてください.
2. .NET DLL をC++で利用するアプリを作成します
まず, VisualStudioを起動して, 【新しいプロジェクトの作成...】を押下します.
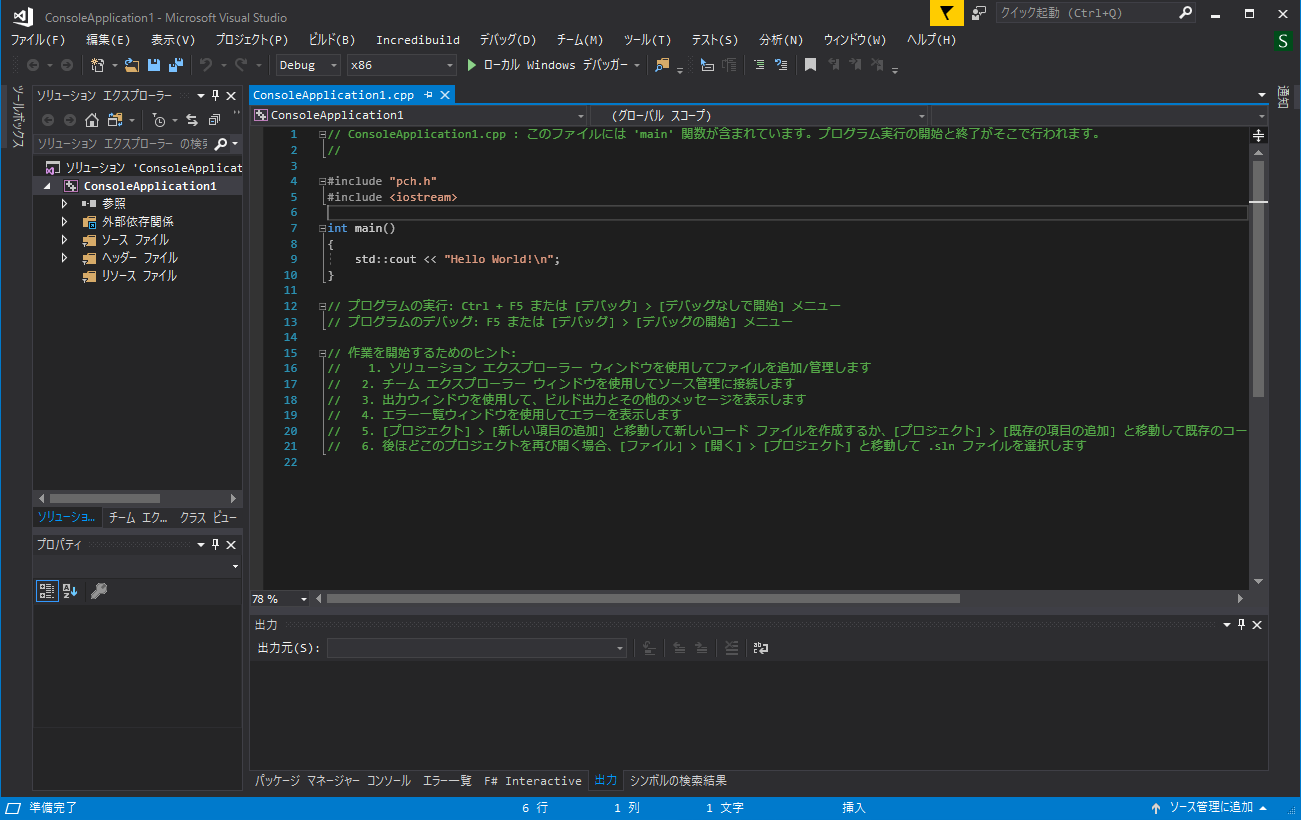
【Visual C++】→【Windows コンソール アプリケーション】→【OK】の順に押下します.
必要であれば, プロジェクト名やソリューション名も変更します.
そうすると, 以下のような画面が表示されます.
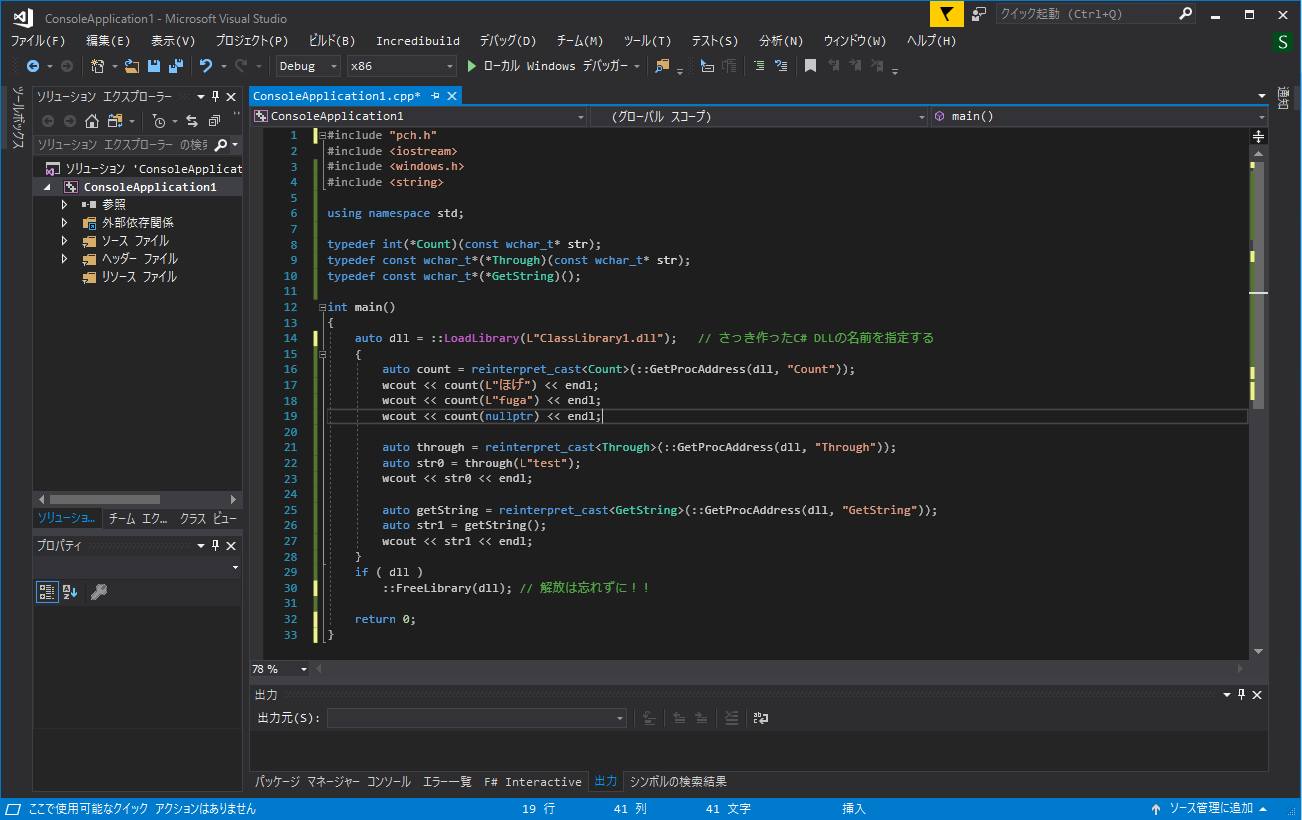
おもむろにコードを修正します.
ついでに不要なコメントも削除しておきましょう.
コピペ用
#include "pch.h"
#include <iostream>
#include <windows.h>
#include <string>

using namespace std;

typedef int(*Count)(const wchar_t* str);
typedef const wchar_t*(*Through)(const wchar_t* str);
typedef const wchar_t*(*GetString)();

int main()
{
    auto dll = ::LoadLibrary(L"ClassLibrary1.dll");   // さっき作ったC# DLLの名前を指定する
    {
        auto count = reinterpret_cast<Count>(::GetProcAddress(dll, "Count"));
        wcout << count(L"ほげ") << endl;
        wcout << count(L"fuga") << endl;
        wcout << count(nullptr) << endl;

        auto through = reinterpret_cast<Through>(::GetProcAddress(dll, "Through"));
        auto str0 = through(L"test");
        wcout << str0 << endl;

        auto getString = reinterpret_cast<GetString>(::GetProcAddress(dll, "GetString"));
        auto str1 = getString();
        wcout << str1 << endl;
    }
    if ( dll )
        ::FreeLibrary(dll); // 解放は忘れずに!!

    return 0;
}
コードの編集が完了したら, サクッとビルドしてみます.
今回はx86でビルドしましたが, x64でも構いません. ただし, このサンプルとは利用するdllが異なりますのでその点は注意してください.
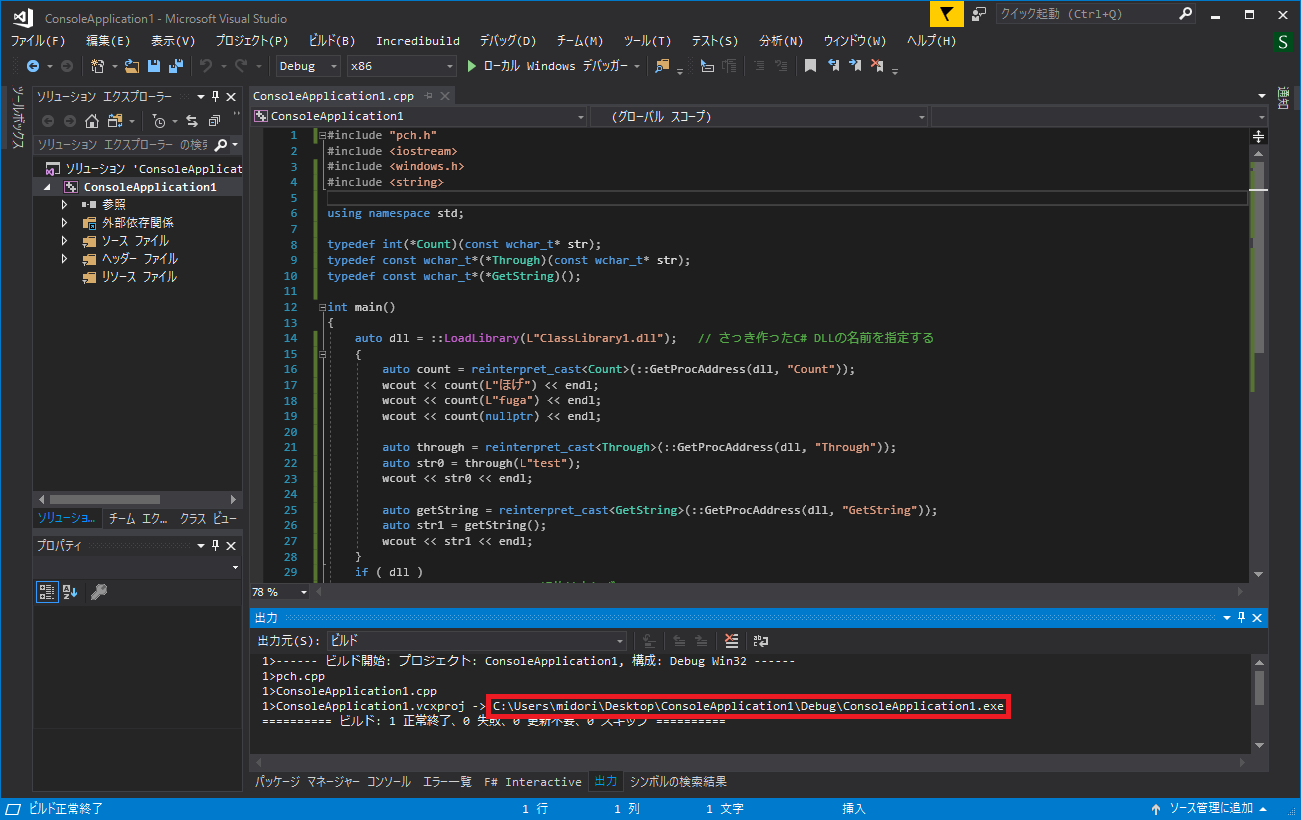
ビルドが完了すると出力タブに実行ファイルの出力先フォルダをエクスプローラで表示します.
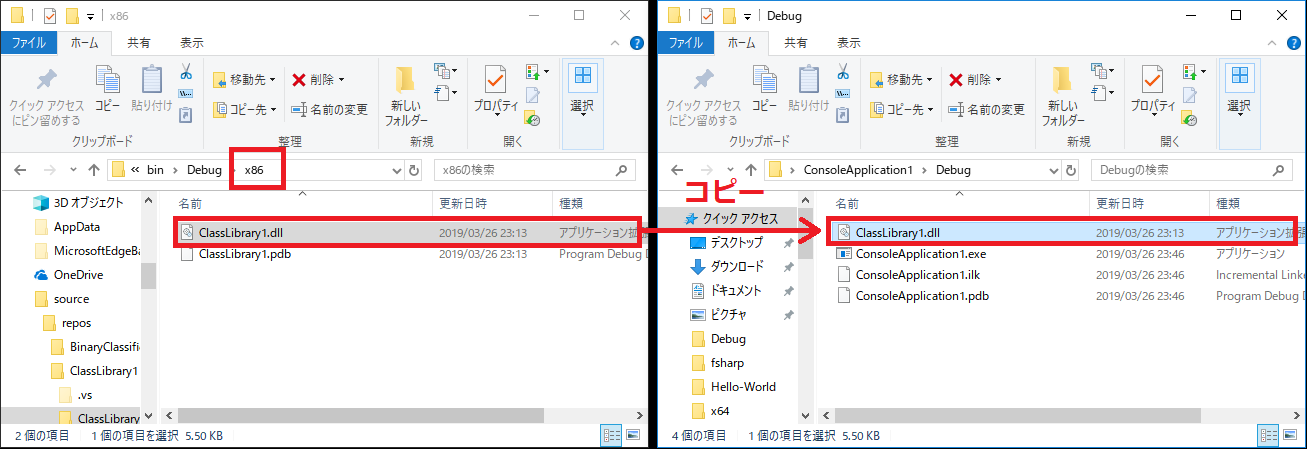
C#のdll(x86版)を実行ファイルのあるフォルダにコピーしてあげます.
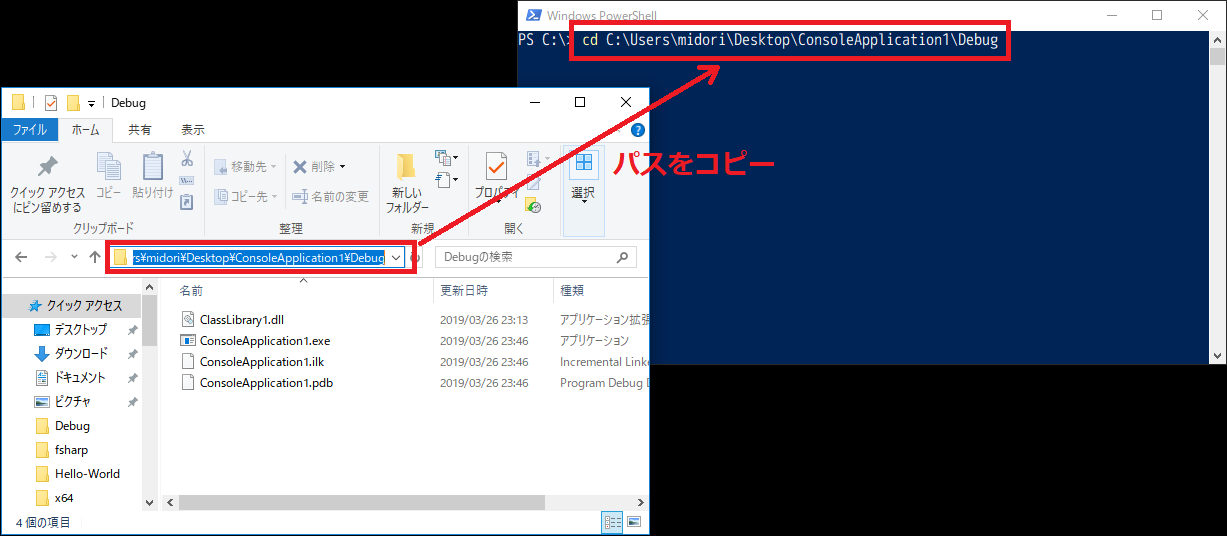
そうしましたら, PowerShell or コマンドプロンプトを起動して, 実行ファイルのあるフォルダパスに cd コマンドで移動します.
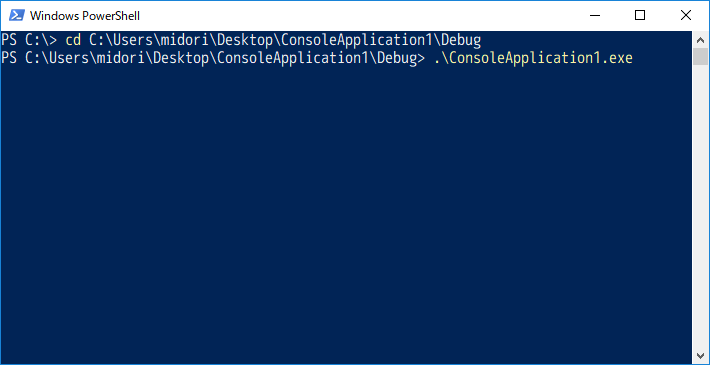
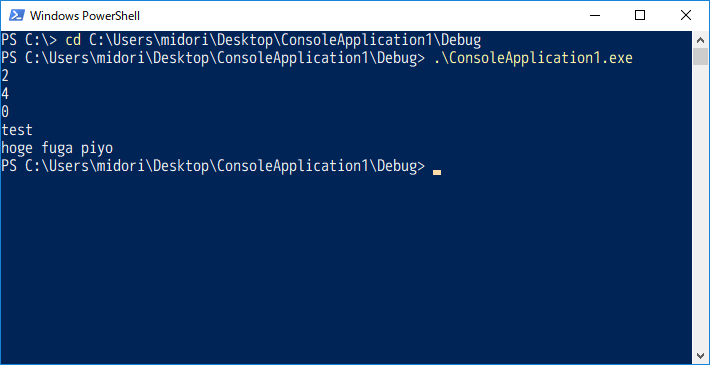
移動できたら, exeを実行します.
そうすると, 以下のように, Netive C++ から C#ライブラリを呼び出すことに成功していることが確認できます.
おわりに
C++からC#のライブラリを使いたいならC++/CLIを利用するのが一般的だと思いますが, さまざまな事由でそれができない場合があると思います. 私もその中の一人です.
今回ご紹介したものは非常にニッチな技術なのであまり一般的ではないと思いますが, もし私のような状況におかれた方がいらっしゃいましたら, 利用してみてください.
また, DllExport.batに関しては, 現状【C# + .NET Framework】のみ利用可能な感じでした. F#でも利用を試みましたが, 失敗に終わるという残念な結果となりましたが, リトライしてみようとは思います.
もちろん .NET Core には非対応でしたので, ご注意ください.余談
今回の記事は 【Youtube Live】 で放送しながら調査したものをまとめたものとなっています.
記事にしないだけで, こんな感じの特殊な技術(ニッチな技術?)を調べたり, 普通にコーディングしたりしていますので, 興味がある方がいらっしゃいましたらぜひおこし下さい.また, 基本的に毎日放送しているので記事のことや.NET関連の質問等がある方は, コメント等でお気軽にご質問ください. 答えられる範囲でお応えいたします.
【ホームページ】にはE-mailアドレスも記載させていただいていますので, そちらから今回の記事以外のことでもご質問・ご意見等がございましたら, コンタクトしていただければと思います.


- 投稿日:2019-03-27T00:13:59+09:00
C++からC# DLL 超超超入門
この記事はいったい...?
この記事は「Native C++ と C#ライブラリを CLI を使わずにどうしても連携させたい!!」という, とてもニッチな思いに応えるためのものです. 普通の人には必要のない技術情報です.
どうするの?
【DllExport】を利用して, .NETライブラリをC++から呼び出せるようにしてあげます.
なんてすばらしいアプリケーションなんだぁ~.最新版をダウンロードしておいてください.
How to
1. C#で .NET Framework ライブラリを作成します
まず, VisualStudioを起動して, 【新しいプロジェクトの作成...】を押下します.
【Visual C#】→【クラス ライブラリ (.NET Framework)】→【OK】の順に押下します.
必要であれば, プロジェクト名やソリューション名も変更します.
おもむろに以下のようなコードを記述します.
この時点ではエラーが発生していますが, あとで解消するので気にしないでください.
コピペ用
using System;
using System.Runtime.InteropServices;  // Marshalを使うのに必要

namespace ClassLibrary1
{
    public class Class1
    {
        [DllExport]
        public static int Count(IntPtr stringPtr)
        {
            var str = Marshal.PtrToStringAuto(stringPtr);    // IntPtrをstring型に変換
            return str?.Length ?? 0;                         // intやdoubleなどのプリミティブはそのままreturnでOK!!
        }

        [DllExport]
        public static IntPtr Through(IntPtr stringPtr)
        {
            var str = Marshal.PtrToStringAuto(stringPtr);    // IntPtrをstring型に変換
            return Marshal.StringToHGlobalAuto(str);         // string型をIntPtrに変換してreturn
        }

        [DllExport]
        public static IntPtr GetString()
        {
            return Marshal.StringToHGlobalAuto("hoge fuga piyo");    // string型をIntPtrに変換してreturn
        }
    }
}
ソリューションエクスプローラの【ソリューション】にカーソルを合わせて右クリックを押下し,
【エクスプローラーでフォルダーを開く】をクリックします.
フォルダが表示されると思いますので, DllExport.batをコピーします.
【PowerShell】または【コマンドプロンプト】を起動します.
サンプルではPowerShellを利用しています.【cd】コマンドを利用して, ソリューションファイルがあるフォルダに移動します.
エクスプローラのフォルダパスをクリックするとコピーできるので, それを貼り付けると楽ちんです.
【cd [フォルダパス]】と入力できたらEnterキーを押下して, 実行しましょう.
【./DllExport.bat -action Configure】と入力してEnterキーを押下します.
そうすると, 以下のようなウィンドウが起動するので,
【installed】→【(86+64)】→【Apply】の順に選択していきます.
すぐに実行が完了するので, VisualStudioに戻ります.
すると, 以下のようなアラートが出てくるので, 【すべて再読み込み】を選択します.
読み込みが完了すると先ほどまであったエラーが消えていると思います.
ここまでくれば, あとはビルドをするだけです!【ビルド】→【ソリューションのビルド】を選択してビルドします.
すると出力タブにビルドされたdllのパスが載っているので, そこをエクスプローラで開きます.
そこにdllの他に【x86】と【x64】フォルダができあがっています.
その中にあるdllがC++から直で呼び出せるようになっているので, C++から呼び出す際はこのフォルダ内のdllを利用します.
それぞれ【x86=32bit版】/【x64=64bit版】用なので, C++アプリでは適宜使い分けしてください.
2. .NET DLL をC++で利用するアプリを作成します
まず, VisualStudioを起動して, 【新しいプロジェクトの作成...】を押下します.
【Visual C++】→【Windows コンソール アプリケーション】→【OK】の順に押下します.
必要であれば, プロジェクト名やソリューション名も変更します.
そうすると, 以下のような画面が表示されます.
おもむろにコードを修正します.
ついでに不要なコメントも削除しておきましょう.
コピペ用
#include "pch.h"
#include <iostream>
#include <windows.h>
#include <string>

using namespace std;

typedef int(*Count)(const wchar_t* str);
typedef const wchar_t*(*Through)(const wchar_t* str);
typedef const wchar_t*(*GetString)();

int main()
{
    auto dll = ::LoadLibrary(L"ClassLibrary1.dll");   // さっき作ったC# DLLの名前を指定する
    {
        auto count = reinterpret_cast<Count>(::GetProcAddress(dll, "Count"));
        wcout << count(L"ほげ") << endl;
        wcout << count(L"fuga") << endl;
        wcout << count(nullptr) << endl;

        auto through = reinterpret_cast<Through>(::GetProcAddress(dll, "Through"));
        auto str0 = through(L"test");
        wcout << str0 << endl;

        auto getString = reinterpret_cast<GetString>(::GetProcAddress(dll, "GetString"));
        auto str1 = getString();
        wcout << str1 << endl;
    }
    if ( dll )
        ::FreeLibrary(dll); // 解放は忘れずに!!

    return 0;
}
コードの編集が完了したら, サクッとビルドしてみます.
今回はx86でビルドしましたが, x64でも構いません. ただし, このサンプルとは利用するdllが異なりますのでその点は注意してください.
ビルドが完了すると出力タブに実行ファイルの出力先フォルダが表示されますので、そこをエクスプローラで表示します.
C#のdll(x86版)を実行ファイルのあるフォルダにコピーしてあげます.
そうしましたら, PowerShell or コマンドプロンプトを起動して, 実行ファイルのあるフォルダパスに cd コマンドで移動します.
移動できたら, exeを実行します.
そうすると, 以下のように, Netive C++ から C#ライブラリを呼び出すことに成功していることが確認できます.
おわりに
C++からC#のライブラリを使いたいならC++/CLIを利用するのが一般的だと思いますが, さまざまな事由でそれができない場合があると思います. 私もその中の一人です.
今回ご紹介したものは非常にニッチな技術なのであまり一般的ではないと思いますが, もし私のような状況におかれた方がいらっしゃいましたら, 利用してみてください.
また, DllExport.batに関しては, 現状【C# + .NET Framework】のみ利用可能な感じでした. F#でも利用を試みましたが, 失敗に終わるという残念な結果となりましたが, リトライしてみようとは思います.
もちろん .NET Core には非対応でしたので, ご注意ください.余談
今回の記事は 【Youtube Live】 で放送しながら調査したものをまとめたものとなっています.
記事にしないだけで, こんな感じの特殊な技術(ニッチな技術?)を調べたり, 普通にコーディングしたりしていますので, 興味がある方がいらっしゃいましたらぜひおこし下さい.また, 基本的に毎日放送しているので記事のことや.NET関連の質問等がある方は, コメント等でお気軽にご質問ください. 答えられる範囲でお応えいたします.
【ホームページ】にはE-mailアドレスも記載させていただいていますので, そちらから今回の記事以外のことでもご質問・ご意見等がございましたら, コンタクトしていただければと思います.