- 投稿日:2020-12-01T23:31:26+09:00
単体テストを書くクラスでXamarin.*を呼び出してはいけない(Xamarin)
はじめに
本記事は Xamarin Advent Calendar 2020 の1日目の記事です。
XamarinでxUnit + Moqを使って単体テストを実装する際のコツを紹介します。環境
- Visual Studio Community 2019 for Mac:8.8 (build 2913)
- xUnit:2.4.0
- Moq:4.14.7
- Xamarin.Essentials:1.5.3.2
実装
かんたんなC#のクラスと単体テストを実装します。
テスト対象クラスの実装
Xamarin.Essentials.AppInfo.VersionStringを返すだけのGetAppVersion()メソッドを持ったFooServiceクラスを実装します。FooService.csusing Xamarin.Essentials; namespace Foo.Services { public interface IFooService { string GetAppVersion(); } public class FooService : IFooService { public FooService() { } public string GetAppVersion() { return AppInfo.VersionString; } } }テストクラスの実装
GetAppVersion()メソッドの戻り値が空でないことを確認するだけの単体テストを実装します。FooServiceTests.csusing Foo.Services; using Xunit; namespace Foo.UnitTests.Services { public class FooServiceTests { [Fact] public void OutputAppVersion() { var fooService = CreateDefaultFooService(); var appVersion = fooService.GetAppVersion(); Assert.NotEmpty(appVersion); } private FooService CreateDefaultFooService() { return new FooService(); } } }単体テストの実行
上記の単体テストを実行すると、以下のエラーで失敗します。
Xamarin.Essentials.NotImplementedInReferenceAssemblyException : This functionality is not implemented in the portable version of this assembly. You should reference the NuGet package from your main application project in order to reference the platform-specific implementation.どうやら
Xamarin.*のクラスを単体テストで呼び出せないようです。
(呼び出せる方法があれば教えていただけると嬉しいです)解決策: 単体テストから呼び出せないクラスをモックに差し替える
単体テストから呼び出せないクラスはDIして、テスト時にモックへ差し替えるようにします。
AppInfoServiceクラスを新規作成し、FooServiceクラスからXamarin.Essentialsへの依存を切り出します。AppInfoService.csusing Xamarin.Essentials; namespace Foo.Services { public interface IAppInfoService { string GetAppVersion(); } public class AppInfoService : IAppInfoService { public AppInfoService() { } public string GetAppVersion() { return AppInfo.VersionString; } } }
FooServiceクラスにコンストラクタ経由でAppInfoServiceクラスをDIすれば、Xamarin.Essentialsに依存しなくなります。FooService.cs- using Xamarin.Essentials; namespace Foo.Services { public interface IFooService { string GetAppVersion(); } public class FooService : IFooService { + private readonly IAppInfoService appInfoService; - public FooService() + public FooService(IAppInfoService appInfoService) { + this.appInfoService = appInfoService; } public string GetAppVersion() { - return AppInfo.VersionString; + return appInfoService.GetAppVersion(); } } }単体テストではMoq(モックライブラリ)を使って
IAppInfoServiceのモックを生成し、FooServiceクラスにDIします。モックで
GetAppVersion()メソッドの戻り値を1.0.0に固定し、アサートで1.0.0と一致するか確認します。
Moqはメソッドが何回呼ばれたかかんたんに確認できるので、1回のみ呼ばれたか(Times.Once())を確認します。FooServiceTests.csusing Foo.Services; + using Moq; using Xunit; namespace Foo.UnitTests.Services { public class FooServiceTests { [Fact] public void OutputAppVersion() { + var mockIAppInfoService = CreateDefaultMockIAppInfoService(); - var fooService = CreateDefaultFooService(); + var fooService = CreateDefaultFooService(mockIAppInfoService); var appVersion = fooService.GetAppVersion(); - Assert.NotEmpty(appVersion); + Assert.Equal("1.0.0", appVersion); + Mock.Get(mockIAppInfoService).Verify(s => s.GetAppVersion(), Times.Once()); } - private FooService CreateDefaultFooService() + private FooService CreateDefaultFooService(IAppInfoService appInfoService) { - return new FooService(); + return new FooService(appInfoService); } + private IAppInfoService CreateDefaultMockIAppInfoService() + { + var mock = Mock.Of<IAppInfoService>(s => + s.GetAppVersion() == "1.0.0" + ); + + return mock; + } } }これで単体テストを実行すると、無事に成功します

Xamarinでは
Xamarin.*に依存しないようにビジネスロジックのクラスを実装すると、テスタブルになります。おわりに
以上、 Xamarin Advent Calendar 2020 の1日目の記事でした。
明日は @ytabuchi さんの記事です。
- 投稿日:2020-12-01T19:07:43+09:00
プリザンターに自動ふりがな入力機能と郵便番号変換機能を追加する
本記事はPleasanter(プリザンター) Advent Calendar 20202日目の記事です。
外部JSライブラリを使って自動入力機能を備えた入力フォームを作る
ユーザー情報登録画面などでよく見る「自動でふりがなを入力する機能」や「郵便番号から住所を自動入力する機能」ですが、残念ながらプリザンターの標準機能にはありません。
ですが、下記のようなオープンソースライブラリを活用することで実現可能です。
- 自動カナ入力
https://github.com/harisenbon/autokana- 郵便番号から住所を自動入力
https://github.com/yubinbango/yubinbango今回は、その設定方法について解説します。
テーブルの準備
まずは、下記のような項目を持ったテーブルを用意します。
- 「姓(漢字)」:分類A(ClassA)
- 「姓(ふりがな)」:分類B(ClassB)
- 「名(漢字)」:分類C(ClassC)
- 「名(ふりがな)」:分類D(ClassD)
- 「郵便番号」:分類E(ClassE)
- 「住所:分類F」(ClassF)
- 「都道府県」:分類G(ClassG)
- 「市区町村」:分類H(ClassH)
- 「番地」:分類I(ClassI)
氏名のふりがなを自動入力する
まずは「姓(漢字)」「名(漢字)」に文字を入力すると「姓(ふりがな)」「名(ふりがな)」に入力した文字のふりがなが自動入力されるように設定します。
- GitHubリポジトリから下記のjsファイルを取得します。
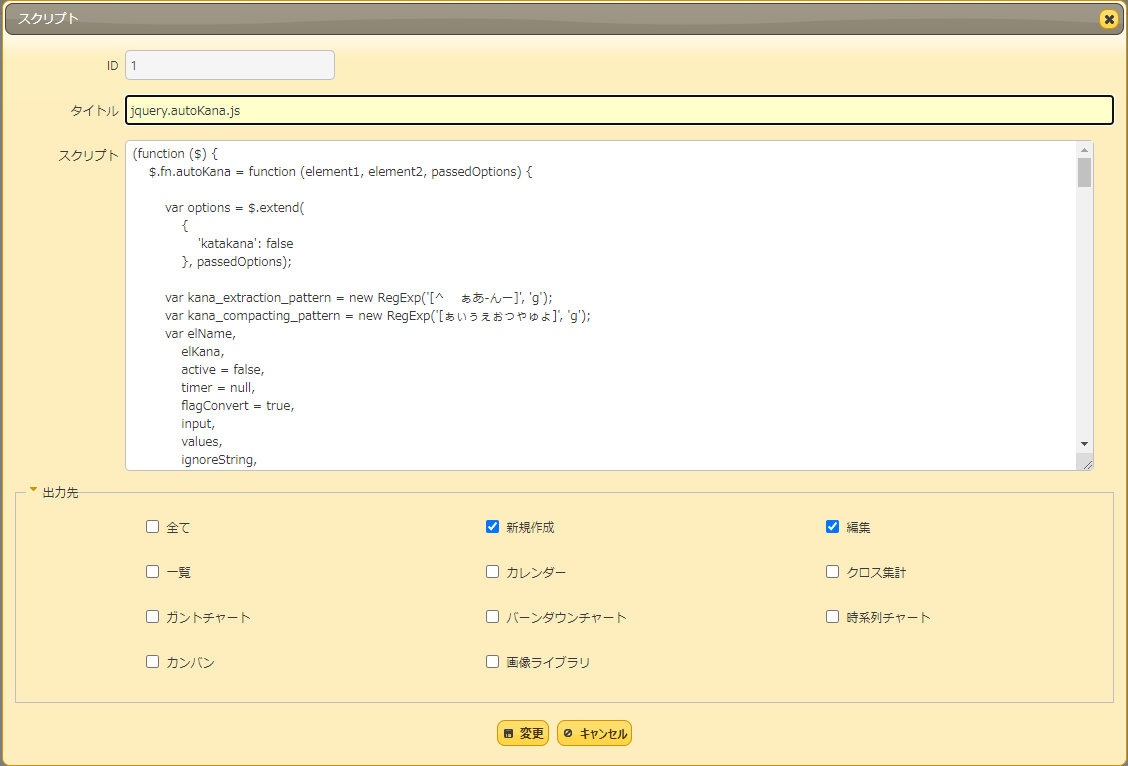
https://github.com/harisenbon/autokana/blob/master/jquery.autoKana.js- 「テーブルの管理」-「スクリプト」タブで「新規作成」ボタンをクリックします。
- 「スクリプト」欄に取得したコードを貼り付けます。
- 「出力先」欄は「新規作成」と「編集」にチェックを付けます。
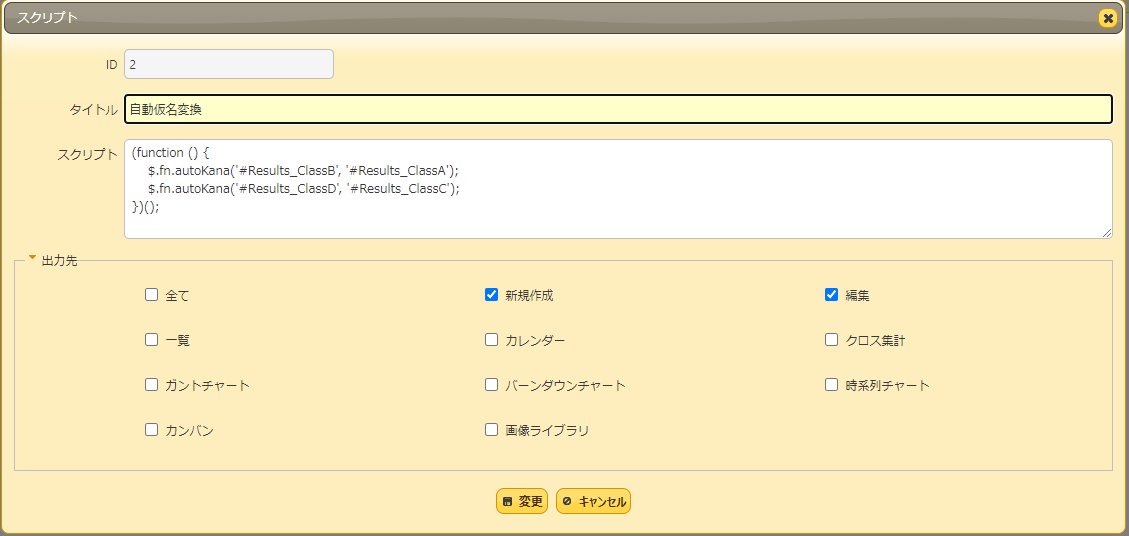
- もう一つ「スクリプト」を「新規作成」し、「スクリプト」欄に下記コードを入力します。
- 「出力先」は同じく「新規作成」と「編集」とします。
(function () {
    $.fn.autoKana('#Results_ClassA', '#Results_ClassB');
    $.fn.autoKana('#Results_ClassC', '#Results_ClassD');
})();
※なお、ふりがなをカタカナで出力したい場合は、下記のように引数を追加します。
$.fn.autoKana('#Results_ClassA', '#Results_ClassB', {katakana:true});
$.fn.autoKana('#Results_ClassC', '#Results_ClassD', {katakana:true});
これでふりがなの自動入力の設定は完了です。
郵便番号から住所を自動入力させる
次に、「郵便番号」を入力すると対応する住所が自動で入力されるように設定します。
拡張HTMLで外部スクリプトを読み込む
今回利用する yubinbango.js は複数のモジュールを参照する構成となっており、カナ入力の場合のようにコードを直接貼り付けるといったことはできません。
そういったケースでは、拡張HTML を利用してBodyタグの最後に <Script>タグを埋め込むことで外部スクリプトを参照させることが可能となります(ただし、サーバー側での設定が必要となりますので、クラウド版プリザンターでは利用できません)。拡張HTMLの設定方法は2通りの方法があります。下記1.、 2. どちらかの方法で設定を行ってください。
1. Extensionsテーブルに設定
プリザンターのデータベース上の Extensionテーブルに下記レコードを追加します。
ExtensionType ExtensionName ExtensionSettings Body Html HtmlBodyBottom {"SitIdList":[1010]} <script src="https://yubinbango.github.io/yubinbango/yubinbango.js" charset="UTF-8"> この設定により、サイトID=1010 のサイトの body タグの最後に yubinbango.js を参照するスクリプトタグが埋め込まれるようになります。
2. App_Data配下にファイルを設置する
プリザンターインストールフォルダ内の "App_Data\Parameters\ExtendedHtmls" フォルダに下記ファイルを配置します。
- HtmlBodyBottm.html ファイルを作成し、挿入するHTMLを記載します。
<script src="https://yubinbango.github.io/yubinbango/yubinbango.js" charset="UTF-8"></script>- HtmlBodyBottom.html.json ファイルを作成し、下記内容を記載します。
{"SiteIDList":[1010]}郵便番号を変換するコードを追加する
スクリプトが参照できるようになったら、それを利用して郵便番号を変換するコードを記述します。
- 「テーブルの管理」-「スクリプト」タブで「新規作成」ボタンをクリック
- 「スクリプト」欄に下記コードを入力
- 「出力先」では「新規作成」と「編集」にチェックを付ける
(function () {
    $('#MainForm').addClass('h-adr').append('<span class="p-country-name" style="display:none;">Japan</span>');
    $('#Results_ClassE').addClass('p-postal-code');
    $('#Results_ClassF').addClass('p-region p-locality p-street-address p-extended-address');
    $('#Results_ClassG').addClass('p-region');
    $('#Results_ClassH').addClass('p-locality');
    $('#Results_ClassI').addClass('p-street-address p-extended-address');
})();
YubinBangoライブラリの仕様に従って、入力Formの各要素に class を追加します。
- formタグのclass指定の中に 'h-adr'を追加します。
- form内に、国名(p-country-name) = Japan を示すタグ追加します。
<span class="p-country-name" style="display:none;">Japan</span>- 郵便番号入力欄のclass指定に 'p-postal-code' を追加します。
- 住所欄のclass指定の中に下記クラスを指定します。
- 都道府県名(p-region)
- 市町村区(p-locality)
- 町域(p-street-address)
- 以降の住所(p-extended-address)
※ 住所(ClassF)欄のように、住所の全体を1つの項目に設定することも、「都道府県(ClassG)」「市区町村(ClassH)」「番地(ClassI)」のように別々の項目に分けて設定することも可能です。
これで郵便番号変換の設定も完了です。
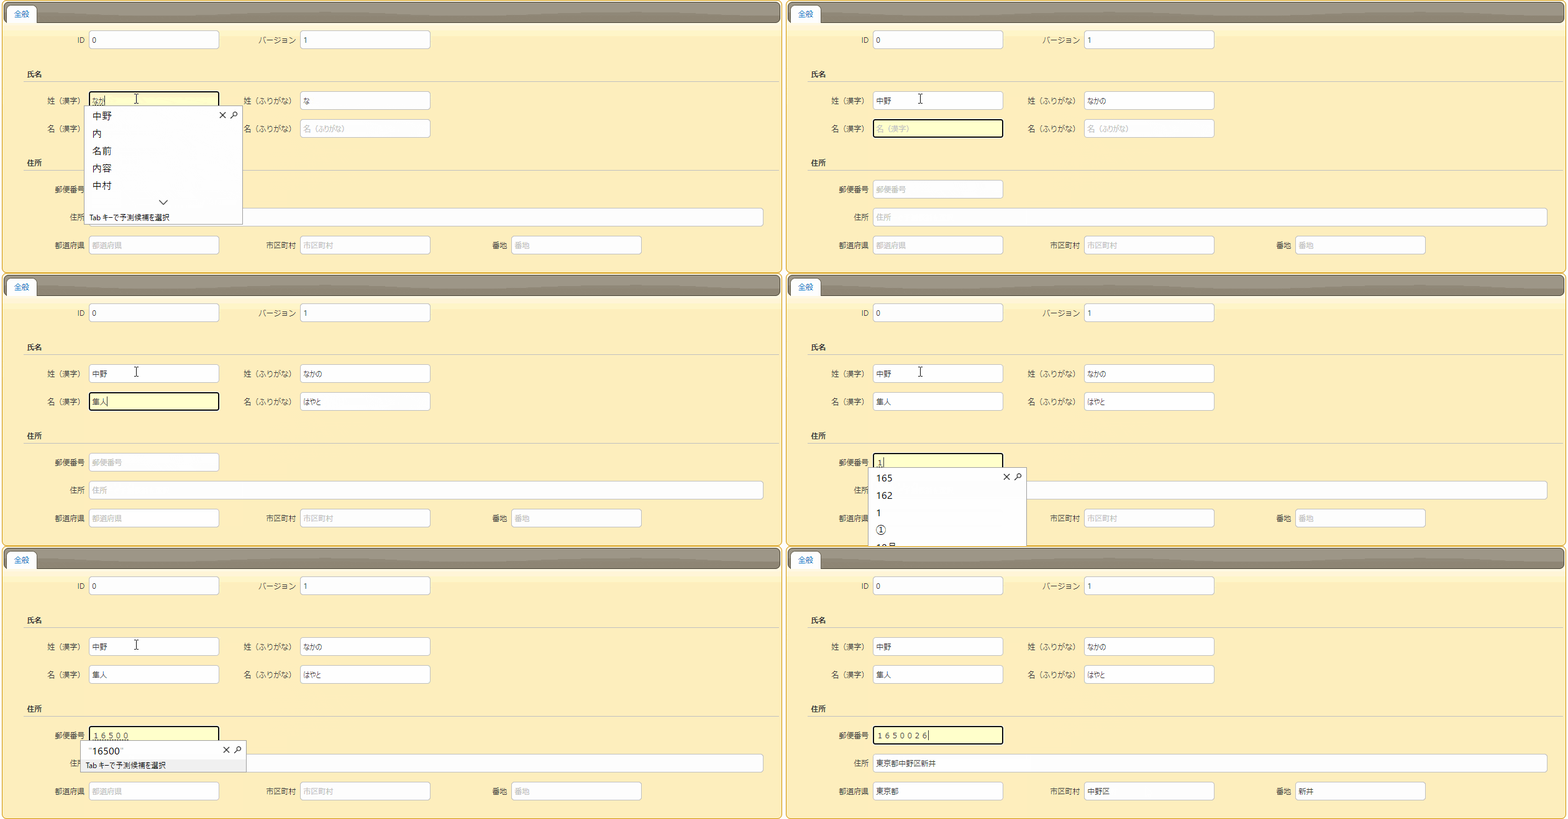
動かしてみる
ふりがなも、住所もちゃんと自動入力されましたね!
まとめ
プリザンター本体が対応していない機能も、今回のように外部のライブラリ等を導入するだけで簡単に実現できるものもありますので、探してみるのも良いかもしれません。
それでは、(まだ少し早いですが)良いクリスマスを!
- 投稿日:2020-12-01T17:22:56+09:00
ASP.NET MVC を ASP.NET Core MVC にしてみる
ふと気になったので ASP.NET MVC を ASP.NET Core MVC にしてみようと思います。とりあえずいきなり巨大なものをコンバートすると心が折れるので ASP.NET MVC のプロジェクトを新規作成したものを、ASP.NET Core MVC に変換するということをやってみようと思います。
とりあえずどれくらい大変なのかを体験するために ASP.NET MVC から ASP.NET Core MVC への移行ドキュメントなどはチェックせずにやってみます。
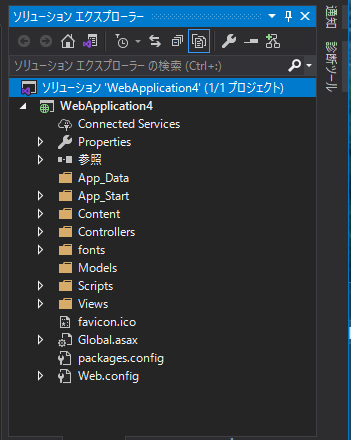
新規作成したプロジェクトはこんな感じです。packages.config などがあるのがドキっとしますね!
とりあえず、後から参照が無い系エラーになったとき用に packages.config を消すのは最後にしようと思います。
まずは、プロジェクトファイルを以下の内容に書き換えます。一度プロジェクトをアンロードしてから読み込みましょう。
WebApplication4.csproj<Project Sdk="Microsoft.NET.Sdk.Web"> <PropertyGroup> <TargetFramework>netcoreapp3.1</TargetFramework> </PropertyGroup> </Project>再オープンしてリビルドをしてみると以下のように 22 個のコンパイルエラーが出ました。
error CS0579: 'System.Reflection.AssemblyCompanyAttribute' 属性が重複しています
error CS0579: 'System.Reflection.AssemblyConfigurationAttribute' 属性が重複しています
error CS0579: 'System.Reflection.AssemblyFileVersionAttribute' 属性が重複しています
error CS0579: 'System.Reflection.AssemblyProductAttribute' 属性が重複しています
error CS0579: 'System.Reflection.AssemblyTitleAttribute' 属性が重複しています
error CS0579: 'System.Reflection.AssemblyVersionAttribute' 属性が重複しています
error CS0234: 型または名前空間の名前 'Optimization' が名前空間 'System.Web' に存在しません (アセンブリ参照があることを確認してください)
error CS0234: 型または名前空間の名前 'Mvc' が名前空間 'System.Web' に存在しません (アセンブリ参照があることを確認してください)
error CS0234: 型または名前空間の名前 'Mvc' が名前空間 'System.Web' に存在しません (アセンブリ参照があることを確認してください)
error CS0234: 型または名前空間の名前 'Routing' が名前空間 'System.Web' に存在しません (アセンブリ参照があることを確認してください)
error CS0234: 型または名前空間の名前 'Mvc' が名前空間 'System.Web' に存在しません (アセンブリ参照があることを確認してください)
error CS0234: 型または名前空間の名前 'Mvc' が名前空間 'System.Web' に存在しません (アセンブリ参照があることを確認してください)
error CS0234: 型または名前空間の名前 'Optimization' が名前空間 'System.Web' に存在しません (アセンブリ参照があることを確認してください)
error CS0234: 型または名前空間の名前 'Routing' が名前空間 'System.Web' に存在しません (アセンブリ参照があることを確認してください)
error CS0234: 型または名前空間の名前 'HttpApplication' が名前空間 'System.Web' に存在しません (アセンブリ参照があることを確認してください)
error CS0246: 型または名前空間の名前 'Controller' が見つかりませんでした (using ディレクティブまたはアセンブリ参照が指定されていることを確認してください)
error CS0246: 型または名前空間の名前 'GlobalFilterCollection' が見つかりませんでした (using ディレクティブまたはアセンブリ参照が指定されていることを確認してください)
error CS0246: 型または名前空間の名前 'ActionResult' が見つかりませんでした (using ディレクティブまたはアセンブリ参照が指定されていることを確認してください)
error CS0246: 型または名前空間の名前 'BundleCollection' が見つかりませんでした (using ディレクティブまたはアセンブリ参照が指定されていることを確認してください)
error CS0246: 型または名前空間の名前 'RouteCollection' が見つかりませんでした (using ディレクティブまたはアセンブリ参照が指定されていることを確認してください)
error CS0246: 型または名前空間の名前 'ActionResult' が見つかりませんでした (using ディレクティブまたはアセンブリ参照が指定されていることを確認してください)
error CS0246: 型または名前空間の名前 'ActionResult' が見つかりませんでした (using ディレクティブまたはアセンブリ参照が指定されていることを確認してください)
AssemblyCompanyAttributeなどの最初の 6 個のエラーは WPF のプロジェクトを変換したときに見たことがあるエラーですね。AssemblyInfo.cs が自動生成されるようになったため、.NET Framework のプロジェクトにある AssemblyInfo.cs と内容が重複してしまうために起きるエラーですね。これはプロジェクトファイルに
GenerateAssemblyInfoタグを追加してfalseを設定しましょう。以下のようになります。<Project Sdk="Microsoft.NET.Sdk.Web"> <PropertyGroup> <TargetFramework>netcoreapp3.1</TargetFramework> <GenerateAssemblyInfo>false</GenerateAssemblyInfo> </PropertyGroup> </Project>不要な using などがあったりする部分もあるので、一旦プロジェクトに対してコードのクリーンナップを実行して綺麗にします。
HomeControllerクラスにはusing Microsoft.AspNetCore.Mvc;を追加します。HomeController.csusing Microsoft.AspNetCore.Mvc; namespace WebApplication4.Controllers { public class HomeController : Controller { public ActionResult Index() { return View(); } public ActionResult About() { ViewBag.Message = "Your application description page."; return View(); } public ActionResult Contact() { ViewBag.Message = "Your contact page."; return View(); } } }残りのエラーが 4 つになりました。
どれもアプリの構成系のファイルで起きています。というか Global.asax.cs ってありましたね。懐かしい…
BundleConfig.csではスクリプトのバンドルを作ってますが、この機能は ASP.NET Core MVC では見た記憶が無いので無いのでしょう。普通にスクリプトをそのまま参照します。
FilterConfig.csではHandleErrorAttributeをフィルターに追加しています。RouteConfig.csはルートの構成ですね。ここらへんは ASP.NET Core MVC ではStartup.csで書くのでStartup.csと エントリーポイントのProgram.csを追加してApp_StartフォルダーとGlobal.asaxは消してしまいます。追加したファイルは以下の 2 つです。手っ取り早く ASP.NET Core MVC のプロジェクトを新規作成して、そこからコピペしてきました。
Program.csusing Microsoft.AspNetCore.Hosting; using Microsoft.Extensions.Hosting; namespace WebApplication4 { public class Program { public static void Main(string[] args) { CreateHostBuilder(args).Build().Run(); } public static IHostBuilder CreateHostBuilder(string[] args) => Host.CreateDefaultBuilder(args) .ConfigureWebHostDefaults(webBuilder => { webBuilder.UseStartup<Startup>(); }); } }Startup.csusing Microsoft.AspNetCore.Builder; using Microsoft.AspNetCore.Hosting; using Microsoft.Extensions.Configuration; using Microsoft.Extensions.DependencyInjection; using Microsoft.Extensions.Hosting; namespace WebApplication4 { public class Startup { public Startup(IConfiguration configuration) { Configuration = configuration; } public IConfiguration Configuration { get; } // This method gets called by the runtime. Use this method to add services to the container. public void ConfigureServices(IServiceCollection services) { services.AddControllersWithViews(); } // This method gets called by the runtime. Use this method to configure the HTTP request pipeline. public void Configure(IApplicationBuilder app, IWebHostEnvironment env) { if (env.IsDevelopment()) { app.UseDeveloperExceptionPage(); } else { app.UseExceptionHandler("/Home/Error"); // The default HSTS value is 30 days. You may want to change this for production scenarios, see https://aka.ms/aspnetcore-hsts. app.UseHsts(); } app.UseHttpsRedirection(); app.UseStaticFiles(); app.UseRouting(); app.UseAuthorization(); app.UseEndpoints(endpoints => { endpoints.MapControllerRoute( name: "default", pattern: "{controller=Home}/{action=Index}/{id?}"); }); } } }この状態でビルドするとエラーが以下の内容に変化しました!何かのエラーを解決する調査をしているときもそうですけど、エラー内容が変わると進捗を感じますね!
これはスクリプトバンドルが無くなったせいですね。なので、
Conetntフォルダーの中身をwwwroot/cssに移動させてScriptsフォルダーをwwwroot/jsフォルダーに移動させて、fontsフォルダーをwwwroot/fontsに移動させてfavicon.icoをwwwrootフォルダーに移動させます。以下のようになりました。
そしてエラーの出ている
_Layout.cshtmlを以下の内容から_Layout.cshtml<!DOCTYPE html> <html> <head> <meta http-equiv="Content-Type" content="text/html; charset=utf-8" /> <meta charset="utf-8" /> <meta name="viewport" content="width=device-width, initial-scale=1.0"> <title>@ViewBag.Title - マイ ASP.NET アプリケーション</title> @Styles.Render("~/Content/css") @Scripts.Render("~/bundles/modernizr") </head> <body> <div class="navbar navbar-inverse navbar-fixed-top"> <div class="container"> <div class="navbar-header"> <button type="button" class="navbar-toggle" data-toggle="collapse" data-target=".navbar-collapse"> <span class="icon-bar"></span> <span class="icon-bar"></span> <span class="icon-bar"></span> </button> @Html.ActionLink("アプリケーション名", "Index", "Home", new { area = "" }, new { @class = "navbar-brand" }) </div> <div class="navbar-collapse collapse"> <ul class="nav navbar-nav"> <li>@Html.ActionLink("ホーム", "Index", "Home")</li> <li>@Html.ActionLink("詳細", "About", "Home")</li> <li>@Html.ActionLink("問い合わせ", "Contact", "Home")</li> </ul> </div> </div> </div> <div class="container body-content"> @RenderBody() <hr /> <footer> <p>© @DateTime.Now.Year - マイ ASP.NET アプリケーション</p> </footer> </div> @Scripts.Render("~/bundles/jquery") @Scripts.Render("~/bundles/bootstrap") @RenderSection("scripts", required: false) </body> </html>直接ファイルを参照するように変更します。
_Layout.cshtml<!DOCTYPE html> <html> <head> <meta http-equiv="Content-Type" content="text/html; charset=utf-8" /> <meta charset="utf-8" /> <meta name="viewport" content="width=device-width, initial-scale=1.0"> <title>@ViewBag.Title - マイ ASP.NET アプリケーション</title> <link rel="stylesheet" href="~/css/bootstrap.min.css" /> <link rel="stylesheet" href="~/css/bootstrap-theme.min.css" /> <link rel="stylesheet" href="~/css/Site.css" /> </head> <body> <div class="navbar navbar-inverse navbar-fixed-top"> <div class="container"> <div class="navbar-header"> <button type="button" class="navbar-toggle" data-toggle="collapse" data-target=".navbar-collapse"> <span class="icon-bar"></span> <span class="icon-bar"></span> <span class="icon-bar"></span> </button> @Html.ActionLink("アプリケーション名", "Index", "Home", new { area = "" }, new { @class = "navbar-brand" }) </div> <div class="navbar-collapse collapse"> <ul class="nav navbar-nav"> <li>@Html.ActionLink("ホーム", "Index", "Home")</li> <li>@Html.ActionLink("詳細", "About", "Home")</li> <li>@Html.ActionLink("問い合わせ", "Contact", "Home")</li> </ul> </div> </div> </div> <div class="container body-content"> @RenderBody() <hr /> <footer> <p>© @DateTime.Now.Year - マイ ASP.NET アプリケーション</p> </footer> </div> <script src="~/js/jquery-3.4.1.min.js"></script> <script src="~/js/jquery.validate.min.js"></script> <script src="~/js/jquery.validate.unobtrusive.min.js"></script> <script src="~/js/bootstrap.min.js"></script> <script src="~/js/modernizr-2.8.3.js"></script> @RenderSection("scripts", required: false) </body> </html>この時点でビルドするとエラーが消えます。とりあえずデバッグ実行してみましょう。
あっ、動いた…
詳細ページや問い合わせページも動きました。
もうちょっと詰まるかと思ったら思ったよりあっさりいってびっくりしました。
ASP.NET から ASP.NET Core への移行ドキュメントを見てもアプローチは異なりますが、やっていることは大体同じでした。.NET Framework でなくなった機能を踏んでいない限りは割と機械的に移植できそうですね。
- 投稿日:2020-12-01T15:59:45+09:00
C#のstringとbyteの相互変換
shift-jisは可変長だから、自分で勝手に2バイト区切りにしては駄目
            {
                string sOriginal = "ユニCodeのbyte変換";
                byte[] arrBytes = Encoding.Unicode.GetBytes(sOriginal);
                //foreach (byte b in bytesData) Debug.WriteLine(b);
                Debug.WriteLine(BitConverter.ToString(arrBytes));
                string hexString = BitConverter.ToString(arrBytes).Replace("-", "");
                Debug.WriteLine(hexString);

                byte[] repack = new byte[hexString.Length / 2];
                for (var i = 0; i < hexString.Length / 2; i++)
                {
                    var hexChar = hexString.Substring(2 * i, 2);
                    repack[i] = Convert.ToByte(hexChar, 16);
                }
                Debug.WriteLine(Encoding.Unicode.GetString(repack));

                //2バイトずつもどす
                byte[] tmp = new byte[2];
                for (int i = 0; i < arrBytes.Length / 2; i++)
                {
                    tmp[0] = arrBytes[2 * i + 0];
                    tmp[1] = arrBytes[2 * i + 1];
                    Debug.WriteLine(Encoding.Unicode.GetString(tmp));
                }
            }
            Debug.WriteLine("---");
            {
                string sOriginal = "シフトjisのbyte変換";
                byte[] arrBytes = Encoding.GetEncoding("Shift_JIS").GetBytes(sOriginal);
                //foreach (byte b in bytesData) Debug.WriteLine(b);
                Debug.WriteLine(BitConverter.ToString(arrBytes));
                string hexString = BitConverter.ToString(arrBytes).Replace("-", "");
                Debug.WriteLine(hexString);

                byte[] repack = new byte[hexString.Length / 2];
                for (var i = 0; i < hexString.Length / 2; i++)
                {
                    var hexChar = hexString.Substring(2 * i, 2);
                    repack[i] = Convert.ToByte(hexChar, 16);
                }
                Debug.WriteLine(Encoding.GetEncoding("Shift_JIS").GetString(repack));

                //shiftjisは可変長なので、2バイトで区切るとくしゃくしゃになる
                byte[] tmp = new byte[2];
                for (int i = 0; i < arrBytes.Length / 2; i++)
                {
                    tmp[0] = arrBytes[2 * i + 0];
                    tmp[1] = arrBytes[2 * i + 1];
                    Debug.WriteLine(Encoding.GetEncoding("Shift_JIS").GetString(tmp));
                }
            }
実行結果
E6-30-CB-30-23-FF-4F-FF-44-FF-45-FF-6E-30-62-00-79-00-74-00-65-00-09-59-DB-63
E630CB3023FF4FFF44FF45FF6E3062007900740065000959DB63
ユニCodeのbyte変換
ユ
ニ
C
o
d
e
の
b
y
t
e
変
換
---
83-56-83-74-83-67-6A-69-73-82-CC-62-79-74-65-95-CF-8A-B7
8356837483676A697382CC6279746595CF8AB7
シフトjisのbyte変換
シ
フ
ト
ji
s・
フb
yt
e・
マ・
- 投稿日:2020-12-01T14:33:37+09:00
Unityでカメラの向きを参考に移動するソースコード
using System.Collections;
using System.Collections.Generic;
using UnityEngine;

public class PlayerController : MonoBehaviour
{
    [SerializeField]
    Transform mainCamera;

    float scale = 0.1f;

    // Update is called once per frame
    void Update()
    {
        if (Input.GetKey(KeyCode.W))
        {
            var direction = Quaternion.Euler(mainCamera.eulerAngles) * Vector3.forward;
            transform.position += new Vector3(direction.x, 0, direction.z) * scale;
        }
        if (Input.GetKey(KeyCode.S))
        {
            var direction = Quaternion.Euler(mainCamera.transform.eulerAngles) * Vector3.back;
            transform.localPosition += new Vector3(direction.x, 0, direction.z) * scale;
        }
        if (Input.GetKey(KeyCode.A))
        {
            var direction = Quaternion.Euler(mainCamera.transform.eulerAngles) * Vector3.left;
            transform.localPosition += new Vector3(direction.x, 0, direction.z) * scale;
        }
        if (Input.GetKey(KeyCode.D))
        {
            var direction = Quaternion.Euler(mainCamera.transform.eulerAngles) * Vector3.right;
            transform.localPosition += new Vector3(direction.x, 0, direction.z) * scale;
        }
    }
}
- 投稿日:2020-12-01T14:33:37+09:00
Unityでカメラの向き(ベクトル)を参考に移動するソースコード
using System.Collections;
using System.Collections.Generic;
using UnityEngine;

public class PlayerController : MonoBehaviour
{
    [SerializeField]
    Transform mainCamera;

    float scale = 0.1f;

    // Update is called once per frame
    void Update()
    {
        if (Input.GetKey(KeyCode.W))
        {
            var direction = Quaternion.Euler(mainCamera.eulerAngles) * Vector3.forward;
            transform.position += new Vector3(direction.x, 0, direction.z) * scale;
        }
        if (Input.GetKey(KeyCode.S))
        {
            var direction = Quaternion.Euler(mainCamera.transform.eulerAngles) * Vector3.back;
            transform.localPosition += new Vector3(direction.x, 0, direction.z) * scale;
        }
        if (Input.GetKey(KeyCode.A))
        {
            var direction = Quaternion.Euler(mainCamera.transform.eulerAngles) * Vector3.left;
            transform.localPosition += new Vector3(direction.x, 0, direction.z) * scale;
        }
        if (Input.GetKey(KeyCode.D))
        {
            var direction = Quaternion.Euler(mainCamera.transform.eulerAngles) * Vector3.right;
            transform.localPosition += new Vector3(direction.x, 0, direction.z) * scale;
        }
    }
}
- 投稿日:2020-12-01T13:26:30+09:00
C#でネスト化したJSONを出力する
やりたいこと
何かしらから得たデータをC#上でJSONをネスト化して出力してみました。
環境や使用したライブラリ
- windows 10 64bit
- Visual Studio 2019
- .NET framework 4.7.2
- System.Text.Json
手順
コンソールアプリケーションの作成
動作確認としてコンソールアプリを作成しました。
1.ファイル→新規作成→プロジェクト→コンソールアプリ(.NET Framework)とクリックして新しいプロジェクトつくります。2.ソリューションエクスプローラーから「参照」を右クリックで「NuGetパッケージの管理」をクリックします。
3.「参照」から「text.json」を検索欄に入れてると、「System.Text.Json」がヒットします。そして、これをインストールします。
これで下準備は完了です。プログラム
プログラムは下記のようになります。
C#のDictionaryを入れ子にするイメージです。using System; using System.Collections.Generic; using System.Linq; using System.Text; using System.Threading.Tasks; using System.Text.Json; namespace sample_json { class Program { static void Main(string[] args) { // 例えば個人データを表すpersonのDictionaryを作成 var person1 = new Dictionary<string, string>() { { "name" ,"John"}, { "age" ,"12"}, { "city" ,"Tokyo"}, }; var person2 = new Dictionary<string, string>() { { "name" ,"Ann"}, { "age" ,"13"}, { "city" ,"Kyoto"}, }; // groupは個人データをまとめるためのDictionary var group = new Dictionary<int, Dictionary<string, string>>(); //groupに個人データpersonを追加する group.Add(1, person1); group.Add(2, person2); // Dictionaryをシリアライズ var jsonstr = JsonSerializer.Serialize(group); // コンソールに出力 Console.WriteLine("{0}", jsonstr); Console.ReadKey(); } } }結果
おわりに
Dictionaryを入れ子にして、System.Text.Jsonを使うことでネスト化されたJSONを出力することができました。
他にも良い方法があれば教えてください。参考
- 投稿日:2020-12-01T10:03:48+09:00
HoloLens2 × Azure Cognitive Services (Face API 編)
はじめに
HoloLensアドベントカレンダー1日目の記事です!
APIよくわからないと弟子から相談があったので、Cognitive Services系をまとめていきたいと思いまーす。
今日は、Cognitive ServicesのFace APIをHoloLens2でやってみました。
実機なしでもできるのでやってみてください。開発環境
- Unity 2019.4.1f1
- MRTK 2.5.1
- OpenCV for Unity
- Windows PC
プライムデーで安かったので、予備PC
— 藤本賢志(ガチ本)@pixivFANBOXはじめました (@sotongshi) October 18, 2020
【基本スペック】
OS:Windows 10 Home 64bit、CPU:インテル Core i7-9750H、GPU:NVIDIA GeForce GTX 1650 Ti Max-Q デザイン 4GB GDDR5、メモリ:16GB(8GB ×2)、SSD:512GB、液晶パネル:15.6インチ、フルHD(1,920×1,080)、リフレッシュレート120Hz pic.twitter.com/S8RIsayFPY導入
1.AzureポータルからFace APIを作成し、エンドポイントとサブスクリプションキーをメモしておいてください。
2.Unityでプロジェクトを作成、MRTK2.5.1をインポートします。なんかウィンドウでたらApplyします。
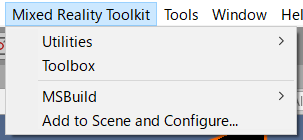
3.メニューのMixed Reality Toolkit->Add to Scene and Configureしてください。
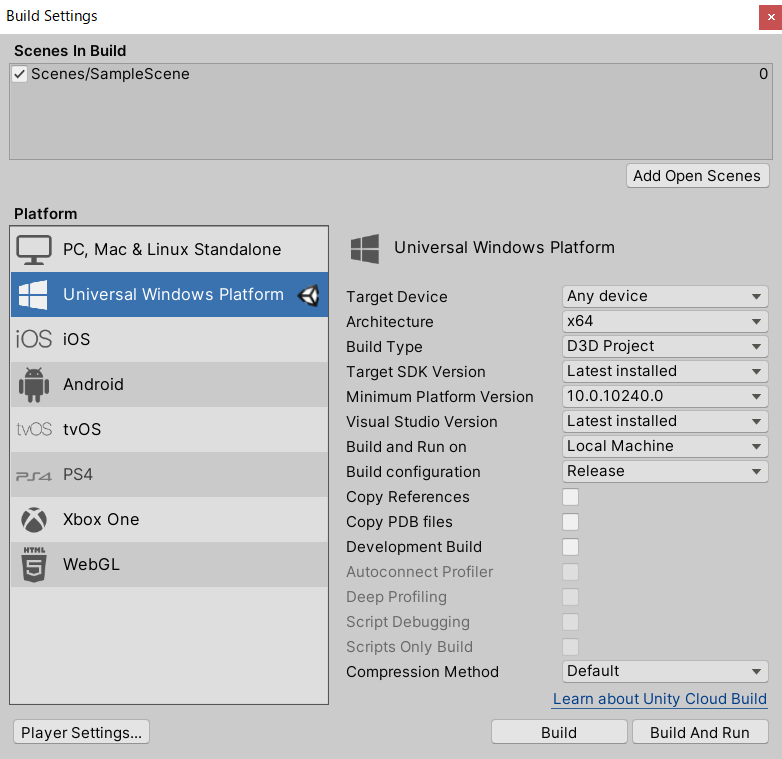
4.Build Settingsから、Universal Windows PlatformにSwitch Platformして、以下のように設定してください。あとAdd Open ScenesでScenes/SampleSceneにチェックが入っていることを確認します。
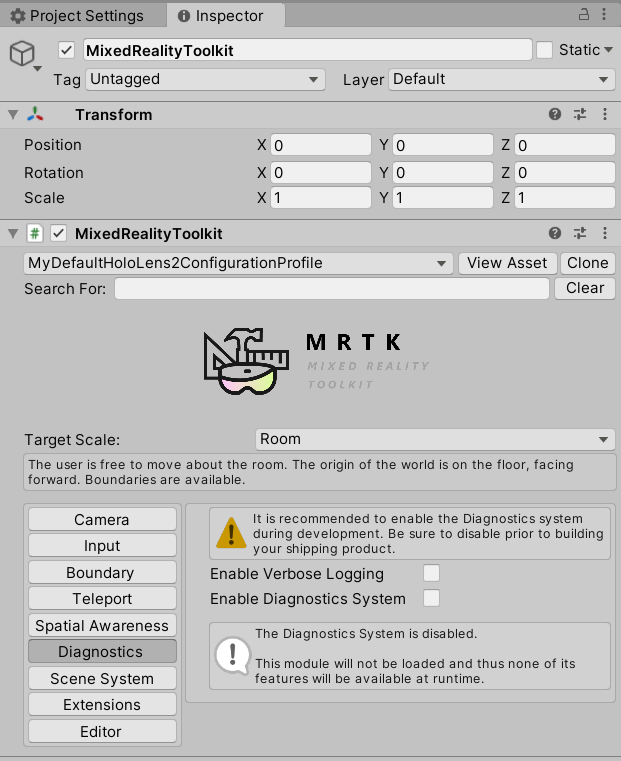
5.MixedRealityToolkitのDefaultHoloLens2ConfigureProfileをcloneし、Diagnostics->Enable Diagnostics Systemのチェックを外します。これでCPU使用率とかのデバッグ情報を非表示にできます。
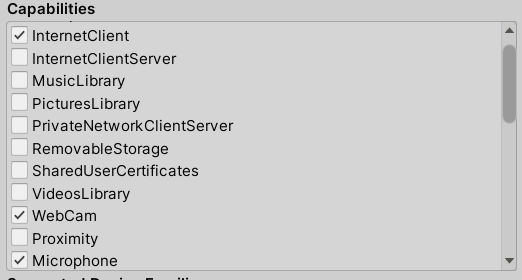
6.Project SettingsのXR Settings、Publishing Settings->Capabilitiesを以下のように設定してください。
7.空のGameObjectを作成し、名前を「TapToCapture」にします。
8.Add Componentから「TapToCapture.cs」スクリプトを作成します。エアタップしたら、画像をキャプチャし、Face APIに投げるスクリプトになります。
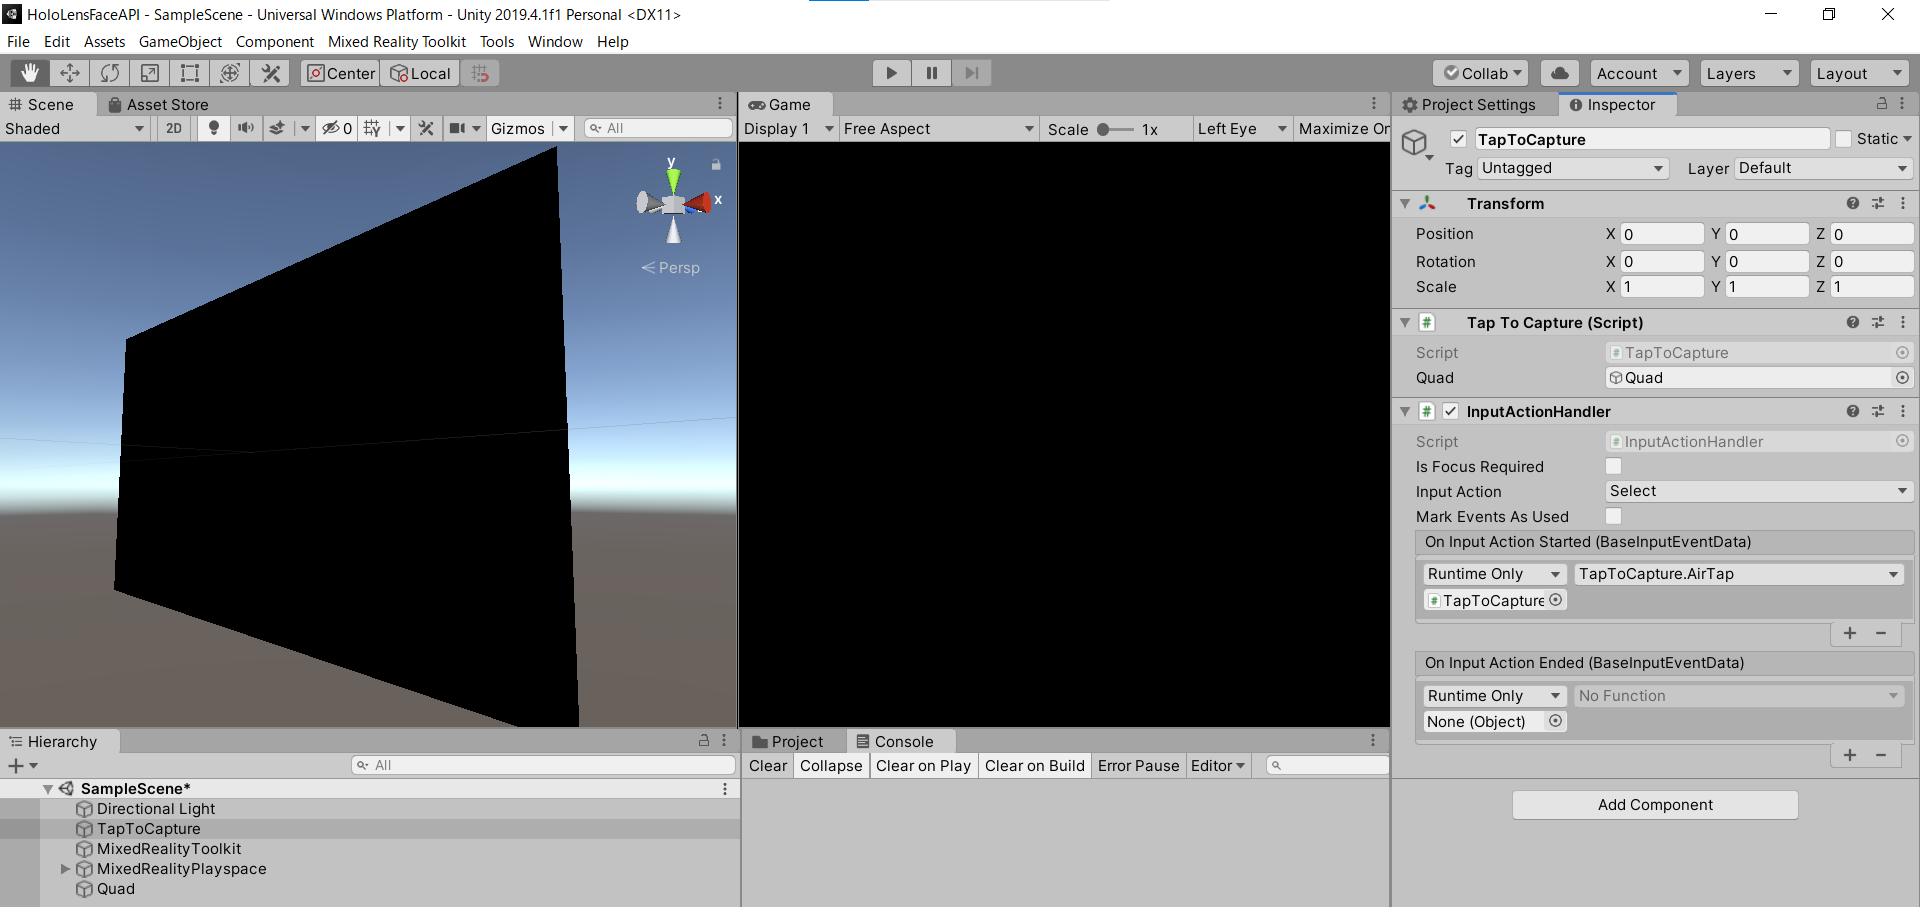
TapToCapture.csusing System.Collections; using System.Collections.Generic; using System.Linq; using System; using UnityEngine; using Microsoft.MixedReality.Toolkit.Utilities; using System.Threading.Tasks; using OpenCVForUnity.CoreModule; using OpenCVForUnity.UnityUtils; using OpenCVForUnity.ImgprocModule; public class TapToCapture : MonoBehaviour { public GameObject quad; [System.Serializable] public class Face { public string faceId; public FaceRectangle faceRectangle; public FaceAttribute faceAttributes; } [System.Serializable] public class FaceRectangle { public int top; public int left; public int width; public int height; } [System.Serializable] public class FaceAttribute { public float age; public string gender; } UnityEngine.Windows.WebCam.PhotoCapture photoCaptureObject = null; Texture2D targetTexture = null; private string endpoint = "https://<Your Endpoint>.cognitiveservices.azure.com/face/v1.0/detect"; private string subscription_key = "<Insert Your API Key>"; public void AirTap() { Resolution cameraResolution = UnityEngine.Windows.WebCam.PhotoCapture.SupportedResolutions.OrderByDescending((res) => res.width * res.height).First(); targetTexture = new Texture2D(cameraResolution.width, cameraResolution.height); // PhotoCapture オブジェクトを作成します UnityEngine.Windows.WebCam.PhotoCapture.CreateAsync(false, delegate (UnityEngine.Windows.WebCam.PhotoCapture captureObject) { photoCaptureObject = captureObject; UnityEngine.Windows.WebCam.CameraParameters cameraParameters = new UnityEngine.Windows.WebCam.CameraParameters(); cameraParameters.hologramOpacity = 0.0f; cameraParameters.cameraResolutionWidth = cameraResolution.width; cameraParameters.cameraResolutionHeight = cameraResolution.height; cameraParameters.pixelFormat = UnityEngine.Windows.WebCam.CapturePixelFormat.BGRA32; // カメラをアクティベートします photoCaptureObject.StartPhotoModeAsync(cameraParameters, delegate (UnityEngine.Windows.WebCam.PhotoCapture.PhotoCaptureResult result) { // 写真を撮ります photoCaptureObject.TakePhotoAsync(OnCapturedPhotoToMemoryAsync); }); }); } async void OnCapturedPhotoToMemoryAsync(UnityEngine.Windows.WebCam.PhotoCapture.PhotoCaptureResult result, UnityEngine.Windows.WebCam.PhotoCaptureFrame photoCaptureFrame) { // ターゲットテクスチャに RAW 画像データをコピーします photoCaptureFrame.UploadImageDataToTexture(targetTexture); byte[] bodyData = targetTexture.EncodeToJPG(); Response response = new Response(); try { // string query = endpoint + "?detectionModel=detection_02&returnFaceId=true"; // string query = endpoint + "?detectionModel=detection_01&returnFaceId=true&returnFaceLandmarks=false&returnFaceAttributes=age,gender,headPose,smile,facialHair,glasses,emotion,hair,makeup,occlusion,accessories,blur,exposure,noise"; string query = endpoint + "?detectionModel=detection_01&returnFaceId=true&returnFaceAttributes=age,gender"; var headers = new Dictionary<string, string>(); headers.Add("Ocp-Apim-Subscription-Key", subscription_key); // headers.Add("Content-Type", "application/octet-stream"); response = await Rest.PostAsync(query, bodyData, headers, -1, true); } catch (Exception e) { photoCaptureObject.StopPhotoModeAsync(OnStoppedPhotoMode); return; } if (!response.Successful) { photoCaptureObject.StopPhotoModeAsync(OnStoppedPhotoMode); return; } Debug.Log(response.ResponseCode); Debug.Log(response.ResponseBody); string newResponseBody = "{ \"results\": " + response.ResponseBody + "}"; Face[] faces = JsonHelper.FromJson<Face>(newResponseBody); Mat imgMat = new Mat(targetTexture.height, targetTexture.width, CvType.CV_8UC4); Utils.texture2DToMat(targetTexture, imgMat); // Debug.Log("imgMat.ToString() " + imgMat.ToString()); foreach (var face in faces){ //Debug.Log(face.faceId); //Debug.Log(face.faceRectangle.left); //Debug.Log(face.faceRectangle.top); //Debug.Log(face.faceRectangle.width); //Debug.Log(face.faceRectangle.height); Imgproc.putText(imgMat, face.faceAttributes.age.ToString()+","+face.faceAttributes.gender, new Point(face.faceRectangle.left, face.faceRectangle.top-10), Imgproc.FONT_HERSHEY_SIMPLEX, 1.5, new Scalar(0, 0, 255, 255), 2, Imgproc.LINE_AA, false); Imgproc.rectangle(imgMat, new Point(face.faceRectangle.left, face.faceRectangle.top), new Point(face.faceRectangle.left + face.faceRectangle.width, face.faceRectangle.top + face.faceRectangle.height), new Scalar(0, 0, 255, 255), 2); } Texture2D texture = new Texture2D(imgMat.cols(), imgMat.rows(), TextureFormat.RGBA32, false); Utils.matToTexture2D(imgMat, texture); // テクスチャが適用されるゲームオブジェクトを作成 // GameObject quad = GameObject.CreatePrimitive(PrimitiveType.Quad); Renderer quadRenderer = quad.GetComponent<Renderer>() as Renderer; // quadRenderer.material = new Material(Shader.Find("Unlit/UnlitTexture")); // quad.transform.parent = this.transform; // quad.transform.localPosition = new Vector3(0.0f, 0.0f, 3.0f); quadRenderer.material.SetTexture("_MainTex", texture); // カメラを非アクティブにします photoCaptureObject.StopPhotoModeAsync(OnStoppedPhotoMode); } void OnStoppedPhotoMode(UnityEngine.Windows.WebCam.PhotoCapture.PhotoCaptureResult result) { // photo capture のリソースをシャットダウンします photoCaptureObject.Dispose(); photoCaptureObject = null; } }9.PhotoCaptureのサンプルはこちらです。エアタップしたら、画像キャプチャするようにInputActionHandlerをAdd Componentし、AirTap関数を作成します。エアタップ(On Input Action Started)したらAirTap関数が発火するように設定します。
10.撮影できたら、targetTextureに画像データが入っているので、JPGにエンコードして、Face APIに投げます。FaceAPIのサンプルはこちらC#、Pythonです。
11.endpointとsubscription_keyにメモしておいたものを貼り付けてください。
12.クエリパラメータは、detection_01モデルを使用、FaceId、年齢と性別を返すように設定しています。
<your endpoint>?detectionModel=detection_01&returnFaceId=true&returnFaceAttributes=age,gender"ちなみにfaceAttributesはsmile, headPose, gender, age, facialHair, glasses, emotion, blur, exposure, noise, makeup, accessories, occlusion, hairといった情報が取れます。
13.MRTKのRestを用いてHTTPリクエストします。
ヘッダーは、"Ocp-Apim-Subscription-Key": subscription_keyを指定、"Content-Type": "application/octet-stream"はRestの中でやってくれるのでコメントアウトします。14.クエリと画像データ、ヘッダーをPOSTします。
response = await Rest.PostAsync(query, bodyData, headers, -1, true);15.response.ResponseBodyが下記のように返ってくればOKです。
[{"faceId":"f1b97cf1-58d0-4dc9-9169-e19cb0655e48","faceRectangle":{"top":347,"left":451,"width":285,"height":285},"faceAttributes":{"gender":"male","age":23.0}}]16.Face APIのResponseBodyがリストのjsonになっているので、パースできるようにJsonHelper.csスクリプトを作成します。
JsonHelper.csusing UnityEngine; using System; public class JsonHelper { public static T[] FromJson<T>(string json) { Wrapper<T> wrapper = JsonUtility.FromJson<Wrapper<T>>(json); return wrapper.results; } [Serializable] private class Wrapper<T> { public T[] results; } }JsonHelperについて
- yuiyoichi/JsonHelper.cs
- How to load an array with JsonUtility?
- UnityのJsonUtilityでJSON配列を処理する17.返ってきたResponseBodyを次のようにすることで、パースすることが可能になります。
{
    "results" : [ {...} ]
}
18.あとは仕様に合わせてFaceクラスとFaceRectangleクラス、FaceAttributeクラスを作成しました。
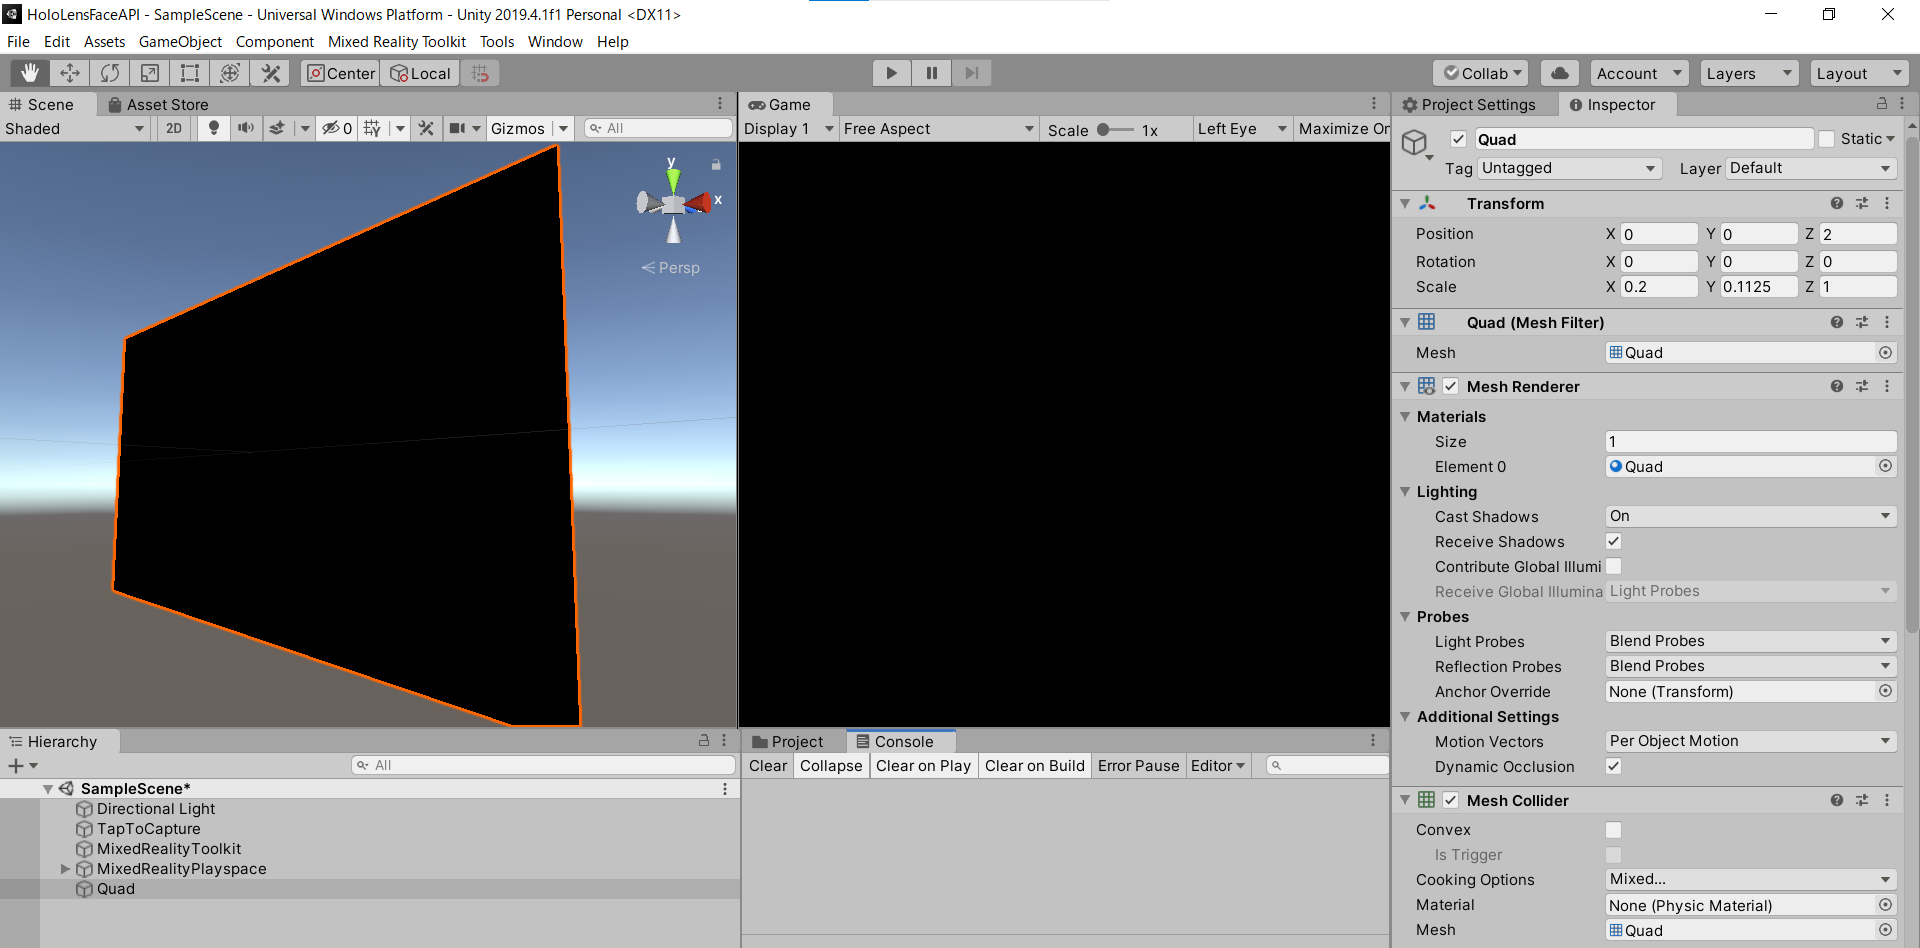
19.顔検出結果をOpenCVを使って画像に描画し、Quadのマテリアルに割り当てます。3D Object->Quadを作成しましょう。
OpenCV for Unity サンプルはこちら
- Texture2DからMatに変換
- 矩形を描画(Imgproc.rectangle)
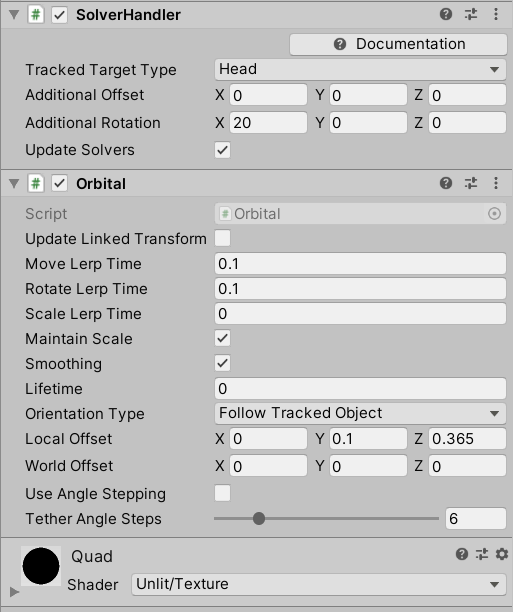
- テキストを描画(Imgproc.putText)20.OrbitalをAdd Componentし、Quadがカメラに追従するようにしています。
21.TapToCaptureにQuadをD&Dしてアタッチしたら完成です。
実行
HoloLens2にデプロイして、実行した結果がこちらになります。Editor上でもできるので試してみてください。
お疲れ様でした。
明日は弟子(@Horomoto-Asahi)による「HoloLens 2のSpatialAwarenessの調査」です。
- 投稿日:2020-12-01T02:42:54+09:00
DontDestroyOnLoadのGameObjectを列挙する
シーンに配置されているもの一覧
開発中のデバッグにおいて、今のシーンに配置されている
GameObjectの一覧を取得したいことがあります。
UnityEditor上でならばHierarchy上にあるものを見れば済むわけですが、やっぱり実機上で何が起こっているのかを知りたいわけです。
このとき、普通のシーン上に配置されているものなら以下のコードで取得できます。getCurrent// 現在のHierarchyのRootにあるGameObjectの一覧 var currentSceneGameObjects = SceneManager.GetActiveScene().GetRootGameObjects();DontDestroyOnLoadの一覧
普通のやつはそれでいいのですが、
DontDestroyOnLoadに登録されたGameObjectを取得するAPIはありません。
実機でしか動作しないSDKが動的にテキトーに作成するGameObjectや、タイミングによって実機でしか起きない事象などを解析する場合など、どうしても実機上でDontDestroyOnLoadの一覧が取りたい場合があります。
というわけで、以下のような回避策で取得することができました。workaround// まずDontDestroyOnLoadされたGameObjectを作る var go = new GameObject(string.Empty); Object.DontDestroyOnLoad(go); // DontDestroyOnLoadはSceneの一種なので,GameObject.sceneから取得することができる var dontDestroyOnLoadGameObjects = go.scene.GetRootGameObjects();解析用コード
これを利用してこんな解析用のコードを作ってみました。
このファイルをプロジェクトに入れておくだけで、シーン遷移のたびに、シーン名と合わせてDontDestroyOnLoadの一覧をログに出力してくれます。
CollectDontDestroyOnLoad()をpublicにしておいたので、好きなときにGameObjectの配列を取得することもできます。DontDestroyOnLoadCollectorusing System.Linq; using UnityEngine; using UnityEngine.SceneManagement; namespace Nekomimi.Daimao { public class DontDestroyOnLoadCollector { [RuntimeInitializeOnLoadMethod(RuntimeInitializeLoadType.BeforeSceneLoad)] private static void Register() { SceneManager.sceneLoaded += (scene, mode) => { var ddol = CollectDontDestroyOnLoad(); var separator = ", "; var s = string.Join(separator, ddol.Where(go => go != null).Select(go => go.name)); Debug.Log($"DDOL_{scene.name} : {s}"); }; } public static GameObject[] CollectDontDestroyOnLoad() { var go = new GameObject(string.Empty); Object.DontDestroyOnLoad(go); var ddol = go.scene.GetRootGameObjects(); Object.Destroy(go); return ddol.Where(o => o != null && !string.Equals(o.name, string.Empty)).ToArray(); } } }実機での動作について
How can I get all DontDestroyOnLoad GameObjects?
ここの解答をもとに作ったのですが、Editorでしか動かないことが強調されています。works only in the Editor
また、その根拠として示されている公式ドキュメントでも以下のような記載があります。
You do not have access to the DontDestroyOnLoad scene and it is not available at runtime.
でも私が試したところでは
AndroidでもiOSでも実機にブッこんだら動きました!
UnityEditorのバージョンは2018と2019です。下のバージョンは覚えてない。
AndroidとiOSでしか試してませんが、この分だと他のプラットフォームでも動きそうな気がします。
公式ができねえ! と言ってることをやってるので、使用範囲はあくまでもデバッグにとどめたほうがよいとは思いますが。まとめ
先人の解答を参考にしつつも、とりあえず自分で数発殴ってみることは重要だなって思いました。
あと普通に考えて公式がそういうAPI用意してくれてもよくない……? って! 思いました!
DontDestroyOnLoadって状態の権化みたいなものなのでできるだけ使わないのがベストプラクティスな気もしますが。でも使っちゃうね。しょうがないね。おしまい。
- 投稿日:2020-12-01T00:47:31+09:00
【.NET (C#)】COMオブジェクトのガベージコレクションの動作を検証してみた
検証の動機
COMオブジェクトである
Microsoft.Office.Interop.Wordを使用した.NETアプリを作成しました。昔から知られていることですが、.NETからCOMオブジェクトの呼び出しはラッパーを仲介するため、処理のオーバーヘッドが高くなります。マネージドなライブラリがあるなら、そちらを用いたほうが効率が良いです。
ですが、どうしてもCOMの使用が必要な場面もあります。その場合の、メモリ開放処理をどう書けばちゃんと解放してくれるのか?を調べてみようと思いました。
一応、用語説明
マネージド
MS以外のベンダー(Oracleとか)では「管理対象」と訳している場合があります(反対語は「非管理対象」)。
マネージドコードと言う場合はCLRによって管理されるコードのことを指し、メモリ自動管理の対象にもなります。反対は「アンマネージド」で、C/C++などで記述されたコードがこれに当たる。COMオブジェクトもアンマネージドなコードで記述されたライブラリ。
COMオブジェクト
Component Object Modelの略ですが、昔のVB6.0の時代ではよく使われていたもので、ソフトウェアの再利用が可能になるもの。今回の場合で言えば、WordのAPIがこのCOMオブジェクトに当たります。CLRのメモリ自動管理の対象になりませんので、開放処理を書いてやる必要があります。
コード
冒頭の私のQiita記事にGitHubのリンクがありますが、一応、ソリューション全体のソースは以下です。
メモリ開放が必要なのは、以下の「変換」ボタン押下時の、WordファイルからPDFへの変換処理の箇所です。一番下の、
finally句のところです。/// <summary> /// 変換ボタンクリック処理 /// </summary> /// <param name="sender"></param> /// <param name="e"></param> private void btnConvert_Click(object sender, EventArgs e) { //using RefWord = Microsoft.Office.Interop.Word;として定義 //WordのCOMオブジェクトをセット RefWord.Application word = new RefWord.Application(); RefWord.Documents docs = word.Documents; RefWord.Document doc = null; //toolCompleteに状態を表示 this.toolComplete.Text = string.Empty; this.Cursor = Cursors.WaitCursor; try { string[] files = Directory.GetFiles(this.txtInput.Text, "*.doc*"); //ファイル数の分ルール foreach (string f in files) { this.toolComplete.Text = Path.GetFileName(f); var attribute = File.GetAttributes(f); var fn = Path.GetFileNameWithoutExtension(f); //テンポラリの隠しファイルは飛ばす if ((attribute & FileAttributes.Hidden) == FileAttributes.Hidden) continue; //PDF出力 doc = docs.Open(f, ReadOnly:true); doc.ExportAsFixedFormat(this.txtOutput.Text + "\\" + fn + ".pdf", RefWord.WdExportFormat.wdExportFormatPDF); doc.Close(); } this.toolComplete.Text = "完了"; } catch(Exception ex) { MessageBox.Show(ex.Message, "Error", MessageBoxButtons.OK, MessageBoxIcon.Error); } finally { //↓計測用 MessageBox.Show(GC.GetTotalMemory(false).ToString()); //COMオブジェクト開放 if (word != null) word.Quit(); Marshal.ReleaseComObject(doc); Marshal.ReleaseComObject(docs); Marshal.ReleaseComObject(word); MessageBox.Show(GC.GetTotalMemory(false).ToString()); //↑計測用 } this.Cursor = Cursors.Default; }
GC.GetTotalMemoryは割り当てられているメモリのバイト数を返します。補足ですが、今回の検証環境は、
- Windows 10 Pro
- .NET Framework 4.6.1
- Office 2019 Word
で実施しました。
結果
開放処理のコードを入れない場合
Marshal.ReleaseComObjectだけでGC.Collect()を入れない場合です。if (word != null) word.Quit(); Marshal.ReleaseComObject(doc); Marshal.ReleaseComObject(docs); Marshal.ReleaseComObject(word);結果:
前:505,092
後:521,476なんか、増加していますね…。
最後にGC.Collect()
MSのドキュメントのサンプル通りの書き方です。
if (word != null) word.Quit(); Marshal.ReleaseComObject(doc); Marshal.ReleaseComObject(docs); Marshal.ReleaseComObject(word); GC.Collect();結果:
前:505,092
後:211,684ちゃんと開放してくれているようですね…。
前後にGC.Collect()
開放処理の前後だと差はあるのでしょうか。
GC.Collect();

if (word != null) word.Quit();
Marshal.ReleaseComObject(doc);
Marshal.ReleaseComObject(docs);
Marshal.ReleaseComObject(word);

GC.Collect();
結果:
前:505,092
後:196,044後だけの時よりも、占有領域が減っているようです。
最後にGC.Collect()とGC.WaitForPendingFinalizers()
これを試した理由は、この記事を見たからです。
上の記事の例ではベストプラクティスとして、
GC.Collect();
GC.WaitForPendingFinalizers();
GC.Collect();
を開放の前後に入れていますが、今回は後だけの場合と前後の場合も検証してみます。
まずは、後だけのパターン。if (word != null) word.Quit(); Marshal.ReleaseComObject(doc); Marshal.ReleaseComObject(docs); Marshal.ReleaseComObject(word); GC.Collect(); GC.WaitForPendingFinalizers(); GC.Collect();結果:
前:505,092
後:195,104
GC.Collect()だけの時より減少していますね…。前後にGC.Collect()とGC.WaitForPendingFinalizers()
ベストプラクティスとして挙げられていた書き方。
GC.Collect();
GC.WaitForPendingFinalizers();
GC.Collect

if (word != null) word.Quit();
Marshal.ReleaseComObject(doc);
Marshal.ReleaseComObject(docs);
Marshal.ReleaseComObject(word);

GC.Collect();
GC.WaitForPendingFinalizers();
GC.Collect();
結果:
前:505,092
後:195,104後だけの場合と変化はありませんね。
結論
COMオブジェクト開放の際は、
Marshal.ReleaseComObject(word)だけでなく、ガーベジコレクションを強制的に走らせる処理を行う必要がある、ということになりますね。
WaitForPendingFinalizersについては、以下を参照。しかし、前後にガベコレを強制させるコードは、かなり可読性がよくないな…。
以上です。
- 投稿日:2020-12-01T00:01:33+09:00
C# 9.0から共変戻り値型が新機能として加わって、メソッドのオーバライドで返値型を元の型の派生型にできるようになった
C# 9.0より前では、オーバライド元のメソッドとオーバライドしたメソッドで、返り値型は同じ型にしないといけませんでした。そのため、以下のコードはC# 9.0より前ではコンパイルエラーとなりました。メソッドをオーバーライドした時、返り値型を派生型にできなかったからです。
ところがC# 9.0で、共変戻り値型が新機能として加わり、メソッドのオーバライドで返り値型を元の返り値型の派生型にできるようになりました。そのため、以下のコードはC# 9.0では、コンパイルエラーにならず問題なく動作します。
public class Enemy
{
    /* 略 */
}

public class BossEnemy : Enemy
{
    /* 略 */
}

public class EnemyFactory
{
    public virtual Enemy Create() { return new Enemy(); }
}

public class BossEnemyFactory : EnemyFactory
{
    // C# 9.0より前ではコンパイルエラー
    // C# 9.0からは正常なコード
    // BossEnemyFactoryを使う際はこう書けた方が便利なことがある
    public override BossEnemy Create () { return new BossEnemy(); }

    // C# 9.0より前ではこうするしかなかった。
    // public override Enemy Create () { return new BossEnemy(); }
}
実際のアプリケーションコードを書く場合、「この機能を全く使わないよー」という人もいるかもしれません。しかし、フレームワーク・ライブラリだと活用されるでしょう。
ちなみにJavaでは以前から「共変戻り値型」が普通に使えます。Java・Androidのフレームワークにおける、「共変戻り値型」が活用されている例を紹介します。
ViewGroupという型には、次のような派生型があります。
などです。
ViewGroupには、ViewGroup.LayoutParams を返す、generateLayoutParamsというメソッドを持っています。このメソッドは各種派生型において、共変戻り値型を活用しオーバーライドされています。次の表のように、ViewGroupの各種派生型において、generateLayoutParamsメソッドの返り値型は、ViewGroup.LayoutParams の派生型になっています。これが実現できるのは、Javaが「戻り値共変型」機能をサポートしているからです。
派生型 generateLayoutParamsの返り値型 FrameLayout FrameLayout.LayoutParams RelativeLayout RelativeLayout.LayoutParams LinearLayout LinearLayout.LayoutParams
C#でもライブラリ・フレームワークを中心に活用が期待されます。
公式ドキュメントのサンプルによると、
たとえば、Roslyn コードベースでは、次のようになります。
とあります。
class Compilation ...
{
    public virtual Compilation WithOptions(Options options)...
}


class CSharpCompilation : Compilation
{
    public override CSharpCompilation WithOptions(Options options)...
}
Compilation型は、派生型にCSharpCompilationやVisualBasicCompilationを持つ型です。
CSharpCompilation型において、WithOptionsをオーバーライドする際、返り値型をCSharpCompilationにしています。CSharpCompilationという型の意味を考えると、WithOptionsという名前のメソッドで返すのがCSharpCompilationになるのは、納得ができます。しかしC# 9.0以前では、返り値共変型を備えていないため、抽象型であるCompilationを返すしかありませんでした。
なおこれは、「もし今から新規実装するならば」という例だと思われます。実際のRoslynのコード(v3.7.0-3.20312.3)では、以下のように共変戻り値型は使われていません。
- https://github.com/dotnet/roslyn/blob/v3.7.0-3.20312.3/src/Compilers/Core/Portable/Compilation/Compilation.cs#L336-L346
- https://github.com/dotnet/roslyn/blob/v3.7.0-3.20312.3/src/Compilers/CSharp/Portable/Compilation/CSharpCompilation.cs
- https://github.com/dotnet/roslyn/blob/v3.7.0-3.20312.3/src/Compilers/CSharp/Portable/Compilation/CSharpCompilation.cs#L583
- https://github.com/dotnet/roslyn/blob/v3.7.0-3.20312.3/src/Compilers/CSharp/Portable/Compilation/CSharpCompilation.cs#L3260-L3263
一見地味な機能ですが、「共変戻り値型」が導入されたことで、フレームワークやライブラリ開発者の、「あぁ、ここもっとこう書きたいのに」が減ったことでしょう。
もちろん、「共変戻り値型」はフレームワークやライブラリだけでなく、アプリケーションのロジックの記述でも活用できるでしょう。
- 投稿日:2020-12-01T00:01:12+09:00
C# 9.0で加わったC# Source Generatorと、それで作ったValueObjectGeneratorの紹介
ValueObjectGenerator
この投稿では、C# 9.0で加わった
C# Source Generatorとそれを使って開発したValueObjectGeneratorを紹介します。コードはこちら!
https://github.com/RyotaMurohoshi/ValueObjectGenerator
背景
次の
Productクラスは、2つのint型のプロパティProductIdとProductCategoryIdを持っています。public class Product { public Product(string name, int productId, int productCategoryId) { Name = name; ProductId = productId; ProductCategoryId = productCategoryId; } public string Name { get; } public int ProductId { get; } public int ProductCategoryId { get; } }この型のインスタンスの利用シーンにおいて、いくつかの場所では
ProductIdが必要で、他の場所ではProductCategoryIdが必要でしょう。どちらもint型で名前が似ているので、うっかりとProductIdとProductCategoryIdを取り違えてしまうかもしれません.この取り違え型を防ぐにはどうしたらいいでしょうか?一つの方法としては、次のような
ProductId型とCategoryId型を作り、それらを利用することです。これらの型を利用することで、コンパイラはProductIdプロパティとProductCategoryIdプロパティの取り違えを検出し、プログラム上のミスを防ぐことができます。このようにValueObjectクラス(もしくは、Wrapperクラス)を作成し利用することで、int型やstring型のプロパティの取り違えやミスを防ぐことができます。
ProductId型とCategoryId型は次のような感じになります。public sealed class ProductId: IEquatable<ProductId> { public int Value { get; } public ProductId(int value) { Value = value; } public override bool Equals(object obj) => ReferenceEquals(this, obj) || obj is ProductId other && Equals(other); public override int GetHashCode() => Value.GetHashCode(); public override string ToString() => Value.ToString(); public static bool operator ==(ProductId left, ProductId right) => Equals(left, right); public static bool operator !=(ProductId left, ProductId right) => !Equals(left, right); public bool Equals(ProductId other) { if (ReferenceEquals(null, other)) return false; if (ReferenceEquals(this, other)) return true; return Value == other.Value; } public static explicit operator ProductId(int value) => new ProductId(value); public static explicit operator int(ProductId value) => value.Value; } public class CategroyId: IEquatable<CategroyId> { public int Value { get; } public CategroyId(int value) { Value = value; } public override bool Equals(object obj) => ReferenceEquals(this, obj) || obj is CategroyId other && Equals(other); public override int GetHashCode() => Value.GetHashCode(); public override string ToString() => Value.ToString(); public static bool operator ==(CategroyId left, CategroyId right) => Equals(left, right); public static bool operator !=(CategroyId left, CategroyId right) => !Equals(left, right); public bool Equals(CategroyId other) { if (ReferenceEquals(null, other)) return false; if (ReferenceEquals(this, other)) return true; return Value == other.Value; } public static explicit operator CategroyId(int value) => new CategroyId(value); public static explicit operator int(CategroyId value) => value.Value; }この
ProductId型とCategoryId型を使った、Product型はこんな感じ。public class Product { public Product(string name, ProductId productId, CategroyId productCategoryId) { Name = name; ProductId = productId; ProductCategoryId = productCategoryId; } public string Name { get; } public ProductId ProductId { get; } public CategroyId ProductCategoryId { get; } }このようにValueObjectクラス(もしくは、Wrapperクラス)を作成し利用することでコンパイルエラーを防ぐことができます。よかった、よかった!けれど、これらのコードは非常に大量のボイラープレートで溢れていますね。長いですね!
ProductId型とCategoryId型。長すぎます!これらのボイラープレートコードは、他の大切な意味のあるコードを読む際にとても邪魔です。さて、こんなふうなボイラープレートコードには、C# 9.0から加わった
C# Source Generatorが大活躍します。C# Source Generatorはこんなの
C# Source Generatorは、ビルド時にC#のソースコードを生成する仕組みです。
- メインのプロジェクトがビルドされる前にコード生成
- コード生成するために必要な入力値はコンパイル時に必要
- 出力結果は、プロジェクトの一部となる
- IDEにおいて、生成したコードの宣言にジャンプもできる
- ILではなくC#を生成するので、デバックがすごい楽
- 既存のソースコードを上書きしたりけしたりすることはできない
この
C# Source Generatorを使うことで、プログラマティカルにコード生成をすることができます。C# Source Generatorをつかうことで、ボイラープレートのコードは非常に簡単になります。他、参考。
- Introducing C# Source Generators
- New C# Source Generator Samples
- Source Generators Cookbook
- C# 9.0の新機能 コード ジェネレーターのサポート
使い方
さてそんな
C# Source Generatorを使って、私が開発した、ValueObjectGeneratorを紹介します。次のように
IntValueObject属性をクラスに付与します。using ValueObjectGenerator; [IntValueObject] public partial class ProductId { }そうすると次のようなコードが生成されます。
public partial class ProductId: IEquatable<ProductId>
{
    public int Value { get; }

    public ProductId(int value)
    {
        Value = value;
    }

    public override bool Equals(object obj) => ReferenceEquals(this, obj) || obj is ProductId other && Equals(other);
    public override int GetHashCode() => Value.GetHashCode();
    public override string ToString() => Value.ToString();
    public static bool operator ==(ProductId left, ProductId right) => Equals(left, right);
    public static bool operator !=(ProductId left, ProductId right) => !Equals(left, right);

    public bool Equals(ProductId other)
    {
        if (ReferenceEquals(null, other)) return false;
        if (ReferenceEquals(this, other)) return true;
        return Value == other.Value;
    }

    public static explicit operator ProductId(int value) => new ProductId(value);
    public static explicit operator int(ProductId value) => value.Value;
}
ProductIdは、ValueObjectクラス(もしくは、Wrapperクラス)です。次のように、ValueObjectクラス(もしくは、Wrapperクラス)を定義するためにあった、大量のボイラープレートコードはなくなりました。
[IntValueObject]
public class ProductId { }

[IntValueObject]
public class CategoryId { }

public class Product
{
    public Product(string name, ProductId productId, CategoryId productCategoryId)
    {
        Name = name;
        ProductId = productId;
        ProductCategoryId = productCategoryId;
    }

    public string Name { get; }
    public ProductId ProductId { get; }
    public CategoryId ProductCategoryId { get; }
}
こんなふうに、
ValueObjectGeneratorを使えば、 ValueObjectクラス(もしくは、Wrapperクラス)の生成に必要な大量のボイラープレートコードを排除することが可能です。ValueObjectGeneratorの機能
ValueObjectGeneratorの機能の紹介をします。
- サポートするValue型
- クラスと構造体のサポート
- プロパティの名前指定
サポートするValue型
ValueObjectGeneratorは、int型以外のValueObjectクラス(もしくは、Wrapperクラス)をサポートしています。[StringValueObject] public partial class ProductName { } public sealed partial class ProductName : System.IEquatable<ProductName> { public string Value { get; } public ProductName(string value) { Value = value; } public override bool Equals(object obj) => ReferenceEquals(this, obj) || obj is ProductName other && Equals(other); public override int GetHashCode() => Value.GetHashCode(); public override string ToString() => Value.ToString(); public static bool operator ==(ProductName left, ProductName right) => Equals(left, right); public static bool operator !=(ProductName left, ProductName right) => !Equals(left, right); public bool Equals(ProductName other) { if (ReferenceEquals(null, other)) return false; if (ReferenceEquals(this, other)) return true; return Value == other.Value; } public static explicit operator ProductName(string value) => new ProductName(value); public static explicit operator string(ProductName value) => value.Value; }次のテープルは、提供している属性とそれに対応する型を示しています。
属性 型 StringValueObject string IntValueObject int LongValueObject long FloatValueObject float DoubleValueObject double クラスと構造体のサポート
ValueObjectGeneratorは、クラスと構造体、両方の生成のサポートをします。まずは、クラス利用例。
[IntValueObject]
public partial class IntClassSample
{
}
クラスの場合、次のようなコードが生成されます。
public sealed partial class IntClassSample : System.IEquatable<IntClassSample>
{
    public int Value { get; }
    public IntClassSample(int value)
    {
        Value = value;
    }
    public override bool Equals(object obj) => ReferenceEquals(this, obj) || obj is IntClassSample other && Equals(other);
    public override int GetHashCode() => Value.GetHashCode();
    public override string ToString() => Value.ToString();
    public static bool operator ==(IntClassSample left, IntClassSample right) => Equals(left, right);
    public static bool operator !=(IntClassSample left, IntClassSample right) => !Equals(left, right);
    public bool Equals(IntClassSample other)
    {
        if (ReferenceEquals(null, other)) return false;
        if (ReferenceEquals(this, other)) return true;
        return Value == other.Value;
    }
    public static explicit operator IntClassSample(int value) => new IntClassSample(value);
    public static explicit operator int(IntClassSample value) => value.Value;
}
次に、構造体の利用例。
[IntValueObject]
public partial struct IntStructSample
{
}
構造体の場合、次のようなコードが生成されます。
public  partial struct IntStructSample : System.IEquatable<IntStructSample>
{
    public int Value { get; }
    public IntStructSample(int value)
    {
        Value = value;
    }
    public override bool Equals(object obj) => ReferenceEquals(this, obj) || obj is IntStructSample other && Equals(other);
    public override int GetHashCode() => Value.GetHashCode();
    public override string ToString() => Value.ToString();
    public static bool operator ==(IntStructSample left, IntStructSample right) => Equals(left, right);
    public static bool operator !=(IntStructSample left, IntStructSample right) => !Equals(left, right);
    public bool Equals(IntStructSample other)
    {


        return Value == other.Value;
    }
    public static explicit operator IntStructSample(int value) => new IntStructSample(value);
    public static explicit operator int(IntStructSample value) => value.Value;
}
プロパティの名前指定
生成するValueObjectクラス(もしくは、Wrapperクラス)が持つ、プロパティの名前も指定することができます。
次のようにすることで、
[StringValueObject(PropertyName = "StringValue")]
public partial class CustomizedPropertyName
{
}
次のような型が生成されます。
public sealed partial class CustomizedPropertyName : System.IEquatable<CustomizedPropertyName>
{
    public string StringValue { get; }
    public CustomizedPropertyName(string value)
    {
        StringValue = value;
    }
    public override bool Equals(object obj) => ReferenceEquals(this, obj) || obj is CustomizedPropertyName other && Equals(other);
    public override int GetHashCode() => StringValue.GetHashCode();
    public override string ToString() => StringValue.ToString();
    public static bool operator ==(CustomizedPropertyName left, CustomizedPropertyName right) => Equals(left, right);
    public static bool operator !=(CustomizedPropertyName left, CustomizedPropertyName right) => !Equals(left, right);
    public bool Equals(CustomizedPropertyName other)
    {
        if (ReferenceEquals(null, other)) return false;
        if (ReferenceEquals(this, other)) return true;
        return StringValue == other.StringValue;
    }
    public static explicit operator CustomizedPropertyName(string value) => new CustomizedPropertyName(value);
    public static explicit operator string(CustomizedPropertyName value) => value.StringValue;
}
今後の改善案
やりたいなと思っているのは、
- IComparableのサポート
- JSON serializer/deserializer
- 他のValueタイプ
- 算術演算のサポート
などです。
あと以前、ufcppさんのYoutube配信に、お邪魔した時に、ufcppとゲストのxin9leさんに、この
ValueObjectGeneratorを紹介した時に、いろいろご指摘をいただきました。その番組の指摘のおかげで
- string interpolationを使うとパフォーマンスが悪いので、パフォーマンスもよくする
- 余分なメンバを持っていたらコンパイルエラーにするアナライザー
も入れたほうがいいことがわかりました。ufcppさん、xin9leさん、ありがとうございます。
もしかしたら、recordでいいかも?
先に紹介した、ufcppさんのYoutube配信番組で、「1要素Recordとそんなに変わらない」という指摘もいただきました。
public record ProductId(int Value) { }いや、もうその通りなんですよね。
ただ、Recordではできないものがあります。それは、「オーバーライドを認めないという」ものです。Recordではできないのでそれがメリットになります。と、ufcppさんとxin9leさんにご指摘いただきました!
ありがとうございます!
まとめ
この投稿では、C# 9.0で加わった
C# Source Generatorとそれを使って開発したValueObjectGeneratorを紹介しました。https://github.com/RyotaMurohoshi/ValueObjectGenerator
現在、ValueObjectGeneratorは開発・改善途中です。「便利じゃん!」「使いたい!」という方は、ぜひGitHubでStarをください!励ましになります!
ご意見、ご要望があれば、GitHubのissueか、Twitterの@RyotaMurohoshiまで!
- 投稿日:2020-12-01T00:00:42+09:00
Blazor WebAssemblyをただC#実行プラットフォームとして使って既存のReactのWebアプリを拡張した話
Blazor Advent Calendar 2020 1日目の記事です
おことわり
特定技術の1日目の記事なんだし、Blazorとはみたいな前提の共有するよね!?と思った方すみません…
Blazor WebAssemblyがGAされて半年経過していますし、いろんな解説記事が溢れているはずと信じてその辺りは割愛します。公式ドキュメントはこちら
ASP.NET Core Blazor の概要 | Microsoft Docs…さて、ドキュメント読みましたか?
Blazor(の中のBlazor WebAssembly)についてわかりましたか?
概要の所を一部抜粋すると
- Blazor WebAssembly は、.NET を使って対話型のクライアント側 Web アプリを構築するためのシングルページ アプリ (SPA) フレームワークです。
- WebAssembly (略称 wasm) によって、Web ブラウザー内で .NET コードを実行することが可能になります。
「.NETでSPAクライアントが書けて、ブラウザ上で.NETコードを実行できるいい感じのフレームワーク」らしいです、すごいフレームワークですね。
そんなすごいBlazor WebAssemblyを使ってみたら良かった話をします。今回の話のテーマとなるアプリケーション
Repository: https://github.com/yamachu/cognitive-cv-visualizer
WebSite: https://cognitive-cv-visualizer.yamachu.dev/React.jsでUIが書かれていて、C#でAPIが書かれている素朴なアプリケーションが今回のテーマです。
ざっくりとこのアプリケーションは何をするかと言うと、ユーザがこのページにドラッグ&ドロップした画像に対してOCRをかけて、その領域を描画します。
動作こそしますが、このアプリケーション(あるいは作り)には問題点が一つありました。このアプリケーションのOCRの部分はAzure Cognitive ServicesのComputer Visionに含まれるものを使用しています。
このOCRのAPIを使用するためにはCognitive Servicesのサブスクリプションが必要ですが、そのサブスクリプションのキーやAPIのエントリポイントの情報はユーザに入力してもらって、自分の実装したAPIに送信し、APIからCognitive Servicesの機能を叩くみたいことをしています。送られてきたパラメータをdumpしたりログに残していない限りそのキーが漏れることはないでしょうが、自分で実装したAPI側で何らかの例外を起こしてRequestParameterなどもトレースに表れてしまった場合見てはいけないユーザのCredentialsを自分が見れてしまう状態になってしまいます。
問題解決に向けて
上記の問題解決に向けて実装時に考えたことが書いてあったり実装を行ったPRがこちら
https://github.com/yamachu/cognitive-cv-visualizer/pull/7Uncontrollableな外部APIと連携している自分で実装したAPIが一番のネックとなっています。
なのでこの問題を解決するにはこの自分の実装しているAPIから引き剥がすのが一番の近道と言えます。
それを達成するためにAPI側で行っていることをJSでリライトする手もありましたが、今回はBlazor WebAssemblyを採用しました。理由としては
- APIがC#で書かれていたので、Interfaceを調整すればそのまま移植できそうだった
- APIに投げていたパラメータが文字列の集合で容易に表現可能だった
という点が挙げられます。
公式ドキュメントには『Blazor WebAssembly は、.NET を使って対話型のクライアント側 Web アプリを構築するためのシングルページ アプリ (SPA) フレームワークです』と書かれていて既に仮想DOMをJSで管理していた場合はどうなるんだろうという不安がありましたが、Blazor WebAssemblyも静的なHTMLの特定のDOMツリーの下にマウントするという形でDOMを管理しているため相互に参照し合うことがなく、また別のツリーの出来事なので問題はありませんでした。
それでは実際に行った移行プロセスを紹介します。
- [C#] dotnetコマンドでBlazor WebAssemblyのテンプレートを作成
- [C#] APIとして提供していた機能の切り出し
- [C#] 当該機能を呼び出すJSInvokableアノテーションのついたロジックをDOMツリーにマウントするコンポーネントに実装
- [JS] JSInvokableアノテーションを呼び出すメソッドを実装
- [JS] APIとBlazor WebAssembly側が提供しているメソッドを呼び出す箇所の差し替え
- [HTML] Blazor WebAssemblyを実行するためのエントリポイントを追加
の大まかに6ステップです。
1はドキュメント通りで、2はアプリケーションに依ることなので省略します。
3、4は公式ドキュメントのASP.NET Core Blazor で JavaScript 関数から .NET メソッドを呼び出すに沿って行いました。コードを例に挙げると、
C#(Blazor)側でこんな感じのコンポーネントを実装して(https://github.com/yamachu/cognitive-cv-visualizer/pull/7/commits/c4b0d32f564e00b352ca014be0e240306d5066fa)@using System.Net.Http @using CVVisualizer.Core @code { private static HttpClient httpClient = new HttpClient(); [JSInvokable] public static Task<string> RunOCR(string endpoint, string subscriptionKey, string imageBase64) { var image = Convert.FromBase64String(imageBase64); return VisionOCRService.AnalyzeAsync(httpClient, endpoint, subscriptionKey, image); } }return window.DotNet.invokeMethodAsync( "CVVisualizer.Blazor", "RunOCR", formEndpoint, formSubscriptionKey, base64File );こんな感じのコードを書くだけです。
C#側のBlazor WebAssemblyは『シングルページ アプリ (SPA) フレームワークです』と言われているのに一切タグを吐き出さない構成となっています。これこそがタイトルにした「Blazor WebAssemblyをただC#実行プラットフォームとして使って」という意味です(タイトル回収)。
5、6も実装に依るのでこの記事ではスキップします。
おわりに
Blazor WebAssemblyを既存のWebアプリケーションに付け加えて、不安のあるAPIを一つ消し去ることが出来ました。
この様に全てBlazorのライフサイクルに乗せたりUIやStateの管理を行わなければいけないということはなく、ただ.NETのコードを実行する環境だけとして使うことも可能なのです。
例えばドメインロジックなどを移植してフロント側を固くしたりすることも出来そうですね。
様々な可能性を秘めたBlazor、多くの人が使って更に知見が増えていけばいいなと思います。明日は @jsakamoto さんのデザインコンポーネントのお話です。
フルBlazorで作ると苦労しがちなデザインなので、デザインフレームワークの話は気になりますね、お楽しみに。

