- 投稿日:2020-10-23T23:47:03+09:00
GraphQLとVueを使ってミニアプリを作る
はじめに
本記事ではVue Apolloを利用して、GraphQLとVueアプリを接続した後に、CRUD機能並びにサブスクリプションの実装を目指す内容となります。
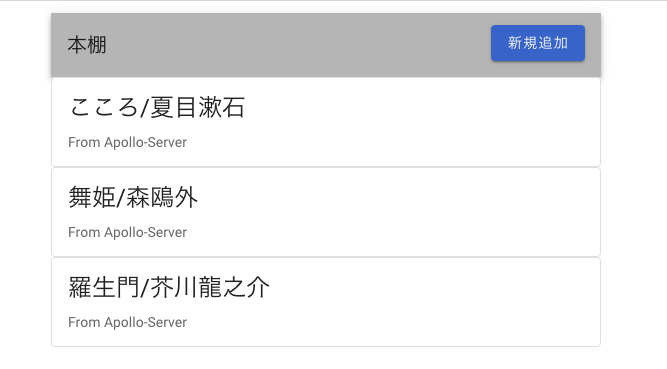
完成イメージ
大まかな概要としては、Apolloサーバーから取得したデータをVueを利用して表示・クライアント側からGraphQLを操作することがゴールとなります。
記事内でGraphQL等の基本的な説明は省略しております。
もし宜しければ、GraphQLの基礎の基礎、並びにApolloサーバーとサブスクリプションについて解説している前回の記事も合わせてご一読ください(Apolloサーバー部分は前回と同一のコードを利用します)Apolloサーバーを作る(前回の記事で既に作ってある方は省略)
先ずはApolloを使ってGraphQLのAPIサーバーを作ります!
プロジェクトを作った後に、npm経由でapollo-serverをインストールします。
$ mkdir Apollo-Server
$ cd Apollo-Server
$ mkdir resolver
$ touch index.js db.js
$ resolver/{Query.js,Mutation.js,Subscription.js}
$ npm init
$ npm install apollo-server --save
データベース代わりのJavaScriptファイルを用意します。
db.jsconst posts = [{ id: '1', title: 'こころ', author: '夏目漱石' }, { id: '2', title: '舞姫', author: '森鴎外' }, { id: '3', title: '羅生門', author: '芥川龍之介' }] const db = { posts, } module.exports = db;続いてQuery,Mutation,そして今回のテーマであるSubscriptionのリゾルバ関数を書いたファイルを順番に用意していきます。
Query.jsconst Query = { posts(parent, args, { db }, info) { //クエリを書いた時に引数が「ない」時 //模擬データベースの内容を全て表示 if (!args.query) { return db.posts //クエリを書いた時に引数が「ある」時 //引数とtitle or authorが一致したものだけを表示 }else{ return db.posts.filter((post) => { const isTitleMatch = post.title.toLowerCase().includes(args.query.toLowerCase()) const isAuthorMatch = post.author.toLowerCase().includes(args.query.toLowerCase()) return isTitleMatch || isAuthorMatch }) } } } module.exports = Queryクエリのリゾルバ関数です。
Mutation.jsconst Mutation = { createPost(parent, args, { db, pubsub }, info) { const postNumTotal = String(db.posts.length + 1) const post = { id: postNumTotal, ...args.data } //データベース更新 db.posts.push(post) //サブスクリプション着火 pubsub.publish('post', { post: { mutation: 'CREATED', data: post } }) return post }, updatePost(parent, args, { db, pubsub }, info) { const { id, data } = args const post = db.posts.find((post) => post.id === id) if (!post) { throw new Error('Post not found') } if (typeof data.title === 'string' && typeof data.author === 'string') { //データベース更新 post.title = data.title post.author = data.author console.log(post) //サブスクリプション着火 pubsub.publish('post', { post: { mutation: 'UPDATED', data: post } }) } return post }, deletePost(parent, args, { db, pubsub }, info) { const post = db.posts.find((post) => post.id === args.id) const postIndex = db.posts.findIndex((post) => post.id === args.id) if (postIndex === -1) { throw new Error('Post not found') } //データベース更新 db.posts.splice(postIndex, 1) //サブスクリプション着火 pubsub.publish('post', { post: { mutation: 'DELETED', data: post } }) return post }, } module.exports = Mutationミューテーションのリゾルバ関数では、データベースの更新とサブスクリプションの着火をしています。
Subscription.jsconst Subscription = { post: { subscribe(parent, args, { pubsub }, info) { return pubsub.asyncIterator('post') } } } module.exports = Subscriptionサブスクリプションのリゾルバ関数です。
pubsub.asyncIteratorでサブスクリプションのイベントを非同期でリッスンします。説明の関係で最後になりましたが、
スキーマの定義とサーバー起動のファイルになります。index.jsconst {ApolloServer,PubSub,gql} = require('apollo-server'); const db = require('./db') const Query = require('./resolver/Query') const Mutation = require('./resolver/Mutation') const Subscription = require('./resolver/Subscription') //スキーマ定義 const typeDefs = gql` type Query { posts(query: String): [Post!]! } type Mutation { createPost(data: CreatePostInput!): Post! deletePost(id: ID!): Post! updatePost(id: ID!, data: UpdatePostInput!): Post! } # サブスクリプション type Subscription { post: PostSubscriptionPayload! } input CreatePostInput { title: String! author: String! } input UpdatePostInput { title: String author: String! } type Post { id: ID! title: String! author: String! } ###################### # サブスクリプションで利用 ###################### # enum型でMutation.js内のサブスクリプション着火と連動 enum MutationType { CREATED UPDATED DELETED } # サブスクリプションのフィールド type PostSubscriptionPayload { mutation: MutationType! data: Post! } ` //PubSubのインスタンスを作成,サブスクリプションが利用可能に! const pubsub = new PubSub() const server = new ApolloServer({ typeDefs: typeDefs, resolvers: { Query, Mutation, Subscription, }, context: { db, pubsub } }) server.listen().then(({ url, subscriptionsUrl }) => { console.log(`? Server ready at ${url}`); console.log(`? Subscriptions ready at ${subscriptionsUrl}`); });サーバーを立てる際にスキーマやリゾルバ、PubSubなどを引数に指定しています。
指定した引数はクエリやミューテーションそしてサブスクリプション、それぞれの処理で利用をしています。準備が出来たらターミナルから起動させます。
$ node index.js
? Server ready at http://localhost:4000/
? Subscriptions ready at ws://localhost:4000/graphql
こちらをGraphQLのエンドポイントとして利用します。
本記事ではサーバーが立ち上がっていないと、クライアント側からデータの表示や更新が出来ないので、必ずサーバーを立てることを忘れないようにしてください?Apolloクライアントの設定
Vueプロジェクトを作ろう
Vue CLIを使ってプロジェクトを作ります。
$ vue create apollo-client #2系を選択してVueプロジェクトの作成
$ cd apollo-client
$ npm run serve # 起動
プロジェクトの作成に成功していた場合、下記のような画面になります。
http://localhost:8080/
Vueプロジェクト内の設定
続いてVueでGraphQLを扱うために、Vue Apolloをインストールしていきます。
本記事においては設定は全てデフォルトで進みます(色々聞かれますが「No」と答えてます)$ vue add apollo見た目をリッチにするために、Vuetifyもインストールします。
$ vue add vuetify以上にて、プロジェクトの設定は完了です。
Vue-ApolloとVuetifyの設定はmain.jsに記述があります。main.jsimport Vue from 'vue' import App from './App.vue' import { createProvider } from './vue-apollo' import vuetify from './plugins/vuetify'; Vue.config.productionTip = false new Vue({ apolloProvider: createProvider(), vuetify, render: h => h(App) }).$mount('#app')importしているvue-apollo.jsではエンドポイントやログイン/ログアウトなどの設定が出来ます。
クエリの実装
クエリとミューテーションの実装はこちらの記事を参考にさせて頂きました。ありがとうございます!
模擬データベース内のデータを「読み取り」するGraphQLのクエリを作成します。
$ mkdir src/graphql $ touch src/graphql/post-query.js前回までの記事でlocalhost内で立ち上げたIDEに書いていたクエリがこちらの部分に該当します。importしているgqlについてはこちらを参照ください。
post-query.jsimport gql from 'graphql-tag' export const ALL_POSTS = gql` query{ posts{ id title author } } `続いてApp.vue内を書き換えます(説明の省略のため、こちらのファイルに書いていますが、component化した方が良いです!)
「apollo」のオプション内で別ファイルで定義したクエリを呼び出し、
dataプロパティで定義したpostsオブジェクトに格納します。App.vue<template> <v-app> <v-main> <v-container> <v-row style="width: 550px;" > <!--ツールバー--> <v-toolbar color="grey lighten-1"> <v-toolbar-title>本棚</v-toolbar-title> <v-spacer></v-spacer> <v-btn color="primary" dark class="mb-1">新規追加</v-btn> </v-toolbar> <!--本棚の中身--> <div v-for="post in posts" :key="post.id" > <v-card class="mx-auto" width="550px" outlined > <v-list-item three-line> <v-list-item-content> <v-list-item-title class="headline mb-1"> {{ post.title}}/{{ post.author}} </v-list-item-title> <v-list-item-subtitle>From Apollo-Server</v-list-item-subtitle> </v-list-item-content> </v-list-item> </v-card> </div> </v-row> </v-container> </v-main> </v-app> </template> <script> //Query import {ALL_POSTS} from "./graphql/post-query" export default { name: "App", data: () => ({ //本棚の中身を定義 posts: [], }), apollo: { //本棚の中身 posts: { //クエリを書いている部分 query: ALL_POSTS, } }, methods: { } } </script>ここまで書き終えたらブラウザで確認しましょう。
$ npm run serveVueを利用して模擬データベースの値を表示することが出来ました!
ミューテーションの実装
続いてミューテーションの実装を行います。
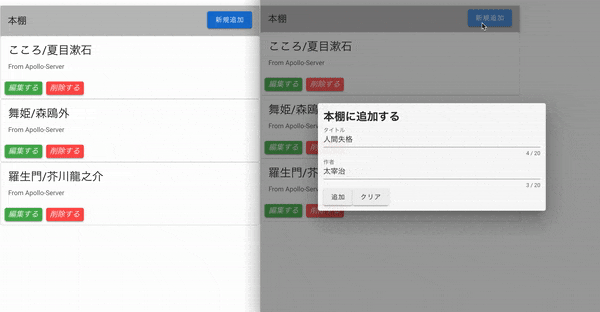
こちらの章を終えると①書き込み、②更新、③削除 が出来るようになります。先ずはファイルを作りましょう。
$ touch src/graphql/post-mutation.jsミューテーションのクエリを書いていきます。
post-mutation.jsimport gql from 'graphql-tag' // POSTの新規追加 export const CREATE_POST = gql`mutation ($title: String!, $author: String!) { createPost(data: { title: $title, author: $author}) { id title author } }` // POSTの更新 export const UPDATE_POST = gql` mutation updatePost($id: ID!, $title: String!, $author: String!) { updatePost(id:$id,data: {title: $title, author: $author}) { id title author } } ` // // POSTの削除 export const DELETE_POST = gql` mutation deletePost($id: ID!) { deletePost(id:$id){ title author } } `App.vueのmethod内に①書き込み、②更新、③削除の関数を作成。
updateQueryメソッドで上記3つを実行することが出来ます。App.vue<template> <v-app> <v-main> <v-container> <!--入力フォーム--> <v-dialog v-model="dialog" max-width="500px"> <v-card> <v-container> <h2 v-if="isCreate">本棚に追加する</h2> <h2 v-if="!isCreate">本棚を更新する</h2> <v-form ref="form" v-model="valid" lazy-validation> <!--名前--> <v-text-field v-model="post.title" :rules="titleRules" :counter="20" label="タイトル" required ></v-text-field> <v-text-field v-model="post.author" :rules="authorRules" :counter="20" label="作者" required ></v-text-field> <!--追加ボタン--> <v-btn v-if="isCreate" :disabled="!valid" @click="createPost" > 追加 </v-btn> <!--更新ボタン--> <v-btn v-if="!isCreate" :disabled="!valid" @click="updatePost" > 更新 </v-btn> <v-btn @click="clear">クリア</v-btn> </v-form> </v-container> </v-card> </v-dialog> <v-row style="width: 550px;" > <!--ツールバー--> <v-toolbar color="grey lighten-1"> <v-toolbar-title>本棚</v-toolbar-title> <v-spacer></v-spacer> <v-btn color="primary" dark class="mb-1" @click="showDialogNew">新規追加</v-btn> </v-toolbar> <!--本棚の中身--> <div v-for="post in posts" :key="post.id" > <v-card class="mx-auto" width="550px" outlined > <v-list-item three-line> <v-list-item-content> <v-list-item-title class="headline mb-1"> {{ post.title}}/{{ post.author}} </v-list-item-title> <v-list-item-subtitle>From Apollo-Server</v-list-item-subtitle> </v-list-item-content> </v-list-item> <!-- 編集・削除ボタン --> <v-card-actions> <v-btn color="success" small @click="showDialogUpdate(post.id,post.title,post.author)" > <v-icon small> 編集する </v-icon> </v-btn> <v-btn color="error" small @click="deletePost(post.id,post.title)" > <v-icon small> 削除する </v-icon> </v-btn> </v-card-actions> </v-card> </div> </v-row> </v-container> </v-main> </v-app> </template> <script> //Query import {ALL_POSTS} from "./graphql/post-query" //Mutation import {CREATE_POST,UPDATE_POST,DELETE_POST} from "./graphql/post-mutation"; export default { name: "App", data: () => ({ //本棚の中身を定義 posts: [], // フォーム入力値 post: { id: '', title: '', author: '', }, // バリデーション valid: true, titleRules: [ v => !!v || 'タイトルは必須項目です', v => (v && v.length <= 20) || 'タイトルは20文字以内で入力してください' ], authorRules: [ v => !!v || '作者名は必須項目です', ], // ローディングの表示フラグ progress: false, // ダイアログの表示フラグ dialog: false, // 新規・更新のフラグ isCreate: true, }), apollo: { //本棚の中身 posts: { //クエリを書いている部分 query: ALL_POSTS, } }, methods: { // -------------------------------- // 新規作成 // -------------------------------- createPost: function () { if (this.$refs.form.validate()) { this.progress = true this.$apollo.mutate({ mutation: CREATE_POST, variables: { title: this.post.title, author: this.post.author, }, }) .then(() => { //UIの更新 this.$apollo.queries.posts.fetchMore({ updateQuery: (previousResult, {fetchMoreResult}) => { // console.log(previousResult) //変更前 // console.log(fetchMoreResult) //変更後 return { posts: fetchMoreResult.posts } } }) this.dialog = false this.progress = false }).catch((error) => { console.error(error) }) } } , // -------------------------------- // 更新 // -------------------------------- updatePost: function () { this.progress = true this.$apollo.mutate({ mutation: UPDATE_POST, variables: { id: this.post.id, title: this.post.title, author: this.post.author, } }).then(() => { this.$apollo.queries.posts.fetchMore({ updateQuery: (previousResult, {fetchMoreResult}) => { // console.log(previousResult) //変更前 // console.log(fetchMoreResult) //変更後 return { posts: fetchMoreResult.posts } } }) this.dialog = false this.progress = false }).catch((error) => { console.error(error) }) }, // -------------------------------- // 削除 // -------------------------------- deletePost: function (id,title) { console.log(id) console.log(title) if (!confirm(title + 'を削除してもよろしいですか?')) { return } this.progress = true this.$apollo.mutate({ mutation: DELETE_POST, variables: { id: id } }).then(() => { this.$apollo.queries.posts.fetchMore({ updateQuery: (previousResult, {fetchMoreResult}) => { // console.log(previousResult) //変更前 // console.log(fetchMoreResult) //変更後 return { posts: fetchMoreResult.posts } } }) this.progress = false }).catch((error) => { console.error(error) }) }, // -------------------------------- // フォームのクリア // -------------------------------- clear: function () { this.$refs.form.reset() }, // -------------------------------- // 新規追加ダイアログの表示 // -------------------------------- showDialogNew: function () { // this.clear() this.isCreate = true this.dialog = true }, // -------------------------------- // 更新ダイアログの表示 // -------------------------------- showDialogUpdate: function (id, title, author) { this.post.id = id this.post.title = title this.post.author = author this.isCreate = false this.dialog = true }, } } </script>CRUD処理が出来るようになりました!!
サブスクリプションの実装
最後にサブスクリプションの実装を行います。
こちらの章を終えるとリアルタイムでの書き込みの共有が出来るようになります。
実際のアプリケーションでは通知機能を作る時などに使う部分となります。今回もファイルを作ります。
$ touch src/graphql/post-subscription.jsサブスクリプションのクエリを書きます。
post-subscription.jsimport gql from 'graphql-tag' // サブスクリプション export const SUBSCRIPTION_POST = gql` subscription { post{ mutation data{ id title author } } } `App.vueを変更します。
「apollo」のオプション内にサブスクリプションの処理を追加しており、既存の投稿と同一の投稿がなかった場合、新規作成した投稿を本棚に追加しています。App.vue<template> <v-app> <v-main> <v-container> <!--入力フォーム--> <v-dialog v-model="dialog" max-width="500px"> <v-card> <v-container> <h2 v-if="isCreate">本棚に追加する</h2> <h2 v-if="!isCreate">本棚を更新する</h2> <v-form ref="form" v-model="valid" lazy-validation> <!--名前--> <v-text-field v-model="post.title" :rules="titleRules" :counter="20" label="タイトル" required ></v-text-field> <v-text-field v-model="post.author" :rules="authorRules" :counter="20" label="作者" required ></v-text-field> <!--追加ボタン--> <v-btn v-if="isCreate" :disabled="!valid" @click="createPost" > 追加 </v-btn> <!--更新ボタン--> <v-btn v-if="!isCreate" :disabled="!valid" @click="updatePost" > 更新 </v-btn> <v-btn @click="clear">クリア</v-btn> </v-form> </v-container> </v-card> </v-dialog> <v-row style="width: 550px;" > <!--ツールバー--> <v-toolbar color="grey lighten-1"> <v-toolbar-title>本棚</v-toolbar-title> <v-spacer></v-spacer> <v-btn color="primary" dark class="mb-1" @click="showDialogNew">新規追加</v-btn> </v-toolbar> <!--本棚の中身--> <div v-for="post in posts" :key="post.id" > <v-card class="mx-auto" width="550px" outlined > <v-list-item three-line> <v-list-item-content> <v-list-item-title class="headline mb-1"> {{ post.title}}/{{ post.author}} </v-list-item-title> <v-list-item-subtitle>From Apollo-Server</v-list-item-subtitle> </v-list-item-content> </v-list-item> <!-- 編集・削除ボタン --> <v-card-actions> <v-btn color="success" small @click="showDialogUpdate(post.id,post.title,post.author)" > <v-icon small> 編集する </v-icon> </v-btn> <v-btn color="error" small @click="deletePost(post.id,post.title)" > <v-icon small> 削除する </v-icon> </v-btn> </v-card-actions> </v-card> </div> </v-row> </v-container> </v-main> </v-app> </template> <script> //Query import {ALL_POSTS} from "./graphql/post-query" //Mutation import {CREATE_POST,UPDATE_POST,DELETE_POST} from "./graphql/post-mutation"; //Subscription import {SUBSCRIPTION_POST} from "./graphql/post-subscription"; export default { name: "App", data: () => ({ //本棚の中身を定義 posts: [], // フォーム入力値 post: { id: '', title: '', author: '', }, // バリデーション valid: true, titleRules: [ v => !!v || 'タイトルは必須項目です', v => (v && v.length <= 20) || 'タイトルは20文字以内で入力してください' ], authorRules: [ v => !!v || '作者名は必須項目です', ], // ローディングの表示フラグ progress: false, // ダイアログの表示フラグ dialog: false, // 新規・更新のフラグ isCreate: true, }), apollo: { //本棚の中身 posts: { //クエリを書いている部分 query: ALL_POSTS, //サブスクリプション subscribeToMore: { document: SUBSCRIPTION_POST, updateQuery:(previousResult, { subscriptionData }) =>{ // console.log(previousResult) //前の投稿 // console.log(subscriptionData.data) //新規作成した投稿 // 既存の投稿と同一の投稿がなかった場合、新規作成した投稿を本棚に追加 if (previousResult.posts.find(post => post.id === subscriptionData.data.post.data.id)) { return previousResult }else{ return { posts: [ ...previousResult.posts, // Add the new data subscriptionData.data.post.data, ], } } } } } }, methods: { // -------------------------------- // 新規作成 // -------------------------------- createPost: function () { if (this.$refs.form.validate()) { this.progress = true this.$apollo.mutate({ mutation: CREATE_POST, variables: { title: this.post.title, author: this.post.author, }, }) .then(() => { //UIの更新 this.$apollo.queries.posts.fetchMore({ updateQuery: (previousResult, {fetchMoreResult}) => { // console.log(previousResult) //変更前 // console.log(fetchMoreResult) //変更後 return { posts: fetchMoreResult.posts } } }) this.dialog = false this.progress = false }).catch((error) => { console.error(error) }) } } , // -------------------------------- // 更新 // -------------------------------- updatePost: function () { this.progress = true this.$apollo.mutate({ mutation: UPDATE_POST, variables: { id: this.post.id, title: this.post.title, author: this.post.author, } }).then(() => { this.$apollo.queries.posts.fetchMore({ updateQuery: (previousResult, {fetchMoreResult}) => { // console.log(previousResult) //変更前 // console.log(fetchMoreResult) //変更後 return { posts: fetchMoreResult.posts } } }) this.dialog = false this.progress = false }).catch((error) => { console.error(error) }) }, // -------------------------------- // 削除 // -------------------------------- deletePost: function (id,title) { console.log(id) console.log(title) if (!confirm(title + 'を削除してもよろしいですか?')) { return } this.progress = true this.$apollo.mutate({ mutation: DELETE_POST, variables: { id: id } }).then(() => { this.$apollo.queries.posts.fetchMore({ updateQuery: (previousResult, {fetchMoreResult}) => { // console.log(previousResult) //変更前 // console.log(fetchMoreResult) //変更後 return { posts: fetchMoreResult.posts } } }) this.progress = false }).catch((error) => { console.error(error) }) }, // -------------------------------- // フォームのクリア // -------------------------------- clear: function () { this.$refs.form.reset() }, // -------------------------------- // 新規追加ダイアログの表示 // -------------------------------- showDialogNew: function () { // this.clear() this.isCreate = true this.dialog = true }, // -------------------------------- // 更新ダイアログの表示 // -------------------------------- showDialogUpdate: function (id, title, author) { this.post.id = id this.post.title = title this.post.author = author this.isCreate = false this.dialog = true }, } } </script>確認してみましょう。ブラウザのウィンドウを2つ用意します。
こちらも上手くいきました!!!
おわりに
以上、今回はGraphQLをVueで扱ってみました。
今回の内容を元にクエリやスキーマの数を増やしていくことで、発展的なアプリケーションを作ることが出来るかと思います。それでは、また?


- 投稿日:2020-10-23T23:03:01+09:00
Vue.jsでテーブルを動的に行追加する(メモ)
完成品
vue.jsで動的にテーブルの行追加#protoout#vuejs pic.twitter.com/TD95uWoVqn
— sawa (@sawakoshi_yy) October 23, 2020参考にしたもの
【Vue.js】データ配列を使ってテーブルを動的に生成してみる。
Vue.jsを100時間勉強して分かったこと
HeartRails Geo APIコード(記事の下の方に完成品のCodePen置いてます)
・HTML
 <div class="row my-3">
    <div class="col-sm-6 mx-auto">
      <input class="form-control" v-model:value="text" placeholder="郵便番号を入力…"><br>
      郵便番号:{{ text }}<button v-on:click="addTask" class="btn btn-primary">検索</button>
    </div>
  </div>

  <table class="table table-striped">
    <thead>
      <tr>
        <th>都道府県</th>
        <th>市区町村</th>
        <th>町域</th>
        <th>緯度</th>
        <th>経度</th>
      </tr>
    </thead>
    <tbody>
        <tr v-for="address in addressList">
          <td>{{ address[0] }}</td>
          <td>{{ address[1] }}</td>
          <td>{{ address[2] }}</td>
          <td>{{ address[3] }}</td>
          <td>{{ address[4] }}</td>
        </tr>
    </tbody>
</table>
・Javascript
const app = new Vue({
    el: '#app', // Vueが管理する一番外側のDOM要素
    data: {
      // Vue内部で使いたい変数は全てこの中に定義する
      text: '',
      prefecture: '',
      addressList:[],
    },
    methods: {
      addTask: async function() {
        //郵便番号から住所情報取得
        try {
          const address = await axios.get('https://geoapi.heartrails.com/api/json?method=searchByPostal&postal=' + this.text);
          this.addressList.unshift([address.data['response']['location'][0].prefecture,address.data['response']['location'][0].city,address.data['response']['location'][0].town,address.data['response']['location'][0].x,address.data['response']['location'][0].y]);
        } catch (e){
          console.log('住所情報の取得に失敗:', this.todoList);
          console.error(e);
        }
      }
      ,
      clearAll: function() {
        console.log('検索履歴が削除されました。');
        this.addressList = [];
      }
    },
});
作成中のメモ
・axios.getの中のURL、node.jsはhttpでいけたけど、Vue.jsはhttpsじゃないとダメ(なぜ)
・CodePenの履歴(メモ書くのめんどくさいからCodePen分けて履歴にすればええやん。のスタイル。)
テーブル使ってないやつ
https://codepen.io/sawakoshi_yy/pen/MWeboLmテーブル使ってるけど1行の中に追加されてるやつ
https://codepen.io/sawakoshi_yy/pen/eYzgpNN完成品
https://codepen.io/sawakoshi_yy/pen/qBNROwY・await使うなら、functionの前にasyncつける
- 投稿日:2020-10-23T23:03:01+09:00
Vue.jsでテーブルを動的に行追加する
完成品
vue.jsで動的にテーブルの行追加#protoout#vuejs pic.twitter.com/TD95uWoVqn
— sawa (@sawakoshi_yy) October 23, 2020完成品のWebアプリ
https://naughty-franklin-898e0a.netlify.app/
郵便番号7桁入力したら住所検索します。
検索ボタンクリックするたびに行追加して検索します。参考にしたもの
【Vue.js】データ配列を使ってテーブルを動的に生成してみる。
Vue.jsを100時間勉強して分かったこと
HeartRails Geo APIコード(記事の下の方に完成品のCodePen置いてます)
・HTML
 <div class="row my-3">
    <div class="col-sm-6 mx-auto">
      <input class="form-control" v-model:value="text" placeholder="郵便番号を入力…"><br>
      郵便番号:{{ text }}<button v-on:click="addTask" class="btn btn-primary">検索</button>
    </div>
  </div>

  <table class="table table-striped">
    <thead>
      <tr>
        <th>都道府県</th>
        <th>市区町村</th>
        <th>町域</th>
        <th>緯度</th>
        <th>経度</th>
      </tr>
    </thead>
    <tbody>
        <tr v-for="address in addressList">
          <td>{{ address[0] }}</td>
          <td>{{ address[1] }}</td>
          <td>{{ address[2] }}</td>
          <td>{{ address[3] }}</td>
          <td>{{ address[4] }}</td>
        </tr>
    </tbody>
</table>
・Javascript
const app = new Vue({
    el: '#app', // Vueが管理する一番外側のDOM要素
    data: {
      // Vue内部で使いたい変数は全てこの中に定義する
      text: '',
      prefecture: '',
      addressList:[],
    },
    methods: {
      addTask: async function() {
        //郵便番号から住所情報取得
        try {
          const address = await axios.get('https://geoapi.heartrails.com/api/json?method=searchByPostal&postal=' + this.text);
          this.addressList.unshift([address.data['response']['location'][0].prefecture,address.data['response']['location'][0].city,address.data['response']['location'][0].town,address.data['response']['location'][0].x,address.data['response']['location'][0].y]);
        } catch (e){
          console.log('住所情報の取得に失敗:', this.todoList);
          console.error(e);
        }
      }
      ,
      clearAll: function() {
        console.log('検索履歴が削除されました。');
        this.addressList = [];
      }
    },
});
作成中のメモ
・axios.getの中のURL、node.jsはhttpでいけたけど、Vue.jsはhttpsじゃないとダメ(なぜ)
・CodePenの履歴(メモ書くのめんどくさいからCodePen分けて履歴にすればええやん。のスタイル。)
テーブル使ってないやつ
https://codepen.io/sawakoshi_yy/pen/MWeboLmテーブル使ってるけど1行の中に追加されてるやつ
https://codepen.io/sawakoshi_yy/pen/eYzgpNN完成品
https://codepen.io/sawakoshi_yy/pen/qBNROwY・await使うなら、functionの前にasyncつける
- 投稿日:2020-10-23T22:58:41+09:00
Vuetifyのtext-fieldにgoogleなどでキャッシュされている情報が入らないように
Nuxtを使って開発を進めているが、ちょっと躓いたことがあったので備忘録として。
ログイン画面やらプロフィール画面を作っていて、
入力できるコンポーネントとして、Vuetifyの"v-text-filed"をよく使用するのだが、
なぜか、googleで保存しているパスワードやらメールアドレスやらが入ってしまう。困ったと思ってググったら
Nuxt.js<v-text-filed autocomplete = "false"> </v-text-filed>とやるのは上手くいかない。
Nuxt.js<v-text-filed autocomplete = "new-password"> </v-text-filed>これだとばっちり!
- 投稿日:2020-10-23T22:14:33+09:00
Laravel8.9.0 + Vue.jsでaxiosを使ったときにthenとcatchの両方を通るときの対処法
- 投稿日:2020-10-23T19:11:51+09:00
【Rails6 Vue.js】axiosを使ってCSVインポート処理を実装する
Vue.jsとRailsAPIを使って複数のCSVファイルをそれぞれのテーブルにインポートする必要があったので記録しておきます。
ご留意ください
Rails,Vue.js学習中の初学者が備忘録を兼ねて書いています。
内容に誤りを含む可能性・さらに良い手法がある可能性が多分にありますので、参考にする際はその点ご留意ください。
何かお気付きの点がございましたら、お気軽にコメントいただけると幸いです。実現したいこと
inputボックスを用意し、選択したCSVファイル(2種類)をそれぞれ用意したテーブルにaxiosを使ってPOSTしたい。
csv1 ⇨ code_listsテーブル
csv2 ⇨ financialsテーブル
テーブルの定義は下記の通りです。code_listsテーブルcreate_table "code_lists", force: :cascade do |t| t.string "edinet" t.string "securities" t.string "company" t.string "sector" t.datetime "created_at", precision: 6, null: false t.datetime "updated_at", precision: 6, null: false t.index ["company"], name: "index_code_lists_on_company" t.index ["edinet"], name: "index_code_lists_on_edinet", unique: true t.index ["securities"], name: "index_code_lists_on_securities" endfinancialsテーブルcreate_table "financials", force: :cascade do |t| t.string "edinet" t.date "rec_date" t.string "account_name" t.float "value" t.datetime "created_at", precision: 6, null: false t.datetime "updated_at", precision: 6, null: false t.index ["account_name"], name: "index_financials_on_account_name" t.index ["edinet", "rec_date", "account_name"], name: "index_financials_on_edinet_and_rec_date_and_account_name", unique: true t.index ["edinet"], name: "index_financials_on_edinet" end下準備
事前にライブラリを追加します。
config/application.rbrequire 'csv' #追記Gemのrooを追加して
bundle installしますGemfilegem 'roo'
axios-post時にcsrfトークン対策が必要な為、別途プラグインを設定します。
pluginsフォルダを新たに作成してください。app/javascript/packs/plugins/vue-axios.jsconst VueAxiosPlugin = {} export default VueAxiosPlugin.install = function(Vue, { axios }) { const csrf_token = document.querySelector('meta[name="csrf-token"]').getAttribute('content') axios.defaults.headers.common = { "X-Requested-With": "XMLHttpRequest", "X-CSRF-Token": csrf_token } Vue.axios = axios Object.defineProperties(Vue.prototype, { axios: { get () { return axios } } }) }エントリーファイルにプラグインをimportします
hello_vue.jsimport Vue from "vue/dist/vue.esm"; import axios from "axios"; // 追加 import VueAxiosPlugin from "./plugins/vue-axios"; // 追加 import App from "./components/App.vue"; Vue.use(VueAxiosPlugin, { axios: axios }) // 追加 new Vue({ el: "#app", render: h => h(App), })ルーティング
ルーティングは次のように設定しました。
必要な箇所のみ記載しています。
それぞれRailsAPIのルーティング設定にしています。
code_listsテーブル用のcsvファイルはapi/code_lists/importへ
financialsテーブル用のcsvファイルはapi/financials/importへPOSTします。config/routes.rbRails.application.routes.draw do (上記省略) namespace :api, format: 'json' do resources :code_lists do post :import, on: :collection end end namespace :api, format: 'json' do resources :financials do post :import, on: :collection end end (以下省略) endView
ビューは次のようにしました。
Import.vue<template> <div> <div class="import-form"> <input @change="selectedFile" type="file" name="file"> </div> <div class="import-form"> <button @click="upload('/api/code_lists/import')" type="submit">コードリストのアップロード</button> </div> <div class="import-form"> <button @click="upload('/api/financials/import')" type="submit">財務データのアップロード</button> </div> </div> </template> <script> import axios from 'axios' export default { data: function(){ return { uploadFile: null }; }, methods: { selectedFile: function(e) { // 選択された File の情報を保存しておく e.preventDefault(); let files = e.target.files; this.uploadFile = files[0]; }, upload: function(url) { // FormData を利用して File を POST する let formData = new FormData(); formData.append('file', this.uploadFile); // let config = { // headers: { // 'content-type': 'multipart/form-data' // } // }; axios .post(url, formData) .then(function(response) { // response 処理 }) .catch(function(error) { // error 処理 }) } } } </script>inputボックスのファイル選択後にselectedFileメソッドでファイルをuploadFileに保存します。そして、buttonのクリックイベントでuploadメソッドが実行されます。uploadメソッドの引数のurl(先ほどroutesで設定した2つのurl)へファイルをPOSTします。POSTする際に事前に保存したuploadFileをFormDataオブジェクトに渡している事がポイントです。
今回はconfigは使用しなかった為コメントアウトしました。サーバサイド
今回は2つのcsvファイルをそれぞれのテーブルにImportする実装となり、それぞれのモデル毎に実装が必要となりますが、ほぼ同じ内容となる為Financial Modelの実装のみ記載しておきます。
まずコントローラについて。app/controllers/api/financials_controller.rbclass Api::FinancialsController < ApplicationController def import Financial.import(params[:file]) end endコントローラはFinancial Classのクラスメソッドを呼び出すだけとなります。
続いて、financialモデルの記述は以下の通りです。
app/models/financial.rbclass Financial < ApplicationRecord validates :edinet, presence: true validates :rec_date, presence: true validates :account_name, presence: true validates :value, presence: true def self.import(file) CSV.foreach(file.path, headers: true) do |row| # IDが見つかれば、レコードを呼び出し、見つかれなければ、新しく作成 financial = find_by(edinet: row["edinet"], rec_date: row["rec_date"], account_name: row["account_name"]) || new # CSVからデータを取得し、設定する financial.attributes = row.to_hash.slice(*updatable_attributes) # 保存する financial.save end end def self.updatable_attributes ["edinet", "rec_date", "account_name", "value"] end endインポートしたいCSVのカラム名をupdatable_attributesに入力。
またfind_byで既に取り込み済みのレコードかどうかを確認しており、取り込み済みの場合は上書きされます。最後に
現何かお気付きの点がございましたら、お気軽にコメントいただけると幸いです。
上場企業の財務データを活用したアプリケーションを開発中です。フロントエンドをVue.js、バックエンドはRailsAPIを使って開発を進めています。引き続き、得られた知見は記事にしてまとめていきたいと思います。
ここまでお付き合いいただきありがとうございました!参考にさせていただいた記事:
csrf対策:【Vue】axiosで、デフォルトでCSRFトークンを設定できるようにする
フロントエンド実装:Vue.js でファイルをポストしたいとき
バックエンド実装:【Ruby on Rails】CSVインポート
- 投稿日:2020-10-23T19:11:51+09:00
【Rails6+Vue.js】axiosを使ってCSVインポート処理を実装する
Vue.jsとRailsAPIを使って複数のCSVファイルをそれぞれのテーブルにインポートする必要があったので記録しておきます。
ご留意ください
Rails,Vue.js学習中の初学者が備忘録を兼ねて書いています。
内容に誤りを含む可能性・さらに良い手法がある可能性が多分にありますので、参考にする際はその点ご留意ください。
何かお気付きの点がございましたら、お気軽にコメントいただけると幸いです。実現したいこと
inputボックスを用意し、選択したCSVファイル(2種類)をそれぞれ用意したテーブルにaxiosを使ってPOSTしたい。
csv1 ⇨ code_listsテーブル
csv2 ⇨ financialsテーブル
テーブルの定義は下記の通りです。code_listsテーブルcreate_table "code_lists", force: :cascade do |t| t.string "edinet" t.string "securities" t.string "company" t.string "sector" t.datetime "created_at", precision: 6, null: false t.datetime "updated_at", precision: 6, null: false t.index ["company"], name: "index_code_lists_on_company" t.index ["edinet"], name: "index_code_lists_on_edinet", unique: true t.index ["securities"], name: "index_code_lists_on_securities" endfinancialsテーブルcreate_table "financials", force: :cascade do |t| t.string "edinet" t.date "rec_date" t.string "account_name" t.float "value" t.datetime "created_at", precision: 6, null: false t.datetime "updated_at", precision: 6, null: false t.index ["account_name"], name: "index_financials_on_account_name" t.index ["edinet", "rec_date", "account_name"], name: "index_financials_on_edinet_and_rec_date_and_account_name", unique: true t.index ["edinet"], name: "index_financials_on_edinet" end下準備
事前にライブラリを追加します。
config/application.rbrequire 'csv' #追記Gemのrooを追加して
bundle installしますGemfilegem 'roo'
axios-post時にcsrfトークン対策が必要な為、別途プラグインを設定します。
pluginsフォルダを新たに作成してください。app/javascript/packs/plugins/vue-axios.jsconst VueAxiosPlugin = {} export default VueAxiosPlugin.install = function(Vue, { axios }) { const csrf_token = document.querySelector('meta[name="csrf-token"]').getAttribute('content') axios.defaults.headers.common = { "X-Requested-With": "XMLHttpRequest", "X-CSRF-Token": csrf_token } Vue.axios = axios Object.defineProperties(Vue.prototype, { axios: { get () { return axios } } }) }エントリーファイルにプラグインをimportします
hello_vue.jsimport Vue from "vue/dist/vue.esm"; import axios from "axios"; // 追加 import VueAxiosPlugin from "./plugins/vue-axios"; // 追加 import App from "./components/App.vue"; Vue.use(VueAxiosPlugin, { axios: axios }) // 追加 new Vue({ el: "#app", render: h => h(App), })ルーティング
ルーティングは次のように設定しました。
必要な箇所のみ記載しています。
それぞれRailsAPIのルーティング設定にしています。
code_listsテーブル用のcsvファイルはapi/code_lists/importへ
financialsテーブル用のcsvファイルはapi/financials/importへPOSTします。config/routes.rbRails.application.routes.draw do (上記省略) namespace :api, format: 'json' do resources :code_lists do post :import, on: :collection end end namespace :api, format: 'json' do resources :financials do post :import, on: :collection end end (以下省略) endView
ビューは次のようにしました。
Import.vue<template> <div> <div class="import-form"> <input @change="selectedFile" type="file" name="file"> </div> <div class="import-form"> <button @click="upload('/api/code_lists/import')" type="submit">コードリストのアップロード</button> </div> <div class="import-form"> <button @click="upload('/api/financials/import')" type="submit">財務データのアップロード</button> </div> </div> </template> <script> import axios from 'axios' export default { data: function(){ return { uploadFile: null }; }, methods: { selectedFile: function(e) { // 選択された File の情報を保存しておく e.preventDefault(); let files = e.target.files; this.uploadFile = files[0]; }, upload: function(url) { // FormData を利用して File を POST する let formData = new FormData(); formData.append('file', this.uploadFile); // let config = { // headers: { // 'content-type': 'multipart/form-data' // } // }; axios .post(url, formData) .then(function(response) { // response 処理 }) .catch(function(error) { // error 処理 }) } } } </script>inputボックスのファイル選択後にselectedFileメソッドでファイルをuploadFileに保存します。そして、buttonのクリックイベントでuploadメソッドが実行されます。uploadメソッドの引数のurl(先ほどroutesで設定した2つのurl)へファイルをPOSTします。POSTする際に事前に保存したuploadFileをFormDataオブジェクトに渡している事がポイントです。
今回はconfigは使用しなかった為コメントアウトしました。コントローラーとモデル
今回は2つのcsvファイルをそれぞれのテーブルにImportする実装となり、それぞれのモデル毎に実装が必要となりますが、ほぼ同じ内容となる為Financial Modelの実装のみ記載しておきます。
まずコントローラについて。app/controllers/api/financials_controller.rbclass Api::FinancialsController < ApplicationController def import Financial.import(params[:file]) end endコントローラはFinancial Classのクラスメソッドを呼び出すだけとなります。
続いて、financialモデルの記述は以下の通りです。
app/models/financial.rbclass Financial < ApplicationRecord validates :edinet, presence: true validates :rec_date, presence: true validates :account_name, presence: true validates :value, presence: true def self.import(file) CSV.foreach(file.path, headers: true) do |row| # IDが見つかれば、レコードを呼び出し、見つかれなければ、新しく作成 financial = find_by(edinet: row["edinet"], rec_date: row["rec_date"], account_name: row["account_name"]) || new # CSVからデータを取得し、設定する financial.attributes = row.to_hash.slice(*updatable_attributes) # 保存する financial.save end end def self.updatable_attributes ["edinet", "rec_date", "account_name", "value"] end endインポートしたいCSVのカラム名をupdatable_attributesに入力。
またfind_byで既に取り込み済みのレコードかどうかを確認しており、取り込み済みの場合は上書きされます。最後に
現何かお気付きの点がございましたら、お気軽にコメントいただけると幸いです。
上場企業の財務データを活用したアプリケーションを開発中です。フロントエンドをVue.js、バックエンドはRailsAPIを使って開発を進めています。引き続き、得られた知見は記事にしてまとめていきたいと思います。
ここまでお付き合いいただきありがとうございました!参考にさせていただいた記事:
csrf対策:【Vue】axiosで、デフォルトでCSRFトークンを設定できるようにする
フロントエンド実装:Vue.js でファイルをポストしたいとき
バックエンド実装:【Ruby on Rails】CSVインポート
- 投稿日:2020-10-23T14:01:20+09:00
VuetifyのClearableはtextfieldとselectで戻り値が違う
TL;TR
textfieldの場合にはnull
selectの場合にはundefined何が問題なの?
人によっては問題ではないのかもしれませんが、axiosでポストする際に、オブジェクトのバリューがundefinedだとサーバーサイドにそもそも送信されません。
axios.post('http://localhost:3000/api', {sample: 'a', test: undefined})

//Request Body {sample: 'a'}
そのため単純にv-selectにてクリアブルを使用していると、そのプロパティに関しては、まず存在チェックをかける必要があり、その上で値の確認をする必要があります。
テキストフィールドの場合と挙動が違うのとあらかじめ設定しておいたプロパティに存在チェックをかけなければいけないのも面倒だったので、selectに関してもクリアしたときにnullを返すように修正してみました。<template> <div> <v-text-field label="sample" v-model="form.sampleText" ></v-text-field> <v-select label="select" v-model="form.sampleSelect" :items="selection" append-icon="close" @click:append="form.sampleSelect = null" ></v-select> </div> </template> <script> export default { data: () => ({ form: { sampleText: '', sampleSelect: null, } }) } </script>
- 投稿日:2020-10-23T00:42:37+09:00
Vue.js のサンプルアプリケーションを立ち上げるときの手順メモ
欲しいもの
- Vue
- TypeScript
- vue-property-decorator
- eslint
- prettier
- tailwindcss
tailwindcss 以外は Vue CLI でプロジェクトを作成するとデフォルトで入る。
手順
Vue CLI でプロジェクト作成
$ vue create vue-samplevue-ts-sample ([Vue 2] babel, typescript, eslint) を選択
? Please pick a preset: (Use arrow keys)
❯ vue-ts-sample ([Vue 2] babel, typescript, eslint)
  vue-simple-sample ([Vue 2] babel, eslint)
  Default ([Vue 2] babel, eslint)
  Default (Vue 3 Preview) ([Vue 3] babel, eslint)
  Manually select features
tailwindcss を追加する(スタイルをあてるのが楽だから)
$ yarn add tailwindcsstailwindcss を有効にするために src/postcss.config.js と src/assets/index.css を追加
src/postcss.config.jsconst autoprefixer = require("autoprefixer"); const tailwindcss = require("tailwindcss"); module.exports = { plugins: [tailwindcss, autoprefixer] };src/assets/index.css@tailwind base; @tailwind components; @tailwind utilities;src/assets/index.css を main.ts で import
main.tsimport Vue from "vue"; import App from "./App.vue"; import "./assets/index.css"; Vue.config.productionTip = false; new Vue({ render: h => h(App) }).$mount("#app");package.json の eslint の extends を下記のような感じにする。Vue のスタイルガイドになるべく沿うようにする。
  "eslintConfig": {
    "root": true,
    "env": {
      "node": true
    },
    "extends": [
      "plugin:vue/essential",
      "plugin:vue/strongly-recommended",
      "plugin:vue/recommended",
      "eslint:recommended",
      "@vue/prettier",
      "@vue/typescript/recommended",
      "@vue/prettier/@typescript-eslint"
    ],
    "parserOptions": {
      "ecmaVersion": 2020
    },
    "rules": {}
  }
あとはデフォルトの無駄な HelloWorld などを削除して終わり。
ハマったところ
VSCode 上で ESLint が効かない
原因
ESLint Server が立ち上がっていなかった
解決方法
VSCode の画面右下の「ESLint」をクリックして有効化
prettier の自動フォーマットが効かない
原因
package.json の設定漏れ
解決方法
"eslintConfig": { "root": true, "env": { "node": true }, "extends": [ "plugin:vue/essential", "plugin:vue/strongly-recommended", "plugin:vue/recommended", "eslint:recommended", "@vue/typescript/recommended", + "@vue/prettier", "@vue/prettier/@typescript-eslint" ], "parserOptions": { "ecmaVersion": 2020 }, "rules": {} },@vue/prettier/@typescript-eslint だけで prettier が有効になると勘違いしていました。
参考
