- 投稿日:2020-08-12T21:50:39+09:00
新型コロナの蜜対策を画像処理でやってみる
コロナ禍の悩み
会社のミーテイングなどの際、換気をしてるとはいえ、人数多くないと思ったことはありませんか?私はあります。しかももう集まってるし、言い出しづらい。
ハッカソンで挑戦する
2020年8月8日に初めてハッカソンに挑戦しその時のアイデア発散で出たアイデアから、一緒にチームで戦った@canonno君と以下のものを作りました。
密を見つけて走り出す!「ミツかるよんく」
obnizを2台使用しています一台は距離センサを2個使用して入退室管理、もう一台のobnizでラジコンを動かしています。
密を見つけて走り出す!「ミツかるよんく」#protoout #obniz https://t.co/l6fn3nuyaR
— Toshiki (@Hirasawa1987) August 8, 2020アイデア発散ボード
ハッカソンでの私の発散ボードです。参加者の皆さんに貼っていただいたキーワードにYOLOなどでの学習済みモデルでの人間検出とありました、ハッカソンでは距離センサで入室人数を管理しましたが、今回は発展させYOLOの学習済みモデルで蜜を見つけてみたいと思います。動かないコード
index.html<html lang="en"> <head> <meta charset="UTF-8"> <title>蜜</title> <meta name="viewport" content="width=device-width, initial-scale=1.0"> <meta http-equiv="X-UA-Compatible" content="ie=edge"> <script src="https://cdnjs.cloudflare.com/ajax/libs/p5.js/0.9.0/p5.min.js"></script> <script src="https://cdnjs.cloudflare.com/ajax/libs/p5.js/0.9.0/addons/p5.dom.min.js"></script> <script src="https://unpkg.com/ml5@latest/dist/ml5.min.js" type="text/javascript"></script> <link rel="stylesheet" href="https://stackpath.bootstrapcdn.com/bootstrap/4.3.1/css/bootstrap.min.css"> <script src="https://obniz.io/js/jquery-3.2.1.min.js"></script> <script src="https://unpkg.com/obniz/obniz.js"></script> </head> <body> <div id="obniz-debug"></div> <h1></h1> <p id="status">Loading Model...</p> <script> let video; let detector; let detections; let bodyPix; var obniz_id = document.getElementsByName("obniz_id"); var obniz = new Obniz(obniz_id); obniz.onconnect = async () => { let speaker = obniz.wired("Speaker", { signal: 0, gnd: 4 }); } } function setup() { createCanvas(480, 360); video = createCapture(VIDEO); video.size(width, height); video.hide(); detector = ml5.objectDetector('yolo', modelReady) console.log(detector); } function modelReady() { console.log('model loaded') detect(); } function detect() { detector.detect(video, gotResults); } function gotResults(err, results) { if (err) { console.log(err); return } // console.log(detector); detections = results; detect(); } function draw() { image(video, 0, 0, width, height); if (detections) { detections.forEach(detection => { noStroke(); fill(255); strokeWeight(2); text(detection.label, detection.x + 4, detection.y + 10) noFill(); strokeWeight(3); if (detection.label === 'person') { stroke(0, 255, 0); if (detection.label === 'person') { speaker.play(1000); console.log(detection.label); } else { stroke(0, 0, 255); } rect(detection.x, detection.y, detection.width, detection.height); }) } } </script> </body> </html>動かない
Ml5.jsからYOLOのサンプルコードを引っ張ってきて、取り敢えず人間を検出する所まで行きました、続いてそのプログラムの中にobnizにコネクタできるコードを加えて、人を検出したらスピーカを鳴らすコードを作りました、で試そうと思いましたがうまくいきません。人間を検出したらエラーがでてしまいます。エラーを見て解決を試みますが、うまくいかず・・・今後の課題です。
- 投稿日:2020-08-12T21:50:39+09:00
新型コロナの密対策を画像処理でやってみる
コロナ禍の悩み
会社のミーテイングなどの際、換気をしてるとはいえ、人数多くないと思ったことはありませんか?私はあります。しかももう集まってるし、言い出しづらい。
ハッカソンで挑戦する
2020年8月8日に初めてハッカソンに挑戦しその時のアイデア発散で出たアイデアから、一緒にチームで戦った@canonno君と以下のものを作りました。
密を見つけて走り出す!「ミツかるよんく」
obnizを2台使用しています一台は距離センサを2個使用して入退室管理、もう一台のobnizでラジコンを動かしています。
密を見つけて走り出す!「ミツかるよんく」#protoout #obniz https://t.co/l6fn3nuyaR
— Toshiki (@Hirasawa1987) August 8, 2020アイデア発散ボード
ハッカソンでの私の発散ボードです。参加者の皆さんに貼っていただいたキーワードにYOLOなどでの学習済みモデルでの人間検出とありました、ハッカソンでは距離センサで入室人数を管理しましたが、今回は発展させYOLOの学習済みモデルで密を見つけてみたいと思います。コード
index.html<html lang="en"> <head> <meta charset="UTF-8"> <title>密</title> <meta name="viewport" content="width=device-width, initial-scale=1.0"> <meta http-equiv="X-UA-Compatible" content="ie=edge"> <script src="https://cdnjs.cloudflare.com/ajax/libs/p5.js/0.9.0/p5.min.js"></script> <script src="https://cdnjs.cloudflare.com/ajax/libs/p5.js/0.9.0/addons/p5.dom.min.js"></script> <script src="https://unpkg.com/ml5@latest/dist/ml5.min.js" type="text/javascript"></script> <link rel="stylesheet" href="https://stackpath.bootstrapcdn.com/bootstrap/4.3.1/css/bootstrap.min.css"> <script src="https://obniz.io/js/jquery-3.2.1.min.js"></script> <script src="https://unpkg.com/obniz/obniz.js"></script> </head> <body> <div id="obniz-debug"></div> <h1></h1> <p id="status">Loading Model...</p> <script> let video; let detector; let detections; let bodyPix; let obniz = new Obniz("OBNIZ_ID_HERE"); let speaker; obniz.onconnect = async function() { speaker = obniz.wired("Speaker", { signal: 0, gnd: 4 }); }; console.log(speaker); function setup() { createCanvas(480, 360); video = createCapture(VIDEO); video.size(width, height); video.hide(); detector = ml5.objectDetector('yolo', modelReady) console.log(detector); } function modelReady() { console.log('model loaded') detect(); } function detect() { detector.detect(video, gotResults); } function gotResults(err, results) { if (err) { console.log(err); return } // console.log(detector); detections = results; detect(); } function draw() { image(video, 0, 0, width, height); if (detections) { detections.forEach(detection => { noStroke(); fill(255); strokeWeight(2); text(detection.label, detection.x + 4, detection.y + 10) noFill(); strokeWeight(3); if (detection.label === 'person') { speaker.play(1000); stroke(0, 255, 0); console.log(speaker); console.log(detection.label); } else { speaker.stop(); stroke(0, 0, 255); } rect(detection.x, detection.y, detection.width, detection.height); }) } } </script> </body> </html>鳴った
WEBカメラで人を検出するとobnizに接続したスピーカーから音を鳴らすことができました。ただし人数での判断はしていませんので、1人でも検出したらなります。
今後
人数によって検出したり、人数×滞在時間で鳴らす、などに挑戦したいです。
- 投稿日:2020-08-12T21:24:52+09:00
ラズパイへのTensorFlow 2.3 & Keras 2.4 超簡単インストールして物体検出
他人の褌で相撲をとり、神速でTensorFlowとKerasをインストールする手順です。ARM 64ビットだと、scipyのインストールにGNU Fortranとかがインストールされていないと、pip がコケてエラーで終わるところが難しい…それとUbuntu 20.04 ARM64bitだとh5pyをpipにインストールさせるとコンパイルエラーでコケるため、
apt-get install python3-h5pyで入れないとどうにもならないとか、ハマりポイントもあった…AArch64はキビシイね…
- 2020-05-27-raspios-buster-armhf.zip と
- 2020-05-27-raspios-buster-arm64.zip では動作した
- Ubuntu 20.04 Focal ではできなかった…できた
をインストールして最低限のネットワークなどの設定をしたことを仮定します。
sudo bashなどで root のプロンプトを出して以下の作業を行って下さい。以下の手順でRaspbian OS Buster 32bit/64bit にTensorFlowをインストールしたSDカードイメージが http://34.83.134.122/raspi/ にあります。 (64bit版はpython3-matplotlibを入れ忘れたので、必要ならsudo apt-get update; sudo apt-get install python3-matplotlibでインストールして下さい。インストールするためのコマンド
apt-get update;apt-get dist-upgradeで古いパッケージを更新するapt-get install python3-protobuf python3-termcolor python3-yaml python3-pydot python3-pyasn1 python3-pyasn1-modules python3-rsa python3-markdown python3-cachetools python3-future python3-dill python3-tqdm python3-pil python3-pip python3-wheel python3-setuptools python3-matplotlib python3-h5py python3-scipy python3-grpcio python3-requests-oauthlib python3-werkzeug/etc/apt/sources.listの# deb-srcの行の先頭の#をすべて削除するapt-get build-dep h5py python-scipy grpc python-wrapt(h5pyとかscipyを64ビットARMでコンパイルするために必要…64ビット版以外ではおそらく不要)apt-get --autoremove --purge purge python3-wrapt(なぜかpipではうまく更新されないので削除しておく)pip3 install -U pip(pipが古いと新し目のTensorFlowを入れられないため)python3 -m pip install --use-feature=2020-resolver tensorflow-hub tensorflow-datasets https://github.com/lhelontra/tensorflow-on-arm/releases/download/v2.3.0/tensorflow-2.3.0-cp37-none-linux_armv7l.whl(TensorFlowのインストール, 64ビットARMだとコンパイルするのでメチャクチャ時間かかる)- 最新のKerasを入れたい場合のみ
python3 -m pip install --use-feature=2020-resolver keras(Kerasのインストール)64bit版や古いラズパイでの変更点(Raspberry Pi OS Buster)
- 64bit版なら8番目の手順を
python3 -m pip install --use-feature=2020-resolver tensorflow-hub tensorflow-datasets https://github.com/lhelontra/tensorflow-on-arm/releases/download/v2.3.0/tensorflow-2.3.0-cp37-none-linux_aarch64.whlのようにarmv7lをaarch64に変える- ラズパイ0やラズパイ1などのARMv6 CPUなら8番目の手順を
python3 -m pip install --use-feature=2020-resolver tensorflow-hub tensorflow-datasets https://github.com/lhelontra/tensorflow-on-arm/releases/download/v2.3.0/tensorflow-2.3.0-cp37-none-linux_armv6l.whlのようにarmv7lをarmv6lに変えるUbuntu 20.04 Focal や Debian 11 Bullseye での変更点
- Python バージョンが3.8であるが、上記のGithubには3.7しか今の所ないので、ファイルをダウンロードしてそのファイル名の
cp37をcp38に変えて、新しいファイル名をpipに与えてインストールする←これだと実行時エラーが出て駄目w あるいは自分でTensorFlowをコンパイルする(それが苦にならないならこれ読んでないと思いますが…)。 https://github.com/PINTO0309/Tensorflow-bin にPython 3.8用TensorFlowがあるから、それをダウンロードして pip に食わせて下さいapt-getするものはpython3-wraptを追加するpython3-wraptが十分新しくそのままで利用できるためapt-get --autoremove --purge purge python3-wraptは不要apt-get build-depはapt-get build-dep scipy grpcとして下さい。そのあとapt-get --purge --autoremove ruby2.7 texlive-baseとしてPythonに関係ないものを削除してもよいです物体検出のテスト
USBカメラまたはラズパイ専用カメラの映像から検出するには ラズパイとUSBカメラとTensorFlowで物体検出 をご覧下さい
https://keras.io/examples/vision/retinanet/ の例
そこに紹介されている物体識別の例を実行してみる。以下は
piなどの非rootユーザーで実行する
git clone https://github.com/keras-team/keras-io.gitcd keras-io/examples/visionpython3 retinanet.pyこの例の実行には仮想メモリが10ギガバイトくらい必要だが、次の例はギリギリ3ギガバイト程度で動作する。
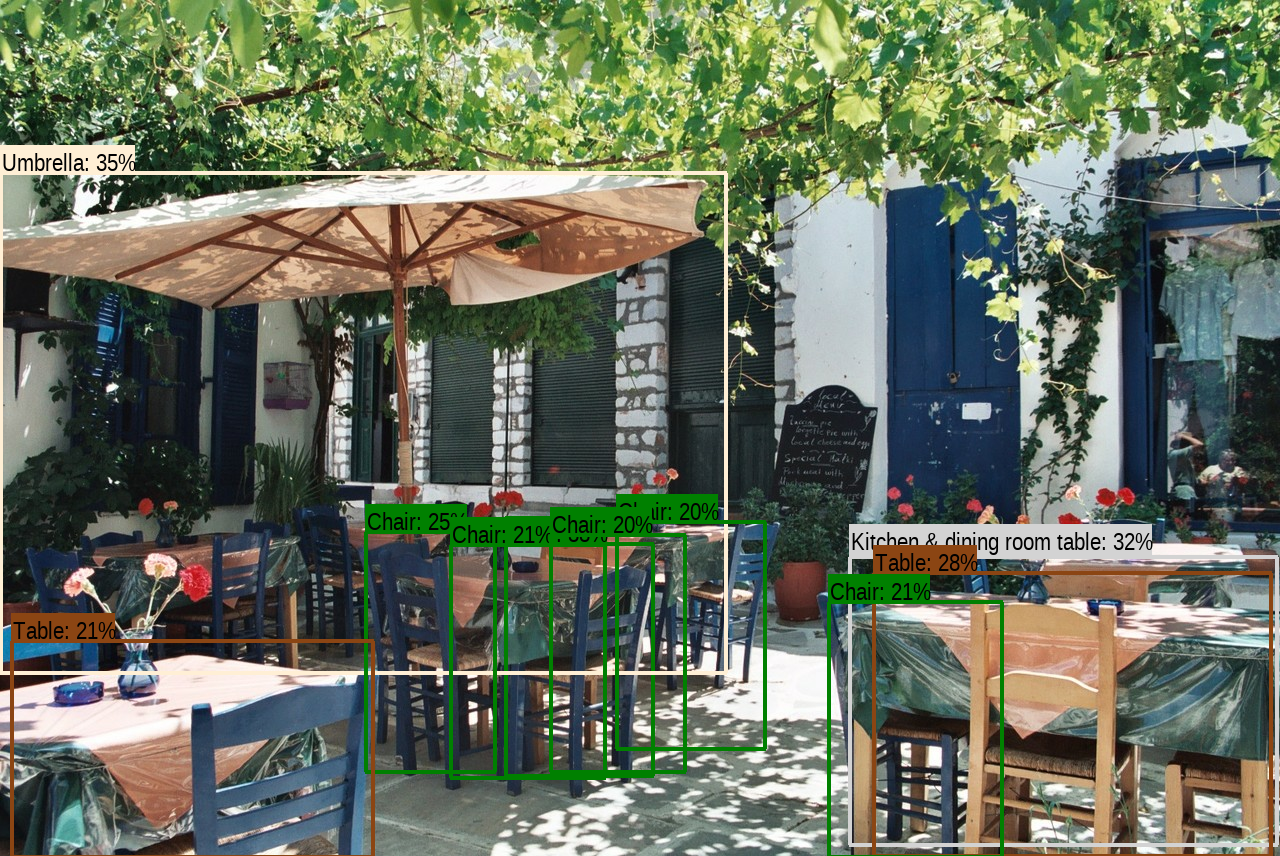
https://www.tensorflow.org/hub/tutorials/object_detection の例
サンプルプログラムを末尾のように少し改変して実行すると以下のような結果を得られる
# from https://github.com/tensorflow/hub/blob/master/examples/colab/object_detection.ipynb

#@title Imports and function definitions

# For running inference on the TF-Hub module.
import tensorflow as tf

import tensorflow_hub as hub

# For downloading the image.
import matplotlib.pyplot as plt
import tempfile
from six.moves.urllib.request import urlopen
from six import BytesIO

# For drawing onto the image.
import numpy as np
from PIL import Image
from PIL import ImageColor
from PIL import ImageDraw
from PIL import ImageFont
from PIL import ImageOps

# For measuring the inference time.
import time

# Print Tensorflow version
print(tf.__version__)

# Check available GPU devices.
print("The following GPU devices are available: %s" % tf.test.gpu_device_name())

def display_image(image):
#  fig = plt.figure(figsize=(20, 15))
#  plt.grid(False)
#  plt.imshow(image)
  image.show()


def download_and_resize_image(url, new_width=256, new_height=256,
                              display=False):
  _, filename = tempfile.mkstemp(suffix=".jpg")
  response = urlopen(url)
  image_data = response.read()
  image_data = BytesIO(image_data)
  pil_image = Image.open(image_data)
  pil_image = ImageOps.fit(pil_image, (new_width, new_height), Image.ANTIALIAS)
  pil_image_rgb = pil_image.convert("RGB")
  pil_image_rgb.save(filename, format="JPEG", quality=90)
  print("Image downloaded to %s." % filename)
#  if display:
#  display_image(pil_image)
  return filename


def draw_bounding_box_on_image(image,
                               ymin,
                               xmin,
                               ymax,
                               xmax,
                               color,
                               font,
                               thickness=4,
                               display_str_list=()):
  """Adds a bounding box to an image."""
  draw = ImageDraw.Draw(image)
  im_width, im_height = image.size
  (left, right, top, bottom) = (xmin * im_width, xmax * im_width,
                                ymin * im_height, ymax * im_height)
  draw.line([(left, top), (left, bottom), (right, bottom), (right, top),
             (left, top)],
            width=thickness,
            fill=color)

  # If the total height of the display strings added to the top of the bounding
  # box exceeds the top of the image, stack the strings below the bounding box
  # instead of above.
  display_str_heights = [font.getsize(ds)[1] for ds in display_str_list]
  # Each display_str has a top and bottom margin of 0.05x.
  total_display_str_height = (1 + 2 * 0.05) * sum(display_str_heights)

  if top > total_display_str_height:
    text_bottom = top
  else:
    text_bottom = top + total_display_str_height
  # Reverse list and print from bottom to top.
  for display_str in display_str_list[::-1]:
    text_width, text_height = font.getsize(display_str)
    margin = np.ceil(0.05 * text_height)
    draw.rectangle([(left, text_bottom - text_height - 2 * margin),
                    (left + text_width, text_bottom)],
                   fill=color)
    draw.text((left + margin, text_bottom - text_height - margin),
              display_str,
              fill="black",
              font=font)
    text_bottom -= text_height - 2 * margin


def draw_boxes(image, boxes, class_names, scores, max_boxes=10, min_score=0.1):
  """Overlay labeled boxes on an image with formatted scores and label names."""
  colors = list(ImageColor.colormap.values())

  try:
    font = ImageFont.truetype("/usr/share/fonts/truetype/liberation/LiberationSansNarrow-Regular.ttf",
                              25)
  except IOError:
    print("Font not found, using default font.")
    font = ImageFont.load_default()

  for i in range(min(boxes.shape[0], max_boxes)):
    if scores[i] >= min_score:
      ymin, xmin, ymax, xmax = tuple(boxes[i])
      display_str = "{}: {}%".format(class_names[i].decode("ascii"),
                                     int(100 * scores[i]))
      color = colors[hash(class_names[i]) % len(colors)]
      image_pil = Image.fromarray(np.uint8(image)).convert("RGB")
      draw_bounding_box_on_image(
          image_pil,
          ymin,
          xmin,
          ymax,
          xmax,
          color,
          font,
          display_str_list=[display_str])
      np.copyto(image, np.array(image_pil))
  return image

# By Heiko Gorski, Source: https://commons.wikimedia.org/wiki/File:Naxos_Taverna.jpg
image_url = "https://upload.wikimedia.org/wikipedia/commons/6/60/Naxos_Taverna.jpg"  #@param
downloaded_image_path = download_and_resize_image(image_url, 1280, 856, True)

module_handle = "https://tfhub.dev/google/openimages_v4/ssd/mobilenet_v2/1" #@param ["https://tfhub.dev/google/openimages_v4/ssd/mobilenet_v2/1", "https://tfhub.dev/google/faster_rcnn/openimages_v4/inception_resnet_v2/1"]

detector = hub.load(module_handle).signatures['default']

def load_img(path):
  img = tf.io.read_file(path)
  img = tf.image.decode_jpeg(img, channels=3)
  return img

def run_detector(detector, path):
  img = load_img(path)

  converted_img  = tf.image.convert_image_dtype(img, tf.float32)[tf.newaxis, ...]
  start_time = time.time()
  result = detector(converted_img)
  end_time = time.time()

  result = {key:value.numpy() for key,value in result.items()}

  print("Found %d objects." % len(result["detection_scores"]))
  print("Inference time: ", end_time-start_time)

  image_with_boxes = draw_boxes(
      img.numpy(), result["detection_boxes"],
      result["detection_class_entities"], result["detection_scores"])

  display_image(Image.fromarray(image_with_boxes))


run_detector(detector, downloaded_image_path)
- 投稿日:2020-08-12T21:24:52+09:00
ラズパイへのTensorFlow 2.3 & Keras 2.4 超簡単インストール
他人の褌で相撲をとり、神速でTensorFlowとKerasをインストールする手順です。
- 2020-05-27-raspios-buster-armhf.zip または
- 2020-05-27-raspios-buster-arm64.zip
をインストールして最低限のネットワークなどの設定をしたことを仮定します。
sudo bashなどで root のプロンプトを出して以下の作業を行って下さい。インストールするためのコマンド
apt-get update;apt-get dist-upgradeで古いパッケージを更新するapt-get install python3-pip(たぶん不要だけど念のため)pip3 install -U pip(pipが古いと新し目のTensorFlowを入れられないため)apt-get install python3-protobuf python3-termcolor python3-yaml python3-pydot python3-pyasn1 python3-pyasn1-modules python3-rsa python3-markdown python3-cachetools python3-future python3-dill python3-tqdm python3-pil python3-matplotlib imagemagick/etc/apt/sources.listの# deb-srcの行の先頭の#をすべて削除するapt-get build-dep h5py python-scipy grpc python-wrapt(h5pyとかscipyを64ビットARMでコンパイルするために必要…)apt-get --autoremove purge python3-wrapt(なぜかpipではうまく更新されないので削除しておく)python3 -m pip install --use-feature=2020-resolver tensorflow-hub tensorflow-datasets https://github.com/lhelontra/tensorflow-on-arm/releases/download/v2.3.0/tensorflow-2.3.0-cp37-none-linux_armv7l.whl(TensorFlowのインストール, 64ビットARMだとコンパイルするのでメチャクチャ時間かかる)- 最新のKerasを入れたい場合のみ
python3 -m pip install --use-feature=2020-resolver keras(Kerasのインストール)64bit版や古いラズパイでの変更点
- 64bit版なら8番目の手順を
python3 -m pip install --use-feature=2020-resolver tensorflow-hub tensorflow-datasets https://github.com/lhelontra/tensorflow-on-arm/releases/download/v2.3.0/tensorflow-2.3.0-cp37-none-linux_aarch64.whlのようにarmv7lをaarch64に変える- ラズパイ0やラズパイ1などのARMv6 CPUなら8番目の手順を
python3 -m pip install --use-feature=2020-resolver tensorflow-hub tensorflow-datasets https://github.com/lhelontra/tensorflow-on-arm/releases/download/v2.3.0/tensorflow-2.3.0-cp37-none-linux_armv6l.whlのようにarmv7lをarmv6lに変えるPythonからOpenCVを使うには…
apt-get install python3-opencvで使えるようになる。簡単❣物体識別のテスト
https://keras.io/examples/vision/retinanet/ に紹介されている物体識別の例を実行してみる。以下は
piなどの非rootユーザーで実行する
git clone https://github.com/keras-team/keras-io.gitcd keras-io/examples/visionpython3 retinanet.py
- 投稿日:2020-08-12T14:21:39+09:00
Input * of layer conv2d_* is incompatible with the layer: expected axis -3 of input shape to have value * but received input with shape [None,*,* ,*]のエラーについて
エラーについて
Input * of layer conv2d_* is incompatible with the layer: expected axis -3 of input shape to have value * but received input with shape [None, *, *, *]
convレイヤーを使う際にNCHWとNHWCの差によって生まれるエラー。
「*」の値はmodelの設定によって変わる。解決法
https://keras.io/ja/backend/
こちらにあるように.keras直下にあるkeras.jsonをエラーに合うように変更する。
- NCHWにするならchannels_first
- NWHCにするならchannels_last
バッチ、チャンネル、高さ、幅の並び順の問題は最初にぶつかる壁な気がします。
- 投稿日:2020-08-12T13:48:05+09:00
How to build MediaPipe hand tracking (iOS) as an Xcode project
Agenda
- Preparation (MediaPipe)
- Build from terminal
- Preparation (Tulsi)
- Build as an Xcode project
Demo
Hand Tracking on iOS?#MediaPipe pic.twitter.com/mgHPfUIHwK
— MIWA Tetsushi (@WWWPONTE) August 11, 2020DEV
- MacBook Pro: Catalina 10.15.4
- Xcode: 11.6
- iPhone SE (2nd generation): iOS 13.5.1
Preparation (MediaPipe)
1. Install Homebrew
- Copy the command at https://brew.sh
- Paste to your terminal and execute
- The version of Homebrew I used this time was 2.4.7.
$ brew -v
# Homebrew 2.4.7
2. Install Command Line Tools
- Go to https://developer.apple.com/download/more and download Command Line Tools for Xcode XX ※You need to sign in Apple Developer Program.
- Double-click
.dmg- Execute the following command
$ sudo xcodebuild -license3. Check the Python version
Python is pre-installed on mac by default. Depending on the Python version, the build may not pass, so it is necessary to check the Python version. I confirmed that the build passed with
Python 3.7.5, so I recommend building with this version of Python. At that time, there is a version manager calledpyenvthat can switch the Python version, so I will explain how to use it.
- Clone the pyenv repository
$ git clone https://github.com/pyenv/pyenv.git ~/.pyenv
- Add to path
.zsh_profile
zsh$ echo 'export PYENV_ROOT="$HOME/.pyenv"' >> ~/.zsh_profile $ echo 'export PATH="$PYENV_ROOT/bin:$PATH"' >> ~/.zsh_profile $ echo 'eval "$(pyenv init -)"' >> ~/.zsh_profile
- Install
Python 3.7.5$ pyenv install 3.7.5
- Rehash
shim$ pyenv rehash
- Specifying the Python version
The global command sets the global Python version. This can be overridden with other commands, but is useful for ensuring you use a particular Python version by default. If you wanted to use
3.7.5by default, then you could run this:$ pyenv global 3.7.5The local command is often used to set an application-specific Python version. You could use it to set the version to
3.7.5:$ pyenv local 3.7.54. Install six library
Install
sixlibrary for absorbing the difference between Python 2 and Python 3.$ pip install –user future six5. Clone the MediaPipe repository
$ git clone https://github.com/google/mediapipe.git6. Install Bazel
- Insatll
Bazel$ brew install bazel
- The version of bazel I used this time was 3.3.0.
$ bazel --version
# bazel 3.3.0
7. Install OpenCV and FFmpeg
$ brew install opencv@38. Install numpy
$ pip install numpy9. Check installation with Hello World
- Execute
Hello World desktop example$ export GLOG_logtostderr=1 $ bazel run --define MEDIAPIPE_DISABLE_GPU=1 \ mediapipe/examples/desktop/hello_world:hello_world # After building bazel (it takes a few minutes), it is OK if "Hello World!" is displayed 10 times as shown below. # Hello World! # Hello World! # Hello World! # Hello World! # Hello World! # Hello World! # Hello World! # Hello World! # Hello World! # Hello World!Build from terminal
1. Prepare Provisioning Profile
In order to execute the iOS app on your device, a file for identifying the iOS device or app called the
Provisioning Profileis required. Apple Developer Program subscribers can create and download from https://developer.apple.com/jp. Rename the downloaded file toprovisioning_profile.mobileprovisionand place it inmediapipe/mediapipe/.2. Change Bundle Identifier
Next, fix
BUILDatmediapipe/mediapipe/examples/ios/handtrackinggpu/. Changebundle_idto the same one which you set atProvisioning Profile.mediapipe/examples/ios/handtrackinggpu/BUILD:36bundle_id = BUNDLE_ID_PREFIX + ".HandTrackingGpu", ↓ bundle_id = "(Bundle Identifier)",3. Build
Move
mediapipe/and execute the following command.$ bazel build -c opt –config=ios_arm64 mediapipe/example/ios/handtrackinggpu:HandTrackingGpuAppAn IPA file is generated at the following directory.
bazel-bin/mediapipe/examples/ios/handtrackinggpu/Preparation (Tulsi)
1. Clone the Tulsi repository
$ git clone https://github.com/bazelbuild/tulsi.git2. Apply the patch
$ cd tulsi
$ git fetch origin pull/99/head:xcodefix
$ git checkout xcodefix
3. Execute the build script
sh build_and_run.shOccurred an error!!
ERROR: /Users/miwa/tulsi/BUILD:62:18: Linking of rule '//:tulsi.__internal__.apple_binary' failed (Exit 1) wrapped_clang failed: error executing command external/local_config_cc/wrapped_clang -Xlinker -objc_abi_version -Xlinker 2 -fobjc-link-runtime -ObjC -arch x86_64 -filelist ... (remaining 26 argument(s) skipped)After checking this, I could execute the build script!
tulsi/WORKSPACE:6tag = "0.17.2", ↓ tag = "0.18.0",4. Open MediaPipe.tulsiproj and generate the Xcode project
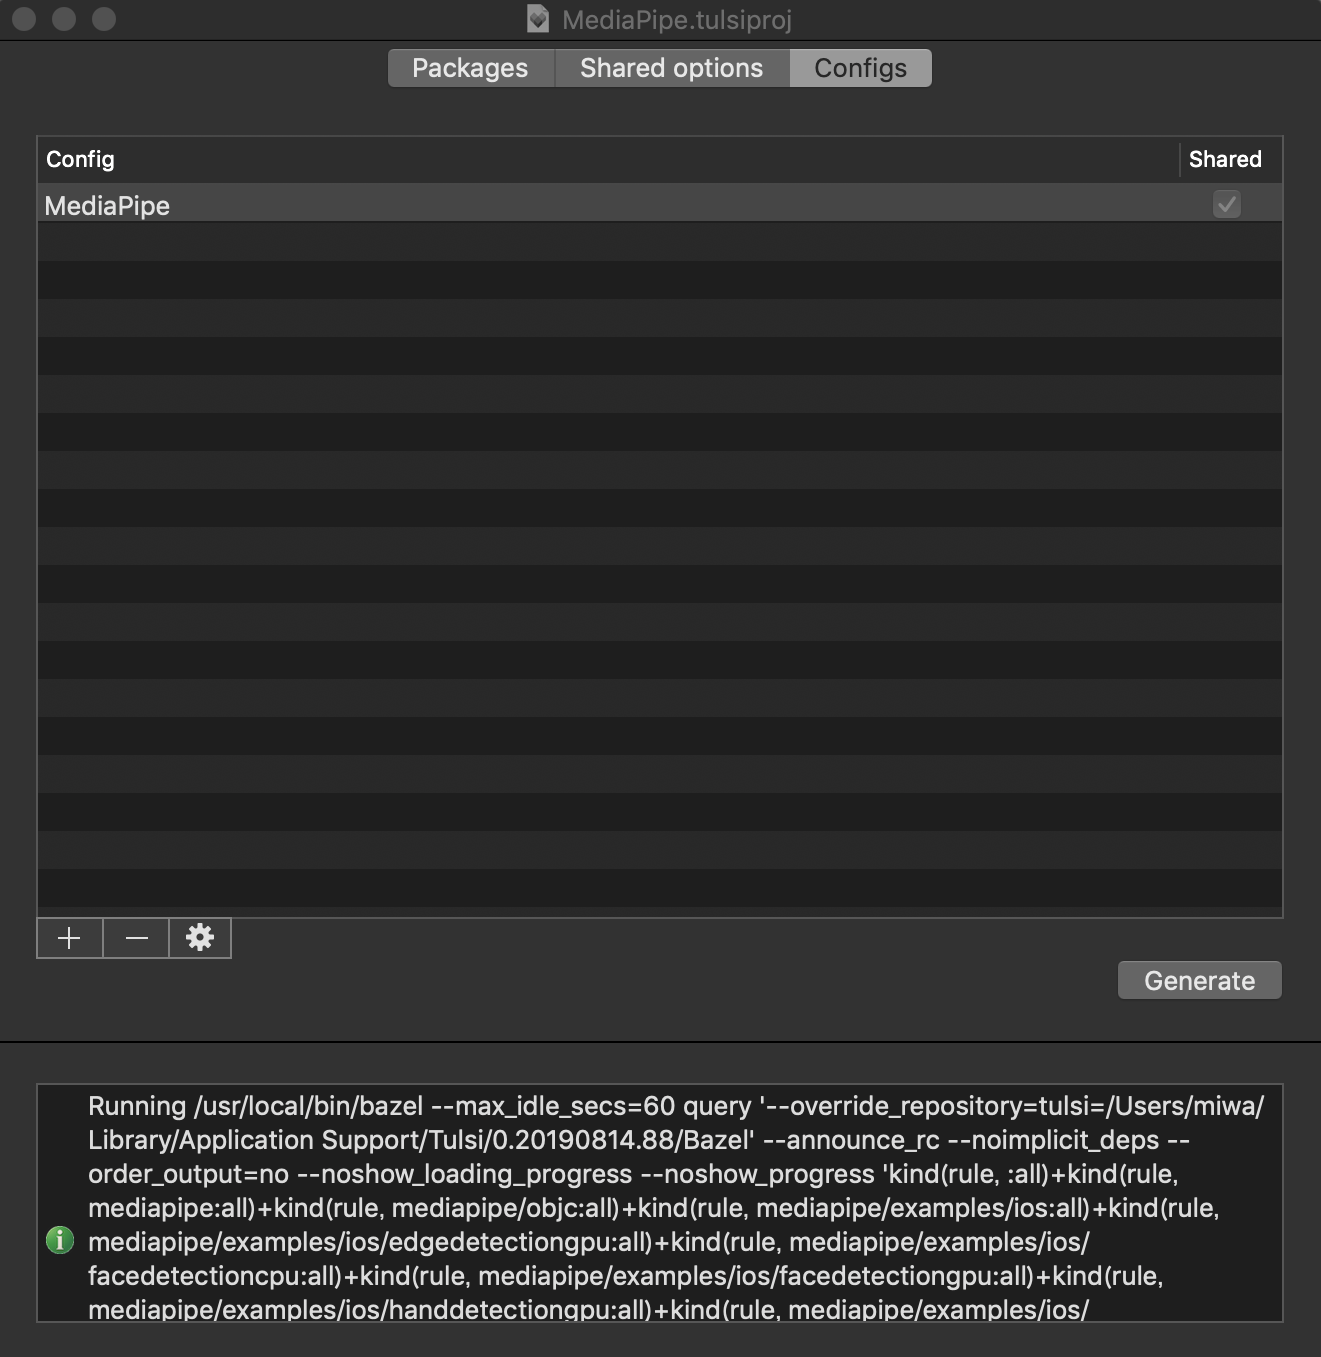
- Launch Tulsi.app and open
Mediapipe.tulsiprojatmediapipe/mediapipe/.
- Push
Generatebutton inConfigstab
Build as an Xcode project
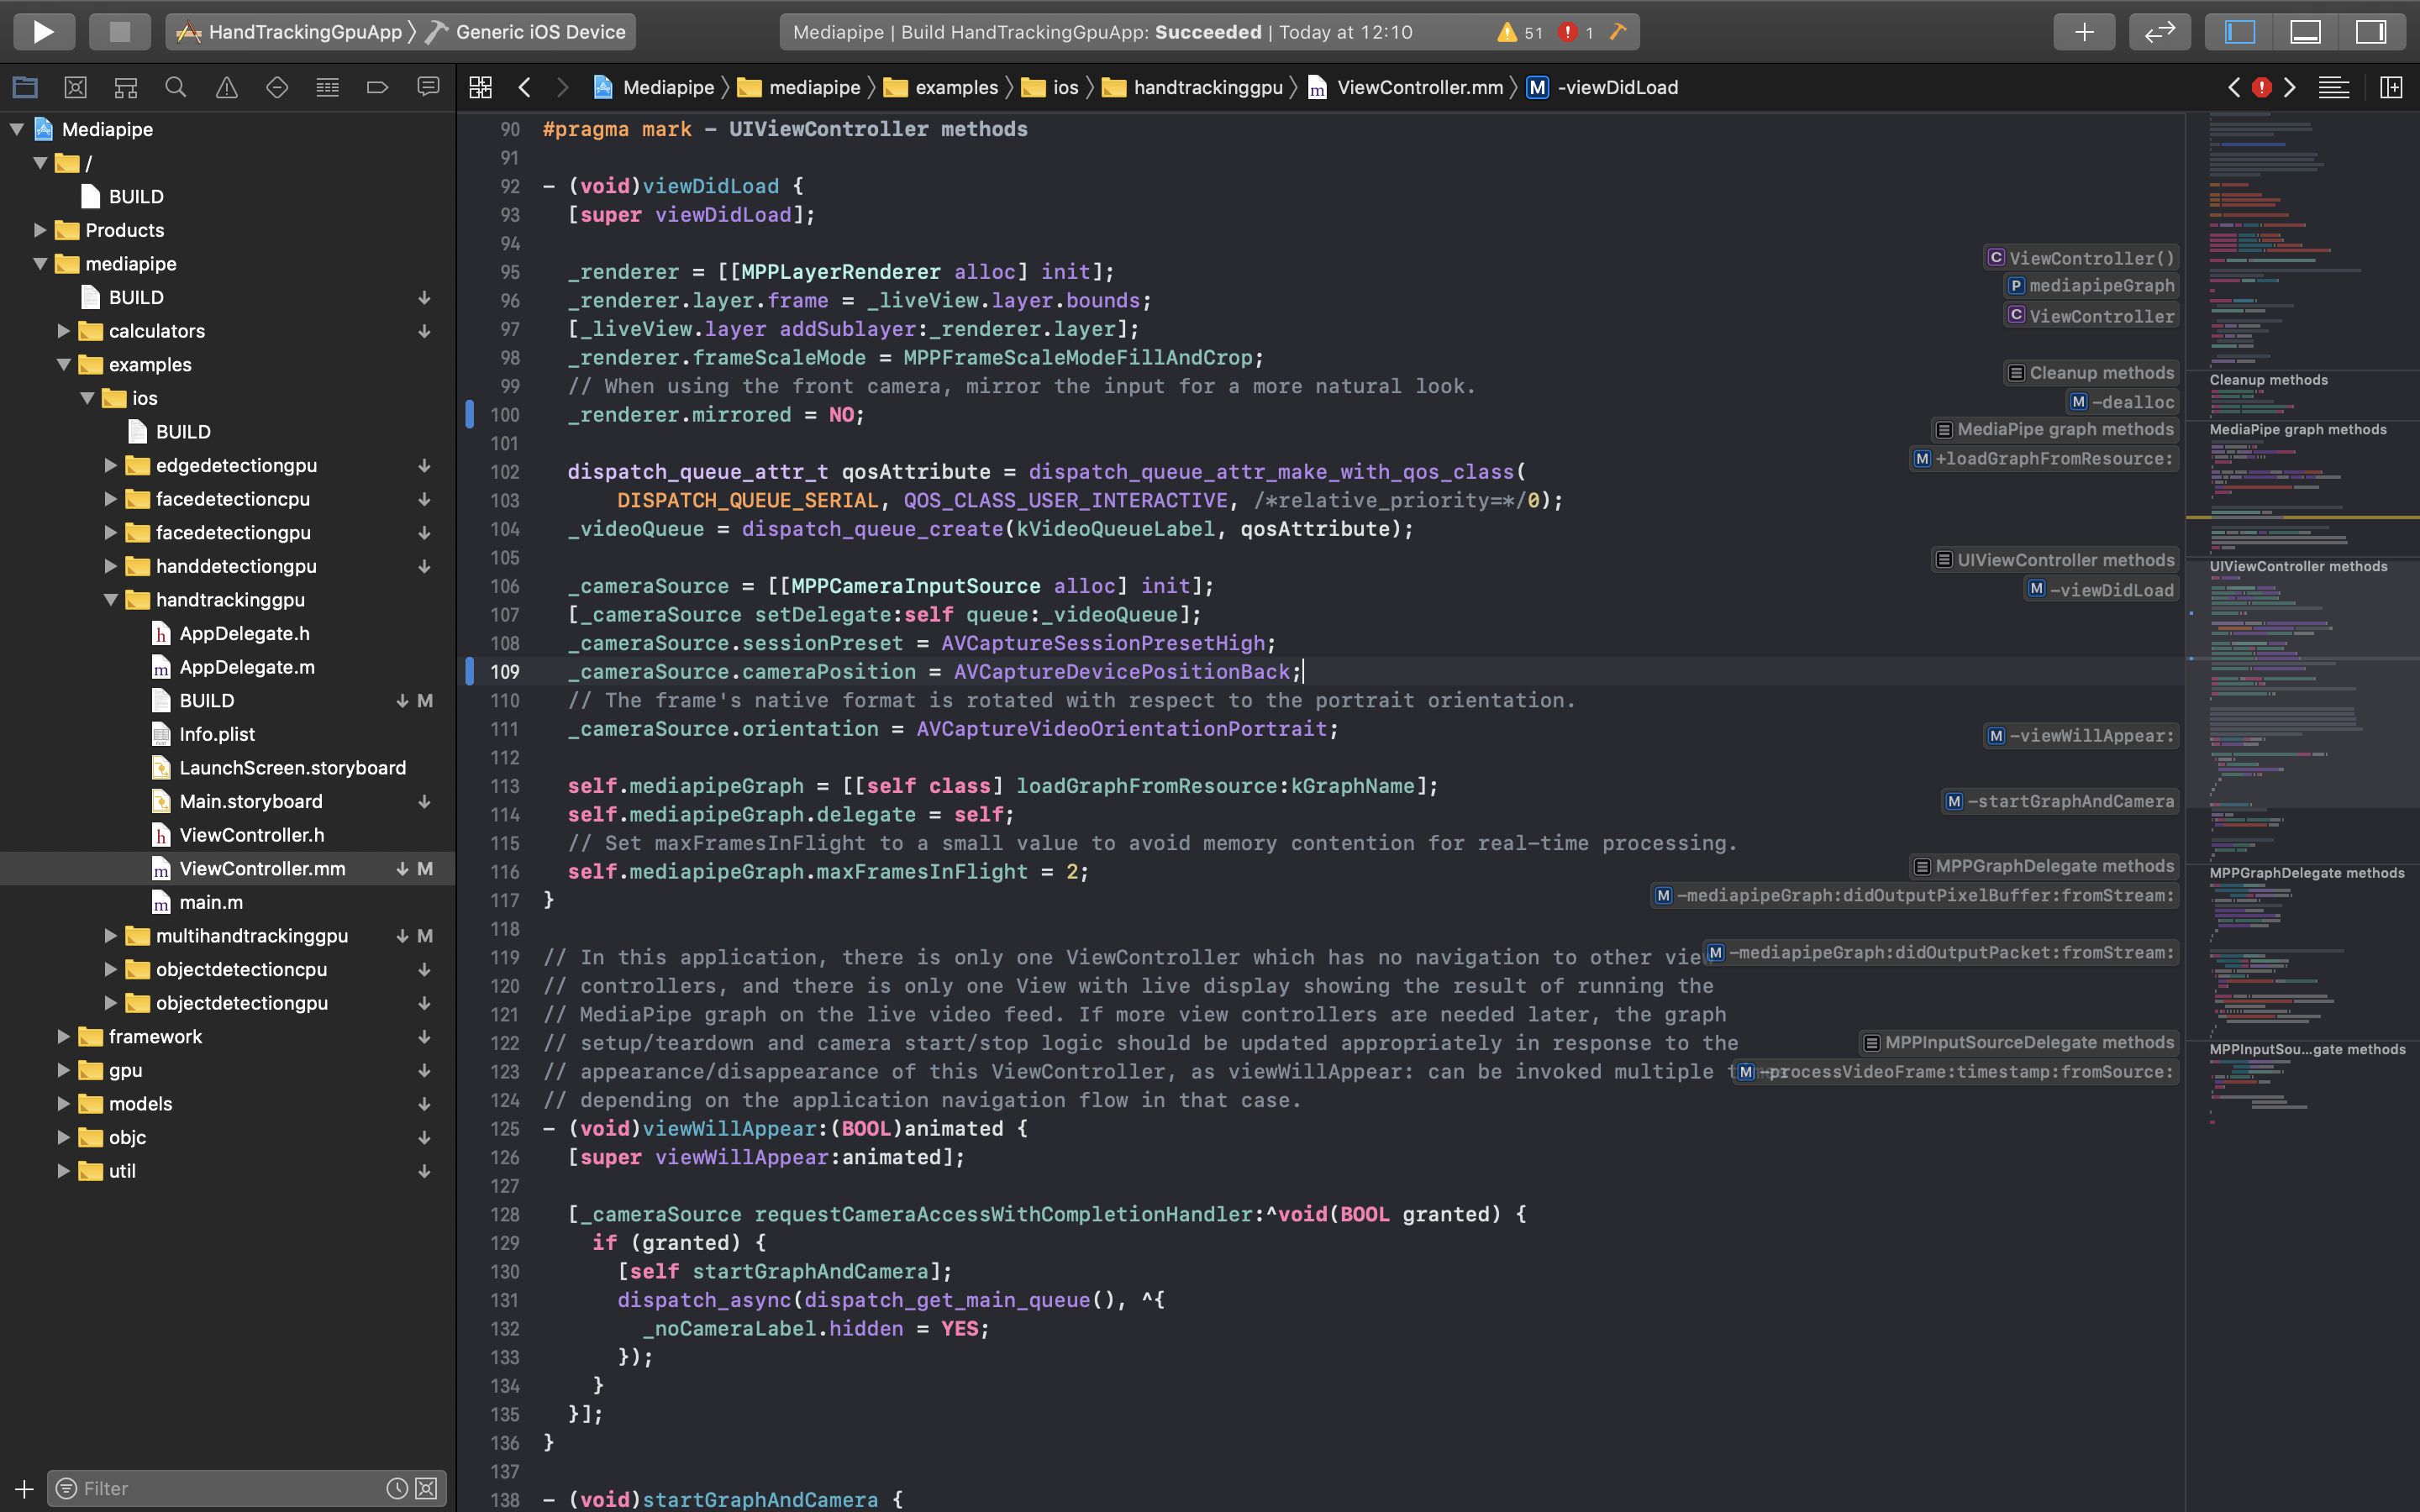
Now connect your iPhone to your mac. Then open the generated Xcode project and start the build. After a while, the build will be completed and it will be installed on your iPhone.
Set to use the rear camera.
mediapipe/examples/ios/handtrackinggpu/ViewController.mm:107_cameraSource.cameraPosition = AVCaptureDevicePositionFront; ↓ _cameraSource.cameraPosition = AVCaptureDevicePositionBack;Displaying reversed image, so I changed the value of
Mirrored.mediapipe/examples/ios/handtrackinggpu/ViewController.mm:111_cameraSource.videoMirrored = YES; ↓ _cameraSource.videoMirrored = NO;Summary
I succeed in implementing high-precision real-time hand tracking on iOS.
In the future, I will develop learning iOS applications for the visually impaired with this technology.