- 投稿日:2020-08-02T20:16:37+09:00
Java, Springでショッピングサイトの管理者機能・画面をつくってみた
はじめに
わたしは、2~3年ほど前からJavaを中心に勉強している者です。
最近になって(遅ればせながら)、Springについて勉強しはじめました。
早速ですが、ショッピングサイトの管理者向け機能・画面を作ってみました。
まだまだ拙いですが、よければ参考にしてみてください。STSのバージョン : 4.7.0.RELEASE
MySQLのバージョン : 8.0.15
mysql-connector-javaのバージョン : 8.0.16SampleApplication.javapackage com.example.demo; import org.springframework.boot.SpringApplication; import org.springframework.boot.autoconfigure.SpringBootApplication; import org.springframework.web.bind.annotation.RequestMapping; import org.springframework.web.bind.annotation.RequestMethod; @SpringBootApplication public class Sample1Application { @RequestMapping(value = "/index", method = RequestMethod.GET) public String index() { return "index"; } public static void main(String[] args) { SpringApplication.run(Sample1Application.class, args); } }SampleController.javapackage com.example.demo; import org.springframework.stereotype.Controller; import org.springframework.ui.Model; import org.springframework.web.bind.annotation.ModelAttribute; import org.springframework.web.bind.annotation.RequestMapping; import org.springframework.web.bind.annotation.RequestMethod; import java.util.*; import org.springframework.beans.factory.annotation.Autowired; import org.springframework.jdbc.core.JdbcTemplate; @Controller public class SampleController { @Autowired JdbcTemplate jdbcTemplate; @Autowired private SampleService sampleService; @ModelAttribute @RequestMapping(value = "/login", method = RequestMethod.GET) public String login(Model model) { LoginForm loginForm = new LoginForm(); loginForm.setId(""); loginForm.setName(""); model.addAttribute("loginForm", loginForm); model.addAttribute("message", "管理者情報を入力してください"); return "login"; } @ModelAttribute @RequestMapping(value = "/login_result", method = RequestMethod.POST) public String login_result(LoginForm loginForm, Model model) { List<Map<String, Object>> list; list = jdbcTemplate.queryForList("select * from user"); for(int i = 0; i < list.size(); i++) { if (("[" + loginForm.getId() + "," + " " + loginForm.getName() + "]").compareTo((list.get(i).values().toString())) == 0) { model.addAttribute("message", "ログインに成功しました"); } else { model.addAttribute("message", "ログインに失敗しました"); } } return "login_result"; } @ModelAttribute @RequestMapping(value = "/admin_menu", method = RequestMethod.GET) public String admin_menu(Model model) { model.addAttribute("message", "メニューを選択してください"); return "admin_menu"; } @ModelAttribute @RequestMapping(value = "/show_product", method = RequestMethod.GET) public String show_product(Model model) { List<String> products = null; products = sampleService.selectAll(); model.addAttribute("products",products); model.addAttribute("message", "商品を表示しました"); return "show_product"; } @ModelAttribute @RequestMapping(value = "/register_product", method = RequestMethod.GET) public String register_product(Model model) { ProductForm productForm = new ProductForm(); model.addAttribute("productForm", productForm); model.addAttribute("message", "商品を登録してください"); return "register_product"; } @ModelAttribute @RequestMapping(value = "/update_product", method = RequestMethod.GET) public String update_product(Model model) { ProductForm productForm = new ProductForm(); model.addAttribute("productForm", productForm); model.addAttribute("message", "商品を更新してください"); return "update_product"; } @ModelAttribute @RequestMapping(value = "/delete_product", method = RequestMethod.GET) public String delete_product(Model model) { ProductForm productForm = new ProductForm(); model.addAttribute("productForm", productForm); model.addAttribute("message", "商品を削除してください"); return "delete_product"; } @ModelAttribute @RequestMapping(value = "/afeter_delete_product", method = RequestMethod.POST) public String afeter_delete_product(ProductForm productForm, Model model) { sampleService.delete(productForm); model.addAttribute("message", "処理が完了しました"); return "afeter_delete_product"; } @ModelAttribute @RequestMapping(value = "/show_result", method = RequestMethod.POST) public String show_result(ProductForm productForm, Model model) { sampleService.insert(productForm); model.addAttribute("message", "処理が完了しました"); return "show_result"; } }SampleService.javapackage com.example.demo; import java.sql.Connection; import java.sql.DriverManager; import java.sql.PreparedStatement; import java.sql.ResultSet; import java.sql.SQLException; import java.sql.Statement; import java.util.ArrayList; import java.util.List; import org.springframework.stereotype.Service; @Service public class SampleService { public List<String> selectAll() { List<String> entities = null; entities = new ArrayList<String>(); ResultSet resultSet = null; Connection connection = null; try { connection = DriverManager.getConnection("jdbc:mysql://localhost:3306/sample?serverTimezone=JST", "root", "root"); Statement statement = connection.createStatement(); resultSet = statement.executeQuery("select * from product"); while (resultSet.next()) { String str = resultSet.getString("code") + " " + resultSet.getString("name") + " " + resultSet.getString("description") + " " + resultSet.getString("price") + " " + resultSet.getString("evaluation"); entities.add(str); } if (connection != null) { connection.close(); } } catch (SQLException e) { e.printStackTrace(); } return entities; } public void insert(ProductForm productForm) { Connection connection = null; try { connection = DriverManager.getConnection("jdbc:mysql://localhost:3306/sample?serverTimezone=JST", "root", "root"); PreparedStatement statement = connection.prepareStatement("INSERT INTO product VALUES (?, ?, ?, ?, ?)"); statement.setString(1, productForm.getCode()); statement.setString(2, productForm.getName()); statement.setString(3, productForm.getDescription()); statement.setString(4, productForm.getPrice()); statement.setString(5, productForm.getEvaluation()); connection.setAutoCommit(true); statement.execute(); if (connection != null) { connection.close(); } } catch (SQLException e) { e.printStackTrace(); } } public void update(ProductForm productForm) { Connection connection = null; try { connection = DriverManager.getConnection("jdbc:mysql://localhost:3306/sample?serverTimezone=JST", "root", "root"); PreparedStatement statement = connection.prepareStatement("UPDATE product SET code=?, name=?, description=?, price=?, evaluation=? WHERE code=?"); statement.setString(1, productForm.getCode()); statement.setString(2, productForm.getName()); statement.setString(3, productForm.getDescription()); statement.setString(4, productForm.getPrice()); statement.setString(5, productForm.getEvaluation()); statement.setString(6, productForm.getCode()); connection.setAutoCommit(true); statement.execute(); if (connection != null) { connection.close(); } } catch (SQLException e) { e.printStackTrace(); } } public void delete(ProductForm productForm) { Connection connection = null; try { connection = DriverManager.getConnection("jdbc:mysql://localhost:3306/sample?serverTimezone=JST", "root", "root"); PreparedStatement statement = connection.prepareStatement("DELETE FROM product WHERE code=?"); statement.setString(1, productForm.getCode()); connection.setAutoCommit(true); statement.execute(); if (connection != null) { connection.close(); } } catch (SQLException e) { e.printStackTrace(); } } }LoginForm.javapackage com.example.demo; public class LoginForm { private String id; private String name; public String getId() { return id; } public void setId(String id) { this.id = id; } public String getName() { return name; } public void setName(String name) { this.name = name; } }ProductForm.javapackage com.example.demo; public class ProductForm { private String code; private String name; private String description; private String price; private String evaluation; public String getCode() { return code; } public void setCode(String code) { this.code = code; } public String getName() { return name; } public void setName(String name) { this.name = name; } public String getDescription() { return description; } public void setDescription(String description) { this.description = description; } public String getPrice() { return price; } public void setPrice(String price) { this.price = price; } public String getEvaluation() { return evaluation; } public void setEvaluation(String evaluation) { this.evaluation = evaluation; } }以上のソースファイルをプロジェクトのsrc/main/javaに格納します。
index.html<!DOCTYPE html> <html xmlns:th="http://www.thymeleaf.org"> <head> <meta http-equiv="Content-Type" content="text/html; charset=UTF-8" /> <title>Spring-Shopsite</title> </head> <body> <p>Spring-Shopsite にようこそ!</p> <a href="/login" >管理者の方は こちらからどうぞ</a> </body> </html>login.html<!DOCTYPE html> <html xmlns:th="http://www.thymeleaf.org"> <head> <meta http-equiv="Content-Type" content="text/html; charset=UTF-8" /> <title>Spring-Shopsite</title> </head> <body> <p th:text="${message}"></p> <form th:action="@{/login_result}" th:object="${loginForm}" method="post"> ID:<input type="text" th:field="*{id}"> <BR/> お名前:<input type="text" th:field="*{name}"> <BR/> <input type="submit" value="ログイン"/> <BR/> </form> </body> </html>login_result.html<!DOCTYPE html> <html xmlns:th="http://www.thymeleaf.org"> <head> <meta http-equiv="Content-Type" content="text/html; charset=UTF-8" /> <title>Spring-Shopsite</title> </head> <body> <p th:text="${message}"></p> <div th:if="${#strings.equals(message, 'ログインに成功しました')}"> <a href="/admin_menu">管理者向けメニュー</a> </div> <div th:if="${#strings.equals(message, 'ログインに失敗しました')}"> <a href="/login">ログインし直してください</a> </div> </body> </html>admin_menu.html<!DOCTYPE html> <html xmlns:th="http://www.thymeleaf.org"> <head> <meta http-equiv="Content-Type" content="text/html; charset=UTF-8" /> <title>Spring-Shopsite</title> </head> <body> <p th:text="${message}"></p> <a href="/show_product">登録済み全商品の表示</a> <br/> <a href="/register_product">商品の登録</a> <br/> <a href="/update_product">商品の更新</a> <br/> <a href="/delete_product">商品の削除</a> </body> </html>show_product.html<!DOCTYPE html> <html xmlns:th="http://www.thymeleaf.org"> <head> <meta http-equiv="Content-Type" content="text/html; charset=UTF-8" /> <title>Spring-Shopsite</title> </head> <body> <p th:text="${message}"></p> <table th:each="product : ${products}"> <tr> <td> <p th:text="${product}"></p> </td> </tr> </table> </body> </html>register_product.html<!DOCTYPE html> <html xmlns:th="http://www.thymeleaf.org"> <head> <meta http-equiv="Content-Type" content="text/html; charset=UTF-8" /> <title>Spring-Shopsite</title> </head> <body> <p th:text="${message}"></p> <form th:action="@{/show_result}" th:object="${productForm}" method="post"> 商品コード:<input type="text" th:field="*{code}"> <BR /> 商品名:<input type="text" th:field="*{name}"> <BR /> 説明 :<input type="text" th:field="*{description}"> <BR /> 価格:<input type="text" th:field="*{price}"> <BR /> 評価:<input type="text" th:field="*{evaluation}"> <BR /> <input type="submit" value="登録"/> <BR /> </form> </body> </html>update_product.html<!DOCTYPE html> <html xmlns:th="http://www.thymeleaf.org"> <head> <meta http-equiv="Content-Type" content="text/html; charset=UTF-8" /> <title>Spring-Shopsite</title> </head> <body> <p th:text="${message}"></p> <form th:action="@{/show_result}" th:object="${productForm}" method="post"> 商品コード:<input type="text" th:field="*{code}"> <BR /> 商品名:<input type="text" th:field="*{name}"> <BR /> 説明 :<input type="text" th:field="*{description}"> <BR /> 価格:<input type="text" th:field="*{price}"> <BR /> 評価:<input type="text" th:field="*{evaluation}"> <BR /> <input type="submit" value="更新"/> <BR /> </form> </body> </html>delete_product.html<!DOCTYPE html> <html xmlns:th="http://www.thymeleaf.org"> <head> <meta http-equiv="Content-Type" content="text/html; charset=UTF-8" /> <title>Spring-Shopsite</title> </head> <body> <p th:text="${message}"></p> <form th:action="@{/afeter_delete_product}" th:object="${productForm}" method="post"> 商品コード:<input type="text" th:field="*{code}"> <BR /> <input type="submit" value="削除"/> <BR /> </form> </body> </html>after_delete_product.html<!DOCTYPE html> <html xmlns:th="http://www.thymeleaf.org"> <head> <meta http-equiv="Content-Type" content="text/html; charset=UTF-8" /> <title>Spring-Shopsite</title> </head> <body> <p th:text="${message}"></p> </body> </html>show_result.html<!DOCTYPE html> <html xmlns:th="http://www.thymeleaf.org"> <head> <meta http-equiv="Content-Type" content="text/html; charset=UTF-8" /> <title>Spring-Shopsite</title> </head> <body> <p th:text="${message}"></p> </body> </html>以上のテンプレートファイルをsrc/main/resources配下のtemplatesに格納します。
おわりに
あとはプロジェクトをビルドすれば正常に実行されるはずです。今回の
プロジェクトでは残念ながら、商品の画像は取り扱いできませんが、基本的な機能だけは押さえたつもりです。
もしかしたら、このプロジェクトの続きをやることになるかもしれませんが、その時はまたよろしくお願いいたします。
それではまたお会いしましょう。ついでに
念のためpomも載せておきます。
pom.xml<?xml version="1.0" encoding="UTF-8"?> <project xmlns="http://maven.apache.org/POM/4.0.0" xmlns:xsi="http://www.w3.org/2001/XMLSchema-instance" xsi:schemaLocation="http://maven.apache.org/POM/4.0.0 https://maven.apache.org/xsd/maven-4.0.0.xsd"> <modelVersion>4.0.0</modelVersion> <parent> <groupId>org.springframework.boot</groupId> <artifactId>spring-boot-starter-parent</artifactId> <version>2.3.1.RELEASE</version> <relativePath/> <!-- lookup parent from repository --> </parent> <groupId>com.example</groupId> <artifactId>Sample-1</artifactId> <version>0.0.1-SNAPSHOT</version> <name>Sample-1</name> <description>Demo project for Spring Boot</description> <properties> <java.version>1.8</java.version> </properties> <dependencies> <dependency> <groupId>org.springframework.boot</groupId> <artifactId>spring-boot-starter-thymeleaf</artifactId> </dependency> <dependency> <groupId>org.springframework.boot</groupId> <artifactId>spring-boot-starter-web</artifactId> </dependency> <dependency> <groupId>org.springframework.boot</groupId> <artifactId>spring-boot-starter-test</artifactId> <scope>test</scope> <exclusions> <exclusion> <groupId>org.junit.vintage</groupId> <artifactId>junit-vintage-engine</artifactId> </exclusion> </exclusions> </dependency> <dependency> <groupId>org.springframework.boot</groupId> <artifactId>spring-boot-starter-data-jdbc</artifactId> </dependency> <dependency> <groupId>org.springframework.boot</groupId> <artifactId>spring-boot-starter-web</artifactId> </dependency> <dependency> <groupId>org.springframework.boot</groupId> <artifactId>spring-boot-starter-web-services</artifactId> </dependency> <dependency> <groupId>mysql</groupId> <artifactId>mysql-connector-java</artifactId> <scope>runtime</scope> </dependency> <dependency> <groupId>org.springframework.boot</groupId> <artifactId>spring-boot-starter-test</artifactId> <scope>test</scope> </dependency> </dependencies> <build> <plugins> <plugin> <groupId>org.springframework.boot</groupId> <artifactId>spring-boot-maven-plugin</artifactId> </plugin> </plugins> </build> </project>
- 投稿日:2020-08-02T16:24:48+09:00
javaでアルゴリズム入門 - しゃくとり法
記事の概要
自分の勉強兼メモでまとめている記事シリーズです。第六弾。
今までの記事はこちら。
# 記事 5 javaでアルゴリズム入門 - 累積和 4 javaでアルゴリズム入門 - 探索編(bit全探索) 3 javaでアルゴリズム入門 - 探索編(幅優先探索) 2 javaでアルゴリズム入門 - 探索編(深さ優先探索) 1 javaでアルゴリズム入門 - 探索編(全探索、二分探索) 今回の記事では
- しゃくとり法
について勉強します。
累積和と一緒に?使われるやつなのですかね。良くセットで紹介されているのを目にします。しゃくとり法
累積和と同様、数値の配列に対しての操作を早くする技法のようです。
参考:【累積和、しゃくとり法】初級者でも解るアルゴリズム図解
まぁ・・・ぶっちゃけリンク先見ればわかるやろ的なところではありますがね。。。自分の勉強のため一応説明してみますね。
例として、サイズnの整数配列を考えます。
そこから指定された区間の長さtに分割したとき、その区間内での和の最大値はなにになるでしょう?的な問題を解く問題です。
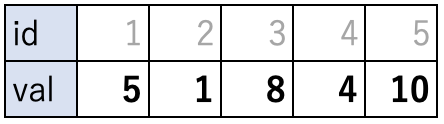
累積和でもできる問題ですね。前回の記事もご覧ください。例として、サイズ5(n = 5)、区間の長さ2(t = 2)のときを考えます。
図の通りの配列を考えます。
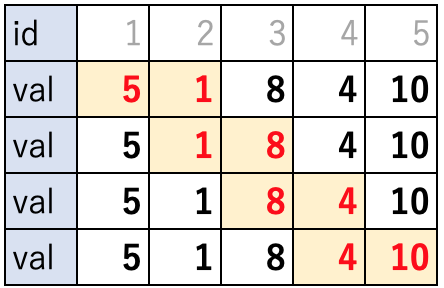
これを区間の長さ2で分割すると以下のようになりますね。
結論からいうと4,5番目を選んだ際の和の4 + 10 = 14が最高値なのですが、ここまでの計算量はいかほどでしょうか。
- どの区間を選択するか
- その区間内での和の計算
にわけて考えてみましょう。
まずは1.区間の分け方ですが、簡単ですね。
上の例だと4回、和をとっています。
計算式に落とすと、 n - t + 1 回となります。今回は 5 - 2 + 1 = 4回。次は2. その区間内での和の計算ですが、配列の各要素にアクセスするためにそれぞれ2回ずつ、処理を行っています。
総じて ( n - t + 1 ) * t 回となります。
tをnに依存してとったらO(n^2)くらいの計算量になってしまうので注意しましょう。
これだとnを10^5とかでとってしまうと、ものすごい時間がかかってしまいますね。
そんなときにしゃくとり法の登場です。まぁ割と簡単な話なのですが・・・
和を覚えておいて、毎回1から足算しないで良いようにしようね。ということです。
以下の図を参照して下さい。
なんとなくわかりますかね。
和を覚えておいて、一回一回全ての要素をt回足さなくて良いようになってます。
計算量は、配列の各要素にアクセスする必要がなくなったので、 n - t + 1回となります。
O(n)と表せると思います。では例題にいきましょう。
例題
問題文・入力例などはここをクリックして表示
※できるだけ問題リンクを参照してください
(セクション開始)
【問題文】
長さ N の非負整数列 S=s1,s2,...,sN と整数 K があります。 あなたの仕事は、以下の条件を満たす S の 連続する 部分列のうち、最も長いものの長さを求めることです。部分列の長さは 1 以上の列でないといけません。・その部分列に含まれる全ての要素の値の積は、K 以下である。
もし条件を満たす部分列が一つも存在しないときは、0 を出力してください。
【入力】
入力は以下の形式で標準入力から与えられる。N K s1 s2 : sN・1 行目には、数列の長さを表す整数 N(1≦N≦105) と問題文中の整数 K(0≦K≦10^9) が空白区切りで与えられる。
・2 行目からの N 行には、数列の各要素の値が与えられる。そのうち i(1≦i≦N) 行目には、si(0≦si≦10^9) が書かれている。【出力】
出力は以下の形式で標準出力に行うこと。
1 行目に、含まれる全ての要素の値の積が K 以下となる連続する部分列のうち最長のものの長さを出力せよ。もし条件を満たす部分列が一つも存在しないときは、0 を出力せよ。末尾の改行を忘れないこと。(セクション終了)
こんな問題です。
ちょっと応用入ってます。
基本的にはしゃくとり法なのですが、今回は長さが決まっていません。
次の方針で実装します。
- しゃくとり法の要領で、積を保存しておく。
- 条件を満たす限り、右端を進める。
- 条件を満たさなくなったら、左端を進める。
- 左端が一番右まで来たら、探索終了。その時点での最長の値を出力する。
以下が回答例です。
Main.javaimport java.util.Scanner; public class Main { public static void main(String[] args) { Scanner sc = new Scanner(System.in); int n = sc.nextInt(); // 非負整数列の長さ long k = sc.nextLong(); // 積の最大値 long[] s = new long[n]; // 非負整数列 for (int i = 0; i < n; i++) { s[i] = sc.nextLong(); if (s[i] == 0l) { System.out.println(n); return; } } long seki = 1; // 積を保存している変数 int ans = 0; // 長さの最大値 int ans_max = -1; // 答えを保存 int left = 0; // 左端 int right = 0; // 右端 for (left = 0; left < n; left++) { // 左端を固定し、行けるところまで右端を動かして掛け算する while (right < n && seki * s[right] <= k) { seki *= s[right++]; } // ansの最大値の保管 ans = right - left; if (ans_max < ans) { ans_max = ans; } // 左端を動かす。left == rightとなるときに注意。 if (left == right) { right++; } else { seki /= s[left]; } } System.out.println(ans_max); } }はい。いろいろなソースを参照しましたが、なかなか難しかった。。
leftがrightに追いつく例が特に難しかったです。
これも練習が必要そうですね。。。
しっかり練習していきましょう。ソースを何度も読み返そうと思います。ではまた!

- 投稿日:2020-08-02T15:45:39+09:00
IntelliJ IDEAを使ってSpring Bootのアプリケーションを作成する
IntelliJ IDEAを使ってSpring Bootのアプリケーションを作成し、実行するところまでの手順です。実行はIntelliJ IDEAでのデバック実行と、JARファイルにビルドして実行できることを確認します。
開発環境
- macOS Caralina 10.15.4
- OpenJDK 14.0.2
- maven 14.0.1
- IntelliJ IDEA
事前準備
Spring Bootの開発を行うために次のものを準備してください。
- OpenJDKのダウンロードとインストール https://openjdk.java.net/
- Mavenのダウンロードとインストール https://maven.apache.org/download.cgi
- IntelliJ IDEAのダウンロードとインストール https://www.jetbrains.com/ja-jp/idea/
- パスの確認
java -versionmvn -vIntelliJ IDEAでSpring Bootの開発
Spring BootのGetting Startedの内容にしたがってプロジェクトを作成していきます。
次の手順で行います。
- 新規プロジェクトの作成
- pom.xmlの作成
- Hello World!アプリケーションの作成
- IntelliJ IDEAを使ってプログラムの実行
- jarファイルにビルドして実行
新規プロジェクトの作成
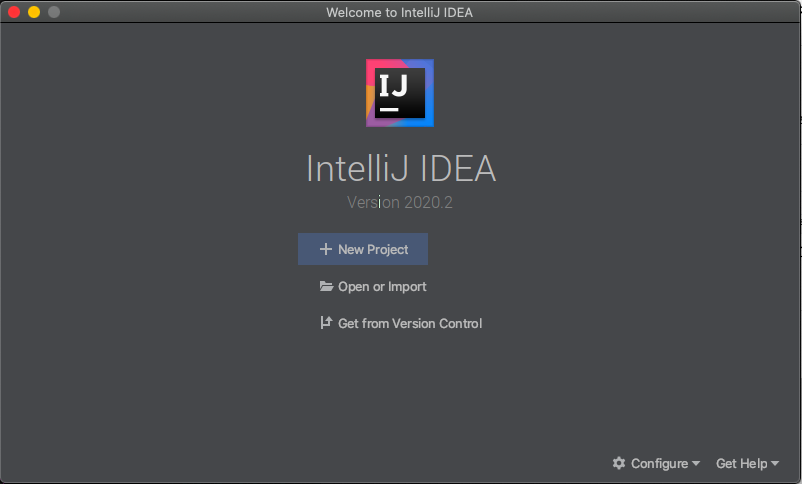
IntelliJ IDEAを起動し、「New Project」を選択します。
「Maven」を選択して、「Project SDK」にインストールしたOpenJDKを指定して、さらに「Next」を選択します。
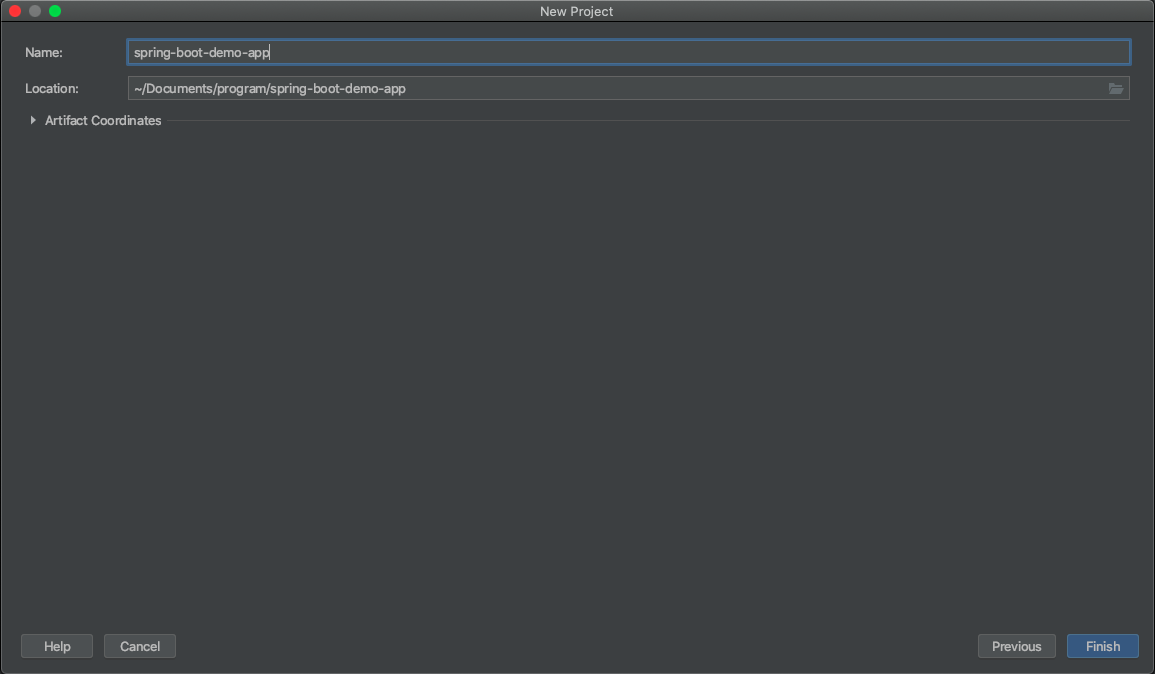
プロジェクトの名前を入力して、「Finish」を選択します。
pom.xmlの編集
pom.xmlに以下の内容を記述します。<?xml version="1.0" encoding="UTF-8"?> <project xmlns="http://maven.apache.org/POM/4.0.0" xmlns:xsi="http://www.w3.org/2001/XMLSchema-instance" xsi:schemaLocation="http://maven.apache.org/POM/4.0.0 http://maven.apache.org/xsd/maven-4.0.0.xsd"> <modelVersion>4.0.0</modelVersion> <groupId>org.example</groupId> <artifactId>spring-boot-demo-app</artifactId> <version>1.0-SNAPSHOT</version> <parent> <groupId>org.springframework.boot</groupId> <artifactId>spring-boot-starter-parent</artifactId> <version>2.3.2.RELEASE</version> </parent> <dependencies> <dependency> <groupId>org.springframework.boot</groupId> <artifactId>spring-boot-starter-web</artifactId> </dependency> </dependencies> <build> <plugins> <plugin> <groupId>org.springframework.boot</groupId> <artifactId>spring-boot-maven-plugin</artifactId> <version>2.3.2.RELEASE</version> </plugin> </plugins> </build> </project>pom.xmlを編集したら、プロジェクトをリロードしておきます。
Hello World!アプリケーションの作成
src/main/java/Example.javaを作成します。
Example.javaには以下の内容を記述します。
import org.springframework.boot.*;
import org.springframework.boot.autoconfigure.*;
import org.springframework.web.bind.annotation.*;

@RestController
@EnableAutoConfiguration
public class Example {

    @RequestMapping("/")
    String home() {
        return "Hello World!";
    }

    public static void main(String[] args) {
        SpringApplication.run(Example.class, args);
    }

}
IntelliJ IDEAを使ってプログラムの実行
作成したプログラムを実行してみます。mainクラスの左に表示されている実行ボタンを押してプログラムを実行します。
正しく実行できた場合は、コンソールに以下のメッセージが表示されます。
/Library/Java/JavaVirtualMachines/jdk-14.0.2.jdk/Contents/Home/bin/java -javaagent:/Applications/IntelliJ IDEA CE.app/Contents/lib/idea_rt.jar=52512:/Applications/IntelliJ IDEA CE.app/Contents/bin -Dfile.encoding=UTF-8 -classpath /Users/masayuki/Documents/program/spring-boot-demo-app/target/classes:/Users/masayuki/.m2/repository/org/springframework/boot/spring-boot-starter-web/2.3.2.RELEASE/spring-boot-starter-web-2.3.2.RELEASE.jar:/Users/masayuki/.m2/repository/org/springframework/boot/spring-boot-starter/2.3.2.RELEASE/spring-boot-starter-2.3.2.RELEASE.jar:/Users/masayuki/.m2/repository/org/springframework/boot/spring-boot/2.3.2.RELEASE/spring-boot-2.3.2.RELEASE.jar:/Users/masayuki/.m2/repository/org/springframework/boot/spring-boot-autoconfigure/2.3.2.RELEASE/spring-boot-autoconfigure-2.3.2.RELEASE.jar:/Users/masayuki/.m2/repository/org/springframework/boot/spring-boot-starter-logging/2.3.2.RELEASE/spring-boot-starter-logging-2.3.2.RELEASE.jar:/Users/masayuki/.m2/repository/ch/qos/logback/logback-classic/1.2.3/logback-classic-1.2.3.jar:/Users/masayuki/.m2/repository/ch/qos/logback/logback-core/1.2.3/logback-core-1.2.3.jar:/Users/masayuki/.m2/repository/org/slf4j/slf4j-api/1.7.30/slf4j-api-1.7.30.jar:/Users/masayuki/.m2/repository/org/apache/logging/log4j/log4j-to-slf4j/2.13.3/log4j-to-slf4j-2.13.3.jar:/Users/masayuki/.m2/repository/org/apache/logging/log4j/log4j-api/2.13.3/log4j-api-2.13.3.jar:/Users/masayuki/.m2/repository/org/slf4j/jul-to-slf4j/1.7.30/jul-to-slf4j-1.7.30.jar:/Users/masayuki/.m2/repository/jakarta/annotation/jakarta.annotation-api/1.3.5/jakarta.annotation-api-1.3.5.jar:/Users/masayuki/.m2/repository/org/springframework/spring-core/5.2.8.RELEASE/spring-core-5.2.8.RELEASE.jar:/Users/masayuki/.m2/repository/org/springframework/spring-jcl/5.2.8.RELEASE/spring-jcl-5.2.8.RELEASE.jar:/Users/masayuki/.m2/repository/org/yaml/snakeyaml/1.26/snakeyaml-1.26.jar:/Users/masayuki/.m2/repository/org/springframework/boot/spring-boot-starter-json/2.3.2.RELEASE/spring-boot-starter-json-2.3.2.RELEASE.jar:/Users/masayuki/.m2/repository/com/fasterxml/jackson/core/jackson-databind/2.11.1/jackson-databind-2.11.1.jar:/Users/masayuki/.m2/repository/com/fasterxml/jackson/core/jackson-annotations/2.11.1/jackson-annotations-2.11.1.jar:/Users/masayuki/.m2/repository/com/fasterxml/jackson/core/jackson-core/2.11.1/jackson-core-2.11.1.jar:/Users/masayuki/.m2/repository/com/fasterxml/jackson/datatype/jackson-datatype-jdk8/2.11.1/jackson-datatype-jdk8-2.11.1.jar:/Users/masayuki/.m2/repository/com/fasterxml/jackson/datatype/jackson-datatype-jsr310/2.11.1/jackson-datatype-jsr310-2.11.1.jar:/Users/masayuki/.m2/repository/com/fasterxml/jackson/module/jackson-module-parameter-names/2.11.1/jackson-module-parameter-names-2.11.1.jar:/Users/masayuki/.m2/repository/org/springframework/boot/spring-boot-starter-tomcat/2.3.2.RELEASE/spring-boot-starter-tomcat-2.3.2.RELEASE.jar:/Users/masayuki/.m2/repository/org/apache/tomcat/embed/tomcat-embed-core/9.0.37/tomcat-embed-core-9.0.37.jar:/Users/masayuki/.m2/repository/org/glassfish/jakarta.el/3.0.3/jakarta.el-3.0.3.jar:/Users/masayuki/.m2/repository/org/apache/tomcat/embed/tomcat-embed-websocket/9.0.37/tomcat-embed-websocket-9.0.37.jar:/Users/masayuki/.m2/repository/org/springframework/spring-web/5.2.8.RELEASE/spring-web-5.2.8.RELEASE.jar:/Users/masayuki/.m2/repository/org/springframework/spring-beans/5.2.8.RELEASE/spring-beans-5.2.8.RELEASE.jar:/Users/masayuki/.m2/repository/org/springframework/spring-webmvc/5.2.8.RELEASE/spring-webmvc-5.2.8.RELEASE.jar:/Users/masayuki/.m2/repository/org/springframework/spring-aop/5.2.8.RELEASE/spring-aop-5.2.8.RELEASE.jar:/Users/masayuki/.m2/repository/org/springframework/spring-context/5.2.8.RELEASE/spring-context-5.2.8.RELEASE.jar:/Users/masayuki/.m2/repository/org/springframework/spring-expression/5.2.8.RELEASE/spring-expression-5.2.8.RELEASE.jar Example

  .   ____          _            __ _ _
 /\\ / ___'_ __ _ _(_)_ __  __ _ \ \ \ \
( ( )\___ | '_ | '_| | '_ \/ _` | \ \ \ \
 \\/  ___)| |_)| | | | | || (_| |  ) ) ) )
  '  |____| .__|_| |_|_| |_\__, | / / / /
 =========|_|==============|___/=/_/_/_/
 :: Spring Boot ::        (v2.3.2.RELEASE)

2020-08-02 14:26:02.276  INFO 35892 --- [           main] Example                                  : Starting Example on maa with PID 35892 (/Users/masayuki/Documents/program/spring-boot-demo-app/target/classes started by masayuki in /Users/masayuki/Documents/program/spring-boot-demo-app)
2020-08-02 14:26:02.280  INFO 35892 --- [           main] Example                                  : No active profile set, falling back to default profiles: default
2020-08-02 14:26:04.567  INFO 35892 --- [           main] o.s.b.w.embedded.tomcat.TomcatWebServer  : Tomcat initialized with port(s): 8080 (http)
2020-08-02 14:26:04.624  INFO 35892 --- [           main] o.apache.catalina.core.StandardService   : Starting service [Tomcat]
2020-08-02 14:26:04.625  INFO 35892 --- [           main] org.apache.catalina.core.StandardEngine  : Starting Servlet engine: [Apache Tomcat/9.0.37]
2020-08-02 14:26:04.847  INFO 35892 --- [           main] o.a.c.c.C.[Tomcat].[localhost].[/]       : Initializing Spring embedded WebApplicationContext
2020-08-02 14:26:04.848  INFO 35892 --- [           main] w.s.c.ServletWebServerApplicationContext : Root WebApplicationContext: initialization completed in 2435 ms
2020-08-02 14:26:05.231  INFO 35892 --- [           main] o.s.s.concurrent.ThreadPoolTaskExecutor  : Initializing ExecutorService 'applicationTaskExecutor'
2020-08-02 14:26:05.676  INFO 35892 --- [           main] o.s.b.w.embedded.tomcat.TomcatWebServer  : Tomcat started on port(s): 8080 (http) with context path ''
2020-08-02 14:26:05.703  INFO 35892 --- [           main] Example                                  : Started Example in 4.953 seconds (JVM running for 6.18)
この状態でブラウザで
http://localhost:8080へアクセスすると、Hello World!が表示されます。jarファイルにビルドして実行
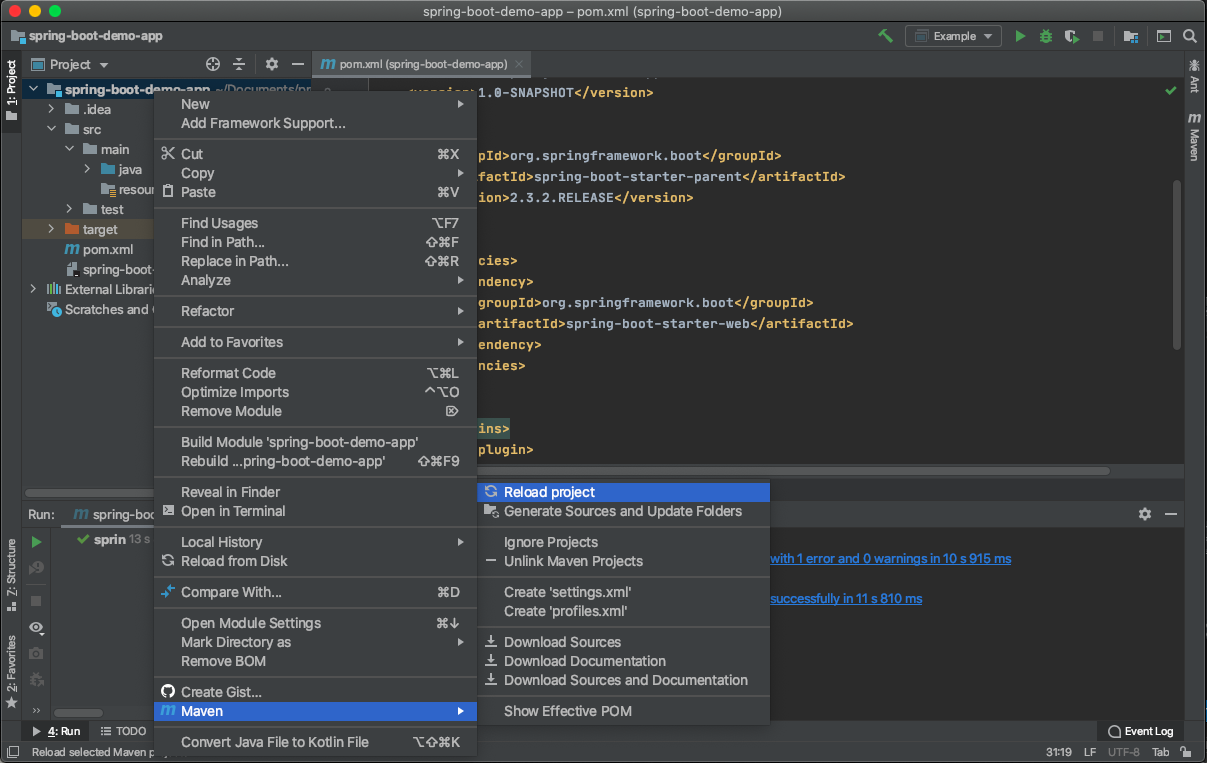
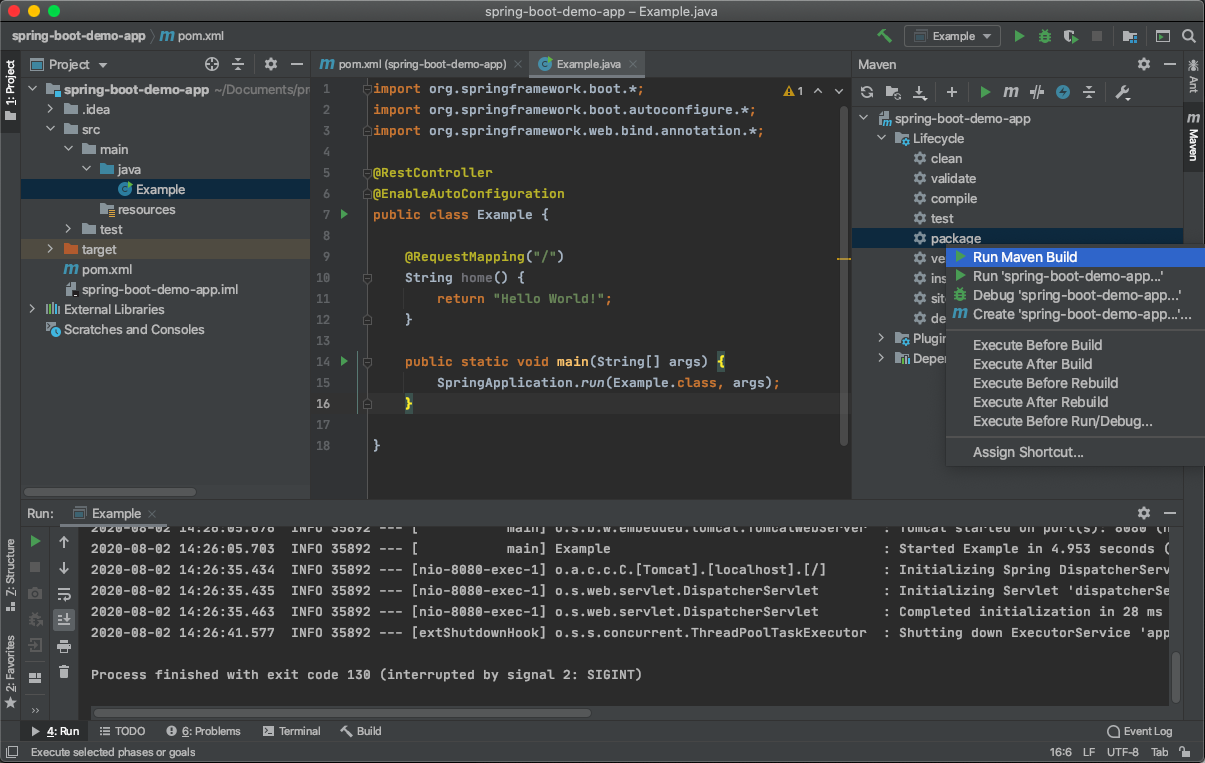
右側の「Maven」をクリックすると表示されるツリーから、「プロジェクト名」 > 「Lifecycle」 > 「package」を右クリックし、さらに「Run Maven Build」を選択します。
正しくビルドできた場合は、コンソールに以下のメッセージが表示されます。
/Library/Java/JavaVirtualMachines/jdk-14.0.2.jdk/Contents/Home/bin/java -Dmaven.multiModuleProjectDirectory=/Users/masayuki/Documents/program/spring-boot-demo-app "-Dmaven.home=/Applications/IntelliJ IDEA CE.app/Contents/plugins/maven/lib/maven3" "-Dclassworlds.conf=/Applications/IntelliJ IDEA CE.app/Contents/plugins/maven/lib/maven3/bin/m2.conf" "-Dmaven.ext.class.path=/Applications/IntelliJ IDEA CE.app/Contents/plugins/maven/lib/maven-event-listener.jar" "-javaagent:/Applications/IntelliJ IDEA CE.app/Contents/lib/idea_rt.jar=52530:/Applications/IntelliJ IDEA CE.app/Contents/bin" -Dfile.encoding=UTF-8 -classpath "/Applications/IntelliJ IDEA CE.app/Contents/plugins/maven/lib/maven3/boot/plexus-classworlds.license:/Applications/IntelliJ IDEA CE.app/Contents/plugins/maven/lib/maven3/boot/plexus-classworlds-2.6.0.jar" org.codehaus.classworlds.Launcher -Didea.version=2020.2 package
[INFO] Scanning for projects...
[INFO]
[INFO] ------------------< org.example:spring-boot-demo-app >------------------
[INFO] Building spring-boot-demo-app 1.0-SNAPSHOT
[INFO] --------------------------------[ jar ]---------------------------------
[INFO]
[INFO] --- maven-resources-plugin:3.1.0:resources (default-resources) @ spring-boot-demo-app ---
[INFO] Using 'UTF-8' encoding to copy filtered resources.
[INFO] Copying 0 resource
[INFO] Copying 0 resource
[INFO]
[INFO] --- maven-compiler-plugin:3.8.1:compile (default-compile) @ spring-boot-demo-app ---
[INFO] Changes detected - recompiling the module!
[INFO] Compiling 1 source file to /Users/masayuki/Documents/program/spring-boot-demo-app/target/classes
[INFO]
[INFO] --- maven-resources-plugin:3.1.0:testResources (default-testResources) @ spring-boot-demo-app ---
[INFO] Using 'UTF-8' encoding to copy filtered resources.
[INFO] skip non existing resourceDirectory /Users/masayuki/Documents/program/spring-boot-demo-app/src/test/resources
[INFO]
[INFO] --- maven-compiler-plugin:3.8.1:testCompile (default-testCompile) @ spring-boot-demo-app ---
[INFO] Changes detected - recompiling the module!
[INFO]
[INFO] --- maven-surefire-plugin:2.22.2:test (default-test) @ spring-boot-demo-app ---
[INFO]
[INFO] --- maven-jar-plugin:3.2.0:jar (default-jar) @ spring-boot-demo-app ---
[INFO] Building jar: /Users/masayuki/Documents/program/spring-boot-demo-app/target/spring-boot-demo-app-1.0-SNAPSHOT.jar
[INFO]
[INFO] --- spring-boot-maven-plugin:2.3.2.RELEASE:repackage (repackage) @ spring-boot-demo-app ---
[INFO] Replacing main artifact with repackaged archive
[INFO] ------------------------------------------------------------------------
[INFO] BUILD SUCCESS
[INFO] ------------------------------------------------------------------------
[INFO] Total time:  9.498 s
[INFO] Finished at: 2020-08-02T14:27:21+09:00
[INFO] ------------------------------------------------------------------------
ビルドした際のコンソールのメッセージに
[プロジェクトのルートフォルダ]/target/[プロジェクト名]-1.0-SNAPSHOT.jarを作成したと表示されているので、JARファイルを探しjava -jar [作成されたjarファイル]で起動します。正しく実行できた場合は、コンソールに以下のメッセージが表示されます。$ java -jar target/spring-boot-demo-app-1.0-SNAPSHOT.jar . ____ _ __ _ _ /\\ / ___'_ __ _ _(_)_ __ __ _ \ \ \ \ ( ( )\___ | '_ | '_| | '_ \/ _` | \ \ \ \ \\/ ___)| |_)| | | | | || (_| | ) ) ) ) ' |____| .__|_| |_|_| |_\__, | / / / / =========|_|==============|___/=/_/_/_/ :: Spring Boot :: (v2.3.2.RELEASE) 2020-08-02 14:27:49.758 INFO 35907 --- [ main] Example : Starting Example on maa with PID 35907 (/Users/masayuki/Documents/program/spring-boot-demo-app/target/spring-boot-demo-app-1.0-SNAPSHOT.jar started by masayuki in /Users/masayuki/Documents/program/spring-boot-demo-app) 2020-08-02 14:27:49.765 INFO 35907 --- [ main] Example : No active profile set, falling back to default profiles: default 2020-08-02 14:27:52.252 INFO 35907 --- [ main] o.s.b.w.embedded.tomcat.TomcatWebServer : Tomcat initialized with port(s): 8080 (http) 2020-08-02 14:27:52.306 INFO 35907 --- [ main] o.apache.catalina.core.StandardService : Starting service [Tomcat] 2020-08-02 14:27:52.306 INFO 35907 --- [ main] org.apache.catalina.core.StandardEngine : Starting Servlet engine: [Apache Tomcat/9.0.37] 2020-08-02 14:27:52.528 INFO 35907 --- [ main] o.a.c.c.C.[Tomcat].[localhost].[/] : Initializing Spring embedded WebApplicationContext 2020-08-02 14:27:52.528 INFO 35907 --- [ main] w.s.c.ServletWebServerApplicationContext : Root WebApplicationContext: initialization completed in 2622 ms 2020-08-02 14:27:53.043 INFO 35907 --- [ main] o.s.s.concurrent.ThreadPoolTaskExecutor : Initializing ExecutorService 'applicationTaskExecutor' 2020-08-02 14:27:53.586 INFO 35907 --- [ main] o.s.b.w.embedded.tomcat.TomcatWebServer : Tomcat started on port(s): 8080 (http) with context path '' 2020-08-02 14:27:53.613 INFO 35907 --- [ main] Example : Started Example in 5.628 seconds (JVM running for 6.985)この状態でブラウザで
http://localhost:8080へアクセスすると、Hello World!が表示されます。以上、IntelliJ IDEAを使ってSpring Bootアプリケーションの実行とビルドを確認しました。


- 投稿日:2020-08-02T12:46:51+09:00
Android入門!
はじめに
こんにちは、今週いっぱいで学校が終わり、来週から中身のない夏休みを過ごす僕です。
今回は前回の記事で作ったDjangoのAPIに実際にAndroidアプリを使用してHTTP通信をしてみたいと思います。ちなみにこれあたふたしながらも1日で実装したものなのであまりクオリティは高くないです。(とは言っても16時間くらいかかってますが)
基本のき!
僕が一番苦労したのはここです。実行構成が全くわからなかったこと、全体像が全く見えなかったこと、フロントエンドはどうやって実装するの?などなど。
まずは全体像が把握できないと何から始めていいのかわかりません。そのため、まずはどのような構成で作られているのか、何ができるのかを理解する必要があります。また、Androidアプリを開発するにあたって最近はKotlinやReactNativeなどありますが、今回はオワコンレガシー言語であるJavaを使用します。
大事なもの
ここではAndroidアプリを作成する上で大切なことをいくつか列挙します。
最低限この構成くらいはわかってて欲しいってレベルなのでガバガバですがご容赦ください。
- アクティビティ
- 実行全体のフローを表します
- メインの実行するクラスにonCreate()をオーバーライドして実行します
- onCreateのあとはonStart、onResumeが実行され、アプリは実行状態になります
- このサイトにわかりやすい説明がありました
- マニフェスト
- マニフェストファイルではAndroidの設定を示します。
- 後で書きますが、HTTP通信を行う際にはインターネットを使用するという宣言をする必要があります
- 実行するメインのクラス名もここで明示的に示してあげます(今回はExSample.java)
- そのほかにも外部のAPIを使用したりする時はここに書きます。
- XML
- 見た目を作る部分を定義します。
- パーツにIDをつけてクラスでの処理を対応させ、そこに値を入れたりイベントを起こしたりすることができます。
- エミュレータ
- Androidの端末がなくても擬似的なエミュレータを使用して実行することができます。
- あるなら実機を使った方がいいです。
- 本記事ではエミュレータの設定方法は割愛します。
ウェッブ大好きな人がMVCに例えると、モデルは今回はDjangoのサーバにあり、Androidを構成するjavaのコードがコントローラ、XMLで記述する部分がビューって感じです。
実行の構成
今回、HTTP通信をするということで、僕自信一番わからなかった部分がここです。
そもそもAndroidってどこのクラスが実行されるの?という感じだったのでとても困りました。
大前提として、
Androidを実行するとマニフェストに指定したクラスが実行されます。
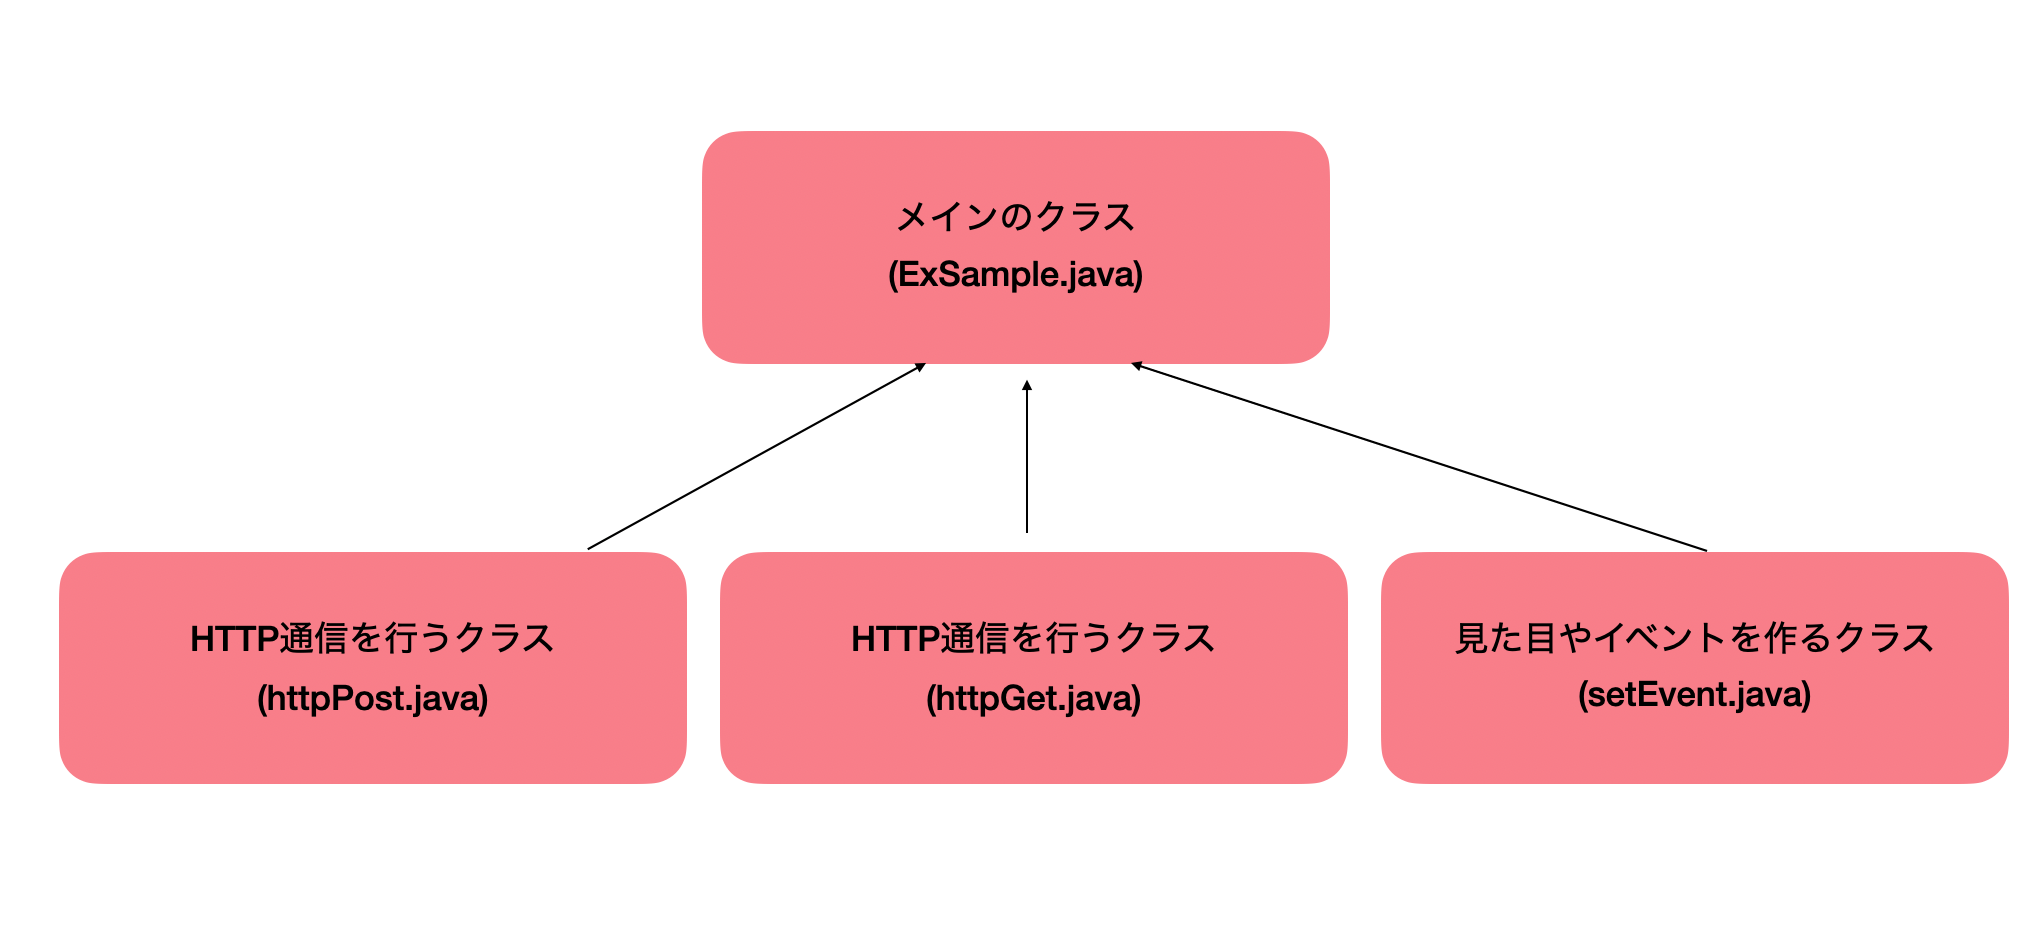
つまり、ほかにクラスを定義した場合でも最終的にはそこに集約する必要があります。(これが理解できてなかった)以下の図のようなイメージになります。
汚い図ですが、最終的に実行されるクラスはメインとなるクラスだけなので、このほかにたくさんクラスがあってもやりたい処理はメインのクラスでしか実行されません。回り道してもいいから、なんとかメインにたどり着かせましょう!!!
では実際にコードを書いていきます。
今回の使用するクラスは以下の通りです。
クラス 用途 ExSample.java メインの実行クラス AsyncHttpRequestGet.java 全てのデータを取得 AsyncHttpRequestPost.java 配達完了通知を送信 ListAndView.java リニアレイアウトのなかにリストビューを設置するためのクラス 今回はこの4つを使用してアンドロイドアプリを作っていきます。
※配達完了通知に関してですが、これは前回の記事から少しAPIをいじりました。作る!
では書いていきます。
ExSampleでのポイント
- AppCompatActivityクラスを継承してプログラムを組む。
- onCreateメソッドで実行する。
- あとで出てきますが、ListViewという表を作るみたいなレイアウトを使うときにメインのクラスのContextを使用することになるのでどこでも使えるようにgetInstanceメソッドを作成する。
- AsyncHttpRequestGetを使用して最初にget requestを送信している。
ExSample.javapackage es.exsample; import android.content.Context; import android.content.Intent; import android.os.Bundle; import android.support.v7.app.AppCompatActivity; import android.util.Log; import android.view.View; public class ExSample extends AppCompatActivity { // クラスを示す private static final String TAG = "ExSample"; // 違うクラスでContextを参照するための変数 private static ExSample context; @Override protected void onCreate(Bundle savedInstanceState) { super.onCreate(savedInstanceState); setContentView(R.layout.list_item); context = this; // 実行 AsyncHttpRequestGet task = new AsyncHttpRequestGet(context); task.execute("http://localhost:8000/get_shop"); Log.d(TAG, "created"); } // 他のクラスでContextを使用するための関数 public static ExSample getInstance(){ return context; } }AsyncHttpRequestGetのポイント
- ExSampleはこいつを実行だけなので割とこのクラスでの分量は多め。
- AsyncTaskを継承して非同期処理を行っている。
- コンストラクタでXMLのパーツのIDを指定して渡すものを初期化している。
- URL url = new URL(params[0]);でメインクラスで定義したURLを取得することができる。
- setRequestPropertyでヘッダを指定(今回は認証がかかっているけど永続化するトークンを作成したのでベタ書き)
- JSONArrayに受け取った値を入れると簡単に操作することができるようになる。
- ArrayAdapterの第一引数にメインクラスで定義したメソッドで得たcontextを代入する。(メインのクラスのみでリストビューを定義する場合には直接thisと書けばいい)
AsyncHttpRequestGet.javapackage es.exsample; import android.content.Context; import android.os.AsyncTask; import android.os.Build; import android.support.annotation.RequiresApi; import android.util.Log; import android.widget.ArrayAdapter; import android.widget.ListView; import android.widget.TextView; import org.json.JSONArray; import org.json.JSONException; import org.json.JSONObject; import java.io.BufferedReader; import java.io.IOException; import java.io.InputStream; import java.io.InputStreamReader; import java.net.URL; import java.util.ArrayList; import java.util.HashMap; import java.util.List; import java.util.Map; import javax.net.ssl.HttpsURLConnection; public class AsyncHttpRequestGet extends AsyncTask<String, Void, String> { // ロガーのタグ private static final String TAG = "AsyncHttpRequestGet"; // UI スレッドから操作するビュー private TextView titleView; private TextView beforUserContent; private TextView doneUserContent; private ListView beforUser; private ListView doneUser; public static Map<String, String> data; public static List<Map<String, String>> dataList; public static ListView listView; public static ListAndView adapter; // コンストラクタ、Viewをセットする public AsyncHttpRequestGet(Context context) { super(); ExSample sample = (ExSample) context; titleView = (TextView)sample.findViewById(R.id.title); beforUserContent = (TextView)sample.findViewById(R.id.befor); doneUserContent = (TextView)sample.findViewById(R.id.done); beforUser = (ListView)sample.findViewById(R.id.beforUser); doneUser = (ListView)sample.findViewById(R.id.doneUser); listView = (ListView)sample.findViewById(R.id.beforUser); } // ここでリクエスト、レスポンスを捌く @Override protected String doInBackground(String... params) { StringBuilder sb = new StringBuilder(); InputStream inputStream = null; HttpsURLConnection connection = null; try { // URLをセット、またここでヘッダの値を管理、tokenはログインした時に取得することができるようにしてある URL url = new URL(params[0]); connection = (HttpsURLConnection)url.openConnection(); connection.setRequestProperty("Content-Type", "application/json"); connection.setRequestProperty("Authorization", "JWT Djangoで取得したキーを指定する"); connection.setConnectTimeout(3000); connection.setReadTimeout(3000); // GET connection.setRequestMethod("GET"); connection.connect(); // レスポンスコードを確認 int responseCode = connection.getResponseCode(); if(responseCode != HttpsURLConnection.HTTP_OK) { throw new IOException("HTTP responseCode: " + responseCode); } // 文字列化 inputStream = connection.getInputStream(); if(inputStream != null) { BufferedReader reader = new BufferedReader(new InputStreamReader(inputStream, "UTF-8")); String line; while ((line = reader.readLine()) != null) { sb.append(line); } } } catch (IOException e) { e.printStackTrace(); } finally { if(inputStream != null) { try { inputStream.close(); } catch (IOException e) { e.printStackTrace(); } } if(connection != null) { connection.disconnect(); } } return sb.toString(); } // ここでViewを作成する @RequiresApi(api = Build.VERSION_CODES.O) @Override protected void onPostExecute(String result) { List<String> userListOrderDone = new ArrayList<String>(); List<String> userListBeforOrder = new ArrayList<String>(); List<String> idList = new ArrayList<String>(); // ExSampleのthisを返すだけの関数(意味があるかはわからない) Context context = ExSample.getInstance().getApplicationContext(); ArrayAdapter<String> beforUserList = new ArrayAdapter<String>(context, android.R.layout.simple_list_item_1, userListBeforOrder); ArrayAdapter<String> doneUserList = new ArrayAdapter<String>(context, android.R.layout.simple_list_item_1, userListOrderDone); Log.d(TAG, result); titleView.setText("モトデリ"); beforUserContent.setText("配達前"); doneUserContent.setText("配達完了"); beforUser.setAdapter(beforUserList); doneUser.setAdapter(doneUserList); try{ // JSONArrayで全てのレスポンスを取得 JSONArray all = new JSONArray(result); dataList = new ArrayList<Map<String, String>>(); for(int i = 0; i < all.length(); i++){ data = new HashMap<String, String>(); // それぞれの欲しい値を取得することができる JSONObject json = all.getJSONObject(i); String email = json.getString("user"); String total = json.getString("total"); String status = json.getString("status"); String id = json.getString("id"); // ユーザの状態によって配達済みか身配達かを判定(Javaの文字列の比較でハマる初心者多いイメージ) if(status.equals("true")){ data.put("text1", email); data.put("text2", id); dataList.add(data); } else{ userListOrderDone.add(String.format("%s: %s円", email, total)); } } } catch (JSONException e){ System.out.println(e); } // 先ほど取り出したデータを元に値を入れる adapter = new ListAndView( context, dataList, R.layout.row, new String[] { "text1", "text2", }, new int[] { android.R.id.text1, android.R.id.text2, }); // リストビューに反映 listView.setAdapter(adapter); listView.setTextFilterEnabled(false); } }AsyncHttpRequestPostのポイント
- ほぼAsyncHttpRequestGetと同じ。
- post requestなので値を成型する必要がない。
- バックエンドの変更点はあとで記述。
AsyncHttpRequestPost.javapackage es.exsample; import android.content.Context; import android.os.AsyncTask; import android.widget.TextView; import java.io.BufferedReader; import java.io.BufferedWriter; import java.io.IOException; import java.io.InputStream; import java.io.InputStreamReader; import java.io.OutputStream; import java.io.OutputStreamWriter; import java.net.URL; import javax.net.ssl.HttpsURLConnection; public class AsyncHttpRequestPost extends AsyncTask<String, Void, String> { private static final String TAG = "AsyncHttpRequestPost"; private TextView textView; public AsyncHttpRequestPost(Context context) { super(); } @Override protected String doInBackground(String... params) { StringBuilder sb = new StringBuilder(); InputStream inputStream = null; HttpsURLConnection connection = null; try { // URL 文字列をセットします。 URL url = new URL(params[0]); connection = (HttpsURLConnection)url.openConnection(); connection.setConnectTimeout(3000); // タイムアウト 3 秒 connection.setReadTimeout(3000); // POST connection.setRequestMethod("POST"); connection.setRequestProperty("Content-Type", "application/json"); connection.setRequestProperty("Authorization", "JWT eyJ0eXAiOiJKV1QiLCJhbGciOiJIUzI1NiJ9.eyJ1c2VyX2lkIjo2LCJ1c2VybmFtZSI6ImIxODA2NDI5QHBsYW5ldC5rYW5hemF3YS1pdC5hYy5qcCIsImV4cCI6MTU5NTIzMTIzNiwiZW1haWwiOiJiMTgwNjQyOUBwbGFuZXQua2FuYXphd2EtaXQuYWMuanAifQ.18LotiLgemUmSXTqmdcjjD3eKLSL1B13N87msbQswoE"); OutputStream outputStream = connection.getOutputStream(); BufferedWriter writer = new BufferedWriter(new OutputStreamWriter(outputStream)); writer.write(params[1]); writer.close(); connection.connect(); // レスポンスコード。 int responseCode = connection.getResponseCode(); if(responseCode != HttpsURLConnection.HTTP_OK) { throw new IOException("HTTP responseCode: " + responseCode); } // 文字列化 inputStream = connection.getInputStream(); if(inputStream != null) { BufferedReader reader = new BufferedReader(new InputStreamReader(inputStream, "UTF-8")); String line; while ((line = reader.readLine()) != null) { sb.append(line); } } } catch (IOException e) { e.printStackTrace(); } finally { if(inputStream != null) { try { inputStream.close(); } catch (IOException e) { e.printStackTrace(); } } if(connection != null) { connection.disconnect(); } } return sb.toString(); } }ListAndViewのポイント
- SimpleAdapterを継承して作成。
- AsyncHttpRequestPostを使用してpostを実行。
- onClickメソッドを使用してボタンが押されたら実行されるようになっている。
ListAndView.javapackage es.exsample; import android.content.Context; import android.util.Log; import android.view.LayoutInflater; import android.view.View; import android.view.ViewGroup; import android.widget.Button; import android.widget.SimpleAdapter; import android.widget.TextView; import java.util.HashMap; import java.util.List; import java.util.Map; import static android.content.ContentValues.TAG; public class ListAndView extends SimpleAdapter { private LayoutInflater inflater; private List<? extends Map<String, ?>> listData; // 各行が保持するデータ保持クラス public class ViewHolder { TextView text1; TextView text2; } public ListAndView(Context context, List<? extends Map<String, ?>> data, int resource, String[] from, int[] to) { super(context, data, resource, from, to); this.inflater = (LayoutInflater) context.getSystemService(Context.LAYOUT_INFLATER_SERVICE); this.listData = data; } @Override public View getView(final int position, View convertView, ViewGroup parent) { final ViewHolder holder; // ビューを受け取る View view = convertView; if (view == null) { view = inflater.inflate(R.layout.row, parent, false); holder = new ViewHolder(); holder.text1 = (TextView) view.findViewById(android.R.id.text1); holder.text2 = (TextView) view.findViewById(android.R.id.text2); view.setTag(holder); } else { holder = (ViewHolder) view.getTag(); } // holderにデータをセットする String text1 = ((HashMap<?, ?>) listData.get(position)).get("text1").toString(); String text2 = ((HashMap<?, ?>) listData.get(position)).get("text2").toString(); holder.text1.setText(text1); holder.text2.setText(text2); // ボタンを押したら実行 Button btn = (Button) view.findViewById(R.id.rowbutton); btn.setTag(position); btn.setOnClickListener(new View.OnClickListener() { @Override public void onClick(View arg0) { String id = holder.text2.getText().toString(); Context context = ExSample.getInstance().getApplicationContext(); AsyncHttpRequestPost task = new AsyncHttpRequestPost(context); String url = "http://localhost:8000/post_shop/" + id; task.execute(url, "hi"); Log.d(TAG, "created"); } }); return view; } }XML
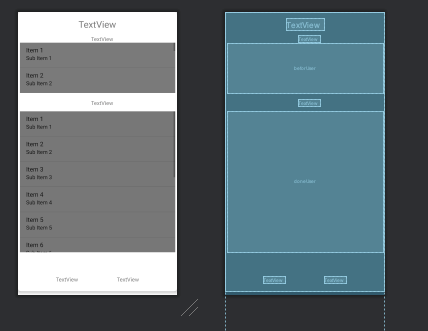
- list_item.xml
- 全体の構成を担っている。
- リニアレイアウトで実装。
list_item.xml<?xml version="1.0" encoding="utf-8"?> <android.support.v7.widget.CardView xmlns:android="http://schemas.android.com/apk/res/android" xmlns:card_view="http://schemas.android.com/apk/res-auto" xmlns:tools="http://schemas.android.com/tools" android:id="@+id/cardView" android:layout_width="match_parent" android:layout_height="wrap_content" android:layout_marginBottom="10dp" card_view:cardBackgroundColor="#ffffff" card_view:cardCornerRadius="7dp" card_view:cardElevation="5dp"> <android.support.constraint.ConstraintLayout android:layout_width="match_parent" android:layout_height="1542dp"> <TextView android:id="@+id/title" android:layout_width="wrap_content" android:layout_height="wrap_content" android:text="TextView" android:textSize="24sp" card_view:layout_constraintBottom_toBottomOf="parent" card_view:layout_constraintEnd_toEndOf="parent" card_view:layout_constraintHorizontal_bias="0.498" card_view:layout_constraintStart_toStartOf="parent" card_view:layout_constraintTop_toTopOf="parent" card_view:layout_constraintVertical_bias="0.01" /> <TextView android:id="@+id/befor" android:layout_width="wrap_content" android:layout_height="wrap_content" android:layout_marginTop="12dp" android:text="TextView" card_view:layout_constraintTop_toBottomOf="@+id/title" tools:layout_editor_absoluteX="189dp" /> <ListView android:id="@+id/beforUser" android:layout_width="402dp" android:layout_height="130dp" android:background="#7A7A7A" card_view:layout_constraintEnd_toEndOf="parent" card_view:layout_constraintStart_toStartOf="parent" card_view:layout_constraintTop_toBottomOf="@+id/befor" /> <TextView android:id="@+id/done" android:layout_width="wrap_content" android:layout_height="wrap_content" android:layout_marginTop="16dp" android:text="TextView" card_view:layout_constraintTop_toBottomOf="@+id/beforUser" tools:layout_editor_absoluteX="189dp" /> <ListView android:id="@+id/doneUser" android:layout_width="402dp" android:layout_height="364dp" android:layout_marginTop="12dp" android:background="#777777" card_view:layout_constraintEnd_toEndOf="parent" card_view:layout_constraintStart_toStartOf="parent" card_view:layout_constraintTop_toBottomOf="@+id/done" /> <TextView android:id="@+id/tag" android:layout_width="wrap_content" android:layout_height="wrap_content" android:layout_marginTop="60dp" android:text="TextView" card_view:layout_constraintTop_toBottomOf="@+id/doneUser" tools:layout_editor_absoluteX="98dp" /> <TextView android:id="@+id/desc" android:layout_width="wrap_content" android:layout_height="wrap_content" android:layout_marginStart="100dp" android:layout_marginTop="60dp" android:text="TextView" card_view:layout_constraintStart_toEndOf="@+id/tag" card_view:layout_constraintTop_toBottomOf="@+id/doneUser" /> </android.support.constraint.ConstraintLayout> </android.support.v7.widget.CardView>
- row.xml
- 1つ1つのリストの中身を作っている
row.xml<?xml version="1.0" encoding="utf-8"?> <android.support.constraint.ConstraintLayout xmlns:android="http://schemas.android.com/apk/res/android" xmlns:tools="http://schemas.android.com/tools" android:layout_width="match_parent" android:layout_height="match_parent"> <LinearLayout android:layout_width="match_parent" android:layout_height="80dp" tools:ignore="MissingConstraints"> <TextView android:id="@android:id/text1" android:layout_width="278dp" android:layout_height="80dp" android:layout_weight="1" android:gravity="center_vertical" android:text="Text1" android:textSize="18dp" /> <TextView android:id="@android:id/text2" android:layout_width="wrap_content" android:layout_height="match_parent" android:gravity="center_vertical|right" android:text="Text2" android:textSize="18dp" /> <Button android:id="@+id/rowbutton" android:layout_width="wrap_content" android:layout_height="wrap_content" android:focusable="false" android:focusableInTouchMode="false" android:text="配達した!" /> </LinearLayout> </android.support.constraint.ConstraintLayout>ちょっと説明が雑ですが、これは実際にコピペして使ってもらえるといいと思います!
Djangoのバックエンドの変更点(postの実行)
- 管理者が配達を完了したら通知をする機能を作成。
- AsyncHttpRequestPostのボタンを押したらそのエンドポイントに処理がとび、選択してるカートを所有しているユーザーのカートを空にしてメールを飛ばす。(メールの部分は省略)
- 引数のpkでカートのIDを指定しています。
shop/views.py###### ### 省略 ### # 以下を追加 from rest_framework.decorators import api_view @api_view(['POST']) def order_done_post_request(request, pk): user_info = UserInfomation.objects.get(id=pk) user = User.objects.get(email=user_info) if request.method == 'POST': cart = Cart.objects.get(cart_id=user_info.cart.cart_id) order_done(request, str(cart)) user = user_info # カートの管理は論理削除にではなく負の値を入れることで実装(謎) cart.cart_id = -cart.cart_id user.status = None cart.save() user.save() return Response(None) # 何も返さなくていいよ ### 省略 ###int型のpkを指定することでカートIDを指定
shop/urls.pyurlpatterns = [ ### 省略 ### path('post_shop/<int:pk>', views.order_done_post_request,), # 追加 ]以上がAndroid Studioが復活してから1日で頑張って実装した内容です。こうして記事にしてみると割愛してる部分が多いのにも関わらず、文量はとても多くなってしまいました。
まとめ
こんなにも簡単なアプリケーションを作成するだけでも1日かかってしまい、環境構築もくっそめんどくさいのでエンジニアの方はすごいなあと毎回感心させられます。今回はAndroidでしたが、そのうちiOSにも手を出したいなと思います。パソコン買い換えないと無理ですが。
結構雑な記事になってしまったので、質問はコメント欄またはTwitterのDMあたりに送ってくれれば答えます!あとは、間違ってる点や抜けている点がございましたらコメントください!それでは学生の皆さん良い夏休みを〜!!!

- 投稿日:2020-08-02T12:40:08+09:00
JavaでTODOアプリを制作しよう5 TODOの表示を切り替える
こんにちは、今回はボタンを押すとTODOの完了⇄未完了がスイッチする機能を実装していきたいと思います。
TODOアプリ作成リンク集
1: MVCの簡単な説明
2: Spring Initializrで雛形を作ってHello worldしたい
3: MySQLに仮のデータを保存 -> 全取得 -> topに表示する
4: 投稿機能の実装
5: TODOの表示を切り替える (今ここ)特定のTODOをidから検索する
まず今回の処理の流れは
・idからTODOを検索し取得する
・TODOのstatusをtrue⇄falseで切り替える
・TODOを保存する
となります。なので早速idからTODOを取得する部分をやってみましょう。
java/com/example/todo/TodoService.javapublic TodoEntity findTodoById(Long todoId) { Optional<TodoEntity> todoResult = todoRepository.findById(todoId); //nullチェックする return todoResult.get(); }こんな感じでいいでしょう。
ここで使われているOptional型は中に入っている型がnullかもしれないことを明示する型です。
//nullチェックする
となっている部分は今後の記事でやっていくので一旦置いておきます。今回はOptional型になっていますが
Optional.get()とすることでTodoEntity型に変えることができます。これでidによってTODOを取得することが出来ました!
完了⇄未完了を切り替えるロジックの実装
では続いてTODOの状態をスイッチするロジックを実装していきます。
java/com/example/todo/TodoService.javapublic void switchTodo(Long todoId) { TodoEntity todoEntity = findTodoById(todoId); todoEntity.setStatus(!todoEntity.isStatus()); todoRepository.save(todoEntity); }まずは先ほどの関数を呼んでTODOを取得します。
そしてstatusを切り替えるのですが!todoEntity.isStatus()とすることで現在の状態とは逆の状態にしています。(booleanを切り替える時によく使われる書き方です。)コントローラを編集する
java/com/example/todo/TodoController.java@PatchMapping("/toggle-status/{id}") public String switchStatus(@PathVariable("id") Long todoId) { todoService.switchTodo(todoId); return "redirect:/top"; }こんな感じで書いてみましょう。
@PathVariableはURLに組み込まれている{id}を取得するアノテーションです。
フロントサイドの編集
<!DOCTYPE html>
<html lang="ja" xmlns:th="http://www.thymeleaf.org">
<head>
    <meta charset="UTF-8">
    <title>hello</title>
    <link rel="stylesheet" href="https://stackpath.bootstrapcdn.com/bootstrap/4.3.1/css/bootstrap.min.css" integrity="sha384-ggOyR0iXCbMQv3Xipma34MD+dH/1fQ784/j6cY/iJTQUOhcWr7x9JvoRxT2MZw1T" crossorigin="anonymous">
</head>
<body>

    <!-- 投稿フォーム -->
    <div class=" w-75 h-auto my-1 mx-auto pt-5">
        <p class="pl-5">新しいToDoを作成する</p>
        <form th:action="@{/register}" th:object="${ToDoForm}" method="POST" class="container d-flex w-auto my-0 mx-auto">
            <div class="w-100">
                <label class="row">
                    <span class="col-2 text-center">ToDo名</span>
                    <input type="text" name="title" placeholder="ToDoを30字以内で入力" class="col-9">
                </label>
                <label class="row my-0">
                    <span class="col-2 text-center">期日</span>
                    <input type="date" id="date" name="deadline" class="col-9 my-0">
                </label>
            </div>
            <button class="btn btn-primary w-25 col-2 mr-3" type="submit">ToDoの追加</button>
        </form>
    </div>
    <div th:each="todo: ${todoList}" class=" w-75 h-25 my-1 mx-auto pt-5">
        <div class="container">
            <div  class="row">
                <div class="col-5 pl-5">
                    <p th:text="${todo.title}" class="mb-1"></p>
                    <p class="mb-1">期限:<span  th:text="${todo.deadline}"></span></p>
                    <p class="mb-1">作成日時:<span  th:text="${todo.createTime}"></span></p>
                </div>
                <div class="col-2 d-flex justify-content-start align-items-center px-0">
                    <a class="h-100 w-75 btn btn-info pt-4">
                        編集
                    </a>
                </div>
<!--                〜〜〜〜〜〜 今回追加する内容 〜〜〜〜〜〜-->
                <div th:if="${todo.status}" class="col-3 d-flex px-0">
                    <form th:action="@{/toggle-status/{id}(id=${todo.id})}" method="post" class="w-100 container d-flex my-0 mx-auto p-0 mr-2">
                        <input type="hidden" name="_method" value="patch">
                        <button type="submit" class="h-100 w-75 btn btn-success text-white">
                            完了
                        </button>
                    </form>
                </div>
                <div th:unless="${todo.status}" class="col-3 d-flex px-0">
                    <form th:action="@{/toggle-status/{id}(id=${todo.id})}" method="post" class="w-100 container d-flex my-0 mx-auto p-0 mr-2">
                        <input type="hidden" name="_method" value="patch">
                        <button type="submit" class="h-100 w-75 btn btn-danger text-white">
                            未完了
                        </button>
                    </form>
                </div>
<!--                〜〜〜〜〜〜 今回追加する内容 ここまで〜〜〜〜〜〜-->

            </div>
        </div>
    </div>

<script src="https://code.jquery.com/jquery-3.3.1.slim.min.js" integrity="sha384-q8i/X+965DzO0rT7abK41JStQIAqVgRVzpbzo5smXKp4YfRvH+8abtTE1Pi6jizo" crossorigin="anonymous"></script>
<script src="https://cdn.jsdelivr.net/npm/popper.js@1.16.0/dist/umd/popper.min.js" integrity="sha384-Q6E9RHvbIyZFJoft+2mJbHaEWldlvI9IOYy5n3zV9zzTtmI3UksdQRVvoxMfooAo" crossorigin="anonymous"></script>
<script src="https://stackpath.bootstrapcdn.com/bootstrap/4.4.1/js/bootstrap.min.js" integrity="sha384-wfSDF2E50Y2D1uUdj0O3uMBJnjuUD4Ih7YwaYd1iqfktj0Uod8GCExl3Og8ifwB6" crossorigin="anonymous"></script>
</body>
</html>
th:if="${todo.status}"
となっていますが、これはstatusがtrueだったら、つまり完了済みだった場合という意味です。
緑色で完了と表示する様にしています。またmethod="post"になっていますが先ほどのコントローラ編集では@PatchMappingを使ってました。
実はHTMLはPatchをリクエストする機能をサポートしていません。なのでPatchでリクエストしたい時はひと工夫いります。
Thymeleafでは
<input type="hidden" name="_method" value="patch">としたい場合に
application.propertyに
spring.mvc.hiddenmethod.filter.enabled=trueと追加するとtype="hidden"が使えるようになりPatchリクエストが送れるようになります。
Controller, Service, TodoEntityまとめ
Contollerpackage com.example.todo; import com.example.todo.dao.TodoEntity; import lombok.RequiredArgsConstructor; import org.springframework.stereotype.Controller; import org.springframework.ui.Model; import org.springframework.web.bind.annotation.GetMapping; import org.springframework.web.bind.annotation.ModelAttribute; import org.springframework.web.bind.annotation.PatchMapping; import org.springframework.web.bind.annotation.PathVariable; import org.springframework.web.bind.annotation.PostMapping; import java.util.List; @Controller @RequiredArgsConstructor public class TodoController { private final TodoService todoService; @GetMapping("/top") public String top(Model model){ List<TodoEntity> todoEntityList = todoService.findAllTodo(); model.addAttribute("todoList", todoEntityList); return "top"; } @PostMapping("/register") public String register(@ModelAttribute TodoForm formData) { todoService.setTodo(formData); return "redirect:/top"; } @PatchMapping("/toggle-status/{id}") public String switchStatus(@PathVariable("id") Long todoId) { todoService.switchTodo(todoId); return "redirect:/top"; } }Servicepackage com.example.todo; import com.example.todo.dao.TodoEntity; import com.example.todo.dao.TodoRepository; import lombok.RequiredArgsConstructor; import org.springframework.stereotype.Service; import java.util.List; import java.util.Optional; @Service @RequiredArgsConstructor public class TodoService { private final TodoRepository todoRepository; public List<TodoEntity> findAllTodo() { return todoRepository.findAll(); } public void setTodo(TodoForm formData) { TodoEntity todo = new TodoEntity(); todo.setTitle(formData.getTitle()); todo.setDeadline(formData.getDeadline()); todoRepository.save(todo); } public TodoEntity findTodoById(Long todoId) { Optional<TodoEntity> todoResult = todoRepository.findById(todoId); //例外処理する return todoResult.get(); } public void switchTodo(Long todoId) { TodoEntity todoEntity = findTodoById(todoId); todoEntity.setStatus(!todoEntity.isStatus()); todoRepository.save(todoEntity); } }Entitypackage com.example.todo.dao; import lombok.Getter; import lombok.Setter; import org.hibernate.annotations.CreationTimestamp; import org.hibernate.annotations.UpdateTimestamp; import javax.persistence.Column; import javax.persistence.Entity; import javax.persistence.GeneratedValue; import javax.persistence.GenerationType; import javax.persistence.Id; import javax.persistence.Table; import java.time.LocalDate; import java.time.LocalDateTime; @Entity @Getter @Setter @Table(name="todo") public class TodoEntity { @Id @Column @GeneratedValue(strategy = GenerationType.IDENTITY) private Long id; @Column(name="title") private String title; @Column(name="deadline") private LocalDate deadline; @Column(name="status") private boolean status; @CreationTimestamp @Column(name="create_time") private LocalDateTime createTime; @UpdateTimestamp @Column(name="update_time") private LocalDateTime updateTime; }現状のTODOアプリは上記のようなものになっています。