- 投稿日:2020-08-02T18:01:03+09:00
Androidアプリ開発探求記(その2)
はじめに
今回も前回同様、行き当たりばったりでまったりと実験しつつ、その過程を綴ってみようと思います。
misc.xml の怪
前回は、GitHub 上に repository を作成し、そこに Android project を作ってみました。
Android Studio から生成された直後の Android project を commit したわけなのですが、その後 misc.xml というファイルが何やら妙な差分を生成しているようなのです。
◆ 勝手に書き換わるコード
いろいろ実験してみたところ、どうも Reimport Gradle Project と sync にて書き換えのピンポンが起こっているようでした。
☆ Android project 生成直後
languageLevel が JDK_1_7 となっている。
misc.xml<component name="ProjectRootManager" version="2" languageLevel="JDK_1_7" project-jdk-name="1.8" project-jdk-type="JavaSDK"> <output url="file://$PROJECT_DIR$/build/classes" /> </component>☆ Reimport Gradle Project 直後
languageLevel が JDK_1_8 に変化する。
misc.xml<component name="ProjectRootManager" version="2" languageLevel="JDK_1_8" project-jdk-name="1.8" project-jdk-type="JavaSDK"> <output url="file://$PROJECT_DIR$/build/classes" /> </component>☆ sync 直後
sync や Rebuild Project を実行すると、languageLevel が JDK_1_7 に戻る。
misc.xml<component name="ProjectRootManager" version="2" languageLevel="JDK_1_7" project-jdk-name="1.8" project-jdk-type="JavaSDK"> <output url="file://$PROJECT_DIR$/build/classes" /> </component>◆ JDKバージョンを設定してみる
現状では JDK のバージョン情報を指定している個所が無いので、各々の機能が異なる default 値を採用しているという可能性はあり得そうです。ということで、以下のように build.gradle に JDK の設定を入れてみたところ、sync 時に languageLevel が JDK_1_8 になるようになりました。
android {
    compileOptions {
        sourceCompatibility JavaVersion.VERSION_1_8
        targetCompatibility JavaVersion.VERSION_1_8
    }
}
ちなみに、kotlinOptions を単独で設定しても効果はありませんでした。
android {
    kotlinOptions {
        jvmTarget = '1.8'
    }
}
考察
◆ JDK バージョン
とりあえずは、JDK のバージョンを設定すればOKすればよさそうです。
しかし、複数のモジュールで異なる JDK のバージョンを指定している場合どうなんだろうとか、そもそも .gitignore に含めてしまえばいいじゃんとか、いろいろと思うところはあります。
◆ .gitignore
おそらく misc.xml を .ignore に含めてしまっても良さそうに思えるのですが、現状では JDK のバージョンを設定ている状態での実害が確認されているわけではないので、.gitignore に含めるのはやめておくこととします。
コード変更
前回 create_new_android_project ブランチで作業したままなので、新規ブランチを作成して JDK バージョン対応用の差分を作成したいと思います。
◆ pull
☆ pull 失敗例
git pull を実行した時点でエラーになります。
$ git fetch -p
$ git checkout develop
$ git pull
There is no tracking information for the current branch.
Please specify which branch you want to merge with.
See git-pull(1) for details.

    git pull <remote> <branch>

If you wish to set tracking information for this branch you can do so with:

    git branch --set-upstream-to=origin/<branch> develop
☆ upstream の設定
毎回 git pull origin develop とするのはめんどくさいので、develop の upstream を設定します。
$ git branch --set-upstream-to=origin/develop develop
Branch 'develop' set up to track remote branch 'develop' from 'origin'.
◆ コード追加
☆ feature branch の作成
$ git pull
$ git checkout -b set_jdk_1_8
☆ 変更差分
前回と同様、ちゃんと Pull Request を行ってコード追加を実施します。
branchの後掃除
Pull Request を merge した後に、以下のように後掃除します。
$ git fetch -p
$ git checkout develop
$ git pull
$ git branch -d create_new_android_project # 前回消し忘れてた local branch
$ git branch -d set_jdk_1_8                # 今回削除すべきな local branch
お掃除後の branch の状況。
※ fetch に -p を付けないと、remotes/origin/set_jdk_1_8 のようなリモートへの参照が残り続けます。$ git branch -a * develop master remotes/origin/HEAD -> origin/master remotes/origin/develop remotes/origin/masterおわりに
ということで、今回は JDK のバージョンを設定してみました。
次回も行き当たりばったりで、まったりと実験しつつ、その過程を綴ってみようと思います。
- 投稿日:2020-08-02T17:12:00+09:00
Jetpack Composeの動画で驚いたこと、知らなかったこと
Jetpack ComposeのonCommitとonActiveの違いなどがコードを見ていてもよくわからなかったりしたのなど、見ることで色々すっきりしたので、見た感想を書いておきます。
今月末ぐらいに11 weeks of androidのUIの回があるので、また新しい動画などが出てくるかもです。
https://www.youtube.com/watch?v=U5BwfqBpiWU
Compose Runtime = AndroidやUIに関連するコードはなく、ツリー状で操作するだけでUI以外のものを処理することもできる
Compose UI Core = 入力管理、計測、描画、レイアウト
Compose UI Foundation = 行や列、デフォルトのインタラクションなど
Compose UI Material = マテリアルデザインに必要なものが入っている
https://youtu.be/U5BwfqBpiWU?t=334 より
ドキュメント内でComposeのプレビューを見ることができるので、コード補完するときにどのように表示されるのかがわかる。
https://youtu.be/U5BwfqBpiWU?t=477 より
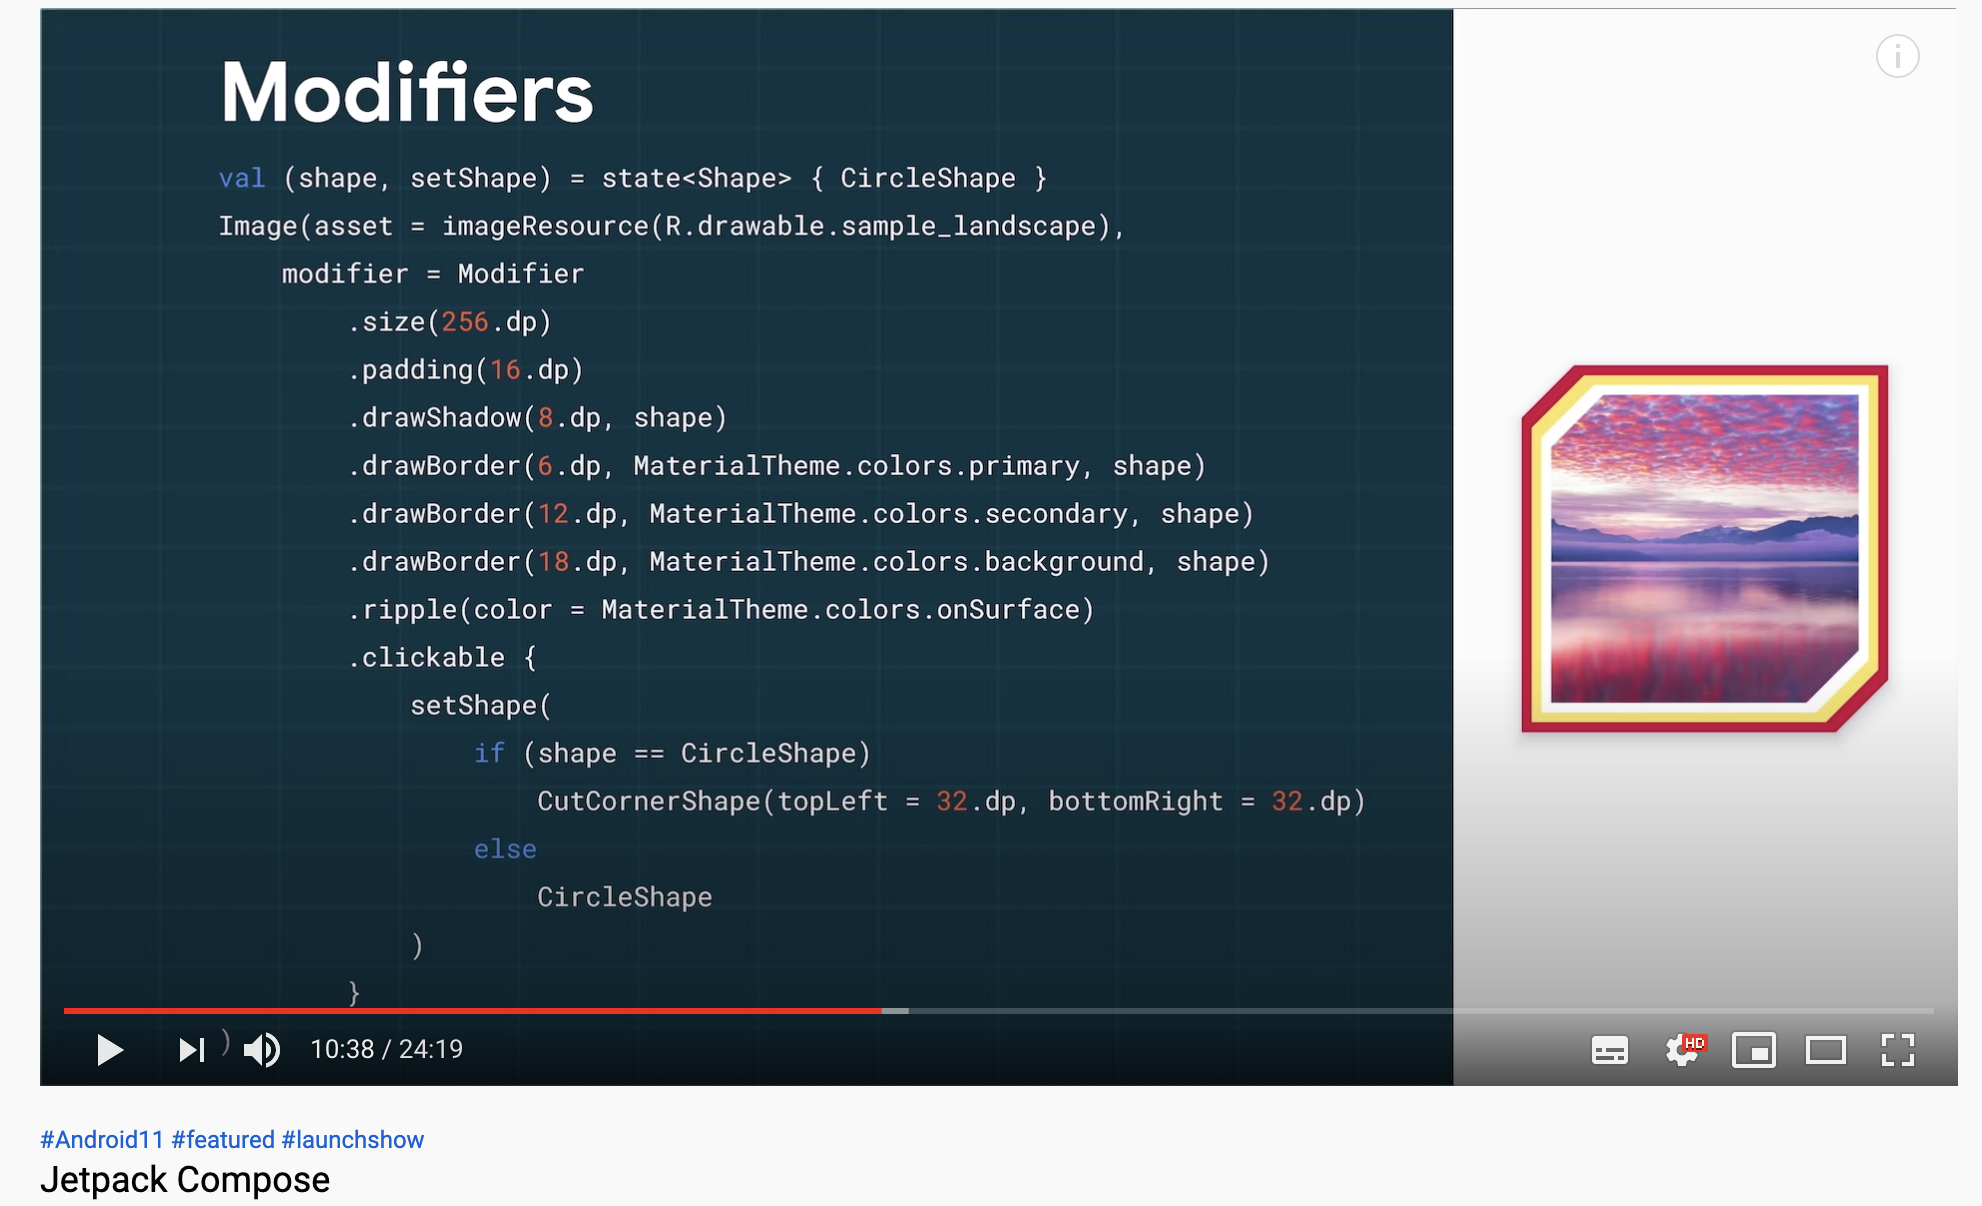
以前PaddingというComposable functionがあったがネストになりすぎるという問題があったため、今はModifierになっている。
Modifierを使ってクリックを処理したり、リップルを処理したり、CutCornerEdgeの処理をできたりして、色々できてすごい
https://youtu.be/U5BwfqBpiWU?t=637 より
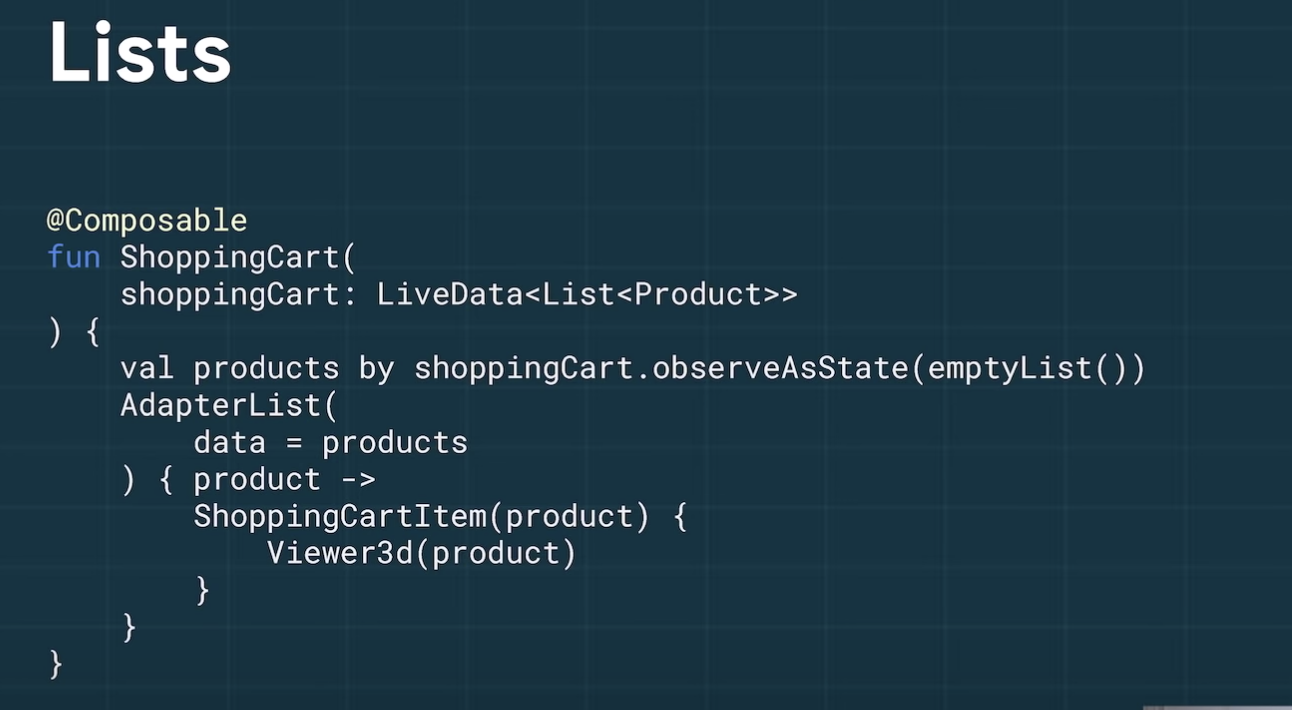
ComposeはLiveDataやRxJavaやFlowに対応していて、使うにはCompose stateとして観測する必要がある。
liveData.observeAsState()という関数を使うとCompose stateとして受けとることができる。 (今はLazyRowなどに名前に変わっているみたいです)
以下の例ではliveDataの値が変更されるとラムダの中が実行されて、recomposeされる。
シンプル
https://youtu.be/U5BwfqBpiWU?t=742 より
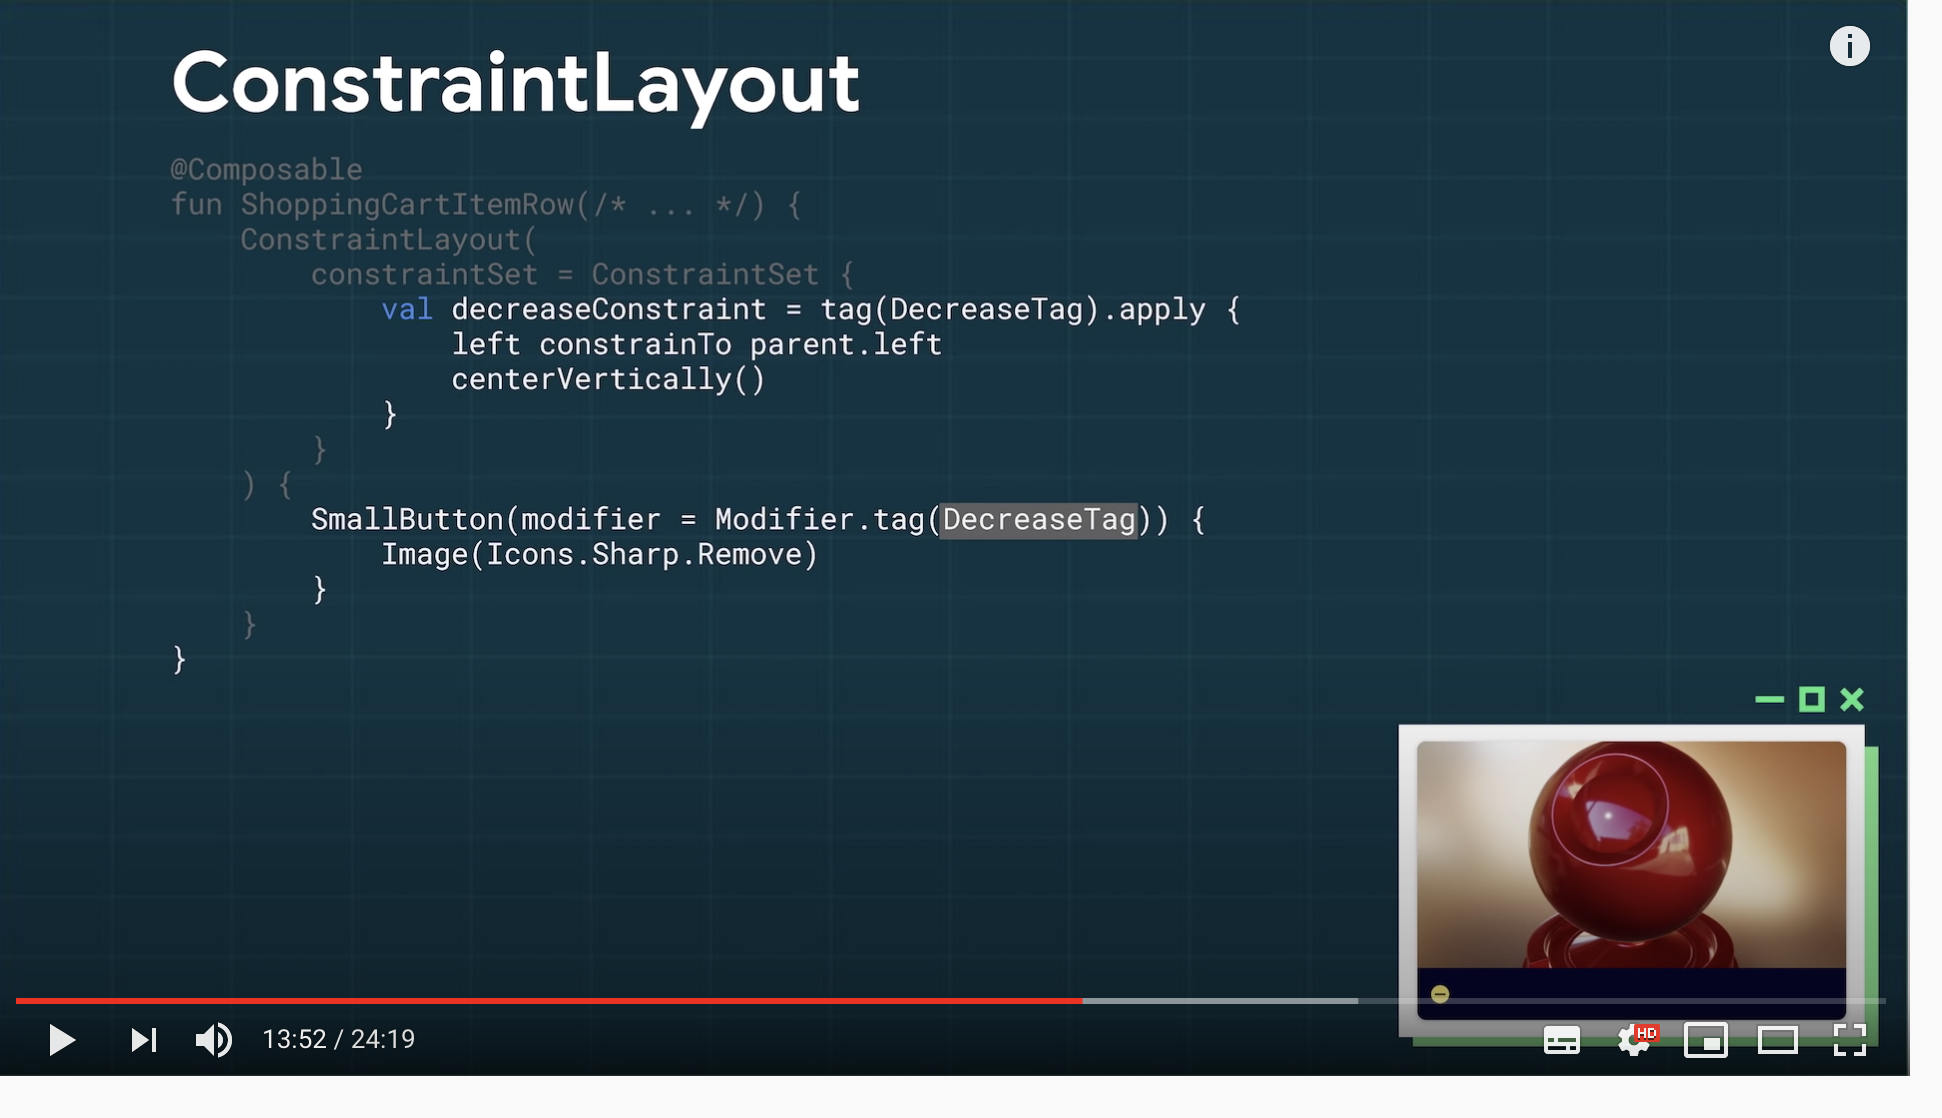
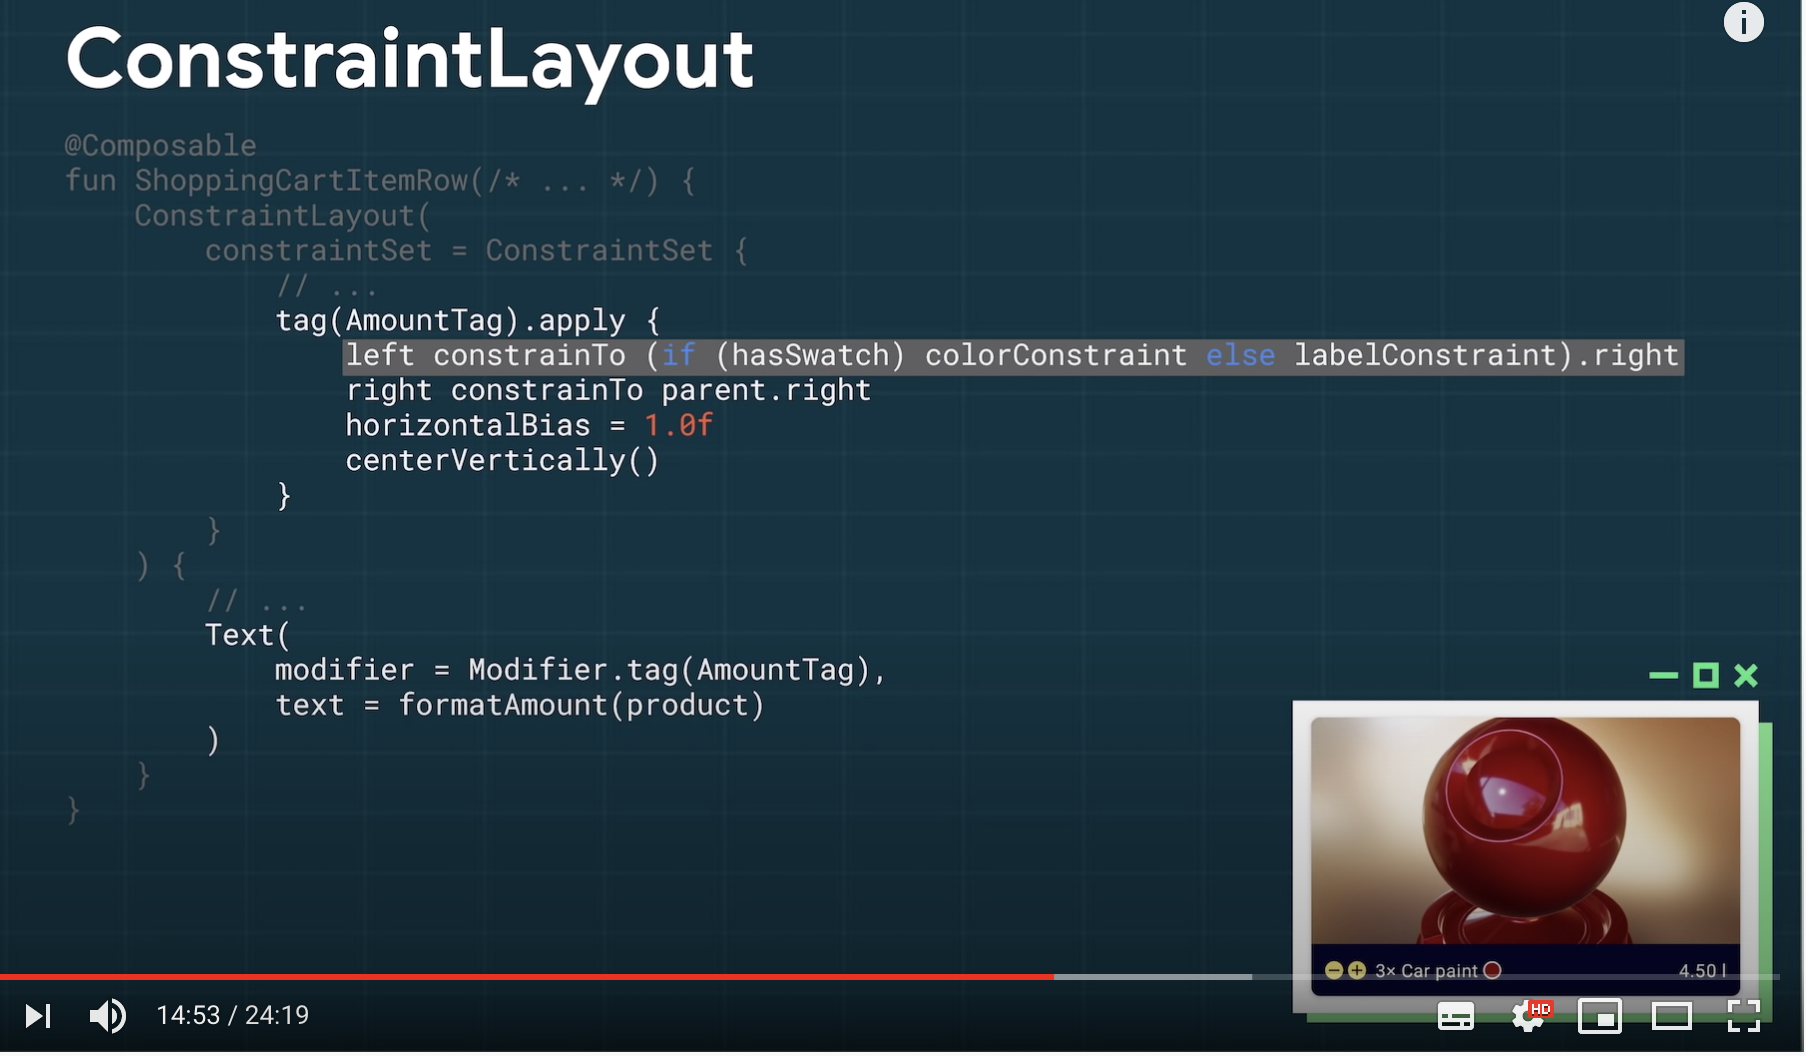
ConstraintLayoutは、constraintSetを作って、それと対応するコンポーネントを下に書く方法で書いていく。対応付はModifier.tag(タグ名)で設定する。 (これは最近書き方が変わっている説があります。)
https://youtu.be/U5BwfqBpiWU?t=832 より条件を書いて制約を変えるなどがコードで直接書くことができるので、xmlとコードを使う方法よりも便利に使うことができる。
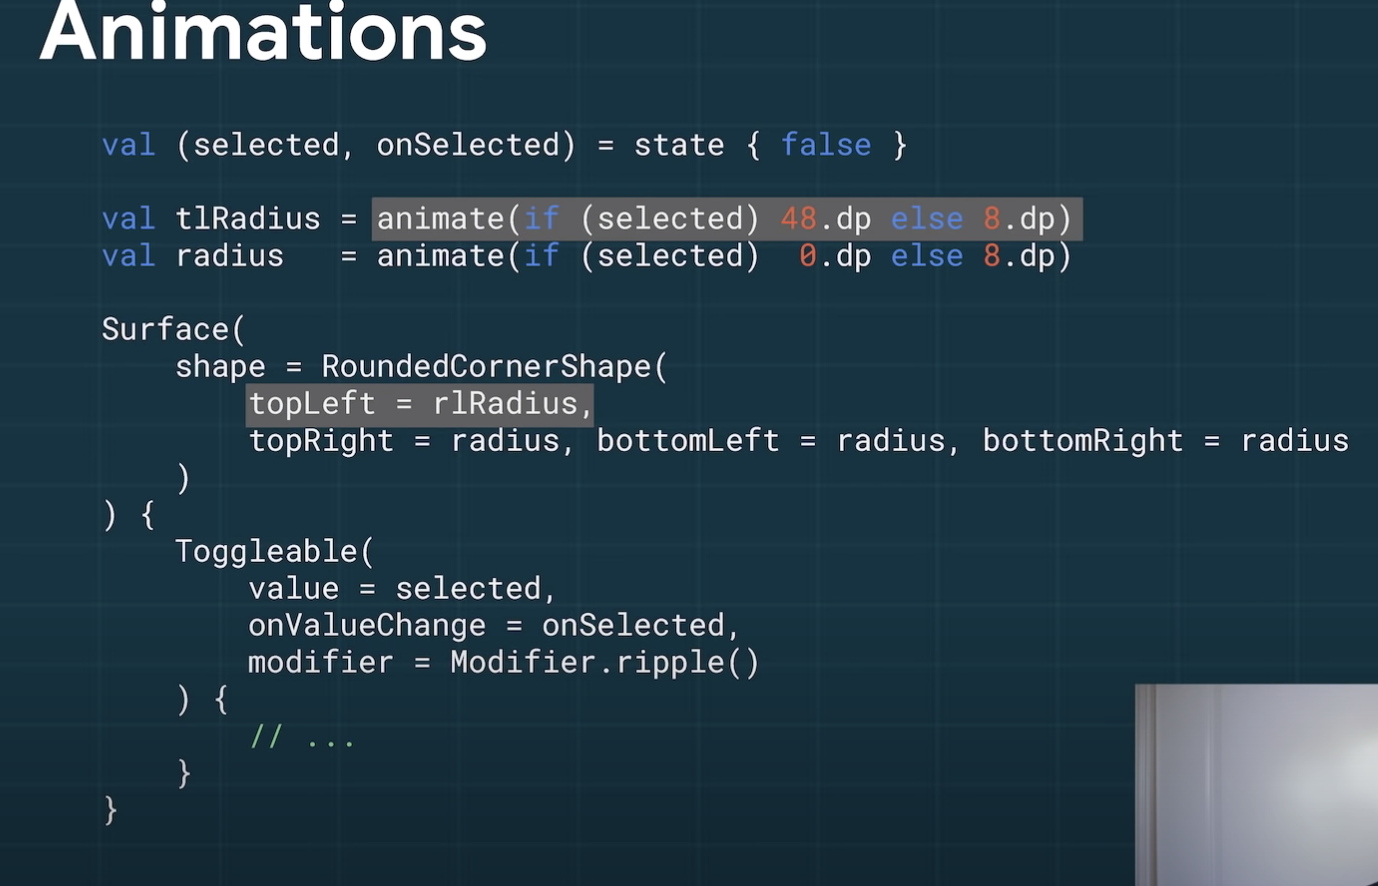
https://youtu.be/U5BwfqBpiWU?t=897 より
アイテムを押したときに左上が丸くなるAnimationがこれだけで動く
リスナーやコールバックやクリーンアップなどは必要なし。
https://youtu.be/U5BwfqBpiWU?t=1024 より
相互互換性
ComposeはKotlinから影響を受けており、KotlinではJavaのアプリケーションから自分のペースでKotlinのコードを追加していけた。Composeを適応したいときは新しい画面、新しい部品など少しずつ適応していくことができる
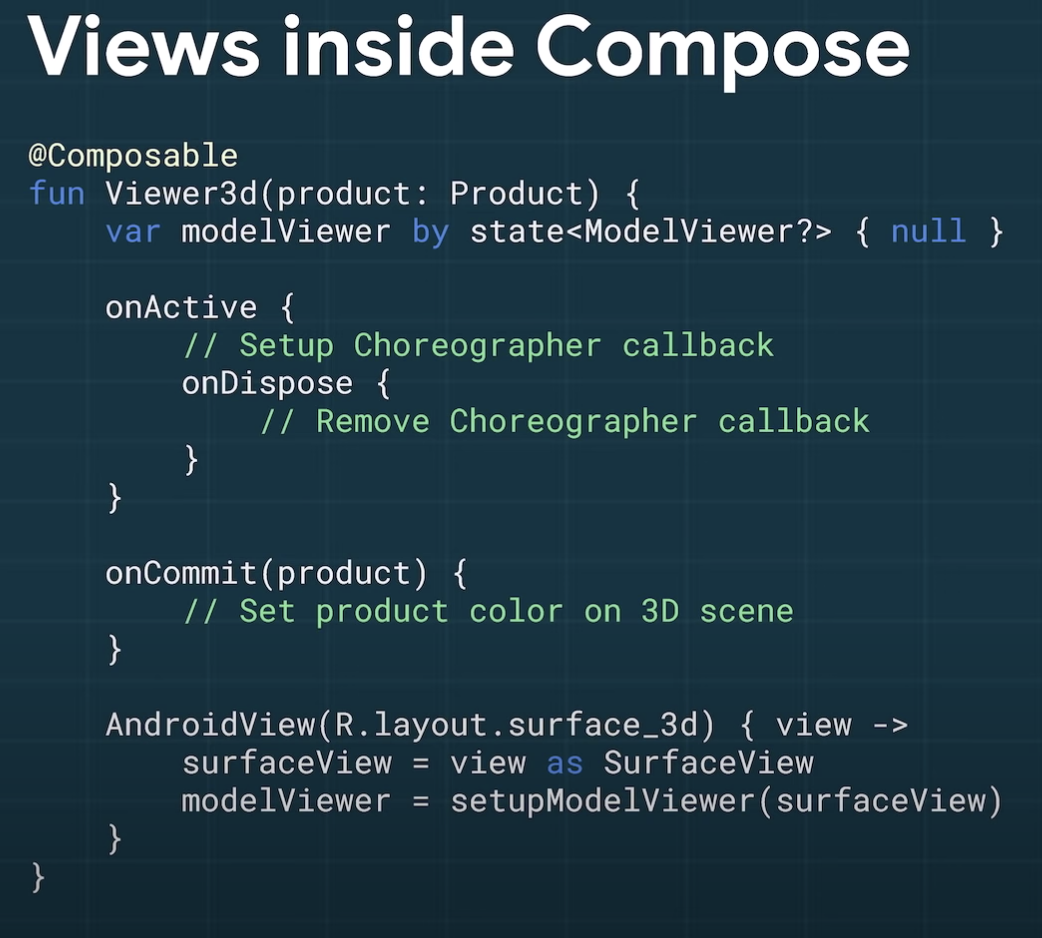
既存のViewを使うにはAndroidViewというのを使い、ラムダでviewが渡ってくるのでそれで処理ができる。
そのViewをstateに保存させることでComposeから操作させられる。
onActivce{}はUIのツリーに追加されたときに最初に呼び出される。ここでセットアップなどができる。(今回はコールバックを設定)そしてonDiposeで後処理などを行うことができる。
データの変更に対応して色を変えたりするにはonCommit(){}を利用する。追跡するデータをパラメーターにわたす。
https://youtu.be/U5BwfqBpiWU?t=1194 より
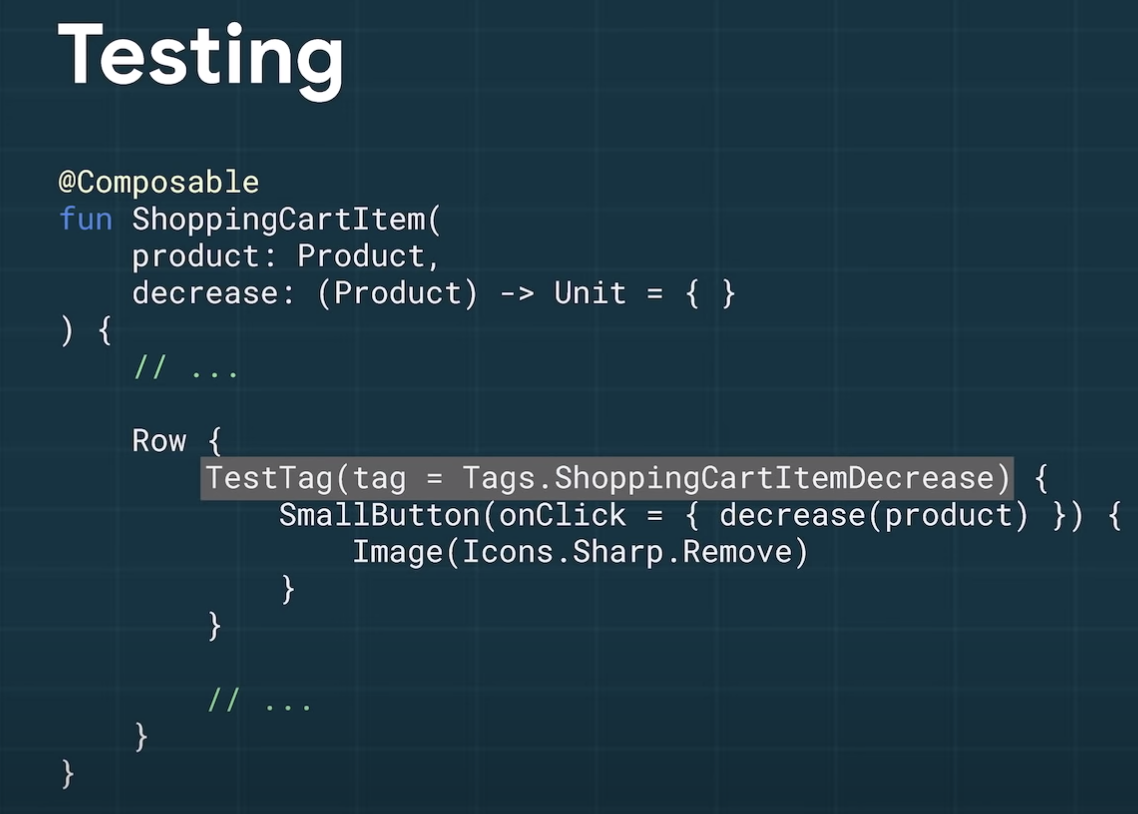
テスト
TestTagで設定しておいて、テストから利用する。
https://youtu.be/U5BwfqBpiWU?t=1227 よりEspressoなどではなく、ユニットテストで以下のようなコードを書くことでテスト可能。


- 投稿日:2020-08-02T16:50:33+09:00
Ionic AdMobのプラグインをcapacitor-communityのに乗り換えた話【Androidバージョン】
はじめに
Ionic AdMobのプラグインをcapacitor-communityのに乗り換えた話【iOSバージョン】
※こちらの記事の続きとなります元々はcapacitor-admobを使っていたのだが、このプラグインではどうやらCapacitor2にアップグレードした場合、Androidでビルドできない問題が起きた!(2020/8月現在)
なのでAdMobのプラグインを変更することにした。
iOSバージョンは比較的簡単に乗り換えれたのだが、Android版はかなりめんどくさかった!!!
と言う訳で、この記事はAndroidバージョンでcapacitor-communityのAdMobプラグインに乗り換えた話。Androidの方が難しかった理由
理由はズバリ、Android X!
Capacitor 2.0以降はAndroidXを使うようになった。「おいおい!AndroidXって何やねん?!」って感じだが、、、実際私もうまく説明はできない。。
AndroidXとは?
AndroidXとSupportライブラリとは
こちらで詳しく解説されています。
それをさらに噛み砕いて言うと、「AndroidXはサポートライブラリ!」
で、「サポートライブラリとは?」について一部を引用するとザックリ言うと、新しいOSバージョンでしか使えないクラス(ToolBarとか)を古いOSバージョンでも使えるように互換性をもたせるライブラリ(パッケージ)です。
こんな感じ。
AndroidX以前では、名前そのまんまの「Support Library」ってのが存在した。
//Support Libraryはこんな感じ
import android.support.v7.app.AppCompatActivity;

//AndroidXはこんな感じ
import androidx.appcompat.app.AppCompatActivity;
でもSupport Libraryがバージョンアップを繰り返した結果、混乱をもたらしていると言うことで一新されたようだ。。
前提
・Angular
・Capacitorのバージョンは2.X(2以上ってこと)
→ Capacitorのアップグレード方法はこちら・capacitor-admobを使っていた(capacitor-communityのAdMobプラグインとほぼ同じで、コードを編集する必要はほぼ無かった。)
もしAbMobプラグインの使用手順を1から知りたい人は、こちら
を参考に
ionic capacitorのAdMobプラグインを使う(capacitor-admob)AndroidXに移行する
これめっちゃめんどくさいです。。。
大体はこちらのドキュメント通りにやって行くMigrate to AndroidX
IonicプロジェクトをAndroid Studioで開く。
Refactor -> Migrate to AndroidX→Migrate→Do Refactorこれだけでは終わらない!!!
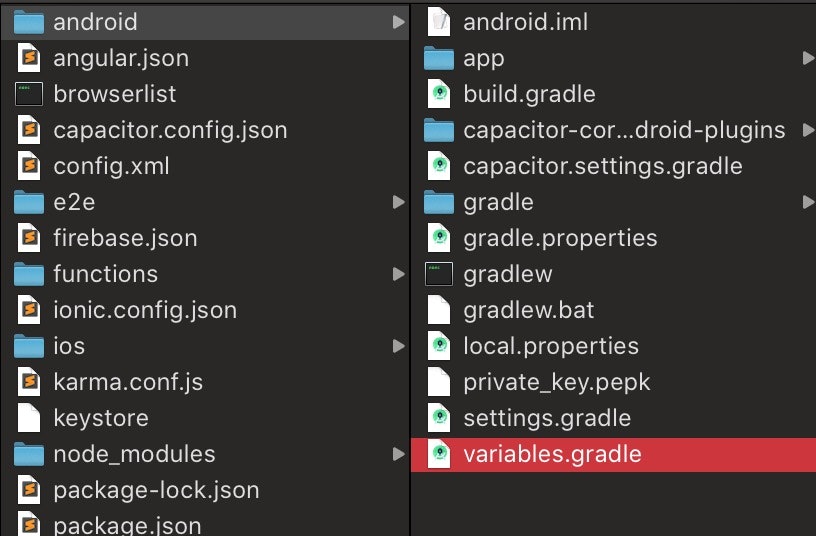
variables.gradleを作成
android/variables.gradleを作成
ドキュメント通りコピペ
variables.gradleext { minSdkVersion = 21 compileSdkVersion = 29 targetSdkVersion = 29 androidxAppCompatVersion = '1.1.0' androidxCoreVersion = '1.2.0' androidxMaterialVersion = '1.1.0-rc02' androidxBrowserVersion = '1.2.0' androidxLocalbroadcastmanagerVersion = '1.0.0' firebaseMessagingVersion = '20.1.2' playServicesLocationVersion = '17.0.0' junitVersion = '4.12' androidxJunitVersion = '1.1.1' androidxEspressoCoreVersion = '3.2.0' cordovaAndroidVersion = '7.0.0' }build.gradle(android)を編集
android/build.gradleを開き、下記のようにコードを追加する
参考はこちら
https://github.com/ionic-team/capacitor/blob/main/android-template/build.gradle#L18build.gradle(android)// Top-level build file where you can add configuration options common to all sub-projects/modules. buildscript { repositories { google() jcenter() } dependencies { // 共にバージョンを上げておく classpath 'com.android.tools.build:gradle:3.6.3' classpath 'com.google.gms:google-services:4.3.3' // NOTE: Do not place your application dependencies here; they belong // in the individual module build.gradle files } } // 追加 apply from: "variables.gradle" allprojects { repositories { google() jcenter() } } task clean(type: Delete) { delete rootProject.buildDir }build.gradle(:app)を編集
android/app/build.gradleを開き、ドキュメント通り編集する(ドキュメントわかりづらいよ〜!!!)
(コメントアウトしてる部分が古いコード)
参考はこちら
https://github.com/ionic-team/capacitor/blob/main/android-template/app/build.gradlebuild.gradle(apply plugin: 'com.android.application' android { // compileSdkVersion 28 compileSdkVersion rootProject.ext.compileSdkVersion defaultConfig { applicationId "com.sample.app" // minSdkVersion 21 // targetSdkVersion 28 minSdkVersion rootProject.ext.minSdkVersion targetSdkVersion rootProject.ext.targetSdkVersion versionCode 24 versionName "1.3.3" // testInstrumentationRunner "android.support.test.runner.AndroidJUnitRunner" testInstrumentationRunner "androidx.test.runner.AndroidJUnitRunner" } buildTypes { release { minifyEnabled false proguardFiles getDefaultProguardFile('proguard-android.txt'), 'proguard-rules.pro' } } } repositories { maven { url "https://dl.bintray.com/ionic-team/capacitor" } flatDir{ dirs '../capacitor-cordova-android-plugins/src/main/libs', 'libs' } } dependencies { implementation fileTree(include: ['*.jar'], dir: 'libs') // implementation 'com.android.support:appcompat-v7:28.0.0' implementation "androidx.appcompat:appcompat:$androidxAppCompatVersion" implementation project(':capacitor-android') // testImplementation 'junit:junit:4.12' // androidTestImplementation 'com.android.support.test:runner:1.0.2' // androidTestImplementation 'com.android.support.test.espresso:espresso-core:3.0.2' testImplementation "junit:junit:$junitVersion" androidTestImplementation "androidx.test.ext:junit:$androidxJunitVersion" androidTestImplementation "androidx.test.espresso:espresso-core:$androidxEspressoCoreVersion" implementation project(':capacitor-cordova-android-plugins') } apply from: 'capacitor.build.gradle' try { def servicesJSON = file('google-services.json') if (servicesJSON.text) { apply plugin: 'com.google.gms.google-services' } } catch(Exception e) { logger.warn("google-services.json not found, google-services plugin not applied. Push Notifications won't work") }gradle.propertiesを編集
Capacitorのドキュメントには書いていなかったが、私の場合は必要だった。。。
下記のようにコードを追加
参考はこちら
https://github.com/ionic-team/capacitor/blob/main/android-template/gradle.propertiesandroid.useAndroidX=true # Automatically convert third-party libraries to use AndroidX android.enableJetifier=trueAndroidManifest.xmlを編集
android/app/src/main/AndroidManifest.xmlを開き、<provider>の部分を変更する
参考はこちら
https://github.com/ionic-team/capacitor/blob/main/android-template/app/src/main/AndroidManifest.xmlよく見比べながらコピペしてね!
AndroidManifest.xml<?xml version="1.0" encoding="utf-8"?> <manifest xmlns:android="http://schemas.android.com/apk/res/android" package="com.sample.app"> <application android:allowBackup="true" android:icon="@mipmap/ic_launcher" android:label="@string/app_name" android:roundIcon="@mipmap/ic_launcher_round" android:supportsRtl="true" android:theme="@style/AppTheme"> <!-- 「|smallestScreenSize|screenLayout|uiMode」を追加! --> <activity android:configChanges="orientation|keyboardHidden|keyboard|screenSize|locale|smallestScreenSize|screenLayout|uiMode" android:name="com.hCalendar.app.MainActivity" android:label="@string/title_activity_main" android:theme="@style/AppTheme.NoActionBarLaunch" android:launchMode="singleTask"> <intent-filter> <action android:name="android.intent.action.MAIN" /> <category android:name="android.intent.category.LAUNCHER" /> </intent-filter> <intent-filter> <action android:name="android.intent.action.VIEW" /> <category android:name="android.intent.category.DEFAULT" /> <category android:name="android.intent.category.BROWSABLE" /> <data android:scheme="@string/custom_url_scheme" /> </intent-filter> </activity> <!-- androidxに変更 --> <provider android:name="androidx.core.content.FileProvider" android:authorities="${applicationId}.fileprovider" android:exported="false" android:grantUriPermissions="true"> <meta-data android:name="android.support.FILE_PROVIDER_PATHS" android:resource="@xml/file_paths"></meta-data> </provider> </application> <!-- Permissions --> <uses-permission android:name="android.permission.INTERNET" /> <!-- Camera, Photos, input file --> <uses-permission android:name="android.permission.READ_EXTERNAL_STORAGE"/> <uses-permission android:name="android.permission.WRITE_EXTERNAL_STORAGE" /> <!-- Geolocation API --> <uses-permission android:name="android.permission.ACCESS_COARSE_LOCATION" /> <uses-permission android:name="android.permission.ACCESS_FINE_LOCATION" /> <uses-feature android:name="android.hardware.location.gps" /> <!-- Network API --> <uses-permission android:name="android.permission.ACCESS_NETWORK_STATE" /> <!-- Navigator.getUserMedia --> <!-- Video --> <uses-permission android:name="android.permission.CAMERA" /> <!-- Audio --> <uses-permission android:name="android.permission.RECORD_AUDIO" /> <uses-permission android:name="android.permission.MODIFY_AUDIO_SETTINGS"/> </manifest>多分これでAndroidへに移行じたはできた(自信ないけど。。。)
インストール
ようやくここからがAdMobプラグインの話ww。いやー長かった・・
まずはプラグインを入れるnpm install --save @capacitor-community/admobそして以前まで使っていたプラグインを消す
npm uninstall capacitor-admobプラグインの初期設定
ほぼuninstallしたcapacitor-admobと同じ
MainActivity.java
android/app/src/main/java/**/**/MainActivity.javaを開くMainActivity.javapackage com.sample.app; import android.os.Bundle; import com.getcapacitor.BridgeActivity; import com.getcapacitor.Plugin; import java.util.ArrayList; public class MainActivity extends BridgeActivity { @Override public void onCreate(Bundle savedInstanceState) { super.onCreate(savedInstanceState); // Initializes the Bridge this.init(savedInstanceState, new ArrayList<Class<? extends Plugin>>() {{ // Additional plugins you've installed go here // Ex: add(TotallyAwesomePlugin.class); // 追加 add(com.getcapacitor.community.admob.AdMob.class); }}); } }AndroidManifest.xml
android/app/src/main/AndroidManifest.xmlを開くAndroidManifest.xml<?xml version="1.0" encoding="utf-8"?> <manifest xmlns:android="http://schemas.android.com/apk/res/android" package="com.sample.app"> <application android:allowBackup="true" android:icon="@mipmap/ic_launcher" android:label="@string/app_name" android:roundIcon="@mipmap/ic_launcher_round" android:supportsRtl="true" android:theme="@style/AppTheme"> <!-- 省略 --> <!-- androidxに変更 --> <provider android:name="androidx.core.content.FileProvider" android:authorities="${applicationId}.fileprovider" android:exported="false" android:grantUriPermissions="true"> <meta-data android:name="android.support.FILE_PROVIDER_PATHS" android:resource="@xml/file_paths"></meta-data> </provider> <!-- AdMobで必要? --> <meta-data android:name="com.google.android.gms.ads.AD_MANAGER_APP" android:value="true"/> </application> <!-- AdMobで必要 --> <meta-data android:name="com.google.android.gms.ads.APPLICATION_ID" android:value="@string/admob_app_id" /> <!-- 省略 --> </manifest>strings.xml
android/app/src/main/res/values/strings.xml
[APP_ID]を入れるstrings.xml<string name="admob_app_id">[APP_ID]</string>最後に
AdMobで広告を出す方法はiOS編を参考に!!
Ionic AdMobのプラグインをcapacitor-communityのに乗り換えた話【iOSバージョン】参考リンクは下記の通り
https://capacitorjs.com/docs/android/updating#from-1-5-1-to-2-0-0https://github.com/capacitor-community/admob
AndroidXにしてしまうと、色々なプラグインで問題が発生しそうなので、十分な時間を確保した上でくれぐれも慎重にやっていきましょう。

- 投稿日:2020-08-02T15:34:50+09:00
Androidアプリ開発探求記(その1)
はじめに
Andorid アプリ開発に関して、あまりトピックを絞らずに、まったりと実験しつつ、その過程を綴ってみようと思います。
新規 GitHub Repository の作成と設定
◆ 新規 GitHub Repository の作成
まずは手始めに、GitHub 上に 新規 repository を作ってみます。
Git Hub の Web ページにて、以下を実行:
- README と MIT License 付きの public repository を作成。
◆ Default Branch を develop に変更
次に、git の default branch を master から develop に変更します。
PC 上で以下を実行:
$ git clone git@github.com:beyondseeker/chrono0015.git
$ cd chrono0015
$ git checkout -b develop
$ git push
Git Hub の Web ページにて、以下を実行:
- Settings -> Branches -> Default branch にて default branch を develop に変更。
◆ ブランチの自動削除設定
PR 後に手動で PR branch を削除するのがめんどいので、自動削除の設定を入れます。
Git Hub の Web ページにて、以下にチェックを入れる:
- Settings -> Options -> Automatically delete head branches
新規 Android Project の作成
ということで、実際にコードをいじっていこうと思います。
まずは、アプリ開発のベースとなる Android project を作成してみようと思います。
◆ 作業内容の確認
まずは作業内容の確認から。
- 作業名
- 新規Androidプロジェクトの作成
- 概要
- Android Studio にて Android project を作成する。
- 完了条件
- Android Studio にて作成された直後の Android project を成果物とする。
◆ Feature Branch の作成
作業内容を十分に推測できる名前の feature branch を作成します。1
Pull Request できるように空コミットを入れたうえで push します。
$ git checkout -b create_new_android_project
$ git commit --allow-empty -m "initial: create_new_android_project"
$ git push
◆ Draft Pull Request の作成
上記で push した branch から develop に merge するための draft pull request を作成します。
事前に draft pull request として作業内容や完了条件などを明言しておくことにより、意図された内容が実装されていることを merge 前に確認できるようにします。
タイトル
新規Androidプロジェクトの作成本文
# 概要
Android Studio にて Android project を作成する。

# 完了条件
Android Studio にて作成された直後の Android project を成果物とする。
◆ 新規 Android Project の作成
Android Studio を起動し、以下のように新規 Android project を作成します。
- Start a new Android Studio project
- Select a Project Template -> Empty Activity
- Configure Your Project
◆ Pull Request の merge
作成直後の Android project を develop に merge します。
一人プロジェクトなので review 入れずに merge しちゃいます。
PC 上で以下を実行:
$ git add .
$ git commit -m "create new android project"
$ git push
Git Hub の Web ページにて以下を実行:
- Ready for review ボタンを押下。
- Merge pull request ボタンを押下。
- Confirm merge ボタンを押下。
おわりに
ということで、今回は手初めに、GitHub 上に repository を作成し、そこに Android project を作ってみました。
次回も行き当たりばったりで、まったりと実験しつつ、その過程を綴ってみようと思います。
feature branch の naming convention については、今回は
作業内容を十分に推測できる名前としておきます。naming convention の best practices と呼ばれるものは世の中に多々ありますが、naming convention の採用自体がプロジェクトに複雑さを導入してしまうというのは本末転倒です。現段階では naming convention の導入自体が YAGNI や BDUF の類だと考えます。 ↩Git Hub の repository の root フォルダを選択している。そのため
'chrono0015' already exists at the specific project location and it is not empty.と警告が出るが、意図したものなので無視します。 ↩https://twitter.com/minsdkversion を参考にしてます。 ↩
- 投稿日:2020-08-02T14:27:46+09:00
flutter build apkすると`Execution failed for task ':app:processReleaseResources'.`と出る
原因
flutter build apk -t -t lib/main_staging.dart --releaseでapkファイルを作成しようとしていた解消法
flutter build appbundle -t lib/main_production.dart --releaseでaabファイルを作成する手元で
flutter build apkした際に出たエラーYou are building a fat APK that includes binaries for android-arm, android-arm64, android-x64. If you are deploying the app to the Play Store, it's recommended to use app bundles or split the APK to reduce the APK size. To generate an app bundle, run: flutter build appbundle --target-platform android-arm,android-arm64,android-x64 Learn more on: https://developer.android.com/guide/app-bundle To split the APKs per ABI, run: flutter build apk --target-platform android-arm,android-arm64,android-x64 --split-per-abi Learn more on: https://developer.android.com/studio/build/configure-apk-splits#configur e-abi-split FAILURE: Build failed with an exception. * What went wrong: Execution failed for task ':app:processReleaseResources'. > A failure occurred while executing com.android.build.gradle.internal.tasks.Workers$ActionFacade > Android resource linking failed /Users/dainaikai/.gradle/caches/transforms-2/files-2.1/9d02fd66e7e6d4a1bc03a8f87e50aa5b/appcompat-1.1.0/res/values-v28/values-v28.xml:5:5-8:13: AAPT: error: resource android:attr/dialogCornerRadius not found. /Users/dainaikai/.gradle/caches/transforms-2/files-2.1/9d02fd66e7e6d4a1bc03a8f87e50aa5b/appcompat-1.1.0/res/values-v28/values-v28.xml:9:5-12:13: AAPT: error: resource android:attr/dialogCornerRadius not found. /Users/dainaikai/.gradle/caches/transforms-2/files-2.1/013bbe37b97b7c0e54550a4ba7498a94/core-1.0.1/res/values/values.xml:57:5-88:25: AAPT: error: resource android:attr/fontVariationSettings not found. /Users/dainaikai/.gradle/caches/transforms-2/files-2.1/013bbe37b97b7c0e54550a4ba7498a94/core-1.0.1/res/values/values.xml:57:5-88:25: AAPT: error: resource android:attr/ttcIndex not found. /Users/dainaikai/.gradle/caches/transforms-2/files-2.1/9d02fd66e7e6d4a1bc03a8f87e50aa5b/appcompat-1.1.0/res/values/values.xml:2772:5-2795:25: AAPT: error: resource android:attr/textFontWeight not found. * Try: Run with --stacktrace option to get the stack trace. Run with --info or --debug option to get more log output. Run with --scan to get full insights. * Get more help at https://help.gradle.org BUILD FAILED in 1m 20s
- 投稿日:2020-08-02T12:46:51+09:00
Android入門!
はじめに
こんにちは、今週いっぱいで学校が終わり、来週から中身のない夏休みを過ごす僕です。
今回は前回の記事で作ったDjangoのAPIに実際にAndroidアプリを使用してHTTP通信をしてみたいと思います。ちなみにこれあたふたしながらも1日で実装したものなのであまりクオリティは高くないです。(とは言っても16時間くらいかかってますが)
基本のき!
僕が一番苦労したのはここです。実行構成が全くわからなかったこと、全体像が全く見えなかったこと、フロントエンドはどうやって実装するの?などなど。
まずは全体像が把握できないと何から始めていいのかわかりません。そのため、まずはどのような構成で作られているのか、何ができるのかを理解する必要があります。また、Androidアプリを開発するにあたって最近はKotlinやReactNativeなどありますが、今回はオワコンレガシー言語であるJavaを使用します。
大事なもの
ここではAndroidアプリを作成する上で大切なことをいくつか列挙します。
最低限この構成くらいはわかってて欲しいってレベルなのでガバガバですがご容赦ください。
- アクティビティ
- 実行全体のフローを表します
- メインの実行するクラスにonCreate()をオーバーライドして実行します
- onCreateのあとはonStart、onResumeが実行され、アプリは実行状態になります
- このサイトにわかりやすい説明がありました
- マニフェスト
- マニフェストファイルではAndroidの設定を示します。
- 後で書きますが、HTTP通信を行う際にはインターネットを使用するという宣言をする必要があります
- 実行するメインのクラス名もここで明示的に示してあげます(今回はExSample.java)
- そのほかにも外部のAPIを使用したりする時はここに書きます。
- XML
- 見た目を作る部分を定義します。
- パーツにIDをつけてクラスでの処理を対応させ、そこに値を入れたりイベントを起こしたりすることができます。
- エミュレータ
- Androidの端末がなくても擬似的なエミュレータを使用して実行することができます。
- あるなら実機を使った方がいいです。
- 本記事ではエミュレータの設定方法は割愛します。
ウェッブ大好きな人がMVCに例えると、モデルは今回はDjangoのサーバにあり、Androidを構成するjavaのコードがコントローラ、XMLで記述する部分がビューって感じです。
実行の構成
今回、HTTP通信をするということで、僕自信一番わからなかった部分がここです。
そもそもAndroidってどこのクラスが実行されるの?という感じだったのでとても困りました。
大前提として、
Androidを実行するとマニフェストに指定したクラスが実行されます。
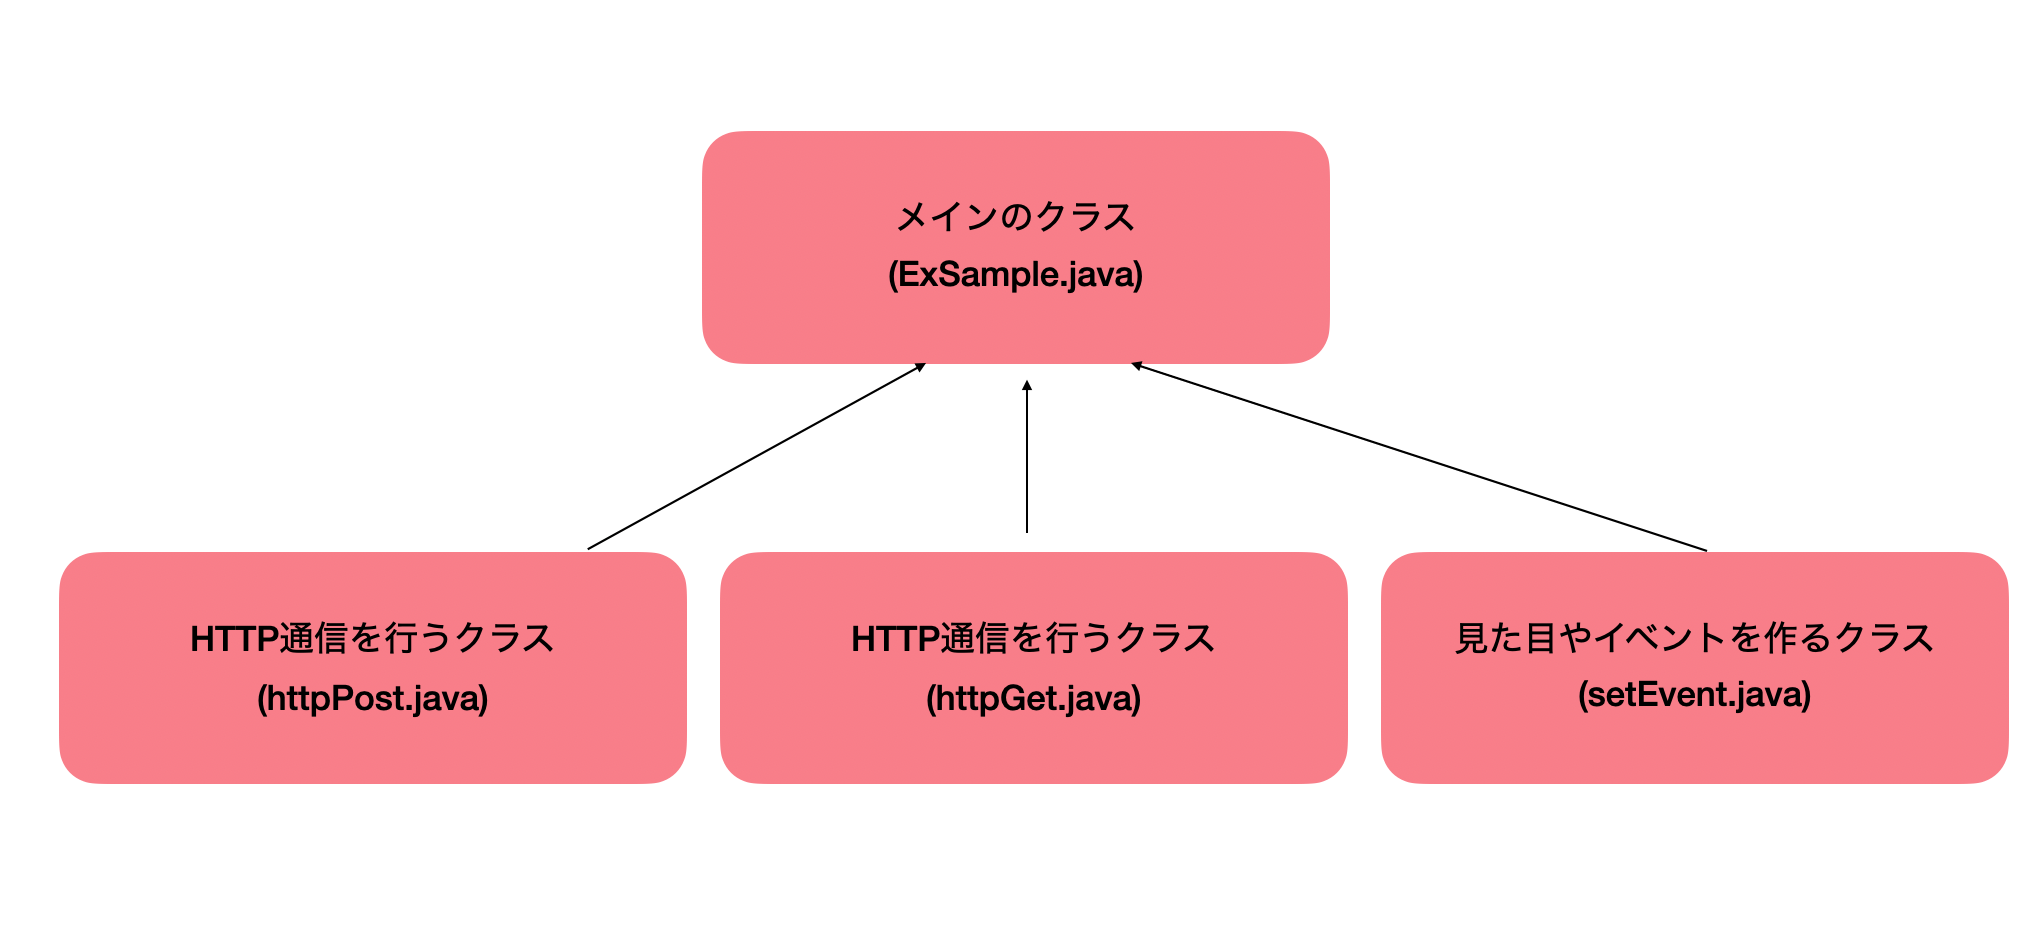
つまり、ほかにクラスを定義した場合でも最終的にはそこに集約する必要があります。(これが理解できてなかった)以下の図のようなイメージになります。
汚い図ですが、最終的に実行されるクラスはメインとなるクラスだけなので、このほかにたくさんクラスがあってもやりたい処理はメインのクラスでしか実行されません。回り道してもいいから、なんとかメインにたどり着かせましょう!!!
では実際にコードを書いていきます。
今回の使用するクラスは以下の通りです。
クラス 用途 ExSample.java メインの実行クラス AsyncHttpRequestGet.java 全てのデータを取得 AsyncHttpRequestPost.java 配達完了通知を送信 ListAndView.java リニアレイアウトのなかにリストビューを設置するためのクラス 今回はこの4つを使用してアンドロイドアプリを作っていきます。
※配達完了通知に関してですが、これは前回の記事から少しAPIをいじりました。作る!
では書いていきます。
ExSampleでのポイント
- AppCompatActivityクラスを継承してプログラムを組む。
- onCreateメソッドで実行する。
- あとで出てきますが、ListViewという表を作るみたいなレイアウトを使うときにメインのクラスのContextを使用することになるのでどこでも使えるようにgetInstanceメソッドを作成する。
- AsyncHttpRequestGetを使用して最初にget requestを送信している。
ExSample.javapackage es.exsample; import android.content.Context; import android.content.Intent; import android.os.Bundle; import android.support.v7.app.AppCompatActivity; import android.util.Log; import android.view.View; public class ExSample extends AppCompatActivity { // クラスを示す private static final String TAG = "ExSample"; // 違うクラスでContextを参照するための変数 private static ExSample context; @Override protected void onCreate(Bundle savedInstanceState) { super.onCreate(savedInstanceState); setContentView(R.layout.list_item); context = this; // 実行 AsyncHttpRequestGet task = new AsyncHttpRequestGet(context); task.execute("http://localhost:8000/get_shop"); Log.d(TAG, "created"); } // 他のクラスでContextを使用するための関数 public static ExSample getInstance(){ return context; } }AsyncHttpRequestGetのポイント
- ExSampleはこいつを実行だけなので割とこのクラスでの分量は多め。
- AsyncTaskを継承して非同期処理を行っている。
- コンストラクタでXMLのパーツのIDを指定して渡すものを初期化している。
- URL url = new URL(params[0]);でメインクラスで定義したURLを取得することができる。
- setRequestPropertyでヘッダを指定(今回は認証がかかっているけど永続化するトークンを作成したのでベタ書き)
- JSONArrayに受け取った値を入れると簡単に操作することができるようになる。
- ArrayAdapterの第一引数にメインクラスで定義したメソッドで得たcontextを代入する。(メインのクラスのみでリストビューを定義する場合には直接thisと書けばいい)
AsyncHttpRequestGet.javapackage es.exsample; import android.content.Context; import android.os.AsyncTask; import android.os.Build; import android.support.annotation.RequiresApi; import android.util.Log; import android.widget.ArrayAdapter; import android.widget.ListView; import android.widget.TextView; import org.json.JSONArray; import org.json.JSONException; import org.json.JSONObject; import java.io.BufferedReader; import java.io.IOException; import java.io.InputStream; import java.io.InputStreamReader; import java.net.URL; import java.util.ArrayList; import java.util.HashMap; import java.util.List; import java.util.Map; import javax.net.ssl.HttpsURLConnection; public class AsyncHttpRequestGet extends AsyncTask<String, Void, String> { // ロガーのタグ private static final String TAG = "AsyncHttpRequestGet"; // UI スレッドから操作するビュー private TextView titleView; private TextView beforUserContent; private TextView doneUserContent; private ListView beforUser; private ListView doneUser; public static Map<String, String> data; public static List<Map<String, String>> dataList; public static ListView listView; public static ListAndView adapter; // コンストラクタ、Viewをセットする public AsyncHttpRequestGet(Context context) { super(); ExSample sample = (ExSample) context; titleView = (TextView)sample.findViewById(R.id.title); beforUserContent = (TextView)sample.findViewById(R.id.befor); doneUserContent = (TextView)sample.findViewById(R.id.done); beforUser = (ListView)sample.findViewById(R.id.beforUser); doneUser = (ListView)sample.findViewById(R.id.doneUser); listView = (ListView)sample.findViewById(R.id.beforUser); } // ここでリクエスト、レスポンスを捌く @Override protected String doInBackground(String... params) { StringBuilder sb = new StringBuilder(); InputStream inputStream = null; HttpsURLConnection connection = null; try { // URLをセット、またここでヘッダの値を管理、tokenはログインした時に取得することができるようにしてある URL url = new URL(params[0]); connection = (HttpsURLConnection)url.openConnection(); connection.setRequestProperty("Content-Type", "application/json"); connection.setRequestProperty("Authorization", "JWT Djangoで取得したキーを指定する"); connection.setConnectTimeout(3000); connection.setReadTimeout(3000); // GET connection.setRequestMethod("GET"); connection.connect(); // レスポンスコードを確認 int responseCode = connection.getResponseCode(); if(responseCode != HttpsURLConnection.HTTP_OK) { throw new IOException("HTTP responseCode: " + responseCode); } // 文字列化 inputStream = connection.getInputStream(); if(inputStream != null) { BufferedReader reader = new BufferedReader(new InputStreamReader(inputStream, "UTF-8")); String line; while ((line = reader.readLine()) != null) { sb.append(line); } } } catch (IOException e) { e.printStackTrace(); } finally { if(inputStream != null) { try { inputStream.close(); } catch (IOException e) { e.printStackTrace(); } } if(connection != null) { connection.disconnect(); } } return sb.toString(); } // ここでViewを作成する @RequiresApi(api = Build.VERSION_CODES.O) @Override protected void onPostExecute(String result) { List<String> userListOrderDone = new ArrayList<String>(); List<String> userListBeforOrder = new ArrayList<String>(); List<String> idList = new ArrayList<String>(); // ExSampleのthisを返すだけの関数(意味があるかはわからない) Context context = ExSample.getInstance().getApplicationContext(); ArrayAdapter<String> beforUserList = new ArrayAdapter<String>(context, android.R.layout.simple_list_item_1, userListBeforOrder); ArrayAdapter<String> doneUserList = new ArrayAdapter<String>(context, android.R.layout.simple_list_item_1, userListOrderDone); Log.d(TAG, result); titleView.setText("モトデリ"); beforUserContent.setText("配達前"); doneUserContent.setText("配達完了"); beforUser.setAdapter(beforUserList); doneUser.setAdapter(doneUserList); try{ // JSONArrayで全てのレスポンスを取得 JSONArray all = new JSONArray(result); dataList = new ArrayList<Map<String, String>>(); for(int i = 0; i < all.length(); i++){ data = new HashMap<String, String>(); // それぞれの欲しい値を取得することができる JSONObject json = all.getJSONObject(i); String email = json.getString("user"); String total = json.getString("total"); String status = json.getString("status"); String id = json.getString("id"); // ユーザの状態によって配達済みか身配達かを判定(Javaの文字列の比較でハマる初心者多いイメージ) if(status.equals("true")){ data.put("text1", email); data.put("text2", id); dataList.add(data); } else{ userListOrderDone.add(String.format("%s: %s円", email, total)); } } } catch (JSONException e){ System.out.println(e); } // 先ほど取り出したデータを元に値を入れる adapter = new ListAndView( context, dataList, R.layout.row, new String[] { "text1", "text2", }, new int[] { android.R.id.text1, android.R.id.text2, }); // リストビューに反映 listView.setAdapter(adapter); listView.setTextFilterEnabled(false); } }AsyncHttpRequestPostのポイント
- ほぼAsyncHttpRequestGetと同じ。
- post requestなので値を成型する必要がない。
- バックエンドの変更点はあとで記述。
AsyncHttpRequestPost.javapackage es.exsample; import android.content.Context; import android.os.AsyncTask; import android.widget.TextView; import java.io.BufferedReader; import java.io.BufferedWriter; import java.io.IOException; import java.io.InputStream; import java.io.InputStreamReader; import java.io.OutputStream; import java.io.OutputStreamWriter; import java.net.URL; import javax.net.ssl.HttpsURLConnection; public class AsyncHttpRequestPost extends AsyncTask<String, Void, String> { private static final String TAG = "AsyncHttpRequestPost"; private TextView textView; public AsyncHttpRequestPost(Context context) { super(); } @Override protected String doInBackground(String... params) { StringBuilder sb = new StringBuilder(); InputStream inputStream = null; HttpsURLConnection connection = null; try { // URL 文字列をセットします。 URL url = new URL(params[0]); connection = (HttpsURLConnection)url.openConnection(); connection.setConnectTimeout(3000); // タイムアウト 3 秒 connection.setReadTimeout(3000); // POST connection.setRequestMethod("POST"); connection.setRequestProperty("Content-Type", "application/json"); connection.setRequestProperty("Authorization", "JWT eyJ0eXAiOiJKV1QiLCJhbGciOiJIUzI1NiJ9.eyJ1c2VyX2lkIjo2LCJ1c2VybmFtZSI6ImIxODA2NDI5QHBsYW5ldC5rYW5hemF3YS1pdC5hYy5qcCIsImV4cCI6MTU5NTIzMTIzNiwiZW1haWwiOiJiMTgwNjQyOUBwbGFuZXQua2FuYXphd2EtaXQuYWMuanAifQ.18LotiLgemUmSXTqmdcjjD3eKLSL1B13N87msbQswoE"); OutputStream outputStream = connection.getOutputStream(); BufferedWriter writer = new BufferedWriter(new OutputStreamWriter(outputStream)); writer.write(params[1]); writer.close(); connection.connect(); // レスポンスコード。 int responseCode = connection.getResponseCode(); if(responseCode != HttpsURLConnection.HTTP_OK) { throw new IOException("HTTP responseCode: " + responseCode); } // 文字列化 inputStream = connection.getInputStream(); if(inputStream != null) { BufferedReader reader = new BufferedReader(new InputStreamReader(inputStream, "UTF-8")); String line; while ((line = reader.readLine()) != null) { sb.append(line); } } } catch (IOException e) { e.printStackTrace(); } finally { if(inputStream != null) { try { inputStream.close(); } catch (IOException e) { e.printStackTrace(); } } if(connection != null) { connection.disconnect(); } } return sb.toString(); } }ListAndViewのポイント
- SimpleAdapterを継承して作成。
- AsyncHttpRequestPostを使用してpostを実行。
- onClickメソッドを使用してボタンが押されたら実行されるようになっている。
ListAndView.javapackage es.exsample; import android.content.Context; import android.util.Log; import android.view.LayoutInflater; import android.view.View; import android.view.ViewGroup; import android.widget.Button; import android.widget.SimpleAdapter; import android.widget.TextView; import java.util.HashMap; import java.util.List; import java.util.Map; import static android.content.ContentValues.TAG; public class ListAndView extends SimpleAdapter { private LayoutInflater inflater; private List<? extends Map<String, ?>> listData; // 各行が保持するデータ保持クラス public class ViewHolder { TextView text1; TextView text2; } public ListAndView(Context context, List<? extends Map<String, ?>> data, int resource, String[] from, int[] to) { super(context, data, resource, from, to); this.inflater = (LayoutInflater) context.getSystemService(Context.LAYOUT_INFLATER_SERVICE); this.listData = data; } @Override public View getView(final int position, View convertView, ViewGroup parent) { final ViewHolder holder; // ビューを受け取る View view = convertView; if (view == null) { view = inflater.inflate(R.layout.row, parent, false); holder = new ViewHolder(); holder.text1 = (TextView) view.findViewById(android.R.id.text1); holder.text2 = (TextView) view.findViewById(android.R.id.text2); view.setTag(holder); } else { holder = (ViewHolder) view.getTag(); } // holderにデータをセットする String text1 = ((HashMap<?, ?>) listData.get(position)).get("text1").toString(); String text2 = ((HashMap<?, ?>) listData.get(position)).get("text2").toString(); holder.text1.setText(text1); holder.text2.setText(text2); // ボタンを押したら実行 Button btn = (Button) view.findViewById(R.id.rowbutton); btn.setTag(position); btn.setOnClickListener(new View.OnClickListener() { @Override public void onClick(View arg0) { String id = holder.text2.getText().toString(); Context context = ExSample.getInstance().getApplicationContext(); AsyncHttpRequestPost task = new AsyncHttpRequestPost(context); String url = "http://localhost:8000/post_shop/" + id; task.execute(url, "hi"); Log.d(TAG, "created"); } }); return view; } }XML
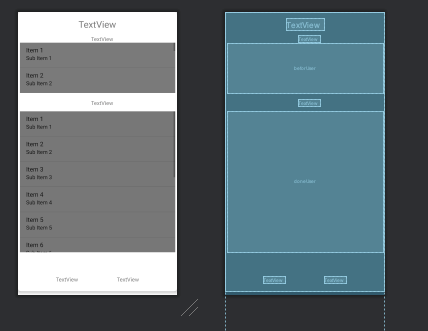
- list_item.xml
- 全体の構成を担っている。
- リニアレイアウトで実装。
list_item.xml<?xml version="1.0" encoding="utf-8"?> <android.support.v7.widget.CardView xmlns:android="http://schemas.android.com/apk/res/android" xmlns:card_view="http://schemas.android.com/apk/res-auto" xmlns:tools="http://schemas.android.com/tools" android:id="@+id/cardView" android:layout_width="match_parent" android:layout_height="wrap_content" android:layout_marginBottom="10dp" card_view:cardBackgroundColor="#ffffff" card_view:cardCornerRadius="7dp" card_view:cardElevation="5dp"> <android.support.constraint.ConstraintLayout android:layout_width="match_parent" android:layout_height="1542dp"> <TextView android:id="@+id/title" android:layout_width="wrap_content" android:layout_height="wrap_content" android:text="TextView" android:textSize="24sp" card_view:layout_constraintBottom_toBottomOf="parent" card_view:layout_constraintEnd_toEndOf="parent" card_view:layout_constraintHorizontal_bias="0.498" card_view:layout_constraintStart_toStartOf="parent" card_view:layout_constraintTop_toTopOf="parent" card_view:layout_constraintVertical_bias="0.01" /> <TextView android:id="@+id/befor" android:layout_width="wrap_content" android:layout_height="wrap_content" android:layout_marginTop="12dp" android:text="TextView" card_view:layout_constraintTop_toBottomOf="@+id/title" tools:layout_editor_absoluteX="189dp" /> <ListView android:id="@+id/beforUser" android:layout_width="402dp" android:layout_height="130dp" android:background="#7A7A7A" card_view:layout_constraintEnd_toEndOf="parent" card_view:layout_constraintStart_toStartOf="parent" card_view:layout_constraintTop_toBottomOf="@+id/befor" /> <TextView android:id="@+id/done" android:layout_width="wrap_content" android:layout_height="wrap_content" android:layout_marginTop="16dp" android:text="TextView" card_view:layout_constraintTop_toBottomOf="@+id/beforUser" tools:layout_editor_absoluteX="189dp" /> <ListView android:id="@+id/doneUser" android:layout_width="402dp" android:layout_height="364dp" android:layout_marginTop="12dp" android:background="#777777" card_view:layout_constraintEnd_toEndOf="parent" card_view:layout_constraintStart_toStartOf="parent" card_view:layout_constraintTop_toBottomOf="@+id/done" /> <TextView android:id="@+id/tag" android:layout_width="wrap_content" android:layout_height="wrap_content" android:layout_marginTop="60dp" android:text="TextView" card_view:layout_constraintTop_toBottomOf="@+id/doneUser" tools:layout_editor_absoluteX="98dp" /> <TextView android:id="@+id/desc" android:layout_width="wrap_content" android:layout_height="wrap_content" android:layout_marginStart="100dp" android:layout_marginTop="60dp" android:text="TextView" card_view:layout_constraintStart_toEndOf="@+id/tag" card_view:layout_constraintTop_toBottomOf="@+id/doneUser" /> </android.support.constraint.ConstraintLayout> </android.support.v7.widget.CardView>
- row.xml
- 1つ1つのリストの中身を作っている
row.xml<?xml version="1.0" encoding="utf-8"?> <android.support.constraint.ConstraintLayout xmlns:android="http://schemas.android.com/apk/res/android" xmlns:tools="http://schemas.android.com/tools" android:layout_width="match_parent" android:layout_height="match_parent"> <LinearLayout android:layout_width="match_parent" android:layout_height="80dp" tools:ignore="MissingConstraints"> <TextView android:id="@android:id/text1" android:layout_width="278dp" android:layout_height="80dp" android:layout_weight="1" android:gravity="center_vertical" android:text="Text1" android:textSize="18dp" /> <TextView android:id="@android:id/text2" android:layout_width="wrap_content" android:layout_height="match_parent" android:gravity="center_vertical|right" android:text="Text2" android:textSize="18dp" /> <Button android:id="@+id/rowbutton" android:layout_width="wrap_content" android:layout_height="wrap_content" android:focusable="false" android:focusableInTouchMode="false" android:text="配達した!" /> </LinearLayout> </android.support.constraint.ConstraintLayout>ちょっと説明が雑ですが、これは実際にコピペして使ってもらえるといいと思います!
Djangoのバックエンドの変更点(postの実行)
- 管理者が配達を完了したら通知をする機能を作成。
- AsyncHttpRequestPostのボタンを押したらそのエンドポイントに処理がとび、選択してるカートを所有しているユーザーのカートを空にしてメールを飛ばす。(メールの部分は省略)
- 引数のpkでカートのIDを指定しています。
shop/views.py###### ### 省略 ### # 以下を追加 from rest_framework.decorators import api_view @api_view(['POST']) def order_done_post_request(request, pk): user_info = UserInfomation.objects.get(id=pk) user = User.objects.get(email=user_info) if request.method == 'POST': cart = Cart.objects.get(cart_id=user_info.cart.cart_id) order_done(request, str(cart)) user = user_info # カートの管理は論理削除にではなく負の値を入れることで実装(謎) cart.cart_id = -cart.cart_id user.status = None cart.save() user.save() return Response(None) # 何も返さなくていいよ ### 省略 ###int型のpkを指定することでカートIDを指定
shop/urls.pyurlpatterns = [ ### 省略 ### path('post_shop/<int:pk>', views.order_done_post_request,), # 追加 ]以上がAndroid Studioが復活してから1日で頑張って実装した内容です。こうして記事にしてみると割愛してる部分が多いのにも関わらず、文量はとても多くなってしまいました。
まとめ
こんなにも簡単なアプリケーションを作成するだけでも1日かかってしまい、環境構築もくっそめんどくさいのでエンジニアの方はすごいなあと毎回感心させられます。今回はAndroidでしたが、そのうちiOSにも手を出したいなと思います。パソコン買い換えないと無理ですが。
結構雑な記事になってしまったので、質問はコメント欄またはTwitterのDMあたりに送ってくれれば答えます!あとは、間違ってる点や抜けている点がございましたらコメントください!それでは学生の皆さん良い夏休みを〜!!!

- 投稿日:2020-08-02T08:28:57+09:00
ConstraintLayout入門その4 - weight
ConstraintLayoutを使用するための設定については、ConstraintLayout入門その1をご覧ください。
ConstraintLayoutの一部に対して比率割り当てする
ConstraintLayout入門その3で紹介した
app:layout_constraintWidth_percent, app:layout_constraintHeight_percentは、親View(すなわちConstraintLayout)の水平方向もしくは垂直方向の長さに対する比率を設定するためのものです。ConstraintLayoutの全長よりも短い部分に対して子Viewへの比率割り当てを行いたいときは、percentでなくapp:layout_constraintHorizontal_weight,layout_constraintVertical_weightを使う必要があります。そして、weightを有効にするためには、ConstraintLayoutの中で子Viewの一団でチェーンを作る必要があります。layout_constraint_2.xml<androidx.constraintlayout.widget.ConstraintLayout xmlns:android="http://schemas.android.com/apk/res/android" xmlns:app="http://schemas.android.com/apk/res-auto" xmlns:tools="http://schemas.android.com/tools" android:layout_width="match_parent" android:layout_height="wrap_content" android:orientation="horizontal" android:background="#CAEB5E" tools:showIn="@layout/activity_main"> <TextView android:id="@+id/txtC2Start" android:layout_width="30dp" android:layout_height="wrap_content" app:layout_constraintTop_toTopOf="parent" app:layout_constraintStart_toStartOf="parent" android:gravity="center_horizontal" android:background="@drawable/rect_frame" android:textColor="@android:color/black" android:textSize="14sp" android:text="30dp" /> <TextView android:id="@+id/txtC21" android:layout_width="0dp" android:layout_height="wrap_content" app:layout_constraintTop_toTopOf="parent" app:layout_constraintStart_toEndOf="@id/txtC2Start" app:layout_constraintEnd_toStartOf="@id/txtC22" app:layout_constraintHorizontal_weight="1" android:gravity="center_horizontal" android:background="@drawable/rect_frame" android:textColor="@android:color/black" android:textSize="14sp" /> <TextView android:id="@+id/txtC22" android:layout_width="0dp" android:layout_height="wrap_content" app:layout_constraintTop_toTopOf="parent" app:layout_constraintStart_toEndOf="@id/txtC21" app:layout_constraintEnd_toStartOf="@id/txtC23" app:layout_constraintHorizontal_weight="2" android:gravity="center_horizontal" android:background="@drawable/rect_frame" android:textColor="@android:color/black" android:textSize="14sp" /> <TextView android:id="@+id/txtC23" android:layout_width="0dp" android:layout_height="wrap_content" app:layout_constraintTop_toTopOf="parent" app:layout_constraintStart_toEndOf="@id/txtC22" app:layout_constraintEnd_toStartOf="@id/txtC2End" app:layout_constraintHorizontal_weight="3" android:gravity="center_horizontal" android:background="@drawable/rect_frame" android:textColor="@android:color/black" android:textSize="14sp" /> <TextView android:id="@+id/txtC2End" android:layout_width="50dp" android:layout_height="wrap_content" app:layout_constraintTop_toTopOf="parent" app:layout_constraintEnd_toEndOf="parent" android:gravity="center_horizontal" android:background="@drawable/rect_frame" android:textColor="@android:color/black" android:textSize="14sp" android:text="50dp" /> </androidx.constraintlayout.widget.ConstraintLayout>上記の5つの
<TextView>のうち、2〜4番目の3つのViewで水平方向の位置参照関係を相互に持つことによって、子View3つからなるチェーンを構成しています(最初と最後の<TextView>は、自らは参照していても他のViewから参照されていないのでチェーンに含まれません)。このチェーンの各Viewにapp:layout_constraintHorizontal_weightを設定することで、最初と最後の<TextView>に割り当てられている部分を取り除いた(親Viewの全体でない)部分を比率配分(ここでは 1:2:3)して表示させています。ここで、子Viewの
app:layout_constraintHorizontal_weightを有効な設定にするためには、android:layout_width="0dp", すなわち、水平方向の長さにMATCH_CONSTRAINTを指定することが必須になります(同様のことを水平方向の長さで行うためには、app: layout_constraintVertical_weightを使いandroid:layout_height="0dp"とします)。
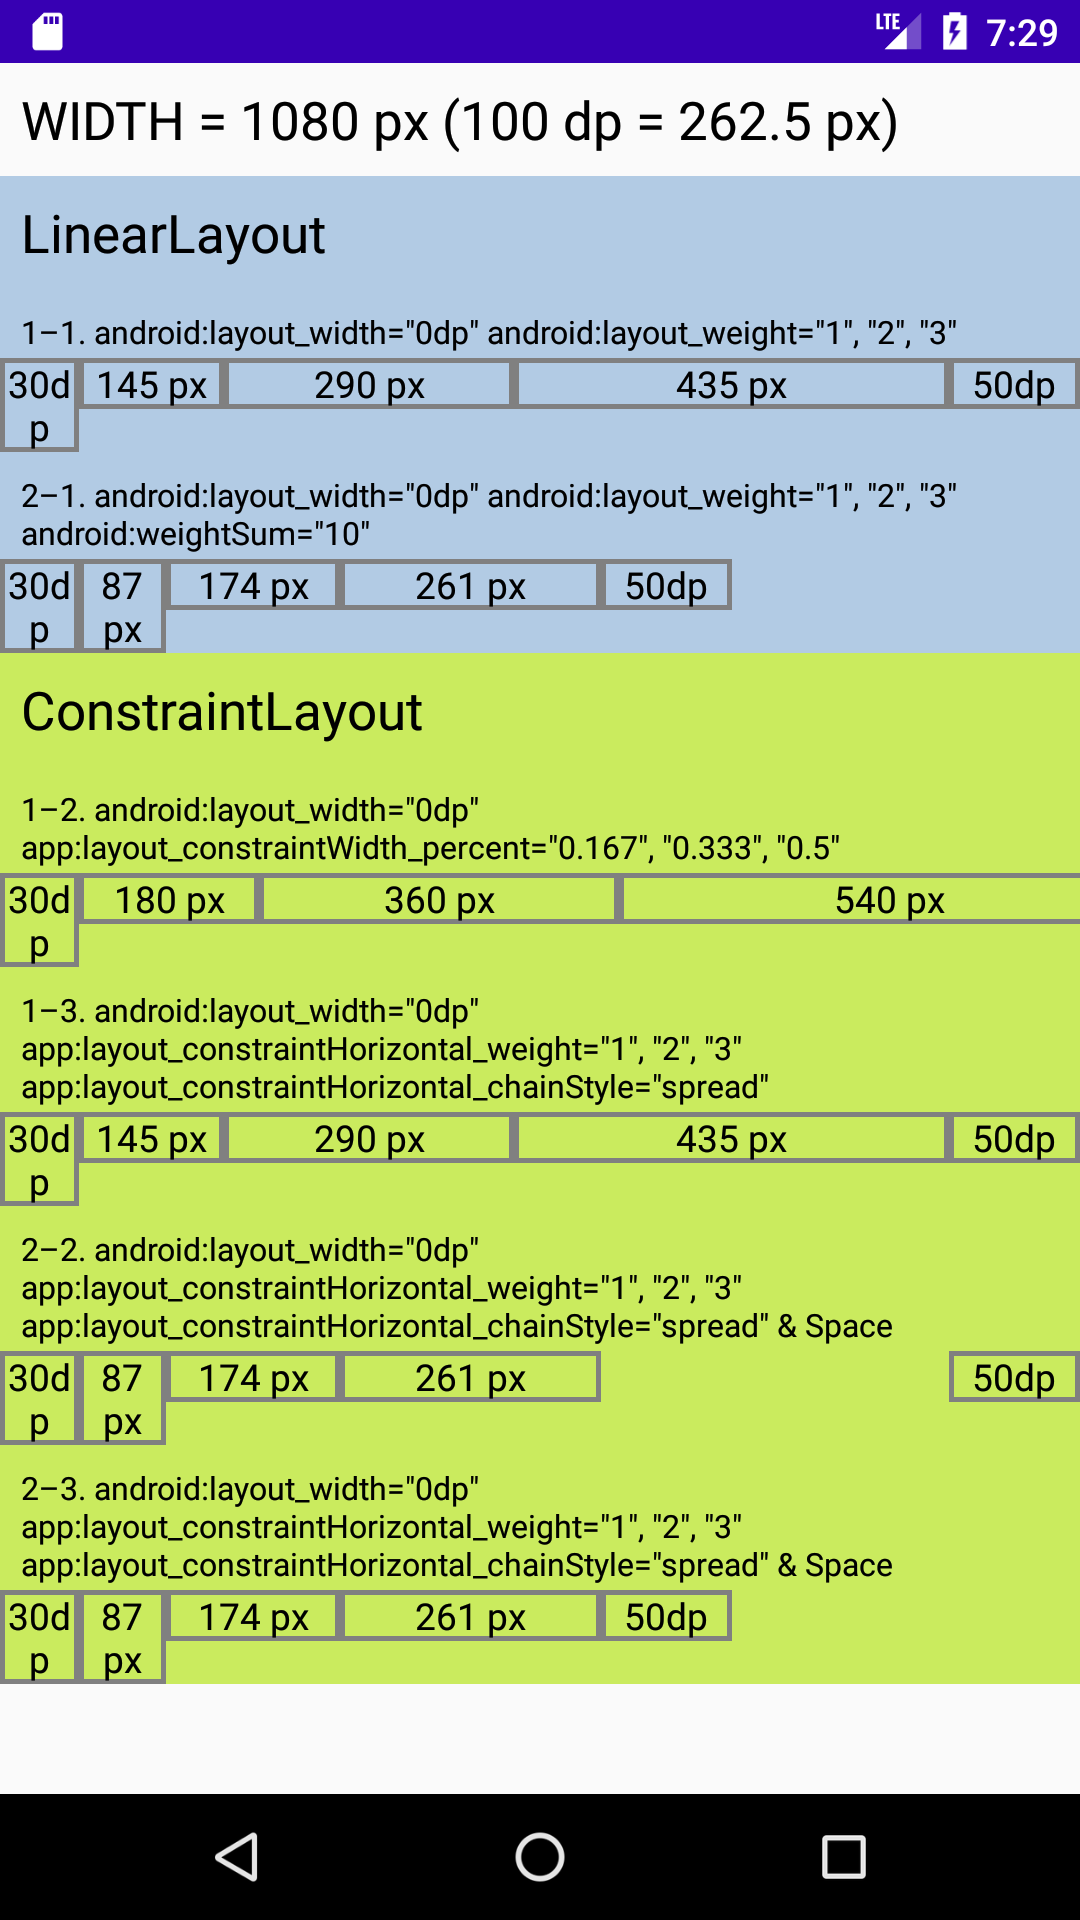
一方、weightを指定する場合はapp:layout_constraintHorizontal_chainStyle(app:layout_constraintVertical_chainStyle)は指定不要です(weightを指定することで、chainStyleで設定可能な[spread], [spread inside], [packed]とは別の 'Weighted' なチェーンになる、という扱いのようです)。LinearLayoutとの比較
ConstraintLayout入門その3と同じようにLinearLayoutとConstraintLayoutの結果を並べた表示例は上のようになります。6通りの表示例いずれも左右両端の30dpと50dpの部分を除いた長さを1:2:3に分割しようとしていますが、
app:layout_constraintWidth_percentを使った1–2では両端を取り除いた部分にpercent合計1を割り当てているため表示がはみ出し、意図通りには表示できていません。
ConstraintLayoutのweightはLinearLayoutと同じく相互の比率が表現できていればよく、percentのような0〜1の定義域に限定されません。ただし、LinearLayoutのandroid:weightSumに該当するパラメータは今のところ存在しないようですので、余白部分をweightで表したいときは、2–2, 2–3のように余白用の子View(今回のサンプルでは<Space>を使っています)をチェーンに含ませ、このViewにもweightを設定する必要がありそうです。サンプルコード
今回のサンプルコードは以下のリポジトリにあります。
https://github.com/csayamada/ConstraintLayout4チェーンを使ってConstraintLayout内の部分的な長さを比率分割することができましたが、2–3のようにConstraintLayoutの水平方向および垂直方向の全体の長さを分割することももちろんできます。これでpercentと同じことができますので、チェーンの概念に慣れたら比率分割には常にweightを使うようにしてpercentのことを忘れてしまっても、差し支えないでしょう。
チェーン内の子Viewにmarginを設定するなどして表示をさらに微調整できますので、さまざまな設定を実地でお試しください。
参考文献
ConstraintLayout でレスポンシブ UI を作成する | Android デベロッパー
ConstraintLayout | Android DevelopersやっぱりLinearLayoutの上位互換じゃない?
ConstraintLayout入門その3で述べた、
android:layout_width(android:layout_height)にゼロより長い値を与えた上でweightを設定する、という使い方をConstraintLayoutで実現することは、チェーンとweightを使ってもできないようです。ConstraintLayoutでは長さゼロを指定しないと比率が使えない、という点はweightもpercentと変わりませんし、他の手段もなさそうです。できない、と断言する自信は筆者にはありませんので、何か秘策をご存じの方はご指摘いただけると幸いです。そもそも長さゼロ、MATCH_CONSTRAINTとは何か、という話題は、次回以降に譲りたいと思います。