- 投稿日:2020-02-18T22:25:40+09:00
【基本文法編】Ruby/Python/PHPの違い
はじめに
個人的な学習のまとめです!
3つの言語の基本文法を学習したのでまとめてみました!1. 出力
Rubyputs "Hello, world"Pythonprint("Hello, world")PHPecho "Hello, world";2. 変数
Rubyvariable = "変数”Pythonvariable = "変数”PHP$variable = "変数”;3.プロパティ値の出力
Ruby# attr_accessor :name 等でゲッターを定義する puts person.namePython# def __init__ 等でゲッターを定義する print(person.name)PHPecho $person->name();4. If文
Rubyif number % 15 == 0 puts "FizzBuzz" elsif number % 3 == 0 puts "Fizz" elsif number % 5 == 0 puts "Buzz" else puts number endPythonif number % 15 == 0: print("FizzBuzz") elif number % 3 == 0: print("Fizz") elif number % 5 == 0: print("Buzz") else: print(number)PHPif (number % 15 == 0){ echo "FizzBuzz"; } elseif (number % 3 == 0){ echo "Fizz"; } elseif (number % 5 == 0){ echo "Buzz"; } else { echo $number; }5. 配列/ハッシュ編
Ruby# 配列 array = ["赤", "青", "黄"] # ハッシュ hash = {"大阪府": "大阪", "愛知県": "名古屋", "東京都": "東京?"}Python# リスト lists = ["赤", "青", "黄"] # 辞書 dict = {"大阪府": "大阪", "愛知県": "名古屋", "東京都": "東京?"}PHP//配列 $array = ["赤", "青", "黄"]; //連想配列 $associative_array = [ "大阪府" => "大阪", "愛知県" => "名古屋", "東京都" => "東京?" ];6. 繰り返し構文
6-1.ループ処理
Rubyi = 1 while i <= 100 do # 処理 i += 1 endPythoni = 1 while i <= 100: # 処理 i += 1 for i in range(1, 101): # 処理PHPfor ($i = 1;$i <= 100;$i++){ //処理 }6-2. 反復処理(?)
Rubyarray.each do |value| #処理 end hash.each {|key, value| #処理 }Pythonfor value in lists: # 処理 for key in dict: # 処理PHPforeach($array as $value){ //処理 } foreach($associativeArray as $key => $value){ //処理 }7.関数定義
Rubydef hello # 処理 endPythondef hello(): # 処理 return # 戻り値PHPfunction hello() { // 処理 return // 戻り値 }8.クラスとインスタンス
Rubyclass Person @@number = 0 def self.classmethod # 処理 end def initialize(name) @name = name end person = Person.new("山田") endPythonclass Person: number = 0 @classmethod def classmethod(cls): # 処理 def __init__(self, name): self.name = name end person = Person("山田") endPHPclass Person { private static $number; private $name; public function static function classmethod(){ echo self::$number; } public function __construct($name){ $this->name = $name; } $person = new Person(); }9.ゲッターとセッター
Rubydef setName(name) @name = name end def getName @name end #あるいは attr_accessor :namePythondef __init__(self, name): self._name = name @property def name(self): return self.__name @name.setter def name(self, name): self.__name = namePHPpublic function setName($name) { $this->name = $name; } public function getName() { return $this->name; }10.最後に
1ブロックをどのように(end/インデント/{})指定するかに個性がある感じですね!
ご一読頂き、ありがとうございました!
- 投稿日:2020-02-18T22:16:10+09:00
rubyのdeviseを後付けで、ユーザー登録エラーNo route matches [POST] "/people/sign_up.person"の解決方法
deviseを最初からインストールしている記事はあるものの、追加でしかもmodel名のuserを使わない記事が皆無だったので後学者の為に。
環境
ruby 2.6.3
rails 5.2.4作業時間を報告するアプリを作成。
先にpersonをmodelとして、複数形としてpeopleを使用。
一応これで課題は終了。応用追加課題として、先のアプリに後付けで、
ログイン機能のdeviseを追加実装。以下状況
gem deviseとdevise viewをインストールし、devise controllersはインストールせず。
personモデルはそのままにして、deviseのuserモデルのカラムを利用する為、userモデルを一度インストール。
インストールしたuserのmigrationファイルに記載されているカラムとfirst_name&second_nameを追加してファイル名をrenameし、migrate。
利用し終わったので、userモデルは削除。ログイン画面と登録画面を実装して、動作確認時にエラー
エラー文
No route matches [POST] "/people/sign_up.person"該当箇所
registration/new.html.haml= form_for(resource, as: resource_name, url: new_person_registration_path(resource_name)) do |f|devise/shared/_links.html.haml- if devise_mapping.registerable? && controller_name != 'registrations' = link_to "Sign up", new_registration_path(resource_name)$ rails routesnew_person_registration GET /people/sign_up(.:format) devise/registrations#new edit_person_registration GET /people/edit(.:format) devise/registrations#edit person_registration PATCH /people(.:format) devise/registrations#update PUT /people(.:format) devise/registrations#update DELETE /people(.:format) devise/registrations#destroy POST /people(.:format) devise/registrations#createcreate画面に飛ばすべき所をnewパスにしていた。
registration/new.html.haml= form_for(resource, as: resource_name, url: person_registration_path(resource_name)) do |f|path修正
devise/shared/_links.html- if devise_mapping.registerable? && controller_name != 'registrations' = link_to "Sign up", new_registration_path(resource_name)こちらもルーティングに従い修正(person追加)
- if devise_mapping.registerable? && controller_name != 'registrations'
  = link_to "Sign up", new_person_registration_path(resource_name)
修正するも次のエラー分
ActionController::UnknownFormat in Devise::RegistrationsController#new受け取るパラメーターをfirst_nameとsecond_nameを指定していなかった為
こちらを参考にして、
https://aliceblog1616.com/devise_parameter_sanitizer%E3%83%A1%E3%82%BD%E3%83%83%E3%83%89%E3%81%A8%E3%81%AF%EF%BC%9F/class ApplicationController < ActionController::Base before_action :authenticate_person! before_action :configure_permitted_parameters, if: :devise_controller? protected def configure_permitted_parameters devise_parameter_sanitizer.permit(:sign_up, keys: [:first_name, :second_name]) devise_parameter_sanitizer.permit(:sign_in, keys: [:first_name, :second_name]) devise_parameter_sanitizer.permit(:account_update, keys: [:first_name, :second_name]) end enddeviseのcontrollersをインストールしてないが、deviseが裏で作動しているので、if: :devise_controller?も記述。
エラー分変わらず。
ActionController::UnknownFormat in Devise::RegistrationsController#newregistration/new.html.haml= form_for(resource, as: resource_name, url: person_registration_path(resource_name)) doから
(resource_name)を消す。registration/new.html.haml= form_for(resource, as: resource_name, url: person_registration_path) do |f|修正
$ rails s再起動忘れずに。
無事開通!動作確認する前にroutesでしっかりpath確認して、parameterで追加カラムを指定する。
この工程を忘れやすいので、改めていい勉強になりました。
- 投稿日:2020-02-18T21:41:27+09:00
Rails 7つのアクション以外
7つのアクション以外でルーティングを設定する方法を説明します。
検索フォームを作成する場合、searchアクション等を利用。7つのアクション以外でルーティングを設定する方法は2つある。
collectionとmember
collectionはルーティングに:idがつかない、memberは:idがつく。
#collectionで定義

Rails.application.routes.draw do
  resources :tweets do
    collection do
      get 'search'
    end
  end
end
#collectionのルーティング Prefix Verb URI Pattern search_tweets GET /tweets/search(.:format) tweets#search#memberで定義 Rails.application.routes.draw do resources :tweets do member do get 'search' end end#memberのルーティング Prefix Verb URI Pattern search_tweet GET /tweets/:id/search(.:format) tweets#search
- 投稿日:2020-02-18T21:19:30+09:00
Rails deviseヘルパーメソッド
user_signed_in?
ユーザーがサインイン済みかどうかを判定する
例 elseの時はサインインしていない場合
app/views/layouts/application.html.erb

<div class="header__right">
        <% if user_signed_in? %>
          <%= link_to "新規投稿", new_post_path, class: "header__right--btn" %>
          <%= link_to "ログアウト", destroy_user_session_path, method: :delete, class: "header__right--btn" %>
        <% else %>
          <%= link_to "ログイン", new_user_session_path, class: "header__right--btn" %>
          <%= link_to "新規登録", new_user_registration_path, class: "header__right--btn" %>
        <% end %>
      </div>
current_user メソッド
サインインしているユーザーを取得する。もし、サインイン中のユーザーidを取得したい場合、current_user.idと記述することで取得できる。
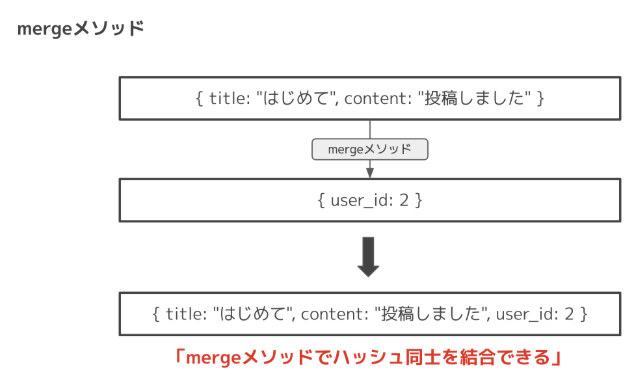
merge メソッド
2つのハッシュを結合することができる。
private
  def post_params
    params.require(:post).permit(:title, :content).merge(user_id: current_user.id)
  end
以下をイメージするとわかりやすい
configure_permitted_parameters メソッド
deviseでは初期状態でサインアップ時にメールアドレスとパスワードのみを受け取るようにストロングパラメーターが設定してあるので、追加したキー(nickname)のパラメーターは許可してない。
なので追加のパラメーターを許可したい場合は、application_controller.rbにおいてbefore_actionにconfigure_permitted_parametersメソッドを設定する。class ApplicationController < ActionController::Base before_action :configure_permitted_parameters, if: :devise_controller? protected def configure_permitted_parameters devise_parameter_sanitizer.permit(:sign_up, keys: [:nickname]) end end上記のように記載すればnicknameも許可される。
before_action :authenticate_user!
コントローラーに設定して、ログイン済ユーザーのみにアクセスを許可する。以下の記載ならばshowはログインユーザーのみ実行可能となる。
class ArticlesController < ApplicationController
  before_action :authenticate_user!, only: [:show]

  def index
  end

  def show
  end
end
- 投稿日:2020-02-18T20:54:07+09:00
[初歩なこと]画像投稿をしたらGithubに大量の画像が上がっちゃうのを阻止したい時
画像投稿機能をつけるときにやっておくこと
投稿した画像のデータを保存する必要がないとき、
ディレクトリの.gitignoreというファイルに以下を記入する。.gitignore#末尾に追記 public/uploads/*完了です
gitignoreとは?
コミットしたくないファイル・ディレクトリを指定できる設定ファイルのことです。
通常画像投稿の機能をつけると画像は自動的にpublic/uploadというディレクトリに
格納されます。
そこで、このファイル名をgitignoreへ追加しておくことでgithubへ画像がコミットされなくなるということです。(コミットされないだけで画像自体はフォルダへ入ってきますが。)終わりに
gitignoreのことすっかり忘れて、コミットの時に大量の画像に危く履歴を圧迫されそうになりました。
備忘録として残しておこうと思います。
- 投稿日:2020-02-18T20:09:20+09:00
解いて終わりにしない、プログラミング初学者にオススメしたい練習問題を使った基礎トレ。
Progate、ドットインストールを終えた後の勉強として、書籍などで基礎固めをするのは鉄板の流れになっています。
そして多くの初学者用書籍には練習問題がついています。この練習問題を「解いて、解答例を見て、終わり」にせず、きちんと筋肉に変えていくために行なっていることをまとめました。
環境
macOS 10.14.1 (Mojave)
Homebrew 2.2.5
Ruby on Rails 5.2.4.1背景
プログラミング初学者にとって、練習問題は大事な勉強方法だと思っています。
なぜなら、プログラミングに限らず「ものごとが上達すること」を考えたときに、初学者が上達するなるには以下が重要だと言われているからです。
- 基本的な動作 を なんども反復 する
- 情報を 自分の言葉 でアウトプットする
- 解きっぱなしにせず、 アウトプットを検証する
練習問題は実務に入っていない未経験者が、自分の頭で考えながらコードを繰り返し検証するのに良い教材になります。
■参考
上達の法則いつ勉強してたの?っていうぐらいたいして全然勉強せずに東大に入ってしまう人は、どのように受験勉強をしている (していた) のですか?
練習問題
もちろん書籍に書いてる練習問題でもOKですが、練習問題はいくらでもネットに落ちているので便利ですね。
自分の学習している言語ではなくても、答えを考えればいいので「プログラミング 練習問題」「プログラミング 初心者 練習」とかで検索しても結構色々出てきます。以下は僕が実際に練習している問題ページです。
解き方(方針)
ただ解くだけで終わらないためには、以下2つの記事が方針の参考になります。
どちらも好きな記事で、それこそ何度も繰り返し読んでいます。きみたちは今まで何のためにRailsでMVCパターンを勉強してきたのか
上記の上達に関する考え方や、練習問題の記事から考えるに、練習問題を解く方針として以下をプロセスに組み込む必要があると分かります。
■問題の選び方
- ややこしい操作や使用頻度の低いメソッドではなく、頻出する動作を中心に問題を選ぶ
- 検証ができるように、できればディスカッションをするスレなどがあるサイトを選ぶ上記のようなサイトは条件に当てはまるかと思います。
その他Qiitaなどに投稿されている問題を自分で解いてみるのも良いかと。■問題の解き方
- 手動入力や目視確認は極力排除する
- 関数の結果を純粋なオブジェクトとして表現する
- 処理を出来るだけ共通化する解き方(Rubyでの詳細例)
今回はこちらの問題を使用します。
# http://vipprog.net/wiki/exercise.html#x9ab58f6
# Hello World!を5回表示させてください。
# print等は1回の使用にとどめてみてください。
# 可能ならコマンドラインから入力を受け取って、n回表示するように改造してください。
とりあえずの回答が以下。
コンソールで受け取った数字に対してHello Worldを繰り返して表示しました。普通にやったらここまでで学習が終わってしまいます。実際サイトを見る限りだと、このレベルの解答が解答例として載っている。num = gets.to_i num.times do |n| print "Hello World! ", n+1, "\n" end問題1)入力が手動になっており煩雑
改善1)手動入力を関数に変換
このままだと、毎回手入力する必要があるため、変更を加える。関数にしておいて、数字を指定できるようにしてみましょう。def repeat_hello(n) n.times do |n| print "Hello World! ", n+1, "\n" end end repeat_hello(5)問題2)テストの実施や、コンソール以外での使用がしにくい
改善2)関数の出力をテスト化
関数にはなったものの、出力がprintのため、このままだとコンソール以外で使いにくくテストも実施しづらいです。そこで以下の変更を行います。
- ロジック本体とコンソール出力用に分解
- minitestを追加
require 'minitest/autorun'

def repeat_hello(n)
# ロジック本体
  rows = []
  n.times do |n|
    rows.push("Hello World! #{n + 1}")
  end

  rows
end

def main
  # コンソール出力用
  rows = repeat_hello(5)
  puts rows
end

class RepeatHello < Minitest::Test
  def test_repeat_hello
    assert_equal ['Hello World! 1', 'Hello World! 2', 'Hello World! 3', 'Hello World! 4', 'Hello World! 5'], repeat_hello(5)
  end
end
問題3)テストの冗長化が気になる
改善3)テストパターンのテストデータ化
1つだから良いものの、複数の引数のテストを試したいとなった時に文が長いのが気になってきます。
安全にチェックするために、テストのパターンが複数試せた方が良いので、以下の修正を行います。require 'minitest/autorun' def repeat_hello(n) # ロジック本体 rows = [] n.times do |n| rows.push("Hello World! #{n + 1}") end rows end def main # コンソール出力用 rows = repeat_hello(5) puts rows end class RepeatHello < Minitest::Test def test_repeat_hello # テストデータの作成 test_data = [ [], ['Hello World! 1'], ['Hello World! 1', 'Hello World! 2'], ['Hello World! 1', 'Hello World! 2', 'Hello World! 3'], ['Hello World! 1', 'Hello World! 2', 'Hello World! 3', 'Hello World! 4'], ['Hello World! 1', 'Hello World! 2', 'Hello World! 3', 'Hello World! 4', 'Hello World! 5'] ] # テストの繰り返し実施 test_data.each_with_index do |expected, id| assert_equal expected, repeat_hello(id) end end end改善4)ロジック本体のリファクタリング
ここまできたら、テストで結果を手軽に試せるので、あとはロジック本体のリファクタリングに入れると。
今回の例ではわざわざややこしくしてるけど、例えば先に1.2.3.4.5のような配列を作ってからpushするような書き方はできるかな、とか、色々試して楽しめます。def repeat_hello(n) # ロジック本体 => 変更 list = [] n.times do |i| list.push(i + 1) end rows = [] for l in list rows.push("Hello World! #{l}") end rows endまとめ
早く新しいことを覚えたいと、つい流してしまいがちな練習問題。
ですが、新しいことを覚えるときに大切な要素が詰まっていますので、毎日1題ずつでも継続していきましょう!Qiita始めたばかりですので、改善のためにもぜひコメントくださいませ。
追記
@scivola さんにコメントいただきました。ありがとうございます。
ロジック本体を以下のように修正し、テストを問題なく通過することを確認しました。def repeat_hello(n) # ロジック本体 (1..n).map{ |i| "Hello World! #{i}" } end
- 投稿日:2020-02-18T19:44:18+09:00
each_with_objectでwith_indexしたい
- 投稿日:2020-02-18T19:02:42+09:00
プログラミングの基礎力をつける:なるべく基本命令だけで作る「ブロック崩し」
概要
この記事は中学高校生向けプログラミング教室の教材として作ったものを一部改変したものです。
以前、
・DXRubyで 1ステップずつ作っていく「ブロック崩し」 - Qiita
という投稿をしました。RubyやDXRubyは、衝突判定だけでなく、プログラミングに便利な数々の機能を持っています。そのため、わずか100行足らずで「ブロック崩し」ができてしまいました。
しかし、プログラミングの学習としては、便利機能に頼りすぎるのもどうなんだろうか?と思っていたところ、『プログラムはこうして作られる』という本と、その著者の平山尚さんの言葉を見つけてドキッとしました。
「なんか動くもん作れていい気になってんだろうが、ライブラリを剥ぎ取ったおまえ自身の力はその程度だ。よく鏡を見ておけ」平山 尚 @hirasho
もし、それらの便利な機能をなるべく使わず、基本的な機能だけを使って「ブロック崩し」を作ってみるとどうなるでしょうか?
プログラミングの本当の力が試されることになります。
そこで、今回はRubyとそのゲームライブラリDXRubyを使いますが、以下のような基本機能・命令だけを使うことにします。
Rubyは、プログラミング言語として最低限の機能
DXRubyは、ウィンドウの生成、座標(x,y)に点を描く、座標(x,y)の色を取得する、文字の表示、マウス/キー/カーソルキーの状態の取得のみ
今回はこの課題に挑戦してみます。
→ 『プログラムはこうして作られる プログラマの頭の中をのぞいてみよう』(平山尚 著)
画像
前の記事
・DXRuby:「当たり判定」を自分で作ってみよう C. 色で判定する - Qiita技術解説
使用する基本機能・命令
前述の著書で使われた「プログラミング言語 Sunaba」を参考にして以下の通りとしました。
→ プログラミング言語
Sunaba
https://hirasho.github.io/Sunaba/
● Ruby
定数 変数 true false nil
数値 文字 文字列 ' ''
演算子/式
=(代入)
+ - * / % < > <= => == != ( )
&& ||
- 制御構造
while~end
if~(else)~end
return
break
- 関数
def~end
- その他
require puts p #(コメント)
※クラス、配列、ハッシュ、do~end、each などは使わない
● DXRuby
○ Image(Imageクラスはスクリーン以外は使わない)
- $screen = Image.new(640, 480) (ウィンドサイズのスクリーンの設定)
- $screen[x, y] (色の取得)
- $screen[x, y] = 色 (色の設定;これで
ドット(点)を描く)- 色定数
○ Window
- Window.loop do~end (ウィンドウの生成、更新)
- Window.draw(x, y, $screen) (これで
ドット(点)を描く)- Window.draw_font() (文字の表示)
○ Input
- Input.x (カーソルキー←→の押下の取得)
- Input.y (カーソルキー↑↓の押下の取得)
- Input.mouse_pos_x (マウス位置xの取得)
- Input.mouse_pos_y (マウス位置yの取得)
- Input.key_down? (キーボードの押下の取得)
○ Font
Font.new() (文字フォントの設定)
※Spriteクラス、衝突判定などは使わない
使用ライブラリ
Windows向けRuby用2Dゲームライブラリ
DXRubyを使用します。
バージョン1.4.2以上を想定しています。
1.4.2より前のバージョンとの主な相違点
Window.loopが複数置けるマウス位置を取得する
Input.mouse_pos_x、Input.mouse_pos_yの新しい書き方として、Input.mouse_x、Input.mouse_yが追加→ DXRuby 1.4.6:更新履歴
http://mirichi.github.io/dxruby-doc/CHANGELOG.html
DXRubyインストールの注意点
→ DXRuby 1.4.6 をWindows10で使う時の注意点とインストール方法 - noanoa07 - Qiita
https://qiita.com/noanoa07/items/0ce14c2404df38de94b7参考サイト
DXRuby のホームページ
http://dxruby.osdn.jpDXRuby 1.4.6 リファレンスマニュアル
http://mirichi.github.io/dxruby-doc/index.html困ったときは、このページの「チュートリアル」と「マニュアル」にだいたい書いてあります。
- DXRuby 1.4.1 リファレンスマニュアル http://dxruby.osdn.jp/DXRubyReference/20095313382446.htm
古いバージョンのリファレンスも役に立つときがあります。
→ 「ブロック崩し」追加課題2;なるべく基本命令だけで「ブロック崩し」を作ってみよう - noanoa 日々の日記
http://blog.livedoor.jp/noanoa07/archives/2050752.html→ 「ブロック崩し」追加課題に向けて;コンピュータの世界の下側を見てみよう - noanoa 日々の日記
http://blog.livedoor.jp/noanoa07/archives/2048469.html→ プログラミング言語 Sunaba で「ブロック崩し」を作ってみた - noanoa 日々の日記
http://blog.livedoor.jp/noanoa07/archives/1979433.htmlこのテキスト関連のブログ記事です。
ライセンス
ソースコード、本解説ともにパブリックドメイン
プログラム解説
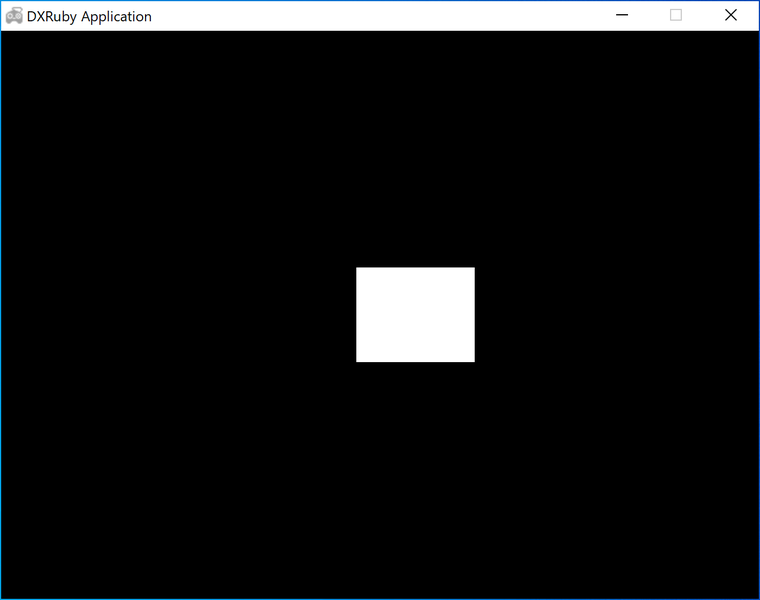
0. 練習:ウィンドウを表示
ウィンドウを表示するために、ウィンドウサイズ 640×480(色は透明)の
$screenイメージを作成し、Window.drawで描画します。($でグローバル変数にしています。)→ DXRuby 1.4.1 リファレンス:Imageクラス Image.new
http://dxruby.osdn.jp/DXRubyReference/200953184038328.htm→ DXRubyリファレンス:チュートリアル 2. 画像の読み込みと描画
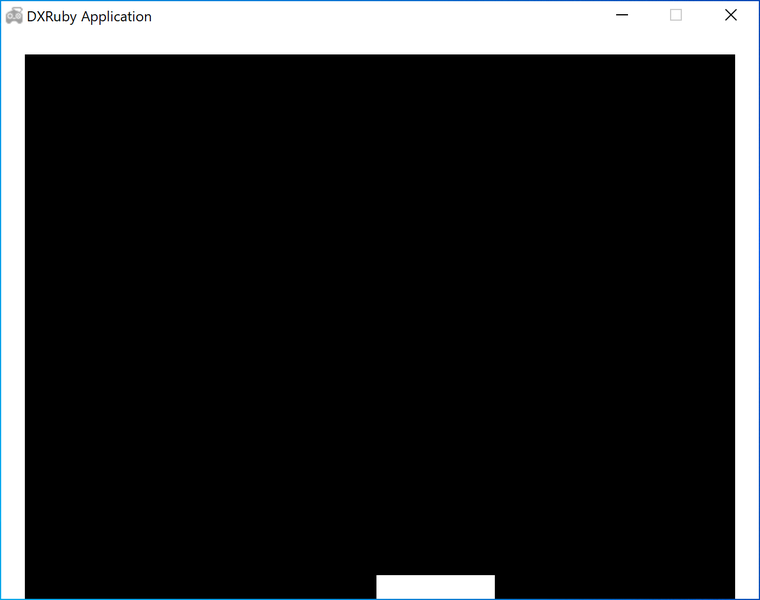
http://mirichi.github.io/dxruby-doc/tutorial/basic.htmlpri_00.rbrequire 'dxruby' $screen = Image.new(640, 480) Window.loop do Window.draw(0, 0, $screen) end
1. 練習:点(ドット)を表示する
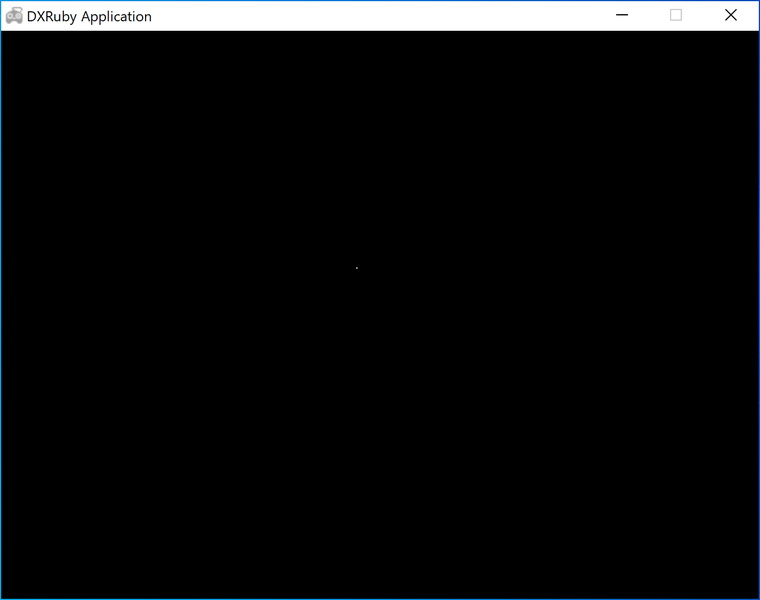
座標(300, 200)に白色の点(ドット)を表示させてみます。
$screen上の座標(x,y)に色を指定することで、点(ドット)を表示させられます。
これには、イメージ[x, y] = 色を使います。色の指定は、「DXRubyリファレンス:色配列と色定数について」
http://mirichi.github.io/dxruby-doc/api/constant_color.htmlを見てください。
→ DXRuby 1.4.1 リファレンス:Imageクラス Image#[x, y]=color
http://dxruby.osdn.jp/DXRubyReference/200953184038328.htmpri_01.rbrequire 'dxruby' $screen = Image.new(640, 480) Window.loop do $screen[300, 200] = C_WHITE Window.draw(0, 0, $screen) end
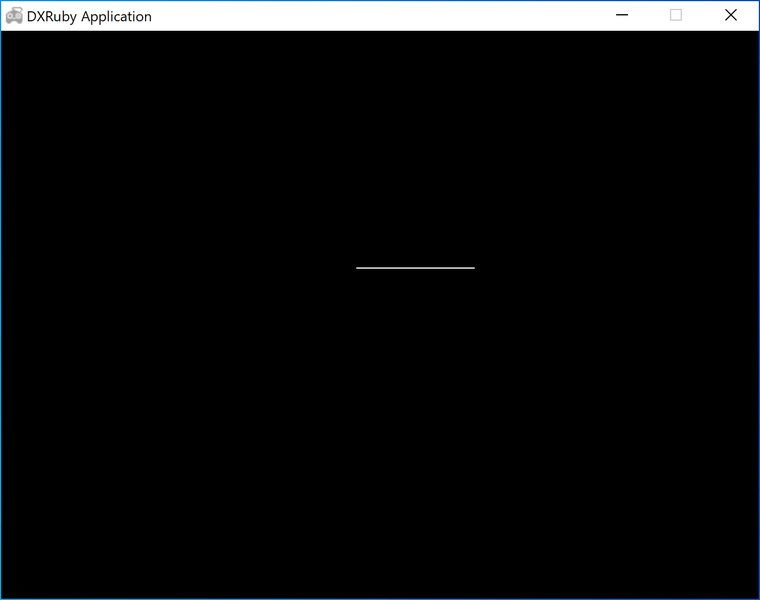
(よく見ると、画面中央やや上に白色の点が描かれています。)2. 練習:点で線を描く
次は、長さ100の線を描いてみます。
線は点(ドット)の集まりとして描画します。
今回、繰り返しは
while~endのみを使います。
- pri_02.rb
require 'dxruby'

$screen = Image.new(640, 480)

Window.loop do
  width = 0
  while width < 100
    $screen[300 + width, 200] = C_WHITE
    width = width + 1
  end

  Window.draw(0, 0, $screen)
end
3. 練習:点で四角(トウフ)を描く
線が描けたので、四角(トウフ)を描きます。
二重ループを使います。
- pri_03.rb(失敗!四角にならない)
require 'dxruby'

$screen = Image.new(640, 480)

Window.loop do
  width  = 0
  height = 0
  while width < 100
    while height < 80
      $screen[300 + width, 200 + height] = C_WHITE
      height = height + 1
    end
    width = width + 1
  end

  Window.draw(0, 0, $screen)
end
二重ループの初期値の設定の間違いです。(ありがち?)
書き直します。
- pri_04.rb
require 'dxruby'

$screen = Image.new(640, 480)

Window.loop do
  width = 0
  while width < 100
    height = 0
    while height < 80
      $screen[300 + width, 200 + height] = C_WHITE
      height = height + 1
    end
    width = width + 1
  end

  Window.draw(0, 0, $screen)
end
4. ブロック崩し:壁を描く
それでは、ブロック崩しの壁を描いていきます。
まず、左壁(位置(0, 0)、大きさ(横 20、縦 480) 、白色)
を作ります。
- pri_05.rb
require 'dxruby'

$screen = Image.new(640, 480)

Window.loop do
  x0 = 0
  y0 = 0
  width = 0
  while width < 20
    height = 0
    while height < 480
      $screen[x0 + width, y0 + height] = C_WHITE
      height = height + 1
    end
    width = width + 1
  end

  Window.draw(0, 0, $screen)
end
5. ブロック崩し:壁を複数描く
もう一つ、上壁(位置(0, 0)、大きさ(横 640、縦 20)、白色)を追加します。
- pri_06.rb
require 'dxruby'

$screen = Image.new(640, 480)

Window.loop do
  x0 = 0
  y0 = 0
  width0 = 0
  while width0 < 20
    height0 = 0
    while height0 < 480
      $screen[x0 + width0, y0 + height0] = C_WHITE
      height0 = height0 + 1
    end
    width0 = width0 + 1
  end

  x1 = 0
  y1 = 0
  width1 = 0
  while width1 < 640
    height1 = 0
    while height1 < 20
      $screen[x1 + width1, y1 + height1] = C_WHITE
      height1 = height1 + 1
    end
    width1 = width1 + 1
  end

  Window.draw(0, 0, $screen)
end
6. ブロック崩し:「四角を描く」をまとめる(関数化)
続いて、左壁(位置(620, 0)、大きさ(横 20、縦 480) 、白色)
を作ります。コードが複雑になってきたので、「四角を描く」という処理を
rectという名前にまとめます(関数化)。def rect(引数) 処理内容 endこの
rectを使ってコードを書いてみます。
- pri_07.rb
require 'dxruby'

$screen = Image.new(640, 480)

def rect(x, y, width, height, color)   # 四角を描画する
  w = 0
  while w < width
    h = 0
    while h < height
      $screen[x + w, y + h] = color
      h = h + 1
    end
    w = w + 1
  end
end

Window.loop do
  rect(  0,   0,  20, 480, C_WHITE)
  rect(  0,   0, 640,  20, C_WHITE)
  rect(620,   0,  20, 480, C_WHITE)

  Window.draw(0, 0, $screen)
end
7. 練習:トウフを動かす
トウフをカーソルキーで動かす試作をします。
→ DXRubyリファレンス:チュートリアル 5. カーソルキーの入力
http://mirichi.github.io/dxruby-doc/tutorial/basic.html
- pri_08.rb(失敗!軌跡が残る)
require 'dxruby'

$screen = Image.new(640, 480)

def rect(x, y, width, height, color)   # 四角を描画する
  w = 0
  while w < width
    h = 0
    while h < height
      $screen[x + w, y + h] = color
      h = h + 1
    end
    w = w + 1
  end
end

x = 300
y = 200

Window.loop do
  x = x + Input.x
  y = y + Input.y

  rect(x, y, 100, 80, C_WHITE)

  Window.draw(0, 0, $screen)
end
図形を動かすと、前回の位置の色がそのまま残ってしまいました。動いて見えるには、
Window.loopが一周する毎に前回の図形を消す処理が必要でした。
書き直します。
- pri_09.rb
require 'dxruby'

$screen = Image.new(640, 480)

def rect(x, y, width, height, color)   # 四角を描画する
  w = 0
  while w < width
    h = 0
    while h < height
      $screen[x + w, y + h] = color
      h = h + 1
    end
    w = w + 1
  end
end

x = 300
y = 200

Window.loop do
  rect(x, y, 100, 80, C_DEFAULT)  # 前回の位置のトウフの軌跡を消す

  x = x + Input.x
  y = y + Input.y

  rect(x, y, 100, 80, C_WHITE)

  Window.draw(0, 0, $screen)
end
8. ブロック崩し:壁とバーを描く(pri_10.rb)
図形の動かし方がわかったので、バーを描いて、マウスと共に動くようにします。
→ DXRubyリファレンス:チュートリアル 7. マウスの入力
http://mirichi.github.io/dxruby-doc/tutorial/basic.html
- pri_10.rb
require 'dxruby'

$screen = Image.new(640, 480)

def rect(x, y, width, height, color)   # 四角を描画する
  w = 0
  while w < width
    h = 0
    while h < height
      $screen[x + w, y + h] = color
      h = h + 1
    end
    w = w + 1
  end
end

# バーの初期位置
x = 300

Window.loop do
  rect(x, 460, 100, 20, C_DEFAULT)    # バーの軌跡を消す

  rect(  0,   0,  20, 480, C_WHITE)   # 左壁
  rect(  0,   0, 640,  20, C_WHITE)   # 上壁
  rect(620,   0,  20, 480, C_WHITE)   # 右壁

  x = Input.mouse_pos_x
  rect(x, 460, 100, 20, C_WHITE)      # バー

  Window.draw(0, 0, $screen)
end
9. ブロック崩し:ボールを描く(動かす)
ボールを描き、動かします。移動量は、x方向 4、y方向 -4 に設定しました。
- pri_11.rb
require 'dxruby'

$screen = Image.new(640, 480)

def rect(x, y, width, height, color)   # 四角を描画する
  w = 0
  while w < width
    h = 0
    while h < height
      $screen[x + w, y + h] = color
      h = h + 1
    end
    w = w + 1
  end
end

# バーの初期位置
x = 300

# ボールの初期値
ball_x = 300
ball_y = 400
dx =  4
dy = -4

Window.loop do
  rect(x, 460, 100, 20, C_DEFAULT)         # バーの軌跡を消す
  rect(ball_x, ball_y, 20, 20, C_DEFAULT)  # ボールの軌跡を消す

  rect(  0,   0,  20, 480, C_WHITE)   # 左壁
  rect(  0,   0, 640,  20, C_WHITE)   # 上壁
  rect(620,   0,  20, 480, C_WHITE)   # 右壁

  x = Input.mouse_pos_x
  rect(x, 460, 100, 20, C_WHITE)      # バー

  ball_x = ball_x + dx
  ball_y = ball_y + dy
  rect(ball_x, ball_y, 20, 20, C_RED) # ボール

  Window.draw(0, 0, $screen)
end
10. 練習:衝突判定の試作
衝突判定を作ります。判定方法は、色で判定する方法にします。
・DXRuby:「当たり判定」を自分で作ってみよう C. 色で判定する - Qiita
で使った方法です。→ 「ブロック崩し」追加課題 1c);衝突判定の自作(色) - noanoa 日々の日記
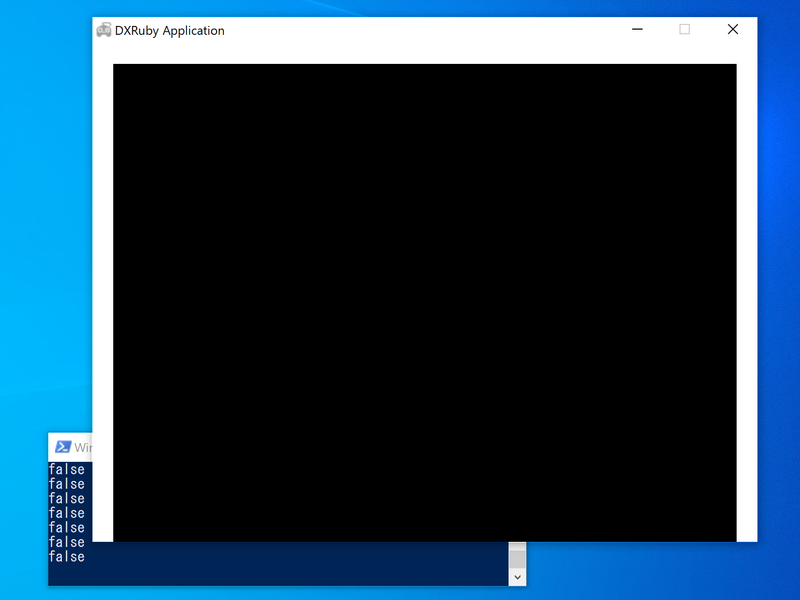
http://blog.livedoor.jp/noanoa07/archives/2052899.html10-1. 大きさ1ドット(点)での衝突判定
衝突判定
atari?(x, y)を作ります。座標(x, y) の色が透明(C_DEFAULT)以外なら衝突と判定します。マウスの座標(x, y)と、壁との
衝突/非衝突をターミナル(コマンドプロンプト)にtrue/falseで出力します。
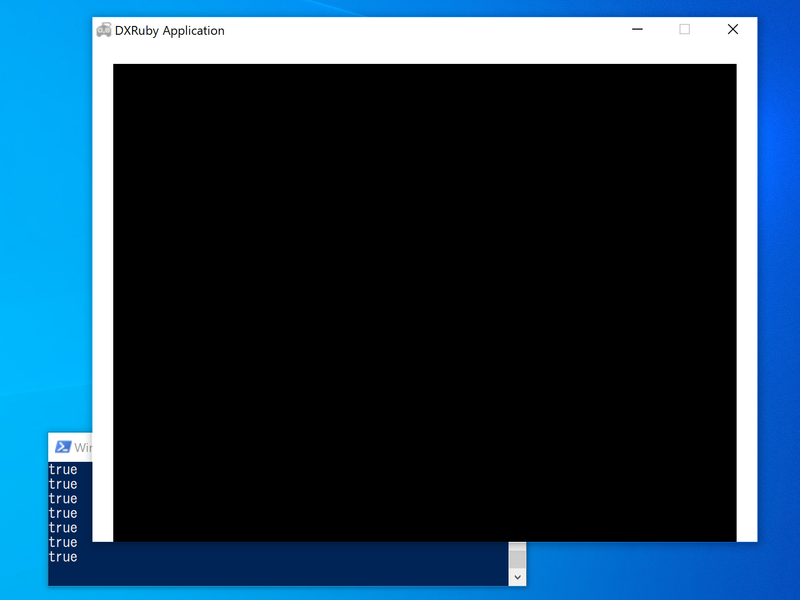
- pri_12.rb
require 'dxruby'

$screen = Image.new(640, 480)

def rect(x, y, width, height, color)   # 四角を描画する
  w = 0
  while w < width
    h = 0
    while h < height
      $screen[x + w, y + h] = color
      h = h + 1
    end
    w = w + 1
  end
end

def atari?(x, y)                       # 衝突判定(1ドット)
  if $screen[x,y] == C_DEFAULT
    return false
  end
  true
end

Window.loop do
  rect(  0,   0,  20, 480, C_WHITE)   # 左壁
  rect(  0,   0, 640,  20, C_WHITE)   # 上壁
  rect(620,   0,  20, 480, C_WHITE)   # 右壁

  x = Input.mouse_pos_x
  y = Input.mouse_pos_y

  p result =  atari?(x, y)            # マウスの位置と壁の衝突判定

  Window.draw(0, 0, $screen)
end
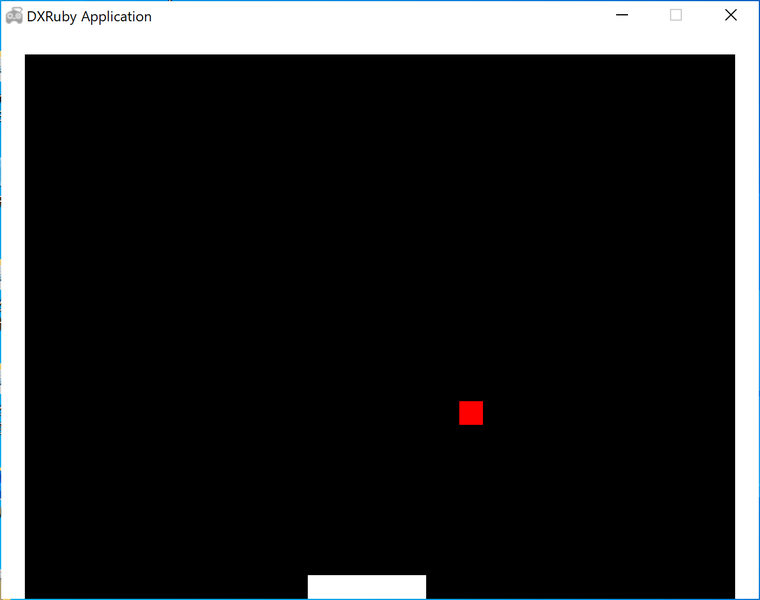
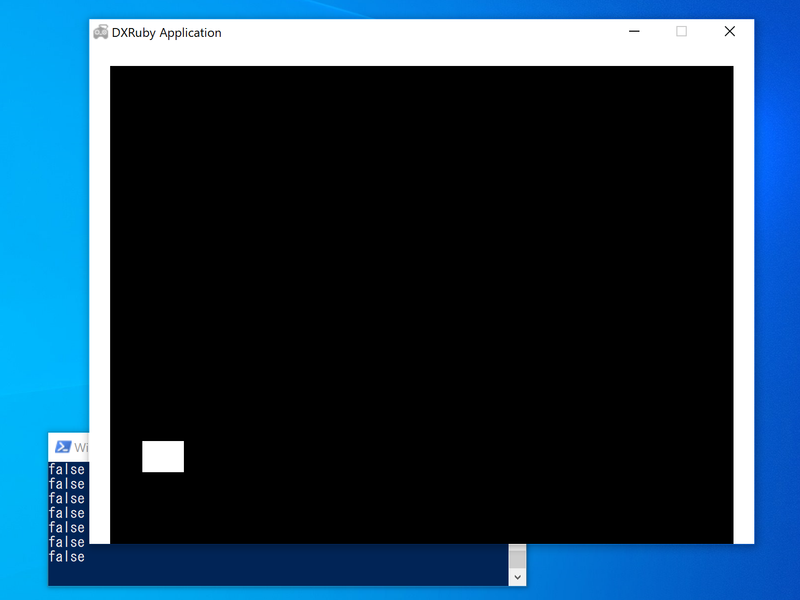
10-2. 四角形での衝突判定
四角形が、壁と衝突しているかを
atari_4?で判定します。
衝突/非衝突の結果をターミナル(コマンドプロンプト)にtrue/falseで出力しつつ、四角形の色も赤/白にします。
- pri_13.rb
require 'dxruby'

$screen = Image.new(640, 480)

def rect(x, y, width, height, color)   # 四角を描画する
  w = 0
  while w < width
    h = 0
    while h < height
      $screen[x + w, y + h] = color
      h = h + 1
    end
    w = w + 1
  end
end

def atari?(x, y)                       # 衝突判定(1ドット)
  if $screen[x,y] == C_DEFAULT
    return false
  end
  true
end

def atari_4?(x, y, width, height)      # 衝突判定(四角)
  atari?(x, y)         || atari?(x + width, y) ||
  atari?(x, y + width) || atari?(x + width, y + width)
end

# 四角の初期値
x = 200
y = 300
width  = 40
height = 30

Window.loop do
  rect(x, y, width, height, C_DEFAULT) # 四角の軌跡を消す

  rect(  0,   0,  20, 480, C_WHITE)    # 左壁
  rect(  0,   0, 640,  20, C_WHITE)    # 上壁
  rect(620,   0,  20, 480, C_WHITE)    # 右壁

  x = Input.mouse_pos_x
  y = Input.mouse_pos_y

  p result =  atari_4?(x, y, width, height)
  if result
    rect(x, y, width, height, C_RED)
  else
    rect(x, y, width, height, C_WHITE)
  end

  Window.draw(0, 0, $screen)
end
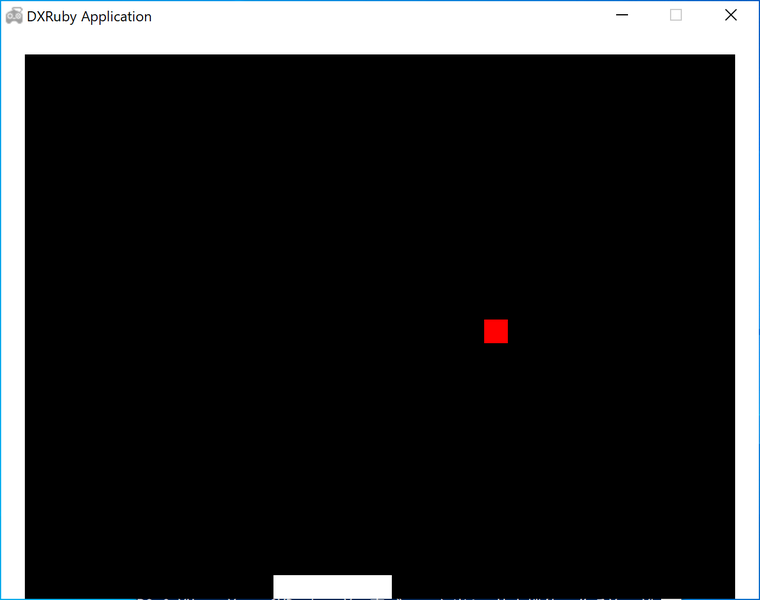
11. ブロック崩し:壁とバーで跳ね返る
衝突判定を使って、ボールが壁とバーで跳ね返るようにします。
- pri_14.rb
require 'dxruby'

$screen = Image.new(640, 480)

def rect(x, y, width, height, color)   # 四角を描画する
  w = 0
  while w < width
    h = 0
    while h < height
      $screen[x + w, y + h] = color
      h = h + 1
    end
    w = w + 1
  end
end

def atari?(x, y)                       # 衝突判定(1ドット)
  if $screen[x,y] == C_DEFAULT
    return false
  end
  true
end

def atari_4?(x, y, width, height)      # 衝突判定(四角)
  atari?(x, y)         || atari?(x + width, y) ||
  atari?(x, y + width) || atari?(x + width, y + width)
end

# バーの初期位置
x = 300

# ボールの初期値
ball_x = 300
ball_y = 400
dx =  4
dy = -4

Window.loop do
  rect(x, 460, 100, 20, C_DEFAULT)         # バーの軌跡を消す
  rect(ball_x, ball_y, 20, 20, C_DEFAULT)  # ボールの軌跡を消す

  rect(  0,   0,  20, 480, C_WHITE)   # 左壁
  rect(  0,   0, 640,  20, C_WHITE)   # 上壁
  rect(620,   0,  20, 480, C_WHITE)   # 右壁

  x = Input.mouse_pos_x
  rect(x, 460, 100, 20, C_WHITE)      # バー

  ball_x = ball_x + dx
  if atari_4?(ball_x, ball_y, 20, 20)
    ball_x = ball_x - dx
    dx = -dx
  end

  ball_y = ball_y + dy
  if atari_4?(ball_x, ball_y, 20, 20)
    ball_y = ball_y - dy
    dy = -dy
  end

  rect(ball_x, ball_y, 20, 20, C_RED) # ボール

  Window.draw(0, 0, $screen)
end
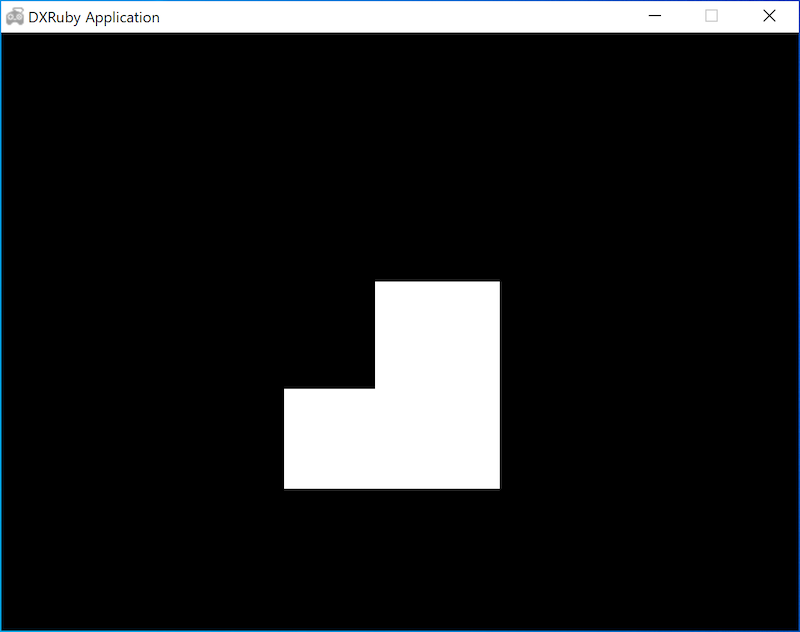
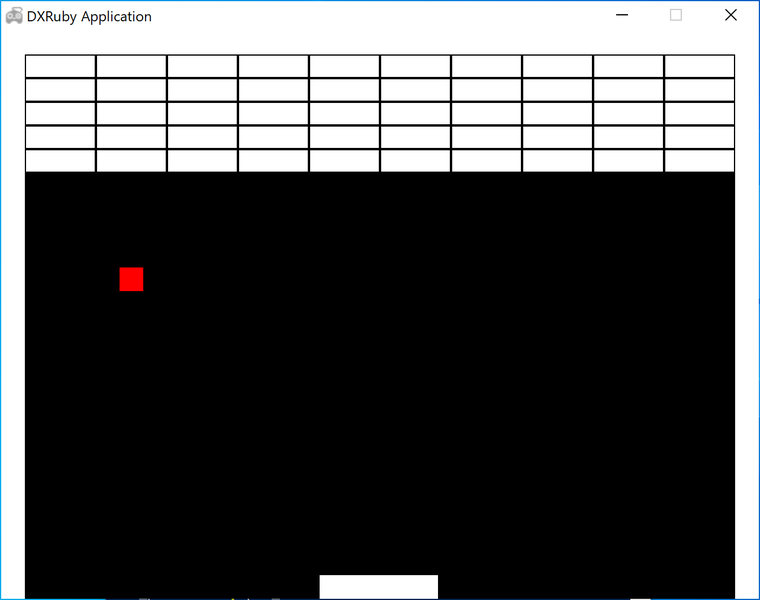
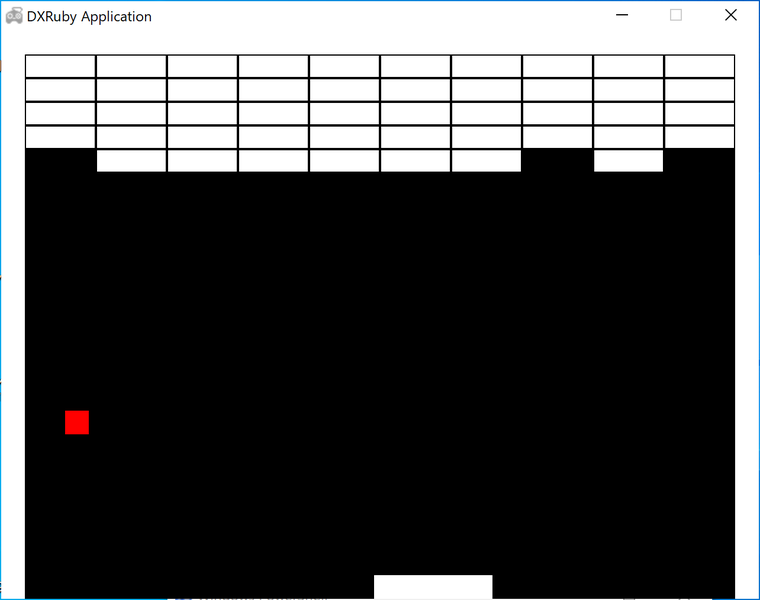
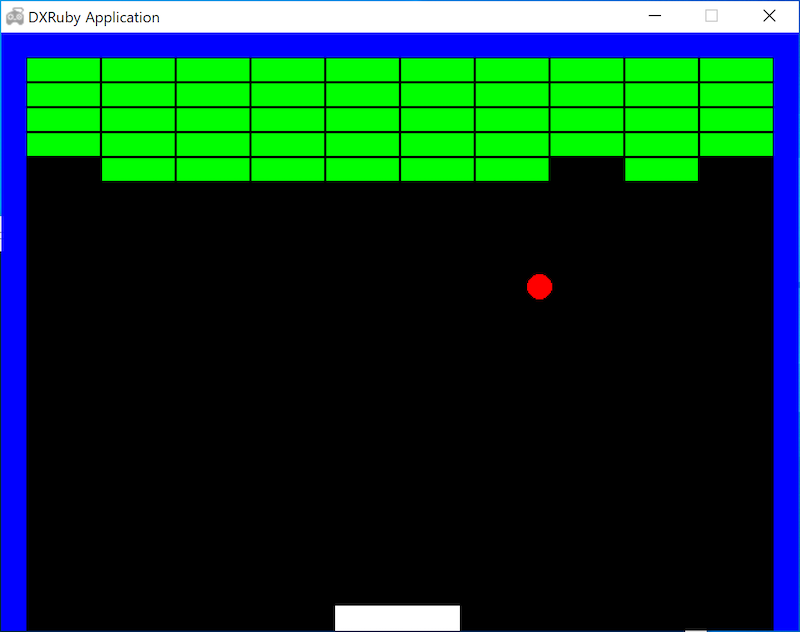
12. ブロック崩し:ブロックを描く
ブロック群を描画します。
- pri_15.rb
require 'dxruby'

$screen = Image.new(640, 480)

def rect(x, y, width, height, color)   # 四角を描画する
  w = 0
  while w < width
    h = 0
    while h < height
      $screen[x + w, y + h] = color
      h = h + 1
    end
    w = w + 1
  end
end

def atari?(x, y)                       # 衝突判定(1ドット)
  if $screen[x,y] == C_DEFAULT
    return false
  end
  true
end

def atari_4?(x, y, width, height)      # 衝突判定(四角)
  atari?(x, y)         || atari?(x + width, y) ||
  atari?(x, y + width) || atari?(x + width, y + width)
end

def block(x, y, color)                 # ブロック1つ
  rect(x, y, 58, 18, color)
end

def blocks                             # ブロック群を描画する
  count_x = 0
  while count_x < 10
    count_y = 0
    while count_y < 5
      x = 21 + 60 * count_x
      y = 21 + 20 * count_y
      block(x, y, C_WHITE)
      count_y = count_y + 1
    end
  count_x = count_x + 1
  end
end

# バーの初期位置
x = 300

# ボールの初期値
ball_x = 300
ball_y = 400
dx =  4
dy = -4

Window.loop do
  rect(x, 460, 100, 20, C_DEFAULT)         # バーの軌跡を消す
  rect(ball_x, ball_y, 20, 20, C_DEFAULT)  # ボールの軌跡を消す

  rect(  0,   0,  20, 480, C_WHITE)   # 左壁
  rect(  0,   0, 640,  20, C_WHITE)   # 上壁
  rect(620,   0,  20, 480, C_WHITE)   # 右壁

  x = Input.mouse_pos_x
  rect(x, 460, 100, 20, C_WHITE)      # バー

  ball_x = ball_x + dx
  if atari_4?(ball_x, ball_y, 20, 20)
    ball_x = ball_x - dx
    dx = -dx
  end

  ball_y = ball_y + dy
  if atari_4?(ball_x, ball_y, 20, 20)
    ball_y = ball_y - dy
    dy = -dy
  end

  rect(ball_x, ball_y, 20, 20, C_RED) # ボール

  blocks                              # ブロック群

  Window.draw(0, 0, $screen)
end
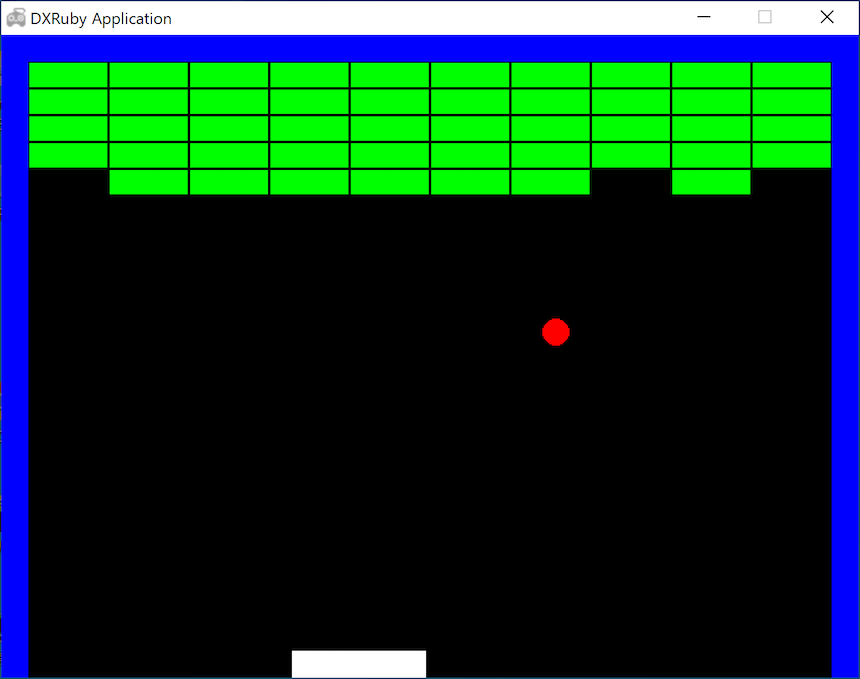
13. ブロック崩し:ブロックとの衝突判定(衝突したら消す)をする(完成)
衝突したブロックの (x, y) を計算して、ブロックを消す処理を追加します。
ブロック群の初期状態(白色)を設定する処理が必要になります。
- pri_16.rb
# 基本機能だけでブロック崩し:衝突ブロックを消す(完成)

require 'dxruby'

$screen = Image.new(640, 480)

def rect(x, y, width, height, color)   # 四角を描画する
  w = 0
  while w < width
    h = 0
    while h < height
      $screen[x + w, y + h] = color
      h = h + 1
    end
    w = w + 1
  end
end

def atari?(x, y)                       # 衝突判定(1ドット)
  if $screen[x,y] == C_DEFAULT
    return false
  end
  true
end

def atari_4?(x, y, width, height)      # 衝突判定(四角)
  atari?(x, y)         || atari?(x + width, y) ||
  atari?(x, y + width) || atari?(x + width, y + width)
end

def block(x, y, color)                 # ブロック1つ
  rect(x, y, 58, 18, color)
end

def blocks                             # ブロック群を描画する
  count_x = 0
  while count_x < 10
    count_y = 0
    while count_y < 5
      x = 21 + 60 * count_x
      y = 21 + 20 * count_y
      block(x, y, $screen[x, y])       # 色は前回の色と同じにする
      count_y = count_y + 1
    end
  count_x = count_x + 1
  end
end

def vanish_block(x, y)                 # ブロックを消去する
  if (20 < x && x < 600) && (20 < y && y < 120)
    rect_x = x - (x - 21) % 60         # 衝突位置から衝突ブロックの
    rect_y = y - (y - 21) % 20         # (x, y)を計算する
    block(rect_x, rect_y, C_DEFAULT)
  end
end

def initialize_blocks                  # ブロック群の初期色を白にする
  count_x = 0
  while count_x < 10
    count_y = 0
    while count_y < 5
      x = 21 + 60 * count_x
      y = 21 + 20 * count_y
      $screen[x, y] = C_WHITE
      count_y = count_y + 1
    end
  count_x = count_x + 1
  end
end

# バーの初期位置
x = 300

# ボールの初期値
ball_x = 300
ball_y = 400
dx =  4
dy = -4

# ブロック群の初期色の設定
initialize_blocks

Window.loop do
  rect(x, 460, 100, 20, C_DEFAULT)         # バーの軌跡を消す
  rect(ball_x, ball_y, 20, 20, C_DEFAULT)  # ボールの軌跡を消す

  rect(  0,   0,  20, 480, C_WHITE)   # 左壁
  rect(  0,   0, 640,  20, C_WHITE)   # 上壁
  rect(620,   0,  20, 480, C_WHITE)   # 右壁

  x = Input.mouse_pos_x
  rect(x, 460, 100, 20, C_WHITE)      # バー

  ball_x = ball_x + dx
  if atari_4?(ball_x, ball_y, 20, 20)
    vanish_block(ball_x, ball_y)      # 衝突ブロックを消す
    ball_x = ball_x - dx
    dx = -dx
  end

  ball_y = ball_y + dy
  if atari_4?(ball_x, ball_y, 20, 20)
    vanish_block(ball_x, ball_y)      # 衝突ブロックを消す
    ball_y = ball_y - dy
    dy = -dy
  end

  rect(ball_x, ball_y, 20, 20, C_RED) # ボール

  blocks                              # ブロック群

  Window.draw(0, 0, $screen)
end
描画処理が追いつかず、ボールの移動スピードが低下してしまいました。
改良の余地があるようです。参考
プログラミング初心者向け:DXRubyで 1ステップずつ作っていく「ブロック崩し」 - Qiita
で作った「ブロック崩し」のプログラムです。
- block28.rb
require 'dxruby'

img_bar   = Image.new(100,  20, C_WHITE)
img_hwall = Image.new( 20, 480, C_BLUE)
img_vwall = Image.new(640,  20, C_BLUE)
img_ball  = Image.new( 20,  20).circle_fill(10, 10, 10, C_RED)
img_block = Image.new( 58,  18, C_GREEN)
img_block_y = Image.new( 58,  18, C_YELLOW)

bar   = Sprite.new(  0, 460, img_bar)
lwall = Sprite.new(  0,   0, img_hwall)
rwall = Sprite.new(620,   0, img_hwall)
twall = Sprite.new(  0,   0, img_vwall)

walls = [bar, lwall, rwall, twall]

ball  =  Sprite.new(300, 400, img_ball)
dx =  2
dy = -2

def move(sprite, speed_x, speed_y)
  sprite.x += speed_x
  sprite.y += speed_y
end

blocks = []
10.times do |x|
  5.times do |y|
    blocks << Sprite.new(21 + 60 * x, 21 + 20 * y, img_block)
  end
end


Window.loop do
  bar.x = Input.mouse_pos_x
  Sprite.draw(walls)

  move(ball, dx, 0)
  if ball === walls
    ball.x -= dx
    dx = -dx
  end
  coll_x = ball.check(blocks)
  if coll_x[0]
    coll_x[0].image = img_block_y
    coll_x[0].draw     #一瞬色が変わって表示
    coll_x[0].vanish   #消える
    ball.x -= dx
    dx = -dx
  end

  move(ball, 0, dy)
  if ball === walls
    ball. y -= dy
    dy = -dy
  end
  coll_y = ball.check(blocks)
  if coll_y[0]
    coll_y[0].image = img_block_y
    coll_y[0].draw     #一瞬色が変わって表示
    coll_y[0].vanish   #消える
    ball. y -= dy
    dy = -dy
  end

  ball.draw

  Sprite.draw(blocks)
end


- 投稿日:2020-02-18T19:02:42+09:00
プログラミングの基礎力をつける:DXRuby;なるべく基本命令だけで作る「ブロック崩し」
概要
この記事は中学高校生向けプログラミング教室の教材として作ったものを一部改変したものです。
以前、
・DXRubyで 1ステップずつ作っていく「ブロック崩し」 - Qiita
という投稿をしました。RubyやDXRubyは、衝突判定だけでなく、プログラミングに便利な数々の機能を持っています。そのため、わずか100行足らずで「ブロック崩し」ができてしまいました。
しかし、プログラミングの学習としては、便利機能に頼りすぎるのもどうなんだろうか?と思っていたところ、『プログラムはこうして作られる』という本と、その著者の平山尚さんの言葉を見つけてドキッとしました。
「なんか動くもん作れていい気になってんだろうが、ライブラリを剥ぎ取ったおまえ自身の力はその程度だ。よく鏡を見ておけ」平山 尚 @hirasho
もし、それらの便利な機能をなるべく使わず、基本的な機能だけを使って「ブロック崩し」を作ってみるとどうなるでしょうか?
プログラミングの本当の力が試されることになります。
そこで、今回はRubyとそのゲームライブラリDXRubyを使いますが、以下のような基本機能・命令だけを使うことにします。
Rubyは、プログラミング言語として最低限の機能
DXRubyは、ウィンドウの生成、座標(x,y)に点を描く、座標(x,y)の色を取得する、文字の表示、マウス/キー/カーソルキーの状態の取得のみ
今回はこの課題に挑戦してみます。
→ 『プログラムはこうして作られる プログラマの頭の中をのぞいてみよう』(平山尚 著)
画像
前の記事
・DXRuby:「当たり判定」を自分で作ってみよう C. 色で判定する - Qiita技術解説
使用する基本機能・命令
前述の著書で使われた「プログラミング言語 Sunaba」を参考にして以下の通りとしました。
→ プログラミング言語
Sunaba
https://hirasho.github.io/Sunaba/
● Ruby
定数 変数 true false nil
数値 文字 文字列 ' ''
演算子/式
=(代入)
+ - * / % < > <= => == != ( )
&& ||
- 制御構造
while~end
if~(else)~end
return
break
- 関数
def~end
- その他
require puts p #(コメント)
※クラス、配列、ハッシュ、do~end、each などは使わない
● DXRuby
○ Image(Imageクラスはスクリーン以外は使わない)
- $screen = Image.new(640, 480) (ウィンドサイズのスクリーンの設定)
- $screen[x, y] (色の取得)
- $screen[x, y] = 色 (色の設定;これで
ドット(点)を描く)- 色定数
○ Window
- Window.loop do~end (ウィンドウの生成、更新)
- Window.draw(x, y, $screen) (これで
ドット(点)を描く)- Window.draw_font() (文字の表示)
○ Input
- Input.x (カーソルキー←→の押下の取得)
- Input.y (カーソルキー↑↓の押下の取得)
- Input.mouse_pos_x (マウス位置xの取得)
- Input.mouse_pos_y (マウス位置yの取得)
- Input.key_down? (キーボードの押下の取得)
○ Font
Font.new() (文字フォントの設定)
※Spriteクラス、衝突判定などは使わない
使用ライブラリ
Windows向けRuby用2Dゲームライブラリ
DXRubyを使用します。
バージョン1.4.2以上を想定しています。
1.4.2より前のバージョンとの主な相違点
Window.loopが複数置けるマウス位置を取得する
Input.mouse_pos_x、Input.mouse_pos_yの新しい書き方として、Input.mouse_x、Input.mouse_yが追加→ DXRuby 1.4.6:更新履歴
http://mirichi.github.io/dxruby-doc/CHANGELOG.html
DXRubyインストールの注意点
→ DXRuby 1.4.6 をWindows10で使う時の注意点とインストール方法 - noanoa07 - Qiita
https://qiita.com/noanoa07/items/0ce14c2404df38de94b7参考サイト
DXRuby のホームページ
http://dxruby.osdn.jpDXRuby 1.4.6 リファレンスマニュアル
http://mirichi.github.io/dxruby-doc/index.html困ったときは、このページの「チュートリアル」と「マニュアル」にだいたい書いてあります。
- DXRuby 1.4.1 リファレンスマニュアル http://dxruby.osdn.jp/DXRubyReference/20095313382446.htm
古いバージョンのリファレンスも役に立つときがあります。
→ 「ブロック崩し」追加課題2;なるべく基本命令だけで「ブロック崩し」を作ってみよう - noanoa 日々の日記
http://blog.livedoor.jp/noanoa07/archives/2050752.html→ 「ブロック崩し」追加課題に向けて;コンピュータの世界の下側を見てみよう - noanoa 日々の日記
http://blog.livedoor.jp/noanoa07/archives/2048469.html→ プログラミング言語 Sunaba で「ブロック崩し」を作ってみた - noanoa 日々の日記
http://blog.livedoor.jp/noanoa07/archives/1979433.htmlこのテキスト関連のブログ記事です。
ライセンス
ソースコード、本解説ともにパブリックドメイン
プログラム解説
0. 練習:ウィンドウを表示
ウィンドウを表示するために、ウィンドウサイズ 640×480(色は透明)の
$screenイメージを作成し、Window.drawで描画します。($でグローバル変数にしています。)→ DXRuby 1.4.1 リファレンス:Imageクラス Image.new
http://dxruby.osdn.jp/DXRubyReference/200953184038328.htm→ DXRubyリファレンス:チュートリアル 2. 画像の読み込みと描画
http://mirichi.github.io/dxruby-doc/tutorial/basic.htmlpri_00.rbrequire 'dxruby' $screen = Image.new(640, 480) Window.loop do Window.draw(0, 0, $screen) end
1. 練習:点(ドット)を表示する
座標(300, 200)に白色の点(ドット)を表示させてみます。
$screen上の座標(x,y)に色を指定することで、点(ドット)を表示させられます。
これには、イメージ[x, y] = 色を使います。色の指定は、「DXRubyリファレンス:色配列と色定数について」
http://mirichi.github.io/dxruby-doc/api/constant_color.htmlを見てください。
→ DXRuby 1.4.1 リファレンス:Imageクラス Image#[x, y]=color
http://dxruby.osdn.jp/DXRubyReference/200953184038328.htmpri_01.rbrequire 'dxruby' $screen = Image.new(640, 480) Window.loop do $screen[300, 200] = C_WHITE Window.draw(0, 0, $screen) end
(よく見ると、画面中央やや上に白色の点が描かれています。)2. 練習:点で線を描く
次は、長さ100の線を描いてみます。
線は点(ドット)の集まりとして描画します。
今回、繰り返しは
while~endのみを使います。
- pri_02.rb
require 'dxruby'

$screen = Image.new(640, 480)

Window.loop do
  width = 0
  while width < 100
    $screen[300 + width, 200] = C_WHITE
    width = width + 1
  end

  Window.draw(0, 0, $screen)
end
3. 練習:点で四角(トウフ)を描く
線が描けたので、四角(トウフ)を描きます。
二重ループを使います。
- pri_03.rb(失敗!四角にならない)
require 'dxruby'

$screen = Image.new(640, 480)

Window.loop do
  width  = 0
  height = 0
  while width < 100
    while height < 80
      $screen[300 + width, 200 + height] = C_WHITE
      height = height + 1
    end
    width = width + 1
  end

  Window.draw(0, 0, $screen)
end
二重ループの初期値の設定の間違いです。(ありがち?)
書き直します。
- pri_04.rb
require 'dxruby'

$screen = Image.new(640, 480)

Window.loop do
  width = 0
  while width < 100
    height = 0
    while height < 80
      $screen[300 + width, 200 + height] = C_WHITE
      height = height + 1
    end
    width = width + 1
  end

  Window.draw(0, 0, $screen)
end
4. ブロック崩し:壁を描く
それでは、ブロック崩しの壁を描いていきます。
まず、左壁(位置(0, 0)、大きさ(横 20、縦 480) 、白色)
を作ります。
- pri_05.rb
require 'dxruby'

$screen = Image.new(640, 480)

Window.loop do
  x0 = 0
  y0 = 0
  width = 0
  while width < 20
    height = 0
    while height < 480
      $screen[x0 + width, y0 + height] = C_WHITE
      height = height + 1
    end
    width = width + 1
  end

  Window.draw(0, 0, $screen)
end
5. ブロック崩し:壁を複数描く
もう一つ、上壁(位置(0, 0)、大きさ(横 640、縦 20)、白色)を追加します。
- pri_06.rb
require 'dxruby'

$screen = Image.new(640, 480)

Window.loop do
  x0 = 0
  y0 = 0
  width0 = 0
  while width0 < 20
    height0 = 0
    while height0 < 480
      $screen[x0 + width0, y0 + height0] = C_WHITE
      height0 = height0 + 1
    end
    width0 = width0 + 1
  end

  x1 = 0
  y1 = 0
  width1 = 0
  while width1 < 640
    height1 = 0
    while height1 < 20
      $screen[x1 + width1, y1 + height1] = C_WHITE
      height1 = height1 + 1
    end
    width1 = width1 + 1
  end

  Window.draw(0, 0, $screen)
end
6. ブロック崩し:「四角を描く」をまとめる(関数化)
続いて、左壁(位置(620, 0)、大きさ(横 20、縦 480) 、白色)
を作ります。コードが複雑になってきたので、「四角を描く」という処理を
rectという名前にまとめます(関数化)。def rect(引数) 処理内容 endこの
rectを使ってコードを書いてみます。
- pri_07.rb
require 'dxruby'

$screen = Image.new(640, 480)

def rect(x, y, width, height, color)   # 四角を描画する
  w = 0
  while w < width
    h = 0
    while h < height
      $screen[x + w, y + h] = color
      h = h + 1
    end
    w = w + 1
  end
end

Window.loop do
  rect(  0,   0,  20, 480, C_WHITE)
  rect(  0,   0, 640,  20, C_WHITE)
  rect(620,   0,  20, 480, C_WHITE)

  Window.draw(0, 0, $screen)
end
7. 練習:トウフを動かす
トウフをカーソルキーで動かす試作をします。
→ DXRubyリファレンス:チュートリアル 5. カーソルキーの入力
http://mirichi.github.io/dxruby-doc/tutorial/basic.html
- pri_08.rb(失敗!軌跡が残る)
require 'dxruby'

$screen = Image.new(640, 480)

def rect(x, y, width, height, color)   # 四角を描画する
  w = 0
  while w < width
    h = 0
    while h < height
      $screen[x + w, y + h] = color
      h = h + 1
    end
    w = w + 1
  end
end

x = 300
y = 200

Window.loop do
  x = x + Input.x
  y = y + Input.y

  rect(x, y, 100, 80, C_WHITE)

  Window.draw(0, 0, $screen)
end
図形を動かすと、前回の位置の色がそのまま残ってしまいました。動いて見えるには、
Window.loopが一周する毎に前回の図形を消す処理が必要でした。
書き直します。
- pri_09.rb
require 'dxruby'

$screen = Image.new(640, 480)

def rect(x, y, width, height, color)   # 四角を描画する
  w = 0
  while w < width
    h = 0
    while h < height
      $screen[x + w, y + h] = color
      h = h + 1
    end
    w = w + 1
  end
end

x = 300
y = 200

Window.loop do
  rect(x, y, 100, 80, C_DEFAULT)  # 前回の位置のトウフの軌跡を消す

  x = x + Input.x
  y = y + Input.y

  rect(x, y, 100, 80, C_WHITE)

  Window.draw(0, 0, $screen)
end
8. ブロック崩し:壁とバーを描く(pri_10.rb)
図形の動かし方がわかったので、バーを描いて、マウスと共に動くようにします。
→ DXRubyリファレンス:チュートリアル 7. マウスの入力
http://mirichi.github.io/dxruby-doc/tutorial/basic.html
- pri_10.rb
require 'dxruby'

$screen = Image.new(640, 480)

def rect(x, y, width, height, color)   # 四角を描画する
  w = 0
  while w < width
    h = 0
    while h < height
      $screen[x + w, y + h] = color
      h = h + 1
    end
    w = w + 1
  end
end

# バーの初期位置
x = 300

Window.loop do
  rect(x, 460, 100, 20, C_DEFAULT)    # バーの軌跡を消す

  rect(  0,   0,  20, 480, C_WHITE)   # 左壁
  rect(  0,   0, 640,  20, C_WHITE)   # 上壁
  rect(620,   0,  20, 480, C_WHITE)   # 右壁

  x = Input.mouse_pos_x
  rect(x, 460, 100, 20, C_WHITE)      # バー

  Window.draw(0, 0, $screen)
end
9. ブロック崩し:ボールを描く(動かす)
ボールを描き、動かします。移動量は、x方向 4、y方向 -4 に設定しました。
- pri_11.rb
require 'dxruby'

$screen = Image.new(640, 480)

def rect(x, y, width, height, color)   # 四角を描画する
  w = 0
  while w < width
    h = 0
    while h < height
      $screen[x + w, y + h] = color
      h = h + 1
    end
    w = w + 1
  end
end

# バーの初期位置
x = 300

# ボールの初期値
ball_x = 300
ball_y = 400
dx =  4
dy = -4

Window.loop do
  rect(x, 460, 100, 20, C_DEFAULT)         # バーの軌跡を消す
  rect(ball_x, ball_y, 20, 20, C_DEFAULT)  # ボールの軌跡を消す

  rect(  0,   0,  20, 480, C_WHITE)   # 左壁
  rect(  0,   0, 640,  20, C_WHITE)   # 上壁
  rect(620,   0,  20, 480, C_WHITE)   # 右壁

  x = Input.mouse_pos_x
  rect(x, 460, 100, 20, C_WHITE)      # バー

  ball_x = ball_x + dx
  ball_y = ball_y + dy
  rect(ball_x, ball_y, 20, 20, C_RED) # ボール

  Window.draw(0, 0, $screen)
end
10. 練習:衝突判定の試作
衝突判定を作ります。判定方法は、色で判定する方法にします。
・DXRuby:「当たり判定」を自分で作ってみよう C. 色で判定する - Qiita
で使った方法です。→ 「ブロック崩し」追加課題 1c);衝突判定の自作(色) - noanoa 日々の日記
http://blog.livedoor.jp/noanoa07/archives/2052899.html10-1. 大きさ1ドット(点)での衝突判定
衝突判定
atari?(x, y)を作ります。座標(x, y) の色が透明(C_DEFAULT)以外なら衝突と判定します。マウスの座標(x, y)と、壁との
衝突/非衝突をターミナル(コマンドプロンプト)にtrue/falseで出力します。
- pri_12.rb
require 'dxruby'

$screen = Image.new(640, 480)

def rect(x, y, width, height, color)   # 四角を描画する
  w = 0
  while w < width
    h = 0
    while h < height
      $screen[x + w, y + h] = color
      h = h + 1
    end
    w = w + 1
  end
end

def atari?(x, y)                       # 衝突判定(1ドット)
  if $screen[x,y] == C_DEFAULT
    return false
  end
  true
end

Window.loop do
  rect(  0,   0,  20, 480, C_WHITE)   # 左壁
  rect(  0,   0, 640,  20, C_WHITE)   # 上壁
  rect(620,   0,  20, 480, C_WHITE)   # 右壁

  x = Input.mouse_pos_x
  y = Input.mouse_pos_y

  p result =  atari?(x, y)            # マウスの位置と壁の衝突判定

  Window.draw(0, 0, $screen)
end
10-2. 四角形での衝突判定
四角形が、壁と衝突しているかを
atari_4?で判定します。
衝突/非衝突の結果をターミナル(コマンドプロンプト)にtrue/falseで出力しつつ、四角形の色も赤/白にします。
- pri_13.rb
require 'dxruby'

$screen = Image.new(640, 480)

def rect(x, y, width, height, color)   # 四角を描画する
  w = 0
  while w < width
    h = 0
    while h < height
      $screen[x + w, y + h] = color
      h = h + 1
    end
    w = w + 1
  end
end

def atari?(x, y)                       # 衝突判定(1ドット)
  if $screen[x,y] == C_DEFAULT
    return false
  end
  true
end

def atari_4?(x, y, width, height)      # 衝突判定(四角)
  atari?(x, y)         || atari?(x + width, y) ||
  atari?(x, y + width) || atari?(x + width, y + width)
end

# 四角の初期値
x = 200
y = 300
width  = 40
height = 30

Window.loop do
  rect(x, y, width, height, C_DEFAULT) # 四角の軌跡を消す

  rect(  0,   0,  20, 480, C_WHITE)    # 左壁
  rect(  0,   0, 640,  20, C_WHITE)    # 上壁
  rect(620,   0,  20, 480, C_WHITE)    # 右壁

  x = Input.mouse_pos_x
  y = Input.mouse_pos_y

  p result =  atari_4?(x, y, width, height)
  if result
    rect(x, y, width, height, C_RED)
  else
    rect(x, y, width, height, C_WHITE)
  end

  Window.draw(0, 0, $screen)
end
11. ブロック崩し:壁とバーで跳ね返る
衝突判定を使って、ボールが壁とバーで跳ね返るようにします。
- pri_14.rb
require 'dxruby'

$screen = Image.new(640, 480)

def rect(x, y, width, height, color)   # 四角を描画する
  w = 0
  while w < width
    h = 0
    while h < height
      $screen[x + w, y + h] = color
      h = h + 1
    end
    w = w + 1
  end
end

def atari?(x, y)                       # 衝突判定(1ドット)
  if $screen[x,y] == C_DEFAULT
    return false
  end
  true
end

def atari_4?(x, y, width, height)      # 衝突判定(四角)
  atari?(x, y)         || atari?(x + width, y) ||
  atari?(x, y + width) || atari?(x + width, y + width)
end

# バーの初期位置
x = 300

# ボールの初期値
ball_x = 300
ball_y = 400
dx =  4
dy = -4

Window.loop do
  rect(x, 460, 100, 20, C_DEFAULT)         # バーの軌跡を消す
  rect(ball_x, ball_y, 20, 20, C_DEFAULT)  # ボールの軌跡を消す

  rect(  0,   0,  20, 480, C_WHITE)   # 左壁
  rect(  0,   0, 640,  20, C_WHITE)   # 上壁
  rect(620,   0,  20, 480, C_WHITE)   # 右壁

  x = Input.mouse_pos_x
  rect(x, 460, 100, 20, C_WHITE)      # バー

  ball_x = ball_x + dx
  if atari_4?(ball_x, ball_y, 20, 20)
    ball_x = ball_x - dx
    dx = -dx
  end

  ball_y = ball_y + dy
  if atari_4?(ball_x, ball_y, 20, 20)
    ball_y = ball_y - dy
    dy = -dy
  end

  rect(ball_x, ball_y, 20, 20, C_RED) # ボール

  Window.draw(0, 0, $screen)
end
12. ブロック崩し:ブロックを描く
ブロック群を描画します。
- pri_15.rb
require 'dxruby'

$screen = Image.new(640, 480)

def rect(x, y, width, height, color)   # 四角を描画する
  w = 0
  while w < width
    h = 0
    while h < height
      $screen[x + w, y + h] = color
      h = h + 1
    end
    w = w + 1
  end
end

def atari?(x, y)                       # 衝突判定(1ドット)
  if $screen[x,y] == C_DEFAULT
    return false
  end
  true
end

def atari_4?(x, y, width, height)      # 衝突判定(四角)
  atari?(x, y)         || atari?(x + width, y) ||
  atari?(x, y + width) || atari?(x + width, y + width)
end

def block(x, y, color)                 # ブロック1つ
  rect(x, y, 58, 18, color)
end

def blocks                             # ブロック群を描画する
  count_x = 0
  while count_x < 10
    count_y = 0
    while count_y < 5
      x = 21 + 60 * count_x
      y = 21 + 20 * count_y
      block(x, y, C_WHITE)
      count_y = count_y + 1
    end
  count_x = count_x + 1
  end
end

# バーの初期位置
x = 300

# ボールの初期値
ball_x = 300
ball_y = 400
dx =  4
dy = -4

Window.loop do
  rect(x, 460, 100, 20, C_DEFAULT)         # バーの軌跡を消す
  rect(ball_x, ball_y, 20, 20, C_DEFAULT)  # ボールの軌跡を消す

  rect(  0,   0,  20, 480, C_WHITE)   # 左壁
  rect(  0,   0, 640,  20, C_WHITE)   # 上壁
  rect(620,   0,  20, 480, C_WHITE)   # 右壁

  x = Input.mouse_pos_x
  rect(x, 460, 100, 20, C_WHITE)      # バー

  ball_x = ball_x + dx
  if atari_4?(ball_x, ball_y, 20, 20)
    ball_x = ball_x - dx
    dx = -dx
  end

  ball_y = ball_y + dy
  if atari_4?(ball_x, ball_y, 20, 20)
    ball_y = ball_y - dy
    dy = -dy
  end

  rect(ball_x, ball_y, 20, 20, C_RED) # ボール

  blocks                              # ブロック群

  Window.draw(0, 0, $screen)
end
13. ブロック崩し:ブロックとの衝突判定(衝突したら消す)をする(完成)
衝突したブロックの (x, y) を計算して、ブロックを消す処理を追加します。
ブロック群の初期状態(白色)を設定する処理が必要になります。
- pri_16.rb
# 基本機能だけでブロック崩し:衝突ブロックを消す(完成)

require 'dxruby'

$screen = Image.new(640, 480)

def rect(x, y, width, height, color)   # 四角を描画する
  w = 0
  while w < width
    h = 0
    while h < height
      $screen[x + w, y + h] = color
      h = h + 1
    end
    w = w + 1
  end
end

def atari?(x, y)                       # 衝突判定(1ドット)
  if $screen[x,y] == C_DEFAULT
    return false
  end
  true
end

def atari_4?(x, y, width, height)      # 衝突判定(四角)
  atari?(x, y)         || atari?(x + width, y) ||
  atari?(x, y + width) || atari?(x + width, y + width)
end

def block(x, y, color)                 # ブロック1つ
  rect(x, y, 58, 18, color)
end

def blocks                             # ブロック群を描画する
  count_x = 0
  while count_x < 10
    count_y = 0
    while count_y < 5
      x = 21 + 60 * count_x
      y = 21 + 20 * count_y
      block(x, y, $screen[x, y])       # 色は前回の色と同じにする
      count_y = count_y + 1
    end
  count_x = count_x + 1
  end
end

def vanish_block(x, y)                 # ブロックを消去する
  if (20 < x && x < 600) && (20 < y && y < 120)
    rect_x = x - (x - 21) % 60         # 衝突位置から衝突ブロックの
    rect_y = y - (y - 21) % 20         # (x, y)を計算する
    block(rect_x, rect_y, C_DEFAULT)
  end
end

def initialize_blocks                  # ブロック群の初期色を白にする
  count_x = 0
  while count_x < 10
    count_y = 0
    while count_y < 5
      x = 21 + 60 * count_x
      y = 21 + 20 * count_y
      $screen[x, y] = C_WHITE
      count_y = count_y + 1
    end
  count_x = count_x + 1
  end
end

# バーの初期位置
x = 300

# ボールの初期値
ball_x = 300
ball_y = 400
dx =  4
dy = -4

# ブロック群の初期色の設定
initialize_blocks

Window.loop do
  rect(x, 460, 100, 20, C_DEFAULT)         # バーの軌跡を消す
  rect(ball_x, ball_y, 20, 20, C_DEFAULT)  # ボールの軌跡を消す

  rect(  0,   0,  20, 480, C_WHITE)   # 左壁
  rect(  0,   0, 640,  20, C_WHITE)   # 上壁
  rect(620,   0,  20, 480, C_WHITE)   # 右壁

  x = Input.mouse_pos_x
  rect(x, 460, 100, 20, C_WHITE)      # バー

  ball_x = ball_x + dx
  if atari_4?(ball_x, ball_y, 20, 20)
    vanish_block(ball_x, ball_y)      # 衝突ブロックを消す
    ball_x = ball_x - dx
    dx = -dx
  end

  ball_y = ball_y + dy
  if atari_4?(ball_x, ball_y, 20, 20)
    vanish_block(ball_x, ball_y)      # 衝突ブロックを消す
    ball_y = ball_y - dy
    dy = -dy
  end

  rect(ball_x, ball_y, 20, 20, C_RED) # ボール

  blocks                              # ブロック群

  Window.draw(0, 0, $screen)
end
描画処理が追いつかず、ボールの移動スピードが低下してしまいました。
改良の余地があるようです。参考
プログラミング初心者向け:DXRubyで 1ステップずつ作っていく「ブロック崩し」 - Qiita
で作った「ブロック崩し」のプログラムです。
- block28.rb
require 'dxruby'

img_bar   = Image.new(100,  20, C_WHITE)
img_hwall = Image.new( 20, 480, C_BLUE)
img_vwall = Image.new(640,  20, C_BLUE)
img_ball  = Image.new( 20,  20).circle_fill(10, 10, 10, C_RED)
img_block = Image.new( 58,  18, C_GREEN)
img_block_y = Image.new( 58,  18, C_YELLOW)

bar   = Sprite.new(  0, 460, img_bar)
lwall = Sprite.new(  0,   0, img_hwall)
rwall = Sprite.new(620,   0, img_hwall)
twall = Sprite.new(  0,   0, img_vwall)

walls = [bar, lwall, rwall, twall]

ball  =  Sprite.new(300, 400, img_ball)
dx =  2
dy = -2

def move(sprite, speed_x, speed_y)
  sprite.x += speed_x
  sprite.y += speed_y
end

blocks = []
10.times do |x|
  5.times do |y|
    blocks << Sprite.new(21 + 60 * x, 21 + 20 * y, img_block)
  end
end


Window.loop do
  bar.x = Input.mouse_pos_x
  Sprite.draw(walls)

  move(ball, dx, 0)
  if ball === walls
    ball.x -= dx
    dx = -dx
  end
  coll_x = ball.check(blocks)
  if coll_x[0]
    coll_x[0].image = img_block_y
    coll_x[0].draw     #一瞬色が変わって表示
    coll_x[0].vanish   #消える
    ball.x -= dx
    dx = -dx
  end

  move(ball, 0, dy)
  if ball === walls
    ball. y -= dy
    dy = -dy
  end
  coll_y = ball.check(blocks)
  if coll_y[0]
    coll_y[0].image = img_block_y
    coll_y[0].draw     #一瞬色が変わって表示
    coll_y[0].vanish   #消える
    ball. y -= dy
    dy = -dy
  end

  ball.draw

  Sprite.draw(blocks)
end
- 投稿日:2020-02-18T19:02:42+09:00
プログラミングの基礎力をつける:なるべく基本命令だけで作る「ブロック崩し」 on DXRuby
概要
この記事は中学高校生向けプログラミング教室の教材として作ったものを一部改変したものです。
以前、
・DXRubyで 1ステップずつ作っていく「ブロック崩し」 - Qiita
という投稿をしました。RubyやDXRubyは、衝突判定だけでなく、プログラミングに便利な数々の機能を持っています。そのため、わずか100行足らずで「ブロック崩し」ができてしまいました。
しかし、プログラミングの学習としては、便利機能に頼りすぎるのもどうなんだろうか?と思っていたところ、『プログラムはこうして作られる』という本と、その著者の平山尚さんの言葉を見つけてドキッとしました。
「なんか動くもん作れていい気になってんだろうが、ライブラリを剥ぎ取ったおまえ自身の力はその程度だ。よく鏡を見ておけ」平山 尚 @hirasho
もし、それらの便利な機能をなるべく使わず、基本的な機能だけを使って「ブロック崩し」を作ってみるとどうなるでしょうか?
プログラミングの本当の力が試されることになります。
そこで、今回はRubyとそのゲームライブラリDXRubyを使いますが、以下のような基本機能・命令だけを使うことにします。
Rubyは、プログラミング言語として最低限の機能
DXRubyは、ウィンドウの生成、座標(x,y)に点を描く、座標(x,y)の色を取得する、文字の表示、マウス/キー/カーソルキーの状態の取得のみ
今回はこの課題に挑戦してみます。
→ 『プログラムはこうして作られる プログラマの頭の中をのぞいてみよう』(平山尚 著)
前の記事
・DXRuby:「当たり判定」を自分で作ってみよう C. 色で判定する - Qiita関連記事
・Ruby用2Dゲームライブラリ DXRuby:使い方の初歩 - Qiita
・プログラミング初心者向け:DXRubyで 1ステップずつ作っていく「ブロック崩し」 - Qiita
・DXRuby:「当たり判定」を自分で作ってみよう - Qiita技術解説
使用する基本機能・命令
前述の著書で使われた「プログラミング言語 Sunaba」を参考にして以下の通りとしました。
→ プログラミング言語
Sunaba
https://hirasho.github.io/Sunaba/
● Ruby
定数 変数 true false nil
数値 文字 文字列 ' ''
演算子/式
=(代入)
+ - * / % < > <= => == != ( )
&& ||
- 制御構造
while~end
if~(else)~end
return
break
- 関数
def~end
- その他
require puts p #(コメント)
※クラス、配列、ハッシュ、do~end、each などは使わない
● DXRuby
○ Image(Imageクラスはスクリーン以外は使わない)
- $screen = Image.new(640, 480) (ウィンドサイズのスクリーンの設定)
- $screen[x, y] (色の取得)
- $screen[x, y] = 色 (色の設定;これで
ドット(点)を描く)- 色定数
○ Window
- Window.loop do~end (ウィンドウの生成、更新)
- Window.draw(x, y, $screen) (これで
ドット(点)を描く)- Window.draw_font() (文字の表示)
○ Input
- Input.x (カーソルキー←→の押下の取得)
- Input.y (カーソルキー↑↓の押下の取得)
- Input.mouse_pos_x (マウス位置xの取得)
- Input.mouse_pos_y (マウス位置yの取得)
- Input.key_down? (キーボードの押下の取得)
○ Font
Font.new() (文字フォントの設定)
※Spriteクラス、衝突判定などは使わない
使用ライブラリ
Windows向けRuby用2Dゲームライブラリ
DXRubyを使用します。
バージョン1.4.2以上を想定しています。
1.4.2より前のバージョンとの主な相違点
Window.loopが複数置けるマウス位置を取得する
Input.mouse_pos_x、Input.mouse_pos_yの新しい書き方として、Input.mouse_x、Input.mouse_yが追加→ DXRuby 1.4.6:更新履歴
http://mirichi.github.io/dxruby-doc/CHANGELOG.html
DXRubyインストールの注意点
→ DXRuby 1.4.6 をWindows10で使う時の注意点とインストール方法 - noanoa07 - Qiita
https://qiita.com/noanoa07/items/0ce14c2404df38de94b7参考サイト
DXRuby のホームページ
http://dxruby.osdn.jpDXRuby 1.4.6 リファレンスマニュアル
http://mirichi.github.io/dxruby-doc/index.html困ったときは、このページの「チュートリアル」と「マニュアル」にだいたい書いてあります。
- DXRuby 1.4.1 リファレンスマニュアル http://dxruby.osdn.jp/DXRubyReference/20095313382446.htm
古いバージョンのリファレンスも役に立つときがあります。
→ 「ブロック崩し」追加課題2;なるべく基本命令だけで「ブロック崩し」を作ってみよう - noanoa 日々の日記
http://blog.livedoor.jp/noanoa07/archives/2050752.html→ 「ブロック崩し」追加課題に向けて;コンピュータの世界の下側を見てみよう - noanoa 日々の日記
http://blog.livedoor.jp/noanoa07/archives/2048469.html→ プログラミング言語 Sunaba で「ブロック崩し」を作ってみた - noanoa 日々の日記
http://blog.livedoor.jp/noanoa07/archives/1979433.htmlこのテキスト関連のブログ記事です。
ライセンス
ソースコード、本解説ともにパブリックドメイン
プログラム解説
0. 練習:ウィンドウを表示
ウィンドウを表示するために、ウィンドウサイズ 640×480(色は透明)の
$screenイメージを作成し、Window.drawで描画します。($でグローバル変数にしています。)→ DXRuby 1.4.1 リファレンス:Imageクラス Image.new
http://dxruby.osdn.jp/DXRubyReference/200953184038328.htm→ DXRubyリファレンス:チュートリアル 2. 画像の読み込みと描画
http://mirichi.github.io/dxruby-doc/tutorial/basic.htmlpri_00.rbrequire 'dxruby' $screen = Image.new(640, 480) Window.loop do Window.draw(0, 0, $screen) end
1. 練習:点(ドット)を表示する
座標(300, 200)に白色の点(ドット)を表示させてみます。
$screen上の座標(x,y)に色を指定することで、点(ドット)を表示させられます。
これには、イメージ[x, y] = 色を使います。色の指定は、「DXRubyリファレンス:色配列と色定数について」
http://mirichi.github.io/dxruby-doc/api/constant_color.htmlを見てください。
→ DXRuby 1.4.1 リファレンス:Imageクラス Image#[x, y]=color
http://dxruby.osdn.jp/DXRubyReference/200953184038328.htmpri_01.rbrequire 'dxruby' $screen = Image.new(640, 480) Window.loop do $screen[300, 200] = C_WHITE Window.draw(0, 0, $screen) end
(よく見ると、画面中央やや上に白色の点が描かれています。)2. 練習:点で線を描く
次は、長さ100の線を描いてみます。
線は点(ドット)の集まりとして描画します。
今回、繰り返しは
while~endのみを使います。pri_02.rbrequire 'dxruby' $screen = Image.new(640, 480) Window.loop do width = 0 while width < 100 $screen[300 + width, 200] = C_WHITE width = width + 1 end Window.draw(0, 0, $screen) end
3. 練習:点で四角(トウフ)を描く
線が描けたので、四角(トウフ)を描きます。
二重ループを使います。
- pri_03.rb(失敗!四角にならない)
pri_03.rbrequire 'dxruby' $screen = Image.new(640, 480) Window.loop do width = 0 height = 0 while width < 100 while height < 80 $screen[300 + width, 200 + height] = C_WHITE height = height + 1 end width = width + 1 end Window.draw(0, 0, $screen) end
二重ループの初期値の設定の間違いです。(ありがち?)
書き直します。
pri_04.rbrequire 'dxruby' $screen = Image.new(640, 480) Window.loop do width = 0 while width < 100 height = 0 while height < 80 $screen[300 + width, 200 + height] = C_WHITE height = height + 1 end width = width + 1 end Window.draw(0, 0, $screen) end
4. ブロック崩し:壁を描く
それでは、ブロック崩しの壁を描いていきます。
まず、左壁(位置(0, 0)、大きさ(横 20、縦 480) 、白色)
を作ります。pri_05.rbrequire 'dxruby' $screen = Image.new(640, 480) Window.loop do x0 = 0 y0 = 0 width = 0 while width < 20 height = 0 while height < 480 $screen[x0 + width, y0 + height] = C_WHITE height = height + 1 end width = width + 1 end Window.draw(0, 0, $screen) end
5. ブロック崩し:壁を複数描く
もう一つ、上壁(位置(0, 0)、大きさ(横 640、縦 20)、白色)を追加します。
pri_06.rbrequire 'dxruby' $screen = Image.new(640, 480) Window.loop do x0 = 0 y0 = 0 width0 = 0 while width0 < 20 height0 = 0 while height0 < 480 $screen[x0 + width0, y0 + height0] = C_WHITE height0 = height0 + 1 end width0 = width0 + 1 end x1 = 0 y1 = 0 width1 = 0 while width1 < 640 height1 = 0 while height1 < 20 $screen[x1 + width1, y1 + height1] = C_WHITE height1 = height1 + 1 end width1 = width1 + 1 end Window.draw(0, 0, $screen) end
6. ブロック崩し:「四角を描く」をまとめる(関数化)
続いて、左壁(位置(620, 0)、大きさ(横 20、縦 480) 、白色)
を作ります。コードが複雑になってきたので、「四角を描く」という処理を
rectという名前にまとめます(関数化)。def rect(引数) 処理内容 endこの
rectを使ってコードを書いてみます。pri_07.rbrequire 'dxruby' $screen = Image.new(640, 480) def rect(x, y, width, height, color) # 四角を描画する w = 0 while w < width h = 0 while h < height $screen[x + w, y + h] = color h = h + 1 end w = w + 1 end end Window.loop do rect( 0, 0, 20, 480, C_WHITE) rect( 0, 0, 640, 20, C_WHITE) rect(620, 0, 20, 480, C_WHITE) Window.draw(0, 0, $screen) end
7. 練習:トウフを動かす
トウフをカーソルキーで動かす試作をします。
→ DXRubyリファレンス:チュートリアル 5. カーソルキーの入力
http://mirichi.github.io/dxruby-doc/tutorial/basic.html
- pri_08.rb(失敗!軌跡が残る)
pri_08.rbrequire 'dxruby' $screen = Image.new(640, 480) def rect(x, y, width, height, color) # 四角を描画する w = 0 while w < width h = 0 while h < height $screen[x + w, y + h] = color h = h + 1 end w = w + 1 end end x = 300 y = 200 Window.loop do x = x + Input.x y = y + Input.y rect(x, y, 100, 80, C_WHITE) Window.draw(0, 0, $screen) end
図形を動かすと、前回の位置の色がそのまま残ってしまいました。動いて見えるには、
Window.loopが一周する毎に前回の図形を消す処理が必要でした。
書き直します。pri_09.rbrequire 'dxruby' $screen = Image.new(640, 480) def rect(x, y, width, height, color) # 四角を描画する w = 0 while w < width h = 0 while h < height $screen[x + w, y + h] = color h = h + 1 end w = w + 1 end end x = 300 y = 200 Window.loop do rect(x, y, 100, 80, C_DEFAULT) # 前回の位置のトウフの軌跡を消す x = x + Input.x y = y + Input.y rect(x, y, 100, 80, C_WHITE) Window.draw(0, 0, $screen) end
8. ブロック崩し:壁とバーを描く(pri_10.rb)
図形の動かし方がわかったので、バーを描いて、マウスと共に動くようにします。
→ DXRubyリファレンス:チュートリアル 7. マウスの入力
http://mirichi.github.io/dxruby-doc/tutorial/basic.htmlpri_10.rbrequire 'dxruby' $screen = Image.new(640, 480) def rect(x, y, width, height, color) # 四角を描画する w = 0 while w < width h = 0 while h < height $screen[x + w, y + h] = color h = h + 1 end w = w + 1 end end # バーの初期位置 x = 300 Window.loop do rect(x, 460, 100, 20, C_DEFAULT) # バーの軌跡を消す rect( 0, 0, 20, 480, C_WHITE) # 左壁 rect( 0, 0, 640, 20, C_WHITE) # 上壁 rect(620, 0, 20, 480, C_WHITE) # 右壁 x = Input.mouse_pos_x rect(x, 460, 100, 20, C_WHITE) # バー Window.draw(0, 0, $screen) end
9. ブロック崩し:ボールを描く(動かす)
ボールを描き、動かします。移動量は、x方向 4、y方向 -4 に設定しました。
pri_11.rbrequire 'dxruby' $screen = Image.new(640, 480) def rect(x, y, width, height, color) # 四角を描画する w = 0 while w < width h = 0 while h < height $screen[x + w, y + h] = color h = h + 1 end w = w + 1 end end # バーの初期位置 x = 300 # ボールの初期値 ball_x = 300 ball_y = 400 dx = 4 dy = -4 Window.loop do rect(x, 460, 100, 20, C_DEFAULT) # バーの軌跡を消す rect(ball_x, ball_y, 20, 20, C_DEFAULT) # ボールの軌跡を消す rect( 0, 0, 20, 480, C_WHITE) # 左壁 rect( 0, 0, 640, 20, C_WHITE) # 上壁 rect(620, 0, 20, 480, C_WHITE) # 右壁 x = Input.mouse_pos_x rect(x, 460, 100, 20, C_WHITE) # バー ball_x = ball_x + dx ball_y = ball_y + dy rect(ball_x, ball_y, 20, 20, C_RED) # ボール Window.draw(0, 0, $screen) end
10. 練習:衝突判定の試作
衝突判定を作ります。判定方法は、色で判定する方法にします。
・DXRuby:「当たり判定」を自分で作ってみよう C. 色で判定する - Qiita
で使った方法です。→ 「ブロック崩し」追加課題 1c);衝突判定の自作(色) - noanoa 日々の日記
http://blog.livedoor.jp/noanoa07/archives/2052899.html10-1. 大きさ1ドット(点)での衝突判定
衝突判定
atari?(x, y)を作ります。座標(x, y) の色が透明(C_DEFAULT)以外なら衝突と判定します。マウスの座標(x, y)と、壁との
衝突/非衝突をターミナル(コマンドプロンプト)にtrue/falseで出力します。pri_12.rbrequire 'dxruby' $screen = Image.new(640, 480) def rect(x, y, width, height, color) # 四角を描画する w = 0 while w < width h = 0 while h < height $screen[x + w, y + h] = color h = h + 1 end w = w + 1 end end def atari?(x, y) # 衝突判定(1ドット) if $screen[x,y] == C_DEFAULT return false end true end Window.loop do rect( 0, 0, 20, 480, C_WHITE) # 左壁 rect( 0, 0, 640, 20, C_WHITE) # 上壁 rect(620, 0, 20, 480, C_WHITE) # 右壁 x = Input.mouse_pos_x y = Input.mouse_pos_y p result = atari?(x, y) # マウスの位置と壁の衝突判定 Window.draw(0, 0, $screen) end
10-2. 四角形での衝突判定
四角形が、壁と衝突しているかを
atari_4?で判定します。
衝突/非衝突の結果をターミナル(コマンドプロンプト)にtrue/falseで出力しつつ、四角形の色も赤/白にします。pri_13.rbrequire 'dxruby' $screen = Image.new(640, 480) def rect(x, y, width, height, color) # 四角を描画する w = 0 while w < width h = 0 while h < height $screen[x + w, y + h] = color h = h + 1 end w = w + 1 end end def atari?(x, y) # 衝突判定(1ドット) if $screen[x,y] == C_DEFAULT return false end true end def atari_4?(x, y, width, height) # 衝突判定(四角) atari?(x, y) || atari?(x + width, y) || atari?(x, y + width) || atari?(x + width, y + width) end # 四角の初期値 x = 200 y = 300 width = 40 height = 30 Window.loop do rect(x, y, width, height, C_DEFAULT) # 四角の軌跡を消す rect( 0, 0, 20, 480, C_WHITE) # 左壁 rect( 0, 0, 640, 20, C_WHITE) # 上壁 rect(620, 0, 20, 480, C_WHITE) # 右壁 x = Input.mouse_pos_x y = Input.mouse_pos_y p result = atari_4?(x, y, width, height) if result rect(x, y, width, height, C_RED) else rect(x, y, width, height, C_WHITE) end Window.draw(0, 0, $screen) end
11. ブロック崩し:壁とバーで跳ね返る
衝突判定を使って、ボールが壁とバーで跳ね返るようにします。
pri_14.rbrequire 'dxruby' $screen = Image.new(640, 480) def rect(x, y, width, height, color) # 四角を描画する w = 0 while w < width h = 0 while h < height $screen[x + w, y + h] = color h = h + 1 end w = w + 1 end end def atari?(x, y) # 衝突判定(1ドット) if $screen[x,y] == C_DEFAULT return false end true end def atari_4?(x, y, width, height) # 衝突判定(四角) atari?(x, y) || atari?(x + width, y) || atari?(x, y + width) || atari?(x + width, y + width) end # バーの初期位置 x = 300 # ボールの初期値 ball_x = 300 ball_y = 400 dx = 4 dy = -4 Window.loop do rect(x, 460, 100, 20, C_DEFAULT) # バーの軌跡を消す rect(ball_x, ball_y, 20, 20, C_DEFAULT) # ボールの軌跡を消す rect( 0, 0, 20, 480, C_WHITE) # 左壁 rect( 0, 0, 640, 20, C_WHITE) # 上壁 rect(620, 0, 20, 480, C_WHITE) # 右壁 x = Input.mouse_pos_x rect(x, 460, 100, 20, C_WHITE) # バー ball_x = ball_x + dx if atari_4?(ball_x, ball_y, 20, 20) ball_x = ball_x - dx dx = -dx end ball_y = ball_y + dy if atari_4?(ball_x, ball_y, 20, 20) ball_y = ball_y - dy dy = -dy end rect(ball_x, ball_y, 20, 20, C_RED) # ボール Window.draw(0, 0, $screen) end
12. ブロック崩し:ブロックを描く
ブロック群を描画します。
pri_15.rbrequire 'dxruby' $screen = Image.new(640, 480) def rect(x, y, width, height, color) # 四角を描画する w = 0 while w < width h = 0 while h < height $screen[x + w, y + h] = color h = h + 1 end w = w + 1 end end def atari?(x, y) # 衝突判定(1ドット) if $screen[x,y] == C_DEFAULT return false end true end def atari_4?(x, y, width, height) # 衝突判定(四角) atari?(x, y) || atari?(x + width, y) || atari?(x, y + width) || atari?(x + width, y + width) end def block(x, y, color) # ブロック1つ rect(x, y, 58, 18, color) end def blocks # ブロック群を描画する count_x = 0 while count_x < 10 count_y = 0 while count_y < 5 x = 21 + 60 * count_x y = 21 + 20 * count_y block(x, y, C_WHITE) count_y = count_y + 1 end count_x = count_x + 1 end end # バーの初期位置 x = 300 # ボールの初期値 ball_x = 300 ball_y = 400 dx = 4 dy = -4 Window.loop do rect(x, 460, 100, 20, C_DEFAULT) # バーの軌跡を消す rect(ball_x, ball_y, 20, 20, C_DEFAULT) # ボールの軌跡を消す rect( 0, 0, 20, 480, C_WHITE) # 左壁 rect( 0, 0, 640, 20, C_WHITE) # 上壁 rect(620, 0, 20, 480, C_WHITE) # 右壁 x = Input.mouse_pos_x rect(x, 460, 100, 20, C_WHITE) # バー ball_x = ball_x + dx if atari_4?(ball_x, ball_y, 20, 20) ball_x = ball_x - dx dx = -dx end ball_y = ball_y + dy if atari_4?(ball_x, ball_y, 20, 20) ball_y = ball_y - dy dy = -dy end rect(ball_x, ball_y, 20, 20, C_RED) # ボール blocks # ブロック群 Window.draw(0, 0, $screen) end
13. ブロック崩し:ブロックとの衝突判定(衝突したら消す)をする(完成)
衝突したブロックの (x, y) を計算して、ブロックを消す処理を追加します。
ブロック群の初期状態(白色)を設定する処理が必要になります。pri_16.rb# 基本機能だけでブロック崩し:衝突ブロックを消す(完成) require 'dxruby' $screen = Image.new(640, 480) def rect(x, y, width, height, color) # 四角を描画する w = 0 while w < width h = 0 while h < height $screen[x + w, y + h] = color h = h + 1 end w = w + 1 end end def atari?(x, y) # 衝突判定(1ドット) if $screen[x,y] == C_DEFAULT return false end true end def atari_4?(x, y, width, height) # 衝突判定(四角) atari?(x, y) || atari?(x + width, y) || atari?(x, y + width) || atari?(x + width, y + width) end def block(x, y, color) # ブロック1つ rect(x, y, 58, 18, color) end def blocks # ブロック群を描画する count_x = 0 while count_x < 10 count_y = 0 while count_y < 5 x = 21 + 60 * count_x y = 21 + 20 * count_y block(x, y, $screen[x, y]) # 色は前回の色と同じにする count_y = count_y + 1 end count_x = count_x + 1 end end def vanish_block(x, y) # ブロックを消去する if (20 < x && x < 600) && (20 < y && y < 120) rect_x = x - (x - 21) % 60 # 衝突位置から衝突ブロックの rect_y = y - (y - 21) % 20 # (x, y)を計算する block(rect_x, rect_y, C_DEFAULT) end end def initialize_blocks # ブロック群の初期色を白にする count_x = 0 while count_x < 10 count_y = 0 while count_y < 5 x = 21 + 60 * count_x y = 21 + 20 * count_y $screen[x, y] = C_WHITE count_y = count_y + 1 end count_x = count_x + 1 end end # バーの初期位置 x = 300 # ボールの初期値 ball_x = 300 ball_y = 400 dx = 4 dy = -4 # ブロック群の初期色の設定 initialize_blocks Window.loop do rect(x, 460, 100, 20, C_DEFAULT) # バーの軌跡を消す rect(ball_x, ball_y, 20, 20, C_DEFAULT) # ボールの軌跡を消す rect( 0, 0, 20, 480, C_WHITE) # 左壁 rect( 0, 0, 640, 20, C_WHITE) # 上壁 rect(620, 0, 20, 480, C_WHITE) # 右壁 x = Input.mouse_pos_x rect(x, 460, 100, 20, C_WHITE) # バー ball_x = ball_x + dx if atari_4?(ball_x, ball_y, 20, 20) vanish_block(ball_x, ball_y) # 衝突ブロックを消す ball_x = ball_x - dx dx = -dx end ball_y = ball_y + dy if atari_4?(ball_x, ball_y, 20, 20) vanish_block(ball_x, ball_y) # 衝突ブロックを消す ball_y = ball_y - dy dy = -dy end rect(ball_x, ball_y, 20, 20, C_RED) # ボール blocks # ブロック群 Window.draw(0, 0, $screen) end
描画処理が追いつかず、ボールの移動スピードが低下してしまいました。
改良の余地があるようです。参考
プログラミング初心者向け:DXRubyで 1ステップずつ作っていく「ブロック崩し」 - Qiita
で作った「ブロック崩し」のプログラムです。block28.rbrequire 'dxruby' img_bar = Image.new(100, 20, C_WHITE) img_hwall = Image.new( 20, 480, C_BLUE) img_vwall = Image.new(640, 20, C_BLUE) img_ball = Image.new( 20, 20).circle_fill(10, 10, 10, C_RED) img_block = Image.new( 58, 18, C_GREEN) img_block_y = Image.new( 58, 18, C_YELLOW) bar = Sprite.new( 0, 460, img_bar) lwall = Sprite.new( 0, 0, img_hwall) rwall = Sprite.new(620, 0, img_hwall) twall = Sprite.new( 0, 0, img_vwall) walls = [bar, lwall, rwall, twall] ball = Sprite.new(300, 400, img_ball) dx = 2 dy = -2 def move(sprite, speed_x, speed_y) sprite.x += speed_x sprite.y += speed_y end blocks = [] 10.times do |x| 5.times do |y| blocks << Sprite.new(21 + 60 * x, 21 + 20 * y, img_block) end end Window.loop do bar.x = Input.mouse_pos_x Sprite.draw(walls) move(ball, dx, 0) if ball === walls ball.x -= dx dx = -dx end coll_x = ball.check(blocks) if coll_x[0] coll_x[0].image = img_block_y coll_x[0].draw #一瞬色が変わって表示 coll_x[0].vanish #消える ball.x -= dx dx = -dx end move(ball, 0, dy) if ball === walls ball. y -= dy dy = -dy end coll_y = ball.check(blocks) if coll_y[0] coll_y[0].image = img_block_y coll_y[0].draw #一瞬色が変わって表示 coll_y[0].vanish #消える ball. y -= dy dy = -dy end ball.draw Sprite.draw(blocks) end
- 投稿日:2020-02-18T17:31:48+09:00
お前らまだ引数に順番指定してんの?
はじめに
vueとnuxtの記事も書こうかなあ、、、
お前らのプロジェクト壊れる可能性あるぞ
先日、仕事中に学んだこと。
インスタンス変数を作成するためにinistializeメソッドを活用していた際に今までの自分は引数の順番に依存していました。Human.rbclass Human attr_render :name, :age, :sex def initialize(name, age, sex) @name = name @age = age @sex = sex end 〜省略〜 end Human.new('Taro',20,'male')この例では、Humanのinitializeメソッドは次の3つの引数を取ります。name, age, sexの3つですね。
つまりHuman.newでインスタンスを作成するところでは引数を3つ渡しています。
まあ教科書通りのinistializeメソッド及び引数の使い方ですね。
しかしこの方法には大きな欠点があります。
- 引数を順番に渡さなければならない
- 3つの引数をもれなく、だぶりなく渡さなければならない
この引数の使い方は小規模かつ個人での開発なら何ら問題有りません。
自分が作成したインスタンスなので勝手はわかっているし、他のクラスとの依存関係も頭に入っているはずです。
小規模の開発なら変更も少ないですし、この仕様が変わることはないかもしれません。しかし、大規模な開発かつチームでの開発だったらどうでしょう?
チームでの開発/実務レベルでの大規模な開発では常に変更を考えて実装しなければなりません。
プログラムに機能が追加されたり、改修要望が入った際には、インスタンスの引数の数が変わるかもしれないし、
そもそも既存のインスタンス変数が削除されるかもしれません。
また、この一つのインスタンスだけなら良いですが、別のクラスでHumanクラスのインスタンスを作成していた場合その箇所をすべて直さなければなりません。(10箇所の変更とか普通にあります、、、)
この書き方ではまずそうですね、、、。ではどのように書きましょう?
引数にハッシュを使う
先程述べた「引数の順番固定」を簡単に回避する方法があります。
ハッシュです!!!Human.rbclass Human attr_render :name, :age, :sex def initialize(args) @name = args[:name] @age = args[:age] @sex = args[:sex] end 〜省略〜 end Human.new(name: 'Taro', age: 20, sex: 'male')このテクニックにはいくつかの利点があります。
- 引数の順番依存を取り除ける
- 変更に強い
- key名が明示的なドキュメントになってくれている
この方法のおかげでどんなに引数を変更しても他のコードに対する副作用がなくなりました。
よって、仕様変更の際になんの気兼ねもなく引数の追加や除去ができます。
安心感がすごいです。
またkey名がなんの情報を渡しているのかを示してくれているため、
インスタンスを生成する際にとてもわかりやすいですね。その他のテクニック①
Human.rbclass Human attr_render :name, :age, :sex def initialize(args) @name = args[:name] || 'Jiro' @age = args[:age] || '10' @sex = args[:sex] || 'male' end 〜省略〜 end Human.new(name: 'Taro', age: 20, sex: 'male')||メソッドを使用することでデフォルト値を設定することができます。
||メソッドはor演算子と同様に作用します。
左辺を評価し、その結果がfalseまたはnilであれば右辺の評価に移ります。
こうすることで引数に値を入れ忘れたとき(意図的に入れないとき)でもインスタンス変数を生成することができるでしょう。
例えば「sexの値はほとんどの人がmaleだな」と思えば@sex = args[:sex] || 'male'と設定しておくだけでインスタンス生成時に引数を渡さなくても良くなります。
その他のテクニック②
Human.rbclass Human attr_render :name, :age, :sex def initialize(args) args = defaults.merge(args) @name = args[:name] @age = args[:age] @sex = args[:sex] end 〜省略〜 def defaults {name: 'Jiro', age: 10, sex: 'male'} end endこの方法もデフォルト値を設定するのに大変役立ちます。
隔離テクニックとでも名付けましょうか。
defaultsメソッドを設定し、initializeメソッド内で呼び出しています。
この方法は特にデフォルト値が長いときや複雑な時に活用すべきです。
コードの可視性が高まりますね。終わりに
プログラムは普遍的なものではありません。
常に変更と改善の繰り返しです。
変化に強いコードを書けるスキルは今の時代(アジャイルでの開発が主流になってきた時代)、必須のスキルと言っても過言ではありません。
あなたのコードがチームメンバーに多くの手間と工数をかけさせるかもしれません。
ひどいときにはプログラム自体を破壊してしまう可能性もあるのです。
ただ動くだけではなく、本当に"良いコード"を書けるように一緒に邁進しましょう!!!(今回はちょっと真面目に書きすぎたな、、、
)
参考
オブジェクト指向設計実践ガイド ~Rubyでわかる 進化しつづける柔軟なアプリケーションの育て方
Sandi Metz (著), 髙山泰基 (翻訳)
- 投稿日:2020-02-18T17:02:32+09:00
DXRuby:「当たり判定」を自分で作ってみよう C. 色で判定する
概要
この記事は中学高校生向けプログラミング教室の教材として作ったものを一部改変したものです。
今回の記事は、
・DXRuby:「当たり判定」を自分で作ってみよう - Qiita● 当たり(衝突)判定の方法
A. 四角形の四隅の座標で判定する
B. 円の中心からの距離で判定する
C. 色で判定するの内の
C. 色で判定する
になります。
前の記事
・DXRuby:「当たり判定」を自分で作ってみよう B. 円の中心からの距離で判定する - Qiita次の記事
・プログラミングの基礎力をつける:なるべく基本命令だけで作る「ブロック崩し」 on DXRuby - Qiita技術解説
- 使用ライブラリ
- 参考サイト については、上記記事を参照してください。
ライセンス
ソースコード、本解説ともにパブリックドメイン
プログラム解説
C. 色で判定する
→ 「ブロック崩し」追加課題 1c);衝突判定の自作(色) - noanoa 日々の日記
http://blog.livedoor.jp/noanoa07/archives/2052899.htmlC-1a.
===を使った準備:判定相手が単独(atari_iro1.rb)DXRubyのスプライトでは、
===を使うと、衝突の有/無でtrue/fasleを返します。
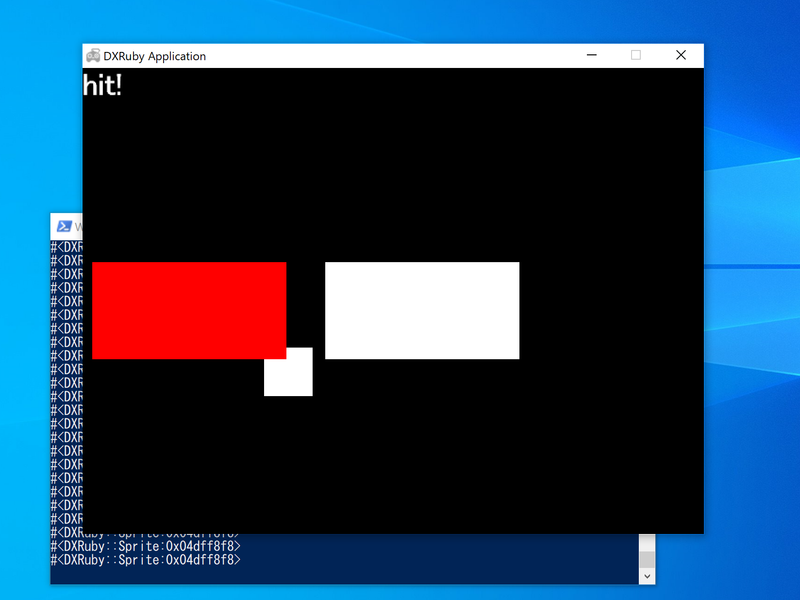
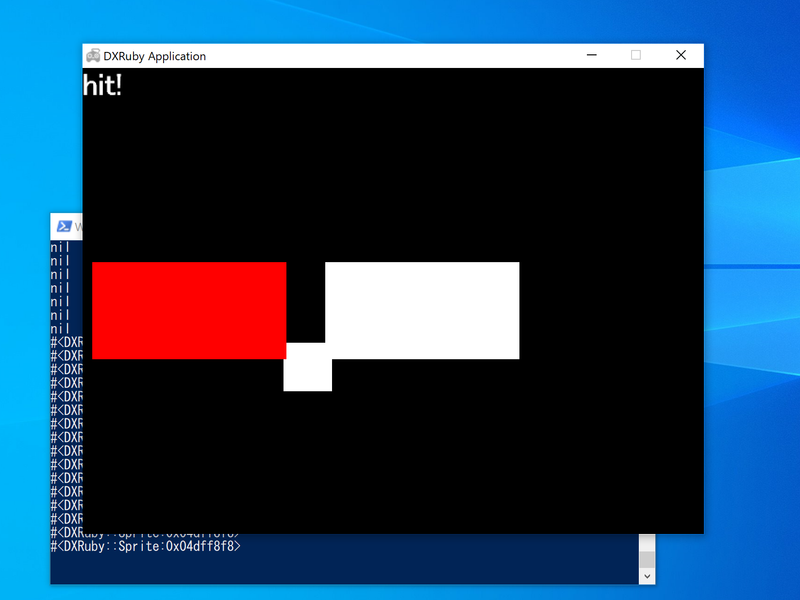
ball(小さい正方形)が、block(大きい長方形)と衝突しているかを===で判定します。
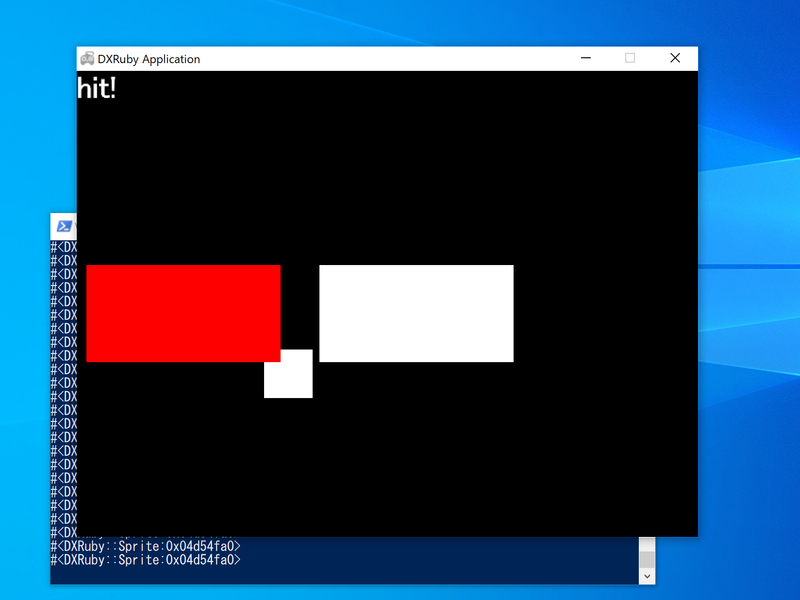
衝突/非衝突 の結果をターミナル(コマンドプロンプト)にtrue/falseで出力しつつ、blockの色も赤/白にします。
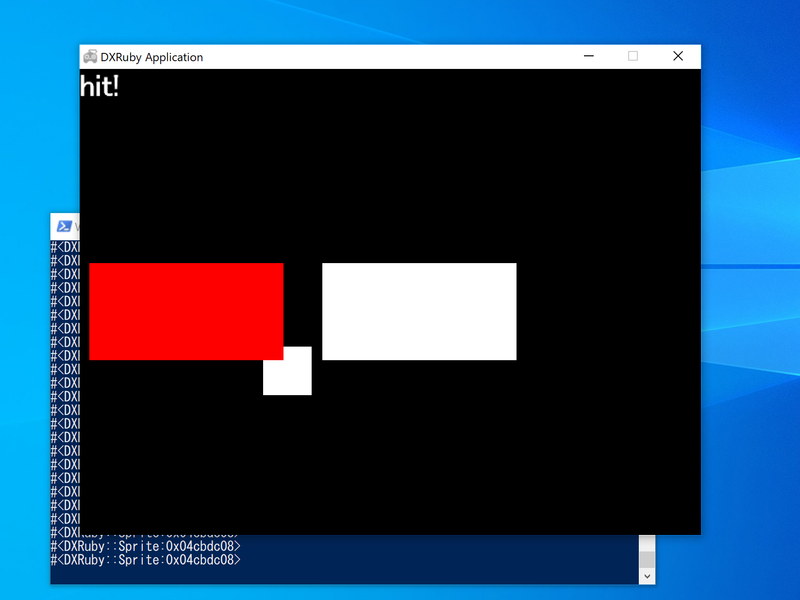
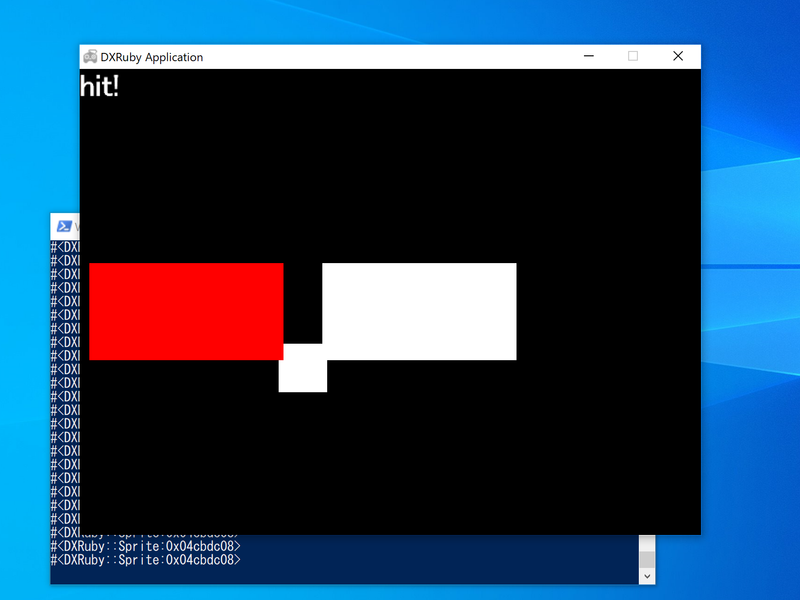
また、ウィンドウに衝突時はhit!の文字列を表示します。atari_iro1.rbrequire 'dxruby' image0 = Image.new( 50, 50, C_WHITE) image1 = Image.new(200, 100, C_WHITE) image2 = Image.new(200, 100, C_RED) ball = Sprite.new(300, 400, image0) block = Sprite.new(200, 200, image1) font = Font.new(32) Window.loop do ball.x = Input.mouse_pos_x ball.y = Input.mouse_pos_y ball.draw result = (ball === block) p result if result Window.draw_font(0, 0, "hit!", font) block.image = image2 else block.image = image1 end block.draw end
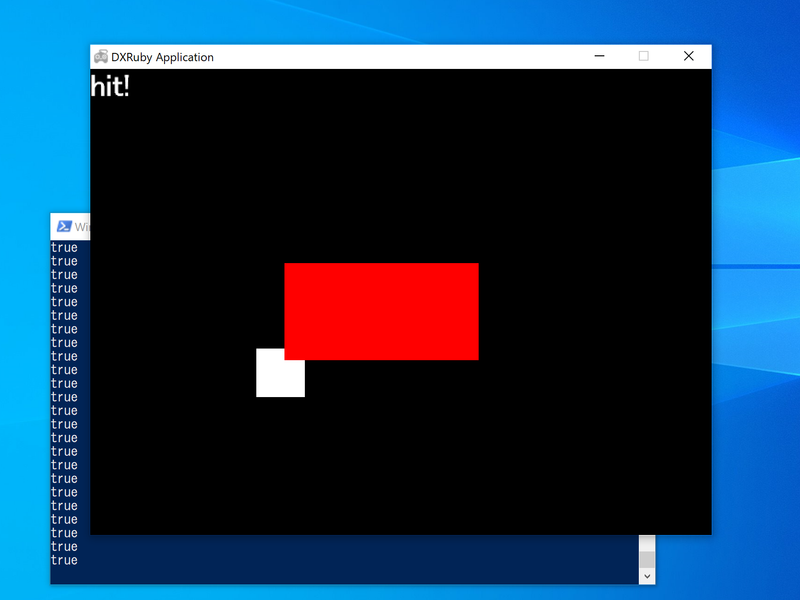
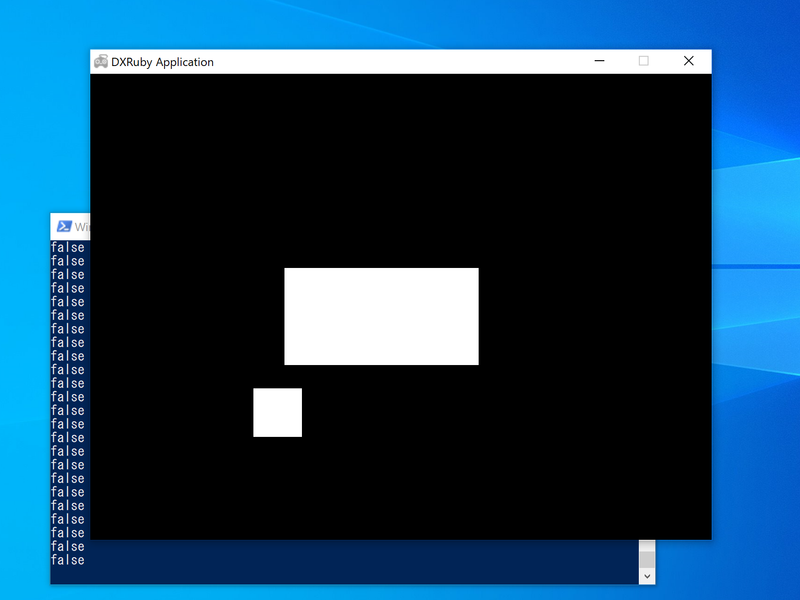
C-1b.
atari_sprite?を自作:判定相手が単独(atari_iro2.rb)
atari_sprite?(jibun, aite)を作って、 衝突の有/無でtrue/fasleを返すようにします。DXRubyでは、座標(x, y)の色を取得する方法は、
イメージ[x, y]しかありませんので、これを使うことにします。これを使えば、
イメージ[x, y] == C_DEFAULTで座標(x,y)が透明かどうかを比較できます。手順としては、まず、表示するウィンドウと同じサイズの透明な衝突判定用のイメージ
$screenを用意します。($でグローバル変数にしています。)$screen[x, y]で座標(x,y)の色を取得して、色がある/透明を衝突している/していないの判定に使います。この部分を
atari?(x,y)として作ってみます。$screen = Image.new(640, 480) def atari?(x, y) if $screen[x,y] == C_DEFAULT # 位置(x,y)が透明かどうかで衝突判定 return false end true endこれだけだと、点(x, y)しか判定できないので、スプライト画像を判定できるように
atari_sprite?(jibun, aite)を作ります。これにはDXRubyの
イメージ.draw(x, y, コピーしたいイメージ画像)を使います。これで、あるイメージの上に別のイメージ画像をコピーできます。def atari_sprite?(jibun, aite) x0 = jibun.x xx0 = x0 + jibun.image.width y0 = jibun.y yy0 = y0 + jibun.image.height $screen.clear # $screenは毎回 clearする $screen.draw(aite.x, aite.y, aite.image) # $screenに描画して衝突判定 atari?(x0, y0) || atari?(xx0, y0) || atari?(x0, yy0) || atari?(xx0, yy0) endここで、
$screen.clearは、毎回$screenを透明に戻しています。
また、衝突判定は四角形jibunの四隅が透明かどうかで判定しています。atari?(x0, y0) || atari?(xx0, y0) || atari?(x0, yy0) || atari?(xx0, yy0)そして、実際の画面の描画では、この
$screenは使わず、普通にウィンドウにスプライト.draw、Window.draw_fontを使います。それでは、自作した
atari_sprite?を使って、===を使ったコードを書き換えてみます。→ DXRubyリファレンス:API INDEX;class Image :[],draw,clear
http://mirichi.github.io/dxruby-doc/api/Image.html→ DXRubyリファレンス:API INDEX;class Sprite :image,draw
http://mirichi.github.io/dxruby-doc/api/Sprite.html→ Re: 描画処理の改善法 - DXRuby 掲示板 322 mirichi(2015/05/31 11:49)
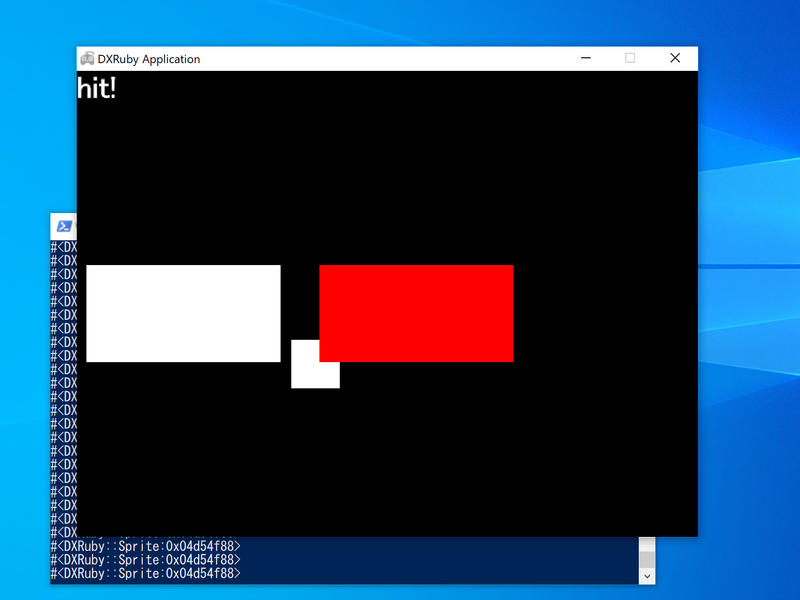
http://dxruby.osdn.jp/bbs_/atari_iro2.rbrequire 'dxruby' $screen = Image.new(640, 480) def atari?(x, y) if $screen[x,y] == C_DEFAULT # 位置(x,y)が透明かどうかで衝突判定 return false end true end def atari_sprite?(jibun, aite) x0 = jibun.x xx0 = x0 + jibun.image.width y0 = jibun.y yy0 = y0 + jibun.image.height $screen.clear # $screenは毎回 clearする $screen.draw(aite.x, aite.y, aite.image) # $screenに描画して衝突判定 atari?(x0, y0) || atari?(xx0, y0) || atari?(x0, yy0) || atari?(xx0, yy0) end image0 = Image.new( 50, 50, C_WHITE) image1 = Image.new(200, 100, C_WHITE) image2 = Image.new(200, 100, C_RED) ball = Sprite.new(300, 400, image0) block = Sprite.new(200, 200, image1) font = Font.new(32) Window.loop do ball.x = Input.mouse_pos_x ball.y = Input.mouse_pos_y ball.draw result = atari_sprite?(ball, block) p result if result Window.draw_font(0, 0, "hit!", font) block.image = image2 else block.image = image1 end block.draw end
C-2a.
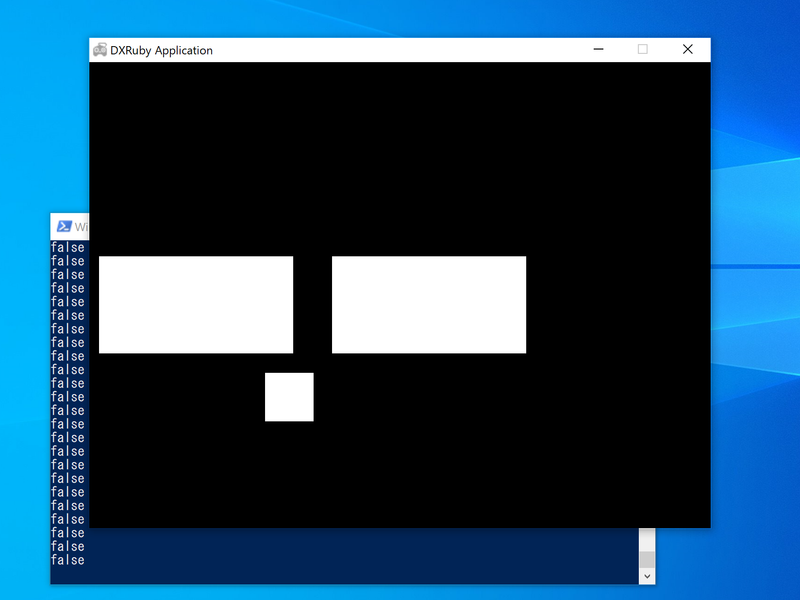
===を使った準備:判定相手が配列(atari_iro3.rb)DXRubyのスプライトでは、
===は、相手がスプライトの配列でも、衝突の有/無でtrue/fasleを返します。
ballが、スプライトの配列blocksと衝突しているかを===で判定します。
blocksのいずれかと衝突していたら、ターミナル(コマンドプロンプト)にtrueで出力し、それ以外はfalseを出力します。
また、ウィンドウに衝突時はhit!の文字列を表示します。atari_iro3.rbrequire 'dxruby' image0 = Image.new( 50, 50, C_WHITE) image1 = Image.new(200, 100, C_WHITE) image2 = Image.new(200, 100, C_RED) ball = Sprite.new(300, 400, image0) block1 = Sprite.new( 10, 200, image1) block2 = Sprite.new(250, 200, image1) blocks = [block1, block2] font = Font.new(32) Window.loop do ball.x = Input.mouse_pos_x ball.y = Input.mouse_pos_y ball.draw result = (ball === blocks) p result if result Window.draw_font(0, 0, "hit!", font) end Sprite.draw(blocks) end
C-2b.
atari_array?を自作:判定相手が配列(atari_iro4.rb)
===の代わりに、atari_array?(jibun, array)を自作します。
判定相手の配列の要素を一つずつatari_sprite?で判定していきます。自作した
atari_array?を使って、コードを書き換えます。atari_iro4.rbrequire 'dxruby' $screen = Image.new(640, 480) def atari?(x, y) if $screen[x,y] == C_DEFAULT return false end true end def atari_sprite?(jibun, aite) x0 = jibun.x xx0 = x0 + jibun.image.width y0 = jibun.y yy0 = y0 + jibun.image.height $screen.clear $screen.draw(aite.x, aite.y, aite.image) atari?(x0, y0) || atari?(xx0, y0) || atari?(x0, yy0) || atari?(xx0, yy0) end def atari_array?(jibun, array) array.each do |aite| return true if atari_sprite?(jibun, aite) end false end image0 = Image.new( 50, 50, C_WHITE) image1 = Image.new(200, 100, C_WHITE) image2 = Image.new(200, 100, C_RED) ball = Sprite.new(300, 400, image0) block1 = Sprite.new( 10, 200, image1) block2 = Sprite.new(250, 200, image1) blocks = [block1, block2] font = Font.new(32) Window.loop do ball.x = Input.mouse_pos_x ball.y = Input.mouse_pos_y ball.draw result = atari_array?(ball, blocks) p result if result Window.draw_font(0, 0, "hit!", font) end Sprite.draw(blocks) end
C-3a.
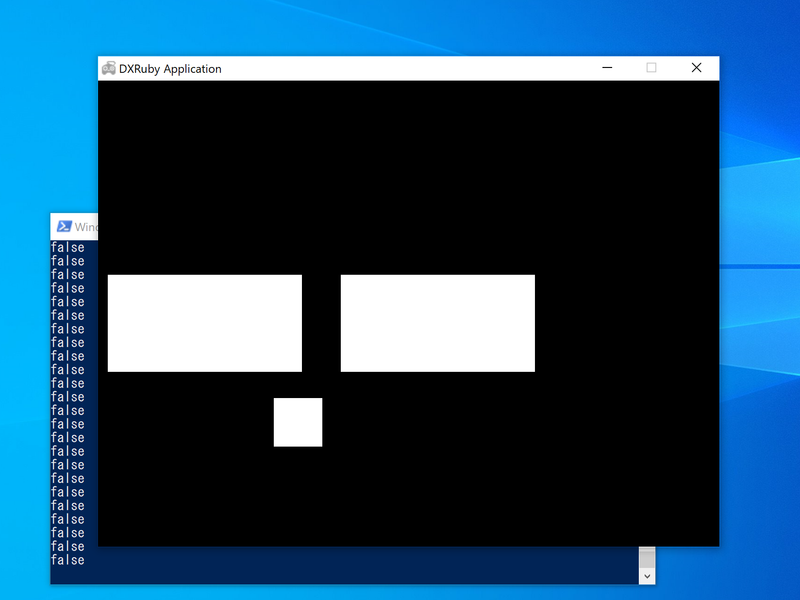
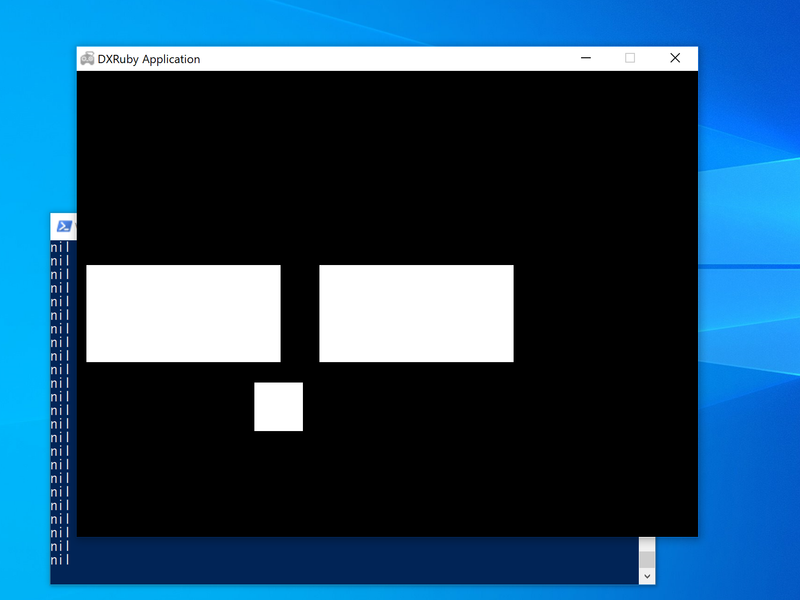
checkを使った準備(atari_iro5.rb)DXRubyの
===や、自作したatari_array?では、どの相手に衝突したかは分かりませんでした。一方、DXRubyのスプライトでは
checkを使うと、衝突している相手すべてを配列に入れて返します。(衝突していない時は、何も入ってない配列を返す)この配列を
arrayとすると、0番目のarray.first(array[0]でも同じ)が最初に衝突した相手です。また、array.firstに何か入っていれば衝突している、空(nil)ならば衝突していないという、当たり判定にも使えます。→ DXRubyリファレンス:Spriteを使うためのチュートリアル;衝突したオブジェクトを取得する
http://mirichi.github.io/dxruby-doc/tutorial/sprite.html→ DXRubyリファレンス:API INDEX;Sprite;check
http://mirichi.github.io/dxruby-doc/api/Sprite_23check.htmlプログラムでは、
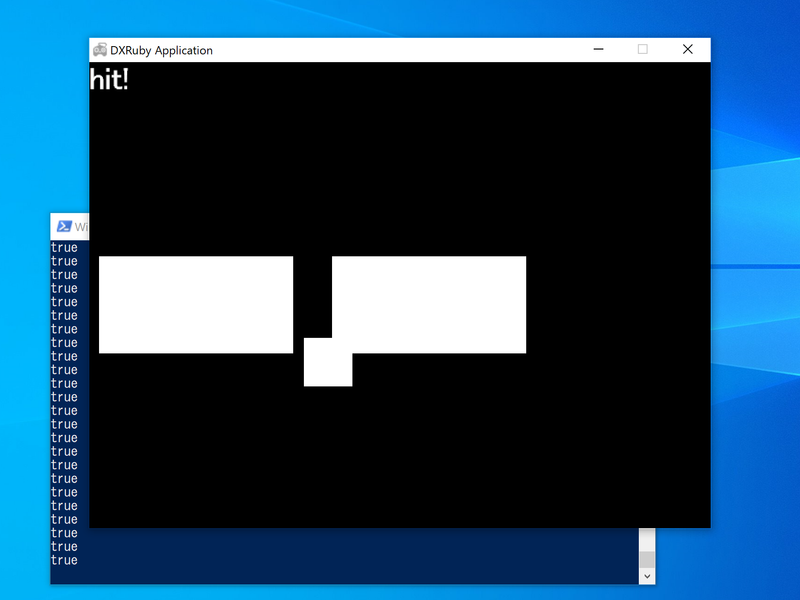
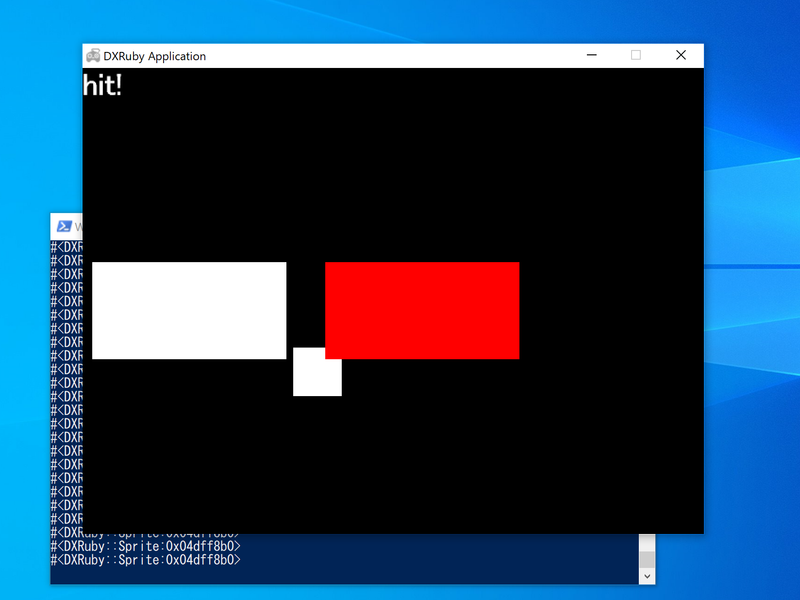
ballがblocksのどれに最初に衝突しているかをcheck.firstで判定します。
最初に衝突しているブロックをターミナル(コマンドプロンプト)に出力し、そのブロックを赤色にします。それ以外はnilを出力します。
また、ウィンドウに衝突時はhit!の文字列を表示します。atari_iro5.rbrequire 'dxruby' image0 = Image.new( 50, 50, C_WHITE) image1 = Image.new(200, 100, C_WHITE) image2 = Image.new(200, 100, C_RED) ball = Sprite.new(300, 400, image0) block1 = Sprite.new( 10, 200, image1) block2 = Sprite.new(250, 200, image1) blocks = [block1, block2] font = Font.new(32) Window.loop do ball.x = Input.mouse_pos_x ball.y = Input.mouse_pos_y ball.draw col = ball.check(blocks).first p col if col Window.draw_font(0, 0, "hit!", font) col.image = image2 Sprite.draw(blocks) col.image = image1 else Sprite.draw(blocks) end end
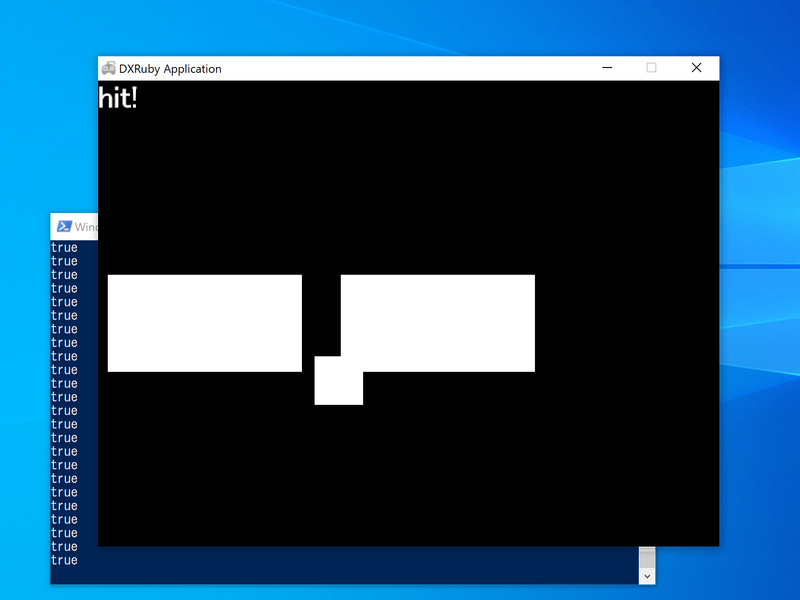
C-3b.
atari_arrayを自作(atari_iro6.rb)ぶつかった相手は最初のものだけ分かればよいので、DXRubyの
check.first相当のatari_arrayを自作します。つまり、
atari_arrayは、衝突していないとnilを返し、衝突すると "ぶつかった最初のもの" を返します。方法は、判定相手の配列の要素を一つずつ
atari?で判定していき、最初に衝突している要素を返します。自作した
atari_arrayを使って、コードを書き換えます。atari_iro6.rbrequire 'dxruby' $screen = Image.new(640, 480) def atari?(x, y) if $screen[x,y] == C_DEFAULT return false end true end def atari_sprite?(jibun, aite) x0 = jibun.x xx0 = x0 + jibun.image.width y0 = jibun.y yy0 = y0 + jibun.image.height $screen.clear $screen.draw(aite.x, aite.y, aite.image) atari?(x0, y0) || atari?(xx0, y0) || atari?(x0, yy0) || atari?(xx0, yy0) end def atari_array(jibun, array) array.each do |aite| return aite if atari_sprite?(jibun, aite) end nil end image0 = Image.new( 50, 50, C_WHITE) image1 = Image.new(200, 100, C_WHITE) image2 = Image.new(200, 100, C_RED) ball = Sprite.new(300, 400, image0) block1 = Sprite.new( 10, 200, image1) block2 = Sprite.new(250, 200, image1) blocks = [block1, block2] font = Font.new(32) Window.loop do ball.x = Input.mouse_pos_x ball.y = Input.mouse_pos_y ball.draw col = atari_array(ball, blocks) p col if col Window.draw_font(0, 0, "hit!", font) col.image = image2 Sprite.draw(blocks) col.image = image1 else Sprite.draw(blocks) end end
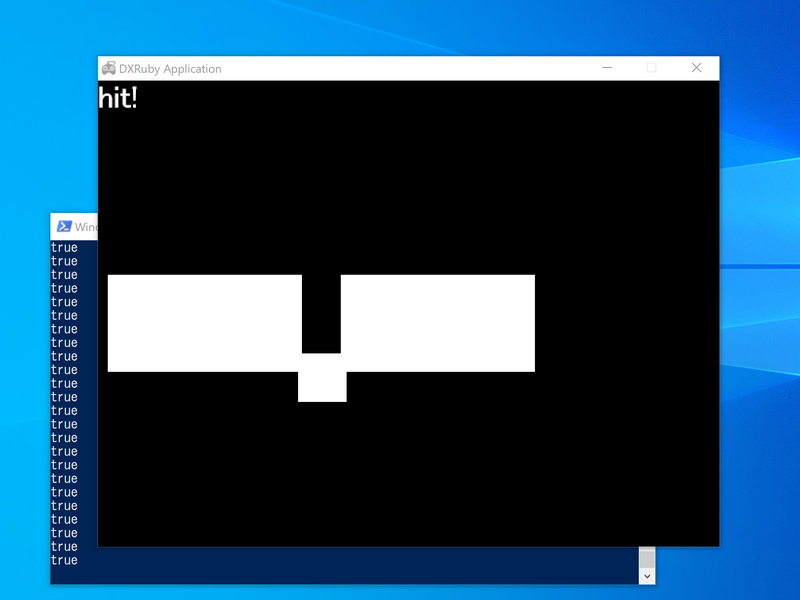
C-4. 自作の当たり判定(色)を
Spriteクラスのメソッドにする(atari_iro7.rb)元の
===とcheckは、Spriteクラスのメソッド(命令)なので、書き方としては、ball.check(blocks)のようになります。自作の
atari_arrayも同じような書き方になるように、Spriteクラスのメソッドにしてみます。
クラスやメソッドについての説明はここでは説明を省きますので、詳しくはRubyのテキストを見てください。クラスメソッドを追加する方法は簡単で、以下のようにします。
class Sprite
  def 追加したいメソッド
    #追加したいメソッドの内容
  end
end
Spriteクラスにatari?とatari_array追加します。ちなみに、
jibun(自分)に相当するものは、selfと書きます。class Sprite def atari?(x, y) if $screen[x,y] == C_DEFAULT return false end true end def atari_sprite?(aite) x0 = self.x xx0 = x0 + self.image.width y0 = self.y yy0 = y0 + self.image.height $screen.clear $screen.draw(aite.x, aite.y, aite.image) atari?(x0, y0) || atari?(xx0, y0) || atari?(x0, yy0) || atari?(xx0, yy0) end def atari_array(array) array.each do |aite| return aite if atari_sprite?(aite) end nil end endこれで、クラスメソッドになったので、今までの
atari_array(ball, blocks)という書き方ではなく、ball.atari_array(blocks)というように書くことができるようになりました。atari_iro7.rbrequire 'dxruby' $screen = Image.new(640, 480) class Sprite def atari?(x, y) if $screen[x,y] == C_DEFAULT return false end true end def atari_sprite?(aite) x0 = self.x xx0 = x0 + self.image.width y0 = self.y yy0 = y0 + self.image.height $screen.clear $screen.draw(aite.x, aite.y, aite.image) atari?(x0, y0) || atari?(xx0, y0) || atari?(x0, yy0) || atari?(xx0, yy0) end def atari_array(array) array.each do |aite| return aite if atari_sprite?(aite) end nil end end image0 = Image.new( 50, 50, C_WHITE) image1 = Image.new(200, 100, C_WHITE) image2 = Image.new(200, 100, C_RED) ball = Sprite.new(300, 400, image0) block1 = Sprite.new( 10, 200, image1) block2 = Sprite.new(250, 200, image1) blocks = [block1, block2] font = Font.new(32) Window.loop do ball.x = Input.mouse_pos_x ball.y = Input.mouse_pos_y ball.draw col = ball.atari_array(blocks) p col if col Window.draw_font(0, 0, "hit!", font) col.image = image2 Sprite.draw(blocks) col.image = image1 else Sprite.draw(blocks) end end
C-5. 自作の当たり判定(色)を使ったブロック崩し(atari_iro8.rb)
「ブロック崩し」のプログラム
block28.rbを、自作のatari_arrayに書き換えてみましょう。元の
===とcheck.firstを同じ動きをしているのがわかると思います。atari_iro8.rbrequire 'dxruby' $screen = Image.new(640, 480) class Sprite def atari?(x, y) if $screen[x,y] == C_DEFAULT return false end true end def atari_sprite?(aite) x0 = self.x xx0 = x0 + self.image.width y0 = self.y yy0 = y0 + self.image.height $screen.clear $screen.draw(aite.x, aite.y, aite.image) atari?(x0, y0) || atari?(xx0, y0) || atari?(x0, yy0) || atari?(xx0, yy0) end def atari_array(array) array.each do |aite| return aite if atari_sprite?(aite) end nil end end img_bar = Image.new(100, 20, C_WHITE) img_hwall = Image.new( 20, 480, C_BLUE) img_vwall = Image.new(640, 20, C_BLUE) img_ball = Image.new( 20, 20).circle_fill(10, 10, 10, C_RED) img_block = Image.new( 58, 18, C_GREEN) img_block_y = Image.new( 58, 18, C_YELLOW) bar = Sprite.new( 0, 460, img_bar) lwall = Sprite.new( 0, 0, img_hwall) rwall = Sprite.new(620, 0, img_hwall) twall = Sprite.new( 0, 0, img_vwall) walls = [bar, lwall, rwall, twall] ball = Sprite.new(300, 400, img_ball) dx = 2 dy = -2 def move(sprite, speed_x, speed_y) sprite.x += speed_x sprite.y += speed_y end blocks = [] 10.times do |x| 5.times do |y| blocks << Sprite.new(21 + 60 * x, 21 + 20 * y, img_block) end end Window.loop do bar.x = Input.mouse_pos_x Sprite.draw(walls) move(ball, dx, 0) if ball.atari_array(walls) ball.x -= dx dx = -dx end coll_x = ball.atari_array(blocks) if coll_x coll_x.image = img_block_y coll_x.draw #一瞬色が変わって表示 coll_x.vanish #消える ball.x -= dx dx = -dx end move(ball, 0, dy) if ball.atari_array(walls) ball. y -= dy dy = -dy end coll_y = ball.atari_array(blocks) if coll_y coll_y.image = img_block_y coll_y.draw #一瞬色が変わって表示 coll_y.vanish #消える ball. y -= dy dy = -dy end ball.draw Sprite.draw(blocks) end
参考
プログラミング初心者向け:DXRubyで 1ステップずつ作っていく「ブロック崩し」 - Qiita
で作った「ブロック崩し」のプログラムです。block28.rbrequire 'dxruby' img_bar = Image.new(100, 20, C_WHITE) img_hwall = Image.new( 20, 480, C_BLUE) img_vwall = Image.new(640, 20, C_BLUE) img_ball = Image.new( 20, 20).circle_fill(10, 10, 10, C_RED) img_block = Image.new( 58, 18, C_GREEN) img_block_y = Image.new( 58, 18, C_YELLOW) bar = Sprite.new( 0, 460, img_bar) lwall = Sprite.new( 0, 0, img_hwall) rwall = Sprite.new(620, 0, img_hwall) twall = Sprite.new( 0, 0, img_vwall) walls = [bar, lwall, rwall, twall] ball = Sprite.new(300, 400, img_ball) dx = 2 dy = -2 def move(sprite, speed_x, speed_y) sprite.x += speed_x sprite.y += speed_y end blocks = [] 10.times do |x| 5.times do |y| blocks << Sprite.new(21 + 60 * x, 21 + 20 * y, img_block) end end Window.loop do bar.x = Input.mouse_pos_x Sprite.draw(walls) move(ball, dx, 0) if ball === walls ball.x -= dx dx = -dx end coll_x = ball.check(blocks) if coll_x[0] coll_x[0].image = img_block_y coll_x[0].draw #一瞬色が変わって表示 coll_x[0].vanish #消える ball.x -= dx dx = -dx end move(ball, 0, dy) if ball === walls ball. y -= dy dy = -dy end coll_y = ball.check(blocks) if coll_y[0] coll_y[0].image = img_block_y coll_y[0].draw #一瞬色が変わって表示 coll_y[0].vanish #消える ball. y -= dy dy = -dy end ball.draw Sprite.draw(blocks) end


- 投稿日:2020-02-18T15:47:08+09:00
Rails tutorialを一周した。&不安しかないんで見てほしいっていう話
さきほどRails tutorialを一周してこれからどうしようかなと思ったので、
ひとまず書いてみることにしました。
長くなるかもしれませんがどうか片手間にお付き合いくださるとうれしいです。次にどうするか
現在大学1年生で、もともと「何か役に立つ物を作ってみてぇ.....」といった理由でプログラミング学習を始めました。
Rubyを少し触っていたこともあり、Rails Tutorialの理解も進み、一周できたということで
いよいよWebアプリの作成にかかりたいと思います。
.....しかしやはりお金も稼ぎたい
プログラミングは学べば学ぶほどできることが増えて、それに伴う達成感もあります。
しかし、やはりお金は必要ッ...!!現実は無常無慈悲であるッ....!!
おまけに文系大学生。ある意味地雷の塊です。
というわけでポートフォリオ等を充足させつつ、
インターン、或いは学生アルバイトやらを現段階、目指す必要があります。
本来なら、自発的な欲求を貫徹させて道筋を立てたいところですが、
社会的な干渉は避けえないものです。
ありがたいことに東京内の大学に在籍させていただいて、インターンを募集している企業様は地域内に数多く、環境には恵まれています。
インターンを視野に入れた、実践的技術を用いたプロダクトを作成することが要になりそうです。
......ですがDockerが使えない
まず最初に思いついた実践技術がDockerだったので、試してみることにしました。
この、一年間を共にしてきたWindowsならどこまでも行ける。そう意気揚々に信じていました。
Macがおすすめとか知ったもんかい!
こちとらバリバリのWindowsユーザーなんじゃ!Mac怖い!(本心)
しかし、その勢いは早々に裏切られます。
動かない。
いくら参考資料漁って調べて実行しても画面が固まる....。なんでや....。
原因はPCそのものにありました。
自分の所有するPCの弊害
やはりMacは偉大だったようです。ここで引っかかるとは....。
Dockerなどの仮想化技術をWindowsで用いる際、VT-X/AMD-vといったBIOS内の設定が必要なのですが、自分の持っているPCにそもそも装備されていませんでした。
WindowsのPCにもいろいろ機能差があったようで、無知が仇となった瞬間でした...。
Dockerは採用する側の方々から重要視されるとよく目にしていたので、ショックでした...。ひとまず何をするべきか
ここまで紆余曲折ありましたが、自分のレベルを過大評価して、焦ってはいけません。
僕はまだ初心者。仕方ない。そう考えていったん落ち着くことにしました。
では、どうするか。
ひとまず、最初の目標である「役に立つもの」を作りたい。
この思いは何よりも大切な、内発的な動機です。
なのでこの動機で自らを動かすことにしました。
そして何を作りたいか考えました。これから作るもの
結論として、学校の評価をすることができるSNSのようなものを作ってみたいと思いました。
その根拠として、この一年の大学生活から、授業の当たりはずれというものは意外と大きく、
個人的に苦労したというのがあり、学生アンケートはあるのですが、
フィードバックが少ない、或いは目にできる機会がないということで、授業の情報蓄積をしつつ、授業の概要を履修登録前に知れたら便利だな~と感じたからです。
ひとまずはRails Tutorialの2週目をしながら、触れることのなかったSlim, Rspec等のgemやVue.js等を使用してアプリ作成をしようと思います。
学生のくせに授業に文句を言うな勉強しろという意見は至極当然ですすいません!最後に
ここまでご覧いただきありがとうございました。
東京在住の一学生の、不安を書き綴った技術発信の場にそぐわない記事ですが、
同じような状況にいる方々、あるいはこの記事にふらりと来てくださった方が面白いなと感じてくださったら幸いです。
上記内では述べませんでしたが、渋谷、世田谷近辺の勉強会にも参加できたらいいなあと考えています!
ご精読ありがとうございました!
- 投稿日:2020-02-18T15:28:13+09:00
【Ruby】大文字→小文字変換(アッパーケース→キャメルケース)
用意されているメソッド
大文字・小文字変換に使えるもの
upcase
全部大文字に変換
'abc'.upcase # => ABCdowncase
全部小文字に変換
'ABC'.downcase # => abccapitalize
最初の文字を大文字に、他を小文字にする
'abc'.capitalize # => Abcswapcase
小文字と大文字の入れ替え
'AbCd'.swapcase # => aBcDcamelize
キャメルケースに変換する。通常はアッパーキャメルケース。
'john_do'.camelize # => JohnDo引数に
:lowerを指定するとローワーキャメルケースになる'john_do'.camelize(:lower) # => johnDounderscore
スネークケースにする
'JohnDo'.underscore # => john_doアッパーケース → ローワーキャメルケースへの変換
メソッドを組み合わせれば可能
"UPPER_CASE".downcase.camelize(:lower)
# -> upperCase
参考
- 投稿日:2020-02-18T14:36:21+09:00
`require': dlopen(/Users/hoge/.rbenv/versions/2.4.1/lib/ruby/gems/2.4.0/gems/mysql2-0.4.5/lib/mysql2/mysql2.bundle, 9): Library not loaded: /usr/local/opt/openssl@1.1/lib/libssl.1.1.dylib (LoadError)
0. 問題
rails serverが立ち上がらず、以下のようなエラーが出る。$ rails s /Users/yokoto/.rbenv/versions/2.4.1/lib/ruby/gems/2.4.0/gems/mysql2-0.4.5/lib/mysql2.rb:31:in `require': dlopen(/Users/yokoto/.rbenv/versions/2.4.1/lib/ruby/gems/2.4.0/gems/mysql2-0.4.5/lib/mysql2/mysql2.bundle, 9): Library not loaded: /usr/local/opt/openssl@1.1/lib/libssl.1.1.dylib (LoadError) Referenced from: /Users/yokoto/.rbenv/versions/2.4.1/lib/ruby/gems/2.4.0/gems/mysql2-0.4.5/lib/mysql2/mysql2.bundleどうやら、
openssl@1.1、libssl.1.1、mysql2-0.4.5あたりに問題がありそう。1. 環境
$ openssl version
LibreSSL 2.8.3
MacのHigh Sierraから、デフォルトのOpenSSLがOpenSSLからLibreSSLになっている
らしく、OpenSSL依存のライブラリが問題を起こしていらしい。
ちなみに自分の環境は、
- macOS Catalina バージョン10.15.1
参考リンク
2. 解決方法
1. mysql2 gemのアンインストール
$ gem uninstall mysql22. opensslのインストール
$ brew install openssl次が重要。上記の出力で、
...
openssl@1.1 is keg-only, which means it was not symlinked into /usr/local,
because openssl/libressl is provided by macOS so don't link an incompatible version.

If you need to have openssl@1.1 first in your PATH run:
  echo 'export PATH="/usr/local/opt/openssl@1.1/bin:$PATH"' >> ~/.bash_profile

For compilers to find openssl@1.1 you may need to set:
  export LDFLAGS="-L/usr/local/opt/openssl@1.1/lib"
  export CPPFLAGS="-I/usr/local/opt/openssl@1.1/include"

For pkg-config to find openssl@1.1 you may need to set:
  export PKG_CONFIG_PATH="/usr/local/opt/openssl@1.1/lib/pkgconfig"
とあるので、これに従い、
$ echo 'export PATH="/usr/local/opt/openssl@1.1/bin:$PATH"' >> ~/.bash_profile
$ export LDFLAGS="-L/usr/local/opt/openssl@1.1/lib"
$ export CPPFLAGS="-I/usr/local/opt/openssl@1.1/include"
$ export PKG_CONFIG_PATH="/usr/local/opt/openssl@1.1/lib/pkgconfig"
bash_profileの再起動を忘れずに。$ . ~/.bash_profile3. mysql2 gemのインストール
OpenSSLを使ってインストールする必要がある。
$ gem install mysql2 -v 0.4.10 -- --with-cppflags=-I/usr/local/opt/openssl/include --with-ldflags=-L/usr/local/opt/openssl/lib参考リンク
3. 結果
$ rails s
=> Booting Puma
=> Rails 5.1.0 application starting in development on http://localhost:3000
=> Run `rails server -h` for more startup options
Puma starting in single mode...
* Version 3.8.2 (ruby 2.4.1-p111), codename: Sassy Salamander
* Min threads: 5, max threads: 5
* Environment: development
* Listening on tcp://0.0.0.0:3000
よかった。
- 投稿日:2020-02-18T14:01:15+09:00
Ruby と JavaScript でライフゲームを書いた
ハッカーになろうや模造クリスタル『ゲーム部』2で言及されてたライフゲームが面白そうだったので書いてみた。ライフゲームはセル平面上(要は方眼紙のこと)で生命をシミュレートするモデルです。
ライフゲームのルール
- セルには生と死の二つの状態がある。
- 時間(世代)が経過すると、あるルールに従ってセルの状態が変わる。
- あるルールとは次の4つ。
- 過疎による死: 自身が生で、周りの8セルのうち1セル以下が生のとき、次の世代で死ぬ。
- 生存: 自身が生で、周りの8セルのうち2〜3セルが生のとき、次の世代で生き続ける。
- 過密による死: 自身が生で、周りの8セルのうち4セル以上が生のとき、次の世代で死ぬ。
- 誕生: 自身が死で、周りの8セルのうち3セルが生のとき、次の世代で生になる。
コードで表現しやすそうなルールだ。疑似コードで書いてみるとこんな感じ?
class Cell
  def next_alive?
    alive_count = 周囲.count { |item| item.alive? }

    # 過疎
    return false if self.alive? && alive_count <= 1
    # 生存
    return true if self.alive? && 2 <= alive_count && alive_count <= 3
    # 過密
    return false if self.alive? && 4 <= alive_count
    # 誕生
    return false if self.dead? && alive_count == 3

    false
  end
end
で、これを1世代ごとに全てのセルに対してチェックすればいけそう。
Ruby で実装
https://github.com/oieioi/lifegame.rb
こんな感じに動きます。JoyDivisionっぽい見た目になった。
上に示した次世代の生死判定はこんな感じのコードになりました。
lib/lifegame/game.rb#L47-L78# あるセルが次のターンに生きてるか確認する def next_alive?(x, y) target = self[x, y] # 隣接セルの座標 adjoining = [ [x - 1, y - 1], [x , y - 1], [x + 1, y - 1], [x - 1, y], # [x , y], [x + 1, y], [x - 1, y + 1], [x , y + 1], [x + 1, y + 1], ] dead_or_live = adjoining.map { |point| n_x, n_y = point self[n_x, n_y]&.alive? }.compact live_count = dead_or_live.count { |live| live } if target.dead? # 3の時のみ誕生 live_count == 3 else # 2,3の時のみ生き残る (2..3).include?(live_count) end endJavaScript (with React)で実装
CLI だとインタラクティブなのがやりづらいのでJSでも書いてみた。
https://github.com/oieioi/lifegame.js
デモはこちら: https://dreamy-lumiere-0f384d.netlify.com/
こちらは全てのセルを二次元配列で受け取って新しい生死の二次元配列を返すようにした。
src/lib/LifegameLogic.js#L1-L18function nextCells(cells) { return cells.map((line, x)=> { return line.map((alive, y) => { // 周囲を調べる const aliveCount = getAdojoiningPositions(x, y).filter((position) => { const [x,y] = position; if (!cells[x]) return false; return cells[x][y] }).length if (alive) { // 周囲の生き残りが2,3のとき生存 return aliveCount === 2 || aliveCount === 3; } else { return aliveCount === 3 } }); }); }


- 投稿日:2020-02-18T09:19:15+09:00
Rails.root.join("foo", "bar")よりも、Rails.root.join("foo/bar")が良いのでは?というお話
はじめに:joinに渡す引数はいくつ?
たとえば、Railsのテストを書いたりするときに、テスト用のCSVファイルのパスを指定することがあると思います。
# 入力フォームでCSVファイルをアップロードするコード例
attach_file 'CSV file', csv_file_path
このとき、
Rails.root.joinを使うと簡潔にファイルパスを取得できるのですが、いろんな人のコードを見ていると、大きく分けて以下のような2パターンがあるようです。# "/" で区切った1つの文字列を渡すパターン csv_file_path = Rails.root.join('spec/fixtures/sample.csv') # パスの要素ごとに区切って複数の文字列を渡すパターン csv_file_path = Rails.root.join('spec', 'fixtures', 'sample.csv')僕はふだん前者のパターンで書いています。その理由は以下のとおりです。
- 後者のパターンより短く書けるから
'spec/fixtures/sample.csv'のようなパスが、プロジェクトルートから見た相対パスとして、ぱっと認識しやすいから一方、後者のパターンで書く人の理由を聞いてみると、「実行環境によってはパスの区切り文字が
/と限らないから」と答える人が多かったです。
これはおそらく、Windows環境でパスの区切り文字が\になることを意識しているんだと思います。検証:"/"でパスを区切っても、Windows環境でちゃんと動く
しかし、後者のパターンで書く理由が「Windows環境を意識しているから」なのであれば、その心配はおそらく無用です。
Windows環境のrails consoleで、先ほどのような
Rails.root.joinの2つの書き方を比較した結果を以下に載せます。
(僕はWindowsをふだん使わないため、Railsのバージョンが少し古いですが、おそらく挙動は今でも同じだと思います)C:\dev\rails-sandbox>rails c Loading development environment (Rails 5.0.2) irb(main):001:0> Rails.root => #<Pathname:C:/dev/rails-sandbox> irb(main):002:0> p1 = Rails.root.join('config', 'database.yml') => #<Pathname:C:/dev/rails-sandbox/config/database.yml> irb(main):003:0> File.exist? p1 => true irb(main):004:0> p2 = Rails.root.join('config/database.yml') => #<Pathname:C:/dev/rails-sandbox/config/database.yml> irb(main):005:0> File.exist? p2 => trueすこし見づらいかもしれませんが、
Rails.root.join('config', 'database.yml')と書いた場合も、Rails.root.join('config/database.yml')と書いた場合も、どちらも同じようにファイルの存在チェックに成功しています。まとめ:"/"で区切る書き方でも問題ないのでは?
どちらが絶対に正しい書き方、というのはないと思いますが、短くシンプルに書ける「
/で区切る書き方」を積極的に採用するのは悪くない考えだと思います。もし「パスの区切り文字が
/とは限らないから(Windows環境が心配だから)」という理由でRails.root.join('spec', 'fixtures', 'sample.csv')のような書き方をしている人がいたら、次回からRails.root.join('spec/fixtures/sample.csv')のような書き方も検討してみてください。また、
Rails.root.join('spec', 'fixtures', 'sample.csv')の方がメリットが大きい、という方がいたら、コメントをお待ちしています。補足1:"/"で始まるパスを渡さないように注意!
ただし、この書き方には1つだけ注意点があります。それは「
/ではじまる文字列を引数として渡さないこと」です。
/で始まる文字列を引数にすると、プロジェクトルートのパスが付与されず、引数がそのまま絶対パスとして扱われます。# OK: 最初に"/"を付けない場合→プロジェクトルートのパスが付与される Rails.root.join('spec/fixtures/sample.csv').to_s #=> "/Users/jnito/dev/rails-sandbox/spec/fixtures/sample.csv" # NG: 最初に"/"を付けた場合→プロジェクトルートのパスが付与されない Rails.root.join('/spec/fixtures/sample.csv').to_s #=> "/spec/fixtures/sample.csv"
Pathname#joinメソッドがなぜこのような振る舞いをするのかについては、以下の記事で詳しく説明しています。補足2:Rails.rootメソッドが返すオブジェクトは何?
Rails.rootメソッドが返すのはRuby標準のPathnameオブジェクトです。Rails.root.class #=> Pathnameまた、
joinメソッドもRuby標準の実装が使われています。(ActiveSupportによって拡張されているわけではありません)Rails.root.method(:join).source_location #=> ["/Users/jnito/.rbenv/versions/2.6.5/lib/ruby/2.6.0/pathname.rb", 407]
Pathname#joinメソッドの仕様については以下のドキュメントを参照してください。
- 投稿日:2020-02-18T07:40:34+09:00
【Rails】ユーザー情報変更後投稿一覧ページに遷移する
現在作成中のポートフォリオでは、ユーザー機能にdeviseを利用しています。
今回はユーザー情報変更後、指定のページに戻る方法を学びましたのメモしておきます。
registrations_controllerの設定
registrations_controller.rbで以下の部分のコメントアウトを外してください。
registrations_controller.rbdef after_update_up_path_for(resource) # ここにページ遷移したいパスをいれる home_show_path(resource) end私の場合はhome/showページに飛ばしたかったのでhome_show_pathと記入しています。
routesの設定
次はルートです。
以下のように記述してください。routes.rbas :user do get 'home/show',:to =>'devise/registrations#edit',:as => :user_root endasメソッドを使うと、どのリソースがルートかを伝えてくれるため、指定ページに簡単にリダイレクトしてくれます。
まとめ
今回のパターンを含め、他パターンは公式で紹介されているのでそちらもぜひ参考にしてください。
【How To: Customize the redirect after a user edits their profile】deviseは便利ですが結構複雑な印象があるので、色々試してなれていきたいです。
この記事が誰かの助けになれば幸いです。
ではでは。
- 投稿日:2020-02-18T02:06:26+09:00
【Ruby】バブルソート・選択ソート・挿入ソート・クイックソートの速度の違いを検証してみた
はじめに
代表的な4つのソートを生Rubyで書き、ついでに速度の違いを検証してみました。
※勉強として、Rubyの便利メソッドは使わないようにしています。環境
OS: macOS Catalina 10.15.3
Ruby: 2.6.5
前提
実装方法
- 左->右 に 小->大 となるような昇順での並び替えとする
- Rubyのメソッドは極力使わず、
while,if,length,ceilのみで実装する速度の検証方法
- 1~100000(10万)の重複しない数字をランダムに並べた配列をサンプルとする
- 検証は同条件で3回行い、平均値で評価する
Benchmarkライブラリの出力のうち、userで評価する1.バブルソート
特徴
- 隣り合う要素の大小を比較し、小さい方が左になるように並べ替えていく
- 実行速度が遅いためあまり使われない
コード
bubble_sort.rbdef bubble_sort(array) k = 0 while k < array.length - 1 i = 0 while i < array.length - 1 if array[i] > array[i+1] w = array[i] array[i] = array[i+1] array[i+1] = w end i += 1 end k += 1 end array end2.選択ソート
特徴
- 一番小さなデータを選択して、先頭から順に並べ替えていく
コード
selection_sort.rbdef selection_sort(array) i = 0 while i < array.length - 1 indexMin = i k = i + 1 while k < array.length if array[k] < array[indexMin] indexMin = k end k += 1 end w = array[i] array[i] = array[indexMin] array[indexMin] = w i += 1 end array end挿入ソート
特徴
- 正しい順序になるようにデータを挿入していく
コード
insertion_sort.rbdef insertion_sort(array) i = 0 while i < array.length - 1 x = array[i+1] k = i+1 while (k > 0) && (array[k-1] > x) array[k] = array[k-1] k = k-1 end array[k] = x i += 1 end array endクイックソート
特徴
- データを大小のグループ2つに分割しながら全体を整列していく
- 実行速度が速く、使用頻度が高い
- 再帰(自分自身を呼び出す)を使用するので理解が難しい
コード
quick_sort.rbdef quick_sort(array, left, right) pivot_index = ((left + right).to_f / 2.to_f).ceil pivot = array[pivot_index] i = left k = right while i < k while (array[i] < pivot) && (i < right) i += 1 end while (array[k] > pivot) && (k > left) k -= 1 end if i < k w = array[i] array[i] = array[k] array[k] = w end end if array[left] > array[k] w = array[left] array[left] = array[k] p array[k] = w end ### ここから再帰呼び出し ### if left < k-1 quick_sort(array, left, k-1) end if k+1 < right quick_sort(array, k+1, right) end ### ここまで再帰呼び出し ### array end速度
以下の内容で検証します。
(2020/2/18 @Nabetani さんにご指摘頂き、サンプルデータの位置を正しく修正しました)(再掲)速度の検証方法
- 1~100000(10万)の重複しない数字をランダムに並べた配列をサンプルとする
- 検証は同条件で3回行い、平均値で評価する
Benchmarkライブラリの出力のうち、totalで評価するbenchmark.rbrequire 'benchmark' require './bubble_sort.rb' require './selection_sort.rb' require './insertion_sort.rb' require './quick_sort.rb' Benchmark.bm 10 do |r| array = [*1..100000].shuffle r.report "bubble_sort" do bubble_sort(array) end array = [*1..100000].shuffle r.report "selection_sort" do selection_sort(array) end array = [*1..100000].shuffle r.report "insertion_sort" do insertion_sort(array) end array = [*1..100000].shuffle r.report "quick_sort" do quick_sort(array, 0, array.length - 1) end end実行結果
(2020/2/18 @Nabetani さんにご指摘頂き、サンプルデータの位置を正しく修正しました)
結果(1回目)user system total real bubble_sort 570.124053 1.904297 572.028350 (577.834412) selection_sort 161.563083 0.357987 161.921070 (162.479403) insertion_sort 145.170302 0.817478 145.987780 (148.046180) quick_sort 0.121813 0.000896 0.122709 ( 0.124643)結果(2回目)user system total real bubble_sort 571.812702 2.242382 574.055084 (580.725139) selection_sort 164.664549 0.478888 165.143437 (165.996426) insertion_sort 142.275122 0.445982 142.721104 (143.516951) quick_sort 0.124349 0.001020 0.125369 ( 0.129149)結果(3回目)user system total real bubble_sort 569.067523 1.805529 570.873052 (574.410594) selection_sort 164.282769 0.491190 164.773959 (165.733148) insertion_sort 140.670870 0.424666 141.095536 (141.956379) quick_sort 0.117259 0.001045 0.118304 ( 0.120254)
結論
平均(秒) バブルソート 570.334 選択ソート 163.503 挿入ソート 142.705 クイックソート 0.120 TOPはクイックソートでした!
他と比較して圧倒的な速さ!こりゃバブルソートが使われない理由もよく分かりますね
おわりに
最後まで読んで頂きありがとうございました
どなたかの参考になれば幸いです
※私事ながら、当記事で通算100記事目の投稿でした!
これからも学習継続していきます
- 投稿日:2020-02-18T01:10:50+09:00
敢えてRubyで学ぶ「ゼロから作るDeep Learning」基本関数群
以下の関数群をRubyに変換してみる。
これを持って、次回以降、ニューラルネットを実装していく。https://github.com/oreilly-japan/deep-learning-from-scratch/blob/master/common/functions.py
require 'numo/narray'

def identity_function(x)
    return x
end

def step_function(x)
  grad = Numo::Uint32.zeros(x.shape)
  grad[x>=0] = 1
  grad
end

def sigmoid(x)
  1 / (1 + Numo::DFloat::Math.exp(-x))
end

def sigmoid_grad(x)
  (1.0 - sigmoid(x)) * sigmoid(x)
end

def relu(x)
  x.append(0).max
end

def relu_grad(x)
  grad = Numo::DFloat.zeros(x.shape)
  grad[x>=0] = 1
  grad
end

def softmax(x)
  if x.ndim == 2
    x = x.transpose
    x = x - x.max(0)
    y = Numo::DFloat::Math.exp(x) / Numo::DFloat::Math.exp(x).sum(0)
    return y.transpose
  end

  c = x - x.max
  exp_x = Numo::DFloat::Math.exp(x - c)
  sum_exp_x = exp_x.sum
  exp_x / sum_exp_x
end

def sum_squared_error(y, t)
  0.5 * ((y-t)**2).sum
end

def cross_entropy_error(y, t)
  if y.ndim == 1
    t = t.reshape(1, t.size)
    y = y.reshape(1, y.size)
  end
  # 教師データがone-hot-vectorの場合、正解ラベルのインデックスに変換
  if t.size == y.size
    t = t.argmax
  end

  delta = 1e-7
  batch_size = y.shape[0]
  -(Numo::NMath.log(y[seq,true][true,t] + delta)).sum / batch_size
end

def softmax_loss(X, t)
  y = softmax(X)
  cross_entropy_error(y, t)
end
- 投稿日:2020-02-18T00:50:47+09:00
Railsのannotateでハマった話
ハマったところ
Railsでannotateのgemを入れて
group :development do
  gem 'web-console',           '3.5.1'
  gem 'listen',                '3.1.5'
  gem 'spring',                '2.0.2'
  gem 'spring-watcher-listen', '2.0.1'
  gem 'pry-byebug'
  gem 'annotate'
end
インストールしたのに
bundle installannotateコマンドが反映されない,なぜか
$ bundle exec annotate
// なにも結果が帰ってこない
こうやって解決
Railsのプロジェクトに明示的に導入しないと使えないみたい.
$ rails g annotate
// これでannotateできるようになった
gemがinstallされていることと,今作業しているプロジェクトで使えることは別モノだということに気づけた.