- 投稿日:2020-02-05T23:26:53+09:00
Unityのテキストで現在の日付を表示させる
1.はじめに
私はVRのコンテンツを作成しているが、ゴーグルを被って長時間作業すると想定した場合、現在の時間がわからないのは不便だろうと思い記事を書くことにしました。
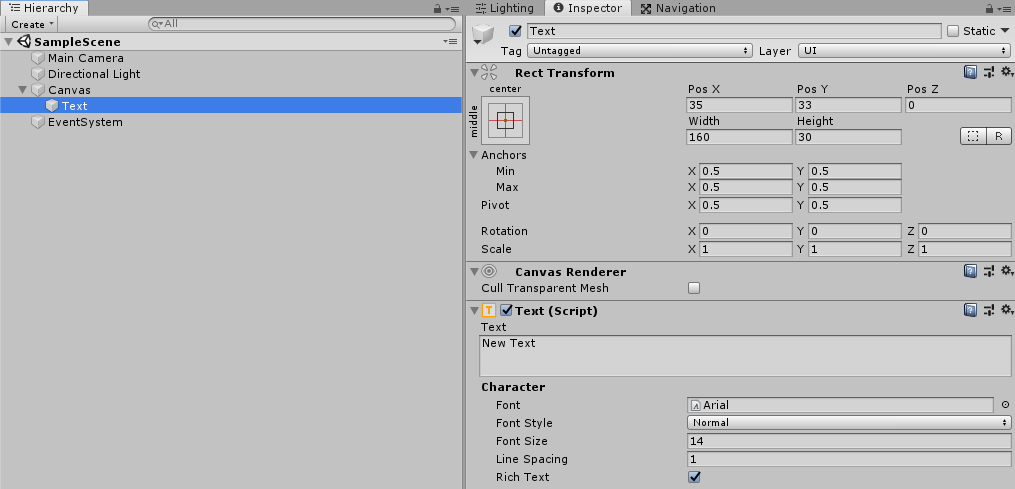
2.Unityの画面①
・Canvas作成手順、テキストUIの追加。
・追加後
3.スクリプトを書く
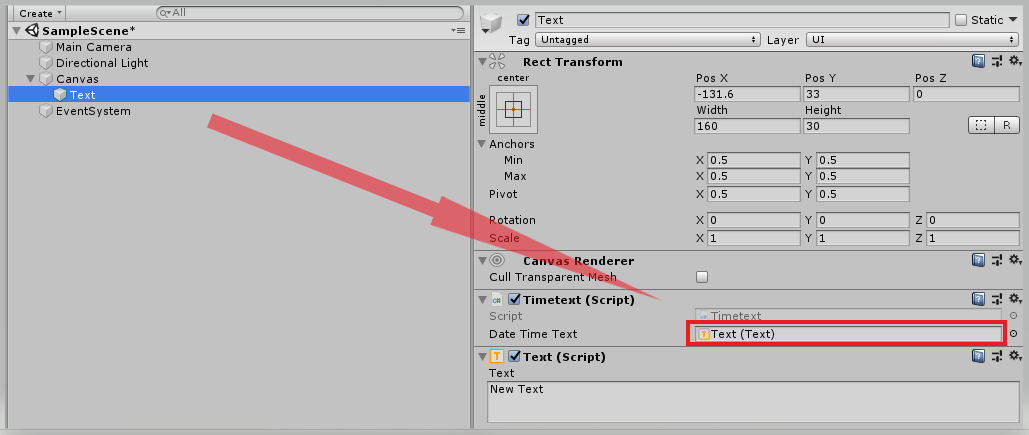
using UnityEngine;
using UnityEngine.UI; //Textを使用する為追加。
using System; //DateTimeを使用する為追加。

public class Timetext : MonoBehaviour
{
    //テキストUIをドラッグ&ドロップ
    [SerializeField] Text DateTimeText;

    //DateTimeを使うため変数を設定
    DateTime TodayNow;

    void Update()
    {
        //時間を取得
        TodayNow = DateTime.Now;

        //テキストUIに年・月・日・秒を表示させる
        DateTimeText.text = TodayNow.Year.ToString() + "年 " + TodayNow.Month.ToString() + "月" + TodayNow.Day.ToString() + "日" + DateTime.Now.ToLongTimeString();
    }
}
4.Unityの画面②
ヒエラキーのTextにスクリプトをコンポーネントし、スクリプトのDateTimeTextにText(UI)をドラッグ&ドロップをする。
5.結果
再生ボタンを押すと時間が表示。秒数はリアルタイムで更新されます。


- 投稿日:2020-02-05T22:54:20+09:00
【Unity】ValveIndexでHumanoidキャラクターの指を動かす
UnityでValveIndexコントローラーの指入力を取り、Humanoid対応モデルの指を動かす方法です
本題の前に
- SteamVRは2.0以降を使用します
- SteamVRのセットアップ、ValveIndexコントローラーの指入力を取る方法の説明は以下の記事を参照してください
UnityでValveIndexコントローラーの指入力を取るスクリプトの作成
HoldFinger.csusing UnityEngine; using Valve.VR; public class HoldFinger : MonoBehaviour { private Animator animator; private HumanPoseHandler handler; private HumanPose humanPose; private SteamVR_Action_Skeleton actionLeftSkeleton; private SteamVR_Action_Skeleton actionRightSkeleton; void Start() { actionLeftSkeleton = SteamVR_Actions.default_SkeletonLeftHand; actionRightSkeleton = SteamVR_Actions.default_SkeletonRightHand; animator = GetComponent<Animator>(); handler = new HumanPoseHandler(animator.avatar, animator.transform); // 開始時点のポーズを取得 handler.GetHumanPose(ref humanPose); } private void Update() { // 左親指 humanPose.muscles[55] = 1 - (2 * actionLeftSkeleton.thumbCurl); humanPose.muscles[57] = 1 - (2 * actionLeftSkeleton.thumbCurl); humanPose.muscles[58] = 1 - (2 * actionLeftSkeleton.thumbCurl); // 左人差し指 humanPose.muscles[59] = 1 - (2 * actionLeftSkeleton.indexCurl); humanPose.muscles[61] = 1 - (2 * actionLeftSkeleton.indexCurl); humanPose.muscles[62] = 1 - (2 * actionLeftSkeleton.indexCurl); // 左中指 humanPose.muscles[63] = 1 - (2 * actionLeftSkeleton.middleCurl); humanPose.muscles[65] = 1 - (2 * actionLeftSkeleton.middleCurl); humanPose.muscles[66] = 1 - (2 * actionLeftSkeleton.middleCurl); // 左薬指 humanPose.muscles[67] = 1 - (2 * actionLeftSkeleton.ringCurl); humanPose.muscles[69] = 1 - (2 * actionLeftSkeleton.ringCurl); humanPose.muscles[70] = 1 - (2 * actionLeftSkeleton.ringCurl); // 左小指 humanPose.muscles[71] = 1 - (2 * actionLeftSkeleton.pinkyCurl); humanPose.muscles[73] = 1 - (2 * actionLeftSkeleton.pinkyCurl); humanPose.muscles[74] = 1 - (2 * actionLeftSkeleton.pinkyCurl); // 右親指 humanPose.muscles[75] = 1 - (2 * actionRightSkeleton.thumbCurl); humanPose.muscles[77] = 1 - (2 * actionRightSkeleton.thumbCurl); humanPose.muscles[78] = 1 - (2 * actionRightSkeleton.thumbCurl); // 右人差し指 humanPose.muscles[79] = 1 - (2 * actionRightSkeleton.indexCurl); humanPose.muscles[81] = 1 - (2 * actionRightSkeleton.indexCurl); humanPose.muscles[82] = 1 - (2 * actionRightSkeleton.indexCurl); // 右中指 humanPose.muscles[83] = 1 - (2 * actionRightSkeleton.middleCurl); humanPose.muscles[85] = 1 - (2 * actionRightSkeleton.middleCurl); humanPose.muscles[86] = 1 - (2 * actionRightSkeleton.middleCurl); // 右薬指 humanPose.muscles[87] = 1 - (2 * actionRightSkeleton.ringCurl); humanPose.muscles[89] = 1 - (2 * actionRightSkeleton.ringCurl); humanPose.muscles[90] = 1 - (2 * actionRightSkeleton.ringCurl); // 右小指 humanPose.muscles[91] = 1 - (2 * actionRightSkeleton.pinkyCurl); humanPose.muscles[93] = 1 - (2 * actionRightSkeleton.pinkyCurl); humanPose.muscles[94] = 1 - (2 * actionRightSkeleton.pinkyCurl); // ポーズを設定 handler.SetHumanPose(ref humanPose); } }使い方
HumanoidキャラクターのAnimatorと同じ階層に、先ほど作成したスクリプト「HoldFinger.cs」をAddComponentします
ゲームを再生してValveIndexコントローラーを握ると、コントローラーを握った指の形に合わせてHumanoidキャラクターの指が動きます
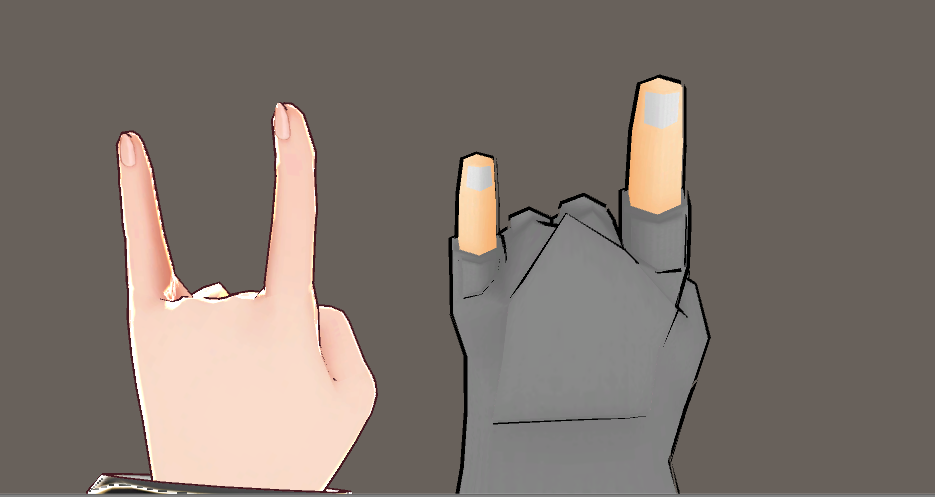
微調整
Vroidなど、モデルによっては親指の付け根が伸びたり、小指~人先し指の第1関節が曲がりすぎることがあります
HumanoidリグのConfigureで直す方法もありますが、ここではスクリプトから調整します// 左親指 //humanPose.muscles[55] = 1 - (2 * actionLeftSkeleton.thumbCurl); // 親指の第3関節を曲げない humanPose.muscles[57] = 1 - (2 * actionLeftSkeleton.thumbCurl); humanPose.muscles[58] = (1 - (2 * actionLeftSkeleton.thumbCurl))/2; // 指の第1関節の曲がる量を半分にする // 左人差し指 humanPose.muscles[59] = 1 - (2 * actionLeftSkeleton.indexCurl); humanPose.muscles[61] = 1 - (2 * actionLeftSkeleton.indexCurl); humanPose.muscles[62] = (1 - (2 * actionLeftSkeleton.indexCurl)) / 2; // 左中指 humanPose.muscles[63] = 1 - (2 * actionLeftSkeleton.middleCurl); humanPose.muscles[65] = 1 - (2 * actionLeftSkeleton.middleCurl); humanPose.muscles[66] = (1 - (2 * actionLeftSkeleton.middleCurl)) / 2; // 左薬指 humanPose.muscles[67] = 1 - (2 * actionLeftSkeleton.ringCurl); humanPose.muscles[69] = 1 - (2 * actionLeftSkeleton.ringCurl); humanPose.muscles[70] = (1 - (2 * actionLeftSkeleton.ringCurl)) / 2; // 左小指 humanPose.muscles[71] = 1 - (2 * actionLeftSkeleton.pinkyCurl); humanPose.muscles[73] = 1 - (2 * actionLeftSkeleton.pinkyCurl); humanPose.muscles[74] = (1 - (2 * actionLeftSkeleton.pinkyCurl)) / 2; // 右親指 //humanPose.muscles[75] = 1 - (2 * actionRightSkeleton.thumbCurl); humanPose.muscles[77] = 1 - (2 * actionRightSkeleton.thumbCurl); humanPose.muscles[78] = 1 - (2 * actionRightSkeleton.thumbCurl); // 右人差し指 humanPose.muscles[79] = 1 - (2 * actionRightSkeleton.indexCurl); humanPose.muscles[81] = 1 - (2 * actionRightSkeleton.indexCurl); humanPose.muscles[82] = (1 - (2 * actionRightSkeleton.indexCurl)) / 2; // 右中指 humanPose.muscles[83] = 1 - (2 * actionRightSkeleton.middleCurl); humanPose.muscles[85] = 1 - (2 * actionRightSkeleton.middleCurl); humanPose.muscles[86] = (1 - (2 * actionRightSkeleton.middleCurl)) / 2; // 右薬指 humanPose.muscles[87] = 1 - (2 * actionRightSkeleton.ringCurl); humanPose.muscles[89] = 1 - (2 * actionRightSkeleton.ringCurl); humanPose.muscles[90] = (1 - (2 * actionRightSkeleton.ringCurl)) / 2; // 右小指 humanPose.muscles[91] = 1 - (2 * actionRightSkeleton.pinkyCurl); humanPose.muscles[93] = 1 - (2 * actionRightSkeleton.pinkyCurl); humanPose.muscles[94] = (1 - (2 * actionRightSkeleton.pinkyCurl)) / 2;
まだ少し不格好ですが、調整前よりキレイに指が曲がります参考
Unityでスクリプトから、Animatorコンポーネントの「Chest-Twist」などの値を取得する方法
https://teratail.com/questions/168728【Unity】スクリプトからキャラクターのボーンを制御する準備 (備忘録)
https://qiita.com/Nekomasu/items/8884b8584bfc191582d4


- 投稿日:2020-02-05T16:32:45+09:00
【Unity ARFoundation】Sample Sceneの人体検知がやっと触れた、、!(HumanSegmentationImages)
2019年末にARFoundationを触り始めてから、ずっと同じエラーに悩まされていたがようやく解決ができた。
QAプラットフォームの『teratail』に投稿した質問内容を以下に貼り付ける。
リンク:https://teratail.com/questions/239151
UnityのARFoundationを触りたく、Unity公式のGitHubからarfoundtion-samplesをダウンロードして、Unityにアップロードしたら下記のようなエラーが出ました。
Failed to load ‘/Users/user/UnityARFoundation/Assets/arfoundation-samples/ProjectSettings/XRSettings.asset’ because it was serialized with a newer version of Unity. (Has a higher SerializedFile version)
UnityEditorInternal.InternalEditorUtility:ProjectWindowDrag(HierarchyProperty, Boolean)
UnityEngine.GUIUtility:ProcessEvent(Int32, IntPtr)
上のエラーコードでは「より新しいバージョンのUnityでシリアル化されているため」と書かれているので、Unityのバージョンをダウングレードすれば良いということでしょうか。このエラーに至った手順を記載します。
①ターミナルにて下記URLを「git clone」
https://github.com/Unity-Technologies/arfoundation-samples.git
②arfoundation-samples.gitフォルダをUnityのProjectのAssetsにドラッグ&ドロップ○環境
macOS Catalina 10.15.2
Unityバージョン 2019.2.19f1
AR Foundation 3.0.1
AR Subsystems 3.0.0
ARKit XR Plugin 3.0.1
ARKit Face Tracking 3.0.1
いただいた回答にある通り、リンク先に公開されているフォルダはプロジェクトそのものなため、
UnityHubで「リストに追加」しプロジェクトを開けば全て解決した。この1ヶ月間あまりにも解決できず、上記のエラーを一度無視してサンプルシーンを端末にビルドして遊んでいた。
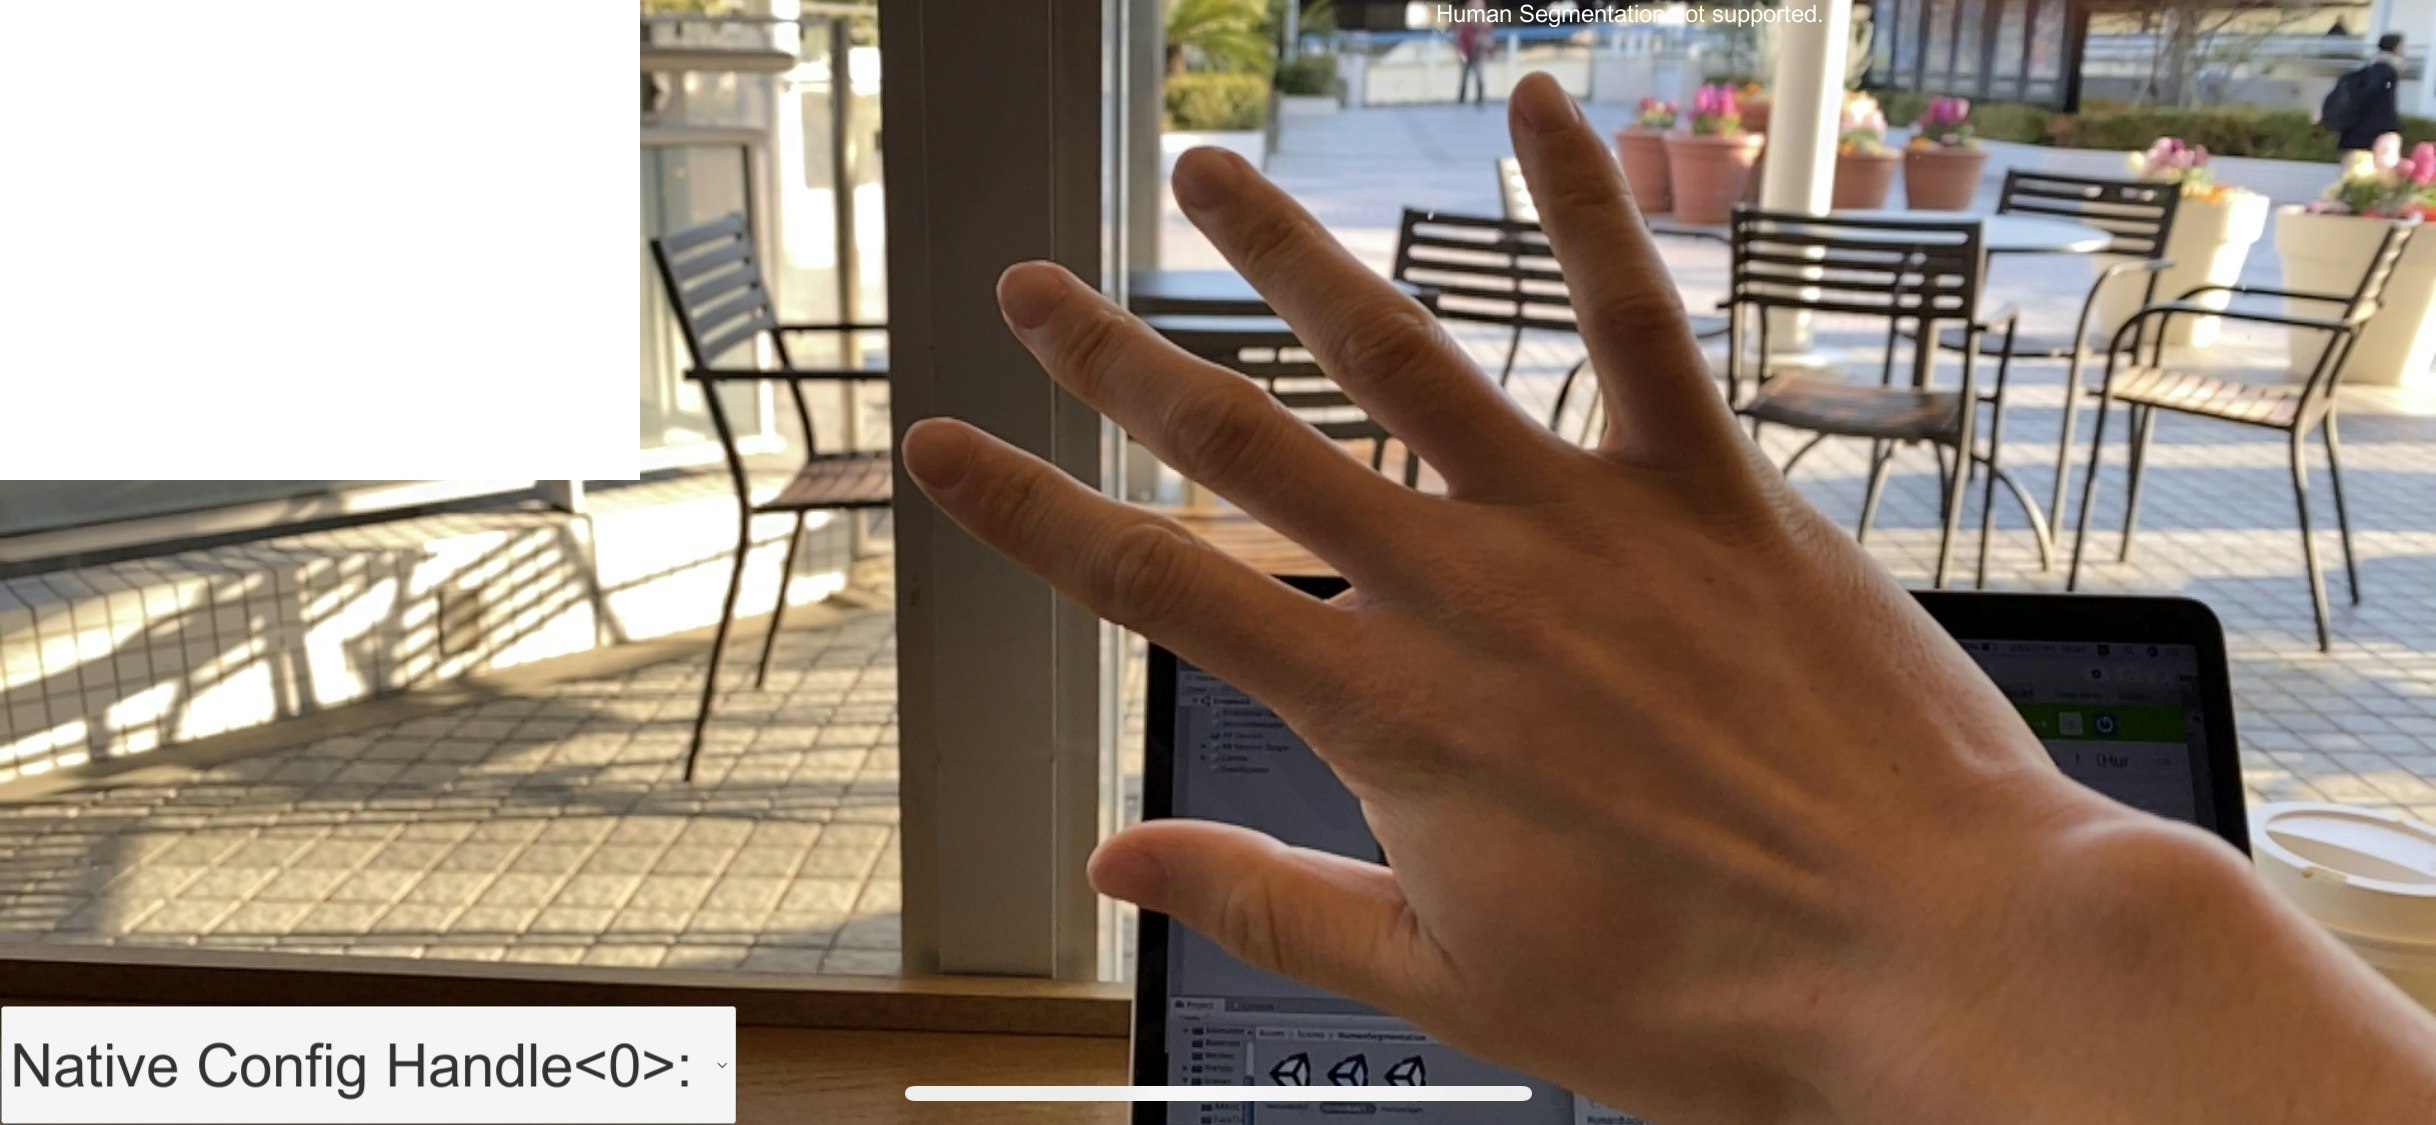
サンプルシーンの中でも、SimpleARはなぜか問題なく動作して、お目当てのHumanSegmentationImagesやHumanBodyTracking3Dが動作しなかったので、「動作しないサンプルシーンのコードに問題がある!(アホ)」と思っていた笑※下記画像が、上記エラーを無視してHumanSegmentationImagesを動かしている様子。
※画面中央上部に「Human Segmentation not supported.」とメッセージが出ているので、このメッセージを出しているコードを特定 & 条件分岐・参照を遡り、原因を特定しようとしていた。
(この遡りをしているときにも知らないことが出てきたので、またわかったらQiitaに投稿する)
ちなみに、正常な動作をしているのがこちら。(iPhone 11Pro)
画面左上に検知した手・腕の形が赤く表示されている。
この検知スピードがめちゃくちゃ早くて正確で、驚いたしワクワクした!!(本当に0.1秒くらい)
この検知のコードを使えば、人間とUnityで作ったオブジェクトのオクルージョンができるっぽい。
未来きてるわ。【学び】
・エラーは絶対に無視しない(トンチンカンな所を調べて無駄に時間かかるだけ)
・考えて調べて解決できなかったらすぐに質問する(あっという間に解決した)【関連して知りたい事】
・実際の開発現場では、例えばARFoundationのサンプルシーンのコードをコピペして利用しているのか。

- 投稿日:2020-02-05T13:05:23+09:00
Groovy2系(Gradle)はコメント中の\uもUnicodeエスケープされる
Groovy2系の文字列リテラルは
\u0000のように\uに続けて4桁の数字でUnicodeエスケープされます。
このUnicodeエスケープは文字列リテラルだけではなく困った事にコメントにも適用されます。なので例えば以下のようなコメントを書くとエラーになります。// C:\uploadこの動作は以下のバグレポートによるとバージョン2系のパーサーはunicode readerでソースコードを読み込むので発生するとコメントされていました。つまり文字列やコメントだけではなくコードすべてに対してUnicodeエスケープしているという事です。
バージョン3系ではパーサーが新しくなりコメントに
\uを含めることができます。またドキュメントから見つけられなかったのですがスラッシュ文字列とドルスラッシュ文字列も\uはUnicodeエスケープされなくなりました。とは言え、まだリリースされていないので今はどうにかしてコード中から
\uを取り除く必要があります。そもそもの発端はUnityでAndroid用にカスタム build.gradle テンプレートを利用して
DIR_UNITYPROJECTをプロジェクトフォルダの絶対パスに置換する機能を使った時にuで始まるフォルダがあった事が原因でWindowsでエラーが起きた事でした。
Unity2019.1以降ならDIR_UNITYPROJECTを置換する時にパス区切り文字をエスケープして\\で出力するのでこの変数で問題は起きないようです。
- 投稿日:2020-02-05T07:51:21+09:00
PUN2 でUserId がnull になっている時の対処法
環境
Windows 10
Unity 2019.2.19f1
Photon2 (Photon Unity Networking 2 2.16)
症状
public class NetworkInterface : MonoBehaviourPunCallbacks
{private void Start() { PhotonNetwork.ConnectUsingSettings(); PhotonNetwork.JoinOrCreateRoom(_config.RoomName, new RoomOptions(), TypedLobby.Default); } public override void OnJoinedRoom() { Debug.Log("Room Max number: " + PhotonNetwork.CurrentRoom.MaxPlayers); Player[] player = PhotonNetwork.PlayerList; // プレイヤー名とIDを表示. for (int i = 0; i < player.Length; i++) { Debug.Log((i).ToString() + " : " + player[i].NickName + " ID = " + player[i].UserId); } }}
上記のコードでルームに数人が入る。最後に入室した人の場合、PhotonNetwork.PlayerList に全員登録されているはずなので、NickName とUserId がすべて入っているはずだが、UserId が自分のもの以外null になっている。対策
- 投稿日:2020-02-05T05:52:56+09:00
PUN2 でUserId がnull になっている時の対処法
環境
- Windows 10
- Unity 2019.2.19f1
- Photon2 (Photon Unity Networking 2 2.16)
症状
public class NetworkInterface : MonoBehaviourPunCallbacks
{

    private void Start()
    {
        PhotonNetwork.ConnectUsingSettings();
        PhotonNetwork.JoinOrCreateRoom(_config.RoomName, new RoomOptions(), TypedLobby.Default);
    }

    public override void OnJoinedRoom()
    {
        Debug.Log("Room Max number: " + PhotonNetwork.CurrentRoom.MaxPlayers);
        Player[] player = PhotonNetwork.PlayerList;

        // プレイヤー名とIDを表示.
        for (int i = 0; i < player.Length; i++)
        {
            Debug.Log((i).ToString() + " : " + player[i].NickName + " ID = " + player[i].UserId);
        }
    }
}
上記のコードでルームに数人が入る。最後に入室した人の場合、PhotonNetwork.PlayerList に全員登録されているはずなので、NickName とUserId がすべて入っているはずだが、UserId が自分のもの以外null になっている。
対策
RoomOptions を生成するときの、デフォルト値のままではなく、
public class NetworkInterface : MonoBehaviourPunCallbacks
{

    private void Start()
    {
        PhotonNetwork.ConnectUsingSettings();
        RoomOptions options = new RoomOptions();
        options.PublishUserId = true; // ★お互いにユーザIDが見えるようにする。
        options.MaxPlayers = 3; // ★最大人数もきちんと定義しておく。
        PhotonNetwork.JoinOrCreateRoom(_config.RoomName, options, TypedLobby.Default);
     }

    public override void OnJoinedRoom()
    {
...
    }
}
RoomOptions のPublishUserId はデフォルト値がfalse のようなので、true に変更してJoinOrCreateRoom すると意図通りUserId が見えるようになった。
- 投稿日:2020-02-05T00:15:08+09:00
【Unity】Time.deltaTimeの正しい使い方わかってる?適当に掛ければいいてもんじゃない!
Time.deltaTime、正しく使えていますか?
Unityには
Time.deltaTimeというプロパティが存在します。このプロパティを計算式に掛けることで、「スペックによらずある処理の速度が一定になる」と思っている人もいるでしょう。
実際にWebを検索すると、「フレームレートが一定でないので、Time.deltaTimeを掛けないといけない」という説明が多く出てきます。このプロパティは本当にそういう性質のものなのか。
なぜ掛けることで処理が安定するのか。
その意味をしっかり把握して、必要な場所で正しく使うようにしましょう。そもそもTime.deltaTimeの意味とは
Time.deltaTimeは単に 直前のフレームと今のフレーム間で経過した時間[秒] を返すプロパティです。
これ自身に処理を安定化させる機能はありません。単純に秒数を返すだけです。ではどういう場面でTime.deltaTimeを使えばよいのか
適当に計算式に混ぜ込めば処理がなめらかになるといった理解は間違いです。
答えを言ってしまうと、「右辺に
Time.deltaTimeを掛けた時に、左辺と同じ単位になったら使ってもよい」です。「単位」とは
ここでいう単位とは、「物理量」を示す単位のことです。「秒[s]」「距離[m]」「速さ[m/s]」といったものです。
単位には大事な性質があります。
- 異なる単位同士は足せない( 距離 + 秒、みたいな計算はできない )
- 異なる単位同士は掛け算できる、その場合は別の単位となる(距離 = 速度✕時間、みたいな)
- 単位を持たない場合は[1]と表記する(無次元)
Time.deltaTimeを使った例
例1: 速度と移動量
「はやさ = きょり / じかん」という式は小学生のころに習ったはずです。
その式を思い出し、それが成り立つように式を組み立てるだけです。「なぜ速度に
Time.deltaTimeを掛けないといけないのか」の答えは「実際にそのフレームで進んだ"距離"を求める必要があるため」です。public class Sample : MonoBehaviour { /// <summary> /// 速度[m/s] /// </summary> private Vector3 _velocity = new Vector3(1, 0, 0); void Update() { // position[m] = position[m] + (velocity[m/s] * time[s]) // [m] = [m] + [(m/s * s)] // [m] = [m] + [m] ←両辺で単位が同じになった transform.position = transform.position + (_velocity * Time.deltaTime); } }例2: 速度と速度
続いて、左辺が速度で、この速度を制御したい場合です。この場合、右辺で扱うパラメータが最初から速度であるならば
Time.deltaTimeを掛けてはいけません。
これも単位を計算すればすぐわかります。public class Sample : MonoBehaviour { /// <summary> /// 速度[m/s] /// </summary> private Vector3 _velocity = new Vector3(1, 0, 0); private Rigidbody _rigidbody; void Start() { _rigidbody = GetComponent<Rigidbody>(); } void Update() { // [m/s] = [m/s] * [s] // [m/s] = [m] ←???????? _rigidbody.velocity = _velocity * Time.deltaTime; // 間違い // この場合は普通に代入するだけでよい _rigidbody.velocity = _velocity; } }例3: 移動量と加速度
ちょっと複雑な例ですが、「加速度」を使って「移動量」を計算する場合です。
この場合も、それぞれの単位をしっかり考えれば難しくはありません。public class Sample : MonoBehaviour { /// <summary> /// 加速度[m/s/s] /// </summary> [SerializeField] private Vector3 _acceleration = new Vector3(1, 0, 0); /// <summary> /// 現在の速度[m/s] /// </summary> private Vector3 _currentVelocity = Vector3.zero; void Update() { // 現在の速度を計算する // [m/s] = [m/s] + [m/s/s] * [s] // [m/s] = [m/s] + [m/s] _currentVelocity = _currentVelocity + _acceleration * Time.deltaTime; // 速度から移動量をもとめる // [m] = [m] + [m/s] * [s] // [m] = [m] + [m] transform.position = transform.position + _currentVelocity * Time.deltaTime; } }
(それぞれパラメータを変えて動作させた結果)
例4: Lerpで使う例
Time.deltaTimeをよくMathf.LerpやVector3.Lerpと組み合わせることがあります。この場合は、「パラメータの変化速度[1/s]に対して
Time.deltaTimeを掛けている」思えばよいです。public class Sample : MonoBehaviour { private Vector3 _startPosition = Vector3.zero; private Vector3 _goalPosition = new Vector3(10, 0, 0); /// <summary> /// パラメータの変化量[1/s] /// 10.0f、の場合は、1.0/10.0 = 0.1[s]で遷移が完了する、という意味になる /// </summary> private float speed = 10.0f; // 現在の変化量 private float _progress = 0.0f; void Update() { // Vector3.Lerpの第三引数に与えられるパラメータは「全体の変化の割合量[1]」 // [1] = [1/s] * [s] _progress = _progress + speed * Time.deltaTime; transform.position = Vector3.Lerp(_startPosition, _goalPosition, _progress); } }まとめ
Time.deltaTimeは処理を安定化させる魔法のパラメータではありません。
単に経過時間を返すだけのプロパティです。そもそも「
Time.deltaTimeを掛けると処理がなめらかになる。なぜならばフレームレートが一定でないから」という説明自体が間違いだらけです。
「経過時間のパラメータが必要な計算式を(意識せずとも)実装しており、その経過時間の項にTime.deltaTimeがぴったり収まる」というだけに過ぎません。自分が今、なんの式を書いており、どのような計算が行われているのか、をしっかり意識して書けば難しい話ではありません。
その指標となるのが「単位」であり、これを意識すればTime.deltaTimeで迷うことはないでしょう。