- 投稿日:2020-02-05T23:26:53+09:00
Unityのテキストで現在の日付を表示させる
1.はじめに
私はVRのコンテンツを作成しているが、ゴーグルを被って長時間作業すると想定した場合、現在の時間がわからないのは不便だろうと思い記事を書くことにしました。
2.Unityの画面①
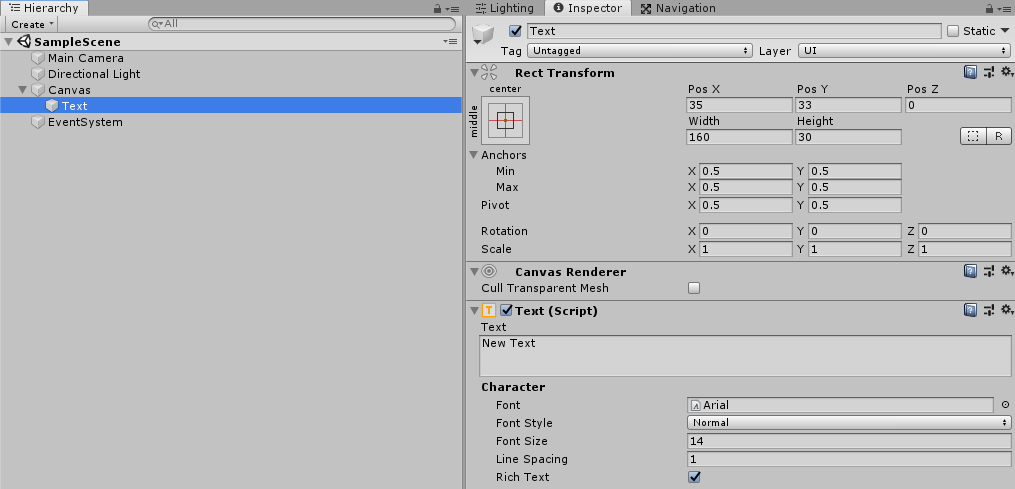
・Canvas作成手順、テキストUIの追加。
・追加後
3.スクリプトを書く
using UnityEngine;
using UnityEngine.UI; //Textを使用する為追加。
using System; //DateTimeを使用する為追加。

public class Timetext : MonoBehaviour
{
    //テキストUIをドラッグ&ドロップ
    [SerializeField] Text DateTimeText;

    //DateTimeを使うため変数を設定
    DateTime TodayNow;

    void Update()
    {
        //時間を取得
        TodayNow = DateTime.Now;

        //テキストUIに年・月・日・秒を表示させる
        DateTimeText.text = TodayNow.Year.ToString() + "年 " + TodayNow.Month.ToString() + "月" + TodayNow.Day.ToString() + "日" + DateTime.Now.ToLongTimeString();
    }
}
4.Unityの画面②
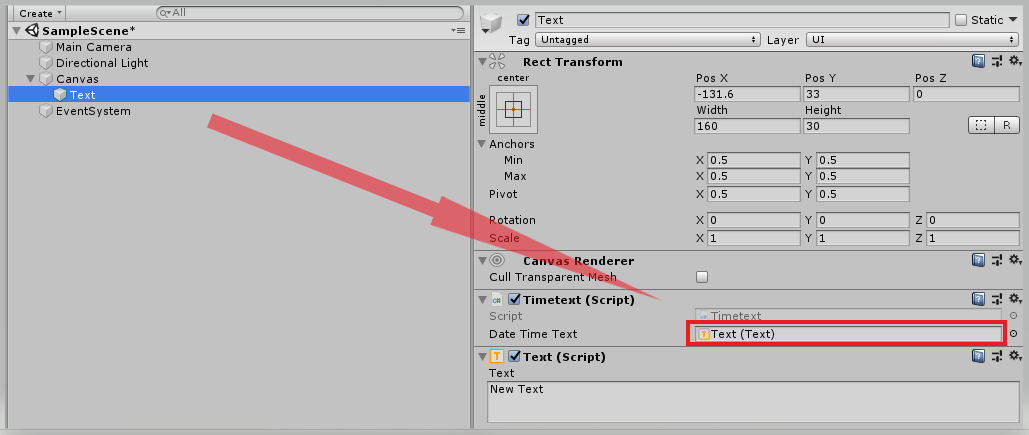
ヒエラキーのTextにスクリプトをコンポーネントし、スクリプトのDateTimeTextにText(UI)をドラッグ&ドロップをする。
5.結果
再生ボタンを押すと時間が表示。秒数はリアルタイムで更新されます。


- 投稿日:2020-02-05T22:54:20+09:00
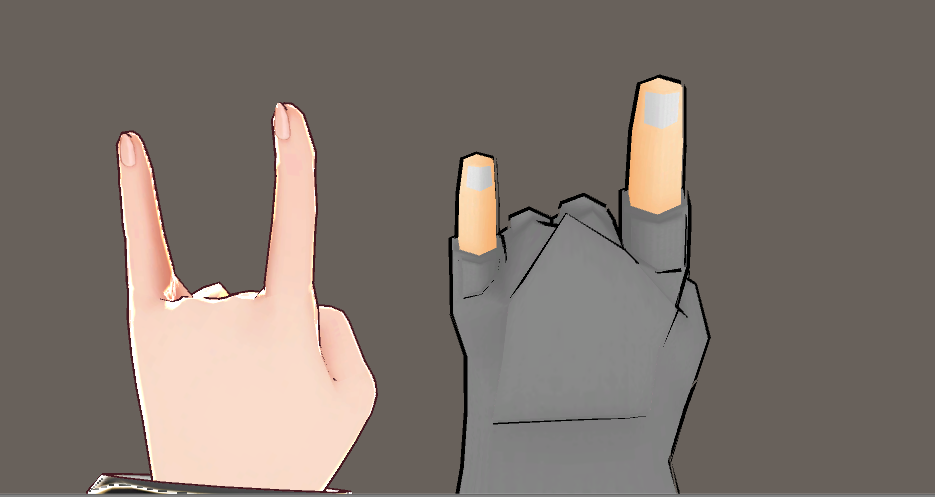
【Unity】ValveIndexでHumanoidキャラクターの指を動かす
UnityでValveIndexコントローラーの指入力を取り、Humanoid対応モデルの指を動かす方法です
本題の前に
- SteamVRは2.0以降を使用します
- SteamVRのセットアップ、ValveIndexコントローラーの指入力を取る方法の説明は以下の記事を参照してください
UnityでValveIndexコントローラーの指入力を取るスクリプトの作成
HoldFinger.csusing UnityEngine; using Valve.VR; public class HoldFinger : MonoBehaviour { private Animator animator; private HumanPoseHandler handler; private HumanPose humanPose; private SteamVR_Action_Skeleton actionLeftSkeleton; private SteamVR_Action_Skeleton actionRightSkeleton; void Start() { actionLeftSkeleton = SteamVR_Actions.default_SkeletonLeftHand; actionRightSkeleton = SteamVR_Actions.default_SkeletonRightHand; animator = GetComponent<Animator>(); handler = new HumanPoseHandler(animator.avatar, animator.transform); // 開始時点のポーズを取得 handler.GetHumanPose(ref humanPose); } private void Update() { // 左親指 humanPose.muscles[55] = 1 - (2 * actionLeftSkeleton.thumbCurl); humanPose.muscles[57] = 1 - (2 * actionLeftSkeleton.thumbCurl); humanPose.muscles[58] = 1 - (2 * actionLeftSkeleton.thumbCurl); // 左人差し指 humanPose.muscles[59] = 1 - (2 * actionLeftSkeleton.indexCurl); humanPose.muscles[61] = 1 - (2 * actionLeftSkeleton.indexCurl); humanPose.muscles[62] = 1 - (2 * actionLeftSkeleton.indexCurl); // 左中指 humanPose.muscles[63] = 1 - (2 * actionLeftSkeleton.middleCurl); humanPose.muscles[65] = 1 - (2 * actionLeftSkeleton.middleCurl); humanPose.muscles[66] = 1 - (2 * actionLeftSkeleton.middleCurl); // 左薬指 humanPose.muscles[67] = 1 - (2 * actionLeftSkeleton.ringCurl); humanPose.muscles[69] = 1 - (2 * actionLeftSkeleton.ringCurl); humanPose.muscles[70] = 1 - (2 * actionLeftSkeleton.ringCurl); // 左小指 humanPose.muscles[71] = 1 - (2 * actionLeftSkeleton.pinkyCurl); humanPose.muscles[73] = 1 - (2 * actionLeftSkeleton.pinkyCurl); humanPose.muscles[74] = 1 - (2 * actionLeftSkeleton.pinkyCurl); // 右親指 humanPose.muscles[75] = 1 - (2 * actionRightSkeleton.thumbCurl); humanPose.muscles[77] = 1 - (2 * actionRightSkeleton.thumbCurl); humanPose.muscles[78] = 1 - (2 * actionRightSkeleton.thumbCurl); // 右人差し指 humanPose.muscles[79] = 1 - (2 * actionRightSkeleton.indexCurl); humanPose.muscles[81] = 1 - (2 * actionRightSkeleton.indexCurl); humanPose.muscles[82] = 1 - (2 * actionRightSkeleton.indexCurl); // 右中指 humanPose.muscles[83] = 1 - (2 * actionRightSkeleton.middleCurl); humanPose.muscles[85] = 1 - (2 * actionRightSkeleton.middleCurl); humanPose.muscles[86] = 1 - (2 * actionRightSkeleton.middleCurl); // 右薬指 humanPose.muscles[87] = 1 - (2 * actionRightSkeleton.ringCurl); humanPose.muscles[89] = 1 - (2 * actionRightSkeleton.ringCurl); humanPose.muscles[90] = 1 - (2 * actionRightSkeleton.ringCurl); // 右小指 humanPose.muscles[91] = 1 - (2 * actionRightSkeleton.pinkyCurl); humanPose.muscles[93] = 1 - (2 * actionRightSkeleton.pinkyCurl); humanPose.muscles[94] = 1 - (2 * actionRightSkeleton.pinkyCurl); // ポーズを設定 handler.SetHumanPose(ref humanPose); } }使い方
HumanoidキャラクターのAnimatorと同じ階層に、先ほど作成したスクリプト「HoldFinger.cs」をAddComponentします
ゲームを再生してValveIndexコントローラーを握ると、コントローラーを握った指の形に合わせてHumanoidキャラクターの指が動きます
微調整
Vroidなど、モデルによっては親指の付け根が伸びたり、小指~人先し指の第1関節が曲がりすぎることがあります
HumanoidリグのConfigureで直す方法もありますが、ここではスクリプトから調整します// 左親指 //humanPose.muscles[55] = 1 - (2 * actionLeftSkeleton.thumbCurl); // 親指の第3関節を曲げない humanPose.muscles[57] = 1 - (2 * actionLeftSkeleton.thumbCurl); humanPose.muscles[58] = (1 - (2 * actionLeftSkeleton.thumbCurl))/2; // 指の第1関節の曲がる量を半分にする // 左人差し指 humanPose.muscles[59] = 1 - (2 * actionLeftSkeleton.indexCurl); humanPose.muscles[61] = 1 - (2 * actionLeftSkeleton.indexCurl); humanPose.muscles[62] = (1 - (2 * actionLeftSkeleton.indexCurl)) / 2; // 左中指 humanPose.muscles[63] = 1 - (2 * actionLeftSkeleton.middleCurl); humanPose.muscles[65] = 1 - (2 * actionLeftSkeleton.middleCurl); humanPose.muscles[66] = (1 - (2 * actionLeftSkeleton.middleCurl)) / 2; // 左薬指 humanPose.muscles[67] = 1 - (2 * actionLeftSkeleton.ringCurl); humanPose.muscles[69] = 1 - (2 * actionLeftSkeleton.ringCurl); humanPose.muscles[70] = (1 - (2 * actionLeftSkeleton.ringCurl)) / 2; // 左小指 humanPose.muscles[71] = 1 - (2 * actionLeftSkeleton.pinkyCurl); humanPose.muscles[73] = 1 - (2 * actionLeftSkeleton.pinkyCurl); humanPose.muscles[74] = (1 - (2 * actionLeftSkeleton.pinkyCurl)) / 2; // 右親指 //humanPose.muscles[75] = 1 - (2 * actionRightSkeleton.thumbCurl); humanPose.muscles[77] = 1 - (2 * actionRightSkeleton.thumbCurl); humanPose.muscles[78] = 1 - (2 * actionRightSkeleton.thumbCurl); // 右人差し指 humanPose.muscles[79] = 1 - (2 * actionRightSkeleton.indexCurl); humanPose.muscles[81] = 1 - (2 * actionRightSkeleton.indexCurl); humanPose.muscles[82] = (1 - (2 * actionRightSkeleton.indexCurl)) / 2; // 右中指 humanPose.muscles[83] = 1 - (2 * actionRightSkeleton.middleCurl); humanPose.muscles[85] = 1 - (2 * actionRightSkeleton.middleCurl); humanPose.muscles[86] = (1 - (2 * actionRightSkeleton.middleCurl)) / 2; // 右薬指 humanPose.muscles[87] = 1 - (2 * actionRightSkeleton.ringCurl); humanPose.muscles[89] = 1 - (2 * actionRightSkeleton.ringCurl); humanPose.muscles[90] = (1 - (2 * actionRightSkeleton.ringCurl)) / 2; // 右小指 humanPose.muscles[91] = 1 - (2 * actionRightSkeleton.pinkyCurl); humanPose.muscles[93] = 1 - (2 * actionRightSkeleton.pinkyCurl); humanPose.muscles[94] = (1 - (2 * actionRightSkeleton.pinkyCurl)) / 2;
まだ少し不格好ですが、調整前よりキレイに指が曲がります参考
Unityでスクリプトから、Animatorコンポーネントの「Chest-Twist」などの値を取得する方法
https://teratail.com/questions/168728【Unity】スクリプトからキャラクターのボーンを制御する準備 (備忘録)
https://qiita.com/Nekomasu/items/8884b8584bfc191582d4


- 投稿日:2020-02-05T19:10:23+09:00
CSOM(C#)でSharePointサイトを作成する
概要
CSOM(C#)で新しくSharePointサイトを作成するのに、簡単かと思いきや意外と迷走したので備忘録として書いておきます。
機能としてはそれほど需要が無いかもしれませんが、テスト用に複数のサイトをまとめて作る場合などに便利です。コード
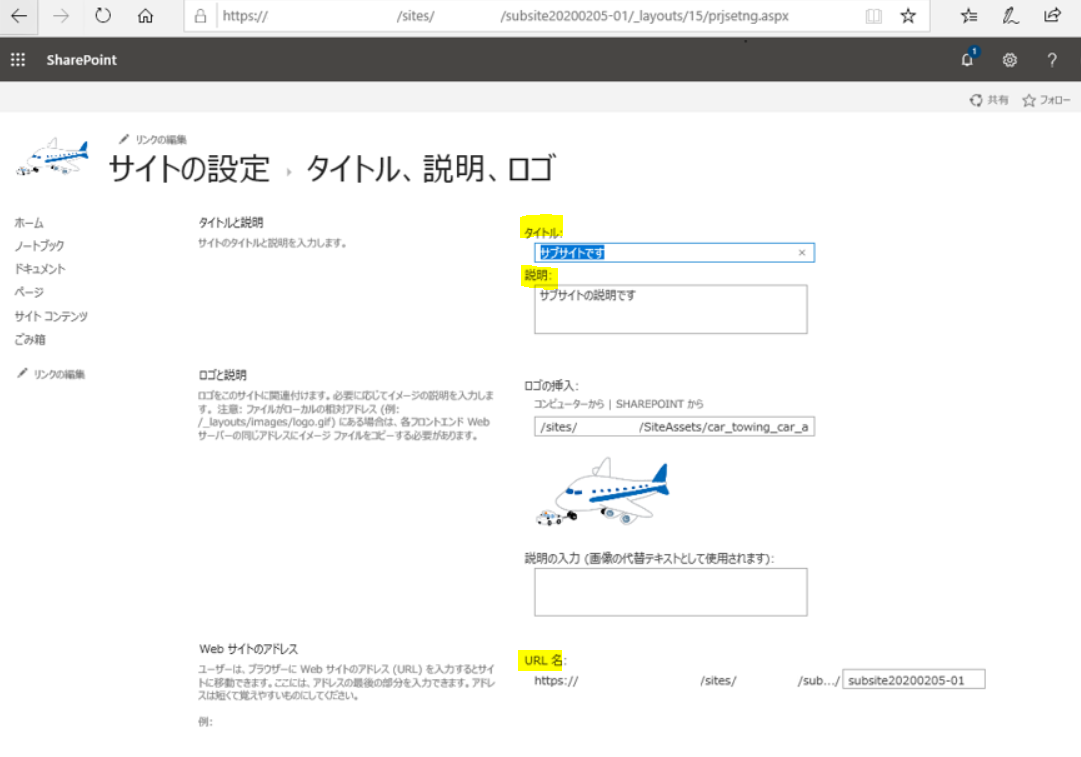
ControlSite.csvar loginUser = ConfigurationManager.AppSettings["SPO_ID"]; var loginPass = ConfigurationManager.AppSettings["SPO_PASS"]; var siteCollectionUrl = ConfigurationManager.AppSettings["SITE_URL"]; using (var clientContext = new ClientContext(siteCollectionUrl)) using (var secureString = new SecureString()) { foreach (var c in loginPass) secureString.AppendChar(c); secureString.MakeReadOnly(); clientContext.Credentials = new SharePointOnlineCredentials(loginUser, secureString); //作成するサイト情報 var subSiteCreateInfo = new WebCreationInformation { Title = "サブサイトです", // タイトル Description = "サブサイトの説明です", // 説明 Language = 1041, // 言語(日本語) Url = "subsite20200205-01", // Url UseSamePermissionsAsParentSite = true, // 権限の継承 WebTemplate = "STS#3" // サイトテンプレート(チームサイト・Office365グループ無し) }; //作成 var newWebSite = clientContext.Web.Webs.Add(subSiteCreateInfo); clientContext.Load( newWebSite, s => s.ServerRelativeUrl, // 結果出力用 s => s.Created); // 結果出力用 clientContext.ExecuteQuery(); Console.WriteLine($"サブサイトが正常に作成されました。Url:{newWebSite.ServerRelativeUrl} Created:{newWebSite.Created}"); }コード説明
- サイトコレクションまたはサイトに接続
- WebCreationInformationクラスを用いて新しいサイトのプロパティを指定
- ClientContext.Web.Webs.Addで、現在のサイトのサブサイトとして新しいサイトが作成される
WebCreationInformationクラス
新しいサイトのプロパティを設定します。
- Title … サイト名を指定
- Description … サイトの説明を指定
- Language … LCIDを指定
- Url … URLを指定
- UseSamePermissionsAsParentSite … True:権限を継承する / False:権限を継承しない
- WebTemplate … サイトテンプレートを指定
WebCreationInformation.Lanuguage
LCIDを指定します。日本語の場合、1041です。
他言語の場合は、下記が参照になると思います。
Language.Lcid propertyWebCreationInformation.WebTemplate
サイトテンプレートを指定します。
チームサイト・Office365グループ無しは、"STS#3" です。サイトテンプレート一覧を探したのですが、Microsoft公式からは見つけられませんでしたので、下記リンクを置いておきます。
SharePoint Site Template ID – Microsoft Office 365
ブラウザ上で、サイト作成時に使用したテンプレートを特定するちなみに私は一つサイトを作り、そのWebサイトのプロパティをデバッグで調べるという力技を使いました。
実行結果
下記のように新しくサイトが作成されます。
参考
- 投稿日:2020-02-05T16:32:45+09:00
【Unity ARFoundation】Sample Sceneの人体検知がやっと触れた、、!(HumanSegmentationImages)
2019年末にARFoundationを触り始めてから、ずっと同じエラーに悩まされていたがようやく解決ができた。
QAプラットフォームの『teratail』に投稿した質問内容を以下に貼り付ける。
リンク:https://teratail.com/questions/239151
UnityのARFoundationを触りたく、Unity公式のGitHubからarfoundtion-samplesをダウンロードして、Unityにアップロードしたら下記のようなエラーが出ました。
Failed to load ‘/Users/user/UnityARFoundation/Assets/arfoundation-samples/ProjectSettings/XRSettings.asset’ because it was serialized with a newer version of Unity. (Has a higher SerializedFile version)
UnityEditorInternal.InternalEditorUtility:ProjectWindowDrag(HierarchyProperty, Boolean)
UnityEngine.GUIUtility:ProcessEvent(Int32, IntPtr)
上のエラーコードでは「より新しいバージョンのUnityでシリアル化されているため」と書かれているので、Unityのバージョンをダウングレードすれば良いということでしょうか。このエラーに至った手順を記載します。
①ターミナルにて下記URLを「git clone」
https://github.com/Unity-Technologies/arfoundation-samples.git
②arfoundation-samples.gitフォルダをUnityのProjectのAssetsにドラッグ&ドロップ○環境
macOS Catalina 10.15.2
Unityバージョン 2019.2.19f1
AR Foundation 3.0.1
AR Subsystems 3.0.0
ARKit XR Plugin 3.0.1
ARKit Face Tracking 3.0.1
いただいた回答にある通り、リンク先に公開されているフォルダはプロジェクトそのものなため、
UnityHubで「リストに追加」しプロジェクトを開けば全て解決した。この1ヶ月間あまりにも解決できず、上記のエラーを一度無視してサンプルシーンを端末にビルドして遊んでいた。
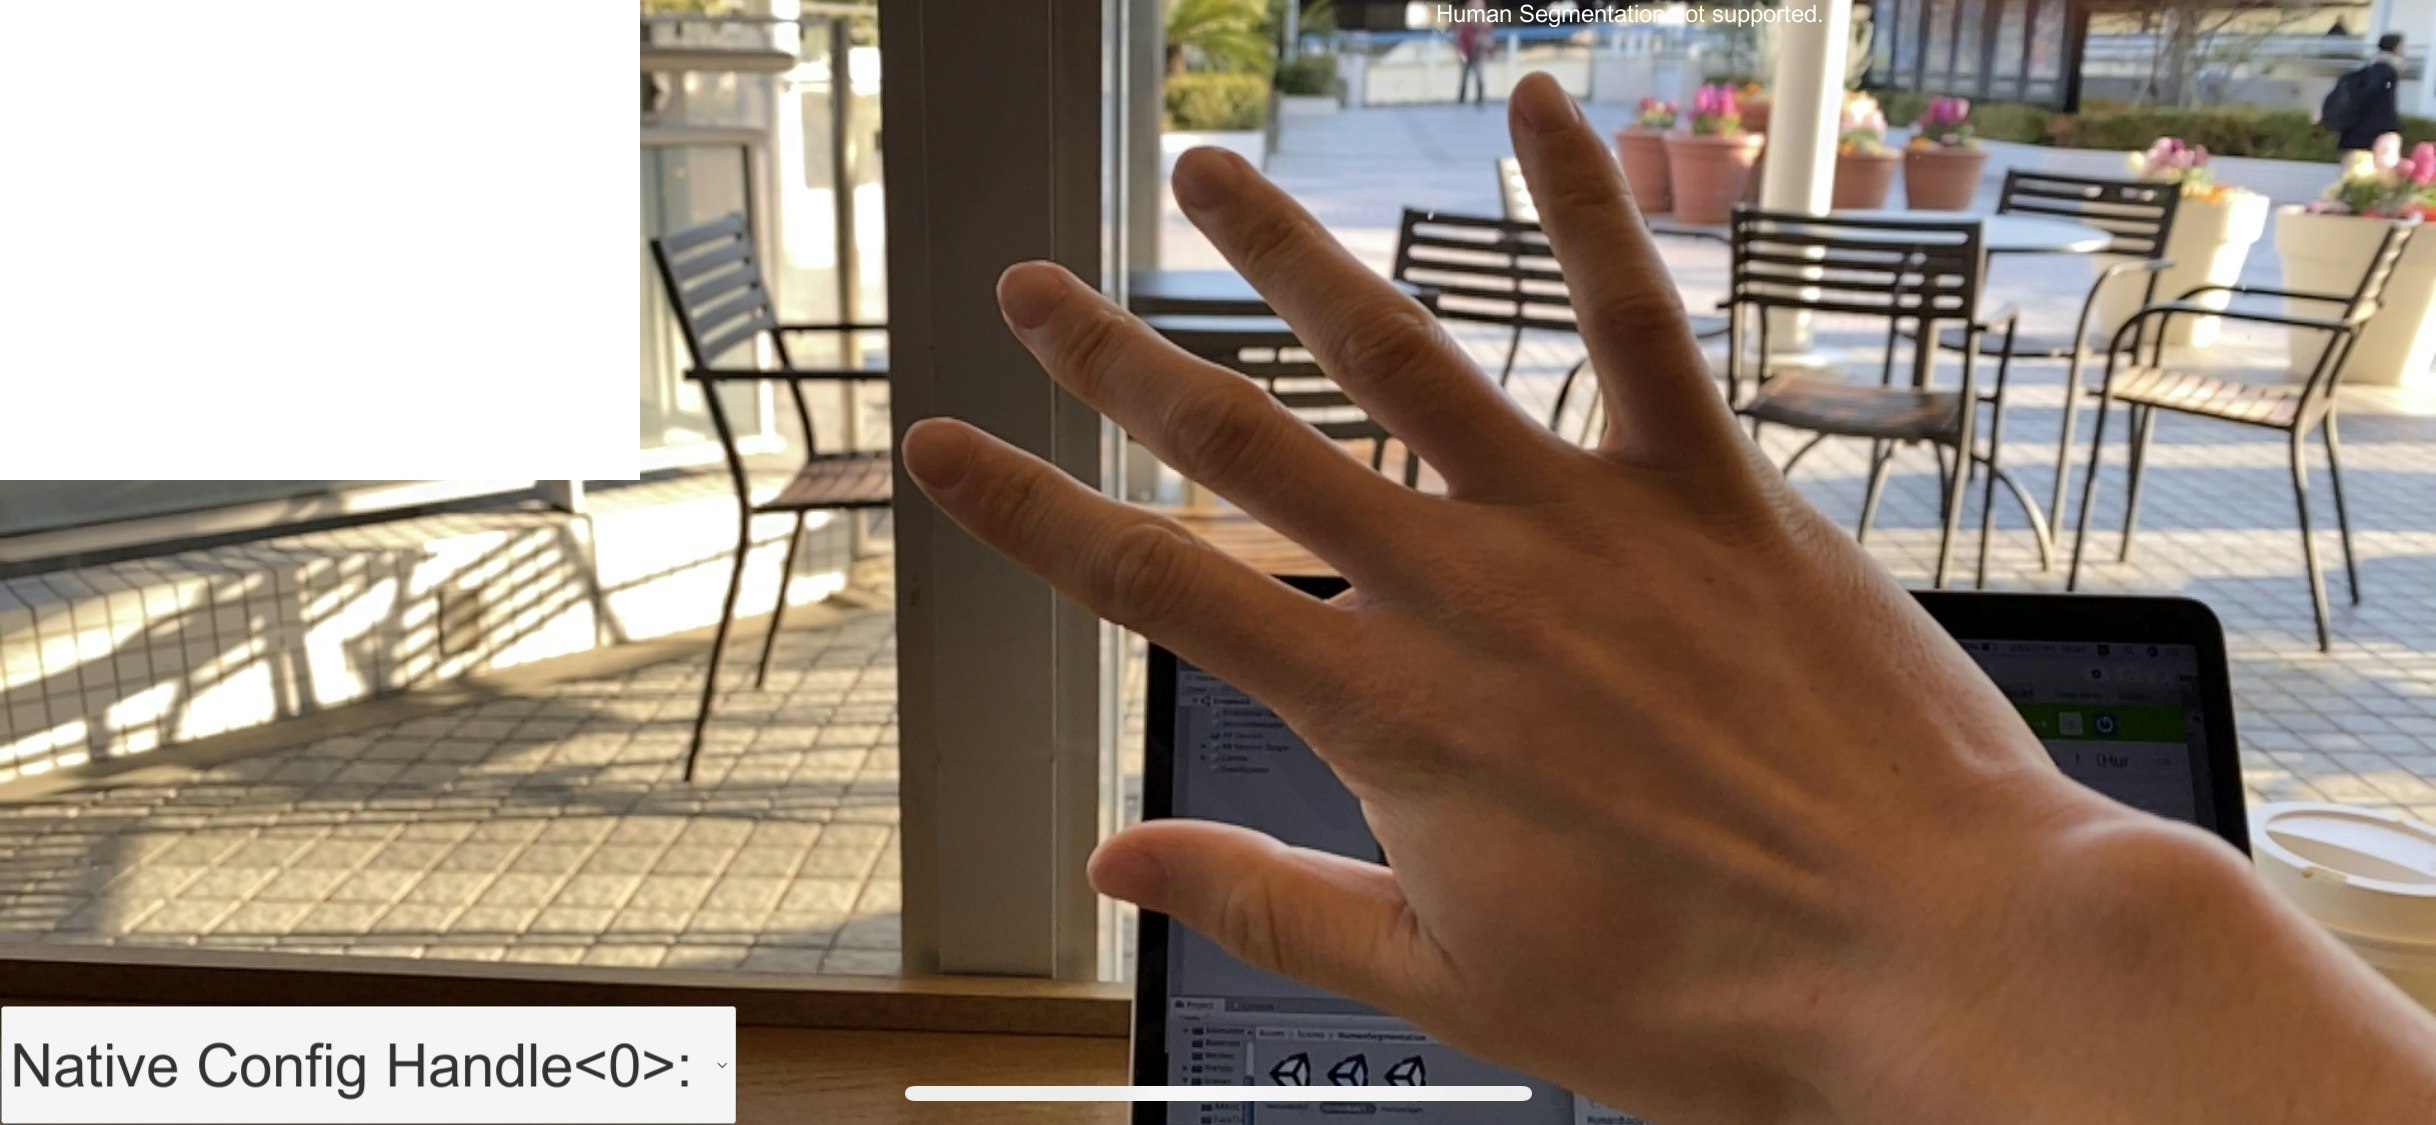
サンプルシーンの中でも、SimpleARはなぜか問題なく動作して、お目当てのHumanSegmentationImagesやHumanBodyTracking3Dが動作しなかったので、「動作しないサンプルシーンのコードに問題がある!(アホ)」と思っていた笑※下記画像が、上記エラーを無視してHumanSegmentationImagesを動かしている様子。
※画面中央上部に「Human Segmentation not supported.」とメッセージが出ているので、このメッセージを出しているコードを特定 & 条件分岐・参照を遡り、原因を特定しようとしていた。
(この遡りをしているときにも知らないことが出てきたので、またわかったらQiitaに投稿する)
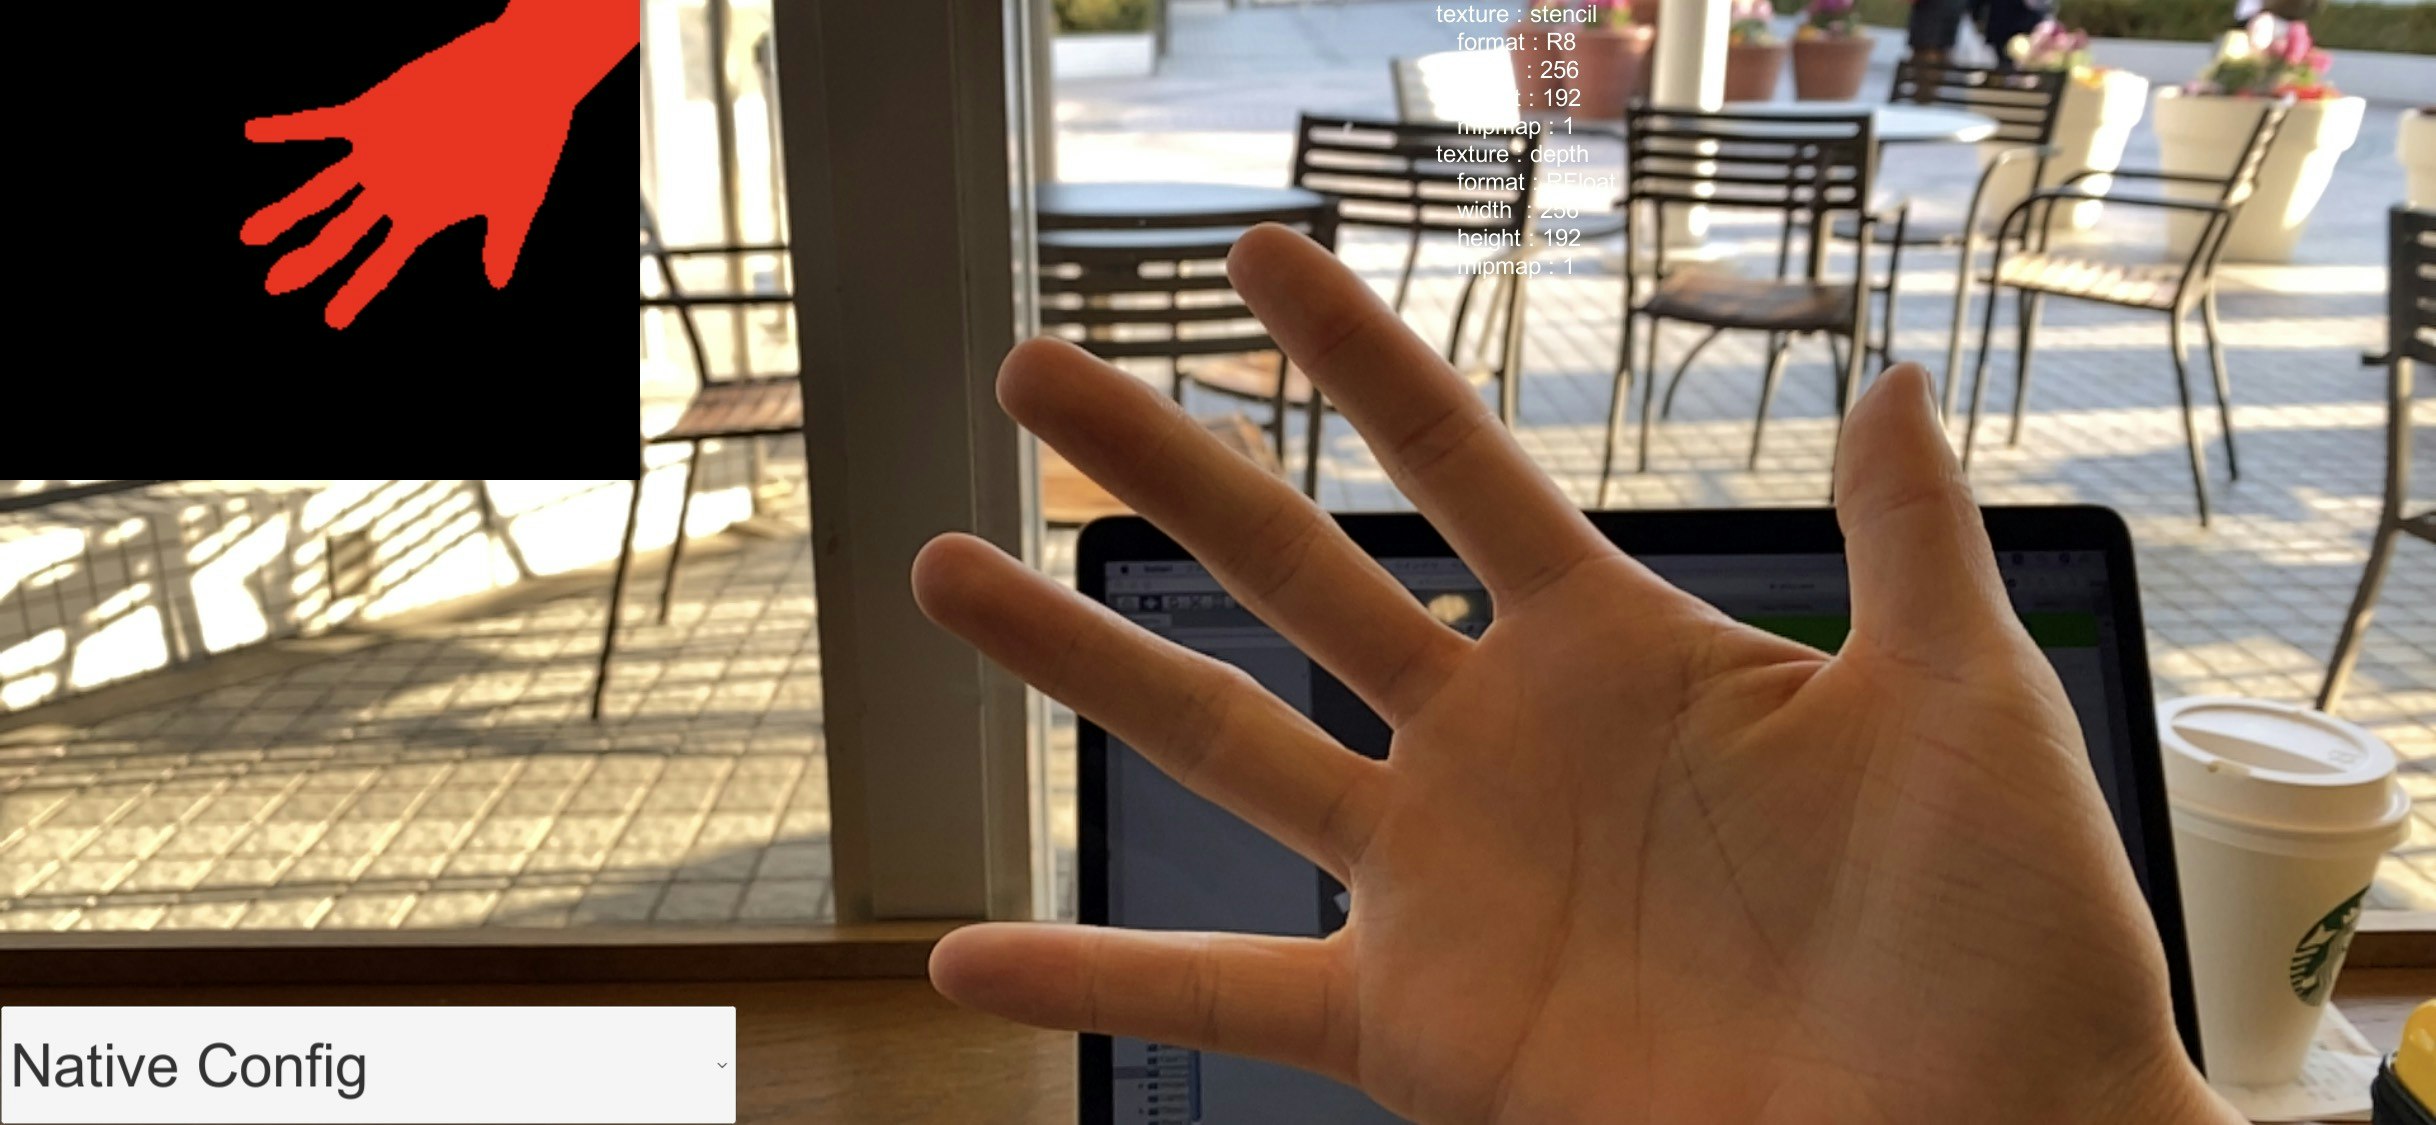
ちなみに、正常な動作をしているのがこちら。(iPhone 11Pro)
画面左上に検知した手・腕の形が赤く表示されている。
この検知スピードがめちゃくちゃ早くて正確で、驚いたしワクワクした!!(本当に0.1秒くらい)
この検知のコードを使えば、人間とUnityで作ったオブジェクトのオクルージョンができるっぽい。
未来きてるわ。【学び】
・エラーは絶対に無視しない(トンチンカンな所を調べて無駄に時間かかるだけ)
・考えて調べて解決できなかったらすぐに質問する(あっという間に解決した)【関連して知りたい事】
・実際の開発現場では、例えばARFoundationのサンプルシーンのコードをコピペして利用しているのか。