- 投稿日:2020-01-16T23:28:16+09:00
WordPressのローカル環境の構築にどうぞ!怖くないdocker-compose
Wordpressの爆速な環境構築
wordpressのローカル環境構築で手間取っているあなたへ
dockerを使っていますが、怖くないと思います。dockerとdocker-composeコマンドのインストール先
dockerのインストール方法
https://www.docker.com/products/docker-desktophttp://docs.docker.jp/compose/install.htmlリポジトリをクローンする
リポジトリを配置するディレクトリで行う
私の参考のリポジトリです。git clone https://github.com/noracorn/bakusoku_wordpressWordPressを立ち上げる(docker-composeで立ち上げる)
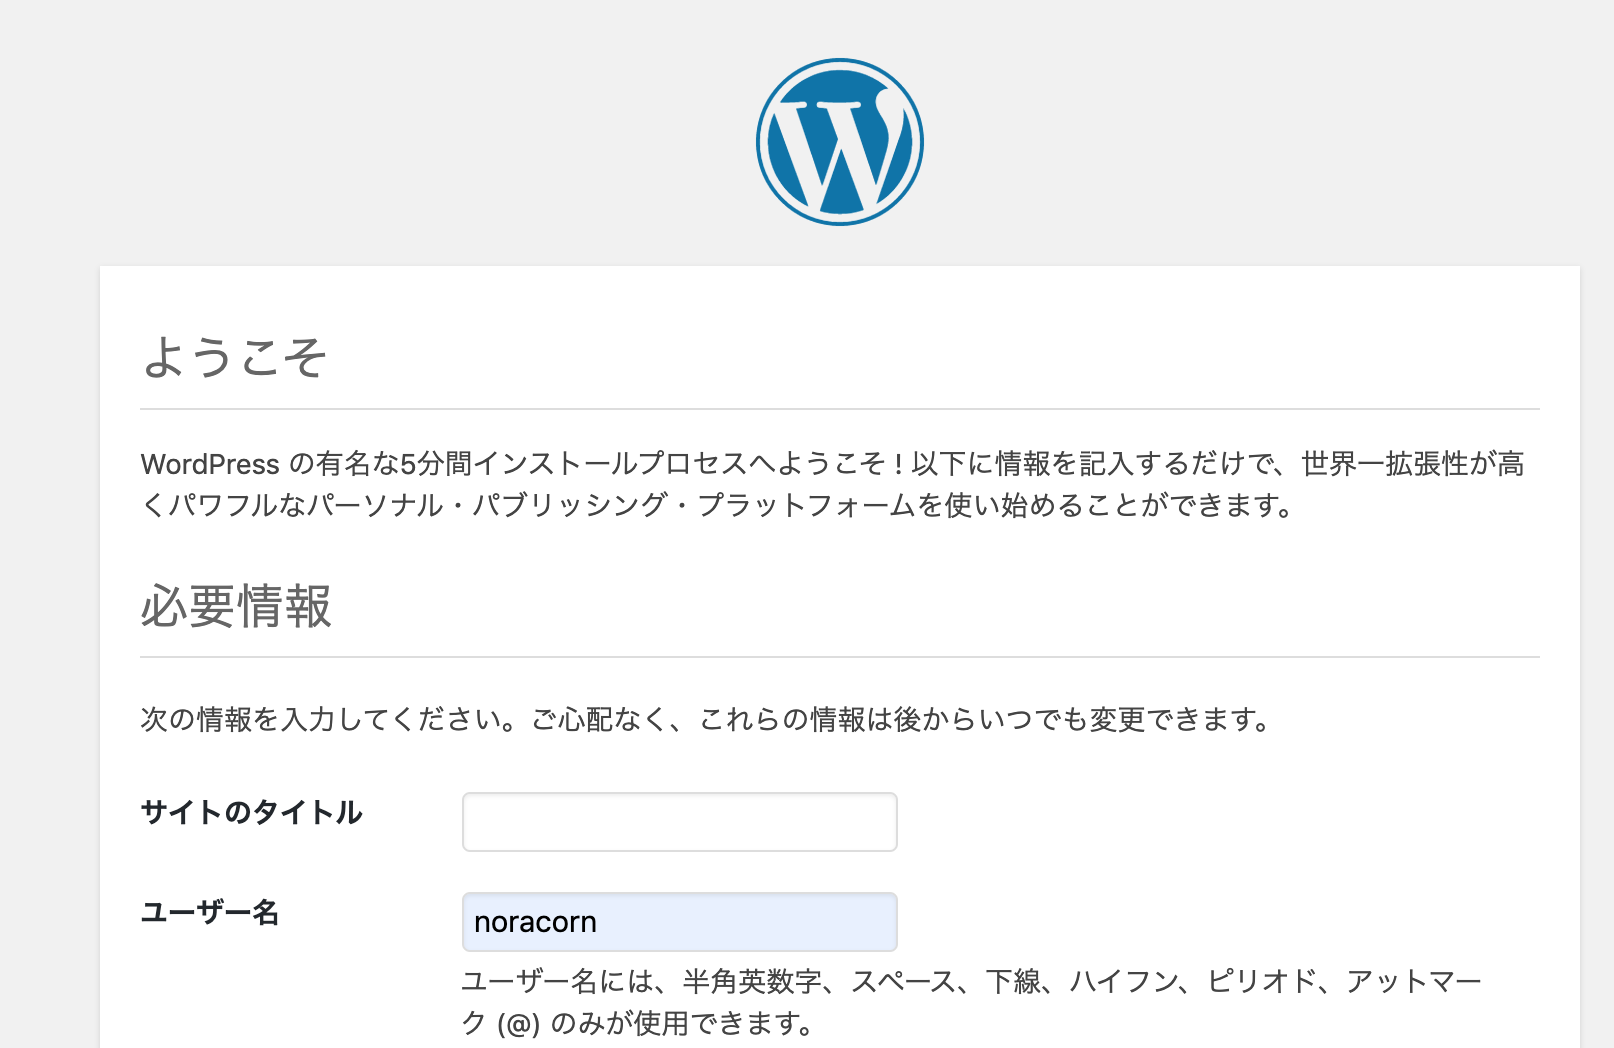
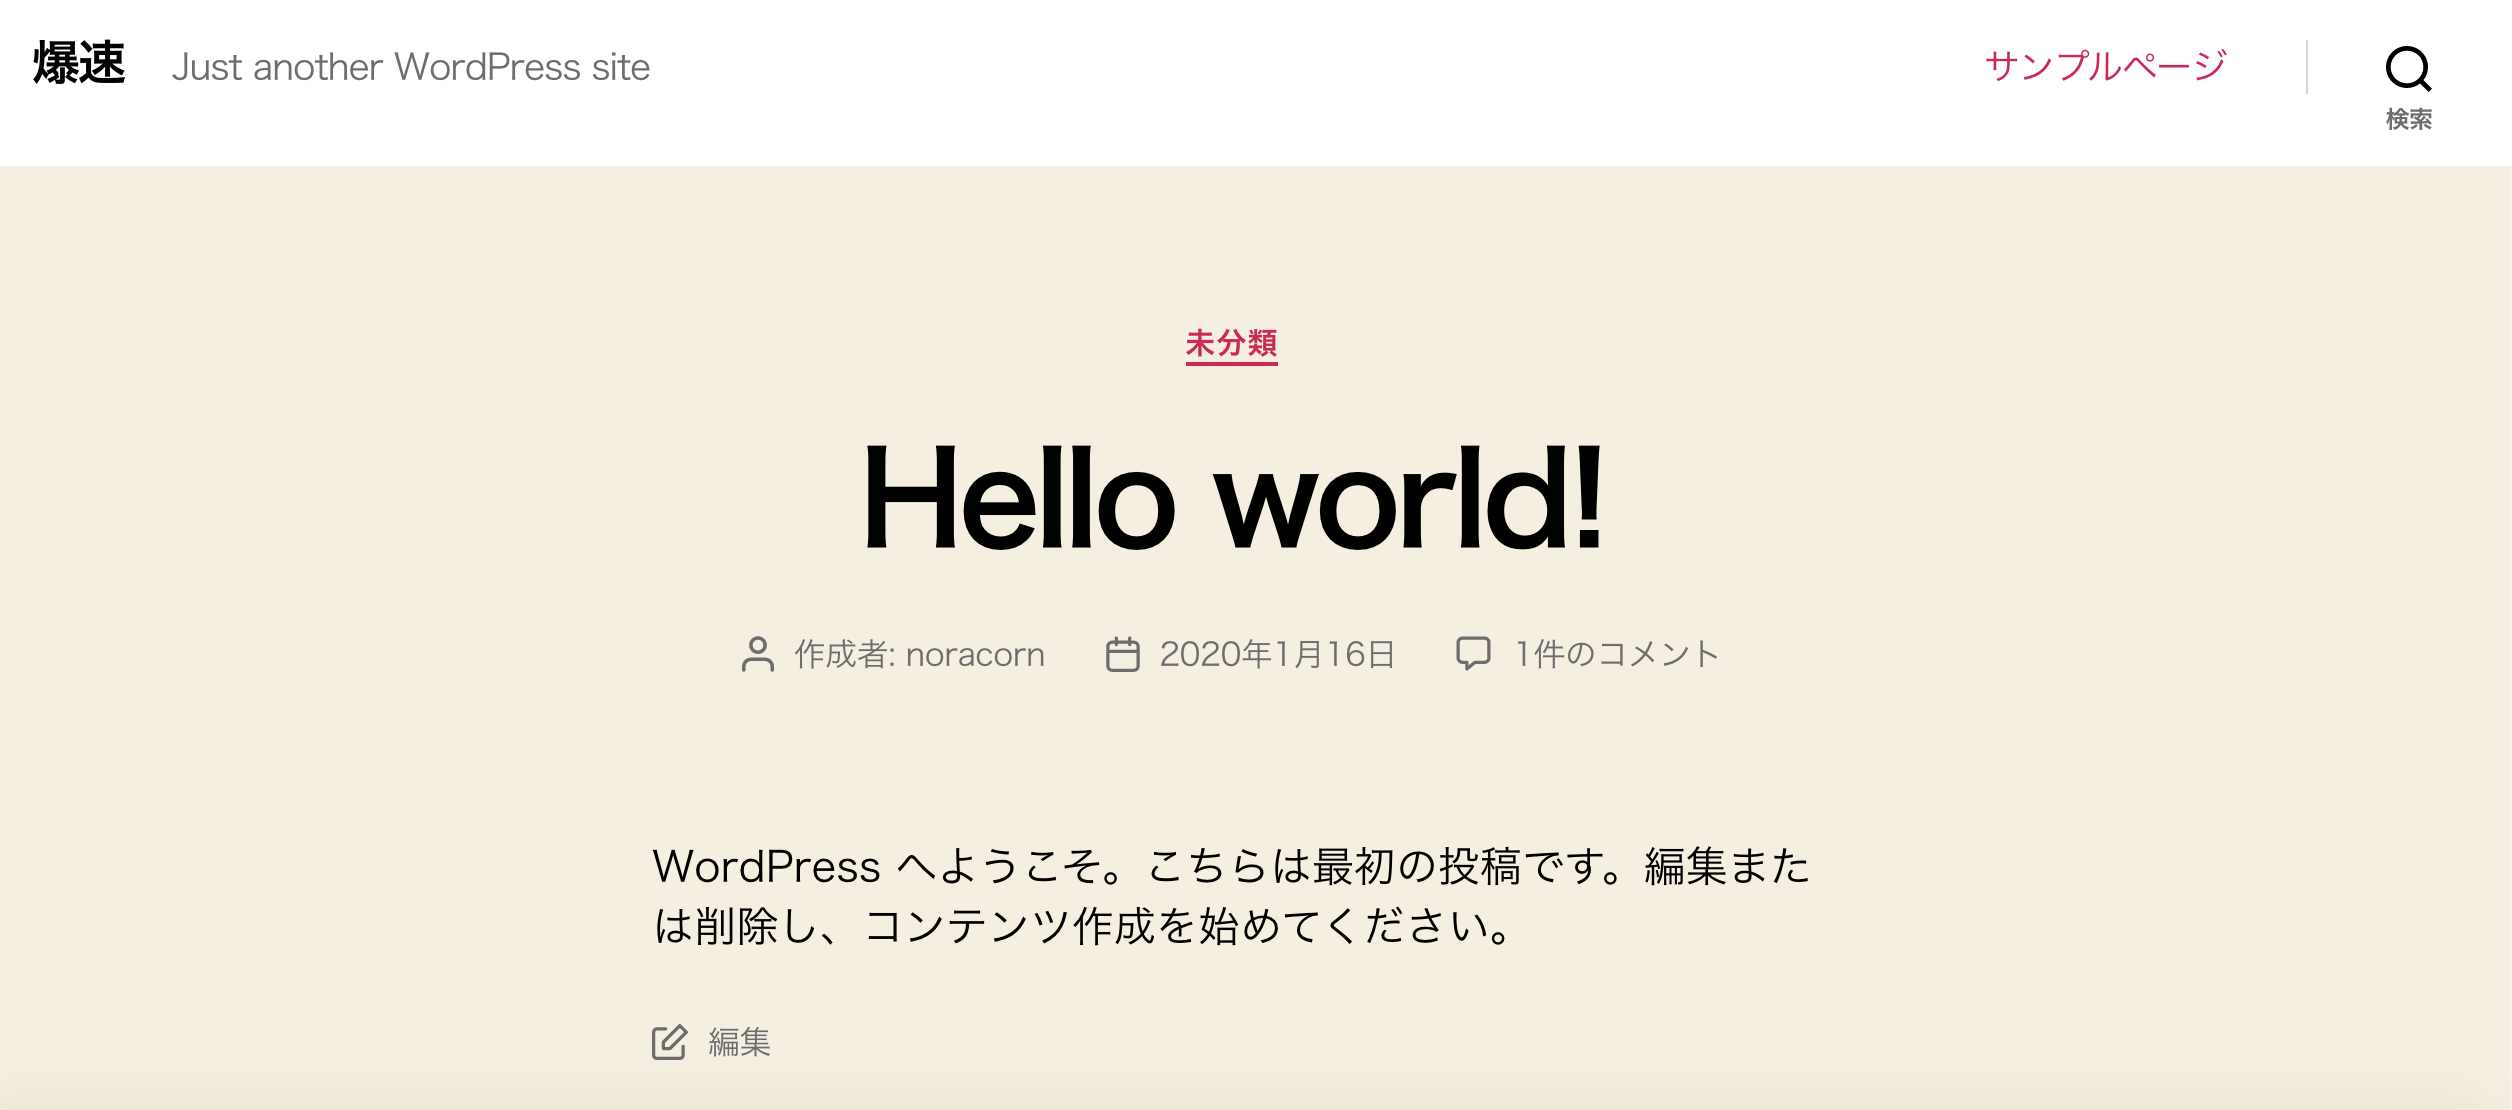
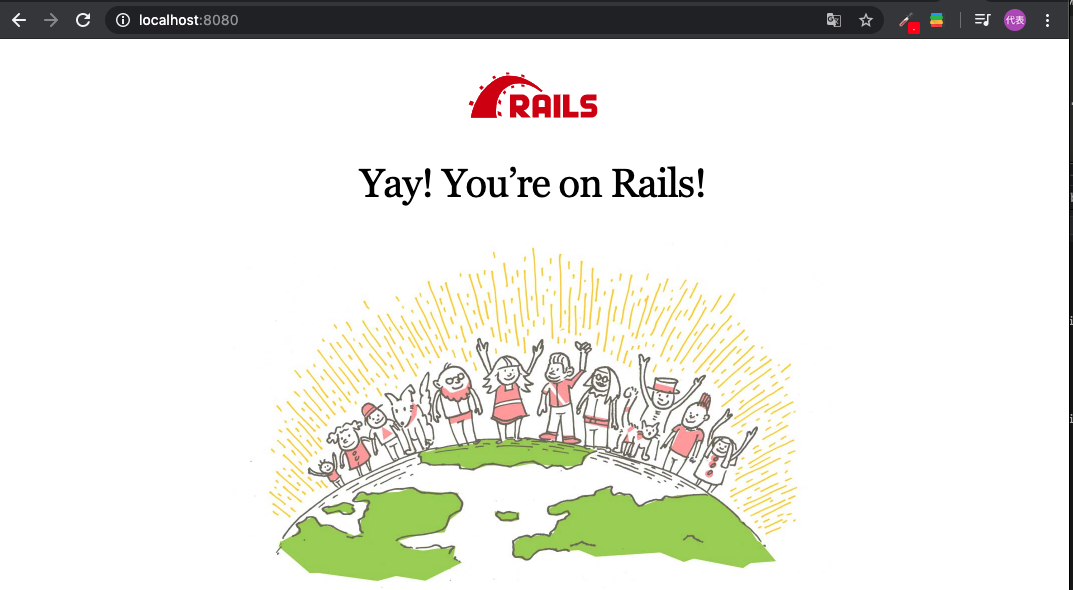
cd bakusoku_wordpress
docker-compose up -d
立ち上がったことを確認する
ブラウザを立ち上げて、以下のURLにアクセスしてインストールする。
http://localhost:8080
インストール後に、ログインしもういちど、以下のURLにアクセスする
http://localhost:8080
WordPressを終了する(docker-composeを終了する)
docker-compose downさいごに
慣れたら、docker-compose.ymlと、config、wordpressフォルダを自分のPCのディレクトリにコピーして、自分用のGitなど登録してみましょう
- 投稿日:2020-01-16T21:51:09+09:00
2本目:ホスト側のWebブラウザから仮想マシンに立てたdocker上のwebサーバーにアクセスする
やりたいこと
掲題の通り。
環境
- ホストOS:Windows 10
- 仮想マシン:Virtual Box
- ゲストOS:Ubuntu(16.04.6)
- docker
前提条件
ホスト側からゲスト側へアクセスするための設定ができている
Key Word:NAT + ホストオンリーアダプターゲストOSにdockerを動かすための環境が整っている
やったこと
- Virtual Box:ネットワーク設定からアダプター1(NAT)のポートフォワーディングを以下のように設定
名前(任意) プロトコル ホストポート ゲストポート HTTP ※1 TCP 50080 80 HTTP ※2 TCP 58080 8080 SSH TCP 50022 22 ※1 ゲストOS上にサーバー(Tomcat, apache2等)を立てた状態でホスト側から"http://ゲストOSのIPアド:50080"
にアクセスがあると、立てたサーバーのWelcome Pageに遷移する
※2 docker上に立てたWebサーバーにアクセスするためのポートを指定(ポート番号は任意でOK)
- Webサーバーのイメージを作成する
- 今回の目的はただホスト側のWebブラウザからdocker上のwebサーバー(on 仮想マシン) にアクセスするだけなので、Webブラウザ上で"Hello world"を出力する単純なWebアプリの イメージを作成する。(ここは今回の主眼ではないので手順の概要のみ残す)
※Dockerfileは任意のディレクトリ内に作成
※Dockerfileを作成したのと同じディレクトリ内にindex.html("Hello world"と記載)も用意しておく
※Dockerfileの記載内容は下記の記事を参考にした
https://qiita.com/nl0_blu/items/1de829288db2670276e8手順1:ゲストOS上に任意のディレクトリを作成
手順2: 作成したディレクトリ上にDockerfileを作成する#Dockerfileの中身 FROM centos CMD echo "now running..." RUN yum install -y httpd ADD ./index.html /var/www/html/ #ポート80を開ける EXPOSE 80 #起動した時にapache起動するコマンド CMD ["/usr/sbin/httpd", "-D", "FOREGROUND"]
- 作成したDockerfileを元にコンテナを起動する
- 以下のコマンドを実行しコンテナを起動する
$ docker run -d --name コンテナ名(任意) -p 8080:80 イメージ名(or ID)※ "-p 8080:80"とすることで、ゲストOS側の8080ポートとコンテナ側の80ポートが紐づく。
※ ゲストOS側の8080ポートはホスト側の58080ポートと紐づいているので、
ホスト側からゲストOS側の58080ポートに受けるアクセスは、ゲストOSの8080ポートを経由して
コンテナ側の80へのアクセスとなり、コンテナ上のWebサーバーへのアクセスが可能となる。
実際にアクセスしてみる
⚪︎ ホスト側からゲスト側へ50080ポート経由でアクセスした場合
→ゲストOS上で起動しているapache2のデフォルトページが表示される。
⚪︎ ホスト側からゲスト側へ58080ポート経由でアクセスした場合
→"Hello world"が表示される。


- 投稿日:2020-01-16T21:24:27+09:00
Dockerを使って、phpMyAdminをいとも簡単に接続する 。
「Dockerでwebアプリケーションを作ろう!」
と思い立ち、せっせと環境構築をし、なんとか構築し終わったーと思い、phpMyAdminに接続しようとしたら、全然できない…。公式イメージ通りにやってるつもりなのにエラーの連続。
なんとか接続できたので、
Docker初学者の人のためにここに書き残します!
*データベースの設定完了後につまずいていたので、それ以降から投稿します。データベースがローカルで走っている状態にしてください。
そうしたら、ターミナルでコンテナを見てみましょう。$ docker ps CONTAINER ID IMAGE COMMAND CREATED STATUS PORTS NAMES 655317389bfd mysql:5.7 "docker-entrypoint.s…" 23 hours ago Up 34 minutes 33060/tcp, 0.0.0.0:4506->3306/tcp twitter_clone_db_1ぐちゃぐちゃですみません笑
これで、データベースを確認できます。私がつまづいてしまった場所がここからです。
まず、はじめにdocker-hubから公式のimageを取ってきます。
https://hub.docker.com/r/phpmyadmin/phpmyadmin/そしてpullしていきます。
pullっていうのは、特定のイメージをダウンロードしてくることです!$ docker pull phpmyadmin/phpmyadminそして、完了。よし、runだー!と思ったら…
$ docker run --name my-own-phpmyadmin -d --link  twitter_clone_db_1 -p 8081:80
phpmyadmin/phpmyadmin

f1df1be3ac876912155029470016bdbe97960e293eec543cbd0bad383269fda9
docker: Error response from daemon: Cannot link to /twitter_clone_db_1, as it
does not belong to the default network.
なんかネットワークにつながっていないみたい。
とりあえずネットワークを調べてみる。$ docker network ls NETWORK ID NAME DRIVER SCOPE a05d069a01f9 bridge bridge local 411a1f6ecd92 host host local 5398f730cb0c none null local 8117a9fd204d twitter_clone_default bridge localつなぐべきは、一番下のネットワークだとわかったので、
オプションを使ってネットワークに接続させつつ、コンテナを起動させてみる。$ docker run --net=twitter_clone_default --name my-own-phpmyadmin -d --link twitter_clone_db_1 -p 8081:80 phpmyadmin/phpmyadminすると…
d762f136d4c888e4d1cb715536b44b33c98aca180bc10965fb9389624e834bbできたーーーーーー
自力でやった甲斐がありました。泣確認してみます!
$ docker ps
CONTAINER ID        IMAGE                   COMMAND                  CREATED
STATUS              PORTS                               NAMES
fd762f136d4c        phpmyadmin/phpmyadmin   "/docker-entrypoint.…"   43 seconds
ago      Up 42 seconds       0.0.0.0:8081->80/tcp           my-own-phpmyadmin

655317389bfd        mysql:5.7               "docker-entrypoint.s…"   24 hours ago
Up 41 minutes       33060/tcp, 0.0.0.0:4506->3306/tcp   twitter_clone_db_1
しっかりできていました。
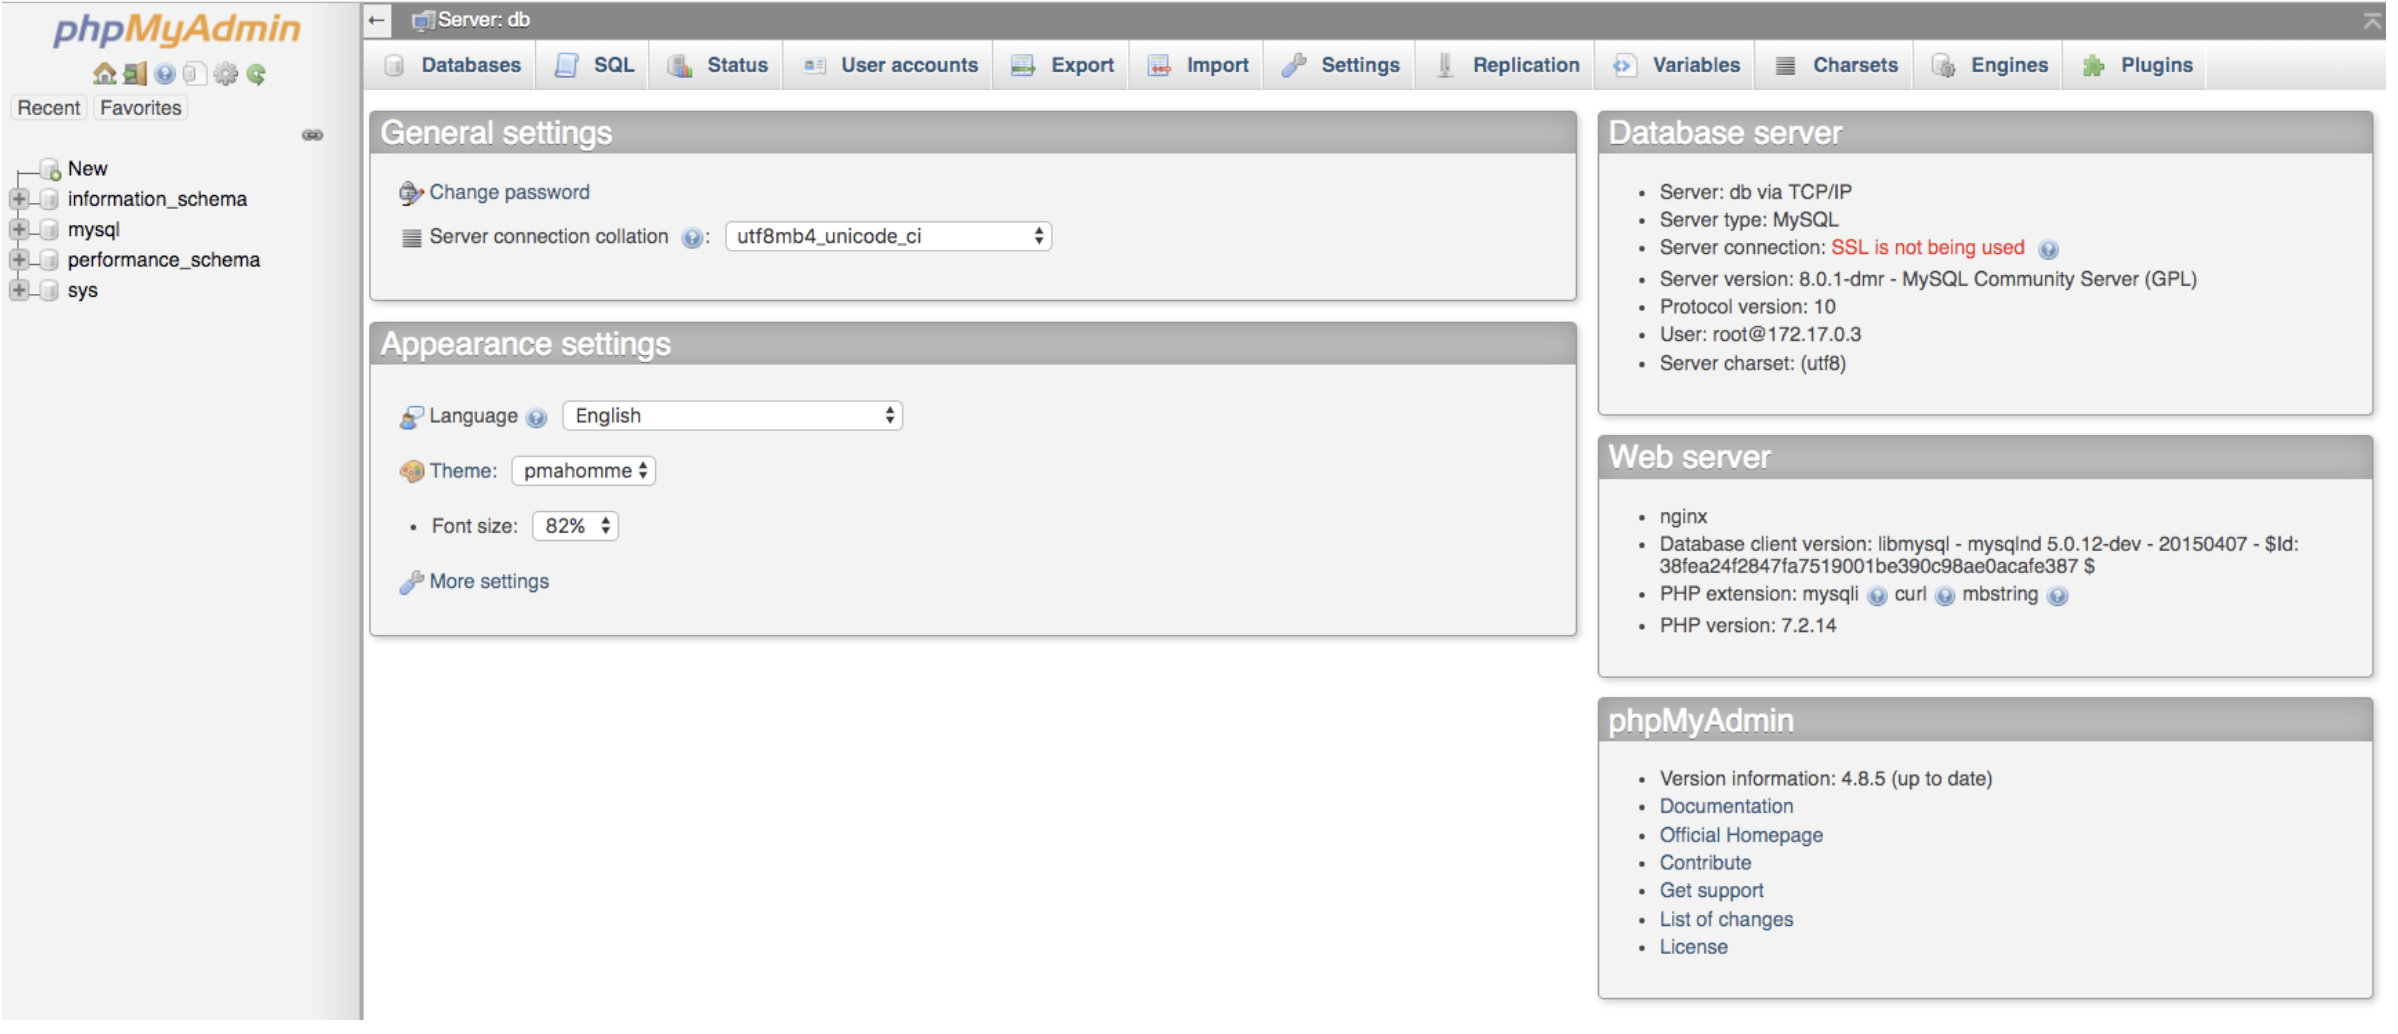
ということで、localhost:8081 へアクセスします。
usernameに「root」を入れて、Passwordは自分で設定したものを入れてください。
これで完成です!
Dockerを使えば、効率が著しく上がりますよね!
引き続き、webアプリケーション作成に励みます!

- 投稿日:2020-01-16T20:54:01+09:00
Docker Hub の Build triggers の使い方
Docker Hub の (Remote) Build triggers の使い方がよく分からなかったので調べました。
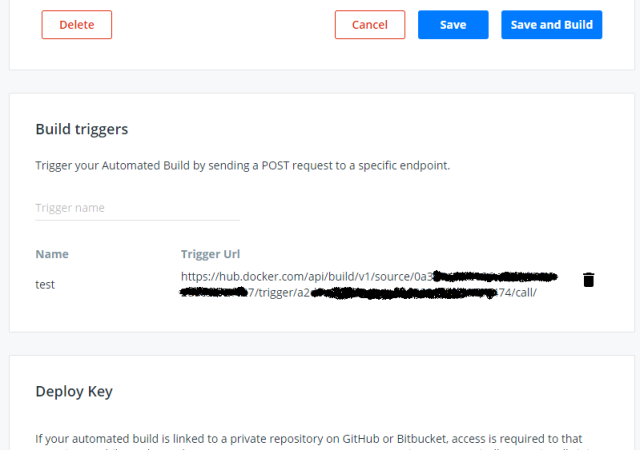
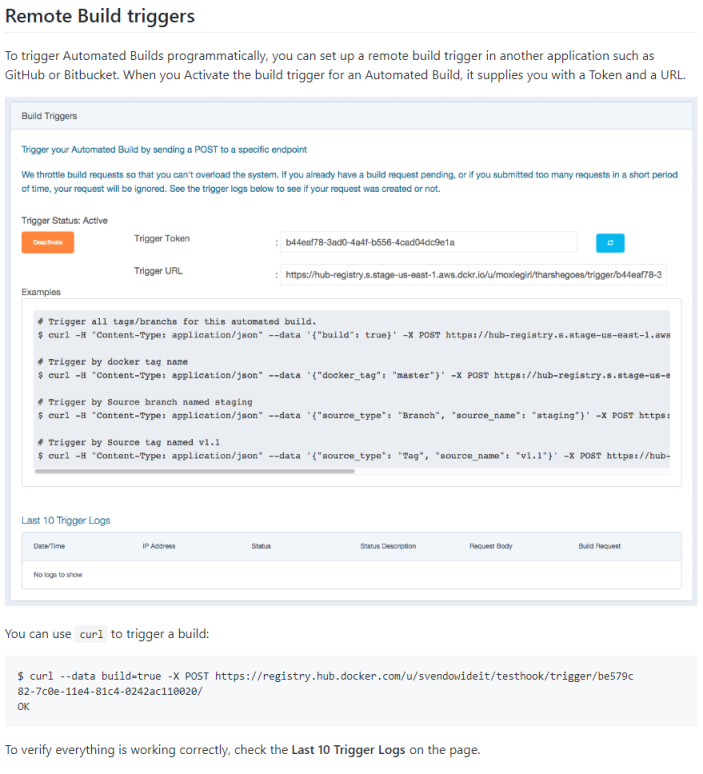
Docker Hubには外部からリクエストをPOSTすることでAutomated Buildを実行する「Build triggers」という設定がBuildタブの「Configure Automated Builds」の中にあるのですが(下記画像参照)、どうもDocker v19.03現在時点で、その使い方の詳細が消えてしまっているようです。(現在のドキュメントにも記載されていません。)
昔のドキュメントをさかのぼってみるとv17.06時点のドキュメントには書いてありました。(オリジナルサイズの画像はリンク先へ)
よく見ると「Trigger Url」の形式も変わっています。(昔のTrigger TokenはTrigger Urlに含まれたように見えます。)どこかの時点で仕様が変わったのだと思いますがよくわかりませんでした。Trigger Urlは変わっていますが、JSONパラメータは同じものが使えるようです。
少なくともTrigger by Source tag named v1.1がすべて動作することを確認しました。buildまたはdocker_tagはBUILD RULESの定義にマッチするものが反応し、source_typeは指定したブランチ/タグをpushした時と同じように反応するようです。(注意 もしかしたらJSONパラメータは将来廃止する or 廃止されたという意図なのかもしれないので注意した方がいいかもしれません。)ちなみに現在のTrigger Urlの形式
https://hub.docker.com/api/build/v1/source/で検索してもBuild triggersの情報はあまり見つかりませんが、古い形式であるhttps://registry.hub.docker.com/triggerあたりを検索キーワードとすると見つかると思います。検索&コピペ用に画像のExamplesの内容をテキスト化しておきます。
# Trigger all tags/branchs for this automated build.
$ curl -H "Content-Type: application/json" --data '{"build": true}' -X POST https://

# Trigger by docker tag name
$ curl -H "Content-Type: application/json" --data '{"docker_tag": "master"}' -X POST https://

# Trigger by Source branch named staging
$ curl -H "Content-Type: application/json" --data '{"source_type": "Branch", "source_name": "staging"}' -X POST https://

# Trigger by Source tag named v1.1
$ curl -H "Content-Type: application/json" --data '{"source_type": "Tag", "source_name": "v1.1"}' -X POST https://


curl --data build=true -X POST https://registry.hub.docker.com/u/svendowideit/testhook/trigger/be579c
82-7c0e-11e4-81c4-0242ac110020/
おまけ
勢い余って、Build triggers をCLIで実行するツールを作ってみたけど、curlで十分だし使わない気がするなぁ。
- 投稿日:2020-01-16T19:46:11+09:00
Homebrew + rbenv + Bundler + dockerで開発環境をマネージドに構築する(番外編-Ruby on Railsアプリ)
〜後編〜からの続き
前提
- 便宜上、既存のワーキングコピーがあります
- ただし、
Dockerfileやdocker-compose.ymlは後編からガラッと変わりますDocker手順
Dockerfileのコマンド
コマンド 説明 FROM 使用するイメージとバージョン RUN コマンドの実行。railsに必要な必要なnodejsとpostgeqsqlをインストールしている WORKDIR そのままの意味。作業ディレクトリを設定します。 ADD ローカルのファイルをコンテナへコピーする(昔のCOPYコマンドになります) ENTRYPOINT 一番最初に実行するコマンド(ここではentrypoint.shを参照) EXPOSE コンテナがリッスンするport番号 CMD イメージ内部のソフトウェア実行(つまりRailsのことですね) 1. Dockerfileを作成する
DockerfileFROM ruby:2.6.5 # Setting environment ENV LANG C.UTF-8 ENV TZ Asia/Tokyo ENV APP_HOME /var/www/capistrano_sample_app_v1 # Install libraries RUN apt-get update -qq && \ apt-get install -y build-essential \ libpq-dev \ nodejs \ vim \ default-mysql-client RUN gem install bundler -v '2.1.4' # Create app home RUN mkdir -p $APP_HOME WORKDIR $APP_HOME # Copy Gemfile from origin ADD Gemfile $APP_HOME/Gemfile RUN bundle _2.1.4_ install --path vendor/bundle ADD . $APP_HOME2. docker-composeを作成する
docker-compose.ymlversion: '3' services: mysql: # https://dev.mysql.com/doc/relnotes/mysql/5.7/en/ image: mysql:5.7 environment: MYSQL_ALLOW_EMPTY_PASSWORD: "yes" MYSQL_DATABASE: capistrano_sample MYSQL_USER: developer MYSQL_PASSWORD: %masking% MYSQL_ROOT_PASSWORD: password ports: - "3306:3306" command: mysqld --innodb_file_per_table=1 --innodb_file_format=barracuda --innodb_large_prefix=1 redis: # https://github.com/RedisLabs/docker-library-redis image: redis:3.2-alpine # memcached: # https://github.com/autopilotpattern/memcached/releases # image: memcached:1.4-alpine app: build: context: . dockerfile: "Dockerfile" tty: true stdin_open: true ports: - "8080:8080" # environment: # RAILS_LOG_TO_STDOUT: "true" # STACKDRIVER_LOGGING_MODE: "agent" # command: /bin/sh -c "rm -f /capistrano_sample_app_v1/tmp/pids/server.pid && bundle exec rails s -p 8080 -b '0.0.0.0'" command: /bin/sh -c "rm -f tmp/pids/server.pid && bundle exec rails s -p 8080 -b '0.0.0.0'" volumes: # ホストのカレントディレクトリをコンテナの/appにマウント - "./:/app" links: - mysql - redis # - memcached3.docker build
Terminal$ docker-compose up --build Creating network "capistrano_sample_app_v1_default" with the default driver Pulling mysql (mysql:5.7)... 5.7: Pulling from library/mysql 804555ee0376: Pull complete c53bab458734: Pull complete ca9d72777f90: Pull complete 2d7aad6cb96e: Pull complete 8d6ca35c7908: Pull complete 6ddae009e760: Pull complete 327ae67bbe7b: Pull complete 9e05241b7707: Pull complete e822978df8f0: Pull complete 14ca71ed53be: Pull complete 026afe6fd35e: Pull complete Digest: sha256:2ca675966612f34b4036bbcfa68cb049c03e34b561fba0f88954b03931823d29 Status: Downloaded newer image for mysql:5.7 Pulling redis (redis:3.2-alpine)... 3.2-alpine: Pulling from library/redis 4fe2ade4980c: Pull complete fb758dc2e038: Pull complete 989f7b0c858b: Pull complete 42b4b9f869ad: Pull complete 17e06138ef20: Pull complete c0ecd66db81e: Pull complete Digest: sha256:e9083e10f5f81d350a3f687d582aefd06e114890b03e7f08a447fa1a1f66d967 Status: Downloaded newer image for redis:3.2-alpine Building app Step 1/11 : FROM ruby:2.6.5 ---> a161c3e3dda8 Step 2/11 : ENV LANG C.UTF-8 ---> Using cache ---> 5e1f7a284c55 Step 3/11 : ENV TZ Asia/Tokyo ---> Using cache ---> 36064309c74a Step 4/11 : ENV APP_HOME /var/www/capistrano_sample_app_v1 ---> Using cache ---> b6ad93523f4f Step 5/11 : RUN apt-get update -qq && apt-get install -y build-essential libpq-dev nodejs vim default-mysql-client ---> Using cache ---> 27f7958c4205 Step 6/11 : RUN gem install bundler -v '2.1.4' ---> Using cache ---> 2152e68a959d Step 7/11 : RUN mkdir -p $APP_HOME ---> Using cache ---> 34bf7f30bbcb Step 8/11 : WORKDIR $APP_HOME ---> Using cache ---> 1be2dad77d77 Step 9/11 : ADD Gemfile $APP_HOME/Gemfile ---> Using cache ---> f2549fe43d36 Step 10/11 : RUN bundle _2.1.4_ install --path vendor/bundle ---> Using cache ---> 55ba3d1dbf0c Step 11/11 : ADD . $APP_HOME ---> 4d459e27e55e Successfully built 4d459e27e55e Successfully tagged capistrano_sample_app_v1_app:latest Creating capistrano_sample_app_v1_mysql_1 ... done Creating capistrano_sample_app_v1_redis_1 ... done Creating capistrano_sample_app_v1_app_1 ... done Attaching to capistrano_sample_app_v1_redis_1, capistrano_sample_app_v1_mysql_1, capistrano_sample_app_v1_app_1 mysql_1 | 2020-01-16 09:55:41+00:00 [Note] [Entrypoint]: Entrypoint script for MySQL Server 5.7.29-1debian9 started. redis_1 | 1:C 16 Jan 09:55:40.955 # Warning: no config file specified, using the default config. In order to specify a config file use redis-server /path/to/redis.conf mysql_1 | 2020-01-16 09:55:45+00:00 [Note] [Entrypoint]: Switching to dedicated user 'mysql' redis_1 | _._ redis_1 | _.-``__ ''-._ redis_1 | _.-`` `. `_. ''-._ Redis 3.2.12 (00000000/0) 64 bit redis_1 | .-`` .-```. ```\/ _.,_ ''-._ redis_1 | ( ' , .-` | `, ) Running in standalone mode redis_1 | |`-._`-...-` __...-.``-._|'` _.-'| Port: 6379 redis_1 | | `-._ `._ / _.-' | PID: 1 redis_1 | `-._ `-._ `-./ _.-' _.-' redis_1 | |`-._`-._ `-.__.-' _.-'_.-'| redis_1 | | `-._`-._ _.-'_.-' | http://redis.io redis_1 | `-._ `-._`-.__.-'_.-' _.-' redis_1 | |`-._`-._ `-.__.-' _.-'_.-'| redis_1 | | `-._`-._ _.-'_.-' | redis_1 | `-._ `-._`-.__.-'_.-' _.-' redis_1 | `-._ `-.__.-' _.-' redis_1 | `-._ _.-' redis_1 | `-.__.-' redis_1 | redis_1 | 1:M 16 Jan 09:55:40.961 # WARNING: The TCP backlog setting of 511 cannot be enforced because /proc/sys/net/core/somaxconn is set to the lower value of 128. redis_1 | 1:M 16 Jan 09:55:40.961 # Server started, Redis version 3.2.12 redis_1 | 1:M 16 Jan 09:55:40.961 # WARNING you have Transparent Huge Pages (THP) support enabled in your kernel. This will create latency and memory usage issues with Redis. To fix this issue run the command 'echo never > /sys/kernel/mm/transparent_hugepage/enabled' as root, and add it to your /etc/rc.local in order to retain the setting after a reboot. Redis must be restarted after THP is disabled. redis_1 | 1:M 16 Jan 09:55:40.961 * The server is now ready to accept connections on port 6379 mysql_1 | 2020-01-16 09:55:45+00:00 [Note] [Entrypoint]: Entrypoint script for MySQL Server 5.7.29-1debian9 started. mysql_1 | 2020-01-16 09:55:45+00:00 [Note] [Entrypoint]: Initializing database files mysql_1 | 2020-01-16T09:55:45.597324Z 0 [Warning] TIMESTAMP with implicit DEFAULT value is deprecated. Please use --explicit_defaults_for_timestamp server option (see documentation for more details). mysql_1 | 2020-01-16T09:55:45.635369Z 0 [Warning] InnoDB: Using innodb_file_format is deprecated and the parameter may be removed in future releases. See http://dev.mysql.com/doc/refman/5.7/en/innodb-file-format.html mysql_1 | 2020-01-16T09:55:48.077398Z 0 [Warning] InnoDB: New log files created, LSN=45790 mysql_1 | 2020-01-16T09:55:48.646754Z 0 [Warning] InnoDB: Creating foreign key constraint system tables. mysql_1 | 2020-01-16T09:55:48.952749Z 0 [Warning] No existing UUID has been found, so we assume that this is the first time that this server has been started. Generating a new UUID: 5f8348e1-3846-11ea-8ab5-0242ac130003. mysql_1 | 2020-01-16T09:55:49.020134Z 0 [Warning] Gtid table is not ready to be used. Table 'mysql.gtid_executed' cannot be opened. mysql_1 | 2020-01-16T09:55:51.294446Z 0 [Warning] CA certificate ca.pem is self signed. app_1 | from /var/www/capistrano_sample_app_v1/vendor/bundle/ruby/2.6.0/gems/bootsnap-1.4.5/lib/bootsnap.rb:22:in `setup': The 'disable_trace' method is not allowed with this Ruby version. current: 2.6.5, allowed version: < 2.5.0 mysql_1 | 2020-01-16T09:55:51.879252Z 1 [Warning] root@localhost is created with an empty password ! Please consider switching off the --initialize-insecure option. app_1 | => Booting Puma app_1 | => Rails 5.2.4.1 application starting in development app_1 | => Run `rails server -h` for more startup options app_1 | Puma starting in single mode... app_1 | * Version 3.12.2 (ruby 2.6.5-p114), codename: Llamas in Pajamas app_1 | * Min threads: 5, max threads: 5 app_1 | * Environment: development app_1 | * Listening on tcp://0.0.0.0:8080 app_1 | Use Ctrl-C to stop mysql_1 | 2020-01-16 09:55:58+00:00 [Note] [Entrypoint]: Database files initialized mysql_1 | 2020-01-16 09:55:58+00:00 [Note] [Entrypoint]: Starting temporary server mysql_1 | 2020-01-16 09:55:58+00:00 [Note] [Entrypoint]: Waiting for server startup mysql_1 | 2020-01-16T09:55:58.626438Z 0 [Warning] TIMESTAMP with implicit DEFAULT value is deprecated. Please use --explicit_defaults_for_timestamp server option (see documentation for more details). mysql_1 | 2020-01-16T09:55:58.627939Z 0 [Note] mysqld (mysqld 5.7.29) starting as process 80 ... mysql_1 | 2020-01-16T09:55:58.631949Z 0 [Warning] InnoDB: Using innodb_file_format is deprecated and the parameter may be removed in future releases. See http://dev.mysql.com/doc/refman/5.7/en/innodb-file-format.html mysql_1 | 2020-01-16T09:55:58.632065Z 0 [Note] InnoDB: PUNCH HOLE support available mysql_1 | 2020-01-16T09:55:58.632232Z 0 [Note] InnoDB: Mutexes and rw_locks use GCC atomic builtins mysql_1 | 2020-01-16T09:55:58.632267Z 0 [Note] InnoDB: Uses event mutexes mysql_1 | 2020-01-16T09:55:58.632275Z 0 [Note] InnoDB: GCC builtin __atomic_thread_fence() is used for memory barrier mysql_1 | 2020-01-16T09:55:58.632281Z 0 [Note] InnoDB: Compressed tables use zlib 1.2.11 mysql_1 | 2020-01-16T09:55:58.632286Z 0 [Note] InnoDB: Using Linux native AIO mysql_1 | 2020-01-16T09:55:58.632901Z 0 [Note] InnoDB: Number of pools: 1 mysql_1 | 2020-01-16T09:55:58.633235Z 0 [Note] InnoDB: Using CPU crc32 instructions mysql_1 | 2020-01-16T09:55:58.634985Z 0 [Note] InnoDB: Initializing buffer pool, total size = 128M, instances = 1, chunk size = 128M mysql_1 | 2020-01-16T09:55:58.644127Z 0 [Note] InnoDB: Completed initialization of buffer pool mysql_1 | 2020-01-16T09:55:58.646140Z 0 [Note] InnoDB: If the mysqld execution user is authorized, page cleaner thread priority can be changed. See the man page of setpriority(). mysql_1 | 2020-01-16T09:55:58.660112Z 0 [Note] InnoDB: Highest supported file format is Barracuda. mysql_1 | 2020-01-16T09:55:58.702341Z 0 [Note] InnoDB: Creating shared tablespace for temporary tables mysql_1 | 2020-01-16T09:55:58.702446Z 0 [Note] InnoDB: Setting file './ibtmp1' size to 12 MB. Physically writing the file full; Please wait ... mysql_1 | 2020-01-16T09:55:58.916889Z 0 [Note] InnoDB: File './ibtmp1' size is now 12 MB. mysql_1 | 2020-01-16T09:55:58.917944Z 0 [Note] InnoDB: 96 redo rollback segment(s) found. 96 redo rollback segment(s) are active. mysql_1 | 2020-01-16T09:55:58.917995Z 0 [Note] InnoDB: 32 non-redo rollback segment(s) are active. mysql_1 | 2020-01-16T09:55:58.919329Z 0 [Note] InnoDB: 5.7.29 started; log sequence number 2629932 mysql_1 | 2020-01-16T09:55:58.919668Z 0 [Note] InnoDB: Loading buffer pool(s) from /var/lib/mysql/ib_buffer_pool mysql_1 | 2020-01-16T09:55:58.920063Z 0 [Note] Plugin 'FEDERATED' is disabled. mysql_1 | 2020-01-16T09:55:58.922411Z 0 [Note] InnoDB: Buffer pool(s) load completed at 200116 9:55:58 mysql_1 | 2020-01-16T09:55:58.926524Z 0 [Note] Found ca.pem, server-cert.pem and server-key.pem in data directory. Trying to enable SSL support using them. mysql_1 | 2020-01-16T09:55:58.926589Z 0 [Note] Skipping generation of SSL certificates as certificate files are present in data directory. mysql_1 | 2020-01-16T09:55:58.927349Z 0 [Warning] CA certificate ca.pem is self signed. mysql_1 | 2020-01-16T09:55:58.927419Z 0 [Note] Skipping generation of RSA key pair as key files are present in data directory. mysql_1 | 2020-01-16T09:55:58.929692Z 0 [Warning] Insecure configuration for --pid-file: Location '/var/run/mysqld' in the path is accessible to all OS users. Consider choosing a different directory. mysql_1 | 2020-01-16T09:55:58.938200Z 0 [Note] Event Scheduler: Loaded 0 events mysql_1 | 2020-01-16T09:55:58.938729Z 0 [Note] mysqld: ready for connections. mysql_1 | Version: '5.7.29' socket: '/var/run/mysqld/mysqld.sock' port: 0 MySQL Community Server (GPL) mysql_1 | 2020-01-16 09:55:59+00:00 [Note] [Entrypoint]: Temporary server started. mysql_1 | Warning: Unable to load '/usr/share/zoneinfo/iso3166.tab' as time zone. Skipping it. mysql_1 | Warning: Unable to load '/usr/share/zoneinfo/leap-seconds.list' as time zone. Skipping it. mysql_1 | Warning: Unable to load '/usr/share/zoneinfo/zone.tab' as time zone. Skipping it. mysql_1 | Warning: Unable to load '/usr/share/zoneinfo/zone1970.tab' as time zone. Skipping it. mysql_1 | mysql_1 | 2020-01-16 09:56:06+00:00 [Note] [Entrypoint]: Stopping temporary server mysql_1 | 2020-01-16T09:56:06.599321Z 0 [Note] Giving 0 client threads a chance to die gracefully mysql_1 | 2020-01-16T09:56:06.599402Z 0 [Note] Shutting down slave threads mysql_1 | 2020-01-16T09:56:06.599412Z 0 [Note] Forcefully disconnecting 0 remaining clients mysql_1 | 2020-01-16T09:56:06.599422Z 0 [Note] Event Scheduler: Purging the queue. 0 events mysql_1 | 2020-01-16T09:56:06.599572Z 0 [Note] Binlog end mysql_1 | 2020-01-16T09:56:06.600707Z 0 [Note] Shutting down plugin 'ngram' mysql_1 | 2020-01-16T09:56:06.600763Z 0 [Note] Shutting down plugin 'partition' mysql_1 | 2020-01-16T09:56:06.600771Z 0 [Note] Shutting down plugin 'BLACKHOLE' mysql_1 | 2020-01-16T09:56:06.600777Z 0 [Note] Shutting down plugin 'ARCHIVE' mysql_1 | 2020-01-16T09:56:06.600781Z 0 [Note] Shutting down plugin 'PERFORMANCE_SCHEMA' mysql_1 | 2020-01-16T09:56:06.600812Z 0 [Note] Shutting down plugin 'MRG_MYISAM' mysql_1 | 2020-01-16T09:56:06.600817Z 0 [Note] Shutting down plugin 'MyISAM' mysql_1 | 2020-01-16T09:56:06.600831Z 0 [Note] Shutting down plugin 'INNODB_SYS_VIRTUAL' mysql_1 | 2020-01-16T09:56:06.600836Z 0 [Note] Shutting down plugin 'INNODB_SYS_DATAFILES' mysql_1 | 2020-01-16T09:56:06.601155Z 0 [Note] Shutting down plugin 'INNODB_SYS_TABLESPACES' mysql_1 | 2020-01-16T09:56:06.601163Z 0 [Note] Shutting down plugin 'INNODB_SYS_FOREIGN_COLS' mysql_1 | 2020-01-16T09:56:06.601167Z 0 [Note] Shutting down plugin 'INNODB_SYS_FOREIGN' mysql_1 | 2020-01-16T09:56:06.601170Z 0 [Note] Shutting down plugin 'INNODB_SYS_FIELDS' mysql_1 | 2020-01-16T09:56:06.601173Z 0 [Note] Shutting down plugin 'INNODB_SYS_COLUMNS' mysql_1 | 2020-01-16T09:56:06.601176Z 0 [Note] Shutting down plugin 'INNODB_SYS_INDEXES' mysql_1 | 2020-01-16T09:56:06.601179Z 0 [Note] Shutting down plugin 'INNODB_SYS_TABLESTATS' mysql_1 | 2020-01-16T09:56:06.601182Z 0 [Note] Shutting down plugin 'INNODB_SYS_TABLES' mysql_1 | 2020-01-16T09:56:06.601186Z 0 [Note] Shutting down plugin 'INNODB_FT_INDEX_TABLE' mysql_1 | 2020-01-16T09:56:06.601189Z 0 [Note] Shutting down plugin 'INNODB_FT_INDEX_CACHE' mysql_1 | 2020-01-16T09:56:06.601192Z 0 [Note] Shutting down plugin 'INNODB_FT_CONFIG' mysql_1 | 2020-01-16T09:56:06.601195Z 0 [Note] Shutting down plugin 'INNODB_FT_BEING_DELETED' mysql_1 | 2020-01-16T09:56:06.601198Z 0 [Note] Shutting down plugin 'INNODB_FT_DELETED' mysql_1 | 2020-01-16T09:56:06.601201Z 0 [Note] Shutting down plugin 'INNODB_FT_DEFAULT_STOPWORD' mysql_1 | 2020-01-16T09:56:06.601204Z 0 [Note] Shutting down plugin 'INNODB_METRICS' mysql_1 | 2020-01-16T09:56:06.601207Z 0 [Note] Shutting down plugin 'INNODB_TEMP_TABLE_INFO' mysql_1 | 2020-01-16T09:56:06.601211Z 0 [Note] Shutting down plugin 'INNODB_BUFFER_POOL_STATS' mysql_1 | 2020-01-16T09:56:06.601214Z 0 [Note] Shutting down plugin 'INNODB_BUFFER_PAGE_LRU' mysql_1 | 2020-01-16T09:56:06.601217Z 0 [Note] Shutting down plugin 'INNODB_BUFFER_PAGE' mysql_1 | 2020-01-16T09:56:06.601220Z 0 [Note] Shutting down plugin 'INNODB_CMP_PER_INDEX_RESET' mysql_1 | 2020-01-16T09:56:06.601223Z 0 [Note] Shutting down plugin 'INNODB_CMP_PER_INDEX' mysql_1 | 2020-01-16T09:56:06.601226Z 0 [Note] Shutting down plugin 'INNODB_CMPMEM_RESET' mysql_1 | 2020-01-16T09:56:06.601229Z 0 [Note] Shutting down plugin 'INNODB_CMPMEM' mysql_1 | 2020-01-16T09:56:06.601232Z 0 [Note] Shutting down plugin 'INNODB_CMP_RESET' mysql_1 | 2020-01-16T09:56:06.601236Z 0 [Note] Shutting down plugin 'INNODB_CMP' mysql_1 | 2020-01-16T09:56:06.601239Z 0 [Note] Shutting down plugin 'INNODB_LOCK_WAITS' mysql_1 | 2020-01-16T09:56:06.601242Z 0 [Note] Shutting down plugin 'INNODB_LOCKS' mysql_1 | 2020-01-16T09:56:06.601245Z 0 [Note] Shutting down plugin 'INNODB_TRX' mysql_1 | 2020-01-16T09:56:06.601248Z 0 [Note] Shutting down plugin 'InnoDB' mysql_1 | 2020-01-16T09:56:06.601457Z 0 [Note] InnoDB: FTS optimize thread exiting. mysql_1 | 2020-01-16T09:56:06.602096Z 0 [Note] InnoDB: Starting shutdown... mysql_1 | 2020-01-16T09:56:06.703296Z 0 [Note] InnoDB: Dumping buffer pool(s) to /var/lib/mysql/ib_buffer_pool mysql_1 | 2020-01-16T09:56:06.703781Z 0 [Note] InnoDB: Buffer pool(s) dump completed at 200116 9:56:06 mysql_1 | 2020-01-16T09:56:08.246243Z 0 [Note] InnoDB: Shutdown completed; log sequence number 12441955 mysql_1 | 2020-01-16T09:56:08.249558Z 0 [Note] InnoDB: Removed temporary tablespace data file: "ibtmp1" mysql_1 | 2020-01-16T09:56:08.249620Z 0 [Note] Shutting down plugin 'MEMORY' mysql_1 | 2020-01-16T09:56:08.249628Z 0 [Note] Shutting down plugin 'CSV' mysql_1 | 2020-01-16T09:56:08.249632Z 0 [Note] Shutting down plugin 'sha256_password' mysql_1 | 2020-01-16T09:56:08.249635Z 0 [Note] Shutting down plugin 'mysql_native_password' mysql_1 | 2020-01-16T09:56:08.249751Z 0 [Note] Shutting down plugin 'binlog' mysql_1 | 2020-01-16T09:56:08.253458Z 0 [Note] mysqld: Shutdown complete mysql_1 | mysql_1 | 2020-01-16 09:56:08+00:00 [Note] [Entrypoint]: Temporary server stopped mysql_1 | mysql_1 | 2020-01-16 09:56:08+00:00 [Note] [Entrypoint]: MySQL init process done. Ready for start up. mysql_1 | mysql_1 | 2020-01-16T09:56:09.018888Z 0 [Warning] TIMESTAMP with implicit DEFAULT value is deprecated. Please use --explicit_defaults_for_timestamp server option (see documentation for more details). mysql_1 | 2020-01-16T09:56:09.020190Z 0 [Note] mysqld (mysqld 5.7.29) starting as process 1 ... mysql_1 | 2020-01-16T09:56:09.024040Z 0 [Warning] InnoDB: Using innodb_file_format is deprecated and the parameter may be removed in future releases. See http://dev.mysql.com/doc/refman/5.7/en/innodb-file-format.html mysql_1 | 2020-01-16T09:56:09.024328Z 0 [Note] InnoDB: PUNCH HOLE support available mysql_1 | 2020-01-16T09:56:09.024371Z 0 [Note] InnoDB: Mutexes and rw_locks use GCC atomic builtins mysql_1 | 2020-01-16T09:56:09.024378Z 0 [Note] InnoDB: Uses event mutexes mysql_1 | 2020-01-16T09:56:09.024382Z 0 [Note] InnoDB: GCC builtin __atomic_thread_fence() is used for memory barrier mysql_1 | 2020-01-16T09:56:09.024388Z 0 [Note] InnoDB: Compressed tables use zlib 1.2.11 mysql_1 | 2020-01-16T09:56:09.024395Z 0 [Note] InnoDB: Using Linux native AIO mysql_1 | 2020-01-16T09:56:09.024922Z 0 [Note] InnoDB: Number of pools: 1 mysql_1 | 2020-01-16T09:56:09.025108Z 0 [Note] InnoDB: Using CPU crc32 instructions mysql_1 | 2020-01-16T09:56:09.026850Z 0 [Note] InnoDB: Initializing buffer pool, total size = 128M, instances = 1, chunk size = 128M mysql_1 | 2020-01-16T09:56:09.036547Z 0 [Note] InnoDB: Completed initialization of buffer pool mysql_1 | 2020-01-16T09:56:09.038578Z 0 [Note] InnoDB: If the mysqld execution user is authorized, page cleaner thread priority can be changed. See the man page of setpriority(). mysql_1 | 2020-01-16T09:56:09.061020Z 0 [Note] InnoDB: Highest supported file format is Barracuda. mysql_1 | 2020-01-16T09:56:10.650530Z 0 [Note] InnoDB: Creating shared tablespace for temporary tables mysql_1 | 2020-01-16T09:56:10.650727Z 0 [Note] InnoDB: Setting file './ibtmp1' size to 12 MB. Physically writing the file full; Please wait ... mysql_1 | 2020-01-16T09:56:10.920702Z 0 [Note] InnoDB: File './ibtmp1' size is now 12 MB. mysql_1 | 2020-01-16T09:56:10.922096Z 0 [Note] InnoDB: 96 redo rollback segment(s) found. 96 redo rollback segment(s) are active. mysql_1 | 2020-01-16T09:56:10.922158Z 0 [Note] InnoDB: 32 non-redo rollback segment(s) are active. mysql_1 | 2020-01-16T09:56:10.922898Z 0 [Note] InnoDB: Waiting for purge to start mysql_1 | 2020-01-16T09:56:10.973211Z 0 [Note] InnoDB: 5.7.29 started; log sequence number 12441955 mysql_1 | 2020-01-16T09:56:10.973628Z 0 [Note] InnoDB: Loading buffer pool(s) from /var/lib/mysql/ib_buffer_pool mysql_1 | 2020-01-16T09:56:10.973931Z 0 [Note] Plugin 'FEDERATED' is disabled. mysql_1 | 2020-01-16T09:56:10.979959Z 0 [Note] InnoDB: Buffer pool(s) load completed at 200116 9:56:10 mysql_1 | 2020-01-16T09:56:10.981172Z 0 [Note] Found ca.pem, server-cert.pem and server-key.pem in data directory. Trying to enable SSL support using them. mysql_1 | 2020-01-16T09:56:10.981228Z 0 [Note] Skipping generation of SSL certificates as certificate files are present in data directory. mysql_1 | 2020-01-16T09:56:10.981958Z 0 [Warning] CA certificate ca.pem is self signed. mysql_1 | 2020-01-16T09:56:10.982025Z 0 [Note] Skipping generation of RSA key pair as key files are present in data directory. mysql_1 | 2020-01-16T09:56:10.982602Z 0 [Note] Server hostname (bind-address): '*'; port: 3306 mysql_1 | 2020-01-16T09:56:10.982676Z 0 [Note] IPv6 is available. mysql_1 | 2020-01-16T09:56:10.991740Z 0 [Note] - '::' resolves to '::'; mysql_1 | 2020-01-16T09:56:10.991902Z 0 [Note] Server socket created on IP: '::'. mysql_1 | 2020-01-16T09:56:10.994292Z 0 [Warning] Insecure configuration for --pid-file: Location '/var/run/mysqld' in the path is accessible to all OS users. Consider choosing a different directory. mysql_1 | 2020-01-16T09:56:11.005402Z 0 [Note] Event Scheduler: Loaded 0 events mysql_1 | 2020-01-16T09:56:11.005836Z 0 [Note] mysqld: ready for connections. mysql_1 | Version: '5.7.29' socket: '/var/run/mysqld/mysqld.sock' port: 3306 MySQL Community Server (GPL)4. プロセスの確認
Terminal$ docker-compose ps Name Command State Ports -------------------------------------------------------------------------------------------------- capistrano_sample_app_v1_app_1 /bin/sh -c rm -f /app/tmp/ ... Up 0.0.0.0:8080->8080/tcp capistrano_sample_app_v1_mysql_1 docker-entrypoint.sh mysql ... Up 3306/tcp, 33060/tcp capistrano_sample_app_v1_redis_1 docker-entrypoint.sh redis ... Up 6379/tcp5.appのコンテナにアクセスできるか確認
Terminal$ docker exec -it capistrano_sample_app_v1_app_1 /bin/bash root@a72845229f9c:/var/www/capistrano_sample_app_v1# root@a72845229f9c:/var/www/capistrano_sample_app_v1# ps aux USER PID %CPU %MEM VSZ RSS TTY STAT START TIME COMMAND root 1 0.0 0.0 2384 744 pts/0 Ss+ 18:55 0:00 /bin/sh -c rm -f /app/tmp/pids/server.pid && bin/rails s -p 8080 -b '0.0.0.0' root 7 0.2 6.3 1125704 130296 pts/0 Sl+ 18:55 0:04 puma 3.12.2 (tcp://0.0.0.0:8080) [capistrano_sample_app_v1] root 27 1.0 0.1 5748 3400 pts/1 Ss 19:28 0:00 /bin/bash root 32 0.0 0.1 9388 2992 pts/1 R+ 19:28 0:00 ps aux root@a72845229f9c:/var/www/capistrano_sample_app_v1# ls Capfile Dockerfile Gemfile Gemfile.lock README.md Rakefile app bin config config.ru db docker-compose.yml lib log package.json spec storage tmp vendor root@a72845229f9c:/var/www/capistrano_sample_app_v1# bundle exec rails c from /var/www/capistrano_sample_app_v1/vendor/bundle/ruby/2.6.0/gems/bootsnap-1.4.5/lib/bootsnap.rb:22:in `setup': The 'disable_trace' method is not allowed with this Ruby version. current: 2.6.5, allowed version: < 2.5.0 Loading development environment (Rails 5.2.4.1) irb(main):001:0> irb(main):002:0> Rails.env => "development" irb(main):003:0> irb(main):004:0> quit root@a72845229f9c:/var/www/capistrano_sample_app_v1#6.mysqlのコンテナにアクセスできるか確認
Terminal$ docker exec -it capistrano_sample_app_v1_mysql_1 /bin/bash root@38fa1f53821a:/# mysql -udeveloper -p capistrano_sample Enter password: Welcome to the MySQL monitor. Commands end with ; or \g. Your MySQL connection id is 2 Server version: 5.7.29 MySQL Community Server (GPL) Copyright (c) 2000, 2020, Oracle and/or its affiliates. All rights reserved. Oracle is a registered trademark of Oracle Corporation and/or its affiliates. Other names may be trademarks of their respective owners. Type 'help;' or '\h' for help. Type '\c' to clear the current input statement. mysql> show tables -> ; Empty set (0.00 sec)ここまでで、開発のためのコンテナの設定は完了しています
尚、コンテナを実行しているホストマシンのワーキングコピーで変更があった場合、
dockerをstop / startすることで変更反映できます7. Webアプリのコンテナをセットアップする
Terminal$ docker exec -it capistrano_sample_app_v1_app_1 /bin/bash # bundle exec rails db:migrate RAILS_ENV=development8.URLアクセス
ローカルホストのRailsにアクセスする
ワーキングスペースの開発など
1. bundle install
Terminal$ bundle _2.1.4_ install --path vendor/bundleYour Ruby version is 2.3.7, but your Gemfile specified 2.6.5となる場合
- 上記、bundle installをしないと、systemのruby versionを見るようです
mysql2の原因でエラーが出た方はこちら参考に
Terminal$ bundle config --local build.mysql2 "--with-ldflags=-L/usr/local/opt/openssl@1.1/lib --with-cppflags=-I/usr/local/opt/openssl@1.1/include" $ bundle _2.1.4_ install --path vendor/bundle [DEPRECATED] The `--path` flag is deprecated because it relies on being remembered across bundler invocations, which bundler will no longer do in future versions. Instead please use `bundle config set path 'vendor/bundle'`, and stop using this flag The dependency tzinfo-data (>= 0) will be unused by any of the platforms Bundler is installing for. Bundler is installing for ruby but the dependency is only for x86-mingw32, x86-mswin32, x64-mingw32, java. To add those platforms to the bundle, run `bundle lock --add-platform x86-mingw32 x86-mswin32 x64-mingw32 java`. Fetching gem metadata from https://rubygems.org/......... Fetching gem metadata from https://rubygems.org/. Resolving dependencies... ...途中省略... Fetching mysql2 0.5.3 Installing mysql2 0.5.3 with native extensions ...途中省略... Bundle complete! 37 Gemfile dependencies, 148 gems now installed. Bundled gems are installed into `./vendor/bundle`2. 機能を追加してみる
Terminal$ bundle exec rails generate scaffold v1::Event game:string description:string event_date:date join_limit:integer latitude:string longitude:string --skip-assets --skip-helper --skip-stylesheets --skip-view-specs --skip-jbuilder --skip-migration invoke active_record create app/models/v1/high_store.rb create app/models/v1.rb invoke rspec create spec/models/v1/event_spec.rb invoke resource_route route namespace :v1 do resources :events end invoke scaffold_controller create app/controllers/v1/events_controller.rb invoke rspec create spec/controllers/v1/events_controller_spec.rb create spec/routing/v1/events_routing_spec.rb invoke rspec create spec/requests/v1/events_spec.rb $ rm app/models/v1.rbリポジトリ
- 本記事のリポジトリは「webmaster-patche/capistrano_sample_app_v1」にて公開しております
- 投稿日:2020-01-16T19:19:25+09:00
Ubuntu18.04 開発環境作成メモ
how to use
cd ~
chmod +x setup.sh
./setup.sh
setup.sh
setup.shsudo apt update sudo apt -y upgrade sudo apt -y install vim sudo apt -y install git sudo apt -y install guake sudo apt -y install curl sudo apt-get -y install xsel # pyenv sudo apt -y install build-essential libffi-dev libssl-dev zlib1g-dev liblzma-dev libbz2-dev libreadline-dev libsqlite3-dev git clone https://github.com/pyenv/pyenv.git ~/.pyenv echo 'export PYENV_ROOT="$HOME/.pyenv"' >> ~/.bash_profile echo 'export PATH="$PYENV_ROOT/bin:$PATH"' >> ~/.bash_profile echo 'eval "$(pyenv init -)"' >> ~/.bash_profile source ~/.bash_profile pyenv install 3.7.6 pyenv global 3.7.6 # nodebrew curl -L git.io/nodebrew | perl - setup echo 'export PATH=$HOME/.nodebrew/current/bin:$PATH' >> ~/.bash_profile source ~/.bash_profile nodebrew install-binary latest nodebrew use latest # docker sudo apt install docker.io sudo groupadd docker sudo gpasswd -a $USER docker sudo systemctl restart docker # docker-compose sudo curl -L "https://github.com/docker/compose/releases/download/1.25.1/docker-compose-$(uname -s)-$(uname -m)" -o /usr/local/bin/docker-compose sudo chmod +x /usr/local/bin/docker-compose # ssh keygen ssh-keygen -t rsa cat .ssh/id_rsa.pub | xsel --clipboard --input # english directory LANG=C xdg-user-dirs-gtk-update # sudo reboot -h now
- 投稿日:2020-01-16T17:58:54+09:00
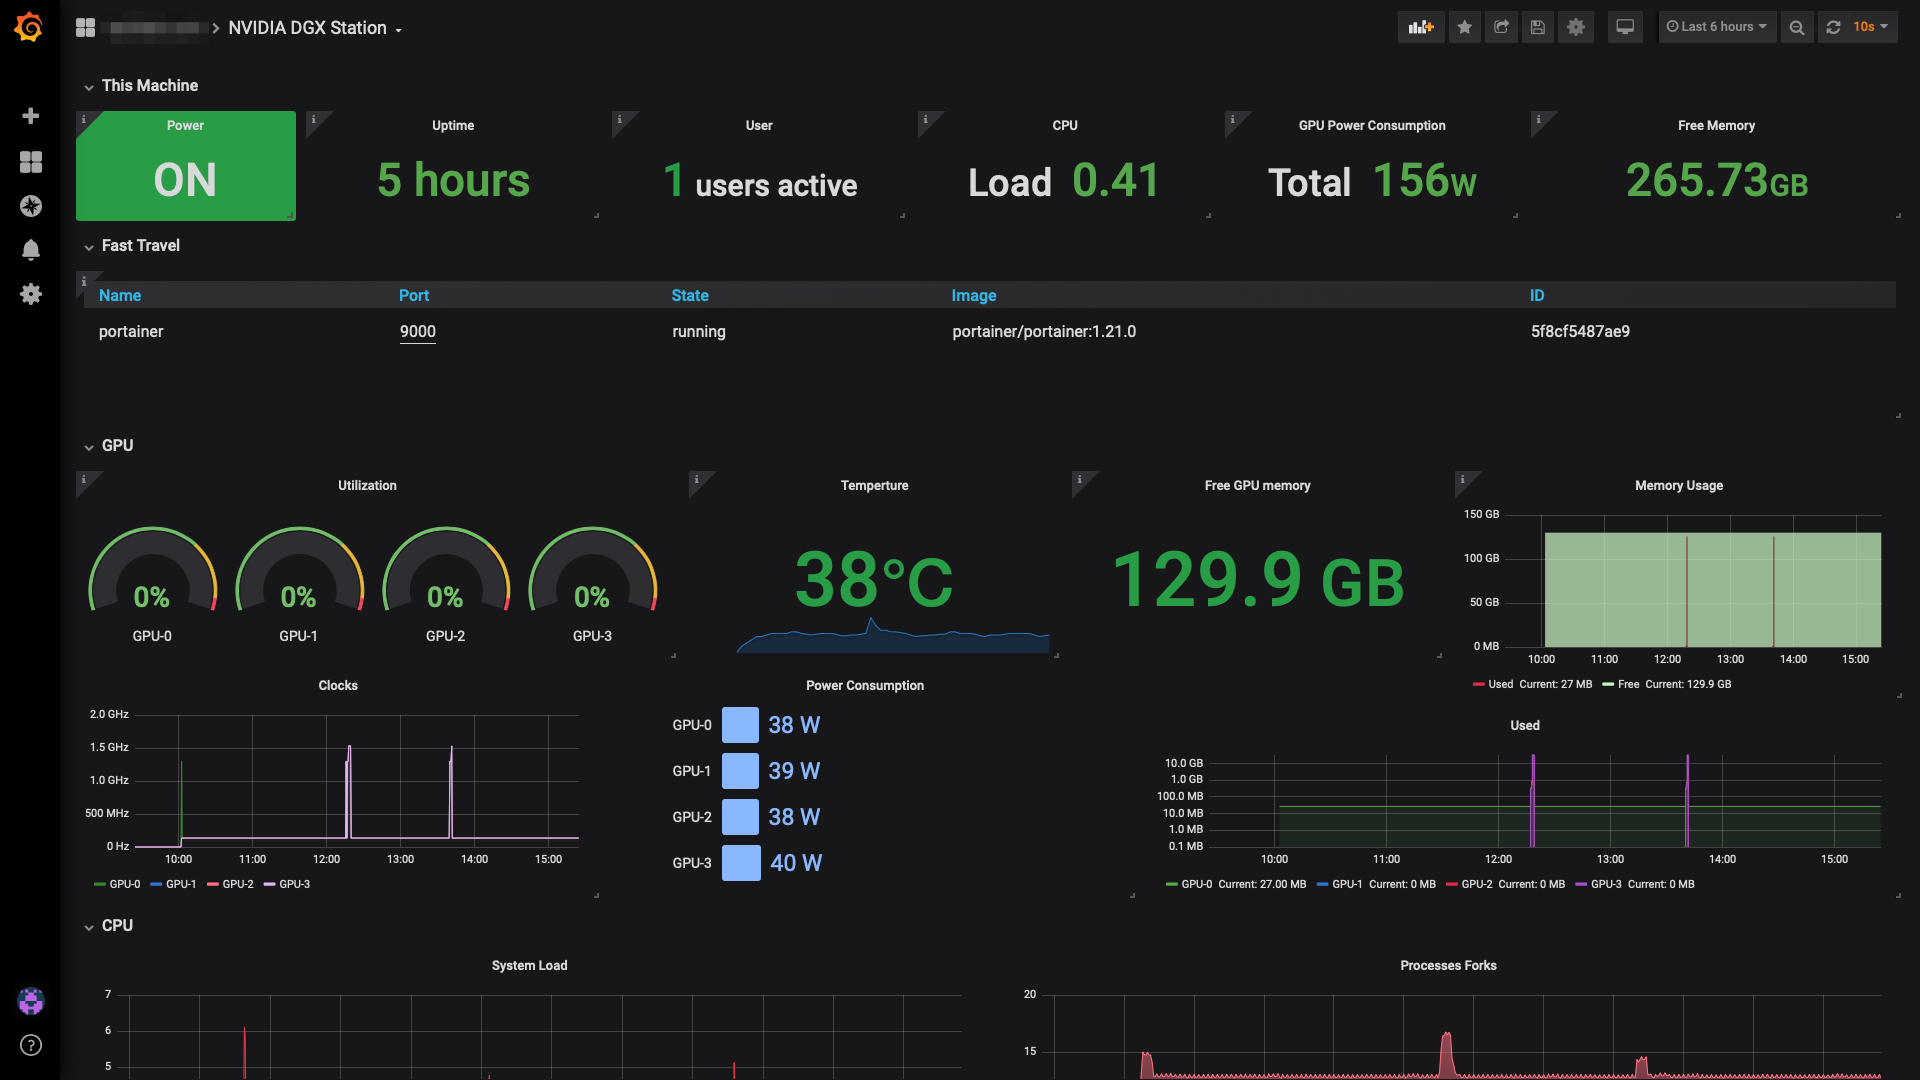
Grafana + Node-RED で DGX Station を有効活用するための仕組みづくり
はじめに
GPU ワークステーションとして DGX Station が 社内に 1台配備されています。
現在はスポットで利用したい人が都度起動して使う形で運用されており、普段は電源 OFF の状態で利用者が WOL で起動し、SSH 等でアクセスするようになっています。
ですが、この運用だと利用者が電源を入れっぱなしにして忘れてしまい、そのまま週末を迎えて付けっぱなしになってしまう事もあり、
付けっぱなしは色々と社内政治的にアレなやつなので電気代節約のために運用を変えることにしました。また、他にも「使い始めたら実は他の人が既に使っていたりする」など、これまでは当事者同士で話し合って決めていた運用もあるので、今後は「全員が監視出来て、誰が何をしているか分かる」ようにするため Grafana と Prometheus を使った監視を行うことにしました。
今回は、DGX Station 上で Prometheus の Exporter をセットアップした上で、Slack 通知などを組み合わせて上記の課題解決を行います。
※ Prometheus と Grafana は社内の別サーバで動いていますExporter のセットアップ
ほぼすべて Docker コンテナで準備しました。
ホストマシンのメトリクスを取得する node-exporter と、 NVIDIA 公式の GPU モニタリングツールである DCGM (NVIDIA Data Center GPU Manager) からメトリクスを取得出来る dcgm-exporter を使いました。
dcgm-exporterは、メトリクスが記載されたdcgm.promファイルを出力するので、それをnode-exporterの Textfile Collector で読み込ませます。というわけで、以下のような
docker-compose.ymlを作成して実行します。docker-compose.ymlversion: '2.3' services: dcgm-exporter: container_name: nvidia-dcgm-exporter image: nvidia/dcgm-exporter:1.4.6 runtime: nvidia restart: unless-stopped volumes: - /run/prometheus:/run/prometheus node-exporter: container_name: node-exporter image: quay.io/prometheus/node-exporter:v0.18.1 network_mode: host pid: host restart: unless-stopped ports: - 0.0.0.0:9100:9100 volumes: - /:/host:ro,rslave - /run/dbus:/var/run/dbus:ro volumes_from: - dcgm-exporter:ro command: | --collector.filesystem --collector.processes --collector.textfile.directory="/run/prometheus" --path.rootfs /host$ docker-compose up -d && docker-compose logs -f Creating nvidia-dcgm-exporter ... done Creating node-exporter ... done Attaching to node-exporter, nvidia-dcgm-exporter node-exporter | time="2020-01-16T06:46:37Z" level=info msg="Starting node_exporter (version=0.18.1, branch=HEAD, revision=3db77732e925c08f675d7404a8c46466b2ece83e)" source="node_exporter.go:156" node-exporter | time="2020-01-16T06:46:37Z" level=info msg="Build context (go=go1.12.5, user=root@b50852a1acba, date=20190604-16:41:18)" source="node_exporter.go:157" node-exporter | time="2020-01-16T06:46:37Z" level=info msg="Enabled collectors:" source="node_exporter.go:97" ... node-exporter | time="2020-01-16T06:46:37Z" level=info msg="Listening on :9100" source="node_exporter.go:170" nvidia-dcgm-exporter | Starting NVIDIA host engine... nvidia-dcgm-exporter | Collecting metrics at /run/prometheus/dcgm.prom every 1000ms...これで基本的な情報は取得出来るので、後はダッシュボードを作成すればほぼ完成です(トップ画像のダッシュボードは自作したもの)。
Textfile Collector に渡すカスタムメトリクスの作成
通常は取得出来ない情報を bash スクリプトと cron を使って定期的に出力するようにしています。
具体的には以下の情報を取得します。
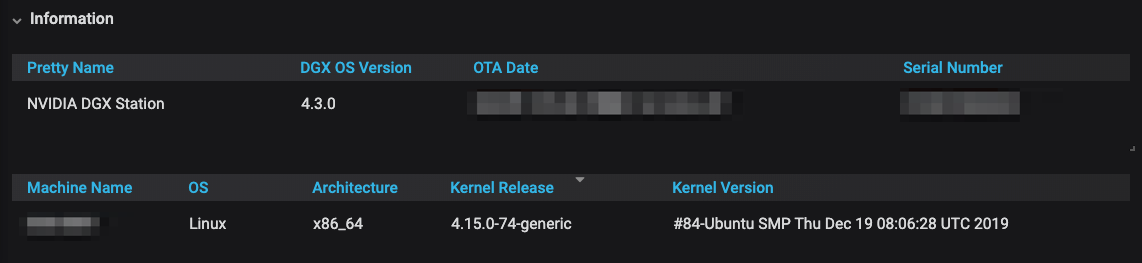
dgx-release
/etc/dgx-releaseに記載されている情報を取得します- 現在の DGX OS のバージョンやシリアルナンバーなどが記載されています
- ポート開放している稼働中の Docker コンテナ
/var/run/docker.sockから API で取得します- 稼働中のコンテナの中からポートを公開しているコンテナを取得します
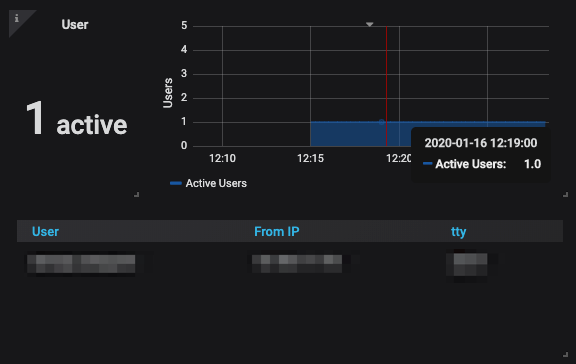
- ログイン中のユーザ
wコマンドから出力されるログインユーザの情報を取得しますログイン中のユーザについては、本来であれば
node-exporterのlogindから取得出来るはずですが dbusObject にアクセス出来ず、解決に至らなかったため自作しました。~/.cron# tree . ├── README.md ├── crontab ├── get_metrics.sh └── scripts ├── dgx-release.sh ├── exposes.sh └── userlist.shフォルダ構成としては、
scriptsにメトリクスを出力するスクリプトを置いて、get_metrics.shでスクリプトファイルを見つけて実行しています。あとは
crontabファイルを読み込ませて有効化します1。cron は10秒ごとにスクリプトを実行しています2。crontab# m h dom mon dow command * * * * * for i in `seq 0 10 59`;do (sleep ${i} ; $HOME/.cron/get_metrics.sh) & done;
/run/prometheusにファイルを出力して、Textfile Collector に取得させます。/run/prometheus# tree . ├── dcgm.prom ├── dgx_release.prom ├── exposes.prom └── userlist.promダッシュボードでメトリクスを表示する
自作した Grafana ダッシュボードのレイアウトを紹介します。
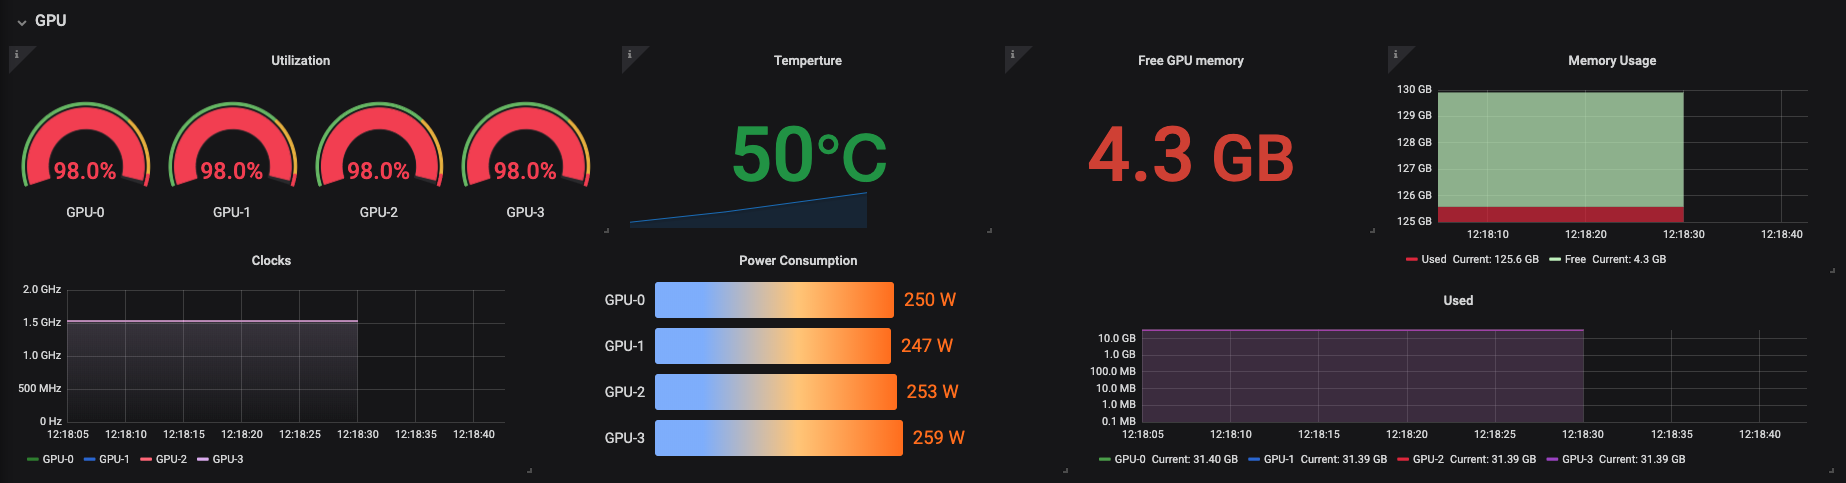
アクティブなユーザ数や実行中のコンテナを可視化しているので、「誰が、何をしているのか」を簡単に確認出来るようになっています。dcgm-exporter
GPU の利用率以外にも消費電力など目に見えて分かる利用状況を可視化に含めています。
ちなみに GPU がフルで動いている時はこんな感じで表示されます:
dgx-release
上が dgx-release から取得出来る情報、下が
node_uname_infoの情報です。
なお、列順を入れ替えるために、小手先ですがlabel_replaceを多用しています。label_replace( label_replace( label_replace( label_replace( label_replace( label_replace( node_uname_info{instance="XX.XX.XX.XX:9100"} > 0, "______nodename", "$1", "nodename", "(.*)" ), "_____sysname", "$1", "sysname", "(.*)" ), "____machine", "$1", "machine", "(.*)" ), "___linux", "$1", "linux", "(.*)" ), "__release", "$1", "release", "(.*)" ), "_version", "$1", "version", "(.*)" )コンテナ情報
ポート番号をクリックすると http://IP:PORT が開くようになっており、学習中は Grafana -> Web UI の順で開けばすぐに必要な情報にアクセス出来るようにしています。
ログインユーザ
アクティブなユーザ数などを分かりやすくしています。
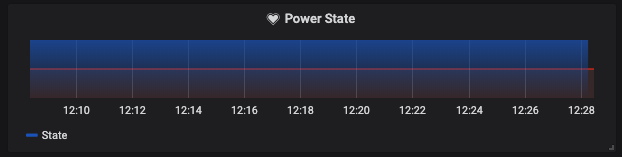
電源状態
node_uname_infoが取得出来る事を条件にして電源状態を表すようにしています。Node-RED 経由で Slack 通知を行う
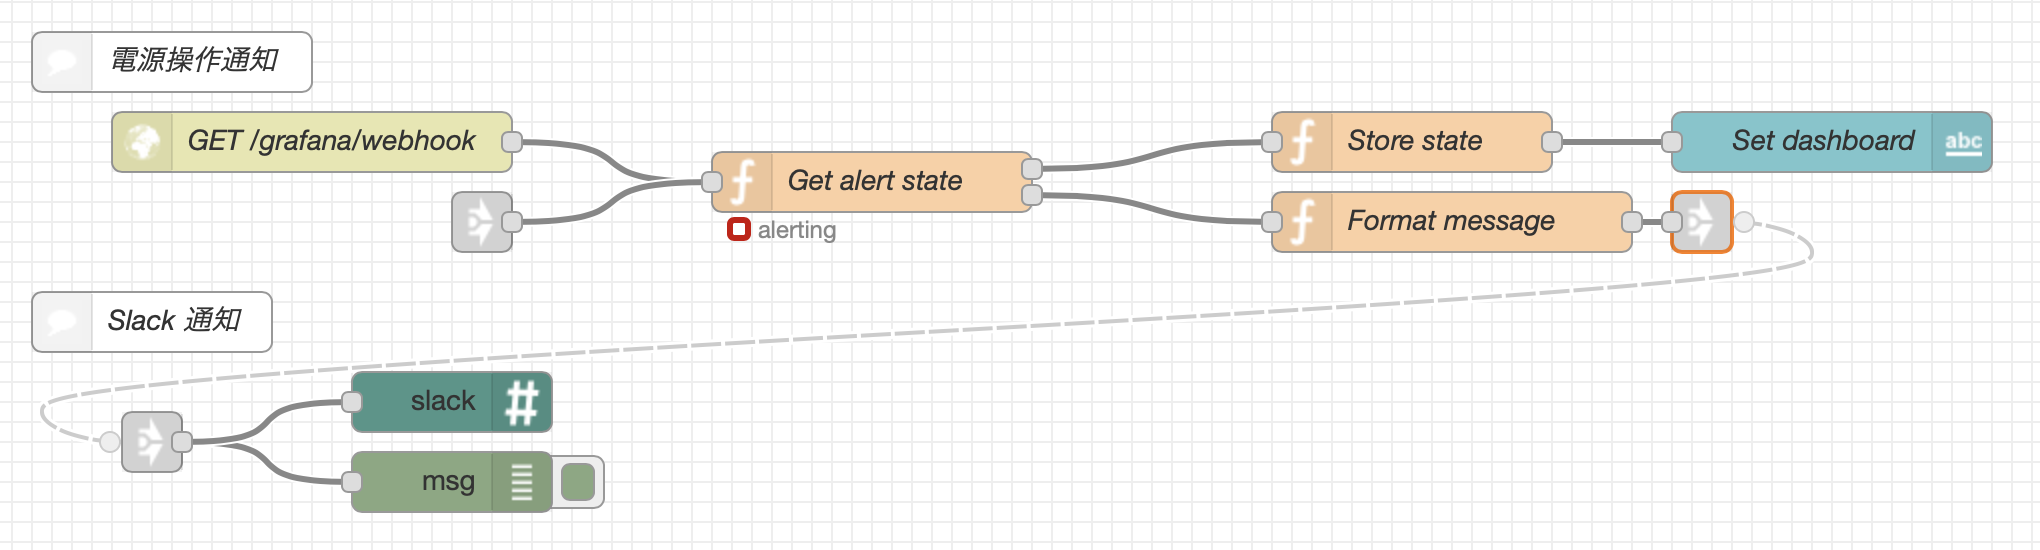
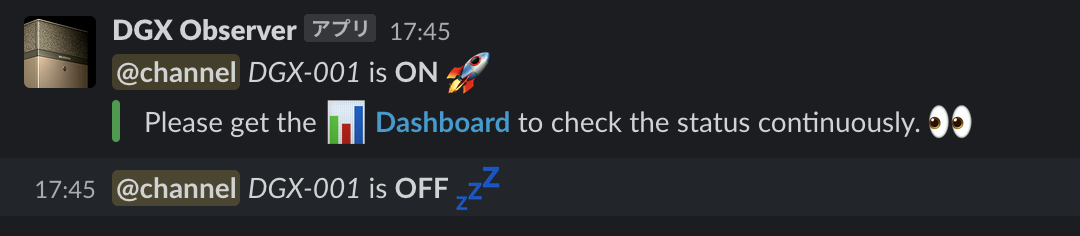
DGX Station に電源が投入されたら、Grafana 経由で Slack 通知されるような仕組みを作ります。
ただ、Grafana の通知はアラートがメインのため、情報通知とは少しベクトルが異なるので、まずは Node-RED に Webhook で経由させてから Slack へと通知しています。また、Node-RED 上で電源投入からの経過時間を計測することで、週末の帰宅時間前に電源が付いていたら念の為通知するような仕組みを作ってみました。
電源操作の通知
Webhook で受け取った値からアラートの状態を受け取り、
flow.setで状態を保存しつつ、 Slack にメッセージを送信しています(Dashboard はおまけです)。
メッセージには Grafana の Dashboard リンクがあるので、通知から直接開くような導線にしています。
週末の切れ忘れ通知
週末になったら稼働開始の時間と比較して通知します。


- 投稿日:2020-01-16T16:33:52+09:00
[未解決] Rails on Docker を Heroku へデプロイ時, db:create が通らない.
現在docker-composeを用いてRailsアプリケーションを開発しており,
本番環境へのリリースとしてHerokuへのデプロイを行っている途中でエラーが発生している状態です.やったこと
こちらのQiita記事やherokuのdocsを参照しながら以下のコマンドを実行していきました.
ここまでは何のエラーもなく通っています.
(herokuへログイン済み)$ heroku container:push web $ heroku container:release web $ heroku addons:create cleardb:ignite $ heroku config === myapp Config Vars CLEARDB_DATABASE_URL: mysql://xxx $ heroku config:set DATABASE_URL='mysql2://xxx' Setting DATABASE_URL and restarting ⬢ myapp... done, v21 DATABASE_URL: mysql2://xxx $ heroku config:set RAILS_ENV='production' Setting RAILS_ENV and restarting ⬢ myapp... done, v22 RAILS_ENV: production
発生している問題
以上のコマンドに引き続き
db:createを実行した際に以下のエラーが発生しています.$ heroku run rails db:create Running rails db:create on ⬢ myapp... up, run.9235 (Free) rails aborted! NameError: Cannot load database configuration: undefined local variable or method `root' for main:Object (erb):19:in `block in <main>' (erb):19:in `fetch' (erb):19:in `<main>' /usr/local/bundle/gems/railties-5.2.4.1/lib/rails/application/configuration.rb:172:in `database_configuration' /usr/local/bundle/gems/activerecord-5.2.4.1/lib/active_record/railtie.rb:39:in `block (3 levels) in <class:Railtie>' /usr/local/bundle/gems/railties-5.2.4.1/lib/rails/commands/rake/rake_command.rb:23:in `block in perform' /usr/local/bundle/gems/railties-5.2.4.1/lib/rails/commands/rake/rake_command.rb:20:in `perform' /usr/local/bundle/gems/railties-5.2.4.1/lib/rails/command.rb:48:in `invoke' /usr/local/bundle/gems/railties-5.2.4.1/lib/rails/commands.rb:18:in `<main>' /usr/local/bundle/gems/bootsnap-1.4.5/lib/bootsnap/load_path_cache/core_ext/kernel_require.rb:22:in `require' /usr/local/bundle/gems/bootsnap-1.4.5/lib/bootsnap/load_path_cache/core_ext/kernel_require.rb:22:in `block in require_with_bootsnap_lfi' /usr/local/bundle/gems/bootsnap-1.4.5/lib/bootsnap/load_path_cache/loaded_features_index.rb:92:in `register' /usr/local/bundle/gems/bootsnap-1.4.5/lib/bootsnap/load_path_cache/core_ext/kernel_require.rb:21:in `require_with_bootsnap_lfi' /usr/local/bundle/gems/bootsnap-1.4.5/lib/bootsnap/load_path_cache/core_ext/kernel_require.rb:30:in `require' /usr/local/bundle/gems/activesupport-5.2.4.1/lib/active_support/dependencies.rb:291:in `block in require' /usr/local/bundle/gems/activesupport-5.2.4.1/lib/active_support/dependencies.rb:257:in `load_dependency' /usr/local/bundle/gems/activesupport-5.2.4.1/lib/active_support/dependencies.rb:291:in `require' /katagami-ant/bin/rails:9:in `<top (required)>' /usr/local/bundle/gems/spring-2.1.0/lib/spring/client/rails.rb:28:in `load' /usr/local/bundle/gems/spring-2.1.0/lib/spring/client/rails.rb:28:in `call' /usr/local/bundle/gems/spring-2.1.0/lib/spring/client/command.rb:7:in `call' /usr/local/bundle/gems/spring-2.1.0/lib/spring/client.rb:30:in `run' /usr/local/bundle/gems/spring-2.1.0/bin/spring:49:in `<top (required)>' /usr/local/bundle/gems/spring-2.1.0/lib/spring/binstub.rb:11:in `load' /usr/local/bundle/gems/spring-2.1.0/lib/spring/binstub.rb:11:in `<top (required)>' /katagami-ant/bin/spring:15:in `<top (required)>' bin/rails:3:in `load' bin/rails:3:in `<main>'
考えうる原因
/usr/local/bundle/gems/railties-5.2.4.1/lib/rails/application/configuration.rb:172:in `database_configuration'エラーが発生したコードは以上の部分ということだったので,
database_configurationについて調べてみるとLoads and returns the entire raw configuration of database from values stored in
config/database.yml.ということで, どうも
config/database.ymlが怪しいと分かりました.
heroku configで設定した環境変数が読み込まれているかを確認するために,
initializers/の適当なファイルに以下を置いてみましたが問題ないようでした.initializers/xx.rbp ENV['DATABASE_URL'] p ENV['RAILS_ENV']$ heroku run rails db:create Running rails db:create on ⬢ myapp... up, run.2733 (Free) "mysql2://xxx" "production" rails aborted! NameError: Cannot load database configuration: undefined local variable or method `root' for main:Object ...
関連のあるコード
docker-compose.ymlversion: "3" services: web: build: . command: /bin/sh -c "rm -f /myapp/tmp/pids/server.pid && bundle exec rails s -p '3001' -b '0.0.0.0'" tty: true stdin_open: true # environment: # - DATABASE=myapp_development # - DATABASE_USER=root # - DATABASE_PASSWORD=password # - DATABASE_HOST=db volumes: - .:/katagami-ant ports: - 3001:3001 depends_on: - db - redis db: image: mysql:5.7 command: mysqld --character-set-server=utf8 --collation-server=utf8_unicode_ci environment: - MYSQL_DATABASE=myapp_development - MYSQL_ROOT_USER=root - MYSQL_ROOT_PASSWORD=password volumes: - mysql_vol:/var/lib/mysql ports: - 3306:3306 redis: image: redis ports: - 6379:6379 volumes: - "./app/redis:/data" volumes: mysql_vol:
config/database.ymldefault: &default adapter: mysql2 encoding: utf8 pool: <%= ENV.fetch("RAILS_MAX_THREADS") { 5 } %> development: <<: *default # username: <%= ENV.fetch("DATABASE_USER") { root } %> # password: <%= ENV.fetch("DATABASE_PASSWORD") { password } %> # host: <%= ENV.fetch("DATABASE_HOST") { db } %> # database: <%= ENV.fetch("DATABASE") { katagami-ant_development } %> production: <<: *default url: <%= ENV['DATABASE_URL'] %>実現したいこと
heroku run db:createを実行したい.開発環境
$ sw_vers
ProductName:    Mac OS X
ProductVersion: 10.15.1
BuildVersion:   19B88
$ docker -v
Docker version 19.03.1, build 74b1e89
$ docker-compose -v
docker-compose version 1.24.1, build 4667896b
現状
Qiitaに質問を投稿しています...
https://teratail.com/questions/235499
- 投稿日:2020-01-16T16:33:52+09:00
[解決済] Rails on Docker を Heroku へデプロイ時, db:create が通らない.
現在docker-composeを用いてRailsアプリケーションを開発しており,
本番環境へのリリースとしてHerokuへのデプロイを行っている途中でエラーが発生している状態です.やったこと
こちらのQiita記事やherokuのdocsを参照しながら以下のコマンドを実行していきました.
ここまでは何のエラーもなく通っています.
(herokuへログイン済み)$ heroku container:push web $ heroku container:release web $ heroku addons:create cleardb:ignite $ heroku config === myapp Config Vars CLEARDB_DATABASE_URL: mysql://xxx $ heroku config:set DATABASE_URL='mysql2://xxx' Setting DATABASE_URL and restarting ⬢ myapp... done, v21 DATABASE_URL: mysql2://xxx $ heroku config:set RAILS_ENV='production' Setting RAILS_ENV and restarting ⬢ myapp... done, v22 RAILS_ENV: production
発生している問題
以上のコマンドに引き続き
db:createを実行した際に以下のエラーが発生しています.$ heroku run rails db:create Running rails db:create on ⬢ myapp... up, run.9235 (Free) rails aborted! NameError: Cannot load database configuration: undefined local variable or method `root' for main:Object (erb):19:in `block in <main>' (erb):19:in `fetch' (erb):19:in `<main>' /usr/local/bundle/gems/railties-5.2.4.1/lib/rails/application/configuration.rb:172:in `database_configuration' /usr/local/bundle/gems/activerecord-5.2.4.1/lib/active_record/railtie.rb:39:in `block (3 levels) in <class:Railtie>' /usr/local/bundle/gems/railties-5.2.4.1/lib/rails/commands/rake/rake_command.rb:23:in `block in perform' /usr/local/bundle/gems/railties-5.2.4.1/lib/rails/commands/rake/rake_command.rb:20:in `perform' /usr/local/bundle/gems/railties-5.2.4.1/lib/rails/command.rb:48:in `invoke' /usr/local/bundle/gems/railties-5.2.4.1/lib/rails/commands.rb:18:in `<main>' /usr/local/bundle/gems/bootsnap-1.4.5/lib/bootsnap/load_path_cache/core_ext/kernel_require.rb:22:in `require' /usr/local/bundle/gems/bootsnap-1.4.5/lib/bootsnap/load_path_cache/core_ext/kernel_require.rb:22:in `block in require_with_bootsnap_lfi' /usr/local/bundle/gems/bootsnap-1.4.5/lib/bootsnap/load_path_cache/loaded_features_index.rb:92:in `register' /usr/local/bundle/gems/bootsnap-1.4.5/lib/bootsnap/load_path_cache/core_ext/kernel_require.rb:21:in `require_with_bootsnap_lfi' /usr/local/bundle/gems/bootsnap-1.4.5/lib/bootsnap/load_path_cache/core_ext/kernel_require.rb:30:in `require' /usr/local/bundle/gems/activesupport-5.2.4.1/lib/active_support/dependencies.rb:291:in `block in require' /usr/local/bundle/gems/activesupport-5.2.4.1/lib/active_support/dependencies.rb:257:in `load_dependency' /usr/local/bundle/gems/activesupport-5.2.4.1/lib/active_support/dependencies.rb:291:in `require' /katagami-ant/bin/rails:9:in `<top (required)>' /usr/local/bundle/gems/spring-2.1.0/lib/spring/client/rails.rb:28:in `load' /usr/local/bundle/gems/spring-2.1.0/lib/spring/client/rails.rb:28:in `call' /usr/local/bundle/gems/spring-2.1.0/lib/spring/client/command.rb:7:in `call' /usr/local/bundle/gems/spring-2.1.0/lib/spring/client.rb:30:in `run' /usr/local/bundle/gems/spring-2.1.0/bin/spring:49:in `<top (required)>' /usr/local/bundle/gems/spring-2.1.0/lib/spring/binstub.rb:11:in `load' /usr/local/bundle/gems/spring-2.1.0/lib/spring/binstub.rb:11:in `<top (required)>' /katagami-ant/bin/spring:15:in `<top (required)>' bin/rails:3:in `load' bin/rails:3:in `<main>'
考えうる原因
/usr/local/bundle/gems/railties-5.2.4.1/lib/rails/application/configuration.rb:172:in `database_configuration'エラーが発生したコードは以上の部分ということだったので,
database_configurationについて調べてみるとLoads and returns the entire raw configuration of database from values stored in
config/database.yml.ということで, どうも
config/database.ymlが怪しいと分かりました.
heroku configで設定した環境変数が読み込まれているかを確認するために,
initializers/の適当なファイルに以下を置いてみましたが問題ないようでした.initializers/xx.rbp ENV['DATABASE_URL'] p ENV['RAILS_ENV']$ heroku run rails db:create Running rails db:create on ⬢ myapp... up, run.2733 (Free) "mysql2://xxx" "production" rails aborted! NameError: Cannot load database configuration: undefined local variable or method `root' for main:Object ...
関連のあるコード
docker-compose.ymlversion: "3" services: web: build: . command: /bin/sh -c "rm -f /myapp/tmp/pids/server.pid && bundle exec rails s -p '3001' -b '0.0.0.0'" tty: true stdin_open: true # environment: # - DATABASE=myapp_development # - DATABASE_USER=root # - DATABASE_PASSWORD=password # - DATABASE_HOST=db volumes: - .:/katagami-ant ports: - 3001:3001 depends_on: - db - redis db: image: mysql:5.7 command: mysqld --character-set-server=utf8 --collation-server=utf8_unicode_ci environment: - MYSQL_DATABASE=myapp_development - MYSQL_ROOT_USER=root - MYSQL_ROOT_PASSWORD=password volumes: - mysql_vol:/var/lib/mysql ports: - 3306:3306 redis: image: redis ports: - 6379:6379 volumes: - "./app/redis:/data" volumes: mysql_vol:
config/database.ymldefault: &default adapter: mysql2 encoding: utf8 pool: <%= ENV.fetch("RAILS_MAX_THREADS") { 5 } %> development: <<: *default # username: <%= ENV.fetch("DATABASE_USER") { root } %> # password: <%= ENV.fetch("DATABASE_PASSWORD") { password } %> # host: <%= ENV.fetch("DATABASE_HOST") { db } %> # database: <%= ENV.fetch("DATABASE") { katagami-ant_development } %> production: <<: *default url: <%= ENV['DATABASE_URL'] %>実現したいこと
heroku run db:createを実行したい.開発環境
$ sw_vers
ProductName:    Mac OS X
ProductVersion: 10.15.1
BuildVersion:   19B88
$ docker -v
Docker version 19.03.1, build 74b1e89
$ docker-compose -v
docker-compose version 1.24.1, build 4667896b
解決
config/database.ymlにおいて,
username: <%= ENV.fetch("DATABASE_USER") { root }のrootを
ちゃんと文字列にしてなかったのが原因でした.以下のように他の部分もクォーテーションで囲って実行すると上手くいきました.
コメントアウトが効いてないのかな...ちょっと謎いです...development: <<: *default # username: <%= ENV.fetch("DATABASE_USER") { 'root' } %> # password: <%= ENV.fetch("DATABASE_PASSWORD") { 'password' } %> # host: <%= ENV.fetch("DATABASE_HOST") { 'db' } %> # database: <%= ENV.fetch("DATABASE") { 'katagami-ant_development' } %>
- 投稿日:2020-01-16T16:09:27+09:00
Dockerの公式MySQLの文字コードをutf8mb4に設定する
概要
Docker公式のMySQLの文字コードをutf8mb4に変更する。
mysql> show variables like "chara%";
+--------------------------+----------------------------+
| Variable_name            | Value                      |
+--------------------------+----------------------------+
| character_set_client     | utf8mb4                    |
| character_set_connection | utf8mb4                    |
| character_set_database   | utf8mb4                    |
| character_set_filesystem | binary                     |
| character_set_results    | utf8mb4                    |
| character_set_server     | utf8mb4                    |
| character_set_system     | utf8                       |
| character_sets_dir       | /usr/share/mysql/charsets/ |
+--------------------------+----------------------------+
8 rows in set (0.00 sec)
方法が2つあった。
また謎のエラーが出たのでメモとして残しておく。方法1 my.cnfの書き換え
my.cnf[mysqld] character-set-server=utf8mb4 collation-server=utf8mb4_general_ci explicit-defaults-for-timestamp=1 general-log=1 general-log-file=/var/log/mysql/mysqld.log [client] default-character-set=utf8mb4方法2 commandで実行
docker-compose.ymlversion: '3' services: # MySQL db: build: ./docker/db image: mysql:5.7.28 container_name: test_db environment: MYSQL_ROOT_PASSWORD: xxxx MYSQL_DATABASE: test MYSQL_USER: test MYSQL_PASSWORD: xxx TZ: 'Asia/Tokyo' command: mysqld --character-set-server=utf8mb4 --collation-server=utf8mb4_unicode_ci volumes: - ./docker/db/my.cnf:/etc/mysql/conf.d/my.cnf ports: - 43306:3306ERROR 2019 (HY000): Can’t initialize character set utf8mb4
my.cnfを書き換えたときに以下のようなエラーが出た。
root@b733eb496608:/# mysql
mysql: Character set 'utf8mb4               ' is not a compiled character set and is not specified in the '/usr/share/mysql/charsets/Index.xml' file
mysql: Character set 'utf8mb4               ' is not a compiled character set and is not specified in the '/usr/share/mysql/charsets/Index.xml' file
ERROR 2019 (HY000): Can't initialize character set utf8mb4         (path: /usr/share/mysql/charsets/)
原因はよくわからなかったが解決方法としては、Dockerfileでコンテナ内をアップデートすれば治った。
たぶん/usr/share/mysql/charsets/Index.xml内にutf8mb4がセットされてなかったからだと思う。DockerfileFROM mysql:5.7.28 RUN touch /var/log/mysql/mysqld.log RUN apt update \ && apt install -y --no-install-recommends \ vim \ && apt -y clean \ && rm -rf /var/lib/apt/lists/*
- 投稿日:2020-01-16T11:54:37+09:00
Dockerコンテナに好きなフォントをインストールする方法
概要
dockerコンテナをビルドしただけでは当然フォントが全然入っていない
つまりcssでフォントを指定しようとしても、デフォルトで入っているものを使う or webフォントを使う 等しないと文字化けしたりしちゃう
webフォントで無駄にパフォーマンス落としたくないのでインストールしたい1. フォントファイルを用意しよう
当然フォントファイルが必要なので、入れたいフォントのフォントファイル(
.ttfなり.otfなりいっぱい種類あります)を用意する2. コンテナ内から参照できる場所に置こう
1でホストPCにダウンロードしてきたファイル(あるいはディレクトリごとでも可)をコンテナ内に持っていく
dockerの環境はそれぞれだと思うのでここでは割愛
とにかくコンテナから見られるところに置くのです[自分用メモ]
- docker-syncでsyncされるところに置けばOK
- とりあえず assets 配下とかでいいんじゃない3. インストール
インストールというかただ配置するだけなんです。
インストールされているフォントはOSによって場所は異なりますが、
~/.fontsや/usr/share/fontsなどに入っています。これは調べればすぐ出ます。
つまり用意したフォントファイルをここに置いてあげればそれで使えるようになります。(Windowsにしか入っていないフォント(MSゴシックとか)も、Windowsからフォントファイルを抜いて持って来れば入る。多分ライセンスとか的にアウトかも。)
それをコンテナビルド時にやりたいので
# フォントをインストール
RUN mkdir -p /usr/share/fonts
COPY app/assets/fonts /usr/share/fonts
こんな感じで書いておけば入る
0. いいコマンド
fc-list
インストールされているフォント一覧を表示してくれる
ファイルの在り処、cssで指定する名称も出してくれるので最高感想
コンテナビルド時にフォントファイルのダウンロードもできるようにすればスマートですな
- 投稿日:2020-01-16T08:52:26+09:00
ERROR: network xxxx is ambiguous (2 matches found based on name) - #docker
- 投稿日:2020-01-16T08:26:28+09:00
Homebrew + rbenv + Bundler + dockerで開発環境をマネージドに構築する(後編)
〜前編〜からの続き
前提
- 便宜上、既存のワーキングコピーがあります
Docker手順
1. Dockerfileを作成する
DockerfileFROM ruby:2.6.5 # Setting environment ENV LANG C.UTF-8 ENV TZ Asia/Tokyo ENV APP_HOME /var/www/capistrano_sample_app_v1 # Install libraries RUN apt-get update -qq && \ apt-get install -y build-essential \ libpq-dev \ nodejs \ vim \ default-mysql-client RUN gem install bundler -v '2.1.4' # Create app home RUN mkdir -p $APP_HOME WORKDIR $APP_HOME # Copy Gemfile from origin ADD Gemfile $APP_HOME/Gemfile RUN bundle _2.1.4_ install --path vendor/bundle ADD . $APP_HOMEE: Package 'mysql-client' has no installation candidateとなった場合
- mysql-clientは消滅しており、代わりに
default-mysql-clientを使うか、mariadb-clientとなりますDockerfileのコマンド
コマンド 説明 FROM 使用するイメージとバージョン RUN コマンドの実行。railsに必要な必要なnodejsとpostgeqsqlをインストールしている WORKDIR そのままの意味。作業ディレクトリを設定します。 ADD ローカルのファイルをコンテナへコピーする(昔のCOPYコマンドになります) ENTRYPOINT 一番最初に実行するコマンド(ここではentrypoint.shを参照) EXPOSE コンテナがリッスンするport番号 CMD イメージ内部のソフトウェア実行(つまりRailsのことですね) 2. docker-composeを作成する
docker-compose.ymlversion: '3' services: api: tty: true stdin_open: true build: . ports: - "8080:8080" command: /bin/sh -c "rm -f /capistrano_sample_app_v1/tmp/pids/server.pid && bundle exec rails s -p 8080 -b '0.0.0.0'" volumes: # ホストのカレントディレクトリをコンテナの/capistrano_sample_app_v1にマウント - .:/capistrano_sample_app_v13. docker build
Terminal$ docker-compose up --build ...省略... Successfully built b72c436f105e Successfully tagged capistrano_sample_app_v1_api:latest Creating capistrano_sample_app_v1_api_1 ... done Attaching to capistrano_sample_app_v1_api_1 api_1 | from /var/www/capistrano_sample_app_v1/vendor/bundle/ruby/2.6.0/gems/bootsnap-1.4.5/lib/bootsnap.rb:22:in `setup': The 'disable_trace' method is not allowed with this Ruby version. current: 2.6.5, allowed version: < 2.5.0 api_1 | => Booting Puma api_1 | => Rails 5.2.4.1 application starting in development api_1 | => Run `rails server -h` for more startup options api_1 | Puma starting in single mode... api_1 | * Version 3.12.2 (ruby 2.6.5-p114), codename: Llamas in Pajamas api_1 | * Min threads: 5, max threads: 5 api_1 | * Environment: development api_1 | * Listening on tcp://0.0.0.0:8000 api_1 | Use Ctrl-C to stop4. プロセスの確認
Terminal$ docker-compose ps Name Command State Ports ------------------------------------------------------------------------------------------------ capistrano_sample_app_v1_api_1 /bin/sh -c rm -f /capistra ... Up 0.0.0.0:8000->8000/tcp5. 停止
Terminal$ docker-compose down Stopping capistrano_sample_app_v1_api_1 ... done Removing capistrano_sample_app_v1_api_1 ... done Removing network capistrano_sample_app_v1_defaultこれで、ワーキングコピーをコンテナとして起動することができました
- 投稿日:2020-01-16T07:20:58+09:00
Homebrew + rbenv + Bundler + dockerで開発環境をマネージドに構築する
はじめに
システム
- MacBookPro9,1
- Intel Core i7 2.6 GHz
- APPLE HDD HTS541075A9E682
- DDR3 4GB 1.6GHz
構成
Tree-map[Homebrew] ├─[formula] │ ├─rbenv │ ├─docker │ └─... │ └─[cask] └─docker [Bundler]brewコマンドリファレンス
セットアップ
Homebrew手順
1. Homebrewインストール
* Homebrew総集編を参照Terminal$ brew --version Homebrew 2.2.2 Homebrew/homebrew-core (git revision f246; last commit 2020-01-14) Homebrew/homebrew-cask (git revision 7585; last commit 2020-01-15)rbenv + Bundler手順
1. rbenvをインストール
Terminal$ brew install rbenv ruby-build Updating Homebrew... ==> Installing dependencies for rbenv: autoconf, pkg-config, readline and ruby-build ==> Installing rbenv dependency: autoconf ==> Downloading https://homebrew.bintray.com/bottles/autoconf-2.69.mojave.bottle.4.tar.gz ==> Downloading from https://akamai.bintray.com/97/9724736d34773b6e41e2434ffa28fe79feccccf7b7786e54671441ca75115cdb?__gda__=exp=157912005 ######################################################################## 100.0% ==> Pouring autoconf-2.69.mojave.bottle.4.tar.gz ==> Caveats Emacs Lisp files have been installed to: /usr/local/share/emacs/site-lisp/autoconf ==> Summary ? /usr/local/Cellar/autoconf/2.69: 71 files, 3.0MB ==> Installing rbenv dependency: pkg-config ==> Downloading https://homebrew.bintray.com/bottles/pkg-config-0.29.2.mojave.bottle.1.tar.gz ==> Downloading from https://akamai.bintray.com/dc/dcfcba723621eee085ddd5ebadc41fb8787a4717b9686f5288281633a830ac5e?__gda__=exp=157912007 ######################################################################## 100.0% ==> Pouring pkg-config-0.29.2.mojave.bottle.1.tar.gz ? /usr/local/Cellar/pkg-config/0.29.2: 11 files, 626.9KB ==> Installing rbenv dependency: readline ==> Downloading https://homebrew.bintray.com/bottles/readline-8.0.1.mojave.bottle.tar.gz ==> Downloading from https://akamai.bintray.com/3c/3c754391e9d243835811d128771ca0f1a565024100fd2c2871534353d46aaf0e?__gda__=exp=157912007 ######################################################################## 100.0% ==> Pouring readline-8.0.1.mojave.bottle.tar.gz ==> Caveats readline is keg-only, which means it was not symlinked into /usr/local, because macOS provides the BSD libedit library, which shadows libreadline. In order to prevent conflicts when programs look for libreadline we are defaulting this GNU Readline installation to keg-only. For compilers to find readline you may need to set: export LDFLAGS="-L/usr/local/opt/readline/lib" export CPPFLAGS="-I/usr/local/opt/readline/include" For pkg-config to find readline you may need to set: export PKG_CONFIG_PATH="/usr/local/opt/readline/lib/pkgconfig" ==> Summary ? /usr/local/Cellar/readline/8.0.1: 48 files, 1.5MB ==> Installing rbenv dependency: ruby-build ==> Downloading https://github.com/rbenv/ruby-build/archive/v20191225.tar.gz ==> Downloading from https://codeload.github.com/rbenv/ruby-build/tar.gz/v20191225 ######################################################################## 100.0% ==> ./install.sh ==> Caveats ruby-build installs a non-Homebrew OpenSSL for each Ruby version installed and these are never upgraded. To link Rubies to Homebrew's OpenSSL 1.1 (which is upgraded) add the following to your ~/.bash_profile: export RUBY_CONFIGURE_OPTS="--with-openssl-dir=$(brew --prefix openssl@1.1)" Note: this may interfere with building old versions of Ruby (e.g <2.4) that use OpenSSL <1.1. ==> Summary ? /usr/local/Cellar/ruby-build/20191225: 467 files, 232.9KB, built in 9 seconds ==> Installing rbenv ==> Downloading https://homebrew.bintray.com/bottles/rbenv-1.1.2.mojave.bottle.tar.gz ######################################################################## 100.0% ==> Pouring rbenv-1.1.2.mojave.bottle.tar.gz ? /usr/local/Cellar/rbenv/1.1.2: 36 files, 65KB ==> Caveats ==> autoconf Emacs Lisp files have been installed to: /usr/local/share/emacs/site-lisp/autoconf ==> readline readline is keg-only, which means it was not symlinked into /usr/local, because macOS provides the BSD libedit library, which shadows libreadline. In order to prevent conflicts when programs look for libreadline we are defaulting this GNU Readline installation to keg-only. For compilers to find readline you may need to set: export LDFLAGS="-L/usr/local/opt/readline/lib" export CPPFLAGS="-I/usr/local/opt/readline/include" For pkg-config to find readline you may need to set: export PKG_CONFIG_PATH="/usr/local/opt/readline/lib/pkgconfig" ==> ruby-build ruby-build installs a non-Homebrew OpenSSL for each Ruby version installed and these are never upgraded. To link Rubies to Homebrew's OpenSSL 1.1 (which is upgraded) add the following to your ~/.bash_profile: export RUBY_CONFIGURE_OPTS="--with-openssl-dir=$(brew --prefix openssl@1.1)" Note: this may interfere with building old versions of Ruby (e.g <2.4) that use OpenSSL <1.1.2. rbenvのバージョンを確認
Terminalwebmaster-patche-no-MacBook-Pro:~ webmaster-patche$ rbenv --version rbenv 1.1.23. インストール可能なバージョン一覧表示
Terminalwebmaster-patche-no-MacBook-Pro:~ webmaster-patche$ rbenv install -l ...省略... 2.5.0-dev 2.5.0-preview1 2.5.0-rc1 2.5.0 2.5.1 2.5.2 2.5.3 2.5.4 2.5.5 2.5.6 2.5.7 2.6.0-dev 2.6.0-preview1 2.6.0-preview2 2.6.0-preview3 2.6.0-rc1 2.6.0-rc2 2.6.0 2.6.1 2.6.2 2.6.3 2.6.4 2.6.5 2.7.0-dev 2.7.0-preview1 2.7.0-preview2 2.7.0-preview3 2.7.0-rc1 2.7.0-rc2 2.7.0 jruby-1.5.6 jruby-1.6.3 jruby-1.6.4 jruby-1.6.5 jruby-1.6.5.1 jruby-1.6.6 jruby-1.6.7 jruby-1.6.7.2 jruby-1.6.8 jruby-1.7.0-preview1 jruby-1.7.0-preview2 jruby-1.7.0-rc1 jruby-1.7.0-rc2 jruby-1.7.0 jruby-1.7.1 jruby-1.7.2 jruby-1.7.3 jruby-1.7.4 jruby-1.7.5 jruby-1.7.6 jruby-1.7.7 jruby-1.7.8 jruby-1.7.9 jruby-1.7.10 jruby-1.7.11 jruby-1.7.12 jruby-1.7.13 jruby-1.7.14 jruby-1.7.15 jruby-1.7.16 jruby-1.7.16.1 jruby-1.7.16.2 jruby-1.7.17 jruby-1.7.18 jruby-1.7.19 jruby-1.7.20 jruby-1.7.20.1 jruby-1.7.21 jruby-1.7.22 jruby-1.7.23 jruby-1.7.24 jruby-1.7.25 jruby-1.7.26 jruby-1.7.27 jruby-9.0.0.0.pre1 jruby-9.0.0.0.pre2 jruby-9.0.0.0.rc1 jruby-9.0.0.0.rc2 jruby-9.0.0.0 jruby-9.0.1.0 jruby-9.0.3.0 jruby-9.0.4.0 jruby-9.0.5.0 jruby-9.1.0.0-dev jruby-9.1.0.0 jruby-9.1.1.0 jruby-9.1.2.0 jruby-9.1.3.0 jruby-9.1.4.0 jruby-9.1.5.0 jruby-9.1.6.0 jruby-9.1.7.0 jruby-9.1.8.0 jruby-9.1.9.0 jruby-9.1.10.0 jruby-9.1.11.0 jruby-9.1.12.0 jruby-9.1.13.0 jruby-9.1.14.0 jruby-9.1.15.0 jruby-9.1.16.0 jruby-9.1.17.0 jruby-9.2.0.0-dev jruby-9.2.0.0 jruby-9.2.1.0-dev jruby-9.2.1.0 jruby-9.2.3.0 jruby-9.2.4.0 jruby-9.2.4.1 jruby-9.2.5.0 jruby-9.2.6.0 jruby-9.2.7.0 jruby-9.2.8.0 jruby-9.2.9.0 maglev-1.0.0 maglev-1.1.0-dev maglev-2.0.0-dev mruby-dev mruby-1.0.0 mruby-1.1.0 mruby-1.2.0 mruby-1.3.0 mruby-1.4.0 mruby-1.4.1 mruby-2.0.0 mruby-2.0.1 mruby-2.1.0 rbx-2.2.2 rbx-2.2.3 rbx-2.2.4 rbx-2.2.5 rbx-2.2.6 rbx-2.2.7 rbx-2.2.8 rbx-2.2.9 rbx-2.2.10 rbx-2.3.0 rbx-2.4.0 rbx-2.4.1 rbx-2.5.0 rbx-2.5.1 rbx-2.5.2 rbx-2.5.3 rbx-2.5.4 rbx-2.5.5 rbx-2.5.6 rbx-2.5.7 rbx-2.5.8 rbx-2.6 rbx-2.7 rbx-2.8 rbx-2.9 rbx-2.10 rbx-2.11 rbx-2.71828182 rbx-3.0 rbx-3.1 rbx-3.2 rbx-3.3 rbx-3.4 rbx-3.5 rbx-3.6 rbx-3.7 rbx-3.8 rbx-3.9 rbx-3.10 rbx-3.11 rbx-3.12 rbx-3.13 rbx-3.14 rbx-3.15 rbx-3.16 rbx-3.17 rbx-3.18 rbx-3.19 rbx-3.20 rbx-3.21 rbx-3.22 rbx-3.23 rbx-3.24 rbx-3.25 rbx-3.26 rbx-3.27 rbx-3.28 rbx-3.29 rbx-3.30 rbx-3.31 rbx-3.32 rbx-3.33 rbx-3.34 rbx-3.35 rbx-3.36 rbx-3.37 rbx-3.38 rbx-3.39 rbx-3.40 rbx-3.41 rbx-3.42 rbx-3.43 rbx-3.44 rbx-3.45 rbx-3.46 rbx-3.47 rbx-3.48 rbx-3.49 rbx-3.50 rbx-3.51 rbx-3.52 rbx-3.53 rbx-3.54 rbx-3.55 rbx-3.56 rbx-3.57 rbx-3.58 rbx-3.59 rbx-3.60 rbx-3.61 rbx-3.62 rbx-3.63 rbx-3.64 rbx-3.65 rbx-3.66 rbx-3.67 rbx-3.68 rbx-3.69 rbx-3.70 rbx-3.71 rbx-3.72 rbx-3.73 rbx-3.74 rbx-3.75 rbx-3.76 rbx-3.77 rbx-3.78 rbx-3.79 rbx-3.80 rbx-3.81 rbx-3.82 rbx-3.83 rbx-3.84 rbx-3.85 rbx-3.86 rbx-3.87 rbx-3.88 rbx-3.89 rbx-3.90 rbx-3.91 rbx-3.92 rbx-3.93 rbx-3.94 rbx-3.95 rbx-3.96 rbx-3.97 rbx-3.98 rbx-3.99 rbx-3.100 rbx-3.101 rbx-3.102 rbx-3.103 rbx-3.104 rbx-3.105 rbx-3.106 rbx-3.107 ree-1.8.7-2011.03 ree-1.8.7-2011.12 ree-1.8.7-2012.01 ree-1.8.7-2012.02 topaz-dev truffleruby-1.0.0-rc10 truffleruby-1.0.0-rc11 truffleruby-1.0.0-rc12 truffleruby-1.0.0-rc13 truffleruby-1.0.0-rc14 truffleruby-1.0.0-rc15 truffleruby-1.0.0-rc16 truffleruby-1.0.0-rc2 truffleruby-1.0.0-rc3 truffleruby-1.0.0-rc5 truffleruby-1.0.0-rc6 truffleruby-1.0.0-rc7 truffleruby-1.0.0-rc8 truffleruby-1.0.0-rc9 truffleruby-19.0.0 truffleruby-19.1.0 truffleruby-19.2.0 truffleruby-19.2.0.1 truffleruby-19.3.04. インストール
Terminal$ rbenv install 2.6.5 Downloading openssl-1.1.1d.tar.gz... -> https://dqw8nmjcqpjn7.cloudfront.net/1e3a91bc1f9dfce01af26026f856e064eab4c8ee0a8f457b5ae30b40b8b711f2 Installing openssl-1.1.1d... Installed openssl-1.1.1d to /Users/webmaster-patche/.rbenv/versions/2.6.5 Downloading ruby-2.6.5.tar.bz2... -> https://cache.ruby-lang.org/pub/ruby/2.6/ruby-2.6.5.tar.bz2 Installing ruby-2.6.5... ruby-build: using readline from homebrew Installed ruby-2.6.5 to /Users/webmaster-patche/.rbenv/versions/2.6.55. rbenvで認識しているすべてのRubyバージョンを一覧表示
Terminal$ rbenv versions * system (set by /Users/webmaster-patche/.rbenv/version) 2.6.5systemはMacに最初から入っているRubyを意味します
6. globalのRubyバージョンを変更
Terminal$ rbenv global 2.6.5 $ rbenv versions system * 2.6.5 (set by /Users/webmaster-patche/.rbenv/version)7. rbenv init
Terminal$ rbenv init # Load rbenv automatically by appending # the following to ~/.bash_profile: eval "$(rbenv init -)"8. プロファイルにinitを追記
Terminalecho 'eval "$(rbenv init --no-rehash -)"' >> ~/.bash_profile $ source ~/.bash_profile*尚、 8〜9の手順をしないと、
You don't have write permissionsが発生しますTerminal$ gem install bundler ERROR: While executing gem ... (Gem::FilePermissionError) You don't have write permissions for the /Library/Ruby/Gems/2.3.0 directory.9. bundlerのインストール
Terminal$ gem list bundler --remote *** REMOTE GEMS *** appbundler (0.13.1) asset_bundler (0.2.0) atd-asset_bundler (0.0.3) bonnie_bundler (2.2.5) bowline-bundler (0.0.4) bundler (2.1.4) bundler-add (0.0.1) bundler-advise (1.2.0) bundler-audit (0.6.1) bundler-audited_update (0.1.5) bundler-auto-update (0.1.0) bundler-bootstrap (0.0.3) bundler-bouncer (0.1.2) bundler-bower (0.0.3) bundler-budit (0.6.3) bundler-changelog (0.0.0) ...省略... $ gem install bundler Fetching bundler-2.1.4.gem Successfully installed bundler-2.1.4 Parsing documentation for bundler-2.1.4 Installing ri documentation for bundler-2.1.4 Done installing documentation for bundler after 4 seconds 1 gem installed $ rbenv rehash10. bundlerのバージョンの確認
Terminal$ bundler -v Bundler version 2.1.4Docker手順
1. Brew経由でインストール
Terminal$ brew install docker Updating Homebrew... ==> Auto-updated Homebrew! Updated 1 tap (homebrew/cask). No changes to formulae. ==> Downloading https://homebrew.bintray.com/bottles/docker-19.03.5.mojave.bottle.tar.gz ==> Downloading from https://akamai.bintray.com/99/99bfeaa39dfe7b1ee02bbe37b7433176d7f17266575bfa565ca94e0f1a3d204d?__gda__=exp=157912477 ######################################################################## 100.0% ==> Pouring docker-19.03.5.mojave.bottle.tar.gz ==> Caveats Bash completion has been installed to: /usr/local/etc/bash_completion.d zsh completions have been installed to: /usr/local/share/zsh/site-functions ==> Summary ? /usr/local/Cellar/docker/19.03.5: 14 files, 75.8MB $ brew cask install docker ==> Downloading https://download.docker.com/mac/stable/40693/Docker.dmg ######################################################################## 100.0% ==> Verifying SHA-256 checksum for Cask 'docker'. ==> Installing Cask docker ==> Moving App 'Docker.app' to '/Applications/Docker.app'. ? docker was successfully installed!2. バージョン確認
Terminal$ docker --version Docker version 19.03.5, build 633a0ea3. 起動確認
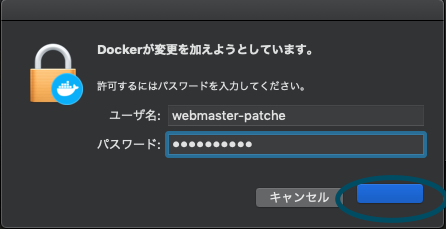
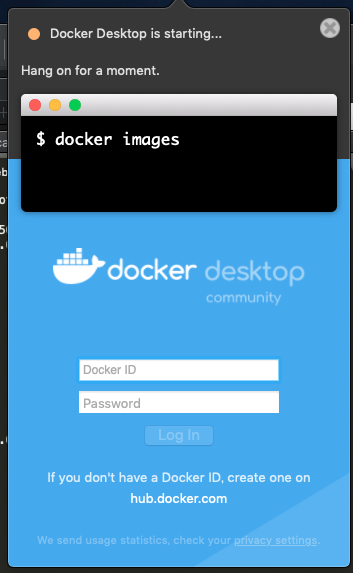
Terminal$ open /Applications/Docker.app4. アクセス権付与
ログインユーザーのパスワード要求がされます
パスワード入力後、ボタンに文言がありませんが(汗 クリックします
起動しました
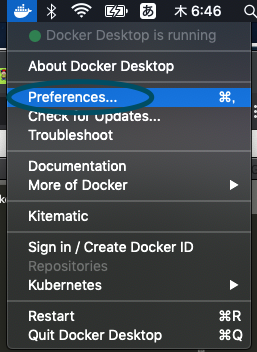
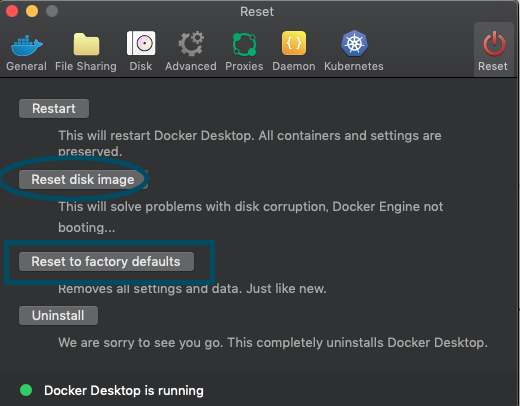
5. セットアップ
まずは
Reset to factory defaultsで rawフォーマットを行う
再起動します。この際に、権限付与のダイアログが表示されます
ただ、
Diskの情報を見る限り、デフォルトでrawフォーマットになっていると考えられる
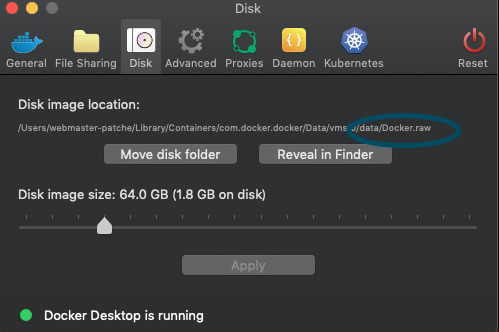
リリースノートを見る限りでは、rawフォーマットについては2018年以降、記述がありません6. メンテナンス
(*GB on disk)がDisk image sizeに限りなく近くなった場合、build時のゴミなどが溜まってきている可能性が高い
定期的に
Reset disk imageする必要がありますが、再度、ビルドし直しとなります。


- 投稿日:2020-01-16T07:20:58+09:00
Homebrew + rbenv + Bundler + dockerで開発環境をマネージドに構築する(前編)
はじめに
システム
- MacBookPro9,1
- Intel Core i7 2.6 GHz
- APPLE HDD HTS541075A9E682
- DDR3 4GB 1.6GHz
構成
Tree-map[Homebrew] ├─[formula] │ ├─rbenv │ ├─docker │ └─... │ └─[cask] └─docker [Bundler]brewコマンドリファレンス
セットアップ
Homebrew手順
1. Homebrewインストール
- Homebrew総集編を参照
Terminal$ brew --version Homebrew 2.2.2 Homebrew/homebrew-core (git revision f246; last commit 2020-01-14) Homebrew/homebrew-cask (git revision 7585; last commit 2020-01-15)rbenv + Bundler手順
1. rbenvをインストール
Terminal$ brew install rbenv ruby-build Updating Homebrew... ==> Installing dependencies for rbenv: autoconf, pkg-config, readline and ruby-build ==> Installing rbenv dependency: autoconf ==> Downloading https://homebrew.bintray.com/bottles/autoconf-2.69.mojave.bottle.4.tar.gz ==> Downloading from https://akamai.bintray.com/97/9724736d34773b6e41e2434ffa28fe79feccccf7b7786e54671441ca75115cdb?__gda__=exp=157912005 ######################################################################## 100.0% ==> Pouring autoconf-2.69.mojave.bottle.4.tar.gz ==> Caveats Emacs Lisp files have been installed to: /usr/local/share/emacs/site-lisp/autoconf ==> Summary ? /usr/local/Cellar/autoconf/2.69: 71 files, 3.0MB ==> Installing rbenv dependency: pkg-config ==> Downloading https://homebrew.bintray.com/bottles/pkg-config-0.29.2.mojave.bottle.1.tar.gz ==> Downloading from https://akamai.bintray.com/dc/dcfcba723621eee085ddd5ebadc41fb8787a4717b9686f5288281633a830ac5e?__gda__=exp=157912007 ######################################################################## 100.0% ==> Pouring pkg-config-0.29.2.mojave.bottle.1.tar.gz ? /usr/local/Cellar/pkg-config/0.29.2: 11 files, 626.9KB ==> Installing rbenv dependency: readline ==> Downloading https://homebrew.bintray.com/bottles/readline-8.0.1.mojave.bottle.tar.gz ==> Downloading from https://akamai.bintray.com/3c/3c754391e9d243835811d128771ca0f1a565024100fd2c2871534353d46aaf0e?__gda__=exp=157912007 ######################################################################## 100.0% ==> Pouring readline-8.0.1.mojave.bottle.tar.gz ==> Caveats readline is keg-only, which means it was not symlinked into /usr/local, because macOS provides the BSD libedit library, which shadows libreadline. In order to prevent conflicts when programs look for libreadline we are defaulting this GNU Readline installation to keg-only. For compilers to find readline you may need to set: export LDFLAGS="-L/usr/local/opt/readline/lib" export CPPFLAGS="-I/usr/local/opt/readline/include" For pkg-config to find readline you may need to set: export PKG_CONFIG_PATH="/usr/local/opt/readline/lib/pkgconfig" ==> Summary ? /usr/local/Cellar/readline/8.0.1: 48 files, 1.5MB ==> Installing rbenv dependency: ruby-build ==> Downloading https://github.com/rbenv/ruby-build/archive/v20191225.tar.gz ==> Downloading from https://codeload.github.com/rbenv/ruby-build/tar.gz/v20191225 ######################################################################## 100.0% ==> ./install.sh ==> Caveats ruby-build installs a non-Homebrew OpenSSL for each Ruby version installed and these are never upgraded. To link Rubies to Homebrew's OpenSSL 1.1 (which is upgraded) add the following to your ~/.bash_profile: export RUBY_CONFIGURE_OPTS="--with-openssl-dir=$(brew --prefix openssl@1.1)" Note: this may interfere with building old versions of Ruby (e.g <2.4) that use OpenSSL <1.1. ==> Summary ? /usr/local/Cellar/ruby-build/20191225: 467 files, 232.9KB, built in 9 seconds ==> Installing rbenv ==> Downloading https://homebrew.bintray.com/bottles/rbenv-1.1.2.mojave.bottle.tar.gz ######################################################################## 100.0% ==> Pouring rbenv-1.1.2.mojave.bottle.tar.gz ? /usr/local/Cellar/rbenv/1.1.2: 36 files, 65KB ==> Caveats ==> autoconf Emacs Lisp files have been installed to: /usr/local/share/emacs/site-lisp/autoconf ==> readline readline is keg-only, which means it was not symlinked into /usr/local, because macOS provides the BSD libedit library, which shadows libreadline. In order to prevent conflicts when programs look for libreadline we are defaulting this GNU Readline installation to keg-only. For compilers to find readline you may need to set: export LDFLAGS="-L/usr/local/opt/readline/lib" export CPPFLAGS="-I/usr/local/opt/readline/include" For pkg-config to find readline you may need to set: export PKG_CONFIG_PATH="/usr/local/opt/readline/lib/pkgconfig" ==> ruby-build ruby-build installs a non-Homebrew OpenSSL for each Ruby version installed and these are never upgraded. To link Rubies to Homebrew's OpenSSL 1.1 (which is upgraded) add the following to your ~/.bash_profile: export RUBY_CONFIGURE_OPTS="--with-openssl-dir=$(brew --prefix openssl@1.1)" Note: this may interfere with building old versions of Ruby (e.g <2.4) that use OpenSSL <1.1.後編の
bundle installで ld: library not found for -lmysqlclientが出る場合
- mysql-clientをbrew installする
- 今回は便宜上mysql本体もインストールします
Terminal$ brew install mysql@5.7 mysql-client Updating Homebrew... ==> Auto-updated Homebrew! Updated 2 taps (homebrew/core and homebrew/cask). ==> Updated Formulae ask-cli cppunit firebase-cli grafana kepubify nss swagger-codegen vnstat balena-cli exploitdb gatsby-cli homebank kubernetes-cli pnetcdf swiftformat wireshark bandwhich fastmod gnu-sed jetty nnn sk triton ==> Installing dependencies for mysql@5.7: openssl@1.1 ==> Installing mysql@5.7 dependency: openssl@1.1 ==> Downloading https://homebrew.bintray.com/bottles/openssl@1.1-1.1.1d.mojave.bottle.tar.gz ==> Downloading from https://akamai.bintray.com/10/104ef018b7bb8fcc49f57e5a60359a28a02d480d85a959e6141394b0571cbb28?__gda__=exp=1579158856~hmac=a9efd8d394c8395a239164f6 ######################################################################## 100.0% ==> Pouring openssl@1.1-1.1.1d.mojave.bottle.tar.gz ==> Caveats A CA file has been bootstrapped using certificates from the system keychain. To add additional certificates, place .pem files in /usr/local/etc/openssl@1.1/certs and run /usr/local/opt/openssl@1.1/bin/c_rehash openssl@1.1 is keg-only, which means it was not symlinked into /usr/local, because openssl/libressl is provided by macOS so don't link an incompatible version. If you need to have openssl@1.1 first in your PATH run: echo 'export PATH="/usr/local/opt/openssl@1.1/bin:$PATH"' >> ~/.bash_profile For compilers to find openssl@1.1 you may need to set: export LDFLAGS="-L/usr/local/opt/openssl@1.1/lib" export CPPFLAGS="-I/usr/local/opt/openssl@1.1/include" For pkg-config to find openssl@1.1 you may need to set: export PKG_CONFIG_PATH="/usr/local/opt/openssl@1.1/lib/pkgconfig" ==> Summary ? /usr/local/Cellar/openssl@1.1/1.1.1d: 7,983 files, 17.9MB ==> Installing mysql@5.7 ==> Downloading https://homebrew.bintray.com/bottles/mysql@5.7-5.7.29.mojave.bottle.tar.gz ==> Downloading from https://akamai.bintray.com/88/88cf1f9f07a84694654f790507da937909eee1b16a0e47d473b2fc45e19c9ec1?__gda__=exp=1579158876~hmac=aded53b411d68f102730593c ######################################################################## 100.0% ==> Pouring mysql@5.7-5.7.29.mojave.bottle.tar.gz ==> /usr/local/Cellar/mysql@5.7/5.7.29/bin/mysqld --initialize-insecure --user=webmaster-patche --basedir=/usr/local/Cellar/mysql@5.7/5.7.29 --datadir=/usr/local/var/my ==> Caveats We've installed your MySQL database without a root password. To secure it run: mysql_secure_installation MySQL is configured to only allow connections from localhost by default To connect run: mysql -uroot mysql@5.7 is keg-only, which means it was not symlinked into /usr/local, because this is an alternate version of another formula. If you need to have mysql@5.7 first in your PATH run: echo 'export PATH="/usr/local/opt/mysql@5.7/bin:$PATH"' >> ~/.bash_profile For compilers to find mysql@5.7 you may need to set: export LDFLAGS="-L/usr/local/opt/mysql@5.7/lib" export CPPFLAGS="-I/usr/local/opt/mysql@5.7/include" For pkg-config to find mysql@5.7 you may need to set: export PKG_CONFIG_PATH="/usr/local/opt/mysql@5.7/lib/pkgconfig" To have launchd start mysql@5.7 now and restart at login: brew services start mysql@5.7 Or, if you don't want/need a background service you can just run: /usr/local/opt/mysql@5.7/bin/mysql.server start ==> Summary ? /usr/local/Cellar/mysql@5.7/5.7.29: 319 files, 232MB ==> Downloading https://homebrew.bintray.com/bottles/mysql-client-8.0.18.mojave.bottle.tar.gz ==> Downloading from https://akamai.bintray.com/97/9729c80a49ac7b808bbc26a93130c3ea16797da3824ed9450df53974958de066?__gda__=exp=1579158956~hmac=1875d3c653a83978e85b9a4d ######################################################################## 100.0% ==> Pouring mysql-client-8.0.18.mojave.bottle.tar.gz ==> Caveats mysql-client is keg-only, which means it was not symlinked into /usr/local, because it conflicts with mysql (which contains client libraries). If you need to have mysql-client first in your PATH run: echo 'export PATH="/usr/local/opt/mysql-client/bin:$PATH"' >> ~/.bash_profile For compilers to find mysql-client you may need to set: export LDFLAGS="-L/usr/local/opt/mysql-client/lib" export CPPFLAGS="-I/usr/local/opt/mysql-client/include" For pkg-config to find mysql-client you may need to set: export PKG_CONFIG_PATH="/usr/local/opt/mysql-client/lib/pkgconfig" ==> Summary ? /usr/local/Cellar/mysql-client/8.0.18: 127 files, 137.6MB ==> Caveats ==> openssl@1.1 A CA file has been bootstrapped using certificates from the system keychain. To add additional certificates, place .pem files in /usr/local/etc/openssl@1.1/certs and run /usr/local/opt/openssl@1.1/bin/c_rehash openssl@1.1 is keg-only, which means it was not symlinked into /usr/local, because openssl/libressl is provided by macOS so don't link an incompatible version. If you need to have openssl@1.1 first in your PATH run: echo 'export PATH="/usr/local/opt/openssl@1.1/bin:$PATH"' >> ~/.bash_profile For compilers to find openssl@1.1 you may need to set: export LDFLAGS="-L/usr/local/opt/openssl@1.1/lib" export CPPFLAGS="-I/usr/local/opt/openssl@1.1/include" For pkg-config to find openssl@1.1 you may need to set: export PKG_CONFIG_PATH="/usr/local/opt/openssl@1.1/lib/pkgconfig" ==> mysql@5.7 We've installed your MySQL database without a root password. To secure it run: mysql_secure_installation MySQL is configured to only allow connections from localhost by default To connect run: mysql -uroot mysql@5.7 is keg-only, which means it was not symlinked into /usr/local, because this is an alternate version of another formula. If you need to have mysql@5.7 first in your PATH run: echo 'export PATH="/usr/local/opt/mysql@5.7/bin:$PATH"' >> ~/.bash_profile For compilers to find mysql@5.7 you may need to set: export LDFLAGS="-L/usr/local/opt/mysql@5.7/lib" export CPPFLAGS="-I/usr/local/opt/mysql@5.7/include" For pkg-config to find mysql@5.7 you may need to set: export PKG_CONFIG_PATH="/usr/local/opt/mysql@5.7/lib/pkgconfig" To have launchd start mysql@5.7 now and restart at login: brew services start mysql@5.7 Or, if you don't want/need a background service you can just run: /usr/local/opt/mysql@5.7/bin/mysql.server start ==> mysql-client mysql-client is keg-only, which means it was not symlinked into /usr/local, because it conflicts with mysql (which contains client libraries). If you need to have mysql-client first in your PATH run: echo 'export PATH="/usr/local/opt/mysql-client/bin:$PATH"' >> ~/.bash_profile For compilers to find mysql-client you may need to set: export LDFLAGS="-L/usr/local/opt/mysql-client/lib" export CPPFLAGS="-I/usr/local/opt/mysql-client/include" For pkg-config to find mysql-client you may need to set: export PKG_CONFIG_PATH="/usr/local/opt/mysql-client/lib/pkgconfig"それでもmysql client is missing. You may need to 'brew install mysql' or 'port install mysql', and try again.が出る場合
Terminalchecking for rb_absint_size()... yes checking for rb_absint_singlebit_p()... yes checking for rb_wait_for_single_fd()... yes checking for -lmysqlclient... no ----- mysql client is missing. You may need to 'brew install mysql' or 'port install mysql', and try again. ----- *** extconf.rb failed *** Could not create Makefile due to some reason, probably lack of necessary libraries and/or headers. Check the mkmf.log file for more details. You may need configuration options. Provided configuration options: --with-opt-dir --without-opt-dir --with-opt-include --without-opt-include=${opt-dir}/include --with-opt-lib --without-opt-lib=${opt-dir}/lib --with-make-prog --without-make-prog --srcdir=. --curdir --ruby=/Users/webmaster-patche/.rbenv/versions/2.6.5/bin/$(RUBY_BASE_NAME) --with-mysql-dir --without-mysql-dir --with-mysql-include --without-mysql-include=${mysql-dir}/include --with-mysql-lib --without-mysql-lib=${mysql-dir}/lib --with-mysql-config --without-mysql-config --with-mysql-dir --without-mysql-dir --with-mysql-include --without-mysql-include=${mysql-dir}/include --with-mysql-lib --without-mysql-lib=${mysql-dir}/lib --with-mysqlclientlib --without-mysqlclientlib To see why this extension failed to compile, please check the mkmf.log which can be found here: /Users/webmaster-patche/capistrano_sample_app_v1/vendor/bundle/ruby/2.6.0/extensions/x86_64-darwin-18/2.6.0/mysql2-0.5.3/mkmf.log extconf failed, exit code 1brew install時のログの以下の箇所が原因と考えられます
Terminalmysql@5.7 is keg-only, which means it was not symlinked into /usr/localPATHを通すことで解決します
Terminal$ echo 'export PATH="/usr/local/opt/mysql@5.7/bin:$PATH"' >> ~/.bash_profile $ source ~/.bash_profile疎通確認します
Terminal$ mysql -uroot Welcome to the MySQL monitor. Commands end with ; or \g. Your MySQL connection id is 2 Server version: 5.7.29 Homebrew Copyright (c) 2000, 2020, Oracle and/or its affiliates. All rights reserved. Oracle is a registered trademark of Oracle Corporation and/or its affiliates. Other names may be trademarks of their respective owners. Type 'help;' or '\h' for help. Type '\c' to clear the current input statement. mysql> quitさらに Don't know how to set rpath on your system, if MySQL libraries are not in path mysql2 may not loadが出る場合(?くどい)
TerminalFor compilers to find openssl@1.1 you may need to set: export LDFLAGS="-L/usr/local/opt/openssl@1.1/lib" export CPPFLAGS="-I/usr/local/opt/openssl@1.1/include" For pkg-config to find openssl@1.1 you may need to set: export PKG_CONFIG_PATH="/usr/local/opt/openssl@1.1/lib/pkgconfig"これを元に後編の
bundle installにて、bundle configを設定しておいてくださいTerminal$ bundle config --local build.mysql2 "--with-ldflags=-L/usr/local/opt/openssl@1.1/lib --with-cppflags=-I/usr/local/opt/openssl@1.1/include"2. rbenvのバージョンを確認
Terminalwebmaster-patche-no-MacBook-Pro:~ webmaster-patche$ rbenv --version rbenv 1.1.23. インストール可能なバージョン一覧表示
Terminalwebmaster-patche-no-MacBook-Pro:~ webmaster-patche$ rbenv install -l ...省略... 2.5.0-dev 2.5.0-preview1 2.5.0-rc1 2.5.0 2.5.1 2.5.2 2.5.3 2.5.4 2.5.5 2.5.6 2.5.7 2.6.0-dev 2.6.0-preview1 2.6.0-preview2 2.6.0-preview3 2.6.0-rc1 2.6.0-rc2 2.6.0 2.6.1 2.6.2 2.6.3 2.6.4 2.6.5 2.7.0-dev 2.7.0-preview1 2.7.0-preview2 2.7.0-preview3 2.7.0-rc1 2.7.0-rc2 2.7.0 jruby-1.5.6 jruby-1.6.3 jruby-1.6.4 jruby-1.6.5 jruby-1.6.5.1 jruby-1.6.6 jruby-1.6.7 jruby-1.6.7.2 jruby-1.6.8 jruby-1.7.0-preview1 jruby-1.7.0-preview2 jruby-1.7.0-rc1 jruby-1.7.0-rc2 jruby-1.7.0 jruby-1.7.1 jruby-1.7.2 jruby-1.7.3 jruby-1.7.4 jruby-1.7.5 jruby-1.7.6 jruby-1.7.7 jruby-1.7.8 jruby-1.7.9 jruby-1.7.10 jruby-1.7.11 jruby-1.7.12 jruby-1.7.13 jruby-1.7.14 jruby-1.7.15 jruby-1.7.16 jruby-1.7.16.1 jruby-1.7.16.2 jruby-1.7.17 jruby-1.7.18 jruby-1.7.19 jruby-1.7.20 jruby-1.7.20.1 jruby-1.7.21 jruby-1.7.22 jruby-1.7.23 jruby-1.7.24 jruby-1.7.25 jruby-1.7.26 jruby-1.7.27 jruby-9.0.0.0.pre1 jruby-9.0.0.0.pre2 jruby-9.0.0.0.rc1 jruby-9.0.0.0.rc2 jruby-9.0.0.0 jruby-9.0.1.0 jruby-9.0.3.0 jruby-9.0.4.0 jruby-9.0.5.0 jruby-9.1.0.0-dev jruby-9.1.0.0 jruby-9.1.1.0 jruby-9.1.2.0 jruby-9.1.3.0 jruby-9.1.4.0 jruby-9.1.5.0 jruby-9.1.6.0 jruby-9.1.7.0 jruby-9.1.8.0 jruby-9.1.9.0 jruby-9.1.10.0 jruby-9.1.11.0 jruby-9.1.12.0 jruby-9.1.13.0 jruby-9.1.14.0 jruby-9.1.15.0 jruby-9.1.16.0 jruby-9.1.17.0 jruby-9.2.0.0-dev jruby-9.2.0.0 jruby-9.2.1.0-dev jruby-9.2.1.0 jruby-9.2.3.0 jruby-9.2.4.0 jruby-9.2.4.1 jruby-9.2.5.0 jruby-9.2.6.0 jruby-9.2.7.0 jruby-9.2.8.0 jruby-9.2.9.0 maglev-1.0.0 maglev-1.1.0-dev maglev-2.0.0-dev mruby-dev mruby-1.0.0 mruby-1.1.0 mruby-1.2.0 mruby-1.3.0 mruby-1.4.0 mruby-1.4.1 mruby-2.0.0 mruby-2.0.1 mruby-2.1.0 rbx-2.2.2 rbx-2.2.3 rbx-2.2.4 rbx-2.2.5 rbx-2.2.6 rbx-2.2.7 rbx-2.2.8 rbx-2.2.9 rbx-2.2.10 rbx-2.3.0 rbx-2.4.0 rbx-2.4.1 rbx-2.5.0 rbx-2.5.1 rbx-2.5.2 rbx-2.5.3 rbx-2.5.4 rbx-2.5.5 rbx-2.5.6 rbx-2.5.7 rbx-2.5.8 rbx-2.6 rbx-2.7 rbx-2.8 rbx-2.9 rbx-2.10 rbx-2.11 rbx-2.71828182 rbx-3.0 rbx-3.1 rbx-3.2 rbx-3.3 rbx-3.4 rbx-3.5 rbx-3.6 rbx-3.7 rbx-3.8 rbx-3.9 rbx-3.10 rbx-3.11 rbx-3.12 rbx-3.13 rbx-3.14 rbx-3.15 rbx-3.16 rbx-3.17 rbx-3.18 rbx-3.19 rbx-3.20 rbx-3.21 rbx-3.22 rbx-3.23 rbx-3.24 rbx-3.25 rbx-3.26 rbx-3.27 rbx-3.28 rbx-3.29 rbx-3.30 rbx-3.31 rbx-3.32 rbx-3.33 rbx-3.34 rbx-3.35 rbx-3.36 rbx-3.37 rbx-3.38 rbx-3.39 rbx-3.40 rbx-3.41 rbx-3.42 rbx-3.43 rbx-3.44 rbx-3.45 rbx-3.46 rbx-3.47 rbx-3.48 rbx-3.49 rbx-3.50 rbx-3.51 rbx-3.52 rbx-3.53 rbx-3.54 rbx-3.55 rbx-3.56 rbx-3.57 rbx-3.58 rbx-3.59 rbx-3.60 rbx-3.61 rbx-3.62 rbx-3.63 rbx-3.64 rbx-3.65 rbx-3.66 rbx-3.67 rbx-3.68 rbx-3.69 rbx-3.70 rbx-3.71 rbx-3.72 rbx-3.73 rbx-3.74 rbx-3.75 rbx-3.76 rbx-3.77 rbx-3.78 rbx-3.79 rbx-3.80 rbx-3.81 rbx-3.82 rbx-3.83 rbx-3.84 rbx-3.85 rbx-3.86 rbx-3.87 rbx-3.88 rbx-3.89 rbx-3.90 rbx-3.91 rbx-3.92 rbx-3.93 rbx-3.94 rbx-3.95 rbx-3.96 rbx-3.97 rbx-3.98 rbx-3.99 rbx-3.100 rbx-3.101 rbx-3.102 rbx-3.103 rbx-3.104 rbx-3.105 rbx-3.106 rbx-3.107 ree-1.8.7-2011.03 ree-1.8.7-2011.12 ree-1.8.7-2012.01 ree-1.8.7-2012.02 topaz-dev truffleruby-1.0.0-rc10 truffleruby-1.0.0-rc11 truffleruby-1.0.0-rc12 truffleruby-1.0.0-rc13 truffleruby-1.0.0-rc14 truffleruby-1.0.0-rc15 truffleruby-1.0.0-rc16 truffleruby-1.0.0-rc2 truffleruby-1.0.0-rc3 truffleruby-1.0.0-rc5 truffleruby-1.0.0-rc6 truffleruby-1.0.0-rc7 truffleruby-1.0.0-rc8 truffleruby-1.0.0-rc9 truffleruby-19.0.0 truffleruby-19.1.0 truffleruby-19.2.0 truffleruby-19.2.0.1 truffleruby-19.3.04. インストール
Terminal$ rbenv install 2.6.5 Downloading openssl-1.1.1d.tar.gz... -> https://dqw8nmjcqpjn7.cloudfront.net/1e3a91bc1f9dfce01af26026f856e064eab4c8ee0a8f457b5ae30b40b8b711f2 Installing openssl-1.1.1d... Installed openssl-1.1.1d to /Users/webmaster-patche/.rbenv/versions/2.6.5 Downloading ruby-2.6.5.tar.bz2... -> https://cache.ruby-lang.org/pub/ruby/2.6/ruby-2.6.5.tar.bz2 Installing ruby-2.6.5... ruby-build: using readline from homebrew Installed ruby-2.6.5 to /Users/webmaster-patche/.rbenv/versions/2.6.55. rbenvで認識しているすべてのRubyバージョンを一覧表示
Terminal$ rbenv versions * system (set by /Users/webmaster-patche/.rbenv/version) 2.6.5systemはMacに最初から入っているRubyを意味します
6. globalのRubyバージョンを変更
Terminal$ rbenv global 2.6.5 $ rbenv versions system * 2.6.5 (set by /Users/webmaster-patche/.rbenv/version)7. rbenv init
Terminal$ rbenv init # Load rbenv automatically by appending # the following to ~/.bash_profile: eval "$(rbenv init -)"8. プロファイルにinitを追記
Terminalecho 'export PATH="~/.rbenv/shims:/usr/local/bin:$PATH"' >> ~/.bash_profile echo 'eval "$(rbenv init --no-rehash -)"' >> ~/.bash_profile $ source ~/.bash_profile*尚、 7〜8の手順をしないと、
You don't have write permissionsが発生しますTerminal$ gem install bundler ERROR: While executing gem ... (Gem::FilePermissionError) You don't have write permissions for the /Library/Ruby/Gems/2.3.0 directory.9. bundlerのインストール
Terminal$ gem list bundler --remote *** REMOTE GEMS *** appbundler (0.13.1) asset_bundler (0.2.0) atd-asset_bundler (0.0.3) bonnie_bundler (2.2.5) bowline-bundler (0.0.4) bundler (2.1.4) bundler-add (0.0.1) bundler-advise (1.2.0) bundler-audit (0.6.1) bundler-audited_update (0.1.5) bundler-auto-update (0.1.0) bundler-bootstrap (0.0.3) bundler-bouncer (0.1.2) bundler-bower (0.0.3) bundler-budit (0.6.3) bundler-changelog (0.0.0) ...省略... $ gem install bundler Fetching bundler-2.1.4.gem Successfully installed bundler-2.1.4 Parsing documentation for bundler-2.1.4 Installing ri documentation for bundler-2.1.4 Done installing documentation for bundler after 4 seconds 1 gem installed $ rbenv rehash10. bundlerのバージョンの確認
Terminal$ bundler -v Bundler version 2.1.4Docker手順
1. Brew経由でインストール
Terminal$ brew install docker Updating Homebrew... ==> Auto-updated Homebrew! Updated 1 tap (homebrew/cask). No changes to formulae. ==> Downloading https://homebrew.bintray.com/bottles/docker-19.03.5.mojave.bottle.tar.gz ==> Downloading from https://akamai.bintray.com/99/99bfeaa39dfe7b1ee02bbe37b7433176d7f17266575bfa565ca94e0f1a3d204d?__gda__=exp=157912477 ######################################################################## 100.0% ==> Pouring docker-19.03.5.mojave.bottle.tar.gz ==> Caveats Bash completion has been installed to: /usr/local/etc/bash_completion.d zsh completions have been installed to: /usr/local/share/zsh/site-functions ==> Summary ? /usr/local/Cellar/docker/19.03.5: 14 files, 75.8MB $ brew cask install docker ==> Downloading https://download.docker.com/mac/stable/40693/Docker.dmg ######################################################################## 100.0% ==> Verifying SHA-256 checksum for Cask 'docker'. ==> Installing Cask docker ==> Moving App 'Docker.app' to '/Applications/Docker.app'. ? docker was successfully installed!2. バージョン確認
Terminal$ docker --version Docker version 19.03.5, build 633a0ea3. 起動確認
Terminal$ open /Applications/Docker.app4. アクセス権付与
ログインユーザーのパスワード要求がされます
パスワード入力後、ボタンに文言がありませんが(汗 クリックします
起動しました
5. セットアップ
まずは
Reset to factory defaultsで rawフォーマットを行う
再起動します。この際に、権限付与のダイアログが表示されます
ただ、
Diskの情報を見る限り、デフォルトでrawフォーマットになっていると考えられる
リリースノートを見る限りでは、rawフォーマットについては2018年以降、記述がありません6. メンテナンス
(*GB on disk)がDisk image sizeに限りなく近くなった場合、build時のゴミなどが溜まってきている可能性が高い
定期的に
Reset disk imageする必要がありますが、再度、ビルドし直しとなります。
- 参考になった技術まとめ
〜後編〜に続く
- 投稿日:2020-01-16T03:32:15+09:00
dockerコンテナ リソース変化とメトリクス確認(docker stats, htop)
Dockerのリソース変化
dockerを0から触れていまだ勉強中なので記事内に間違った内容などがあれば編集リクエストを送っていただけるととても助かります
cpu割り当て時間
dockerコンテナのcpu割り当て時間は基本的に100%で割り振られ,そのコアに割り当てられたコンテナの個数で決まる. なので1つだけコンテナを立てるとcpuの割り当て時間は100%になってしまう.
要するに同じコアに3つコンテナが建てられたら1つあたりの割り当て時間は、100/3で33.333...%になるらしい.cpuのコアの指定には
--cpuset-cpus
cpu割り当て時間の変更には--cpusを使い変更.
以下の例は起動中のコンテナのcpuコアを1にして割り当て時間を50%にする場合です.docker container update --cpuset-cpus=0 --cpus="0.5" <変更したいコンテナID>メモリ割り当て
メモリの割り当て変更には,
-mを使います.
以下の例は, 起動中のコンテナのメモリ容量を100MBに制限する例です.docker container update -m 100m <変更したいコンテナID>制限したいメモリ容量の単位は、b(バイト)k(キロバイト)m(メガバイト)g(ギガバイト)が使えます.
コンテナメトリクス
コンテナのメトリクスを確認するうえで手っ取り早いのは
- docker stats
- htop
個人的には、この2つだと思います...
(コンテナのメトリクス確認なのでデータ取得にはdata dogやelasticsaerchを入れたほうが楽)docker stats
docker statsを実行するだけで起動中のコンテナの状態を一目で確認することができます.docker stats CONTAINER ID NAME CPU % MEM USAGE / LIMIT MEM % NET I/O BLOCK I/O PIDS e7c6f7cd0153 magical_elbakyan 9.84% 50.67MiB / 100MiB 50.67% 9.97kB / 0B 341MB / 807MB 1 7d8cddfc7d9c nervous_jones 50.08% 52.11MiB / 100MiB 52.11% 9.97kB / 0B 8.24GB / 8.91GB 1 d7d25131fa19 confident_kilby 100.33% 53.11MiB / 100MiB 53.11% 10.2kB / 0B 3.87TB / 10.7TB 1
docker stats 意味 cpu% cpu割り当て時間 MEM use メモリ使用量 MEM% メモリ使用率 NET I/O ネットワークI/O BLOCK I/O 入出力中の待機I/O htop
htopはdocker statsとは違い実行したマシンのプロセスがすべて表示されます.
htopで実行(ぱっと見すごいことしてる感が出てて僕は好きです)
cpuの状態とメモリ, swap, load averageが一目で見れてCPU・メモリ使用量で並び変えもできるので マシン全体でコンテナがどう動いているかの確認に向いてると思います.
htopステータス 意味 PID プロセスID NI プロセス優先度 VIRT 仮想メモリ RES 物理メモリ SHR プロセスと共有されるメモリ S プロセス起動状態 CPU% cpu使用率 MEM% メモリ使用率 TIME+ プロセス起動時間 参考文献
この記事は以下の情報を参考にして執筆しました。
