- 投稿日:2019-12-19T22:33:48+09:00
Pulumi SDKとGoogle Cloud SDKを組み合わせてみる
この記事は NTTコミュニケーションズ Advent Calendar 2019 の20日目です。
昨日は @kirikei さんの Googleのデータ可視化&モデル分析ツール What-if Toolで覗いてみるTitanic生存者予測 でした。はじめに
入社6年目、主にインフラエンジニアな仕事をしています。
今回は、最近盛り上がりつつあるPulumiという Infrastructure as Code(IaC)のツールの簡単な説明と、プログラミング言語でIaCができるというPulumiの特性を生かした利用方法について、紹介したいと思います。Pulumiとは
本家HPのArchitecture & Conceptsには、以下のように書かれてます。
The Pulumi Cloud Development Platform is a combination of tools, libraries, runtime, and service that delivers a consistent development and operational >?control plane for cloud-native infrastructure. Not only does Pulumi enable you to manage your infrastructure as code, it also lets you define and manage your infrastructure using real programming languages (and all of their supporting tools) instead of YAML.
要するに、Infrastructure as Codeを実際のプログラミング言語を用いて、定義・管理できるよ、ということのようです。現在サポートされている言語は、以下の4種類で、.NETとGoはまだPreviewのようです。バージョン2.0から正式サポートらしいです。(Pulumi 2.0 Roadmapより)
- Node.js - JavaScript, TypeScript, or any other Node.js compatible language
- Python - Python 3.6 or greater
- .NET Core - C#, F#, and Visual Basic on .NET Core 3.0 or greater
- Go - statically compiled Go binaries (documentation coming soon)
また、デプロイできるCloud Provider は続々と増えているようです。
Kubernetesにデプロイしてみる
今回は例として、以下のような構成をKubernetesにデプロイしてみようと思います。
nginxのweb server(nginx)を3台をロードバランスし、外部からアクセスできるようにする構成です。nginx.ymlapiVersion: networking.k8s.io/v1beta1 kind: Ingress metadata: name: nginx spec: backend: serviceName: nginx servicePort: 80 --- apiVersion: v1 kind: Service metadata: name: nginx spec: type: NodePort ports: - port: 80 targetPort: http-port selector: app: nginx --- apiVersion: apps/v1 kind: Deployment metadata: name: nginx spec: replicas: 3 selector: matchLabels: app: nginx template: metadata: labels: app: nginx spec: containers: - name: nginx image: nginx:alpine ports: - name: http-port containerPort: 80PulumiのKubernetes SDKを利用してデプロイする
Kubernetes の Manifestの内容を、ほぼそのままObjectとして定義し、newでinstanceがデプロイされるようなイメージです。
index.tsimport * as k8s from "@pulumi/kubernetes"; const appName = "nginx"; const appLabels = { app: appName }; const deployment = new k8s.apps.v1.Deployment(appName, { metadata: { name: appName }, spec: { selector: { matchLabels: appLabels}, replicas: 3, template: { metadata: { labels: appLabels}, spec: { containers: [{ name: appName, image: "nginx:alpine", ports: [{ name: "http-port", containerPort: 80 }] }] } } } }); new k8s.core.v1.Service(appName, { metadata: { name: appName, labels: deployment.spec.template.metadata.labels }, spec: { type: "NodePort", ports: [{ port: 80, targetPort: "http-port" }], selector: appLabels } }); new k8s.networking.v1beta1.Ingress(appName, { metadata: { name: appName }, spec: { backend: { serviceName: appName, servicePort: 80 } } });YAML形式のManifestを読み込んでデプロイする
Kubernetesでは、ある程度YAMLでエコシステムが回ってる場合もあると思うので、再度Pulumiで焼き直しをすることが面倒なこともあると思います。その場合、YAMLをそのまま読み込んでデプロイすることも可能です。
Deploying a YAML Manifestにあるサンプルコードのように、PulumiのKubernetes SDKには、ローカルにあるYAMLファイルを読み込み、YAML内のリソース種別(KubernetesのKind)を自己解決しデプロイする機能、を用意してくれているのでかなりシンプルなコードで済みます。
index.tsimport * as k8s as "@pulumi/kubernetes"; const manifest = "nginx.yml" new k8s.yaml.ConfigFile(`k8s/app/${manifest}`, { file: manifest });Google Cloud StorageにあるYAML読み込んでデプロイする
エコシステムの中で、別のソフトウェアがYAMLのCreate/Validationを担っており、Google Cloud Storageなどの別のストレージを介してYAMLがやり取りされる場合、さらに状況が複雑になります。
現状、Node.jsのPulumi SDKでは、ローカルのファイルから読み込む機能以外はサポートされていません。代わりに、YAML形式のDataがあれば、そこから同様のことをしてくれる機能はあるようです。
そこで、 Google Cloud のSDKと組み合わせて利用してみます。index.tsimport * as gcs from "@google-cloud/storage"; import * as k8s from "@pulumi/kubernetes"; async function readFileFromGcs(bucket: gcs.Bucket, file: string): Promise<string> { const remoteFile = bucket.file(file); return new Promise((resolve) => { let yamlData = ''; remoteFile.createReadStream() .on('data', function(data) { yamlData += data; }).on('end', function() { resolve(yamlData); }); }); }; async function main(): Promise<any> { const storage = new gcs.Storage({keyFilename: './key.json'}); const bucket = storage.bucket('test-pulumi'); const manifest = "nginx.yml" const yamlData = await readFileFromGcs(bucket, manifest) new k8s.yaml.ConfigGroup(`k8s/app/${manifest}`, { yaml: yamlData }); }; main();実行結果
Google Cloud のSDKと組み合わせて利用した場合の実行結果が以下です。
$ pulumi up
Previewing update (dev):

     Type                                        Name                 Plan
 +   pulumi:pulumi:Stack                         manifest_on_gcs-dev  create
 +   └─ kubernetes:yaml:ConfigGroup              k8s/app/nginx.yml    create
 +      ├─ kubernetes:core:Service               nginx                create
 +      ├─ kubernetes:networking.k8s.io:Ingress  nginx                create
 +      └─ kubernetes:apps:Deployment            nginx                create

Resources:
    + 5 to create

Do you want to perform this update? yes
Updating (dev):

     Type                                        Name                 Status
 +   pulumi:pulumi:Stack                         manifest_on_gcs-dev  created
 +   └─ kubernetes:yaml:ConfigGroup              k8s/app/nginx.yml    created
 +      ├─ kubernetes:networking.k8s.io:Ingress  nginx                created
 +      ├─ kubernetes:core:Service               nginx                created
 +      └─ kubernetes:apps:Deployment            nginx                created

Resources:
    + 5 created

Duration: 17s
きちんとYAMLが読み込まれ、デプロイできました。今回は省略しましたが、前述した 「PulumiのKubernetes SDKを利用してデプロイする」、「ローカルにあるYAML形式のManifestを読み込んでデプロイする」のパターンも同じ実行結果になります。
おわりに
今回は、 Pulumiを用いてKubernetesにデプロイする方法の紹介をしました。特に最後の
Google Cloud StorageにあるYAML読み込んでデプロイするでは、PulumiのKubernetes SDKと、単なる Node.jsのGoogle Cloud SDKを組み合わせて利用しました。
PulumiのSDKの中だけだとできないことも、純粋なプログラミングとして実現できることは、Pulumiでは実装可能だというのが、terraformなどの別のツールとの違いな気がします。今回、Pulumiを触ってみて感じたのは、普段使っている言語でインフラをデプロイするという、よりアプリケーション開発者がCloudを使うためのツールとしての1つのアプローチだなと思いました。企業のサービスやシステムでは、まだまだまインフラエンジニアと呼ばれる人たちが多く存在しますが、どんどんシームレスになり、ソフトウェアを書くことが当たり前になるべきだと思います。NTTコミュニケーションズの中でも、そう言う流れが徐々に強くなりつつあるので、自身も含め、精進していきたいなと思っています。
以上です。明日は、 @kanatakita さんの記事です。

- 投稿日:2019-12-19T18:35:55+09:00
Node.js 13.2.0 で--experimental-modulesが外れたのでESMを試す
はじめに
Node.js 13.2.0 で
--experimental-modulesが外れた。晴れて Node.js の世界でも ECMAScript 標準のモジュール管理を標準で使える!
と思って使ってみた。
というわけで本稿は所謂"やってみた系"の話である。
デフォルトESMにして嬉しいケースは「ソース=配布物なライブラリ開発」の時に限られるが※1、tscでコンパイルする環境でも"module":"esnext"でどこまで頑張れるかやってみた。
※1: TypeScriptやbabelのようなトランスパイラやwebpackのようなバンドラによって出力結果は環境に応じて変更するのが一般的なので
※本稿では、{...}のような記法を使っている場合、中身が省略されていることを示す(スプレッド演算子は使っていない)
※今回のやってみたの趣旨は、「"target":"esnext"でtscコンパイルしたファイルをオプション指定無しでNode.jsで実行し、なんとか動かすところまでを目指すこと」である。その目的とバッティングするESLintのエラーやTypeScriptのエラーは都度ignoreしていく。
主張
結構しんどいしTypeScript開発をしたい昨今の事情を鑑みると、旨味が少ない
おさらい
JavaScriptには長らくモジュール機構が備わっていなかったため様々な仕様が考えられた。
「え、じゃあどうやって別ファイルに機能を切り出していたの?」という質問に対しては、皆さんご存知の通りHTML内で各JSファイルを読み込み、サーバにファイルを要求してダウンロードしていた、というのが回答になるであろう。
そして各ファイルではグローバル変数としてモジュールを提供し、それぞれが別々のグローバル変数に依存する仕組みをとっていた。モジュール機能なんてなかったのだ。
一般的なmodule機能について
ここで呼ぶモジュール機能とは、他言語でよく見られる
requireやincludeやimportのようなものである。個別ファイルとして切り出されたモジュールを読み込む方法のことだ。例えば C++ では下記のように helloworld.cpp の処理を main.cpp から呼び出すことが出来る。
// helloworld.cpp
export module helloworld;  // モジュール宣言。
import <iostream>;         // インポート宣言。

export void hello() {      // エクスポート宣言。
    std::cout << "Hello world!\n";
}
// main.cpp import helloworld; // インポート宣言。 int main() { hello(); }出典: https://ja.cppreference.com/w/cpp/language/modules
JavaScriptにおけるモジュール機能
JavaScriptにおいて考案された様々なモジュール機能の具体例としては、RequireJSやAMD、CommonJSやECMAScriptモジュール等が挙げられる。今回それぞれの詳しい説明は省くが、気になる方は調べてみると良いだろう。ちなみに筆者はRequireJSやAMDを知ることなく、ECMAScriptモジュールでフロントエンドを書くことが当たり前の世界になってからフロントエンドの門を叩いた幸せ者である。
本稿ではCommonJSとECMAScriptモジュールについて触れることが多いので、知らない方のために軽く紹介する。
CommonJS
CommonJSとは言語仕様でありモジュール解決するために主にNode.jsに実装されている。
syntaxは下記のような形になっている。
// helloworld.js
exports.helloworld = () => {
  process.stdout.write("hello world\n");
};
// index.js const { helloworld } = require("./helloworld"); helloworld(); // => hello worldESLintの設定ファイルやwebpackの設定ファイル等で下記のような記法を目にした方も多いのではないだろうか。
module.exports = {...}module.exportsは(関数も含む)一つのオブジェクトをこのファイルから提供したい場合に使う。大抵はmodule.exportsを使うことになるだろう。
ECMAScriptモジュール
ECMAScriptについては各所で解説がされているのでここでの説明は省く。
JavaScriptの言語仕様であるECMAScriptが定めたモジュール機能の仕様をEcmaScriptモジュールと呼ぶ。CommonJSから遅れること○○年、ようやくEcmaScriptでもモジュール機能に関する仕様が定められたのだ。
syntaxは下記のようになる
// helloworld.js
export const helloworld = () => process.stdout.write("hello world\n");
// index.js import { helloworld } from "./helloworld.js" helloworld(); // hello worldCommonJSと同様に単一オブジェクトのみをexportしたいケースでは
export default {...}という構文を用いる。以降、CommonJSをCJS、ECMAScriptモジュールをESMと記載する
ホスト側でのESM対応
冒頭でこのように書いた。
Node.js 13.2.0 で
--experimental-modulesが外れた。これが意味するところについて説明する。
WHATWGとNode.js
ECMAScriptでのモジュール機能が定まった。次はホスト側が、どう動くのか、というところを定めていくこととなった。
ESMの仕様に関して、TC39がsyntaxを決めたが、どのように動くのか、というところはホストに任されている事情があるため、ブラウザはWHATWG、サーバはNode.jsと別々に定めていく必要があった。
ブラウザ側の動きについては、フラグ付きではあるが全モダンブラウザでの初期実装も揃った。※2
しかしNode.jsは既にCommonJSというモジュール機能が存在しているため、後方互換性をどう担保していくかを考えていかなければならなかった。そのためブラウザでの実装に遅れをとっているという状況である。(とはいえフロントエンドでESMネイティブな開発が行える環境は多くはないだろう)
※2: https://teppeis.hatenablog.com/entry/2017/08/es-modules-in-nodejs
Node.jsのESM対応
Node.jsのESM対応については完了までのフェーズを5つに分けられていて、現在はPhase3が終了して最終フェーズのPhase4に差し掛かったところかと思われる
At the end of this phase, the --experimental-modules flag is dropped.
無事にNode.js 13.2.0 で
--experimental-modulesが外れた。以降ではNode.jsでESMを使っていく上での現状での課題を示す。
ESMの課題1: CJS→ESM呼び出しができない
CJS→ESM, ESM→CJSの検証
下記のようなディレクトリ構造でプロジェクトを作り、それぞれでCJS、MJSのモジュール機能を使って欲しい。
├── node-type-common
│   ├── export.js
│   ├── import.js
│   └── package.json
└── node-type-esm
    ├── export.js
    ├── import.js
    └── package.json
CJS→EJSプロジェクト
- node-type-common/export.js
const Bar = {
  name: "bar"
};

console.log(`cjs: ${JSON.stringify(Bar, null, 2)}`);

module.exports = Bar;
- node-type-common/import.js
const Foo = require("../node-type-esm/export");

console.log(`cjs: ${JSON.stringify(Foo)}`);
- node-type-common/package.json
{
  "name": "node-type-common",
  "version": "1.0.0",
  "license": "MIT",
  "type": "commonjs"
}
ESM→CJSプロジェクト
- node-type-esm/export.js
const Foo = {
  name: "foo"
};

console.log(`esm: ${JSON.stringify(Foo, null, 2)}`);

export default Foo;
- node-type-esm/import.js
import Bar from "../node-type-common/export.js";

console.log(`esm: ${JSON.stringify(Bar, null, 2)}`);
- node-type-esm/package.json
{
  "name": "node-type-esm",
  "version": "1.0.0",
  "license": "MIT",
  "type": "module"
}
ESM→CJS
cd node-type-esm
node import.js
(node:72280) ExperimentalWarning: The ESM module loader is experimental. cjs: { "name": "bar" } esm: { "name": "bar" }CJS→ESM
cd node-type-common
node import.js
(node:72455) Warning: require() of ES modules is not supported. require() of /*****/node-type-esm/export.js from /*****/node-type-common/import.js is an ES module file as it is a .js file whose nearest parent package.json contains "type": "module" which defines all .js files in that package scope as ES modules. Instead rename export.js to end in .cjs, change the requiring code to use import(), or remove "type": "module" from /*****/node-type-esm/package.json. internal/modules/cjs/loader.js:1156 throw new ERR_REQUIRE_ESM(filename); ^ Error [ERR_REQUIRE_ESM]: Must use import to load ES Module: /*****/node-type/node-type-esm/export.js at Object.Module._extensions..js (internal/modules/cjs/loader.js:1156:13) at Module.load (internal/modules/cjs/loader.js:976:32) at Function.Module._load (internal/modules/cjs/loader.js:884:14) at Module.require (internal/modules/cjs/loader.js:1016:19) at require (internal/modules/cjs/helpers.js:69:18) at Object.<anonymous> (/*****/node-type-common/import.js:1:13) at Module._compile (internal/modules/cjs/loader.js:1121:30) at Object.Module._extensions..js (internal/modules/cjs/loader.js:1160:10) at Module.load (internal/modules/cjs/loader.js:976:32) at Function.Module._load (internal/modules/cjs/loader.js:884:14) { code: 'ERR_REQUIRE_ESM' }やってみたように、MJSからCJSの呼び出しはbabel×WebpackやTypeScriptで使っていた方法そのままとはいかないが可能である一方、CJSからのMJS呼び出しはできなくなっている。
MJSからCJSの呼び出しが可能とはいえ
__dirnameやいくつかの予約語が使えなくなったり、named exportが使えなかったりする。注意点は@teppeisさんのブログエントリを見ていただきたい。
https://teppeis.hatenablog.com/entry/2017/08/es-modules-in-nodejs
CJS→ESMができない
さて本題のCJS→MJSができない件である。
具体的にどういったケースで困るのか考えていく。
以下では参考に作ったこのリポジトリで議論を進める。
https://github.com/azawakh/node-type-module
拡張子まで指定しないといけない
CJSのモジュール機能では、index.jsが呼ばれる形でのディレクトリ指定や拡張子の省略が可能である。
// ./helloworld/index.js
module.exports = () => process.stdout.write('hello world\n');
const helloworld = require("./helloworld"); // ./helloworld/index.js helloworld(); // hello worldという具合である。
WebpackやTypeScriptでのESMは、このCJSの仕様を踏襲しているため拡張子を省いた記述が可能である。
.eslintrc.jsはCJSで呼び出される
検証リポジトリを見れば分かるが、ESLintの設定ファイルの拡張子が.cjsとなっている。
https://github.com/azawakh/node-type-module/blob/master/.eslintrc.cjs
.cjsと.mjs
唐突に.cjs拡張子のファイルが出てきた。これが何を表すのかというと、.cjs拡張子であればCJSのモジュール機能、.mjs拡張子であればESMのモジュール機能を使う、というNode.jsの仕様である。
Node.jsのESM対応ではこのファイルがCJSなのかMJSなのかという判定をせねばならず、一つの解決策が拡張子.mjs, .cjsであった。
.eslintrc.jsがCJSで呼び出される理由
ESLintパッケージがCJSである理由
Node.jsのドキュメントには下記のように記載がある
Node.js will treat as CommonJS all other forms of input, such as .js files where the nearest parent package.json file contains no top-level "type" field
これは後方互換性を保つためのものとすぐ後に説明があるが、ESLintのパッケージのpackage.jsonには"type"フィールドがない。
そのため、プロジェクトのESLint設定ファイルを読みに行くこのファイルのモジュール解決はCJSとなる。
https://github.com/eslint/eslint/blob/master/lib/cli-engine/config-array-factory.js#L197
プロジェクト自体はESM
Node.jsのドキュメントには下記のように記載がある
Files ending in .js, or extensionless files, when the nearest parent package.json file contains a top-level field "type" with a value of "module".
検証用リポジトリのpackage.jsonには、"type"フィールドがあり、"module"と定義されている。
もしこのプロジェクトに存在するESLintの設定ファイル名が
.eslintrc.jsだとしたら、CJSであるESLintパッケージからESMである検証用プロジェクトのファイルを呼び出すことになる。前段で検証したとおりCJS→ESMは不可能なためエラーが発生する。
~/*****/node-type-module master●● 0m yarn lint yarn run v1.21.1 $ eslint --ext ts . (node:79774) Warning: require() of ES modules is not supported. require() of /*****/node-type-module/.eslintrc.js from /*****/node-type-module/node_modules/eslint/lib/cli-engine/config-array-factory.js is an ES module file as it is a .js file whose nearest parent package.json contains "type": "module" which defines all .js files in that package scope as ES modules. Instead rename .eslintrc.js to end in .cjs, change the requiring code to use import(), or remove "type": "module" from /*****/node-type-module/package.json. Error [ERR_REQUIRE_ESM]: Must use import to load ES Module: /*****/node-type-module/.eslintrc.js at Object.Module._extensions..js (internal/modules/cjs/loader.js:1156:13) at Module.load (internal/modules/cjs/loader.js:976:32) at Function.Module._load (internal/modules/cjs/loader.js:884:14) at Module.require (internal/modules/cjs/loader.js:1016:19) at module.exports (/*****/node-type-module/node_modules/import-fresh/index.js:31:59) at loadJSConfigFile (/*****/node-type-module/node_modules/eslint/lib/cli-engine/config-array-factory.js:201:16) at loadConfigFile (/*****/node-type-module/node_modules/eslint/lib/cli-engine/config-array-factory.js:284:20) at ConfigArrayFactory._loadConfigDataInDirectory (/*****/node-type-module/node_modules/eslint/lib/cli-engine/config-array-factory.js:517:34) at ConfigArrayFactory.loadInDirectory (/*****/node-type-module/node_modules/eslint/lib/cli-engine/config-array-factory.js:434:18) at CascadingConfigArrayFactory._loadConfigInAncestors (/*****/node-type-module/node_modules/eslint/lib/cli-engine/cascading-config-array-factory.js:328:46) error Command failed with exit code 2. info Visit https://yarnpkg.com/en/docs/cli/run for documentation about this command.対応策
「
.eslintrc.jsを.eslintrc.cjsに書き換えればうまくいくだろう。なぜなら、.cjsファイルはCJSモジュール解決なのだから。」と思うであろう。筆者も同様に考えて検証を行ったがESLint側が.eslintrc.cjsに対応していないため何らかの対策が必要である。ESLint側の.mjs, .cjs対応についてはRFCが公開されているので是非読んで欲しい。
https://github.com/eslint/rfcs/tree/master/designs/2019-esm-compatibilty
とはいえ「待てない、すぐに動くようにしたい」と思う方もいるであろう。そのような方は一旦forkして限定的に動くようにしてしまうのも手である。
(ここからは決して動作を保証するものではないのでやらない方が良い。もしやる場合は自己責任でやること。)
ESLintの修正
差分はこれだけである
https://github.com/azawakh/eslint/blob/master/lib/cli-engine/config-array-factory.js
@@ -61,6 +61,7 @@
 const debug = require("debug")("eslint:config-array-factory");
 const eslintRecommendedPath = path.resolve(__dirname, "../../conf/eslint-recommended.js");
 const eslintAllPath = path.resolve(__dirname, "../../conf/eslint-all.js");
 const configFilenames = [
+    ".eslintrc.cjs",
     ".eslintrc.js",
     ".eslintrc.yaml",
     ".eslintrc.yml",
@@ -279,6 +280,7 @@
function configMissingError(configName, importerName) {
function loadConfigFile(filePath) {
    switch (path.extname(filePath)) {
        case ".js":
+       case ".cjs":
            return loadJSConfigFile(filePath);

        case ".json":
リポジトリはこちら
https://github.com/azawakh/eslint
あとは、このリポジトリをpackage.jsonに指定すれば良い。検証用のリポジトリのpackage.jsonを参照すること。
https://github.com/azawakh/node-type-module/blob/master/package.json#L23
.eslintrc.jsの拡張子を.cjsに変える
残りは.eslintrc.jsの拡張子を.cjsに変えるだけだ。
~/*****/node-type-module master 0m yarn lint yarn run v1.21.1 $ eslint --ext ts . Done in 1.99s.無事にESLintが動いた。
設定ファイルをjsonやymlで定義する
ESLintの設定ファイルについて.jsにこだわる必要はない。jsonやymlで書いていてjsで書きたいという気持ちが訪れた時に書けば良いと考えている。
ESMの課題2: 拡張子省略したモジュール読み込みに対応していない
先にも述べたが、CJSのモジュール解決方法は.jsを省略することができる。ryan dahlが失敗と述べているが、この挙動はブラウザのセマンティクスと少し離れてしまっている。
CJSのモジュール解決方法と異なり、Node.jsのMJSのデフォルトの仕様は拡張子を必須としている。
The --experimental-specifier-resolution=[mode] flag can be used to customize the extension resolution algorithm. The default mode is explicit, which requires the full path to a module be provided to the loader. To enable the automatic extension resolution and importing from directories that include an index file use the node mode.
defaultのモードが"explicit"であり、CJS標準で書きたい場合は"node"と指定する必要がある。
冒頭で述べた通り、no optionでESMのプロジェクトを動かすのが本稿の趣旨のため、今回このオプションは特に指定せず、デフォルトの"explicit"のまま進めていく。
TypeScriptコンパイラは拡張子を補完しない
TypeScriptではESMの仕様を踏襲したモジュール解決を行う。つまり、
import Foo from "./foo";やexort default {...}という構文を用いる。ここで問題になるのが出力結果だ。esnextで出力した際にはモジュール解決部分の記述は概ねそのままビルドされるので、拡張子が補完されることはない。
ということはTypeScriptでモジュール解決を行っているプロジェクトで、esnextで出力したものをoption指定せずに実行すると、
Error: Cannnot find module ...というエラーを吐く。試しに検証プロジェクトのソースファイルのimport文の拡張子を削って実行してみよう。
~/*****/node-type-module master● 0m SECRET=***** API_KEY=***** node dist/index.js (node:83848) ExperimentalWarning: The ESM module loader is experimental. internal/modules/esm/default_resolve.js:94 let url = moduleWrapResolve(specifier, parentURL); ^ Error: Cannot find module /*****/node-type-module/dist/lib/search_slide imported from /*****/node-type-module/dist/index.js at Loader.resolve [as _resolve] (internal/modules/esm/default_resolve.js:94:13) at Loader.resolve (internal/modules/esm/loader.js:74:33) at Loader.getModuleJob (internal/modules/esm/loader.js:148:40) at ModuleWrap.<anonymous> (internal/modules/esm/module_job.js:41:40) at link (internal/modules/esm/module_job.js:40:36) { code: 'ERR_MODULE_NOT_FOUND' }このようにエラーが出てしまう。実行時に
The --experimental-specifier-resolution=nodeにすればこのエラーは抑えられるが、本稿の趣旨とは外れてしまうため違う形で対応することにした。こちらの問題についてはこのissueで議論が行われている
https://github.com/microsoft/TypeScript/issues/16577
補完しないことを逆手に取る
TypeScriptコンパイラは、import文について補完は行わないようなので、拡張子も含めてそのまま出力される。つまり、
import Foo from "./foo.ts"と書いたらそのまま出力されるのだ。(.ts拡張子を指定した場合ビルドの段階でエラーが出るがファイルは出力される。)※これに関しては実行環境までTypeScriptの環境で困ったことになる。正常な挙動なのにエラーが出てくるのだ。
※現段階で実行環境がTypeScriptなものはあまり多くはないがdenoなどはそれに当たるだろう
※closeされているがこのissueがこの困り事に関するものである。
https://github.com/Microsoft/TypeScript/issues/27481
話がそれてしまった。拡張子も含めたimport文を書くことでこの問題を辛うじて乗り切ることができる。
TypeScriptのビルドタイムでは嘘になるが、コンパイラは.tsのファイルを.jsとして読み込ませても正常にコンパイルする上、推論も効くので、ビルドから結果出力まで問題なく行うことができる。
結果的にTypeScriptのファイルでTypeScriptのファイルを
.jsで呼び出すという奇妙な形になった。// helloworld.ts export default (): void => { process.stdout.write("hello world"); };// index.ts import helloworld from "./helloworld.js"; helloworld(); // hello worldESLintのimport/no-unresolved
残る課題はESLintのエラーだけとなった。.jsを読み込ませようとすると、そのようなファイルは存在しないため、ESLintのルールに引っかかってしまう。勿論ルールにはよるが、検証用プロジェクトで採用しているルールではエラーになるようになっている。
この問題に対してはeslint-ignoreすることでしか解決できなかった。
勿論badな選択肢なのだが、本稿の趣旨は「Node.jsでオプションなしでESMを実行し切る」であるため、この方法でエラーを解消することにした。
結論
繰り返しになるが、結論は、「結構しんどいしTypeScript開発をしたい昨今の事情を鑑みると、旨味が少ない」だが、あくまで「現在は」である。
先にも述べたように、ESLintではRFCが出ていてTypeScriptでもissueで議論が行われている。TypeScript側のissueは2017年から動きが無かったようだが、数日前からまた議論が行われている。
ソースファイルとビルド結果ファイルの差分が少ないに越したことは無いので、Node.jsエコシステムがESMにフレンドリーになる日を心待ちにしている。
参考
https://teppeis.hatenablog.com/entry/2017/08/es-modules-in-nodejs
https://blog.hiroppy.me/entry/nodejs-experimental-modules
https://blog.hiroppy.me/entry/node-esm
http://var.blog.jp/archives/80335431.html
https://yosuke-furukawa.hatenablog.com/entry/2019/12/11/094404
最後に
(雑感)検証用のリポジトリはSlideShareのAPIを叩いています。ちょっとオーバーエンジニアリングな感じが見受けられますが何かの参考になれば良いと思います。
明日は@massaaaaanさんの『たった10行でOCR!RubyとGoogle Cloud Vision APIで飲食店のメニュー画像を文字認識してみた』です。
- 投稿日:2019-12-19T16:08:01+09:00
nodebrewのセットアップ&操作方法(Mac)
「nodebrew」とは?
Node.jsのバージョンを管理するツールです。
rbenvやpyenvのNode.js版と考えるとわかりやすいです。環境
- OS:macOS Mojave 10.14.6
- nodebrew:1.0.1
セットアップ
nodebrewのインストール
Homebrewからインストールします。
$ brew install nodebrewnodebrewの初期設定
nodebrew setupを実行するのみです。$ nodebrew setup Fetching nodebrew... Installed nodebrew in $HOME/.nodebrew ======================================== Export a path to nodebrew: export PATH=$HOME/.nodebrew/current/bin:$PATH ========================================出力内容に従って
~/.bash_profileに以下を追記し、パスを通します。.bash_profileexport NODEBREW_DIR="${HOME}/.nodebrew" if [ -d "${NODEBREW_DIR}" ]; then export PATH=$NODEBREW_DIR/current/bin:$PATH fi
PATHを$PATH:$NODEBREW_DIR/current/binのように書くと、MacにプリインストールされているNode.jsが優先されることがあるようです。
~/.bash_profileをリフレッシュします。$ source ~/.bash_profile操作方法
Node.jsのインストール
以下のコマンドを実行し、任意のバージョンのNode.jsをインストールします。
# インストールできるNode.jsのバージョンを確認する
$ nodebrew ls-remote
v0.0.1    v0.0.2    v0.0.3    v0.0.4    v0.0.5    v0.0.6
…
v12.0.0   v12.1.0   v12.2.0   v12.3.0   v12.3.1   v12.4.0   v12.5.0   v12.6.0
v12.7.0   v12.8.0   v12.8.1   v12.9.0   v12.9.1   v12.10.0  v12.11.0  v12.11.1
v12.12.0  v12.13.0  v12.13.1  v12.14.0

v13.0.0   v13.0.1   v13.1.0   v13.2.0   v13.3.0   v13.4.0   v13.5.0
…

# 最新版をインストールする
$ nodebrew install-binary v13.5.0
nodebrew setupを実行していないと、以下のエラーが発生します。$ nodebrew install-binary latest Fetching: https://nodejs.org/dist/v11.12.0/node-v11.12.0-darwin-x64.tar.gz Warning: Failed to create the file Warning: /Users/{ユーザー名}/.nodebrew/src/v11.12.0/node-v11.12.0-darwin-x64.tar Warning: .gz: No such file or directory 0.0% curl: (23) Failed writing body (0 != 1057) download failed: https://nodejs.org/dist/v11.12.0/node-v11.12.0-darwin-x64.tar.gzNode.jsのバージョン切替
nodebrew useコマンドでNode.jsのバージョンを設定します。$ nodebrew use v13.5.0Node.jsのバージョン確認
nodebrew listコマンドでインストールされているNode.jsの全バージョンを確認できます。
「current」が設定しているバージョンです。$ nodebrew list v13.5.0 current: v13.5.0実際のNode.jsのバージョンも確認します。
currentとバージョンが異なる場合、nodebrewでインストールしているNode.jsが使われていない可能性があります。$ node -v v13.5.0コラム:LTSとCurrent
Node.jsにはLTS(Long-term support)とCurrentがあります。
基本的に奇数バージョン(v11, 13など)はLTSにならないため、業務では偶数バージョン(v10, 12など)を使うことが多いと思います。
https://nodejs.org/ja/about/releases/2019/12/19現在、LTSの最新バージョンが12.14.0、Currentの最新バージョンが13.5.0です。
https://nodejs.org/ja/nodebrewでは
stableでLTSの最新バージョン、latestでCurrentの最新バージョンを指定できます。
つまり、業務でバージョンの細かい指定が不要ならnodebrew install-binary stableでインストールすればOKです。参考リンク
- 投稿日:2019-12-19T14:49:54+09:00
【執筆中】Aurora Data API を TypeScript + typeorm から 使う物語
リンク先として先んじて公開した、執筆中の記事です
概要
特定のツイートのリツイート情報をクローリングするツールを、以下の構成で実装した。
その過程で踏み抜いた、5000兆個くらいある落とし穴の倒し方を書き残す。
踏みすぎて疲れた。
- AWS
- Aurora Serverless (MySQL5.6)
- ServerlessFramework
- Lambda
- Node.js
- TypeScript
- typeorm
前提と関連記事
「Aurora Serverless DB を作って Node.js(TS) から使う」 を前提としています。
「Aurora Serverless MySQL(5.6) で日本語データを扱えるようにする」 も設定しています。typeormとは
TypeScript の class として Entity を定義すると、
自分でSQL書かなくても一通りなんでもできる OR Mapper だよ。
べんりだね!環境
Aurora エンジンAurora (MySQL)-5.6.10aAWS SDK2.590.0Node.jsv10.15.0npm6.6.0typeorm0.2.21typeorm-aurora-data-api-driver1.1.8- Serverless Framework
↓で作った serverless.yml
serverless create --template aws-nodejs-typescriptpackage.json
- 投稿日:2019-12-19T14:49:54+09:00
Aurora Data API を TypeScript + typeorm から 使う物語
概要
Rest API を経由してツイッターのリツイート情報を取得し、
Aurora DB に格納するサンプルツールtwittererを、以下の構成で実装した。その過程で 5000兆個くらいある落とし穴を踏み抜いたので倒し方を書こうと思ったが、
1日経ったら過程をほとんど忘れたのでちゃんと動く結果を主に書き残す。前提と関連記事
「Aurora Serverless DB を作って Node.js(TS) から使う」 を前提としています。
「Aurora Serverless MySQL(5.6) で日本語データを扱えるようにする」 も設定しています。typeormとは
TypeScript の class として Entity を定義すると、
自分でSQL書かなくても一通りなんでもできる OR Mapper だよ。TypeORMはNode.js開発のスタンダードになるか?
こちらの紹介記事がわかりやすいと思いました。
べんりだね!環境
Aurora エンジンAurora (MySQL)-5.6.10aAWS SDK2.590.0Node.jsv10.15.0npm6.6.0typeorm0.2.21typeorm-aurora-data-api-driver1.1.8Serverless Frameworkプロジェクトの構成と解説
主要な構成
twitterer/
├── serverless.yml
├── ormconfig.js    // typeormの設定ファイル
├── package.json
├── webpack.config.js
|
├── twitterer-handler.ts
└── src/
    ├── twitterer-express.ts
    ├── twitterer-service.ts
    ├── entities/
    |   └── twitterer-types.ts
    ├── helpers/
    |   └── typeorm-helper.ts
    └── db/    // typeormにより出力されたスクリプトが蓄積される
        ├── migrations/
        └── subscribers/
serverless.yml
基本的には以下でしたときのまま。
serverless create --template aws-nodejs-typescriptポリシーの設定
Lambda Role から Data API を使うために追加したポリシー。
必要なポリシーセットがわからず苦労していたserverless.ymlprovider: iamRoleStatements: - Effect: "Allow" Action: - "secretsmanager:GetSecretValue" - "secretsmanager:PutResourcePolicy" - "secretsmanager:PutSecretValue" - "secretsmanager:DeleteSecret" - "secretsmanager:DescribeSecret" - "secretsmanager:TagResource" Resource: "arn:aws:secretsmanager:*:*:secret:*" - Effect: "Allow" Action: - "dbqms:CreateFavoriteQuery" - "dbqms:DescribeFavoriteQueries" - "dbqms:UpdateFavoriteQuery" - "dbqms:DeleteFavoriteQueries" - "dbqms:GetQueryString" - "dbqms:CreateQueryHistory" - "dbqms:DescribeQueryHistory" - "dbqms:UpdateQueryHistory" - "dbqms:DeleteQueryHistory" - "rds-data:ExecuteSql" - "rds-data:ExecuteStatement" - "rds-data:BatchExecuteStatement" - "rds-data:BeginTransaction" - "rds-data:CommitTransaction" - "rds-data:RollbackTransaction" - "secretsmanager:CreateSecret" - "secretsmanager:ListSecrets" - "secretsmanager:GetRandomPassword" - "tag:GetResources" Resource: "arn:aws:rds:ap-northeast-1:XXXXXXXXXXXX:cluster:XXXXXXXXXXXX"webpack
そのまんまだと、なぜか
typeorm-aurora-data-api-driverがpackされなくてハマったので追記custom: webpack: webpackConfig: ./webpack.config.js includeModules: packagePath: package.json forceInclude: - typeorm-aurora-data-api-driverhandler
express で受けるので、以下のように書く
serverless.ymlfunctions: twitterer: handler: twitterer-handler.v1 events: - http: ANY / - http: "ANY /{proxy+}"package.json
scripts
package.json"scripts": { "debug": "$(npm bin)/ts-node-dev --clear --respawn ./twitterer-handler.ts", "migration:generate": "ts-node $(npm bin)/typeorm migration:generate -n migration", "migration:run": "ts-node $(npm bin)/typeorm migration:run " },dependencies
package.json"dependencies": { "aws-sdk": "^2.590.0", "body-parser": "^1.19.0", // expressで意図したrequest bodyを受け取るため "cors": "^2.8.5", // web viewから蹴ることも想定して "express": "^4.17.1", "serverless-http": "^2.3.0", "source-map-support": "^0.5.10", "twitter": "^1.7.1", "typeorm": "^0.2.21", "typeorm-aurora-data-api-driver": "^1.1.8" // typeormからData APIを使える }, "devDependencies": { "@types/aws-lambda": "^8.10.17", "@types/express": "^4.17.2", "@types/node": "^10.12.18", "@types/twitter": "^1.7.0", "@typescript-eslint/eslint-plugin": "^2.11.0", "@typescript-eslint/parser": "^2.11.0", "copy-webpack-plugin": "^5.1.1", // ormconfig.js をpackするために使う "eslint": "^6.7.2", "eslint-config-prettier": "^6.7.0", "eslint-plugin-prettier": "^3.1.1", "fork-ts-checker-webpack-plugin": "^3.0.1", "prettier": "^1.19.1", "serverless-webpack": "^5.2.0", "ts-loader": "^5.3.3", "ts-node-dev": "^1.0.0-pre.44", "typescript": "^3.2.4", "webpack": "^4.29.0", "webpack-node-externals": "^1.7.2" }webpack.config.js
そのままだと、
ormconfig.jsがpackされなくてハマったので、以下のように追記webpack.config.js// import 部分 const CopyWebpackPlugin = require("copy-webpack-plugin"); // plugins 部分 plugins: [ new CopyWebpackPlugin(["ormconfig.js"]), ],ormconfig.js
ormconfig.jsmodule.exports = { type: "aurora-data-api", region: "ap-northeast-1", // Aurora Serverless DB の arn resourceArn: "arn:aws:rds:ap-northeast-1:XXXXXXXXXXXX:cluster:XXXXXXXXXXXX", // DB にアクセスするために作った Secret の arn secretArn: "arn:aws:secretsmanager:ap-northeast-1:XXXXXXXXXXXX:secret:XXXXXXXXXXXX", // デフォルトでつなぐDB(schema) database: "twitterer", entities: [__dirname + "/src/entities/**/*.ts"], migrations: [__dirname + "/src/db/migrations/**/*.ts"], subscribers: [__dirname + "/src/db/subscribers/**/*.ts"], cli: { entitiesDir: "src/entities/", migrationsDir: "src/db/migrations/", subscribersDir: "src/db/subscribers/", }, };twitterer-handler.ts
twitterer-handler.tsimport "source-map-support/register"; import { TwittererExpress } from "./src/twitterer-express"; const serverless = require("serverless-http"); export const v1 = serverless(TwittererExpress);twitterer-express.ts
公開用に加工してます、エラーハンドリングとか適当なので許してちょ。
twitterer-express.tsimport bodyParser from "body-parser"; import cors from "cors"; import express, { Request, Router } from "express"; import { NextFunction, Response } from "express-serve-static-core"; import { RetweetEntity } from "./entities/twitterer-types"; import { TwittererService } from "./twitterer-service"; /** * initialize */ const { app, r } = (() => { TwittererService.init().then(); const app = express(); const r: Router = Router(); app.use(cors()); app.use(bodyParser.json()); app.use(r); // ローカル実行用 app.listen("8080", () => console.log(`Start listening on port 8080`)); return { app, r }; })(); export const TwittererExpress = app; /** * define routes */ const P = "/twitterer/v1"; r.post(`${P}/tweets/:tweetId/retweets/clawl`, clawlRetweet); r.get(`${P}/tweets/:tweetId/retweets`, getRetweets); /*****************************************************************/ async function clawlRetweet(req: Request, res: Response, next: NextFunction) { const { tweetId } = req.params; try { const retweets = await TwittererService.clawlRetweets(tweetId); res.status(200).send(retweets); next(); } catch (e) { console.error(e); res.status(424 /* failed dependency */).send(JSON.stringify(e)); } } async function getRetweets(req: Request, res: Response, next: NextFunction) { const { tweetId } = req.params; const retweets = await RetweetEntity.find({ where: { tweetId } }); const resRetweets = retweets.map(e => ({ retweetId: e.retweetId, userScreenName: e.userScreenName, userName: e.userName, })); res.status(200).send({ count: retweets.length, retweets: resRetweets, }); next(); }twitterer-service.ts
createConnection() で利用するすべての entities を指定しないと、
ローカルでは動いてもデプロイ後動かなくなるtwitterer-service.tsimport Twitter from "twitter"; import { BaseEntity, Connection, createConnection, getConnection, getConnectionOptions } from "typeorm"; import { TypeormHelper } from "./typeorm-helper"; import { RetweetEntity } from "./entities/twitterer-types"; export class TwittererService { /** * init aurora connnection */ static async init() { // 後述の TypeormHelper.patchBug(Connection); const connectionOptions = await getConnectionOptions(); const conn = await createConnection({ ...connectionOptions, // 利用するEntityをこうして書かないと、デプロイ後動かない。 // (entityがrepositoryに見つかりませんよ、みたいなエラー出る) entities: [RetweetEntity], }); BaseEntity.useConnection(conn); } static get client(): Twitter { return new Twitter({ consumer_key: "XXXXXXXXXX", consumer_secret: "XXXXXXXXXX", access_token_key: "XXXXXXXXXX", access_token_secret: "XXXXXXXXXX", }); } static async clawlRetweets(tweetId: string): Promise<RetweetEntity[]> { const clawledAt = new Date(); // 本当は保持していたカーソルの読み込みとかいろいろやってる const twitterRes = await this.client.get(`statuses/retweets/${tweetId}.json`, {}); const retweets: RetweetEntity[] = []; for (const e of twitterRes as any) { const retweet = new RetweetEntity(); retweet.tweetId = e.retweeted_status.id_str; retweet.retweetId = e.id_str; retweet.userId = e.user.id_str; retweet.userName = e.user.name; retweet.userScreenName = e.user.screen_name; retweet.retweetedAt = new Date(e.created_at); retweet.clawledAt = clawledAt; retweet.rawJson = e; retweets.push(retweet); } await getConnection().transaction(async e => { await e.save(retweets); // 本当はカーソルの更新とかいろいろやってる }); return retweets; } }typeorm-helper.ts
何故かデプロイ後動かない というエラーに悩まされた結果たどり着いたソリューション。
めっっっっちゃここでハマった。二度とハマりたくない
patch-packageを使おうとしたけどwebpackとの組み合わせに難航したのでモンキーパッチtypeorm-helper.tsimport { EntityMetadata, EntitySchema } from "typeorm"; export class TypeormHelper { /** * デプロイすると動かなくなる糞バグのモンキーパッチ * https://github.com/typeorm/typeorm/issues/3427 */ static patchBug(typeormConnection: any) { // this is a copypasta of the existing typeorm Connection method // with one line changed // @ts-ignore typeormConnection.prototype.findMetadata = function( target: Function | EntitySchema<any> | string ): EntityMetadata | undefined { // @ts-ignore return this.entityMetadatas.find(metadata => { // @ts-ignore if (metadata.target.name === target.name) { // in latest typeorm it is metadata.target === target return true; } if (target instanceof EntitySchema) { return metadata.name === target.options.name; } if (typeof target === "string") { if (target.indexOf(".") !== -1) { return metadata.tablePath === target; } else { return metadata.name === target || metadata.tableName === target; } } return false; }); }; } }twitterer-types.ts
typeormではlength指定なしの文字列カラムは varchar(255) となる。
こちらの記事でも触れたように、このままではキーカラム767bytes制限に阻まれて使うことができない。対策には、
- キーカラムの長さを短くするか、
- 上記記事の内容と合わせて テーブルに
ROW_FORMAT=DYNAMICを指定する必要がある。前者はめんどかったので後者で実現しようとしたが、typeorm には ROW_FORMAT を指定できない、なんてことだ
ということでSQLインジェクションをつかって無理やり解決twitterer-types.tsimport { BaseEntity, Column, Entity, PrimaryColumn } from "typeorm"; // typeormには ROW_FORMAT の指定オプションが無いため、 SQL インジェクションを使うクソリューション @Entity({ name: "retweet", engine: "InnoDB ROW_FORMAT=DYNAMIC" }) export class RetweetEntity extends BaseEntity { @PrimaryColumn() tweetId: string; @PrimaryColumn() retweetId: string; @Column() userId: string; @Column() userName: string; @Column() userScreenName: string; @Column() retweetedAt: Date; @Column() clawledAt: Date; // AuroraServerless は MySQL5.6 しか使えないため、実際はTEXT型になる // (JSON は MySQL5.7から) @Column("simple-json") rawJson: any; }マイグレーションSQLの生成と実行
npm run migration:generate
npm run migration:run
generateでできるスクリプト
現状のDBの状態とEntityの定義を比較し、差分を埋めるために必要なSQLを作ってくれる。
テーブルのない状態で実行するとCREATE文が生成される
あとはこれをgitで管理して環境ごとに適用したりして便利につかうわけですねさっきSQLインジェクションした
ROW_FORMAT=DYNAMICもしっかり入ってるねimport {MigrationInterface, QueryRunner} from "typeorm"; export class migration1576639222255 implements MigrationInterface { name = 'migration1576639222255' public async up(queryRunner: QueryRunner): Promise<any> { await queryRunner.query("CREATE TABLE `retweet` (`tweetId` varchar(255) NOT NULL, `retweetId` varchar(255) NOT NULL, `userId` varchar(255) NOT NULL, `userName` varchar(255) NOT NULL, `userScreenName` varchar(255) NOT NULL, `retweetedAt` datetime NOT NULL, `clawledAt` datetime NOT NULL, `rawJson` text NOT NULL, PRIMARY KEY (`tweetId`, `retweetId`)) ENGINE=InnoDB ROW_FORMAT=DYNAMIC", undefined); } public async down(queryRunner: QueryRunner): Promise<any> { await queryRunner.query("DROP TABLE `retweet`", undefined); } }ローカルで実行してみる
npm run debug
curl -X POST http://localhost:8080/twitterer/v1/tweets/<TWEET_ID>/clawl
curl -X GET http://localhost:8080/twitterer/v1/tweets/<TWEET_ID>
デプロイして確かめてみる
sls deploy
curl -X GET https://XXXXXXXX/twitterer/v1/tweets/<TWEET_ID>
まとめ
正直落とし穴踏みすぎて、全部網羅できたか覚えてない。
もし問題あれば教えて下さい。
普段はFirestoreとか使ってるんだけど
- 小規模ツールでいちいちfirebase プロジェクト増やすのめんどいな
- やっぱSQL使いたいときもあるよね
ってことで取り組んでみました。
typeorm使うと、自分でSQL書かなくていい!ちょう楽ちん!!
このテンプレートをつかって、今後の開発が爆速になりそう。
- 投稿日:2019-12-19T14:29:27+09:00
せっかくTypescriptなんだからJSONを自動でvalidationしよう(ajv+typescript-json-schema)
はじめに
- Validationコードを手で書きたくなかった
- JSON schemaを手書きしたくなかった(typescriptの型定義を使ってほしい)
国内外たくさんやってることだけど、真似しても使うのに時間がかかった。
最小構成のコードを書く。まず、Validationができてない状態とは?
index.tsinterface Cat { name: string, age: number } const catObj = JSON.parse('{"name":"tamago", "weight":2.0}'); const cat = catObj as Cat; console.log(cat.age); //undefined (Catのageはオプショナルじゃないのに!)さあ、validationしよう
- 実行前にtypescriptコードからtypescript-json-schemaでJSON schema(.json)を生成する
- 実行時にajvでJSON Schemaを読み込んで、JSONをvalidationする
1.実行前にtypescriptコードからtypescript-json-schemaでJSON schema(.json)を生成する
typescript-json-schemaをインストール
% npm install typescript-json-schema -gtypescriptコードからJSON schemaを生成
型情報が含まれるtypescriptファイル
cat.tsinterface Cat { name: string, age: number } export {Cat};cat.tsのCat型のスキーマをCatSchema.jsonに吐き出す
(cat.tsのように単独ファイルにしていなくてもいい)% typescript-json-schema --strictNullChecks true --noExtraProps true cat.ts Cat > CatSchema.json--strictNullChecks Make values non-nullable by default. [boolean] [default: false]
--noExtraProps Disable additional properties in objects by default. [boolean] [default: false]2. 実行時にajvでJSON Schemaを読み込んで、JSONをvalidationする
ajv他をインストール
% npm install ajv --save
% npm install @types/node --save-dev
% npm install @types/ajv --save-dev
コード全体
index.tsimport * as fs from 'fs' import * as Ajv from 'ajv'; import {Cat} from './cat' const myJSON = '{"name":"tamago", "weight":2.0}' const catObj = JSON.parse(myJSON); const ajv = new Ajv(); const catSchema = JSON.parse(fs.readFileSync('./CatSchema.json').toString()); const validate = ajv.compile(catSchema); if(validate(catObj)){ console.log('validation ok'); //安心してasを使おう const myCat = catObj as Cat; } else{ console.log('validation ng'); console.error(validate.errors); }実行
% ts-node index.ts validation ng [ { keyword: 'additionalProperties', dataPath: '', schemaPath: '#/additionalProperties', params: { additionalProperty: 'weight' }, message: 'should NOT have additional properties' } ]ts-node便利なのでよく使っています。
typescriptの型定義のオプショナルもちゃんと扱ってくれるようです。
まとめ
事前のJSON Schema生成はいるが、自動でvalidation環境が作れる。
丁寧な日本語メッセージを返したい場合は、ErrorObject型をアレコレしましょう。Typescriptの標準機能で欲しい。
- 投稿日:2019-12-19T12:30:18+09:00
C#でアクセストークン(JWT)を発行して、Node.js(Express)で検証する
SC(非公式)Advent Calendar 2019 の19日目です。
はじめに
最近JWT周りのなんやかんやを触る機会が多いです。
別の言語での取り回しなんかもできるのが、JWTでの検証の良いところだと思います。今回は.NetCore3.0で追加された 暗号化キーのインポート/エクスポートで、
RSAではなくECDsa(楕円暗号方式)で署名/検証しました。サーバー構成としては以下になります。
実行環境
OS: mac OS Mojave 10.14.6
IDE: VS2019 for Mac community 8.3.6
.NetCore: 3.1.100
node: 10.14.1
npm: 6.4.1
クライアント: POSTMAN余談ですが、MacでわざわざC#を触る人ってキチガイですよね~。
と、後輩に言われました。秘密鍵・公開鍵の作成
以下のコマンドで楕円曲線暗号方式で秘密鍵と公開鍵を作成します。
ssh-keygen -t ecdsa -b 256 -m PEM -f jwtES256.key
openssl ec -in jwtES256.key -pubout -outform PEM -out jwtES256.key.pub
C#でIDProviderを作成
JWTを発行するC#のプロジェクトを立ち上げます。
必要なパッケージとして
Microsoft.AspNetCore.Authentication.JwtBearer
を追加しています。# ワークフォルダ mkdir JwtSample cd JwtSample # ソリューションの作成 dotnet new sln # WebAPIテンプレートのプロジェクト作成 dotnet new webapi -o ./CSharpIDP # ソリューションにプロジェクトを追加 dotnet sln add ./CSharpIDP # JWTでの認証をするためにNugetパッケージを追加 dotnet add ./CSharpIDP package Microsoft.AspNetCore.Authentication.JwtBearerいざJWTを生成
まずは
AuthenticationControllerの全貌をさらします。AuthenticationController.csusing CSharpIDP.Utils; using Microsoft.AspNetCore.Mvc; using Microsoft.Extensions.Logging; using Microsoft.IdentityModel.Tokens; using System; using System.IdentityModel.Tokens.Jwt; using System.Security.Claims; using System.Security.Cryptography; using System.Threading.Tasks; namespace CSharpIDP.Controllers { [ApiController] [Route("[controller]")] public class AuthenticationController : ControllerBase { private readonly ILogger<AuthenticationController> _logger; public AuthenticationController(ILogger<AuthenticationController> logger) { _logger = logger; } [HttpPost] public async Task<IActionResult> Token([FromBody] LoginModel model) { var tokenString = await AuthenticateAsync(model); if (tokenString != "") { return Ok(new { token = tokenString }); } return Unauthorized(); } private async Task<string> AuthenticateAsync([FromBody] LoginModel model) { _logger.LogInformation("AuthenticateAsync"); var user = await FetchUserAsync(model.Email); // DB接続などを想定 if (user.Email == model.Email && user.Password == model.Password) { var tokenString = GenerateToken(user); return tokenString; } return ""; } private async Task<UserInfo> FetchUserAsync(string email) { _logger.LogInformation($"fetch user data by email={email}"); return await Task.Run(() => new UserInfo { UserId = 888, UserName = "jwtSignningUser", Email = "aaa@gmail.com", Password = "password", Groups = new int[] { 1, 2, 3 } }); } private string GenerateToken(UserInfo user) { var claims = new[] { new Claim(JwtRegisteredClaimNames.Jti, Guid.NewGuid().ToString()), new Claim(JwtRegisteredClaimNames.Sid, user.UserId.ToString()), new Claim(JwtRegisteredClaimNames.Sub, "JWT Sample for node.js"), new Claim(JwtRegisteredClaimNames.Email, user.Email) }; var pemStr = System.IO.File.ReadAllText(@"./jwtES256.key"); var der = StringUtil.ConvertX509PemToDer(pemStr); using var ecdsa = ECDsa.Create(); ecdsa.ImportECPrivateKey(der, out _); var key = new ECDsaSecurityKey(ecdsa); var creds = new SigningCredentials(key, SecurityAlgorithms.EcdsaSha256); var jwtHeader = new JwtHeader(creds); var jwtPayload = new JwtPayload( issuer: "https://localhost:5001/", audience: "https://localhost:3000/", claims: claims, notBefore: DateTime.Now, expires: DateTime.Now.AddMinutes(600), issuedAt: DateTime.Now ); var token = new JwtSecurityToken(jwtHeader, jwtPayload); return new JwtSecurityTokenHandler().WriteToken(token); } } public class LoginModel { public string Email { get; set; } = ""; public string Password { get; set; } = ""; } public class UserInfo { public int UserId { get; set; } public string? UserName { get; set; } public string? Email { get; set; } public string? Password { get; set; } public int[]? Groups { get; set; } } }ではでは、
GenerateTokenメソッドの解説をしていきますJWTのスキーマ
JWTは、RFC7519で定義されているスキーマを持っていて、大きく以下の3種類のスキーマ定義があります。詳しくはここのサイトが大変参考になります。(JSON Web Token(JWT)のClaimについて)
- Registered Claim Names
- Public Claim Names
- Private Claim Names
Registered Claim Names
Registered Claim Namesはあらかじめ決められた、「JWTならこれ持ってますよね」という定義です。
予約語 意味 役割 iss Issuer JWTの発行者。文字列かURIの形式 sub Subject JWTの用途。文字列かURIの形式 aud Audience JWTの利用者。文字列かURIの形式 exp Expiration Time JWTの失効する日時 nbf Not Before JWTが有効になる日時 iat Issued At JWTの発行日時 jti JWT ID JWTを一意な識別子。UUIDなどを入れるのが一般的 これらのスキーマ定義に則って、
JwtPayloadクラスの設定をしているのが、以下の部分です。var claims = new[] { new Claim(JwtRegisteredClaimNames.Jti, Guid.NewGuid().ToString()), new Claim(JwtRegisteredClaimNames.Sid, user.UserId.ToString()), new Claim(JwtRegisteredClaimNames.Sub, "JWT Sample for node.js"), new Claim(JwtRegisteredClaimNames.Email, user.Email) }; // ... 略 var jwtPayload = new JwtPayload( issuer: "https://localhost:5001/", audience: "http://localhost:3000/", claims: claims, notBefore: DateTime.Now, expires: DateTime.Now.AddMinutes(60), issuedAt: DateTime.Now );現在から有効な、
http://localhost:3000向けのJWTを発行しています。
有効期限は現在から1時間です。
実際のアプリではユーザーIDなどを入れると思いますので、Private Claim NamesとしてSid属性に入れています。ECDsaでの署名
今回は、どの言語でも汎用的に使用できるように、opensslで秘密鍵と公開鍵のファイルを作成しました。
もちろんC#のプログラムからキーの生成を行うこともできますが、PEMファイルを読み込むとき少しハマったので、ご紹介。// 秘密鍵ファイルの内容を取得 var pemStr = System.IO.File.ReadAllText(@"./jwtES256.key"); // PEM形式からbase64にデコード var der = StringUtil.ConvertX509PemToDer(pemStr); // ECDsaのインスタンス化 using var ecdsa = ECDsa.Create(); // der形式のデータをインポート ecdsa.ImportECPrivateKey(der, out _); // SecurityKeyインスタンス生成 var key = new ECDsaSecurityKey(ecdsa);ECDsaの
ImportECPrivateKeyメソッドはこんな定義になっているので、
ファイルの余分な部分を削除して、base64デコードして渡してあげないとダメです。
ですので、Utilクラスでこんな泥くさいことをやっています。
    public static byte[] ConvertX509PemToDer(string pemContents)
    {
      var base64 = pemContents
          .Replace("-----BEGIN EC PRIVATE KEY-----", string.Empty)
          .Replace("-----END EC PRIVATE KEY-----", string.Empty)
          .Replace("\r\n", string.Empty)
          .Replace("\n", string.Empty); // Windowsだったらこの行は不要かも
      return Convert.FromBase64String(base64);
    }
メールアドレス・パスワードでトークンを取得
POSTMANからメールアドレスとパスワードでアクセストークンを取得します。
定義 値 URL https://localhost:5001/authentication メソッド POST ヘッダー Content-Type:application/jsonBODY { "Email": "aaa@gmail.com", "Password": "password"}
DECsaの形式で署名されたJWTを取得できました。
Node.jsで検証サーバーを作成
つづいてはアクセストークンを検証するサーバーをNode.jsで作っていきます。
Expressのテンプレートを作成するexpress-generatorをグローバルインストールして、
適当なアプリを作成します。npm install -g express-generator # ワークディレクトリ mkdir Express cd Express # verifyappという名前で作成 express verifyapp -e cd verifyapp # パッケージをインストール npm i # JWTを扱うためのパッケージもインストール npm i jsonwebtoken # サーバー起動 npm startこれで
http://localhost:3000でサーバーが立つはずです。
app.jsは以下のコードを追加します。app.js// ... 略 + var jwt = require("jsonwebtoken"); + var fs = require('fs'); // ... 略 // ... 略 - app.use("/users", usersRouter); + app.use("/users", Authorize, usersRouter); + function Authorize(req, _, next) { + const authHeader = ParseAuthHeader(req.headers); + if (!authHeader) next(createError(401)); + const token = authHeader.value; + const publicKey = fs.readFileSync("./jwtES256.key.pub", { encoding: "utf8" + }); + const options = { + algorithms: ["ES256"] // 署名オプション + }; + const decodedToken = jwt.verify(token, publicKey, options); + if (typeof decodedToken !== "object") next(createError(401)); + req.token = decodedToken; + next(); + } + function ParseAuthHeader(headers) { + const AUTH_HEADER = "authorization"; + const regex = /(\S+)\s+(\S+)/; + if (!headers[AUTH_HEADER]) return undefined; + if (typeof headers[AUTH_HEADER] !== "string") return undefined; + const matches = headers[AUTH_HEADER].match(regex); + return matches && { scheme: matches[1], value: matches[2] }; + } // ... 略 module.exports = app;
Authorizeというミドルウェアを追加しています。
何をやっているか詳しく見ていくと、app.jsfunction Authorize(req, _, next) { // リクエストヘッダーのauthorizationヘッダーからベアラートークンを取得 const authHeader = ParseAuthHeader(req.headers); if (!authHeader) next(createError(401)); const token = authHeader.value; // 公開鍵ファイルを読み込み const publicKey = fs.readFileSync("./jwtES256.key.pub", { encoding: "utf8" }); const options = { algorithms: ["ES256"] // 署名アルゴリズムを指定 }; const decodedToken = jwt.verify(token, publicKey, options); if (typeof decodedToken !== "object") next(createError(401)); // トークンからペイロードの情報が取れたら、reqにtokenとして保存 req.token = decodedToken; next(); }userRouterの先の
user.jsファイルはこんな感じになっています。user.jsvar express = require('express'); var router = express.Router(); /* GET users listing. */ router.get('/', function(req, res, next) { res.send(`${req.token.sub}さんからのリクエストです(${req.token.sid})`); }); module.exports = router;では先ほど取得したトークン情報をauthorizationヘッダーに載せてアクセスしてみます。
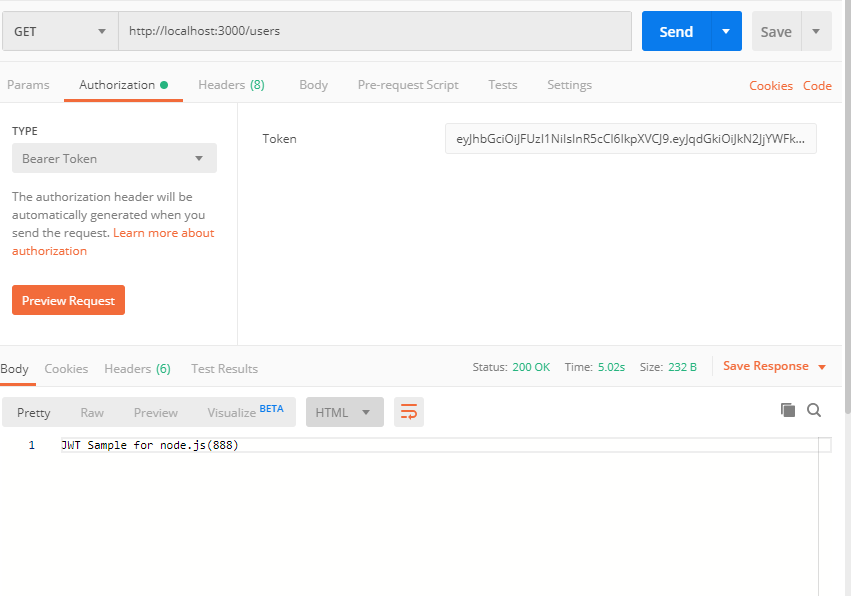
POSTMANでAuthorizationタブからBaerer Tokenを選択して、Tokenに先ほど取得したToken値を入れてGetでSendするだけです。
Tokenがなかった場合、きちんと401が返ってきます。
以上です。
C#での検証もためしてみたので、雑に載せときます。
Startup.csusing CSharpIDP.Utils; using Microsoft.AspNetCore.Authentication.JwtBearer; using Microsoft.AspNetCore.Builder; using Microsoft.AspNetCore.Hosting; using Microsoft.Extensions.Configuration; using Microsoft.Extensions.DependencyInjection; using Microsoft.Extensions.Hosting; using Microsoft.IdentityModel.Tokens; using System.IO; using System.Security.Cryptography; namespace CSharpIDP { public class Startup { public Startup(IConfiguration configuration) { Configuration = configuration; Ecdsa = ECDsa.Create(); } ~Startup() { Ecdsa.Dispose(); } public IConfiguration Configuration { get; } private ECDsa Ecdsa { get; } // This method gets called by the runtime. Use this method to add services to the container. public void ConfigureServices(IServiceCollection services) { var pemStr = File.ReadAllText(@"./jwtES256.key.pub"); var der = StringUtil.ConvertPubKeyToDer(pemStr); // 秘密鍵と同じことやってます Ecdsa.ImportSubjectPublicKeyInfo(der, out _); services.AddAuthentication(options => { options.DefaultAuthenticateScheme = JwtBearerDefaults.AuthenticationScheme; options.DefaultChallengeScheme = JwtBearerDefaults.AuthenticationScheme; }) .AddJwtBearer(options => { options.TokenValidationParameters = new TokenValidationParameters() { ValidateIssuer = true, ValidIssuer = "https://localhost:5001/", ValidateIssuerSigningKey = true, IssuerSigningKey = new ECDsaSecurityKey(Ecdsa), ValidateAudience = false, ValidateLifetime = false, }; }); services.AddControllers(); } // This method gets called by the runtime. Use this method to configure the HTTP request pipeline. public void Configure(IApplicationBuilder app, IWebHostEnvironment env) { if (env.IsDevelopment()) { app.UseDeveloperExceptionPage(); } app.UseHttpsRedirection(); app.UseRouting(); app.UseAuthentication(); // 追加 app.UseAuthorization(); app.UseEndpoints(endpoints => { endpoints.MapControllers(); }); } } }これで、認可したいControllerに
[Authorize]属性つければ、
認証のフィルターができるようになります。参考
.NET Core 3.0 の新機能
Embracing nullable reference types
JWT Signing using ECDSA in .NET Core



- 投稿日:2019-12-19T12:30:18+09:00
C#でJWTを発行して、Node.jsで検証する簡単なお仕事です
SC(非公式)Advent Calendar 2019 の19日目です。
はじめに
最近JWT周りのなんやかんやを触る機会が多いです。
別の言語での取り回しなんかもできるのが、JWTでの検証の良いところだと思います。今回は.NetCore3.0で追加された 暗号化キーのインポート/エクスポートで、
RSAではなくECDsa(楕円暗号方式)で署名/検証しました。サーバー構成としては以下になります。
実行環境
OS: mac OS Mojave 10.14.6
IDE: VS2019 for Mac community 8.3.6
.NetCore: 3.1.100
node: 10.14.1
npm: 6.4.1
クライアント: POSTMAN余談ですが、MacでわざわざC#を触る人ってキチガイですよね~。
と、後輩に言われました。秘密鍵・公開鍵の作成
以下のコマンドで楕円曲線暗号方式で秘密鍵と公開鍵を作成します。
ssh-keygen -t ecdsa -b 256 -m PEM -f jwtES256.key
openssl ec -in jwtES256.key -pubout -outform PEM -out jwtES256.key.pub
C#でIDProviderを作成
JWTを発行するC#のプロジェクトを立ち上げます。
必要なパッケージとして
Microsoft.AspNetCore.Authentication.JwtBearer
を追加しています。# ワークフォルダ mkdir JwtSample cd JwtSample # ソリューションの作成 dotnet new sln # WebAPIテンプレートのプロジェクト作成 dotnet new webapi -o ./CSharpIDP # ソリューションにプロジェクトを追加 dotnet sln add ./CSharpIDP # JWTでの認証をするためにNugetパッケージを追加 dotnet add ./CSharpIDP package Microsoft.AspNetCore.Authentication.JwtBearerいざJWTを生成
まずは
AuthenticationControllerを新しく作成します。
全貌がこちら。AuthenticationController.csusing CSharpIDP.Utils; using Microsoft.AspNetCore.Mvc; using Microsoft.Extensions.Logging; using Microsoft.IdentityModel.Tokens; using System; using System.IdentityModel.Tokens.Jwt; using System.Security.Claims; using System.Security.Cryptography; using System.Threading.Tasks; namespace CSharpIDP.Controllers { [ApiController] [Route("[controller]")] public class AuthenticationController : ControllerBase { private readonly ILogger<AuthenticationController> _logger; public AuthenticationController(ILogger<AuthenticationController> logger) { _logger = logger; } [HttpPost] public async Task<IActionResult> Token([FromBody] LoginModel model) { var tokenString = await AuthenticateAsync(model); if (tokenString != "") { return Ok(new { token = tokenString }); } return Unauthorized(); } private async Task<string> AuthenticateAsync([FromBody] LoginModel model) { _logger.LogInformation("AuthenticateAsync"); var user = await FetchUserAsync(model.Email); // DB接続などを想定 if (user.Email == model.Email && user.Password == model.Password) { var tokenString = GenerateToken(user); return tokenString; } return ""; } private async Task<UserInfo> FetchUserAsync(string email) { _logger.LogInformation($"fetch user data by email={email}"); return await Task.Run(() => new UserInfo { UserId = 888, UserName = "jwtSignningUser", Email = "aaa@gmail.com", Password = "password", Groups = new int[] { 1, 2, 3 } }); } private string GenerateToken(UserInfo user) { var claims = new[] { new Claim(JwtRegisteredClaimNames.Jti, Guid.NewGuid().ToString()), new Claim(JwtRegisteredClaimNames.Sid, user.UserId.ToString()), new Claim(JwtRegisteredClaimNames.Sub, "JWT Sample for node.js"), new Claim(JwtRegisteredClaimNames.Email, user.Email) }; var pemStr = System.IO.File.ReadAllText(@"./jwtES256.key"); var der = StringUtil.ConvertX509PemToDer(pemStr); using var ecdsa = ECDsa.Create(); ecdsa.ImportECPrivateKey(der, out _); var key = new ECDsaSecurityKey(ecdsa); var creds = new SigningCredentials(key, SecurityAlgorithms.EcdsaSha256); var jwtHeader = new JwtHeader(creds); var jwtPayload = new JwtPayload( issuer: "https://localhost:5001/", audience: "https://localhost:3000/", claims: claims, notBefore: DateTime.Now, expires: DateTime.Now.AddMinutes(600), issuedAt: DateTime.Now ); var token = new JwtSecurityToken(jwtHeader, jwtPayload); return new JwtSecurityTokenHandler().WriteToken(token); } } public class LoginModel { public string Email { get; set; } = ""; public string Password { get; set; } = ""; } public class UserInfo { public int UserId { get; set; } public string? UserName { get; set; } public string? Email { get; set; } public string? Password { get; set; } public int[]? Groups { get; set; } } }ではでは、
GenerateTokenメソッドの解説をしていきますJWTのスキーマ
JWTは、RFC7519で定義されているスキーマを持っていて、大きく以下の3種類のスキーマ定義があります。詳しくはここのサイトが大変参考になります。(JSON Web Token(JWT)のClaimについて)
- Registered Claim Names
- Public Claim Names
- Private Claim Names
Registered Claim Names
Registered Claim Namesはあらかじめ決められた、「JWTならこれ持ってますよね」という定義です。
予約語 意味 役割 iss Issuer JWTの発行者。文字列かURIの形式 sub Subject JWTの用途。文字列かURIの形式 aud Audience JWTの利用者。文字列かURIの形式 exp Expiration Time JWTの失効する日時 nbf Not Before JWTが有効になる日時 iat Issued At JWTの発行日時 jti JWT ID JWTを一意な識別子。UUIDなどを入れるのが一般的 これらのスキーマ定義に則って、
JwtPayloadクラスの設定をしているのが、以下の部分です。var claims = new[] { new Claim(JwtRegisteredClaimNames.Jti, Guid.NewGuid().ToString()), new Claim(JwtRegisteredClaimNames.Sid, user.UserId.ToString()), new Claim(JwtRegisteredClaimNames.Sub, "JWT Sample for node.js"), new Claim(JwtRegisteredClaimNames.Email, user.Email) }; // ... 略 var jwtPayload = new JwtPayload( issuer: "https://localhost:5001/", audience: "http://localhost:3000/", claims: claims, notBefore: DateTime.Now, expires: DateTime.Now.AddMinutes(60), issuedAt: DateTime.Now );現在から有効な、
http://localhost:3000向けのJWTを発行しています。
有効期限は現在から1時間です。
実際のアプリではユーザーIDなどを入れると思いますので、Private Claim NamesとしてSid属性に入れています。ECDsaでの署名
今回は、どの言語でも汎用的に使用できるように、opensslで秘密鍵と公開鍵のファイルを作成しました。
もちろんC#のプログラムからキーの生成を行うこともできますが、PEMファイルを読み込むとき少しハマったので、ご紹介。// 秘密鍵ファイルの内容を取得 var pemStr = System.IO.File.ReadAllText(@"./jwtES256.key"); // PEM形式からbase64にデコード var der = StringUtil.ConvertX509PemToDer(pemStr); // ECDsaのインスタンス化 using var ecdsa = ECDsa.Create(); // der形式のデータをインポート ecdsa.ImportECPrivateKey(der, out _); // SecurityKeyインスタンス生成 var key = new ECDsaSecurityKey(ecdsa);ECDsaの
ImportECPrivateKeyメソッドはこんな定義になっているので、
ファイルの余分な部分を削除して、base64デコードして渡してあげないとダメです。
ですので、Utilクラスでこんな泥くさいことをやっています。
    public static byte[] ConvertX509PemToDer(string pemContents)
    {
      var base64 = pemContents
          .Replace("-----BEGIN EC PRIVATE KEY-----", string.Empty)
          .Replace("-----END EC PRIVATE KEY-----", string.Empty)
          .Replace("\r\n", string.Empty)
          .Replace("\n", string.Empty); // Windowsだったらこの行は不要かも
      return Convert.FromBase64String(base64);
    }
メールアドレス・パスワードでトークンを取得
POSTMANからメールアドレスとパスワードでアクセストークンを取得します。
定義 値 URL https://localhost:5001/authentication メソッド POST ヘッダー Content-Type:application/jsonBODY { "Email": "aaa@gmail.com", "Password": "password"}
DECsaの形式で署名されたJWTを取得できました。
Node.jsで検証サーバーを作成
つづいてはアクセストークンを検証するサーバーをNode.jsで作っていきます。
Expressのテンプレートを作成するexpress-generatorをグローバルインストールして、
適当なアプリを作成します。npm install -g express-generator # ワークディレクトリ mkdir Express cd Express # verifyappという名前で作成 express verifyapp -e cd verifyapp # パッケージをインストール npm i # JWTを扱うためのパッケージもインストール npm i jsonwebtoken # サーバー起動 npm startこれで
http://localhost:3000でサーバーが立つはずです。
app.jsは以下のコードを追加します。app.js// ... 略 + var jwt = require("jsonwebtoken"); + var fs = require('fs'); // ... 略 // ... 略 - app.use("/users", usersRouter); + app.use("/users", Authorize, usersRouter); + function Authorize(req, _, next) { + const authHeader = ParseAuthHeader(req.headers); + if (!authHeader) next(createError(401)); + const token = authHeader.value; + const publicKey = fs.readFileSync("./jwtES256.key.pub", { encoding: "utf8" + }); + const options = { + algorithms: ["ES256"] // 署名オプション + }; + const decodedToken = jwt.verify(token, publicKey, options); + if (typeof decodedToken !== "object") next(createError(401)); + req.token = decodedToken; + next(); + } + function ParseAuthHeader(headers) { + const AUTH_HEADER = "authorization"; + const regex = /(\S+)\s+(\S+)/; + if (!headers[AUTH_HEADER]) return undefined; + if (typeof headers[AUTH_HEADER] !== "string") return undefined; + const matches = headers[AUTH_HEADER].match(regex); + return matches && { scheme: matches[1], value: matches[2] }; + } // ... 略 module.exports = app;
Authorizeというミドルウェアを追加しています。
何をやっているか詳しく見ていくと、app.jsfunction Authorize(req, _, next) { // リクエストヘッダーのauthorizationヘッダーからベアラートークンを取得 const authHeader = ParseAuthHeader(req.headers); if (!authHeader) next(createError(401)); const token = authHeader.value; // 公開鍵ファイルを読み込み const publicKey = fs.readFileSync("./jwtES256.key.pub", { encoding: "utf8" }); const options = { algorithms: ["ES256"] // 署名アルゴリズムを指定 }; const decodedToken = jwt.verify(token, publicKey, options); if (typeof decodedToken !== "object") next(createError(401)); // トークンからペイロードの情報が取れたら、reqにtokenとして保存 req.token = decodedToken; next(); }userRouterの先の
user.jsファイルはこんな感じになっています。user.jsvar express = require('express'); var router = express.Router(); /* GET users listing. */ router.get('/', function(req, res, next) { res.send(`${req.token.sub}さんからのリクエストです(${req.token.sid})`); }); module.exports = router;では先ほど取得したトークン情報をauthorizationヘッダーに載せてアクセスしてみます。
POSTMANでAuthorizationタブからBaerer Tokenを選択して、Tokenに先ほど取得したToken値を入れてGetでSendするだけです。
Tokenがなかった場合、きちんと401が返ってきます。
以上です。
C#での検証もためしてみたので、雑に載せときます。
Startup.csusing CSharpIDP.Utils; using Microsoft.AspNetCore.Authentication.JwtBearer; using Microsoft.AspNetCore.Builder; using Microsoft.AspNetCore.Hosting; using Microsoft.Extensions.Configuration; using Microsoft.Extensions.DependencyInjection; using Microsoft.Extensions.Hosting; using Microsoft.IdentityModel.Tokens; using System.IO; using System.Security.Cryptography; namespace CSharpIDP { public class Startup { public Startup(IConfiguration configuration) { Configuration = configuration; Ecdsa = ECDsa.Create(); } ~Startup() { Ecdsa.Dispose(); } public IConfiguration Configuration { get; } private ECDsa Ecdsa { get; } // This method gets called by the runtime. Use this method to add services to the container. public void ConfigureServices(IServiceCollection services) { var pemStr = File.ReadAllText(@"./jwtES256.key.pub"); var der = StringUtil.ConvertPubKeyToDer(pemStr); // 秘密鍵と同じことやってます Ecdsa.ImportSubjectPublicKeyInfo(der, out _); services.AddAuthentication(options => { options.DefaultAuthenticateScheme = JwtBearerDefaults.AuthenticationScheme; options.DefaultChallengeScheme = JwtBearerDefaults.AuthenticationScheme; }) .AddJwtBearer(options => { options.TokenValidationParameters = new TokenValidationParameters() { ValidateIssuer = true, ValidIssuer = "https://localhost:5001/", ValidateIssuerSigningKey = true, IssuerSigningKey = new ECDsaSecurityKey(Ecdsa), ValidateAudience = false, ValidateLifetime = false, }; }); services.AddControllers(); } // This method gets called by the runtime. Use this method to configure the HTTP request pipeline. public void Configure(IApplicationBuilder app, IWebHostEnvironment env) { if (env.IsDevelopment()) { app.UseDeveloperExceptionPage(); } app.UseHttpsRedirection(); app.UseRouting(); app.UseAuthentication(); // 追加 app.UseAuthorization(); app.UseEndpoints(endpoints => { endpoints.MapControllers(); }); } } }これで、認可したいControllerに
[Authorize]属性つければ、
認証のフィルターができるようになります。参考
.NET Core 3.0 の新機能
Embracing nullable reference types
JWT Signing using ECDSA in .NET Core
- 投稿日:2019-12-19T10:41:55+09:00
WASI (WebAssembly System Interface)のランタイム5種を動かす
はじめに
これは Node.js Advent Calendar 2019 の22日目の記事です。内容としてはNode.jsから遠いかもしれませんが、先日のJSConf.JP のLT発表のオマケとしてこちらに書かせていただきます。
WebAssembly と WASI
WebAssembly(WASM)は、ブラウザで実行できるバイナリーコードで、「同じコードを全てのマシンで高速、スケーラブル、安全に実行できる」ことを目指して作られています。その実行環境はブラウザを飛び出し、Node.jsでも直接利用できるようになりました。
現在のWASM自体は数値処理に特化していて、ファイルI/Oやユーザーインターフェイスについては直接利用はできません。ファイルやUIに関してはブラウザやNode.jsといった呼び出し元に処理を委ねることになります。
WASMをもっと色々な環境で利用するために、WebAssembly System Interface (WASI) という仕様が提案され、現在Bytecode Allianceという団体が活動しています。
WASIでは、POSIXのシステムコールに類似する、次の要素へのアクセスを提供します。
- ファイル
- ネットワーク
- クロック
- 乱数
WASIのランタイム
すでに複数のWASIランタイムが実装されていて、利用することができます。それぞれ特徴を持ったものになっています。
- wasmtime ... Rustで作られた、リファレンス実装的なランタイム
- Lucet ... CDNのFastlyが作っている、CDNのエッジサーバーでWASM/WASIを動かすためのランタイム
- WebAssembly Micro Runtime(WAMR) ... 組み込みデバイスで動かすことを前提とした軽量ランタイム
- https://github.com/bytecodealliance/wasm-micro-runtime
- JITは含まず、インタープリターだけを実装している
- WASMER ... パッケージマネージャーや、PHP/Rubyなどのスクリプト言語からの呼び出しも対応
また、Node.jsでもWASIをサポートする動きがでているようです。
- Node.js v13.3.0 Documentation WebAssembly System Interface (WASI)
先日のLT発表のときは wasmtime を利用していましたが、今回は他のランタイムも実行できるか試してみます。
前提環境
対象コード
こちらの記事「Node.js でつくる WASMコンパイラー - Extra1:WASIを使ってWASMを動かす」で作成した、fizzbuzzとフィボナッチ数列のJSコードをWASI対応のWASMにしたものを対象にします。内部ではWASIのAPIのfd_write()のみ利用しています。
- fizz buzz
- もとのJSコード ... sample/fizzbuzz_func.js
- ミニコンパイラーで生成したWATコード ... wasi_example/fizzbuzz_wasi.wat
- バイナリに変換したWASMコード ... wasi_example/fib_wasi.wasm
- フィボナッチ数列
- もとのJSコード ... sample/fib_func.js
- ミニコンパイラーで生成したWATコード ... wasi_example
- バイナリに変換したWASMコード ... wasi_example
実行環境
macOS Mojave 10.14.6 で環境構築、実行しました。(一部、macOSでの環境が作成できずに、Ubuntu 18.04を使っています)
WAT→WASMの変換
テキストフォーマットのWATから、バイナリフォーマットのWASMに変換するために、WebAssembly/wabt に含まれるwat2wasmを使いました。
インストール手順は次の通りです。cmakeが必要です。
$ git clone --recursive https://github.com/WebAssembly/wabt
$ cd wabt
$ mkdir build
$ cd build
$ cmake ..
$ cmake --build .
ビルド後、必要に応じてパスを通しておきます。
次のように変換すれば、テキスト形式からバイナリ形式のfizzbuzzz_wasi.wasmが生成されます。
$ wat2wasm fizzbuzz_wasi.wat※上記の対象コードは、バイナリに変換済みのものを用意してありますので、それを使えばwat2wasmは不要です。
wasmtime の場合
wasmtimeの環境作成
wasmtimeをビルドするには、RustとCargoが必要です。私がビルドした時は、version 0.7.0 でした。
$ git clone --recurse-submodules https://github.com/bytecodealliance/wasmtime.git
$ cd wasmtime
$ cargo build --release
$ ./target/release/wasmtime --version
0.7.0
wasmtimeでの実行
wasmtimeは、テキスト形式のWATとバイナリ形式のWASMの両方を動かすことができます。
$ wasmtime fizbuzz_wasi.wasm
1
2
Fizz
4
Buzz
Fizz
... 省略 ...
98
Fizz
Buzz
ちなみに wasmtime 自身のサイズは8 MBです。
Lucet の場合
- 記事: https://www.fastly.com/blog/announcing-lucet-fastly-native-webassembly-compiler-runtime
- GitHub: https://github.com/bytecodealliance/lucet
Lucetの環境作成
Lucetの環境をローカルに構築するには、Dockerが必要です。
$ git clone https://github.com/bytecodealliance/lucet.git
$ git submodule init
$ git submodule update
$ source devenv_setenv.sh
devenv_setenv.sh では、未作成ならコンテナをビルドし、起動します。コンテナ自体はUbuntuで、起動するとsleepで待ち状態に入るようです。また devenv_setenv.sh では必要なツール類にパスも通してくれます。
$ docker ps
CONTAINER ID        IMAGE               COMMAND                 CREATED             STATUS              PORTS               NAMES
c2xxxxxxxx94        lucet:latest        "/bin/sleep 99999999"   16 hours ago        Up 16 hours                             lucet
lucetでの実行
直接wasmを実行するのではなく一度lucetc-wasiで変換してからlucet-wasiで実行します。
ホストOS上で実行$ lucetc-wasi fizzbuzz_wasi.wasm -o fizzbuzz.so $ lucet-wasi fizzbuzz.solucetc-wasi, lucet-wasi自体はホストOS上(今回はmacOS)で動くシェルスクリプトで、コンテナの内部の lucetc-wasi, lucet-wasi を実行しています。
- ホストOS上の lucetc-wasi ... lucet/host/bin/lucetc-wasi (シェルスクリプト)
- ホストOS上の lucet-wasi ... lucet/host/bin/lucet-wasi(シェルスクリプト)
- コンテナ内の lucetc-wasi ... /opt/lucet/bin/lucetc-wasi (シェルクスリプト、最終的には同じディレクトリの lucetc を実行)
- コンテナ内の lucet-wasi ... /opt/lucet/bin/lucet-wasi (実行モジュール)
ちなみにlucetコンテナ内の lucet-wasi 自身のサイズは8 MBです。
WebAssembly Micro Runtime(WAMR) の場合
こちらは組み込みデバイスを想定して、JITコンパイラーを除外してインタープリターのみ実装しているそうです。
WAMRの環境作成
ドキュメントによると下記手順でMac用にビルドできるとのことですが、makeでエラーが出てしまいました。
macOS用のビルド手順$ git clone https://github.com/bytecodealliance/wasm-micro-runtime.git $ cd wasm-micro-runtime/ $ cd core/iwasm/products/darwin/ $ mkdir build $ cd build $ cmake .. $ makeそのため、今回は例外的にUbuntu 18.04でビルドして試しました。cmakeが必要です。
Ubuntu用のビルド手順$ sudo apt install lib32gcc-5-dev g++-multilib $ sudo apt install build-essential $ sudo apt install cmake $ $ git clone https://github.com/bytecodealliance/wasm-micro-runtime.git $ cd wasm-micro-runtime/ $ cd core/iwasm/products/linux/ $ mkdir build $ cd build $ cmake ..WAMRでの実行
先ほどのbuildディレクトリにiwasmという実行モジュールが出来ているので、それを使います。
$ ./iwasm fizzbuzz_wasi.wasmちなみにiwasm自身のサイズは226 KBでした。こちらはUbuntuなので他のmacOSの物と比較はできませんが、wasmtimeと一桁違うということは相当小さいですね。
WASMERの場合
名前が紛らわしいですが、WASMERというランタイムもあります。wapmというパッケージマネージャーを備えていたり、PHPやRubyといったスクリプト言語からWASMを実行するためのインタフェイスを提供していることが特徴です。
- サイト: https://wasmer.io/
- GitHub: https://github.com/wasmerio/wasmer
WASMERの環境作成
スクリプトを実行することで、セットアップができます。各種プラットフォーム向けのビルド済みバイナリが用意されているようです。ARM64向けのバイナリもあり、AWS a1.medium でも実行することができました。
$ curl https://get.wasmer.io -sSfL | sh
$ source ~/.wasmer/wasmer.sh
WASMERでの実行
先ほどのsource実行すると、wasmerにパスが通っているので、そのまま実行できます。
$ wasmer fizzbuzz_wasi.wasmwasmer自身のサイズは32 MBです。こちらはwasmtimeと比べて一桁大きいです。
Node.js の場合
タイムリーなことに、2019/12/3にリリースされたNode.js v13.3.0で、WASIが試験的にサポートされました。
Node.js v13.3での実行
wasiモジュールを利用し、WASMの実行環境として wasi.wasiImport を渡します。
run_wasi.js// node --experimental-wasi-unstable-preview0 run_wasi.js your_wasi.wasm 'use strict' const fs = require('fs'); const filename = process.argv[2]; // 対象とするwasmファイル名 console.warn('Loading wasm/wasi file: ' + filename); const { WASI } = require('wasi'); const wasi = new WASI({ args: process.argv, env: process.env, preopens: { //'/sandbox': '/some/real/path/that/wasm/can/access' } }); const importObject = { wasi_unstable: wasi.wasiImport }; (async () => { const wasm = await WebAssembly.compile(fs.readFileSync(filename)); const instance = await WebAssembly.instantiate(wasm, importObject); wasi.start(instance); })();wasi.wasiImportには、次のようにWASIのAPIの定義が含まれています。今回のサンプルで呼び出しているfd_write()も存在しています。
wasi.wasiImportの内容(抜粋)WASI { args_get: [Function: bound args_get], args_sizes_get: [Function: bound args_sizes_get], clock_res_get: [Function: bound clock_res_get], clock_time_get: [Function: bound clock_time_get], environ_get: [Function: bound environ_get], environ_sizes_get: [Function: bound environ_sizes_get], fd_advise: [Function: bound fd_advise], fd_allocate: [Function: bound fd_allocate], fd_close: [Function: bound fd_close], ... 省略 ... fd_write: [Function: bound fd_write], path_create_directory: [Function: bound path_create_directory], ... 省略 ... proc_exit: [Function: bound proc_exit], proc_raise: [Function: bound proc_raise], random_get: [Function: bound random_get], sched_yield: [Function: bound sched_yield], sock_recv: [Function: bound sock_recv], sock_send: [Function: bound sock_send], sock_shutdown: [Function: bound sock_shutdown] }まだ試験的なサポートなので、WASIの実行にはnode起動時に --experimental-wasi-unstable-preview0 オプションが必要です。
$ node --experimental-wasi-unstable-preview0 run_wasi.js fizzbuzz_wasi.wasm参考までにnode自体のサイズは67 MBでした。WASIの実行環境としては最重量級です。
まとめ
WASMを色々なOS上で実行するためのWASIのランタイムも徐々に増えてきまいた。今回WASI向けに生成した同一のWASMファイルが、5種のランタイム上で同じように動作することが確認できました。
使っているAPIがfd_write()だけなので、完全に互換性が確認されたわけではありませんが、同一バイナリを複数環境で動かすというWASM/WASIの理念が実装されていることが分かりました。ランタイムのサイズだけでなく、実行速度や実行中のメモリ使用量なども調べたいところですが、今回はそこまでやれませんでした。まだまだ改良が進むと予想されるので、定期的に比較すると面白そうです。