- 投稿日:2019-12-19T22:38:13+09:00
Wikipedia 読み上げ Android アプリを Jsoup + TextToSpeech で作った話
Android 開発初心者がアプリ開発をしてみた体験記です。なお、作成物はストア公開はしてないです
やったこと
- Kotlin で Activity 三つのアプリ作成
- Jsoup を利用したウェブページのロード、DOM 操作
- TextToSpeech を利用した読み上げ機能
ソースコードはこちら: https://github.com/negito6/WikipediaSpeech-Android
動機と機能
Android の読み上げ機能を使ってウェブページ全体を読み上げようとすると、読み上げにはちょっと邪魔な文字列が沢山あります。特に Wikipedia でいうと、メニューにある各種リンクのテキストや、細かい数字が載った表などです。
また、(端末によってなのか知らないのですが) Chrome 上で「全て選択」をすると選択範囲が変更できないため、読み上げアプリにコピペする文字列として長い文章を選択しづらいです。そこで、Wikipedia のページの文字列のうち、読んでほしいところだけを読み上げてくれるアプリを自作することに。
自分の Android 習熟度
(自己紹介みたいな話。)
仕事で数回、会社で出しているアプリに機能追加の仕事をしたことがあります。Android の初心者向けの本はバージョン3くらいの時代にさらっと読んだことがあるのですが、借り物の本だったし、概念を掴んだ程度。
いちからコードを作ってみたのは、勉強用に、activity のtemplate をちょっといじっただけのアプリをビルドしたことはありました。それくらいの初心者感です。
技術的なメモ(感想)
Android Studio
Android Studio をインストールしたのは通算で五回目くらいだと思うのですが、毎回変わっている気がしていつも困ります。今回はAVD Manager の場所が変わっていて、見つけるのに割と時間がかかりました。アプリ開発を始めるには、エミュレータのインストール、gradle sync、manifest など、相変わらず初心者にはハードルが高いなあと思います。
また、以前からLayout のGUI エディタがずっと苦手で、今回は新規アプリだし頑張ろうと思ってました。しかし、またしても挫折してしまいました。言語 (Kotlin)
現在の仕事でも使っているKotlinを採用。コードは少ないし書きやすいと思います。Android に関する技術ブログなどは当然 Java がサンプルになっているものがまだまだ多いので、プログラミング学び始めで Android 開発をする人は苦労しそうだなーと。
公式ドキュメントやググって出てきた Java のコードをはっつけるときは、当然 IDE の変換機能を使います。単に貼り付けるとよくエラーが出ますが、そのときに、IDE の変換能力の問題ではないと強く信じることが大切だと学びました。なぜかというと、よく考えれば、名前の間違いか、挿入場所を間違えてることがほとんどだからです。Jsoup
適当にググって出てきたので使いました。なので、定番かどうかは分からないです。
ページのロードも簡単にかけたし、DOM 操作も JavaScript ライクに簡単に書けたので良かったです。
TextToSpeech
読み上げを Start させてから状態変化によって呼ばれる callback を登録することができます。
エラー時に呼ばれる
onErrorが二つあって、errorCodeが受け取れる方と受け取れない方があるのですが、なぜかerrorCodeが結局受け取れず、ここはまだうまくいっていません。実装当初はエラーが発生して読み上げてくれないことがたくさん起きたのですが、おそらく読み上げできない文字列を含んでるんだろうと予測し、行を句点でひたすら分割することで乗り気っています。分解すると
- 読み上げたい文章を文字列の配列にして、一文ずつ渡す
- 現在読んでいる文のインデックスを外の変数に保持
- TextToSpeech に登録した finish のcallback がインデックスを一進める
- そのインデックスの文をまた読み上げる
ということをしています。どっかで詰まりそうなんですが、なぜか今のところきちんと回っています。気づいていないだけかも。
その他
Wikipedia の HTML
今回のアプリを作った視点からいうと、HTML の構造化が思ったよりもされてなくて面倒でした。MediaWiki? の何かがアップデートされてらすぐにこのアプリは動かなくなってしまいそうです。まあ、こんな用途に向けて作ってないと思うので、文句言う筋合いはありません。
ストア公開観点
個人的にはアイコンが一番のハードルなのでやってないです。加えてデザインとか、複数の Android バージョン対応とか。個人開発で公開までやる人は尊敬します。

- 投稿日:2019-12-19T19:23:50+09:00
Androidをfastlaneで配信しようとして沼にハマった
要点
Androidでfastlane使って配信しようとして上手くいかず、沼にハマったけど、
実際はコマンドによるビルドで失敗していた話。
JDK 8を使わないとダメだよという話。
(筆者はjdk-8u231-macosx-x64.dmgをインストールして解決)経緯
環境構築で、AndroidアプリをfastlaneによってbetaからDLできるような作りになっていた。
fastlane入れる。
fastlaneコマンドを叩く
はい!エラー!
fastlane_error$ bundle exec fastlane staging [✔] ? [14:31:08]: --- Step: Verifying fastlane version --- [14:31:08]: Your fastlane version 2.137.0 matches the minimum requirement of 1.109.0 ✅ [14:31:08]: The `generated_fastfile_id` action was deprecated, you can remove the line from your `Fastfile` [14:31:08]: --- Step: default_platform --- [14:31:08]: Driving the lane 'staging' ? [14:31:08]: --- Step: gradle --- [14:31:08]: $ /Users/anonymous/pjt/project-android/gradlew assemblebetadebug -p . [14:31:09]: ▸ > Configure project :app [14:31:09]: ▸ WARNING: Configuration 'compile' is obsolete and has been replaced with 'implementation' and 'api'. [14:31:09]: ▸ It will be removed at the end of 2018. For more information see: http://d.android.com/r/tools/update-dependency-configurations.html [14:31:09]: ▸ FAILURE: Build failed with an exception. [14:31:09]: ▸ * What went wrong: [14:31:09]: ▸ A problem occurred configuring project ':app'. [14:31:09]: ▸ > SDK location not found. Define location with an ANDROID_SDK_ROOT environment variable or by setting the sdk.dir path in your project's local properties file at '/Users/anonymous/pjt/project-android/local.properties'. [14:31:09]: ▸ * Try: [14:31:09]: ▸ Run with --stacktrace option to get the stack trace. Run with --info or --debug option to get more log output. Run with --scan to get full insights. [14:31:09]: ▸ * Get more help at https://help.gradle.org [14:31:09]: ▸ Deprecated Gradle features were used in this build, making it incompatible with Gradle 6.0. [14:31:09]: ▸ Use '--warning-mode all' to show the individual deprecation warnings. [14:31:09]: ▸ See https://docs.gradle.org/5.1.1/userguide/command_line_interface.html#sec:command_line_warnings [14:31:09]: ▸ BUILD FAILED in 0s +-------------------+---------+ | Lane Context | +-------------------+---------+ | DEFAULT_PLATFORM | android | | PLATFORM_NAME | | | LANE_NAME | staging | | GRADLE_BUILD_TYPE | debug | | GRADLE_FLAVOR | beta | +-------------------+---------+ [14:31:10]: Exit status of command '/Users/anonymous/pjt/project-android/gradlew assemblebetadebug -p .' was 1 instead of 0. > Configure project :app WARNING: Configuration 'compile' is obsolete and has been replaced with 'implementation' and 'api'. It will be removed at the end of 2018. For more information see: http://d.android.com/r/tools/update-dependency-configurations.html FAILURE: Build failed with an exception. * What went wrong: A problem occurred configuring project ':app'. > SDK location not found. Define location with an ANDROID_SDK_ROOT environment variable or by setting the sdk.dir path in your project's local properties file at '/Users/anonymous/pjt/project-android/local.properties'. * Try: Run with --stacktrace option to get the stack trace. Run with --info or --debug option to get more log output. Run with --scan to get full insights. * Get more help at https://help.gradle.org Deprecated Gradle features were used in this build, making it incompatible with Gradle 6.0. Use '--warning-mode all' to show the individual deprecation warnings. See https://docs.gradle.org/5.1.1/userguide/command_line_interface.html#sec:command_line_warnings BUILD FAILED in 0s +------+----------------------------+-------------+ | fastlane summary | +------+----------------------------+-------------+ | Step | Action | Time (in s) | +------+----------------------------+-------------+ | 1 | Verifying fastlane version | 0 | | 2 | default_platform | 0 | | ? | gradle | 1 | +------+----------------------------+-------------+ [14:31:10]: fastlane finished with errors Looking for related GitHub issues on fastlane/fastlane... ####################################################################### # fastlane 2.138.0 is available. You are on 2.137.0. # You should use the latest version. # Please update using `bundle update fastlane`. ####################################################################### 2.138.0 Improvements * [action] fix app_store_build_number so it works with macOS builds. (#15688) via Michael Block * [supply] support default changelog (#15701) via Janic Duplessis * [spaceship] add basic support for retrieving TestFlight Feedback screenshots via ConnectAPI (#15793) via Max Ott * [supply] fix supply error when no tracks are returned (#15799) via Michael Collins * [spaceship] ignore corrupted cookie file (#15809) via ubamrein * [action] register_devices: More useful error message for invalid device files (#15801) via Alex Ghiculescu * [gemspec] ensure excon version is at least 0.71.0 (CVE-2019-16779) (#15812) via Rajiv Shah * [action] make xcode_select action's details clearer (#15579) via Iulian Onofrei * [spaceship] fix language list retrieving (#15572) via mugabe * [match] add bearer authentication support for git (#15722) via Vasco Gonçalves * [action] get_version_number: Supports when INFOPLIST_FILE is specified as an absolute path (#15738) via Yoon Joonghyun * [action] fix with new default parameter for increment version (#15737) via Adam * [action] verify_build: remove extraneous quote (#15758) via Nick Hodapp * [gemspec] change xcodeproj dependency to be 1.13.0 minimum (#15728) via Hannes Oud * [action] add the BITRISE_IO env var to the is_ci check. (#15716) via Sebastian Hubrich * [screenscrab] use AdbHelper instead of duplicated code (#15402) via Jan Piotrowski Please update using `bundle update fastlane` bundler: failed to load command: fastlane (/Users/anonymous/.rbenv/versions/2.4.4/bin/fastlane) FastlaneCore::Interface::FastlaneShellError: [!] Exit status of command '/Users/anonymous/pjt/project-android/gradlew assemblebetadebug -p .' was 1 instead of 0. > Configure project :app WARNING: Configuration 'compile' is obsolete and has been replaced with 'implementation' and 'api'. It will be removed at the end of 2018. For more information see: http://d.android.com/r/tools/update-dependency-configurations.html FAILURE: Build failed with an exception. * What went wrong: A problem occurred configuring project ':app'. > SDK location not found. Define location with an ANDROID_SDK_ROOT environment variable or by setting the sdk.dir path in your project's local properties file at '/Users/anonymous/pjt/project-android/local.properties'. * Try: Run with --stacktrace option to get the stack trace. Run with --info or --debug option to get more log output. Run with --scan to get full insights. * Get more help at https://help.gradle.org Deprecated Gradle features were used in this build, making it incompatible with Gradle 6.0. Use '--warning-mode all' to show the individual deprecation warnings. See https://docs.gradle.org/5.1.1/userguide/command_line_interface.html#sec:command_line_warnings BUILD FAILED in 0s /Users/anonymous/.rbenv/versions/2.4.4/lib/ruby/gems/2.4.0/gems/fastlane-2.137.0/fastlane_core/lib/fastlane_core/ui/interface.rb:153:in `shell_error!' /Users/anonymous/.rbenv/versions/2.4.4/lib/ruby/gems/2.4.0/gems/fastlane-2.137.0/fastlane_core/lib/fastlane_core/ui/ui.rb:17:in `method_missing' /Users/anonymous/.rbenv/versions/2.4.4/lib/ruby/gems/2.4.0/gems/fastlane-2.137.0/fastlane/lib/fastlane/helper/sh_helper.rb:80:in `sh_control_output' /Users/anonymous/.rbenv/versions/2.4.4/lib/ruby/gems/2.4.0/gems/fastlane-2.137.0/fastlane/lib/fastlane/helper/gradle_helper.rb:32:in `trigger' /Users/anonymous/.rbenv/versions/2.4.4/lib/ruby/gems/2.4.0/gems/fastlane-2.137.0/fastlane/lib/fastlane/actions/gradle.rb:56:in `run' /Users/anonymous/.rbenv/versions/2.4.4/lib/ruby/gems/2.4.0/gems/fastlane-2.137.0/fastlane/lib/fastlane/runner.rb:256:in `block (2 levels) in execute_action' /Users/anonymous/.rbenv/versions/2.4.4/lib/ruby/gems/2.4.0/gems/fastlane-2.137.0/fastlane/lib/fastlane/actions/actions_helper.rb:50:in `execute_action' /Users/anonymous/.rbenv/versions/2.4.4/lib/ruby/gems/2.4.0/gems/fastlane-2.137.0/fastlane/lib/fastlane/runner.rb:235:in `block in execute_action' /Users/anonymous/.rbenv/versions/2.4.4/lib/ruby/gems/2.4.0/gems/fastlane-2.137.0/fastlane/lib/fastlane/runner.rb:227:in `chdir' /Users/anonymous/.rbenv/versions/2.4.4/lib/ruby/gems/2.4.0/gems/fastlane-2.137.0/fastlane/lib/fastlane/runner.rb:227:in `execute_action' /Users/anonymous/.rbenv/versions/2.4.4/lib/ruby/gems/2.4.0/gems/fastlane-2.137.0/fastlane/lib/fastlane/runner.rb:157:in `trigger_action_by_name' /Users/anonymous/.rbenv/versions/2.4.4/lib/ruby/gems/2.4.0/gems/fastlane-2.137.0/fastlane/lib/fastlane/fast_file.rb:159:in `method_missing' Fastfile:20:in `block in parsing_binding' /Users/anonymous/.rbenv/versions/2.4.4/lib/ruby/gems/2.4.0/gems/fastlane-2.137.0/fastlane/lib/fastlane/lane.rb:33:in `call' /Users/anonymous/.rbenv/versions/2.4.4/lib/ruby/gems/2.4.0/gems/fastlane-2.137.0/fastlane/lib/fastlane/runner.rb:49:in `block in execute' /Users/anonymous/.rbenv/versions/2.4.4/lib/ruby/gems/2.4.0/gems/fastlane-2.137.0/fastlane/lib/fastlane/runner.rb:45:in `chdir' /Users/anonymous/.rbenv/versions/2.4.4/lib/ruby/gems/2.4.0/gems/fastlane-2.137.0/fastlane/lib/fastlane/runner.rb:45:in `execute' /Users/anonymous/.rbenv/versions/2.4.4/lib/ruby/gems/2.4.0/gems/fastlane-2.137.0/fastlane/lib/fastlane/lane_manager.rb:56:in `cruise_lane' /Users/anonymous/.rbenv/versions/2.4.4/lib/ruby/gems/2.4.0/gems/fastlane-2.137.0/fastlane/lib/fastlane/command_line_handler.rb:36:in `handle' /Users/anonymous/.rbenv/versions/2.4.4/lib/ruby/gems/2.4.0/gems/fastlane-2.137.0/fastlane/lib/fastlane/commands_generator.rb:108:in `block (2 levels) in run' /Users/anonymous/.rbenv/versions/2.4.4/lib/ruby/gems/2.4.0/gems/commander-fastlane-4.4.6/lib/commander/command.rb:178:in `call' /Users/anonymous/.rbenv/versions/2.4.4/lib/ruby/gems/2.4.0/gems/commander-fastlane-4.4.6/lib/commander/command.rb:153:in `run' /Users/anonymous/.rbenv/versions/2.4.4/lib/ruby/gems/2.4.0/gems/commander-fastlane-4.4.6/lib/commander/runner.rb:476:in `run_active_command' /Users/anonymous/.rbenv/versions/2.4.4/lib/ruby/gems/2.4.0/gems/fastlane-2.137.0/fastlane_core/lib/fastlane_core/ui/fastlane_runner.rb:76:in `run!' /Users/anonymous/.rbenv/versions/2.4.4/lib/ruby/gems/2.4.0/gems/commander-fastlane-4.4.6/lib/commander/delegates.rb:15:in `run!' /Users/anonymous/.rbenv/versions/2.4.4/lib/ruby/gems/2.4.0/gems/fastlane-2.137.0/fastlane/lib/fastlane/commands_generator.rb:349:in `run' /Users/anonymous/.rbenv/versions/2.4.4/lib/ruby/gems/2.4.0/gems/fastlane-2.137.0/fastlane/lib/fastlane/commands_generator.rb:41:in `start' /Users/anonymous/.rbenv/versions/2.4.4/lib/ruby/gems/2.4.0/gems/fastlane-2.137.0/fastlane/lib/fastlane/cli_tools_distributor.rb:119:in `take_off' /Users/anonymous/.rbenv/versions/2.4.4/lib/ruby/gems/2.4.0/gems/fastlane-2.137.0/bin/fastlane:23:in `<top (required)>' /Users/anonymous/.rbenv/versions/2.4.4/bin/fastlane:23:in `load' /Users/anonymous/.rbenv/versions/2.4.4/bin/fastlane:23:in `<top (required)>'解決
結局
JDK 8使わなきゃいけないところ、JDK 13を使ってることでどハマりしてた。gradleで死んでるし、そのあたりを検索したり、fastlane使ってるからそこを検索していたけど、fastlane+Androidの情報自体少ないし…怪しい単語で検索しまくって丸1日浪費してた。
そしてもう1度エラー内容見て、fastlane関係なくターミナルからコマンドビルドがそもそもダメじゃない?って思い至って、検索したらJDK 8云々って出てくるので、試したら成功したという話。
- 投稿日:2019-12-19T18:34:47+09:00
Flutterで作ったアプリをfastlane+App Distributionで配信する(Android編)
iOS編の続き。AndroidもローカルからApp Distributionに配信できるようにする。
1.環境を分けてビルド
Androidの方はめちゃくちゃ簡単で、この記事を参考にgradleで設定すれば問題なくできる。flavorはiOSの側と合わせておく。
https://medium.com/flutter-community/flutter-ready-to-go-e59873f9d7de2.fastlaneのインストール
iOS編でインストールしているのでスキップ。
3.Fastfileを作る
flavorを分けたら、それに合わせてFlutterでビルドする。App DistributionではAppBundleに対応していないので、apkで出力する。
テストする端末に合わせて32bit版と64bit版両方欲しかったので、オプションに--split-per-abiも追加する。$ flutter build apk --split-per-abi --release --flavor staging --target lib/main_staging.dart $ cd android $ fastlane init
fastlane/Fastfileとfastlane/Appfileができるので、Appfileのpackage_nameを確認しておく。今回はスキップしたけど、GooglePlayStoreにアップしたい場合は、GooglePlayConsoleからjson_key_fileを用意する。
https://docs.fastlane.tools/getting-started/android/setup/#collect-your-google-credentials4.Firebase App Distributionにアップする
androidの側でもfirebase_app_distributionプラグインをインストールする。途中、Gemfileを作るか聞かれるので"y"と答えておく。
$ fastlane add_plugin firebase_app_distribution
GemfileとGemfile.lock、fastlane/Pluginfileが作成される。あとはFastfileにfirebase_app_distributionのアクションを追加する。default_platform(:android) platform :android do desc "Submit a new Staging Build to Firebase AppDistribution" lane :staging do firebase_app_distribution( app: "(Firebase上のアプリ ID)", groups: "dev", release_notes: "from fastlane (32bit)", apk_path: "../build/app/outputs/apk/staging/release/app-staging-armeabi-v7a-release.apk", firebase_cli_path: `which firebase`.strip() ) firebase_app_distribution( app: "(Firebase上のアプリ ID)", groups: "dev", release_notes: "from fastlane (64bit)", apk_path: "../build/app/outputs/apk/staging/release/app-staging-arm64-v8a-release.apk", firebase_cli_path: `which firebase`.strip() ) end endapkの出力自体はすでにFlutterで行っているので、firebase_app_distributionの
apk_pathに出力されたapkのパスを渡してある。firebase_app_distributionの実行にfirebase-toolsのバージョン7.4.0以上が必要なので、インストールする。今回はローカルからのアップなので、Firebaseへのログインもしておく。
すでにインストールしている場合はここはスキップする。$ npm install -g firebase-tools $ firebase login以上で準備は整ったので、fastlaneを実行する。Gemfileを作ったので、
bundle execから起動する。$ bundle exec fastlane stagingおわり
iOS編と同様に、App Distributionに配信できるようになった。
次はGithub Actionsでビルドしたり、GooglePlayにアップできるようにもしたいところ。
- 投稿日:2019-12-19T18:12:51+09:00
Canvas: trying to draw too largeで落ちる
こんなエラーが出て落ちる
java.lang.RuntimeException: Canvas: trying to draw too large(******bytes) bitmap.
drawableに大きい画像があると出るそうですが、なかった。
代わりに、AndroidManifest.xmlの内に
android:hardwareAccelerated="false"を入れたら直りました。
- 投稿日:2019-12-19T18:01:53+09:00
AndroidでスイッチUIの実装をいくつか比較検討してみた
つくりたかった物
デザイナーさんからZeplinでいただいていたイメージ
これをどうやってつくるかプロトタイプを作成しながら比較検討しました。onDrawでCanvasに書いていく
概要
AndroidのViewをカスタムする時にonDrawというメソッドの中で、
Canvasに独自で丸やテキストを書いたりする事でUIを再現する。内部でホバーがどこに表示されているかを計算して、ジェスチャーに応じて描画に反映して
再描画する。コード
package inc.azit.android.gesturelearning

import android.content.Context
import android.graphics.*
import android.graphics.drawable.Drawable
import android.util.AttributeSet
import android.util.Log
import android.view.GestureDetector
import android.view.MotionEvent
import android.view.View
import android.util.DisplayMetrics
import android.util.TypedValue

class CustomSwitcherView : View {

    private var ratio: Double = 0.0
    private val switchColor: Int
        get() = Color.argb(255, (255 * this.ratio).toInt(), 0, (255 * (1.0 - this.ratio)).toInt())
    private val hoverWidth: Int
        get() {
            return (width * 0.5).toInt()
        }
    private val contentWidth: Int
        get() {
            return width - paddingLeft - paddingRight
        }
    private val contentHeight: Int
        get() {
            return height - paddingTop - paddingBottom
        }
    private val hoverLeft: Int
        get() {
            return  (contentWidth / 2 * this.ratio).toInt()
        }

    private var draggingHover: Boolean = false

    lateinit var discontentDrawable: Drawable
    lateinit var goodDrawable: Drawable

    constructor(context: Context) : super(context) {
        init(context, null, 0)
    }

    constructor(context: Context, attrs: AttributeSet) : super(context, attrs) {
        init(context, attrs, 0)
    }

    constructor(context: Context, attrs: AttributeSet, defStyle: Int) : super(context, attrs, defStyle) {
        init(context, attrs, defStyle)

    }

    private fun init(context: Context, attrs: AttributeSet?, defStyle: Int) {

        this.discontentDrawable = context.resources.getDrawable(R.drawable.ic_discontent)
        this.goodDrawable = context.resources.getDrawable(R.drawable.ic_good)

        val gestureDetector = GestureDetector(context, object: GestureDetector.OnGestureListener {
            override fun onShowPress(p0: MotionEvent?) {
            }

            override fun onSingleTapUp(event: MotionEvent): Boolean {
                return false
            }

            override fun onDown(p0: MotionEvent): Boolean {
                onDownEvent(p0)
                return true
            }

            override fun onFling(p0: MotionEvent?, p1: MotionEvent?, p2: Float, p3: Float): Boolean {
                return false
            }

            override fun onScroll(scrollStart: MotionEvent, currentScroll: MotionEvent, distanceX: Float, distanceY: Float): Boolean {
                onScrollEvent(scrollStart, currentScroll, distanceX.toDouble())
                return true
            }

            override fun onLongPress(p0: MotionEvent?) {
            }
        })

        setOnTouchListener(object: View.OnTouchListener {
            override fun onTouch(p0: View, p1: MotionEvent): Boolean {
                if (p1.action == MotionEvent.ACTION_UP) {
                    onUp(p1)
                    return true
                } else {
                    return gestureDetector.onTouchEvent(p1)
                }
            }
        })
    }

    fun setRatio(newRatio: Double) {
        if (newRatio < 0.0 || newRatio > 1.0) {
            throw RuntimeException("Ratio out bounds: $newRatio")
        }
        this.ratio = newRatio
        invalidate()
    }

    private fun onDownEvent(event: MotionEvent) {
        this.draggingHover = inHoverArea(event.x.toInt())
    }

    private fun onUp(event: MotionEvent) {
        var newRatio: Double = (event.x.toDouble() / width.toDouble()).coerceIn(0.0, 1.0)
        if (newRatio < 0.5) {
            newRatio = 0.0
        } else {
            newRatio = 1.0
        }
        setRatio(newRatio)
        this.draggingHover = false
    }

    private fun onScrollEvent(scrollStartAt: MotionEvent, scrollingAt: MotionEvent, distanceX: Double) {
        if (draggingHover) {
            Log.d("switcher", "distanceX: $distanceX, width / 2: ${width.toDouble() / 2}")
            val ratioDiff: Double = (distanceX * -1) / (width.toDouble() / 2.0)
            Log.d("switcher", "Ratio diff: $ratioDiff")
            var newRatio: Double = (ratioDiff + ratio).coerceIn(0.0, 1.0)
            setRatio(newRatio)
        }
    }

    private fun inHoverArea(x: Int): Boolean {
        return hoverLeft <= x && x <= (hoverLeft + hoverWidth)
    }

    private fun dp2px(dp: Float): Int {
        val metrics = context.resources.displayMetrics
        return (dp * metrics.density).toInt()
    }

    private fun sp2px(sp: Float): Int {
        return TypedValue.applyDimension(TypedValue.COMPLEX_UNIT_SP, sp, context.resources.displayMetrics).toInt()
    }

    override fun onDraw(canvas: Canvas) {
        super.onDraw(canvas)

        val metrics = context.resources.displayMetrics

        //Draw Background
        val bgPaint = Paint()
        bgPaint.color = Color.WHITE
        canvas.drawCircle((height / 2).toFloat(), (height / 2).toFloat(), (height / 2).toFloat(), bgPaint)
        canvas.drawCircle((width - height / 2).toFloat(), (height / 2).toFloat(), (height / 2).toFloat(), bgPaint)
        canvas.drawRect(Rect((height / 2).toInt(), 0, width - (height / 2), height), bgPaint)

        /*
         * Draw Hover
         */
        val hoverPaint = Paint()
        hoverPaint.color = switchColor

        val hoverHeight: Int = (height * 0.8).toInt()
        val hoverTop: Int = (height * 0.1).toInt()
        val hoverWidth: Int = contentWidth / 2 - (height - hoverHeight) / 2
        val hoverLeft: Int = ((contentWidth / 2 - (height - hoverHeight) / 2) * this.ratio).toInt() + (height - hoverHeight) / 2
        val hoverRight: Int = hoverLeft + hoverWidth
        val hoverRadius: Int = hoverHeight / 2

        //Draw Hover Left Cap
        canvas.drawCircle(
            (hoverLeft + hoverHeight / 2).toFloat(),
            (height / 2.0).toFloat(),
            hoverRadius.toFloat(),
            hoverPaint)
        //Draw Hover Right Cap
        canvas.drawCircle(
            ((hoverLeft + hoverWidth) - hoverHeight / 2).toFloat(),
            (height / 2.0).toFloat(),
            hoverRadius.toFloat(),
            hoverPaint
        )
        //Draw Hover Body
        canvas.drawRect(
            Rect(
                (hoverLeft + hoverHeight / 2),
                hoverTop,
                hoverRight - hoverHeight / 2,
                hoverTop + hoverHeight
                ),
            hoverPaint
        )

        /*
         * Draw Left Icon
         */
        goodDrawable.setBounds(
            dp2px(20F),
            dp2px(12F),
            dp2px(20F + 24F),
            dp2px(12F + 24F))
        goodDrawable.draw(canvas)

        /*
         * Draw Left Text
         */
        val textPaint = Paint()
        textPaint.color = Color.WHITE
        textPaint.textSize = sp2px(14F).toFloat()
        canvas.drawText("良かった", dp2px(20F + 24F + 4F).toFloat(), dp2px(33F).toFloat(), textPaint)
    }
}
良い点
- 単なるグラフィックの描画なので、 スムーズにジェスチャに追従する事ができる。
- 色の変化等も直接描画しているために、コントロールしやすい。
悪い点
- 円やテキストを独自で書く事になるため、レイアウトや座標系の管理を計算して実施する必要があり、画面のレイアウト構築が困難。
- 影やグラーデーションといったリッチな表現にプラットフォームからの恩恵を受けづらい
Viewで構築してLayoutParamsをいじる
概要
Canvasで苦労した点をふまえて、逆にプラットフォームネイティブのViewを利用して
Viewのレイアウトの数値を変更する事で、UIを再現する。コンポーネントを、背景、ホバー、テキスト・アイコンという3層で構築して
背景とホバーでそれぞれジェスチャに応じて動くようにする。全体をConstraintLayoutで配置して、ホバーの座標はConstraintLayoutのhorizontal biasを
調節する事によって移動させる。参考記事
コード
レイアウトファイル
<?xml version="1.0" encoding="utf-8"?>
<merge xmlns:android="http://schemas.android.com/apk/res/android"
       xmlns:app="http://schemas.android.com/apk/res-auto"
       xmlns:tools="http://schemas.android.com/tools"
       tools:parentTag="android.widget.FrameLayout"
       android:layout_width="match_parent"
       android:layout_height="match_parent">

    <androidx.constraintlayout.widget.ConstraintLayout
            android:layout_width="match_parent"
                  android:layout_height="match_parent"
                  android:padding="4dp"
                  android:background="@drawable/custom_switcher_background"
                  android:orientation="horizontal">

        <View app:layout_constraintWidth_percent="0.5"
              android:layout_width="0dp"
              app:layout_constraintStart_toStartOf="parent"
              app:layout_constraintTop_toTopOf="parent"
              app:layout_constraintEnd_toEndOf="parent"
              app:layout_constraintBottom_toBottomOf="parent"
              android:layout_height="wrap_content"
              android:id="@+id/custom_switcher_hover"
              android:background="@drawable/custom_switcher_hover_background"
              app:layout_constraintHorizontal_bias="1.0"/>

        <androidx.constraintlayout.widget.ConstraintLayout
                app:layout_constraintStart_toStartOf="parent"
                app:layout_constraintTop_toTopOf="parent"
                app:layout_constraintEnd_toEndOf="parent"
                app:layout_constraintBottom_toBottomOf="parent"
                app:layout_constraintWidth_percent="0.5"
                app:layout_constraintHorizontal_bias="0.0"
                android:layout_width="0dp"
                android:layout_height="match_parent">

            <LinearLayout
                    app:layout_constraintStart_toStartOf="parent"
                    app:layout_constraintTop_toTopOf="parent"
                    app:layout_constraintEnd_toEndOf="parent"
                    app:layout_constraintBottom_toBottomOf="parent"
                    android:orientation="horizontal"
                    android:layout_width="wrap_content"
                    android:layout_height="wrap_content">

                <ImageView
                        android:layout_width="24dp"
                        android:layout_height="24dp"
                        app:srcCompat="@drawable/ic_good"
                        android:id="@+id/left_icon_image_view"
                        app:layout_constraintTop_toTopOf="parent"
                        app:layout_constraintBottom_toBottomOf="parent"
                        app:layout_constraintStart_toStartOf="parent"/>

                <Space android:layout_width="4dp" android:layout_height="0dp"/>

                <TextView
                        android:text="良かった"
                        android:layout_width="wrap_content"
                        android:layout_height="wrap_content"
                        android:textSize="14sp"
                        android:id="@+id/left_text_view"
                        android:textStyle="bold"
                        android:textColor="@android:color/white"
                        app:layout_constraintStart_toEndOf="@id/left_icon_image_view"
                        app:layout_constraintEnd_toEndOf="parent"
                        app:layout_constraintTop_toTopOf="parent"
                        app:layout_constraintBottom_toBottomOf="parent" android:layout_gravity="center_vertical"/>
            </LinearLayout>

        </androidx.constraintlayout.widget.ConstraintLayout>

        <androidx.constraintlayout.widget.ConstraintLayout
                app:layout_constraintStart_toStartOf="parent"
                app:layout_constraintTop_toTopOf="parent"
                app:layout_constraintEnd_toEndOf="parent"
                app:layout_constraintBottom_toBottomOf="parent"
                app:layout_constraintWidth_percent="0.5"
                app:layout_constraintHorizontal_bias="1.0"
                android:layout_width="0dp"
                android:layout_height="match_parent">

            <LinearLayout
                    app:layout_constraintStart_toStartOf="parent"
                    app:layout_constraintTop_toTopOf="parent"
                    app:layout_constraintEnd_toEndOf="parent"
                    app:layout_constraintBottom_toBottomOf="parent"
                    android:layout_width="wrap_content"
                    android:layout_height="wrap_content">

                <ImageView
                        android:layout_width="24dp"
                        android:layout_height="24dp"
                        app:srcCompat="@drawable/ic_discontent"
                        android:id="@+id/right_icon_image_view"
                        app:layout_constraintTop_toTopOf="parent"
                        app:layout_constraintBottom_toBottomOf="parent"
                        app:layout_constraintStart_toStartOf="parent"/>

                <Space android:layout_width="4dp" android:layout_height="0dp"/>

                <TextView
                        android:text="不満あり"
                        android:layout_width="wrap_content"
                        android:layout_height="wrap_content"
                        android:textSize="14sp"
                        android:id="@+id/right_text_view"
                        android:textStyle="bold"
                        android:textColor="@android:color/white"
                        app:layout_constraintStart_toEndOf="@id/right_icon_image_view"
                        app:layout_constraintEnd_toEndOf="parent"
                        app:layout_constraintTop_toTopOf="parent"
                        app:layout_constraintBottom_toBottomOf="parent" android:layout_gravity="center_vertical"/>
            </LinearLayout>
        </androidx.constraintlayout.widget.ConstraintLayout>

    </androidx.constraintlayout.widget.ConstraintLayout>
</merge>
クラス
package inc.azit.android.gesturelearning

import android.content.Context
import android.util.AttributeSet
import android.util.Log
import android.view.GestureDetector
import android.view.LayoutInflater
import android.view.MotionEvent
import android.view.View
import android.widget.FrameLayout
import android.widget.LinearLayout
import android.widget.Space
import androidx.constraintlayout.widget.ConstraintLayout
import java.util.logging.Handler
import java.util.zip.DeflaterOutputStream
import kotlin.math.absoluteValue

class CustomSwitcherByViewView : FrameLayout {

    lateinit var racketView: View

    private var ratio: Double = 0.0

    constructor(context: Context) : super(context) {
        init(context, null, 0)
    }

    constructor(context: Context, attrs: AttributeSet) : super(context, attrs) {
        init(context, attrs, 0)
    }

    constructor(context: Context, attrs: AttributeSet, defStyle: Int) : super(context, attrs, defStyle) {
        init(context, attrs, defStyle)
    }

    private fun init(context: Context, attrs: AttributeSet?, defStyle: Int) {
        val rootView: View = LayoutInflater.from(context).inflate(R.layout.custom_switcher_by_view_layout, this, true)

        rootView.setOnTouchListener(object : OnTouchListener {
            override fun onTouch(p0: View, p1: MotionEvent): Boolean {
                if (p1.action == MotionEvent.ACTION_UP) {
                    onRootGestureUpEvent(p1)
                }
                return true
            }
        })

        racketView = rootView.findViewById(R.id.custom_switcher_hover)

        val racketGestureDetector = buildRacketGestureDetector(context)
        racketView.setOnTouchListener(object: OnTouchListener {
            override fun onTouch(v: View, event: MotionEvent): Boolean {
                if (event.action == MotionEvent.ACTION_UP) {
                    onRacketUpEvent(event)
                    return true
                } else {
                    return racketGestureDetector.onTouchEvent(event)
                }
            }
        })
    }

    fun setRatio(newRatio: Double) {
        if (newRatio < 0.0 || newRatio > 1.0) {
            throw RuntimeException("Ratio out bounds: $newRatio")
        }

        val racketLayoutParams = racketView.layoutParams as ConstraintLayout.LayoutParams
        racketLayoutParams.horizontalBias = newRatio.toFloat()
        racketView.layoutParams = racketLayoutParams

        this.ratio = newRatio
    }

    /*
     * Root View Gesture
     */
    private fun onRootGestureUpEvent(event: MotionEvent) {
        var newRatio: Double = (event.x.toDouble() / width).coerceIn(0.0, 1.0)
        if (newRatio < 0.5) {
            newRatio = 0.0
        } else {
            newRatio = 1.0
        }
        setRatio(newRatio)
    }

    /*
     * Racket Gesture Detector
     */
    private fun buildRacketGestureDetector(context: Context): GestureDetector {
        return GestureDetector(context, object: GestureDetector.OnGestureListener {
            override fun onShowPress(p0: MotionEvent?) {
            }

            override fun onSingleTapUp(p0: MotionEvent?): Boolean {
                return false
            }

            override fun onDown(event: MotionEvent): Boolean {
                return true
            }

            override fun onFling(p0: MotionEvent?, p1: MotionEvent?, p2: Float, p3: Float): Boolean {
                return false
            }

            override fun onScroll(scrollStart: MotionEvent, current: MotionEvent, distanceX: Float, distanceY: Float): Boolean {
                val ratioDiff: Double = (distanceX.toDouble() * -1) / (width.toDouble() / 2.0)
                var newRatio: Double = (ratioDiff + ratio).coerceIn(0.0, 1.0)
                Log.d("switch", "New Ratio from onScroll: $newRatio")
                setRatio(newRatio)
                return true
            }

            override fun onLongPress(p0: MotionEvent?) {
            }
        })
    }

    private fun onRacketUpEvent(event: MotionEvent) {
        var newRatio: Double = ratio
        if (newRatio < 0.5) {
            newRatio = 0.0
        } else {
            newRatio = 1.0
        }
        setRatio(newRatio)
    }
}
良い点
- Androidの標準のViewコンポーネントやレイアウトルールがつかえる分、UIの再現がしやすい。
- ConstraintLayoutを利用しているため、画面サイズに対応して適切にレイアウトが調節されるという安心感を持ちやすい
悪い点
- パフォーマンスがわるい、おそらくonScrollの中でレイアウトを変更しているが、レイアウトの変更処理が重いため
- onScroll内の処理が重い結果、描画が安定しない、指への追従性が悪い
- レイアウトの縮小化等を試みたが、状況が大幅に改善する事はなかった
Lottieをつかって描画する
手法
デザイナーさんからLottieのファイルをもらって、アニメーションの進捗パラメータを変更する事でホバーの移動を表現する。
ホバーの位置については、想定される位置を計算する事で、適切に反応しているように見えるよう調節するコード
package inc.azit.android.gesturelearning

import android.content.Context
import android.graphics.Canvas
import android.graphics.Color
import android.graphics.Paint
import android.graphics.drawable.Drawable
import android.text.TextPaint
import android.util.AttributeSet
import android.util.Log
import android.view.GestureDetector
import android.view.MotionEvent
import android.view.View
import com.airbnb.lottie.LottieAnimationView
import android.animation.ValueAnimator


/**
 * TODO: document your custom view class.
 */
class CustomSwitcherByLottieView : LottieAnimationView {

    private var ratio: Double = 0.0
    private var draggingHover: Boolean = false

    constructor(context: Context) : super(context) {
        init(context, null, 0)
    }

    constructor(context: Context, attrs: AttributeSet) : super(context, attrs) {
        init(context, attrs, 0)
    }

    constructor(context: Context, attrs: AttributeSet, defStyle: Int) : super(context, attrs, defStyle) {
        init(context, attrs, defStyle)
    }

    private fun setRatio(newRatio: Double, animate: Boolean = false) {
        if (newRatio < 0.0 || newRatio > 1.0) {
            throw RuntimeException("Ratio out bounds: $newRatio")
        }
        if (animate) {
            val animator = ValueAnimator.ofFloat(ratio.toFloat(), newRatio.toFloat())
            animator.duration = 300
            animator.addUpdateListener { animation -> progress = animation.animatedValue as Float }
            animator.start()

        } else {
            this.progress = newRatio.toFloat()
        }
        this.ratio = newRatio
    }

    private fun init(context: Context, attrs: AttributeSet?, defStyle: Int) {
        val gestureDetector = GestureDetector(context, object: GestureDetector.OnGestureListener {
            override fun onShowPress(p0: MotionEvent?) {
            }

            override fun onSingleTapUp(p0: MotionEvent?): Boolean {
                return false
            }

            override fun onDown(p0: MotionEvent): Boolean {
                draggingHover = inHover(p0)
                return true
            }

            override fun onFling(p0: MotionEvent?, p1: MotionEvent?, p2: Float, p3: Float): Boolean {
                return false
            }

            override fun onScroll(scrollStart: MotionEvent, current: MotionEvent, diffX: Float, diffY: Float): Boolean {
                if (draggingHover) {
                    val ratioDiff: Double = (diffX.toDouble() * -1) / (width.toDouble() / 2.0)
                    var newRatio: Double = (ratioDiff + ratio).coerceIn(0.0, 1.0)
                    Log.d("switch", "New Ratio from onScroll: $newRatio")
                    setRatio(newRatio)
                }
                return true
            }


            override fun onLongPress(p0: MotionEvent?) {
            }
        })

        setOnTouchListener { view, motionEvent ->
            if (motionEvent.action == MotionEvent.ACTION_UP) {
                onMotionUp(motionEvent)
                draggingHover = false
                true
            } else {
                gestureDetector.onTouchEvent(motionEvent)
            }
        }
    }

    private fun inHover(event: MotionEvent): Boolean {
        val positon = event.x
        val hoverLeft = width * 0.5 * this.ratio
        val hoverRight = hoverLeft + width * 0.5
        return positon in hoverLeft..hoverRight
    }

    private fun onMotionUp(event: MotionEvent) {
        var newRatio: Double = (event.x.toDouble() / width.toDouble()).coerceIn(0.0, 1.0)
        if (newRatio < 0.5) {
            newRatio = 0.0
        } else {
            newRatio = 1.0
        }
        setRatio(newRatio, true)
    }
}
良い点
- デザイナーさんから貰ったデザインがほぼそのまま動くので、デザインを再現するというステップを挟まなくて良い。
- スクロール時のパフォーマンスも非常に良く、Canvasと同程度でサクサク動く
悪い点
- Canvas手法やView手法と異なり、ホバーが表示されている範囲をプログラム内で正確に管理するのが困難
- アニメーションの構成にも依るが、角丸が表示されておらずLottieファイルの調節が必要
- Lottieがサポートしていないような属性を使っているグラフィクスは再現するのが困難になる
CanvasとLayoutのハイブリッド
手法
Canvasで描画した場合に、ホバーについてはシンプルな形状であるため描画のコストはそれほどでないが、
テキストやアイコンのレイアウト等については管理が複雑になってしまうという課題があった。
そこで、ホバーはCanvasで書き、その上に重ねてテキストやアイコンはViewのLayoutで描画するというハイブリッド手法コード
レイアウトファイル
<?xml version="1.0" encoding="utf-8"?>
<merge xmlns:android="http://schemas.android.com/apk/res/android"
       xmlns:tools="http://schemas.android.com/tools" xmlns:app="http://schemas.android.com/apk/res-auto"
       tools:parentTag="androidx.constraintlayout.widget.ConstraintLayout"
       android:layout_width="match_parent"
       android:layout_height="match_parent">

    <inc.azit.android.gesturelearning.hybrid.CustomSwitcherHoverCanvasView
            android:id="@+id/hybrid_hover_canvas"
            app:layout_constraintStart_toStartOf="parent"
            app:layout_constraintTop_toTopOf="parent"
            app:layout_constraintEnd_toEndOf="parent"
            app:layout_constraintBottom_toBottomOf="parent"
            android:layout_width="0dp"
            android:layout_height="0dp"
    />

    <androidx.constraintlayout.widget.ConstraintLayout
            app:layout_constraintStart_toStartOf="parent"
            app:layout_constraintTop_toTopOf="parent"
            app:layout_constraintEnd_toEndOf="parent"
            app:layout_constraintBottom_toBottomOf="parent"
            app:layout_constraintWidth_percent="0.5"
            app:layout_constraintHorizontal_bias="0.0"
            android:layout_width="0dp"
            android:layout_height="match_parent">

        <LinearLayout
                app:layout_constraintStart_toStartOf="parent"
                app:layout_constraintTop_toTopOf="parent"
                app:layout_constraintEnd_toEndOf="parent"
                app:layout_constraintBottom_toBottomOf="parent"
                android:orientation="horizontal"
                android:layout_width="wrap_content"
                android:layout_height="wrap_content">

            <ImageView
                    android:layout_width="24dp"
                    android:layout_height="24dp"
                    app:srcCompat="@drawable/ic_good"
                    android:id="@+id/left_icon_image_view"
                    app:layout_constraintTop_toTopOf="parent"
                    app:layout_constraintBottom_toBottomOf="parent"
                    app:layout_constraintStart_toStartOf="parent"/>

            <Space android:layout_width="4dp" android:layout_height="0dp"/>

            <TextView
                    android:text="良かった"
                    android:layout_width="wrap_content"
                    android:layout_height="wrap_content"
                    android:textSize="14sp"
                    android:id="@+id/left_text_view"
                    android:textStyle="bold"
                    android:textColor="@android:color/white"
                    app:layout_constraintStart_toEndOf="@id/left_icon_image_view"
                    app:layout_constraintEnd_toEndOf="parent"
                    app:layout_constraintTop_toTopOf="parent"
                    app:layout_constraintBottom_toBottomOf="parent" android:layout_gravity="center_vertical"/>
        </LinearLayout>

    </androidx.constraintlayout.widget.ConstraintLayout>

    <androidx.constraintlayout.widget.ConstraintLayout
            app:layout_constraintStart_toStartOf="parent"
            app:layout_constraintTop_toTopOf="parent"
            app:layout_constraintEnd_toEndOf="parent"
            app:layout_constraintBottom_toBottomOf="parent"
            app:layout_constraintWidth_percent="0.5"
            app:layout_constraintHorizontal_bias="1.0"
            android:layout_width="0dp"
            android:layout_height="match_parent">

        <LinearLayout
                app:layout_constraintStart_toStartOf="parent"
                app:layout_constraintTop_toTopOf="parent"
                app:layout_constraintEnd_toEndOf="parent"
                app:layout_constraintBottom_toBottomOf="parent"
                android:layout_width="wrap_content"
                android:layout_height="wrap_content">

            <ImageView
                    android:layout_width="24dp"
                    android:layout_height="24dp"
                    app:srcCompat="@drawable/ic_discontent"
                    android:id="@+id/right_icon_image_view"
                    app:layout_constraintTop_toTopOf="parent"
                    app:layout_constraintBottom_toBottomOf="parent"
                    app:layout_constraintStart_toStartOf="parent"/>

            <Space android:layout_width="4dp" android:layout_height="0dp"/>

            <TextView
                    android:text="不満あり"
                    android:layout_width="wrap_content"
                    android:layout_height="wrap_content"
                    android:textSize="14sp"
                    android:id="@+id/right_text_view"
                    android:textStyle="bold"
                    android:textColor="@android:color/white"
                    app:layout_constraintStart_toEndOf="@id/right_icon_image_view"
                    app:layout_constraintEnd_toEndOf="parent"
                    app:layout_constraintTop_toTopOf="parent"
                    app:layout_constraintBottom_toBottomOf="parent" android:layout_gravity="center_vertical"/>
        </LinearLayout>
    </androidx.constraintlayout.widget.ConstraintLayout>
</merge>
Canvas Hover View
package inc.azit.android.gesturelearning.hybrid

import android.animation.ValueAnimator
import android.content.Context
import android.graphics.Canvas
import android.graphics.Color
import android.graphics.Paint
import android.graphics.Rect
import android.util.AttributeSet
import android.util.Log
import android.view.GestureDetector
import android.view.MotionEvent
import android.view.View

class CustomSwitcherHoverCanvasView: View {

    interface OnRatioChangeListener {
        fun onRatioChanged(ratio: Double)
    }


    var ratioChangeListener: OnRatioChangeListener? = null

    private var ratio: Double = 0.0
    private val switchColor: Int
        get() = Color.argb(255, (255 * this.ratio).toInt(), 0, (255 * (1.0 - this.ratio)).toInt())
    private val hoverWidth: Int
        get() {
            return (width * 0.5).toInt()
        }
    private val contentWidth: Int
        get() {
            return width - paddingLeft - paddingRight
        }
    private val contentHeight: Int
        get() {
            return height - paddingTop - paddingBottom
        }
    private val hoverLeft: Int
        get() {
            return  (contentWidth / 2 * this.ratio).toInt()
        }

    private var draggingHover: Boolean = false

    constructor(context: Context) : super(context) {
        init(context, null, 0)
    }

    constructor(context: Context, attrs: AttributeSet) : super(context, attrs) {
        init(context, attrs, 0)
    }

    constructor(context: Context, attrs: AttributeSet, defStyle: Int) : super(context, attrs, defStyle) {
        init(context, attrs, defStyle)

    }

    private fun init(context: Context, attrs: AttributeSet?, defStyle: Int) {

        val gestureDetector = GestureDetector(context, object: GestureDetector.OnGestureListener {
            override fun onShowPress(p0: MotionEvent?) {
            }

            override fun onSingleTapUp(event: MotionEvent): Boolean {
                return false
            }

            override fun onDown(p0: MotionEvent): Boolean {
                onDownEvent(p0)
                return true
            }

            override fun onFling(p0: MotionEvent?, p1: MotionEvent?, p2: Float, p3: Float): Boolean {
                return false
            }

            override fun onScroll(scrollStart: MotionEvent, currentScroll: MotionEvent, distanceX: Float, distanceY: Float): Boolean {
                onScrollEvent(scrollStart, currentScroll, distanceX.toDouble())
                return true
            }

            override fun onLongPress(p0: MotionEvent?) {
            }
        })

        setOnTouchListener(object: View.OnTouchListener {
            override fun onTouch(p0: View, p1: MotionEvent): Boolean {
                if (p1.action == MotionEvent.ACTION_UP) {
                    onUp(p1)
                    return true
                } else {
                    return gestureDetector.onTouchEvent(p1)
                }
            }
        })
    }

    fun setRatio(newRatio: Double, animate: Boolean = false) {
        if (newRatio < 0.0 || newRatio > 1.0) {
            throw RuntimeException("Ratio out bounds: $newRatio")
        }

        if (animate) {
            val animator = ValueAnimator.ofFloat(ratio.toFloat(), newRatio.toFloat())
            animator.duration = 300
            animator.addUpdateListener {
                    animation ->
                val currentValue = animation.animatedValue as Float
                this.ratio = currentValue.toDouble()
                ratioChangeListener?.onRatioChanged(currentValue.toDouble())
                invalidate()
            }
            animator.start()
        } else {
            this.ratio = newRatio
            ratioChangeListener?.onRatioChanged(newRatio)
            invalidate()
        }
    }

    private fun onDownEvent(event: MotionEvent) {
        this.draggingHover = inHoverArea(event.x.toInt())
    }

    private fun onUp(event: MotionEvent) {
        var newRatio: Double = (event.x.toDouble() / width.toDouble()).coerceIn(0.0, 1.0)
        if (newRatio < 0.5) {
            newRatio = 0.0
        } else {
            newRatio = 1.0
        }
        setRatio(newRatio, true)
        this.draggingHover = false
    }

    private fun onScrollEvent(scrollStartAt: MotionEvent, scrollingAt: MotionEvent, distanceX: Double) {
        if (draggingHover) {
            Log.d("switcher", "distanceX: $distanceX, width / 2: ${width.toDouble() / 2}")
            val ratioDiff: Double = (distanceX * -1) / (width.toDouble() / 2.0)
            Log.d("switcher", "Ratio diff: $ratioDiff")
            var newRatio: Double = (ratioDiff + ratio).coerceIn(0.0, 1.0)
            setRatio(newRatio, false)
        }
    }

    private fun inHoverArea(x: Int): Boolean {
        return hoverLeft <= x && x <= (hoverLeft + hoverWidth)
    }

    override fun onDraw(canvas: Canvas) {
        super.onDraw(canvas)

        //Draw Background
        val bgPaint = Paint()
        bgPaint.color = Color.WHITE
        canvas.drawCircle((height / 2).toFloat(), (height / 2).toFloat(), (height / 2).toFloat(), bgPaint)
        canvas.drawCircle((width - height / 2).toFloat(), (height / 2).toFloat(), (height / 2).toFloat(), bgPaint)
        canvas.drawRect(Rect((height / 2).toInt(), 0, width - (height / 2), height), bgPaint)

        /*
         * Draw Hover
         */
        val hoverPaint = Paint()
        hoverPaint.color = switchColor

        val hoverHeight: Int = (height * 0.8).toInt()
        val hoverTop: Int = (height * 0.1).toInt()
        val hoverWidth: Int = contentWidth / 2 - (height - hoverHeight) / 2
        val hoverLeft: Int = ((contentWidth / 2 - (height - hoverHeight) / 2) * this.ratio).toInt() + (height - hoverHeight) / 2
        val hoverRight: Int = hoverLeft + hoverWidth
        val hoverRadius: Int = hoverHeight / 2

        //Draw Hover Left Cap
        canvas.drawCircle(
            (hoverLeft + hoverHeight / 2).toFloat(),
            (height / 2.0).toFloat(),
            hoverRadius.toFloat(),
            hoverPaint)
        //Draw Hover Right Cap
        canvas.drawCircle(
            ((hoverLeft + hoverWidth) - hoverHeight / 2).toFloat(),
            (height / 2.0).toFloat(),
            hoverRadius.toFloat(),
            hoverPaint
        )
        //Draw Hover Body
        canvas.drawRect(
            Rect(
                (hoverLeft + hoverHeight / 2),
                hoverTop,
                hoverRight - hoverHeight / 2,
                hoverTop + hoverHeight
            ),
            hoverPaint
        )
    }
}
HybridView
package inc.azit.android.gesturelearning.hybrid

import android.content.Context
import android.content.res.ColorStateList
import android.graphics.Canvas
import android.graphics.Color
import android.graphics.Paint
import android.graphics.drawable.Drawable
import android.text.TextPaint
import android.util.AttributeSet
import android.view.LayoutInflater
import android.view.MotionEvent
import android.view.View
import android.widget.ImageView
import android.widget.TextView
import androidx.constraintlayout.widget.ConstraintLayout
import androidx.core.widget.ImageViewCompat
import inc.azit.android.gesturelearning.R

/**
 * TODO: document your custom view class.
 */
class CustomSwitcherByCanvasLayoutHybridView : ConstraintLayout {

    lateinit var leftIconView: ImageView
    lateinit var leftTextView: TextView

    lateinit var rightIconView: ImageView
    lateinit var rightTextView: TextView


    constructor(context: Context) : super(context) {
        init(context, null, 0)
    }

    constructor(context: Context, attrs: AttributeSet) : super(context, attrs) {
        init(context, attrs, 0)
    }

    constructor(context: Context, attrs: AttributeSet, defStyle: Int) : super(context, attrs, defStyle) {
        init(context, attrs, defStyle)
    }

    private fun init(context: Context, attrs: AttributeSet?, defStyle: Int) {
        val rootView: View = LayoutInflater.from(context).inflate(R.layout.custom_switcher_by_canvas_layout_hibrid_layout, this, true)
        leftIconView = rootView.findViewById(R.id.left_icon_image_view)
        leftTextView = rootView.findViewById(R.id.left_text_view)

        rightIconView = rootView.findViewById(R.id.right_icon_image_view)
        rightTextView = rootView.findViewById(R.id.right_text_view)
        rootView.findViewById<CustomSwitcherHoverCanvasView>(R.id.hybrid_hover_canvas).ratioChangeListener = object: CustomSwitcherHoverCanvasView.OnRatioChangeListener {
            override fun onRatioChanged(ratio: Double) {
                val leftTint = leftItemTintColor(ratio)
                val rightTint = rightItemTintColor(ratio)

                ImageViewCompat.setImageTintList(leftIconView, ColorStateList.valueOf(leftTint))
                leftTextView.setTextColor(leftTint)

                ImageViewCompat.setImageTintList(rightIconView, ColorStateList.valueOf(rightTint))
                rightTextView.setTextColor(rightTint)
            }
        }
    }

    private fun leftItemTintColor(ratio: Double): Int {
        return Color.rgb((255 * (1.0 - ratio)).toInt(), (255 * (1.0 - ratio)).toInt(), (255 * (1.0 - ratio)).toInt())
    }

    private fun rightItemTintColor(ratio: Double): Int {
        return Color.rgb((255 * ratio).toInt(), (255 * ratio).toInt(), (255 * ratio).toInt())
    }
}
良い点
- 描画のパフォーマンスが落ちない、ホバーのスムーズさについてはCanvasと(ほぼ?)同様になっている。
- キャンバスで描画する領域が限られているので、デザインの装飾がやりやすい
悪い点
- 実装工数が多い(これについては再利用性をうまくつくればいけるか?)
- ホバーにたいするリッチな表現自体はCanvasと同様に自前で描画する必要がある
最終的に
総合的に最後のハイブリッドパターンがコスパのバランスが良いという事で最終的な実装に利用しました。
つくりたかった物 できた物
こんな感じで比較的綺麗に良い感じで再現できたかとおもいます。
ホバーの影等もキャンバスなので調整可能ですが、スキップという感じにデザイナーさんと話して無事リリースできました。ライブラリとしてリリースしました
<jp.pocket7878.switcherview.SwitcherView
    app:sv_background_color="@color/white"
    app:sv_leftmost_hover_color="@color/primary"
    app:sv_rightmost_hover_color="@color/alert"
    app:sv_left_choice_icon_src="@drawable/ic_good"
    app:sv_left_choice_text="@string/switcher_good_text"
    app:sv_right_choice_icon_src="@drawable/ic_discontent"
    app:sv_right_choice_text="@string/switcher_discontent_text"
    app:sv_disable_choice_tint_color="@color/icon_default"
    app:sv_enable_choice_tint_color="@color/white"
    />
こんな感じで指定して利用する事ができます。




- 投稿日:2019-12-19T17:44:25+09:00
Dialogflow の Java client library は Android で動作するのか?(DetectIntent編)
はじめに
Android で Dialogflow を使いたい!というのはよくある話だと思う。
さて、作ってみよう!とまずは SDK が無いか調べてみる。https://cloud.google.com/dialogflow/docs/reference/libraries/java
おっと、Android はサポートしていないだって。
みんなどうやって開発してるんだろ?と思って調べてみると、api.ai なるものを発見!
なんだって。
Dialogflow API V2 を使いたいなら client library を使え?
サポート外って書いてるじゃん…。はてさて、REST API 使うしかないのか。
けど、SDK は音声入力ストリームもできるようで、是非とも使いたい!そこで、Java client library がどこまで動くのか検証してみました。
今回は DetectIntent が動くか確認してみます。
別途、音声入力ストリームも試す予定です。(追記)
音声入力ストリーム編もアップしました!
https://qiita.com/r-hashioka/items/a9d0ca0704ef8dd739a2
ただ、今回記事ありきで書いてるので結構端折ってます。対象者
Dialogflow の機能説明などは省きます。
はじめましての人は公式ドキュメントなどを見てから読むといいかもしれません。環境
言語:Kotlin
端末:Pixcel3a (Android 10)Dialogflow の 事前準備
今回使用する intent は次の2点です。
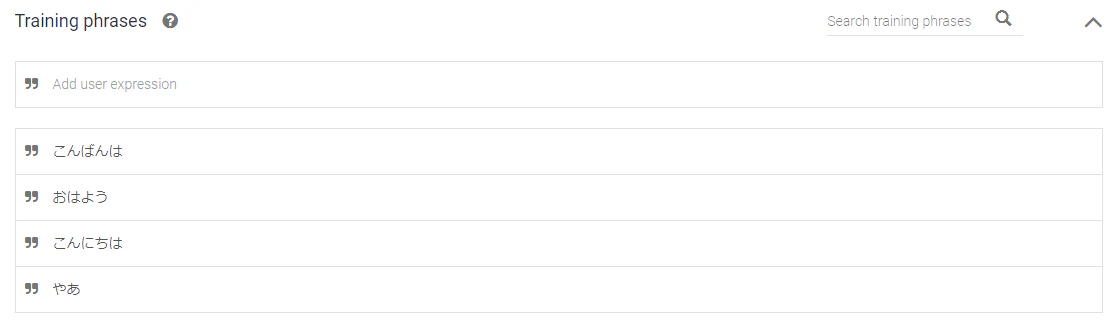
Default Welcome Intent
today's_weather
説明
- 挨拶をすると、
Default Welcome Intentに入り、コマンド受付状態に入ります。- 「今日の天気は?」と問いかけると「今日の天気は晴れです」と応答がある。といった流れです。
Let's Programming!!!
まずはライブラリ import から
dependencies に下記2つを追加してください。
Dialogflow のライブラリだけではダメだったようです。app/build.gradleimplementation 'com.google.cloud:google-cloud-dialogflow:0.105.0-alpha' // https://mvnrepository.com/artifact/io.grpc/grpc-okhttp // GCP サービスとコネクション貼るときに使用 implementation 'io.grpc:grpc-okhttp:1.25.0'Manifest に PERMISSION 追加
- Dialogflow に接続するので INTERNET を追加
- 音声入力ストリームも見越して、RECORD_AUDIO も追加
AndroidManifest.xml<uses-permission android:name="android.permission.INTERNET" /> <uses-permission android:name="android.permission.RECORD_AUDIO" />credentials.json を配置
まずはアカウントキー IAM の サービスアカウント の「Dialogflow Integrations」から鍵を作成し、JSONをダウンロード
細かい手順は省きます。
下記を参考にダウンロードしてください。
https://cloud.google.com/iam/docs/creating-managing-service-account-keys?hl=ja#iam-service-account-keys-create-console
https://www.magellanic-clouds.com/blocks/guide/create-gcp-service-account-key/
res/rawにcredentials.jsonを配置
※※注意※※
Credential を端末に持たせるのはいいことではありません。
今回は検証でとりあえず、とやっているだけですので、対策必須です!layout を作成
下記画像のような画面を作りたいと思います
各 UI の機能は下記の通りです。
- 「こんにちは」ボタンを押すと、Dialogflow に「こんにちは」を送信
- 「今日の天気」ボタンを押すと、Dialogflow に「今日の天気は?」を送信
- Dialogflow からの応答を Hello World! の TextView に表示
- 「RESET」ボタンを押すと、contexts を削除します。
activity_main.xml<?xml version="1.0" encoding="utf-8"?> <androidx.constraintlayout.widget.ConstraintLayout xmlns:android="http://schemas.android.com/apk/res/android" xmlns:app="http://schemas.android.com/apk/res-auto" xmlns:tools="http://schemas.android.com/tools" android:layout_width="match_parent" android:layout_height="match_parent" tools:context=".MainActivity"> <TextView android:id="@+id/textView" android:layout_width="wrap_content" android:layout_height="wrap_content" android:text="Hello World!" app:layout_constraintBottom_toBottomOf="parent" app:layout_constraintLeft_toLeftOf="parent" app:layout_constraintRight_toRightOf="parent" app:layout_constraintTop_toTopOf="parent" /> <Button android:id="@+id/greetingBtn" android:layout_width="wrap_content" android:layout_height="wrap_content" android:layout_marginTop="32dp" android:text="こんにちは" app:layout_constraintEnd_toEndOf="parent" app:layout_constraintStart_toStartOf="parent" app:layout_constraintTop_toTopOf="parent" /> <Button android:id="@+id/weatherBtn" android:layout_width="wrap_content" android:layout_height="wrap_content" android:layout_marginTop="32dp" android:text="今日の天気" app:layout_constraintEnd_toEndOf="parent" app:layout_constraintStart_toStartOf="parent" app:layout_constraintTop_toBottomOf="@+id/greetingBtn" /> <Button android:id="@+id/resetBtn" android:layout_width="wrap_content" android:layout_height="wrap_content" android:layout_marginTop="32dp" android:text="RESET" app:layout_constraintEnd_toEndOf="parent" app:layout_constraintStart_toStartOf="parent" app:layout_constraintTop_toBottomOf="@+id/weatherBtn" /> </androidx.constraintlayout.widget.ConstraintLayout>MainActivity にボタンイベント追加
※この時点ではエラー発生します。
MainActivity.ktpackage jp.hashioka.ryo.dialogflowsample import androidx.appcompat.app.AppCompatActivity import android.os.Bundle import android.widget.Button import android.widget.TextView import jp.hashioka.ryo.dialogflowsample.dialogflow.DetectIntent class MainActivity : AppCompatActivity() { override fun onCreate(savedInstanceState: Bundle?) { super.onCreate(savedInstanceState) setContentView(R.layout.activity_main) val detectIntent = DetectIntent(this) findViewById<Button>(R.id.greetingBtn).setOnClickListener { findViewById<TextView>(R.id.textView).text = detectIntent.send("こんにちは") } findViewById<Button>(R.id.weatherBtn).setOnClickListener { findViewById<TextView>(R.id.textView).text = detectIntent.send("今日の天気は?") } findViewById<Button>(R.id.resetBtn).setOnClickListener { detectIntent.resetContexts() findViewById<TextView>(R.id.textView).text = "-" } } companion object { const val TAG = "MainActivity" } }DetectIntent クラス作成
dialogflow パッケージを作成し、DetectIntent.kt ファイルを作成します。
dialogflow/DetectIntent.ktpackage jp.hashioka.ryo.dialogflowsample.dialogflow import android.content.Context import android.util.Log import com.google.api.gax.core.FixedCredentialsProvider import com.google.auth.oauth2.GoogleCredentials import com.google.cloud.dialogflow.v2.* import jp.hashioka.ryo.dialogflowsample.R /** * Dialogflow の detectIntent に関するクラス */ class DetectIntent ( context: Context ) { companion object { private const val TAG = "DetectIntent" const val PROJECT_ID = "voice-recognition-trial-261200" const val LANGUAGE_CODE = "ja" // TODO: Dialogflow の言語コードはグローバル対応するときに設定ファイルで管理 val SCOPE = listOf("https://www.googleapis.com/auth/cloud-platform") /** * セッションを取得する。 * TODO : Dialogflow のセッションはクライアント毎にユニークとなるよう処理を記述する。 */ private fun getSession() : String { return "hogehoge" } } private val sessionsClient : SessionsClient private val contextClient : ContextsClient init { // 認証情報セット val credentials = GoogleCredentials .fromStream(context.resources.openRawResource(R.raw.credentials)) .createScoped(SCOPE) sessionsClient = createSessions(credentials) contextClient = createContexts(credentials) } /** * SessionClient を作成する。 */ private fun createSessions(credentials: GoogleCredentials): SessionsClient { val sessionsSetting = SessionsSettings.newBuilder() .setCredentialsProvider(FixedCredentialsProvider.create(credentials)) .build() return SessionsClient.create(sessionsSetting) } /** * ContextsClient を作成する。 */ private fun createContexts(credentials: GoogleCredentials) : ContextsClient { val contextsSettings = ContextsSettings.newBuilder() .setCredentialsProvider(FixedCredentialsProvider.create(credentials)) .build() return ContextsClient.create(contextsSettings) } /** * detectIntent を実行し、その結果を返却 * 指定されたテキストを送信するだけ。 */ fun send(text: String) : String { val request = DetectIntentRequest.newBuilder() .setQueryInput( QueryInput.newBuilder() .setText( TextInput.newBuilder() .setText(text) .setLanguageCode(LANGUAGE_CODE) ) .build()) .setSession(SessionName.format(PROJECT_ID, getSession())) .build() val res = sessionsClient.detectIntent(request) Log.d(TAG, "response result : ${res.queryResult}") return res.queryResult.fulfillmentText } /** * detectIntent を実行し、その結果を返却 * context 指定可能 */ fun send(text: String, contexts: List<String>) : String { val queryParametersBuilder = QueryParameters.newBuilder() contexts.forEach { queryParametersBuilder .addContexts( com.google.cloud.dialogflow.v2.Context.newBuilder() .setName(ContextName.format(PROJECT_ID, getSession(), it)) .setLifespanCount(5) // TODO: context の Lifespan を動的にする。 .build() ) } // Dialogflow に投げるテキスト、コンテキストなどセット val request = DetectIntentRequest.newBuilder() .setQueryParams(queryParametersBuilder.build()) .setQueryInput( QueryInput.newBuilder() .setText( TextInput.newBuilder() .setText(text) .setLanguageCode(LANGUAGE_CODE) ) .build()) .setSession(SessionName.format(PROJECT_ID, getSession())) .build() val res = sessionsClient.detectIntent(request) Log.d(TAG, "response result : ${res.queryResult}") return res.queryResult.fulfillmentText } /** * context をリセットする。 */ fun resetContexts() { contextClient.deleteAllContexts(SessionName.format(PROJECT_ID, getSession())) } }おお!動いた!
さいごに
Android でも DetectIntent はできました。
多分、REST API の機能くらいはできるんでは?と思ってます。結構走り書きでしたが、最後まで読んでいただきありがとうございます。
(追記)
ソースコードを GitHub に公開しました。(音声入力ストリームも含む)
https://github.com/ryohashioka/DialogflowSampleForAndroid




- 投稿日:2019-12-19T17:21:50+09:00
[UE4] Android開発でお馴染みの4点タップで表示されるウィンドウ内のConsole Commandのリストをカスタムしよう!
はじめに
モバイル端末の場合、4本の指で画面を同時にタップするとConsole Commandを入力するためのConsole Windowが表示されます。更にAndroidの場合は以下のConsole Commandのリストから選択し実行することが可能です。
- stat FPS
- stat Anim
- stat OpenGLRHI
- stat VulkanRHI
- stat DumpEvents
- stat DumpFrame
- stat DumpHitches
- stat Enginestat Game
- stat Groupedstat Hitches
- stat InitViews
- stat LightRendering
- stat Memorystat Particles
- stat SceneRendering
- stat SceneUpdate
- stat ShadowRendering
- stat Slow
- stat Streaming
- stat StreamingDetails
- stat Unit
- stat UnitGraph
- stat StartFile
- stat StopFile
- GameVer
- show PostProcessing
- stat AndroidCPU
用意されているConsole Commandはどれも有用なので助かるのですが…別のConsole Commandを使いたい時もしばしばあります。そして、そのためだけにデバッグメニューを作るのは面倒です。また、最近追加された Device Output Logを活用する手もありますが、端末単体で完結したいケースもあるかと思います。
ということで、今回はこのConsole Windowに用意されたリストにConsole Commandを追加する方法についてご紹介します。
Console WindowにConsole Commandを追加する方法
GameActivity.java// Console private static final String CONSOLE_SPINNER_ITEMS[] = {"Common Console Commands", "stat FPS", "stat Anim","stat OpenGLRHI","stat VulkanRHI","stat DumpEvents","stat DumpFrame", "stat DumpHitches","stat Engine","stat Game","stat Grouped","stat Hitches","stat InitViews","stat LightRendering", "stat Memory","stat Particles","stat SceneRendering","stat SceneUpdate","stat ShadowRendering","stat Slow", "stat Streaming","stat StreamingDetails","stat Unit","stat UnitGraph", "stat StartFile", "stat StopFile", "GameVer", "show PostProcessing", "stat AndroidCPU"};Console Commandのリストは GameActivity.java で上記のようにして設定されています。
そして、この
GameAcitivity.javaは「パッケージング」または「起動」の度にEngine\Build\Android\Java\src\com\epicgames\ue4\GameActivity.java.templateをベースに再生成されます(UEDeployAndroid.csのUpdateGameActivity関数参照 )。GameActivity.java.template// Console private static final String CONSOLE_SPINNER_ITEMS[] = {"Common Console Commands", "stat FPS", "stat Anim","stat OpenGLRHI","stat VulkanRHI","stat DumpEvents","stat DumpFrame", "stat DumpHitches","stat Engine","stat Game","stat Grouped","stat Hitches","stat InitViews","stat LightRendering", "stat Memory","stat Particles","stat SceneRendering","stat SceneUpdate","stat ShadowRendering","stat Slow", "stat Streaming","stat StreamingDetails","stat Unit","stat UnitGraph", "stat StartFile", "stat StopFile", "GameVer", "show PostProcessing", "stat AndroidCPU", "ぼくのかんがえたさいきょうのこまんど"};そのため、
GameActivity.java.templateに対して上記のような変更を加えると…(エンジンビルド不要です)
このようにConsole Commandのリストに反映されます(見切れてる!)是非色々カスタムしてみてください!
おしまい


- 投稿日:2019-12-19T17:10:53+09:00
androidアプリのdebugビルド署名をリリース署名に変更すると、色々便利だ
はじめに
androidアプリのdebugビルド署名、普通はリリースビルド署名と違いますね。
まあリリースビルド署名のキーストアは重要なので、利用制限したほうがいいんですが、debugビルド署名をリリースビルド署名に変更すると、開発が色々楽になります。
リリース版にdebug版を上書きインストールしたりできますからね。
やりかた
signingConfigs {
        //DEBUG版をリリースビルド署名したいときに、これを有効にする
        debug {
            storeFile=file(project.properties.storeFile)
            storePassword=project.properties.storePassword
            keyAlias=project.properties.keyAlias
            keyPassword=project.properties.keyPassword
        }
    }
こんなんを追加するのみ。
効果
- リリースアプリにandroidStuidoから上書きインストールできる。これがあると本番データ使って色々できる。バージョンアップ時のデータ移行のdebugとかね。
- google認証とか、サーバー側にdebugのキーストアを登録せず、debug版で認証できるようになる。
- デバイスにリリース版がインストールされているとき、debugインストールに失敗しない。いちいちアンインストールを求められない。これ、マジでうざい。初期インストールになっちゃうと、色々消えてしまうし。
まとめ
いや、まじで便利。もっと早くやればよかったと後悔している今日この頃
いや、変えられるのは前から知ってたんですが、必要に駆られてやってみたら、もう・・・・。セキュリティ的に問題がないのであれば、オススメです。
まあパッケージ名同じ場合のみですがね。

- 投稿日:2019-12-19T17:00:16+09:00
【ぶっちゃけAndroidアプリ開発】Android Studioを初期インストールした時にやる事
これは2019年12月に書いた記事です。
ものすごく久しぶりにAndroidアプリ開発をする事になったのですが、のっぴきならない理由により、Macbook ProにAndroid Studioを初期インストールして使用再開する事になりました。
という事で、最新Android Studioをインストールして、過去に作成したプロジェクトを使えるようにするまでの過程を備忘録としてまとめておきたいと思います。
簡単に言うと、Android Studioは日々進化しているので、SDKや設定について過去からの差分を埋めてあげれば良いです。1.Android Studioインストール
(1)ダウンロード
・App Storeからはダウンロードできない。
・Android Developersのサイトからダウンロード。
https://developer.android.com/studio?hl=ja
(2)Android SDK
・とりあえず最新のSDKがインストールされる(はず)。今回はAndroid10.0(Q)、API Level29。
(3)過去プロジェクト開く
・「Welcome to Android Studio」画面で「Open an existing Android Studio Project」を選択して、過去プロジェクトを開く。
・すぐにビルドが走るが、古いプロジェクトだと多分エラーが出る。(4)過去プロジェクトのエラーを解消させる
「Failed to find target with hash string 'android-26' in: /Users/ユーザー名/Library/Android/sdk」
・API Level26のSDKが必要。targetSdkVersionがLevel26のため。
・対処として、SDK Managerから、SDKをインストールする。
・SDK pratformsタブから、Android8.0(Oreo)、API Level26にチェック。
・SDK Toolsタブから、「Show Package Details」にチェックして詳細を表情し、Android SDK Build-Toolsの26.0.0にチェック。
・Applyボタンを押下して、ライセンスに同意してインストール。
「ERROR: Failed to resolve: com.android.support.test.espresso:espresso-core:2.2.2」「Add Google Maven repository and sync project」「Show in Project Structure dialog」
・Googleから提供されているAndroidプラグインがネットからダウンロードできないというエラー。以前はjcenterから提供されていたが、最近はmavenから提供されているので、gradleにURLを定義する。
build.gradle(Project)// Top-level build file where you can add configuration options common to all sub-projects/modules. buildscript { repositories { jcenter() } dependencies { classpath 'com.android.tools.build:gradle:2.3.3' // NOTE: Do not place your application dependencies here; they belong // in the individual module build.gradle files } } allprojects { repositories { jcenter() maven { url 'https://maven.google.com' } // 追加 } } task clean(type: Delete) { delete rootProject.buildDir }わたしの場合、とりあえずこれで動作するようになりました。
過去プロジェクトがどのくらい古いかによって、ハードルは異なってくると思います。


- 投稿日:2019-12-19T13:46:18+09:00
[サーバーレス]UnityとFirebaseでアプリのアップデートをせずに、動作と外観の変更を行う
この記事は、鹿児島大学生 Advent Calendar 2019の21日目の記事です。
概要
以前、クライアントからの要件でサーバーを準備せずにアプリ内の表示を変更したいという要望があったので、その時に行なった対応と、UnityとFirebaseの連携を簡単に解説します。
今回はできるだけシンプルな状態で実装まで行おうと思います。
上手く活用すると、アプリの背景画像の変更を行なったり、広告表示の頻度もデータをみながら即時反映することができます。
またFirebaseとの連携でA/Bテストへの応用も簡単に行うことができます。環境
- iMac Catalina 10.15.1
- Unity 2019.3.0f3
- Firebase for Unity 6.8.1
Catalinaだと訳あってUnity2019.2系が上手く動いてくれないのでまだ正式リリースされていない2019.3系で行います。。。
UIが変わったのは個人的には好きです。セットアップ
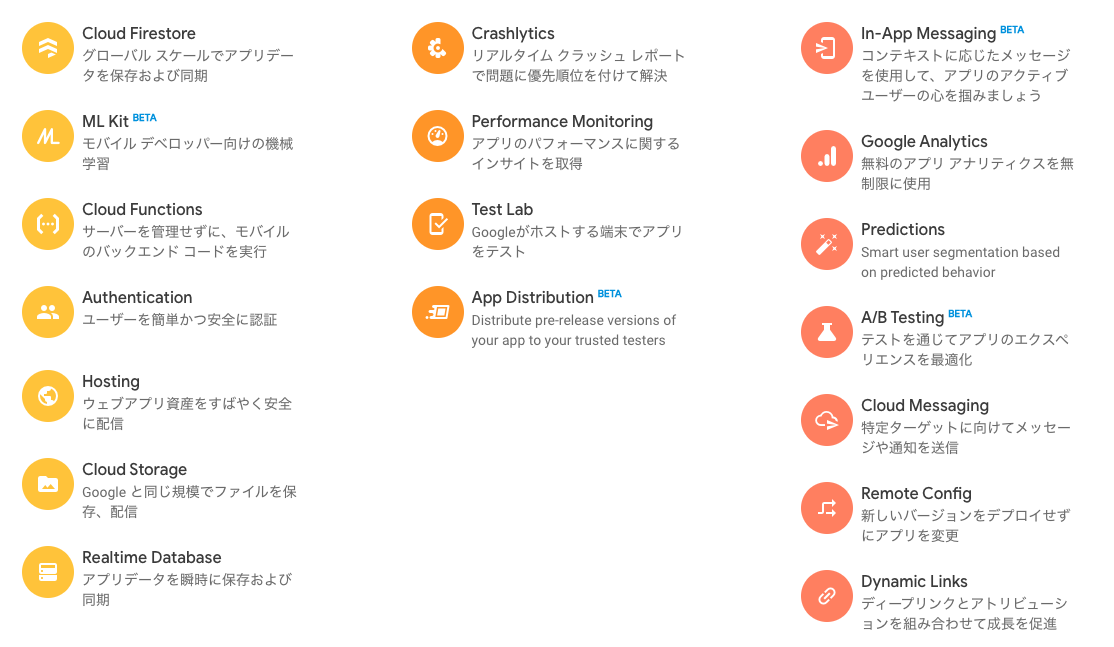
Firebaseは、Googleのプラットフォームでいくつものサービスがありますが
今回はRemote Configを使用していきます。
Unityのプロジェクト構築
まずはサンプルプロジェクトを作成していきます。
中身はなんでもいいのですが、今回は2DプロジェクトでFirebaseからデータを取得するボタンと取得した文言を表示するテキストを準備します。
こちらのやり方は、Unity ボタンとかUnity Textなどで調べるとすぐにわかるので今回は割愛します。
Firebaseプロジェクトを追加
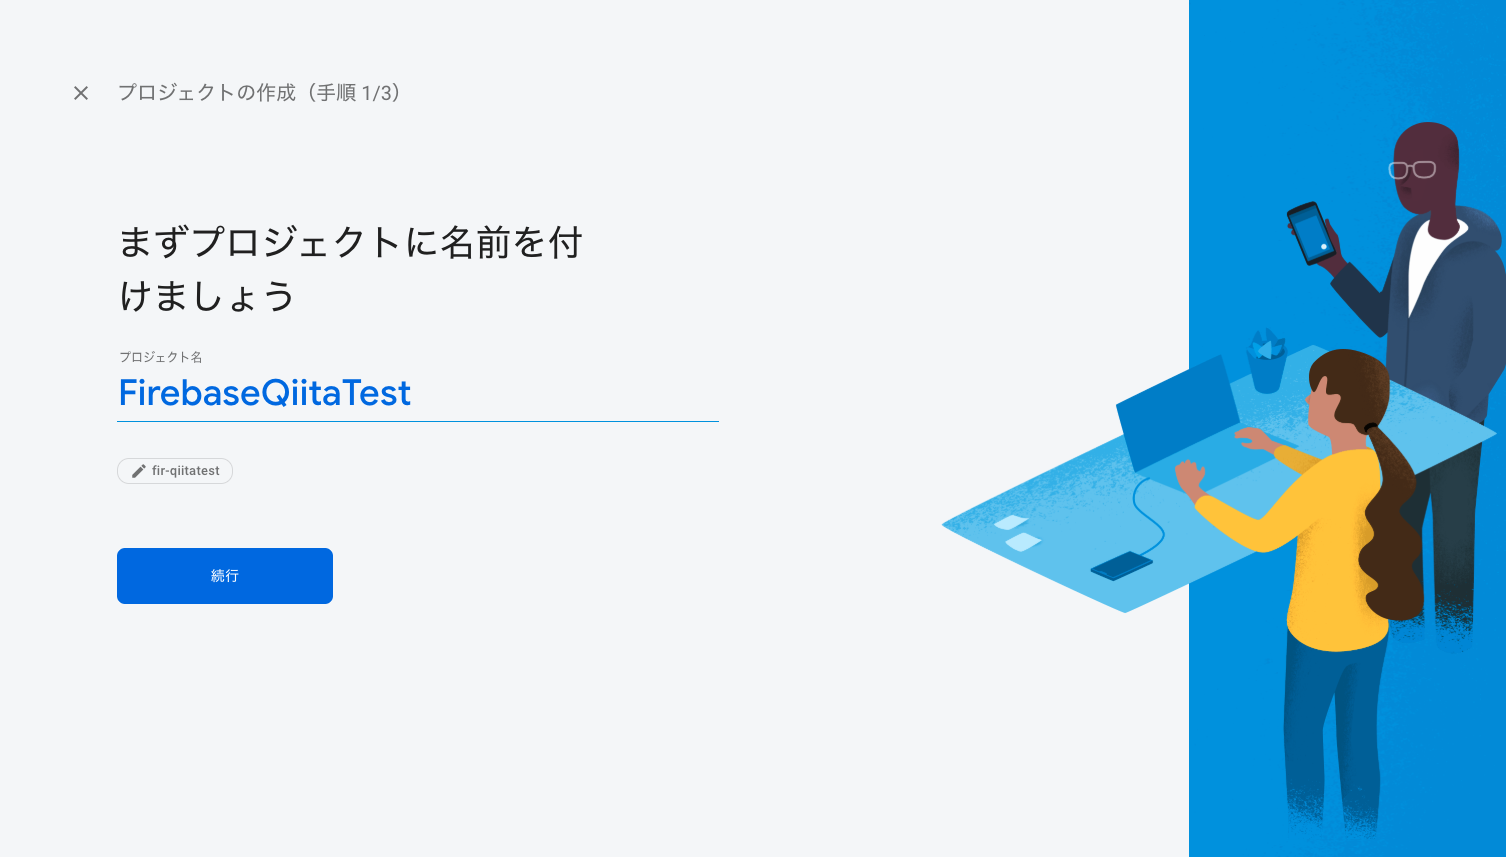
Firebaseを使用するため、Firebaseコンソールからプロジェクトを追加していきます。
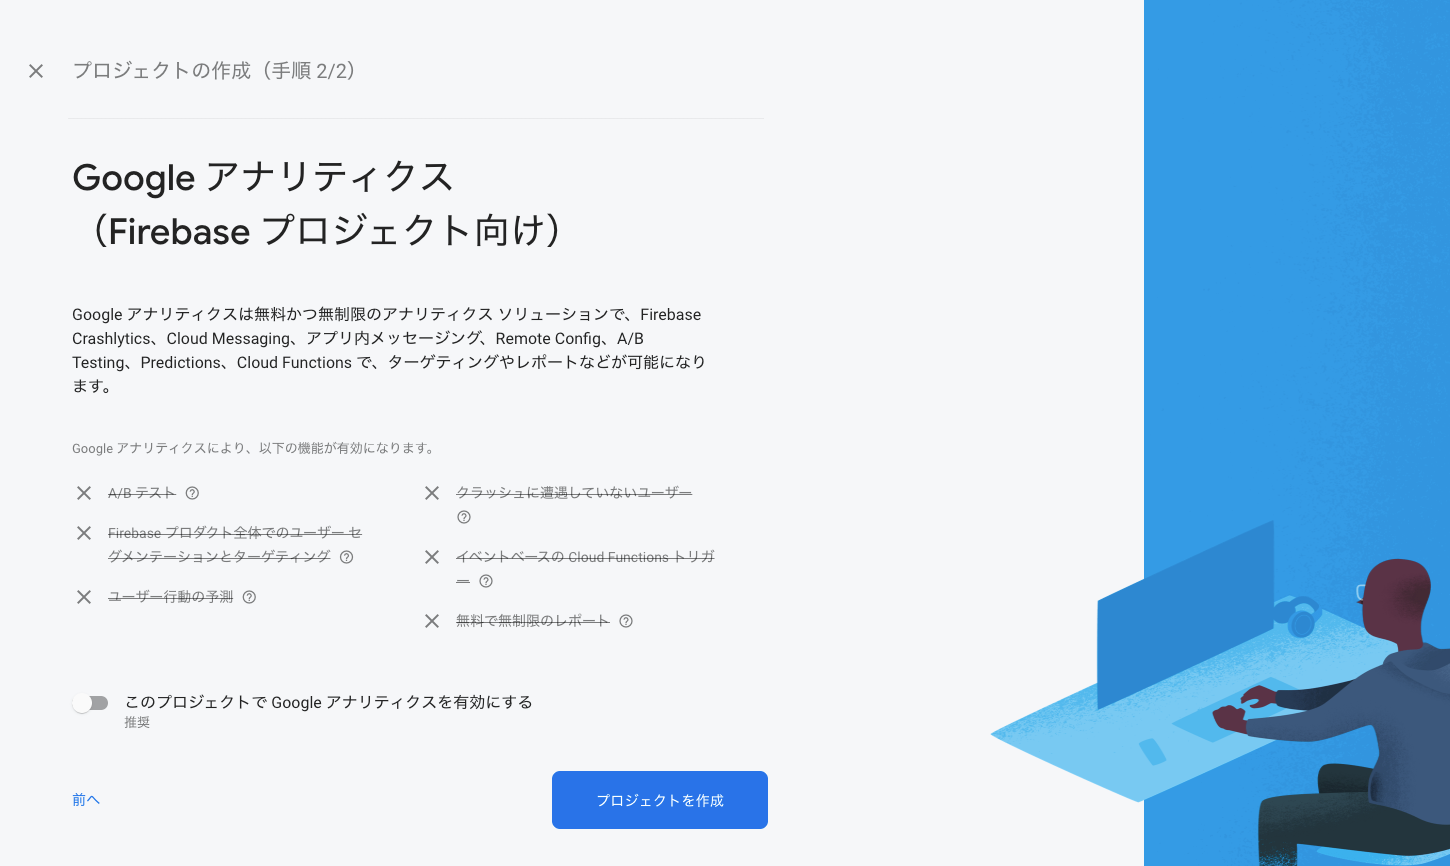
手順2でのアナリティクスは有効にすることで他のFirebaseのサービスと連携することができるのですが、
今回はできるだけシンプルに考えられるようにしたいので、Offにします。
実際は有効にして使うことがほとんどです。
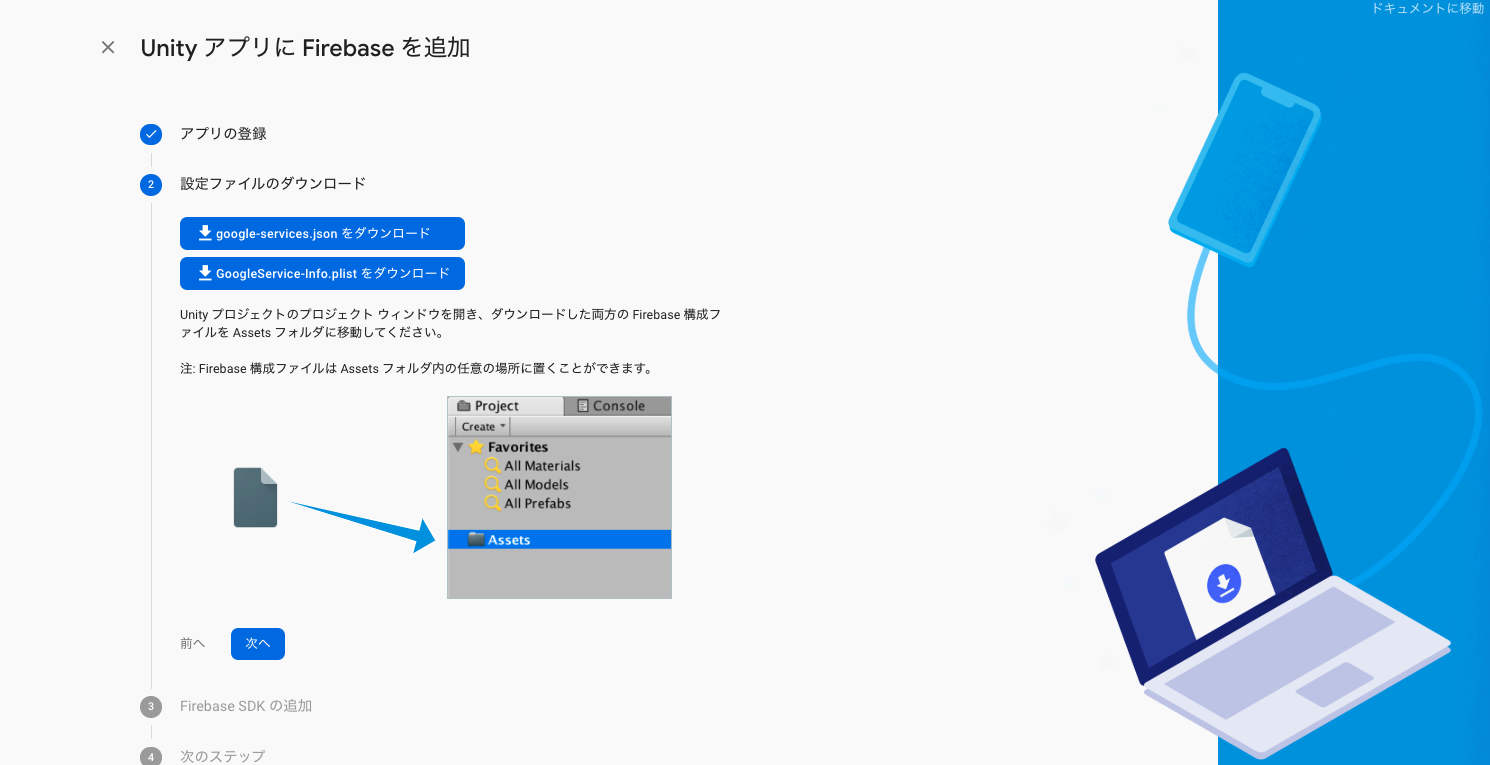
Unityアイコンから構成ファイルの作成を行なっていきます。
Register as iOS appとRegister as Android appにチェックを入れてバンドルIDとパッケージ名を登録していきます。
ここは後から変更ができないので、先にストアの作成からしてバンドルIDとパッケージ名を確定しておいた方がいいかもしれません。
構成ファイルがダウンロードできるので、指示通りダウンロードしてUnityのAssets直下にDDで追加します。
構成ファイルはAssets直下であればSDKがよしなに読み取ってくれるので任意のフォルダに整理しても大丈夫です。
SDKをダウンロードしインポートします。
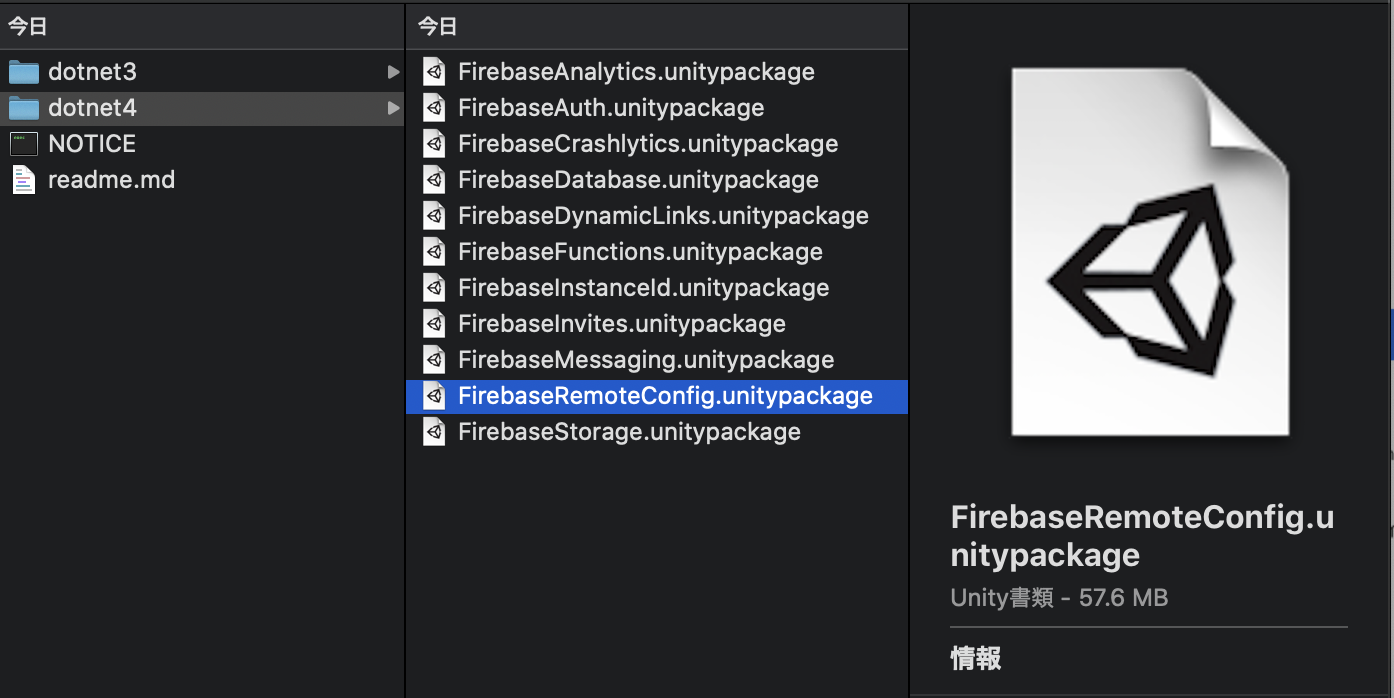
zipを解凍したら
dotnet3とdotnet4のフォルダが作成されます。
Unity 5.0以前では、.NET 3.x フレームワークを使用しているため、dotnet3フォルダのpackageを使用します。
Unity 2017.x以降では.NET 4.x フレームワークを使用できるため.NET 4.xを使用する場合はdotnet4フォルダのpackageを使用します。
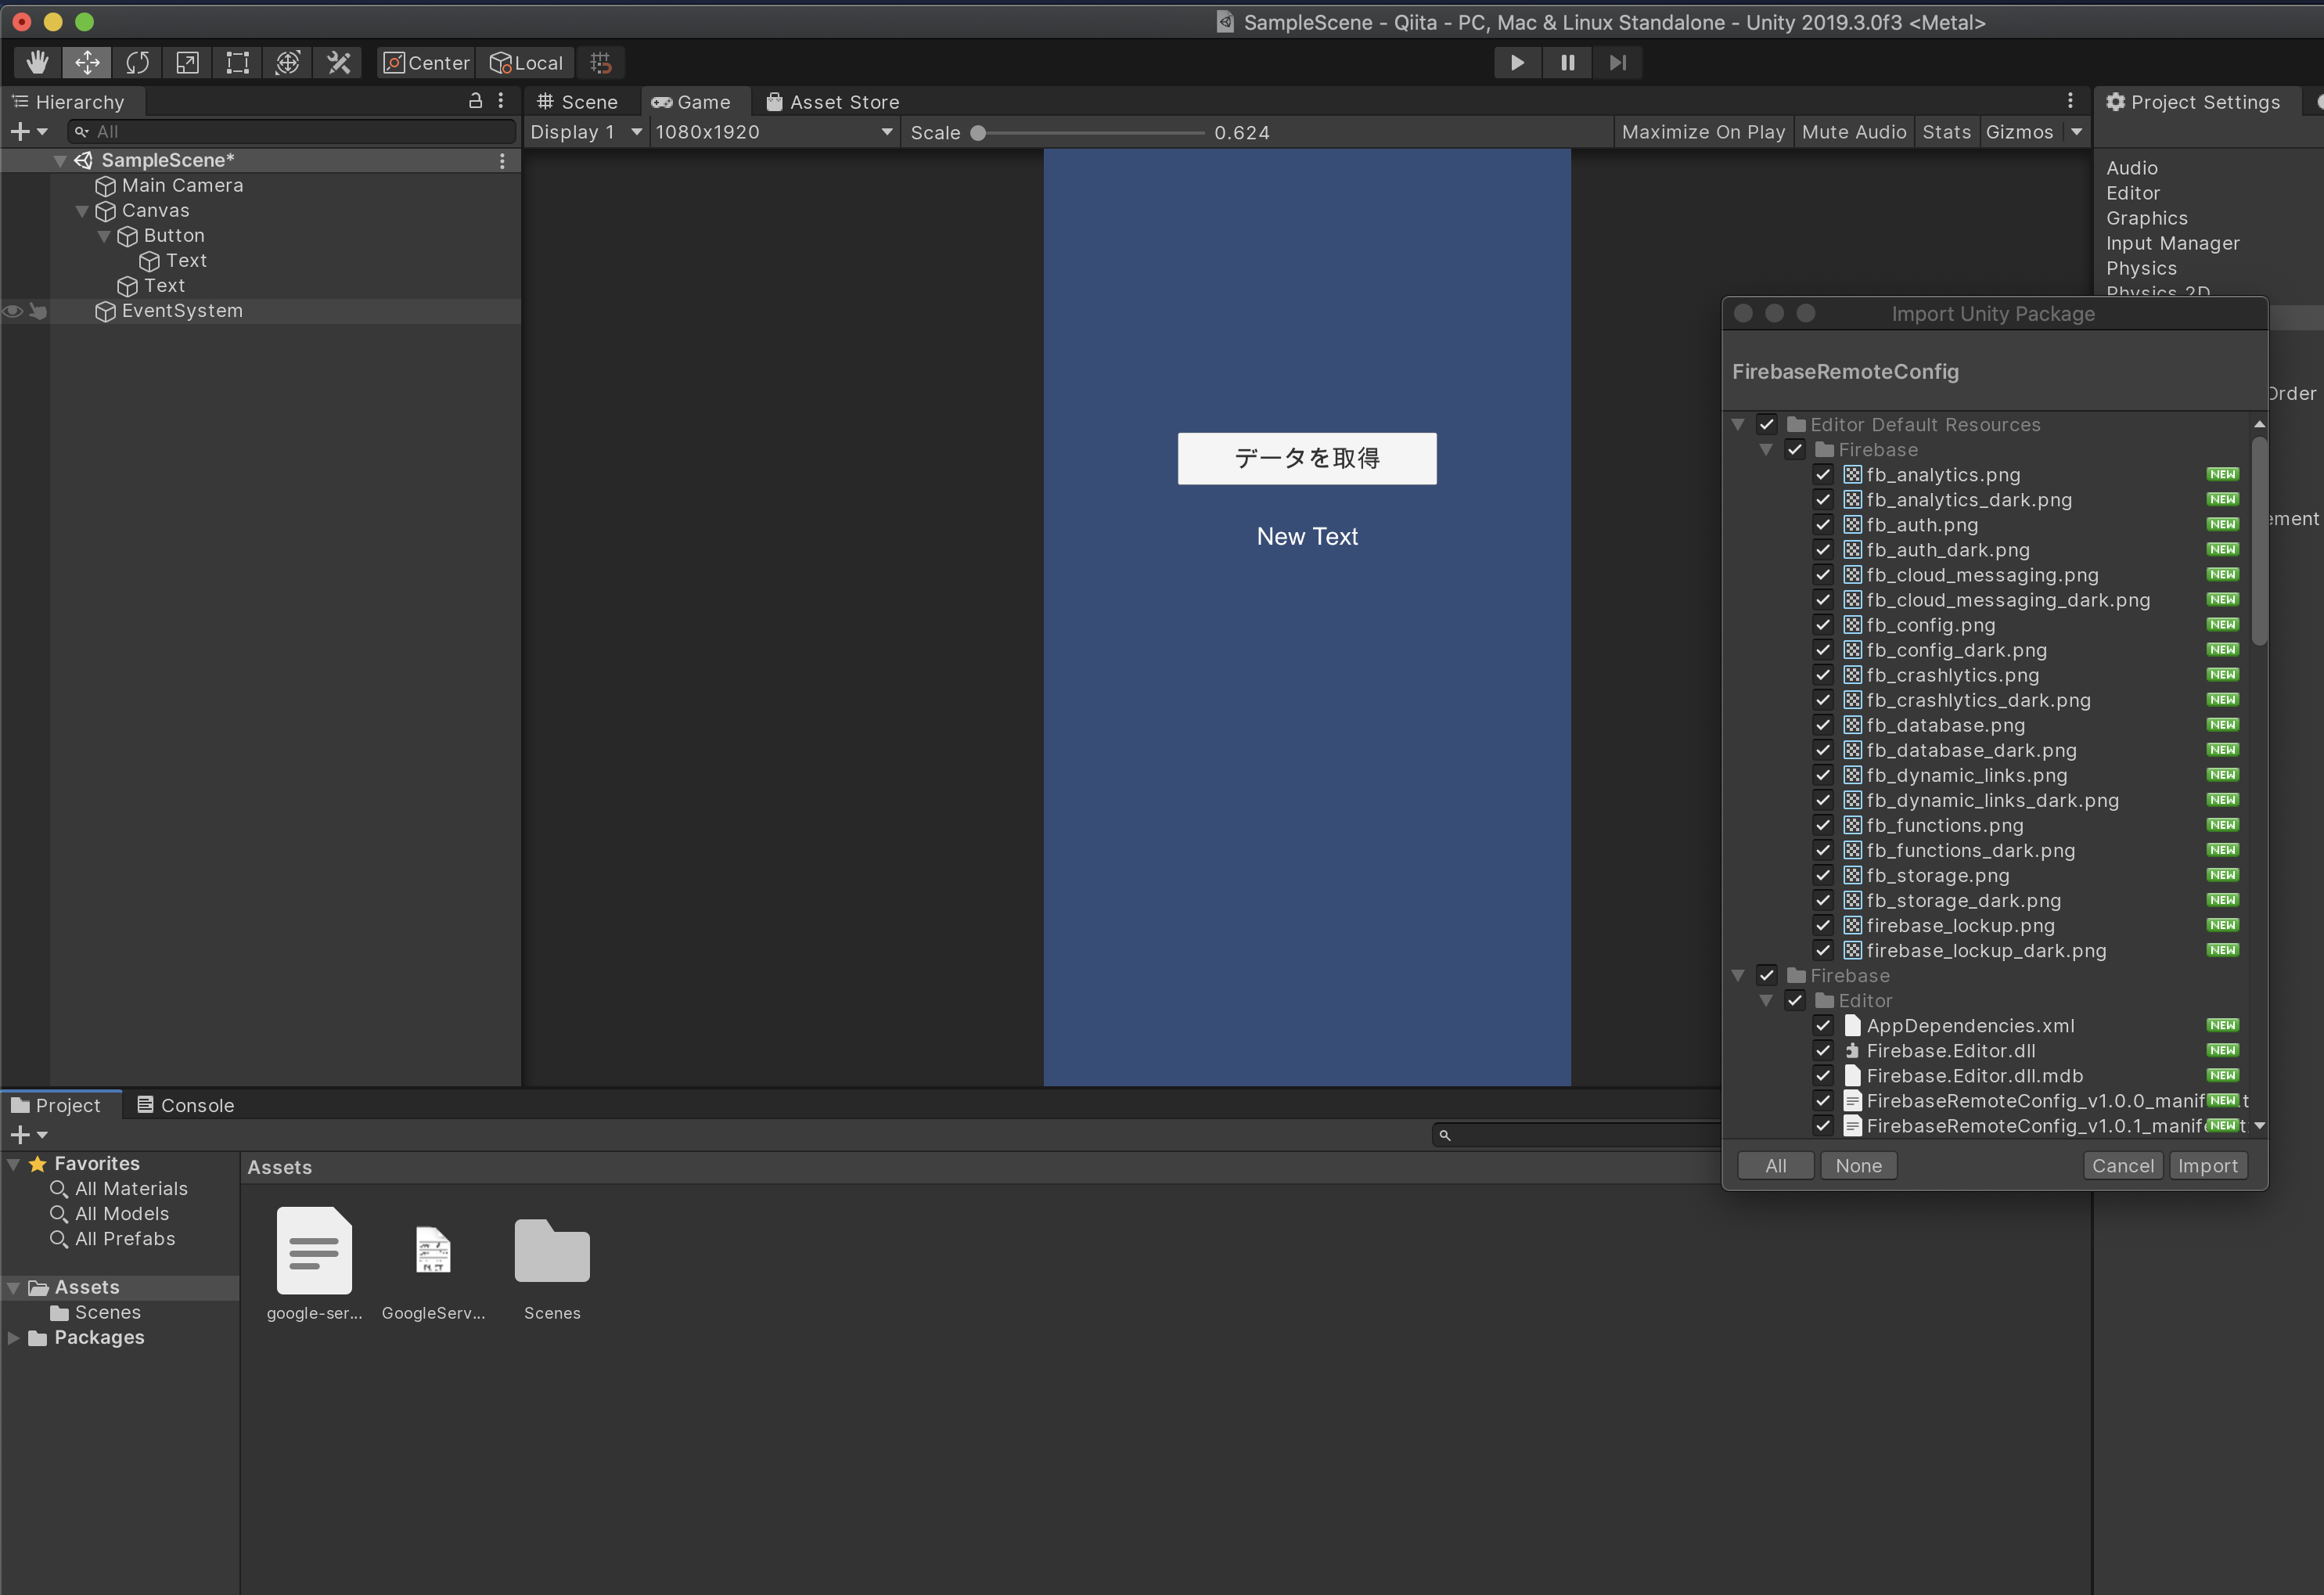
FirebaseRemoteConfig.unitypackageをダブルクリックで開いているUnityプロジェクトにインポートできます。
インポートまで完了したらセットアップは完了です。
実装
Android 向け Firebase Unity SDK には Google Play 開発者サービスが必要であり、SDK を使用する前に最新版にしておく必要があります。
アプリケーションの先頭に次のコードを追加します。
SDK で他のメソッドを呼び出す前に Google Play 開発者サービスを確認し、必要であれば、Firebase Unity SDK で必要とされるバージョンに更新するようにします。初期化
    void Start()
    {
        Firebase.FirebaseApp.CheckAndFixDependenciesAsync().ContinueWith(task =>
        {
            var dependencyStatus = task.Result;
            if (dependencyStatus == Firebase.DependencyStatus.Available) {
                // 使用する準備が整った時に通る
            } else {
                Debug.LogError(String.Format("すべてのFirebase依存関係を解決できませんでした: {0}", dependencyStatus));
            }
        });
    }
デフォルトパラメータ値の設定
Remote Config オブジェクトにデフォルトのパラメータ値を設定しておくと、Firebaseから値を取得できない場合にデフォルト値を使用するようにできます。
これにより、オフラインなどの状況でもアプリがクラッシュしないようにできます。// リモート設定を初期化し、デフォルト値を設定します。 void InitializeRemoteConfig() { Dictionary<string, object> defaults = new Dictionary<string, object>(); defaults.Add("remote_string_value", "ローカルの文字です。"); FirebaseRemoteConfig.SetDefaults(defaults); }パラメータ値の取得
Firebaseからデータをフェッチすることでデータを取得できます。
    //フェッチリクエストを開始します。
    public Task FetchDataAsync() {
      Debug.Log("データを取得しています...");
      System.Threading.Tasks.Task fetchTask = Firebase.RemoteConfig.FirebaseRemoteConfig.FetchAsync(
          TimeSpan.Zero);
      return fetchTask.ContinueWithOnMainThread(FetchComplete);
    }

    void FetchComplete(Task fetchTask) {
      if (fetchTask.IsCanceled) {
          Debug.Log("フェッチはキャンセルされました。");
      } else if (fetchTask.IsFaulted) {
          Debug.Log("フェッチでエラーが発生しました。");
      } else if (fetchTask.IsCompleted) {
          Debug.Log("フェッチが正常に完了しました!");
      }

      var info = Firebase.RemoteConfig.FirebaseRemoteConfig.Info;
      switch (info.LastFetchStatus) {
        case Firebase.RemoteConfig.LastFetchStatus.Success:
          Firebase.RemoteConfig.FirebaseRemoteConfig.ActivateFetched();
          Debug.Log(String.Format("リモートデータがロードされ、準備完了 (最終取得時間{0}",
                                 info.FetchTime));
          break;
        case Firebase.RemoteConfig.LastFetchStatus.Failure:
          switch (info.LastFetchFailureReason) {
            case Firebase.RemoteConfig.FetchFailureReason.Error:
              // 不明な理由でフェッチに失敗しました
              break;
            case Firebase.RemoteConfig.FetchFailureReason.Throttled:
              Debug.Log( info.ThrottledEndTime + "まで取得を抑制");
              break;
          }
          break;
        case Firebase.RemoteConfig.LastFetchStatus.Pending:
          Debug.Log("最新のフェッチ呼び出しはまだ保留中です。");
          break;
      }
    }
パラメータ値を使用するには
GetBalue()関数を使用します。var value = Firebase.RemoteConfig.FirebaseRemoteConfig.GetValue("remote_string_value").StringValue;これらを使用して、ボタンを押したらフェッチを行います。
先ほど作成したテキストに状態を表示できるようにしていきます。
Debug.LogをすべてDebugLogに置き換えることで表示を更新できるようにします。//デバッグログテキストフィールドとコンソールにテキストを出力します。 public void DebugLog(string s) { uiText.text = s; }あとはこれらをUnityに設定していきます。
動作確認
このままだと、まだデフォルトしか表示されていないので次にFirebase側で更新したいパラメータを設定していきます。
先ほど作成したFirebaseプロジェクトからRemote Configの管理画面を開きます。
管理画面から、簡単にパラメータの追加が行えるので
先ほどプログラムで引数に与えたremote_string_valueのキーで設定していきます。
追加できたら右上の変更を公開を押して動作確認してみてください。
さいごに
とても簡単にサーバーレスで即時にアプリの変更をすることができましたね。
ストアの規約上、なんでも変更していいというわけではないですが
A/Bテストなどではとても力を発揮すると思いますので是非使ってみてください。






- 投稿日:2019-12-19T12:13:04+09:00
【AOSP】Androidが文鎮化しそうな時に工場出荷時状態に戻す方法
ビルドしたAndroidOSを実機に入れようとして、謎のエラーを吐いて完全に詰んだ時などに役立ちます。
工場出荷時状態に戻すので、当然ですがデータは全て消えます。事前準備
fastbootモードに入る
- 実機をPCに接続します
- fastbootモードに入るために次のコマンドを打ちます
$ adb reboot bootloaderadbコマンドが使えない方はググるか、こちらの記事を参照してください
- 【AOSP】ビルドしたAndroidOSを実機に入れるブートローダーをアンロックする
fastbootモードで次のコマンドを叩いて、ブートローダーをアンロックします
$ fastboot flashing unlock
- 音量ボタン押して
Do not unlock the bootloaderをUnlock the bootloaderに変更し、電源ボタンを押しますDevice stateがunlockedになっていればOKです
工場出荷時状態に戻す
- こちらのサイトから各端末の工場出荷時イメージをダウンロードします
- 自分の端末の名前の欄を見つけます
- 本記事ではPixel 3aを使うため、
"sargo" for Pixel 3aの欄を見つけます
- 好みのバージョンをダウンロードすると、
sargo-qq1a.191205.011のようなフォルダがダウンロードされます- ターミナルで、ダウンロードしたフォルダのpathに移動し、次のコマンドを叩きます
$ ./flash-all.shこれでしばらく待つとAndroidが正常に起動します
- 投稿日:2019-12-19T12:12:40+09:00
【AOSP】ビルドしたAndroidOSを実機に入れる
この記事はFUN Advent Calendar 2019の19日目の記事です。
未来大生なら誰もが触っているAndrooidOSについてです。AndroidOSをビルドして、実機で動かす方法について説明します。
エミュレータで動かす方法については@natmarkさんの記事が一番わかりやすいです。※こちらの方法で端末が文鎮化しても一切責任は取りません
文鎮化した場合はこちらの記事を参考に直してみてください
- 【AOSP】Androidが文鎮化しそうな時に工場出荷時状態に戻す方法環境
ビルドするためには、64ビットで250GBの空き容量が必要です。
自分はこんな感じの環境でやりました。
- OS: Ubuntu18.04
- RAM: 8GB
- CPU: Corei3(2コア/4スレッド)
- ROM: HDD 500GB
- 実機: Pixel 3a
ビルドの準備
必要なパッケージをインストール
$ sudo apt update
$ sudo apt -y install curl make zip unzip \
git python default-jre openjdk-8-jdk \
bison g++-multilib gcc-multilib libxml2-utils
repoのインストール
ソースコードのDLに必要repoが必要になります
$ mkdir ~/bin
$ PATH=~/bin:$PATH
$ curl https://storage.googleapis.com/git-repo-downloads/repo > ~/bin/repo
$ chmod a+x ~/bin/repo
プロジェクト用のフォルダの作成
$ mkdir AOSP
$ cd AOSP
リポジトリのクローン
$ repo init -u https://android.googlesource.com/platform/manifest -b android-10.0.0_r1
$ repo sync -j4
-b android-10.0.0_r1でタグを選択しています
- タグ一覧
- ここで選択するタグはなんでもいいわけではなく、
Supported devicesに、AndroidOSを入れようとしている実機の名前が無いといけません。- 本記事ではPixel 3aを使用するので、Pixel 3aをサポートしている
android-10.0.0_r1を選択していますrepo syncでリポジトリのクローンをします
- 環境にもよりますが、1時間以上かかります
デバイスドライバの入手
- リポジトリをクローンをした時のタグのビルドバージョンを確認します
android10.0.0-r1のビルドバージョンはQP1A.190711.019- こちらのページで、端末名とビルドバージョンにあったものを探します

Vendor imageのDownload Linkのリンクのアドレスをコピーして、AOSPフォルダ内でcurlして解凍します$ curl -o hoge コピーしたリンクのアドレス $ tar -xzvf hoge解凍すると
x extract-google_devices-sargo.shのようにシェルが生成されるので実行します$./extract-google_devices-sargo.sh
- 利用規約が流れるのでずーっとみていって、最後に「I ACCEPT」と入力してくださいと表示されるので「I ACCEPT」を入力してEnterを押します
- すると、AOSPフォルダ内に
vendorが生成されます
- ここでビルドバージョンを間違えると、ビルドと実機に入れることが成功しても、タッチが効かないなどバグるので気をつけてください
ビルド
前準備
AOSPフォルダ内で以下のコマンド入力します
$ export LC_ALL=C
$ source build/envsetup.sh #環境設定
$ lunch ターゲット端末のコードネーム
- ローケル環境変数を英語にしないとビルドがこけるため
LC_ALL=Cとしますsource build/envsetup.shでlunchコマンドなどが使えるようになりますlunchコマンドでは、どの端末を対象とするのか、コードネームを指定する必要があり、このページから各端末のコードネームを確認することができます- Pixel 3aのコードネームは
sargoなので、lunch aosp_sargo-userdebugと叩きます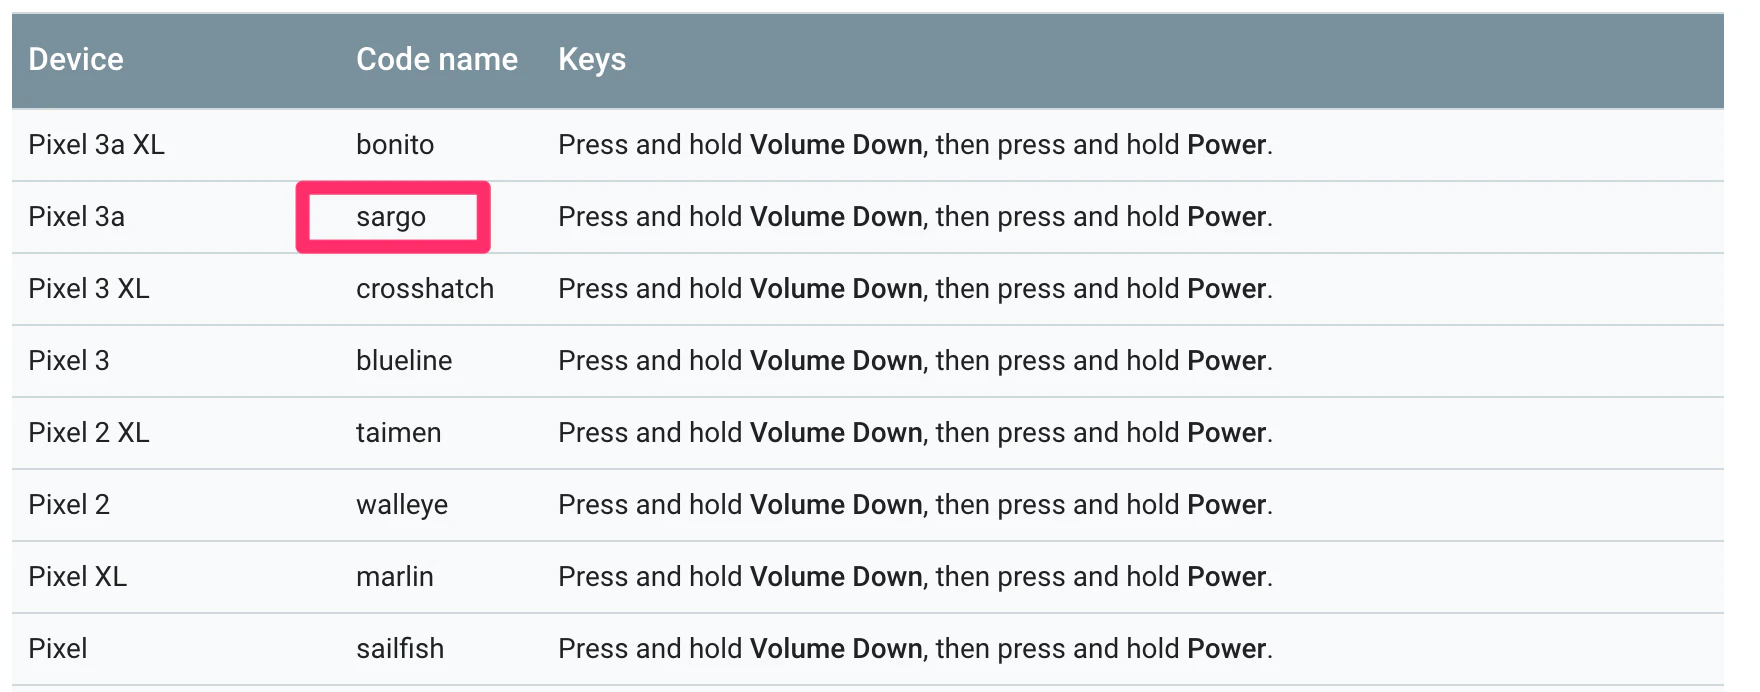
- 引数なしで
lunchのみを叩くと全てのターゲットの選択肢が表示されるので、それで指定することもできます$ lunch You're building on Linux Lunch menu... pick a combo: 1. aosp_arm-eng 2. aosp_arm64-eng 3. aosp_blueline-userdebug 4. aosp_bonito-userdebug 5. aosp_car_arm-userdebug 6. aosp_car_arm64-userdebug 7. aosp_car_x86-userdebug 8. aosp_car_x86_64-userdebug 9. aosp_cf_arm64_phone-userdebug 10. aosp_cf_x86_64_phone-userdebug 11. aosp_cf_x86_auto-userdebug 12. aosp_cf_x86_phone-userdebug 13. aosp_cf_x86_tv-userdebug 14. aosp_crosshatch-userdebug 15. aosp_marlin-userdebug 16. aosp_sailfish-userdebug 17. aosp_sargo-userdebug 18. aosp_taimen-userdebug 19. aosp_walleye-userdebug 20. aosp_walleye_test-userdebug 21. aosp_x86-eng 22. aosp_x86_64-eng 23. beagle_x15-userdebug 24. fuchsia_arm64-eng 25. fuchsia_x86_64-eng 26. hikey-userdebug 27. hikey64_only-userdebug 28. hikey960-userdebug 29. hikey960_tv-userdebug 30. hikey_tv-userdebug 31. m_e_arm-userdebug 32. mini_emulator_arm64-userdebug 33. mini_emulator_x86-userdebug 34. mini_emulator_x86_64-userdebug 35. poplar-eng 36. poplar-user 37. poplar-userdebug 38. qemu_trusty_arm64-userdebug 39. uml-userdebug Which would you like? [aosp_arm-eng] 17ビルド
$ make -j4
- -jオプションでスレッド数を指定すると、ビルド時間を短縮できます
- 自分の環境では8時間かかりました
ビルドの完了
#### build completed successfully (49:27 (mm:ss)) ####最後にこれが表示されていればビルド成功です!
キャッシュ
- キャッシュを有効にすると次回以降のビルド時間を早めることができます
$ export USE_CCACHE=1 #ccacheを有効にする
$ export CCACHE_DIR=/home/$USER/.ccache #キャッシュディレクトリの指定
$ ccache -M 100G #ccacheでキャッシュするサイズ上限
ビルドが失敗した場合
- 前のビルドで生成されたファイルを削除します
- 基本的にビルドに失敗した場合に使います
$ make clobber実機にビルドしたAndroidOSを入れる
adb, fastbootの導入
adbとfastbootを導入します
$ sudo apt-get install android-tools-adb
$ sudo apt-get install android-tools-fastboot
- adbとfastbootは最新バージョンでなければ実機に入れる時にエラーを吐きます
- 上記コマンドで最新バージョンを入手できたとは限らないため、このページから入手します
- SDK Platform-Tools for Linuxをダウンロードして解凍すると、platform-toolsが生成され、その中に最新バージョンのadbとfastbootが入っています
現状入っているadbを最新バージョンのadbと置き換えるため、
adb --versionを使ってadbの場所を確認します$ adb --version Android Debug Bridge version 1.0.41 Version 29.0.5-5949299 Installed as /usr/lib/android-sdk/platform-tools/adb
/usr/lib/android-sdk/platform-tools/adbに入っていることを確認したので、/usr/lib/android-sdk/platform-toolsをダウンロードしたplatform-toolsと置き換えます- これで最新のadbとfastbootを導入することができました
実機の設定をする
- 設定アプリを開き、デバイス情報を開き、一番下にある「ビルド番号」を10回ほど連続でタップします
- これで開発者向けオプションが有効になります
システムを開き、開発者向けオプションを開きます
- 「OEMロック解除」をONにします
- 「USBデバッグ」をONにします
fastbootモードに入る
- 実機をPCに接続します
- fastbootモードに入るために次のコマンドを打ちます
$ adb reboot bootloaderするとこのような画面になります
次にブートローダーをアンロックします$ fastboot flashing unlock
音量ボタン押してDo not unlock the bootloaderをUnlock the bootloaderに変更し、電源ボタンを押します
これでブートローダーがアンロックされました
最後にこのコマンドを打ち込んでしばらく待つと...
$ fastboot flashall -w
↓
↓
↓
無事、ビルドしたAndroidOSを実機に入れることができました!!!
ANDROID_PRODUCT_OUT not setが表示された場合
boot.imgなどが入った、端末のコードネームのフォルダのpathを指定する必要があります
.bashrcを開き、pathを書きます$ vim .bashrc#.bashrcにこれを追加します export ANDROID_PRODUCT_OUT=/home/ユーザー名/AOSP/out/target/product/端末のコードネーム自分の環境(Pixel 3a)の場合、
export ANDROID_PRODUCT_OUT=/home/yamakentoc/AOSP/out/target/product/sargoとなります
最後に.bashrcを読み込んで...$ source .bashrcもう一度
fastboot flashall -wを叩くとできるはずです終わりに
ビルドしたAndroidOSを実機へ導入する方法を解説しているサイトは少なく、どうしても英語や中国語のサイトを見なければいけなく大変でした。。。(それでもサイトの内容が古かったり)
AlaskaLinuxUser AKLUというYoutubeチャンネルがAOSP関連のこと(ビルドの方法含め)で動画を随時投稿しているっぽいのでおすすめです
なんだかんだ10日間かかって実機で動かすことができたのでよかったです。
間違いなどありましたらコメントでご教授くださるとありがたいです。
fastboot flashall -wでエラーが起きたり、エラーが起きなくても、起動ができないことがよくあります。
そういう場合は使用しているandroid-10.0.0_r1などのタグ(ブランチ)が悪さしていることもあるので、どうしても上手くいかない場合はタグを切り替えてみた方がいいです
確認できているタグだと、android9.0.0_r47はfastboot flahall -wの実行中に、本来fastbootdモードに勝手に切り替わるところが切り替わらないなど、バグがあります。
エラーが起きた場合は最後にまとめたよく使うadb, fastbootコマンドが役に立つと思います。よく使うadb, fastbootコマンド
- 接続されている端末の確認
$ adb devices
 #or
$ fastboot devices
- fastbootモードで再起動
$ adb reboot bootloader
- リカバリーモードで再起動
$ adb reboot recovery
- fastbootモード内でfastbootモードを再起動
$ fastboot reboot-bootloader
- システムの通常起動
$ fastboot reboot
- fastbootdモードで再起動
$ adb reboot fastboot参考サイト
- AOSP環境構築 [備忘録]
- Android Open Source Project
- Building A Connected Android-Based Bus Stop Display
- Build your own custom Android ROM using Android Open Source Project(AOSP)
- build-aosp-on-ubuntu
- building AOSP, fastbooting on a device
- Flash Nexus Device with Compiled AOSP
- Compile AOSP 10: Setting up the build environment and repo sync


- 投稿日:2019-12-19T11:45:54+09:00
通知が届かないので Android NotificationChannel の使い方を調べてみた
NotificationChannel とは?
2018年夏~秋にかけての話になりますが、ビルドする Android SDK の APIレベルを26(Android8)に上げたところ通知が届かなくなりました。
よくよく調べてみると Android8(APIレベル26)以降、通知を表示するにはNotificationChannel を指定しなければならなくなりました。通知を実装していく上で NotificationChannel の実装・検証の過程で躓いたり気づいたことがありましたので、こちらにまとめます。NotificationChannel 作成時の注意点
作成タイミング
通知を使用するのなら NotificationChannel はアプリを起動した直後に作成すべきです。
なぜなら通知はユーザーが能動的に呼び出すものではありません。よってアプリを一度でも起動したら、端末の「設定」から NotificationChannel の設定を変更できるようになるべきです。初回起動直後に作成するようにしましょう。デフォルトのID
デフォルトのID "miscellaneous" が存在していますが、このIDを指定して createChannel をしても作ることはできません。このチャンネルは APIレベル26未満のSDKでビルドされたプログラムで通知を実装したときに使用されるチャンネルです。APIレベル26以降でこちらのIDを指定しても通知は届きません。
初回作成時のみしか設定できない項目
NotificationChannel には初回作成時のみしか設定できない項目が存在しています。たとえ deleteChannel して createChannel を行なっても、アプリを消して再インストールする または アプリのストレージのデータを削除する をしない限り変更できません。なのでアプリをリリースする際には、リリース前に NotificationChannel の設定を決めておく必要があります。
NotificationChannel のメソッド このメソッドで変更可能か? void enableLights(boolean lights) 設定メニューで変更可能
初回作成時のみ有効void enableVibration(boolean vibration) 設定メニューで変更可能
初回作成時のみ有効void setAllowBubbles (boolean allowBubbles) 不可
※API レベル29~ 未検証void setDescription(String description) 可能 void setBypassDnd(boolean bypassDnd) アプリから呼びだしても効果なし void setGroup(String groupId) 不可 void setImportance(int importance) 設定メニューで変更可能
初回作成時のみ有効void setLightColor(int argb) 不可 void setLockscreenVisibility(int lockscreenVisibility) アプリから呼びだしても効果なし
初回チャンネル作成時に、その時の端末の「ロック画面の通知設定」からコピーされ、チャンネルの設定メニューで変更可能となる
「ロック画面の通知設定」と「アプリの通知設定」から、よりセキュリティ的に強い状態で通知が表示されるvoid setName(CharSequence name) 可能 void setShowBadge(boolean showBadge) 設定メニューで変更可能
初回作成時のみ有効void setSound(Uri sound, AudioAttributes audioAttributes) 設定メニューで変更可能
初回作成時のみ有効
アプリ内のサウンドを指定するように実装し、設定メニューから別のサウンドに変更すると、ここで設定したリソースへ戻し方がわからない。戻せない?void setVibrationPattern(long[] vibrationPattern) 不可 通知実装時の注意点
通知時に設定しても NotificationChannel の設定が使用される項目
- サウンド
- ライト
- 振動
- ロック画面での表示(visibility)
Android8未満に対応する場合はこれらを設定して通知を呼びだすと、Android8以降の端末では NotificationChannel の設定が反映され、Android8未満の端末では通知時の設定が反映されます。
動作検証時は端末設定を確認しよう
- 通知に関する実装の検証を行なう場合は、アプリの「通知設定」だけではなく端末の「設定」の「通知」を確認して、実装しようとしている機能がオンになっていることを確認しましょう。また通知ランプはそもそも通知用のLEDを搭載していない端末もあるので、検証している端末が機能を満たしているか確認しましょう。
- ロック画面での通知表示を確認するには、端末のロック解除にセキュリティをかけて確認する必要があります。セキュリティをかけていない状態では「すべての内容が表示される」という状態になります。
- 投稿日:2019-12-19T01:26:37+09:00
ARCore入門チュートリアル(Unity)
こんにちはJUNOと申します。
最近本屋でAR開発に関する本を探していますがまだ数は少ないようです。
そこで今回、AR初心者向けに
AR開発環境(Unity)の導入方法とAndroidにおけるチュートリアルアプリを紹介します。参考元:Google公式ドキュメント
私の環境
・Unity
・エディタ
VisualStudio2019(今回のチュートリアルでは使用しません)
・開発PC
MacBookPro(恐らくWindowsでも同じように動作する)
・Android端末
HUAWEI P20 LITE(Android v9)要件
ハードウェア
・ARCore対応端末を確認してください。
・デバイスと開発PCがUSBケーブルで接続できるものソフトウェア
それぞれ後ほどダウンロードしていきます。
・Unity 2017.4.34f1 以降のバージョン
・Android SDK 7.0 (API Level 24) 以降のバージョン
・ARCore SDK for Unity 1.13.0 以降のバージョン【参考】
AndroidSDKを導入するため、以前はAndroidStudio(以下AS)をインストールする必要がありましたが、今はUnityHubでインストールできるのでASはなくても大丈夫かと思われます。
(検証していないため、UnityHubでAndroidSDKが導入できない場合はASを導入してください。)Unity導入
Unity及びAndroidSDKを導入していない方は以下の手順で導入してください。
今回はUnity Hubを用いてUnityを導入してみます。Unity HubというのはUnity本体ではなく、Unityのバージョンを管理してくれるツールです。
これでUnityの各種バージョンを導入でき、同時に各種モジュール(AndroidSDKなど)のインストールも行えます。Unity Hubはこちらからダウンロードしてください。
DLしたら開いて、Unityをインストールします。
Unity2019で良いでしょう。
追加するモジュールにAndroidBuildSupportにチェックを入れてください。
ここがチェックされていればAndroidSDKも導入できます。
他のモジュールはチェックをいれなくても良いです。
この状態でインストールしてください。
これでUnityの導入は完了です。ARCoreSDKのダウンロード
こちらからダウンロードしてください。
プロジェクトの作成
ここからは実際にプロジェクトを作成し、サンプルアプリをAndroid端末に導入していきます。
①新規作成
「プロジェクト」の「新規作成」を押します。
テンプレートは「3D」で、プロジェクト名に適当な名前を入力して「作成」を押してください。
これでプロジェクトが作成されます。
②Unity2019の場合パッケージをインストールする。
メニューバーからWindow > Package Managerを開く。
開いたら、この中から下記2つのパッケージをインストールする。
・Multiplayer HLAPI
・XR Legacy Input Helpers
インストールが完了したらPackageManagerを閉じる。
③ARCoreSDKのインポート
メニューバーからAssets > Import Package > Custom Packageで先ほどDLしたARCoreSDKパッケージ(arcore-unity-sdk-1.14.unitypackage)を選択する。
Import Unity Packageが表示されたら「Import」を押す。
これでARCoreSDKのインストールが完了しました。
④シーンを開く
Assets/GoogleARCore/Eamples/HelloAR/Scenes/HelloARを開く。
Hiearchy内のHelloAR Controllerをクリックする。
Inspectorでオブジェクトの設定などができる。「ARCorePawn」というのが設置するオブジェクトで右側の点を押して変更もできる。
⑤ビルドセッティング
メニューバーからFile>Build Settingsを開く。
Platformは「Android」を選択し、SwitchPlatformをクリック。
PlayerSettingsを押し、設定画面を開き、以下の設定を行う。OtherSettingsを開き、
・GraphicsAPIs中で「Vulkan」を選択し-で削除する。
・PackageNameをユニークな名前に設定する(初期値でもOK!)
(ex:com.DefaultCompany.ARCoreApp)
・Minimum API LevelをAndroid7.0'Nougat'より高いものに設定する
XR Settingsを開き、
・ARCoreSupportedにチェックを入れる。
ここまで設定できたら設定画面を閉じる。
⑥Build&RUN
Android端末とPCをUSBケーブルで接続する。
この時、Androidはデバックモードを設定し、かつファイル送信可能にしておく。
Build And Runをクリックする。
端末でアプリが起動する。
平面を認識して、その平面上でタップするとオブジェクトが出現する。
終わりに
今回はUnityを導入してARCoreのチュートリアルを体験しました。
環境を作って設定するだけでARを体験できるのはすごいですね。
機会があれば次なるステップの記事をあげられたらいいなと思います。


- 投稿日:2019-12-19T01:09:57+09:00
一日で俺の嫁を作る方法 ~一日で自分の好きな声・キャラ・見た目でおしゃべりしてくれるAIキャラクターを作ろう~
はじめに
いくつかのAPIを組み合わせることで、一日で自分の好きな声・キャラ・見た目でおしゃべりできるAIキャラクターを作りました。この記事を読めば同じ感じで誰でも一日で俺の嫁を作ることができるようになります。
また今回はVR環境版とスマートフォン環境版の二種類を作成しました。
これらのアプリとUnity Projectは以下のgithubで公開しています。
軽く試してみたい人は作り方の6に従って、AgentCraftでAIの会話例を作成して、それをSebastienでデバイスIDとして発行すれば試すことができます。詳しくは6および6に載せている資料をご覧ください。
https://github.com/gyokuro33/ai-agent何を作ったか
こんなのです。
スマートフォン版
俺の嫁を一日で作ってみた pic.twitter.com/c3xbmofXH8
— おろろ (@ororo33) December 18, 2019VR版
VRバージョン pic.twitter.com/jUok4d38qu
— おろろ (@ororo33) December 18, 2019使用したもの
NTTドコモのAgentcraft : AIエージェント作成ツール
NTTドコモのSEBASTIEN : AIエージェント基盤
SEBASTIENと音声対話するためのUnity向けSDK
Oculus社のOculus RiftS もしくはOculus LinkでOculus Riftsと同様に操作可能にしたOculus Quest
Oculus社のOVRLipsync : 3Dモデルに音声に合わせた口パクを行わせるツール
Unity Technolosies Japanのunity chan! © UTJ/UCL : 3Dモデル。可愛いくて様々なポーズや表情が揃っている。違うキャラが作りたい人は自分の好きなキャラの3Dモデル
Unity(2018.4.13f1) : ゲーム開発エンジン
適当なAndroidのスマートフォン参考にした記事
ドコモAIエージェントAPI
【UnityC#講座】ユニティちゃんの表情を替える【SetLayerWeight】
キャラクターを喋らせる!OVR Lip Syncの導入から問題発生時の解決法まで
Unityで作る!ドコモAIエージェントAPIを使った音声対話アプリ作成ハンズオン構成図
アプリの仕組みは以下のようになっています。
基本アプリ側で行うのはグラフィックの描画と音声のInput,Outputのみで、それ以外の音声認識や音声合成、会話作成などは連携するAPI先で処理しています。
作り方
1. 使用したものの欄にあるものをすべてダウンロード
バージョン指定されているものはそのバーションのものを。バーション指定されていないものは最新のものをダウンロード。
2. Unityに空のプロジェクトを作成する
3. ダウンロードした以下の三つのファイルを作成したプロジェクトにインポートする
- SEBASTIENと音声対話するためのUnity向けSDK
- OVRLipsync
- Unity Chan
インポートの方法は以下の記事を参考にしてください。
パッケージのインポート4. Asset/Sebastien/Scenes/mainのシーンを開く
5. 以下の記事を参考に、Unitychanが音声を再生することで口パクしてくれるようにする
キャラクターを喋らせる!OVR Lip Syncの導入から問題発生時の解決法まで
ただし最新のOVRLipsyncを使う場合ならVisemeToBlendTargetsの設定は記事とは異なり、以下のように設定する必要があります。
またUnity chan以外をしゃべらせたい場合は違う3Dキャラクターを同様の手順で設定して、口パクできるようにしてください。
6. 以下のハンズオン資料に従って、エージェントとの対話までできるようにする
Unityで作る!ドコモAIエージェントAPIを使った音声対話アプリ作成ハンズオン
対話内容はお好みで。この段階で、キャラがしゃべる声や会話内容などを作成します。
Agentcraftの詳しい使い方や作り方はここに載っています。
簡単に説明すると、会話については以下のように発話例とそれへの応答を決めることで、会話への対応パターンを作ることができます。
またキャラクターの声は以下のように、50以上の声から選ぶことができます。声のサンプルはここで聞くことができます。
さらにこれらの声は声質や話速、抑揚、声の高さなど様々なパラメーターをチューニングすることで、自分だけの声を作ることも可能です。
7. SpeakToLipsyncというC#スクリプトを書き、手順5で作成したLipSyncSoundに追加する
コードの内容は以下のもの。
書いている内容としては、Sebastienが合成した音声をOVRLipSyncで再生させることで、言った内容と同じことを口パクしてくれるようにする、というもの。SpeakToLipsync.cssusing System; using UnityEngine; using System.Diagnostics; using Debug = UnityEngine.Debug; using System.Threading; public class SpeakToLipsync : MonoBehaviour { public AudioSource currentAudioSource = null; public AudioSource speakAudioSource = null; public GameObject speakOb; private AudioClip beforeAudioClip; void Awake() { speakAudioSource = speakOb.GetComponent<AudioSource>(); if (!currentAudioSource) currentAudioSource = GetComponent<AudioSource>(); if (!currentAudioSource) return; } // Start is called before the first frame update void Start() { currentAudioSource.mute = false; beforeAudioClip = speakAudioSource.clip; } // Update is called once per frame void Update() { if (beforeAudioClip != speakAudioSource.clip) { currentAudioSource.clip = speakAudioSource.clip; currentAudioSource.Play(); } beforeAudioClip = speakAudioSource.clip; } }8. SpeakToLipsync.cssのSpeakObにHierarchyにあるSpeakを入れる
9. HierarchyにあるCanvasのGameObjectを非アクティブにする
10. Asset/Sebastien/Example内にあるExample.cssを以下のように変更する
関数Startの一番最後、speak.start();の次に以下の二行を入れてください。
speak.cancelPlay();//音声再生をキャンセルする
speak.unmute();
また関数onPlayEndに以下の一行を入れてください。
speak.unmute();こうすることで、AIキャラクターが常に音声を聞いて反応してくれるようになります。
11. (VR版を試したい場合は)Player SettingのXR SettingからVirtual Reality Supportedにチェックを入れて、VRに対応できるようにする。
12. (android版を試したい場合は)使用プラットフォームをAndroidに変える
13. 各デバイスをPCにつなぐ
14. アプリをBuild&Runする
応用例
以上に書いた作り方は基本です。
これを基にさらに工夫を加えることで、より人間のような応答をAIキャラクターがしてくれるようになります。1. AIキャラクターの応答に表情を加える
DocomoのAgentcraftには言葉以外のメタ情報を応答の際に送るという機能が存在します。
その機能を使って、AIキャラクターが応答する際に以下のような感情の情報も一緒に送り込み、その感情に応じた表情をさせることで、AIキャラクターが表情豊かに話してくれます。
表情の変え方は以下の記事を参考にすれば簡単に変えることができます。
詳しい作り方は、いいねが50超えたら書きます……(力尽きた感)
【UnityC#講座】ユニティちゃんの表情を替える【SetLayerWeight】
言葉と一緒に表情を変える pic.twitter.com/SS8JLK6of0
— おろろ (@ororo33) December 18, 20192. AIキャラクターが会話を記憶して、その情報を基に話すようにする
DocomoのAgentcraftには会話中で発された言葉を記憶して、会話を作成する機能があります。
例えば「私のことを覚えていますか?」 という質問に対して、その人と話したことがあるかで、以下のように分岐を作ることができます。
この機能を活用すると、以下のように、自分の好みなどのパーソナライズな情報を汲んでくれる、まさしく俺の嫁を作ることができます!
会話の情報を記録する pic.twitter.com/s0wImLHEuk
— おろろ (@ororo33) December 18, 2019会話の情報がまだない場合 pic.twitter.com/uwz6oGhsuN
— おろろ (@ororo33) December 18, 20193. AIキャラクターを攻略できるようにする
応用2のさらなる応用です。
このAIキャラクターには情報を記憶させることが可能です。
そして会話にはその記憶から分岐を作ることが可能です。
そしてこの記憶は会話内以外にもあらかじめ設定することが可能です。
つまり、AIキャラクターと会話して、AIキャラクターの好みに合った返答を行えば好感度が上昇or下降するようにする。そうした会話を多数作れば、会話するにしたがってどんどん好感度が上昇(もしくは下降)していく、攻略可能な俺の嫁が誕生します!
ただ一つ問題点があり、自分で作るとそこらへんの好みや会話をすべて知っている状態で会話をすることになり、非常に虚しいことです……
この記事を読んだ誰かに作ってほしい……まとめ
以上のように作っていくことで、自分の好きな声・キャラでおしゃべりしてくれるVRアシスタントを作ることができるようになります。
ぜひみんなで自分だけのキャラクターを作って、楽しんでください。
またこのアプリはSEBASTIENのデバイスIDを使用することで作成したキャラクターのAIの振る舞いを試すことができます。
つまり、他の人が育成したキャラクターとおしゃべりすることもできるんです!
この記事を読んでくれた方は、ぜひ自分だけのキャラクターを作り、それを公開することで色んなキャラクターを生み出してほしいです!




- 投稿日:2019-12-19T00:39:54+09:00
Jatpack Composeについて
元々はネイティブアプリのエンジニアでiOS/Androidアプリを作ってたんですが、今は本業ではサーバーサイドエンジニアをしていてGo言語とかでAPI作ってます。
ただ、個人でアプリを作ったりはしてるので最近流行りのJetpack Compseをまとめてみようと思います。
Jetpack Composeとは?
Jetpack Composeは2019年のGoogle I/OのDeveloper Keynoteで発表された技術で、FlutterやiOSのSwift UIのように宣言的にアプリのUIを構築できるツールキットです。
最近、FluterとかSwiftUIとかもそうですがViewをコード化するのが流行っているらしい。
サンプルを動かしてみる
Android Studio 4.0 Previewをダウンロードする。
まずはAndroidStudioのPreview版である4.0をインストールしてください。
本家のサイトから簡単にダウンロードできます。ここで余談ですが、AS4.0の起動画面カッコイイですね。
Jetpack Composeのサンプルを選択
何やら見慣れないEmpty Compose Activityをサンプルから選べるので選択してプロジェクトを起動する。
ざっとコードを見てみる
今回のサンプルコードはただのHello Androidと画面に表示するだけのサンプルアプリです。
これまでのAndroid開発だとlayoutをxmlで作成しておりますが、Jetpack ComposeだとActivityにレイアウトの構成をコードで持っており一つのファイルで管理できるのは良いと思うしViewの共通化も楽そう。MainActivity.ktpackage com.example.myapplication import android.os.Bundle import androidx.appcompat.app.AppCompatActivity import androidx.compose.Composable import androidx.ui.core.Text import androidx.ui.core.setContent import androidx.ui.material.MaterialTheme import androidx.ui.tooling.preview.Preview class MainActivity : AppCompatActivity() { override fun onCreate(savedInstanceState: Bundle?) { super.onCreate(savedInstanceState) setContent { MaterialTheme { Greeting("Android") } } } } @Composable fun Greeting(name: String) { Text(text = "Hello $name!") } @Preview @Composable fun DefaultPreview() { MaterialTheme { Greeting("Android") } }ちょっとだけ使ってみたまとめ
Androidのオーソドックスなアーキテクチャの構成だとMVVMが主流だと思いますが、layoutファイルとViewModelのデータバインディングあたりが大きく影響を受けそう。

