- 投稿日:2019-10-28T23:53:55+09:00
【Laravel】複数のテーブルをJOIN→GROUP BYでグループ化→特定のレコードを取得
前提条件
親テーブル:classes
id name 1 A 2 B 3 C 子テーブル:students
id number name class_id 1 1 AAA 1 2 2 BBB 1 3 1 CCC 2 4 2 DDD 2 5 1 EEE 3 6 3 FFF 2 やりたいこと:各クラスの中で出席番号(number)が一番最後の生徒のデータを取得
MySQLSQL
SELECT * FROM classes
    LEFT JOIN students
    ON classes.id = students.class_id
WHERE students.number IN(
    SELECT MAX(students.number)
    FROM students
    GROUP BY students.class_id
);
Laravel SQL直書き
$sql = 'students.number IN(
    SELECT MAX(students.number)
    FROM students
    GROUP BY students.class_id
)';

$student = DB::table('classes')
    ->leftJoin('students', 'classes.id','=','students.class_id')
    ->whereRaw($sql);
Laravel サブクエリ
$student = DB::table('classes')
    ->leftJoin('students', 'classes.id','=','students.class_id')
    ->whereIn('students.number', function($sub) {
        $sub->from('students')
            ->select(DB::raw('max(students.number)'))
            ->groupBy('students.class_id');
    });

- 投稿日:2019-10-28T23:34:21+09:00
formタグを使った名前検索機能ーPHP
formタグを使った検索機能ーPHP
データベースに保存されているものをformタグを使用して検索する方法。
inputタグに入力された文字列を指定しているテーブルのカラムに対して検索をかけ、一致するものを表示させる。
今回は部分一致での検索。例)
・田中
・佐藤
・鈴木
・木村「木」という文字列を検索したときの結果は
「鈴木」「木村」が結果として返ってくる。その他前方一致、後方一致、完全一致に関しては下記記事参考
https://alunote.hatenablog.com/entry/2018/09/12/143652通常部分一致をの検索をかける際は下記の書き方で実行できる。
$search = $_GET['search'];
$sql = "SELECT * FROM users WHERE name LIKE '%$search%'";
この場合、「%」を入れて検索した場合、全件取得される。
文字列として「%」を含むものを検索できなくなってしまっている・
「%」も文字として検索するためにエスケープする必要がある。select.php<?php $dbh = new PDO('mysql:host=localhost; dbname=xxxxxx; charset=utf8;', 'xxxxxx', 'xxxxxx'); $search = addslashes($_GET['search']); //検索された文字列の前にバックスラッシュを入れてエスケープする $sql = "SELECT * FROM 'テーブル名' WHERE 'カラム名' LIKE :search"; $stmt = $dbh->prepare($sql); $stmt->bindValue(':search', '%' . addcslashes($search, '\_%') . '%', PDO::PARAM_STR); //addcslashesの第二引数にエスケープの対象となる(バックスラッシュを入れる)文字列を入れる $stmt->execute(); ?>addslashes関数
エスケープすべき文字の前にバックスラッシュを付けて返します。 エスケープすべき文字とは、シングルクォート('), ダブルクォート("),バックスラッシュ () ,NUL (NULL バイト) です。
addcslashes関数
第一引数にエスケープしたい文字列、第二引数にエスケープの対象となる文字列を入れる。この方法で例えばデータベースに「%」や「_」を含むデータがあったとしても文字列を認識して検索することができる。
- 投稿日:2019-10-28T22:45:57+09:00
phpメソッドをすげ替える掟破りの技、runkit
概要
- phpのrunkitを使うと掟破りのアレコレができる
- strtotime()を叩いた時に-9h分勝手にやるとか
使いどころ
- 弊社ブラウザゲームでは開発環境で未来日のデバッグをする時などに。
参考ドキュメント
実行例
// 時間調整
//date()をオーバーライドしてsimulationTimeを返す
runkit_function_copy('date', 'date2');
runkit_function_redefine('date', '$a, $b=null', 'return date2($a, $b ? $b : strtotime("' . $simulationTime . '"));');

//strtotime()をオーバーライドしてsimulationTimeを返す
runkit_function_copy('strtotime', 'strtotime2');
runkit_function_redefine('strtotime', '$a, $b=null', 'return strtotime2($a, $b ? $b : strtotime2(date2("Y-m-d H:i:s", time())));');

//time()をオーバーライドしてsimulationTimeを返す
runkit_function_redefine('time', '', 'return strtotime2("' . $simulationTime . '");');

//DBの時刻も上書きする
Db::Update("set TIMESTAMP = unix_timestamp('{$simulationTime}');");
ハマリどころ
オーバーライドが使えない
strtotime() is an internal function and runkit.internal_override is disabled in file /xxxx/xxx.php
- 普通に「runkit.internal_override使えねーよ」って言われた
解決方法
phpinfoを見てみる
Directive   Local Value Master Value
runkit.internal_override    Off Off
runkit.superglobal  no value    no value
iniファイルで設定できる
phpinfo.additional .ini files parsedにパスがある
/etc/php.d/runkit.ini

runkit.internal_override On
雑感
- 非常に強力なので知らない人には意識させない(FWの上位で利用するetc)のが大事
- ただ開発環境のデバッグなどでイベントやキャンペーンを開きたい時に、本番相当の開催データのままデプロイできるのは非常に有用
- 投稿日:2019-10-28T20:50:13+09:00
PHPで例外発生中に例外スローすると例外チェーンになる
タイトルの通りですが、PHPで例外発生中に例外スローすると、新たな例外に以前の例外が登録されます。
以前の例外は
getPrevious()で辿ることができます。<?php try { try { throw new Exception("foo"); } finally { throw new Exception("bar"); } } catch (Exception $e) { var_dump($e->getMessage()); // "bar" var_dump($e->getPrevious()->getMessage()); // "foo" }catchブロックでは明示的に以前の例外を登録しないとチェーンにならない
ただし、上のような状況はfinallyブロックでしか起きません。catchブロックに入ったタイミングで例外は解消されるので、catchブロックで例外スローしてもチェーンにはならないのです。
catchブロックで同じことをしたい場合、Exceptionのコンストラクタ第三引数にキャッチした例外を渡せば同じことになります。
<?php

try {
    try {
        throw new Exception("foo");
    } catch (Exception $e) {
        throw new Exception("bar", 0, $e);
    }
} catch (Exception $e) {
    var_dump($e->getMessage()); // "bar"
    var_dump($e->getPrevious()->getMessage()); // "foo"
}
所感
普段PHPを使っている人でもまず知らない挙動だと思ったので紹介してみました。
言語実装者の気持ちはわかるけど、そもそもfinallyブロックで例外発生するコード書くの良くないでしょとか、勝手に以前の例外を登録するんかいとか、色々ツッコミどころがあってモヤモヤしますね。
- 投稿日:2019-10-28T20:35:17+09:00
laravelのmigrationでintのカラムが勝手にAutoIncrementにされてハマった話
laravel: 5.7.28
Mysql: 5.7先に結論
migrationを書くときには引数に気をつけよう!!
何があったの
新しいテーブルを作成するため、このようなmigrationファイルを作成し実行したところエラーが出た。
2019_10_28_000000_create_m_conf.phpclass CreateMConf extends Migration { /** * Run the migrations. * * @return void */ public function up() { Schema::create('m_conf', function (Blueprint $table) { $table->increments('id')->unsigned()->nullable(false); $table->tinyInteger('type')->unsigned()->nullable(false)->default(1); $table->integer('watcher_id', 10)->nullable(false); $table->string('content', 200)->nullable(false); $table->char('created_from', 36)->nullable(false); $table->timestamps(); }); } /** * Reverse the migrations. * * @return void */ public function down() { Schema::dropIfExists('m_conf'); } }出力されたエラー
$ php artisan migrate
Migrating: 2019_10_28_000000_create_m_conf

   Illuminate\Database\QueryException  : SQLSTATE[42000]: Syntax error or access violation: 1075 Incorrect table definition; there can be only one auto column and it must be defined as a key (SQL: create table `m_conf` (`id` int unsigned not null auto_increment primary key, `type` tinyint unsigned not null default '1', `watcher_id` int not null auto_increment primary key, `content` varchar(200) not null, `created_from` char(36) not null, `created_at` timestamp null, `updated_at` timestamp null) default character set utf8mb4 collate 'utf8mb4_unicode_ci')

  at /var/www/witone-prjct01/vendor/laravel/framework/src/Illuminate/Database/Connection.php:664
    660|         // If an exception occurs when attempting to run a query, we'll format the error
    661|         // message to include the bindings with SQL, which will make this exception a
    662|         // lot more helpful to the developer instead of just the database's errors.
    663|         catch (Exception $e) {
  > 664|             throw new QueryException(
    665|                 $query, $this->prepareBindings($bindings), $e
    666|             );
    667|         }
    668|

  Exception trace:

  1   Doctrine\DBAL\Driver\PDOException::("SQLSTATE[42000]: Syntax error or access violation: 1075 Incorrect table definition; there can be only one auto column and it must be defined as a key")
      /var/www/witone-prjct01/vendor/doctrine/dbal/lib/Doctrine/DBAL/Driver/PDOStatement.php:119

  2   PDOException::("SQLSTATE[42000]: Syntax error or access violation: 1075 Incorrect table definition; there can be only one auto column and it must be defined as a key")
      /var/www/witone-prjct01/vendor/doctrine/dbal/lib/Doctrine/DBAL/Driver/PDOStatement.php:117

  Please use the argument -v to see more details.
どうやら、AutoIncrementを複数のカラムに設定しているということでエラーが出ているらしい。
が、AutoIncrementはidカラムにしか設定していないはず・・・。改めて、まずは実行されているCREATE文を確認。
php artisan migrate --pretendで実行するSQLが確認できる。CreateMConf: create table `m_conf` (`id` int unsigned not null auto_increment primary key, `type` tinyint unsigned not null default '1', `watcher_id` int not null auto_increment primary key, `content` varchar(200) not null, `created_from` char(36) not null, `created_at` timestamp null, `updated_at` timestamp null ) default character set utf8mb4 collate 'utf8mb4_unicode_ci'やはり、エラー文の通り
watcher_idにもAutoIncrementが設定されてしまっている。
しかし、どこをどう見てもmigrationファイルでwatcher_idにはincrementsではなくintegerを設定している。試しに、カラム名を変更したりnullable()を消したりして、新しいファイルの内容がキャッシュか何かで反映されていないのかも?と確認するも
エラー内容SQLSTATE[42000]: Syntax error or access violation: 1075 Incorrect table definition; there can be only one auto column and it must be defined as a keyに変化なし。migrationがなにやってるか調べた
laravel公式リファレンスにもmigrationについてあまり詳しく書いてない。
仕方ないので、migrationでintegerカラムを設定するとき内部的にどんな処理をいているのか見てみることにした。
以下、該当箇所のみ抜粋。\vendor\laravel\framework\src\Illuminate\Database\Schema\Blueprint.php/** * Create a new integer (4-byte) column on the table. * * @param string $column * @param bool $autoIncrement * @param bool $unsigned * @return \Illuminate\Database\Schema\ColumnDefinition */ public function integer($column, $autoIncrement = false, $unsigned = false) { return $this->addColumn('integer', $column, compact('autoIncrement', 'unsigned')); }なんと、
integer()の第2引数はAutoIncrementかどうかを判断するものだった!!!
しかも第3引数はunsignedを判断するものであることも判明!
てっきり、string()やchar()などの第2引数と同じく長さを設定できると勘違いをしていました。。。修正したあとのSQL
CreateMConf: create table `m_conf`
     (`id` int unsigned not null auto_increment primary key,
      `type` tinyint unsigned not null default '1',
      `watcher_id` int not null,
      `content` varchar(200) not null,
      `created_from` char(36) not null,
      `created_at` timestamp null,
      `updated_at` timestamp null
      )
default character set utf8mb4 collate 'utf8mb4_unicode_ci'
ということで、無事にmigrationを実行することができました。
反省
- migrationが内部的にどんな処理をしているのか見るまでにとても時間がかかった
- 実際には、色々いじっていく中で同僚が第2変数を削除するとうまくいくことを発見したのが先だった
- 確実な情報を見ないで「こうやって書けばこんな感じで動くはず!」という思い込みが激しかった
- vendorの中身をみるのがちょっと怖かった
とはいえ、同じような事象で困ったという記事が見つからなかったので
同じような事象で困ってしまった人には参考になる記事が書けたかなと思います。
- 投稿日:2019-10-28T18:52:22+09:00
PHP7.4でアロー関数くるので使いやすい関数型ライブラリ作った。
こんにちわ、入田 関太郎(らむだ ふぁんたろう) です。
PHP7.4ではアロー関数がきますね。これでクロージャが簡単にたくさん作れるようになります。
さて突然ですが、カレーを食べたいですよね。食べましょう。
ライブラリを作りました。使い方
- インストール
$ composer require chemirea/lambda-php=dev-master
- 使いたいファイルで
use<?php use Chemirea\Lambda\Functional as F;あとはF::wrapを使おう!
何ができるの
F::wrap()という関数が公開されていて、ここにクロージャを突っ込んでラップするとカリー化されていて、部分適用できて、関数合成が簡単にできちゃう関数が帰ってきちゃいます。カリー化と部分適用
さくっとカリー化!
// 第一引数で第二引数を割る関数 $div = function (int $x, int $y): int { return $y / $x; } // 包んじゃう $div = F::wrap($div); // 第一引数にだけ値を適用して第二引数を引数にとる関数を生成 $divByTwo = $div(2); // やったね $divByTwo(10); // 5関数合成
ラップされた関数は直接
()で呼び出せるのに->bind($f)をつけると$fを合成できる!引数
$fはF:wrapでラップされた関数でも、ただのクロージャでも可能。$addOne = F::wrap(function (int $x, int $y): int { return $x + $y; }); $addTwo = function(int $x): int { return $x + 2; } // 関数合成するためのメソッド $addOneAddTwoAddTwo = $addOne->bind($addTwo)->bind($addTwo); $addOneAddTwoAddTwo(1); // 6たいていのこうやったらいい感じに動いてくれないかなーって構造はある程度網羅してるので使ってみてください。
おまけ
組み込みのarray向け関数も用意しているよ。
全ての関数がカリー化されていて、部分適用可能で、合成可能だよ。
対応表
array_map() -> Vec::map() array_filter() -> Vec::filter() その他全て...
arrayの部分をVec::にかえるだけだね!array_がつかない
hogehoge関数はそのままVec::hogehogeとかくと動くよ。リポジトリ
https://github.com/chemirea/lambda-php
機能追加やドキュメント整備など貢献したい方はぜひよろしくお願いします。CI系たくさん入っているのでたくさんプルリクください。
おしまい
カリー化も部分適用も関数合成もこれであってるのかわかりません...
イケてるHaskellerのみなさんぜひご教授ください...ライブラリ内部に関してはまた解説します。
- 投稿日:2019-10-28T18:52:22+09:00
PHPでカリー化と部分適用と関数合成
こんにちわ、入田 関太郎(らむだ ふぁんたろう) です。
PHP7.4ではアロー関数がきますね。これでクロージャが簡単にたくさん作れるようになります。
さて突然ですが、カレーを食べたいですよね。食べましょう。
ライブラリを作りました。何ができるの
F::wrap()という関数が公開されていて、ここにクロージャを突っ込んでラップするとカリー化されていて、部分適用できて、関数合成が簡単にできちゃう関数が帰ってきちゃいます。カリー化と部分適用
さくっとカリー化!
// 第一引数で第二引数を割る関数 $div = function (int $x, int $y): int { return $y / $x; } // 包んじゃう $div = F::wrap($add); // 第一引数にだけ値を適用して第二引数を引数にとる関数を生成 $divByTwo = $div(2); // やったね $divByTwo(10); // 5関数合成
ラップされた関数は直接
()で呼び出せるのに->bind($f)をつけると$fを合成できる!引数
$fはF:wrapでラップされた関数でも、ただのクロージャでも可能。$addOne = F::wrap(function (int $x, int $y): int { return $x + $y; }); $addTwo = function(int $x): int { return $x + 2; } // 関数合成するためのメソッド $addOneAddTwoAddTwo = $addOne->bind($addTwo)->bind($addTwo); $addOneAddTwoAddTwo(1); // 6たいていのこうやったらいい感じに動いてくれないかなーって構造はある程度網羅してるので使ってみてください。
usage
- インストール
$ composer require chemirea/lambda-php=dev-master
- ユーズ
<?php

use Chemirea\Lambda\Functional as F;
あとはF::wrapを使おう!
おまけ
組み込みのarray向け関数も用意しているよ。
全ての関数がカリー化されていて、部分適用可能で、合成可能だよ。
対応表
array_map()    -> Vec::map()
array_filter() -> Vec::filter()
その他全て...
arrayの部分をVec::にかえるだけだね!array_がつかない
hogehoge関数はそのままVec::hogehogeとかくと動くよ。リポジトリ
https://github.com/chemirea/lambda-php
機能追加やドキュメント整備など貢献したい方はぜひよろしくお願いします。CI系たくさん入っているのでたくさんプルリクください。
おしまい
カリー化も部分適用も関数合成もこれであってるのかわかりません...
イケてるHaskellerのみなさんぜひご教授ください...ライブラリ内部に関してはまた解説します。
- 投稿日:2019-10-28T15:02:50+09:00
Laravel 6で旅行予約サイトを作成してAuth0で認証機能を追加する
はじめに
この記事はLaravelフレームワークで旅行予約サイトを作成して、Auth0で認証機能を追加する手順で、こちらの原文を元に作成しています。完成版のソースコードはここで公開しています。
前提条件と検証環境
sshキーペアの作成、PHP, Virtualbox, Vagrant, Node, NPMのインストール、およびAuth0の無料アカウントの取得とテナントの作成が完了していることが前提となっています。Auth0の無料アカウント取得がまだの方はこちらの記事を参照の上ご準備をお願いします。
- OS :
macOS Mojave 10.14.6- PHP :
7.2.24- Virtualbox :
6.0.14 r133895 (Qt5.6.3)- Vagrant :
2.2.6- node :
10.15.3- npm :
6.12.0手順
各種ツールのインストール
PHP7.2をインストールします。この記事ではこちらを参考にインストールしています。
composer(PHPのパッケージ管理ツール)をインストールします。この記事ではこちらを参考にインストールしています。インストール後、~/.composer/vendor/binをPATHにセットします。その他のツールのインストール手順は割愛します。Qiitaに多数記事が掲載されているのでそれらをご参照お願いします。
composerを使ってLaravelをインストールします。$ composer global require laravel/installerLaravel Homesteadの設定
Laravelのプロジェクトを作成します。
$ laravel new travel-planet-crud
$ cd travel-planet-crud
Laravel Homestead Vagrant boxをダウンロードします。
$ vagrant box add laravel/homesteadHomesteadをインストールします。
$ pwd
~/travel-planet-crud
$ composer require laravel/homestead --dev
Homestead.yaml(構成情報ファイル)を作成します。
$ php vendor/bin/homestead make/etc/hostsファイルにホスト名を追加します。IPはHomestead.yamlに記載されています。
/etc/hosts192.168.10.10 homestead.test仮想マシンを起動します。
$ pwd
~/travel-planet-crud
$ vagrant up
Chrhomeで
http://homestead.testにアクセスしてページが表示されることを確認します。Routeの作成
routes/web.phpを編集してルートを指定します。手順の後半でApplicationとAuth0を連携します。ここでは連携後のAuth0モデルを利用することを前提としています。
<?php

/*
|--------------------------------------------------------------------------
| Web Routes
|--------------------------------------------------------------------------
|
| Here is where you can register web routes for your application. These
| routes are loaded by the RouteServiceProvider within a group which
| contains the "web" middleware group. Now create something great!
|
*/

Route::view('/', 'home');
Route::get('/hotels', 'HotelController@index');
Route::get('/auth0/callback', '\Auth0\Login\Auth0Controller@callback' )->name('auth0-callback');
Route::get('/login', 'Auth\Auth0IndexController@login')->name('login');
Route::get('/logout', 'Auth\Auth0IndexController@logout')->name('logout')->middleware('auth');

Route::group(['prefix' => 'dashboard', 'middleware' => 'auth'], function() {
    Route::view('/', 'dashboard/dashboard');
    Route::get('reservations/create/{id}', 'ReservationController@create');
    Route::resource('reservations', 'ReservationController')->except('create');
});
Databaseの作成
reservation, hotels, roomsの3つのテーブルを作成します。
設定
MySQLのパラメータを修正します。
travel-planet-crud/.env---省略--- DB_CONNECTION=mysql DB_HOST=127.0.0.1 DB_PORT=3306 DB_DATABASE=homestead DB_USERNAME=homestead DB_PASSWORD=secret --省略--Modelの作成
Modelファイルを作成します。この記事ではLaravel's Eloquent ORMを利用したModelを作成します。
$ pwd
~/travel-planet-crud
$ mkdir app/Models
$ php artisan make:model Models/Hotel -m
$ php artisan make:model Models/Room -m
$ php artisan make:model Models/Reservation -m
Hotel.php, Room.php, Reservation.phpを編集して属性とテーブル間の相関を定義します。
app/Models/Hotel.php<?php namespace App\Models; use Illuminate\Database\Eloquent\Model; class Hotel extends Model { public $timestamps = false; protected $fillable = [ 'name', 'location', 'description', 'image' ]; public function rooms() { return $this->hasMany('App\Models\Room'); } }app/Models/Room.php<?php namespace App\Models; use Illuminate\Database\Eloquent\Model; class Room extends Model { public $timestamps = false; protected $fillable = [ 'hotel_id', 'type', 'description', 'price', 'image' ]; public function hotel() { return $this->belongsTo('App\Models\Hotel'); } }app/Models/Reservation.php<?php namespace App\Models; use Illuminate\Database\Eloquent\Model; class Reservation extends Model { protected $fillable = [ 'user_id', 'room_id', 'num_of_guests', 'arrival', 'departure' ]; public function room() { return $this->belongsTo('App\Models\Room'); } }Migrationの作成
LaravelのMigration(データベースのバージョンコントロール)を作成します。
プロジェクトルートディレクトリ配下のdatabase/migrations/xxxx_xx_xx_xxxxx_create_hotels_table.phpを編集します。travel-planet-crud/database/migrations/xxxx_xx_xx_xxxxx_create_hotels_table.php<?php use Illuminate\Database\Migrations\Migration; use Illuminate\Database\Schema\Blueprint; use Illuminate\Support\Facades\Schema; class CreateHotelsTable extends Migration { /** * Run the migrations. * * @return void */ public function up() { Schema::create('hotels', function (Blueprint $table) { $table->bigIncrements('id'); $table->string('name'); $table->string('location'); $table->string('description'); $table->string('image'); }); } /** * Reverse the migrations. * * @return void */ public function down() { Schema::dropIfExists('hotels'); } }database/migrations/xxxx_xx_xx_xxxxx_create_rooms_table.phpを編集します。
travel-planet-crud/database/migrations/xxxx_xx_xx_xxxxx_create_rooms_table.php<?php use Illuminate\Database\Migrations\Migration; use Illuminate\Database\Schema\Blueprint; use Illuminate\Support\Facades\Schema; class CreateRoomsTable extends Migration { /** * Run the migrations. * * @return void */ public function up() { Schema::create('rooms', function (Blueprint $table) { $table->bigIncrements('id'); $table->unsignedBigInteger('hotel_id'); $table->foreign('hotel_id')->references('id')->on('hotels'); $table->string('type'); $table->string('description'); $table->decimal('price', 10, 2); $table->string('image'); }); } /** * Reverse the migrations. * * @return void */ public function down() { Schema::dropIfExists('rooms'); } }database/migrations/xxxx_xx_xx_xxxxx_create_reservations_table.phpを編集します。
travel-planet-crud/database/migrations/xxxx_xx_xx_xxxxx_create_reservations_table.php<?php use Illuminate\Database\Migrations\Migration; use Illuminate\Database\Schema\Blueprint; use Illuminate\Support\Facades\Schema; class CreateReservationsTable extends Migration { /** * Run the migrations. * * @return void */ public function up() { Schema::create('reservations', function (Blueprint $table) { $table->bigIncrements('id'); $table->timestamps(); $table->string('user_id'); $table->unsignedBigInteger('room_id'); $table->foreign('room_id')->references('id')->on('rooms'); $table->integer('num_of_guests'); $table->date('arrival'); $table->date('departure'); }); } /** * Reverse the migrations. * * @return void */ public function down() { Schema::dropIfExists('reservations'); } }データの投入
Seeder Fileを作成します。
$ pwd
~/travel-planet-crud
$ php artisan make:seeder HotelSeeder
$ php artisan make:seeder RoomSeeder
$ php artisan make:seeder ReservationSeeder
database/HotelSeeder.phpを編集します。
travel-planet-crud/database/HotelSeeder.php<?php use Illuminate\Database\Seeder; use App\Models\Hotel; class HotelSeeder extends Seeder { /** * Run the database seeds. * * @return void */ public function run() { // array of specific hotels to populate database $hotels = [ [ 'name' => 'Marriott', 'location' => 'Seattle, WA', 'description' => 'International luxurious hotel.', 'image' => 'https://placeimg.com/640/480/arch' ], [ 'name' => 'Aria', 'location' => 'Las Vegas, NV', 'description' => 'International luxurious hotel.', 'image' => 'https://placeimg.com/640/480/arch' ], [ 'name' => 'MGM Grand', 'location' => 'Las Vegas, NV', 'description' => 'International luxurious hotel.', 'image' => 'https://placeimg.com/640/480/arch' ] ]; foreach ($hotels as $hotel) { Hotel::create(array( 'name' => $hotel['name'], 'location' => $hotel['location'], 'description' => $hotel['description'], 'image' => $hotel['image'] )); } } }database/seeds/RoomSeeder.phpを編集します。
travel-planet-crud/database/seeds/RoomSeeder.php<?php use Illuminate\Database\Seeder; use App\Models\Room; class RoomSeeder extends Seeder { /** * Run the database seeds. * * @return void */ public function run() { // array of specific rooms to populate database $rooms = [ [ 'hotel_id' => 1, 'type' => 'Luxury Suite', 'description' => '2000 sqft, 3 king sized beds, full kitchen.', 'price' => 980.00, 'image' => 'https://placeimg.com/640/480/arch' ], [ 'hotel_id' => 1, 'type' => 'Double', 'description' => 'Two queen beds.', 'price' => 200.00, 'image' => 'https://placeimg.com/640/480/arch' ], [ 'hotel_id' => 2, 'type' => 'Suite', 'description' => 'International luxurious room.', 'price' => 350.00, 'image' => 'https://placeimg.com/640/480/arch' ], [ 'hotel_id' => 2, 'type' => 'Economy', 'description' => 'One queen bed, mini fridge.', 'price' => 87.99, 'image' => 'https://placeimg.com/640/480/arch' ], [ 'hotel_id' => 3, 'type' => 'Suite', 'description' => 'One ultra wide king bed, full kitchen.', 'price' => 399.00, 'image' => 'https://placeimg.com/640/480/arch' ] ]; foreach ($rooms as $room) { Room::create(array( 'hotel_id' => $room['hotel_id'], 'type' => $room['type'], 'description' => $room['description'], 'price' => $room['price'], 'image' => $room['image'] )); } } }database/seeds/ReservationSeeder.phpを編集します。
travel-planet-crud/database/seeds/ReservationSeeder.php<?php use Illuminate\Database\Seeder; use App\Models\Reservation; class ReservationSeeder extends Seeder { /** * Run the database seeds. * * @return void */ public function run() { // array of specific reservations to populate database $reservations = [ [ 'user_id' => '1', 'room_id' => 1, 'num_of_guests' => 4, 'arrival' => '2020-05-18', 'departure' => '2020-05-28' ], [ 'user_id' => '1', 'room_id' => 2, 'num_of_guests' => 1, 'arrival' => '2020-05-10', 'departure' => '2020-05-12' ], [ 'user_id' => '1', 'room_id' => 3, 'num_of_guests' => 3, 'arrival' => '2020-05-06', 'departure' => '2020-05-07' ], [ 'user_id' => '1', 'room_id' => 4, 'num_of_guests' => 2, 'arrival' => '2020-05-12', 'departure' => '2020-05-15' ], [ 'user_id' => '1', 'room_id' => 2, 'num_of_guests' => 2, 'arrival' => '2020-05-20', 'departure' => '2020-05-24' ] ]; foreach ($reservations as $reservation) { Reservation::create(array( 'user_id' => $reservation['user_id'], 'room_id' => $reservation['room_id'], 'num_of_guests' => $reservation['num_of_guests'], 'arrival' => $reservation['arrival'], 'departure' => $reservation['departure'] )); } } }database/seeds/DatabaseSeeder.phpを編集します。
travel-planet-crud/database/seeds/DatabaseSeeder.php<?php use Illuminate\Database\Seeder; class DatabaseSeeder extends Seeder { /** * Seed the application's database. * * @return void */ public function run() { $this->call(HotelSeeder::class); $this->call(RoomSeeder::class); $this->call(ReservationSeeder::class); } }Homestead Boxにログインします。
$ vagrant sshMySQLにデータを投入します。
vagrant@travel-planet-crud:~$ cd code
vagrant@travel-planet-crud:~$ php artisan migrate
vagrant@travel-planet-crud:~$ php artisan db:seed
正常に投入できたか確認します。
vagrant@travel-planet-crud:~$ mysql
mysql> USE homestead;
Reading table information for completion of table and column names
You can turn off this feature to get a quicker startup with -A

\Database changed
mysql> SHOW tables;
+---------------------+
| Tables_in_homestead |
+---------------------+
| failed_jobs         |
| hotels              |
| migrations          |
| password_resets     |
| reservations        |
| rooms               |
| users               |
+---------------------+
7 rows in set (0.00 sec)

mysql> SELECT * FROM hotels;
+----+-----------+---------------+--------------------------------+-----------------------------------+
| id | name      | location      | description                    | image                             |
+----+-----------+---------------+--------------------------------+-----------------------------------+
|  1 | Marriott  | Seattle, WA   | International luxurious hotel. | https://placeimg.com/640/480/arch |
|  2 | Aria      | Las Vegas, NV | International luxurious hotel. | https://placeimg.com/640/480/arch |
|  3 | MGM Grand | Las Vegas, NV | International luxurious hotel. | https://placeimg.com/640/480/arch |
+----+-----------+---------------+--------------------------------+-----------------------------------+
3 rows in set (0.00 sec)
Controllerの作成
HotelControllerとReservationControllerを作成します。
$ pwd
~/travel-planet-crud
$ php artisan make:controller HotelController
$ php artisan make:controller ReservationController --resource
app/Http/Controllers/ReservationController.phpを編集します。
travel-planet-crud/app/Http/Controllers/ReservationController.php<?php namespace App\Http\Controllers; use Illuminate\Http\Request; use Illuminate\Support\Facades\DB; use App\Models\Reservation; use App\Models\Hotel; use App\Models\Room; class ReservationController extends Controller { /** * Display a listing of the reservations. * * @return \Illuminate\Http\Response */ public function index() { $reservations = Reservation::with('room', 'room.hotel') ->where('user_id', \Auth::user()->getUserInfo()['sub']) ->orderBy('arrival', 'asc') ->get(); return view('dashboard.reservations')->with('reservations', $reservations); } /** * Show the form for creating a new reservation. * * @return \Illuminate\Http\Response */ public function create($hotel_id) { $hotelInfo = Hotel::with('rooms')->get()->find($hotel_id); return view('dashboard.reservationCreate', compact('hotelInfo')); } /** * Store a newly created reservation in storage. * * @param \Illuminate\Http\Request $request * @return \Illuminate\Http\Response */ public function store(Request $request) { // Set the user_id equal to the user's Auth0 sub id before // Will be similar to "auth0|123123123123123" $user_id = \Auth::user()->getUserInfo()['sub']; $request->request->add(['user_id' => $user_id]); // Create the request Reservation::create($request->all()); return redirect('dashboard/reservations')->with('success', 'Reservation created!'); } /** * Display the specified reservation. * * @param int $id * @return \Illuminate\Http\Response */ public function show(Reservation $reservation) { $reservation = Reservation::with('room', 'room.hotel') ->get() ->find($reservation->id); if ($reservation->user_id === \Auth::user()->getUserInfo()['sub']) { $hotel_id = $reservation->room->hotel_id; $hotelInfo = Hotel::with('rooms')->get()->find($hotel_id); return view('dashboard.reservationSingle', compact('reservation', 'hotelInfo')); } else return redirect('dashboard/reservations')->with('error', 'You are not authorized to see that.'); } /** * Show the form for editing the specified reservation. * * @param int $id * @return \Illuminate\Http\Response */ public function edit(Reservation $reservation) { $reservation = Reservation::with('room', 'room.hotel') ->get() ->find($reservation->id); if ($reservation->user_id === \Auth::user()->getUserInfo()['sub']) { $hotel_id = $reservation->room->hotel_id; $hotelInfo = Hotel::with('rooms')->get()->find($hotel_id); return view('dashboard.reservationEdit', compact('reservation', 'hotelInfo')); } else return redirect('dashboard/reservations')->with('error', 'You are not authorized to do that'); } /** * Update the specified reservation in storage. * * @param \Illuminate\Http\Request $request * @param int $id * @return \Illuminate\Http\Response */ public function update(Request $request, Reservation $reservation) { if ($reservation->user_id != \Auth::user()->getUserInfo()['sub']) return redirect('dashboard/reservations')->with('error', 'You are not authorized to update this reservation'); $user_id = \Auth::user()->getUserInfo()['sub']; $reservation->user_id = $user_id; $reservation->num_of_guests = $request->num_of_guests; $reservation->arrival = $request->arrival; $reservation->departure = $request->departure; $reservation->room_id = $request->room_id; $reservation->save(); return redirect('dashboard/reservations')->with('success', 'Successfully updated your reservation!'); } /** * Remove the specified reservation from storage. * * @param int $id * @return \Illuminate\Http\Response */ public function destroy(Reservation $reservation) { $reservation = Reservation::find($reservation->id); if ($reservation->user_id === \Auth::user()->getUserInfo()['sub']) { $reservation->delete(); return redirect('dashboard/reservations')->with('success', 'Successfully deleted your reservation!'); } else return redirect('dashboard/reservations')->with('error', 'You are not authorized to delete this reservation'); } }app/Http/Controllers/HotelController.phpを編集します。
travel-planet-crud/app/Http/Controllers/HotelController.php<?php namespace App\Http\Controllers; use Illuminate\Http\Request; use App\Models\Hotel; class HotelController extends Controller { public function index() { $hotels = Hotel::all(); return view('hotels')->with('hotels', $hotels); } }Viewの作成
Viewディレクトリ/ファイルを作成します。
$ pwd
~/travel-planet-crud
$ cd resources/views
$ mkdir dashboard partials
$ cd dashboard
$ touch reservationCreate.blade.php reservationEdit.blade.php reservationSingle.blade.php reservations.blade.php dashboard.blade.php
$ cd ../partials
$ touch nav.blade.php
$ cd ..
$ touch home.blade.php hotels.blade.php index.blade.php
LaravelのデフォルトViewを削除します。
$ pwd
~/travel-planet-crud
$ rm resources/views/welcome.blade.php
Bootstrapをインストールします。
$ pwd
~/travel-planet-crud
$ composer require laravel/ui
$ php artisan ui bootstrap
$ npm install
$ npm run dev
resources/views/index.blade.phpを編集します。
travel-planet-crud/resources/views/index.blade.php<!DOCTYPE html> <html lang="{{ str_replace('_', '-', app()->getLocale()) }}"> <head> <meta charset="utf-8"> <meta name="viewport" content="width=device-width, initial-scale=1"> <title>@yield('title') - Hotel Manager</title> <link href="https://fonts.googleapis.com/css?family=Nunito:200,600" rel="stylesheet"> <link rel="stylesheet" href="{{asset('css/app.css')}}"> </head> <body> @include('partials.nav') <main>@yield('content')</main> </body> </html>resources/views/home.blade.phpを編集します。
travel-planet-crud/resources/views/home.blade.php@extends('index') {{-- Specify that we want to extend the index file --}} @section('title', 'Home') {{-- Set the title content to "Home" --}} {{-- Set the "content" section, which will replace "@yield('content')" in the index file we're extending --}} @section('content') <div class="jumbotron text-light" style="background-image: url('https://cdn.auth0.com/blog/laravel-6-crud/laravel-beach-bg.png')"> <div class="container"> @if(Auth::user()) <h1 class="display-4">Welcome back, {{ Auth::user()->nickname}}!</h1> <p class="lead">To your one stop shop for reservation management.</p> <a href="/dashboard" class="btn btn-success btn-lg my-2">View your Dashboard</a> @else <h1 class="display-3">Reservation management made easy.</h1> <p class="lead">Lorem, ipsum dolor sit amet consectetur adipisicing elit. Numquam in quia natus magnam ducimus quas molestias velit vero maiores. Eaque sunt laudantium voluptas. Fugiat molestiae ipsa delectus iusto vel quod.</p> <a href="/login" class="btn btn-success btn-lg my-2">Sign Up for Access to Thousands of Hotels</a> @endif </div> </div> <div class="container"> <div class="row"> <div class="col-sm-4"> <div class="card"> <div class="card-body"> <h5 class="card-title">Convenient</h5> <p class="card-text">Manage all your hotel reservations in one place</p> </div> </div> </div> <div class="col-sm-4"> <div class="card"> <div class="card-body"> <h5 class="card-title">Best prices</h5> <p class="card-text">We have special discounts at the best hotels</p> </div> </div> </div> <div class="col-sm-4"> <div class="card"> <div class="card-body"> <h5 class="card-title">Easy to use</h5> <p class="card-text">Book and manage with the click of a button</p> </div> </div> </div> </div> </div> @endsectionresources/views/partials/nav.blade.phpを編集します。
travel-planet-crud/resources/views/partials/nav.blade.php<nav class="navbar navbar-expand navbar-dark bg-primary"> <div class="navbar-nav w-100"> <a class="navbar-brand text-color" href="/">TravelPlanet</a> <a class="nav-item nav-link" href="/hotels">Browse Hotels</a> </div> </nav>resources/views/hotels.blade.phpを編集します。
travel-planet-crud/resources/views/hotels.blade.php<!-- resources/views/hotels.blade.php --> @extends('index') @section('title', 'Hotels') @section('content') <div class="container my-5"> <div class="row"> <!-- Loop through hotels returned from controller --> @foreach ($hotels as $hotel) <div class="col-sm-4"> <div class="card mb-3"> <div style="background-image:url('{{ $hotel->image }}');height:300px;background-size:cover;" class="img-fluid" alt="Front of hotel"></div> <div class="card-body"> <h5 class="card-title">{{ $hotel->name }}</h5> <small class="text-muted">{{ $hotel->location }}</small> <p class="card-text">{{ $hotel->description }}</p> <a href="/dashboard/reservations/create/{{ $hotel->id }}" class="btn btn-primary">Book Now</a> </div> </div> </div> @endforeach </div> </div> @endsectionresources/views/dashboard/dashboard.blade.phpを編集します。
travel-planet-crud/resources/views/dashboard/dashboard.blade.php<!-- resources/views/dashboard/dashboard.blade.php --> @extends('index') @section('title', 'Dashboard') @section('content') <div class="container text-center my-5"> <div class="row"> <div class="col-sm-6"> <div class="card"> <div class="card-body"> <h4 class="card-title">Manage your Reservations</h4> <p class="card-text">Modify your current reservations.</p> <a href="/dashboard/reservations" class="btn btn-primary">My Reservations</a> </div> </div> </div> <div class="col-sm-6"> <div class="card"> <div class="card-body"> <h4 class="card-title">Find a Room</h4> <p class="card-text">Browse our catalog of top-rated hotels.</p> <a href="/hotels" class="btn btn-primary">Our Hotels</a> </div> </div> </div> </div> </div> @endsectionresources/views/dashboard/reservations.blade.phpを編集します。
travel-planet-crud/resources/views/dashboard/reservations.blade.php@extends('index') @section('title', 'Reservations') @section('content') <div class="container mt-5"> <h2>Your Reservations</h2> <table class="table mt-3"> <thead> <tr> <th scope="col">Hotel</th> <th scope="col">Arrival</th> <th scope="col">Departure</th> <th scope="col">Type</th> <th scope="col">Guests</th> <th scope="col">Price</th> <th scope="col">Manage</th> </tr> </thead> <tbody> @foreach ($reservations as $reservation) <tr> <td>{{ $reservation->room->hotel['name'] }}</td> <td>{{ $reservation->arrival }}</td> <td>{{ $reservation->departure }}</td> <td>{{ $reservation->room['type'] }}</td> <td>{{ $reservation->num_of_guests }}</td> <td>${{ $reservation->room['price'] }}</td> <td><a href="/dashboard/reservations/{{ $reservation->id }}/edit" class="btn btn-sm btn-success">Edit</a></td> </tr> @endforeach </tbody> </table> @if(!empty(Session::get('success'))) <div class="alert alert-success"> {{ Session::get('success') }}</div> @endif @if(!empty(Session::get('error'))) <div class="alert alert-danger"> {{ Session::get('error') }}</div> @endif </div> @endsectionresources/views/dashboard/reservationSingle.blade.phpを編集します。
travel-planet-crud/resources/views/dashboard/reservationSingle.blade.php@extends('index') @section('title', 'Edit Reservation') @section('content') <div class="container"> <div class="card my-5"> <div class="card-header"> <h2>You're all booked for the {{ $hotelInfo->name }} in {{ $hotelInfo->location }}!</h2> </div> <div class="card-body"> <div class="card-body"> <div class="row"> <div class="col-sm-6"> <img src="{{ $hotelInfo->image }}" class="img-fluid" alt="Front of hotel"> </div> <div class="col-sm-6"> <h3 class="card-title"> {{ $hotelInfo->name }} - <small>{{ $hotelInfo->location }}</small> </h3> <p class="card-text">{{ $hotelInfo->description }}</p> <p class="card-text"><strong>Arrival: </strong>{{ $reservation->arrival }}</p> <p class="card-text"><strong>Departure: </strong>{{ $reservation->departure }}</p> <p class="card-text"><strong>Room: </strong>{{ $reservation->room['type'] }}</p> <p class="card-text"><strong>Guests: </strong>{{ $reservation->num_of_guests }}</p> <p class="card-text"><strong>Price: </strong>${{ $reservation->room['price'] }}</p> </div> </div> <div class="text-center mt-3"> <a href="/dashboard/reservations/{{ $reservation->id }}/edit" class="btn btn-lg btn-success">Edit this reservation</a> <a href="/dashboard/reservations/{{ $reservation->id }}/delete" class="btn btn-lg btn-danger">Delete</a> </div> </div> </div> </div> </div> @endsectionresources/views/dashboard/reservationEdit.blade.phpを編集します。
travel-planet-crud/resources/views/dashboard/reservationEdit.blade.php<!-- resources/views/dashboard/reservationEdit.blade.php --> @extends('index') @section('title', 'Edit Reservation') @section('content') <div class="container"> <div class="card my-5"> <div class="card-header"> <h2>{{ $hotelInfo->name }} - <small class="text-muted">{{ $hotelInfo->location }}</small></h2> </div> <div class="card-body"> <h5 class="card-title"></h5> <p class="card-text">Book your stay now at the most magnificent resort in the world!</p> <form action="{{ route('reservations.update', $reservation->id) }}" method="POST"> @csrf @method('PUT') <div class="row"> <div class="col-sm-8"> <div class="form-group"> <label for="room">Room Type</label> <select class="form-control" name="room_id" value="{{ old('room_id', $reservation->room_id) }}"> @foreach ($hotelInfo->rooms as $option) <option value="{{$option->id}}">{{ $option->type }} - ${{ $option->price }}</option> @endforeach </select> </div> </div> <div class="col-sm-4"> <div class="form-group"> <label for="guests">Number of guests</label> <input class="form-control" name="num_of_guests" value="{{ old('num_of_guests', $reservation->num_of_guests) }}"> </div> </div> <div class="col-sm-6"> <div class="form-group"> <label for="arrival">Arrival</label> <input type="date" class="form-control" name="arrival" placeholder="03/21/2020" value="{{ old('arrival', $reservation->arrival) }}"> </div> </div> <div class="col-sm-6"> <div class="form-group"> <label for="departure">Departure</label> <input type="date" class="form-control" name="departure" placeholder="03/23/2020" value="{{ old('departure', $reservation->departure) }}"> </div> </div> </div> <button type="submit" class="btn btn-lg btn-primary">Submit</button> </form> </div> </div> <form action="{{ route('reservations.destroy', $reservation->id) }}" method="POST"> @method('DELETE') @csrf <p class="text-right"> <button type="submit" class="btn btn-sm text-danger">Delete reservation</button> </p> </form> </div> @endsectionresources/views/dashboard/reservationCreate.blade.phpを編集します。
travel-planet-crud/resources/views/dashboard/reservationCreate.blade.php@extends('index') @section('title', 'Create reservation') @section('content') <div class="container my-5"> <div class="card"> <div class="card-header"> <h2>{{ $hotelInfo->name }} - <small class="text-muted">{{ $hotelInfo->location }}</small></h2> </div> <div class="card-body"> <h5 class="card-title"></h5> <p class="card-text">Book your stay now at the most magnificent resort in the world!</p> <form action="{{ route('reservations.store') }}" method="POST"> @csrf <div class="row"> <div class="col-sm-8"> <div class="form-group"> <label for="room">Room Type</label> <select class="form-control" name="room_id"> @foreach ($hotelInfo->rooms as $option) <option value="{{$option->id}}">{{ $option->type }} - ${{ $option->price }}</option> @endforeach </select> </div> </div> <div class="col-sm-4"> <div class="form-group"> <label for="guests">Number of guests</label> <input class="form-control" name="num_of_guests" placeholder="1"> </div> </div> <div class="col-sm-6"> <div class="form-group"> <label for="arrival">Arrival</label> <input type="date" class="form-control" name="arrival" placeholder="03/21/2020"> </div> </div> <div class="col-sm-6"> <div class="form-group"> <label for="departure">Departure</label> <input type="date" class="form-control" name="departure" placeholder="03/23/2020"> </div> </div> </div> <button type="submit" class="btn btn-lg btn-primary">Book it</button> </form> </div> </div> </div> @endsection認証機能の追加
Auth0のダッシュボードにログイン、左ペインの"Applications"をクリックして右上の"CREATE APPLICATION"を押します。
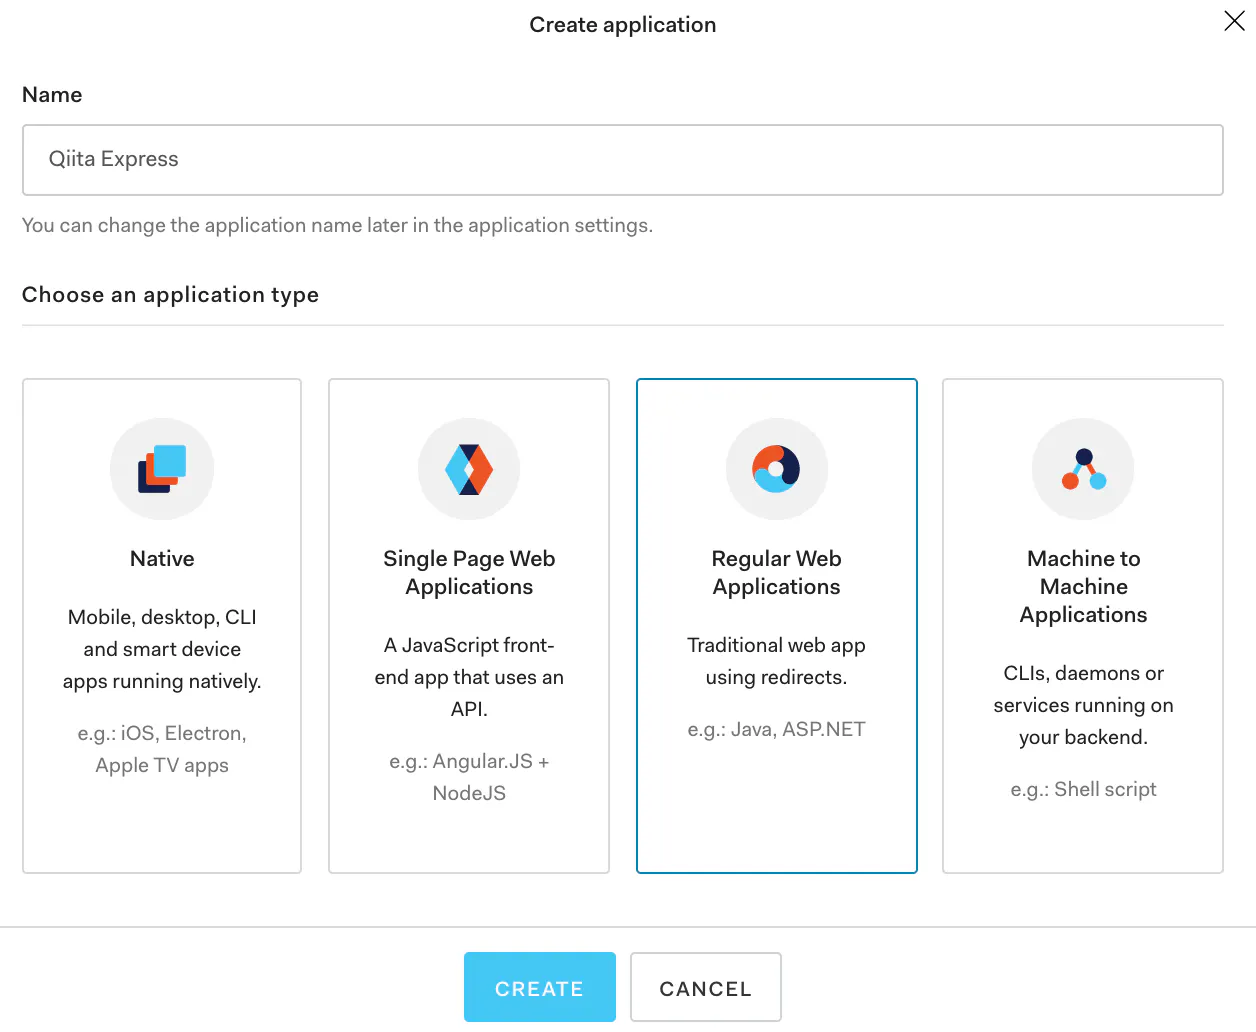
"Name"に任意の名前を入力、"Choose an application type"で"Regular Web Applications"を選択して”CREATE”を押します。
"Settings"タブをクリック、"Allowed Callback URLs"に"
http://homestead.test/auth0/callback"を、"Allowed Logout URLs"に"http://homestead.test"を入力して"SAVE CHANGES"を押します。Auth0でLogin/Logout後にリダイレクトを許可するURLを設定しています。実在するURLと完全一致している必要があります。
Auth0 PHP/Laravel Plug-inをインストールします。
$ pwd
~/travel-planet-crud
$ composer require auth0/login:"~5.0"
config/app.phpにAuth0 login service providerを追加します。以下、編集後のconfig/app.phpです。
travel-planet-crud/config/app.php<?php return [ /* |-------------------------------------------------------------------------- | Application Name |-------------------------------------------------------------------------- | | This value is the name of your application. This value is used when the | framework needs to place the application's name in a notification or | any other location as required by the application or its packages. | */ 'name' => env('APP_NAME', 'Laravel'), /* |-------------------------------------------------------------------------- | Application Environment |-------------------------------------------------------------------------- | | This value determines the "environment" your application is currently | running in. This may determine how you prefer to configure various | services the application utilizes. Set this in your ".env" file. | */ 'env' => env('APP_ENV', 'production'), /* |-------------------------------------------------------------------------- | Application Debug Mode |-------------------------------------------------------------------------- | | When your application is in debug mode, detailed error messages with | stack traces will be shown on every error that occurs within your | application. If disabled, a simple generic error page is shown. | */ 'debug' => env('APP_DEBUG', false), /* |-------------------------------------------------------------------------- | Application URL |-------------------------------------------------------------------------- | | This URL is used by the console to properly generate URLs when using | the Artisan command line tool. You should set this to the root of | your application so that it is used when running Artisan tasks. | */ 'url' => env('APP_URL', 'http://localhost'), 'asset_url' => env('ASSET_URL', null), /* |-------------------------------------------------------------------------- | Application Timezone |-------------------------------------------------------------------------- | | Here you may specify the default timezone for your application, which | will be used by the PHP date and date-time functions. We have gone | ahead and set this to a sensible default for you out of the box. | */ 'timezone' => 'UTC', /* |-------------------------------------------------------------------------- | Application Locale Configuration |-------------------------------------------------------------------------- | | The application locale determines the default locale that will be used | by the translation service provider. You are free to set this value | to any of the locales which will be supported by the application. | */ 'locale' => 'en', /* |-------------------------------------------------------------------------- | Application Fallback Locale |-------------------------------------------------------------------------- | | The fallback locale determines the locale to use when the current one | is not available. You may change the value to correspond to any of | the language folders that are provided through your application. | */ 'fallback_locale' => 'en', /* |-------------------------------------------------------------------------- | Faker Locale |-------------------------------------------------------------------------- | | This locale will be used by the Faker PHP library when generating fake | data for your database seeds. For example, this will be used to get | localized telephone numbers, street address information and more. | */ 'faker_locale' => 'en_US', /* |-------------------------------------------------------------------------- | Encryption Key |-------------------------------------------------------------------------- | | This key is used by the Illuminate encrypter service and should be set | to a random, 32 character string, otherwise these encrypted strings | will not be safe. Please do this before deploying an application! | */ 'key' => env('APP_KEY'), 'cipher' => 'AES-256-CBC', /* |-------------------------------------------------------------------------- | Autoloaded Service Providers |-------------------------------------------------------------------------- | | The service providers listed here will be automatically loaded on the | request to your application. Feel free to add your own services to | this array to grant expanded functionality to your applications. | */ 'providers' => [ /* * Laravel Framework Service Providers... */ Illuminate\Auth\AuthServiceProvider::class, Illuminate\Broadcasting\BroadcastServiceProvider::class, Illuminate\Bus\BusServiceProvider::class, Illuminate\Cache\CacheServiceProvider::class, Illuminate\Foundation\Providers\ConsoleSupportServiceProvider::class, Illuminate\Cookie\CookieServiceProvider::class, Illuminate\Database\DatabaseServiceProvider::class, Illuminate\Encryption\EncryptionServiceProvider::class, Illuminate\Filesystem\FilesystemServiceProvider::class, Illuminate\Foundation\Providers\FoundationServiceProvider::class, Illuminate\Hashing\HashServiceProvider::class, Illuminate\Mail\MailServiceProvider::class, Illuminate\Notifications\NotificationServiceProvider::class, Illuminate\Pagination\PaginationServiceProvider::class, Illuminate\Pipeline\PipelineServiceProvider::class, Illuminate\Queue\QueueServiceProvider::class, Illuminate\Redis\RedisServiceProvider::class, Illuminate\Auth\Passwords\PasswordResetServiceProvider::class, Illuminate\Session\SessionServiceProvider::class, Illuminate\Translation\TranslationServiceProvider::class, Illuminate\Validation\ValidationServiceProvider::class, Illuminate\View\ViewServiceProvider::class, /* * Package Service Providers... */ /* * Application Service Providers... */ App\Providers\AppServiceProvider::class, App\Providers\AuthServiceProvider::class, Auth0\Login\LoginServiceProvider::class, // App\Providers\BroadcastServiceProvider::class, App\Providers\EventServiceProvider::class, App\Providers\RouteServiceProvider::class, ], /* |-------------------------------------------------------------------------- | Class Aliases |-------------------------------------------------------------------------- | | This array of class aliases will be registered when this application | is started. However, feel free to register as many as you wish as | the aliases are "lazy" loaded so they don't hinder performance. | */ 'aliases' => [ 'App' => Illuminate\Support\Facades\App::class, 'Arr' => Illuminate\Support\Arr::class, 'Artisan' => Illuminate\Support\Facades\Artisan::class, 'Auth' => Illuminate\Support\Facades\Auth::class, 'Auth0' => Auth0\Login\Facade\Auth0::class, 'Blade' => Illuminate\Support\Facades\Blade::class, 'Broadcast' => Illuminate\Support\Facades\Broadcast::class, 'Bus' => Illuminate\Support\Facades\Bus::class, 'Cache' => Illuminate\Support\Facades\Cache::class, 'Config' => Illuminate\Support\Facades\Config::class, 'Cookie' => Illuminate\Support\Facades\Cookie::class, 'Crypt' => Illuminate\Support\Facades\Crypt::class, 'DB' => Illuminate\Support\Facades\DB::class, 'Eloquent' => Illuminate\Database\Eloquent\Model::class, 'Event' => Illuminate\Support\Facades\Event::class, 'File' => Illuminate\Support\Facades\File::class, 'Gate' => Illuminate\Support\Facades\Gate::class, 'Hash' => Illuminate\Support\Facades\Hash::class, 'Lang' => Illuminate\Support\Facades\Lang::class, 'Log' => Illuminate\Support\Facades\Log::class, 'Mail' => Illuminate\Support\Facades\Mail::class, 'Notification' => Illuminate\Support\Facades\Notification::class, 'Password' => Illuminate\Support\Facades\Password::class, 'Queue' => Illuminate\Support\Facades\Queue::class, 'Redirect' => Illuminate\Support\Facades\Redirect::class, 'Redis' => Illuminate\Support\Facades\Redis::class, 'Request' => Illuminate\Support\Facades\Request::class, 'Response' => Illuminate\Support\Facades\Response::class, 'Route' => Illuminate\Support\Facades\Route::class, 'Schema' => Illuminate\Support\Facades\Schema::class, 'Session' => Illuminate\Support\Facades\Session::class, 'Storage' => Illuminate\Support\Facades\Storage::class, 'Str' => Illuminate\Support\Str::class, 'URL' => Illuminate\Support\Facades\URL::class, 'Validator' => Illuminate\Support\Facades\Validator::class, 'View' => Illuminate\Support\Facades\View::class, ], ];app/Providers/AppServiceProvider.phpを編集して、Auth0UserRepositoryをバインドします。ユーザがログインまたはJWTがデコードされるたびに生成されるUserモデルです。以下、編集後のapp/Providers/AppServiceProvider.phpです。
travel-planet-crud/app/Providers/AppServiceProvider.php<?php namespace App\Providers; use Illuminate\Support\ServiceProvider; class AppServiceProvider extends ServiceProvider { /** * Register any application services. * * @return void */ public function register() { $this->app->bind( \Auth0\Login\Contract\Auth0UserRepository::class, \Auth0\Login\Repository\Auth0UserRepository::class ); } /** * Bootstrap any application services. * * @return void */ public function boot() { // } }Loginサービスプロバイダーを設定します。
$ pwd
~/travel-planet-crud
$ php artisan vendor:publish
php artisan vendor:publish                                                                                                                                                                    月 10/28 13:59:41 2019


 Which provider or tag's files would you like to publish?:
  [0 ] Publish files from all providers and tags listed below
  [1 ] Provider: Auth0\Login\LoginServiceProvider --> これを選択します
  [2 ] Provider: Facade\Ignition\IgnitionServiceProvider
  [3 ] Provider: Fideloper\Proxy\TrustedProxyServiceProvider
  [4 ] Provider: Illuminate\Foundation\Providers\FoundationServiceProvider
  [5 ] Provider: Illuminate\Mail\MailServiceProvider
  [6 ] Provider: Illuminate\Notifications\NotificationServiceProvider
  [7 ] Provider: Illuminate\Pagination\PaginationServiceProvider
  [8 ] Provider: Laravel\Tinker\TinkerServiceProvider
  [9 ] Tag: flare-config
  [10] Tag: ignition-config
  [11] Tag: laravel-errors
  [12] Tag: laravel-mail
  [13] Tag: laravel-notifications
  [14] Tag: laravel-pagination
 >1

Publishing complete.
.envにAuth0の情報を追記します。
travel-planet-crud/.envAUTH0_DOMAIN=kiriko.auth0.com AUTH0_CLIENT_ID=xxxxxxxx AUTH0_CLIENT_SECRET=xxxxxxxx情報は"Applications"から作成したApplicationの"Settings"タブで確認できます。
.env内のAPP_URLの設定が"homestead.test"になっていることを確認します。
travel-planet-crud/.envAPP_URL=http://homestead.testconfig/auth.phpを修正してuser driverをAuth0にスイッチします。これでApplictionとAuth0の連携は完了です。以下、修正後のconfig/auth.phpです。
travel-planet-crud/config/auth.php<?php return [ /* |-------------------------------------------------------------------------- | Authentication Defaults |-------------------------------------------------------------------------- | | This option controls the default authentication "guard" and password | reset options for your application. You may change these defaults | as required, but they're a perfect start for most applications. | */ 'defaults' => [ 'guard' => 'web', 'passwords' => 'users', ], /* |-------------------------------------------------------------------------- | Authentication Guards |-------------------------------------------------------------------------- | | Next, you may define every authentication guard for your application. | Of course, a great default configuration has been defined for you | here which uses session storage and the Eloquent user provider. | | All authentication drivers have a user provider. This defines how the | users are actually retrieved out of your database or other storage | mechanisms used by this application to persist your user's data. | | Supported: "session", "token" | */ 'guards' => [ 'web' => [ 'driver' => 'session', 'provider' => 'users', ], 'api' => [ 'driver' => 'token', 'provider' => 'users', 'hash' => false, ], ], /* |-------------------------------------------------------------------------- | User Providers |-------------------------------------------------------------------------- | | All authentication drivers have a user provider. This defines how the | users are actually retrieved out of your database or other storage | mechanisms used by this application to persist your user's data. | | If you have multiple user tables or models you may configure multiple | sources which represent each model / table. These sources may then | be assigned to any extra authentication guards you have defined. | | Supported: "database", "eloquent" | */ 'providers' => [ 'users' => [ 'driver' => 'auth0', 'model' => App\User::class, ], // 'users' => [ // 'driver' => 'database', // 'table' => 'users', // ], ], /* |-------------------------------------------------------------------------- | Resetting Passwords |-------------------------------------------------------------------------- | | You may specify multiple password reset configurations if you have more | than one user table or model in the application and you want to have | separate password reset settings based on the specific user types. | | The expire time is the number of minutes that the reset token should be | considered valid. This security feature keeps tokens short-lived so | they have less time to be guessed. You may change this as needed. | */ 'passwords' => [ 'users' => [ 'provider' => 'users', 'table' => 'password_resets', 'expire' => 60, ], ], ];Auth0IndexControllerを作成します。/Login, /Logoutルートが使うControllerです。
$ php artisan make:controller Auth/Auth0IndexControllerapp/Http/Controllers/Auth/Auth0IndexController.phpを編集します。
travel-planet-crud/app/Http/Controllers/Auth/Auth0IndexController.php<?php namespace App\Http\Controllers\Auth; use Illuminate\Http\Request; use App\Http\Controllers\Controller; class Auth0IndexController extends Controller { /** * Redirect to the Auth0 hosted login page * * @return mixed */ public function login() { $authorize_params = [ 'scope' => 'openid profile email', // Use the key below to get an access token for your API. // 'audience' => config('laravel-auth0.api_identifier'), ]; return \App::make('auth0')->login(null, null, $authorize_params); } /** * Log out of Auth0 * * @return mixed */ public function logout() { \Auth::logout(); $logoutUrl = sprintf( 'https://%s/v2/logout?client_id=%s&returnTo=%s', env('AUTH0_DOMAIN'), env('AUTH0_CLIENT_ID'), env('APP_URL')); return \Redirect::intended($logoutUrl); } }resources/views/partials/nav.blade.phpを修正します。以下、修正後です。
travel-planet-crud/resources/views/partials/nav.blade.php<nav class="navbar navbar-expand navbar-dark bg-primary"> <div class="navbar-nav w-100"> <a class="navbar-brand text-color" href="/">TravelPlanet</a> <a class="nav-item nav-link" href="/hotels">Browse Hotels</a> @if (Route::has('login')) <div class="ml-auto"> @auth <a class="nav-item nav-link" href="{{ route('logout') }}">Logout</a> @else <a class="nav-item nav-link" href="{{ route('login') }}">Login/Signup</a> @endauth </div> @endif </div> </nav>resources/views/home.blade.phpを修正します。以下、修正後です。
travel-planet-crud/resources/views/home.blade.php@extends('index') {{-- Specify that we want to extend the index file --}} @section('title', 'Home') {{-- Set the title content to "Home" --}} {{-- Set the "content" section, which will replace "@yield('content')" in the index file we're extending --}} @section('content') <div class="jumbotron text-light" style="background-image: url('https://cdn.auth0.com/blog/laravel-6-crud/laravel-beach-bg.png')"> <div class="container"> @if(Auth::user()) <h1 class="display-4">Welcome back, {{ Auth::user()->nickname}}!</h1> <p class="lead">To your one stop shop for reservation management.</p> <a href="/dashboard" class="btn btn-success btn-lg my-2">View your Dashboard</a> @else <h1 class="display-3">Reservation management made easy.</h1> <p class="lead">Lorem, ipsum dolor sit amet consectetur adipisicing elit. Numquam in quia natus magnam ducimus quas molestias velit vero maiores. Eaque sunt laudantium voluptas. Fugiat molestiae ipsa delectus iusto vel quod.</p> <a href="/login" class="btn btn-success btn-lg my-2">Sign Up for Access to Thousands of Hotels</a> @endif </div> </div> <div class="container"> <div class="row"> <div class="col-sm-4"> <div class="card"> <div class="card-body"> <h5 class="card-title">Convenient</h5> <p class="card-text">Manage all your hotel reservations in one place</p> </div> </div> </div> <div class="col-sm-4"> <div class="card"> <div class="card-body"> <h5 class="card-title">Best prices</h5> <p class="card-text">We have special discounts at the best hotels</p> </div> </div> </div> <div class="col-sm-4"> <div class="card"> <div class="card-body"> <h5 class="card-title">Easy to use</h5> <p class="card-text">Book and manage with the click of a button</p> </div> </div> </div> </div> </div> @endsection動作確認
Chromeで
http://http://homestead.test/にアクセスして、右上の"Login/Signup"をクリックします。
Email/Passwordを入力してログインします。
おわりに
Laravelのような便利なフレームワークのおかげで、今はスタイリッシュなWeb Applicationを誰でも簡単に実装できるようになりました。であれば、Web Applicationに必須の認証機能も簡単に実装できるべきかと思います。ソフトウェア開発者の皆様には、ボタン設定で簡単に認証機能を実装できるAuth0を利用して、ワクワクするようなWeb Applicationを早く世に送り出して頂きたいですね。



- 投稿日:2019-10-28T13:42:48+09:00
macOSでWebサーバーを立ち上げる
macOS 10.13.6のMacにWebサーバーを立ち上げるためのメモ。
元々MAMPでサーバーを立ち上げていたのですが勉強にならないので。
標準のApacheとPHPを使わず、Homebrewでインストールしたものを使っています。
色々なところから引用させていただいています。macOS標準のApacheの場所
usr/sbin/apachectl
Apache/2.2.29(Unix)HomebrewでインストールしたApacheの場所
usr/local/bin/apachectl
Apache/2.4.41(Unix)macOS標準のphpの場所
usr/bin/php
PHP 7.1.23 (cli)Homebrewでインストールしたphpの場所
/usr/local/bin/php
PHP 7.3.9 (cli)usr/local/binを優先で読み込むようにPATHを通す
vi ~./bash_profle
export PATH=/usr/local/bin:$PATH
export PATH=/usr/local/sbin:$PATH以下、MacでPATHを通す より引用
.bash_profileの更新
source ~/.bash_profilePATHの確認
printenv PATH
もしくは
echo $PATH実行すると次のような文字列が帰ってくる。(『:』はPATHの区切り)
/usr/bin:/bin:/usr/sbin:/sbin:/usr/local/bin:/Users/test/
目的のPATHがここに記載されていれば成功。usr/local/etc/httpd/httpd.conf を編集
httpd.confデフォルトから編集したところ Listen 8080 ↓ Listen 80 User _www Group _www ↓ User administrator Group staff DirectoryIndex index.html ↓ DirectoryIndex index.php index.html #AddHandler cgi-script .cgi ↓ AddHandler cgi-script .cgi AddType application/x-httpd-php .php #AddType text/html .shtml #AddOutputFilter INCLUDES .shtml ↓ AddType text/html .shtml AddOutputFilter INCLUDES .shtml .html .htm .php Include /usr/local/etc/httpd/extra/php73.conf を追加 AddHandler application/x-httpd-php .php .html を追加 (htmlファイル内でphpが動作するように)あとはこちらの記事を参照
Apacheのhttpd.confにPHPを設定する方法より引用これでMacのサーバー上でphpが動くようになりました。
Macだと何かうまく動かない時、標準から入っているApacheとphpと、後からHomebrewで入れたApacheとphpのどちらかが読み込まれているのか確認しないといけないのでそれが面倒と言えば面倒ですね。
最近のmacOSだとApacheもphpも最初から高いバージョンが入っているので無理にHomebrewでインストールし直さなくてもいいかもしれないです。
- 投稿日:2019-10-28T11:44:23+09:00
php7.1から使える負の文字列オフセット
php7.0以前までは、
$str[3]のように、 角括弧を使用してゼロから始まるオフセットを指定すると、
文字列内の任意の文字を取り出すことが可能でした。ただ、php7.1からは負の値のオフセットも指定できるようになりました。
注意: PHP 7.1.0 以降では、負の文字列オフセットにも対応するようになりました。 これは、文字列の末尾からのオフセットを表します。 以前のバージョンでは、負のオフセットで読み込もうとすると E_NOTICE が発生し (空文字列を返します)、負のオフセットで書き込もうとすると E_WARNING が発生していました (文字列には何も手が加えられません)。
var_dump("abcdef"[-1]);
var_dump("abcdef"[2]);
var_dump("abcdef"[-3]);
出力結果 ーーーーー string(1) "f" string(1) "c" string(1) "d"単一文字の場合はsubstr()を使う必要がなくなりそうです。
複数の文字を取り出したり変更したりしたいときは、substr()を使用すればよいです。
ただ、個人的には第三者への可読性という意味ではsubstr()を使ってもいいのかと思います。
- 投稿日:2019-10-28T11:14:49+09:00
Laravel Dusk + Selenium + Dockerでブラウザテスト(Laravel6.0)
Laravel6.0 + Docker開発環境でブラウザテストを自動化する方法について解説します。
前提条件として、LaravelのDocker開発環境が構築済みで、Laravelのウェルカムページにアクセスできる必要があります。開発環境
Laravel6.0
PHP7.3.10
macOS
Docker19.03.2
docker-selenium images:
・selenium/hub:3.141.59-vanadium
・selenium/node-chrome:3.141.59-vanadium
Google ChromeLaravel Duskのインストール
composer.jsonのrequire-devにLaravel duskを追加します。
(この時、requireの方に追加しないように注意しましょう。本番環境にDuskをインストールするとセキュリティ的によくないです。)"require-dev": { "laravel/dusk": "^5.5", }その後、
composer installでライブラリをインストールしましょう。docker-seleniumでブラウザテスト用サーバーを立てる
docker-compose.ymlを編集します。
version: '3.7'

services:
  dev:
    build:
      context: "./docker/dev/"
    image: project/dev
    container_name: project-dev
    volumes:
      - "./project:/project"
    ports:
      - 8000:80

  selenium-hub:
      image: selenium/hub:3.141.59-vanadium
      container_name: selenium-hub
      ports:
          - 4444:4444

  chrome:
    image: selenium/node-chrome:3.141.59-vanadium
    container_name: selenium-chrome
    volumes:
      - /dev/shm:/dev/shm
    depends_on:
      - selenium-hub
    environment:
      - HUB_HOST=selenium-hub
      - HUB_PORT=4444
Laravel Duskの設定を行う。
project/tests/DuskTestCase.phpを編集します。<?php namespace Tests; use Laravel\Dusk\TestCase as BaseTestCase; use Facebook\WebDriver\Chrome\ChromeOptions; use Facebook\WebDriver\Remote\RemoteWebDriver; use Facebook\WebDriver\Remote\DesiredCapabilities; abstract class DuskTestCase extends BaseTestCase { use CreatesApplication; public static function prepare() { // static::startChromeDriver(); } protected function baseUrl(){ return 'http://project-dev:80'; } protected function driver() { $options = (new ChromeOptions)->addArguments([ '--disable-gpu', '--headless', ]); return RemoteWebDriver::create( 'http://selenium-hub:4444/wd/hub', DesiredCapabilities::chrome()->setCapability( ChromeOptions::CAPABILITY, $options ) ); } }デフォルトでは、
project/tests/Browser/ExampleTest.phpに書かれている以下のテストが実行されます。<?php namespace Tests\Browser; use Tests\DuskTestCase; use Laravel\Dusk\Browser; use Illuminate\Foundation\Testing\DatabaseMigrations; class ExampleTest extends DuskTestCase { public function testBasicExample() { $this->browse(function (Browser $browser) { $browser->visit('/') ->assertSee('Laravel'); }); } }これでブラウザテストの準備が整いました!!
早速コンテナを立ち上げ、phg artisan duskを実行してみましょう。
問題なくブラウザテストが通ったら完了です。
- 投稿日:2019-10-28T10:39:16+09:00
LaravelのSeederはFactory使うとリレーションしてても簡潔にかける
Seederとは
データベースにあらかじめデータが欲しい時に、Seederを使用すれば楽に用意ができる
Factoryとは
Factoryを使用すると意図したModelのデータを定義しておけば、任意のタイミングでFactoryを使えばModelインスタンスを呼び出せる。テストやSeederを使用するときに利用する
FactoryをSeederで使用する
FactoryをSeederで使用すると複数データを用意する場合にfor文を書かなくていいので、簡潔にコードが書ける。いくつかRelationがあっても簡潔に書ける。
仮のモデルのコード
namespace App;

use Illuminate\Database\Eloquent\Builder;
use Illuminate\Database\Eloquent\Model;

class Post extends Model
{
    protected $fillable = [
        'title', 'content',
    ];

    public function post_images()
    {
        return $this->hasMany(PostImage::class, 'post_id', 'id');
    }

    public function user() {
        return $this->belongsTo(User::class);
    }
}
1対多でPostImage、多対1でUserとRelationを設定してある
Factoryを作成する
- 1. artisanコマンドの実行
php artisan make:factory PostFactorydatabase/factoriesにPostFactory.phpが作成される
- 2. PostFactory.phpの編集
use Faker\Generator as Faker;

$factory->define(App\Post::class, function (Faker $faker) {
    return [
        'title'   => $faker->realText(100),
        'content' => $faker->realText(3000)
    ];
});]
Fakerを使ってFactoryでModelを生成する際の標準のダミーデータをセットできる
Seederを作成する
- 1. artisanコマンドの実行
php artisan make:seeder PostsTableSeederdatabase/seedsにPostsTableSeeder.phpが作成される
- 2. PostsTableSeeder.phpの編集
use Illuminate\Database\Seeder;

class PostsTableSeeder extends Seeder
{
    public function run()
    {
        // factoryを利用
        factory(App\Post::class, 10)
            ->create(['title' => 'test'])
            ->each(function(App\Post $post) {
                $post->post_images()->saveMany(factory(App\PostImage::class, 3)->make());
                $post->user()->associate(factory(App\User::class)->create());
            });

        // factoryを利用しない場合(Relationはめんどいので省略)
        $faker = Faker::create('ja_JP');

        for ($i = 1; $i <= 10; $i++) {
            Post::create([
              'title' => $faker->realText(100),
              'content' => $faker->realText(3000)
            ]);
        }
    }
}
factoryメソッドで生成するModelと個数を指定して、ModelのCollectionをcreateする
createするときにPostFactoryで指定した値をパラメーターごとに変更が可能
Collectionのeachを呼ぶことで、各Modelのリレーションを表現できる
each内でもfactoryを使うことでリレーションも簡潔に記述できる
- 投稿日:2019-10-28T03:02:35+09:00
Moodle-3.7 マニュアル カテゴリ:インストール
カテゴリ:インストール
Moodle のインストールおよびアップグレードに関連するページです。
カテゴリ "Installation"次の 全76 のうち、76ページがあります。
A
Administration via command line
Apache
Automatic updates deploymentB
Blackboard migration
C
Development:Compiling FreeTDS under Windows
Compiling PHP from source
Complete install packages
Complete install packages for Windows
Configuration file
Cron(日本語訳)
Cron on 1and1 shared servers
Cron with MAC OS X
Cron with Unix or Linux
Cron with web hosting services
Cron with Windows OSF
File upload size
Finding and Selecting A Web Host
FreeBSD InstallingG
Git for Administrators
Git for OS XH
How to fix just one bug without upgrading
I
install on OS X
Installation(日本語訳)
Installation FAQ
Installation Guide for Installing on Amazon EC2
Installation guide for Windows using EasyPHP
Installation on OS X
Installation on Ubuntu using Git
Installation Package for OS X
Installation quick guide(日本語訳)
Installing AMP
Development:Installing and upgrading plugin database tables
Installing Apache on Windows
Installing APC in Windows
Installing Moodle(日本語訳)
Installing Moodle on Debian based distributions
Installing Moodle on SmarterASP.NET
Installing MSSQL for PHP
Installing MySQL on Windows
Installing Oracle for PHP
Installing PHP on Windows
Installing plugins
Internet Information ServicesM
Manual install on Windows 7 with Apache and MySQL
Masquerading
Migration
Moodle migration
Moodle site moodle directory
MSSQL
MySQLN
Nginx
None Mamp install on OS XO
OPcache
OracleP
PHP(日本語訳)
Plugin Review Criteria
Plugins FAQ
PostgreSQL(日本語訳)R
RedHat Linux installation
S
SQLite
Step by Step Installation on a OS X Mountain Lion Server
Step-by-step Installation Guide for UbuntuU
Unexpected installation halts
Unix or Linux Installation
Upgrade overview
Upgrade warnings
Upgrading
Upgrading FAQ
Upgrading XAMPP
Using the Microsoft SQL Server Driver for PHPV
Verify Database Schema
W
Windows installation
Windows installation using Git
Windows installation using XAMPPX
Xampp Installer FAQ
Development:XMLDB Documentationカテゴリ:Administrator
- 投稿日:2019-10-28T00:49:04+09:00
Laravelでabortをつかってjsonを返す
はじめに
LaravelではabortというHTTP例外を投げるヘルパが存在します
https://readouble.com/laravel/6.0/ja/errors.html#http-exceptions通常のHTTP例外を返すのによく使われていますが、jsonの例外を投げるのにも使えることを知ったのでそのメモです
jsonによる例外
結論から言うとresponseインスタンスからjsonを作ってそれをそのままabortに食わっせるだけでおkです
独自で例外作ってhanderに食わせるのもなーってときに使えるのはとても便利
abort全般で使えますabort(response()->json(['message' => 'error!'], 400)); abort_if('hoge' === 'hoge', response()->json(['message' => 'error!'], 400)); abort_unless('hoge' !== 'hoge', response()->json(['message' => 'error!'], 400));
responseで渡すゆえにステータスコードの位置が変わるのがわかりにくいあとがき
検証したのは6.1ですが、5.6以降でもできるようです
詳しい部分は下記参照で(まるなげ)
https://cpoint-lab.co.jp/article/201903/8753/
- 投稿日:2019-10-28T00:31:54+09:00
cronはもはや不要!?lavary/crunzを使って、PHPでタスク管理してみた。
lavary/crunzを使って、PHPでタスク管理してみた。
できること
タスク管理は、crontabやcron.dでシェルやファイル毎に時間の指定をすることが多いと思うが、その管理をPHPで制御できるようにする。
メリット
PHPファイルの中でタスク管理が可能
デプロイ時が楽デメリット
日本語の文献が少ない
大元のphpファイルだけはcronの設定が必要準備
①ライブラリをcomposerでインストール
インストールしたいアプリケーションディレクトリ上で以下のコマンド。
composerがインストールされていなければ入れる必要がある。composer require lavary/crunz成功すると、vendor/binフォルダの中に「crunz」ファイルが作成されます。
※CakePHP3での動作は確認済み
②大元のタスク管理ファイルをphpで作成
ディレクトリの場所は問わないが、ファイル名を必ず「〇〇Tasks.php」とすること
例:
・DefaultTasks.php
・TestTasks.php
・SimpleTasks.php
など。③大元のタスク管理ファイルの中でlavary/crunzを呼び出す。
use Crunz\Schedule;④大元のタスク管理ファイルの中にタスクを書く。
<?php

use Crunz\Schedule;

$schedule = new Schedule();
$task = $schedule->run('mv /var/www/html/test.php /var/log/test.php');
$task->daily();

return $schedule;
以上のサンプルは、1日毎にtest.phpを移動させるスクリプトになります。
$schedule->run('')()内に、linuxのコマンドをそのまま書くことができます。
$task->daily();以上は1日毎に実行という意味です。
実行のパターン
①毎日10時に実行
$task->dailyAt('10:00');②毎分実行
$task->everyMinute();③毎週月曜日の5時に実行
$task->mondays()->at('5:00');④毎分10分毎に実行
$task->everyTenMinute();⑤月の初めの9時に実行
$task->monthly()->at('9:00')※もっとパターンがあります。詳しくはgithubを参照ください。
https://github.com/lavary/crunz複数タスクも勿論可能
<?php

use Crunz\Schedule;

$schedule = new Schedule();
$task = $schedule->run('mv /var/www/html/test.php /var/log/test.php');
$task->daily();

$task = $schedule->run('cp test.php{,.20191010}');
$task->mondays()->at('19:00');

//CakePHP3のシェルも、もちろん可能!!
$task = $schedule->run('bin/cake TestShell');
$task->everyMinute();

return $schedule;
⑤大元のタスク管理ファイルをcronに置く
タイトルにcronはもはや不要!?と書いたのですが、実際は結局必要なのです。
大元のタスク管理ファイルを、cronで毎分(毎秒)実行させることによって、
phpで設定した実行コマンドをタスクとしてそれぞれ実行するのです。linux CentOS7で動作確認してます。
cron.dに移動
cd /etc/cron.d/cron.d内にsampleタスクを作成
vi sample毎分に実行するタスクを書く(実行者はサンプルではroot)
* * * * * root vendor/bin/crunz schedule:runschedule:runを呼び出すことによって、
先に作ったDefaultTasks.phpを呼ぶ形になるのです。これでタスクは設定どおりに呼び出されます。
おまけ
タスク管理ファイルはphpなので勿論、以下のような使い方も可能です。
<?php

use Crunz\Schedule;

$environment = 'local'; // or production
$date = date("YmdHis");
$schedule = new Schedule();

//ファイル名をPHPで生成
$task = $schedule->run('mv /var/www/html/test.php /var/log/'.$date.'.php');
$task->daily();

//if文の利用
if($environment == 'local'){
   $task = $schedule->run('mv /var/www/html/test.php /var/log/test.php');
   $task->daily();
}

return $schedule;
等々