- 投稿日:2019-04-30T23:33:58+09:00
Vue.jsでポートフォリオサイトを作ってgithub pagesに配置してみた。
概要
Vue.jsとgithub pagesで躓いたこと大まかな流れを備忘録も含めて、記事化してみました。
書き方がざっくりとしているので、後から気づいたことがあれば、追記します。
(初心者なので、至らない点もありますが、よろしくお願いします。)追記
vue.jsでプロジェクトファイルごとgithubに乗っける場合はこちらのほうがよさそうです。参考文献
【超簡単】Vue.jsを使って3時間で自分のホームページを作成&公開する
一応、太字は↑こちらの記事の内容を踏襲した場合のやり方も記載しました。
適宜読み替えて試してみてください。
(画像などは入れてないのでもう少し詳しく知りたい方は、参考文献の方の閲覧をお願いします。)使用したもの(素材やAPI)
google font
https://fonts.google.com/icon-rainbow
https://icon-rainbow.com/SNS等のリンクアイコン素材
https://about.twitter.com/ja/company/brand-resources.htmlgithub
https://github.com/logosQiita
https://help.qiita.com/ja/articles/others-brand-guideline使用技術
- Vue.js
- BootStrap4
サイトを置いた場所
- github pages
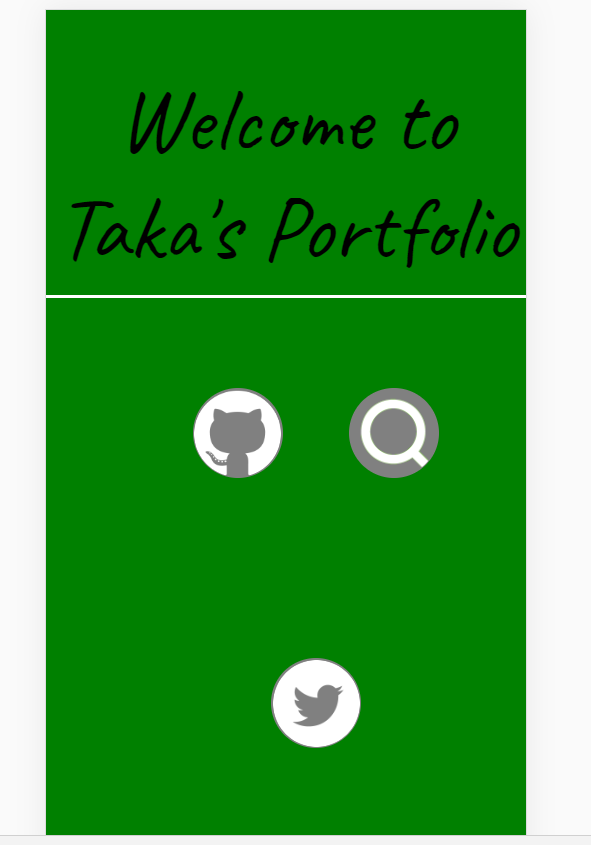
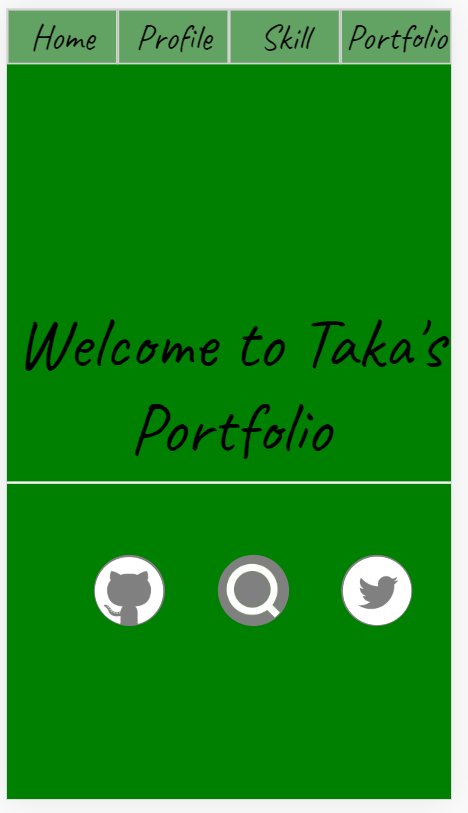
できたもの
https://taka1156.github.io/
下記に変更↓
https://taka1156.github.io/TakasPortfolio/やったこと
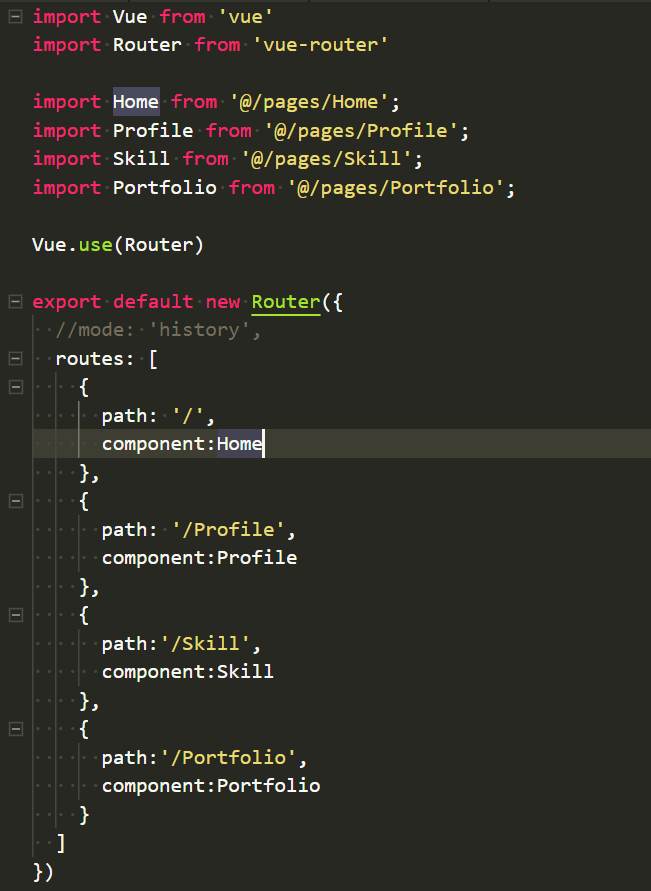
Vue.jsで
npm init webpack <プロジェクト名>を実行、対話形式でひな形を作成いろいろ聞かれますが、基本Enterを押しました。(vue-routerなどはしっかり確認)
プロジェクトができたらコンテンツの内容3~4つ決めました。
(自分の場合、Home、Profile、Skill、Portfolioで作成しました。)
1ページ全てのコンテンツを並べる(縦長)ならVue.component()でコンテンツ(vueファイル)のページをタグ化して配置。
個別ページなら、vue-routerを使用してページアドレス?を定義。
のどっちかにしようか迷ったところ結局後者で実装しました。
(一応、二種類作ってみました・・・
)
アイコンは迷った挙句、githubのアイデンティコンを使用。
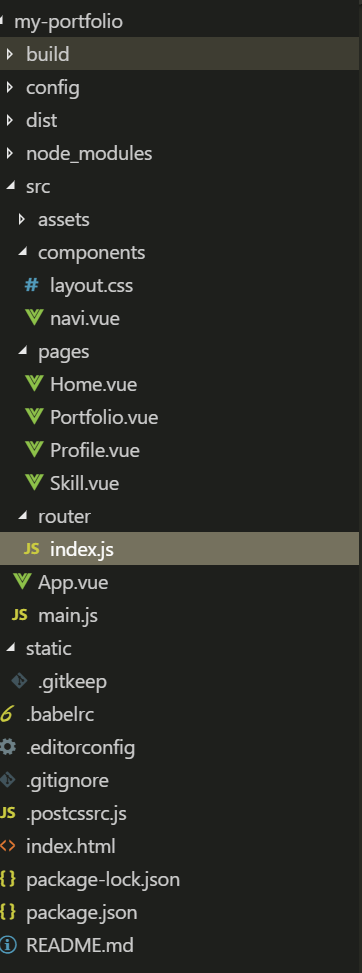
完成後のプロジェクトの構造はこんな感じになりました↓
vueファイルの役割一覧
- navi.vue ・・・ナビゲーションバー
- Home.vue ・・・サイトのトップページ
- profile ・・・自己紹介等
- Skill.vue ・・・資格や経験等
- Portfolio.vue・・・何か作ったらとりあえずここに配置(今は何もないですが
という構成になっています。
また、vue-routerを使う場合、historyモードは外しました。
(なぜかわかりませんが、build後のdistを見るとrouterで設定されたものが表示されない)
ページ切り替えのたびに#が混じっているのが気持ち悪いですが・・・
出来上がったら、
vue run buildでdistを生成。
(ちょっとした確認なら、vue run devでlocalhost:8080にアクセスする形のほうがいいかも。)
追記のやり方をした場合は、distとは別でdocsが生成されました。google chromeのデベロッパーツールを使うと各種デバイスの対応具合も確かめることができます。
(自分の場合iphone5で閲覧時に崩れました。)
出来上がったらいよいよ、githubに配置します
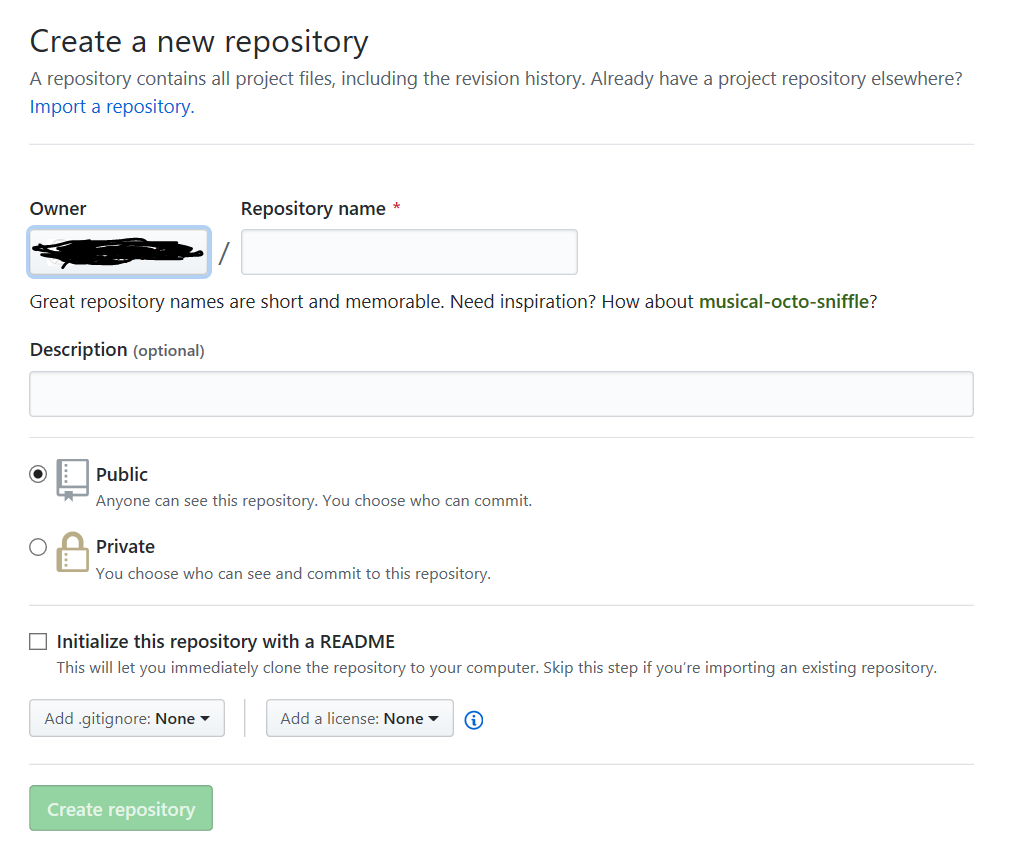
まず、githubにOwner.github.ioというリポジトリを作ります。
※Ownerは自分のものを使ってください。(左側の自動で記載されるOwner欄と同じものです。)
追記の方法の場合は好きな名前で構いません(ある程度は意味が通るもので)
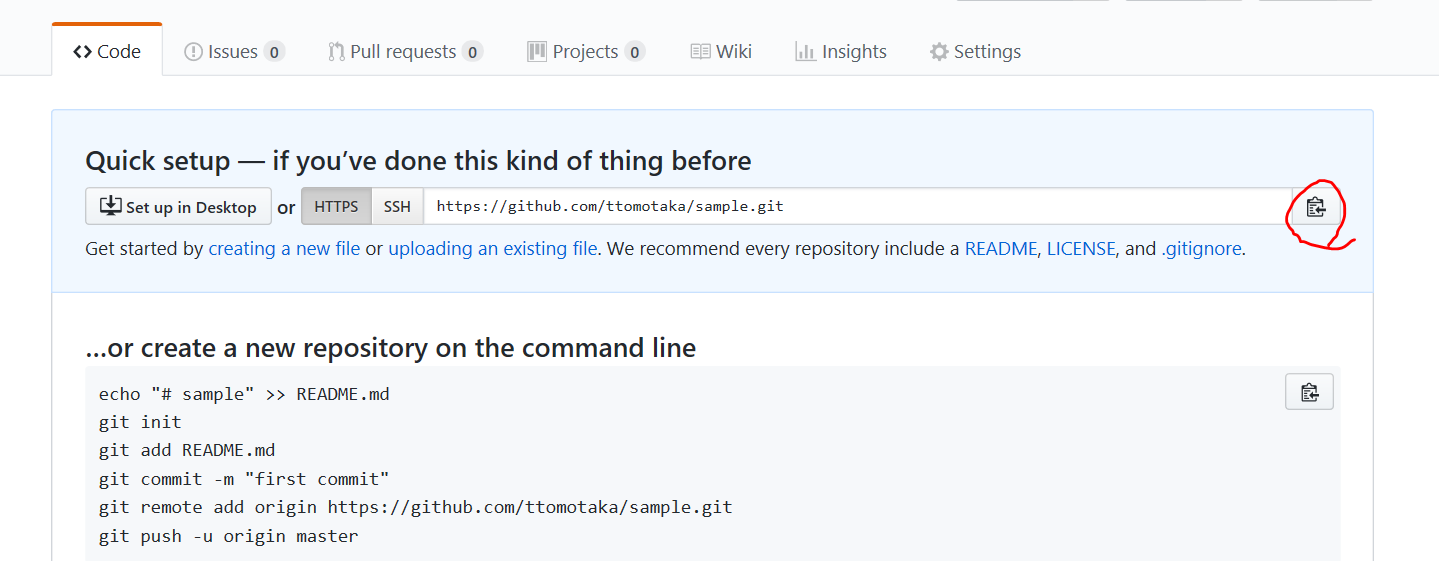
赤い囲みの部分をクリックしてコピー
gitをインストールしてcmdやPowershellなどを開き、プロジェクトを置きたい場所に、cdコマンドで移動。
その後git clone URL(URLを張り付けてください)を実行クローンしてできたファイルにdistの中身を配置。
git add --allでステージングし、git commit -m "hoge"を行う。
(hogeは後から何したかわかるような内容の方がいい気がします。最悪日付でもいいのかな?)
追記の方法の場合、プロジェクトファイルの中身を全てを投入しgit add --allすると、プロジェクト作成時に勝手に作られるモジュールなどは抜けていきました。(共用部分は抜けるみたい?)ちなみに、
git log --onelineで履歴が、見れるみたいです。最後に
git push -u origin masterしてhttps://Owner.github.ioにアクセスすると表示されます。(Ownerは、自分のを使ってください。)
追記の方法の場合は、https://Owner名.github.io/リポジトリ名/でできました。プッシュした際にgithubへのログインを求められることがありますが、その場合は普通にログインすれば問題なかったです。
※ただし、gitの設定を変えてないとOSに登録されている本名でプッシュが行くのでその場合は、
git config --global user.name "hoge"で名前を変えてください。最後に
初めてQiitaに記事を書いたので、見にくいところや記載事項のミスなどありましたら、コメントお願いします。
これからも頻繁にアウトプットしていくのでもしよかったら、見てください。
(次回はVagrant+LAMPを検討しています。)ここまで読んでいただき、ありがとうございました。

- 投稿日:2019-04-30T18:04:16+09:00
Nuxt & scssで、UA によってスタイルを適用し分ける方法
0. はじめに
- 「レスポンシブでイケそう、でもアプリとしては UA 分割する」ような場合有効そう
- 今回は Desktop or その他(= Mobile) で分岐させています
package version nuxt 2.6.1 vue 2.6.10 nuxt-device-detect 1.1.4 1. User Agent を判定する
https://github.com/dotneet/nuxt-device-detect
を利用しましたが、ここはなんでも大丈夫です。グローバルの Mixin として、こんな感じに layout を分岐させると便利です。
~/plugins/global-mixins.jsimport Vue from 'vue' Vue.mixin({ layout({ app }) { return app.$device.isDesktop ? 'desktop' : 'mobile' } })レイアウトコンポーネント
レイアウトコンポーネントがそれぞれ
#desktopor#mobileを持っていることが重要です。
下記では 2レイアウト準備していますが、動的に出力しても問題ありません。~/layouts/desktop.vue<template> <div id="desktop"> <nuxt /> </div> </template>~/layouts/mobile.vue<template> <div id="desktop"> <nuxt /> </div> </template>2. あとは scss でなんとかする
mixins.scss@mixin desktop { #desktop & { @content; } } @mixin mobile { #mobile & { @content; } }もちろん SCSS 周りの設定もいくつか必要ですが、割愛します
参考:
3. 使用例
~/components/TheFooter.vue<template> <script> <style lang="scss" scoped> .footer { color: red; @include desktop { color: green; } } </style>祖先に
#desktopや#mobileがあれば適用するモノですね。
いつかレスポンシブになるかもしれない際、mixin 内を変更すれば、メディアクエリへの移行も比較的楽に出来そうです。Help wanted.
Desktop 時に、Mobile 時の CSS を出力しない ような方法はありませんか? 下記のように。
HogeHoge.vue<style scoped v-if="$device.isDesktop"> .hoge { width: 800px; } </style> <style scoped v-else> .hoge { width: 100%; } </style>
- 投稿日:2019-04-30T16:33:01+09:00
モダンな技術を全く知らないSIer5年目がWebサービスを作ることになったため0から勉強する ~Laravel jwt-auth + メール認証 + パスワードリセット~
はじめに
現在SIer5年目でjavascript(Jqueryのみ)、PHP(フレームワーク無し)を2年ほど、C#(Windowsアプリ)3年ほどやってきました。
色々なご縁があり、個人で最近Webサービスの立ち上げをやることになったのですが何せ本当にWebサービスを立ち上げるための知識がほぼ0に等しいですただ今後のキャリアを考えた時に今のままではいけないと思いチャレンジすることにしました。
まずは最初に技術を習得しないといけないので、学ぶ&アウトプットするために毎回投稿していこうと思います。
今後身についていこうと思ってるのは下記のような技術です。
AWS
Docker
CI/CD環境の構築
Laravel
Nuxt.js
今回はLaravel+Nuxtについて学んでいきます。今回学ぶこと
Laravel+Nuxtでのメール認証機能とパスワードリセット機能を作成していこうかと思います。
今回はLaravel API側の実装をしていきます参考サイト
メール認証の概要は個々がわかりやっすかったです。
前提
Laravel 5.8
Nuxt 2.5.4
jwt-authログイン機能などはこちらで実装してるのでこちらを参照ください
パスワードリセット機能の実装
php artisan make:authで作成されたForgotPasswordControllerをAPI用にカスタマイズしていきます/app/Http/Controllers/api/Auth/ForgotPasswordController.php<?php namespace App\Http\Controllers\Auth; use App\Http\Controllers\Controller; use Illuminate\Foundation\Auth\SendsPasswordResetEmails; use Illuminate\Http\JsonResponse; use Illuminate\Http\Request; use Illuminate\Support\Facades\Validator; use Illuminate\Support\Facades\Password; class ForgotPasswordController extends Controller { use SendsPasswordResetEmails; public function __construct() { $this->middleware('guest'); } public function sendResetLinkEmail(Request $request) { //メールリセットのリクエストをチェックする $validate = $this->validateEmail($request->all()); if ($validate->fails()) { return new JsonResponse('Email is Invalid'); } $response = $this->broker()->sendResetLink( $request->only('email') ); return $response == Password::RESET_LINK_SENT ? $this->sendResetLinkResponse($request, $response) : $this->sendResetLinkFailedResponse($request, $response); } //メールアドレスチェック protected function validateEmail(array $data) { return Validator::make($data, [ 'email' => 'required|email', ]); } protected function sendResetLinkResponse(): JsonResponse { return new JsonResponse('Send Reset Mail'); } protected function sendResetLinkFailedResponse(Request $request, $response): JsonResponse { return new JsonResponse(trans($response)); } }Nuxt側でのパスワードリセットURLを指定する
/config/frontend.php<?php return [ 'url' => env('FRONTEND_URL', 'http://localhost:3000'), //フロントエンドのURL 'reset_pass_url' => env('RESET_PASS_URL', '/reset?queryURL='), // フロントエンドのパスワードリセットページのURL ];パスワードリセットのメールを呼び出す関数
sendPasswordResetNotificationを追加する/app/Http/Controllers/Models/User.php<?php namespace App\Models; use Illuminate\Notifications\Notifiable; use Illuminate\Contracts\Auth\MustVerifyEmail; use Illuminate\Foundation\Auth\User as Authenticatable; use Tymon\JWTAuth\Contracts\JWTSubject; + use App\Notifications\CustomPasswordReset; class User extends Authenticatable implements JWTSubject { use Notifiable; /** * The attributes that are mass assignable. * * @var array */ protected $fillable = [ 'name', 'email', 'password', ]; /** * The attributes that should be hidden for arrays. * * @var array */ protected $hidden = [ 'password', 'remember_token', ]; /** * The attributes that should be cast to native types. * * @var array */ protected $casts = [ 'email_verified_at' => 'datetime', ]; public function getJWTIdentifier() { return $this->getKey(); } public function getJWTCustomClaims() { return []; } + public function sendPasswordResetNotification($token) + { + $this->notify(new CustomPasswordReset($token)); + } }パスワードリセットメール通知用のclassを実装する
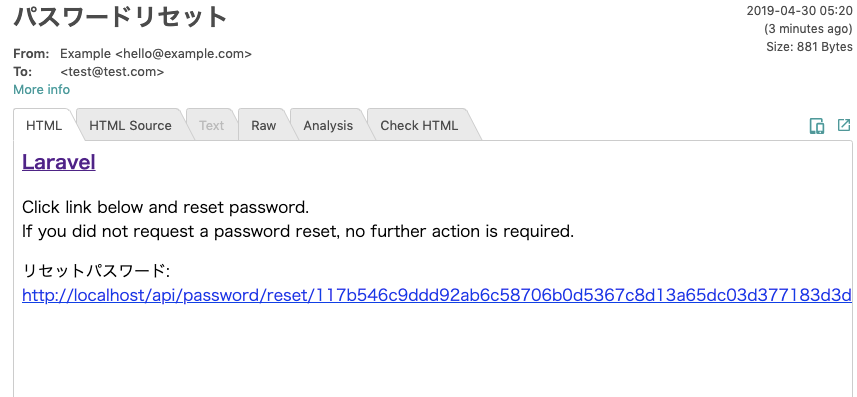
app/Notifications/CustomPasswordReset.php<?php namespace App\Notifications; use App; use Illuminate\Bus\Queueable; use Illuminate\Notifications\Notification; use Illuminate\Contracts\Queue\ShouldQueue; use Illuminate\Notifications\Messages\MailMessage; class CustomPasswordReset extends Notification { use Queueable; public $token; public function __construct($token) { $this->token = $token; } public function via($notifiable) { return ['mail']; } public function toMail($notifiable) { return (new MailMessage) ->subject('パスワードリセット') // 件名 ->view('emails.resetpass') // メールテンプレートの指定 ->action('リセットパスワード', config('frontend.url') . config('frontend.reset_pass_url') . url('api/password/reset', $this->token) //アクセスするURL ); } }メールテンプレートの作成を行う
/resources/views/emails/resetpass.blade.php<h3> <a href="{{ config('app.url') }}">{{ config('app.name') }}</a> </h3> <p> {{ __('Click link below and reset password.') }}<br> {{ __('If you did not request a password reset, no further action is required.') }} </p> <p> {{ $actionText }}: <a href="{{ $actionUrl }}">{{ $actionUrl }}</a> </p>ルートの定義を追加する
/routes/api.phpRoute::group(['prefix' => '/auth', ['middleware' => 'throttle:20,5']], function (){ Route::post('/register', 'Auth\RegisterController@register'); Route::post('/login', 'Auth\LoginController@login'); + Route::post("/password/email", "Auth\ForgotPasswordController@sendResetLinkEmail"); + Route::post("/password/reset/{token}", "Auth\ResetPasswordController@reset"); });メール送信テスト
今回は、mailtrapというサービスを使用して簡単にローカルでもメール送信テストをしていきたいと思います
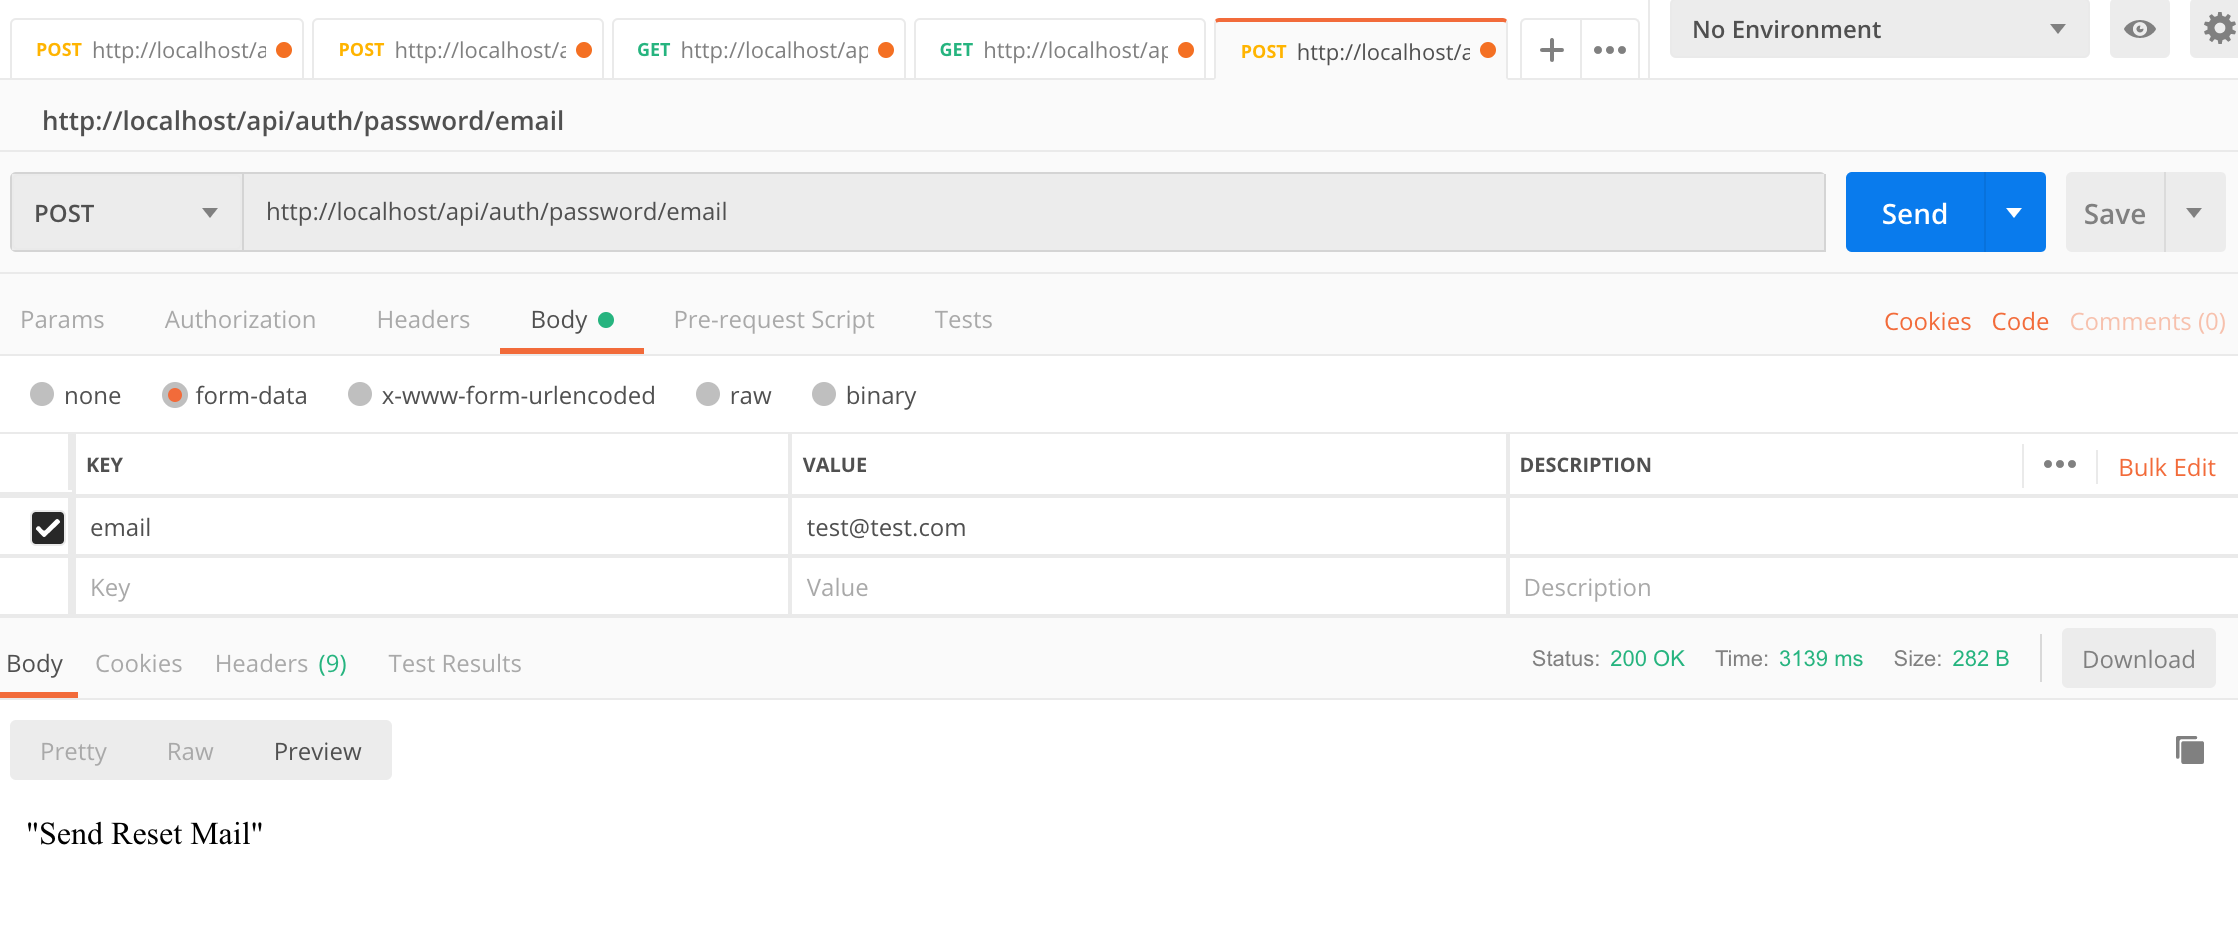
.env参考サイトを元に記載しました。MAIL_DRIVER=smtp MAIL_HOST=smtp.mailtrap.io MAIL_PORT=2525 MAIL_USERNAME=XXXXX MAIL_PASSWORD=XXXXX MAIL_ENCRYPTION=nullPostManでテストする
mailtrapでも送信ができていることを確認する
パスワードリセットするリクエストを実行するAPIを実装
/app/Http/Controller/api/Auth/ResetPasswordController.php<?php namespace App\Http\Controllers\api\Auth; use App\Http\Controllers\Controller; use Illuminate\Foundation\Auth\ResetsPasswords; + use Illuminate\Http\Request; + use Illuminate\Support\Str; + use Illuminate\Support\Facades\Validator; + use Illuminate\Support\Facades\Password; + use Illuminate\Auth\Events\PasswordReset; + use Illuminate\Contracts\Auth\PasswordBroker; + use Illuminate\Http\JsonResponse; class ResetPasswordController extends Controller { /* |-------------------------------------------------------------------------- | Password Reset Controller |-------------------------------------------------------------------------- | | This controller is responsible for handling password reset requests | and uses a simple trait to include this behavior. You're free to | explore this trait and override any methods you wish to tweak. | */ use ResetsPasswords; /** * Where to redirect users after resetting their password. * * @var string */ protected $redirectTo = '/home'; /** * Create a new controller instance. * * @return void */ public function __construct() { $this->middleware('guest'); } + public function reset(Request $request) + { + $validate = $this->validator($request->all()); + + if ($validate->fails()) { + return new JsonResponse($validate->errors()); + } + $response = $this->broker()->reset( + $this->credentials($request), function ($user, $password) { + $this->resetPassword($user, $password); + } + ); + return $response == Password::PASSWORD_RESET + ? $this->sendResetResponse($request, $response) + : $this->sendResetFailedResponse($request, $response); + } + protected function resetPassword($user, $password) + { + $user->forceFill([ + 'password' => bcrypt($password), + 'remember_token' => Str::random(60), + ])->save(); + } + protected function sendResetResponse(Request $request, $response) + { + return new JsonResponse('Password Reset'); + } + protected function sendResetFailedResponse(Request $request, $response) + { + return new JsonResponse($response); + } + protected function validator(array $data) + { + return Validator::make($data, [ + 'token' => 'required', + 'email' => 'required|email', + 'password' => 'required|confirmed|min:6', + ]); + } + }PostManでパスワードが変更できるのか確認する
メール認証機能の実装
/app/Models/User.php<?php namespace App\Models; use Illuminate\Notifications\Notifiable; use Illuminate\Contracts\Auth\MustVerifyEmail; use Illuminate\Foundation\Auth\User as Authenticatable; use Tymon\JWTAuth\Contracts\JWTSubject; use App\Notifications\CustomPasswordReset; + use App\Notifications\VerifyEmail; - class User extends Authenticatable implements JWTSubject + class User extends Authenticatable implements JWTSubject, MustVerifyEmail { use Notifiable; /** * The attributes that are mass assignable. * * @var array */ protected $fillable = [ 'name', 'email', 'password', ]; /** * The attributes that should be hidden for arrays. * * @var array */ protected $hidden = [ 'password', 'remember_token', ]; /** * The attributes that should be cast to native types. * * @var array */ protected $casts = [ 'email_verified_at' => 'datetime', ]; public function getJWTIdentifier() { return $this->getKey(); } public function getJWTCustomClaims() { return []; } public function sendPasswordResetNotification($token) { $this->notify(new CustomPasswordReset($token)); } + public function sendEmailVerificationNotification() + { + $this->notify(new VerifyEmail); + } }メール認証のURLを生成する
VerifyEmailを作成する/app/Notifications/VerifyEmail.php<?php namespace app\Notifications; use App; use Illuminate\Auth\Notifications\VerifyEmail as VerifyEmailBase; use Illuminate\Support\Facades\URL; use Carbon\Carbon; class VerifyEmail extends VerifyEmailBase { protected function verificationUrl($user) { $prefix = config('frontend.url') .config('frontend.email_verify_url'); $routeName = 'verification.verify'; $temporarySignedURL = URL::temporarySignedRoute( $routeName, Carbon::now()->addMinutes(60), ['id' => $user->getKey()] ); return $prefix . urlencode($temporarySignedURL); } }Nuxt側の認証画面URLを定義する
/config/frontend.php<?php return [ 'url' => env('FRONTEND_URL', 'http://localhost:3000'), //フロントエンドのURL 'reset_pass_url' => env('RESET_PASS_URL', '/reset?queryURL='), // フロントエンドのパスワードリセットページのURL + 'email_verify_url' => env('FRONTEND_EMAIL_VERIFY_URL', '/verify?queryURL='), // メール認証のURL ];認証APIのルートも定義する
/routes/api.phpRoute::group(['prefix' => '/auth', ['middleware' => 'throttle:20,5']], function (){ Route::post('/register', 'Auth\RegisterController@register'); Route::post('/login', 'Auth\LoginController@login'); Route::post("/password/email", "Auth\ForgotPasswordController@sendResetLinkEmail"); Route::post("/password/reset/{token}", "Auth\ResetPasswordController@reset"); + Route::get('email/verify/{id}', 'Auth\VerificationController@verify')->name('verification.verify'); + Route::post('email/resend', 'Auth\VerificationController@resend')->name('verification.resend'); });ユーザ登録時にメール認証のためのメール送信を行うために
RegisterControllerを修正する/app/Http/Controllers/Auth/RegisterController.php- $user = $this->create($request->all()); + event(new Registered($user = $this->create($request->all())));ユーザ登録を行い、メールが送られてることを確認する
認証を完了するAPIを実装する
/app/Http/Controllers/api/Auth/VerificationController.php<?php namespace App\Http\Controllers\Auth; use App\Http\Controllers\Controller; use Illuminate\Foundation\Auth\VerifiesEmails; use Illuminate\Http\Request; use Illuminate\Auth\Events\Verified; use App\User; use Illuminate\Http\JsonResponse; class VerificationController extends Controller { use VerifiesEmails; public function __construct() { $this->middleware('throttle:6,1'); } public function verify(Request $request) { $user = User::find($request->route('id')); if (!$user->email_verified_at) { $user->markEmailAsVerified(); event(new Verified($user)); return new JsonResponse('Email Verified'); } return new JsonResponse('Email Verify Failed'); } public function resend(Request $request) { $user = User::where('email', $request->get('email'))->get()->first(); if (!$user) { return new JsonResponse('No Such User'); } if ($user->hasVerifiedEmail()) { return new JsonResponse('Already Verified User'); } $user->sendEmailVerificationNotification(); return new JsonResponse('Send Verify Email'); } }認証用のURLを叩いて、DBの
email_verified_atが日時が入っていれば認証完了となる
まとめ
基本的には、Laravelの機能をAPI用に改造するだけで実装ができてしまうので、本当に便利でした。
次回はNuxtの画面側の実装もしていきたいと思います。

- 投稿日:2019-04-30T12:04:09+09:00
vue.jsのtemplateファイルの書き方
vue.jsのテンプレートファイル(
.vue)について、備忘録的にまとめてみました。
ちょくちょく書き足していきます。基本
SampleTag.vue<template> <div class="sample-tag"> <p>{{ msg }}</p> </div> </template> <script> export default { name: 'sample-tag', props: { msg: String } } </script> <style scoped> p { color: red; } </style>App.vue<template> <div id="app"> <sample-tag msg="さんぷるてきすと" /> </div> </template>
nameプロパティの定義ケバブケース(
sample-tag)とキャメルケース(SampleTag)の2つの書き方があります。他のコンポーネントファイルを読込む
PugとStylusを使って書いてみる
どうやったらできるか、はこの記事が参考になりました。
SampleTag.vue(pugver)<template lang="pug"> .sample-tag p {{ msg }} </template> <script> </script> <style scoped lang="stylus"> p color red </style>
- 投稿日:2019-04-30T01:44:46+09:00
Vue.js+Firebase+Dockerで環境構築をして、初期画面をデプロイするまで
環境構築をしたもののデプロイまで上手く行かなかったので、
コンテナを一つにして、やり直してみました。
いいねとかストックもしてくれた方もいると思うので、元記事はしばらく残しますが、
じきに消します。環境
- Vue.js(Vue CLI 3.0)
- Firebase
- Docker
留意点
- alpine linuxはbashがないので今回はashを使用する
環境構築
1.プロジェクトのフォルダを作成、直下にDockerfileとdocker-compose.ymlを作成する
DockerfileFROM node:8.11.3-alpine WORKDIR /app RUN apk update && \ npm install -g npm \ npm install -g @vue/cli \ npm install -g firebase-tools \ && rm -rf /var/lib/apt/lists/* CMD ["/bin/ash"]
volumesでホスト側とコンテナ側の同期部分を指定しているので、このあとbuildとupをするとコンテナ内のappフォルダが、ローカル側にも反映されます。docker-compose.ymlversion: '3' services: vue: build: . volumes: - ./app:/app ports: - '8080:8080' stdin_open: true tty: true2.コンテナの構築と起動、ログイン
project_folder/ $ docker-compose build // コンテナの構築
project_folder/ $ docker-compose up -d // バックグラウンドでコンテナを起動
project_folder/ $ docker ps -a // コンテナが立っているか確認できる(STATUSがUp)
project_folder/ $ docker exec -it コンテナ名orコンテナID /bin/ash // 起動しているコンテナにログイン
3.コンテナの中でVueのプロジェクトを作成する
/app # vue --version // バージョン確認でVueが入っていることを確認する
/app # vue create project_name // vue init webpack project_nameのコマンドはVue CLI 2.0の書き方みたいです
# Vueのプロジェクト作成にあたってオプションを選択していく(Ctrl + Cで中断できる) # 主はRouterとVuexを使用したいので、Manually select featuresから進めて行きました # 一応オプションについて残しておきます #上下キーで選択、returnで決定 Vue CLI v3.7.0 ? Please pick a preset: default (babel, eslint) ❯ Manually select features # スペースキーでチェックボックスを選択する、キーが効かないときは英数入力にする ? Check the features needed for your project: ❯◉ Babel ◯ TypeScript ◯ Progressive Web App (PWA) Support ◉ Router ◉ Vuex ◯ CSS Pre-processors ◉ Linter / Formatter ◯ Unit Testing ◯ E2E Testing # Vue Routerのヒストリーモードを使用するかどうかを選択する ? Use history mode for router? (Requires proper server setup for index fallback in production) Yes # LinterとFormatterの設定を選択する(エラー防止のみのESLint with error prevention onlyを選択した) ? Pick a linter / formatter config: ❯ ESLint with error prevention only ESLint + Airbnb config ESLint + Standard config ESLint + Prettier # 追加のLint機能を選択する(Lintを保存時に実行) ? Pick additional lint features: (Press <space> to select, <a> to toggle all, <i> to invert selection) ❯◉ Lint on save ◯ Lint and fix on commit (requires Git) # Babel、PostCSS、ESLint等の設定をどこで行うかを選択する(それぞれの設定ファイルで行う) ? Where do you prefer placing config for Babel, PostCSS, ESLint, etc.? (Use arrow keys) ❯ In dedicated config files In package.json # 次回からもこの設定を使うために、設定を保存するかどうかを選択する ? Save this as a preset for future projects? Yes # どこに保存するかを入力する ? Save preset as: ./setting # パッケージ管理は何でするか(yarnの方が高速で知られているがnpmを性能がよくなってきているので慣れてるnpmにした) ? Pick the package manager to use when installing dependencies: Use Yarn ❯ Use NPM Vue CLI v3.7.0 ✨ Creating project in /app/project_name. ⚙ Installing CLI plugins. This might take a while... > yorkie@2.0.0 install /app/project_name/node_modules/yorkie > node bin/install.js setting up Git hooks can't find .git directory, skipping Git hooks installation added 1158 packages from 913 contributors and audited 23624 packages in 166.581s found 0 vulnerabilities ? Invoking generators... ? Installing additional dependencies... added 38 packages from 27 contributors, updated 2 packages, moved 9 packages and audited 23915 packages in 72.268s found 0 vulnerabilities ⚓ Running completion hooks... ? Generating README.md... ? Successfully created project project_name. ? Get started with the following commands: $ cd project_name $ npm run serve4.サーバーを立てて初期画面を確認する
# インストールしたディレクトリに移動(package.jsonがある)
/app # cd project_name

# ローカルにVueのアプリサーバー起動、ビルドに時間が30秒くらいかかる localhost:8080にアクセス、止めるときは[Ctrl+c]
/app/project_name # npm run serve


> project_name@0.1.0 serve /app/project_name
> vue-cli-service serve

 INFO  Starting development server...
 98% after emitting CopyPlugin

 DONE  Compiled successfully in 39236ms                                                                                                                     10:06:01


  App running at:
  - Local:   http://localhost:8080/

  It seems you are running Vue CLI inside a container.
  Access the dev server via http://localhost:<your container's external mapped port>/

  Note that the development build is not optimized.
  To create a production build, run npm run build.
5.確認
初期画面を実際Firebaseにホスティングしてみる
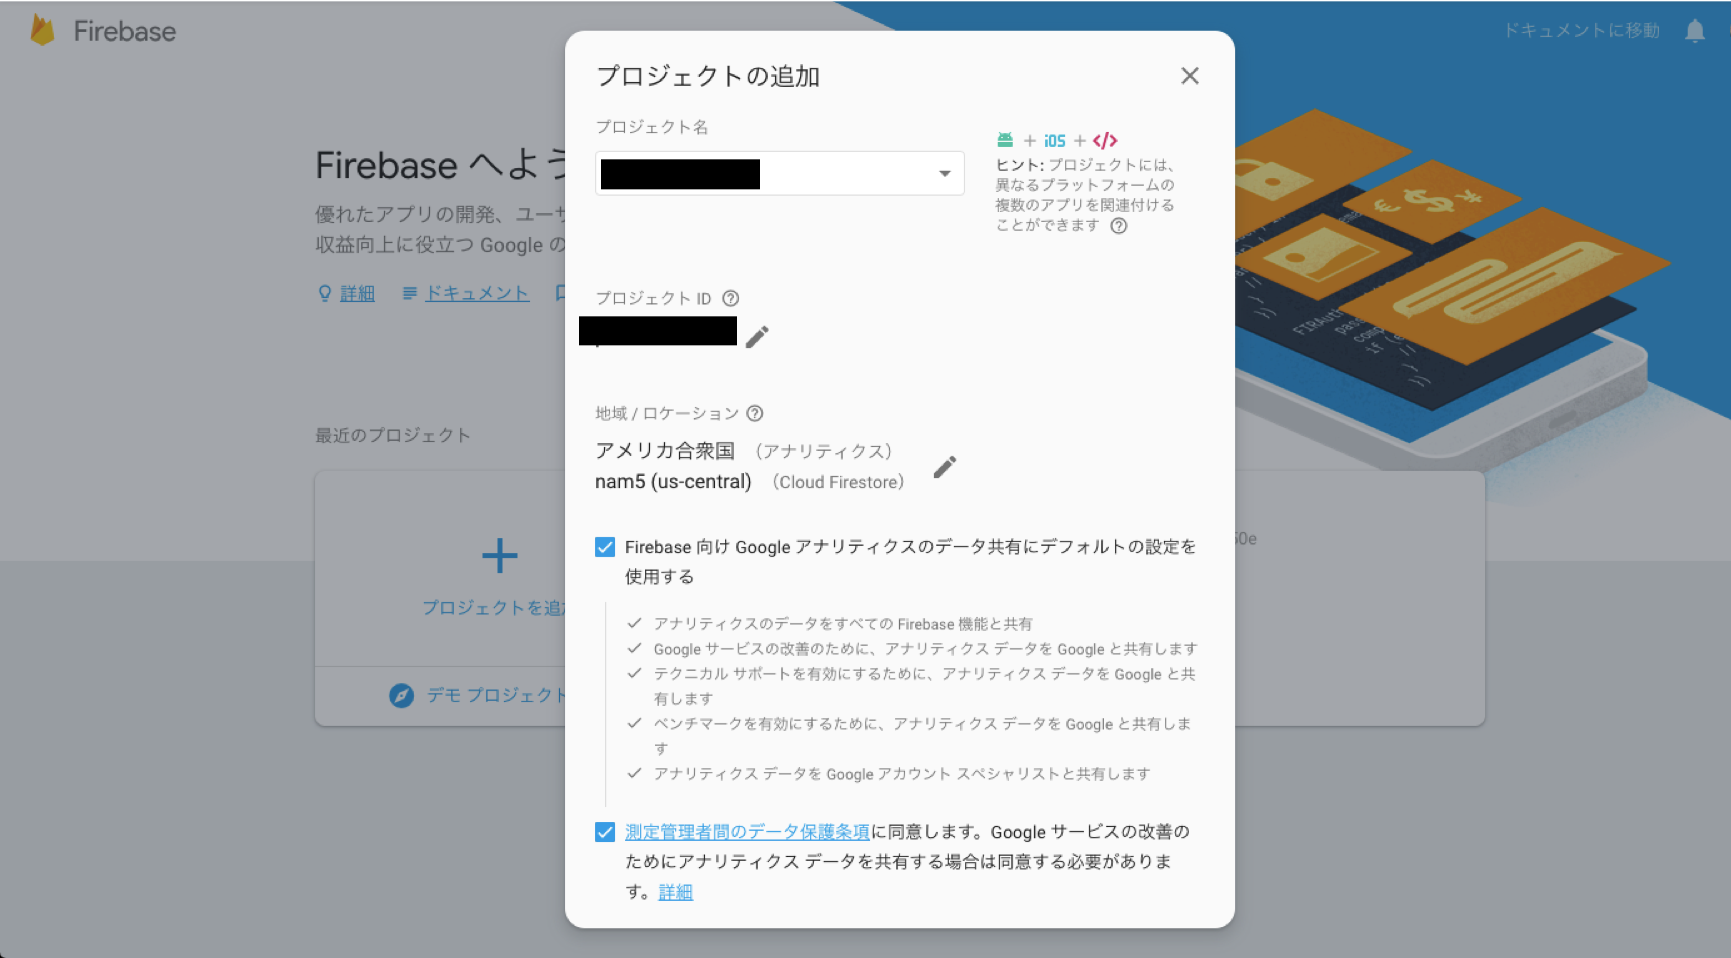
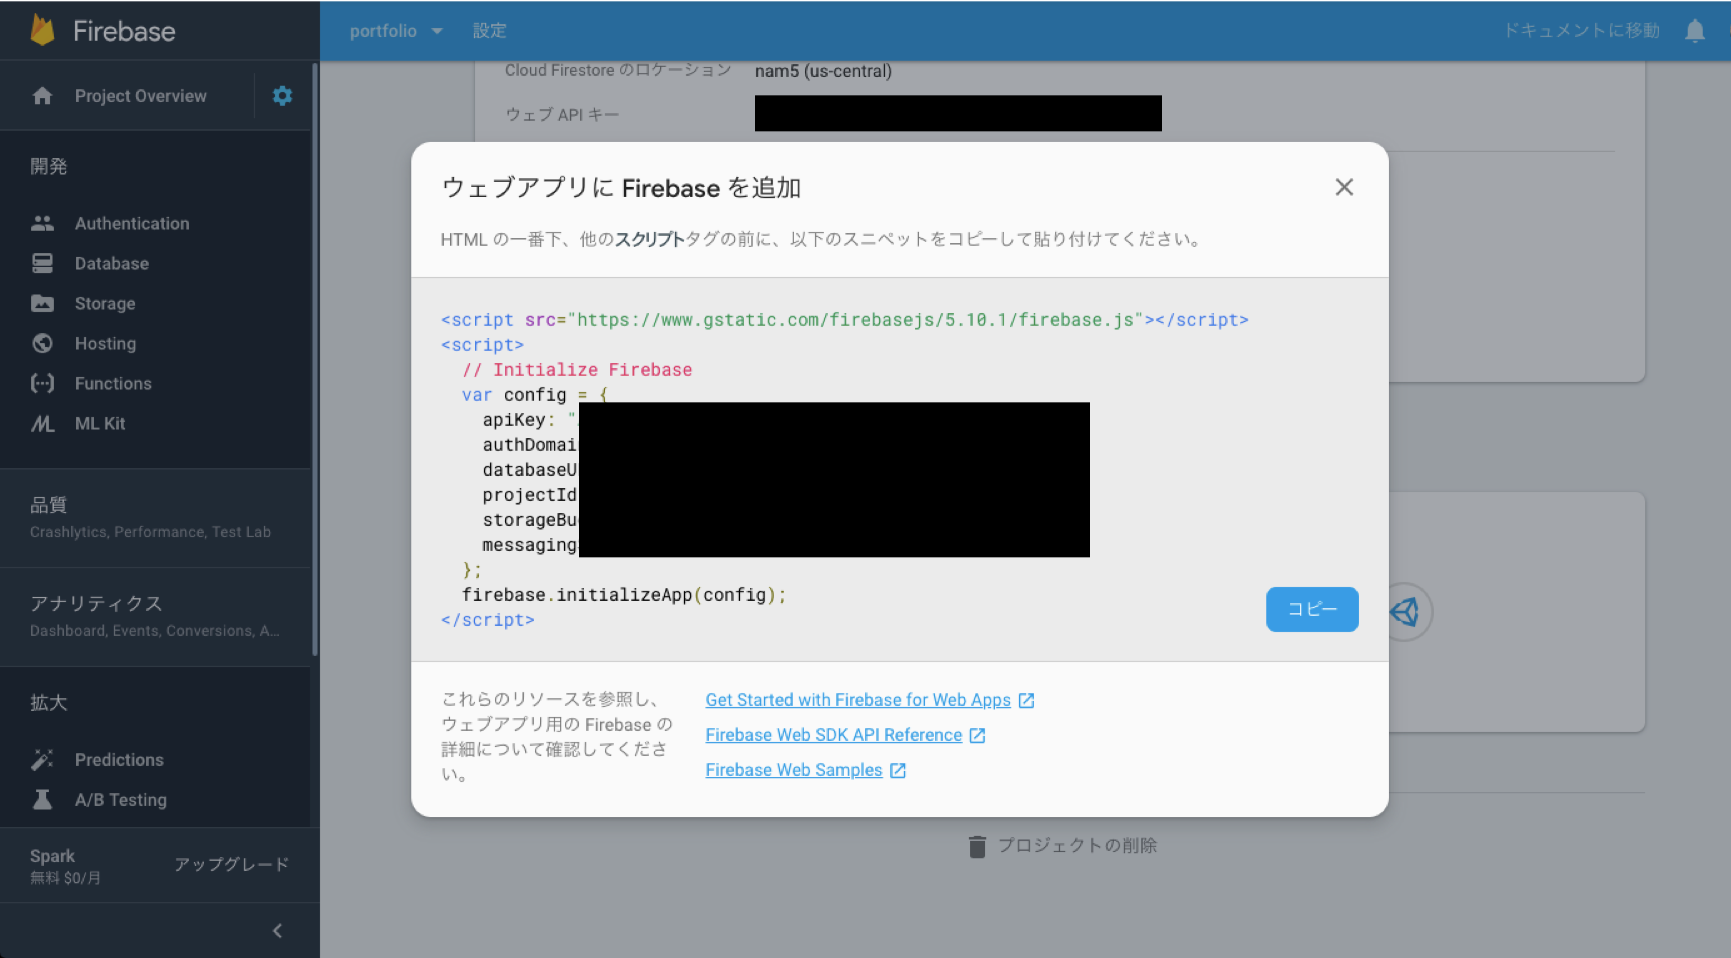
Firebaseでプロジェクトを作りCLIと連携する
firebaseにアクセスして、プロジェクトを作成する
プロジェクトのコンソールからscriptタグを生成してコピーする
Firebaseを利用するためにindex.htmlを書き換える
project_folder/app/project_name/public/index.html<!DOCTYPE html> <html lang="en"> <head> <meta charset="utf-8"> <meta http-equiv="X-UA-Compatible" content="IE=edge"> <meta name="viewport" content="width=device-width,initial-scale=1.0"> <link rel="icon" href="<%= BASE_URL %>favicon.ico"> <title>project_name</title> </head> <body> <noscript> <strong>We're sorry but project_name doesn't work properly without JavaScript enabled. Please enable it to continue.</strong> </noscript> <div id="app"></div> <!-- built files will be auto injected --> <script src="https://www.gstatic.com/firebasejs/5.10.1/firebase.js"></script> <script> // Initialize Firebase var config = { apiKey: "apiKeyapiKeyapiKeyapiKeyapiKeyapiKey", authDomain: "project_name.firebaseapp.com", databaseURL: "https://project_name.firebaseio.com", projectId: "project_name-xxxxx", storageBucket: "project_name-xxxxx.appspot.com", messagingSenderId: "xxxxxxxxx" }; firebase.initializeApp(config); </script> </body> </html>
- Firebaseにログインするコマンドを実行(ローカルで仮想環境を使用するので、オプション の--no-localhostが非常に重要)
/app/project_name # firebase login --no-localhost

# 使用状況の情報に関する協力の同意を求められるのでY(es)で進める
? Allow Firebase to collect anonymous CLI usage and error reporting information? (Y/n) Yes

# 「Visit this URL on any device to log in:」の下にトークンつきのURLが発行されるので、ブラウザにコピペして、ログインしたいGoogleのアカウントを選択する
# ブラウザ側でGoogleからコードが発行されるので、コピーして「? Paste authorization code here」にペーストして実行
# 「Success! Logged in as hoge@gmail.com」と自分が選択したアカウントのgmailアドレスが表示されていたら認証成功
Vueのソースをビルドしてみる
1.firebaseを依存モジュールとして入れる(package.jsonのdependenciesにfirebaseが加わる)
/app/project_name # npm install --save firebase2.Vueプロジェクトのビルド
# Vueのプロジェクトをビルドする(projectt_name配下にdistというフォルダができるのがポイント)
# 作成後このdistフォルダをfirebaseにデプロイしていく
/app/project_name # npm run build


> project_name@0.1.0 build /app/project_name
> vue-cli-service build


⠧  Building for production...

(省略)

Entrypoints:
  app (1000 KiB)
      js/chunk-vendors.562a481f.js
      css/app.3c0b035c.css
      js/app.e21a0fda.js


  File                                 Size               Gzipped

  dist/js/chunk-vendors.562a481f.js    993.33 KiB         263.16 KiB
  dist/js/app.e21a0fda.js              6.28 KiB           2.42 KiB
  dist/js/about.edea997e.js            0.44 KiB           0.31 KiB
  dist/css/app.3c0b035c.css            0.42 KiB           0.26 KiB

  Images and other types of assets omitted.

 DONE  Build complete. The dist directory is ready to be deployed.
 INFO  Check out deployment instructions at https://cli.vuejs.org/guide/deployment.html
FirebaseCLIの設定
デプロイ対象となるディレクトリを選択するオプションで上記で
npm run buildで作られた「dist」ディレクトリを指定するのがポイント
直下にdistディレクトリがあることをわかった上で作業を進める(ここでは、/app/project_name/dist)1.Firebase初期化
/app/project_name # firebase init

     ######## #### ########  ######## ########     ###     ######  ########
     ##        ##  ##     ## ##       ##     ##  ##   ##  ##       ##
     ######    ##  ########  ######   ########  #########  ######  ######
     ##        ##  ##    ##  ##       ##     ## ##     ##       ## ##
     ##       #### ##     ## ######## ########  ##     ##  ######  ########

You're about to initialize a Firebase project in this directory:

  /app/project_name

Before we get started, keep in mind:

  * You are currently outside your home directory

# 使いたい機能をお好みで選ぶ
? Which Firebase CLI features do you want to set up for this folder? Press Space to select features, then Enter to confirm your choices.
 ◉ Database: Deploy Firebase Realtime Database Rules
 ◯ Firestore: Deploy rules and create indexes for Firestore
 ◯ Functions: Configure and deploy Cloud Functions
 ◉ Hosting: Configure and deploy Firebase Hosting sites
❯◉ Storage: Deploy Cloud Storage security rules

=== Project Setup

First, let's associate this project directory with a Firebase project.
You can create multiple project aliases by running firebase use --add,
but for now we'll just set up a default project.

# 作ったFirebaseプロジェクトを選択する
? Select a default Firebase project for this directory:
  [don't setup a default project]
  hoge-fuga-xxxxx (hoge-fuga)
❯ project_name-xxxxx (project_name)
  [create a new project]


=== Database Setup

Firebase Realtime Database Rules allow you to define how your data should be
structured and when your data can be read from and written to.

? What file should be used for Database Rules? (database.rules.json)

=== Hosting Setup

# ここではデフォルトがpublicとなっているが、「dist」とするのがポイント
# ビルド対象となるディレクトリの選択をここでしているので
# 先程ビルドしたVueのプロジェクトが入っているdistを選択する
Your public directory is the folder (relative to your project directory) that
will contain Hosting assets to be uploaded with firebase deploy. If you
have a build process for your assets, use your build's output directory.

? What do you want to use as your public directory? (public) dist

# SPAにするかどうかの質問ではN(o)とした
? Configure as a single-page app (rewrite all urls to /index.html)? (y/N) N

? File dist/index.html already exists. Overwrite? Yes
✔  Wrote dist/index.html

=== Storage Setup

Firebase Storage Security Rules allow you to define how and when to allow
uploads and downloads. You can keep these rules in your project directory
and publish them with firebase deploy.

? What file should be used for Storage Rules? (storage.rules)
2.firebaseにデプロイしてホスティングする
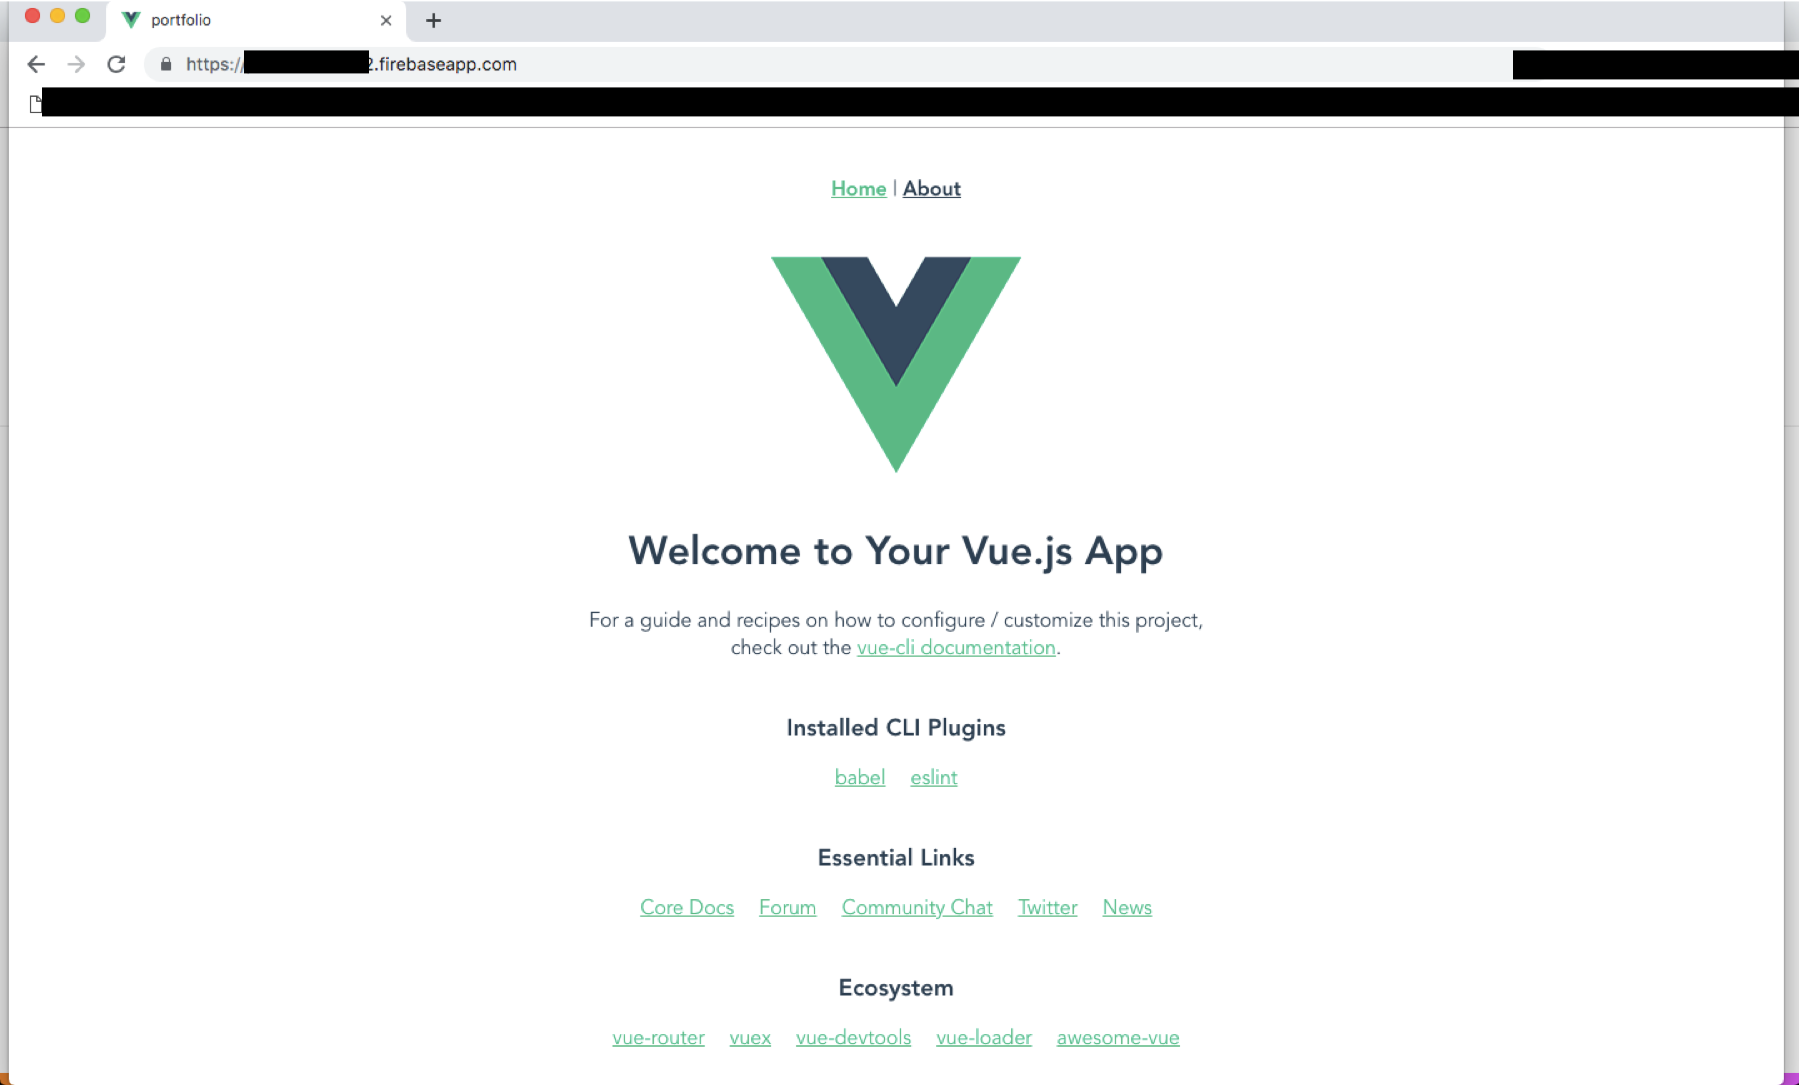
# 先程と同じディレクトリでコマンドを実行する
/app/project_name # firebase deploy

=== Deploying to 'project_name-xxxxx'...

i  deploying database, storage, hosting
i  database: checking rules syntax...
✔  database: rules syntax for database project_name-xxxxx is valid
i  storage: checking storage.rules for compilation errors...
✔  storage: rules file storage.rules compiled successfully
i  storage: uploading rules storage.rules...
i  hosting[project_name-xxxxx]: beginning deploy...
i  hosting[project_name-xxxxx]: found 10 files in dist
✔  hosting[project_name-xxxxx]: file upload complete
i  database: releasing rules...
✔  database: rules for database project_name-xxxxx released successfully
✔  storage: released rules storage.rules to firebase.storage/project_name-xxxxx.appspot.com
i  hosting[project_name-xxxxx]: finalizing version...
✔  hosting[project_name-xxxxx]: version finalized
i  hosting[project_name-xxxxx]: releasing new version...
✔  hosting[project_name-xxxxx]: release complete

✔  Deploy complete!

Project Console: https://console.firebase.google.com/project/project_name-xxxxx/overview
Hosting URL: https://project_name-xxxxx.firebaseapp.com
3.Hosting URLにブラウザでアクセスして、ホスティングが正常に行われているか確認する
4.ホスティングの停止
/app/project_name # firebase hosting:disable

# ホスティングを止めるかどうかの質問をされるのでY(es)で回答する
? Are you sure you want to disable Firebase Hosting?
  This will immediately make your site inaccessible! Yes
✔  Hosting has been disabled for project_name-xxxxx. Deploy a new version to re-enable.
修正版は以上です。なにかありましたらコメントください。
- 投稿日:2019-04-30T01:16:02+09:00
2019年 Vue.js + Electron の環境構築は vue-cli-plugin-electron-builder がおすすめ
今まで Vue.js + Electron の組み合わせでプロジェクトを作成するには electron-vue が定番でした。
しかし、Vue CLI がバージョン3になり、Webpack 周りの設定を意識することなく TypeScript などが手軽に導入できることに慣れてしまうと、Vue CLI 2 ベースの electron-vue で新規プロジェクトを作るのは若干面倒に思えてしまいます。
検索してみたところ、Vue CLI 3 のプラグインである vue-cli-plugin-electron-builder というのが見つかり、大変便利だったのでご紹介させていただきます。
公式サイト https://nklayman.github.io/vue-cli-plugin-electron-builder/導入方法
Vue CLI 3 がインストールしてあり、すでにプロジェクト作成済みの状態で、
vue add electron-builderと入力すると、 Electron や依存パッケージがインストールされるほか、いろいろと設定やファイルを追加してくれます。
※
vue uiのプラグイン画面からでも追加できます追加されるもの
.gitignore
アプリケーションビルド先のディレクトリ
/dist_electronが .gitignore に追加されます。package.json
プロジェクトルートの package.json に npm スクリプトがいくつか追加されます。
重要なのは以下の2つです。
electron:buildビルドコマンド。
/dist_electronディレクトリに Electron アプリケーションやインストーラが書き出されます。
electron:serveDev サーバ起動。Electron ウィンドウが立ち上がり、ホットリロードしながら開発できます。
src/background.js
Electron 起動スクリプトのファイルが新たに作成されます。
メインウィンドウの作成や、すべてのウィンドウが閉じられた時にアプリケーション終了(Mac OS除く)などのテンプレ的な内容に加え、開発時は起動後に DevTools を開く、といった処理が書かれています。
ちなみに Vue CLI で TypeScript を選択したプロジェクトの場合、拡張子がちゃんと.tsになっていて感心しました。electron-vue との違い
一番の違いはディレクトリ構成でしょうか。
electron-vue は/app/srcの下がメインプロセス用とレンダラプロセス用のディレクトリに分かれていますが、 vue-cli-plugin-electron-builder は Vue CLI のディレクトリ構成のままなので、/srcに両方のファイルが置かれることになります。また、electron-vue は 設定ファイルが細かく分かれていますが、vue-cli-plugin-electron-builder は Vue CLI の設定ファイル
vue.config.jsを使用します。electron-vue も vue-cli-plugin-electron-builder もしっかり使い込んでいるわけではないので、他にも違いがあったらお知らせください。
まとめ
公式サイトのガイドページには、インストール方法から使い方、各種設定、アイコン作成方法などのTipsやFAQ的なページなどがあり、しっかり作りこまれていて安心感があります。
既存プロジェクトにも簡単に Electron を導入できるのも大きな強みですね。
Vue.js + Electron の新たな定番になりそうなポテンシャルを秘めているのではないでしょうか。
