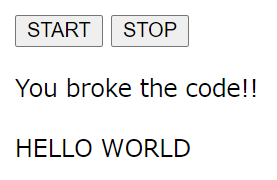
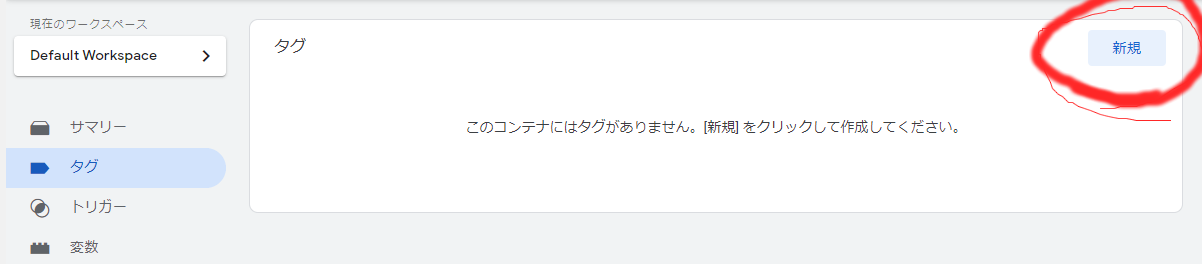
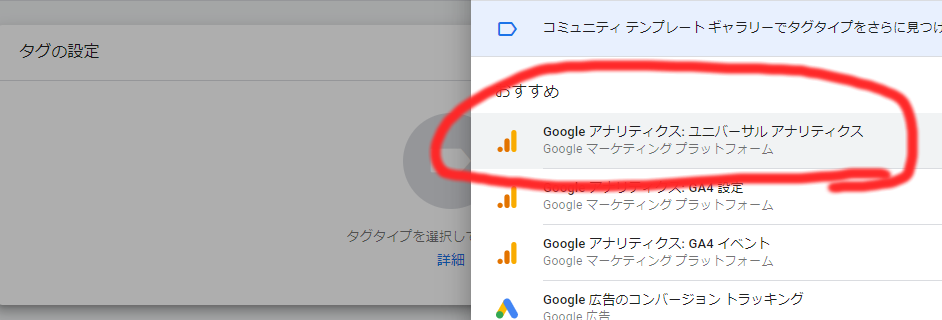
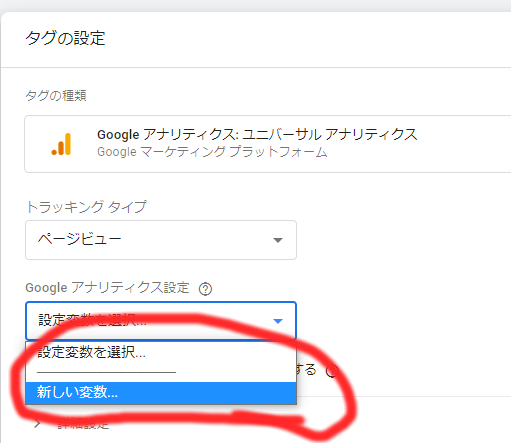
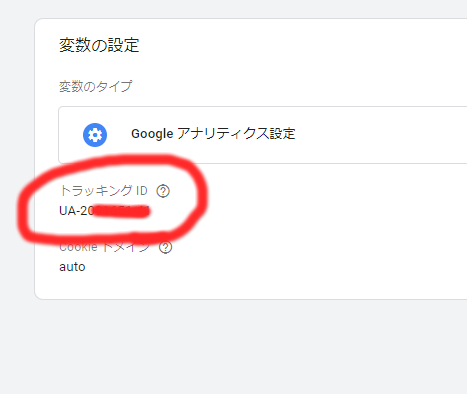
- 投稿日:2021-01-14T21:33:22+09:00
Vue.js オプション 属性 の順序
コンポーネント/インスタンス オプションの順序
よく使うのだけ抜粋。
export default { name: '', components: {}, filters: {}, mixins: {}, props: {}, data() { return {} }, computed: {}, watch: {}, created() {}, mounted() {}, beforeDestroy() {}, methods: {}, }他のも詳しく知りたい場合はこちら、
参照:コンポーネント/インスタンス オプション順序要素の属性の順序
- is
- v-for
- v-if, v-else-if, v-else
- v-show
- v-cloak
- v-pre
- v-once
- id
- ref
- key
- v-model
- v-on
- v-html
- v-text
参照:要素の属性の順序
- 投稿日:2021-01-14T20:40:56+09:00
Vue.js でアプリを作って楽しむ
初めに
ここ最近Vue.jsの勉強をしているが、今日はまとまった時間が取れないのでドキュメントが読めない。そこでアニメーションを作って楽しむことにした。
どんなアプリか
映画でよくあるパスワードを破るシーン
文字がA, B, C, ... と勢いよく次々に表示され、パスワード解除!みたいなシーンを再現してみる。
実装
v-on
ディレクティブでSTARTボタンを押したら文字がA, B, C, ... と次々に表示されるようにする。
念のためSTOPボタンも用意。<div id="app"> <button v-on:click="rotateStart()">START</button> <button v-on:click="rotateStop()">STOP</button> <p>{{ character }}</p> <p>{{ message }}</p> </div>アルファベットはリストにしてぐるぐる回るように。
sleep で0.05秒で文字が切り替わるよう設定。var app = new Vue({ el: '#app', data: { character: '', message: '', isTrue: true, cipher: 'HELLO WORLD' }, methods: { rotateStart: async function() { var aplhabetList = 'ABCDEFGHIJKLMNOPQRSTUVWXYZ'.split(''); var cipherList = this.cipher.split(''); var count = 0; var cipherIndex = 0; while (this.isTrue) { this.character = aplhabetList[count % 26]; if (cipherList[cipherIndex] === this.character) { this.message += this.character; if (cipherList.length === cipherIndex + 1) { this.character = 'You broke the code!!' break; } else { cipherIndex++; } } else if (cipherList[cipherIndex] === ' ') { this.message += ' '; cipherIndex++; } await this.sleep(50); count++; } }, rotateStop: function(){ this.isTrue = false this.message = '' }, sleep: time => new Promise(resolve => setTimeout(resolve, time)) } })
- 画面更新後
- START押下後
動いてる!楽しい!
- 自然停止
- 投稿日:2021-01-14T18:48:05+09:00
Vuetify2.0でカスタムソートを使用する
datatableの並び替えについて
デフォルトのソートは便利ですが、「100円、200円」のような文字列の場合、思うような並び替えができません。
昇順の並び替えですので、「みかん」⇒「りんご」の順番で並び替えてほしいところ。カスタムソートを実装する
<v-data-table :custom-sort="custom" >カスタムソートを実装するには
custom-sort
を定義し、ソート条件を作成します。
以下の例では、値段の並び替えの場合、文字列から数値を取り出し比較しています。methods: { custom: function(items, index, isDesc) { items.sort((a, b) => { if (index[0] === 'price') { var priceA = a[index].replace(/[^0-9]/g, ''); var priceB = b[index].replace(/[^0-9]/g, ''); if (!isDesc[0]) { return priceA - priceB; } else { return priceB - priceA; } } else { if (!isDesc[0]) { return a[index] < b[index] ? -1 : 1; } else { return b[index] < a[index] ? -1 : 1; } } }); return items; }使用したテストデータです。
data () { return { headers: [ { text: '名前', value: 'name',}, { text: '値段', value: 'price' }, ], items: [ { name: 'りんご', price: '50円',}, { name: 'みかん', price: '10円',},
- 投稿日:2021-01-14T17:33:27+09:00
vue.js で google tag managerやろうぜ
GTM って何よ?
google analytics や adwords のタグをかんたんに管理できる。
今後は直接挿入でなく、これを使ってくべきですね。やり方教えてよ
まずはアカウントを作ろう
https://tagmanager.google.com/
英語のポップアップ(利用規約)が出るので、OKする
ここまででアカウント作成OK
Analyticsの設定
タグを選択し、新規をクリック。
タグの設定をクリック。Google アナリティクス:ユニバーサル アナリティクスを選択
Google アナリティクス設定の 新しい変数を選択
トラッキングIDにあなたの Analytics のIDを入れる
で保存。
今度はトリガー選択をクリックし、 All Pages を選択し、保存。ここまでできたら、タグを有効にするために公開しましょう。
これで公開され、Analytics の設定が完了しました。
続いて、vue.js で利用してみましょう。
※古いAnalyticsタグは削除しておいたほうが良いかも
vue2 で使う場合は必ずバージョンを指定。
でないと、vue3 用のが入ってしまいバグるnpm install vue-gtm@3.0.0-vue2インスコok
続いて使うにはapp.jsの最下部らへんに
app.jsimport VueGtm from 'vue-gtm'; Vue.use(VueGtm, { id: 'GTM-hoge92',//your });ページにアクセスしてテストしてみよう
はい!
アクセスがカウントされていますね。Google広告のコンバージョンとか取得するには?
https://www.kwm.co.jp/blog/cv_tag_setting2019/
を参考に設定すると良い。
ちなみに、google広告をクリックしていないと、コンバージョンに反映されない。
なので、有料でクリックする必要がある。