- 投稿日:2020-11-13T11:35:05+09:00
LTS版ではないNode.jsを使用することによるAngularのng serveエラー(仮説)
背景
先日Macを購入し、MacでAngularの環境構築していたところ、ng serveの実行エラーで3日ほどハマりました。このエラーは結局解決したのですが解決方法に確証はありません。ですが、同じ原因で詰まっている人がいるかもしれないと思ったため、チェックポイントの一つとして僕が陥ったエラー原因の仮説をここに残します。
環境 (エラー解決前)
- Mac (Version 10.15.7)
- Node.js (15.0.1)
- Angular CLI (11.0.1)
発生したエラー
上記環境でng serveコマンドを打ったところ以下のエラーが出力されました。
ERROR.txtERROR in ./src/app/shared/theme/styles.scss (./node_modules/css- loader/dist/cjs.js??ref--13-1!./node_modules/postcss-loader/src?? embedded!./node_modules/resolve-url-loader??ref--13- 3!./node_modules/sass-loader/dist/cjs.js??ref--13- 4!./src/app/shared/theme/styles.scss) Module build failed (from ./node_modules/sass-loader/dist/cjs.js): SassError: Can't find stylesheet to import.Angular導入の前提条件
Angular CLIを導入するためにはNode.jsが必要となりますが、前提条件として "LTS版のNode.js" (2020/11/13時点での最新LTSはv14.15.0) がインストールされていることが必要らしいです。
Angular は Node.js の現行またはアクティブLTS、メンテナンスLTS バージョンを必要とします。
Angular -ローカル環境とワークスペースのセットアップNode.jsのバージョン切り替え
僕がインストールしたNode.jsはLTS版ではないv15.0.1であったため、v14.15.0のNode.jsをインストールした後で以下コマンドを打ってNode.jsのバージョンを切り替えました。
nodebrew ls
nodebrew use v14.15.0
node -v
"v14.15.0"と表示されていれば切り替え完了です。LTS版のNode.jsに切り替えた後で(更にゴチャゴチャした後)ng serveコマンドを打つとコンパイルが正常に完了し、ローカル環境のブラウザにページを表示させることができました。
まとめ
エラー原因と解決方法がマッチしていたのかは分かりませんが、公式ドキュメントを見る限りNode.jsバージョンの違いが悪さをしていたことは間違いなさそうです。
- 投稿日:2020-11-13T07:51:33+09:00
[React]コンポーネントを作るときに他からコピーしてくる作業を自動化するCLIツールを作る
TL;DR
Reactでコンポーネントを新しく作るとき、Storybookやテストも作成するのであれば、ディレクトリを作成してから、
index.ts,Component.tsxComponent.stories.tsxComponent.spec.tsx
と4ファイルくらい作成することになると思いますが、
毎回これらを手動で作成して、他のコンポーネントからimport文とかをコピーしてくるのは面倒なので、CLIツールを作成して、コマンド一発で出来るようにします。コードはこちら
作ったもの
ディレクトリ構成
AtomicDesign想定です。
.
├── package.json
├── src
│   └── components
│       └── atoms
│           └── Button
│               ├── Button.spec.tsx
│               ├── Button.stories.tsx
│               ├── Button.tsx
│               └── index.ts
└── tools
    ├── componentTemplates
    │   ├── Component.tsx
    │   ├── Spec.tsx
    │   ├── Story.tsx
    │   └── index.ts
    └── createComponent.js
コード
テンプレート作成
まず、環境に合わせて
./tools/componentTemplates/以下に、作成したいファイルのテンプレートを配置します。
このテンプレートをリネームして、必要な場所にコピーする感じです。テンプレートはこちらを参照してください。
script作成
コマンドライン引数 オプション
-Cで、コンポーネントの粒度とコンポーネント名を受け取ります。以下はコマンドのhelpです。
Usage: create-component [options]

Options:
  -C, --component [dir/Component]  The name of the component to be created (ex) atoms/Button
  -h, --help                       display help for command
- 引数が不正である場合はエラー(atoms, molecules, organismsしか許容しない)
- すでにコンポーネントが存在しているときはエラー(上書きしない)
- ディレクトリが存在しないとき(
/molecules/など未作成の場合)は新規作成します。
コードは以下です。
const { program } = require("commander");
const fs = require("fs");

program.option(
  "-C, --component [component name]",
  "The name of the component to be created (ex) atoms/Button"
);

program.parse(process.argv);

if (!program.component) {
  program.help();
}

const argument = program.component.split("/");
const dir = argument[0];
const component = argument[1];

if (!["atoms", "molecules", "organisms"].includes(dir)) {
  console.error(
    "ERROR: Only 'atoms', 'molecules', and 'organisms' can be specified."
  );
  return;
}

// If the directory is not yet created, create it.
if (!fs.existsSync(`./src/components/${dir}`)) {
  fs.mkdirSync(`./src/components/${dir}`);
}

const templates = [
  "./tools/componentTemplates/index.ts",
  "./tools/componentTemplates/Component.tsx",
  "./tools/componentTemplates/Story.tsx",
  "./tools/componentTemplates/Spec.tsx",
];

const dests = [
  `./src/components/${dir}/${component}/index.ts`,
  `./src/components/${dir}/${component}/${component}.tsx`,
  `./src/components/${dir}/${component}/${component}.stories.tsx`,
  `./src/components/${dir}/${component}/${component}.spec.tsx`,
];

fs.mkdirSync(`./src/components/${dir}/${component}`);

// Error when a component already exists
templates.forEach((template, index) => {
  fs.copyFileSync(
    template,
    dests[index],
    fs.constants.COPYFILE_EXCL,
    (error) => {
      if (error) {
        throw error;
      }
    }
  );
  console.log(`✨ Create component template ${dests[index]}`);
});
package.jsonに追記
package.jsonのscriptsに、"create-component": "node ./tools/createComponent.js"を追記して完了です。
使用例
$ yarn create-component -C atoms/Icon

✨ Create component ./src/components/atoms/Icon/index.ts
✨ Create component ./src/components/atoms/Icon/Icon.tsx
✨ Create component ./src/components/atoms/Icon/Icon.stories.tsx
✨ Create component ./src/components/atoms/Icon/Icon.spec.tsx
これでめんどくさい作業から開放されました!
- 投稿日:2020-11-13T01:42:21+09:00
子供用の学習アプリケーションを作る(1)
はじめに
昨日、筋萎縮性側索硬化症(ALS)と呼ばれる病気についての記事を見かけ、以前より知っている病気ではあったもののなぜ、この病気になってしまうのかについては、知らなかった。
ネットで調べてみたところ、様々なサイトで解説されているものの、言葉が難しかったり、文字数が多く読むのが大変であった。そこで、そのような知識を分かりやすく、まとめ尚且つ大人から子供まで使えるような学習アプリケーションを自作してみました。
実装
まず、環境構築については、下記の記事を見ていただければと思います。
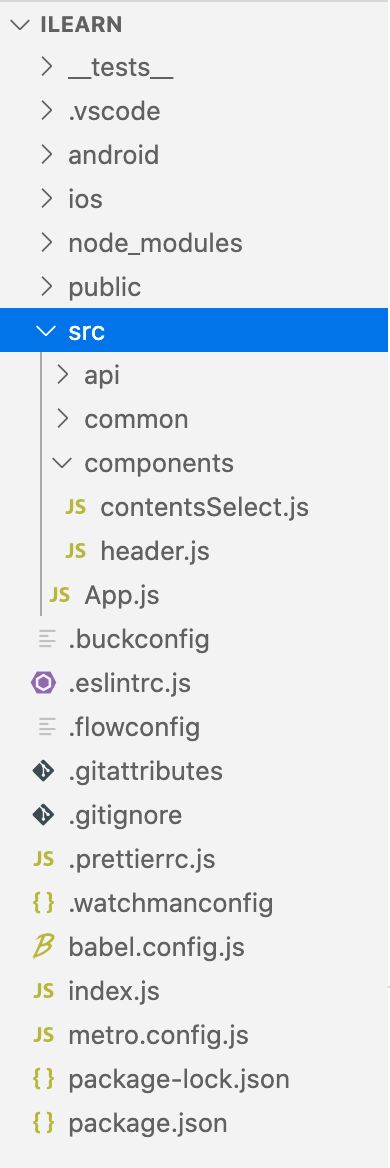
参考: React Nativeをはじめる(環境構築)ディレクトリ構成
使用したUI component, ライブラリ, フリーイラスト
UI component
1.React-native-elements
React-Native-Elementsは、フリーのクロスプラットフォームのUIcomponentです。
色々な開発者が作成したcomponentが集められ、クオリティもかなり高いです。2.React-native-paper
React-native-paperは、使いやすく設計されているUIcomponentです。
componentは、Googleのマテリアル基準に準拠しているのでデザイン性がかなり高いという感想です。ライブラリ
1.React Navigation
React Navigationは、画面遷移のライブラリです。
なぜ、このライブラリが必要かというと、Reactでは画面遷移のための機能が用意されていないからです。React Navigationでは3つの方法で画面遷移ができます。
1.stack:スライドしながら画面遷移する方法
2.tabs:タブを選択することで画面遷移する方法
3.drawer:画面端から現れるメニューで画面遷移する方法今回は、1の方法で実装を行いました。
フリーイラスト
1.manypixels
manypixelsは、フラットなイラストをフリーでdlできます。App.js
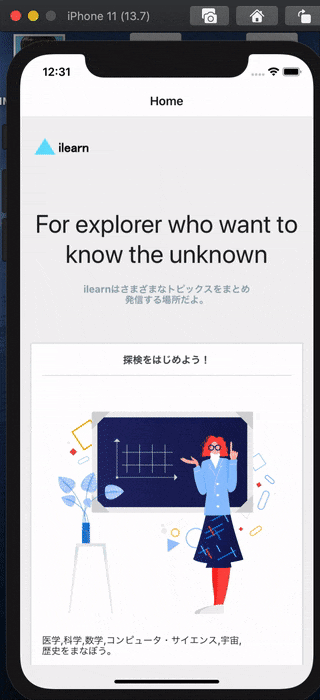
このファイルではメインとなるページの処理を記載しています。
App.jsimport 'react-native-gesture-handler'; import * as React from 'react'; import {Image, SafeAreaView, ScrollView, StyleSheet} from 'react-native'; import {Text, Card, Button} from 'react-native-elements'; import {NavigationContainer} from '@react-navigation/native'; import {createStackNavigator} from '@react-navigation/stack'; import AppHeader from './components/header'; import contentsSelect from './components/contentsSelect'; const HomeScreen = ({navigation}) => { return ( <SafeAreaView style={styles.container}> <ScrollView> <AppHeader /> <Text h2 style={styles.hearderMessage}> For explorer who want to know the unknown </Text> <Text style={styles.hearderMessageBody}> ilearnはさまざまなトピックスをまとめ{'\n'}発信する場所だよ。 </Text> <Card> <Card.Title>探検をはじめよう!</Card.Title> <Card.Divider /> <Image source={require('../public/img/teach.png')} style={styles.cardImage} /> <Text style={styles.cardText}> 医学,科学,数学,コンピュータ・サイエンス,宇宙,{'\n'}歴史をまなぼう。 </Text> <Button style={styles.cardButtonText} title="出発する?" onPress={() => navigation.navigate('Contents')} /> </Card> </ScrollView> </SafeAreaView> ); }; const Stack = createStackNavigator(); const App = () => { return ( <NavigationContainer> <Stack.Navigator> <Stack.Screen name="Home" component={HomeScreen} /> <Stack.Screen name="Contents" component={contentsSelect} /> </Stack.Navigator> </NavigationContainer> ); }; const styles = StyleSheet.create({ container: { flex: 1, }, headerImg: { width: 90, height: 30, top: 60, }, hearderMessage: { marginTop: 100, textAlign: 'center', }, hearderMessageBody: { flex: 1, top: 20, marginBottom: 60, textAlign: 'center', fontWeight: 'bold', color: '#93a5b1', }, cardImage: { width: 350, height: 350, }, cardText: { marginBottom: 10, }, cardButtonText: { marginTop: 20, marginBottom: 20, }, }); export default App;header component
名前から察するようにヘッダーについてまとめたファイルになります。
header.jsimport React from 'react'; import {View, StyleSheet, Image} from 'react-native'; const AppHeader = () => { return ( <View> <Image source={require('../../public/img/Header.png')} style={styles.headerImg} /> </View> ); }; const styles = StyleSheet.create({ headerImg: { width: 90, height: 30, marginLeft: 20, top: 30, }, }); export default AppHeader;contents component
こちらのcontents componentは、ユーザが実際に何のコンテンツについて学びたいかを選ばせるページの処理をまとめています。
contentsSelect.jsimport React from 'react'; import {SafeAreaView, ScrollView, StyleSheet} from 'react-native'; import {Card, Title} from 'react-native-paper'; import AppHeader from './header'; const contentsSelect = () => { return ( <SafeAreaView style={styles.container}> <ScrollView> <AppHeader /> <Card style={styles.cardPadding}> <Card.Content> <Title style={styles.cardTitle}>宇宙って?</Title> <Card.Cover source={require('../../public/img/alien.png')} style={styles.cardImg} /> </Card.Content> </Card> <Card style={styles.cardPadding}> <Card.Content> <Title style={styles.cardTitle}>ALSって知ってる?</Title> <Card.Cover source={require('../../public/img/health.png')} style={styles.cardImg} /> </Card.Content> </Card> <Card style={styles.cardPadding}> <Card.Content> <Title style={styles.cardTitle}>Falcon 9がすごい</Title> <Card.Cover source={require('../../public/img/startup_isometric.png')} style={styles.cardImg} /> </Card.Content> </Card> </ScrollView> </SafeAreaView> ); }; const styles = StyleSheet.create({ container: { flex: 1, }, cardImg: { height: 300, }, cardPadding: { marginBottom: 20, }, cardTitle: { fontWeight: 'bold', }, }); export default contentsSelect;動作
次回
次回は、コンテンツ選択した後の詳細画面を作り込んでいこうと思います。
おわり
かなり気合を入れて作成を始めたので、随時記事も更新していこうと思います。
また、React-vativeをさわってみたい方に対し、開発コードがお役に立てば幸いです。参考
React-native
React-native-elements
React Navigation
React-native-paper
manypixels
難病情報センター: ALS