- 投稿日:2020-07-31T18:39:20+09:00
C#+POS for .NETでサーマルプリンター等のPOS機器を制御する
これは「C#によるPOS開発入門(的な)」と称して連載している記事の1つです。他はこちら
やっとプログラミングに辿り着きました。ここまで長かった……
1. はじめに
この記事では、Microsoft Point of Service for .NET(POS for .NET)を用いてPOS機器を制御する方法を説明します。
なお、私に教えてくれるような人など周りにいなかったため、ここに書いてあるのはサンプルやマニュアルの見ながらの完全独学な知識です。「ここ良くないよー」という所があれば教えて下さると泣いて喜びます。機器を購入する際のポイントやPOS for .NET以外の機器制御方法については、記事の一番上にあるリンクから見ることが出来ます。良ければ参考にして下さい。
2. この記事の対象読者
- POS開発に興味があるが、やったことは無くやり方も知らない人
- 面白そうだったので感熱プリンターを買ってみたものの、動かし方が分からず途方に暮れている人
3. POS for .NETって?
Microsoftが定めた、POS機器を扱うための共通規格です。機器メーカーにPOS for .NETを通じて動作させるドライバーを作らせることで、使用する機器を入れ替えても今までのコードをそのまま使えるのがポイントです。
4. 基礎
※POS for .NETで機器を制御するには、事前にPOS for .NETとその機器のOPOS(POS for .NET)対応ドライバーをPCにインストールする必要があります。
機器を動作させ、終了するまでの流れ
Open()するClaim()するDeviceEnabledをtrueに- 印刷とか表示とか
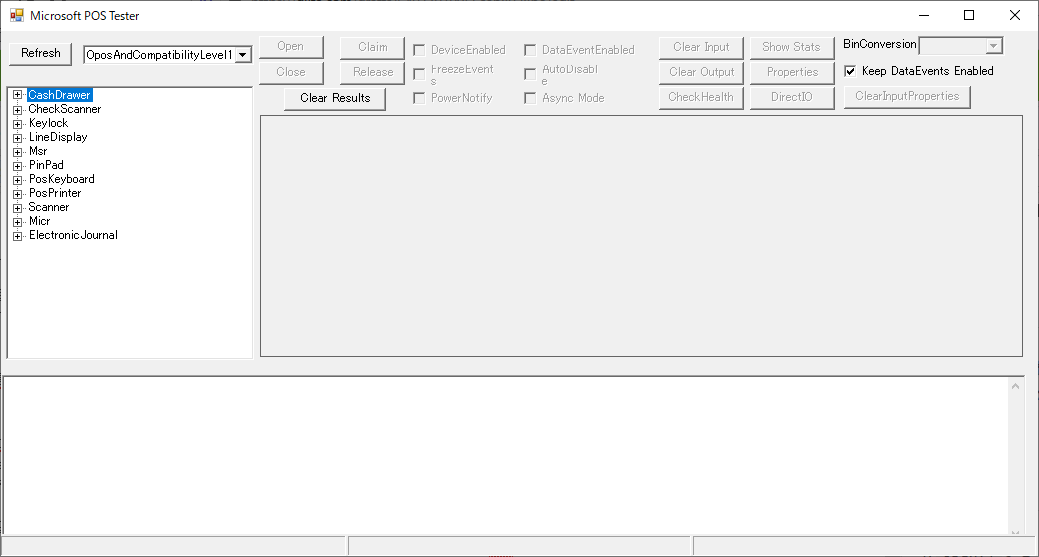
DeviceEnabledをfalseにRelease()するClose()するこのあたりの流れは、POS for .NETのSDKに入っているサンプルアプリケーション(Microsoft Point Of Service\SDK\Samples\Sample Application\TestApp.exe)が非常に分かりやすいです。
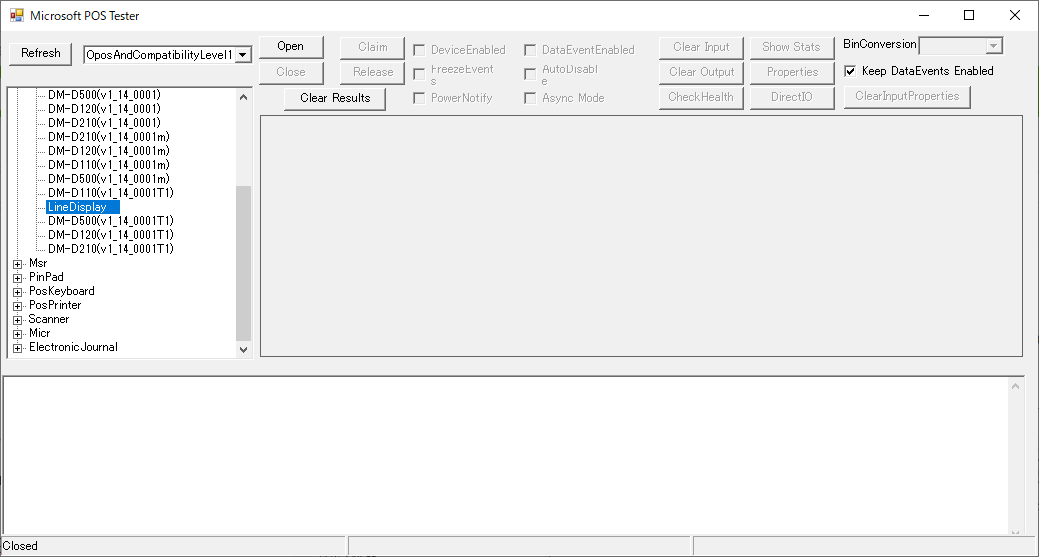
左のメニューから制御したい機器を選択します。ここではEPSON OPOS ADK同梱のSetupPOSで事前に登録しておいたEPSON DM-D30を使用します。なお、このサンプルアプリケーション内で使える機器のシミュレーターも準備されているので、機器を持っていなくても使い勝手を試してみることが出来ます。
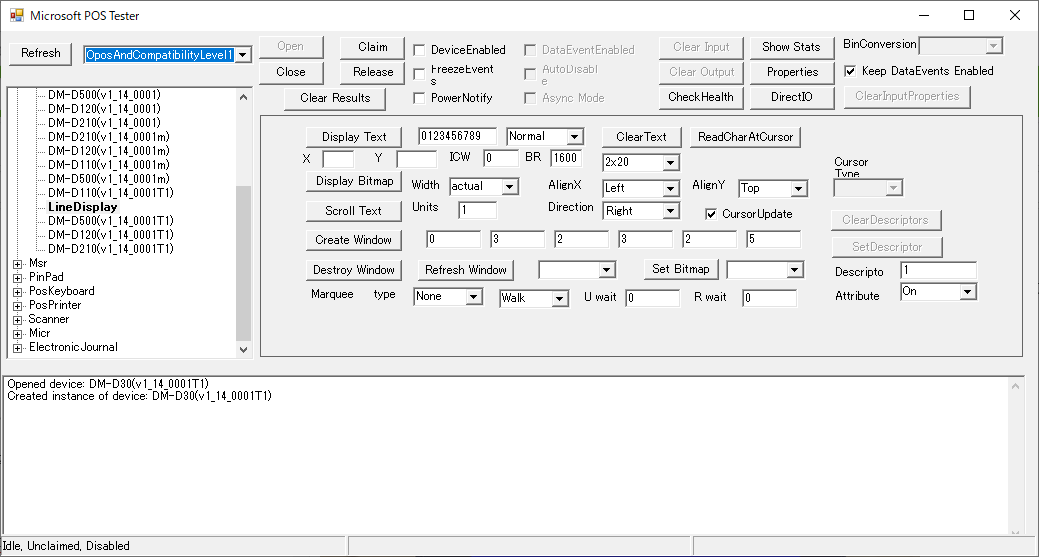
Openボタン→Claimボタン→DeviceEnabledチェックボックスの順に押します。これで機器が使用可能が状態になりました。
ここでは無難に「Hello, POS for .NET!」とでも表示することにします。「Hello, POS for .NET!」と入力し、Display Textボタンを押します。
問題が無ければ、これで無事表示されたはずです。
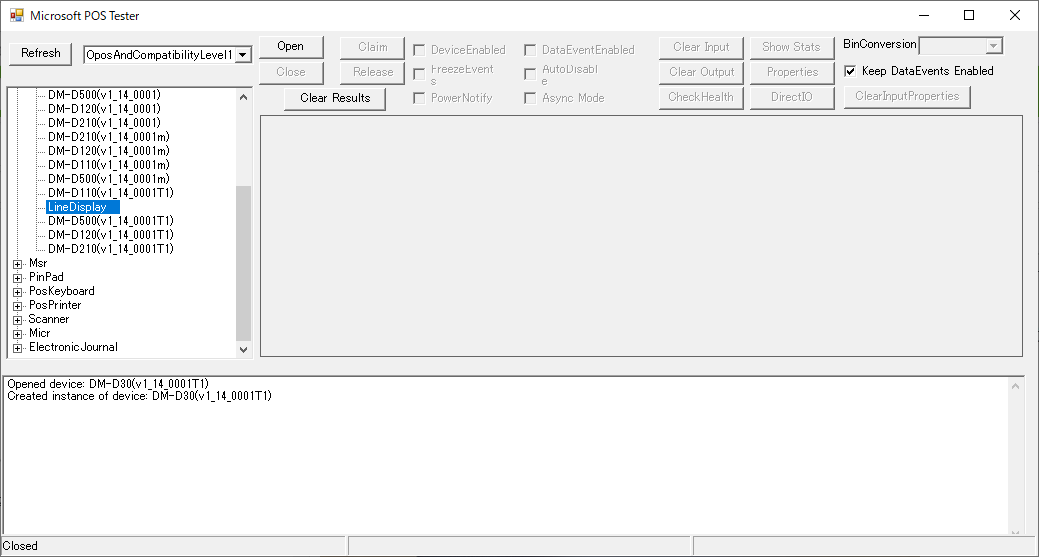
終了するときは、DeviceEnabledチェックボックス→Releaseボタン→Closeボタンの順に押します。
OPOSの正式名称は「OLE for Retail POS」、要するにPOS for .NETのラップ元はOLEです。なので、この終了処理を怠ると、オブジェクトが解放されずプロセスに残り続けます。また、プロセスが残るせいで、他のアプリケーションがOPOSのサービスを利用できなくなります。終了処理はちゃんとやりましょう。
5. 実際にコードを書いてみる
前項でボタンやチェックボックスを操作していたところをコードに落とし込むのみで、基本形が完成します。
以下のサンプルコードを使う場合は
Microsoft.PointOfService名前空間をusingして下さい。カスタマーディスプレイの場合
前準備
PosExplorer posExplorer = new PosExplorer();
DeviceInfo deviceInfo = null;
deviceInfo = PosExplorer.GetDevice(DeviceType.LineDisplay, "MyLineDisplay"); // 論理デバイス名が「MyLineDisplay」のカスタマーディスプレイを見つける
LineDisplay lineDisplay = (LineDisplay)PosExplorer.CreateInstance(deviceInfo); // DeviceInfoからカスタマーディスプレイのインスタンスを作成
lineDisplay.Open();
lineDisplay.Claim(1000); // 1000ミリ秒でタイムアウトし、Claimに失敗する
lineDisplay.DeviceEnabled = true;

lineDisplay.CharacterSet = 932; // カスタマーディスプレイで表示させる言語に日本語を設定
実際に動作させる部分のコード
lineDisplay.DisplayText("Hello, POS for .NET!", DisplayTextMode.Normal); // カスタマーディスプレイに「Hello, POS for .NET!」と表示後始末
lineDisplay.DeviceEnabled = true;
lineDisplay.Release();
lineDisplay.Close();
どう書くのか知ってさえいれば簡単ですね。
カスタマーディスプレイで一部のみスクロール表示させる
ちなみにカスタマーディスプレイの場合は、ウィンドウを作成して1行目に「いらっしゃいませ」を固定表示し、2行目にお知らせをスクロール表示する、といったことも出来ます。最適化できているかは怪しいですが、以下のように書きます。
// LineDisplay.CreateWindow(viewportRow, viewportColumn, viewportHeight, viewportWidth, windowHeight, windowWidth);

// ウィンドウ(ID=0)
// ウィンドウのIDは作った順につけられていきます
lineDisplay.CreateWindow(0, 0, 1, 20, 1, 21); // ウィンドウを作成
lineDisplay.MarqueeFormat = DisplayMarqueeFormat.Place; // 固定表示に設定
lineDisplay.MarqueeType = DisplayMarqueeType.Init; // 初期化処理中フラグを立てる
lineDisplay.DisplayText("いらっしゃいませ", DisplayTextMode.Normal);
lineDisplay.MarqueeType = DisplayMarqueeType.None; // スクロール無しで表示

// ウィンドウ(ID=1)
string scrollingMessage = "ご利用ありがとうございます。只今の時間帯、お惣菜がなんと9割引!是非お買い求め下さい!!";
lineDisplay.CreateWindow(1, 0, 1, 20, 1, 20 + 2 * scrollingMessage.Length); // ウィンドウを作成。全角は2文字としてカウント
lineDisplay.MarqueeFormat = DisplayMarqueeFormat.Walk; // スクロール表示に設定
lineDisplay.MarqueeType = DisplayMarqueeType.Init; // 初期化処理中フラグを立てる
lineDisplay.MarqueeRepeatWait = 1000; // スクロールし切ってからまた現れるまでのミリ秒数
lineDisplay.MarqueeUnitWait = 100; // 半角1文字分スクロールするのにかかるミリ秒数
lineDisplay.DisplayText(scrollingMessage, DisplayTextMode.Normal);
lineDisplay.MarqueeType = DisplayMarqueeType.Left; // 左方向にスクロール
サーマルプリンターの場合
カスタマディスプレイ以外でも、前準備と後始末の書き方はほぼ同じです。
前準備
PosExplorer posExplorer = new PosExplorer();
DeviceInfo deviceInfo = null;
deviceInfo = PosExplorer.GetDevice(DeviceType.PosPrinter, "MyPosPrinter"); // 論理デバイス名が「MyPosPrinter」のサーマルプリンターを見つける
PosPrinter posPrinter = (PosPrinter)PosExplorer.CreateInstance(deviceInfo); // DeviceInfoからサーマルプリンターのインスタンスを作成
posPrinter.Open();
posPrinter.Claim(1000); // 1000ミリ秒でタイムアウトし、Claimに失敗する
posPrinter.DeviceEnabled = true;
後始末
posPrinter.DeviceEnabled = true;
posPrinter.Release();
posPrinter.Close();
サーマルプリンターで印刷する基礎
カスタマーディスプレイと異なり、印刷に関しては難解です。
まずは基本的なコードです。「Hello, POS for .NET!」と印刷し、紙をカットします。posPrinter.PrintNormal(PrinterStation.Receipt, "Hello, POS for .NET!"); // サーマルプリンターで「Hello, POS for .NET!」と印刷 posPrinter.PrintNormal(PrinterStation.Receipt, "\u001b|100fP"); // ESC|100fP:カッター位置までフィードし、フルカット。100を1~99に変えるとパーシャルカット(1点残しカット)、fPをPに変えるとフィードせずカットのみ行う印字以外の特殊な操作を行うには、エスケープシーケンスを
PrintNormalメソッドから送信します。このエスケープシーケンスはESC/POSコマンドとは異なったものです。リファレンスはこちらからどうぞ。
紙をカットするためのCutPaperメソッドもあるのですが、EPSON OPOS ADK同梱のサンプルではコマンドを送信する方法で記述されていたので、恐らくこちらの方が良いのでしょう。サーマルプリンターで画像を印刷する
画像を印刷する方法は3通りあります。
- プリンターの記憶領域に事前に画像を保存しておき、それを印刷する(
SetBitmapメソッド+ESC|B)- 画像ファイルのパスを指定して印刷する(
PrintBitmapメソッド)- 画像をコードで生成して印刷する(
PrintMemoryBitmapメソッド)画像の印刷には罠が2つ仕掛けられています。これについては別の記事でまとめたので、良ければそちらも参照して下さい。
プリンターの記憶領域に事前に画像を保存しておき、それを印刷する
店のロゴを毎回レシートの先頭に印刷する場合、決まった割引の案内を末尾に印刷する場合などは、毎回PCから画像のデータを送信すると時間がかかってしまうため、あらかじめプリンターの記憶領域に画像を保存しておくという手法をとります。
※文字列を組み合わせてロゴを作成する
SetLogoメソッドもありますが、ここでは割愛します。// 前準備で以下のコードを実行 posPrinter.RecLetterQuality = true; // 画像を劣化させずに印刷 posPrinter.MapMode = MapMode.Dots; // 単位をドットに設定(省略可) posPrinter.SetBitmap(1, PrinterStation.Receipt, "discount.bmp", PosPrinter.PrinterBitmapAsIs, PosPrinter.PrinterBitmapCenter); // discount.bmpを拡大縮小せず、センタリングして印刷するよう、ID1として保存 // ここまで posPrinter.PrintNormal(PrinterStation.Receipt, "\u001b|1B"); // ID1で保存されていた画像を印刷 posPrinter.PrintNormal(PrinterStation.Receipt, "\u001b|99fP"); // カッター位置までフィードし、パーシャルカット画像ファイルのパスを指定して印刷する
画像をプリンターの記憶領域に事前に保存せず、その都度読み込んでプリンターに送信する方法です。
// 前準備で以下のコードを実行
posPrinter.RecLetterQuality = true; // 画像を劣化させずに印刷
posPrinter.MapMode = MapMode.Dots; // 単位をドットに設定(省略可)
// ここまで

posPrinter.PrintBitmap(PrinterStation.Receipt, "bitmap.bmp", PosPrinter.PrinterBitmapAsIs, PosPrinter.PrinterBitmapLeft); // bitmap.bmpを拡大縮小せず、左寄せして印刷
posPrinter.PrintNormal(PrinterStation.Receipt, "\u001b|99fP"); // カッター位置までフィードし、パーシャルカット
画像をコードで生成して印刷する
System.Drawing.Bitmapのインスタンスを渡して印刷する方法です。
この方法で使用するPrintMemoryBitmapメソッドなのですが、渡すBitmapでGraphicsのインスタンスが作成されている場合、エラーが起こるという謎仕様となっています。/* using System.Drawing; using System.Drawing.Imaging; using Microsoft.PointOfService; */ Bitmap baseBmp = new Bitmap(200, 150, PixelFormat.Format24bppRgb); using (Graphics g = Graphics.FromImage(baseBmp)) // 透明なBitmapの全体に赤いバツ印を描く { g.DrawLine(Pens.Red, 0, 0, bitmap.Width, bitmap.Height); g.DrawLine(Pens.Red, bitmap.Width, 0, 0, bitmap.Height); } // これはダメ posPrinter.PrintMemoryBitmap(PrinterStation.Receipt, baseBmp, PosPrinter.PrinterBitmapAsIs, PosPrinter.PrinterBitmapRight); // Graphicsに汚染されたBitmapを渡すとエラーになる // これもダメ Bitmap newBmp = new Bitmap(baseBmp); posPrinter.PrintMemoryBitmap(PrinterStation.Receipt, newBmp, PosPrinter.PrinterBitmapAsIs, PosPrinter.PrinterBitmapRight); // Bitmapを複製しても汚染は除去できない模様Graphicsを使えないとなるとこのメソッドの魅力がほぼ0になってしまうんですが……
私はゴリ押しでなんとかやりました。詳しくはこちらへ。
ここにはコードのみ載せておきます。
コードを見たい方は展開して下さい
// 32bitアルファチャンネル付bmpを24bitに変換
// EPSON製のプリンターではアルファチャンネルが無視されて真っ黒になるため、アルファチャンネル無しに変換する必要がある
BitmapData bmpData = baseBmp.LockBits(new Rectangle(0, 0, baseBmp.Width, baseBmp.Height), ImageLockMode.ReadOnly, PixelFormat.Format32bppArgb);

byte[] basePixels = new byte[bmpData.Stride * bmpData.Height];
Marshal.Copy(bmpData.Scan0, basePixels, 0, basePixels.Length);

int stride = (int)Math.Ceiling(3.0 * bmpData.Width / 4) * 4;
byte[] pixels = new byte[14 + 40 + stride * bmpData.Height];
for (int y = 0; y < bmpData.Height; y++)
{
  for (int x = 0; x < bmpData.Width; x++)
  {
    int basePos = 4 * x + bmpData.Stride * y;
    int pos = 14 + 40 + 3 * x + stride * (bmpData.Height - y - 1);

    pixels[pos] = (byte)(255 + (basePixels[basePos] - 255) * basePixels[basePos + 3] / 255);
    pixels[pos + 1] = (byte)(255 + (basePixels[basePos + 1] - 255) * basePixels[basePos + 3] / 255);
    pixels[pos + 2] = (byte)(255 + (basePixels[basePos + 2] - 255) * basePixels[basePos + 3] / 255);
  }
}

// bmpファイルのヘッダーバイナリを自作
byte[] bfSize = BitConverter.GetBytes(pixels.GetLength(0));
byte[] biWidth = BitConverter.GetBytes(bmpData.Width);
byte[] biHeight = BitConverter.GetBytes(bmpData.Height);
byte[] biSizeImage = BitConverter.GetBytes(pixels.GetLength(0) - 14 - 40);

byte[] header = new byte[14 + 40]
{
  0x42, 0x4d, // bfType
  bfSize[0], bfSize[1], bfSize[2], bfSize[3], // bfSize
  0x00, 0x00, // bfReserved1
  0x00, 0x00, // bfReserved2
  0x01, 0x00, 0x00, 0x00, // bfOffBits

  0x28, 0x00, 0x00, 0x00, // biSize
  biWidth[0], biWidth[1], biWidth[2], biWidth[3], // biWidth
  biHeight[0], biHeight[1], biHeight[2], biHeight[3], // biHeight
  0x01, 0x00, // biPlanes
  0x18, 0x00, // biBitCount
  0x00, 0x00, 0x00, 0x00, // biCompression
  biSizeImage[0], biSizeImage[1], biSizeImage[2], biSizeImage[3], // biSizeImage
  0xc4, 0x0e, 0x00, 0x00, // biXPixPerMeter
  0xc4, 0x0e, 0x00, 0x00, // biYPixPerMeter
  0x00, 0x00, 0x00, 0x00, // biCirUsed
  0x00, 0x00, 0x00, 0x00, // biCirImportant
};


Array.Copy(header, 0, pixels, 0, 14 + 40); // ヘッダーとビットマップデータをくっつける
Bitmap newBmp = new Bitmap(new MemoryStream(pixels)); // Graphicsに汚染されていないBitmapの出来上がり
posPrinter.PrintMemoryBitmap(PrinterStation.Receipt, newBmp, PosPrinter.PrinterBitmapAsIs, PosPrinter.PrinterBitmapRight); // これでOK
もっと良い方法をご存知の方がいらっしゃれば教えて下さいm(_ _)m
キャッシュドロアの場合
サーマルプリンターの場合とは打って変わってとても簡単なので、コードのみ載せておきます。
前準備
PosExplorer posExplorer = new PosExplorer();
DeviceInfo deviceInfo = null;
deviceInfo = PosExplorer.GetDevice(DeviceType.CashDrawer, "MyCashDrawer");
CashDrawer cashDrawer = (CashDrawer)PosExplorer.CreateInstance(deviceInfo);
cashDrawer.Open();
cashDrawer.Claim(1000);
cashDrawer.DeviceEnabled = true;
実際に動作させる部分のコード
cashDrawer.OpenDrawer(); // キャッシュドロアを開く後始末
cashDrawer.DeviceEnabled = true;
cashDrawer.Release();
cashDrawer.Close();
注意
- PosExplorerのインスタンスを複数個作成しようとすると例外を吐きます。
- POS for .NETを2個以上のアプリケーションから同時に呼び出すことは出来ません。
6. 終わりに
この記事以外にもPOS開発関連の記事を投稿しています。もし良ければこちらからどうぞ。

- 投稿日:2020-07-31T18:36:16+09:00
POS for .NETのPrintMemoryBitmapで、Graphicsで編集したBitmapを渡せない件
これは「C#によるPOS開発入門(的な)」と称して連載している記事の1つです。他はこちら
はじめに
System.Drawing.Bitmapを渡すとサーマルプリンターで印刷してくれるPrintMemoryBitmapメソッドというものがあります。Graphicsを使って生成した画像を渡すことが出来るのは便利ですね。……と思いきや、なんとこの
PrintMemoryBitmapメソッド、Graphicsで汚染されたBitmapは受け付けてくれないのです。Graphicsが使えないとこのメソッドの魅力が大幅に減ってしまいます。
そこで、無理やりPrintMemoryBitmapメソッドにGraphics由来の画像を突っ込む方法を調べました。POS for .NETって?
Microsoftが定めた、POS機器を扱うための共通規格です。機器メーカーにPOS for .NETを通じて動作させるドライバーを作らせることで、使用する機器を他メーカー製のものに入れ替えても今までのコードをそのまま使えるのがポイントです。
POS for .NETによるPOS機器の制御の基礎は別の記事にまとめました。良ければそちらも参考にして下さい。前提コード
以下の全てのサンプルコードの前には、以下のコードがあるものとします。
/*
using System.IO;
using System.Drawing;
using System.Drawing.Imaging;
using System.Runtime.InteropServices;
using Microsoft.PointOfService;
*/

Bitmap baseBmp = new Bitmap(200, 150, PixelFormat.Format24bppRgb);
using (Graphics g = Graphics.FromImage(baseBmp)) // 透明なBitmapの全体に赤いバツ印を描く
{
  g.DrawLine(Pens.Red, 0, 0, bitmap.Width, bitmap.Height);
  g.DrawLine(Pens.Red, bitmap.Width, 0, 0, bitmap.Height);
}
まずは普通に渡してみる
posPrinter.PrintMemoryBitmap(PrinterStation.Receipt, baseBmp, PosPrinter.PrinterBitmapAsIs, PosPrinter.PrinterBitmapRight);これだと例外を吐いて駄目なんですね。
Bitmapを複製してみる
Bitmapを複製し、新しいものを渡してみます。
Bitmap newBmp = new Bitmap(baseBmp);
posPrinter.PrintMemoryBitmap(PrinterStation.Receipt, newBmp, PosPrinter.PrinterBitmapAsIs, PosPrinter.PrinterBitmapRight);
これでも駄目です。
(一応OK)一旦ファイルに保存する
new Bitmap("fileName")したままのものを渡すと正常に動作するので、一度生成したBitmapをファイルとして保存し、それを読み込み直せば動くのでは?と思いやってみました。(コードはありません)
勿論これで動くことは動きます。が、一度ファイルにするのは……なんかやだ。パフォーマンスの問題もありますし、何よりスマートじゃない。
(解決)bmp形式のヘッダーバイナリを自作して、くっつけてみる
new Bitmap("fileName")したままのものを渡すと正常に動作することから、元のBitmapからbmp形式のファイルのバイナリを生成し、それをnew Bitmap()の引数に渡すと上手くいくんじゃないかと予想しました。
そこで、自前でbmp形式のファイルのヘッダーバイナリを作成し、そこに元のBitmapのビットマップ部分をLockBitsで取得したものをくっつけて渡してみます。// 32bitアルファチャンネル付bmpを24bitに変換 // EPSON製のプリンターではアルファチャンネルが無視されて真っ黒になるため、アルファチャンネル無しに変換する必要がある BitmapData bmpData = baseBmp.LockBits(new Rectangle(0, 0, baseBmp.Width, baseBmp.Height), ImageLockMode.ReadOnly, PixelFormat.Format32bppArgb); byte[] basePixels = new byte[bmpData.Stride * bmpData.Height]; Marshal.Copy(bmpData.Scan0, basePixels, 0, basePixels.Length); int stride = (int)Math.Ceiling(3.0 * bmpData.Width / 4) * 4; byte[] pixels = new byte[14 + 40 + stride * bmpData.Height]; for (int y = 0; y < bmpData.Height; y++) { for (int x = 0; x < bmpData.Width; x++) { int basePos = 4 * x + bmpData.Stride * y; int pos = 14 + 40 + 3 * x + stride * (bmpData.Height - y - 1); pixels[pos] = (byte)(255 + (basePixels[basePos] - 255) * basePixels[basePos + 3] / 255); pixels[pos + 1] = (byte)(255 + (basePixels[basePos + 1] - 255) * basePixels[basePos + 3] / 255); pixels[pos + 2] = (byte)(255 + (basePixels[basePos + 2] - 255) * basePixels[basePos + 3] / 255); } } // bmpファイルのヘッダーバイナリを自作 byte[] bfSize = BitConverter.GetBytes(pixels.GetLength(0)); byte[] biWidth = BitConverter.GetBytes(bmpData.Width); byte[] biHeight = BitConverter.GetBytes(bmpData.Height); byte[] biSizeImage = BitConverter.GetBytes(pixels.GetLength(0) - 14 - 40); byte[] header = new byte[14 + 40] { 0x42, 0x4d, // bfType bfSize[0], bfSize[1], bfSize[2], bfSize[3], // bfSize 0x00, 0x00, // bfReserved1 0x00, 0x00, // bfReserved2 0x01, 0x00, 0x00, 0x00, // bfOffBits 0x28, 0x00, 0x00, 0x00, // biSize biWidth[0], biWidth[1], biWidth[2], biWidth[3], // biWidth biHeight[0], biHeight[1], biHeight[2], biHeight[3], // biHeight 0x01, 0x00, // biPlanes 0x18, 0x00, // biBitCount 0x00, 0x00, 0x00, 0x00, // biCompression biSizeImage[0], biSizeImage[1], biSizeImage[2], biSizeImage[3], // biSizeImage 0xc4, 0x0e, 0x00, 0x00, // biXPixPerMeter 0xc4, 0x0e, 0x00, 0x00, // biYPixPerMeter 0x00, 0x00, 0x00, 0x00, // biCirUsed 0x00, 0x00, 0x00, 0x00, // biCirImportant }; Array.Copy(header, 0, pixels, 0, 14 + 40); // ヘッダーとビットマップデータをくっつける Bitmap newBmp = new Bitmap(new MemoryStream(pixels)); // Graphicsに汚染されていないBitmapの出来上がり posPrinter.PrintMemoryBitmap(PrinterStation.Receipt, newBmp, PosPrinter.PrinterBitmapAsIs, PosPrinter.PrinterBitmapRight); // これでOKこれだと上手くいきました。かなり抜け道的な解法ですが……まあ動いたし、そこまで見た目も汚くないので良いでしょう(?)
終わりに
正直私の解決方法も綺麗とは言い難いです。もしもっと良い方法をご存知でしたら教えて頂けると嬉しいです。
元々C++等向けだったのを.NET向けに実装したものなので、この辺りの仕様がこうなっているのは理解出来ますが、やはり使いづらいです。この記事以外にもPOS開発関連の記事を投稿しています。もし良ければこちらからどうぞ。
- 投稿日:2020-07-31T16:55:25+09:00
WPFアプリのリモートデスクトップ対応[グラフィックス関係編]
WPFで開発したアプリがリモートデスクトップで正しく動作しなかったことってありませんか。
「リモートデスクトップなんで、ごめんなさいねー」でサポートしないことがあったりなかったり。
一昔前の私はあったり。しかしながらコロナ禍の今、そうもいっていられなくなりました。
そこで、出会ったリモートデスクトップ問題とその解決についてまとめます。※今回はグラフィックス関係についてのみ扱います。
検証環境の用意
リモートデスクトップ接続中ではハードウェア描画に制限がかかります。
ローカル開発環境にハードウェア描画に制限をかけ検証環境をデバッグのしやすい環境を手元に作ります。
グラフィックスの問題の追及はこれで大方OKでしょう。以下のドキュメントを参考にレジストリキー
HKEY_CURRENT_USER\SOFTWARE\Microsoft\Avalon.Graphics\DisableHWAccelerationに値を設定します。
https://docs.microsoft.com/dotnet/framework/wpf/graphics-multimedia/graphics-rendering-registry-settings
この環境下であらかた確認対処します。あらかた確認対処後、実際にリモートデスクトップ接続を作り試します。
パソコンを複数台用意する必要がありますが、そうもいかない方はスマホアプリの利用を検討してください。
- Remote Desktop 8 (Android)
- Microsoft リモート デスクトップ (iOS)
(症状1)D3DImage が描画されない
原因はドキュメント書いてありました。
リモートデスクトップ接続中やソフトウェア描画中は表示なしとあります。
https://docs.microsoft.com/archive/blogs/wpf3d/d3dimage-and-software-rendering対処法は オーバーライドが2つある SetBuckBuffer メソッドの内
enableSoftwareFallbackが指定できる方を使い、ソフトウェア描画時であればtrue、ハードウェア描画時であればfalseを指定します。このソフトウェア描画時かどうか情報は毎度判断するのは高くつくので、然るべきタイミングで作ってキャッシュするのがよいでしょう。
以下に実装の断片を用意しました。private static bool MakeIsSoftwareRenderingMode() { // Rendering tier var renderingTier = RenderCapability.Tier >> 16; if (renderingTier == 0) return true; // Remote desktop if (GetSystemMetrics(SM_REMOTESESSION) != 0) return true; // DisableHWAcceleration try { var subKey = Registry.CurrentUser.OpenSubKey(@"Software\Microsoft\Avalon.Graphics"); if (subKey != null) { var d = (int) subKey.GetValue("DisableHWAcceleration"); if (d != 0) return true; } } catch { // ignored } return false; } private const int SM_REMOTESESSION = 0x1000; [DllImport("user32")] private static extern int GetSystemMetrics(int index); // -------------------------------------------------------- // 初期化時 SystemEvents.SessionSwitch += SystemEventsOnSessionSwitch; isSoftwareRenderingMode = MakeIsSoftwareRenderingMode(): // 後処理時 SystemEvents.SessionSwitch -= SystemEventsOnSessionSwitch private void SystemEventsOnSessionSwitch(object sender, SessionSwitchEventArgs e) { // セッションのロックが解除されたとき、リモート接続されたとき if (e.Reason == SessionSwitchReason.SessionUnlock) isSoftwareRenderingMode = MakeIsSoftwareRenderingMode(): } bool isSoftwareRenderingMode;(症状2)ShaderEffect が動作しない
原因はドキュメント書いてありました。
ShaderEffectPS 2.0 シェーダーは、ソフトウェアでレンダリングするときに実行されます。 ただし、PS 3.0 がシステムのハードウェアでサポートされている場合でも、 ソフトウェアのレンダリング中に PS 3.0 シェーダーは実行されません。とあります。
私の場合の原因はPS3.0の利用していたから、対処法はPS2.0で再実装しました。そもそもPS2.0では命令数が足りなくてPS3.0にしたのですが、これを何とかなる範囲で何とかしました。一般的には PS2.0内で収まるのであれば、PS2.0でシェーダーをコンパイルしなおします。
- 投稿日:2020-07-31T00:28:30+09:00
C# - VisualStudioもライブラリも使わずにZipファイルを生成する
環境
Windows10 (7も多分いけるはず)
コンパイル
事前にcscにパスを通しておく。
C:\Windows\Microsoft.NET\Framework64\v4.0.30319\csc.execompile.batcsc /r:C:\Windows\Microsoft.NET\Framework64\v4.0.30319\System.IO.Compression.FileSystem.dll ^ /r:C:\Windows\Microsoft.NET\Framework64\v4.0.30319\System.IO.Compression.dll %*下記でコンパイルできる。
compile.bat ソース名.csソースコード
using System;
using System.Collections;
using System.Collections.Generic;
using System.ComponentModel;
using System.Drawing;
using System.IO;
using System.Text;
using System.Windows.Forms;
using System.IO.Compression; // to use zip

class ZipTest : Form
{
    ZipTest()
    {
        var btn = new Button(){
            Size = new Size(200,25),
            Text = "Save zip file",
        };
        btn.Click += (s,e)=>{
            string destPath = Path.Combine(System.Environment.GetFolderPath(Environment.SpecialFolder.DesktopDirectory), "ZipTest_Output.zip");
            CreateZipFile(destPath);
        };
        Controls.Add(btn);

    }

    void CreateZipFile(string destZipPath)
    {
        try {
            //  ZipFile.Open で Zipを作成するとき、すでにファイルが存在していると例外が発生する。
            //  上書きしたい場合は、すでにファイルが存在する場合は削除しておく。
            // if (File.Exists(destZipPath)) {
            //     File.Delete(destZipPath);
            // }

            using( ZipArchive archive = ZipFile.Open(destZipPath, ZipArchiveMode.Create) ) {
                ZipArchiveEntry entry;

                entry = archive.CreateEntry("Test1.txt", CompressionLevel.Optimal);
                using (StreamWriter writer = new StreamWriter(entry.Open()))
                {
                    writer.WriteLine("FileContentSample-1");
                }

                entry = archive.CreateEntry(@"hoge\Test2.txt", CompressionLevel.Optimal);
                using (StreamWriter writer = new StreamWriter(entry.Open()))
                {
                    writer.WriteLine("FileContentSample-2");
                }

                // 既存のファイル(第一引数)を読み込んでzip内にファイルをつくる場合
                // archive.CreateEntryFromFile( @"C:\Test.txt", "a.txt", CompressionLevel.Optimal );
            }
        }
        catch(IOException e) {
            MessageBox.Show(e.ToString());
        }
        catch(UnauthorizedAccessException e) {
            MessageBox.Show(e.ToString());
        }
    }

    [STAThread]
    static void Main(string[] args)
    {
        Application.Run(new ZipTest());
    }
}
参考サイト
- 投稿日:2020-07-31T00:28:30+09:00
C# - VisualStudioもライブラリも使わずにZipを生成する
環境
Windows10 (7も多分いけるはず)
コンパイル
事前にcscにパスを通しておく。
C:\Windows\Microsoft.NET\Framework64\v4.0.30319\csc.execompile.batcsc /r:C:\Windows\Microsoft.NET\Framework64\v4.0.30319\System.IO.Compression.FileSystem.dll ^ /r:C:\Windows\Microsoft.NET\Framework64\v4.0.30319\System.IO.Compression.dll %*下記でコンパイルできる。
compile.bat ソース名.csソースコード
using System;
using System.Collections;
using System.Collections.Generic;
using System.ComponentModel;
using System.Drawing;
using System.IO;
using System.Text;
using System.Windows.Forms;
using System.IO.Compression; // to use zip

class ZipTest : Form
{
    ZipTest()
    {
        var btn = new Button(){
            Size = new Size(200,25),
            Text = "Save zip file",
        };
        btn.Click += (s,e)=>{
            string destPath = Path.Combine(System.Environment.GetFolderPath(Environment.SpecialFolder.DesktopDirectory), "ZipTest_Output.zip");
            CreateZipFile(destPath);
        };
        Controls.Add(btn);

    }

    void CreateZipFile(string destZipPath)
    {
        try {
            //  ZipFile.Open で Zipを作成するとき、すでにファイルが存在していると例外が発生する。
            //  上書きしたい場合は、すでにファイルが存在する場合は削除しておく。
            // if (File.Exists(destZipPath)) {
            //     File.Delete(destZipPath);
            // }

            using( ZipArchive archive = ZipFile.Open(destZipPath, ZipArchiveMode.Create) ) {
                ZipArchiveEntry entry;

                entry = archive.CreateEntry("Test1.txt", CompressionLevel.Optimal);
                using (StreamWriter writer = new StreamWriter(entry.Open()))
                {
                    writer.WriteLine("FileContentSample-1");
                }

                entry = archive.CreateEntry(@"hoge\Test2.txt", CompressionLevel.Optimal);
                using (StreamWriter writer = new StreamWriter(entry.Open()))
                {
                    writer.WriteLine("FileContentSample-2");
                }

                // 既存のファイル(第一引数)を読み込んでzip内にファイルをつくる場合
                // archive.CreateEntryFromFile( @"C:\Test.txt", "a.txt", CompressionLevel.Optimal );
            }
        }
        catch(IOException e) {
            MessageBox.Show(e.ToString());
        }
        catch(UnauthorizedAccessException e) {
            MessageBox.Show(e.ToString());
        }
    }

    [STAThread]
    static void Main(string[] args)
    {
        Application.Run(new ZipTest());
    }
}
参考サイト
- 投稿日:2020-07-31T00:24:46+09:00
MagicLeapのハンドトラッキングの実装
MagicLeapのハンドトラッキング実装の備忘録
基本的にはここの通りに進めていけば問題ない
前提となるもの
- MagicLeapのmpkをビルドできる段階までのセッティングが完了している
- The LabでのZeroIterationが可能になっている
開発環境
Windows10
Unity 2019.3.7f1
MagicLeapUnityPackage 0.24.1出来上がり
こんな感じに各関節
手首、親指 ~ 小指までの座標の取得
ジェスチャの取得( サンプルの中では利用していない )
MagicLeapのハンドトラッキング実装してみた pic.twitter.com/ZSYl1BVXay
— 松本隆介 (@matsumotokaka11) July 30, 2020実装方法
下準備
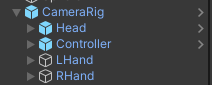
シーンに配置するGameObject
大体のVRデバイスとかで主流な構成の配置にしてます
CameraRig
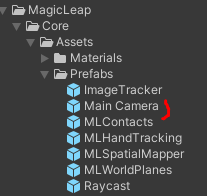
ただのルートオブジェクトとして利用していますHead
MagicLeapパッケージ内 Core > Assets > Prefabs > MainCamera
のプレハブをCameraRigの子オブジェクトにしてHeadと名称を変えたものです、この中にDirectionalLightを子オブジェクトとして配置していますが配置するか否かはお好みで
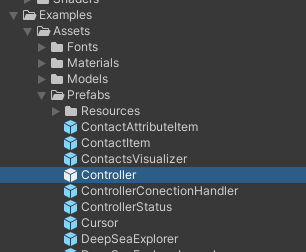
Controller
MagicLeapパッケージ内 Examples > Assets > Prefabs > Controller
のプレハブをCameraRigの子オブジェクトとして配置しています
こちらの記事で紹介したコントローラの入力でホームボタンでアプリを閉じるために利用してます
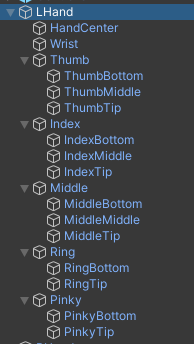
LHand, RHand
今回のメイン
CameraRigの子オブジェクトとしてGameObjectを作成( Emptyとして )
Thumb( 親指 ), Index( 人差し指 ), Middle( 中指 ), Ring( 薬指 ), Pinky( 小指 )をそれぞれEmptyのGameObjectで作成し、
各指の子オブジェクトThumb, Index, Middleは3個、Ring, Pinkyは2個、SphereObjectを生成、スケールは0.01くらいに設定
スクリプト
このスクリプトはMagicLeap公式サンプルのものに手を加えたものです
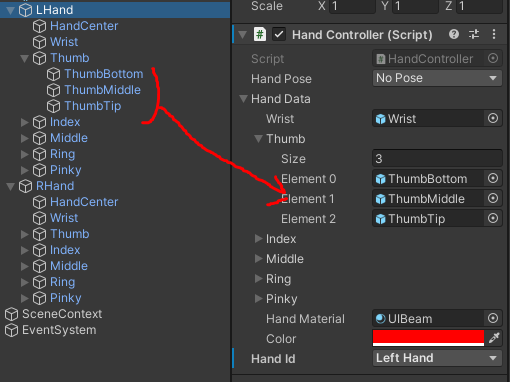
以下のスクリプトをLHand, RHandにアタッチ/// <summary> /// ハンドトラッキング. /// </summary> public class HandController : MonoBehaviour { [System.Serializable] public class HandJointData { [SerializeField] GameObject wrist; [SerializeField] GameObject[] thumb; [SerializeField] GameObject[] index; [SerializeField] GameObject[] middle; [SerializeField] GameObject[] ring; [SerializeField] GameObject[] pinky; [SerializeField] Material handMaterial; [SerializeField] Color color; public Vector3 Wrist { get; private set; } public Vector3[] Thumb { get; private set; } public Vector3[] Index { get; private set; } public Vector3[] Middle { get; private set; } public Vector3[] Ring { get; private set; } public Vector3[] Pinky { get; private set; } MLHandTracking.Hand hand; LineRenderer[] lines; public void Initialize( MLHandTracking.Hand _hand) { hand = _hand; Wrist = Vector3.zero; // 各関節 + 手首の分, 配列をとる. Thumb = new Vector3[thumb.Length + 1]; Index = new Vector3[index.Length + 1]; Middle = new Vector3[middle.Length + 1]; Ring = new Vector3[ring.Length + 1]; Pinky = new Vector3[pinky.Length + 1]; lines = new LineRenderer[5]; lines[0] = thumb[0].transform.parent.gameObject.AddComponent<LineRenderer>(); lines[0].positionCount = 4; lines[1] = index[0].transform.parent.gameObject.AddComponent<LineRenderer>(); lines[1].positionCount = 4; lines[2] = middle[0].transform.parent.gameObject.AddComponent<LineRenderer>(); lines[2].positionCount = 4; lines[3] = ring[0].transform.parent.gameObject.AddComponent<LineRenderer>(); lines[3].positionCount = 3; lines[4] = pinky[0].transform.parent.gameObject.AddComponent<LineRenderer>(); lines[4].positionCount = 3; // LineRendererの初期セッティング. foreach (var line in lines) { line.material = handMaterial; line.startColor = color; line.endColor = color; line.startWidth = 0.01f; line.endWidth = 0.01f; } } public void UpdatePositions() { if (hand == null) return; Thumb[0] = hand.Wrist.KeyPoints[0].Position; Thumb[1] = hand.Thumb.KeyPoints[0].Position; Thumb[2] = hand.Thumb.KeyPoints[1].Position; Thumb[3] = hand.Thumb.KeyPoints[2].Position; for (var i = 1; i < Thumb.Length; ++i) { thumb[i - 1].transform.position = Thumb[i]; } lines[0].SetPositions(Thumb); Index[0] = hand.Wrist.KeyPoints[0].Position; Index[1] = hand.Index.KeyPoints[0].Position; Index[2] = hand.Index.KeyPoints[1].Position; Index[3] = hand.Index.KeyPoints[2].Position; for (var i = 1; i < Index.Length; ++i) { index[i - 1].transform.position = Index[i]; } lines[1].SetPositions(Index); Middle[0] = hand.Wrist.KeyPoints[0].Position; Middle[1] = hand.Middle.KeyPoints[0].Position; Middle[2] = hand.Middle.KeyPoints[1].Position; Middle[3] = hand.Middle.KeyPoints[2].Position; for (var i = 1; i < Middle.Length; ++i) { middle[i - 1].transform.position = Middle[i]; } lines[2].SetPositions(Middle); Ring[0] = hand.Wrist.KeyPoints[0].Position; Ring[1] = hand.Ring.KeyPoints[0].Position; Ring[2] = hand.Ring.KeyPoints[1].Position; for (var i = 1; i < Ring.Length; ++i) { ring[i - 1].transform.position = Ring[i]; } lines[3].SetPositions(Ring); Pinky[0] = hand.Wrist.KeyPoints[0].Position; Pinky[1] = hand.Pinky.KeyPoints[0].Position; Pinky[2] = hand.Pinky.KeyPoints[1].Position; for (var i = 1; i < Pinky.Length; ++i) { pinky[i - 1].transform.position = Pinky[i]; } lines[4].SetPositions(Pinky); } } // ジェスチャ. public enum HandPoses { Ok, Finger, Thumb, OpenHand, Fist, NoPose, NoHand, } public enum HandId { RightHand, LeftHand } [SerializeField] HandPoses handPose = HandPoses.NoPose; [SerializeField] HandJointData handData; [SerializeField] HandId handId; MLHandTracking.HandKeyPose[] gestures; MLHandTracking.Hand hand; void Start() { // HandTrackingを開始する. MLHandTracking.Start(); hand = handId == HandId.LeftHand ? MLHandTracking.Left : MLHandTracking.Right; handData.Initialize(hand); gestures = new MLHandTracking.HandKeyPose[6]; // 各ジェスチャを登録. gestures[0] = MLHandTracking.HandKeyPose.Ok; gestures[1] = MLHandTracking.HandKeyPose.Finger; gestures[2] = MLHandTracking.HandKeyPose.OpenHand; gestures[3] = MLHandTracking.HandKeyPose.Fist; gestures[4] = MLHandTracking.HandKeyPose.Thumb; gestures[5] = MLHandTracking.HandKeyPose.NoHand; MLHandTracking.KeyPoseManager.EnableKeyPoses(gestures, true, false); } void OnDestroy() { MLHandTracking.Stop(); } void Update() { handData.UpdatePositions(); if (GetGesture(hand, MLHandTracking.HandKeyPose.Ok)) { handPose = HandPoses.Ok; } else if (GetGesture(hand, MLHandTracking.HandKeyPose.Finger)) { handPose = HandPoses.Finger; } else if (GetGesture(hand, MLHandTracking.HandKeyPose.OpenHand)) { handPose = HandPoses.OpenHand; } else if (GetGesture(hand, MLHandTracking.HandKeyPose.Fist)) { handPose = HandPoses.Fist; } else if (GetGesture(hand, MLHandTracking.HandKeyPose.Thumb)) { handPose = HandPoses.Thumb; } else { handPose = HandPoses.NoPose; } } /// <summary> /// ジェスチャの取得. /// </summary> /// <param name="hand"></param> /// <param name="type"></param> /// <returns></returns> private bool GetGesture( MLHandTracking.Hand hand, MLHandTracking.HandKeyPose type) { if (hand == null) return false; return 0.9f < hand.HandKeyPoseConfidence && hand.KeyPose == type; } }アタッチしたら以下の画像のように各関節のオブジェクトをセット、配列の添え字が若い方が根元に来るように設定
各パラメータの説明
HandPose : ジェスチャのポーズ名( 今回はInspectorに表示しているだけです )
HandData : 各関節のオブジェクトを保持するクラス、HandCenterは利用していません( うまくトラッキングできなかったので外しました )
HandMaterial : 各関節オブジェクトの球をつなぐ線の描画用マテリアルです、今回はMagicLeapパッケージ内のUIBeamを利用しました
Color : 各関節オブジェクトの球をつなぐ線の色です、今回は左は赤、右は緑で設定しています
HandId : 手の左右を決定する識別子Unity の設定
この状態でTheLabでMagicLeapと接続してPlayModeに入るとハンドトラッキングされたオブジェクトの様子が確認できると思います
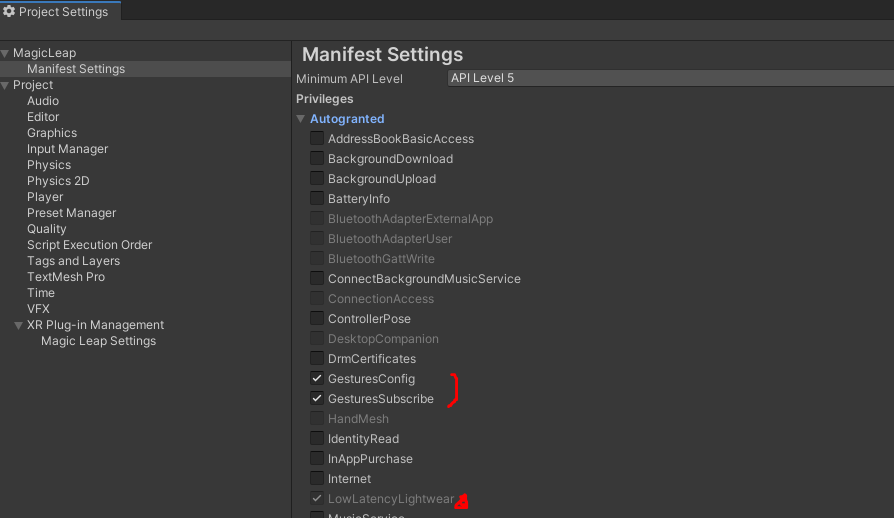
ただしmpkファイルとして出力する際は以下の設定を行わないと実機ではエラーが出てハンドトラッキング及びジェスチャの取得はできません
公式のチュートリアル通りにやれば設定の仕方まで説明されてたけど必要なメソッドとか確認したらすぐ実行したくなっちゃうのよね
Edit > ProjectSettigs > MagicLeap > ManifestSettings の項目を開き
GestureConfig, GestureSubscribeにチェックを入れる ( 公式チュートリアルだと明示的にLowLatencyLightwearにもチェックを入れるように説明されているが現バージョンでは自動で入ってる? )これでmpkを出力して実機でテストするとハンドトラッキングが実装できているはずです
あとがき
これはTheLabからDLしてきたMagicLeapUnityPackageでのサンプルです、MagicLeapToolKitでのハンドトラッキングはまだ触ったことがないので後日記事にできればと思います
- 投稿日:2020-07-31T00:24:46+09:00
MagicLeapのハンドトラッキング実装
MagicLeapのハンドトラッキング実装の備忘録
基本的にはここの通りに進めていけば問題ない
前提となるもの
- MagicLeapのmpkをビルドできる段階までのセッティングが完了している
- The LabでのZeroIterationが可能になっている
開発環境
Windows10
Unity 2019.3.7f1
MagicLeapUnityPackage 0.24.1出来上がり
こんな感じに各関節
手首、親指 ~ 小指までの座標の取得
ジェスチャの取得( サンプルの中では利用していない )
MagicLeapのハンドトラッキング実装してみた pic.twitter.com/ZSYl1BVXay
— 松本隆介 (@matsumotokaka11) July 30, 2020実装方法
下準備
シーンに配置するGameObject
大体のVRデバイスとかで主流な構成の配置にしてます
CameraRig
ただのルートオブジェクトとして利用していますHead
MagicLeapパッケージ内 Core > Assets > Prefabs > MainCamera
のプレハブをCameraRigの子オブジェクトにしてHeadと名称を変えたものです、この中にDirectionalLightを子オブジェクトとして配置していますが配置するか否かはお好みで
Controller
MagicLeapパッケージ内 Examples > Assets > Prefabs > Controller
のプレハブをCameraRigの子オブジェクトとして配置しています
こちらの記事で紹介したコントローラの入力でホームボタンでアプリを閉じるために利用してます
LHand, RHand
今回のメイン
CameraRigの子オブジェクトとしてGameObjectを作成( Emptyとして )
Thumb( 親指 ), Index( 人差し指 ), Middle( 中指 ), Ring( 薬指 ), Pinky( 小指 )をそれぞれEmptyのGameObjectで作成し、
各指の子オブジェクトThumb, Index, Middleは3個、Ring, Pinkyは2個、SphereObjectを生成、スケールは0.01くらいに設定
スクリプト
このスクリプトはMagicLeap公式サンプルのものに手を加えたものです
以下のスクリプトをLHand, RHandにアタッチusing UnityEngine; using UnityEngine.XR.MagicLeap; /// <summary> /// ハンドトラッキング. /// </summary> public class HandController : MonoBehaviour { [System.Serializable] public class HandJointData { [SerializeField] GameObject wrist; [SerializeField] GameObject[] thumb; [SerializeField] GameObject[] index; [SerializeField] GameObject[] middle; [SerializeField] GameObject[] ring; [SerializeField] GameObject[] pinky; [SerializeField] Material handMaterial; [SerializeField] Color color; public Vector3 Wrist { get; private set; } public Vector3[] Thumb { get; private set; } public Vector3[] Index { get; private set; } public Vector3[] Middle { get; private set; } public Vector3[] Ring { get; private set; } public Vector3[] Pinky { get; private set; } MLHandTracking.Hand hand; LineRenderer[] lines; public void Initialize( MLHandTracking.Hand _hand) { hand = _hand; Wrist = Vector3.zero; // 各関節 + 手首の分, 配列をとる. Thumb = new Vector3[thumb.Length + 1]; Index = new Vector3[index.Length + 1]; Middle = new Vector3[middle.Length + 1]; Ring = new Vector3[ring.Length + 1]; Pinky = new Vector3[pinky.Length + 1]; lines = new LineRenderer[5]; lines[0] = thumb[0].transform.parent.gameObject.AddComponent<LineRenderer>(); lines[0].positionCount = 4; lines[1] = index[0].transform.parent.gameObject.AddComponent<LineRenderer>(); lines[1].positionCount = 4; lines[2] = middle[0].transform.parent.gameObject.AddComponent<LineRenderer>(); lines[2].positionCount = 4; lines[3] = ring[0].transform.parent.gameObject.AddComponent<LineRenderer>(); lines[3].positionCount = 3; lines[4] = pinky[0].transform.parent.gameObject.AddComponent<LineRenderer>(); lines[4].positionCount = 3; // LineRendererの初期セッティング. foreach (var line in lines) { line.material = handMaterial; line.startColor = color; line.endColor = color; line.startWidth = 0.01f; line.endWidth = 0.01f; } } public void UpdatePositions() { if (hand == null) return; Thumb[0] = hand.Wrist.KeyPoints[0].Position; Thumb[1] = hand.Thumb.KeyPoints[0].Position; Thumb[2] = hand.Thumb.KeyPoints[1].Position; Thumb[3] = hand.Thumb.KeyPoints[2].Position; for (var i = 1; i < Thumb.Length; ++i) { thumb[i - 1].transform.position = Thumb[i]; } lines[0].SetPositions(Thumb); Index[0] = hand.Wrist.KeyPoints[0].Position; Index[1] = hand.Index.KeyPoints[0].Position; Index[2] = hand.Index.KeyPoints[1].Position; Index[3] = hand.Index.KeyPoints[2].Position; for (var i = 1; i < Index.Length; ++i) { index[i - 1].transform.position = Index[i]; } lines[1].SetPositions(Index); Middle[0] = hand.Wrist.KeyPoints[0].Position; Middle[1] = hand.Middle.KeyPoints[0].Position; Middle[2] = hand.Middle.KeyPoints[1].Position; Middle[3] = hand.Middle.KeyPoints[2].Position; for (var i = 1; i < Middle.Length; ++i) { middle[i - 1].transform.position = Middle[i]; } lines[2].SetPositions(Middle); Ring[0] = hand.Wrist.KeyPoints[0].Position; Ring[1] = hand.Ring.KeyPoints[0].Position; Ring[2] = hand.Ring.KeyPoints[1].Position; for (var i = 1; i < Ring.Length; ++i) { ring[i - 1].transform.position = Ring[i]; } lines[3].SetPositions(Ring); Pinky[0] = hand.Wrist.KeyPoints[0].Position; Pinky[1] = hand.Pinky.KeyPoints[0].Position; Pinky[2] = hand.Pinky.KeyPoints[1].Position; for (var i = 1; i < Pinky.Length; ++i) { pinky[i - 1].transform.position = Pinky[i]; } lines[4].SetPositions(Pinky); } } // ジェスチャ. public enum HandPoses { Ok, Finger, Thumb, OpenHand, Fist, NoPose, NoHand, } public enum HandId { RightHand, LeftHand } [SerializeField] HandPoses handPose = HandPoses.NoPose; [SerializeField] HandJointData handData; [SerializeField] HandId handId; MLHandTracking.HandKeyPose[] gestures; MLHandTracking.Hand hand; void Start() { // HandTrackingを開始する. MLHandTracking.Start(); hand = handId == HandId.LeftHand ? MLHandTracking.Left : MLHandTracking.Right; handData.Initialize(hand); gestures = new MLHandTracking.HandKeyPose[6]; // 各ジェスチャを登録. gestures[0] = MLHandTracking.HandKeyPose.Ok; gestures[1] = MLHandTracking.HandKeyPose.Finger; gestures[2] = MLHandTracking.HandKeyPose.OpenHand; gestures[3] = MLHandTracking.HandKeyPose.Fist; gestures[4] = MLHandTracking.HandKeyPose.Thumb; gestures[5] = MLHandTracking.HandKeyPose.NoHand; MLHandTracking.KeyPoseManager.EnableKeyPoses(gestures, true, false); } void OnDestroy() { MLHandTracking.Stop(); } void Update() { handData.UpdatePositions(); if (GetGesture(hand, MLHandTracking.HandKeyPose.Ok)) { handPose = HandPoses.Ok; } else if (GetGesture(hand, MLHandTracking.HandKeyPose.Finger)) { handPose = HandPoses.Finger; } else if (GetGesture(hand, MLHandTracking.HandKeyPose.OpenHand)) { handPose = HandPoses.OpenHand; } else if (GetGesture(hand, MLHandTracking.HandKeyPose.Fist)) { handPose = HandPoses.Fist; } else if (GetGesture(hand, MLHandTracking.HandKeyPose.Thumb)) { handPose = HandPoses.Thumb; } else { handPose = HandPoses.NoPose; } } /// <summary> /// ジェスチャの取得. /// </summary> /// <param name="hand"></param> /// <param name="type"></param> /// <returns></returns> private bool GetGesture( MLHandTracking.Hand hand, MLHandTracking.HandKeyPose type) { if (hand == null) return false; return 0.9f < hand.HandKeyPoseConfidence && hand.KeyPose == type; } }アタッチしたら以下の画像のように各関節のオブジェクトをセット、配列の添え字が若い方が根元に来るように設定
各パラメータの説明
HandPose : ジェスチャのポーズ名( 今回はInspectorに表示しているだけです )
HandData : 各関節のオブジェクトを保持するクラス、HandCenterは利用していません( うまくトラッキングできなかったので外しました )
HandMaterial : 各関節オブジェクトの球をつなぐ線の描画用マテリアルです、今回はMagicLeapパッケージ内のUIBeamを利用しました
Color : 各関節オブジェクトの球をつなぐ線の色です、今回は左は赤、右は緑で設定しています
HandId : 手の左右を決定する識別子Unity の設定
この状態でTheLabでMagicLeapと接続してPlayModeに入るとハンドトラッキングされたオブジェクトの様子が確認できると思います
ただしmpkファイルとして出力する際は以下の設定を行わないと実機ではエラーが出てハンドトラッキング及びジェスチャの取得はできません
公式のチュートリアル通りにやれば設定の仕方まで説明されてたけど必要なメソッドとか確認したらすぐ実行したくなっちゃうのよね
Edit > ProjectSettigs > MagicLeap > ManifestSettings の項目を開き
GestureConfig, GestureSubscribeにチェックを入れる ( 公式チュートリアルだと明示的にLowLatencyLightwearにもチェックを入れるように説明されているが現バージョンでは自動で入ってる? )これでmpkを出力して実機でテストするとハンドトラッキングが実装できているはずです
あとがき
これはTheLabからDLしてきたMagicLeapUnityPackageでのサンプルです、MagicLeapToolKitでのハンドトラッキングはまだ触ったことがないので後日記事にできればと思います